invacare xlt service manual · service manual xlt wheelchairs ... tel: (49) (0)57 31 754 540, fax:...
TRANSCRIPT

Rekonditionering
Invacare® XLTService Manual
English

2

3
Contents
Contents
Product Description 4Washing and Disinfection 6 Reconditioning 7 Accessories 8 Check List 9
SERVICE MANUAL

4
XLT Power U-front
XLT Power V-front
XLT Nordic
Product Description XLTProduct Description
Until January 2005:XLT is made of titanium which is very light and strong. This makes it a light, stable and durable wheelchair. XLT fits in almost everywhere thanks to its comfort, ergonomics and performance.
XLT is designed for experienced, active users, who understand how important it is with good propelling characteristics. The very stable chassis and the excellent wheel balance provide good propelling characteristics on almost every surface.
XLT is designed for easy handeling and transport, wherever you want to travel.
XLT is well balanced for an one-arm lift into a car. It takes up so little space that it easily can be lifted in front of you into the passanger seat of a car. Titanium is also extra strong and durable which gives it a long life. Quick release wheels and foldable back, is of course standard.
XLT is a solid frame wheelchair with driving wheel plates and castor attachments of aluminium. This provides a light weight and stable wheelchair. The black vinyl seat is easy to clean. The back rest is made of black plastic-coated fabric/black Strix.
XLT Power U-front has a front that helps keep together the lower parts of the legs and the feet. The standard delivery includes a foot bow. With 120 mm castors the seat angles 4°, 8°, and 12° can be obtained, dependent on the row of mounting holes used for the rear wheel.
XLT Power V-front has a front that helps keep together the feet. The standard delivery includes a foot bow. With 120 mm castors the seat angles 4°, 8°, and 12° can be obtained, dependent on the row of mounting holes used for the rear wheel.
XLT Box has a front offering more space for the lower parts of the legs and the feet. The standard delivery may include a foot bow or collapsible footrests. With 120 mm castors the seat angles 3° or 8° can be obtained, dependent on the row ofof mounting holes used for the rear wheel.
SERVICE MANUAL

5
XLT Active
XLT Dynamic
XLT Swing
XLT Max
Frame, footbow and backrest are manufactured from high quality titanium. For the Swing version the legrest hangers are made from aluminium. The cover for the seat cushion is made of Jemima and the backrest cover is made of nylon.
The new XLT is available in the models:
XLT Active (75° knee angle)is designed to hold your feet and lower parts of your leg steady. The footbow is delivered as standard. Seat angles 0-14° can be obtained, depending on the size of castors and rear wheels and the row of mounting holes used for the castors and rear wheels.
XLT Dynamic (90° knee angle)is desgned to hold your feet steady. The wheelchair is very compact and the total length is low. The footbow is delived as standard. Seat angles 0-14° can be obtained, depending on the size of castors and rear wheels and the row of mounting holes used for the castors and rear wheels.
XLT Swing (80°, 90° and angle adjustable legrests)is desgned with a front offering more space for the feet and lower parts of the legs. The standard delivery includes collapsible footrests. Seat angles 0-14° can be obtained, depending on the size of castors and rear wheels and the row of mounting holes used for the castors and rear wheels.
XLT Max (75°)The XLT Max is designed for larger users and has a user weight capacity of 180 kg. Seat angles 0-14° can be obtained, depending on the size of castors and rear wheels and the row of mounting holes used for the castors and rear wheels.
Invacare ®
From spring 2008:
Product Description

6
Washing and Disinfection
Washing and Disinfection1. Remove all loose and removable covers and wash these in a washing machine
following the washing instructions for each article.
2. If the wheelchair is very dirty we recommend that you remove the back and seat to make it easier to wash.
3. Rinse the wheelchair with a high-pressure or ordinary jet of water depending on how dirty the chair is. Do not aim the jet towards bearings and draining holes. If the wheelchair is washed in a machine the water must not be hotter than 60 degrees.
4. Spray the chair with alcohol for disinfection.
5. Spray the wheelchair with detergent, for example a car-cleaning agent with wax.
6. Leave the detergent to work for a couple of minutes.
7. Rinse the wheelchair with a high-pressure or ordinary jet of water depending on how dirty the chair is. Do not aim the jet towards bearings and draining holes.
8. Check that the chair is clean.
9. Leave the chair to dry in a drying cabinet. Remove parts where water has collected for example in end tubes, ferrules etc. If the chair has been washed in a machine, blow-drying with compressed air is recommended.
10. Check that the chair is dry, wipe with a cloth if needed. Also check that all labels are readable, if not change them (e.g. labels and stickers for tilting, and attachment points for transport.).
11. If the wheelchair is not very dirty it may be sufficient to spray with alcohol and wiping dry with a cloth.
12. The wheelchair is now reconditioned.
DartexSuperficial dirt on the coating may be removed by wiping with a soft cloth moistened with water containing a neutral detegent. More persistent con-tamination may be treated by wiping with alcohols or turpentine substitute, followed by hot water and detergent.
Proprietary disinfectants may be used provided manufacturer's instructions are followed. The fabric may be washed at temperatures up to 71° C (160° F). using normal detergent.
SERVICE MANUAL
7
A
Reconditioning
ReconditioningLubricate all movable parts if they are sticking or squeaking with a dry teflon based spray, e.g. Viso 900-B5.
Screws and nuts: Check that all screws and nuts are tight.
Chassis: All parts must be checked for cracks or other damages. Pay special attention to areas close to welds. If damages are discovered the chassis must be discarded.
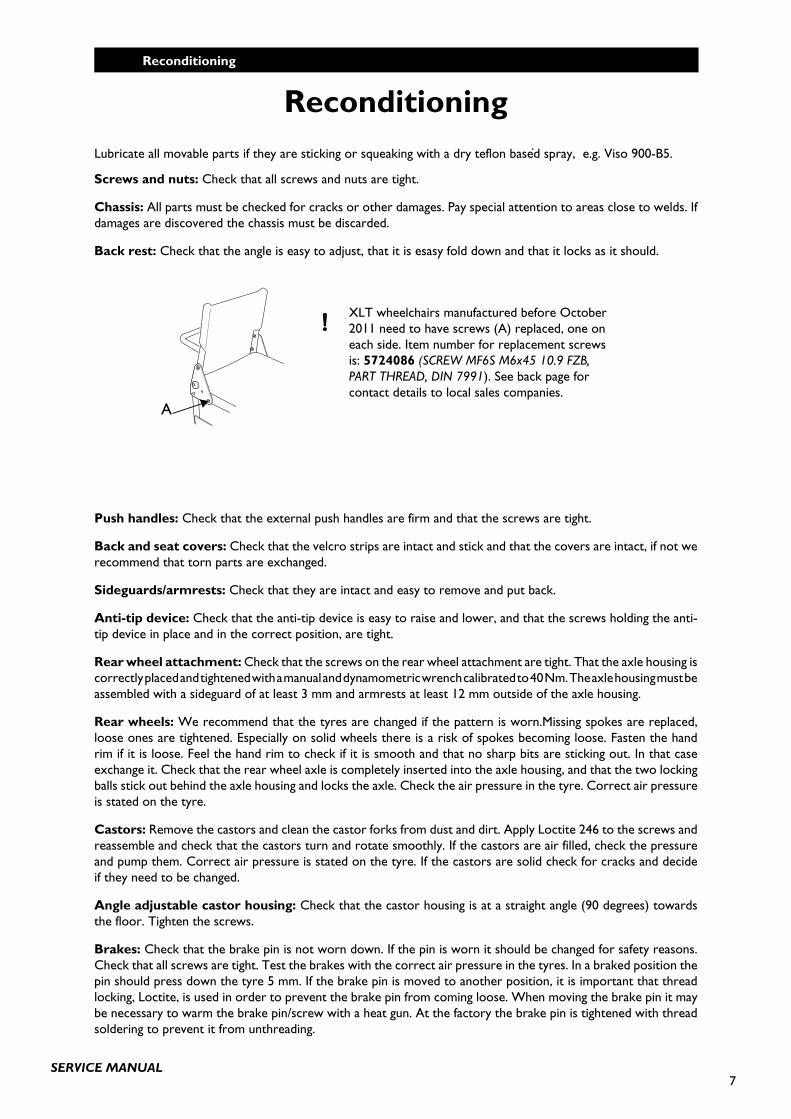
Back rest: Check that the angle is easy to adjust, that it is esasy fold down and that it locks as it should.
Push handles: Check that the external push handles are firm and that the screws are tight.
Back and seat covers: Check that the velcro strips are intact and stick and that the covers are intact, if not we recommend that torn parts are exchanged.
Sideguards/armrests: Check that they are intact and easy to remove and put back.
Anti-tip device: Check that the anti-tip device is easy to raise and lower, and that the screws holding the anti-tip device in place and in the correct position, are tight.
Rear wheel attachment: Check that the screws on the rear wheel attachment are tight. That the axle housing is correctly placed and tightened with a manual and dynamometric wrench calibrated to 40 Nm. The axle housing must be assembled with a sideguard of at least 3 mm and armrests at least 12 mm outside of the axle housing.
Rear wheels: We recommend that the tyres are changed if the pattern is worn.Missing spokes are replaced, loose ones are tightened. Especially on solid wheels there is a risk of spokes becoming loose. Fasten the hand rim if it is loose. Feel the hand rim to check if it is smooth and that no sharp bits are sticking out. In that case exchange it. Check that the rear wheel axle is completely inserted into the axle housing, and that the two locking balls stick out behind the axle housing and locks the axle. Check the air pressure in the tyre. Correct air pressure is stated on the tyre.
Castors: Remove the castors and clean the castor forks from dust and dirt. Apply Loctite 246 to the screws and reassemble and check that the castors turn and rotate smoothly. If the castors are air filled, check the pressure and pump them. Correct air pressure is stated on the tyre. If the castors are solid check for cracks and decide if they need to be changed.
Angle adjustable castor housing: Check that the castor housing is at a straight angle (90 degrees) towards the floor. Tighten the screws.
Brakes: Check that the brake pin is not worn down. If the pin is worn it should be changed for safety reasons. Check that all screws are tight. Test the brakes with the correct air pressure in the tyres. In a braked position the pin should press down the tyre 5 mm. If the brake pin is moved to another position, it is important that thread locking, Loctite, is used in order to prevent the brake pin from coming loose. When moving the brake pin it may be necessary to warm the brake pin/screw with a heat gun. At the factory the brake pin is tightened with thread soldering to prevent it from unthreading.
SERVICE MANUAL
XLT wheelchairs manufactured before October 2011 need to have screws (A) replaced, one on each side. Item number for replacement screws is: 5724086 (SCREW MF6S M6x45 10.9 FZB, PART THREAD, DIN 7991). See back page for contact details to local sales companies.

8
Accessories
Lubricate all movable parts if they are sticking or squeaking with a dry teflon based spray, e.g. Viso 900-B5.
Screws and nuts: Check that all screws and nuts are tight.
Head- and Head support with cheak supports: Check that the side and angle adjustment for the "wings" work. Also check that there is a memory function (after 2005).
Neck support: Check that there is a memory function (after 2005).
Trunk support Multi functional from 2005: Check that the angle adjust-ment works and that there is a memory function.
Abduction cushion: Check that the depth adjustment works (before 2005).
Table trayWhen re-mounting the table tray, try to find the thread manually before fas-tening the screws with any kind of tooling. This spares the threading.
Accessories
SERVICE MANUAL

9
Check List
CHECK LIST
OK NOTE SIGNWASHINGRECONDITIONING:Screws and nutsChassisPush handlesBack coverSeat coverBackBack support
Back angle.Back foldingSeatSideguards/armrestsFoot platesLeg restsAnti-tip devicesFerrulesRubber handlesRear wheel axlesDrive wheelsCastorsBrakesAngle adjustable castor housing
Assistant manoeuvred brakes ToolsTEST DRIVE:Chair rolls in straight lineEasy to propelDELIVERY CHECK:Include a manual
SERVICE MANUAL

10
Notes

11
Notes

Belgium & Luxemburg: Invacare nv, Autobaan 22, B-8210 LoppemTel: (32) (0)50 83 10 10, Fax: (32) (0)50 83 10 [email protected] / www.invacare.be
Denmark: Invacare A/S, Sdr. Ringvej 37, DK-2605 BrøndbyTel: (45) (0)36 90 00 00, Fax: (45) (0)36 90 00 [email protected] / www.invacare.dk
Deutschland:Invacare GmbH, Alemannenstraße 10, D-88316 IsnyTel: (49) (0)75 62 7 00 0, Fax: (49) (0)75 62 7 00 [email protected] / www.invacare.de
Ulrich Alber GmbH, Vor dem Weissen Stein 21, D-72461 Albstadt-TailfingenTel: (49) (0)7432 2006 0, Fax: (49) (0)7432 2006 [email protected]
European Distributor Organisation:Invacare, Kleiststraße 49, D-32457 Porta Westfalica Tel: (49) (0)57 31 754 540, Fax: (49) (0)57 31 754 [email protected] / www.invacare.eu.com
España:Invacare SA, c/Areny s/n, Polígon Industrial de Celrà, E-17460 Celrà (Girona)Tel: (34) (0)972 49 32 00, Fax: (34) (0)972 49 32 [email protected] / www.invacare.es
France:Invacare Poirier SAS, Route de St Roch, F-37230 FondettesTel: (33) (0)2 47 62 64 66, Fax: (33) (0)2 47 42 12 [email protected] / www.invacare.fr
Ireland:Invacare Ireland Ltd, Unit 5 Seatown Business Campus, Seatown Road, Swords, County Dublin - IrelandTel: (353) 1 810 7084, Fax: (353) 1 810 [email protected] / www.invacare.ie
Italia:Invacare Mecc San s.r.l., Via dei Pini 62, I-36016 Thiene (VI)Tel: (39) 0445 38 00 59, Fax: (39) 0445 38 00 [email protected] / www.invacare.it
Nederland:Invacare BV, Celsiusstraat 46, NL-6716 BZ EdeTel: (31) (0)318 695 757, Fax: (31) (0)318 695 [email protected] / [email protected]
Norge:Invacare AS, Grensesvingen 9, Postboks 6230, Etterstad, N-0603 OsloTel: (47) (0)22 57 95 00, Fax: (47) (0)22 57 95 [email protected] / [email protected]
Österreich:Invacare Austria GmbH, Herzog Odilostrasse 101, A-5310 MondseeTel: (43) 6232 5535 0, Fax: (43) 6232 5535 [email protected] / www. invacare.at
Portugal:Invacare Lda, Rua Estrada Velha, 949, P-4465-784 Leça do BalioTel: (351) (0)225 1059 46/47, Fax: (351) (0)225 1057 [email protected] / www.invacare.pt
Sverige & Suomi:Invacare AB, Fagerstagatan 9, S-163 91 SpångaTel: (46) (0)8 761 70 90, Fax: (46) (0)8 761 81 [email protected] / [email protected]
Switzerland:Invacare AG, Benkenstrasse 260, CH-4108 WitterswilTel: (41) (0)61 487 70 80, Fax: (41) (0)61 487 70 [email protected] / www.invacare.ch
United Kingdom:Invacare Limited, Pencoed Technology Park, Pencoed, Bridgend CF35 5AQSwitchboard Tel: (44) (0)1656 776200, Fax: (44) (0)1656 776201Customer services Tel: (44) (0)1656 776222, Fax: (44) (0)1656 [email protected] / www.invacare.co.uk
Invacare Rea ABVäxjövägen 303 S-343 71 DIÖ, SWEDEN
Part
No.
152
2394
-3 2
012-
02-2
3