introduction to web programming - jawaharlal nehru ... lab manual.pdfengineering in the subject of...
TRANSCRIPT

Jawaharlal Nehru Engineering College
Laboratory Manual
On
Introduction to Web Programming
For
Final Year Students CSE Dept: Computer Science & Engineering
Author JNEC, Aurangabad

FOREWORD
It is my great pleasure to present this laboratory manual for second year
engineering students for the subject of Introduction To Web Programming
keeping in view the vast coverage required for understanding the concept of Hyper
Text Markup Language(HTML) and JavaScript.
As a student, many of you may be wondering with some of the questions in your
mind regarding the subject and exactly what has been tried is to answer through
this manual.
As you may be aware that MGM has already been awarded with ISO 9000
certification and it is our endure to technically equip our students taking the
advantage of the procedural aspects of ISO 9000 Certification.
Faculty members are also advised that covering these aspects in initial stage itself,
will greatly relived them in future as much of the load will be taken care by the
enthusiasm energies of the students once they are conceptually clear.
Dr. S.D.Deshmukh,
Principal

LABORATORY MANUAL CONTENTS
This manual is intended for the Second year students of Computer Science &
Engineering in the subject of Introduction To Web Programming. This manual
typically contains practical/Lab Sessions related HTML and Javascript covering
various aspects related the subject to enhanced understanding.
Introduction To Web Programming provides students the idea of Design
Webpages.It also helps to understands the concept of Javascript programming in
designing a webpage
Students are advised to thoroughly go through this manual rather than only topics
mentioned in the syllabus as practical aspects are the key to understanding and
conceptual visualization of theoretical aspects covered in the books.
Good Luck for your Enjoyable Laboratory Sessions
Prof. D .S. Deshpande M.K. Ugale
HOD,CSE Lecturer in CSE

SUBJECT INDEX
1. Design a home page which will display your information i.e. Bio data.
2. Create Hyperlinks in home page i.e educational details, Hobbies,
Achievement, My Ideals etc.
3. Design a timetable and display it in tabular format.
4. Design a Registration form in HTML.
5. Design a webpage i.e. Biodata using CSS.
6. Design webpage using Frames,Framesets.
7. Embedding Javascripts in HTML pages.
8. Design a Biodata page whose content can be changed using JavaScript like events.
9. Design a Signup form with all validations.

DOs and DON’T DOs in Laboratory:
1. Make entry in the Log Book as soon as you enter the Laboratory.
2. All the students should sit according to their roll numbers starting from their left
to right.
3. All the students are supposed to enter the terminal number in the log book.
4. Do not change the terminal on which you are working.
5. All the students are expected to get at least the algorithm of the
program/concept to be implemented.
6. Strictly observe the instructions given by the teacher/Lab Instructor.
Instruction for Laboratory Teachers:
1. Submission related to whatever lab work has been completed should be done
during the next lab session. The immediate arrangements for printouts related to
submission on the day of practical assignments.
2. Students should be taught for taking the printouts under the observation of lab
teacher.
3. The promptness of submission should be encouraged by way of marking and
evaluation patterns that will benefit the sincere students.

1
1. Lab Exercise
Exercise No 1: (2 Hours) – 1 Practical
Aim: - Design a home page which will display your information i.e. Bio data.
Tools: Notepad Editor and Web Browser like Internet Explorer or Mozilla Firefox.
Standard Procedure for Creating and View an HTML document? 1. Use a text editor such as Notepad to write the document.
2. Save the file as filename.html on a PC. This is called the Document Source.
3. Open the file that you have saved in any browser Off-Line.
4. Your HTML page should now appear just like any other Web page in browser.
5. You may now switch back and forth between the Source and the HTML
Document
• switch to Notepad with the Document Source
• make changes .
• save the document again.
• switch back to browser .
• click on RELOAD and view the new HTML Document .
• switch to Notepad with the Document Source.
THEORY:
1. What is HTML?
• A series of tags that are integrated into a text document.
• A series of tags that are integrated into a text document.
• These look like: <code>formatted text</code>
o <code> begins the formatting tag.
o </code> ends the formatting tag.
• These tags are then read by a Browser, which translates the tags into the
formatting that they represent
2. What are Tags?
• HTML tags are used to mark-up HTML elements.
• HTML tags are surrounded by the two characters < and >.
• The surrounding characters are called angle brackets .
• HTML tags normally come in pairs like <b> and </b>.
• The first tag in a pair is the start tag, the second tag is the end tag.
• The text between the start and end tags is the element content .

2
• HTML tags are not case sensitive, <b> means the same as <B>.
3. Structure Tags In HTML
HTML Tag
<HTML></HTML>
These tags begin and end an HTML document.
HEAD Tag <HEAD></HEAD>
These tags are in the beginning of the document. Important information is
stored in- between these tags including: title, meta-data, styles, and
programming scripts
TITLE Tag <TITLE></TITLE>
These tags are in-between the HEAD tags and contain the text that
appears in the title of the Web page.
BODY Tag
<BODY></BODY>
As you may have guessed, the BODY tags contain all the text in the
body of the document.
4. Block Level tags
4.1 HTML Headings – Headings are defined with the<h1> to<h6> tags.
Where <h1> -Defines the largest headings.
<h6> -Defines the smallest headings.
4.2 HTML Paragraphs - Paragraphs are defined with the<p> tag.
4.3 HTML Line Breaks - Use the <br/> tag if you want a line break (a new line) without starting a
new paragraph.
4.4 Horizontal Rule The <hr> element is used for horizontal rules that act as dividers between
sections

3
5. HTML Text Formatting Tags
Tag Description
<b> Defines bold Text
<big> Defines big text.
<em> Defines emphasized text
<i> Defines Italic text
<small> Defines italic text.
<strong> Defines Strong text
<sub> Defines subscripted text
<sup> Defines superscripted text
<ins> Defines inserted text
<del> Defines deleted text
CONCLUSIONS:
In this way we can use different basic tags of HTML for creating webpage
displaying personal information i.e. Biodata.
4
2. Lab Exercise
Exercise No 2: (2 Hours) – 1 Practical
Aim: - Create Hyperlinks in home page i.e. educational details, Hobbies,
Achievement, My Ideals etc.
Tools: Notepad Editor and Web Browser like Internet Explorer or Mozilla Firefox.
STANDARD PROCEDURE:
• Step 1: Create Educational_Details.html page.
• Step 2: Create Hobbies.html page.
• Step 3: Create Achievements.html page.
• Step 4: Create My_Ideals.html page.
• Step 5: Create links of above four html pages in Link.html page.
THEORY:
HTML uses the <a> anchor tag to create a link to another document or web page.
The Anchor Tag and the Href Attribute
• An anchor can point to any resource on the Web: an HTML page, an image,
a sound file, a movie, etc. The syntax of creating an anchor:
• <a href="url">Text to be displayed</a>
• The <a> tag is used to create an anchor to link from, the href attribute is
used to tell the address of the document or page we are linking to, and the
words between the open and close of the anchor tag will be displayed as a
hyperlink.
The Target Attribute
• With the target attribute, you can define where the linked document will be
opened. By default, the link will open in the current window.
• The code below will open the document in a new browser window.
<a href=http://www. google.com/ target="_blank">Visit google!</a>
Email Links

5
• To create an email link, you will use mailto: plus your email address. Here is
a link to ACC's Help Desk:
<a href="mailto:[email protected]">Email Help Desk</a>
• To add a subject for the email message, you would add ?subject= after the
email address. For example:
<a href="mailto:[email protected]?subject=Email Assistance">Email Help
Desk</a>
CONCLUSIONS:
With the help of given procedure and information about the Links we can write
HTML code for creating Hyperlinks in html page.
3. Lab Exercise

6
Exercise No 3: (2 Hours) – 1 Practical
Aim: - Design a timetable and display it in tabular format.
Tools: Notepad Editor and Web Browser like Internet Explorer or Mozilla Firefox.
THEORY:
HTML Tables:
• Tables are defined with the <table> tag.
• A table is divided into rows (with the <tr> tag),
• Each row is divided into data cells (with the <td> tag).
• td stands for "table data," and holds the content of a data cell.
• A <td> tag can contain text, links, images, lists, forms, other tables, etc.
HTML Tables and the Border Attribute
If you do not specify a border attribute, the table will be displayed without borders.
Sometimes this can be useful, but most of the time, we want the borders to show.
To Create Table Header
<html>
<body>
<h4>Table headers:</h4>
<table border="1">
<tr>
<th>Name</th>
<th>Telephone</th>
<th>Telephone</th>
</tr>
<tr>
<td>Bill Gates</td>
<td>555 77 854</td>
<td>555 77 855</td>
</tr>
</table>
</body>
</html>
Output
7
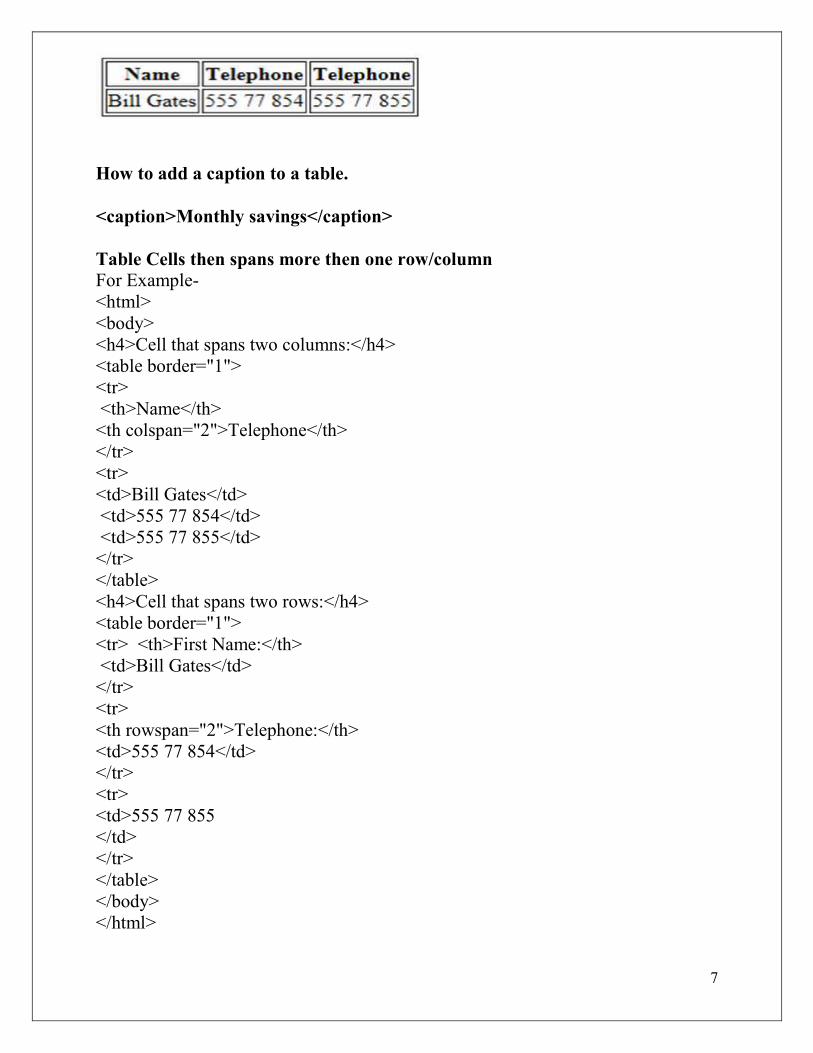
How to add a caption to a table.
<caption>Monthly savings</caption>
Table Cells then spans more then one row/column
For Example-
<html>
<body>
<h4>Cell that spans two columns:</h4>
<table border="1">
<tr>
<th>Name</th>
<th colspan="2">Telephone</th>
</tr>
<tr>
<td>Bill Gates</td>
<td>555 77 854</td>
<td>555 77 855</td>
</tr>
</table>
<h4>Cell that spans two rows:</h4>
<table border="1">
<tr> <th>First Name:</th>
<td>Bill Gates</td>
</tr>
<tr>
<th rowspan="2">Telephone:</th>
<td>555 77 854</td>
</tr>
<tr>
<td>555 77 855
</td>
</tr>
</table>
</body>
</html>

8
Output-
CONCLUSIONS:
With the help of given information about the Table and Table tags we can design a
time table in tabular format.
]
4. Lab Exercise

9
Aim: - Design a Registration form in HTML.
Tools: Notepad Editor and Web Browser like Internet Explorer or Mozilla Firefox.
THEORY:
• HTML Forms are used to select different kinds of user input.
• A form is an area that can contain form elements.
• Form Elements are elements that allow the user to enter information Like
a. Text Fields
b. Text area Fields
c. drop-down Menus
d. Radio buttons
e. Checkboxes
A Form is defined with <form> tag.
Input Tag
• The most used form tag is the <input> tag. The type of input is specified
with the type attribute.
For Creating Textbox: <input type=“text”>
For Creating Password textbox: <input type=‘’password’’>
For Creating Radio button: <input type = "radio">
For Creating Checkbox: <input type = "checkbox">
For Creating Buttons: <input type ="button" value= "OK" />
For Creating Reset Button: <input type ="reset" value= "Reset" />
For Creating Submit Button: <input type ="Submit" value= "Submit" />
Dropdown list:
1. SELECT tag - Defines the controls for selection of options and
creates a dropdown list.

10
2. OPTION tag - Defines an options in a drop-down list , its most
important attribute is the VALUE attribute that determines the value
being sent to the server.
3. OPTGROUP tag - Allows you to group your choices in the form.
For Example-
<form>
<select >
<optgroup label = " Generel Hobby" >
<option value= "playing" > Playing </option>
<option value = "watching movies" > Watching Movies </option>
</optgroup>
<optgroup label = "Educational Hobby">
<option value = "reading" > Reading </option>
<option value ="stamp collection" >Stamp Collection </option>
</optgroup>
</select>
</form>
Output-
1. SELECT tag - Defines the controls for selection of options and
creates a dropdown list.
2. OPTION tag - Defines an options in a drop-down list , its most
important attribute is the VALUE attribute that determines the value
being sent to the server.
3. OPTGROUP tag - Allows you to group your choices in the form.
• Textarea:
For Example-
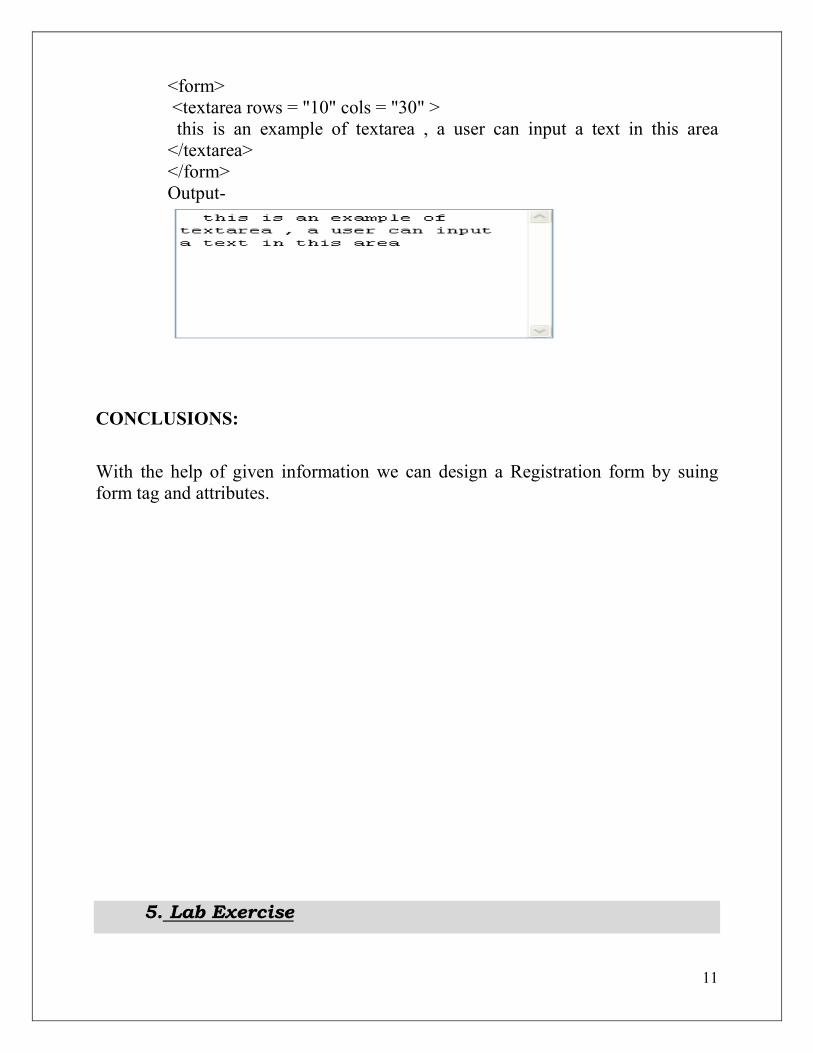
11
<form>
<textarea rows = "10" cols = "30" >
this is an example of textarea , a user can input a text in this area
</textarea>
</form>
Output-
CONCLUSIONS:
With the help of given information we can design a Registration form by suing
form tag and attributes.
5. Lab Exercise

12
Exercise No 5: (2 Hours) – 1 Practical
Aim: - Design a webpage i.e. Biodata using CSS.
Tools: Notepad Editor and Web Browser like Internet Explorer or Mozilla Firefox.
THEORY:
Types of CSS-
1. Inline CSS
Here “Style” Attribute is used.

13
For Example-
<body style=”background-color:red;”>
2. Internal CSS
Here HTML tag <style> is used.
For Example-
<html>
<head>
<title>Example</title>
<style type="text/css">
body {background-color: #FF0000;}
p {background-color: yellow;}
</style>
</head>
<body>
<p>This is a red page</p>
</body>
</html>
3. External CSS
Here we need to create two separate file .css file and .html file.
For Example-
HTML file consisting of “mystyle.css”
<html>
<head>
<link rel="stylesheet“ type="text/css" href="mystyle.css" />
</head>
<body>
<p> paragraph</p>
<hr>
</body>
</html>
CSS Code- CSS files saved as “mystyle.css” <html>
<head>
14
hr {color:sienna;}
p {margin-left:20px;}
body {background-image:url("images/Blue hills.jpg");}
</head>
</html>
CONCLUSIONS:
With the help of given information about CSS we can create webpage using css.
6. Lab Exercise
Exercise No 6: (2 Hours) – 1 Practical

15
Aim: - Design webpage displaying different subject information using
Frames,Framesets.
Tools: Notepad Editor and Web Browser like Internet Explorer or Mozilla Firefox.
STANDARD PROCEDURE:
• Step 1: Create subject1.html page.
• Step 2: Create subject2.html page.
• Step 3: Create subject3.html page.
• Step 4: Create a page having multiple frames of above subjects.
THEORY:
• With Frames, you can display more than one HTML document in the same
browser window.
• Each HTML document is called a frame.
• Each frame is independent of Each Other.
The Frameset Tag-
• The <frameset> tag defines how to divide the window into frames.
• Each Frameset Defines a set of rows or columns.
• The values of rows/columns indicate the amount of screen area each
row/column will occupy.
• The frameset column size value can also be set in pixels (cols=“200,500”),
• and one of the columns can be set to use the remaining space
(cols=“25%,*”)
The Frame Tag-
The <frame> tag defines what HTML document to put into each frame.
In the following example
• We have frameset with two columns.
• The first column is set to 25% of the width of the browser window.

16
• The second column is set to 75% of the width of the browser window.
• The HTML document “frame1.html” is put into first column and
• The HTML document “Frame2.html” is put into the second column.
<html>
<frameset cols = "40% , 60%">
<frame src = "frame1.html ">
<frame src = "frame2.html ">
</frameset>
</html>
Noresize Attribute in Frame Tag-
• If a frame has visible borders, the user can resize it by dragging the border.
• To prevent a user from doing this, you can add noresize=“noresize” to the
<frame> tag.
Iframe Tag-
• Defines an inline sub window (frame).
For Example-
<html>
<iframe src="frame1.html"></iframe><br>
<iframe src="frame2.html"></iframe>
</html>
CONCLUSIONS:
With the help of given procedure and information about the Frame we design a
webpage having multiple frames view for displaying subject information.
7. Lab Exercise
Exercise No 7: (2 Hours) – 1 Practical

17
Aim: - Embedding Javascripts in HTML pages.
Tools: Notepad Editor and Web Browser like Internet Explorer or Mozilla Firefox.
THEORY:
Introduction to JavaScript
Variables in JavaScript
Types of Popup boxes-
18
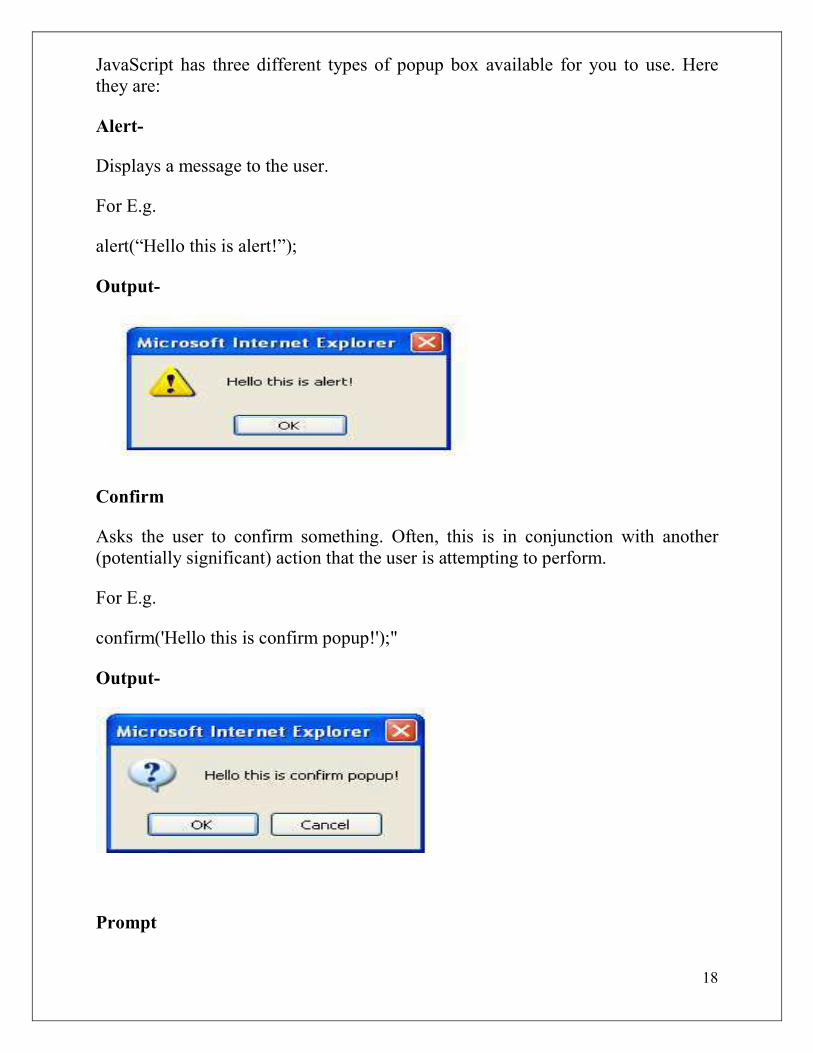
JavaScript has three different types of popup box available for you to use. Here
they are:
Alert-
Displays a message to the user.
For E.g.
alert(“Hello this is alert!”);
Output-
Confirm
Asks the user to confirm something. Often, this is in conjunction with another
(potentially significant) action that the user is attempting to perform.
For E.g.
confirm('Hello this is confirm popup!');"
Output-
Prompt

19
Prompts the user for information.
Example:
prompt (“Please enter your favorite website”);
Output-
Functions in JavaScript-
In JavaScript, you will use functions a lot.
A function (also known as a method) is a self-contained piece of code that
performs a particular "function". You can recognize a function by its format - it's a
piece of descriptive text, followed by open and close brackets.
Program for Addition, Subtractions, Multiplication, Division-
CONCLUSIONS:
With the help of given procedure and information about the variables and function
of javascripts,we can embed javascript in html pages.
8. Lab Exercise

20
Exercise No 8: (2 Hours) – 1 Practical
Aim: - Design a Biodata page whose content can be changed using JavaScript
like events.
Tools: Notepad Editor and Web Browser like Internet Explorer or Mozilla Firefox.
THEORY:
When you write JavaScript function, you will you will need to determine when it
will run, Often this will be when a user does something like click or hover over
something, submit a form, double clicks on something etc.
List of Event Handler
CONCLUSIONS:

21
With the help of given information about the use of Events, We can change the
contents of html pages using JavaScript.
9. Lab Exercise
Exercise No 9: (2 Hours) – 1 Practical

22
Aim: - Design a Signup form with all validations.
Tools: Notepad Editor and Web Browser like Internet Explorer or Mozilla Firefox.
STANDARD PROCEDURE:
THEORY:
When you write JavaScript function, you will you will need to determine when it
will run, Often this will be when a user does something like submit a form,
Validation prompt should appears.
STANDARD PROCEDURE:
• Step 1: Design a signup form.
• Step 2: When user click on Submit/Button-Prompt should be displayed.
CONCLUSIONS:
With the help of given information about the use of Events and Functions , We can
Design a Signup form with all validations

23