introduction to the telescope - asu.edu · in this lab exercise you will become familiar with the...
TRANSCRIPT
AST 113 – Fall 2015 Introduction to the Telescope
© 2016 Arizona State University Page 1 of 19
NAME: _________________________
INTRODUCTION TO THE TELESCOPE
What will you learn in this Lab?
For a few of the labs this semester, you will be using an 8-inch Celestron telescope to take observations. This lab will introduce you to the telescope itself and some properties of a telescope. Observations will be made to illustrate the different telescope properties.
What do I need to bring to the Class with me to do this Lab? For this lab you will need:
A copy of this lab script
A pencil
Your flashlight
Your star wheel
Your Audubon field guide
Scientific calculator
I. Introduction:
In this lab exercise you will become familiar with the parts of a telescope and how to use one. You will also become familiar with some telescope properties and use observations to illustrate these properties. These properties include:
Remember, telescopes are precision instruments; be careful using them. Ask your instructor for help when you are in doubt about what to do.
Lab Goals:
Learn to set-up and operate the Celestron 8” telescope.
Investigate how the focal length of the eyepiece affects the magnification and field of view of the telescope.
Understand the terms (1) light gathering power, (2) resolving power, and (3) scale and know how they factor into the properties of a telescope.
Make measurements with a telescope and understand how those measurements relate to the properties being explored.
AST 113 – Fall 2015 Introduction to the Telescope
© 2016 Arizona State University Page 2 of 19
II. Parts of ASU’s CPC Series Telescope:
Primary Mirror: This is the large mirror at the telescope's lower end that 'collects' and focuses the light so that we can see fainter stars than with our 'naked' eyes. ASU astronomy labs currently use “8-inch” telescopes. This means the diameter of the primary mirror is 8 inches. These are called reflecting telescopes.
Mounting: The mounting supports the telescope and allows it to be moved in two directions (or axes): one in the same sense as the Earth rotates (right ascension) and the other in a north/south direction (declination).
Optical Tube: The optical tube holds the optical parts (eyepiece, primary, and secondary mirrors for reflecting telescopes) in the correct position.
Clock Drive: The clock drive turns the telescope at the same rate as the Earth turns, but in the opposite direction so that the telescope stays pointed at one particular location in the sky (i.e., a star).
Hand Control: The hand control is the primary method used to interface with the Celestron telescopes. The four direction arrows allow you to slew the telescope in any desired direction or to better center an object in the eyepiece’s field of view.
Star Diagonal: The star diagonal diverts light at a right angle from the light path of the telescope. For astronomical observing, this allows you to observe in positions that are more comfortable than if you were to look along the axis of the optical tube.
Finderscope: The finderscope is a smaller telescope with less magnification and a larger field of view. It is attached to the side of the main telescope and points in the same direction as the main telescope. The larger field of view makes it easy to initially locate a star in the finder telescope, hence the name finder. After a star is centered on the cross hairs in the finder, it will also be visible in the eyepiece of the main telescope. DO NOT touch the finderscope for any reason. Do not use it as a handle to move the scope, or attempt to adjust it in any way.
Eyepiece: This is the part you look through! Each eyepiece is identified by its focal length, which is stamped in white letters on the casing (e.g., 18 mm, 25 mm, etc.)
Focus Adjustment: Once you have the star in the main eyepiece, focus on it sharply. It may help to remove your glasses. If you are observing faint objects, try using averted vision. That is, look at the object out of the corner of your eye. This works because the light detecting cells used by averted vision are more sensitive than those used by direct vision. It also will help to turn all the lights out and wait a few minutes for your eyes to become dark adapted.
Tripod: Each telescope rests on a tripod that has been carefully leveled for its location on the observation deck. A telescope’s ability to accurately track a desired

AST 113 – Fall 2015 Introduction to the Telescope
© 2016 Arizona State University Page 3 of 19
target is best maintained by keeping the telescope on a level base. DO NOT move or adjust the tripod in any way during the duration of the outdoor labs.
Fork Arms: The Celestron telescopes are held in place by fork arms and are part of the slewing mechanism that allows proper tracking of celestial objects. NEVER grab the fork arms or body of the telescope to move/adjust the telescope.
The different components of the Celestron 8-inch reflecting telescope is diagrammed in Fig. 1 on the next page.
III. Properties of a Telescope:
Light Gathering Power: The primary function of an astronomical telescope is to collect light. The light gathering power of a telescope is measured by the area of the light collector (either a lens or a mirror), though a telescope's size is always specified by the diameter of its primary mirror. The area of a circular mirror is
A = π (𝐷
2)
2,
where A is the area of the mirror, and D is the diameter of the mirror. Thus, comparing the light gathering power of a 14-inch and 8-inch telescopes, we find the 14-inch has 3.06 times greater light gathering power.
Focal Length: For a simple mirror, the focal length is the distance between that mirror and the place where the image is formed. In a telescope with more than one optical element (or mirror), the effective focal length is often longer than the telescope tube itself. It is useful to know the focal length of the telescope or eyepiece that you are using. The focal lengths of the ASU telescopes are:
focal length = 2000mm, for the 8-inch Celestron telescopes
The focal lengths of the ASU eyepieces are stamped on the end of each eyepiece. Typical eyepiece focal lengths are 40mm (lowest power), 24mm, 18mm, etc.
Magnification of a Telescope: The magnifying power of a telescope is determined by the focal length of both the telescope and the eyepiece used. An eyepiece with a shorter focal length gives a greater magnification.
MAGNIFICATION OF TELESCOPE = TELESCOPE FOCAL LENGTH
EYEPIECE FOCAL LENGTH
Field of View of a Telescope: The angular size of the piece of sky seen through a telescope is called its field of view (i.e., FoV) and depends both on the telescope and the eyepiece used. Since the FoV is an angle, it is measured in degrees (º), arcminutes (‘), or arcseconds (“). For a given telescope, the greater the focal length of the eyepiece, the greater the field of view. If you double the focal length of the eyepiece, you also double the FoV.

AST 113/114 – Fall 2014 / Spring 2015 Introduction to the Telescope
© 2016 Arizona State University Page 4 of 18

AST 113/114 – Fall 2014 / Spring 2015 Introduction to the Telescope
© 2016 Arizona State University Page 5 of 18
Resolving Power: The resolving power (also called angular resolution) is the ability of a telescope to separate two close images or to see fine detail in an image. Greater magnification WILL NOT resolve two images that are closer than the resolution of a telescope. The limit, called the Rayleigh criterion, depends on the diameter of the telescope's primary mirror (D) and the color (or wavelength) of the light observed. For visible light, the minimum separation of two objects which can just be resolved is:
α = 4.56
𝐷,
where α is the angular separation of two stars (in arcseconds), and D is the diameter of the telescope's primary mirror (in inches).
For example, the resolving power for the 8-inch telescopes is α = 0.57”. However, you may not actually be able to see two images this close together because of atmospheric conditions ("seeing"), relative brightness of the objects, etc.
Scale of a Telescope: The scale at the focus of any astronomical telescope is the ratio of the angular size of an object in the sky to its image size with that telescope (e.g., how large the object would look if you were to photograph it with that telescope).
scale = angular size of an object on the sky
size of the final image using the telescope
The scale is constant for a particular telescope and depends only on the focal length of the primary mirror. The scale is usually expressed in units of degrees per millimeter (º/mm) or arcseconds per millimeter (“/mm).
Examples:
1. If the scale is… scale = 30” / mm …an object which is 30 arcseconds in angular size in the sky will appear 1 mm in diameter when viewing that object through the telescope, an object 60 arcseconds in size will appear 2 mm in diameter when viewing through the telescope, etc.
2. If the scale is… scale = 2°/mm …an object which is 2 degrees in angular size in the sky will appear 1 mm in diameter when viewing that object through the telescope, an object 4 degrees in size will appear 2 mm in diameter when viewing through the telescope, etc.
AST 113/114 – Fall 2014 / Spring 2015 Introduction to the Telescope
© 2016 Arizona State University Page 6 of 18
IV. The Experiment
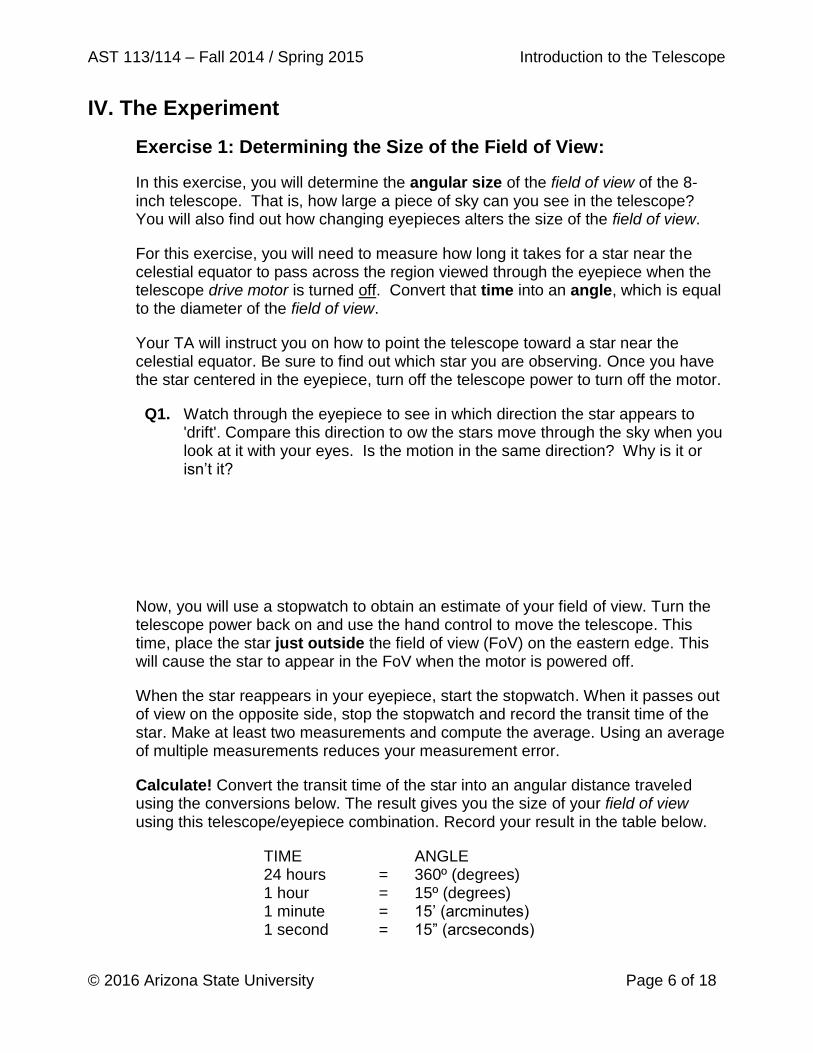
Exercise 1: Determining the Size of the Field of View:
In this exercise, you will determine the angular size of the field of view of the 8-inch telescope. That is, how large a piece of sky can you see in the telescope? You will also find out how changing eyepieces alters the size of the field of view.
For this exercise, you will need to measure how long it takes for a star near the celestial equator to pass across the region viewed through the eyepiece when the telescope drive motor is turned off. Convert that time into an angle, which is equal to the diameter of the field of view.
Your TA will instruct you on how to point the telescope toward a star near the celestial equator. Be sure to find out which star you are observing. Once you have the star centered in the eyepiece, turn off the telescope power to turn off the motor.
Q1. Watch through the eyepiece to see in which direction the star appears to 'drift'. Compare this direction to ow the stars move through the sky when you look at it with your eyes. Is the motion in the same direction? Why is it or isn’t it?
Now, you will use a stopwatch to obtain an estimate of your field of view. Turn the telescope power back on and use the hand control to move the telescope. This time, place the star just outside the field of view (FoV) on the eastern edge. This will cause the star to appear in the FoV when the motor is powered off.
When the star reappears in your eyepiece, start the stopwatch. When it passes out of view on the opposite side, stop the stopwatch and record the transit time of the star. Make at least two measurements and compute the average. Using an average of multiple measurements reduces your measurement error.
Calculate! Convert the transit time of the star into an angular distance traveled using the conversions below. The result gives you the size of your field of view using this telescope/eyepiece combination. Record your result in the table below.
TIME ANGLE 24 hours = 360º (degrees) 1 hour = 15º (degrees) 1 minute = 15’ (arcminutes) 1 second = 15” (arcseconds)

AST 113/114 – Fall 2014 / Spring 2015 Introduction to the Telescope
© 2016 Arizona State University Page 7 of 18
Eyepiece 1 = ______ mm
Time 1 (s) Time 2 (s) Average Time Angle
Eyepiece 2 = ______ mm
Time 1 (s) Time 2 (s) Average Time Angle
Repeat! Repeat these observations using a second eyepiece with a different focal length. Be sure to put your measurements and calculations into the data table.
Q2. Is the field of view greater with a shorter or longer focal length eyepiece? Why?
Q3. Would the Moon be completely visible in either of the eyepieces you used (the moon is 30 arcminutes in diameter)? How do you know? Show work.
Q4. Your transit time was for a star near the celestial equator. How would the transit time change for a star at a higher declination (i.e., closer to the celestial pole). HINT: Think about how fast a CD or a record spins on the outer edge compared to the center.
AST 113/114 – Fall 2014 / Spring 2015 Introduction to the Telescope
© 2016 Arizona State University Page 8 of 18
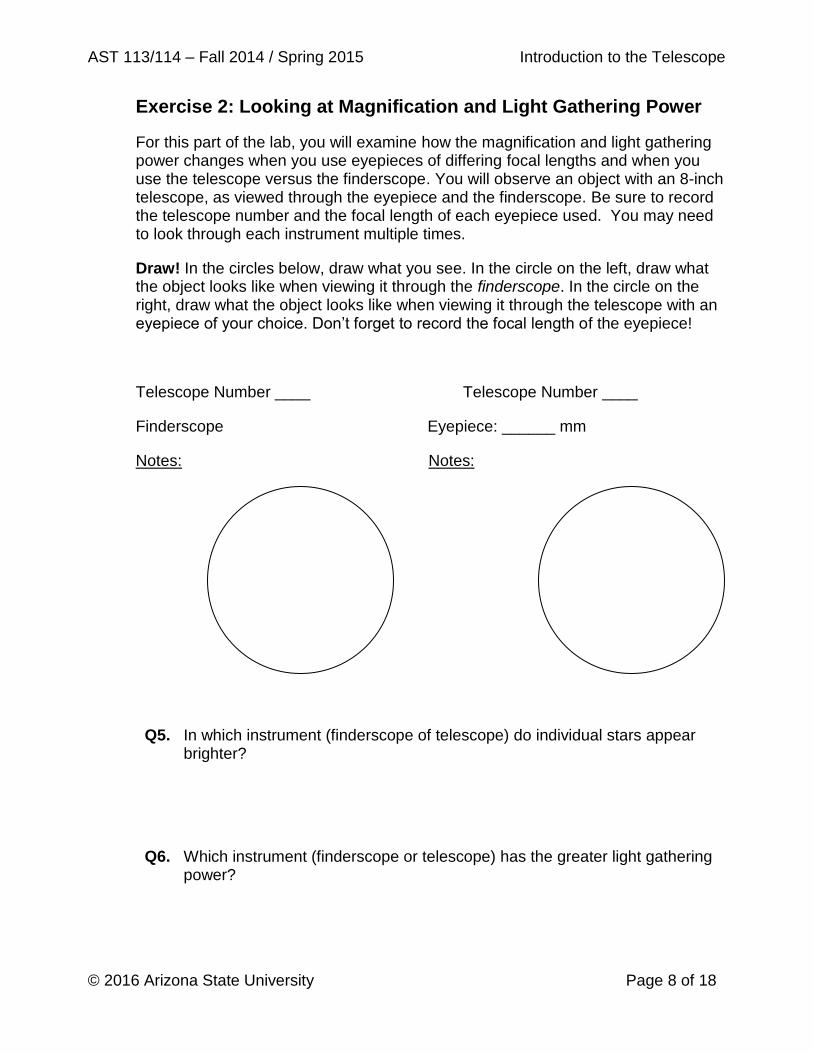
Exercise 2: Looking at Magnification and Light Gathering Power
For this part of the lab, you will examine how the magnification and light gathering power changes when you use eyepieces of differing focal lengths and when you use the telescope versus the finderscope. You will observe an object with an 8-inch telescope, as viewed through the eyepiece and the finderscope. Be sure to record the telescope number and the focal length of each eyepiece used. You may need to look through each instrument multiple times.
Draw! In the circles below, draw what you see. In the circle on the left, draw what the object looks like when viewing it through the finderscope. In the circle on the right, draw what the object looks like when viewing it through the telescope with an eyepiece of your choice. Don’t forget to record the focal length of the eyepiece!
Telescope Number ____ Telescope Number ____
Finderscope Eyepiece: ______ mm
Notes: Notes:
Q5. In which instrument (finderscope of telescope) do individual stars appear brighter?
Q6. Which instrument (finderscope or telescope) has the greater light gathering power?

AST 113/114 – Fall 2014 / Spring 2015 Introduction to the Telescope
© 2016 Arizona State University Page 9 of 18
Next, you will be looking only through the telescopes, and you will compare how magnification changes depending on the focal length of the eyepiece you use. Using the same eyepiece from above, record its focal length in the section below. In the circle on the left (below), draw the astronomical object as it appears when viewing it through this eyepiece, again.
Then, change the eyepiece to one with a different focal length. Record this focal length and in the circle on the right, draw the astronomical object as it appears when viewing it through this other eyepiece.
Telescope Number ____ Telescope Number ____
Eyepiece: _____ mm Eyepiece: ______ mm
Notes: Notes:
Q7. When viewing the object through the finderscope and the two eyepieces, through which instrument and eyepiece did the stars/object appear brightest? Why do you think this particular instrument/eyepiece gave the brightest view? HINT: Which one spreads out the light the least?
Q8. Rank the two eyepieces and the finderscope according to how bright that particular star/object appears in each instrument. Rank the instrument where the object was the faintest to the instrument where it appeared brightest.
______________ _______________ _____________
(Faintest) (Brightest)

AST 113/114 – Fall 2014 / Spring 2015 Introduction to the Telescope
© 2016 Arizona State University Page 10 of 18
Q9. Using your Field Guide, try to name the faintest star that you can see using the finderscope and each of the eyepieces. Include the apparent magnitude next to the star name.
Q10. How does decreasing the focal length of the eyepiece (but not the telescope) change the magnification of the system?
Q11. Can you see fainter objects with a different (higher or lower) magnification? Why?
Q12. Calculate the magnifications for the telescope for each of the eyepieces you used in exercise 2.
Q13. How did the appearance of faint objects change between the finderscope and the telescope? What caused this differences?

AST 113/114 – Fall 2014 / Spring 2015 Introduction to the Telescope
© 2016 Arizona State University Page 11 of 18
Exercise 3: Looking at Resolving Power
For this exercise, you will compare how well you can resolve objects using your eyes compared to the finderscope and your 8-inch telescope. In other words, you will be comparing the resolving power of these three viewing instruments. Be sure to make careful note of what the star looks like in each of these cases.
Q14. Based on the information given in the lab script, which instrument (eye, finderscope, or telescope) do you expect to have the greatest resolving power? Justify your answer.
Your first observation should be with your eyes. Use your field guide or star wheel to locate the star in the sky, and use your eyes to determine the brightness and color of the star compared to the surrounding stars in the constellation. Record whether you think this is a single star or a double star.
Naked Eye Observations
Star Brightness = __________________________
Color = __________________________________
Single or Double? _________________________
Next, look at the star through the finderscope. Again, record brightness, color and whether the star looks like a single star or a double star through the finderscope.
Finderscope Observations
Star Brightness = __________________________
Color = __________________________________
Single or Double? _________________________
Finally, look at the star through the telescope and record brightness, color, and whether the star looks like a single star or a double star through the telescope.
Telescope Observations
Star Brightness = __________________________
Color = __________________________________
Single or Double? _________________________

AST 113/114 – Fall 2014 / Spring 2015 Introduction to the Telescope
© 2016 Arizona State University Page 12 of 18
Q15. How did the appearance of the star change when you looked through the finderscope compared to looking at the star through the telescope? What caused these differences?
Q16. If the separation of two hypothetical stars is 5’ 37”, which of these methods (eyes, finderscope, or telescope) should have resolved the stars? Did they? If not, why? For reference, the pupil diameter of a dark-adapted eye is 0.2 inches.
V. Conclusion
AST 113/114 – Fall 2014 / Spring 2015 Introduction to the Telescope
© 2016 Arizona State University Page 13 of 18
IV. The Experiment – Indoor Alternative
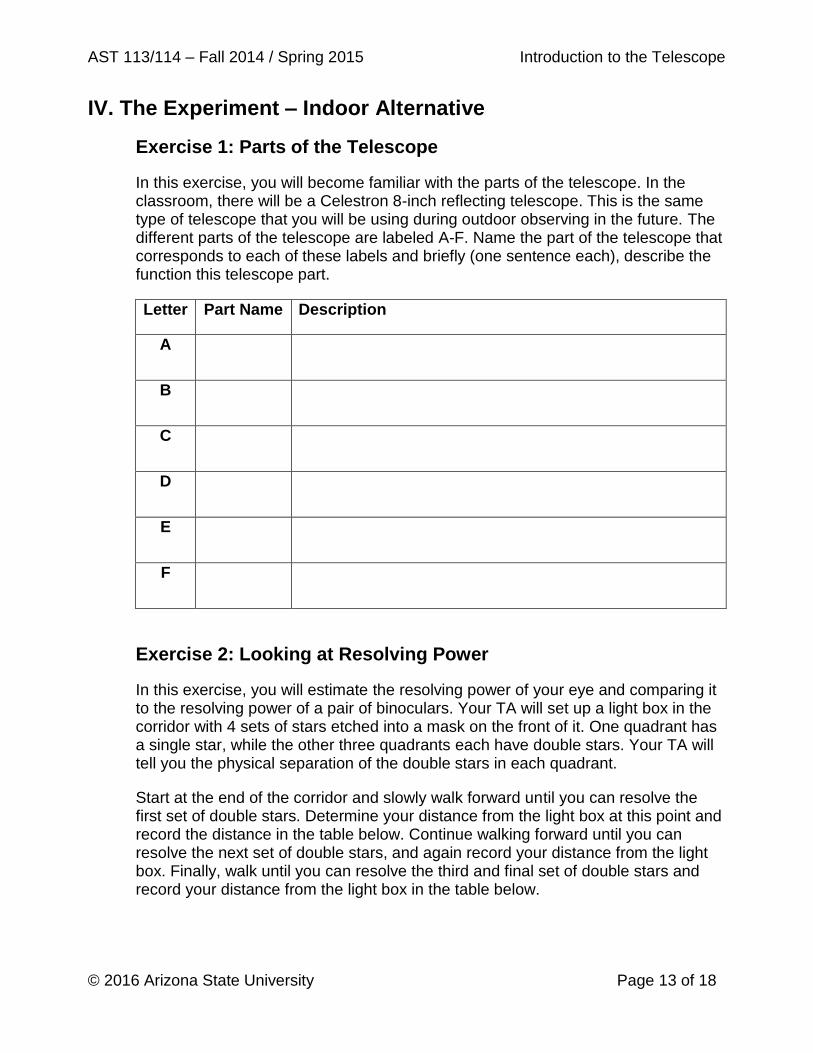
Exercise 1: Parts of the Telescope
In this exercise, you will become familiar with the parts of the telescope. In the classroom, there will be a Celestron 8-inch reflecting telescope. This is the same type of telescope that you will be using during outdoor observing in the future. The different parts of the telescope are labeled A-F. Name the part of the telescope that corresponds to each of these labels and briefly (one sentence each), describe the function this telescope part.
Letter Part Name Description
A
B
C
D
E
F
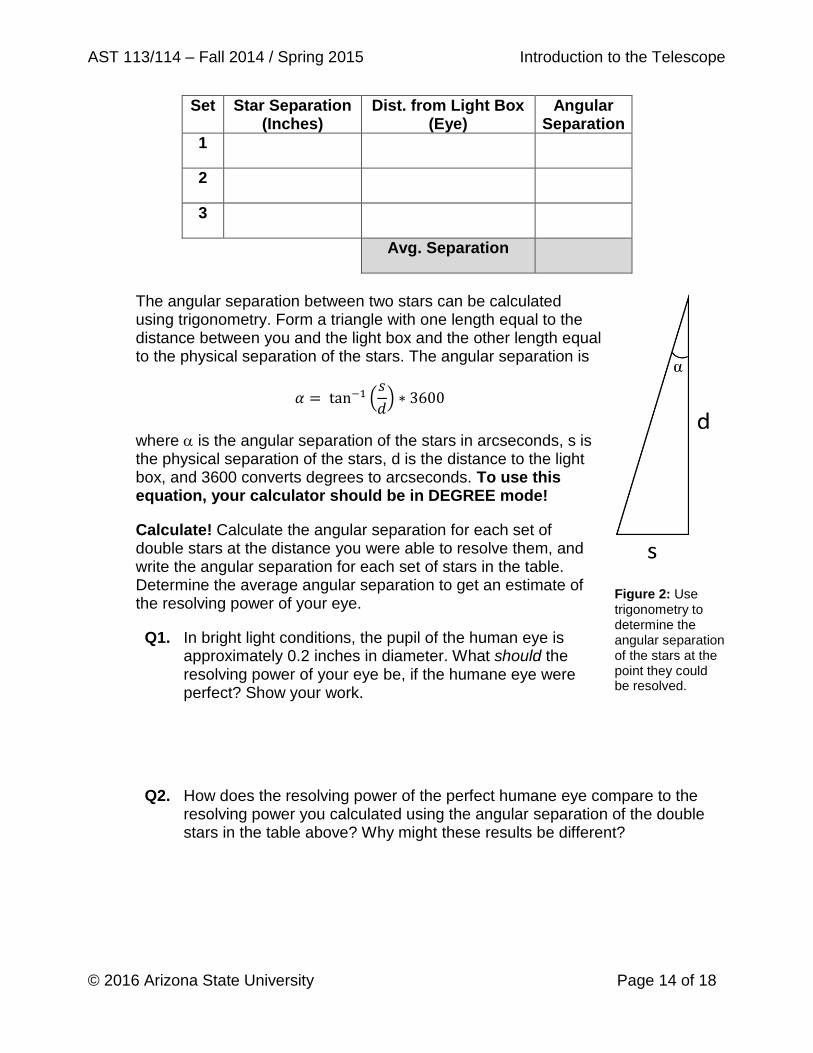
Exercise 2: Looking at Resolving Power
In this exercise, you will estimate the resolving power of your eye and comparing it to the resolving power of a pair of binoculars. Your TA will set up a light box in the corridor with 4 sets of stars etched into a mask on the front of it. One quadrant has a single star, while the other three quadrants each have double stars. Your TA will tell you the physical separation of the double stars in each quadrant.
Start at the end of the corridor and slowly walk forward until you can resolve the first set of double stars. Determine your distance from the light box at this point and record the distance in the table below. Continue walking forward until you can resolve the next set of double stars, and again record your distance from the light box. Finally, walk until you can resolve the third and final set of double stars and record your distance from the light box in the table below.
AST 113/114 – Fall 2014 / Spring 2015 Introduction to the Telescope
© 2016 Arizona State University Page 14 of 18
Set Star Separation (Inches)
Dist. from Light Box (Eye)
Angular Separation
1
2
3
Avg. Separation
The angular separation between two stars can be calculated using trigonometry. Form a triangle with one length equal to the distance between you and the light box and the other length equal to the physical separation of the stars. The angular separation is
𝛼 = tan−1 (𝑠
𝑑) ∗ 3600
where is the angular separation of the stars in arcseconds, s is the physical separation of the stars, d is the distance to the light box, and 3600 converts degrees to arcseconds. To use this equation, your calculator should be in DEGREE mode!
Calculate! Calculate the angular separation for each set of double stars at the distance you were able to resolve them, and write the angular separation for each set of stars in the table. Determine the average angular separation to get an estimate of the resolving power of your eye.
Q1. In bright light conditions, the pupil of the human eye is approximately 0.2 inches in diameter. What should the resolving power of your eye be, if the humane eye were perfect? Show your work.
Q2. How does the resolving power of the perfect humane eye compare to the resolving power you calculated using the angular separation of the double stars in the table above? Why might these results be different?
Figure 2: Use trigonometry to determine the angular separation of the stars at the point they could be resolved.

AST 113/114 – Fall 2014 / Spring 2015 Introduction to the Telescope
© 2016 Arizona State University Page 15 of 18
Repeat! Repeat the exercise, this time using the binoculars to resolve the double stars. Much like you did with your naked eye, slowly walk toward the light box until you can resolve each of the double stars with the binoculars. Record the distance from the light box where you can begin to resolve each set of double stars. Calculate the angular separation
Set Star Separation (Inches)
Dist. from Light Box (Binocular)
Angular Separation
1
2
3
Avg. Separation
Q3. What is the resolving power of the binoculars, if they have a 2.25 inch diameter? Show you work.
Q4. How does the resolving power you calculated in Question 3 compare to the resolving power you measured in the exercise above?
Q5. Compared to your eyes, how much better are the binoculars at resolving things?

AST 113/114 – Fall 2014 / Spring 2015 Introduction to the Telescope
© 2016 Arizona State University Page 16 of 18
Exercise 3: Field of View and Magnification
In this exercise, you will examine two photos of NGC 7635 (the Bubble Nebula) and answer questions regarding the field of view (FoV) and magnification below. Fig. 3 was taken using the Mt. Palomar 60 inch telescope using a CCD camera that rendered the image at a scale of 1.2 arcseconds/pixel. On the image you will see a bar that marks the length of 1 arcminute on the image at this scale.
Figure 3: Mt. Palomar 60 inch telescope. The image above has a scale of 1.2 arcseconds/pixel. On the image you will see a bar that marks the length of 1 arcminute on the image at this scale.

AST 113/114 – Fall 2014 / Spring 2015 Introduction to the Telescope
© 2016 Arizona State University Page 17 of 18
Fig. 4 was taken using the Steward Observatory 90 inch telescope on Kitt Peak with a CCD camera that rendered the image at a scale of 0.3 arcseconds/pixel. On the image you will see a bar that marks the length of 1 arcminute on the image at this scale.
Figure 4: Steward Observatory 90 inch telescope on Kitt Peak. The image above has a scale of 0.3 arcseconds/pixel. On the image you will see a bar that marks the length of 1 arcminute on the
image at this scale.
Q6. Which of the telescopes (Mt. Palomar or Steward) gives a higher apparent
magnification? How do you know?

AST 113/114 – Fall 2014 / Spring 2015 Introduction to the Telescope
© 2016 Arizona State University Page 18 of 18
Q7. Which one gives the widest field of view? How do you know?
Q8. Use a ruler to measure the 1 arcminute scale for each of these photographs. Which image has the larger scale? By how much? HINT: Scale is given in units of angle per length (e.g., 3.4’/mm or 0.2deg/cm)
Q9. Which telescope would you use to take images of small structures inside a very large nebula? Justify your answer.
Q10. Which one would you use to image a dim, extremely distant galaxy? Explain.
V. Conclusion