introduction to snort &...
TRANSCRIPT

Introduction to SNORT & LOIC
Date Assigned: mm/dd/yyyy
Time Due: mm/dd/yyyy by hh:mm
Educational Objectives
Gain hands-on experience on deploying and configuring Snort
Use Low Orbit Ion Cannon (LOIC) to test the Snort.
Tools
Oracle VirtualBox VMs
Kali Linux
Snort
Loic
Pre-lab:
There are four pre-lab activities (install VirtualBox, Install Kali Linux, Install LOIC and Install
Snort) as described in the following.
1. Install VirtualBox
Navigate to https://www.virtualbox.org/wiki/Downloads
Select the download for your specific operation system.
Follow the instructions to install Virtual Box
2. Install Kali Linux
Navigate to http://www.kali.org/downloads/
Follow the instructions to download and install Kali Linux.
Launch VirtualBox.
Click New and in the Name field type Kali Source
In the Type dropdown, select Linux and version Linux 2.6/3.x (64 bit if you have a 64
bit OS) and click Next
In the Memory Size window, make sure the size is at least 512 MB (1024 MB is
recommend for better performance) and click Next
In the Hard drive window, make sure you select Create a virtual hard drive now and
click Create
In the Hard drive file type window, select VDI (VirtualBox Disk Image) and click Next
In the Storage on physical hard drive window, select Dynamically allocated and click
Next
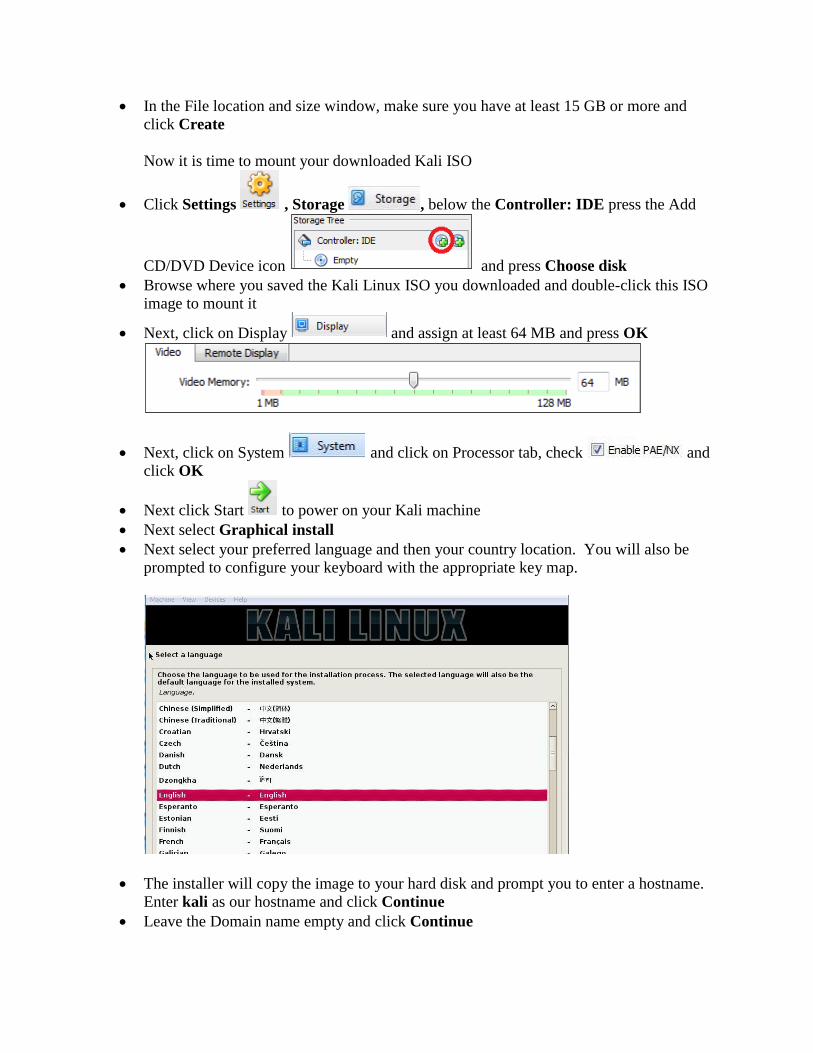
In the File location and size window, make sure you have at least 15 GB or more and
click Create
Now it is time to mount your downloaded Kali ISO
Click Settings , Storage , below the Controller: IDE press the Add
CD/DVD Device icon and press Choose disk
Browse where you saved the Kali Linux ISO you downloaded and double-click this ISO
image to mount it
Next, click on Display and assign at least 64 MB and press OK
Next, click on System and click on Processor tab, check and
click OK
Next click Start to power on your Kali machine
Next select Graphical install
Next select your preferred language and then your country location. You will also be
prompted to configure your keyboard with the appropriate key map.
The installer will copy the image to your hard disk and prompt you to enter a hostname.
Enter kali as our hostname and click Continue
Leave the Domain name empty and click Continue

Enter toor and re-enter password to verify for the Root password account and click
Continue
Next select your time zone.
Next select Guided-use entire disk and click Continue
Click Continue again to confirm Partition disks
Select All files in one partition (recommended for new users) for Partitioning scheme
and Continue
Make sure Finish partitioning and write changes to disk is selected and click
Continue
Select Yes to write the changes to disks and Continue
Wait for few minutes until system installation is completed
Select Yes to use a network mirror

Leave blank on HTTP proxy information (blank for none) and Continue
Select Yes to install CRUB boot loader and Continue
Click Continue to finish the installation and reboot Kali Linux
3. Install LOIC on Kali Linux
Start Kali Linux and press Enter to logon using user name: root and password toor
Open up a terminal window
Type apt-get update and Enter to update your Kali
Type apt-get install mono-runtime and type y and press Enter to confirm continue
Type apt-get install monodevelop and type y and press Enter to confirm continue
Type apt-get install mono-gmcs to install compilier
Type apt-get update
In terminal window, type cd Desktop
Type mkdir loic to create a folder called loic
Type cd loic to enter loci folder directory
Type wget https://raw.github.com/nicolargo/loicinstaller/master/loic.sh to download
LOIC installer
Type chmod a+x loic.sh to change permission of loic.sh file
Type ./loic.sh install to install LOIC installer
Type ./loic.sh update to update LOIC program
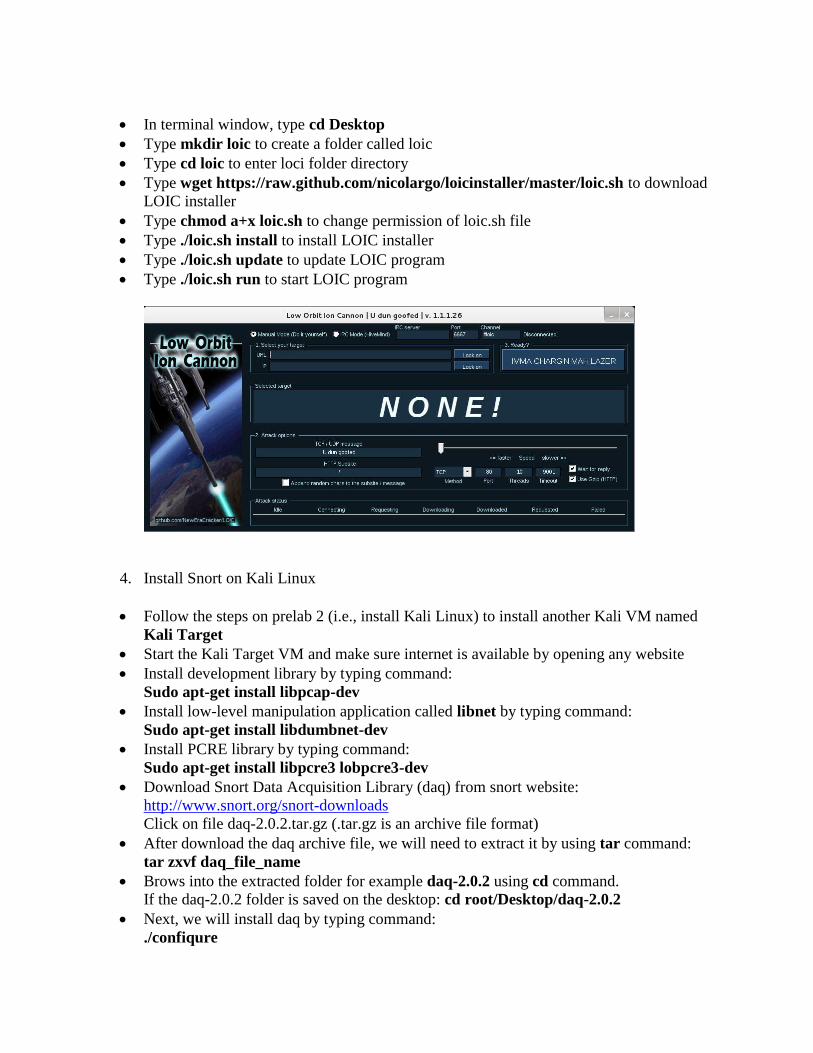
Type ./loic.sh run to start LOIC program
4. Install Snort on Kali Linux
Follow the steps on prelab 2 (i.e., install Kali Linux) to install another Kali VM named
Kali Target
Start the Kali Target VM and make sure internet is available by opening any website
Install development library by typing command:
Sudo apt-get install libpcap-dev
Install low-level manipulation application called libnet by typing command:
Sudo apt-get install libdumbnet-dev
Install PCRE library by typing command:
Sudo apt-get install libpcre3 lobpcre3-dev
Download Snort Data Acquisition Library (daq) from snort website:
http://www.snort.org/snort-downloads
Click on file daq-2.0.2.tar.gz (.tar.gz is an archive file format)
After download the daq archive file, we will need to extract it by using tar command:
tar zxvf daq_file_name
Brows into the extracted folder for example daq-2.0.2 using cd command.
If the daq-2.0.2 folder is saved on the desktop: cd root/Desktop/daq-2.0.2
Next, we will install daq by typing command:
./confiqure

make
make install
Download and save Snort from Snort.org:
http://www.snort.org/snort-downloads
Click on the file snort-2.9.6.0.tar.gz
Extract the snort file by typing command:
tar zxvf snort_file_name
Next, brows into the extracted snort folder using cd command and install Snort by typing:
./configure
make
make install
Now we need modify Snort rule file. For demonstration purposes, we will only create two
custom rules for ICMP and UDP detection.
Brows to installed snort folder:
Click on Computer -> File System -> snort -> rules
Right click on local.rules file and select Open With Leafpad
Type in below two rule codes in the empty space:
alert icmp any any -> $HOME_NET any (msg:” I see your ICMP test” ; sid: 10000001;)
alert udp $EXTERNAL_NET any -> $HOME_NET $HTTP_PORTS (msg:"SLR – Warning !!
LOIC DoS Tool (UDP Mode) - Behavior Rule (tracking/threshold)"; threshold: type threshold,
track by_src, count 100 , seconds 5; reference: url, www.simpleweb.org/reports/loic-report.pdf
; classtype:misc-activity; sid:1234590; rev:1;)
Note: Make sure type this rule above in one line. Do Not Truncate the code.
Press Ctrl and S to save the changes, and close the Leafpad editor.
You are now ready to use snort.
Lab Exercises
Section 1: Setting up Snort
Snort is an open source network intrusion prevention and detection system developed by
Sourcefire. Once configured, it can:
Detect a variety of attacks and probes
Configurable to collect or pass packets
Use its built-in detection engine for plug-ins
Use real-time alerting and logging of threats
Be used as a packet logger, sniffer, or a full network intrusion prevention system
Step 1

Start your Kali Target vm
Logon Kali using user name: root and password toor
Open terminal window
Type ifconfig to display IP address of Kali Target vm. In our example, the IP is
192.168.56.101
Step 2
Now we need to edit the configuration file named snort.conf
Double click on Computer icon , File System , etc , snort ,
snort.conf file to open it in the text editor.
Locate the line below
# Setup the network addresses you are protecting
Ipvar HOME_NET any
Now replace the any with your IP shows in ifconfig result
Click File, Save to save the change and close the text editor
Step 3
In terminal window, type sudo /etc/init.d/snort restart to restart snort service
Now type the command below in the terminal window and leave it open. It is important
not to close this window as it will show you the alerts as Snort detects them
snort –A console –u snort –c/etc/snort/snort.conf –i eth0
A quick note on the above code:
-A console sends the alerts to the terminal window
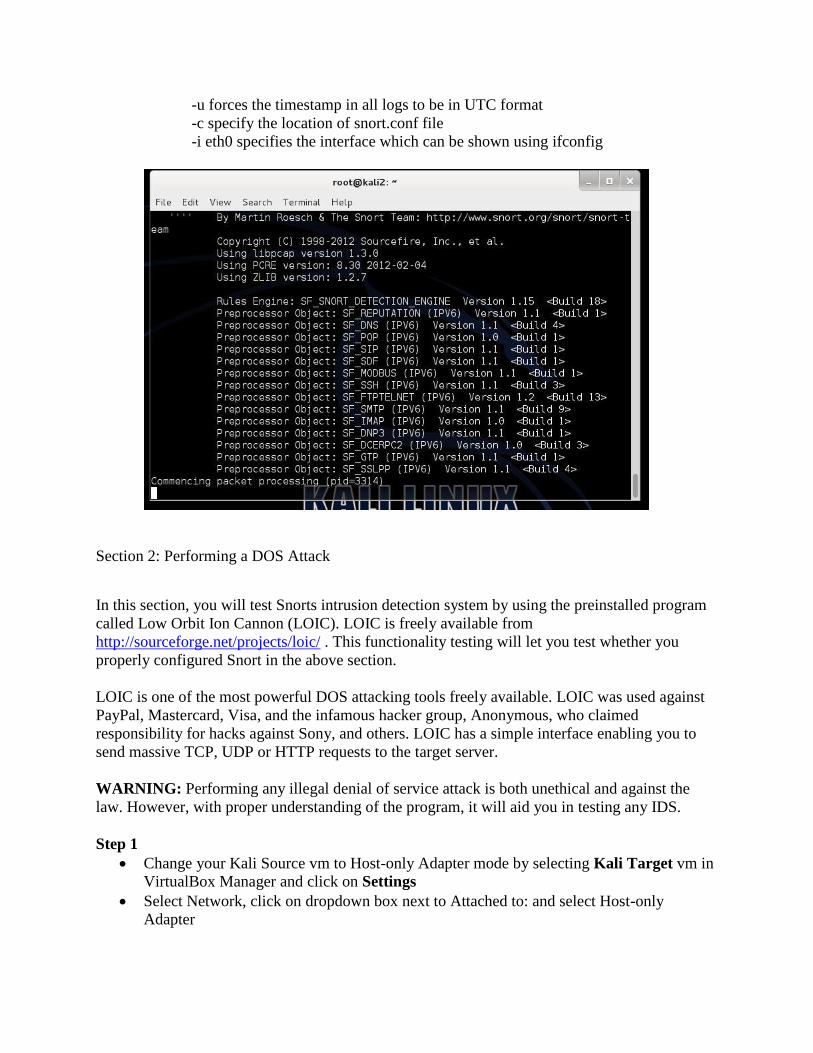
-u forces the timestamp in all logs to be in UTC format
-c specify the location of snort.conf file
-i eth0 specifies the interface which can be shown using ifconfig
Section 2: Performing a DOS Attack
In this section, you will test Snorts intrusion detection system by using the preinstalled program
called Low Orbit Ion Cannon (LOIC). LOIC is freely available from
http://sourceforge.net/projects/loic/ . This functionality testing will let you test whether you
properly configured Snort in the above section.
LOIC is one of the most powerful DOS attacking tools freely available. LOIC was used against
PayPal, Mastercard, Visa, and the infamous hacker group, Anonymous, who claimed
responsibility for hacks against Sony, and others. LOIC has a simple interface enabling you to
send massive TCP, UDP or HTTP requests to the target server.
WARNING: Performing any illegal denial of service attack is both unethical and against the
law. However, with proper understanding of the program, it will aid you in testing any IDS.
Step 1
Change your Kali Source vm to Host-only Adapter mode by selecting Kali Target vm in
VirtualBox Manager and click on Settings
Select Network, click on dropdown box next to Attached to: and select Host-only
Adapter

Expand Advanced and next to Promiscuous Mode: select Allow All in dropdown box
and click OK
Start your Kali Source vm
Logon Kali using user name: root and password toor
Open terminal window
ping Kali Target vm IP address by typing ping <Kali Target IP>, in our example below
ping 192.168.56.101
You should now see snort in Kali Target vm is capturing ping alart
Go back to Kali Source vm and press Ctrl and c keys to stop ping command
Step 2
In terminal window, type the following
cd Desktop/loic
ls this will show you the files/folders in the loic folder
./loic.sh run this will allow you to run the loic gui application
NOTE: You must do this in the command terminal or LOIC will not run. Make sure you keep
the terminal window open during this process. Closing the command terminal will also close the
LOIC gui and you will have to repeat the above steps.
From the LOIC gui window enter in the following
Select your target
- Leave the URL field blank
- Enter the Kali Source vm IP address and click Lock on
- The selected target will now appear replacing NONE!
Enter attack options
- Enter in your own TCP/UDP message or keep the one already in place
- Since we are not testing against an HTTP Subsite, leave the next box as-is
- Append random chars to the subsite / message is optional and will not affect the
outcome
- Change the Method from TCP to UDP Make sure port 80 is being used
- Adjust Threads to 20
- Timeout can be left at 9001
- Wait for reply should be checked
- Use Gzip (HTTP) should be checked
Ready to attack
- Once the above steps are done, press the IMMA CHARGIN MAH LAZER button
- Keep the gui running while you check the progress on the SNORT intrusion detection
After starting the attack, you will see Requested numbers in the Attack status fields shows the
number of requests from the target server. You may need to play with the speed slider on the
GUI to optimize the flood attack.
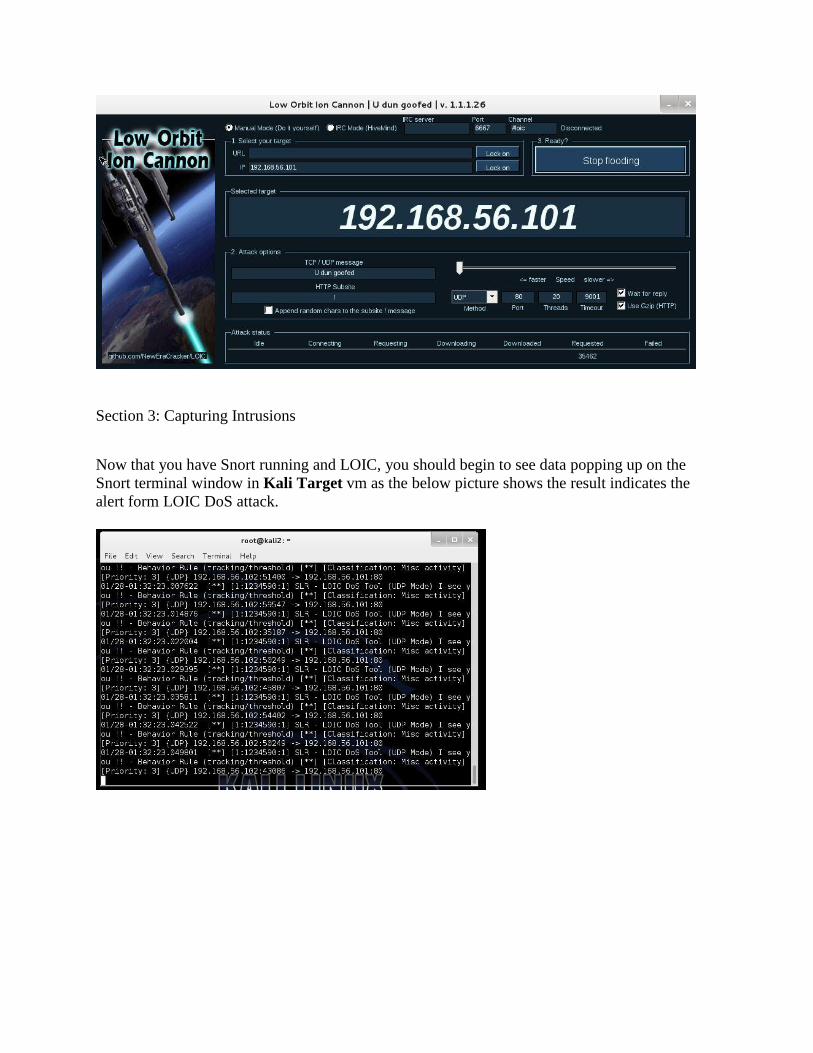
Section 3: Capturing Intrusions
Now that you have Snort running and LOIC, you should begin to see data popping up on the
Snort terminal window in Kali Target vm as the below picture shows the result indicates the
alert form LOIC DoS attack.

Lab Question Sheet
=========================== Required Questions ===========================
Question 1: Looking at the snort.conf file, what are some of the features snort is capable of
analyzing?
Question 2: Why do you need to test against port 80?
Question 3: Write a short paragraph explaining the benefits of using LOIC
Question 4: What did Snort find? Use screenshots with your submission
Question 5: What thread and speed were you using when Snort started to catch alerts? If you
were unable to capture alerts, what thread and speed were you using?
Question 6: Was this lab challenging? Please explain areas you found useful or need additional
clarification.

Answer Sheet
=========================== Required Questions ===========================
Question 1: Looking at the snort.conf file, what are some of the features snort is capable of
analyzing?
Home IP, External IP, DNS, SMTP, HTTP, SQL, TELNET, SSH, FTP, SIP Servers
PORTS: Shellcode 80, Oracle 1024, SSH 22, FTP (21, 2100, 3535), SIP, File Data Ports (110,
143), GTP (2123, 2152, 3386), Aim Servers
Question 2: Why do you need to test against port 80?
Port 80 is the default port that servers “listen to” for packets sent from a Web client.
Question 3: Write a short paragraph explaining the benefits of using LOIC
Simple interface enabling you to send massive TCP, UDP or HTTP requests to the target server
Question 4: What did Snort find? Use screenshots with your submission
Question 5: What thread and speed were you using when Snort started to catch alerts? If you
were unable to capture alerts, what thread and speed were you using?
Question 6: Was this lab challenging? Please explain areas you found useful or need additional
clarification.