introduction to shiny for building web apps in r
TRANSCRIPT

R ShinyAn Introduction to
Making an Interactive Web Application
Chloe ThomasScHARR, University of Sheffield

What is R shiny?
How does it work?
Do I need to know how to code in HTML?
Where can I get more information?
A web application framework for R that allows you to turn your data into an interactive web App.
Shiny apps have two components:
- user interface script (controls layout and appearance by converting R code into HTML)
- server script (contains the code needed to build the app)
No knowledge of HTML, JavaScript or CSS is required. However, you can make your apps more interesting if you know some HTML.
There are some excellent tutorials and lots of links to more
information at http://shiny.rstudio.com/

Getting Started
> install.packages("shiny")
> library(shiny)
> runApp("my_app")
As a minimum, every shiny app has two R scripts (named ui and server) saved within the same directory (e.g. “my_app”).
ui.R
server.R
Other scripts (written in standard R code), libraries and data can be called by the server script if they are needed, using standard R commands above the shinyServerfunction.
shinyUI(fluidPage( ))
shinyServer(function(input, output) {})
The fluidPage function allows the display to adjust automatically to the browser dimensions.
The unnamed function contains the code needed to run the app.

The User Interface (ui.R)
# ui.R
shinyUI(fluidPage( titlePanel("title panel"),
sidebarLayout(position = "right", sidebarPanel( "sidebar panel"), mainPanel("main panel")
) ))
A series of nested shiny functions control the layout of the content.
sidebarLayout is a function with two compulsory arguments, both themselves functions (sidebarPanel and mainPanel). An optional argument controls the position of the panels.
Text is written as a character string inside quotation marks.

absolutePanel (fixedPanel) Panel with absolute positioning
bootstrapPage (basicPage) Create a Bootstrap page
columnCreate a column within a UI definition
conditionalPanel Conditional Panel
fixedPage (fixedRow)Create a page with a fixed layout
fluidPage (fluidRow) Create a page with fluid layout
headerPanel Create a header panel
helpText Create a help text element
icon Create an icon
mainPanel Create a main panel
navbarPage (navbarMenu)Create a page with a top level navigation bar
navlistPanel Create a navigation list panel
pageWithSidebar Create a page with a sidebar
sidebarLayout Layout a sidebar and main area
sidebarPanel Create a sidebar panel
tabPanel Create a tab panel
tabsetPanel Create a tabset panel
titlePanelCreate a panel containing an application title.
inputPanel Input panel
flowLayout Flow layout
splitLayout Split layout
verticalLayout Lay out UI elements vertically
wellPanel Create a well panel
withMathJaxLoad the MathJax library and typeset math expressions
Shiny User Interface Functions

Formatting TextTo make things look a bit more interesting there are lots of shiny commands that can alter the text colour, style and size. Alternatively, if you are familiar with HTML, you can write HTML code directly inside HTML("").
shiny function HTML5 equivalent Creates
p <p> A paragraph of text
h1 <h1> A first level header
h2 <h2> A second level header
h3 <h3> A third level header
h4 <h4> A fourth level header
h5 <h5> A fifth level header
h6 <h6> A sixth level header
a <a> A hyper link
br <br> A line break (e.g. a blank line)
div <div> A division of text with a uniform style
span <span>An in-line division of text with a uniform style
pre <pre> Text ‘as is’ in a fixed width font
code <code> A formatted block of code
img <img> An image
strong <strong> Bold text
em <em> Italicized text
HTMLDirectly passes a character string as HTML code
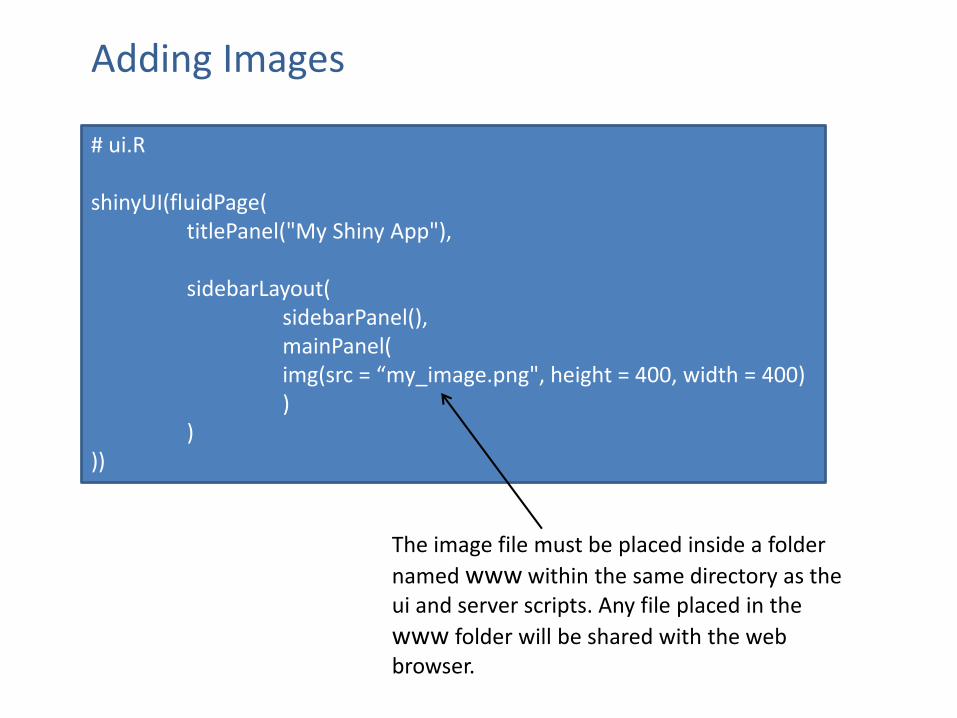
Adding Images
# ui.R
shinyUI(fluidPage( titlePanel("My Shiny App"),
sidebarLayout( sidebarPanel(), mainPanel( img(src = “my_image.png", height = 400, width = 400) )
) ))
The image file must be placed inside a folder
named www within the same directory as the ui and server scripts. Any file placed in the
www folder will be shared with the web browser.

Adding WidgetsWidgets are interactive web elements. A series of inbuild shiny functions allows widgets to be easily added to webpages. Each function has several arguments. It must have at least a name (used to access its value, but not visible) and a label (visible on the page). Both are character strings. Other arguments are widget specific.
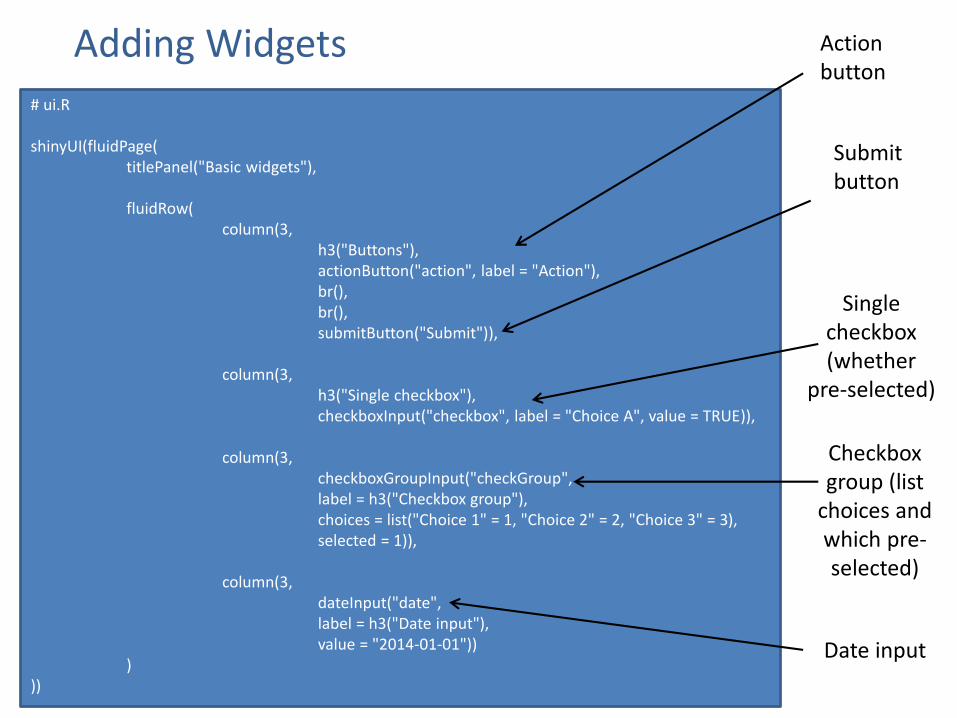
# ui.R
shinyUI(fluidPage( titlePanel("Basic widgets"),
fluidRow( column(3,
h3("Buttons"), actionButton("action", label = "Action"), br(), br(), submitButton("Submit")),
column(3, h3("Single checkbox"), checkboxInput("checkbox", label = "Choice A", value = TRUE)),
column(3, checkboxGroupInput("checkGroup", label = h3("Checkbox group"), choices = list("Choice 1" = 1, "Choice 2" = 2, "Choice 3" = 3),selected = 1)),
column(3, dateInput("date", label = h3("Date input"), value = "2014-01-01"))
)))
Adding Widgets Action button
Submit button
Single checkbox (whether
pre-selected)
Checkbox group (list
choices and which pre-selected)
Date input

Adding Reactive OutputWidgets allow users to input their choices. Reactive output is a response to those choices. Programming it into an app is a two-step process:
- Add an R object to the user interface to indicate where it should be displayed.- Add instructions on how to build the object in the server
Output function creates
htmlOutput raw HTML
imageOutput image
plotOutput plot
tableOutput table
textOutput text
# ui.R
shinyUI(fluidPage( titlePanel("My Shiny App"),
sidebarLayout( sidebarPanel(
sliderInput(“value", label = “Value of interest:", min = 0, max = 100, value = 50)
),
mainPanel( textOutput("text1")
) )
))
Output functions have one argument, which is a name (character string). In
this case “text1”. This is used in the server to identify the output.

Adding Reactive Output
The unnamed function inside shinyServer contains all the code that needs to be updated when a user accesses the app. All R output objects used in the ui need to be
defined in server using the prefix output$ followed by the name of the object.
e.g. output$text1
The element should be defined using one of the shiny render* functions – this should be chosen to reflect the type of output. Each render function takes a single argument (R expression) surrounded by braces.
# server.R
shinyServer(function(input, output) {
output$text1 <- renderText({ "You have selected" , input$value)
}) }
)
render function creates
renderImageimages (saved as a link to a source file)
renderPlot plots
renderPrint any printed output
renderTabledata frame, matrix, other table like structures
renderText character strings
renderUIa Shiny tag object or HTML

The ServerThe server is where all the code is located for execution of the app. How frequently code is run depends upon where it is placed within the server script.
Code placed here will be run once when the app is launched. shinyServer will be executed and the unnamed function saved. Good place to source other scripts, read data sets and load libraries.
Code placed here will run once each time a new user visits the app. The unnamed function will run once and save a distinct set of reactive objects for each user. Good place to put objects that record a user’s session.
Code placed here will run every time the user changes the widget that this particular output depends upon. Important to not put unnecessary code here as it will slow down the entire app.
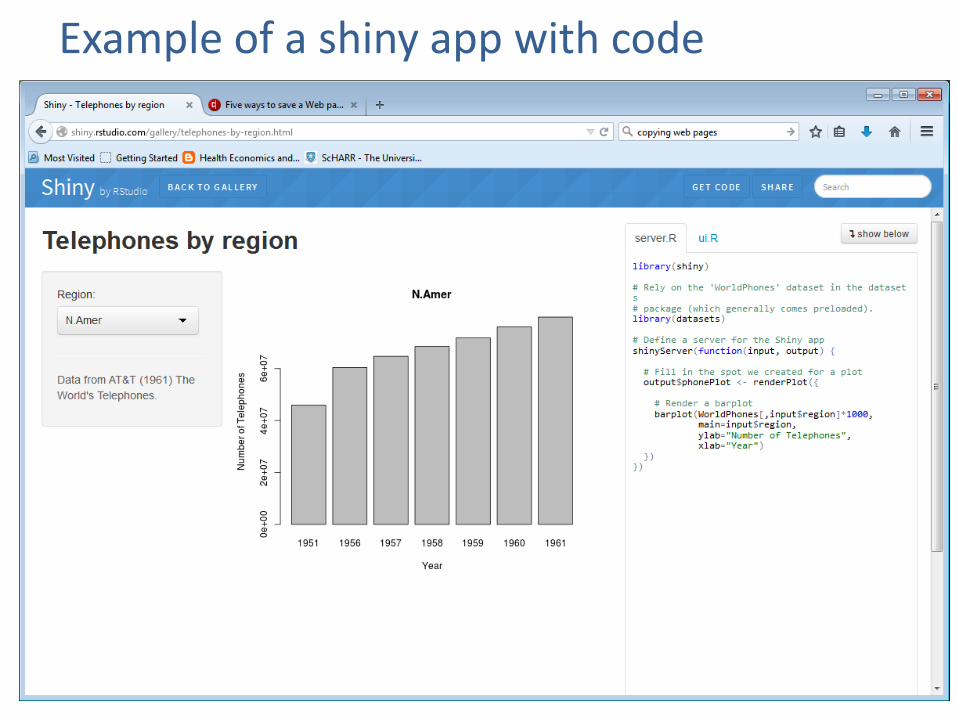
Example of a shiny app with code

More complex shiny functions
Reactive Expressions Like render functions but they allow you to decide which parts of the app update when, for more streamlined computation.
Absolute PositioningAllows personalisation of the user interface of the app using a grid based system.
Interactive VisualisationsAllows you to make interactive maps and charts using JavaScript libraries like Google Charts, Leaflet and d3.
Progress BarsSo users know that something is happening whilst waiting for a calculation to complete.
Integration with R MarkdownTo make interactive documents.
Shiny Server Pro (not free)Allows user authentication and personalisation of user interface.

A slightly more complex shiny app

Sharing appsTwo main options: 1) Share the files with users that have R and know how to use it.
(e.g. email zip file directly, use GitHub to share files, run from a
web-link - runURl(“<the weblink>”)).
2) Share it as a web page.
Host an app yourselfe.g. For University of Sheffield apps, go through CICs - £100 per year for hosting on a virtual server.
Shinyapps.ioRstudio’s cloud hosting service for shiny apps. Four different levels of service, including a free service (max 5 apps and 25 active hours per month). You retain complete control over your app.
Shiny ServerA free downloadable programme that can be run on Linux servers. Shiny Server Pro is a paid professional version that includes password authentification, administrator tools and email support (starts at >$10,000 per year.)
General CommentsShiny takes a bit of getting used to, but the tutorials give an excellent introduction and there is lots of help online.
Really quick way of visually presenting your data interactively – great for impact and engagement with the general public/customers/clients.
Can be frustrating switching between server and ui scripts when writing reactive output. However, apparently now these can be combined into a single script.
Can also be very frustrating when usual R commands don’t work the way you might expect them to in the server.
Problems arise when trying to do more complicated things. A particular issue is needing to create input that is itself reactive to other input – this is possible but not straightforward.
Might not be the best solution if you want a professional looking app, with complex functionality.
Shiny is still in development and if something doesn’t seem possible, it may be worth contacting the developers and seeing whether they can help you.