introduction to php p · introduction to php p ... addition to php 4 was limited support for...
TRANSCRIPT
Introduction to PHP
P HP is a scripting language used primarily on Webservers running the Apache HTTP server software. Whileuses for PHP are many, the core functionality is to
provide a language and framework for the development of Webapplications. As of November 2004, the reported usage of PHPwas at nearly 18 million domains. Combined with Linux, theApache HTTP server, and the MySQL database system, PHPprovides functionality to the great portion of the servers on theWorld Wide Web.
History
PHP/FI
The name PHP is a recursive acronym meaning"PHP: Hypertext Preprocessor." The roots of PHPare in the Perl language, most notably in a set ofPerl scripts created by Rasmus Lerdorf in 1995for use in developing his own personal Web site.The toolset he created was called PHP/FI, or"Personal Home Page/Forms Interpreter," andallowed users to easily manage submitted formsand perform logging and tracking functions. Theinitial version of PHP was an interpreted scriptinglanguage that could be embedded into HTMLpages and a parser that processed the embeddedscripts on each page request. By adhering to thestandard HTTP request-response cycle thescripts could be easily developed, debugged,deployed, and maintained.
PHP 3
The popularity of the PHP module and the enthusiasm of the Open Sourcecommunity lead to PHP being rewritten as an Apache module with robustcapabilities and enhancements. The first version of PHP written as an Apachemodule and resembling the language we use today was PHP 3. The PHP 3project was created by Andi Gutmans and Zeev Suraski in 1997. The mostimportant change to the PHP effort in version 3 was an architecture that alloweddevelopers to easily contribute to and extend PHP.
PHP 3 continued the notion of using embedded scripts, or scriptlets, in an HTMLdocument. By passing documents with a .php extension through the PHP preprocessor before allowing Apache to serve them, each embedded scriptletcould be parsed and executed and any relevant output substituted in its place.Simple tasks such as variable substitution or more complex actions such asdatabase connectivity were suddenly available to users with a knowledge ofHTML and access to the PHP documentation. Because of the interpreted natureof PHP, compiling scripts was not a requirement. Much like the way thatbrowsers render HTML each time a page is viewed, the PHP module for Apachewould render server-side scripts. The change-and-refresh development cycle wasfamiliar to HTML developers, and PHP quickly developed a following amongprogrammers and markup specialists alike. At its peak, it is estimated that PHP 3was installed on 10 percent of the Web servers on the Internet.
2
04_583328 ch01.qxd 3/25/05 10:15 PM Page 2
COPYRIG
HTED M
ATERIAL
Chapter 1: G
etting Started w
ith PH
P
3
Database Interaction
Another great strength of PHP is the ease withwhich a developer can create scripts that interactwith databases. Database-driven Web sites are in highdemand and the robust database libraries availablefor PHP allow developers to create sites quickly andefficiently, giving them the luxury of concentrating noton database connectivity implementation, but on theways in which databases can be used with their sites.
Development Tools
Aside from a Web server with a build of PHP, the onlyadditional tool you need to develop PHP applicationsis a text editor. There are no special integrateddevelopment environments (IDEs) or compilersrequired, though there are many available. Anyone canopen a standard text file and begin writing PHP code.The low overhead and accessible learning curve are bigattractions for developers looking for the path of leastresistance in generating dynamic, server-side content.
Cross-Platform
PHP is a cross-platform language, meaning that boththe engine and the code can be used on nearly everymajor operating system. The majority of the codewritten in PHP is portable from Unix to Windows toMac OS X, for example. The cross-platform naturemakes it easy for developers working on differentoperating systems and server configurations to sharetheir code, creating a rich code base available by wayof open-source projects and community Web sites.
Open Source
The licensing of PHP is undoubtedly one of the coreattractions. PHP is open source and free software,which means that there is no cost for installation orusage and that any skilled developer can contribute tothe project. Because the source code from which PHP iscompiled is open, a community of peers comprised ofpeople from all over the world can review the source,helping to identify inefficiencies, stability issues, andsecurity risks. Along with locating these problems, anydeveloper may help repair the code base.
History (continued)
PHP 4
Each version of PHP seems to not only add functionality but also optimizethe existing code base. Much like the development of PHP 3, the nextversion, PHP 4, was in large part rewritten to take into account newfeatures and optimizations.
The central goals in the PHP 4 project were to optimize the code base toallow for more efficiency in large and complex applications and to facilitatemodularity and portability in both the underlying language implementationand the interpreted scripting language used by Web developers. An importantaddition to PHP 4 was limited support for object-oriented programming(OOP) using classes. Though incomplete in comparison to other languages,the support for OOP in PHP 4 allowed developers with little experience inother languages to begin to understand the importance and power of OOP.
PHP 5
Object-oriented programming is a centralfeature in the newest version of PHP, whichis PHP 5. Though still in its early releases, PHP 5 has been praised as a mature languagefor Web programming, comparable in manyways to Java and the Microsoft C# language.Though different from both in many ways,PHP 5 has already proven to be an excellentobject-oriented language for Web developmentwhose benefits in many ways outshine thoseof the aforementioned languages.
04_583328 ch01.qxd 3/25/05 10:15 PM Page 3
Install Apache on Windows
I n order to use PHP, you must have Web server softwareinstalled and configured to use PHP. The most popularWeb server software is the Apache HTTPD server.
Check the Apache Web site, www.apache.org, for the mostrecent stable release. The Apache HTTPD Web server is extremely reliable androbust. Apache is the most popular Web server on theInternet and is used on small, low-traffic sites as well as onextremely large, load-balanced commercial sites. The Apache Web server for Windows installation process isfairly simple. Like most Windows installers, the ApacheWeb server installer is an executable "wizard" installer thattakes you through the license acceptance and installationprocess. The Apache Web server can be installed oncomputers running any version of Windows, from Windows 95 through 98, 2000, Me, and XP.
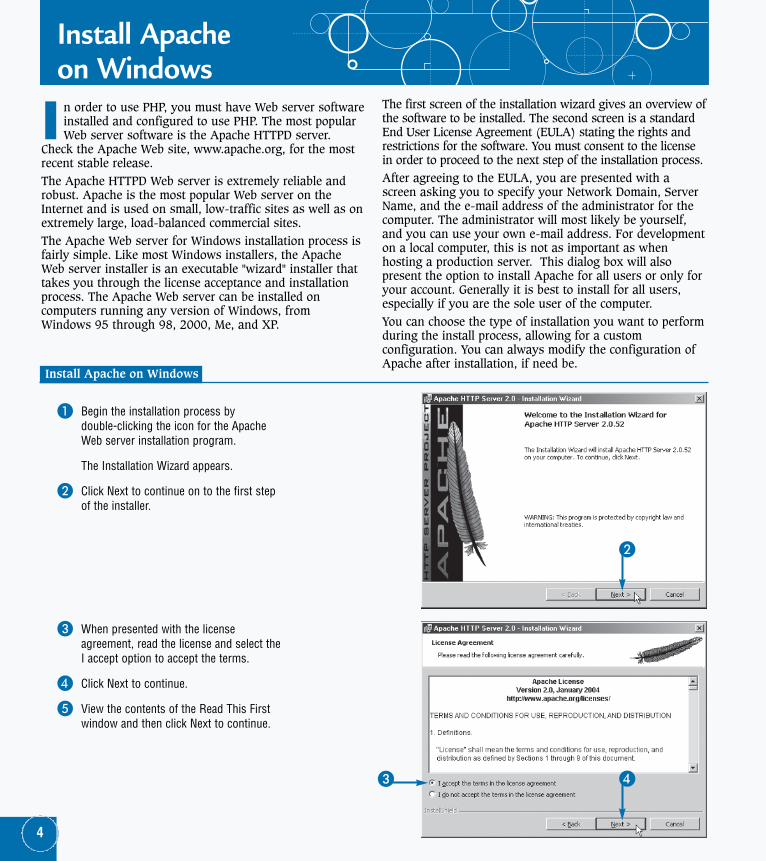
The first screen of the installation wizard gives an overview ofthe software to be installed. The second screen is a standardEnd User License Agreement (EULA) stating the rights andrestrictions for the software. You must consent to the licensein order to proceed to the next step of the installation process.After agreeing to the EULA, you are presented with ascreen asking you to specify your Network Domain, ServerName, and the e-mail address of the administrator for thecomputer. The administrator will most likely be yourself,and you can use your own e-mail address. For developmenton a local computer, this is not as important as whenhosting a production server. This dialog box will alsopresent the option to install Apache for all users or only foryour account. Generally it is best to install for all users,especially if you are the sole user of the computer.You can choose the type of installation you want to performduring the install process, allowing for a customconfiguration. You can always modify the configuration ofApache after installation, if need be.
1 Begin the installation process by double-clicking the icon for the ApacheWeb server installation program.
The Installation Wizard appears.
2 Click Next to continue on to the first stepof the installer.
2
43
4
Install Apache on Windows
3 When presented with the licenseagreement, read the license and select theI accept option to accept the terms.
4 Click Next to continue.
5 View the contents of the Read This Firstwindow and then click Next to continue.
04_583328 ch01.qxd 3/25/05 10:15 PM Page 4

Chapter 1: G
etting Started w
ith PH
P
5
9
!
6
7
8administrator@localhost
0
0 When the Setup Type window appears,select the default Typical installation.
! Click Next to continue.
6 In the Server Information window, typeyour network domain.
Note: You can use the default, localhost, if noother is available.
7 Type the name of your server here.
8 Type an administrator e-mail address,such as administrator@localhost.
• Leave the recommended installationoption selected.
9 Click Next to continue.
continued ➔
When installing Apache on Windows, you can choose one of two standard installationoptions. The Typical option is the recommended option and installs the most standardextensions and configuration options. The Custom option allows advanced systemadministrators and developers to select which modules they want to install.
Because Apache is an open-source project, there are no telephone hotlines or commercialsupport Web sites to which you can go for customer or technical support. There are a numberof community sites on the Web whose members can provide assistance, but discretion shouldbe used when communicating potentially sensitive information or taking advice. Most membersof the open-source community are extremely helpful and kind, but all advice should be checkedagainst manuals and documentation before committing changes to your server software.
04_583328 ch01.qxd 3/25/05 10:15 PM Page 5
Install Apache on Windows (continued)
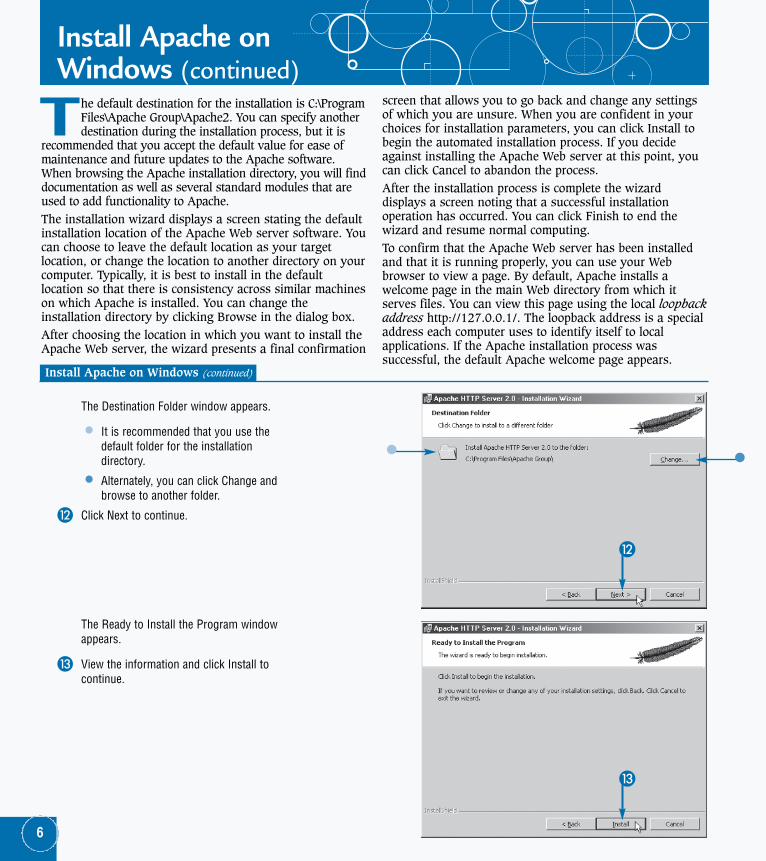
T he default destination for the installation is C:\ProgramFiles\Apache Group\Apache2. You can specify anotherdestination during the installation process, but it is
recommended that you accept the default value for ease ofmaintenance and future updates to the Apache software.When browsing the Apache installation directory, you will finddocumentation as well as several standard modules that areused to add functionality to Apache. The installation wizard displays a screen stating the defaultinstallation location of the Apache Web server software. Youcan choose to leave the default location as your targetlocation, or change the location to another directory on yourcomputer. Typically, it is best to install in the defaultlocation so that there is consistency across similar machineson which Apache is installed. You can change theinstallation directory by clicking Browse in the dialog box.After choosing the location in which you want to install theApache Web server, the wizard presents a final confirmation
screen that allows you to go back and change any settingsof which you are unsure. When you are confident in yourchoices for installation parameters, you can click Install tobegin the automated installation process. If you decideagainst installing the Apache Web server at this point, youcan click Cancel to abandon the process. After the installation process is complete the wizarddisplays a screen noting that a successful installationoperation has occurred. You can click Finish to end thewizard and resume normal computing.To confirm that the Apache Web server has been installedand that it is running properly, you can use your Webbrowser to view a page. By default, Apache installs awelcome page in the main Web directory from which itserves files. You can view this page using the local loopbackaddress http://127.0.0.1/. The loopback address is a specialaddress each computer uses to identify itself to localapplications. If the Apache installation process wassuccessful, the default Apache welcome page appears.
The Destination Folder window appears.
• It is recommended that you use thedefault folder for the installationdirectory.
• Alternately, you can click Change andbrowse to another folder.
@ Click Next to continue.
@
#
6
Install Apache on Windows (continued)
The Ready to Install the Program windowappears.
# View the information and click Install tocontinue.
04_583328 ch01.qxd 3/25/05 10:15 PM Page 6

Chapter 1: G
etting Started w
ith PH
P
You can start and stop Apache using the command prompt. In the command prompt window,change to the directory in which Apache was installed, usually C:\Program Files\Apache Group\Apache2. Type apache to start the Web server. You can use the same command to stop Apache bypassing arguments. To stop Apache, type apache -k shutdown.
When installing Apache Web server on a computer running a Windows operating system, a foldercontaining shortcut commands for the Apache Web server is typically added to the Programs folderon the Start menu. This folder allows quick access to common Apache tools and commands.
The installation program installs a README file in the Apache installation folder that containsinformation specific to the release of Apache you installed. The README file is an important part ofthe application package because it provides succinct notes about changes in the software as well asany special configuration advice or compatibility notes. While not required, it is a good idea to readthis file.
7
$
%
% You can test the installation by opening aWeb browser and going to the location:http://127.0.0.1/.
If your browser does not load the page, trythe installation again.
The installer sets up the Apache files.
$ Click Finish to conclude the installationprocess.
04_583328 ch01.qxd 3/25/05 10:15 PM Page 7
Install Internet Information Services on Windows
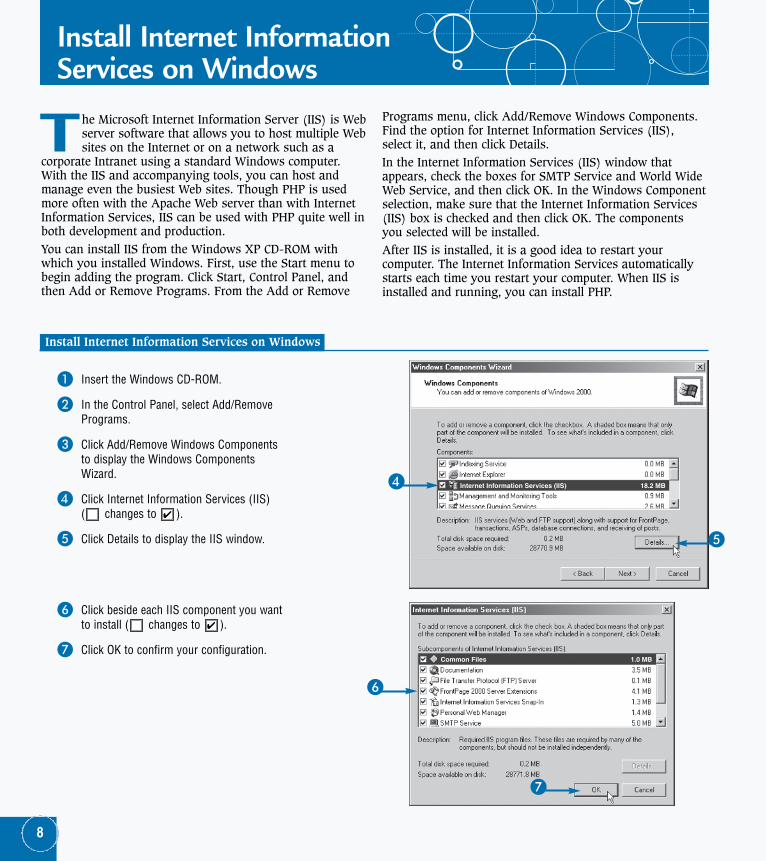
T he Microsoft Internet Information Server (IIS) is Webserver software that allows you to host multiple Websites on the Internet or on a network such as a
corporate Intranet using a standard Windows computer.With the IIS and accompanying tools, you can host andmanage even the busiest Web sites. Though PHP is usedmore often with the Apache Web server than with InternetInformation Services, IIS can be used with PHP quite well inboth development and production.You can install IIS from the Windows XP CD-ROM withwhich you installed Windows. First, use the Start menu tobegin adding the program. Click Start, Control Panel, andthen Add or Remove Programs. From the Add or Remove
Programs menu, click Add/Remove Windows Components.Find the option for Internet Information Services (IIS),select it, and then click Details.In the Internet Information Services (IIS) window thatappears, check the boxes for SMTP Service and World WideWeb Service, and then click OK. In the Windows Componentselection, make sure that the Internet Information Services(IIS) box is checked and then click OK. The componentsyou selected will be installed.After IIS is installed, it is a good idea to restart yourcomputer. The Internet Information Services automaticallystarts each time you restart your computer. When IIS isinstalled and running, you can install PHP.
1 Insert the Windows CD-ROM.
2 In the Control Panel, select Add/RemovePrograms.
3 Click Add/Remove Windows Componentsto display the Windows ComponentsWizard.
4 Click Internet Information Services (IIS)( changes to ).
5 Click Details to display the IIS window. 5
Internet Information Services (IIS) 18.2 MB
Common Files 1.0 MB
4
7
6
8
Install Internet Information Services on Windows
6 Click beside each IIS component you wantto install ( changes to ).
7 Click OK to confirm your configuration.
04_583328 ch01.qxd 3/25/05 10:15 PM Page 8
Chapter 1: G
etting Started w
ith PH
P
Before attempting to install IIS, you should log on to the computer with an Administratoraccount, because a standard user account is restricted from making machine-wide changes suchas installing a Web server. This restriction is in large part in order to enforce security on themachine, but also helps ensure that applications are not accidentally installed or uninstalled.Logging on with an Administrator account ensures that you have proper permissions forexecuting installers. Take care when acting as an Administrator, because damage can be doneto settings or questionable software can be installed.
After IIS is installed, the Internet Information Services window provides tools that allow you toadminister your IIS Web sites. You can select the Administrative Tools option in the ControlPanel to reveal the Internet Information Services window.
9
8
9
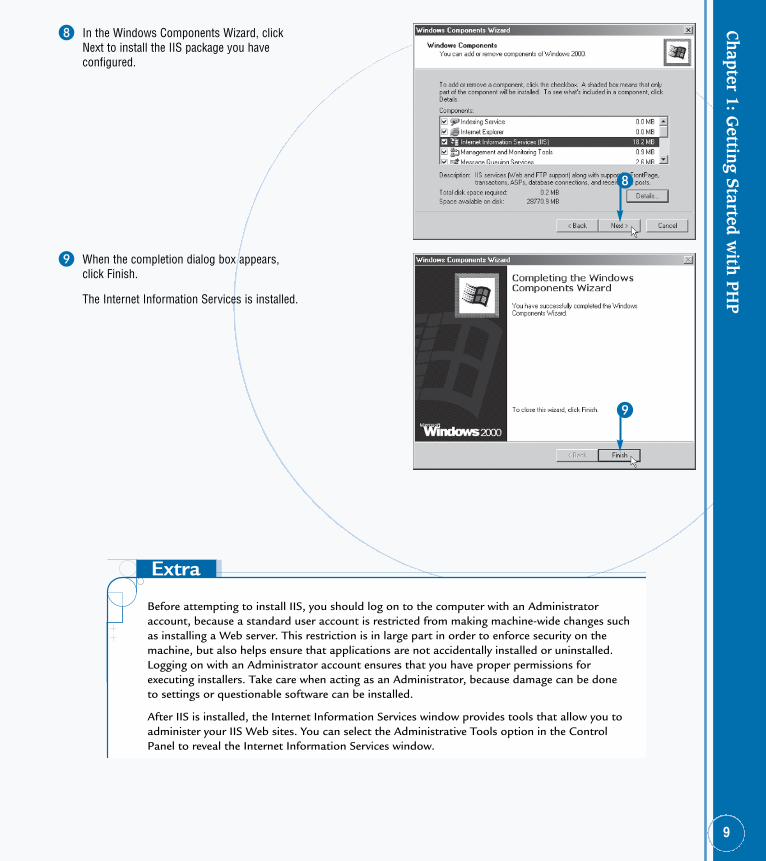
9 When the completion dialog box appears,click Finish.
The Internet Information Services is installed.
8 In the Windows Components Wizard, clickNext to install the IIS package you haveconfigured.
04_583328 ch01.qxd 3/25/05 10:15 PM Page 9
Add a Virtual Directory to Internet Information Services
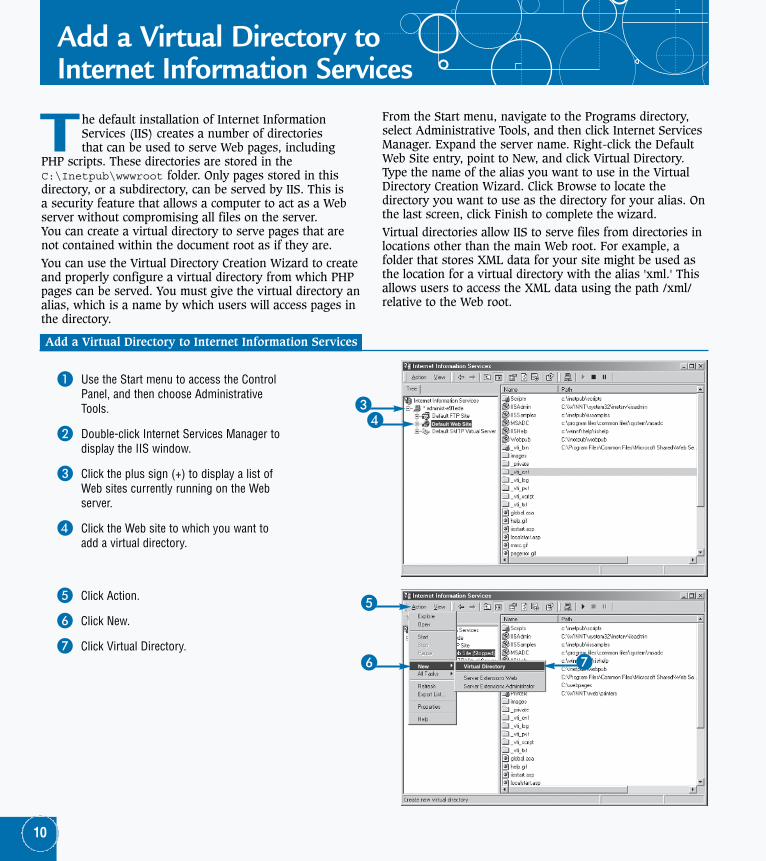
T he default installation of Internet InformationServices (IIS) creates a number of directoriesthat can be used to serve Web pages, including
PHP scripts. These directories are stored in theC:\Inetpub\wwwroot folder. Only pages stored in thisdirectory, or a subdirectory, can be served by IIS. This isa security feature that allows a computer to act as a Webserver without compromising all files on the server.You can create a virtual directory to serve pages that arenot contained within the document root as if they are.You can use the Virtual Directory Creation Wizard to createand properly configure a virtual directory from which PHPpages can be served. You must give the virtual directory analias, which is a name by which users will access pages inthe directory.
From the Start menu, navigate to the Programs directory,select Administrative Tools, and then click Internet ServicesManager. Expand the server name. Right-click the DefaultWeb Site entry, point to New, and click Virtual Directory.Type the name of the alias you want to use in the VirtualDirectory Creation Wizard. Click Browse to locate thedirectory you want to use as the directory for your alias. Onthe last screen, click Finish to complete the wizard.Virtual directories allow IIS to serve files from directories inlocations other than the main Web root. For example, afolder that stores XML data for your site might be used asthe location for a virtual directory with the alias 'xml.' Thisallows users to access the XML data using the path /xml/relative to the Web root.
1 Use the Start menu to access the ControlPanel, and then choose AdministrativeTools.
2 Double-click Internet Services Manager todisplay the IIS window.
3 Click the plus sign (+) to display a list ofWeb sites currently running on the Webserver.
4 Click the Web site to which you want toadd a virtual directory.
7
Default Web Site
New Virtual Directory
34
5
6
10
Add a Virtual Directory to Internet Information Services
5 Click Action.
6 Click New.
7 Click Virtual Directory.
04_583328 ch01.qxd 3/25/05 10:15 PM Page 10
Chapter 1: G
etting Started w
ith PH
P
You can also use Windows Explorer to add a virtual directory to the Internet InformationServices. The first step is to select the directory you want to use as the target of your virtualdirectory. Click the File menu and choose Properties. In the Properties dialog box, click the WebSharing tab and select the "Share this folder" option. In the Edit Alias dialog box that appearsnext, specify the alias you want to use for your virtual directory. Select the access and applicationpermissions to use for the virtual directory and click OK. Click OK in the Properties dialog box,and the virtual directory is added to IIS.
To remove a virtual directory from IIS, open the Internet Information Services window and selectthe virtual directory you want to remove. Click the Delete button ( ) and choose Yes in theconfirmation dialog box that appears. Removing a virtual directory immediately prevents usersfrom accessing the content in the target directory.
11
8
0
9
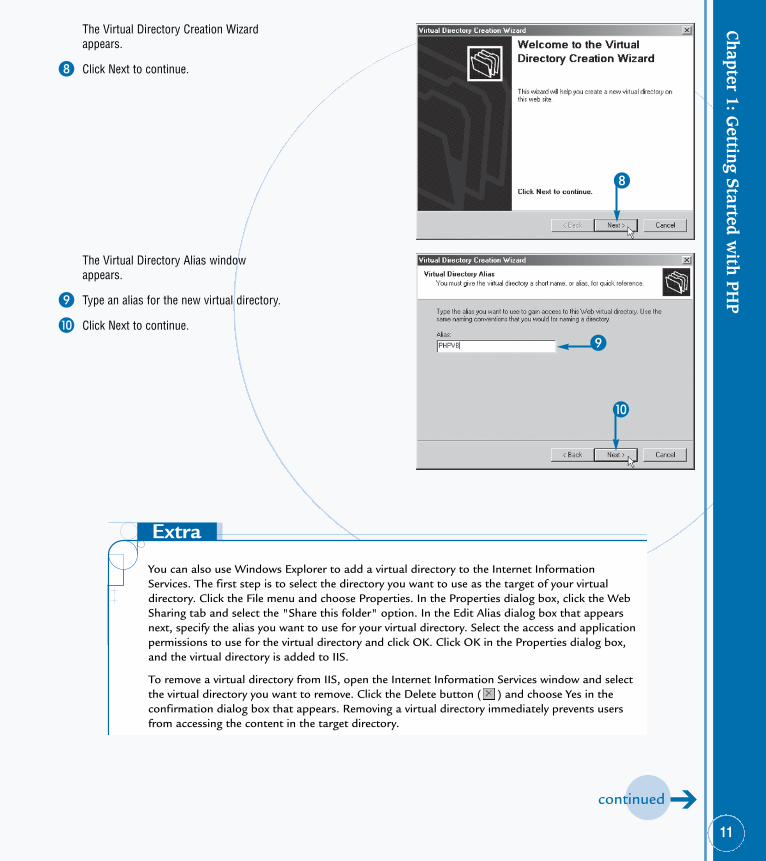
The Virtual Directory Alias windowappears.
9 Type an alias for the new virtual directory.
0 Click Next to continue.
The Virtual Directory Creation Wizardappears.
8 Click Next to continue.
continued ➔
04_583328 ch01.qxd 3/25/05 10:15 PM Page 11
Add a Virtual Directory to InternetInformation Services (continued)
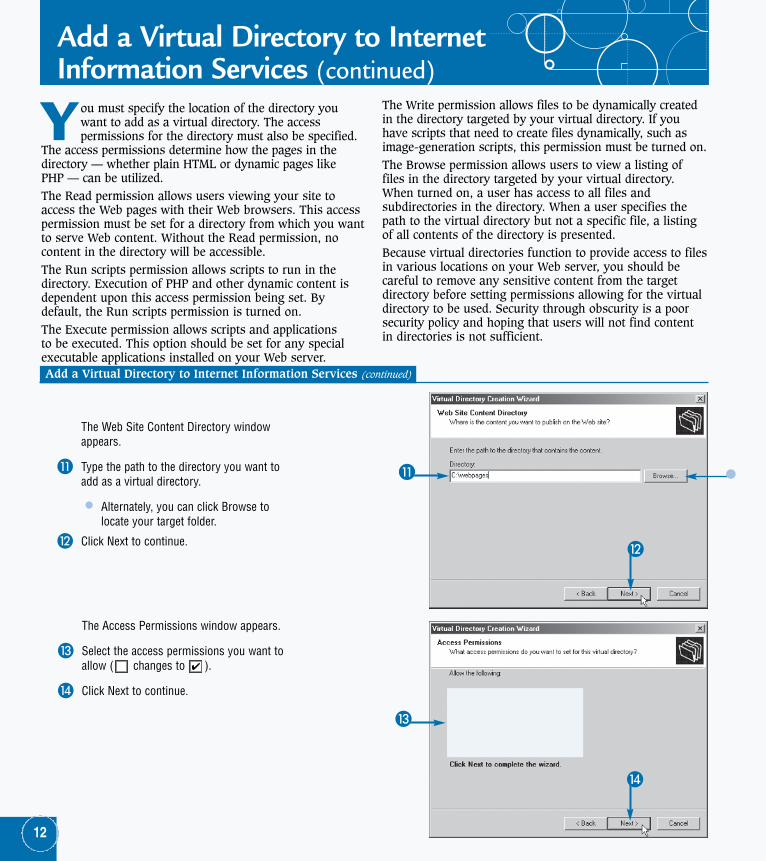
Y ou must specify the location of the directory youwant to add as a virtual directory. The accesspermissions for the directory must also be specified.
The access permissions determine how the pages in thedirectory — whether plain HTML or dynamic pages likePHP — can be utilized. The Read permission allows users viewing your site toaccess the Web pages with their Web browsers. This accesspermission must be set for a directory from which you wantto serve Web content. Without the Read permission, nocontent in the directory will be accessible.The Run scripts permission allows scripts to run in thedirectory. Execution of PHP and other dynamic content isdependent upon this access permission being set. Bydefault, the Run scripts permission is turned on. The Execute permission allows scripts and applicationsto be executed. This option should be set for any specialexecutable applications installed on your Web server.
The Write permission allows files to be dynamically createdin the directory targeted by your virtual directory. If youhave scripts that need to create files dynamically, such asimage-generation scripts, this permission must be turned on.The Browse permission allows users to view a listing offiles in the directory targeted by your virtual directory.When turned on, a user has access to all files andsubdirectories in the directory. When a user specifies thepath to the virtual directory but not a specific file, a listingof all contents of the directory is presented.Because virtual directories function to provide access to filesin various locations on your Web server, you should becareful to remove any sensitive content from the targetdirectory before setting permissions allowing for the virtualdirectory to be used. Security through obscurity is a poorsecurity policy and hoping that users will not find contentin directories is not sufficient.
The Web Site Content Directory windowappears.
! Type the path to the directory you want toadd as a virtual directory.
• Alternately, you can click Browse tolocate your target folder.
@ Click Next to continue.@
$
!
#
12
Add a Virtual Directory to Internet Information Services (continued)
The Access Permissions window appears.
# Select the access permissions you want toallow ( changes to ).
$ Click Next to continue.
04_583328 ch01.qxd 3/25/05 10:15 PM Page 12
Chapter 1: G
etting Started w
ith PH
P
You can change the execute permissions for a virtual directory in IIS after thedirectory has been created. To change the execute permissions, repeat Steps1 and 2 from this task to open the Internet Information Services window.Select the virtual directory you want to change. Click the Properties button( ) to open the Properties dialog box. Select the option in the ExecutePermissions area that you want to use. The Scripts and Executables optionallows files in the directory to be accessed and executed. The Scripts onlyoption allows only scripts to be run. The None option allows access to staticfiles, such as HTML files and images, but no access to scripts or executables.
13
%
PHPVB
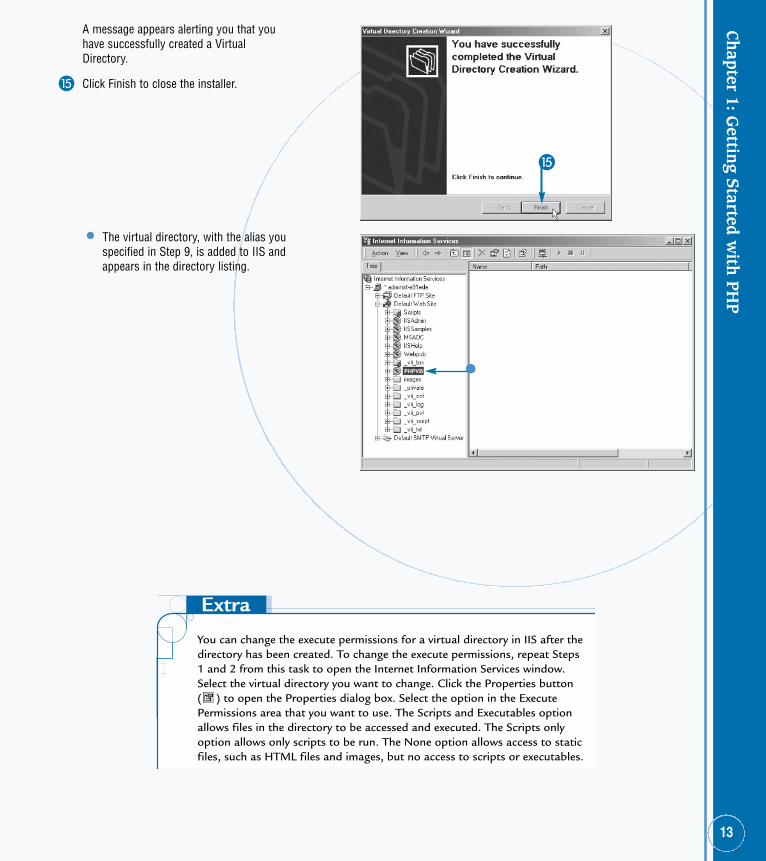
• The virtual directory, with the alias youspecified in Step 9, is added to IIS andappears in the directory listing.
A message appears alerting you that youhave successfully created a VirtualDirectory.
% Click Finish to close the installer.
04_583328 ch01.qxd 3/25/05 10:16 PM Page 13
Set File and Folder Permissions on Windows
Y ou can set file and folder permissions to allow orrestrict access to files by certain users or groups ofusers. The Internet Information Services application
serves files and executes scripts according to thesepermissions. The types of permissions that can be set forfiles and folders depend on the operating system and filesystem installed on the Web server. For example, settingpermissions on a Linux server is much different thanperforming the same operations on a Windows XP server.When IIS is installed on your Windows server, a useraccount is created called IUSR_(computername), where(computername) is the name of the computer on which theuser account is installed. For example, a computer calledWEBDEV would have an account named IUSR_WEBDEV.This account is part of the Everyone group. If you deny theEveryone group access to resources such as files and
folders, you can use the IUSR account to allow users youspecify to access information in the restricted resource.You can set permissions for single users or groups tospecify how either can access files and folders. Full Controlallows users to modify, add, move and delete files.Additionally, these users can change permissions. TheModify option allows users to modify, add, move, and deletefiles. Read & Execute allows users to run applications andscripts, such as PHP scripts. Read allows users to displayfiles, and Write allows users to modify files.Windows file and folder permissions work with the accesspermissions set in Internet Information Services. Accesspermissions set for a folder in IIS apply to all users who accessthe folder. Windows folder permissions apply only to users andgroups you specify. When Windows file and folder permissionsand IIS access permissions differ for the same resource, theWeb server uses the most restrictive permissions.
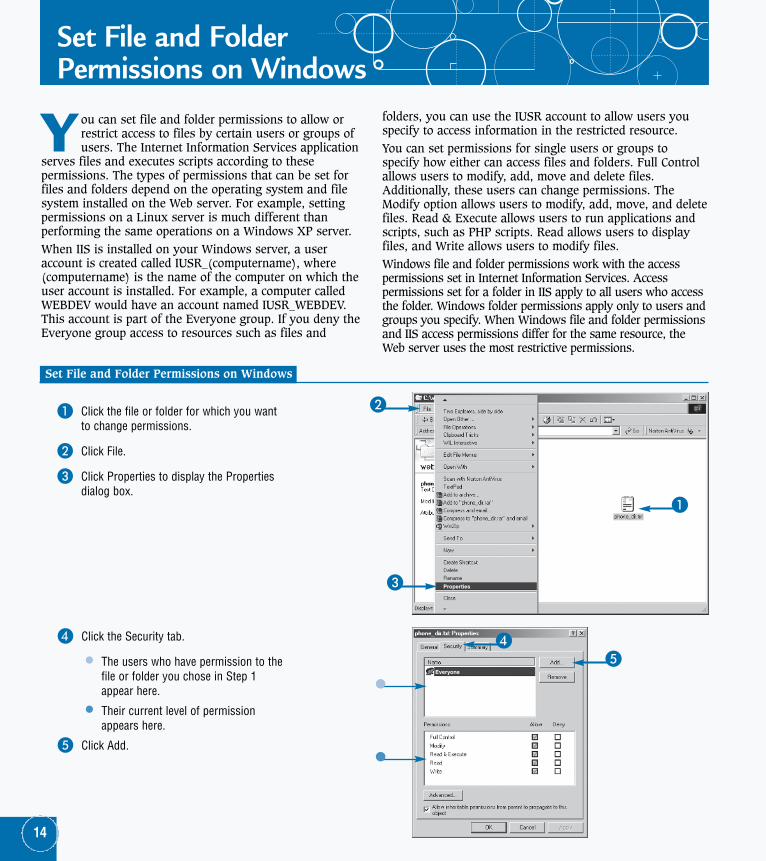
1 Click the file or folder for which you wantto change permissions.
2 Click File.
3 Click Properties to display the Propertiesdialog box.
Properties
Everyone
2
3
1
45
14
Set File and Folder Permissions on Windows
4 Click the Security tab.
• The users who have permission to thefile or folder you chose in Step 1appear here.
• Their current level of permissionappears here.
5 Click Add.
04_583328 ch01.qxd 3/25/05 10:16 PM Page 14
Chapter 1: G
etting Started w
ith PH
P
Take great care when setting file and folder permissions on a Web server. This is true on bothInternet and intranet sites. To gain a full understanding of file and folder permissions and theimplications of any changes you are considering, you should refer to the operating system and Webserver documentation. Incorrectly setting permissions on a Web server can leave the server open toserious security problems as well as data fidelity problems such as corrupted or deleted data.
When moving PHP scripts and associated files between Web servers, you must be careful to ensurethat the permissions on the final server match those on the initial server. The permissions are nottransferred, and are often reset when files are uploaded through FTP or similar protocols.
If you want to revoke access to a file for a given user or group you can remove the user or group.Repeat Steps 1 to 4 of this task to display the Security tab of the Properties dialog box. Click theuser or group that you no longer want to be able to access the file or folder and then click Remove.
15
6
7
9
0
!
8
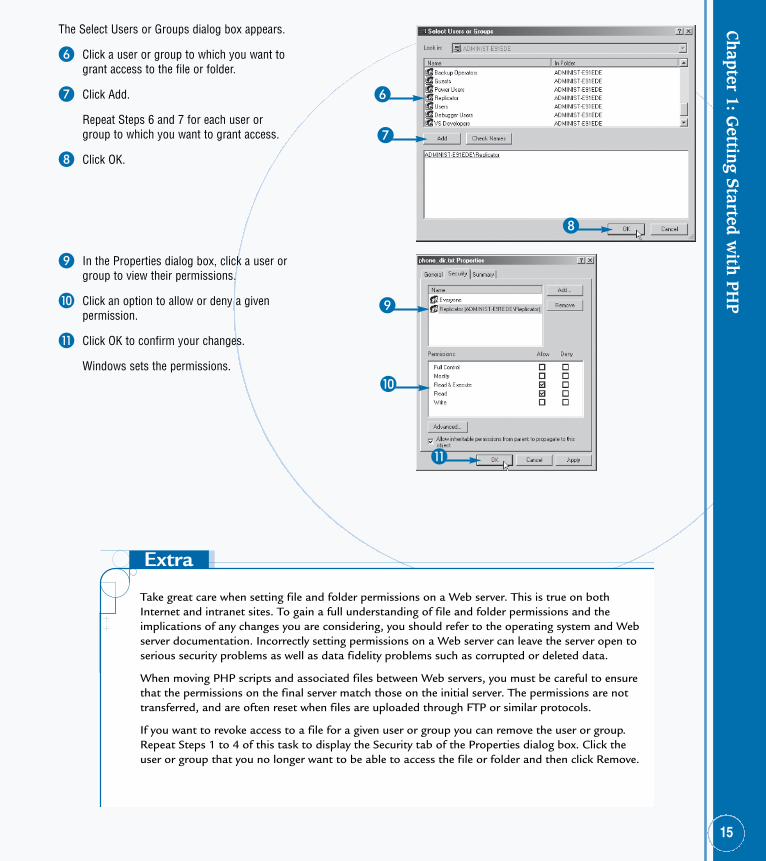
9 In the Properties dialog box, click a user orgroup to view their permissions.
0 Click an option to allow or deny a givenpermission.
! Click OK to confirm your changes.
Windows sets the permissions.
The Select Users or Groups dialog box appears.
6 Click a user or group to which you want togrant access to the file or folder.
7 Click Add.
Repeat Steps 6 and 7 for each user orgroup to which you want to grant access.
8 Click OK.
04_583328 ch01.qxd 3/25/05 10:16 PM Page 15
Install PHP on Windows
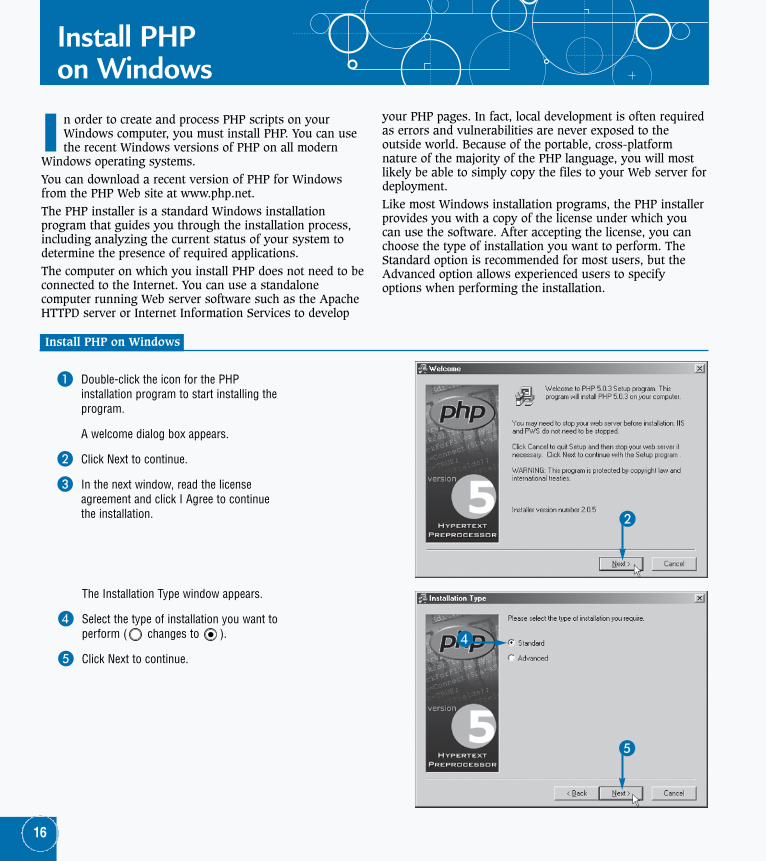
I n order to create and process PHP scripts on yourWindows computer, you must install PHP. You can usethe recent Windows versions of PHP on all modern
Windows operating systems.You can download a recent version of PHP for Windowsfrom the PHP Web site at www.php.net.The PHP installer is a standard Windows installationprogram that guides you through the installation process,including analyzing the current status of your system todetermine the presence of required applications.The computer on which you install PHP does not need to beconnected to the Internet. You can use a standalonecomputer running Web server software such as the ApacheHTTPD server or Internet Information Services to develop
your PHP pages. In fact, local development is often requiredas errors and vulnerabilities are never exposed to theoutside world. Because of the portable, cross-platformnature of the majority of the PHP language, you will mostlikely be able to simply copy the files to your Web server fordeployment.Like most Windows installation programs, the PHP installerprovides you with a copy of the license under which youcan use the software. After accepting the license, you canchoose the type of installation you want to perform. TheStandard option is recommended for most users, but theAdvanced option allows experienced users to specifyoptions when performing the installation.
1 Double-click the icon for the PHPinstallation program to start installing theprogram.
A welcome dialog box appears.
2 Click Next to continue.
3 In the next window, read the licenseagreement and click I Agree to continuethe installation. 2
5
4
16
Install PHP on Windows
The Installation Type window appears.
4 Select the type of installation you want toperform ( changes to ).
5 Click Next to continue.
04_583328 ch01.qxd 3/25/05 10:16 PM Page 16
Chapter 1: G
etting Started w
ith PH
P
The most recent release of PHP is always available from the PHP Web site at www.php.net. Olderversions of PHP are also available from the official site. Installing versions of PHP other than thenewest release is helpful because many Web hosts do not immediately upgrade to new releases forfear of causing interruptions or introducing bugs into the sites they host for their clients. Whenworking on a project that runs on an older version of PHP, you should develop the site using thesame version.
While the differences in minor versions, such as PHP 4.3.2 and PHP 4.3.3, can be mild, it isbest practice to develop your applications on a local development machine that matches theproduction server or servers in all respects. For PHP development, matching hardware is notimportant, though the local and production server should be roughly equivalent so that effectsof load and heavy memory use can be taken into consideration. More important is that allsoftware and permissions are matched. Ideally, the process of making a development versionof your application available on the Internet should consist of nothing more than uploadingfiles to your Web server.
17
6
9
7
8
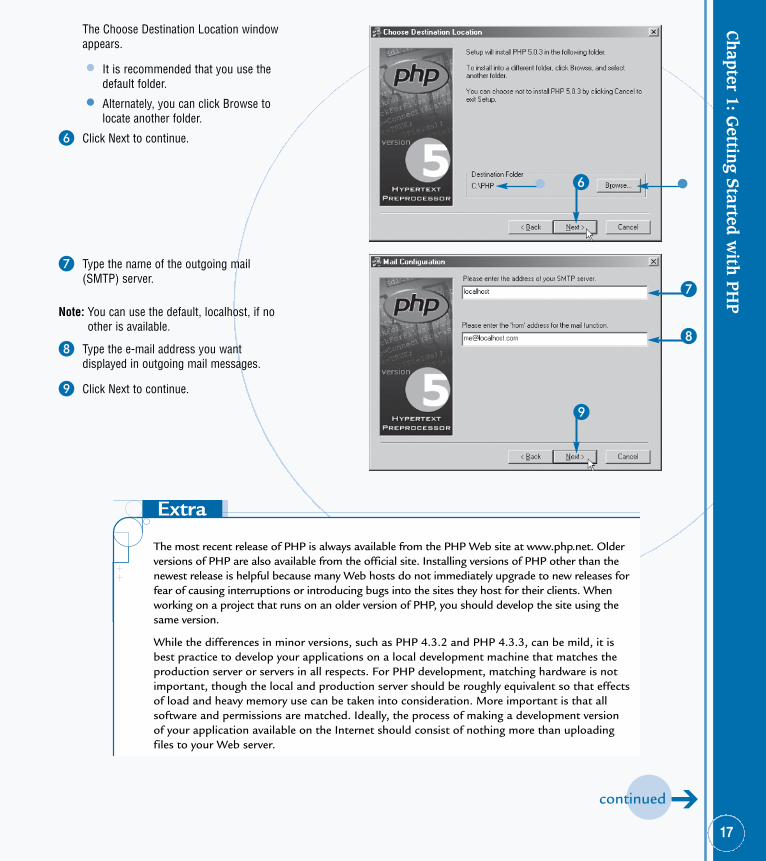
7 Type the name of the outgoing mail(SMTP) server.
Note: You can use the default, localhost, if noother is available.
8 Type the e-mail address you wantdisplayed in outgoing mail messages.
9 Click Next to continue.
The Choose Destination Location windowappears.
• It is recommended that you use thedefault folder.
• Alternately, you can click Browse tolocate another folder.
6 Click Next to continue.
continued ➔
04_583328 ch01.qxd 3/25/05 10:16 PM Page 17
Install PHP on Windows (continued)
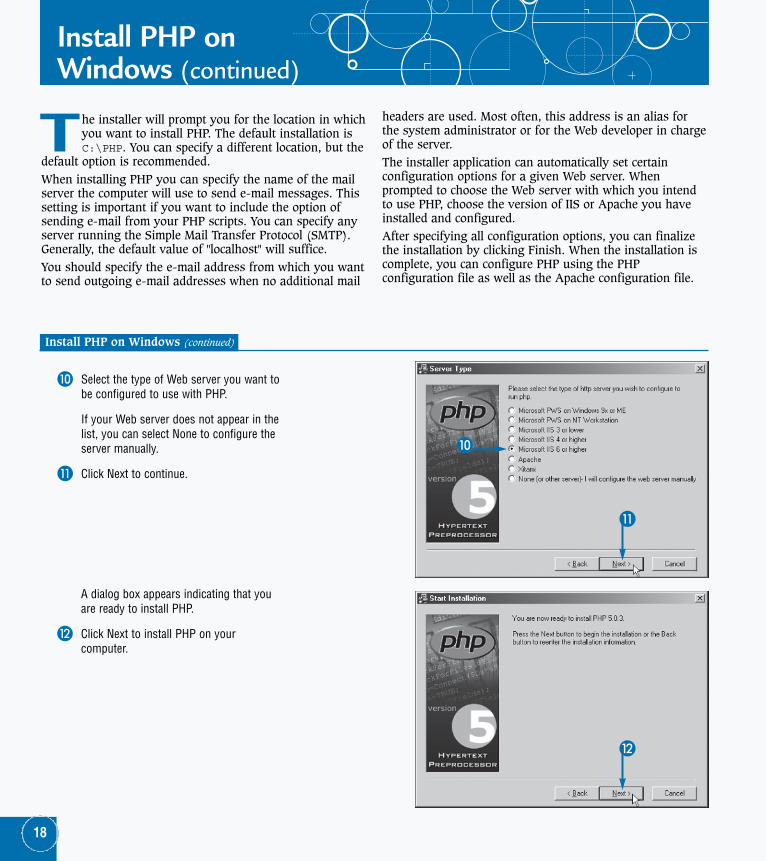
T he installer will prompt you for the location in whichyou want to install PHP. The default installation isC:\PHP. You can specify a different location, but the
default option is recommended.When installing PHP you can specify the name of the mailserver the computer will use to send e-mail messages. Thissetting is important if you want to include the option ofsending e-mail from your PHP scripts. You can specify anyserver running the Simple Mail Transfer Protocol (SMTP).Generally, the default value of "localhost" will suffice.You should specify the e-mail address from which you wantto send outgoing e-mail addresses when no additional mail
headers are used. Most often, this address is an alias forthe system administrator or for the Web developer in chargeof the server.The installer application can automatically set certainconfiguration options for a given Web server. Whenprompted to choose the Web server with which you intendto use PHP, choose the version of IIS or Apache you haveinstalled and configured.After specifying all configuration options, you can finalizethe installation by clicking Finish. When the installation iscomplete, you can configure PHP using the PHPconfiguration file as well as the Apache configuration file.
0 Select the type of Web server you want tobe configured to use with PHP.
If your Web server does not appear in thelist, you can select None to configure theserver manually.
! Click Next to continue.
!
@
0
18
Install PHP on Windows (continued)
A dialog box appears indicating that youare ready to install PHP.
@ Click Next to install PHP on yourcomputer.
04_583328 ch01.qxd 3/25/05 10:16 PM Page 18
Chapter 1: G
etting Started w
ith PH
P
PHP should be installed only on the hard drive of the Web server machine. You shouldnot install PHP on a network drive or on removable media such as an external FireWiredrive. While it is technically possible to perform such an installation, the performanceof the Web server will often be less than ideal and may become unavailable.
When specifying the e-mail address you want to display on outgoing e-mail messages,you may want to use an e-mail address set up for only this purpose. This is especiallytrue on servers that send a lot of mail as bounced messages and can quickly fill thespace allocated to a typical e-mail address.
If the computer stops responding before the installation of PHP is complete, there maybe a problem with the system hardware, network connection, or the PHP installer itself.In such cases, you should close all open programs and restart the computer beforeattempting to reinstall the program.
19
#
$
^ &*
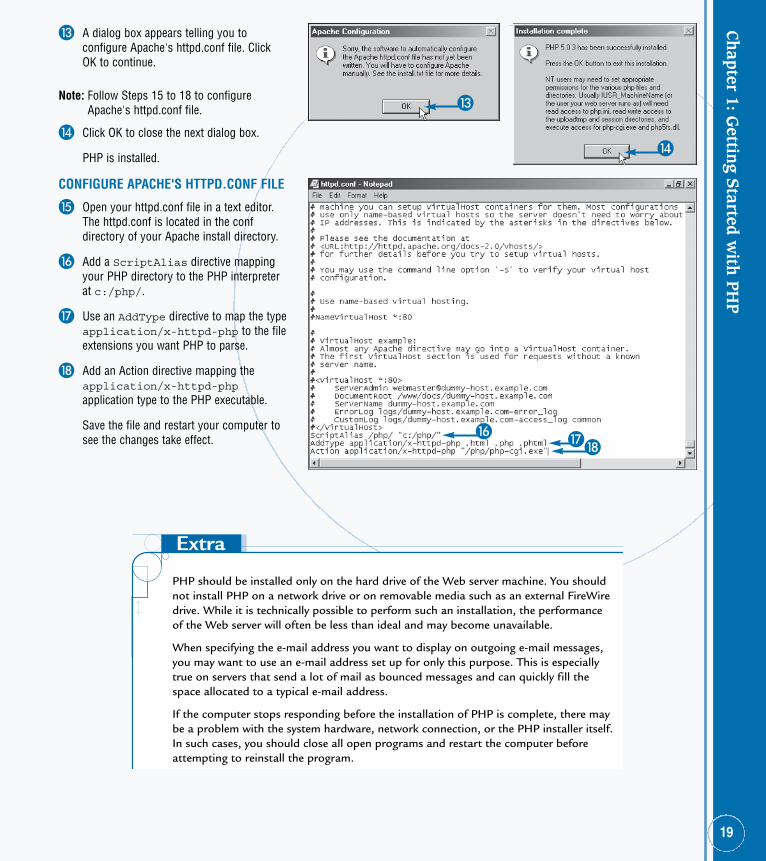
CONFIGURE APACHE'S HTTPD.CONF FILE
% Open your httpd.conf file in a text editor.The httpd.conf is located in the confdirectory of your Apache install directory.
^ Add a ScriptAlias directive mappingyour PHP directory to the PHP interpreterat c:/php/.
& Use an AddType directive to map the typeapplication/x-httpd-php to the fileextensions you want PHP to parse.
* Add an Action directive mapping theapplication/x-httpd-phpapplication type to the PHP executable.
Save the file and restart your computer tosee the changes take effect.
# A dialog box appears telling you toconfigure Apache's httpd.conf file. ClickOK to continue.
Note: Follow Steps 15 to 18 to configureApache's httpd.conf file.
$ Click OK to close the next dialog box.
PHP is installed.
04_583328 ch01.qxd 3/25/05 10:16 PM Page 19
Install Apache on OS X
M ac OS X comes configured with proven versionsof Apache and PHP installed by default. Bothapplications are configured with safety and
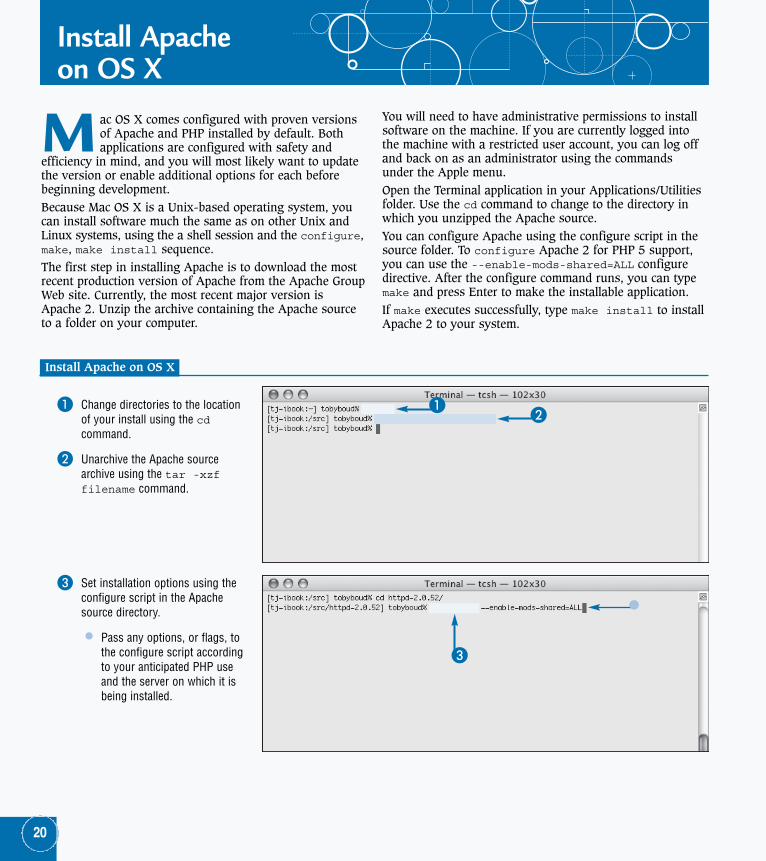
efficiency in mind, and you will most likely want to updatethe version or enable additional options for each beforebeginning development.Because Mac OS X is a Unix-based operating system, youcan install software much the same as on other Unix andLinux systems, using the a shell session and the configure,make, make install sequence.The first step in installing Apache is to download the mostrecent production version of Apache from the Apache GroupWeb site. Currently, the most recent major version isApache 2. Unzip the archive containing the Apache sourceto a folder on your computer.
You will need to have administrative permissions to installsoftware on the machine. If you are currently logged intothe machine with a restricted user account, you can log offand back on as an administrator using the commandsunder the Apple menu.Open the Terminal application in your Applications/Utilitiesfolder. Use the cd command to change to the directory inwhich you unzipped the Apache source.You can configure Apache using the configure script in thesource folder. To configure Apache 2 for PHP 5 support,you can use the --enable-mods-shared=ALL configuredirective. After the configure command runs, you can typemake and press Enter to make the installable application.If make executes successfully, type make install to installApache 2 to your system.
1 Change directories to the locationof your install using the cdcommand.
2 Unarchive the Apache sourcearchive using the tar -xzffilename command.
12
3
20
Install Apache on OS X
3 Set installation options using theconfigure script in the Apachesource directory.
• Pass any options, or flags, tothe configure script accordingto your anticipated PHP useand the server on which it isbeing installed.
04_583328 ch01.qxd 3/25/05 10:16 PM Page 20
Chapter 1: G
etting Started w
ith PH
P
21
You can choose to install either Apache 1.3 or Apache 2 on your OS X machine. Either willwork with PHP 5 and Apache 1.3 comes preinstalled. The choice between Apache 1.3 andApache 2 depends primarily on which version of Apache is running on your production serveras well as any special constraints or parameters in your project specifications.
Generally, it is a good idea to install both versions of Apache on your development machineand switch versions according to your current development needs. You can switch versionsby stopping the current version and starting the alternate version. To stop Apache, theapachectl command is used. Because each installed version has its own apachectlcommand, you should be careful to specify the full path to the apachectl version you wantto use. For example, you might have Apache 1.3 installed in /usr/local/apache, in whichcase you could start the server using /usr/local/apache/bin/apachectl start.
For an Apache 2 install located at /usr/local/apache2 you can use the /usr/local/apache2/bin/apachectl start command.
5
4
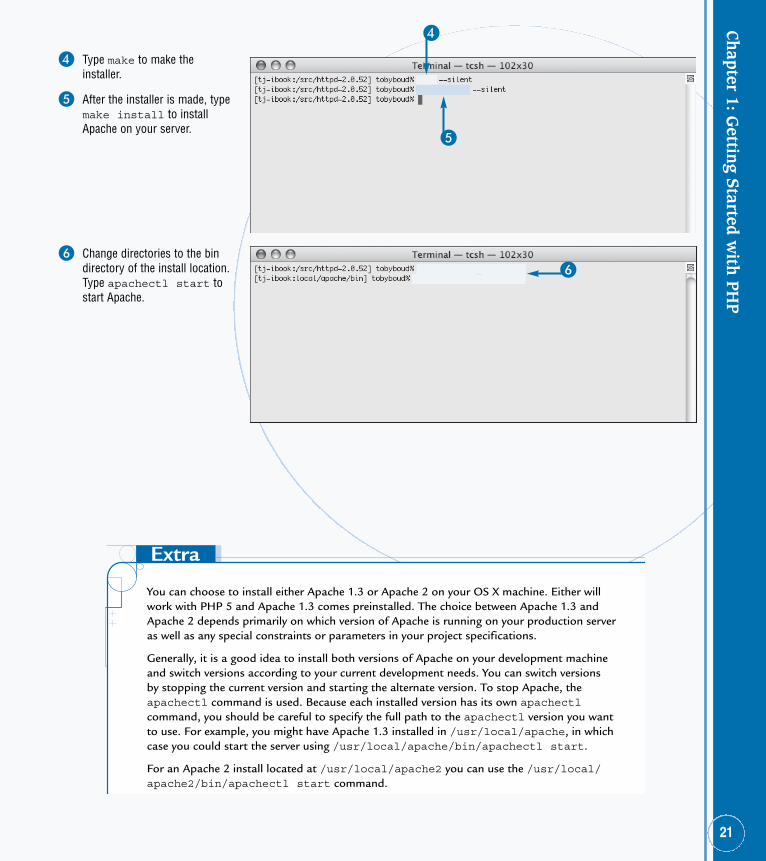
66 Change directories to the bin
directory of the install location.Type apachectl start tostart Apache.
4 Type make to make theinstaller.
5 After the installer is made, typemake install to installApache on your server.
04_583328 ch01.qxd 3/25/05 10:16 PM Page 21
Install PHP on OS X
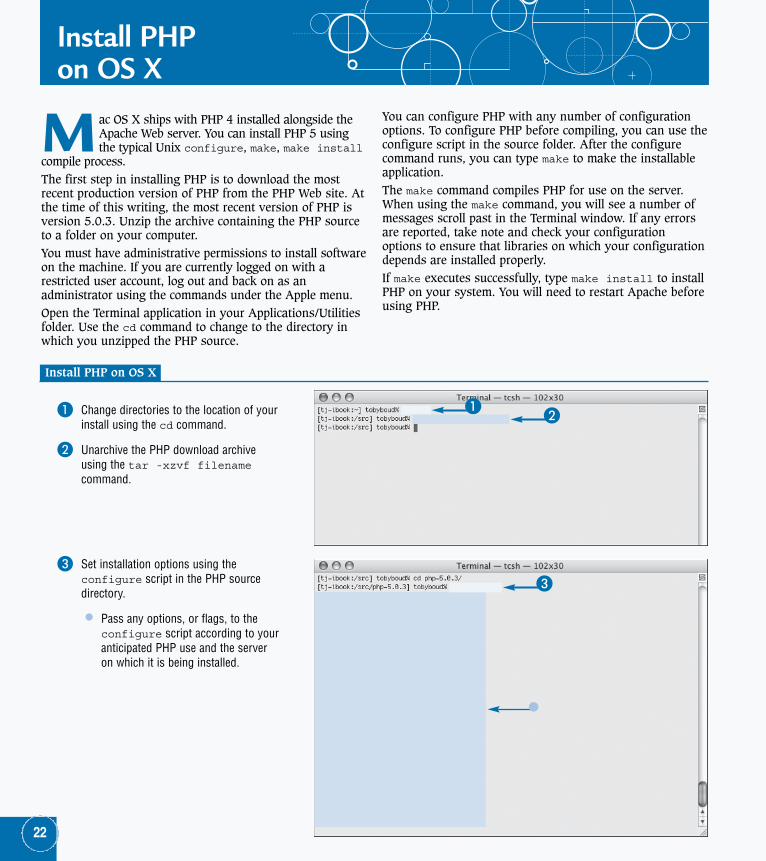
M ac OS X ships with PHP 4 installed alongside theApache Web server. You can install PHP 5 usingthe typical Unix configure, make, make install
compile process.The first step in installing PHP is to download the mostrecent production version of PHP from the PHP Web site. Atthe time of this writing, the most recent version of PHP isversion 5.0.3. Unzip the archive containing the PHP sourceto a folder on your computer. You must have administrative permissions to install softwareon the machine. If you are currently logged on with arestricted user account, log out and back on as anadministrator using the commands under the Apple menu.Open the Terminal application in your Applications/Utilitiesfolder. Use the cd command to change to the directory inwhich you unzipped the PHP source.
You can configure PHP with any number of configurationoptions. To configure PHP before compiling, you can use theconfigure script in the source folder. After the configurecommand runs, you can type make to make the installableapplication.The make command compiles PHP for use on the server.When using the make command, you will see a number ofmessages scroll past in the Terminal window. If any errorsare reported, take note and check your configurationoptions to ensure that libraries on which your configurationdepends are installed properly.If make executes successfully, type make install to installPHP on your system. You will need to restart Apache beforeusing PHP.
1 Change directories to the location of yourinstall using the cd command.
2 Unarchive the PHP download archiveusing the tar -xzvf filenamecommand.
12
3
22
Install PHP on OS X
3 Set installation options using theconfigure script in the PHP sourcedirectory.
• Pass any options, or flags, to theconfigure script according to youranticipated PHP use and the serveron which it is being installed.
04_583328 ch01.qxd 3/25/05 10:16 PM Page 22
Chapter 1: G
etting Started w
ith PH
P
OS X comes with a version of PHP pre-installed. At the time of this writing, theversion of PHP included on the OS X client install is PHP 4. You can install bothversions of PHP as long as the location of the install is different. For example,you can install PHP 5 into the /usr/local/php5 directory. Note that you canhave both PHP 4 and PHP 5 installed on your machine, but only one may berun per instance of Apache at a given time. In fact, you can have as manyversions of PHP installed on your computer as you want as long as there are nolibrary conflicts. Often, a development machine will have at least two or threeminor versions of the latest major version release to accommodate any numberof projects that may be in development. You can specify which version of PHP isloaded by the Apache Web server using the Apache configuration file, usuallyfound at /usr/local/apache/conf/httpd.conf.
23
5
4
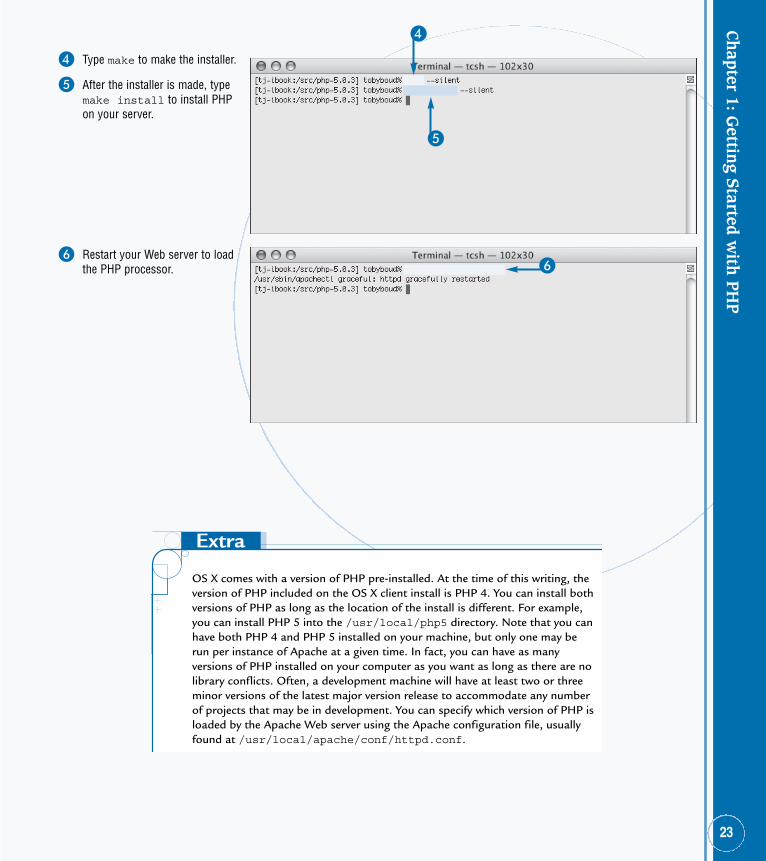
66 Restart your Web server to load
the PHP processor.
4 Type make to make the installer.
5 After the installer is made, typemake install to install PHPon your server.
04_583328 ch01.qxd 3/25/05 10:16 PM Page 23
Set File and Folder Permissions on OS X
Y ou can use the Terminal to set file and folderpermissions on OS X. You can also use the Get Infooption in the Finder to view and modify permission
information about files and folders.Because OS X is a Unix-based operating system, you canset folder and file permissions using the chmod, chown, andchgrp commands. In order to change the permissions of afile or folder, you must have user or group ownershippermissions. If your account does not have permissions tomodify a file, you can use the su command to switch to auser account with adequate permissions. For example, youmight switch to a user named 'admin' using the commandsu admin. When prompted for a password, you must typethe password of the account to which you are switching.You can perform a quick action as another user using thesudo command. For example, to change ownership of
the file 'test.php' to the user 'toby' you might use acommand such as sudo chown toby test.php.Another method of altering file and folder permissions is touse the OS X Finder. You can use the Finder to changepermissions by opening the Get Info palette for a given fileor folder. Right-click the target file or folder in the Finderand choose Get Info from the menu. Alternately, you canpress the Apple key and the I key in combination to openthe Get Info palette.When the Get Info palette is open, you see a sectioncalled Ownership & Permissions. There are select boxes inthis section. If you have permission to modify the ownershipand permissions properties of the currently selected file,you can use the select boxes to change these properties.Otherwise, the menu is dimmed and unusable.
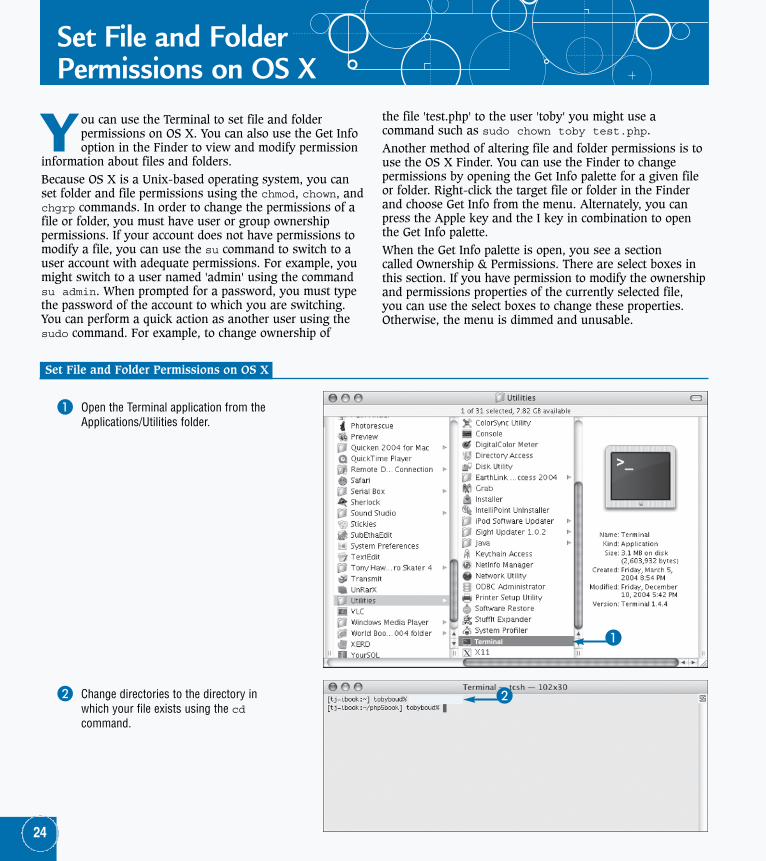
1 Open the Terminal application from theApplications/Utilities folder.
1
2
Terminal
24
Set File and Folder Permissions on OS X
2 Change directories to the directory inwhich your file exists using the cdcommand.
04_583328 ch01.qxd 3/25/05 10:16 PM Page 24
Chapter 1: G
etting Started w
ith PH
P
You can recursively set ownership and permission privileges for a directory byspecifying a special flag for the chmod command. The -R flag tells the chmodcommand to apply the changes not only to the directory in question but to movethrough the directory setting the same permissions on each file therein. Because thisoption is recursive, the permissions of items in subfolders will be set as well as thosein the main folder.
The Details section of the Get Info palette gives detailed permissions informationfor a given file. You can set your own permissions level, the owner of the file, accesslevel of the owner, the group ownership and accompanying group access, and thelevel of permissions applicable to other users.
25
4
3
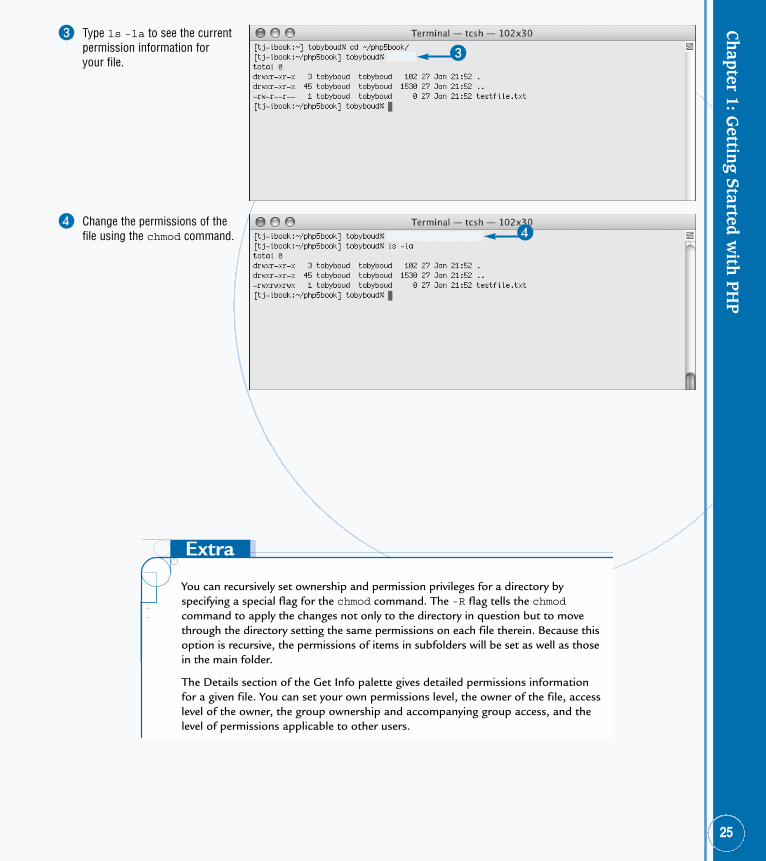
4 Change the permissions of thefile using the chmod command.
3 Type ls -la to see the currentpermission information foryour file.
04_583328 ch01.qxd 3/25/05 10:16 PM Page 25
Configure PHP
P HP configuration is managed by modifying thecontents of a configuration file, usually namedphp.ini. The configuration file is a plain text file
that controls how PHP processes scripts and is read by theWeb server when PHP is started. You can edit the php.ini file using a standard text editor,such as Notepad on a Windows system, and vi or emacs ona Unix or Linux system. The Mac OS X application TextEditis a useful text editor when developing on your Apple.The format of the php.ini file is a standard configurationstyle in which each new line represents a directive.Comments are delimited using a semicolon (;) and entirelines can be commented out by placing a semicolon at thebeginning of each line.Directives are set using the name of the directive, followedby an equals sign (=) with the directive value. Most often,possible values are listed in comments in the php.ini file.
To set a directive, simply change the value to a recognizedvalue other than the current setting and save the file. Thenext request to PHP is processed according to the changedconfiguration.The most common changes made to a new installation ofPHP is to set the appropriate level of error reporting for theserver, based on its use and availability. For localdevelopment servers, you generally want very verbose errorreporting. You can change the error reporting values usingthe error_reporting directive. For example, you can turnon all error reporting using the lines:error_reporting = E_ALL
display_errors = On
Or, for a production server, where you want no errorsdisplayed, you can set the error reporting level with the line:display_errors = Off
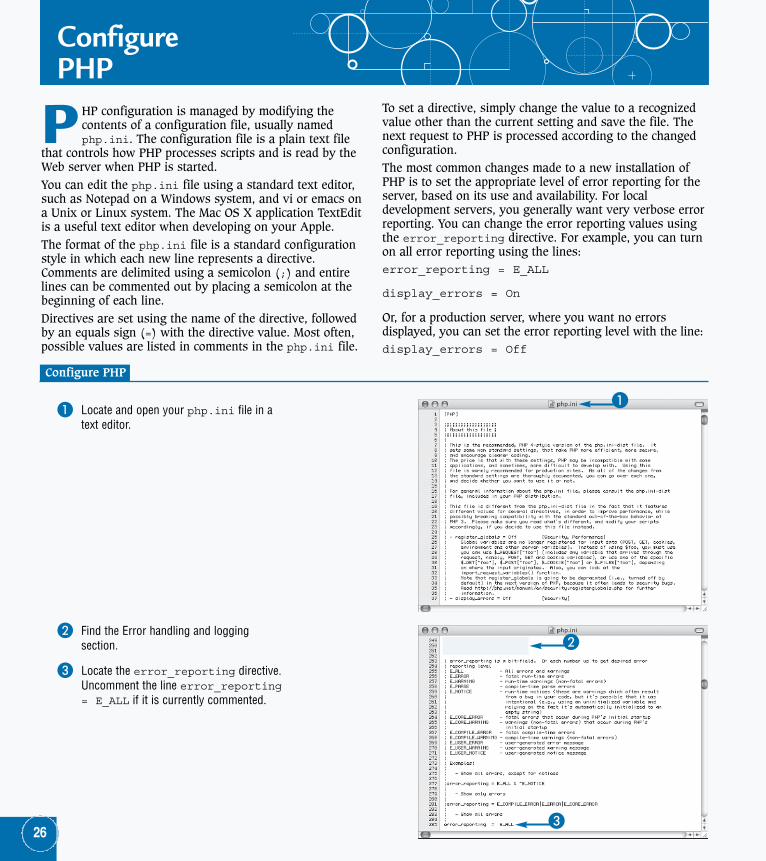
1 Locate and open your php.ini file in atext editor.
2
3
1
26
Configure PHP
2 Find the Error handling and loggingsection.
3 Locate the error_reporting directive.Uncomment the line error_reporting= E_ALL if it is currently commented.
04_583328 ch01.qxd 3/25/05 10:16 PM Page 26
Chapter 1: G
etting Started w
ith PH
P
On computers running a version of the Windows operating system, the php.ini file istypically located in the main Windows directory, such as C:\WINNT or C:\WINDOWS.On Unix systems, the location of the php.ini file can vary, but the file is often foundin the /usr/local/lib directory. You can locate the file on a Unix system using thecommand-line locate tool. To locate all files whose path contains the string php.iniyou can type locate php.ini and press Enter.
The php.ini configuration file can be used to manage which modules are enabled foryour PHP installation. You can also use the configuration file to manage module-specificsettings, such as the default host for MySQL connections, or session managementoptions such as the location of session files and the name of the session identifier to beused in tracking user sessions.
You can read about all of the configuration options available in the php.ini file on thePHP Web site at www.php.net/manual/en/configuration.php.
27
4
5
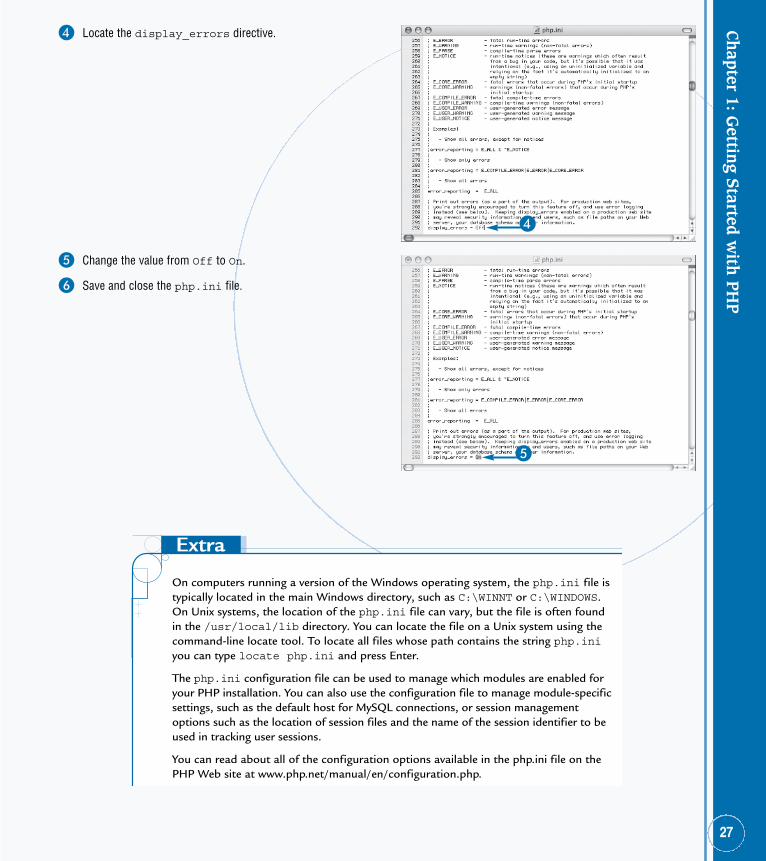
5 Change the value from Off to On.
6 Save and close the php.ini file.
4 Locate the display_errors directive.
04_583328 ch01.qxd 3/25/05 10:16 PM Page 27

Verify Installation
A fter the Web server software and a version of PHPare installed and the Web server is configured toprocess PHP files, you can verify the status of the
installation and check the current configuration settingsusing a PHP script.The phpinfo function is a globally accessible function thatis a useful utility when learning about the configurationof a given PHP installation. The phpinfo function acceptsno arguments and returns no result, acting instead as autility function that gathers information about the currentconfiguration of your Web server and displays it as aneasy-to-understand HTML page.You can use the phpinfo function by creating a new PHPscript in your Web server document root. You can open a
block of PHP code by typing the <?php opening PHPprocessing instruction delimiter. On a new line, call thephpinfo function by typing phpinfo();.You can close the PHP processing block by typing theclosing processing instruction delimiter, ?>.After you save the PHP script to your Web server, you canconnect to the server using a standard Web browser. In thelocation bar, type the path to your server followed by thename of the phpinfo script you created.When the page loads, you see a screen presenting detailedinformation not only about PHP but also about your Webserver software and configuration.
1 Create a new PHP script using atext editor.
2 Create a PHP processing blockusing the PHP processinginstruction delimiters <?phpand ?>.
3
2
1
28
Verify Installation
3 Inside the PHP processing block,type phpinfo();.
04_583328 ch01.qxd 3/25/05 10:16 PM Page 28
Chapter 1: G
etting Started w
ith PH
P
29
5
4
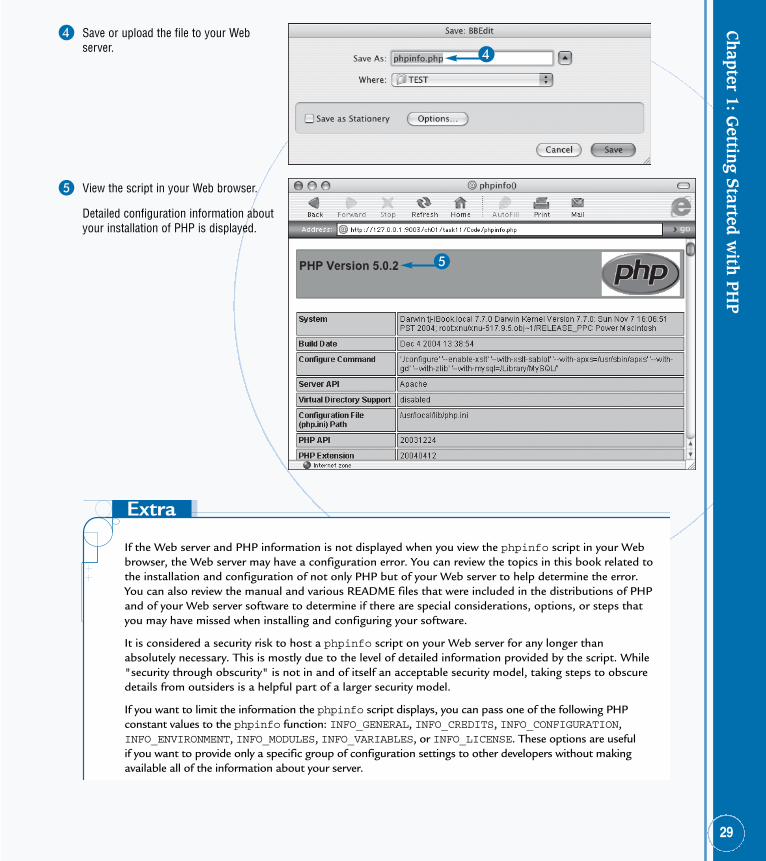
5 View the script in your Web browser.
Detailed configuration information aboutyour installation of PHP is displayed.
4 Save or upload the file to your Webserver.
If the Web server and PHP information is not displayed when you view the phpinfo script in your Webbrowser, the Web server may have a configuration error. You can review the topics in this book related tothe installation and configuration of not only PHP but of your Web server to help determine the error.You can also review the manual and various README files that were included in the distributions of PHPand of your Web server software to determine if there are special considerations, options, or steps thatyou may have missed when installing and configuring your software.
It is considered a security risk to host a phpinfo script on your Web server for any longer thanabsolutely necessary. This is mostly due to the level of detailed information provided by the script. While"security through obscurity" is not in and of itself an acceptable security model, taking steps to obscuredetails from outsiders is a helpful part of a larger security model.
If you want to limit the information the phpinfo script displays, you can pass one of the following PHPconstant values to the phpinfo function: INFO_GENERAL, INFO_CREDITS, INFO_CONFIGURATION,INFO_ENVIRONMENT, INFO_MODULES, INFO_VARIABLES, or INFO_LICENSE. These options are usefulif you want to provide only a specific group of configuration settings to other developers without makingavailable all of the information about your server.
04_583328 ch01.qxd 3/25/05 10:16 PM Page 29
Upload Pages to a Web Server
Y ou can upload your scripts to a Web server differentthan the local server on which you develop. In mostcases, the final production server on which you
deploy your sites is hosted and maintained by a hostingcompany. You can use the File Transfer Protocol (FTP) totransfer your files to your external server.Before you can transfer files to your remote Web server, youneed to install an FTP client application. Due to the ubiquity ofthe File Transfer Protocol there are many available FTP clientapplications for every major operating system. When youchoose an FTP client, install it according to the instructionsprovided by the software publisher. The first step in transferring files or folders to your remoteserver is to create a connection to the server. You can usean FTP program to transfer files from a machine runningone operating system to a machine running a differentoperating system. For example, you can transfer files from
your Mac OS X computer to a Red Hat Linux Web serverrunning your production site.To create a connection with a remote FTP server, you musthave certain information. The address of the server, eitheras a legitimate domain name or an IP address, allowsyour client application to locate the server on the Internetor intranet. You must also have a valid username andpassword for an account set up on the remote server inorder to successfully establish a connection. Most FTPprograms will allow you to save connection informationfor ease of reuse when connecting in the future. You shouldbe aware that saving account information to a computeraccessible by people other than yourself poses a significantsecurity risk. If you use a computer accessible by others,be sure not to save connection information but insteadtype the address, username, and password each time aconnection is necessary.
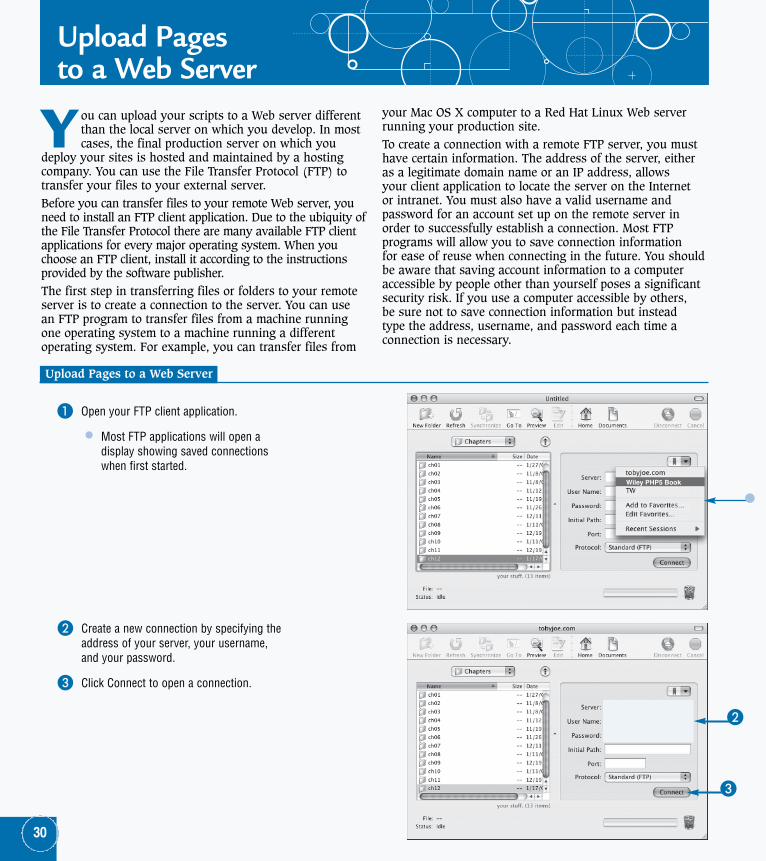
1 Open your FTP client application.
• Most FTP applications will open adisplay showing saved connectionswhen first started.
3
2
Wiley PHP5 Book
30
Upload Pages to a Web Server
2 Create a new connection by specifying theaddress of your server, your username,and your password.
3 Click Connect to open a connection.
04_583328 ch01.qxd 3/25/05 10:16 PM Page 30

Chapter 1: G
etting Started w
ith PH
P
Web hosting companies manage the hardware and software required to serve Web pages topeople on the Internet. While it is possible to serve Web sites from machines on your ownhome Internet connection, for anything beyond the most trivial applications it is best to use ahosting company. Web hosts often provide nearly 100 percent uptime and help keep checkson security. You can also access support services if you need software installed or havequestions about configuration options.
There are many available FTP applications for most popular operating systems. For Mac OS X,the Transmit client is a popular choice. For Windows, the CuteFTP program is a light andreliable FTP client. For Linux running the X Windows windowing system, you can use the AxYFTP program.
31
5
4
5 Using the local view of your files, navigateto the directory on your local machine inwhich your PHP scripts are saved.
• When your connection is established,a listing of files on the remote serverappears.
4 Navigate to the folder representing yourWeb server document root.
2
continued ➔
04_583328 ch01.qxd 3/25/05 10:16 PM Page 31
Upload Pages to a Web Server (continued)
A fter you establish a connection to your remote Webserver, you can read, write, and delete informationfrom the server. You can transfer entire directories,
single files, or file archives. Most FTP clients also allow youto select any number of individual files and directories andupload them in one operation.You must browse to the location on the remote server towhich you want to transfer your files. When you initiallyconnect to the FTP server, the working directory is set tothe default directory associated with your account. If youupload files without changing to the proper location on theremote server, the files may not be visible to your Webserver software. The directory to which you should uploadyour files changes on a server-by-server basis. You can askthe server administrator for the location of the Web serverdocument root, which is the directory from which files areserved to Web browsers. In some cases, your host mayhave a configuration that restricts the location from which
PHP files may be served. You can check with your host forany specific rules for the particular server.In some cases, FTP servers are configured to terminate aconnection if no activity occurs for a given interval. Thishelps free unused resources for other users who may needto connect to the FTP server to manage their sites or files.If your session is dropped after an idle connection, you cansimply reconnect.A connection to an FTP server is temporary and volatile.That is, it is not a permanent and persistent connection. Ifyou change files on your local development machine afteruploading files to the remote server, you must connect andupload the new versions to the Web server to see changestake effect. Most FTP applications present a dialog boxwhen an attempt to overwrite a file is made. You can chooseto overwrite or cancel the upload. This safety mechanismhelps prevent unwanted file overwrites.
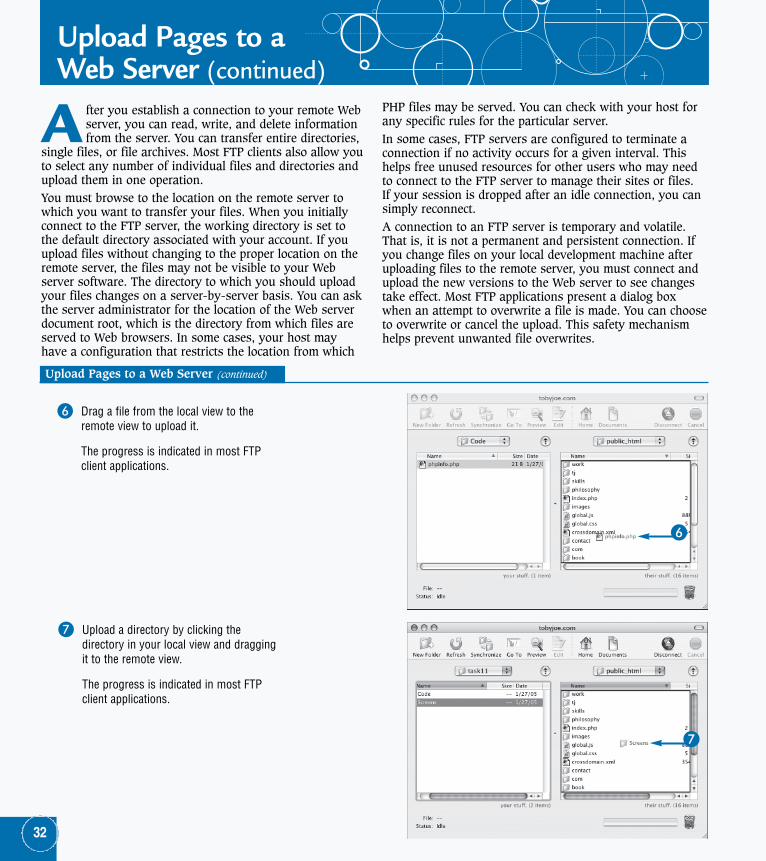
6 Drag a file from the local view to theremote view to upload it.
The progress is indicated in most FTPclient applications.
7
6
32
Upload Pages to a Web Server (continued)
7 Upload a directory by clicking thedirectory in your local view and draggingit to the remote view.
The progress is indicated in most FTPclient applications.
04_583328 ch01.qxd 3/25/05 10:16 PM Page 32
Chapter 1: G
etting Started w
ith PH
P
An important consideration when uploading files to a server is that any file in the document rootof the server is most likely accessible to anyone with the ability to send HTTP requests to your server.Because the Web root is the directory from which files are meant to be served to your visitors, youshould always keep sensitive information in a location outside of the Web root. PHP and similarlanguages can almost always access necessary files from locations outside of the Web root, butWeb servers such as the Apache HTTPD server will never serve files protected in this manner.
PHP best practice where sensitive information is concerned is to keep files containing informationsuch as database usernames and passwords in a special directory outside of the Web root. You canuse the require, require_once, include, and include_once functions to access files locatedin any directory on your computer to which PHP and Apache have the appropriate permissions.
33
9
8
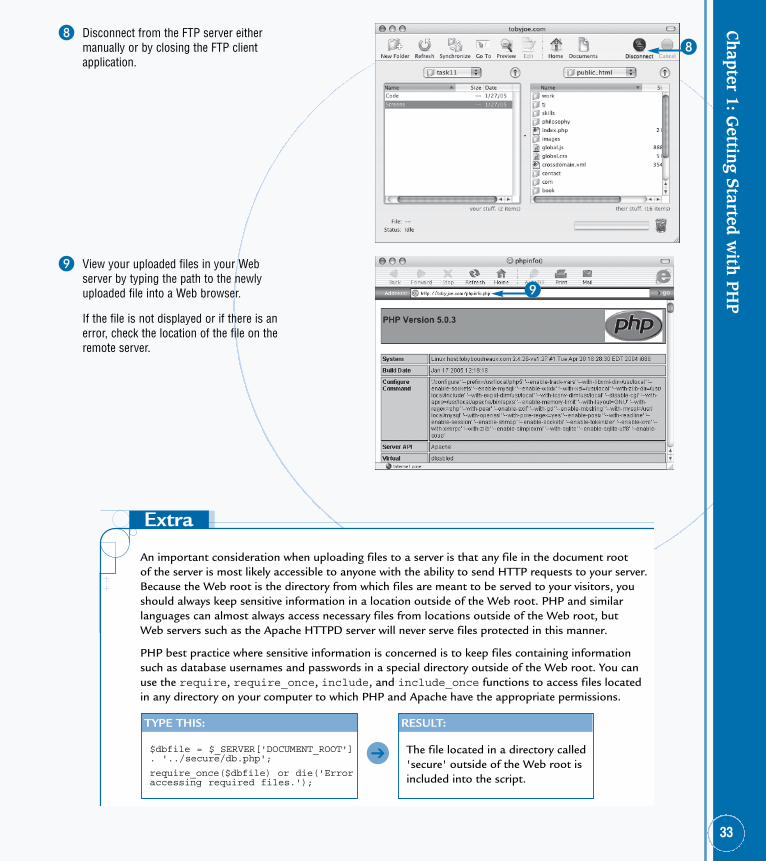
9 View your uploaded files in your Webserver by typing the path to the newlyuploaded file into a Web browser.
If the file is not displayed or if there is anerror, check the location of the file on theremote server.
8 Disconnect from the FTP server eithermanually or by closing the FTP clientapplication.
TYPE THIS:
$dbfile = $_SERVER['DOCUMENT_ROOT']. '../secure/db.php';
require_once($dbfile) or die('Erroraccessing required files.');
RESULT:
The file located in a directory called'secure' outside of the Web root isincluded into the script.
➔
04_583328 ch01.qxd 3/25/05 10:16 PM Page 33