introduction to labview - - università degli studi di … ·...
TRANSCRIPT

Telemark University College Department of Electrical Engineering, Information Technology and Cybernetics
Faculty of Technology, Postboks 203, Kjølnes ring 56, N-3901 Porsgrunn, Norway. Tel: +47 35 57 50 00 Fax: +47 35 57 54 01
Introduction to LabVIEW HANS-‐PETTER HALVORSEN, 2014.03.07

ii
Preface This document explains the basic concepts of LabVIEW.
You find additional resources, code, etc. here:
http://home.hit.no/~hansha/?tutorial=labview
You need to install the LabVIEW Professional Development System.
For more information about LabVIEW, visit my Blog: http://home.hit.no/~hansha/

iii
Table of Contents Preface ....................................................................................................................................... ii
Table of Contents ...................................................................................................................... iii
1 Introduction ........................................................................................................................ 1
1.1 Dataflow Programming ................................................................................................ 1
1.2 Graphical Programming ............................................................................................... 1
1.3 Benefits ........................................................................................................................ 2
2 Start using LabVIEW ............................................................................................................ 4
2.1 The LabVIEW Environment .......................................................................................... 4
2.2 Front Panel .................................................................................................................. 5
2.3 Block Diagram .............................................................................................................. 7
2.4 Controls Palette ......................................................................................................... 10
2.4.1 Numeric Sub Palette ........................................................................................... 12
2.4.2 Boolean Sub Palette ............................................................................................ 13
2.4.3 String & Path Sub Palette .................................................................................... 13
2.5 Function Palette ......................................................................................................... 13
2.6 Tools Palette .............................................................................................................. 14
2.7 Wiring ........................................................................................................................ 16
2.8 Toolbar ....................................................................................................................... 16
2.9 Execution ................................................................................................................... 17
2.10 The Objects short-‐cut menu .................................................................................... 18
2.11 Dataflow Programming ........................................................................................... 19
2.12 Help ......................................................................................................................... 20
Exercises ............................................................................................................................. 20

iv Table of Contents
Tutorial: An Introduction to LabVIEW
3 Sub VIs .............................................................................................................................. 24
3.1 Create New Sub VI from Scratch ................................................................................ 26
3.1.1 Input and Output SubVI Connectors ................................................................... 26
3.1.2 Icon Editor ........................................................................................................... 28
3.2 Create Sub VI from existing code ............................................................................... 29
3.3 Using Sub VIs ............................................................................................................. 30
Exercises ............................................................................................................................. 31
4 Customize LabVIEW .......................................................................................................... 33
Exercises ............................................................................................................................. 34
5 Loops and Structures ........................................................................................................ 35
5.1 Loops ......................................................................................................................... 35
5.1.1 For Loop .............................................................................................................. 36
5.1.2 While Loop .......................................................................................................... 37
5.2 Structures .................................................................................................................. 38
5.2.1 Case Structure ..................................................................................................... 38
5.2.2 Sequence Structure ............................................................................................ 39
5.2.3 Event Structure ................................................................................................... 40
Exercises ............................................................................................................................. 42
6 Troubleshooting and Debugging ...................................................................................... 45
6.1 How to find errors ..................................................................................................... 45
6.2 Highlight Execution .................................................................................................... 45
6.3 Probes ........................................................................................................................ 46
6.4 Breakpoints ................................................................................................................ 47
6.5 Step into/over/out debugging ................................................................................... 48
Exercises ............................................................................................................................. 49

v Table of Contents
Tutorial: An Introduction to LabVIEW
7 Working with Data ............................................................................................................ 51
7.1 Arrays ......................................................................................................................... 51
7.1.1 Auto-‐Indexing ..................................................................................................... 51
7.1.2 Array Functions ................................................................................................... 52
7.2 Cluster ........................................................................................................................ 54
7.2.1 Cluster Order ...................................................................................................... 55
7.2.2 Cluster Elements ................................................................................................. 56
Exercises ............................................................................................................................. 57
8 Working with Strings ........................................................................................................ 59
Exercises ............................................................................................................................. 61
9 Error Handling ................................................................................................................... 63
9.1 Finding Error .............................................................................................................. 63
9.2 Error Wiring ............................................................................................................... 63
9.3 Error Handling in SubVIs ............................................................................................ 64
9.4 Error Handling ............................................................................................................ 65
Exercises ............................................................................................................................. 66
10 Working with Projects .................................................................................................... 67
10.1 Project Explorer ....................................................................................................... 67
10.2 Deployment ............................................................................................................. 68
Exercises ............................................................................................................................. 71
11 Design Techniques .......................................................................................................... 72
11.1 Force Program Flow ................................................................................................. 72
11.2 Shift Register ........................................................................................................... 73
11.3 State Programming Architecture ............................................................................. 74
11.4 Multiple Loops/Parallel programming ..................................................................... 77

vi Table of Contents
Tutorial: An Introduction to LabVIEW
11.5 Templates ................................................................................................................ 78
Exercises ............................................................................................................................. 80
12 User Interface ................................................................................................................. 83
12.1 VI Properties ............................................................................................................ 84
Exercises ............................................................................................................................. 87
13 Plotting Data ................................................................................................................... 88
13.1 Customizing ............................................................................................................. 90
Exercises ............................................................................................................................. 92
14 Tips & Tricks .................................................................................................................... 94
14.1 10 functions you need to know about ..................................................................... 94
14.2 The 10 most useful Short-‐cuts ................................................................................. 99
15 Example Application ..................................................................................................... 100
16 Additional Exercises ...................................................................................................... 105
17 What’s Next? ................................................................................................................ 110
17.1 My Blog .................................................................................................................. 110
17.2 Training .................................................................................................................. 110
17.3 Additional Resources ............................................................................................. 110
17.4 Examples ................................................................................................................ 110
17.5 Documentation ...................................................................................................... 111
17.6 LabVIEW Wiki ........................................................................................................ 112
17.7 LabVIEW on YouTube ............................................................................................ 112
Quick Reference .................................................................................................................... 113

1
1 Introduction LabVIEW (short for Laboratory Virtual Instrumentation Engineering Workbench) is a platform and development environment for a visual programming language from National Instruments. The graphical language is named "G". Originally released for the Apple Macintosh in 1986, LabVIEW is commonly used for data acquisition, instrument control, and industrial automation on a variety of platforms including Microsoft Windows, various flavors of UNIX, Linux, and Mac OS X. The latest version of LabVIEW is version LabVIEW 2011. Visit National Instruments at www.ni.com.
The code files have the extension “.vi”, which is an abbreviation for “Virtual Instrument”. LabVIEW offers lots of additional Add-‐Ons and Toolkits.
1.1 Dataflow Programming The programming language used in LabVIEW, also referred to as G, is a dataflow programming language. Execution is determined by the structure of a graphical block diagram (the LV-‐source code) on which the programmer connects different function-‐nodes by drawing wires. These wires propagate variables and any node can execute as soon as all its input data become available. Since this might be the case for multiple nodes simultaneously, G is inherently capable of parallel execution. Multi-‐processing and multi-‐threading hardware is automatically exploited by the built-‐in scheduler, which multiplexes multiple OS threads over the nodes ready for execution.
1.2 Graphical Programming LabVIEW ties the creation of user interfaces (called front panels) into the development cycle. LabVIEW programs/subroutines are called virtual instruments (VIs). Each VI has three components: a block diagram, a front panel, and a connector panel. The last is used to represent the VI in the block diagrams of other, calling VIs. Controls and indicators on the front panel allow an operator to input data into or extract data from a running virtual instrument. However, the front panel can also serve as a programmatic interface. Thus a virtual instrument can either be run as a program, with the front panel serving as a user interface, or, when dropped as a node onto the block diagram, the front panel defines the inputs and outputs for the given node through the connector pane. This implies each VI can be easily tested before being embedded as a subroutine into a larger program.

2 Introduction
Tutorial: An Introduction to LabVIEW
The graphical approach also allows non-‐programmers to build programs simply by dragging and dropping virtual representations of lab equipment with which they are already familiar. The LabVIEW programming environment, with the included examples and the documentation, makes it simple to create small applications. This is a benefit on one side, but there is also a certain danger of underestimating the expertise needed for good quality "G" programming. For complex algorithms or large-‐scale code, it is important that the programmer possess an extensive knowledge of the special LabVIEW syntax and the topology of its memory management. The most advanced LabVIEW development systems offer the possibility of building stand-‐alone applications. Furthermore, it is possible to create distributed applications, which communicate by a client/server scheme, and are therefore easier to implement due to the inherently parallel nature of G-‐code.
1.3 Benefits One benefit of LabVIEW over other development environments is the extensive support for accessing instrumentation hardware. Drivers and abstraction layers for many different types of instruments and buses are included or are available for inclusion. These present themselves as graphical nodes. The abstraction layers offer standard software interfaces to communicate with hardware devices. The provided driver interfaces save program development time. The sales pitch of National Instruments is, therefore, that even people with limited coding experience can write programs and deploy test solutions in a reduced time frame when compared to more conventional or competing systems. A new hardware driver topology (DAQmxBase), which consists mainly of G-‐coded components with only a few register calls through NI Measurement Hardware DDK (Driver Development Kit) functions, provides platform independent hardware access to numerous data acquisition and instrumentation devices. The DAQmxBase driver is available for LabVIEW on Windows, Mac OS X and Linux platforms.
This document introducing the following themes:
• Start using LabVIEW o The LabVIEW Environment o Front Panel and Block Diagram o Palettes: Control Palette, Functions Palette, Tools Palette o Data Types o Property Nodes
• Sub VIs • Loops and Structures • Troubleshooting and Debugging

3 Introduction
Tutorial: An Introduction to LabVIEW
• Working with Data o Arrays
! Array Functions o Cluster
• Working with Strings • Error Handling • Working with Projects using Project Explorer • Design Techniques
o Shift Register o State Machine o Multiple Loops
• User Interface • Plotting Data • Deployment: Building Executable Applications (.exe) • Introduction to Add Ons and Toolkits
o Briefly explanations… o More detail about Control and Simulation Toolkit in later chapter
• Introduction to DAQ -‐ Data Acquisition o MAX – Measurement and Automation Explorer o NI-‐DAQmx
• Quick Reference with Keyboard Short-‐cuts
For more information about LabVIEW, visit my Blog: http://home.hit.no/~hansha/

4
2 Start using LabVIEW This chapter explains the basic concepts in LabVIEW.
The topics are as follows:
• The LabVIEW Environment • Front Panel and Block Diagram • Palettes: Control Palette, Functions Palette, Tools Palette • Data Types • Property Nodes
2.1 The LabVIEW Environment LabVIEW programs are called Virtual Instruments, or VIs, because their appearance and operation imitate physical instruments, such as oscilloscopes and multimeters. LabVIEW contains a comprehensive set of tools for acquiring analyzing, displaying, and storing data, as well as tools to help you troubleshoot your code.
When opening LabVIEW, you first come to the “Getting Started” window.

5 Start using LabVIEW
Tutorial: An Introduction to LabVIEW
In order to create a new VI, select “Blank VI” or in order to create a new LabVIEW project, select “Empty project”.
When you open a blank VI, an untitled front panel window appears. This window displays the front panel and is one of the two LabVIEW windows you use to build a VI. The other window contains the block diagram. The sections below describe the front panel and the block diagram.
2.2 Front Panel When you have created a new VI or selected an existing VI, the Front Panel and the Block Diagram for that specific VI will appear.
In LabVIEW, you build a user interface, or front panel, with controls and indicators. Controls are knobs, push buttons, dials, and other input devices. Indicators are graphs, LEDs, and other displays.
You build the front panel with controls and indicators, which are the interactive input and output terminals of the VI, respectively. Controls are knobs, push buttons, dials, and other input devices. Indicators are graphs, LEDs, and other displays. Controls simulate instrument

6 Start using LabVIEW
Tutorial: An Introduction to LabVIEW
input devices and supply data to the block diagram of the VI. Indicators simulate instrument output devices and display data the block diagram acquires or generates.
E.g., a “Numeric” can either be a “Numeric Control” or a “Numeric Indicator”, as seen below.
I you select a “Numeric Control”, it can easy be changed to an “Numeric Indicator” by right click on the object an select “Change to Indicator”
Or opposite, I you select a “Numeric Indicator”, it can easy be changed to an “Numeric Control” by right click on the object an select “Change to Control”

7 Start using LabVIEW
Tutorial: An Introduction to LabVIEW
The difference between a “Numeric Control” and a “Numeric Indicator” is that for a “Numeric Control” you may enter a value, while the “Numeric Indicator” is read-‐only, i.e., you may only read the value, not change it.
The appearance is also slightly different, the “Numeric Control” has an increment and an decrement button in front, while the “Numeric Indicator” has a darker background color in order to indicate that its read-‐only.
2.3 Block Diagram After you build the user interface, you add code using VIs and structures to control the front panel objects. The block diagram contains this code. In some ways, the block diagram resembles a flowchart.
8 Start using LabVIEW
Tutorial: An Introduction to LabVIEW
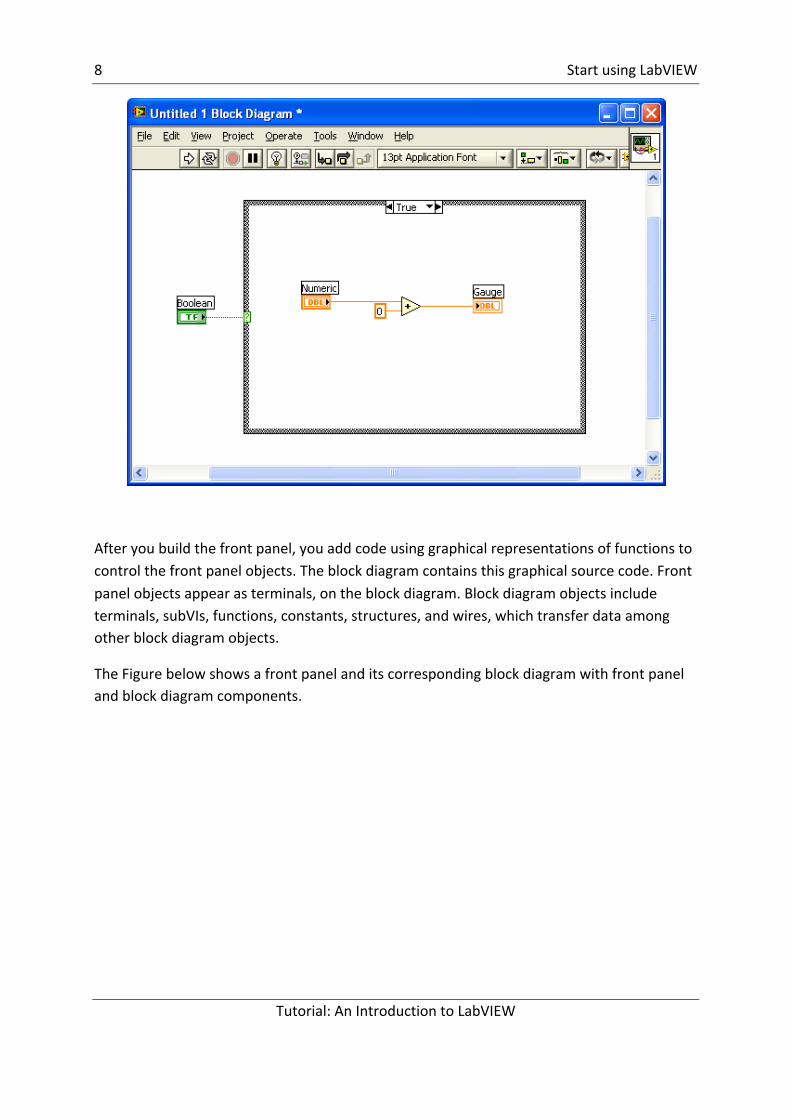
After you build the front panel, you add code using graphical representations of functions to control the front panel objects. The block diagram contains this graphical source code. Front panel objects appear as terminals, on the block diagram. Block diagram objects include terminals, subVIs, functions, constants, structures, and wires, which transfer data among other block diagram objects.
The Figure below shows a front panel and its corresponding block diagram with front panel and block diagram components.

9 Start using LabVIEW
Tutorial: An Introduction to LabVIEW
The different components are as follows:
1. Toolbar 2. Owned Label 3. Numeric Control 4. Free Label 5. Numeric Control Terminal 6. Knob Terminal 7. Numeric Constant 8. Multiply Function 9. Icon 10. Knob Control

10 Start using LabVIEW
Tutorial: An Introduction to LabVIEW
11. Plot Legend 12. XY Graph 13. Wire Data Path 14. XY Graph Terminal 15. Bundle Function 16. SubVI 17. For Loop Structure
2.4 Controls Palette The Controls and Functions palettes contain sub palettes of objects you can use to create a VI. When you click a sub palette icon, the entire palette changes to the sub palette you selected. To use an object on the palettes, click the object and place it on the front panel or block diagram. The Controls palette is available only on the front panel. The Controls palette contains the controls and indicators you use to build the front panel.

11 Start using LabVIEW
Tutorial: An Introduction to LabVIEW
The most used Sub Palettes are the Numeric Sub Palette, the Boolean Sub Palette and the String & Path Sub Palette.
You may change the appearance and the contents of the Controls palette:
You may Pin the palette, so it is always visible, just click the little pin button in the upper left corner of the palette:
If you want to change the content and appearance of the palette, click the “View” button.
Here you may change the way the palette should look.
If you click “Change Visible Categories…” you may change which Categories you want to have visible.

12 Start using LabVIEW
Tutorial: An Introduction to LabVIEW
2.4.1 Numeric Sub Palette
“Numerical Control” and “Numerical Indicator” are the most used objects in the numeric sub palette.

13 Start using LabVIEW
Tutorial: An Introduction to LabVIEW
2.4.2 Boolean Sub Palette
This palette has lots of different buttons you may use. OK, Cancel and Stop buttons are useful.
2.4.3 String & Path Sub Palette
In the String and Path palette we have String Controls, Combo Box, etc.
2.5 Function Palette

14 Start using LabVIEW
Tutorial: An Introduction to LabVIEW
The Functions palette is available only on the block diagram. The Functions palette contains the VIs and functions you use to build the block diagram.
2.6 Tools Palette You can create, modify, and debug VIs using the tools located on the floating Tools palette. The Tools palette is available on both the front panel and the block diagram. A tool is a special operating mode of the mouse cursor. The cursor corresponds to the icon of the tool selected in the Tools palette. Use the tools to operate and modify front panel and block diagram objects.

15 Start using LabVIEW
Tutorial: An Introduction to LabVIEW
The Tools palette is available from the View menu:
If you make sure “Automatic wiring” is disabled (I recommend you do so!) you may use the Tab key on your keyboard in order to switch between the most common tools.
The most used tools are:
Use the Operating tool, shown at left, to change the values of a control or select the text within a control. The Operating tool changes to the icon shown at left when it moves over a text control, such as a numeric or string control.
Use the Positioning tool, shown at left, to select, move, or resize objects. The Positioning tool changes to resizing handles when it moves over the edge of a resizable object.
Use the Labeling tool, shown at left, to edit text and create free labels. The
Labeling tool changes to the following icon when you create free labels.
Use the Wiring tool, shown at left, to wire objects together on the block diagram.

16 Start using LabVIEW
Tutorial: An Introduction to LabVIEW
2.7 Wiring In order to create the logical flow between the object on the Block Diagram, you need to use the Wiring tool in order to connect the different objects together.
Use the Wiring tool to wire objects together on the block diagram.
Available Keyboard Shortcuts when dealing with Wiring:
Ctrl-‐B is very useful. This short-‐cut removes all broken wires on the Block Diagram.
2.8 Toolbar Below we see the LabVIEW Toolbar:

17 Start using LabVIEW
Tutorial: An Introduction to LabVIEW
The behaviors of the different buttons are as follows:
Click the Run button to run a VI. LabVIEW compiles the VI, if necessary. You can run a VI if the Run button appears as a solid white arrow. The solid white arrow, shown above, also indicates you can use the VI as a subVI if you create a connector pane for the VI.
While the VI runs, the Run button appears as shown at left if the VI is a top-‐level VI, meaning it has no callers and therefore is not a subVI.
If the VI that is running is a subVI, the Run button appears as shown at left.
The Run button appears broken, shown at left, when the VI you are creating or editing contains errors. If the Run button still appears broken after you nish wiring the block diagram, the VI is broken and cannot run. Click this button to display the Error list window, which lists all errors and warnings.
Click the Run Continuously button, shown at left, to run the VI until you abort or pause execution. You also can click the button again to disable continuous running.
While the VI runs, the Abort Execution button, shown at left, appears. Click this button to stop the VI immediately if there is no other way to stop the VI. If more than one running top-‐level VI uses the VI, the button is dimmed.
Note: Avoid using the Abort Execution button to stop a VI. Either let the VI complete its data ow or design a method to stop the VI programmatically. By doing so, the VI is at a known state. For example, place a button on the front panel that stops the VI when you click it.
Click the Pause button, shown at left, to pause a running VI. When you click the Pause button, LabVIEW highlights on the block diagram the location where you paused execution, and the Pause button appears red. Click the button again to continue running the VI.
2.9 Execution In addition to the Toolbar buttons above the following Keyboard Shortcuts are available when dealing with Execution:

18 Start using LabVIEW
Tutorial: An Introduction to LabVIEW
2.10 The Objects short-‐cut menu The most often-‐used menu is the object shortcut menu. All LabVIEW objects and empty space on the front panel and block diagram have associated shortcut menus. Use the shortcut menu items to change the look or behavior of front panel and block diagram objects. To access the shortcut menu, right-‐click the object, front panel, or block diagram.
The Numeric control has the following short-‐cut/right-‐click menu:

19 Start using LabVIEW
Tutorial: An Introduction to LabVIEW
The short-‐cut menu will be different for the different controls or objects.
2.11 Dataflow Programming LabVIEW follows a dataflow model for running VIs. A block diagram node executes when all its inputs are available. When a node completes execution, it supplies data to its output terminals and passes the output data to the next node in the dataflow path.
Visual Basic, C++/C#, Java, and most other text-‐based programming languages follow a control flow model of program execution. In control flow, the sequential order of program elements determines the execution order of a program.
Example: Dataflow Programming
The Example shows a block diagram that adds two numbers and then subtracts 50.00 from the result of the addition. In this case, the block diagram executes from left to right, not because the objects are placed in that order, but because the Subtract function cannot execute until the Add function finishes executing and passes the data to the Subtract function. Remember that a node executes only when data are available at all of its input terminals, and it supplies data to its output terminals only when it finishes execution.
Example: Dataflow Programming

20 Start using LabVIEW
Tutorial: An Introduction to LabVIEW
In this example, consider which code segment would execute first-‐the Add, Random Number, or Divide function. You cannot know because inputs to the Add and Divide functions are available at the same time, and the Random Number function has no inputs. In a situation where one code segment must execute before another and no data dependency exists between the functions, use other programming methods, such as error clusters, to force the order of execution.
2.12 Help
The Context Help window (Ctrl +H) displays basic information about LabVIEW objects when you move the cursor over each object. The Context Help window is visible by default. To toggle display of the Context Help window, select Help-‐Show Context Help, press the Ctrl-‐H keys, or click the Show Context Help Window button on the toolbar.
When you move the cursor over front panel and block diagram objects, the Context Help window displays the icon for subVIs, functions, constants, controls, and indicators, with wires attached to each terminal. When you move the cursor over dialog box options, the Context Help window displays descriptions of those options. In the window, required connections are bold, recommended connections are plain text, and optional connections are dimmed or do not appear. The Figure below shows an example of the Context Help window.
Exercises Exercise: Create your first LabVIEW application (VI)

21 Start using LabVIEW
Tutorial: An Introduction to LabVIEW
Create a simple LabVIEW application (VI) with a Front Panel with some Controls and Indicators. Create the logic by connecting the Terminals on the Block Diagram
The Front Panel could look something like this:
The Block Diagram could look something like this:
Start the program with the Run button.
Exercise: Create a simple Calculator
Create a simple calculator that Add and Subtract 2 numbers like this:

22 Start using LabVIEW
Tutorial: An Introduction to LabVIEW
Start the program with the Run button.
Exercise: Write Data to File
Create a VI that writes data to a Text File.
Use Vis or functions from the File I/O palette
The program could look something like this:

23 Start using LabVIEW
Tutorial: An Introduction to LabVIEW
Exercise: Read Data from File
Create another VI that read the text file you created in the previous VI.

24
3 Sub VIs This chapter explains the basic concepts of creating and using Sub VIs in LabVIEW.
Topics:
• Create New Sub VI from Scratch • Create Sub VI from existing code • Using Sub VIs
When you place a VI on the block diagram, LabVIEW considers the VI to be a subVI. When you double-‐click a subVI, its front panel and block diagram appear, rather than a dialog box in which you can configure options. The front panel includes controls and indicators. The block diagram includes wires, front panel icons, functions, possibly subVIs, and other LabVIEW objects. The upper right corner of the front panel and block diagram displays.
Below we see an example of a bad Block Diagram. This example does not make use of the SubVI functionality in LabVIEW at all! This makes the Block diagram hard to read and understand. The size of the diagram is also too large! The Block Diagram should always fit into the screen. Both the Front Panel and the Block Diagram should fit into a screen resolution of 1024x768.

25 Sub VIs
Tutorial: An Introduction to LabVIEW
With use of SubVIs, the example above could turn into, e.g.:
As you can see, much of the code in the Main VI have been replaced and put into SubVIs. The program is now more readable.
Another approach is to use a so-‐called State Machine principle (more about this in chapter 11 -‐ Design Techniques ).
Available Keyboard Shortcuts when dealing with Sub Vis:

26 Sub VIs
Tutorial: An Introduction to LabVIEW
3.1 Create New Sub VI from Scratch Select “Blank VI” in the “Getting Started” window when opening LabVIEW, or when LabVIEW is already opened select File → New V” or use the short-‐cut Ctrl+N.
3.1.1 Input and Output SubVI Connectors
Most SubVIs will have input and output “connectors”. This is similar with functions or methods in other programming language that have input arguments and an output/result.
In order to create connectors, Right-‐click on the icon in the upper right corner of the VI and select “Show Connector”.
You may select different Patterns, i.e., how many input and output connectors you need.

27 Sub VIs
Tutorial: An Introduction to LabVIEW
Make sure you select a Pattern with enough connectors even if you don’t need all the connectors at the moment. I recommend that you standardize on the pattern in the Figure above.
Select the Wire tool and click on the wanted connector, then click on the Control or Indicator on the Front Panel you want to connect to this connector.
You should always follow these connector rules:
• Upper left connector: “Reference” In • Upper right connector: “Reference” Out • Lower left connector: Error In Cluster • Lower right connector: Error Out Cluster
Example: SubVI Connectors
See example below about these connector rules:

28 Sub VIs
Tutorial: An Introduction to LabVIEW
Most common VIs that exits follow these rules, see example below.
If you follow these connector rules it’s much easier to create a clean and neat code like this:
By doing this it’s also clear how the Data flows in the program. It should always flow from left to right.
3.1.2 Icon Editor
You should also create a suitable icon for your SubVI.

29 Sub VIs
Tutorial: An Introduction to LabVIEW
In order to open the Icon Editor, double-‐click on the icon in the upper right corner of your VI.
Below we see a block diagram with SubVIs icon appearance created with the Icon Editor.
3.2 Create Sub VI from existing code If you find out that you code is getting messy, you could consider put some code into a SubVI.

30 Sub VIs
Tutorial: An Introduction to LabVIEW
The procedure is as follows:
1. Select the part of your code you want to turn into a SubVI 2. From the Edit menu, select “Create SubVI” 3. LabVIEW will automatically create a SubVI for the selected code. 4. Clean up automatically created wires, etc. 5. Create a suitable icon for your SubVI
Although this is quite easy to do this, I do not recommend that you use this functionality to much. This is because you should create and use SubVIs from the first moment you start creating your application and not afterwards when you find out that you have been creating a messy code.
So you should structure and design your code with the use of SubVIs from the beginning!
3.3 Using Sub VIs Below we see an example of how to use SubVIs in a program (Top VI or SubVIs):

31 Sub VIs
Tutorial: An Introduction to LabVIEW
You may open a SubVI from the File menu, select a SubVI from the Functions palette or use drag and drop in different ways, e.g., you may drag a VI from the File Explorer in Windows directly into an existing VI you have already opened in LabVIEW
Exercises Exercise: Convert C to F VI
Create a SubVI that convert a Temperature in Celsius to a Temperature in Fahrenheit
1. Create the SubVI 2. Create the Front Panel and the Block Diagram as shown above 3. Create necessary Connectors 4. Create a suitable icon, e.g.:
5. Use the SubVI in another VI 6. Run the program to see if it works 7. Expand the program so you can select if you want to convert from Celsius to
Fahrenheit or from Fahrenheit to Celsius

32 Sub VIs
Tutorial: An Introduction to LabVIEW
Exercise: Convert existing code into a SubVI
Convert a part of your application into a SubVI by using the Create SubVI function in LabVIEW.

33
4 Customize LabVIEW LabVIEW has lots of possibilities for customizing the appearance and the use of the LabVIEW environment. Select “Options…” from the Tools menu.
The default settings is not necessary the best, here are some recommendations for setting up the LabVIEW environment.
Category: Block Diagram

34 Customize LabVIEW
Tutorial: An Introduction to LabVIEW
• Disable “Enable auto wiring” option. This prevents LabVIEW from automatically connecting adjacent blocks. Although it seems useful to have auto wiring enables, it is my experience that the auto wiring is a little annoying since it tends to draw wires between blocks when you do not want any wire.
• Disable “Place front panel elements as icons” option. This causes LabVIEW to use small terminal icons on the block diagram. If you, instead, activate this option, the terminal icons are larger, with a mimic of the element as it appears at the front panel.
Category: Controls/Functions Palettes
• In the Format list: select “Category (Icons and Text)”
Category: Alignment Grid
• Turn off “Show Front Panel Grid” and “Show Block Diagram Grid”
Exercises Exercise: Customize LabVIEW
Try the different settings explained in this chapter. Turn them on and off and watch the different.

35
5 Loops and Structures This chapter explains the basic concepts of Loops and Structures in LabVIEW.
The topics are as follows:
• For Loop • While Loop • Case Structure • Sequence Structure • Event Structure
The different Loops and Structures available are located in the “Structures” sub palette in the Functions palette on the Block Diagram.
5.1 Loops The most important loops are:
• For Loop • While Loop

36 Loops and Structures
Tutorial: An Introduction to LabVIEW
These loops will be explained in detail below.
5.1.1 For Loop
A For Loop executes a sub diagram a set number of times. The Figure below shows an empty For Loop in LabVIEW.
A For loop executes its sub diagram n times, where n is the value wired to the count ( ) terminal. The iteration ( ) terminal provides the current loop iteration count, which ranges from 0 to n-‐1.
After you create a For Loop, you can use shift registers to pass values from one iteration to the next. If you wire an array to a For Loop, you can read and process every element in that array by enabling auto-‐indexing. You also can enable auto-‐indexing by configuring a For Loop to return an array of every value generated by the loop.
You can add a conditional terminal to configure a For Loop to stop when a Boolean condition or an error occurs. A For Loop with a conditional terminal executes until the condition occurs or until all iterations complete, whichever happens first. To add a conditional terminal to a For Loop, right-‐click the For Loop border and select Conditional Terminal from the shortcut menu. You must wire the conditional terminal and either wire the count terminal or auto-‐index an input array for the loop to execute and for the VI to run.
To convert a For Loop to a While Loop, right-‐click the For Loop and select Replace with While Loop from the shortcut menu.
Example: For Loop
The following example uses a For Loop in order to create an array with 10 elements and fill it with random numbers.

37 Loops and Structures
Tutorial: An Introduction to LabVIEW
5.1.2 While Loop
A While loop repeats the sub diagram inside it until the conditional terminal, an input terminal, receives a particular Boolean value. The Boolean value depends on the continuation behavior of the While Loop. Right-‐click the conditional terminal and select Stop if True or Continue if True from the shortcut menu. You also can wire an error cluster to the conditional terminal, right-‐click the terminal, and select Stop on Error or Continue while Error from the shortcut menu. The While Loop always executes at least once.
Below we see an empty While loop:
After you create a While Loop, you can use shift registers to pass values from one iteration to the next. If you wire an array to a While Loop, you can read and process every element in that array by enabling auto-‐indexing.
In order to convert a While Loop into a For Loop, right-‐click the While Loop and select “Replace with For Loop” from the shortcut menu. To convert a While Loop into a Timed Loop, right-‐click the While Loop and select “Replace with Timed Loop” from the shortcut menu.
Example: While Loop

38 Loops and Structures
Tutorial: An Introduction to LabVIEW
This example run until either the user clicks the stop button or number of iterations is greater than 10.
5.2 Structures
5.2.1 Case Structure
The Case Structure has one or more sub diagrams, or cases, exactly one of which executes when the structure executes. The value wired to the selector terminal determines which case to execute and can be Boolean, string, integer, or enumerated type. You may right-‐click the structure border to add or delete cases. Use the Labeling tool to enter value(s) in the case selector label and configure the value(s) handled by each case.
Below we see an empty Case structure:

39 Loops and Structures
Tutorial: An Introduction to LabVIEW
Below we see an example of a Case structure with 2 cases, a “True” case and a “False” case. Depending of the Boolean input value, the Numeric1 and Numeric2 is either Added or Subtracted.
5.2.2 Sequence Structure
A Sequence structure Consists of one or more sub diagrams, or frames, that execute sequentially. Right-‐click the structure border to add and delete frames or to create sequence locals to pass data between frames. Use the Stacked Sequence structure to ensure a sub diagram executes before or after another sub diagram.
Below we see an empty Sequence structure.

40 Loops and Structures
Tutorial: An Introduction to LabVIEW
Below we see an example where we use “Sequence Local”, i.e., we pass a value from one
sequence to the next
Note! To take advantage of the inherent parallelism in LabVIEW, avoid overusing Sequence structures. Sequence structures guarantee the order of execution, but prohibit parallel operations. Another negative to using Sequence structures is that you cannot stop the execution part way through the sequence.
5.2.3 Event Structure
An Event structure has one or more sub diagrams, or event cases, exactly one of which executes when the structure executes. The Event structure waits until an event happens, then executes the appropriate case to handle that event. Right-‐click the structure border to add new event cases and configure which events to handle. Wire a value to the Timeout terminal at the top left of the Event structure to specify the number of milliseconds the

41 Loops and Structures
Tutorial: An Introduction to LabVIEW
Event structure should wait for an event to occur. The default is –1, indicating never to time out.
Below we see an example:
Right-‐click on the border in order to Add/Edit Event Cases, see the dialog box below.

42 Loops and Structures
Tutorial: An Introduction to LabVIEW
Exercises Exercise: For Loop
Create a VI with a For Loop. Create the logic to find out if a number in an array is greater than 10. See Front Panel below:

43 Loops and Structures
Tutorial: An Introduction to LabVIEW
Exercise: While Loop
Create a VI with a While Loop. Create the logic to find out which (the first) index in the array that have a number greater than 30. See Front Panel below:
Exercise: Case Structure
Create a VI with a Case Structure.
Use a Case structure inside a For Loop to write the text “The Number is greater than 10” if value is greater than 10. See Front Panel below:

44 Loops and Structures
Tutorial: An Introduction to LabVIEW
Exercise: Sequence Structure
Create a VI with a Sequence Structure. See Front Panel below:
Exercise: Event Structure
Create a VI with an Event Structure. See Front Panel below:

45
6 Troubleshooting and Debugging
This chapter explains the basic concepts of troubleshooting and debugging in LabVIEW.
Topics:
• How to find errors • Highlight Execution • Probes • Breakpoints • Step into/over/out debugging
6.1 How to find errors If a VI does not run, it is a broken, or “nonexecutable”, VI. The Run button often
appears broken, shown at left, when you create or edit a VI. If it is still broken when you finish wiring the block diagram, the VI is broken and will not run. Generally, this means that a required input is not wired, or a wire is broken.
Click the broken Run button to display the Error list window, which lists all the errors. Double-‐click an error description to display the relevant block diagram or front panel and highlight the object that contains the error.
6.2 Highlight Execution View an animation of the execution of the block diagram by clicking the Highlight
Execution button. Execution highlighting shows the flow of data on the block diagram from one node to another using bubbles that move along the wires. Note! Execution highlighting greatly reduces the speed at which the VI runs.

46 Troubleshooting and Debugging
Tutorial: An Introduction to LabVIEW
6.3 Probes Use the Probe tool to check intermediate values on a wire as a VI runs.
When execution pauses at a node because of single-‐stepping or a breakpoint, you also can probe the wire that just executed to see the value that flowed through that wire. You also can create a custom probe to specify which indicator you use to view the probed data. For example, if you are viewing numeric data, you can choose to see that data in a chart within the probe. To create a custom probe, right-‐click a wire and select Custom Probe-‐New from the shortcut menu.

47 Troubleshooting and Debugging
Tutorial: An Introduction to LabVIEW
6.4 Breakpoints
Use the Breakpoint tool to place a breakpoint on a VI, node, or wire on the block diagram and pause execution at that location. When you set a breakpoint on a wire, execution pauses after data pass through the wire. Place a breakpoint on the block diagram workspace to pause execution after all nodes on the block diagram execute. When a VI pauses at a breakpoint, LabVIEW brings the block diagram to the front and uses a marquee to highlight the node or wire that contains the breakpoint. LabVIEW highlights breakpoints with red borders for nodes and block diagrams and red bullets for wires. When you move the cursor over an existing breakpoint, the black area of the Breakpoint tool cursor appears white. Use the Breakpoint tool to click an existing breakpoint to remove it.
You may also right-‐click on the wire in order to set a breakpoint or open the Breakpoint Manager.

48 Troubleshooting and Debugging
Tutorial: An Introduction to LabVIEW
Breakpoint Manager is a tool for enable, disable and delete breakpoints.
6.5 Step into/over/out debugging Available Keyboard Shortcuts when Debugging:

49 Troubleshooting and Debugging
Tutorial: An Introduction to LabVIEW
Exercises Exercise: Highlight Execution
Enable “Highlight Execution” in one of your programs, and see how it works.
Exercise: Probes
Set Several Probes around in your application and watch how it works. Use the Probe watch Window and check out the functionality this tool offers.
Also check out the “Custom Probe” and the “Find Probe” functionality.
Exercise: Breakpoints
Set some Breakpoint around in your code and check out how it works. Use the Breakpoint Manager tool.
Example:

50 Troubleshooting and Debugging
Tutorial: An Introduction to LabVIEW
Exercise: Step into/over/out debugging
Use the Step into/over/out functionality together with your Breakpoints and learn how you can use them and see what the difference between them is.

51
7 Working with Data This chapter explains the basic concepts of creating and using Sub Vis in LabVIEW.
Topics:
• Arrays • Array Functions • Cluster
7.1 Arrays Arrays are very powerful to use in LabVIEW. In all your applications you would probably use both One-‐Dimensional Arrays and Two-‐Dimensional Arrays.
7.1.1 Auto-‐Indexing
LabVIEW uses a powerful mechanism called “Auto-‐indexing”.
For Example you may use a For loop to create Array data like this:
Or you may use an Array like this in order to automatically specify number of iterations:
52 Working with Data
Tutorial: An Introduction to LabVIEW
7.1.2 Array Functions
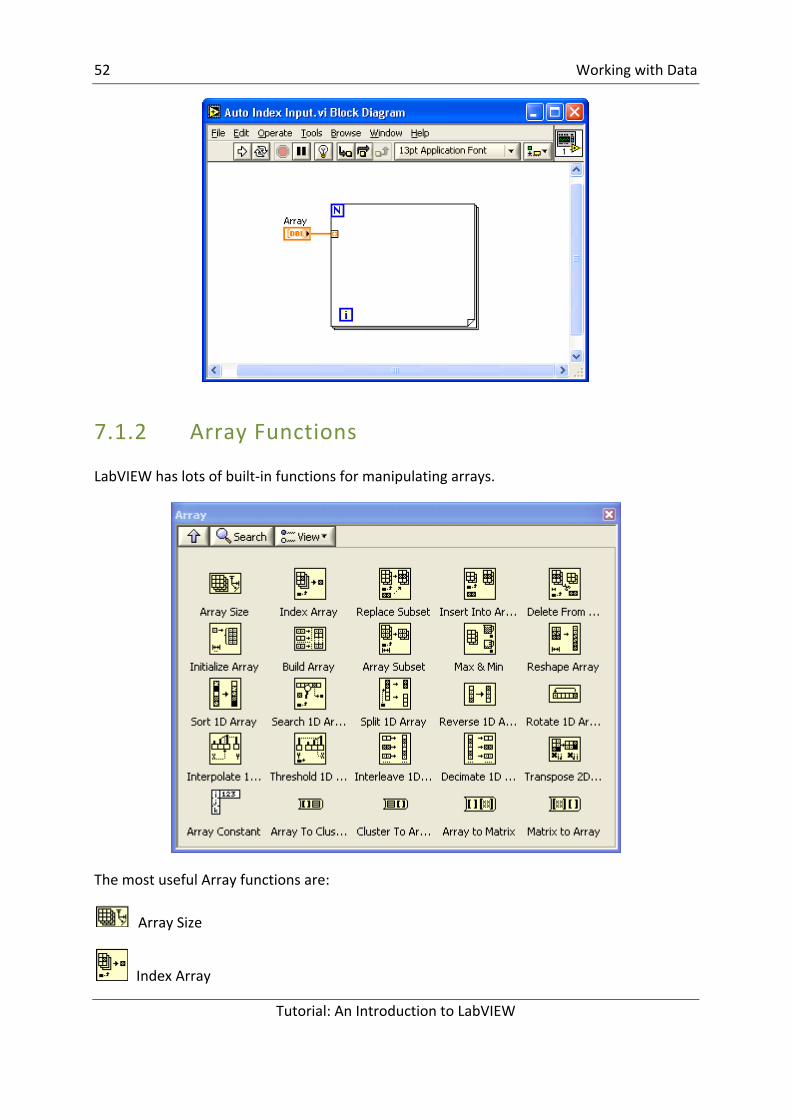
LabVIEW has lots of built-‐in functions for manipulating arrays.
The most useful Array functions are:
Array Size
Index Array

53 Working with Data
Tutorial: An Introduction to LabVIEW
Delete from Array
Search 1D Array
Initialize Array
Build Array
Array Subset
Array Constant
All these functions are basic (but very useful) array functions you will probably be using in all your applications and VIs.
Example: Array functions
In this example we see how we can use these Array functions and what they do.

54 Working with Data
Tutorial: An Introduction to LabVIEW
The resulting Front Panel is as follows:
7.2 Cluster Clusters group data elements of mixed types, such as a bundle of wires, as in a telephone cable, where each wire in the cable represents a different element of the cluster. A cluster is similar to a record or a struct in text-‐based programming languages. Bundling several data elements into clusters eliminates wire clutter on the block diagram and reduces the number of connector pane terminals that subVIs need. The connector pane has, at most, 28 terminals. If a front panel contains more than 28 controls and indicators that you want to use programmatically, group some of them into a cluster and assign the cluster to a terminal on the connector pane. Like an array, a cluster is either a control or an indicator. A cluster cannot contain a mixture of controls and indicators.

55 Working with Data
Tutorial: An Introduction to LabVIEW
Although cluster and array elements are both ordered, you must unbundle all cluster elements at once rather than index one element at a time. You also can use the “Unbundle By Name” function to access specific cluster elements.
Example of a Cluster in LabVIEW:
7.2.1 Cluster Order
You may sort the different elements in the cluster by right-‐click on the cluster border and select “Reorder Controls in Cluster…”

56 Working with Data
Tutorial: An Introduction to LabVIEW
7.2.2 Cluster Elements
In order to manipulate and work with cluster LabVIEW offers lots of functions, such as the “Bundle” and “Unbundle” functions.
In order to write to a cluster from the code, you may use the “Bundle” function or the “Bundle By Name” function. See example below:

57 Working with Data
Tutorial: An Introduction to LabVIEW
Example: Clusters
In order to get access to the different elements in the cluster, you need to “Unbundle” by using the “Unbundle” function or the “Unbundle By Name”. See example below:
Exercises Exercise: Arrays
Create some simple VIs where you use these array functions to manipulate array data:
Array Size
Index Array
Delete from Array
Search 1D Array
Initialize Array
Build Array
Array Subset

58 Working with Data
Tutorial: An Introduction to LabVIEW
Exercise: Arrays
Create a SubVI that find the “peaks” in the input array regarding to an input peak level.
Exercise: Clusters
Create a Cluster and get the different values from the controls in the Cluster. See Front Panel below:

59
8 Working with Strings Working and manipulating with strings is an important part in LabVIEW development.
On the Front panel we have the following String controls and indicators available from the Control palette:
On the Block Diagram we have the following String functions available from the Functions palette:
Some of the most important String functions are:
Concatenate Strings

60 Working with Strings
Tutorial: An Introduction to LabVIEW
This function concatenates several strings into on string:
Search and Replace String
Use this when you want to replace or remove a certain text in a string.
Match Pattern

61 Working with Strings
Tutorial: An Introduction to LabVIEW
This is the most useful function when it comes to string manipulation.
Format Into String
Example:
Exercises Here are some exercises using some of the String functions that are available in LabVIEW.
Exercise: SubVI: Remove leading zeros in string.vi

62 Working with Strings
Tutorial: An Introduction to LabVIEW
Create a SubVI which removes leading zeros in a string. Create a Test VI that uses the SubVI.
Exercise: SubVI: Remove space from end of string.vi
Create a SubVI which removes all spaces from the end of the string. Create a Test VI that uses the SubVI.
Exercise: SubVI: Add 2 String.vi
Create a SubVI which adds 2 strings into one. Create a Test VI that uses the SubVI.

63
9 Error Handling This chapter explains the basic concepts of handle errors in your code.
Topics:
• Finding Errors • Error Wiring • Error Handling
9.1 Finding Error If a VI does not run, it is a broken, or “nonexecutable”, VI. The Run button often appears
broken, shown at left, when you create or edit a VI. If it is still broken when you finish wiring the block diagram, the VI is broken and will not run. Generally, this means that a required input is not wired, or a wire is broken. Click the broken Run button to display the Error list window, which lists all the errors. Double-‐click an error description to display the relevant block diagram or front panel and highlight the object that contains the error.
9.2 Error Wiring Error handling is important in all programming languages. LabVIEW has powerful mechanism for handling errors and error wiring.
You should always wire the Error cluster between all SubVIs, nodes, etc. that support this, see example below.
The Error cluster is located in the Controls palette here:

64 Error Handling
Tutorial: An Introduction to LabVIEW
The Error Cluster:
The Error cluster contains of the following parts:
• Status – True/False. False: No Error, True: Error • Code – Error Code • Source – Textual Error message
9.3 Error Handling in SubVIs When creating SubVIs you should always create an Error In and an Error Out. In the SubVI code you should also use a Case structure and wire the Error in cluster to the Case Selector as shown below.

65 Error Handling
Tutorial: An Introduction to LabVIEW
9.4 Error Handling LabVIEW has several useful SubVIs, etc for Error Handling:

66 Error Handling
Tutorial: An Introduction to LabVIEW
These are:
In general you should always show the error to the user. See LabVIEW Help for more details of how to use these SubVIs.
Exercises Exercise: Error Handling
Check out the different Error Vis in LabVIEW. Use them in some of your previous Vis.

67
10 Working with Projects This chapter explains the basic concepts of the project Explorer in LabVIEW.
Topics:
• Project Explorer • Building .exe (executable) applications • Deployment: Create an Installer
10.1 Project Explorer It is not necessary to use the Project Explorer when developing your LabVIEW code, but it is an easy way to structure your code, especially for larger projects.
The project Explorer is necessary when you want to deploy your code into, e.g., an executable (.exe) application, build a setup, etc.

68 Working with Projects
Tutorial: An Introduction to LabVIEW
The Project Explorer is also very useful when you integrate a source control tool, such as Team Foundation Server, Visual Source Safe, etc. Then you may easily check files in and out of the source code system.
In order to create a new Project in LabVIEW, simply select “Empty Project” from the Getting Started window when you open LabVIEW.
10.2 Deployment When your application is finished, you may want to distribute or deploy your application and share it with others.
The Project Explorer gives you several choices when it comes to distribute and deploy your application. Some of the options are:
• Create an executable application (.exe) – this means that the target doesn’t need to have LabVIEW installed on their computer. All the target need is LabVIEW Run-‐Rime, which is a small installation package.

69 Working with Projects
Tutorial: An Introduction to LabVIEW
• You may create your own installer, so all the target need is to run a setup.exe in order to use your application
• Other possibilities is to create a Web Service or a Shared Library (DLL) of your application
All these options are available from the Project Explorer, just right-‐click on your “Build Specifications” node.
We will go through how we create an executable application. Click Build Specifications→New→Application (EXE).
In the Properties window fill in your name of the application.

70 Working with Projects
Tutorial: An Introduction to LabVIEW
Make sure you select a Startup VI.
There are lots of properties and setting you may use in order to create your application, go through all the Categories in the Properties window.
When you have finished all the steps, just select “Build” in order to create your application.
When you make changes in your application, it is easy to rebuild your application:

71 Working with Projects
Tutorial: An Introduction to LabVIEW
Exercises Exercise: Project Explorer
Create a new Project and put on of your existing application into the project
Exercise: Deployment
Create an executable application

72
11 Design Techniques This chapter explains some useful techniques to use when creating your application.
Topics:
• Force the Program Flow using an Error cluster • Shift Register • State Machine • Multiple Loops • Templates
11.1 Force Program Flow As mentioned earlier, LabVIEW follows a dataflow model for running VIs. A block diagram node executes when all its inputs are available. When a node completes execution, it supplies data to its output terminals and passes the output data to the next node in the dataflow path.
In the example below we cannot be sure that the DAQmx Write.vi executes before the DAQmx Stop Task.vi executes. LabVIEW will in this case randomly execute one of these first. If the Stop VI happens to execute first then the Write VI will failed because task has been stopped.
In the example below we wire the Error cluster through all the VIs, and there will be no doubt that the Write VI will execute before the Stop VI.

73 Design Techniques
Tutorial: An Introduction to LabVIEW
This approach will also take care of the error handling in your program, which is very important in real-‐world applications.
11.2 Shift Register Use shift registers on For Loops and While Loops to transfer values from one loop iteration to the next. Shift registers are similar to static variables in text-‐based programming languages. A shift register appears as a pair of terminals, directly opposite each other on the vertical sides of the loop border. The right terminal contains an up arrow and stores data on the completion of an iteration. LabVIEW transfers the data connected to the right side of the register to the next iteration. Create a shift register by right-‐clicking the left or right border of a loop and selecting Add Shift Register from the shortcut menu.
A shift register transfers any data type and automatically changes to the data type of the first object wired to the shift register. The data you wire to the terminals of each shift register must be the same type.
To initialize a shift register, wire any value from outside the loop to the left terminal. If you do not initialize the shift register, the loop uses the value written to the shift register when the loop last executed or the default value for the data type if the loop has never executed.
Use a loop with an uninitialized shift register to run a VI repeatedly so that each time the VI runs, the initial output of the shift register is the last value from the previous execution. Use an uninitialized shift register to preserve state information between subsequent executions of a VI. After the loop executes, the last value stored in the shift register remains at the right terminal. If you wire the right terminal outside the loop, the wire transfers the last value stored in the shift register. You can add more than one shift register to a loop. If you have multiple operations within a loop, use multiple shift registers to store the data values from those different processes in the structure.

74 Design Techniques
Tutorial: An Introduction to LabVIEW
11.3 State Programming Architecture Creating VIs using the State Machine approach is very useful when creating (large) applications.
In general, a state machine is a model of behavior composed of a finite number of states, transitions between those states, and actions. It is similar to a "flow graph" where we can inspect the way in which the logic runs when certain conditions are met.
Sometimes, you may want to change the order of the sequence, repeat one item in the sequence more often than the other items, stop a sequence immediately, or have items in the sequence that may execute only when certain conditions are met. Although your program may not have any such requirements, there is always the possibility that the program must be modified in the future. Therefore, a state programming architecture is a good choice, even if a sequential programming structure is sufficient. The following list

75 Design Techniques
Tutorial: An Introduction to LabVIEW
describes more complex programming requirements that justify the use of a state programming architecture for an application.
• You need to change the order of the sequence • You must repeat an item in the sequence more often than other items • You want some items in the sequence to execute only when certain conditions are
met
The State Machine approach in LabVIEW uses a Case structure inside a While loop to handle the different states in the program, and the transitions between them. The Shift Register is used to save data from and between the different states.
Below we see examples of a state machine principle implemented in LabVIEW.
Simple State Machine principle

76 Design Techniques
Tutorial: An Introduction to LabVIEW
State Machine with multiple transitions depending on the State:
More advanced State Machine using Shift Registers:

77 Design Techniques
Tutorial: An Introduction to LabVIEW
11.4 Multiple Loops/Parallel programming
Often, you need to program multiple tasks so that they execute at the same time. In LabVIEW tasks can run in parallel if they do not have a data dependency between them, and if they are not using the same shared resource. An example of a shared resource is a file, or an instrument.
Using multiple While loops is sometimes useful in applications that need to handle User interactions in parallel with, e.g., DAQ operations, etc.
Below we see an example of how this structure could look like. The upper loop could handle interaction with the user, while the lower loop could handle DAQ operations, such as reading and writing to some I/O equipments.

78 Design Techniques
Tutorial: An Introduction to LabVIEW
In order to pass data between the loops, you may e.g. use local variables. The loop may have different time cycles. The I/O may require faster cycles than the User interaction loop.
11.5 Templates You should create your own templates for such VI you use a lot. It is easy to create your own templates for scratch, just create a VI as you normally do and then save it as a template with the ending “.vit”. You may also convert a VI you already made just by changing the extension to “.vit”.
You should copy your templates to the LabVIEW template folder which is default located in “C:\Program Files\National Instruments\LabVIEW X.X\Templates\”.

79 Design Techniques
Tutorial: An Introduction to LabVIEW
The Templates will then be available from the Getting Started Window or File→New… in LabVIEW.
I may case I have created a sub folder called “My Templates” where I place all my templates.

80 Design Techniques
Tutorial: An Introduction to LabVIEW
Exercises Here are some exercises about shift-‐registers, State Machines and parallel programming.
Exercise: Shift-‐register
Create a VI (see example below) where you have the following states:
• Initialize • Write • Read • Close
In the VI you will use a shift-‐register as a temporary storage. In the Write state you Write Data to the storage (shift-‐register) while you in the Read state will read the Data from the Storage.
See Example below:

81 Design Techniques
Tutorial: An Introduction to LabVIEW
Write a Test program that test the SubVI, e.g.,
This example shows how you can use a shift-‐register as a temporary storage, which is very useful in many situations.
Exercise: State Machine
Use the State Machine principle on one of your previous exercises.
Exercise: Parallel Programming
Create a VI that consists of 2 parallel loops. Use local variables and other mechanisms in order to share data between the 2 loops.
Exercise: Templates

82 Design Techniques
Tutorial: An Introduction to LabVIEW
Strip some of yours previous Vis and save them as reusable Templates.

83
12 User Interface This chapter explains the basic concepts of creating user-‐friendly Graphical User Interfaces (GUI) in LabVIEW.
Topics:
• Decorations • Tab Control • Splitter • Sub Panel • Etc.
Below we see a Front Panel (GUI) with a “poor” design.
The information (Controls and Indicators) on the Front Panel is not structured. You should group elements that naturally belong together and use different colors with care.
When creating Graphical User Interfaces (GUI) you should use the controls from the System palette and not from the Modern or Classic palettes. Modern Controls may be used in Sub Vis with no visible User Interface (for the user).

84 User Interface
Tutorial: An Introduction to LabVIEW
The appearance of the controls in the System palette is standard MS Windows look and feeling and this look is familiar for most users. These controls also change appearance due to changes in the appearance in the operation system.
12.1 VI Properties In order to make the appearance of the Window that hosts your application, you should always make some changes in the “VI Properties”.
You find the “VI Properties” by right-‐click on the icon in the upper right corner of your VI.

85 User Interface
Tutorial: An Introduction to LabVIEW
The first thing you should change is the “Window title”. Here you may type appropriate name of your application or SubVI.
The next you should do is to the “Customize” button in order to customize the Window appearance.
Below we see an application with a simple and neat User Interface and with a Customized Windows appearance.

86 User Interface
Tutorial: An Introduction to LabVIEW
Below we see a professional application created in LabVIEW that implement common GUI objects such as a Toolbar, a Tree view, a List view, etc..

87 User Interface
Tutorial: An Introduction to LabVIEW
Exercises Exercise: User Interface
Create a Dialog Box where you use some of the Controls from the System palette. Make the necessary settings in VI Properties in order to hide menus, buttons, create a Title, etc.
Create a Test VI from where you open this Dialog Box, enter some data in the Dialog Box, and then retrieve these data in the calling VI.
Example:

88
13 Plotting Data This chapter explains the basic concepts when plotting data in LabVIEW.
LabVIEW offers powerful functionality for plotting data. In the Graph palette we have lots of useful controls for plotting and visualization of data.
The most useful are:
• Waveform Chart • Waveform Graph • XY Graph
Example:
This simple example creates a graph with some random values.

89 Plotting Data
Tutorial: An Introduction to LabVIEW
The example below show the basic difference between a “Chart” and a “Graph”.

90 Plotting Data
Tutorial: An Introduction to LabVIEW
You use the “Graph” if you want to plot a set of data, e.g., an array with data, plot data from a file, etc. Use the “Chart” if you want to plot one data point at a time, e.g., inside a loop, etc.
13.1 Customizing The different Chart components in LabVIEW offer a great deal of customizing.
You may click on the “Plot Legend” in order to set colors, different line styles, etc.

91 Plotting Data
Tutorial: An Introduction to LabVIEW
If you right-‐click on the Graph/Chart, you may set properties such as auto-‐scaling, etc.
If you select Properties, you get the following dialog:

92 Plotting Data
Tutorial: An Introduction to LabVIEW
You may also select which items that should be visible or not.
The “Graph Palette” lets you zoom in and out on the Graph, etc.
Exercises Exercise: Graph
Create a VI that reads data from a file and plot the data in a Graph component.
Exercise: Chart
Create a VI where you use Data Binding in order to retrieve data from an OPC demo.
Data Binding is set in the Properties → Data Binding tab:

93 Plotting Data
Tutorial: An Introduction to LabVIEW
Exercise: Customizing
Customize the Graph and the Chart in the examples above in order to set colors, line thickness, etc.

94
14 Tips & Tricks This chapter gives you some useful Tips & Tricks regarding LabVIEW.
14.1 10 functions you need to know about
These are the 10 most useful functions in LabVIEW, so you could already now learn how to use them and where to find them!
Build Array
This example using the Build Array function inside a For loop in order build an array with 10 elements.
Index Array

95 Tips & Tricks
Tutorial: An Introduction to LabVIEW
It is always useful to find a specific value in an array:
The Index Array is extendible, so you can drag it out to find more than one elements:
Array Size
Find the size of an arbitrary array:

96 Tips & Tricks
Tutorial: An Introduction to LabVIEW
Select
Depending on the input data, go to the Alarm case or the Write Data case.
Concatenate Strings
This function concatenate several strings into on string:
Search and Replace String

97 Tips & Tricks
Tutorial: An Introduction to LabVIEW
Use this when you want to replace or remove a certain text in a string.
Match Pattern
This is the most useful function when it comes to string manipulation.
Format Into String

98 Tips & Tricks
Tutorial: An Introduction to LabVIEW
Example:
Fract/Exp String to Number
This function converts a string into a number:
Example: Number To Fractional String

99 Tips & Tricks
Tutorial: An Introduction to LabVIEW
Example:
14.2 The 10 most useful Short-‐cuts These are the 10 most useful short-‐cuts in LabVIEW, so you could already now learn how to use them!
Short-‐Cut Description Ctrl + B Deletes all broken wires in a VI Ctrl + . Stops the Running VI Ctrl + E Toggle between the Front Panel and Block Diagram Tab Cycles through the most common Tools (Automatic Tool Selection
should be disabled!) Ctrl + Mouse wheel
Scrolls through subdiagrams in Case, Event or Sequence structures
Ctrl + H Displays the Context Help window Ctrl + Mouse Double-‐click on a SubVI
Opens the Block Diagram directly
Ctrl + Arrows (→←←↓ )
Move faster. You first have to select a SubVI, a Function, Object, etc
Ctrl + W Close the SubVI Double-‐click on a wire
Selects the hole wire

100
15 Example Application In this example we will go through an example application. The application uses most of the LabVIEW features you have learned in this Tutorial.
The application is called “Glossary”. It is a simple application that learns kid’s words in English. Since the application is for kids, the user interface is create with a “childish” look and feel.
This is an example of how to create a user-‐friendly application in LabVIEW that uses most of the functionality in LabVIEW, such as State-‐machine principles, reading and writing to files, dialog boxes, graphics and sound effects. Basic functions for string and array manipulation, and of course while loops, case structures, subVIs, etc. The example also uses the Project Explorer to collect all the files in one place and to create an executable file of the solution. Finally it uses the Project Explorer to create a setup package you can use to install the application easily on other computers.

101 Example Application
Tutorial: An Introduction to LabVIEW
I created this application for my kids in the Primary school who had problems with learning their homework in English.
Use the code as an example for creating your own stunning LabVIEW applications. The code is available for download at my blog: http://home.hit.no/~hansha.
Below we see the Glossary List:
If you click on the little book symbol in your application, this window will pop up:
Click tis symbol and you can enter new words:

102 Example Application
Tutorial: An Introduction to LabVIEW
The application uses the Project Explorer:

103 Example Application
Tutorial: An Introduction to LabVIEW
This makes it easy to keep an overview of all your files in your project. You may also use the Project Explorer to create an executable file of your application. In addition you may also create an installation package so you can easily install the application on other computers. As part of the installation the LabVIEW Run-‐time engine will be installed.
Block Diagram:
The application uses the state machine principle, which makes it easy to create large applications:

104 Example Application
Tutorial: An Introduction to LabVIEW
105
16 Additional Exercises This chapter lists lots of additional exercises you could try out in order to improve your LabVIEW skills.
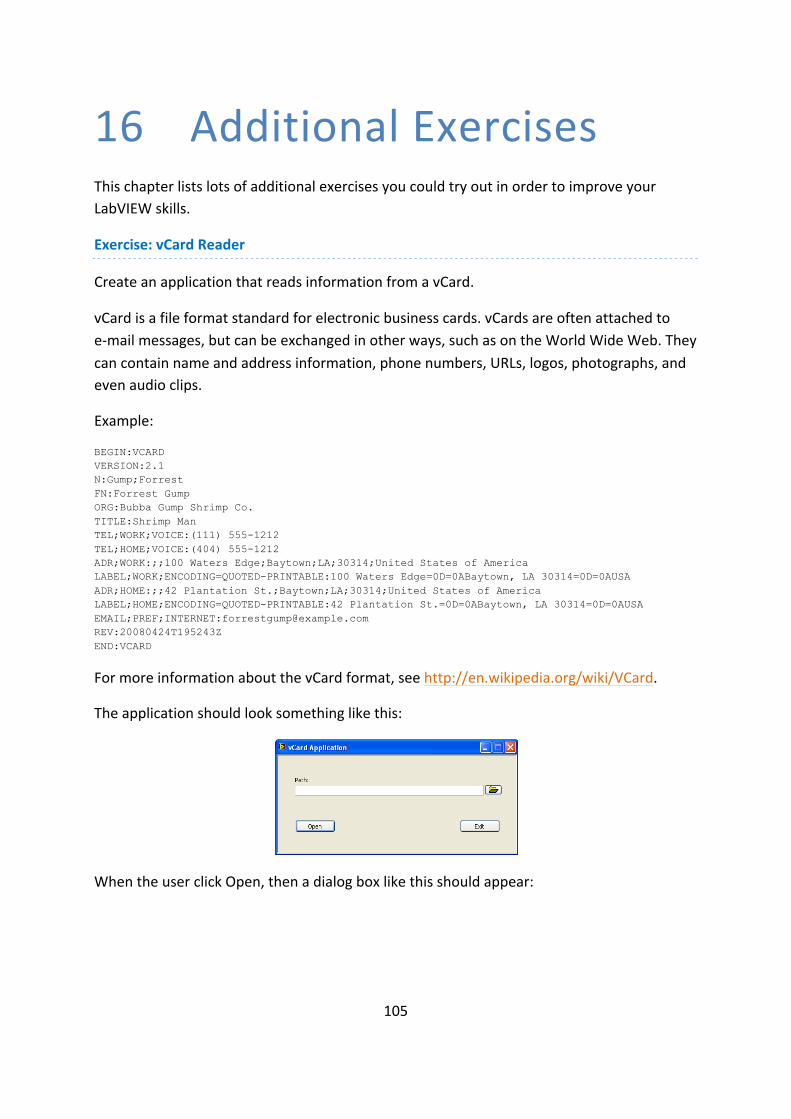
Exercise: vCard Reader
Create an application that reads information from a vCard.
vCard is a file format standard for electronic business cards. vCards are often attached to e-‐mail messages, but can be exchanged in other ways, such as on the World Wide Web. They can contain name and address information, phone numbers, URLs, logos, photographs, and even audio clips.
Example:
BEGIN:VCARD VERSION:2.1 N:Gump;Forrest FN:Forrest Gump ORG:Bubba Gump Shrimp Co. TITLE:Shrimp Man TEL;WORK;VOICE:(111) 555-1212 TEL;HOME;VOICE:(404) 555-1212 ADR;WORK:;;100 Waters Edge;Baytown;LA;30314;United States of America LABEL;WORK;ENCODING=QUOTED-PRINTABLE:100 Waters Edge=0D=0ABaytown, LA 30314=0D=0AUSA ADR;HOME:;;42 Plantation St.;Baytown;LA;30314;United States of America LABEL;HOME;ENCODING=QUOTED-PRINTABLE:42 Plantation St.=0D=0ABaytown, LA 30314=0D=0AUSA EMAIL;PREF;INTERNET:[email protected] REV:20080424T195243Z END:VCARD
For more information about the vCard format, see http://en.wikipedia.org/wiki/VCard.
The application should look something like this:
When the user click Open, then a dialog box like this should appear:

106 Additional Exercises
Tutorial: An Introduction to LabVIEW
Requirements:
• Use the Project Explorer • Use the State Machine principle • Use the Event Structure • Use System Controls • Set the appropriate settings in the VI Properties. • Create a executable application (vCard.exe)
Exercise: vCard Write & Read
Extend the application in the previous example. You should now be able to both write and read vCard files. The application could look something like this:

107 Additional Exercises
Tutorial: An Introduction to LabVIEW
When the user clicks New, the dialog box in the previous exercise appears. The user may enter a new vCard. If the user clicks Edit, a dialog box with the selected contact should appear.
Exercise: Read/Write from .ini files
Read/Write from .ini files. Use the Configuration File VIs:
Exercise: ActiveX
Create a simple Web Browser using ActiveX and the Internet Explorer ActiveX control (Microsoft Web Browser)
Use the ActiveX Container from the Containers control palette:

108 Additional Exercises
Tutorial: An Introduction to LabVIEW
Use the ActiveX function palette:
The application could look something like this:

109 Additional Exercises
Tutorial: An Introduction to LabVIEW
Exercise: Themes
In e.g., ASP.NET we have something called Themes. Themes are used to change the appearance of your whole application regarding to color, font, pictures, etc.
LabVIEW do not offer such a functionality , but try to create your own Theme Configurator, so you can change the appearance of your VI instantly.
Here is an example of how Windows XP handles different Themes:
Create a similar Theme Configurator so you may easily change the appearance of your Vis.

110
17 What’s Next?
17.1 My Blog For more information about LabVIEW, visit my Blog: http://home.hit.no/~hansha/
17.2 Training This Tutorial is a part of a series with other Tuturials I have made, such as:
• Introduction to LabVIEW • Data Acquisition in LabVIEW • Control and Simulation in LabVIEW • LabVIEW MathScript • Linear Algebra in LabVIEW • Datalogging and Supervisory Control in LabVIEW • Wireless Data Acquisition in LabVIEW • Intermediate Topics in LabVIEW • Advanced Topics in LabVIEW • etc.
These Training Kits are available for download (.pdf files, source code, additional resources, etc.) from my blog: http://home.hit.no/~hansha
17.3 Additional Resources You find lots of information about LabVIEW in National Instruments web site:
www.ni.com
17.4 Examples In the NI example Finder (Help→Find Examples…) you find lots of useful examples that you can play with or use as a start when creating your own applications.

111 What’s Next?
Tutorial: An Introduction to LabVIEW
17.5 Documentation As part of the LabVIEW installation there exist lots of useful documentation, such as Getting Started manuals, User Manuals, etc.

112 What’s Next?
Tutorial: An Introduction to LabVIEW
17.6 LabVIEW Wiki LabVIEW Wiki is the free LabVIEW information resource that anyone can edit.
http://labviewwiki.org/Home
17.7 LabVIEW on YouTube There are lots of LabVIEW videos available at YouTube:
http://www.youtube.com/results?search_query=labview&search=Search

113
Quick Reference

Quick Reference
Tutorial: An Introduction to LabVIEW

Telemark University College
Faculty of Technology
Kjølnes Ring 56
N-‐3918 Porsgrunn, Norway
www.hit.no
Hans-‐Petter Halvorsen, M.Sc.
Telemark University College
Department of Electrical Engineering, Information Technology and Cybernetics
E-‐mail: [email protected]
Blog: http://home.hit.no/~hansha/

Quick Reference
Tutorial: An Introduction to LabVIEW