introduction to javascript - alltsnetwork.comalltsnetwork.com/b_downloads/javascript.pdf · page |...
TRANSCRIPT

Page |
1
INTRODUCTION TO JAVASCRIPT Overview
This course is designed to accommodate website designers who have some experience in building web pages.
Lessons familiarize students with the ins and outs of basic JavaScript tools for adding really useful interactivity to a
Web site as quickly and easily as possible with the help of pre-written JavaScript programming language.
Students will learn how to use simple JavaScript code that will liberate them from all of the minute, time-
consuming details of creating JavaScript programs that run well across different browser platforms.
Prerequisites
Students should feel comfortable with HTML and CSS to get the most from this course.
Today’s lesson will focus on how we can add interactivity, inotherwords dynamism to our previously created
website.
Before we proceed with the lesson, i will like to educate us on why we need to master JavaScript programming
language to become proficient and highly sought-after website designer.
WHAT IS JAVASCRIPT
JavaScript is the programming language of HTML and the web.

Page |
2
. JavaScript is one of the 3 languages all web developers must learn:
1. HTML to define the content of web pages
2. CSS to specify the layout of web pages
3. JavaScript to program the behaviour of web pages
This tutorial is about JavaScript, and how JavaScript works with HTML and CSS.
JavaScript and Java are completely different languages, both in concept and design.
JavaScript and Java are similar like Car and Carpet are similar.
Java is an application programming language.
JavaScript is designed for website development.
JavaScript Display Possibilities
JavaScript can "display" data in different ways:
Writing into an HTML element, using innerHTML.
Writing into the HTML output using document.write().
Writing into an alert box, using window.alert().
Writing into the browser console, using console.log().
Using innerHTML
To access an HTML element, JavaScript can use the document.getElementById(id) method.
The id attribute defines the HTML element. The innerHTML property defines the HTML content:

Page |
3
Using document.write()
For testing purposes, it is convenient to use document.write():
Using document.write() after an HTML document is fully loaded, will delete all existing HTML:
Using window.alert()
You can use an alert box to display data:
Using console.log()
For debugging purposes, you can use the console.log() method to display data.
Back to the project………
The first task is to change the color, text-style and font-size of the “studio” header.
This can be achieved with the help of the innerHTML method which was explained earlier.

Page |
4
Kindly add an id=”demo” inside the span tag on line 95 in the text-editor.
Open a script tag, type the following lines of JavaScript code, close the script tag.
From line 154 to line 158 accordingly. Don’t forget to hit the save button.
This is what the output looks like after I refreshed my web browser.
In a nutshell, all we've done so far was to use JavaScript to Change HTML styles (CSS)Changing the
style of an HTML element, is a variant of changing an HTML attribute. In the project above we use the
document.getElementById() method to "find" an HTML element (with id = "demo") after which we
modified the style (CSS) content i.e. (. style. Color = 'green'), (. style. textTransform = 'uppercase'), (.

Page |
5
style. fontSize = '20px') Respectively....
Moving on to the second phase of the project....
Here we are going to explore on how to Toggle (Hide and Show) content in our website. The following
steps will be taken to achieve our desired result.
Step one, Add HTML
Step two, Add CSS
Step three, Add JavaScript.
I added a button tag to the, we play it to...on line 99,
I also added an opening div tag on line 100,
After which i closed the div tag on line 106
Kindly type these lines of code in your text-editor.

Page |
6
The CSS code begins from line 59 to line 63.
Kindly type the following JavaScript code in your text-editor from line 194 to 197.After which you will
close your script tag i.e. </script>
Don't forget to hit the save button at the top-left corner in your text-editor.

Page |
7
This is what the output will look like after you must have refreshed your browser.
This is what the output looks like after i clicked on the “we play it to” button.
Page |
8
The display above is one of the many interactivity, JavaScript programming language can add to your
website.
The Above JavaScript Code Explanation....
I declare a JavaScript function...
A JavaScript function is a block of code designed to perform a task.
After which, i declared a variable. JavaScript variables are containers for storing data values.
I named the variable “element”, Then i use the document.getElementById () method to target my
innerHTML content, which i gave an id="myDIV"....
Lastly, i called my variable name, which was “element” which i assigned a classList and toggle attribute
too.
The class name was "mystyle" which was used in styling our innerHTML content.
In case you are having issues with the CSS kindly review our previous tutorial on HTML/ CSS. Thanks
Let's proceed to the last phase of our project;
Which is to add an accordion to our Excellent, Integrity and Professionalism section in our HTML
document.
To begin with, what is an accordion?
Accordions are useful when you want to toggle between hiding and showing of content. Another name
for an accordion is (Collapsible Content).
How To Create An Accordion

Page |
9
Step one, Add HTML
Step two, Add CSS
Step three, Add JavaScript.
I added a button tag on line 148, to the excellence tab....
I opened a div tag on line 149,
I closed the div tag on line 154....
I repeated the same process for both the Integrity and Professionalism content.
Page |
10
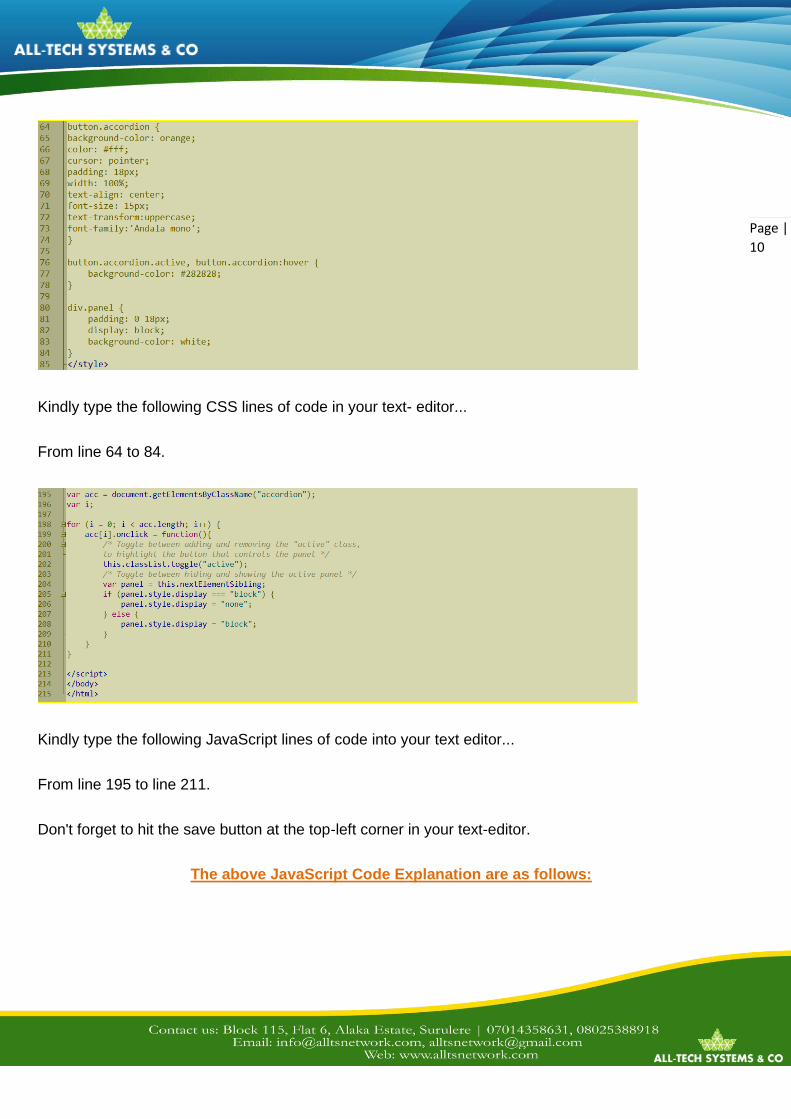
Kindly type the following CSS lines of code in your text- editor...
From line 64 to 84.
Kindly type the following JavaScript lines of code into your text editor...
From line 195 to line 211.
Don't forget to hit the save button at the top-left corner in your text-editor.
The above JavaScript Code Explanation are as follows:

Page |
11
I declared a variable which i named "acc" and "i"
I assigned the document.getElementByClassName ("accordion"), to target the innerHTML content of the
section we are working with.
After which, i declared a For loop.
The for loop is often the tool you will use when you want to create a loop.
The for loop has the following syntax:
for (statement 1; statement 2; statement 3) {
code block to be executed
}
Statement 1: - is executed before the loop (the code block) starts.
Statement 2: - defines the condition for running the loop (the code block).
Statement 3: - is executed each time after the loop (the code block) has been executed.
From the above example, you can read:
Statement 1 sets a variable before the loop starts (var i = 0).
Statement 2 defines the condition for the loop to run (i must be less than acc.length);
The word length in this context means that the length property, returns the length of a string (number of
characters).
Statement 3 increases the value ( i ++ ) each time the code block in the loop has been executed.
After which, i added an onclick event handler to the JavaScript function.

Page |
12
Event handlers are used to handle, and verify, user input, user actions, and browser actions.i. e (Actions
that should be performed when a user clicks a button).
I added the, this.classList.toggle ("active"); the purpose of this is to enable toggling between adding and
removing the "active" class, to highlight the button that controls the panel.
I also added the var panel 1 = this.nextElementSibling;
The purpose of this is to enable the toggle between hiding and showing the active panel.
Lastly i added a conditional if else statement….
The if statement: - i used the " if statement " to specify a block of JavaScript code to be executed if a
condition is true and use the " else statement " to specify a block of code to be executed if the condition
is false.

Page |
13
Above are the result you will see after you must have refreshed your browser.
Don't forget to click the headings of the section we worked on, i.e. (Excellence, Integrity and
Professionalism) to view the effect of the JavaScript accordion.
Ladies and gentlemen; It has been an honour as well as a privilege to walk you through this tutorial.
Thank you very much for your cooperation. All- Tech team......