introduction to javascript electronics - web on devices · node.js is built on top of google’s v8...
TRANSCRIPT

Introduction to JavaScriptElectronics
Beginning Arduino developmentwith JavaScript and Node.js
Mate Marschalko

Introduction to JavaScript Electronics by Mate Marschalko
Published in 2015 by Web on Devices,London, United Kindgom.
Copyediting and Proofreading by Nicholas Headlong.Techincal review by James Miller.Electrical engineering review by Gabor Szoke.

Mate MarschalkoSenior Creative Technologist and
Web Developer
Mate is a Senior Creative Technologist and Web Developer currently working for top creative agencies in London, UK. He has been working with the web for the last 10 years and developed a passion for it. He loves exploring new technologies and devices and hacking them with JavaScript. On his prototyping bench he always has a new toy built using Arduinos, Raspberry PIs or other development boards.
Written by

James MillerTech Lead and
Creative Technologist
James is a freelance Technical Lead and Creative Technologist with over 10 years industry experience. He is a regular contributor to both Net Magazine and Smashing Magazine. He has a passion for Hybrid Apps, building his own hardware and his beloved football team - Luton Town.
Technical review by

Web on DevicesElectronics Hacking with JavaScript and
other Web Technologies
www.webondevices.com

TABLE OF CONTENTS
Introduction 7
Restrictions of the browser 10
JavaScript on the server 12
Development boards 14
The Arduino UNO 18
Starting off with Node.js 27
Blinking an LED 33
Sensing the world 37
Ways forward 51


Introduction to JavaScript Electronics
7
In recent years, JavaScript has evolved past merely being a tool for DOM manipulation and begun to expand its influence beyond the realms of the browser window. We now see JavaScript appearing on operating systems (Chrome OS, Firefox OS), on the server (Node.JS), and even on tiny microcontroller chips. It has also begun to become commonplace to see developers building hardware prototypes, or electronic toys, using JavaScript on prototyping platforms like the Arduino. These platforms and development boards made working with electronics possible for those without a background in electrical engineering.
The Internet of Things, a network of simple connected devices, are paving new ways to market and advertise products through physical experiences, as well as being a great financial investment for developers to shift their skills towards building physical applications. Even today, forward thinking agencies
INTRODUCTION

8
have started hiring Front-end Creative Technologists. These developers are not only proficient in building websites but are also able to build Interactive Kiosks, Virtual Reality experiences or other interactive hardware prototypes. They not only earn a lot more compared to regular front-end developers, but they get to play with all the latest gadgets and toys in their day-to-day job!
This short book will help you take the first step into the world of Creative Technology, and start building electronic prototypes with the Arduino UNO development board and JavaScript. After the introduction, you will learn about the basics of electricity, the UNO and its components, controlling an
Playing with an Arduino RC car

Introduction to JavaScript Electronics
9
LED light and reading light and temperature sensors. In the process, you will learn how to run JavaScript code on the server with Node.js, build simple circuits, and discover the Johnny-Five JavaScript library to control and communicate with the Arduino UNO and its components.
Arduino connected to a Macintosh

10
If we compare it to desktop and mobile applications, JavaScript running in the browser is quite limited. Access to communication ports, hardware components and the file system are all restricted. This level of security is necessary on the Internet as not every website accessed can be trusted, therefore, you need to ensure your computer can’t be infiltrated by malicious code.
One way to work around the security blocks is to run your application on a server, where you can stream all the required data to the front-end. The server can trust the code running on itself and will grant access to its hardware resources. There are many ways to write server applications, for example, running PHP on an Apache Linux server supported by a database (MySQL, Postgres, etc.), sometimes known as a LAMP stack. Instead of this setup JavaScript can also be used with our own computer as a server.
RESTRICTIONS OF THE BROWSER

Introduction to JavaScript Electronics
11
Communicating with the server traditionally meant sending requests through HTTP and waiting for the server to respond. Around 2005, AJAX appeared making this process a bit more dynamic. AJAX is still just polling the server to load new data, but this time without the need to reload the page. This allowed greater control as the connection and response can be managed using JavaScript.
Using WebSockets provides a more efficient approach to retrieving data. The protocol makes it possible to open an interactive, two-way communication session between the user’s browser and a server. With this API, you can send messages to a server and receive event-driven responses without having to poll for a reply.
The next thing is to build the server that accesses the USB port and handles our Arduino connected to it, an ideal task for Node.js.

12
Node.js is built on top of Google’s V8 JavaScript engine which can run independently from the browser and on the server.
Using JavaScript and Node.js for electronics hacking is not a new endeavour. The community is already using it to power successful projects like nodebots.io, Firmata, Cylon or Johnny-Five. The Node.js ecosystem is even stronger, with over a
JAVASCRIPTON THE SERVER
AR Drone connecting to Node.js

Introduction to JavaScript Electronics
13
hundred thousand packages available via the node package manager (www.npmjs.org). In terms of speed and performance JavaScript has also imporoved quite dramatically in the last decade makes this aspect no longer a compromise.
The event driven, asynchronous properties are also great for working with electronics and sensors, enabling applications that communicate through NFC, RFID or Bluetooth, all of which are currently impossible in the browser. Using Node.js opens up new possibilities for application development using devices like the Xbox Kinect, Leap Motion, midi controllers, drones or smart home accessories like the Nest thermostat or the Philips HUE light bulb.

14
The development board revolution started around 2005 when the first Arduino was released. The Arduino project was started by a few Italian university teachers trying to make it easy for students to work with electronic components and program microcontroller chips. Arduino is still by far the most popular platform today.
DEVELOPMENT BOARDS
Arduino UNO development board

Introduction to JavaScript Electronics
15
The microcontroller is the brain of the board that controls and manages everything. This is a low cost, low power, low performance processor capable of running a single application at a time. The microcontroller is only responsible for managing low-level input and output electrical signals, and performing some basic calculations with them. This chip is capable of switching electrical components on and off, measuring electricity from sensors, and interfacing with other components.
These chips can work independently, however, development boards can streamline the building process. They help power, communicate, and interface with the
The microcontroller powering the Arduino UNO

16
microcontroller. The addition of a USB port to upload the code on the UNO, and a barrel plug for powering the system from a 9V battery, are both helpful.
Currently, there’s an overwhelming number of boards available on the market to choose from. Most of these are Arduino compatible, so how are they all different from each other?
As a start they greatly differ in size. One of the smallest boards available are the DFRobot Beetle and the Tinyduino, which are great for wearable or drone projects where size or weight are important factors. With smaller size you have a stripped down feature set too, and less components, which means less things to power, so they are perfect for battery powered prototypes.
Differently sized Arduino compatible boardsfrom DFRObot

Introduction to JavaScript Electronics
17
Other boards enable features like Wi-Fi, ethernet or bluetooth connection, while others can act as a mouse, keyboard or other USB controller when plugged into your computer, and there are also boards designed for building home automation, and home security.
Development board for home automation with two realys to switch mains electricity

18
Those boards are both useful and affordable, but the Arduino UNO is still the number one, most popular board to start developing with. One of the reasons might be that its pin layout is clean and spacious, making it beginner friendly. The extra features listed above, like wireless connection, are all possible with UNO projects, though these will require the addition of external modules or shields.
THE ARDUINO UNO
Extension shields for the Arduino UNO

Introduction to JavaScript Electronics
19
The most important component of the Arduino UNO is the ATmega328 microcontroller chip. This chip manages the input and output pins (GPIO) of the UNO that are exposed through the header pins along the top and bottom edge of the board. In short, input pins (ANALOG IN) are designed to measure electricity from sensors like light, sound or temperature. Output pins (DIGITAL) on the other hand can switch electricity on and off for lights, motors or other electronic components. Both the input and output pins can be accessed and controlled from the application code you write and upload onto the board.
Anatomy of the Arduino UNO
Power and input pins on the UNO next to the long microcontroller chip

20
The header pins also also allow connection to a constant 5V and a 3.3V (5 and 3.3 volts) power source. These will simply let you use the UNO like a battery to power your components. On regular batteries you will find two poles: positive and negative. The 5V and 3.3V pins on the Arduino are the positive poles, GND (ground) pins are the negative ones.
Next to the header pins is the large USB type B port used to communicate with a PC and upload code. The barrel plug on the bottom left is where you can connect a 9V battery or any other DC power source between 6 - 20V (the recommended is 7 -12V), this can be any mains adapter with the correct size of plug and amount of voltage. For the purposes of the following projects, the Arduino won’t be powered from an external source, but will need to be connected via USB to a computer which will in turn power the device.
Digital output pins

Introduction to JavaScript Electronics
21
The output pins on the Arduino board are also power sources, just like the 5V pins are. The difference being that the output pins can be switched on and off by the microcontroller chip and the application we uploaded and run on it.
To demonstrate the behavior of the output pins let’s build a simple circuit and control it from JavaScript. The “Hello World” of hardware development is blinking an LED, so that’s what we are going to start with. For this project you will need an Arduino UNO, a regular LED, a 150 - 1k resistor, a breadboard and a few jumper wires.
Components for the LED blink example

22
Resistors can be identified from the coloured stripes on their body. There are many resistor calculators and cheat sheets to help you with that.
The simplest possible circuit we could think of would be an LED lit by a battery. This circuit connects the positive pole of the battery with the positive leg of the LED and the negative pole with the negative leg. Once they are connected, electricity and electrons start flowing through the led which will inevitably cause it to light up.
Battery and an LED (Fritzing.org)
1
1 http://www.dannyg.com/examples/res2/resistor.htm

Introduction to JavaScript Electronics
23
Rebuilding this simple circuit on the Arduino will essentially mean replacing the positive pole of the battery with the 5V pin or one of the output pins on the Arduino and the negative pole with GND. In this example, I randomly picked output pin number 10.
This circuit is already complete and by switching the 10th output pin on from our program code the LED would light up.
You probably noticed the addition of a small resistor to the circuit and wonder why we need this. Well, there’s one problem: the LED doesn’t limit the electric current in our circuit so without it would try to use too much of it. With no resistor in our circuit we
LED connected to the Arduino output pin (Fritzing.org)

24
would over drive and damage our LED in a short amount of time. It would probably only work for a couple of minutes before burning out irreversibly.
To prevent this from happening, we can limit the flow of electric current through the LED by adding a resistor. Using ohm’s law (Resistance equals voltage divided by current or R = V / I) we can calculate the exact resistor needed in a certain setup.
In our circuit the Arduino provides 5 volts but not all of that will go over the resistor: the LED also has a 2 volts voltage drop which is the ideal supplied voltage for it to work. We also know that the ideal current for our LED is 20mA or 0.02 in Amperes. Now we need to choose a resistor which will drop that voltage at 20mA. The right value is given by Ohm’s law:
R = V / IR = (5V - 2V) / 0.02AR = 150Ω
This means that we need a resistor around 150Ω. You don’t want a resistor that’s less than 150Ω but using a larger one, for example 220Ω, 500Ω or 1000Ω, would resist the flow even further, which would make our LED more dim, but would extend it’s lifetime in return.
1 https://youtu.be/-mHLvtGjum4
1

Introduction to JavaScript Electronics
25
Breadboards make it easy and quick to build circuit prototypes. They are designed to take regular male to male jumper wires or the legs of simple components like LEDs, resistors, diodes or capacitors. Broadboards esenttialy help with connecting these components together. When you stick the leg of an LED anywhere in the breadboard components added to the same pin row will be connected to the LED.
Prototyping breadboards
LED circuit connected inside the breadboard

26
Here is a larger breadboard with all its pin connections highlighted:
Connected pins on a large breadboard

Introduction to JavaScript Electronics
27
The LED is now ready to be switched on and off using JavaScript. To do this we will need to run JavaScript on the server, in order to have access to the USB port that we will connect to the Arduino. The first step in this journey is to install the Node.js environment onto the computer.
Installing Node.js is a quick and easy process, and can be done with the official pre-built installers. You can download these from https://nodejs.org/download/.
Once installed, the new node command is available from the Terminal on OS X or the Command Prompt on Windows. For a Hello World demonstration create a new file called helloworld.js and add this single line of JavaScript to it:
console.log(”Hello World”);
STARTING OFF WITH NODE.JS

28
Entering node helloworld.js to your command line tool (from the same folder that contains the file helloworld.js) will run the JavaScript file and output “Hello World” to the command line.
This might not seem too much progress so far, but with Node.js setup we are ready to start building our hardware projects using JavaScript. From this environment, we now have access to the USB port, sensors and many other components on our computer.
Node.js “Hello World”

Introduction to JavaScript Electronics
29
For this app we will be using the Johnny-Five JavaScript library designed for Node.js. This library was created by the team at Bocoup, to make hardware prototyping easier for web developers.
Running JavaScript code straight on development boards only works with a handful of models and unfortunately, the Arduino is not one of them. Arduinos require you to write code in the Arduino language, and this currently can’t be changed. Johnny-Five, and many other Node libraries work around this limitation by installing Firmata onto the Arduino, which essentially
Connecting Node.js to the Arduino
Firmata forkflow
Node.js running
JavaScript
Arduino running
Firmata API
PC Arduino UNO
USB
1 https://github.com/rwaldron/johnny-five
1
2 https://bocoup.com/
2

30
exposes an API to communicate with and control the Arduino from external devices.
To make the LED blink, we first need to upload the Firmata library onto the Arduino UNO. To upload any code onto the board we need to download and install the official Arduino IDE from the Arduino website. The Arduino IDE is just the name of the application you use to write and upload the Arduino code to the boards.
Once it’s installed, plug in your Arduino into the USB port and the green power LED, labelled ON,
The Arduino UNO is powered up from the USB port
https://www.arduino.cc/en/Main/Software1
1

Introduction to JavaScript Electronics
31
should light up. Open up the IDE application you just installed and make sure under Tools/Board Arduino UNO is selected. You will also need to select the USB port the Arduino is connected to under Tools/Serial Port. The port will only show up in the list when the board is actually connected. If you have problems getting the environment ready please refer to the official installation guide or the troubleshoot page.
Below is what you will see when you open up the IDE. At this stage we won’t be writing anything in
Arduino IDE with the Firmata sketch uploaded
1 https://www.arduino.cc/en/Guide/HomePage2 https://www.arduino.cc/en/Guide/Troubleshooting
1 2

32
Arduino language. We only opened the IDE to upload the standard Firmata library. Select File/Examples/Firmata/StandardFirmata to open the sketch then hit upload (the green arrow pointing to the right), this will upload the Firmata library to your UNO.
If everything was successful you will see the “Done uploading.” message in the green status bar. If you get an error message, make sure the Arduino is connected, has power, and that the correct board and port is selected in the Tool menu.
If you had any problems installing the Firamata library, please refer to this great instructrables guide.
http://www.instructables.com/id/Arduino-Installing-Standard-Firmata1
1

Introduction to JavaScript Electronics
33
The wiring is already completed and the Arduino has the Firmata library loaded. The UNO is now ready to take commands from Node.js.
Feel free to download the source code of all the examples from www.webondevices.com/download-source/ if that’s how you prefer following along.
As we will be using the Johnny-Five library to blink our LED, let’s now install it. Make sure you create a new folder and navigate to it from the command line before running the installation command below:
npm install johnny-five --save
Let’s also create a new file for our Node.js application and name it blink.js. The first thing we need to do is load all the libraries into variables required by our application. In our case it’s only Johnny-Five:
BLINKING AN LED

34
var five = require(”johnny-five”);
Next we initialise a new Board instance that will provide us all the methods to interact with the Arduino:
var arduino = new five.Board();
When working with jQuery we use the $(document).on(”ready”, callback); event listener to wait for the document to finish loading before we do anything else. The Arduino, and the USB connection also need some time to start up, so we will a need to implement a similar event listener before we send our commands.
arduino.on(”ready”, function(){ // The board is ready // We can now blink the LED});
To blink the LED, we will firstly need to create an LED instance inside the callback of the event listener:

Introduction to JavaScript Electronics
35
// Create an LED on pin number 10var led = new five.Led(10);
Then below it, we can just call blink():
// Blink the LED every half secondled.blink(500);
Here’s the complete blink sketch in one:
var five = require(”johnny-five”);
var arduino = new five.Board();
arduino.on(”ready”, function(){ var led = new five.Led(10); led.blink(500);});

36
Now that the LED is setup we can try other methods too: led.pulse(); will fade the led in and out instead of just switching with no transition. Conveniently, fade in and out methods are also available:
// fade led inled.fadeIn();
// wait 3 seconds then fade outthis.wait(3000, function(){ led.fadeOut();});
Blinking an LED from output pin number 10

Introduction to JavaScript Electronics
37
In this chapter, we will extend our knowledge by exploring the input pins. We already know that these pins can measure the change in voltage so we will use simple analog sensors that affect the voltage running through them depending on certain changes in the environement.
SENSING THE WORLD
Components for the sensor projects

38
Measuring temperature
For this project, you will need an Arduino UNO, an LM35 or TMP36 temperature sensor, an LDR, a breadboard, a two 1k resistors and a few jumper wires.
For measuring temperature I picked the very common LM35 sensor. This low cost sensor is rated to operate between -55 and 150°C, with a +/- 0.5°C accuracy (although it’s a little bit tricky to measure minus temperatures with the LM35). The way this analog sensor works is really simple and in fact, most analog sensors work in a similar way. First they are powered from a constant power source on two of their pins (+ and -), then, on a third pin, they output a lower voltage value that is directly proportional to the sensor reading.
Our temperature sensor will be powered from the Arduino UNO’s 5V pin and will output voltage values between 0 volts and 2 volts, changing with the temperature. The LM35’s scale factor is 0.01V/°C, meaning that 1 celsius degrees change in the air temperature will result in a 0.01 volt change on the output pin.
Conveniently, the Arduino’s analog input pins are designed to measure and convert voltage into data we

Introduction to JavaScript Electronics
39
can use. In actual numbers the full range of 0 to 5 volts that can be interpreted by the analog pins of the Arduino UNO will be mapped to a 0 - 1024 scale in our program code.
Let’s say your sensor returns only 1.5 volts from the supplied 5 volts to the analog input pin you connected it to. The reading in your application will be 307 on the 0 - 1024 scale because (1.5 / 5) * 1024 is 307.2.
The Johnny-Five library then maps the 0 - 1024 measurement scale to the sensor’s -55 to 150°C range then calculates the resulting temperature from this information.
Let’s go back to our temperature sensor and wire it up. Before you start wiring, always make sure you have unplugged your Arduino from the USB, or any other power source. Otherwise you could accidentally stick a
Temperature sensor powered (Fritzing.org)

40
wire into the wrong header pin that could damage your board, or the sensor.
From the three legs of the sensor the one on the left is the positive, and the one on the right is the negative pole (the flat side of the sensor is the front). We will feed the power in from the 5V (positive) and GND (negative) pins of the Arduino UNO as seen on the previous page.
The sensor is now powered, and the only pin left is the output. This will need to be connected to one of the five analog pins on the UNO. These are the ones lined up along the bottom right edge of the board, marked A0 to A5. Let’s connect it to pin A0:
Temperature sensor connected to an analog input pin of the Arduino UNO (Fritzing.org)

Introduction to JavaScript Electronics
41
Now that the wiring is finished, let’s write the script that will read the sensor. Firstly, create a new project and name the main file temp.js, starting it off the same way as the blink sketch:
var five = require(”johnny-five”);
var arduino = new five.Board();
arduino.on(”ready”, function(){ // The Arduino is ready});
Next, we need to create a new Temperature sensor instance with a few settings, which are the name of the sensor, and the pin number it’s connected to.
var tempSensor = new five.Temperature({ controller: ”LM35”, pin: ”A0”});

42
If you have a TMP36 sensor that can still be used the same way. Simply change the controller settings to TMP36 and the wiring is the same.
After initialising the temperature sensor we can start using the on data event listener to catch sensor readings as they arrive. The Johnny-Five library leverages the asynchronous capabilities of Node.js which means that sensor readings immediately appear in the on data event listener’s callback function. Let’s write this event listener:
tempSensor.on(”data”, function(er, data){ console.log(data.celsius + ”°C”); console.log(data.fahrenheit + ”°F”);});
Again, we need to wait for the board to be initialised so both of these blocks will need to go into the arduino.on(”ready”, callback); function.
In the final version of the script found on the next page, both the celsius and the fahrenheit sensor readings are rounded to one decimal places to make the numbers easier to read.

Introduction to JavaScript Electronics
43
var five = require(”johnny-five”);
var arduino = new five.Board();
var celsius = 0;var fahrenheit = 0;
arduino.on(”ready”, function(){
var tempSensor = new five.Temperature({ controller: ”LM35”, pin: ”A0”});
tempSensor.on(”data”, function(er, data){ celsius = data.celsius.toFixed(1); fahrenheit = data.fahrenheit.toFixed(1); console.log(celsius + ”°C”); console.log(fahrenheit + ”°F”);});
});

44
Run your script by typing node temp.js into the command line tool. Check the readings, and if there are anomalies, double check your wiring, make sure the Arduino is connected to the USB port, and the green power light is on. If all is good, we can move on to the light sensor.
Here’s the LM35 temperature circuit added to a small breadboard:
Temperature sensor circuit on a breadboard
Introduction to JavaScript Electronics
45
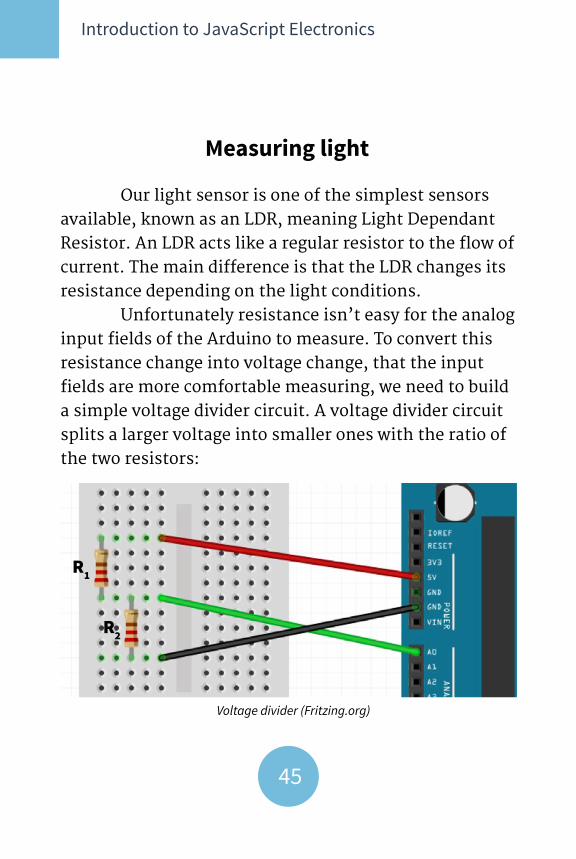
Our light sensor is one of the simplest sensors available, known as an LDR, meaning Light Dependant Resistor. An LDR acts like a regular resistor to the flow of current. The main difference is that the LDR changes its resistance depending on the light conditions.
Unfortunately resistance isn’t easy for the analog input fields of the Arduino to measure. To convert this resistance change into voltage change, that the input fields are more comfortable measuring, we need to build a simple voltage divider circuit. A voltage divider circuit splits a larger voltage into smaller ones with the ratio of the two resistors:
Voltage divider (Fritzing.org)
Measuring light
R1
R2

46
The 5 volts input of this circuit comes from the Arduino through the red wire. The output voltage through the green wire is directly proportional to the input voltage and the ratio of the resistors (R1 , R2).
Vout = Vin * (R2 / (R1 + R2))
In this circuit we use two 1000Ω resistors so here’s how the equation looks like with these values:
Vout = 5V * (1000 / (1000 + 1000))Vout = 5V * 0.5Vout = 2.5V
This means that if two of the same resistors are used in a voltage divider circuit the output voltage will be half of the input voltage. 2.5 volts in our case. Using the equation we also see that changing only one of the resistors will change the output voltage up or down.
In the LDR circuit we change one of the regular resistors to the light dependent resistor. The resistance of the LDR will change with the light conditions in the voltage divider circuit which in return will constantly change the output voltage for our input pin.

Introduction to JavaScript Electronics
47
When the photoresistor is exposed to light, its resistance decreases so the voltage reading will be higher. Conversely, with less light the voltage reading will be lower. The changing voltage value is then what the analog input pins of the Arduino factor to calculate the measurements.
The light dependent resistor changes its resistance between 150Ω in bright light and 9000Ω in dark. Keeping the original fixed 1000Ω resistor in and using the voltage divider equation we can tell that our output voltage will change between 4.35V and 0.5V which is a great range for the Arduino’s input pin.
Here’s how this circuit looks like on the breadboard:
Light sensor circuit (Fritzing.org)

48
The circuit is all done so let’s add the light sensor to our JavaScript app into the arduino on ready callback function. We initialise a new lightSensor then add an on data event listener:
var lightSensor = new five.Sensor({ pin: ”A1”, freq: 250});
lightSensor.on(”data”, function(){ console.log(this.value);});
Light sensor circuit (Fritzing.org)

Introduction to JavaScript Electronics
49
This piece of code is very similar to the way the temperature sensor is handled by the Johnny-Five library. First, a new sensor needs to be initialised with a few settings, then the sensor instance’s on data event listener is used to wait for data to arrive.
Here’s the final version of the light sensor code:
var five = require(”johnny-five”);
var arduino = new five.Board();
var light = 0;
arduino.on(”ready”, function(){
var lightSensor = new five.Sensor({ pin: ”A1”, freq: 250});
lightSensor.on(”data”, function(){ light = this.value; console.log(light);});
});

50
Saving this into a new light.js file and entering node light.js into the command line will result in light sensor readings appearing every quarter of a second. the freq (frequency) property is where we can change this behavior which expects a millisecond value to define the delay in between measurements.
Download the source code of the whole project from www.webondevices.com/download-source

Introduction to JavaScript Electronics
51
In this book you learned the basics of interfacing with the Arduino UNO using Node.js through the USB port. On Web on Devices, www.webondevices.com, you will find several projects built using similar methods.
Check out the Radio Controlled car that was rebuilt from scratch using Arduinos. It connects to a computer wirelessly and with the Gamepad API allows the user to drive the car with a USB steering wheel.
WAYS FORWARD
http://www.webondevices.com/arduino-nodejs-rc-car-driven-with-html5-gamepad-api/1
1

52
Or there’s George, the talking plant. Through his sensors he can detect temperature, light, motion and soil moisture. He complains when he is not happy with any of the sensor readings, and can also answer basic questions. He talks and listens using the WebSpeech API.
There’s also an Arduino gyroscope project that lets you rotate 3D CSS objects on screen using a physical controller.
1 http://www.webondevices.com/the-arduino-plant-with-javascript-voice-recognition/2 http://www.webondevices.com/rotate-a-css-3d-cube-with-an-arduino/
1
2

Introduction to JavaScript Electronics
53
Using Node.js to communicate with the Arduino is just one of many ways to use JavaScript for building electronic projects. In these examples, the JavaScript code was running on your computer processor, and we’ve been sending commands to the Arduino. Other boards like the Raspberry PI, Arduino Yún, Tessel, and the Espruino can actually execute JavaScript on their own. The Arduino compatible Particle boards expose a RESTful API, and there’s a Node.js library to work with them too. Particle boards connect to the internet wirelessly, so the Node library doesn’t have to rely on a USB connection.
The Web on Devices project is dedicated to keep pushing the limits of what’s possible with development boards and smart devices leveraging mainly web technologies. In the upcoming projects we will explore all the mentioned boards and techniques.
Follow Web on Devices on Facebook, Twitter or Instagram so you don’t miss any of the cool upcoming projects:
www.facebook.com/webondevices
www.twitter.com/web_on_devices
www.instagram.com/web_on_devices


Web on DevicesElectronics Hacking with JavaScript and
other Web Technologies
www.webondevices.com