introduction to dreamweaver - indiana university...
TRANSCRIPT
Introduction to Dreamweaver - K200 – IU SPH Microcomputers in Kinesiology
Introduction to Dreamweaver by Margaret Lion, 2012; Updated: November 4, 2015 DW -1
Introduction to Dreamweaver By Margaret Lion
Spec ial thanks to Lowell Furman, Pat Setser, and Betty Haven.
Contents INTRODUCTION ............................................................................................................................................. 5
What is Dreamweaver? ............................................................................................................................ 5
Web Development Workflow: The Big Picture ......................................................................................... 5
Creating Your Web Site ................................................................................................................................. 6
Creating the web-dev Folder On the Desktop: ......................................................................................... 6
Backup Your Work .................................................................................................................................... 6
Launching Dreamweaver and Getting Your Workspace Ready (In an STC Lab) ....................................... 6
Prepare Your Workspace .......................................................................................................................... 7
Set up Local Site in Dreamweaver ............................................................................................................ 8
Create A New Webpage ......................................................................................................................... 10
Different Views in Dreamweaver ........................................................................................................... 12
Exploring the Dreamweaver Window..................................................................................................... 12
To Save A Webpage ................................................................................................................................ 12
Using Dreamweaver’s Text Formatting Tools......................................................................................... 13
Marking Headings and Paragraphs ......................................................................................................... 14
Change Default Font Type ...................................................................................................................... 16
Changing Font Color ............................................................................................................................... 18
Asterix in Dreamweaver File Tab ............................................................................................................ 19
Preview Webpage in Browser ................................................................................................................ 20
Changing Text Alignment ........................................................................................................................ 20
Making A Web Browser Title .................................................................................................................. 21
Creating Links On Your Webpage ........................................................................................................... 22

Introduction to Dreamweaver - K200 – IU SPH Microcomputers in Kinesiology
Introduction to Dreamweaver by Margaret Lion, 2012; Updated: November 4, 2015 DW -2
Create an Absolute Link .......................................................................................................................... 22
Creating a New Page in Dreamweaver ................................................................................................... 23
Create a Relative Link ............................................................................................................................. 24
Downloading and Inserting Images into Your Webpage ........................................................................ 24
Downloading Images from the Web to Your web-dev Folder ................................................................ 24
Inserting Images into Your Webpage ..................................................................................................... 25
Adding Accessibility to Your Images ....................................................................................................... 26
Aligning Images to Text .......................................................................................................................... 27
Inserting and Editing A Table in Your Webpage ..................................................................................... 27
Creating a Table in Your Webpage ......................................................................................................... 27
Adding Text to Your Table ...................................................................................................................... 28
Using a Table to Control Placement of Graphics and Text ..................................................................... 29
Resizing An Image. .................................................................................................................................. 30
Formatting Tables ................................................................................................................................... 30
Adding an Email Link to Your Page ......................................................................................................... 31
Changing the Background ....................................................................................................................... 33
Check Spelling ......................................................................................................................................... 34
Check Your Work – Review Webpage in Browser .................................................................................. 35
Continuing with mypage2.html .............................................................................................................. 35
Editing Second Webpage ........................................................................................................................ 35
Modifying Page Color and Formatting Text ............................................................................................ 36
Create Links Again .................................................................................................................................. 37
Relative Link for mypage2.html .............................................................................................................. 37
Absolute Links for mypage2.html ........................................................................................................... 37
Adding Table and Images ........................................................................................................................ 38
Adding Picture Captions + How to Single Space ..................................................................................... 39
Centering Pictures and Text Inside A Table Cell ..................................................................................... 40
Adding Browser Title Again .................................................................................................................... 41
Introduction to Dreamweaver - K200 – IU SPH Microcomputers in Kinesiology
Introduction to Dreamweaver by Margaret Lion, 2012; Updated: November 4, 2015 DW -3
Page 3 – Multimedia Page ...................................................................................................................... 41
Get Audio File and Create audio Folder ................................................................................................. 42
Refresh Dreamweaver Window ............................................................................................................. 42
Create Multimedia Page ......................................................................................................................... 43
Add Audio File to multimedia.html ........................................................................................................ 45
Add Video Links ...................................................................................................................................... 45
Regular Video Link .................................................................................................................................. 45
New Window Video Link......................................................................................................................... 46
Embedded Video Link ............................................................................................................................. 47
Add Word Document Link ...................................................................................................................... 50
Finishing The Site .................................................................................................................................... 51
Add Your Webpage Links on Multimedia Page ...................................................................................... 51
Add Webpage Links on index Page ......................................................................................................... 51
Add Webpage Links on My Friends and Interests Page ......................................................................... 51
Preview Your Site .................................................................................................................................... 51
Publishing Your web-dev Folder ............................................................................................................. 52
Submitting Your Work For Grading ........................................................................................................ 52
Appendix A – Web Images .......................................................................................................................... 53

Introduction to Dreamweaver - K200 – IU SPH Microcomputers in Kinesiology
Introduction to Dreamweaver by Margaret Lion, 2012; Updated: November 4, 2015 DW -4
Objectives: After completing this project, you will be able to:
• Understand Web development workflow • Launch Dreamweaver • Perform site set up in Dreamweaver • Be familiar with the Dreamweaver Interface • Use Dreamweaver’s Text and Image formatting tools
• Formatting text using HTML and CSS • Paragraphs and headings • Working with fonts and text color • Aligning text • Create bulleted and numbered lists, indention • Spell check, find and replace • Inserting images
• Connect sites and page with links • Create links within the site • Formatting link colors • Create links to remote page • Create email links • Link to files for download
• Structuring a Webpage with Tables • Give each page a title • Inserting tables • Selecting table elements • Entering table content • Formatting tables • Create links to a second Webpage on your site
• Insert graphics • Edit graphics • Create backgrounds • Save a Webpage • Preview a Webpage • Add multimedia including audio and video • Embed video • Add document links to Webpage

Introduction to Dreamweaver - K200 – IU SPH Microcomputers in Kinesiology
Introduction to Dreamweaver by Margaret Lion, 2012; Updated: November 4, 2015 DW -5
INTRODUCTION
What is Dreamweaver? Adobe Dreamweaver is a professional visual HTML editor for the development and design of Websites. It is part of the Adobe Creative Suite. A Website is several inter-linking Webpage. You can also refer to Websites as sites and Webpage as page. The design view in Dreamweaver is considered a WYSIWYG (What You See Is What You Get) program. This means that you can create a Website similar to the way you create a Word document. The visual editing features of Dreamweaver allow users to design and add functionality to Websites or Webpage without writing a line of code.
Code refers HyperText Markup Language or HTML. HTML is the primary markup language used in making Websites. It is the bones of a site. Dreamweaver will write or create the code for you. We will, however, during this tutorial discuss a few basic HTML concepts so that your will better understand the big picture behind the scenes.
In Dreamweaver you can choose to either work in a visual environment or hand-code HTML when you develop your Websites. For K200 you will primarily work in the design view or WYSIWYG.
Web Development Workflow: The Big Picture When building a house, the first step is to make sure you have a good design and a set of well-defined blueprints to communicate with contractors. The contractors then build the house from the blueprints. Likewise, when building a Website, it is important to have blueprints or a plan before creating it, coding it, and publishing it.
The workflow should be something like this:
The hardest part of creating a Website is planning and organizing the site files and folders. With this manual you will create a Website that consists of three Webpage. The Webpage are linked to each other and to outside Websites. The three page you will create (index.html, mypage2.html, and multimedia.html) will contain text, tables, graphics, and links.
For an example of the site, go to: http://mypage.iu.edu/~mlion/web-dev/.
Define
Define a site’s goals & target
audience.
Design
Design the site – How does the information
flow?
Produce Produce the site – code it
Test
Test the site.
Publish
Publish the site.

Introduction to Dreamweaver - K200 – IU SPH Microcomputers in Kinesiology
Introduction to Dreamweaver by Margaret Lion, 2012; Updated: November 4, 2015 DW -6
Creating Your Web Site You will begin by following the below steps.
Creating the web-dev Folder On the Desktop: As you begin to build your Webpage, you need to be sure that you keep all of the files you are using together in one organized place. To help you accomplish this, do the following:
1. Go to the Desktop and create the folder web-dev. NOTE: In this class you will follow these file naming rules:
a. No upper case letters. Use only lower case. b. No spaces. Use – , _ , or run the words together. c. No punctuation.
2. Now create a folder within web-dev and name it images. 3. Once again, inside the web-dev folder, make a new folder named docs.
a. Webpage files ending in .html will be kept in the web-dev folder. b. Pictures will be kept in the images folder. c. Documents will be kept in the docs folder.
4. Once you have made your web-dev folder, you will not need to make it again. Simply copy and paste it onto your Desktop every time you come to class.
Backup Your Work Remember to keep all your files for the homepage site in the web-dev folder. When you have finished, copy and paste the entire web-dev folder to your Box at IU and USB stick. BACKUP YOUR WORK EVERYTIME!!!
Launching Dreamweaver and Getting Your Workspace Ready (In an STC Lab) Once your web-dev folder has been created, you are ready to open Dreamweaver.
1. To open Dreamweaver, do the following:
a. Click Start button. b. Type Dreamweaver. c. Click Adobe Dreamweaver CC 2015. d. Your screen will be similar to the picture below.

Introduction to Dreamweaver - K200 – IU SPH Microcomputers in Kinesiology
Introduction to Dreamweaver by Margaret Lion, 2012; Updated: November 4, 2015 DW -7
Prepare Your Workspace In order to comfortably work in Dreamweaver, do the following:
1. Close the Welcome window. It is a small window in the middle of the Dreamweaver workspace. 2. Click the drop down arrow of the Workspace menu and select Beginner. 3. Your screen will look slightly different.
Workspace menu.
Welcome window.

Introduction to Dreamweaver - K200 – IU SPH Microcomputers in Kinesiology
Introduction to Dreamweaver by Margaret Lion, 2012; Updated: November 4, 2015 DW -8
Set up Local Site in Dreamweaver In Dreamweaver, the local site refers to the folder that holds your site. When you set your site folder, you are telling Dreamweaver to ONLY look at and work in one folder. Dreamweaver will only save the pages you create for your site in the designated folder. This makes managing your files, creating relative links, and inserting pictures easier. It also helps with any link updates. There are two steps to setting up a local site in Dreamweaver. The first is making your site folder on the Desktop. The second is setting up the site in Dreamweaver itself.
You should have already made your web-dev folder in the previous section Creating the web-dev Folder On the Desktop. If you did not do this, go back to that previous section and complete the steps.
WARNING! You must go through the Set up Local Site in Dreamweaver steps every
time you work in an STC lab!!! To set up a local site in Dreamweaver, do the following:
1. From the Dreamweaver menu, click Site. 2. From the new menu, click New Site. The Site Setup for Unnamed Site window will appear. 3. In the Site Name text box type My Site. This is the name that Dreamweaver will give your site.
Workspace menu now says Beginner.
Shows Properties Inspector.

Introduction to Dreamweaver - K200 – IU SPH Microcomputers in Kinesiology
Introduction to Dreamweaver by Margaret Lion, 2012; Updated: November 4, 2015 DW -9
4. Locate the Local Site Folder text box under Site Name. 5. Click the folder icon at the right end of the text box. The Choose Root Folder window will open. 6. From the Choose Root Folder window, navigate to the web-dev folder. 7. Open the web-dev folder. Your screen should look similar to the picture below.
8. Click the Select button. Your Site Setup window should look similar to the picture below.
9. Click the Save button. 10. Your screen should look similar to the picture below.
Select button.

Introduction to Dreamweaver - K200 – IU SPH Microcomputers in Kinesiology
Introduction to Dreamweaver by Margaret Lion, 2012; Updated: November 4, 2015 DW -10
11. You will now see your folders in the Site panel. You will also see the name My Site displayed as well.
Create A New Webpage You will begin your work in Dreamweaver by creating a new Webpage. To create a new Webpage, do the following:
1. Go to the Menu tool bar. 2. Click File > New. 3. The New Document window will open. It will look similar to the picture below.
Dreamweaver is now pointing to the web-dev folder.
Name Dreamweaver uses for your site.

Introduction to Dreamweaver - K200 – IU SPH Microcomputers in Kinesiology
Introduction to Dreamweaver by Margaret Lion, 2012; Updated: November 4, 2015 DW -11
4. Click Create in the lower right hand corner of the window. 5. You will see a new untitled document in Design view. If you do not, click the Design button
pictured below.
Properties.
Document tool bar.
Document window.
Site panel.
Create button.

Introduction to Dreamweaver - K200 – IU SPH Microcomputers in Kinesiology
Introduction to Dreamweaver by Margaret Lion, 2012; Updated: November 4, 2015 DW -12
Here is an explanation of what you are seeing:
• The Document window displays the current document as you create and edit it. • The Document tool bar allows you to change the way you work in a document (e.g., code view,
code and design view, design view only). • The Properties pane displays properties for the selected object or text, and enables you to
modify its properties. • Site panel shows the files and folders on the computer.
Different Views in Dreamweaver Dreamweaver can display a document in three ways:
• Code View • Split View (both the design and code at the same time) • Live and Design View
When you start, your view will be Live. This shows you what your Webpage will look like (hopefully) with a Web browser. To change the view in which you’re working, select a view in the Document tool bar. For K200, we will work on Design View only. Click the drop down arrow by Live and select Design.
Exploring the Dreamweaver Window The Dreamweaver window is organized much like other Windows applications. It includes a title bar, menu bar, tool bars, task pane, panels, and a work area.
To Save A Webpage You will see your Untitled-1 file tab in the upper left corner of the document. The name Untitled-1 means the file has not been saved. Also a Web file should never have a capital in its name. To save this file as the first page of your site, do the following:
1. Save this new file by selecting File | Save As and type index.html as the file name. 2. Click Save. Notice that the new file in the Site panel now has the appropriate filename.
Design button.
Note. You are more than welcome to look at your Webpage in a different view. If you are curious about HTML, use Split view to see the code being created as you type.
Introduction to Dreamweaver - K200 – IU SPH Microcomputers in Kinesiology
Introduction to Dreamweaver by Margaret Lion, 2012; Updated: November 4, 2015 DW -13
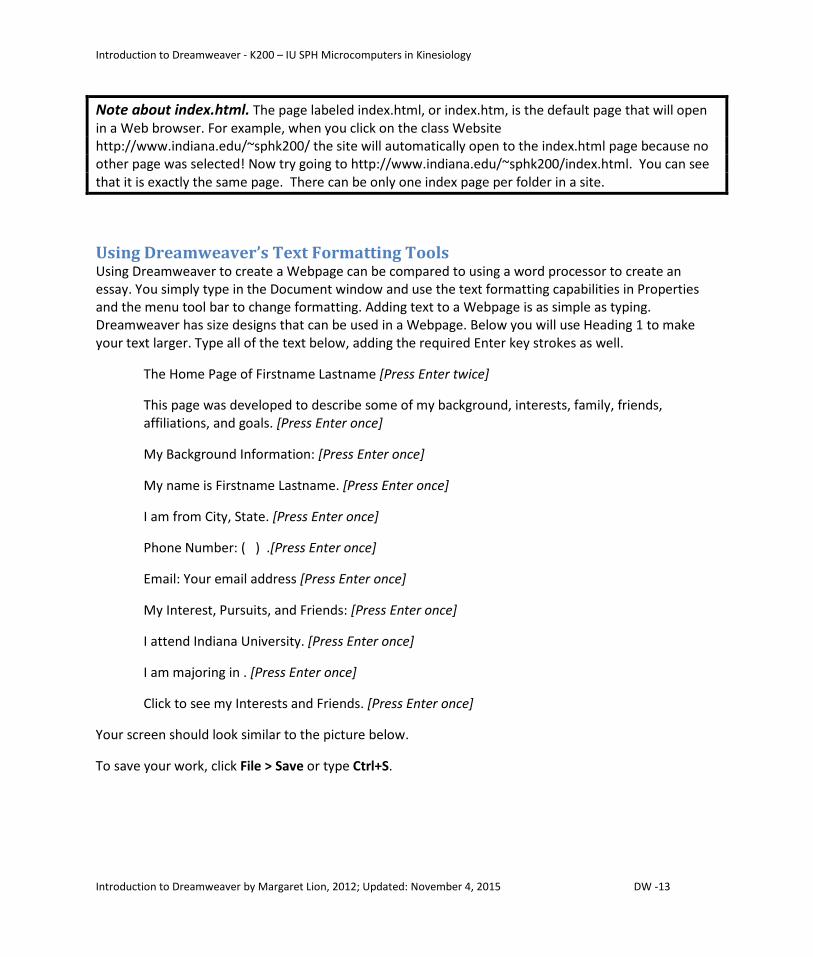
Note about index.html. The page labeled index.html, or index.htm, is the default page that will open in a Web browser. For example, when you click on the class Website http://www.indiana.edu/~sphk200/ the site will automatically open to the index.html page because no other page was selected! Now try going to http://www.indiana.edu/~sphk200/index.html. You can see that it is exactly the same page. There can be only one index page per folder in a site.
Using Dreamweaver’s Text Formatting Tools Using Dreamweaver to create a Webpage can be compared to using a word processor to create an essay. You simply type in the Document window and use the text formatting capabilities in Properties and the menu tool bar to change formatting. Adding text to a Webpage is as simple as typing. Dreamweaver has size designs that can be used in a Webpage. Below you will use Heading 1 to make your text larger. Type all of the text below, adding the required Enter key strokes as well.
The Home Page of Firstname Lastname [Press Enter twice]
This page was developed to describe some of my background, interests, family, friends, affiliations, and goals. [Press Enter once]
My Background Information: [Press Enter once]
My name is Firstname Lastname. [Press Enter once]
I am from City, State. [Press Enter once]
Phone Number: ( ) .[Press Enter once]
Email: Your email address [Press Enter once]
My Interest, Pursuits, and Friends: [Press Enter once]
I attend Indiana University. [Press Enter once]
I am majoring in . [Press Enter once]
Click to see my Interests and Friends. [Press Enter once]
Your screen should look similar to the picture below.
To save your work, click File > Save or type Ctrl+S.
Introduction to Dreamweaver - K200 – IU SPH Microcomputers in Kinesiology
Introduction to Dreamweaver by Margaret Lion, 2012; Updated: November 4, 2015 DW -14
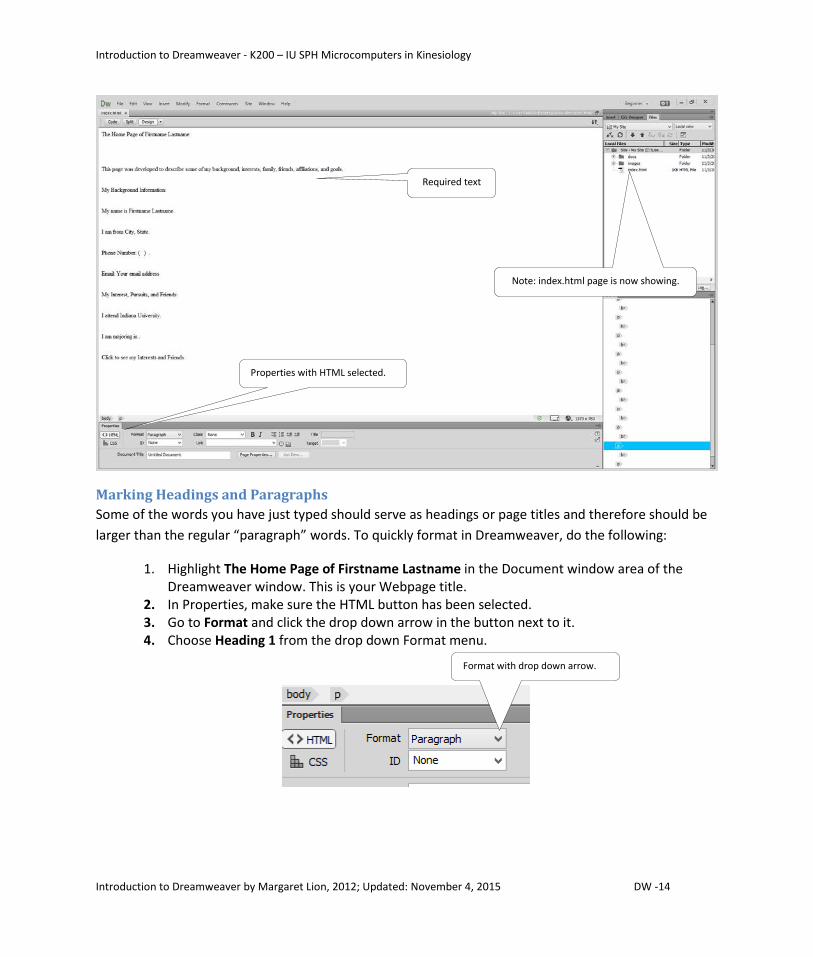
Marking Headings and Paragraphs Some of the words you have just typed should serve as headings or page titles and therefore should be larger than the regular “paragraph” words. To quickly format in Dreamweaver, do the following:
1. Highlight The Home Page of Firstname Lastname in the Document window area of the Dreamweaver window. This is your Webpage title.
2. In Properties, make sure the HTML button has been selected. 3. Go to Format and click the drop down arrow in the button next to it. 4. Choose Heading 1 from the drop down Format menu.
Required text
Note: index.html page is now showing.
Properties with HTML selected.
Format with drop down arrow.

Introduction to Dreamweaver - K200 – IU SPH Microcomputers in Kinesiology
Introduction to Dreamweaver by Margaret Lion, 2012; Updated: November 4, 2015 DW -15
Notice that the text you entered is now displayed as a title in large, bold letters. This is the default style for Heading 1.
Continue formatting your text by doing the following:
1. Highlighting This page was developed to describe some of my background, interests, family, friends, affiliations, and goals. In Properties, click the Bold button.
2. Highlight the words My Background Information: and then choose Heading 3 in Properties.
3. Highlight My name is Firstname Lastname and then click Bold. 4. Highlight the three lines: I am from City, State.; Phone Number: ( ) .; and Email: Your email
address. 5. Click the Unordered List button in Properties. (Note: It looks like the bulleted list icon in Word.)
These three lines are now a bulleted list.
6. Highlight My Interest, Pursuits, and Friends: and click Heading 3. 7. Highlight the three lines I attend Indiana University.; I am majoring in .; Click to see my
Interests and Friends. 8. Click the Ordered List button in Properties. (Note: It looks like the numbered list icon in Word.)
These three lines are now a numbered list. Save your work. Your Dreamweaver page should look similar to the picture below.
Bold button.
Heading 3.
Unordered list button. Ordered list button.

Introduction to Dreamweaver - K200 – IU SPH Microcomputers in Kinesiology
Introduction to Dreamweaver by Margaret Lion, 2012; Updated: November 4, 2015 DW -16
Change Default Font Type The default font type for Webpages is Times New Roman. In fact, in the very first days of the Web that was only font you could use. Fortunately font choice has grown. Also the author of this manual despises Times New Roman, so it must be changed. To change the default font on a page, do the following:
1. From the Menu tool bar, click Modify then Page Properties. The Page Properties window will open.
2. Make sure that in the category column Appearance (CSS) is selected. 3. In the Page font text box choose Segoe, Segoe UI, Déjà Vu Sans, Trebuchet MS, Verdana, sans-
serif. 4. Your window should look like the picture below.

Introduction to Dreamweaver - K200 – IU SPH Microcomputers in Kinesiology
Introduction to Dreamweaver by Margaret Lion, 2012; Updated: November 4, 2015 DW -17
5. Click the Apply button. You will see the font changes appear while the Page Properties window is still open. Click the OK button to save your changes and close the window.
6. Save your work by clicking File then Save or Save All if you have more than one file open. Your work will look similar to the picture below and, in the author’s view, much better.
Appearance (CSS) in Category.
You will only see Segoe, Segoe UIT. That is fine.

Introduction to Dreamweaver - K200 – IU SPH Microcomputers in Kinesiology
Introduction to Dreamweaver by Margaret Lion, 2012; Updated: November 4, 2015 DW -18
What did I just do? When you chose Appearance (CSS) in the Page Properties window you told the Webpage that it the default font would be Segoe. The other fonts are listed in case the computer can’t display Segoe. Then the browser will go down the font list until it finds one that can be displayed.
CSS stands for Cascading Style Sheets. While HTML controls the structure or bones of a Webpage, CSS controls the appearance and look of a Webpage. HTML can also control the appearance, but the new Web design standards encourage you to use CSS.
Changing Font Color You are now going to change the color of the title on your page. To do this you must use CSS. Follow the below instructions to change the color. BIG NOTE: In this new version of Dreamweaver choosing colors can be difficult. Have your teacher help you during lab time.
1. Select the title The Home Page of Firstname Lastname only. 2. Select the CSS button, located under HTML in Properties. 3. Properties will change and look similar to the picture below.

Introduction to Dreamweaver - K200 – IU SPH Microcomputers in Kinesiology
Introduction to Dreamweaver by Margaret Lion, 2012; Updated: November 4, 2015 DW -19
4. Locate the Text Color box and click the arrow in the lower right hand corner. (Note: As of 11/3/2015 in the STC Lab, this is where things got funky. Ask for help. – Ms. Lion)
5. A color palette will appear. Click on a shade of red that you like. 6. Click the plus sign button in the upper right corner of the Text Color window. 7. If you need to, click on your Webpage then click away from the title. 8. Your title should now be the shade of red you chose.
Save your work.
Asterix in Dreamweaver File Tab Dreamweaver will let you know when a file needs to be saved. You can see the asterix by the title. (See above picture.) To ensure do you do not lose any of your work, save now! It is recommended in K200 that you save every five minutes.
CSS selected.
Note the asterix. This means the file needs to be saved.
Text Color box.
Note red title.

Introduction to Dreamweaver - K200 – IU SPH Microcomputers in Kinesiology
Introduction to Dreamweaver by Margaret Lion, 2012; Updated: November 4, 2015 DW -20
Preview Webpage in Browser As you develop your Webpage, you will want to view your work in a browser. This way you know what your Webpage will look like. You can view your work in either Firefox or Internet Explorer. For the below example, use Firefox. To preview your page, do the following:
1. Click File > Preview in Browser > Mozilla Firefox. 2. Your Webpage will now open in Firefox.
Note: Don’t be surprised if the same page looks different in each browser and on different computers. This is the nature of the Web.
Changing Text Alignment Dreamweaver offers centered, right justified, and left justified text alignment options. To change text alignment, do the following:
1. Highlight the red title words on your Webpage. 2. Click CSS in Properties 3. Click the Align Center button. 4. Your Webpage title is centered in the Document window area.
Your page will look similar to the picture below.
Save your work
Align Center button.

Introduction to Dreamweaver - K200 – IU SPH Microcomputers in Kinesiology
Introduction to Dreamweaver by Margaret Lion, 2012; Updated: November 4, 2015 DW -21
Making A Web Browser Title A page’s Web browser title does not refer to the name of the file or the title you type on the page for the viewer to read. Instead the Web browser title of an HTML file appears in the title bar of a Web browser when it is viewed. For example, if you go to the K200 home page you will see K200 – Microcomputer Applications in Kinesiology in the title bar of the Web browser. The title helps in identifying sites when they are bookmarked. If you don’t title a page, the page will appear in the browser window, bookmark lists, and history lists as Untitled Document.
What’s with all the names and titles? You may have noticed, or will notice, that there are many references to file names and titles. They are not the same thing. Here’s a brief description of these terms.
1. File name. This is the name on the html file. In other words index.html is the html file named index. (Note: This is the only name that MUST be lower case, no spaces, no strange punctuation.)
2. Page Title or Title. This is the title on the top of the Webpage. For example, “The Home Page of Margaret Lion” is the title on my Webpage index.html.
Introduction to Dreamweaver - K200 – IU SPH Microcomputers in Kinesiology
Introduction to Dreamweaver by Margaret Lion, 2012; Updated: November 4, 2015 DW -22
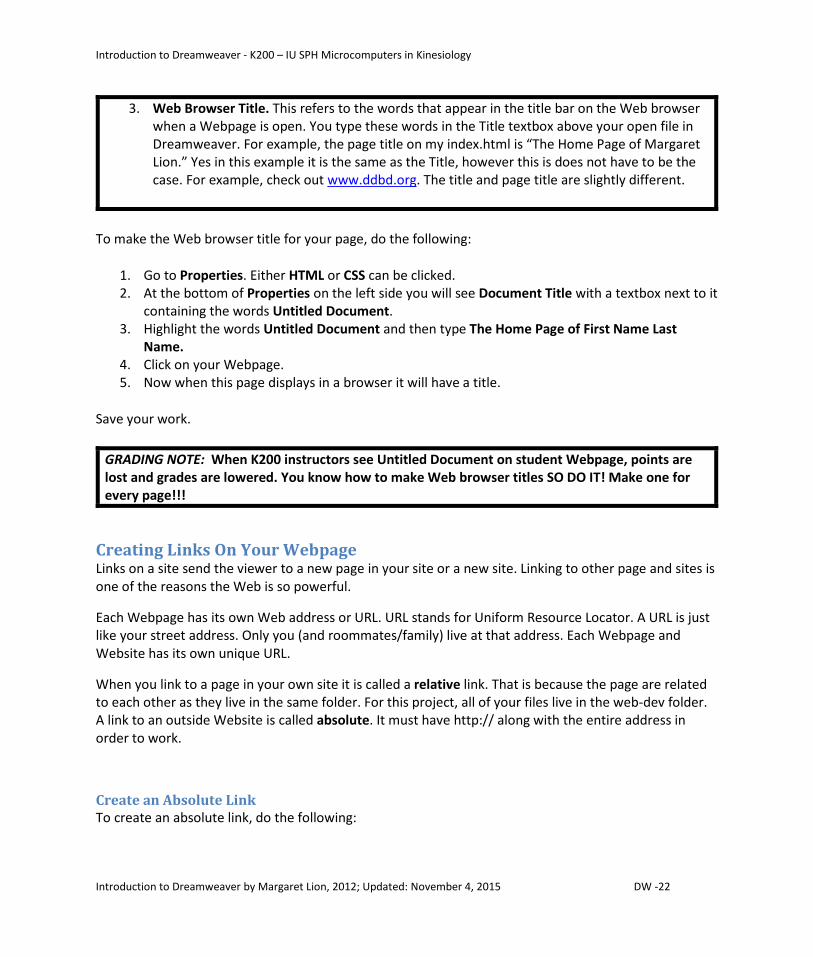
3. Web Browser Title. This refers to the words that appear in the title bar on the Web browser when a Webpage is open. You type these words in the Title textbox above your open file in Dreamweaver. For example, the page title on my index.html is “The Home Page of Margaret Lion.” Yes in this example it is the same as the Title, however this is does not have to be the case. For example, check out www.ddbd.org. The title and page title are slightly different.
To make the Web browser title for your page, do the following:
1. Go to Properties. Either HTML or CSS can be clicked. 2. At the bottom of Properties on the left side you will see Document Title with a textbox next to it
containing the words Untitled Document. 3. Highlight the words Untitled Document and then type The Home Page of First Name Last
Name. 4. Click on your Webpage. 5. Now when this page displays in a browser it will have a title.
Save your work.
GRADING NOTE: When K200 instructors see Untitled Document on student Webpage, points are lost and grades are lowered. You know how to make Web browser titles SO DO IT! Make one for every page!!!
Creating Links On Your Webpage Links on a site send the viewer to a new page in your site or a new site. Linking to other page and sites is one of the reasons the Web is so powerful.
Each Webpage has its own Web address or URL. URL stands for Uniform Resource Locator. A URL is just like your street address. Only you (and roommates/family) live at that address. Each Webpage and Website has its own unique URL.
When you link to a page in your own site it is called a relative link. That is because the page are related to each other as they live in the same folder. For this project, all of your files live in the web-dev folder. A link to an outside Website is called absolute. It must have http:// along with the entire address in order to work.
Create an Absolute Link To create an absolute link, do the following:
Introduction to Dreamweaver - K200 – IU SPH Microcomputers in Kinesiology
Introduction to Dreamweaver by Margaret Lion, 2012; Updated: November 4, 2015 DW -23
1. Find a URL that links to the Website for your home town or neighboring town. You can do this by typing the name and state of your home town in Google or any other search engine.
2. When you find a Website for your home town or neighboring town, click in the address bar so that the URL/Web address is highlighted.
3. Copy the URL. 4. In Dreamweaver, select the words - I am from home town, state. 5. Select the HTML button in the Properties. 6. Paste the URL in the Link field in the Properties bar. 7. Click in the document window to deselect Properties and the linked words. 8. The words I am from home town, state should now be blue and underlined. This means a link
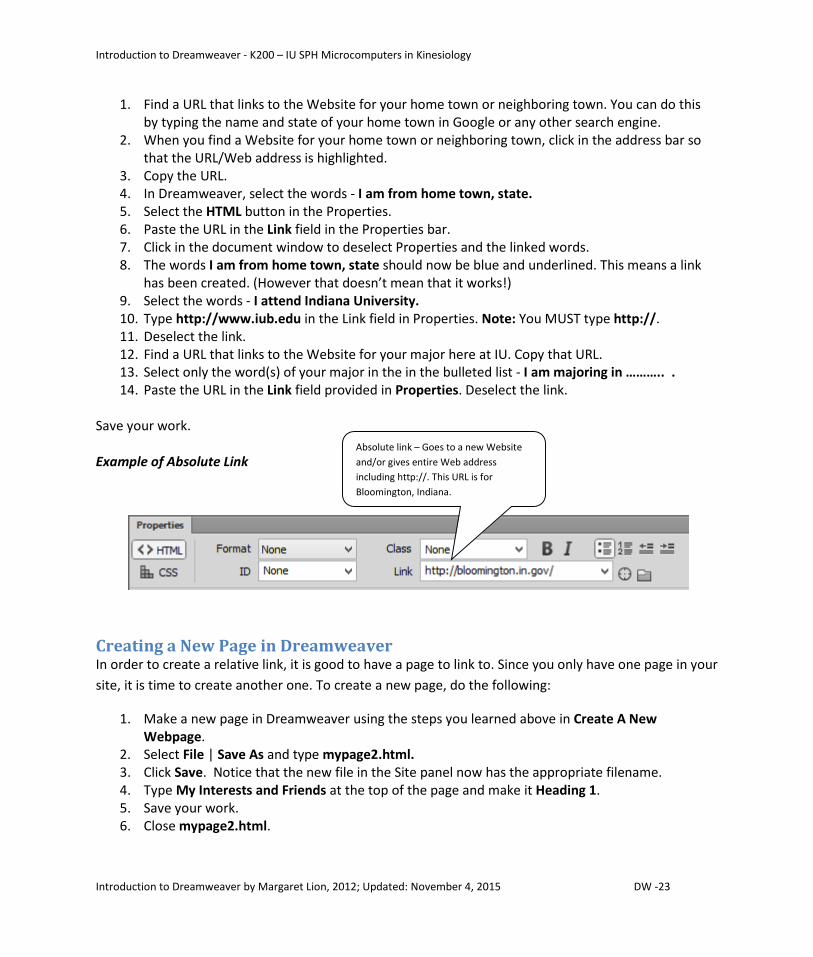
has been created. (However that doesn’t mean that it works!) 9. Select the words - I attend Indiana University. 10. Type http://www.iub.edu in the Link field in Properties. Note: You MUST type http://. 11. Deselect the link. 12. Find a URL that links to the Website for your major here at IU. Copy that URL. 13. Select only the word(s) of your major in the in the bulleted list - I am majoring in ……….. . 14. Paste the URL in the Link field provided in Properties. Deselect the link.
Save your work. Example of Absolute Link
Creating a New Page in Dreamweaver In order to create a relative link, it is good to have a page to link to. Since you only have one page in your site, it is time to create another one. To create a new page, do the following:
1. Make a new page in Dreamweaver using the steps you learned above in Create A New Webpage.
2. Select File | Save As and type mypage2.html. 3. Click Save. Notice that the new file in the Site panel now has the appropriate filename. 4. Type My Interests and Friends at the top of the page and make it Heading 1. 5. Save your work. 6. Close mypage2.html.
Absolute link – Goes to a new Website and/or gives entire Web address including http://. This URL is for Bloomington, Indiana.
Introduction to Dreamweaver - K200 – IU SPH Microcomputers in Kinesiology
Introduction to Dreamweaver by Margaret Lion, 2012; Updated: November 4, 2015 DW -24
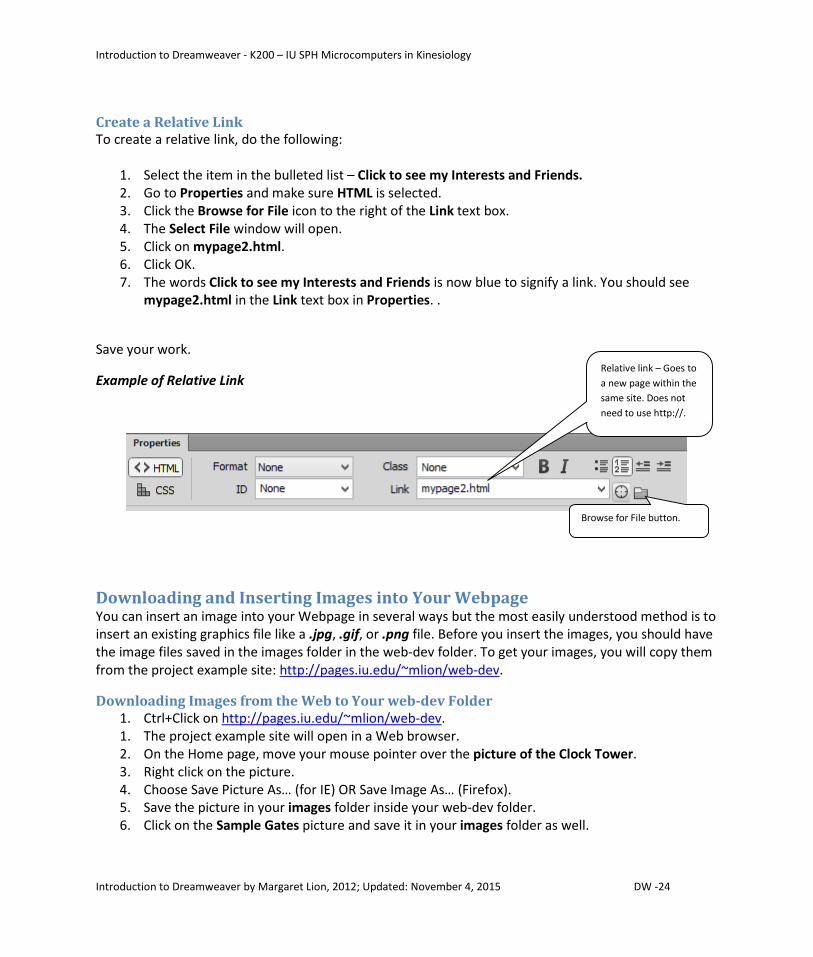
Create a Relative Link To create a relative link, do the following:
1. Select the item in the bulleted list – Click to see my Interests and Friends. 2. Go to Properties and make sure HTML is selected. 3. Click the Browse for File icon to the right of the Link text box. 4. The Select File window will open. 5. Click on mypage2.html. 6. Click OK. 7. The words Click to see my Interests and Friends is now blue to signify a link. You should see
mypage2.html in the Link text box in Properties. .
Save your work.
Example of Relative Link
Downloading and Inserting Images into Your Webpage You can insert an image into your Webpage in several ways but the most easily understood method is to insert an existing graphics file like a .jpg, .gif, or .png file. Before you insert the images, you should have the image files saved in the images folder in the web-dev folder. To get your images, you will copy them from the project example site: http://pages.iu.edu/~mlion/web-dev.
Downloading Images from the Web to Your web-dev Folder 1. Ctrl+Click on http://pages.iu.edu/~mlion/web-dev. 1. The project example site will open in a Web browser. 2. On the Home page, move your mouse pointer over the picture of the Clock Tower. 3. Right click on the picture. 4. Choose Save Picture As… (for IE) OR Save Image As… (Firefox). 5. Save the picture in your images folder inside your web-dev folder. 6. Click on the Sample Gates picture and save it in your images folder as well.
Relative link – Goes to a new page within the same site. Does not need to use http://.
Browse for File button.

Introduction to Dreamweaver - K200 – IU SPH Microcomputers in Kinesiology
Introduction to Dreamweaver by Margaret Lion, 2012; Updated: November 4, 2015 DW -25
Now that you have these images saved, you can insert them into you Webpage.
Inserting Images into Your Webpage Images make your site more interesting and artistic. Follow the instructions below to insert your images.
1. Make Dreamweaver the active window and be sure your index.html page is open. 2. Position the cursor underneath the red title and above This page was developed…. 3. From the Menu bar, click on Insert > Image. 4. The Select Image Source window will open showing the web-dev folder. 5. Open the images folder. 6. Click on tower.jpg.
7. Click OK. 8. The image will now appear on your page.

Introduction to Dreamweaver - K200 – IU SPH Microcomputers in Kinesiology
Introduction to Dreamweaver by Margaret Lion, 2012; Updated: November 4, 2015 DW -26
Save your work.
Adding Accessibility to Your Images Some people who use the Web are visually impaired. In order to be sure they can visit, understand, and learn from your Webpages you need to make your images accessible. You must type a description of all of your images so software used by visually impaired people can describe it to the user. This also helps with Web browsers that are text only or have the image display turned off. This is often called the “alt tag”. It is absolutely necessary to describe all of your images. If you do not, you are not complying with industry and governmental standards for Websites. You are also being inconsiderate. Always describe your pictures. To add accessibility to your images, do the following:
1. Make sure the clock tower image is selected by clicking on it. 2. Go to Properties. 3. Locate the Alt text box in the right side of Properties. 4. Click inside the Alt text box and type IU Clock Tower. 5. Click away from the clock tower image.
Tower picture is now on page.
Alt text box.
Introduction to Dreamweaver - K200 – IU SPH Microcomputers in Kinesiology
Introduction to Dreamweaver by Margaret Lion, 2012; Updated: November 4, 2015 DW -27
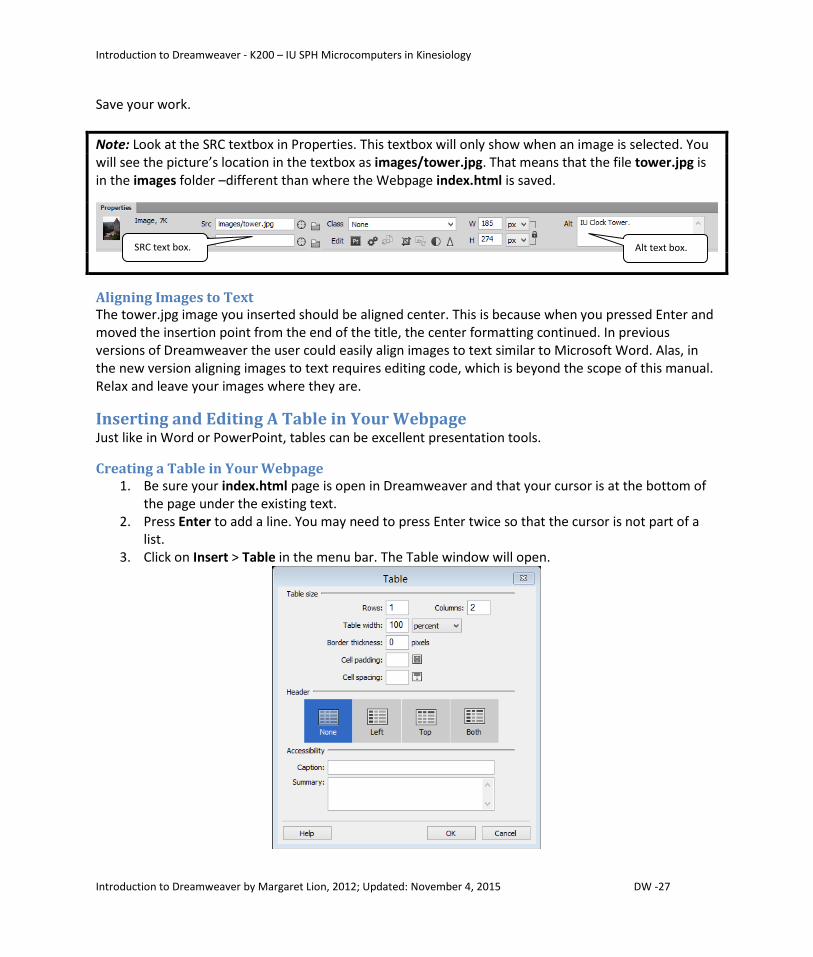
Save your work. Note: Look at the SRC textbox in Properties. This textbox will only show when an image is selected. You will see the picture’s location in the textbox as images/tower.jpg. That means that the file tower.jpg is in the images folder –different than where the Webpage index.html is saved.
Aligning Images to Text The tower.jpg image you inserted should be aligned center. This is because when you pressed Enter and moved the insertion point from the end of the title, the center formatting continued. In previous versions of Dreamweaver the user could easily align images to text similar to Microsoft Word. Alas, in the new version aligning images to text requires editing code, which is beyond the scope of this manual. Relax and leave your images where they are.
Inserting and Editing A Table in Your Webpage Just like in Word or PowerPoint, tables can be excellent presentation tools.
Creating a Table in Your Webpage 1. Be sure your index.html page is open in Dreamweaver and that your cursor is at the bottom of
the page under the existing text. 2. Press Enter to add a line. You may need to press Enter twice so that the cursor is not part of a
list. 3. Click on Insert > Table in the menu bar. The Table window will open.
Alt text box. SRC text box.

Introduction to Dreamweaver - K200 – IU SPH Microcomputers in Kinesiology
Introduction to Dreamweaver by Margaret Lion, 2012; Updated: November 4, 2015 DW -28
4. In the Table window, enter the following information:
a. In Rows text box, type 1 b. In Columns text box, type 2 c. In Table width text box, type 100 - make sure percent is showing. d. In Border thickness text box, type 0.
5. Click OK. 6. The table will appear in your Webpage. 7. Select the table by clicking on the table borders. Notice the change in the Properties Inspector. Save your work.
NOTE: Selecting the Table: Another easy way to select the entire table is to click on the word <table> in the bar right above Properties. (See picture below)
Adding Text to Your Table 1. Move your insertion point to the second (right hand) cell of the table. 2. Type For information about this page contact Your Name. (In place of Your Name, type your
own name.) 3. Make sure your insertion point is flashing next to your text and inside the table cell.
The table will look like this when first inserted.
Table only properties.
Table word to click for selecting the table in the document.

Introduction to Dreamweaver - K200 – IU SPH Microcomputers in Kinesiology
Introduction to Dreamweaver by Margaret Lion, 2012; Updated: November 4, 2015 DW -29
4. To go Properties. 5. Look for the Cell icon (see below) on the left side of Properties. 6. Find Horz next to Cell. 7. Click the drop down arrow and choose Center.
Your page should look similar to the picture below. Note: The cell with the words in it has grown noticeably larger. This is normal and will be corrected when you add content to the left cell.
Save your work using File > Save All.
Using a Table to Control Placement of Graphics and Text In recent years it has become frowned upon to use a table to control the placement of graphics and tables. However, it can also be quick and useful.
Sometimes it is difficult to make your pictures and text appear exactly where you want them. (Welcome to being a Webmaster.) One easy way to control this is by using a table to define where the text and the graphic will appear. We want to show the text you just typed to appear on the right side of the screen and a graphic to appear on the left side of the words. To accomplish this, do the following:
Now cell words and pictures will be centered in the cell.
Introduction to Dreamweaver - K200 – IU SPH Microcomputers in Kinesiology
Introduction to Dreamweaver by Margaret Lion, 2012; Updated: November 4, 2015 DW -30
1. Insert the picture of the Sample Gates in the left hand cell of the table. 2. In the Alt text box, type Sample Gates. This picture should already be in your images folder and
named sgate.jpg. 3. Click inside the cell containing the Sample Gates picture and align the picture center like you did
above in Adding Text to Your Table. Save your work.
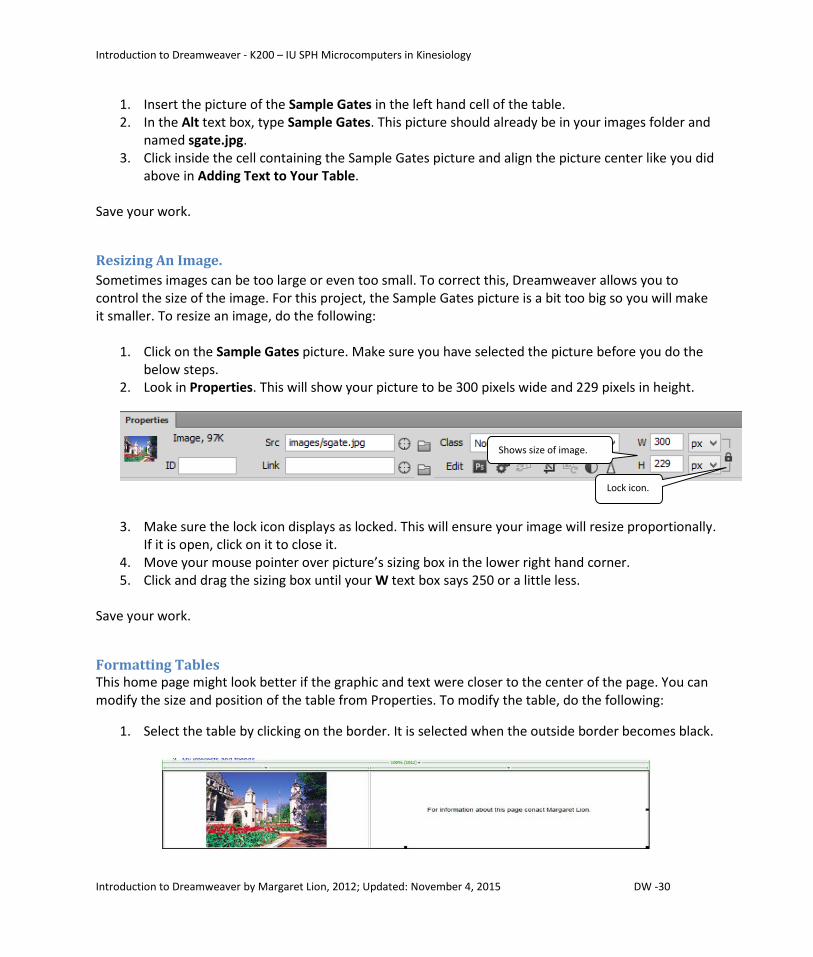
Resizing An Image. Sometimes images can be too large or even too small. To correct this, Dreamweaver allows you to control the size of the image. For this project, the Sample Gates picture is a bit too big so you will make it smaller. To resize an image, do the following:
1. Click on the Sample Gates picture. Make sure you have selected the picture before you do the below steps.
2. Look in Properties. This will show your picture to be 300 pixels wide and 229 pixels in height.
3. Make sure the lock icon displays as locked. This will ensure your image will resize proportionally.
If it is open, click on it to close it. 4. Move your mouse pointer over picture’s sizing box in the lower right hand corner. 5. Click and drag the sizing box until your W text box says 250 or a little less.
Save your work.
Formatting Tables This home page might look better if the graphic and text were closer to the center of the page. You can modify the size and position of the table from Properties. To modify the table, do the following:
1. Select the table by clicking on the border. It is selected when the outside border becomes black.
Shows size of image.
Lock icon.
Introduction to Dreamweaver - K200 – IU SPH Microcomputers in Kinesiology
Introduction to Dreamweaver by Margaret Lion, 2012; Updated: November 4, 2015 DW -31
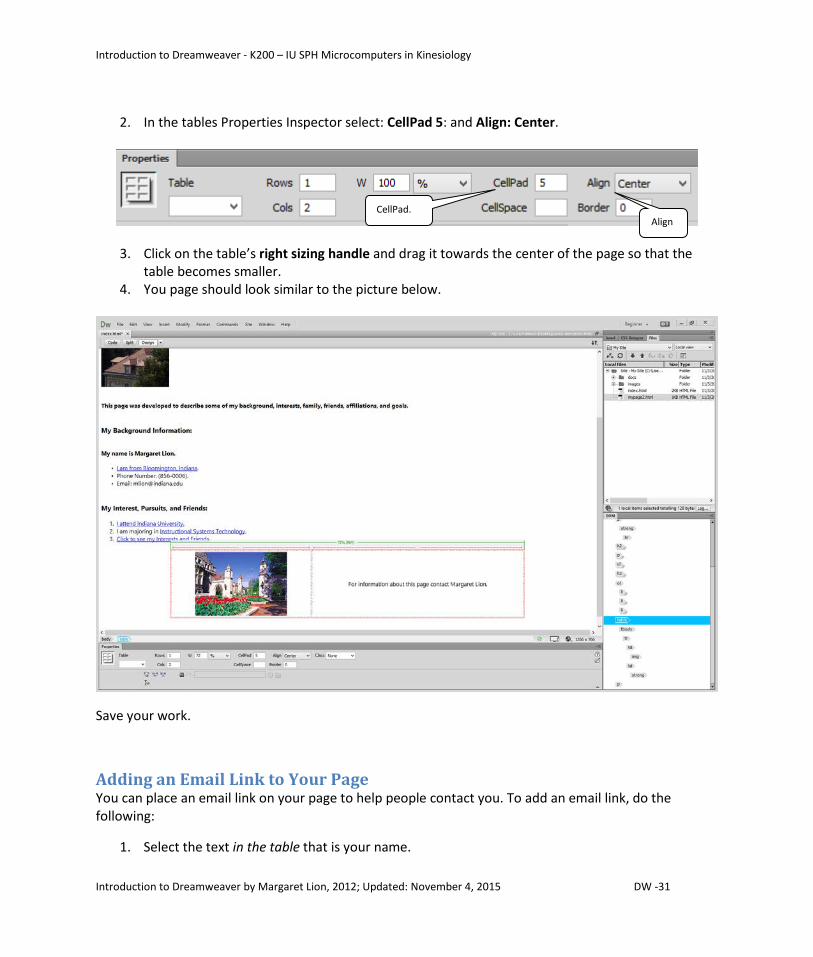
2. In the tables Properties Inspector select: CellPad 5: and Align: Center.
3. Click on the table’s right sizing handle and drag it towards the center of the page so that the table becomes smaller.
4. You page should look similar to the picture below.
Save your work.
Adding an Email Link to Your Page You can place an email link on your page to help people contact you. To add an email link, do the following:
1. Select the text in the table that is your name.
CellPad. Align
Introduction to Dreamweaver - K200 – IU SPH Microcomputers in Kinesiology
Introduction to Dreamweaver by Margaret Lion, 2012; Updated: November 4, 2015 DW -32
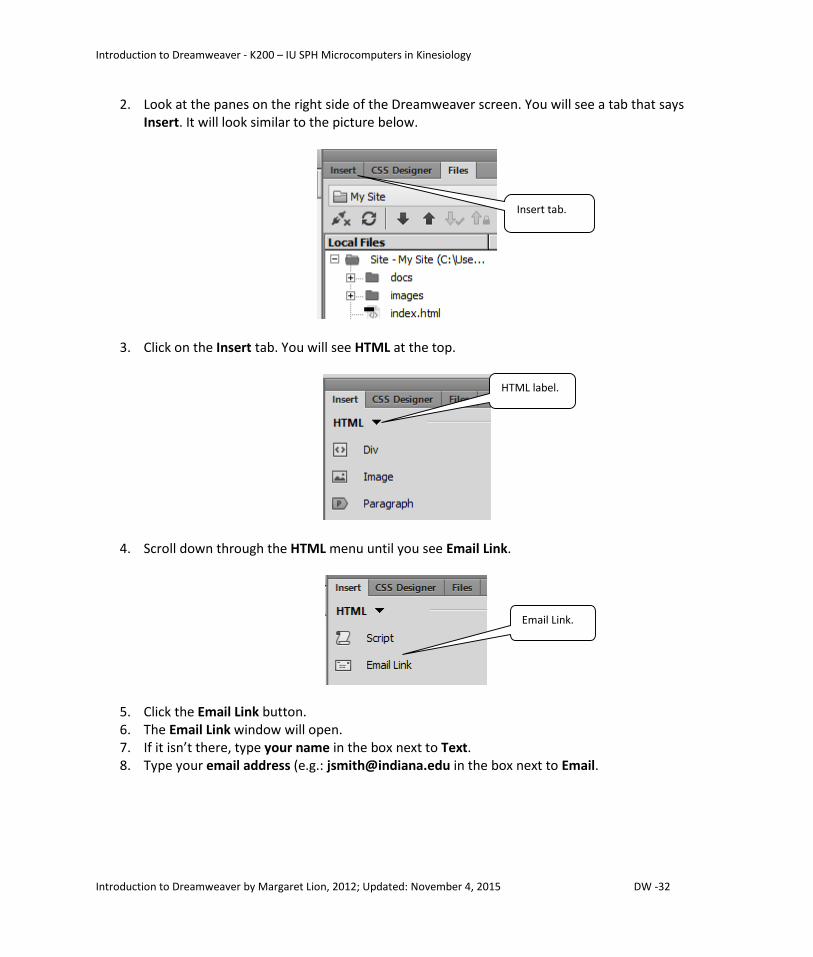
2. Look at the panes on the right side of the Dreamweaver screen. You will see a tab that says Insert. It will look similar to the picture below.
3. Click on the Insert tab. You will see HTML at the top.
4. Scroll down through the HTML menu until you see Email Link.
5. Click the Email Link button. 6. The Email Link window will open. 7. If it isn’t there, type your name in the box next to Text. 8. Type your email address (e.g.: [email protected] in the box next to Email.
Insert tab.
HTML label.
Email Link.

Introduction to Dreamweaver - K200 – IU SPH Microcomputers in Kinesiology
Introduction to Dreamweaver by Margaret Lion, 2012; Updated: November 4, 2015 DW -33
9. Click OK. 10. Your name will now be a link to your email. Note: If you look in Properties, then Link text box
you will see mailto:youremailaddress. This is correct. Save your work. This time use File > Save All.
Changing the Background The default background color for Webpage is white. (It used to be grey.) You can change the background color of your Webpage to any color you like. However you don’t want the new background color you choose to make it hard to read your text. If you have to squint when you read your page, then you need to change the background color. To change the background color, do the following:
1. Select Modify in the Menu bar. 2. Select Page Properties from the drop down list. 3. The Page Properties dialog box will appear. Make sure Appearance (CSS) in the left column is
selected.
4. Click the down arrow on the Background color box. 5. The color selection appears, looking just like the text colors. . 6. Select a light color for your background. If the background color is too dark, it will be difficult to
read your text. Note: For this project white will not be accepted as a background color. 7. Click Apply in the Page Properties window.
Appearance (CSS) Background color box.

Introduction to Dreamweaver - K200 – IU SPH Microcomputers in Kinesiology
Introduction to Dreamweaver by Margaret Lion, 2012; Updated: November 4, 2015 DW -34
8. If you don’t like the new color repeat the above process. The picture below shows the page with a new background color.
Save your work.
Check Spelling Don’t let typos on your Webpage get your grade reduced. Dreamweaver has a built in check spelling tool for you to use. To check spelling, do the following:
1. Click Commands in the Menu tool bar. 2. Click Check Spelling. 3. The Check Spelling window will open. 4. The Check Spelling tool works just like the same tool in Word. 5. When you are done, click the Close button.
Save your work.
Grading Note: Misspelled words on Webpages cause great rage in instructors. Misspelled words are a sign of laziness, proving you just couldn’t be bothered to run a simple spell check. Misspelled words will result in a drastically lower grade for the project. You have been warned.

Introduction to Dreamweaver - K200 – IU SPH Microcomputers in Kinesiology
Introduction to Dreamweaver by Margaret Lion, 2012; Updated: November 4, 2015 DW -35
Check Your Work – Review Webpage in Browser It is wise to check your work to see how it will look in a Web browser. This will give you a good idea of how your page will look and work when it has been published. Follow the instructions from Preview Webpage in Browser to view your page. Note: The URL for your page will show that it is on your computer and not have http:// in front of it.
Continuing with mypage2.html Now that you have finished your site’s home page, index.html, you will want to work on your second page, mypage2.html. Inside Dreamweaver, close index.html and then open mypage2.html. To open mypage2.html, or any other unopened Webpage, do the following:
1. Click on the Files tab in the upper right hand corner. You should then see your Files panel again.
2. Open mypage2.html by double-clicking on it in the Files pane. 3. Mypage2.html should now be open in Dreamweaver.
Editing Second Webpage This Webpage now requires your attention. You will need to add text, a table, pictures, and links.
First, type the required text on the page:
My Interests and Friends [Press Enter once]
My Favorite Websites [Press Enter once]
Name of first favorite Website [Press Enter once]
Name of second favorite Website [Press Enter once]
Name of third favorite Website [Press Enter twice]
My Friends [Press Enter twice]

Introduction to Dreamweaver - K200 – IU SPH Microcomputers in Kinesiology
Introduction to Dreamweaver by Margaret Lion, 2012; Updated: November 4, 2015 DW -36
Back to my Home Page.
Your page should look similar to the picture below.
Modifying Page Color and Formatting Text You will need to format this Webpage like you did for your index page. To properly format this page, do the following:
1. Make My Interests and Friends Heading 1 and red. 2. Make My Favorite Websites and My Friends Heading 3. 3. Go to Modify from the Menu. 4. In the Pages Properties menu do the following:
a. Change Background color – can be different or the same from index.html page. b. Make default font begin with Segoe, Segoe UI…
When you are finished, save your work. Your page should look similar to the picture below.

Introduction to Dreamweaver - K200 – IU SPH Microcomputers in Kinesiology
Introduction to Dreamweaver by Margaret Lion, 2012; Updated: November 4, 2015 DW -37
Create Links Again
Relative Link for mypage2.html You will now create a relative link from your mypage2.html page back to your index.html. You will also add some absolute links.
1. Highlight the words Back to My Home Page. 2. Link to the index.html page using the same technique described in Create a Relative Link.
Save your work.
Absolute Links for mypage2.html 1. Go to your first favorite Website. 2. Copy the URL. 3. Paste the URL into the Link text box in Properties as described in Create an Absolute Link. 4. Repeat the above steps for your second and third favorite Website.
In Addition: Highlight the three favorite Websites and make them an Unordered list. Your page should look similar to the picture below.

Introduction to Dreamweaver - K200 – IU SPH Microcomputers in Kinesiology
Introduction to Dreamweaver by Margaret Lion, 2012; Updated: November 4, 2015 DW -38
Adding Table and Images The below steps will help you edit your page by adding a table and images. To do the following you must find and download four pictures of your friends into the images folder. When you have your images, do the following:
1. Click underneath My Friends heading. 2. Insert a 2-column by 2-row table. Make sure the table has 1 for Borders and that Table width is
100 percent. 3. Insert into each of the cells a picture of your friends. Yes you will probably have to go download
them from the Web. 4. To get pictures of your friends, do the following:
a. You can download pictures of your friends from the Web (like Facebook). b. You can copy pictures from a disk. c. You will need to put the pictures in your images folder in your web-dev folder on your
desktop. Note: These images must be .jpg, .gif, or .png. If your image will only download as a .bmp, read through the instructions in Appendix A – Web Images at the end of this workbook.
5. Make sure you follow the same procedure for adding these pictures as you did for the previous pictures mentioned in Inserting Images into Your Webpage.

Introduction to Dreamweaver - K200 – IU SPH Microcomputers in Kinesiology
Introduction to Dreamweaver by Margaret Lion, 2012; Updated: November 4, 2015 DW -39
6. Resize Pictures. A picture’s largest dimension can only be 350 or less. Also make sure you have the lock icon closed in Properties! If your pictures have a dimension larger than 350, you must resize by doing the following:
a. If the picture is W 550 and H 475, then you must resize so that the W is 350 - H will automatically resize if you use the click and drag method previously given.
b. If the picture is W 300 and H 400, then you must resize so that H is 350. 7. Your images MUST be in your images folder or they will not show and you will have a lot of
heartache. 8. Also be sure to give a caption in the Alt text box. This is industry standard to be sure that people
with visual impairment can know what is on a Website. Save your work.
Insert Picture Note: Sometimes when you insert a picture into your Webpage it appears as huge. Don’t worry. Just resize the picture until it is smaller. If the table then looks distorted, click outside of the table and it will return to its proper size.
Adding Picture Captions + How to Single Space Picture captions help your Website viewers know the content of your pictures. To add picture captions follow the steps below.
1. Give your pictures a caption by doing the following: a. Click on your first picture so that it is selected. b. Press the right arrow key on your keyboard. The insertion point will now be flashing on
the right side of the picture. c. Hold down Shift key and then press Enter. Note: This is how you get single spacing in
Dreamweaver. d. Type a caption for your picture telling the viewer who the people are and what they are
doing. 2. Do the above steps for all of your My Friends pictures. 3. Your page should look similar to the picture below.

Introduction to Dreamweaver - K200 – IU SPH Microcomputers in Kinesiology
Introduction to Dreamweaver by Margaret Lion, 2012; Updated: November 4, 2015 DW -40
Save your work.
Centering Pictures and Text Inside A Table Cell There are times when centering the pictures and text inside a table cell improves the appearance of the Webpage. To center the pictures and text in each cell, perform the steps given in the above section Adding Text to Your Table. When you are done save your work. It should look similar to the picture below.

Introduction to Dreamweaver - K200 – IU SPH Microcomputers in Kinesiology
Introduction to Dreamweaver by Margaret Lion, 2012; Updated: November 4, 2015 DW -41
Adding Browser Title Again Make sure to add the browser title My Friends and Interests. You will find the instructions for this Making A Web Browser Title.
You have now finished creating mypage2.html. Close mypage2.html.
Page 3 – Multimedia Page You have created two page in your Website. It is now time to expand your site and practice what you have just learned.
Often when you create a site you realize you wish to add a new page. This sometimes means adding new folders and files to your Website. It also means you may have to go back to existing page and edit them.
Your third page for this site will be a multimedia page. This page will have links to an audio file, a Word file, and three online videos. In order to create this page you will download an audio file to your web-dev folder, creating a new folder for the file. You will also learn three different ways to link to and display a video on your page. This includes linking to the video’s Webpage, opening video Webpage in a

Introduction to Dreamweaver - K200 – IU SPH Microcomputers in Kinesiology
Introduction to Dreamweaver by Margaret Lion, 2012; Updated: November 4, 2015 DW -42
new window, and inserting an embedded video. You will also download a Word file and place it in the docs folder in web-dev.
View the project example Multimedia page for an example of your work and to find files and links: http://pages.iu.edu/~mlion/web-dev/multimedia.html.
Get Audio File and Create audio Folder The first thing you will need to do even before you create your multimedia page is to download the necessary audio file and create a folder for it inside your web-dev folder. Download the audio file Indiana Fight Song by doing the following:
1. In Firefox, go to http://pages.iu.edu/~mlion/web-dev/multimedia.html. Yes you are now looking at an example of the Multimedia page for your project.
2. Under Audio File heading, look for the words Indiana Fight Song. 3. Right-click on Indiana Fight Song. 4. Click Save Link As… 5. The Save As window will appear. 6. Go to your web-dev folder. 7. Inside the web-dev folder, create a new folder named audio. 8. Open the audio folder and save the file fight.mp3 in the folder. 9. The song fight.mp3 should now be in your audio folder inside your web-dev folder.
Refresh Dreamweaver Window When you add new files or folders to your web-dev folder it is wise to refresh your files view in Dreamweaver. This ensures Dreamweaver is looking at your more current folder and contents. Refresh your view by clicking the Refresh button located at the top of the files pane.
Once you have clicked the Refresh button, you should see the audio folder. To be sure the .mp3 file is there, double click the folder to open it. If the song isn’t there, download it again.
Refresh button.
Audio folder.
Introduction to Dreamweaver - K200 – IU SPH Microcomputers in Kinesiology
Introduction to Dreamweaver by Margaret Lion, 2012; Updated: November 4, 2015 DW -43
Create Multimedia Page To begin, make sure Dreamweaver is open, the web-dev folder and all contents are on the Desktop, and the local site has been set to point to the web-dev folder. You should have set the site in Dreamweaver to be My Site. You should also see your audio folder. Your screen should look similar to the picture below.
Create a new page using the techniques you have previously learned. Note: Your text instructions will be a bit different to test your formatting skills.
Make sure to do the following:
1. Name this page multimedia.html. 2. In Web browser title type My Multimedia Page. 3. Under Modify then Page Properties, make the default font Segoe, Segoe UI, BUT leave the
background color white! 4. On the page, type the following:
a. Title: My Multimedia Page with Heading 1 formatting. Center the title and make it red. b. Subtitle: Audio File with Heading 3 formatting c. Second Subtitle: Video Links with Heading 3 formatting d. Third Subtitle: Word Document with Heading 3 formatting
5. Under Audio File type Indiana Fight! Song.
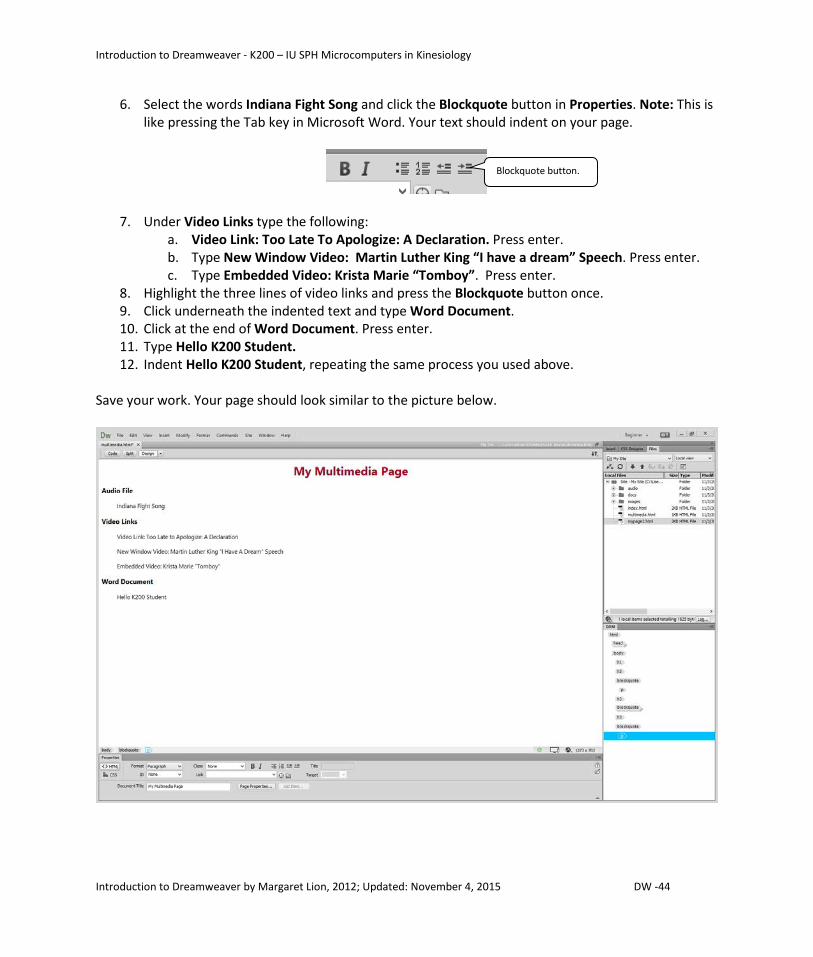
Introduction to Dreamweaver - K200 – IU SPH Microcomputers in Kinesiology
Introduction to Dreamweaver by Margaret Lion, 2012; Updated: November 4, 2015 DW -44
6. Select the words Indiana Fight Song and click the Blockquote button in Properties. Note: This is like pressing the Tab key in Microsoft Word. Your text should indent on your page.
7. Under Video Links type the following: a. Video Link: Too Late To Apologize: A Declaration. Press enter. b. Type New Window Video: Martin Luther King “I have a dream” Speech. Press enter. c. Type Embedded Video: Krista Marie “Tomboy”. Press enter.
8. Highlight the three lines of video links and press the Blockquote button once. 9. Click underneath the indented text and type Word Document. 10. Click at the end of Word Document. Press enter. 11. Type Hello K200 Student. 12. Indent Hello K200 Student, repeating the same process you used above.
Save your work. Your page should look similar to the picture below.
Blockquote button.
Introduction to Dreamweaver - K200 – IU SPH Microcomputers in Kinesiology
Introduction to Dreamweaver by Margaret Lion, 2012; Updated: November 4, 2015 DW -45
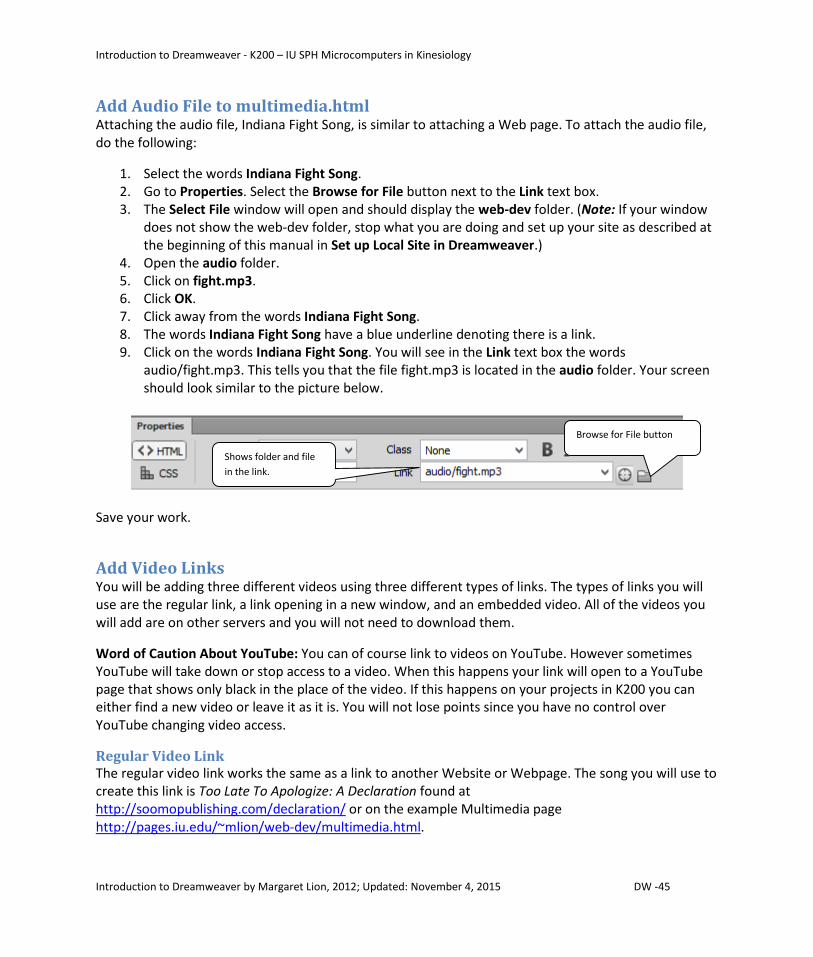
Add Audio File to multimedia.html Attaching the audio file, Indiana Fight Song, is similar to attaching a Web page. To attach the audio file, do the following:
1. Select the words Indiana Fight Song. 2. Go to Properties. Select the Browse for File button next to the Link text box. 3. The Select File window will open and should display the web-dev folder. (Note: If your window
does not show the web-dev folder, stop what you are doing and set up your site as described at the beginning of this manual in Set up Local Site in Dreamweaver.)
4. Open the audio folder. 5. Click on fight.mp3. 6. Click OK. 7. Click away from the words Indiana Fight Song. 8. The words Indiana Fight Song have a blue underline denoting there is a link. 9. Click on the words Indiana Fight Song. You will see in the Link text box the words
audio/fight.mp3. This tells you that the file fight.mp3 is located in the audio folder. Your screen should look similar to the picture below.
Save your work.
Add Video Links You will be adding three different videos using three different types of links. The types of links you will use are the regular link, a link opening in a new window, and an embedded video. All of the videos you will add are on other servers and you will not need to download them.
Word of Caution About YouTube: You can of course link to videos on YouTube. However sometimes YouTube will take down or stop access to a video. When this happens your link will open to a YouTube page that shows only black in the place of the video. If this happens on your projects in K200 you can either find a new video or leave it as it is. You will not lose points since you have no control over YouTube changing video access.
Regular Video Link The regular video link works the same as a link to another Website or Webpage. The song you will use to create this link is Too Late To Apologize: A Declaration found at http://soomopublishing.com/declaration/ or on the example Multimedia page http://pages.iu.edu/~mlion/web-dev/multimedia.html.
Browse for File button
Shows folder and file in the link.

Introduction to Dreamweaver - K200 – IU SPH Microcomputers in Kinesiology
Introduction to Dreamweaver by Margaret Lion, 2012; Updated: November 4, 2015 DW -46
Open this video in your Web browser. (Note: This video is very funny as well as educational so watch it!) To add this video to your page, do the following:
1. Highlight the video address and copy it. Make sure to copy http:// if it appears.as well. If it doesn’t, don’t’ worry. It is there you just can’t see it.
2. Highlight the words Too Late To Apologize: A Declaration on your Multimedia page. 3. Click in the Link text box Properties and paste in the address. Press enter. 4. The words Too Late To Apologize: A Declaration will now be blue and underlined denoting it is a
link. Save your work.
New Window Video Link A new window link means that when you click on the link the Website or page will open in a new window in the browser. Thus you will not navigate away from the original page as it is also still open. This technique is used on the Class Resources page frequently. Your new window link will be to Martin Luther King’s speech “I have a dream” that can be found on the Multimedia example page: http://pages.iu.edu/~mlion/web-dev/multimedia.html. To create a new window link, do the following:
1. Go to the Webpage http://pages.iu.edu/~mlion/web-dev/multimedia.html. 2. Click the link Martin Luther King "I have a dream". Note that this video will open in a new
window. 3. In YouTube under the video, click the word Share. 4. A new address will appear in a text box on the YouTube page. 5. Copy the address. 6. Go to your multimedia page and highlight the words Martin Luther King “I have a dream”
Speech. 7. Paste the address in the Link box. 8. To the right of the Link box find Target. 9. In the Target, click the drop down arrow and select _blank. 10. Your Properties should look similar to the picture below.
11. Click on your Webpage. The words Martin Luther King “I have a dream” Speech should be blue and underlined.
Save your work.
Target box.

Introduction to Dreamweaver - K200 – IU SPH Microcomputers in Kinesiology
Introduction to Dreamweaver by Margaret Lion, 2012; Updated: November 4, 2015 DW -47
Embedded Video Link WARNING! The below instructions may or may not work as Youtube changes how videos are embedded often! If it works, GREAT! If it doesn’t work, make the Embedded video a New Video Window link and mention you couldn’t get this to work in Canvas.
YouTube changes its embedding methods several times a year. At the time this manual was written, the below information was correct. If it is no longer correct, see if you can figure out how to embed the video yourself (YouTube may even have an instructional video for this) or ask your teacher or K200 Buddy. Welcome to technology.
The embedded video link is the most challenging link to create, yet it is also the most impressive link for your Webpage. To add an embedded link, follow the instructions below.
1. Go to the Webpage http://pages.iu.edu/~mlion/web-dev/multimedia.html. 2. Click on the words YouTube in the lower right corner of the embedded video.
3. The video will open in your Web browser and look similar to the picture below.
4. Click Share like you did for the above video. 5. Click Embed. 6. The Webpage will change and look similar to the picture below.
YouTube button.

Introduction to Dreamweaver - K200 – IU SPH Microcomputers in Kinesiology
Introduction to Dreamweaver by Margaret Lion, 2012; Updated: November 4, 2015 DW -48
7. Highlight and copy the embed code. Note: The size of the window is for the embed code is not important.
8. Go to your multimedia page. 9. Click underneath the words Embed Video: Krista Marie “Tomboy”. Make sure your insertion
point is underneath the words. Note: You may have to press the enter key after the word Tomboy.
10. Click on the Code button to view your code! Yes, that’s right; you will now be looking at and editing your page’s code! Your Dreamweaver page should look similar to the picture below.
Embed code.
Embed.
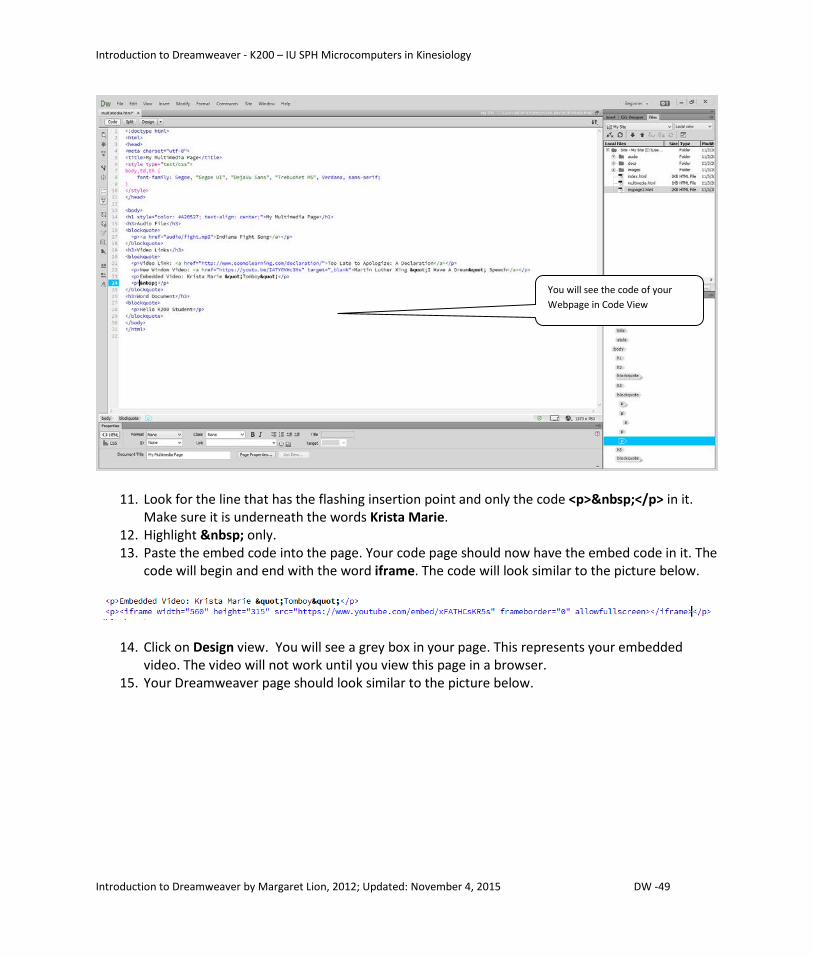
Introduction to Dreamweaver - K200 – IU SPH Microcomputers in Kinesiology
Introduction to Dreamweaver by Margaret Lion, 2012; Updated: November 4, 2015 DW -49
11. Look for the line that has the flashing insertion point and only the code <p> </p> in it. Make sure it is underneath the words Krista Marie.
12. Highlight only. 13. Paste the embed code into the page. Your code page should now have the embed code in it. The
code will begin and end with the word iframe. The code will look similar to the picture below.
14. Click on Design view. You will see a grey box in your page. This represents your embedded video. The video will not work until you view this page in a browser.
15. Your Dreamweaver page should look similar to the picture below.
You will see the code of your Webpage in Code View

Introduction to Dreamweaver - K200 – IU SPH Microcomputers in Kinesiology
Introduction to Dreamweaver by Margaret Lion, 2012; Updated: November 4, 2015 DW -50
Save your work.
Add Word Document Link It is now time to link to a Word document on your site. Note: These instructions will work for linking all file types that you have made in K200 on your site. To make a link to a Word document, do the following:
1. Click on this link: http://pages.iu.edu/~mlion/web-dev/multimedia.html. 2. Move your mouse pointer over Hello K200 Students and right-click. 3. Click Save Link As… and save the document to your docs folder in web-dev. 4. Go to Dreamweaver and highlight the words Hello K200 Student. 5. From Link text box, go to the docs folder. 6. Click on hello-k200-students.docx. 7. Click OK. 8. The words Hello K200 Student should now be blue and underlined denoting a link.
Save your work.
Grey box marks where the embedded video will display.

Introduction to Dreamweaver - K200 – IU SPH Microcomputers in Kinesiology
Introduction to Dreamweaver by Margaret Lion, 2012; Updated: November 4, 2015 DW -51
Finishing The Site To finish your page and your site, you will need to create links to your page index and mypage2 from multimedia.html. You will also need to create a multimedia link on both the index and mypage2.
Add Your Webpage Links on Multimedia Page You will need to add links to your other page on the multimedia page. You will also need to add a multimedia page link on both the index page and the My Friends and Interests page. First add the links on your multimedia page.
1. Click beneath the words Hello K200 Student. 2. Press enter twice. 3. In Properties, click HTML. 4. Click the Remove Blockquote button which looks like and works like the reverse indent button
in Word. 5. Type Go to My Interests and Friends. 6. Highlight Go to My Interests and Friends and create a link to mypage2.html. 7. Press enter. 8. Type Go to Home Page. 9. Highlight Go to Home Page and then type in the Link text box index.html.
MAKE SURE! That you have My Multimedia Page in the Document Title text box in Properties!! Save your work.
Add Webpage Links on index Page 1. Open index.html. 2. Below the table type My Multimedia Page then create the link to the page.
MAKE SURE! That you have The Home Page of Firstname Lastname in the Document Title text box in Properties!! Save your work.
Add Webpage Links on My Friends and Interests Page 1. Open mypage2.html. 2. Below the table and above the Back to My Home Page link type My Multimedia Page then
create the link to the page. MAKE SURE! That you have My Friends and Interests in the Document Title text box in Properties!! Save your work.
Preview Your Site Before you publish site you MUST preview your site in your Web browser from your Desktop!! Make sure that all of your links work and that all of your pictures show. Only when your page works perfectly on your computer do you then publish it.

Introduction to Dreamweaver - K200 – IU SPH Microcomputers in Kinesiology
Introduction to Dreamweaver by Margaret Lion, 2012; Updated: November 4, 2015 DW -52
You have now finished creating your first Dreamweaver Website! Your next step in the project will be to publish the web-dev folder to the Web.
Publishing Your web-dev Folder Read and work through the chapter in the textbook Multimedia in K200, Vol. 3 titled Section 1: WinSCP and Publishing to Mercury to learn how to publish your Website.
You may have heard the term publishing used in conjunction with the Web. Publishing on the Web simply means making the Website you have created available to view on the Web. The Website you have created is not published and cannot be accessed by others until you publish it.
At the beginning of K200 you should have applied for a Mercury account. This is the name of the server that will hold your Website. When you set up an account and are ready to publish your home page you will need to complete Section 1: WinSCP and Publishing to Mercury.
Submitting Your Work For Grading Each K200 instructor has preferred ways to receive Website projects for grading. You will receive submittal instructions from your instructor.
For Fall 2015, copy and paste your web-dev site URL into Canvas – just like you did for Weebly.
You are done!

Introduction to Dreamweaver - K200 – IU SPH Microcomputers in Kinesiology
Introduction to Dreamweaver by Margaret Lion, 2012; Updated: November 4, 2015 DW -53
Appendix A – Web Images You will need to do these steps ONLY if the file is a .bmp when you download it. If you download a file that has the .jpg, .gif, or .png extension, your graphic will work fine. These files are supported by Web browsers. Supported means the browsers are programmed to read them.
For some reason pictures that have been downloading from Facebook over the past year will often appear as untitled.bmp when you go to save them on your computer. This will make the image unreadable by a Web browser as .bmp files are not supported by the Web browser.
So when you find you are downloading a .bmp, fear not! Just do the following steps:
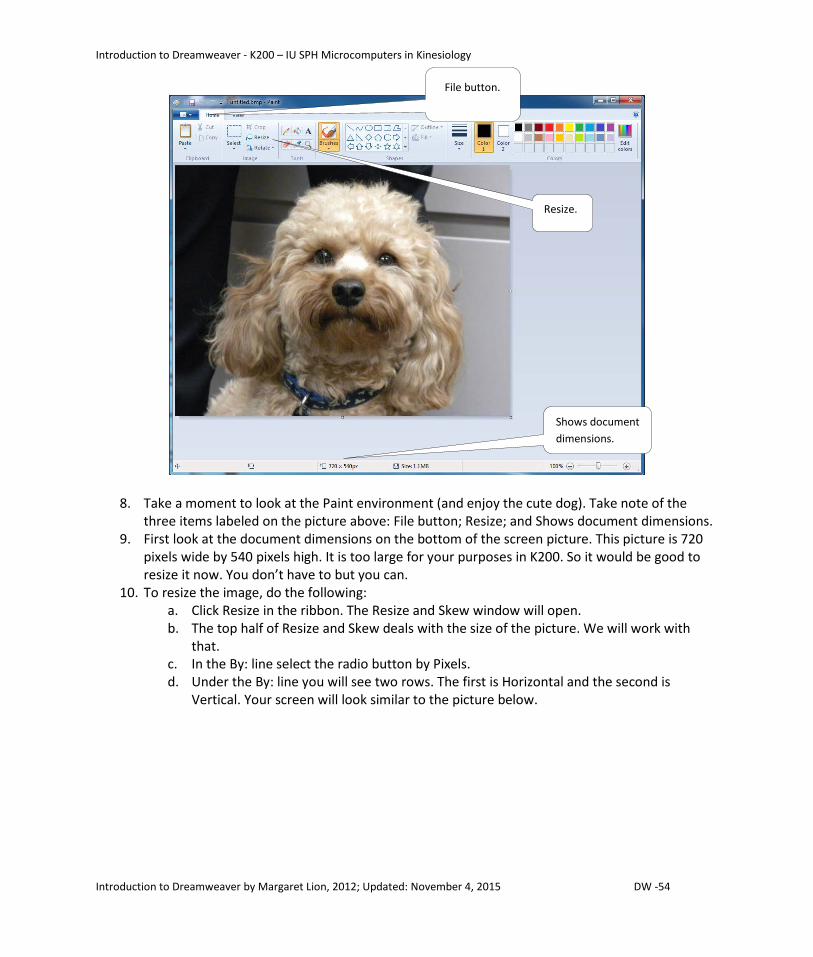
1. Download the file anyway. For this example the file is named untitled.bmp. (This seems to be the norm, by the way.) Save the file to your Desktop, but NOT in the web-dev folder images folder!!
2. Right-click on the image to open a shortcut menu. 3. Select from the new menu Open with. 4. A new menu will appear. 5. Your computer screen should look similar to the picture below.
6. Click on Paint (pictured above) from the second menu. Paint is a small graphics editing program that is part of the Windows 7 operating system.
7. The picture will open in Paint and should look similar to the picture below. (Note: The dog’s name is Jaxx and yes he is unbelievably cute.)
Open with
Paint
Introduction to Dreamweaver - K200 – IU SPH Microcomputers in Kinesiology
Introduction to Dreamweaver by Margaret Lion, 2012; Updated: November 4, 2015 DW -54
8. Take a moment to look at the Paint environment (and enjoy the cute dog). Take note of the three items labeled on the picture above: File button; Resize; and Shows document dimensions.
9. First look at the document dimensions on the bottom of the screen picture. This picture is 720 pixels wide by 540 pixels high. It is too large for your purposes in K200. So it would be good to resize it now. You don’t have to but you can.
10. To resize the image, do the following: a. Click Resize in the ribbon. The Resize and Skew window will open. b. The top half of Resize and Skew deals with the size of the picture. We will work with
that. c. In the By: line select the radio button by Pixels. d. Under the By: line you will see two rows. The first is Horizontal and the second is
Vertical. Your screen will look similar to the picture below.
File button.
Shows document dimensions.
Resize.

Introduction to Dreamweaver - K200 – IU SPH Microcomputers in Kinesiology
Introduction to Dreamweaver by Margaret Lion, 2012; Updated: November 4, 2015 DW -55
e. Make sure that the check box by Maintain aspect ratio has been clicked. f. Click in the cell with the largest size. For our example it will be Horizontal as it is 720
pixels. g. Type 350, or smaller if you prefer. See picture below for example.
h. Click OK.

Introduction to Dreamweaver - K200 – IU SPH Microcomputers in Kinesiology
Introduction to Dreamweaver by Margaret Lion, 2012; Updated: November 4, 2015 DW -56
i. Your picture has now been resized. You are now ready to save it in a Web supported format.
11. Click the File button then click Save As. A new menu will appear looking similar to the picture below.
12. As a general rule, if the picture is a photograph you will save it as a JPEG picture. If it is a line drawing you will save it as a GIF picture. This is not a hard and fast rule and if you save a photograph as a gif that is fine. For our example the picture will be saved as a JPEG picture.
13. Click JPEG picture. 14. The Save As window will open. 15. Navigate to the images folder inside web-dev. 16. Give your picture a short, descriptive name. For this example, the picture is named jaxx.jpg.
Introduction to Dreamweaver - K200 – IU SPH Microcomputers in Kinesiology
Introduction to Dreamweaver by Margaret Lion, 2012; Updated: November 4, 2015 DW -57
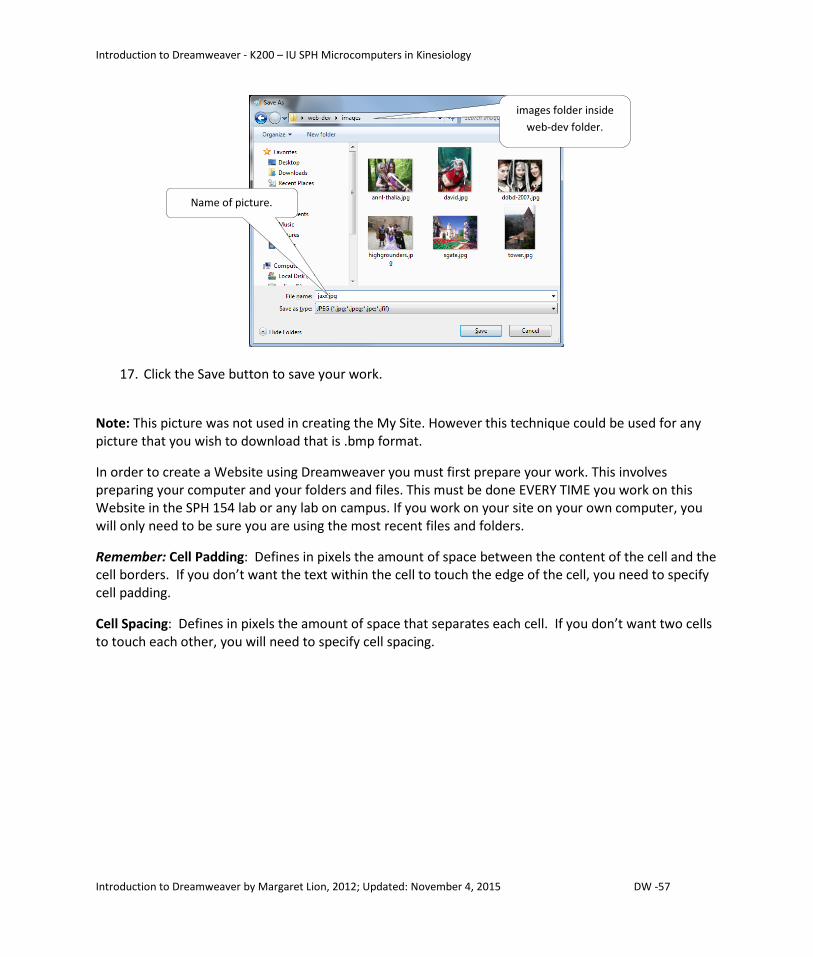
17. Click the Save button to save your work.
Note: This picture was not used in creating the My Site. However this technique could be used for any picture that you wish to download that is .bmp format.
In order to create a Website using Dreamweaver you must first prepare your work. This involves preparing your computer and your folders and files. This must be done EVERY TIME you work on this Website in the SPH 154 lab or any lab on campus. If you work on your site on your own computer, you will only need to be sure you are using the most recent files and folders.
Remember: Cell Padding: Defines in pixels the amount of space between the content of the cell and the cell borders. If you don’t want the text within the cell to touch the edge of the cell, you need to specify cell padding.
Cell Spacing: Defines in pixels the amount of space that separates each cell. If you don’t want two cells to touch each other, you will need to specify cell spacing.
Name of picture.
images folder inside web-dev folder.