introduction to airway management - das.uk.com
TRANSCRIPT
TaysideMasteryLearningProgramme
Introductiontoairwaymanagement
Course Editors: Paul Fettes, Simon Crawley, Barry McGuire (Dundee)
WELCOME
Welcome to this airway teaching package based on the concept of Simulation Based Mastery Learning (SBML). This is designed to give you a grounding in the principles and practice of airway management, providing you with foundation knowledge and skills for you to build on and help you practice safely as an anaesthetist in the initial stages of training. Airway management can be difficult and complex. The package covers basic skills used in the standard management of patients and it is not designed to cover more complex strategies or procedures.
WHY SIMULATION BASED MASTERY LEARNING?
Reduction in clinical exposure secondary to the COVID-19 pandemic means that there is an increased need for simulation training in airway management using task trainers and manikins. There is also an ethical argument for initial learning on inanimate plastic rather than on patients, and there is a lot of evidence that it can be a very effective way of training. SBML for teaching practical procedures has a strong evidence base1,2 regarding its effectiveness in training, but has also been shown to reduce complications.3 Our model for SBML is two-staged, involving learner engagement with:
1. Pre-course material
• a reading pack with relevant information, procedural steps and checklists.
• a video of each procedure being performed.
2. Clinical skills session with focus on practise and feedback. During this session you will be expected to perform the procedure uninterrupted, while observed by the trainer who will assess you according to an agreed checklist, and then give you specific feedback on your performance. You will then repeat the procedure until you have completed it correctly (i.e. achieved the minimum passing grade).
Ideally there will be opportunity to practise outside the supervised training sessions, in pairs or small groups (although it will be important to maintain social distancing). You are strongly encouraged to do this.
It is important to recognise that once you have performed the procedure to a satisfactory level on the manikin, you will not be deemed to be ‘competent’ to perform the procedure on patients, or that you have ‘mastered’ it. The clinical skills session is one stage on a continuum of learning that should be followed by supervised practice in the clinical setting, ideally using the same checklist, and in DOPS form. Every patient is different, and although some are straightforward to manage, you will find that others are extremely difficult.
TRAINING PACK SECTIONS
Airway training is complex, and needs to be further divided. There are 6 sections to this training pack:
1. Anatomy. (This has been taken from the UCL Airway Matters Massive Open Online Course (MOOC), which is an excellent resource and we would strongly recommend that you complete this as part of your training. It goes into much more detail about the theory and ethos of safe airway management.)
2. Pre-oxygenation, basic airway management and bag/mask ventilation.
3. Airway assessment and Intubation.
4. Supra-glottic airway use.
5. Extubation.
6. Difficult airway management and emergency front of neck airway.
It is essential that you read the relevant sections and watch the videos before attending the clinical skills sessions.
REFERENCES
1. McGaghie WC, Issenberg SB, Barsuk JH, Wayne DB. A critical review of simulation-based mastery learning with translational outcomes. Med Educ 2014;48:375–85.
2. McGaghie WC, Issenberg SB, Petrusa ER, Scalese RJ. A critical review of simulation-based medical education research: 2003–2009. Med Educ 2010;44:50–63.
3. Barsuk JH, McGaghie WC, Cohen ER, et al. Simulation-based mastery learning reduces complications during central venous catheter insertion in a medical intensive care unit. Crit Care Med 2009;37:2697–701.

TaysideMasteryLearningProgramme
Pre-oxygenationandBasicAirwayManagement
Authors: Kirsty Wright, Simon Crawley (Dundee)

LEARNING OUTCOMES
By reviewing this pack, a trainee should gain an understanding of the following:
1. the ethos of airway management.
2. the principles of pre-oxygenation and apnoeic oxygenation.
3. the principles of basic airway management and bag–valve–mask ventilation.
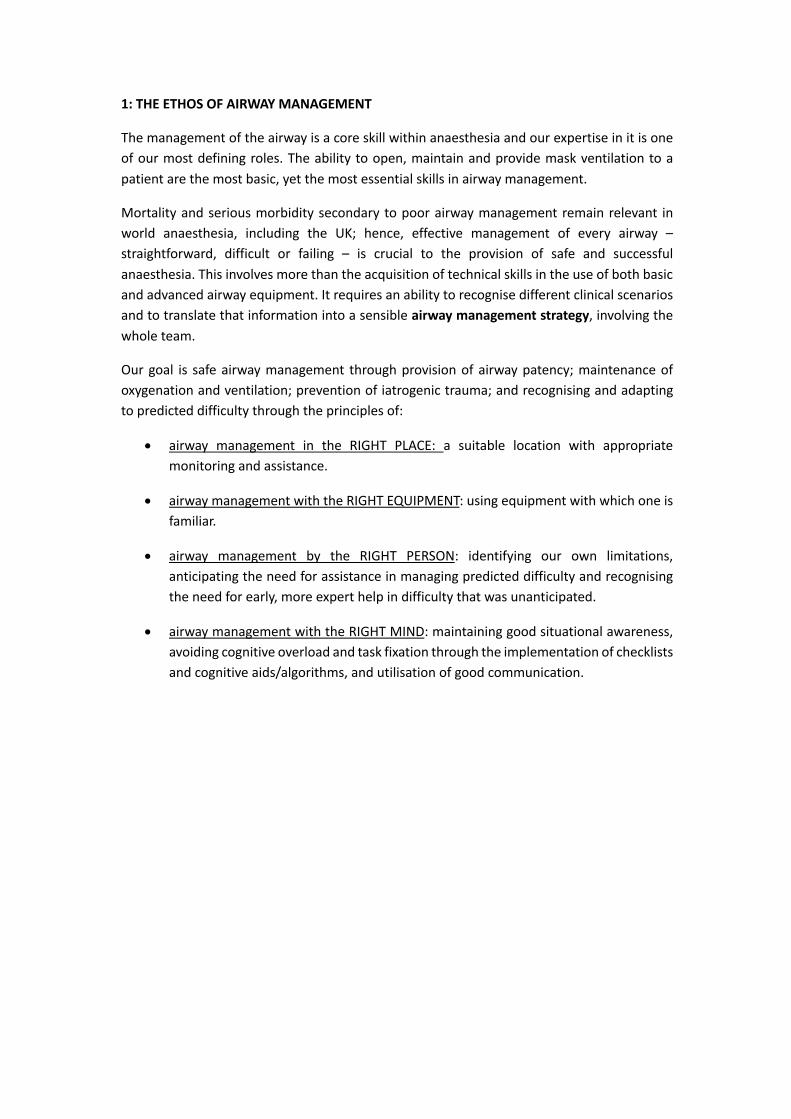
1: THE ETHOS OF AIRWAY MANAGEMENT
The management of the airway is a core skill within anaesthesia and our expertise in it is one of our most defining roles. The ability to open, maintain and provide mask ventilation to a patient are the most basic, yet the most essential skills in airway management.
Mortality and serious morbidity secondary to poor airway management remain relevant in world anaesthesia, including the UK; hence, effective management of every airway – straightforward, difficult or failing – is crucial to the provision of safe and successful anaesthesia. This involves more than the acquisition of technical skills in the use of both basic and advanced airway equipment. It requires an ability to recognise different clinical scenarios and to translate that information into a sensible airway management strategy, involving the whole team.
Our goal is safe airway management through provision of airway patency; maintenance of oxygenation and ventilation; prevention of iatrogenic trauma; and recognising and adapting to predicted difficulty through the principles of:
• airway management in the RIGHT PLACE: a suitable location with appropriate monitoring and assistance.
• airway management with the RIGHT EQUIPMENT: using equipment with which one is familiar.
• airway management by the RIGHT PERSON: identifying our own limitations, anticipating the need for assistance in managing predicted difficulty and recognising the need for early, more expert help in difficulty that was unanticipated.
• airway management with the RIGHT MIND: maintaining good situational awareness, avoiding cognitive overload and task fixation through the implementation of checklists and cognitive aids/algorithms, and utilisation of good communication.

2: PRINCIPLES AND PRACTICE OF PRE-OXYGENATION AND APNOIEC OXYGENATION
Essential theory: physiology
Almost all oxygen is carried in the blood in combination with haemoglobin (Hb). On average, arterial blood contains approximately 200 ml/l. Assuming a cardiac output of 5 l/min, this equates to 1000 ml of oxygen being delivered to the tissues each minute. At rest, the average oxygen consumption is approximately 250 ml/min. During normal breathing, the lungs continually oxygenate the venous blood entering the lungs. When a patient stops breathing (apnoea), the lungs come to rest at a volume known as the functional residual capacity (FRC) and is generally about 30 ml/kg. During apnoea, the FRC provides the reservoir for ongoing oxygenation of the blood. When breathing air, the gas present in the FRC is composed of approximately 14% oxygen, 5% carbon dioxide and 71% nitrogen. In the average 70-kg patient, this equals less than 300 ml of oxygen (14/100 × 30 × 70 = 294 ml). Therefore, when a patient becomes apnoeic, the oxygen in the lungs is rapidly absorbed and the blood oxygen content falls resulting in hypoxaemia after approximately 60 seconds or less. This time to hypoxaemia is affected by the composition of gas within the FRC, the volume of FRC and oxygen consumption of the patient.
Pre-oxygenation is the principle in which the percentage of oxygen within the FRC is increased in anticipation of apnoea. This is done by giving the patient an increased inspired oxygen concentration and replacing the nitrogen within the FRC with oxygen (a process also known as de-nitrogenation). If done correctly, this can increase the volume of oxygen available during apnoea significantly and prolongs the time to hypoxaemia. This is particularly important during the induction of anaesthesia, as it provides a greater safety margin in the event that the patient has an expected or unexpected problem during airway management (see Fig 1 and Fig 2).
Fig 1: Time to haemoglobin desaturation after pre-oxygenation.
Image courtesy of RCOA E-learning Anaesthesia, © e-Learning for Healthcare 2020. Used with permission

Fig 2: Inhaled/exhaled gas monitoring. (Photograph: authors own)
Using gas sampling equipment, anaesthetists can measure the amount of oxygen they deliver into the patient, but also the amount of oxygen they are breathing out. Therefore, one can assess the efficacy of ones attempt to pre-oxygenate the patient by measuring the amount of exhaled oxygen. Through pre-oxygenation, we aim to achieve an end-tidal fraction oxygen concentration (ETO2) of greater than 0.8; this means a large component of expired gas is oxygen rather than nitrogen. In our 70-kg patient, there is now a reserve of 1890 ml of oxygen for consumption while the patient is apnoeic. This ETO2 target of > 0.8 may not be achievable in uncooperative patients, those with rapid oxygen consumption rates or significant ventilatory or pulmonary perfusion deficits.
If the mask-to-patient seal is not complete, then room air will be entrained and the patient will not receive 100% oxygen; thus, reserves will be affected.
In the absence of gas analysis, effective pre-oxygenation can be achieved by:
• 3 minutes of tidal volume breathing with good face mask seal using 100% O2
• 1 minute of vital capacity breathing with good face mask seal using 100% O2.
In addition to pre-oxygenation, one can extend the apnoea time by ensuring a continued supply of oxygen into a patient’s airway up until a more definitive airway is secured (i.e. up to and ideally during laryngoscopy). The uptake of oxygen at the alveolar level ensures a constant stream of oxygen delivery, provided the airway is patent. This can be achieved by:
• delivery of oxygen through the continued application of a well-fitted anaesthetic mask until laryngoscopy
in addition to:
• delivery of low-flow oxygen via nasal prongs during laryngoscopy
• delivery of high-flow oxygen via nasal prongs during laryngoscopy.
Indications
Ideally all patients should undergo preoxygenation prior to induction of general anaesthesia because of the risk of apnoea and subsequent desaturation. This ensures optimal patient
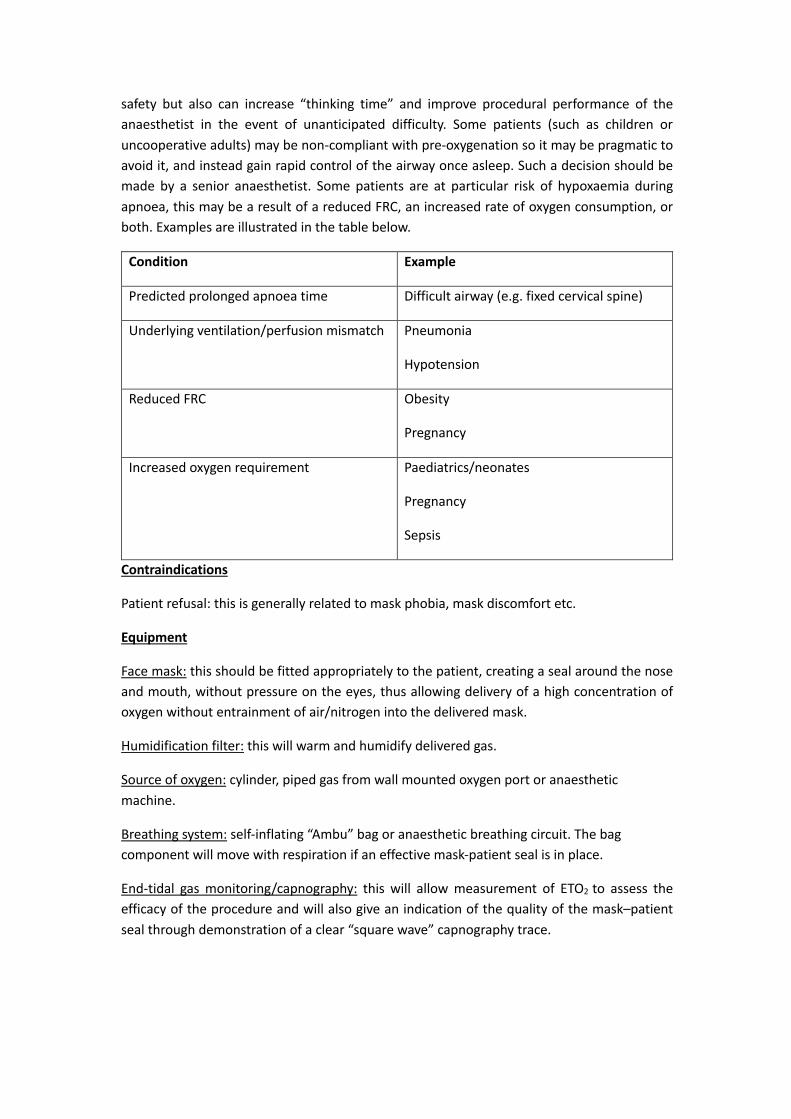
safety but also can increase “thinking time” and improve procedural performance of the anaesthetist in the event of unanticipated difficulty. Some patients (such as children or uncooperative adults) may be non-compliant with pre-oxygenation so it may be pragmatic to avoid it, and instead gain rapid control of the airway once asleep. Such a decision should be made by a senior anaesthetist. Some patients are at particular risk of hypoxaemia during apnoea, this may be a result of a reduced FRC, an increased rate of oxygen consumption, or both. Examples are illustrated in the table below.
Condition Example
Predicted prolonged apnoea time Difficult airway (e.g. fixed cervical spine)
Underlying ventilation/perfusion mismatch Pneumonia
Hypotension
Reduced FRC Obesity
Pregnancy
Increased oxygen requirement Paediatrics/neonates
Pregnancy
Sepsis
Contraindications
Patient refusal: this is generally related to mask phobia, mask discomfort etc.
Equipment
Face mask: this should be fitted appropriately to the patient, creating a seal around the nose and mouth, without pressure on the eyes, thus allowing delivery of a high concentration of oxygen without entrainment of air/nitrogen into the delivered mask.
Humidification filter: this will warm and humidify delivered gas.
Source of oxygen: cylinder, piped gas from wall mounted oxygen port or anaesthetic machine.
Breathing system: self-inflating “Ambu” bag or anaesthetic breathing circuit. The bag component will move with respiration if an effective mask-patient seal is in place.
End-tidal gas monitoring/capnography: this will allow measurement of ETO2 to assess the efficacy of the procedure and will also give an indication of the quality of the mask–patient seal through demonstration of a clear “square wave” capnography trace.
Communication with patient
Explaining the procedure to the patient can markedly reduce patient anxiety and acceptance of a well-sealed or “snug” mask on the face.
In some patients a complete seal can be difficult to achieve (particularly the elderly, edentulous or patients with facial hair) and may require gentle adjustment, including holding the cheeks up to the mask. A small number of patients will struggle to tolerate the face mask because of anxiety or claustrophobia; one way to improve this is to get the patient to hold the mask themselves with our support.
Preparation and procedure for pre-oxygenation
1. Patient consent • Explain the technique and reasons for preoxygenation in advance so they know
what to expect.
2. Assistance • Ensure that you have an adequately trained anaesthetic assistant.
3. Monitoring • Attach standard anaesthesia monitoring (SpO2, ECG, NIBP) to the patient.
• Ensure that capnography is attached to the breathing circuit at the HME filter.
4. Patient positioning • Place the patient in a semi-recumbent position as this more efficient for pre-
oxygenation than lying the patient supine as a result of positional effects on FRC.
• The “sniffing” position is ideal. An imaginary horizontal line taken from the patient’s tragus should be higher than the patient’s sternum.
• Ensure that the patient is comfortable and the head is well supported with pillows.
5. Equipment • Ensure an appropriately sized face mask is used.
• Use HME filter within the breathing circuit.
• Check that the APL valve is fully open and start the oxygen supply (minimum flow in adults of 6 l/min of 100% oxygen).
6. Procedure • Assemble circuit, HME, face mask apparatus.
• Turn on oxygen to 6–8 l/min.
• Gently place mask on face ensuring comfort and avoiding compression of the eyes/soft tissues.

• Ensure an adequate seal – visualise the bag moving with respiration.
• Observe capnography for a trace.
• Observe the fraction of expired oxygen concentration.
7. Assess and adjust • Ensure an adequate seal of the face mask. This is confirmed by movement of the
bag and an ETCO2 trace.
• Adjust mask position/seal if capnography trace not attained.
• Assess ETO2 value and trend.
• If suboptimal ETO2 or slow rate of rise: encourage deep inspiratory efforts (vital capacity breaths) and/or add a small amount of continuous positive-end expiratory pressure (CPAP).
3: THE PRINCIPLES OF SKILL IN BASIC AIRWAY MANAGEMENT
Basic airway management is the technique used to open an airway, ensuring patency, to administer gases during patient spontaneous ventilation, support oxygenation and ventilation in inadequate respiration, and to provide positive pressure ventilation during apnoea. The most basic way to maintain an airway and allow either spontaneous or assisted ventilation is by using both hands to hold a face mask on the patient’s face to maintain an airtight seal. The airway is kept open to allow unobstructed respiration if the patient is breathing spontaneously. In an apnoeic patient, an assistant can squeeze the reservoir bag to achieve positive-pressure ventilation. Vigilance is necessary to detect airway obstruction. Alternatively, one hand can be used, freeing up the assistant to do other tasks. In addition, airway adjuncts, oropharyngeal and nasopharyngeal airways, can be used to enhance airway patency.
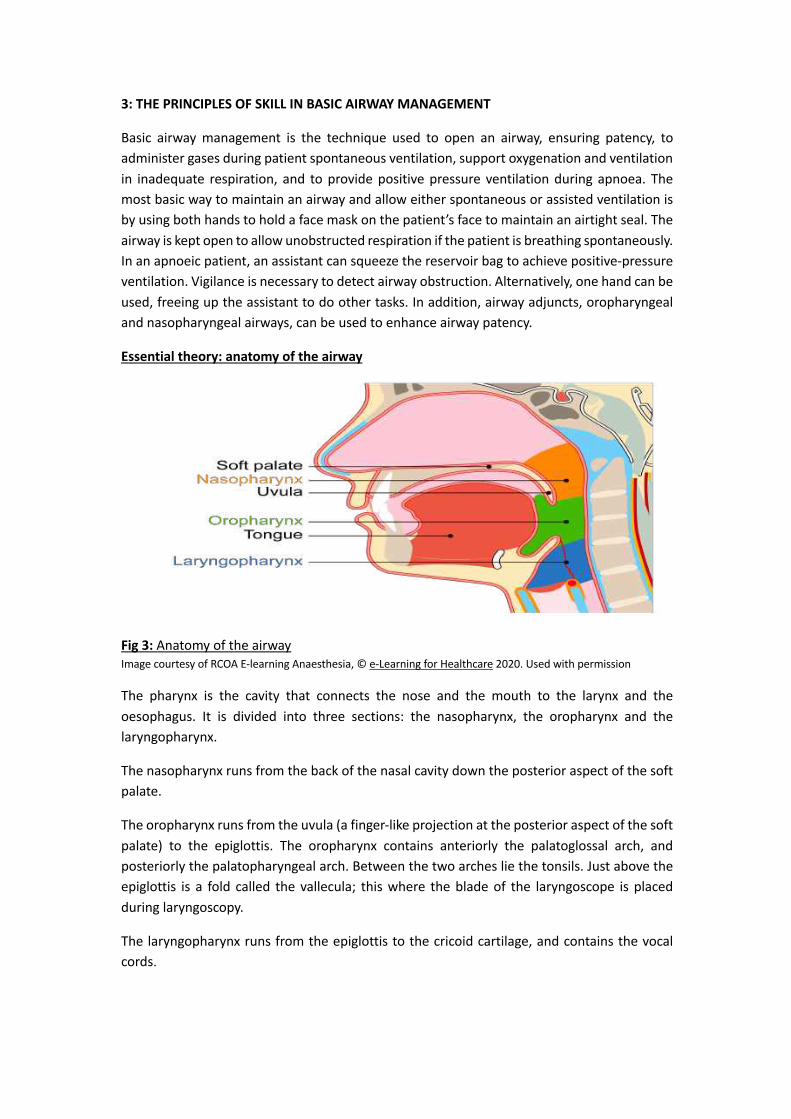
Essential theory: anatomy of the airway
Fig 3: Anatomy of the airway Image courtesy of RCOA E-learning Anaesthesia, © e-Learning for Healthcare 2020. Used with permission
The pharynx is the cavity that connects the nose and the mouth to the larynx and the oesophagus. It is divided into three sections: the nasopharynx, the oropharynx and the laryngopharynx.
The nasopharynx runs from the back of the nasal cavity down the posterior aspect of the soft palate.
The oropharynx runs from the uvula (a finger-like projection at the posterior aspect of the soft palate) to the epiglottis. The oropharynx contains anteriorly the palatoglossal arch, and posteriorly the palatopharyngeal arch. Between the two arches lie the tonsils. Just above the epiglottis is a fold called the vallecula; this where the blade of the laryngoscope is placed during laryngoscopy.
The laryngopharynx runs from the epiglottis to the cricoid cartilage, and contains the vocal cords.

Essential theory: physiology of obstruction
To understand simple airway management, one must understand simple airway obstruction. Collapse of the upper airway is common during anaesthesia; hence the reason why upper airway maintenance is a fundamental skill. Obstruction can occur for many reasons, but the most common is anaesthesia itself, where the loss of pharyngeal tone essentially produces a collapsible segment of the airway.
The upper airway is a framework of bone and cartilage with attached soft tissue from the nose to the larynx. Where not supported by bone, the airway can collapse once the muscle tone, that provides a degree of support, reduces with anaesthesia. Collapse will occur at points of narrowing and flaccidity, and can be additionally affected by anatomical pathology (e.g. tonsillar hypertrophy, tumour). The narrowest, most compliant section of the airway is within the pharynx. This is essentially a mobile segment between two rigid structures (nose/mouth and trachea).
Supine positioning increases the tendency to obstruct as the tongue and soft palate move posteriorly, causing additional narrowing of the palatal airway. Excessive neck flexion is also unfavourable.
To provide anatomical advantage in maintaining the airway we can:
• position in the ‘sniffing air’ position: lower cervical flexion, upper cervical extension with extension of the head on the neck (“flextension”).
• lift the chin: increasing pharyngeal dimensions by tensioning pharyngeal muscles.
• displacing the mandible forward: pulling the tongue/soft palate forward, thus increasing airway calibre retropalatally.
• place oral or nasopharyngeal airways that bypass the obstruction in addition to the above.
• We can also apply positive airway pressure to the upper airway in order to pneumatically splint it at the collapsible segment.
To provide a patent airway, one must know how to recognise an obstructed one by the presence of:
• see-saw or paradoxical breathing.
• suprasternal, intercostal and/or subcostal indrawing.
• additional noises or silence.
• absence of face mask condensation on expiration.
• inadequate or absent capnography trace.
Indications
Basic airway management is indicated in the presence or anticipation of airway obstruction of whatever cause: this is everyone having a general anaesthetic.
Contraindications
There are no contraindications to basic airway management. Some caution is required in positioning patients with neck pathology.
Equipment
For the provision of safe airway management, it is necessary to assemble appropriate equipment and ensure all available resources are in good working order. An experienced and skilled assistant +/– competent supervisor is required for all episodes of airway management.
• Source of supplementary oxygen.
• Source of suction.
• Appropriately sized oropharyngeal airways (also nasopharyngeal airways but these are used infrequently in anaesthesia).
• Hudson mask or anaesthetic face mask.
• Equipment necessary for provision of positive-pressure gas delivery (Ambu bag or anaesthetic circuit).
Communication with patient The patient should be informed that you are going to handle their airway. Initial movements in positioning and in chin lift/jaw thrust should always be gentle as these can be stimulating in a lightly anaesthetised patient.
Preparation and procedure
1. Patient and clinician preparation: ensure that equipment is available and in anaesthesia settings, pre-oxygenate as above.
2. Patient position: positioning of the patient is key prior to airway management. Patients are anaesthetised in the supine position with a head up tilt. Looking from the side, a horizontal line from the tragus should be at a greater height that the patient’s sternum. In obese patients, additional equipment or pillows are required to achieve this position.
3. Open the airway before it obstructs: using both hands, one can gently pull the face up ‘into the mask’ rather than pushing the mask into the face. Fingertips should rest on bony structures, taking care not to compress soft tissues with either mask (on eyes/nose) or hands (submandibular tissue compression can worsen obstruction). Control of the mask and possible hand positions are shown in Fig 4 for using both or

one hand. Subtle adjustments can make a big difference – this is the skill of the anaesthetist and is one that develops with practice and experience.
Fig 4: A variety of hand grips, as described. (Photographs: author’s own)
4. Assess the airway: if respiration is preserved, signs of a clear airway should be sought (e.g. mask misting, smooth respiratory mechanics, square wave capnography). If apnoeic, supply positive pressure and assess signs of a clear airway.
5. Continued assessment and adjustment: the patency of the airway and the efficacy of oxygenation and ventilation provided needs to be continuously assessed until a more definitive airway is secured if this is planned.
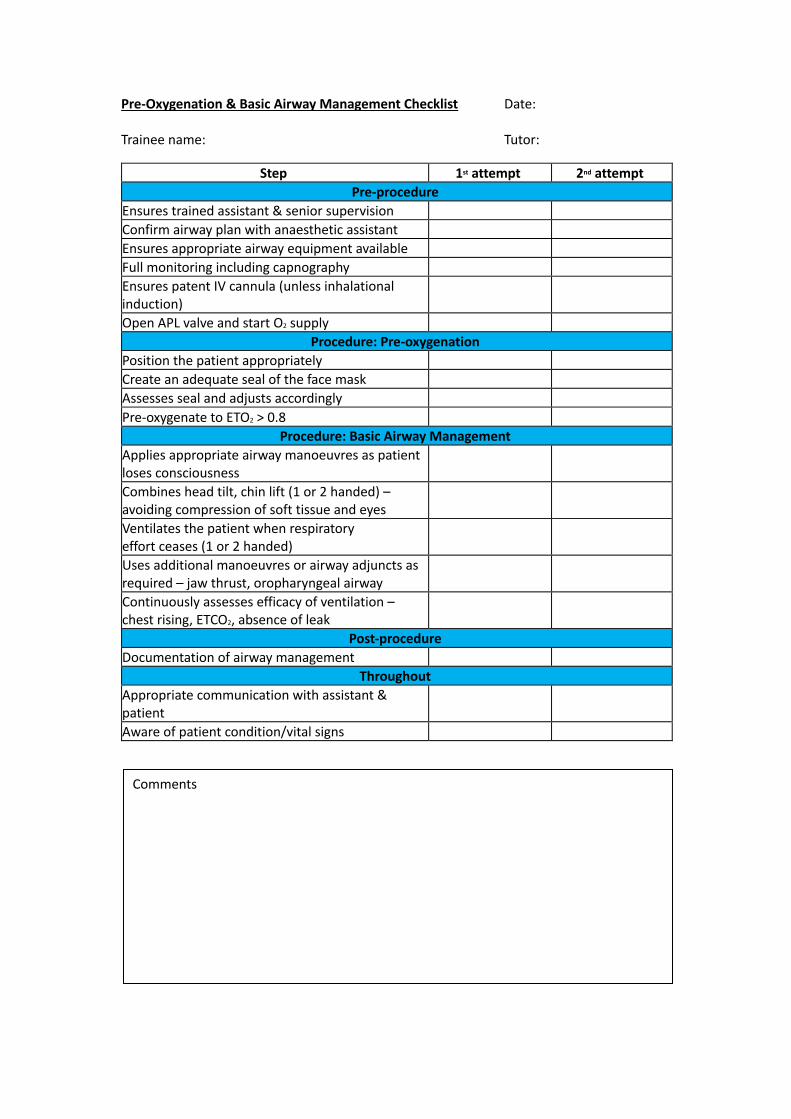
Pre-Oxygenation & Basic Airway Management Checklist Date: Trainee name: Tutor:
Step 1st attempt 2nd attempt Pre-procedure
Ensures trained assistant & senior supervision Confirm airway plan with anaesthetic assistant Ensures appropriate airway equipment available Full monitoring including capnography Ensures patent IV cannula (unless inhalational induction)
Open APL valve and start O2 supply Procedure: Pre-oxygenation
Position the patient appropriately Create an adequate seal of the face mask Assesses seal and adjusts accordingly Pre-oxygenate to ETO2 > 0.8
Procedure: Basic Airway Management Applies appropriate airway manoeuvres as patient loses consciousness
Combines head tilt, chin lift (1 or 2 handed) – avoiding compression of soft tissue and eyes
Ventilates the patient when respiratory effort ceases (1 or 2 handed)
Uses additional manoeuvres or airway adjuncts as required – jaw thrust, oropharyngeal airway
Continuously assesses efficacy of ventilation – chest rising, ETCO2, absence of leak
Post-procedure Documentation of airway management
Throughout Appropriate communication with assistant & patient
Aware of patient condition/vital signs
Comments

TaysideMasteryLearningProgramme
Airwayassessmentandendotrachealintubation
Authors: Claire Wallace, Naveeta Maini (Dundee)

LEARNING OUTCOMES
By reviewing this module, a trainee should gain an understanding of the following:
1. the ethos of tracheal intubation. 2. the principles of airway assessment. 3. the principles of endotracheal intubation.

1: THE ETHOS OF TRACHEAL INTUBATION
Tracheal intubation is an essential skill in anaesthesia for the care of the unconscious, anaesthetised or critically ill patient. It can be a difficult and traumatic process causing both morbidity and mortality. The risk of complication is reduced by:
• careful preoperative assessment to predict risk of difficulty • an appropriate plan and preparation for intubation • judicious technique using appropriate personnel • a strategy for managing unanticipated difficulty that prioritises oxygenation over
intubation. Intubation involves more than the acquisition of technical skills in the use of both basic and advanced airway equipment. It requires an ability to recognise different clinical scenarios and to translate that information into a sensible airway management strategy, involving the whole team.
As with basic airway management, our goal is safe intubation through the principles of:
• airway management in the RIGHT PLACE: a suitable location with appropriate monitoring and assistance.
• airway management with the RIGHT EQUIPMENT: using equipment with which one is familiar.
• airway management by the RIGHT PERSON: identifying our own limitations, anticipating the need for assistance in managing predicted difficulty and recognising the need for early, more expert help in difficulty that was unanticipated.
• airway management with the RIGHT MIND: maintaining good situational awareness, avoiding cognitive overload and task fixation through the implementation of checklists and cognitive aids/algorithms, and utilisation of good communication.
Remember that failure to intubate is not necessarily a critical problem, but failure to oxygenate the patient is.
Indications
It is important to remember that there are no absolutes; however, the main indications for intubation include:
• enabling mechanical ventilation, where muscle relaxants are used to facilitate surgery and in critical care situations.
• prone positioning and other positions of the patient that make maintenance of the airway difficult.
• the shared airway, such as when there is competition between surgeon and anaesthetist for the airway (e.g. operations on the head and neck).
• patients in whom the airway cannot be satisfactorily maintained by any other technique (e.g. morbidly obese patients).
Contraindication
The only contraindication to intubation is total airway obstruction of the upper airway preventing laryngeal access and necessitating a front-of-neck-airway.
Equipment
A variety of equipment exists and is selected based on the clinical situation and the anaesthetist’s preference. All equipment should be checked to ensure that it is functional prior to use.
The basic requirements include those outlined below.
Monitoring – full monitoring (ECG, BP, SpO2) including end-tidal capnography is essential.
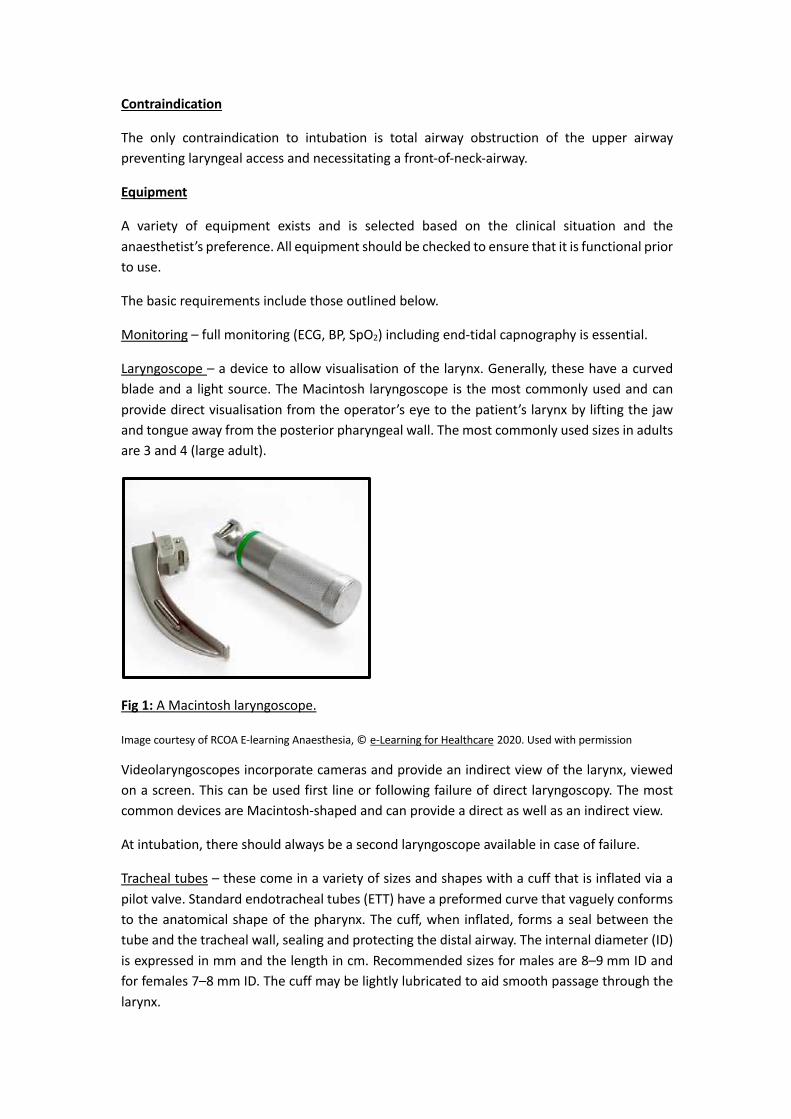
Laryngoscope – a device to allow visualisation of the larynx. Generally, these have a curved blade and a light source. The Macintosh laryngoscope is the most commonly used and can provide direct visualisation from the operator’s eye to the patient’s larynx by lifting the jaw and tongue away from the posterior pharyngeal wall. The most commonly used sizes in adults are 3 and 4 (large adult).
Fig 1: A Macintosh laryngoscope.
Image courtesy of RCOA E-learning Anaesthesia, © e-Learning for Healthcare 2020. Used with permission
Videolaryngoscopes incorporate cameras and provide an indirect view of the larynx, viewed on a screen. This can be used first line or following failure of direct laryngoscopy. The most common devices are Macintosh-shaped and can provide a direct as well as an indirect view.
At intubation, there should always be a second laryngoscope available in case of failure.
Tracheal tubes – these come in a variety of sizes and shapes with a cuff that is inflated via a pilot valve. Standard endotracheal tubes (ETT) have a preformed curve that vaguely conforms to the anatomical shape of the pharynx. The cuff, when inflated, forms a seal between the tube and the tracheal wall, sealing and protecting the distal airway. The internal diameter (ID) is expressed in mm and the length in cm. Recommended sizes for males are 8–9 mm ID and for females 7–8 mm ID. The cuff may be lightly lubricated to aid smooth passage through the larynx.

Fig 2: An endotracheal tube.
Image courtesy of RCOA E-learning Anaesthesia, © e-Learning for Healthcare 2020. Used with permission
Syringe – to inflate the cuff.
Suction – including yankauer to clear the pharynx of secretions to improve view or to perform airway toilet if regurgitation occurs.
Stethoscope – to confirm correct ETT placement.
Intubation aides – these include a bougie (a long, malleable device that can be placed through the larynx and used to railroad the tube into position) and the stylet (a shorter, malleable device that is placed inside an ETT and used to alter its shape to aide correct placement).
Tapes or ties – to secure the tube in position.
Cuff pressure manometer – to measure and limit pressure within the ETT cuff to reduce the risk of tracheal mucosa injury.
Personal protective equipment – depending on local and national policy at the time of intubation. This may be aerosol- or droplet-precaution PPE. Intubation is an aerosol-generating procedure (AGP).

2: THE PRINCIPLES OF AIRWAY ASSESSMENT
All patients should undergo a pre-operative evaluation by an anaesthetist. This must include a careful history and relevant examination; it helps the anaesthetist plan the most suitable anaesthetic approach and increases the safety of the procedure.
When assessing the airway both history and examination are important.
Some useful questions to ask:
• Any problems with previous anaesthetics? (Review previous anaesthetic charts.) • Any history of gastric reflux? • Fasting time (³ 6 hours for solids, ³ 2 hours for liquids.) • Any caps, crowns, loose teeth or dentures? • Any previous radiotherapy to the neck? (If known to have had a head and neck cancer.) • New hoarseness/voice change/swallowing difficulties? • Any history of obstructive sleep apnoea? • Review patient’s history of presenting complaint and past medical history to identify any
potential for delayed gastric emptying.
Examination
There are several important aspects of examination that each anaesthetist needs to consider:
• mouth opening – Mallampati Score and incisor gap. • ability to protrude lower jaw. • thyromental distance. • neck extension (atlanto-occipital). • awkward dentition – can make intubation difficult. • obesity – can make bag mask ventilation (BMV) difficult. • facial hair – can make BMV difficult. • appearance of scars/radiation burns to face and neck – may indicate distorted anatomy.
Mallampatti Score
This examination is used to assess the patient’s oropharynx, and relative tongue size, by asking them to open their mouth as wide as possible and stick out their tongue. The classes are divided as follows:
i. Soft palate, fauces, uvula and tonsillar pillars seen. ii. Soft palate, fauces, some of uvula seen.
iii. Soft palate and only base of uvula seen. iv. Soft palate not visible at all.
Class 3 and 4 are associated with increased difficulty in intubation.
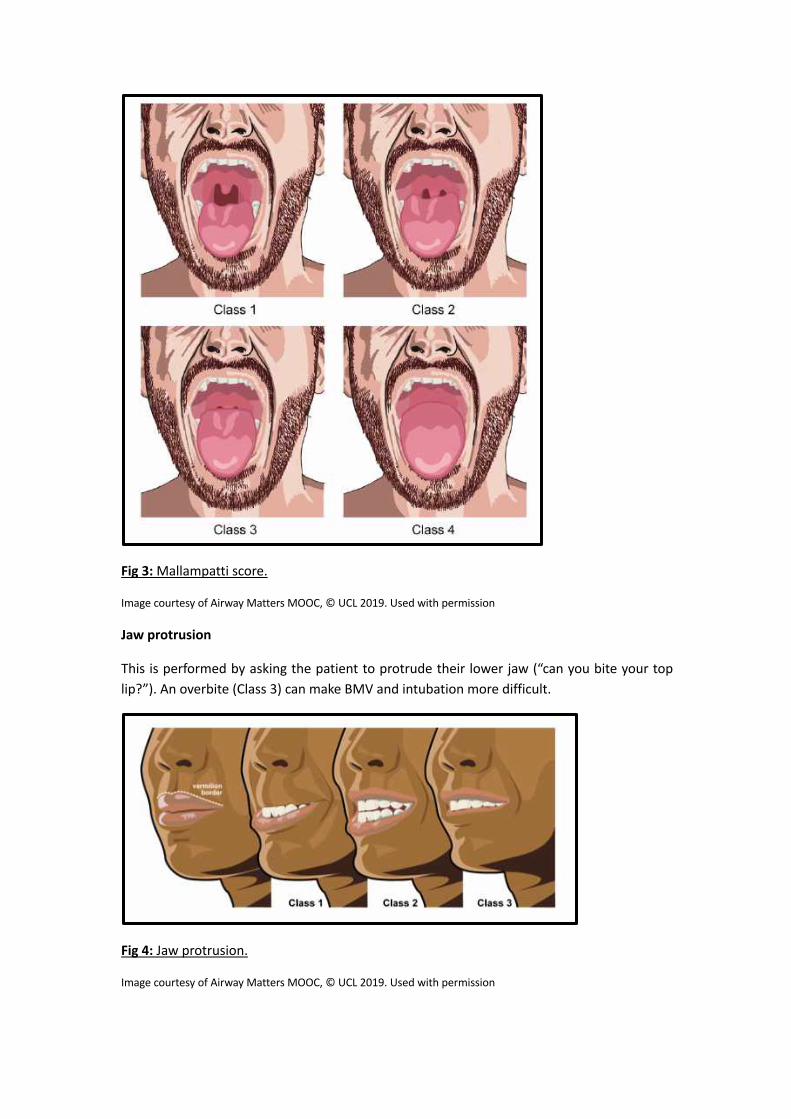
Fig 3: Mallampatti score.
Image courtesy of Airway Matters MOOC, © UCL 2019. Used with permission
Jaw protrusion
This is performed by asking the patient to protrude their lower jaw (“can you bite your top lip?”). An overbite (Class 3) can make BMV and intubation more difficult.
Fig 4: Jaw protrusion.
Image courtesy of Airway Matters MOOC, © UCL 2019. Used with permission

Thyromental distance
Ask the patient to tilt their head back as far as they can and measure the distance from their thyroid cartilage to the tip of their chin with your hand. A thyromental distance of less than 7 cm suggests potential difficulty with intubation. This is not always possible in those with neck injuries/arthritis.
Fig 5: Thyromental distance.
Image courtesy of Airway Matters MOOC, © UCL 2019. Used with permission
Many difficult intubations can be predicted by using a combination of these bedside tests and findings should not be ignored. Patients who you anticipate being difficult may turn out to be straightforward and airway management is uneventful.
However, it is important to recognise that airway assessment is not an exact science and one should always be prepared for unanticipated difficulty (i.e. airway assessment did not predict difficulty). Therefore, every anaesthetist must be prepared, and have a plan for managing an unanticipated difficult airway or intubation.

3: THE PRINCIPLES OF ENDOTRACHEAL INTUBATION
Laryngoscopy
Traditional direct laryngoscopy depends on achieving line of sight from the maxillary teeth to the larynx. This requires alignment of three axes: the oral axis, the pharyngeal axis and the laryngeal axis. This is achieved by optimal positioning of the patient, whereby the lower neck is flexed and the head extended on the atlanto-occipital joint (sniffing the morning air position) while resting on a pillow or raised surface and extending the head with your right hand. The laryngoscope is then used to lift the anterior structures off the posterior pharyngeal wall.
Fig 6: Alignment of three axes.
Image courtesy of Airway Matters MOOC, © UCL 2019. Used with permission
Fig 7: Direct line of sight.
Image courtesy of RCOA E-learning Anaesthesia, © e-Learning for Healthcare 2020. Used with permission
Preparation and procedure
Prior to induction of general anaesthesia there are a few principles that all anaesthetists should follow to ensure safe induction and airway management:

• ensure that you have a trained assistant and senior supervision • perform a WHO sign in to confirm correct patient and procedure • confirm your airway plan with the anaesthetic assistant • ensure that the patient has a patent IV cannula • apply full monitoring, including waveform capnography • optimise the patient position (sniffing the morning air) • pre-oxygenate until ETO2 > 0.8 • ensure adequate depth of anaesthesia and paralysis • maintain oxygenation (+/- anaesthesia) with BMV.
The procedure for basic tracheal intubation can be described in the following steps (Images courtesy of RCOA E-learning Anaesthesia, © e-Learning for Healthcare 2020. Used with permission):
1. Insert the blade: • hold the laryngoscope in the left hand • insert the blade of the laryngoscope into the right
side of the fully open mouth • pass the blade to the right of the tongue • avoid contact with the soft tissues and teeth.
2. Advance the blade: • advance the blade down the right side of the
tongue • “sweep” the tongue to the left and out of the
way • continue to advance the blade towards the base
of the tongue • return the tip of the blade to the midline,
identifying the epiglottis, prior to placing the tip into the vallecula.

3. Lift the epiglottis: • use a moderate lifting force applied along the line
of the laryngoscope handle (at a 45-degree angle to the floor) to lift the epiglottis and reveal the glottis
• do not lever backwards on to the top teeth • while doing this it is essential to maintain mouth
opening and head and neck position.
4. Reveal the vocal cords: • The larynx should now be visible (if it is not
clearly visible, other manoeuvres are required – see TROUBLESHOOTING).
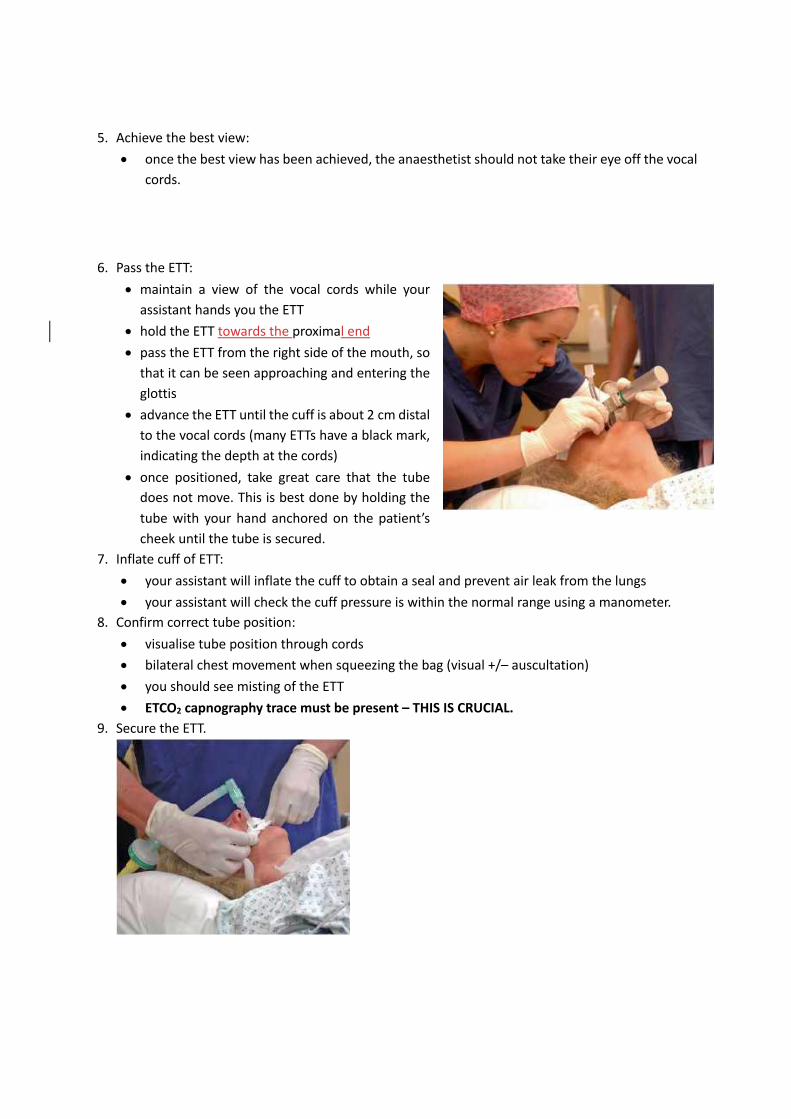
5. Achieve the best view: • once the best view has been achieved, the anaesthetist should not take their eye off the vocal
cords.
6. Pass the ETT: • maintain a view of the vocal cords while your
assistant hands you the ETT • hold the ETT towards the proximal end • pass the ETT from the right side of the mouth, so
that it can be seen approaching and entering the glottis
• advance the ETT until the cuff is about 2 cm distal to the vocal cords (many ETTs have a black mark, indicating the depth at the cords)
• once positioned, take great care that the tube does not move. This is best done by holding the tube with your hand anchored on the patient’s cheek until the tube is secured.
7. Inflate cuff of ETT: • your assistant will inflate the cuff to obtain a seal and prevent air leak from the lungs • your assistant will check the cuff pressure is within the normal range using a manometer.
8. Confirm correct tube position: • visualise tube position through cords • bilateral chest movement when squeezing the bag (visual +/– auscultation) • you should see misting of the ETT • ETCO2 capnography trace must be present – THIS IS CRUCIAL.
9. Secure the ETT.

10. Record details of airway management on the anaesthetic chart. This is important to inform future care and should include: • ease or difficulty of bag/mask ventilation, including use of adjuncts. • ease or difficulty of intubation, including grade of laryngoscopy and use of stylet/bougie.
Recording the best view of the larynx obtained at laryngoscopy
Cormack and Lehane
Most intubations are straightforward. However, awkward and difficult laryngoscopy is associated with increased morbidity and mortality.
The view at laryngoscopy must always be documented. The scale most widely used was described by Cormack and Lehane and applies to the 'best view achieved'. (Images courtesy of RCOA E-learning Anaesthesia, © e-Learning for Healthcare 2020. Used with permission).
Grade 1 Most of the glottis is visible
Grade 2 Only the posterior extremity of the glottis is visible
Grade 3 No part of the glottis, but only the epiglottis, is visible
Grade 4 Not even the epiglottis can be seen
One of the problems with the Cormack and Lehane classification is that very different views may be graded the same. For example, Grade 2 includes both a view of nearly 50% of the vocal cords (easy), and a view of only the tips of the arytenoid cartilages (pretty difficult).
Several modifications of this classification have been suggested. In one modification Grade 2 is subdivided:

Grade 2a Part of the vocal cords are visible
Grade 2b Only posterior elements (arytenoids or of the posterior commissure) of glottis visible

TROUBLESHOOTING
1. It is not uncommon for the anaesthetist to achieve a good view of the larynx, yet have difficulty in passing the tube between the vocal cords. • Always check that the patient is in the optimal position. • Passage of the tube can be facilitated if an assistant retracts the right side of the mouth
laterally and the tube has an optimal shape (consider a stylet). • You can perform external laryngeal manipulation (ELM) with your right hand and then ask your
assistant to replicate this to improve the laryngeal view. Some refer to this manoeuvre as BURP (backwards, upwards, rightwards pressure). ELM should also be applied when a sub-optimal view of the larynx is obtained at laryngoscopy.
• Good views on a Macintosh videolaryngoscope screen and difficulty passing a tube can be a sign of poor laryngoscopy technique. Focusing on optimising the direct view first, prior to looking at the screen, should ensure optimal technique.
2. Oesophageal intubation. • Signs of oesophageal intubation include:
• capnography: absent or decaying trace – THIS IS CRUCIAL • progressive hypoxia (may take 3 minutes or more for onset) • abnormal sounds heard in axillae or epigastrium.
• Action plan: • remove ETT (If in doubt, pull it out) • default to bag and mask ventilation (+/– adjunct) • administer 100 % oxygen • call for senior help
3. Endobronchial intubation. Occurs when the ETT is advanced too far, entering one of the main bronchi (most commonly the right). The best way to avoid endobronchial intubation is to insert the ETT to the correct distance in the first place, and then ensure it does not move while it is being secured.
Signs of bronchial intubation:
• uneven chest expansion • reduced breath sounds unilaterally (can be subtle) • high airway pressures • desaturation to around 85–88% (may take several minutes).
Action plan:
• administer 100 % oxygen • observe the chest and auscultate both axillae • deflate the cuff and withdraw the ETT carefully until breath sounds are heard bilaterally • ensure adequate re-expansion of non-ventilated lung – patient may require hand
ventilation, continuous positive airway pressure (CPAP) or positive-end expiratory pressure (PEEP).
It is important to communicate details of problems with airway management on the anaesthetic chart so that this information is available to any future anaesthetist.

Intubation Checklist Date:
Trainee Name: Tutor:
Step 1st attempt 2nd attempt Pre-procedure
Assessment of patient and airway Ensures trained assistant & senior supervision Confirms airway plan with anaesthetic assistant Performs WHO sign in Full monitoring including capnography Ensures patent IV cannula Optimises patient position Pre-oxygenation until ETO2 > 0.8
Procedure Supports airway using simple manoeuvres Supports ventilation using bag mask ventilation Assesses adequacy of anaesthesia/relaxation Inserts laryngoscope correctly in to mouth and obtains view – vocalises view
Inserts endotracheal tube to correct distance Uses additional manouevres or adjuncts, if required (e.g. external neck pressure; bougie)
Anchors ETT to ensure it does not move Removes laryngoscope carefully from mouth Attaches ventilator tubing to ETT Confirms ventilation – chest rising, ETCO2, auscultates chest
Secures ETT Post-procedure
Documentation of airway management Throughout
Appropriate communication with assistant & patient
Aware of patient condition/vital signs Shows understanding of adequate anaesthetic/paralysis for intubation/maintenance
Comments
TaysideMasteryLearningProgramme
SupraglotticAirwayDevices
Authors: Eleanor Waters, Rhona Younger (Dundee)

LEARNING OUTCOMES
By reviewing this pack, a trainee should gain an understanding of the following:
1. the use and function of a supraglottic airway (SGA) device.
2. the differences in SGA types and be aware of different models of SGA.
3. insertion technique.
INTRODUCTION TO SUPRAGLOTTIC AIRWAY DEVICES
The first supraglottic airway (SGA) device was introduced to anaesthetic practice in 1988, enabling hands-free airway maintenance without the need for tracheal intubation. Prior to this, the patient was either intubated or a face mask was held on the patients face for a prolonged period of time.
There are broadly two types of SGA: first generation (classic LMA, Unique, AuraOnce, AuraStraight) and second generation (e.g. i-Gel, LMA Pro-Seal, LMA-Supreme, AuraGain). The main difference between the two being that the second generation has:
• a gastric lumen that allows for drainage of gastric fluids or secretions.
• an integrated bite block to prevent damage/obstruction on emergence.
Second generation SGAs are generally associated with providing better oropharyngeal leak pressures (OLPs) or “seal” within the airway and thus provide better separation of respiratory and gastric systems. The higher the seal pressure, the more protected the airway is in terms of potential contamination from the gastric system.
Other modes of classifying SGAs are to use the terms cuffed or uncuffed. The i-Gel (Intersurgical) is the only example of an uncuffed SGA at present. All others have a cuff that requires inflation with air to provide an adjustable seal within the airway. SGAs are now more widely used than tracheal tubes in general anaesthesia, but it is of upmost importance to understand their limitations.
INDICATIONS
• GA cases where it is deemed an ETT is unnecessary. This is more likely when muscle paralysis or assisted ventilation are not required.
• GA cases where the patient is fasted and the aspiration risk has been determined as low. • Common examples include peripheral surgery in patients who are not obese; minor abdominal
surgery where muscle relaxation is not needed; cases undertaken in the supine, lateral or “legs-up” position.
• Advanced use includes SGA with positive pressure ventilation and/or paralysis (not recommended for trainees).
• Airway rescue device following failed intubation/cardiac arrest.
CONTRAINDICATIONS
There are few true absolute contraindications. SGAs should not be used in cases in which the anaesthetist feels that there is a significant risk of aspiration. These include:
• history of gastric reflux or hiatus hernia. • intra-abdominal pathology. • pregnancy. • recent major trauma or administration of opiates. • morbid obesity. • autonomic dysfunction associated with diabetes (gastroparesis).
Other relative contraindications are the position of the patient under GA (i.e. prone); the surgery being performed (e.g. most head and neck surgery); and the predicted need for respiratory support requiring pressures that may not be readily be achieved through an SGA without exceeding the OLP.
EQUIPMENT
• An appropriately sized SGA device for the patient about to be anaesthetised.
• Availability of an alternative SGA size or design in event of failure of first device.
• Availability of an endotracheal tube and associated intubation equipment in event of failure of SGA.
• Syringe for cuff inflation.
• Lubricant gel.
• Fixation tape or tie.
• Cuff-pressure monitoring device.
A guide for choosing the size of SGA device to use
Choosing which size of SGA to use is guided by patient weight (see table below). It is worth noting that the size guide may vary slightly depending on which specific SGA is used (e.g. i-Gel compared to classic LMA); you will find this information either on the device itself or its packaging. This is useful to guide but is not absolute in its accuracy of what will provide the best airway.
SGA size (approx.) Size of patient (ideal body weight)
Cuff inflation volume if applicable
3 30–50 kg Up to 20 ml
4 50–70 kg Up to 30 ml
5 70–100 kg Up to 40 ml
NB: paediatric sizes not covered here.
COMMUNICATION WITH PATIENT
No communication with the patient is required.
PREPARATION AND PROCEDURE
1. Patient consent
• Patient would normally be consented for general anaesthesia. Specific details of airway management are often not discussed, but it is important to mention the process, common complications and significant risks.
2. Assistance/monitoring/positioning
• Ensure trained assistance, full monitoring, patient positioning and pre-oxygenation as per standard practice.
3. Equipment • Choose size and type of SGA to be used and communicate this to your assistant following
assessment of the patient and their aspiration risk. • Visual inspection: check for external damage, look through the airway tube to ensure its
patency and that no foreign bodies are present that would lead to airway obstruction. • Inflation/deflation check for cuffed SGA: inflate the cuff. It should remain inflated with no
herniations of cuff or pilot balloon. Fully deflate the cuff, if it re-inflates this indicates a leak or pilot valve failure. The SGA cuff should be fully deflated for insertion.
• The posterior surface of the SGA should be lubricated with a lubricating gel prior to insertion.
• Ensure that you have an alternative size and/or type of SGA device available to the one you are inserting.
4. Procedure
• Carry out pre-oxygenation and basic airway management prior to insertion of SGA.
• Anaesthetise patient.
• Prior to insertion, assess adequacy of anaesthesia; the patient should be unresponsive, have a relaxed jaw and not respond to a jaw thrust.
• Holding the SGA: grasp in the dominant hand, holding it like you would a pen (see Fig 1).
• Place your non-dominant hand on the patient’s occiput in order to maintain the correct head/neck position throughout insertion.
• Gently open the patient’s mouth and, taking care of dentition and soft tissues, insert the SGA past the teeth, advancing the bowl of the SGA up against the hard palate
• Advance the SGA using gentle but continuous pressure upwards and backwards (onto the hard palate, then the soft palate and posterior pharyngeal wall) until definitive resistance is felt.
• NB: It is helpful if an assistant initially opens the mouth slightly when inserting the SGA into the mouth, then applies jaw thrust to increase the posterior pharyngeal space.
• The correct position is when the SGA stops advancing and the cuff lies above the larynx with the airway orifice facing anteriorly into the glottis
• If a cuff is present, your assistant will inflate it and you will see the SGA rise out of the mouth by 0.5-1.5cm as it adjusts it resting position within the airway. Pressure should be less than 60cmH20. Note: The i-Gel has no inflatable cuff. Although the patient positioning and hard palate guiding technique is similar to that described, downward pressure on the device is applied more proximally until ‘hold-up’ is felt. Clearly, with no inflation, there is no confirmatory ‘rise’.

Fig 1: Insertion of an SGA.
Image courtesy of RCOA E-learning Anaesthesia, © e-Learning for Healthcare 2020. Used with permission
5. Assess and adjust • Connect the anaesthetic tubing and gently ventilate under low pressure by hand to
confirm successful placement of the SGA by checking for: adequate chest rise and fall, presence of ETCO2 with a square-wave capnography tracing and the absence of audible leaks at pressures equating to just greater than that required to produce tidal volume ventilation.
• With the second-generation SGA, an additional check should be undertaken relating to the gastric port which, if correctly placed, should be in communication with the oesophagus. On application of a small amount of lubricating gel to the port you should see minimal movement, or gentle up-and-down movements, which indicates a satisfactory position of the SGA (as airway pressure changes are translated to the gastric system). However, gel ejection with gentle positive pressure ventilation indicates a clear break in the seal separating the respiratory and gastric systems, and is indicative of poor SGA positioning within the airway.
• Equally, entrainment of gel with inspiration during spontaneous respiration signifies malposition of the device. All devices should have seal assessed with gentle positive pressure to adequately assess OLP in case of a need for positive pressure ventilation.
6. Secure the device

• Hold the SGA in position until it is secured in place with tape or a tie. • If a cuff has been inflated on the SGA device the cuff pressure should be checked to
ensure that it is not overinflated. • Vigilance is required throughout the procedure to ensure that the SGA is performing
as you require it to. This is especially important during positive pressure ventilation and, hence, SGA use in this regard is considered an advanced technique.
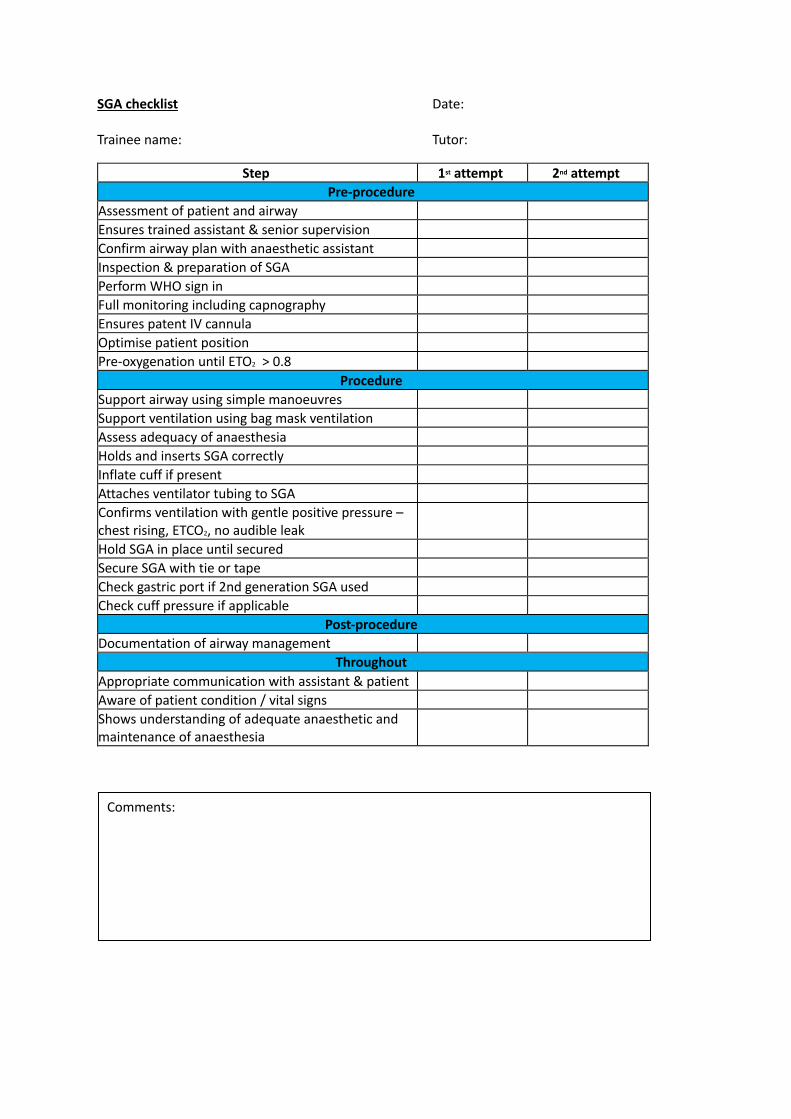
SGA checklist Date: Trainee name: Tutor:
Step 1st attempt 2nd attempt Pre-procedure
Assessment of patient and airway Ensures trained assistant & senior supervision Confirm airway plan with anaesthetic assistant Inspection & preparation of SGA Perform WHO sign in Full monitoring including capnography Ensures patent IV cannula Optimise patient position Pre-oxygenation until ETO2 > 0.8
Procedure Support airway using simple manoeuvres Support ventilation using bag mask ventilation Assess adequacy of anaesthesia Holds and inserts SGA correctly Inflate cuff if present Attaches ventilator tubing to SGA Confirms ventilation with gentle positive pressure – chest rising, ETCO2, no audible leak
Hold SGA in place until secured Secure SGA with tie or tape Check gastric port if 2nd generation SGA used Check cuff pressure if applicable
Post-procedure Documentation of airway management
Throughout Appropriate communication with assistant & patient Aware of patient condition / vital signs Shows understanding of adequate anaesthetic and maintenance of anaesthesia
Comments:

TaysideMasteryLearningProgramme
Extubation
Authors: Iain Belford, Pavan Raju (Dundee)
LEARNING OUTCOMES
By reviewing this module, a trainee should gain an understanding of the following:
1. the ethos of tracheal extubation. 2. the principles of extubation. 3. the process of extubation.
1: ETHOS OF EXTUBATION
It is easy to underestimate the importance of extubation, and to dismiss it as just something that happens at the end of the anaesthetic. Literature, including the fourth National Audit Project (NAP4), suggests that respiratory complications are three times more common during extubation than intubation and induction. Emergence and extubation is a high-risk phase of anaesthesia and it is important for the anaesthetist to anticipate and prevent potential complications and plan to ensure patient safety at all times.1,2 Emergence is a time of transition, where the patient will be regaining consciousness. It is also a time where we need to be cognisant of the importance of maintaining physiological stability. The focus in this regard must be on reversal of neuromuscular blocking drugs (NMBD), maintaining airway patency, avoiding hypoxia and reducing the risk of pulmonary aspiration of gastric contents. In order to achieve this – planning and preparation are key.
As with previous sections, our goal is safe extubation through the principles of:
• Airway management in the RIGHT PLACE: a suitable location with appropriate monitoring and assistance.
• Airway management with the RIGHT EQUIPMENT: using equipment with which one is familiar.
• Airway management by the RIGHT PERSON: identifying our own limitations, anticipating the need for assistance in managing predicted difficulty and recognising the need early for more expert help if unanticipated difficulty is encountered.
• Airway management with the RIGHT MIND: maintaining good situational awareness, avoiding cognitive overload and task fixation through the implementation of checklists and cognitive aids/algorithms and utilisation of good communication.

2: PRINCIPLES OF EXTUBATION
Preparation
It is important to include extubation as a part of the overall anaesthetic management plan. We will first of all consider how we prepare for extubation – this will inform our planning. Areas for consideration are the patient, the equipment required, the timing, the personnel, and the locations for extubation and for ongoing care. These interconnected factors need to be considered as a whole in making an extubation plan. In difficult or atypical scenarios, it is wise to seek senior advice and/or support.
Patient
The physiology of pre-oxygenation has been covered elsewhere in this course, but suffice to say that it is just as important at the time of emergence and extubation as it is at intubation. Sufficient pre-oxygenation gives a margin for error and a buffer against unexpected complications including airway obstruction. Therefore, it is prudent to turn up the fresh gas flows and the FiO2 to 1.0 prior to extubation, aiming to achieve an ETO2% of > 80.
Physiological stability is also paramount prior to emergence and extubation. This includes cardiovascular parameters being similar to pre-induction state, a normalised acid–base status and a normal core temperature. Failure to maintain this status can result in significant instability in the immediate post-operative period and may necessitate an admission to critical care.
The patient must have their neuromuscular blockade (NMB) adequately reversed. NAP5 demonstrated the increased incidence of accidental awareness under GA during emergence and extubation, and the use of NMBDs was the most significant associated risk factor. Although neuromuscular monitoring is beyond the scope of this document, it is important to know that reversal should be monitored – best practice includes the use of a quantitative neuromuscular blockade monitor such as a ToF-scanÒ – to ensure the return of the train of four (ToF) ratio to ³ 0.9 prior to extubation. Evidence suggests clinical tests and timing of most recent administration of NMBD are unreliable. The dose and timing of the reversal agent should be tailored to the individual patient. It is important to include NMB management in the overall planning of extubation. The above measures will provide a high degree of airway tone, as well as adequate respiration, in the immediate post-operative period. Both will reduce the risk of post-operative pulmonary complications.
Conditions for safe extubation include physiological stability, adequate reversal from NMB, adequate respiratory drive and a return of consciousness to obey simple commands.
Consideration must also be given to the patient’s positioning prior to extubation. Historically, the left-lateral head-down (‘recovery’) position was preferred to minimise the risk of gastric aspiration. This position is still occasionally used, more so in paediatric practice. However, many of the same advantages can be achieved with a semi-recumbent, supine position which, in the absence of vomiting, is likely to reduce the risk of passive regurgitation and contamination of the respiratory tract. Sitting the patient upright will optimise respiratory function. It also retains a familiarity for staff, safe access to the airway in a position that we are used to managing and one that patients find comfortable.

Examples of ‘at-risk’ extubation scenarios3
Airway
• Pre-existing difficulties – those identified as having difficult airway access at or prior to induction (e.g. OSA, obesity, anatomical abnormality).
• Peri-operative airway deterioration – distorted anatomy as a result of surgery, haemorrhage, haematoma, oedema, trauma, etc.
• Restricted airway access – as a result of surgery (e.g. HALO fixation, mandibular wiring, c-spine fixation).
General
• Impaired respiratory function. • Cardiovascular instability. • Neurological/neuromuscular impairment. • Hypo/hyperthermia. • Coagulopathy. • Acid/base disturbance. • Electrolyte derangement. Timing and location
For reasons that should be quite apparent, the surgical procedure should be completed prior to emergence and extubation. This should be confirmed with the surgical team and it is good practice to allow the scrub staff to clean the patient and apply dressings prior to waking, in order to optimise patient comfort and dignity.
As noted previously, the patient should be physiologically stable prior to emergence and extubation. If this is not the case it is prudent to ask for senior assistance.
Extubation should be performed in a place of safety with optimal availability of equipment, drugs and expertise. Often this will be the theatre.
Personnel
Excluding exceptional circumstances, an anaesthetic assistant should be present during extubation as they would for intubation. It is often also useful to have a ‘runner’ present to call for further assistance in the event of a complication. A senior anaesthetist should be present for any high-risk cases and where the first anaesthetist requires assistance.
Potential complications of extubation1
• Airway obstruction. • Post-obstructive pulmonary oedema. • Hypoxia. • Aspiration. • Airway trauma. • Cardiovascular disturbance.

3: PRACTICE OF EXTUBATION
Equipment
• Table/trolley capable of tipping head-down. • Suction. • Syringe for cuff deflation. • Face mask. • Spare ETT. • Laryngoscope. • Hudson mask and oxygen cylinder for transfer. • Drugs to provide emergency anaesthesia. • Anaesthetic machine/circuit capable of providing IPPV and PEEP. • Consider the need for a bite-block. • Monitoring including quantitative NMB monitor. Procedure
• Prepare the patient as described above and ensure that you have all of the required equipment. • Ensure appropriate analgesia and anti-emetic prophylaxis. • Ensure adequate reversal of NMB (ToF ratio > 0.9). • Pre-oxygenate. • Position the patient. • Suction and clear the oro-pharynx under direct visualisation. • If appropriate, aspirate the NG tube to empty the stomach. • +/– insert a bite-block (e.g. rolled gauze). • Cease delivery of anaesthetic drug (Volatile/TIVA). • Allow patient to establish adequate respiratory pattern and depth. • Await the patient awakening. • Ensure that the patient obeys simple commands. • Deflate the cuff of the ETT. • Remove the tube while applying positive pressure to the bag of the anaesthetic circuit. • Apply the face mask attached to breathing circuit and ensure airway patency. • Confirm airway patency using capnography and clinical assessment. • Titrate analgesia as required. • Safely transfer the patient to the recovery area and hand over. • Document any difficulties encountered during emergence/extubation.
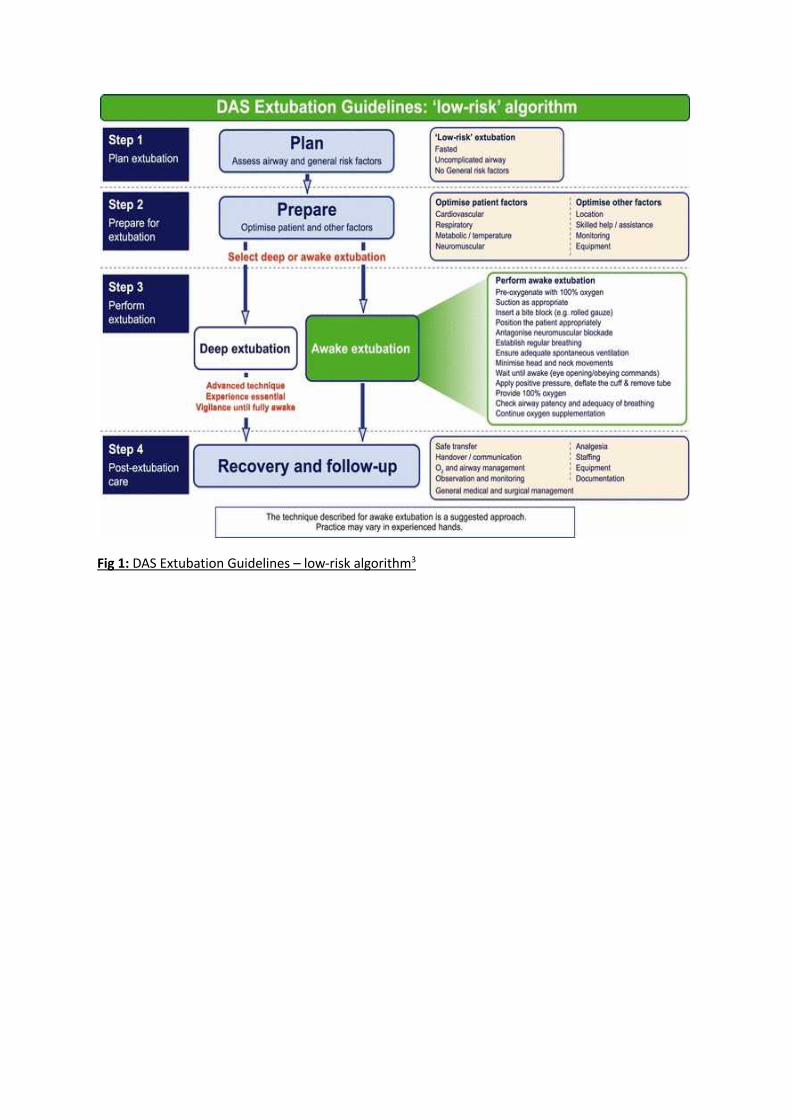
Fig 1: DAS Extubation Guidelines – low-risk algorithm3

REFERENCES
1. Foulds L, Dalton A. Extubation and emergence. Anaesth Intensive Care Med 2018;19(9):465–70. 2. Karmarkar S, Varshney S. Tracheal extubation. Contin Educ Anaesthes Crit Care Pain
2008;8(6):214–20. 3. Popat M, Mitchell V, Dravid R, et al. Difficult airway society guidelines for the management of
tracheal extubation. Anaesthesia 2012;67: 318–40.

Extubation Checklist Date:
Trainee name: Tutor:
Step Pre-procedure
Evaluate extubation risk factors – airway and general Confirms surgical procedure complete Ensures trained assistant & senior supervision Ensures complete reversal of NMB (ToFr > 0.9) Confirms cardiovascular stability/normothermia Ensures necessary equipment available Optimises patient position Pre-oxygenates until ETO2 > 0.8 Confirms extubation plan with anaesthetic assistant Ensure the anaesthetic agent (IV/inhalational) is stopped
Procedure Continues oxygenation Performs thorough oropharyngeal toilet Inserts bite block (e.g. rolled gauze) Confirms adequate spontaneous ventilation Confirms patient is obeying simple commands Applies positive pressure, deflates the cuff and removes the ETT Provides oxygenation (face mask or nasal cannula) Confirms patent airway Confirms adequate breathing
Post-procedure Documentation Safe transfer to recovery area Appropriate handover Confirms continued monitoring and observation
Throughout Appropriate communication with assistant & patient Aware of patient condition/vital signs
Comments

TaysideMasteryLearningProgramme
UnanticipatedDifficultAirwayManagementandEmergencyFront-of-NeckAirway(eFONA)
Authors: Joanna Lynch, Adam Janeczko (Dundee)
LEARNING OUTCOMES By reviewing this pack, a trainee should gain an understanding of the following:
1. the underlying principles of managing the unexpectedly difficult airway. 2. the practice of managing the unexpectedly difficult airway. 3. the practice of performing emergency front of neck airway.

UNANTICIPATED DIFFICULT AIRWAY MANAGEMENT AND EMERGENCY FRONT-OF-NECK AIRWAY (EFONA) The purpose of airway assessment is to identify potential features which may make airway management difficult. This allows an airway plan to be made that anticipates the identified features and addresses them. For example, one may choose to use an awake technique in a patient who is morbidly obese with poor mouth opening. Cases such as these, although challenging at times, often allow sufficient time for decision making and strategy planning. Airway assessment, however, is not an exact science and situations may arise in which a difficult airway is encountered unexpectedly. The Difficult Airway Society (DAS) has published algorithms to help with the management of the unanticipated difficult airway and you will hear about them a lot during the first few weeks of your anaesthetic training. The guideline for the management of unanticipated difficult intubation comprise a series of plans, Plans A–D, which should be moved through sequentially, following best efforts at each stage, when managing the unanticipated difficult airway. These provide the team with a structured management comprising of safe and familiar skills. The guideline also contains prompts to increase the chances of success at each stage, along with reminders that if ventilation is achieved at any point following declaration of failure, waking the patient up must be considered. You will notice that at each stage the absolute priority is oxygenation – oxygenation is crucial for patient survival, intubation is not.

Can’t intubate, can’t oxygenate In the event of failing to manage the airway by endotracheal intubation (Plan A), insertion of a supraglottic airway device (Plan B) or rescue face mask ventilation (Plan C), a “can't intubate, can't oxygenate” (CICO) scenario should be declared to the team and Plan D must be implemented. The Royal College of Anaesthetists has carried out a number of national audit projects and the fourth project was concerned with complications of airway management. To date, it is the largest survey of its kind in the world. The 4th National Anaesthetic Project (NAP 4) made a number of recommendations to reduce the likelihood of entering a CICO scenario. These included:
• thorough airway assessment and planning • effective pre-oxygenation to prolong the time prior to desaturation • limiting the number of attempts at intubation to prevent causing iatrogenic trauma and
swelling to the airway • moving through the airway strategy in an appropriately timely fashion to maximise the chances
of a rescue attempt succeeding prior to the development of life-threatening hypoxia. The authors of NAP4 note that if one aspect of airway management was predicted to be difficult, the likelihood of other aspects being difficult is increased, and one should have a higher index of suspicion that eFONA may ultimately be required. Conversely, a CICO scenario may occur in patients who have no adverse predictive features. It may also be precipitated in situations where mask ventilation has initially been possible, but the airway deteriorates as a result of trauma caused by repeated instrumentation. Thus, one should limit the number of intubation attempts and recognise the need to change something between subsequent attempts rather than repeating something that previously failed. NAP4 also reminds anaesthetists that, as well as being a risk factor for both difficult mask ventilation and intubation, obesity increases the speed of onset of hypoxia.
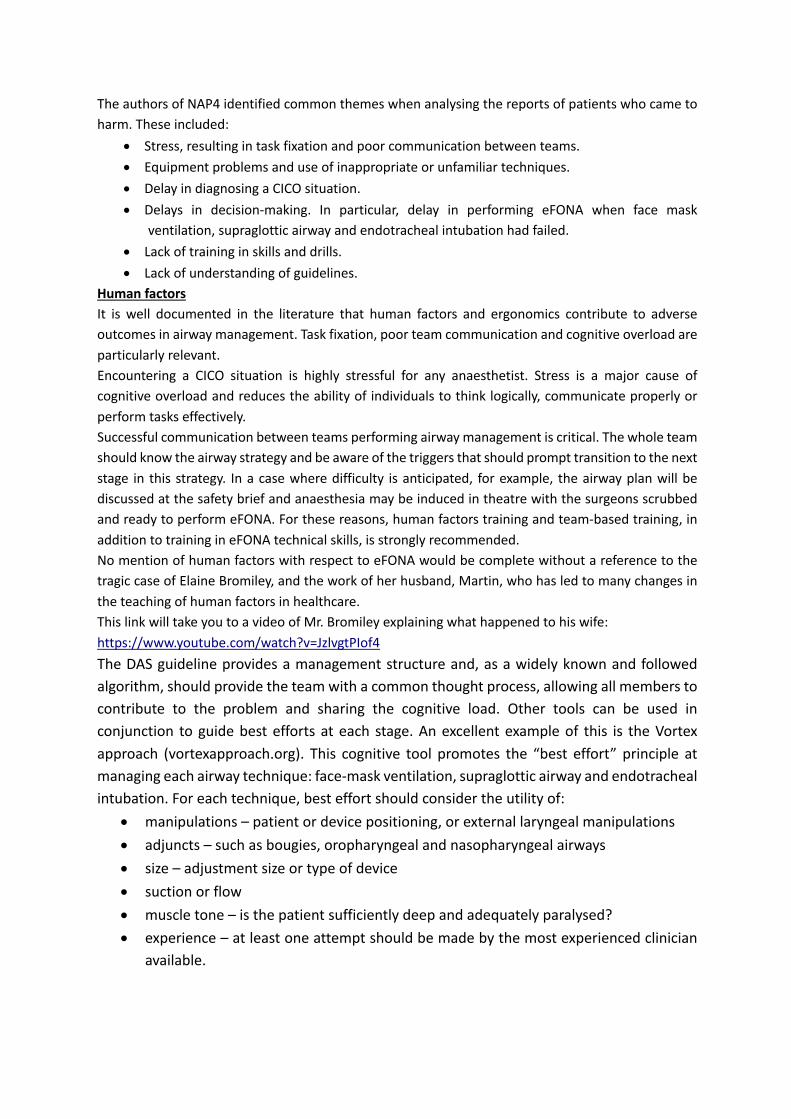
The authors of NAP4 identified common themes when analysing the reports of patients who came to harm. These included:
• Stress, resulting in task fixation and poor communication between teams. • Equipment problems and use of inappropriate or unfamiliar techniques. • Delay in diagnosing a CICO situation. • Delays in decision-making. In particular, delay in performing eFONA when face mask
ventilation, supraglottic airway and endotracheal intubation had failed. • Lack of training in skills and drills. • Lack of understanding of guidelines.
Human factors It is well documented in the literature that human factors and ergonomics contribute to adverse outcomes in airway management. Task fixation, poor team communication and cognitive overload are particularly relevant. Encountering a CICO situation is highly stressful for any anaesthetist. Stress is a major cause of cognitive overload and reduces the ability of individuals to think logically, communicate properly or perform tasks effectively. Successful communication between teams performing airway management is critical. The whole team should know the airway strategy and be aware of the triggers that should prompt transition to the next stage in this strategy. In a case where difficulty is anticipated, for example, the airway plan will be discussed at the safety brief and anaesthesia may be induced in theatre with the surgeons scrubbed and ready to perform eFONA. For these reasons, human factors training and team-based training, in addition to training in eFONA technical skills, is strongly recommended. No mention of human factors with respect to eFONA would be complete without a reference to the tragic case of Elaine Bromiley, and the work of her husband, Martin, who has led to many changes in the teaching of human factors in healthcare. This link will take you to a video of Mr. Bromiley explaining what happened to his wife: https://www.youtube.com/watch?v=JzlvgtPIof4 The DAS guideline provides a management structure and, as a widely known and followed algorithm, should provide the team with a common thought process, allowing all members to contribute to the problem and sharing the cognitive load. Other tools can be used in conjunction to guide best efforts at each stage. An excellent example of this is the Vortex approach (vortexapproach.org). This cognitive tool promotes the “best effort” principle at managing each airway technique: face-mask ventilation, supraglottic airway and endotracheal intubation. For each technique, best effort should consider the utility of:
• manipulations – patient or device positioning, or external laryngeal manipulations • adjuncts – such as bougies, oropharyngeal and nasopharyngeal airways • size – adjustment size or type of device • suction or flow • muscle tone – is the patient sufficiently deep and adequately paralysed? • experience – at least one attempt should be made by the most experienced clinician
available.

Equipment – airway rescue trolleys Airway Rescue Trolleys (ARTs) are trolleys that contain all the kit needed to rescue an airway which has been unexpectedly difficult. Standardised ARTs are present in all areas where anaesthetics are routinely given. See how many you can spot on your travels! The drawers of the ARTs are designed to mirror each of the steps of the DAS guidelines from A to D. Each drawer contains the kit you may require to best manage the airway.
Note the difference from the Anticipated Difficult Intubation Trolley, which contains the kit you would need for dealing with an anticipated difficult airway. The distinction between the two is really important as they do not contain the same kit and you must be sure what you are asking for!
Plan A:
Face Mask & Tracheal Intubation
MAXIMUM 3 attempts + 1 EXPERT
Remove cricoid pressure if difficult
CALL FOR HELP
Plan B:
Maintaining OxygenationSAD insertion
i-gel2 attempts
LMA1 attempt
STOP & THINKOptions:1. WAKE THE PATIENT UP2. Intubate via SAD (Aintree Catheter)3. Proceed without intubating4. Tracheostomy/Cricothyroidotomy
Plan C:
Facemask Ventilation
CAN VENTILATE Reverse paralysis
WAKE UP!!CALL FOR HELP
CAN NOT VENTILATE
ENSURE PARALYSISMAINTAIN ATTEMPTS AT 2
PERSON BMVPLAN D
Plan D:
Emergency Front Of Neck Access
Scalpel - Twist Bougie - Tube
Ask Surgeon to attend
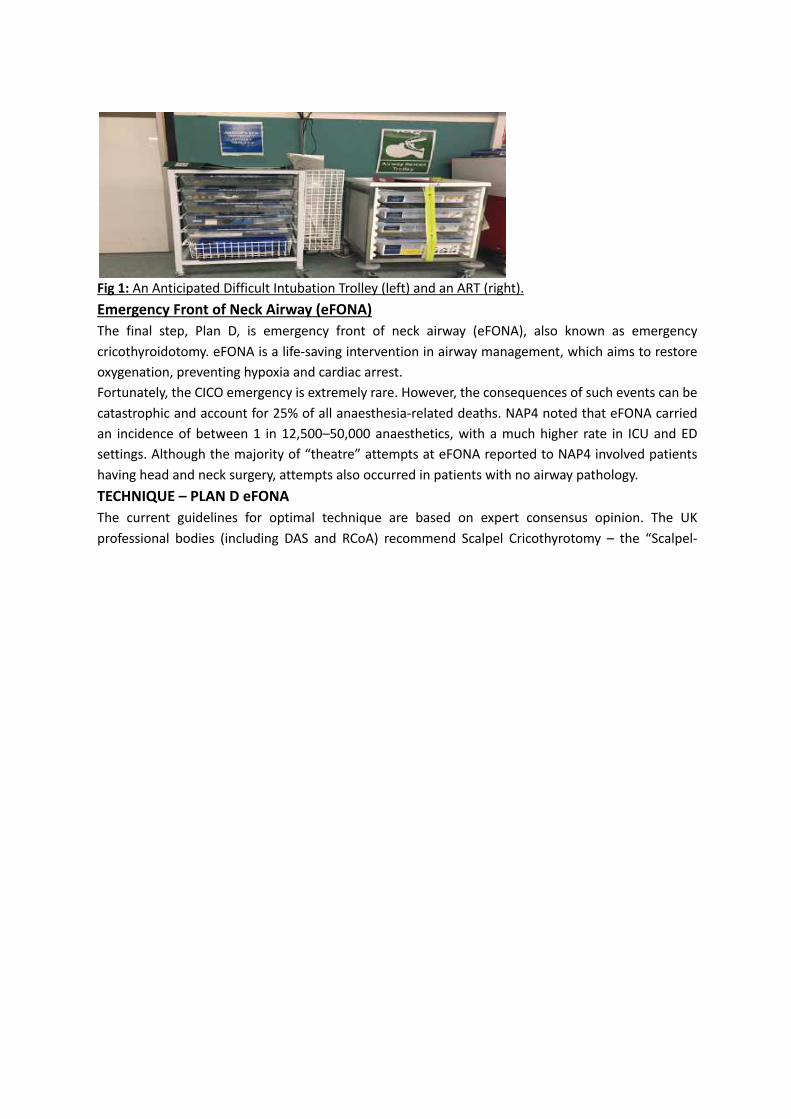
Fig 1: An Anticipated Difficult Intubation Trolley (left) and an ART (right). Emergency Front of Neck Airway (eFONA) The final step, Plan D, is emergency front of neck airway (eFONA), also known as emergency cricothyroidotomy. eFONA is a life-saving intervention in airway management, which aims to restore oxygenation, preventing hypoxia and cardiac arrest. Fortunately, the CICO emergency is extremely rare. However, the consequences of such events can be catastrophic and account for 25% of all anaesthesia-related deaths. NAP4 noted that eFONA carried an incidence of between 1 in 12,500–50,000 anaesthetics, with a much higher rate in ICU and ED settings. Although the majority of “theatre” attempts at eFONA reported to NAP4 involved patients having head and neck surgery, attempts also occurred in patients with no airway pathology. TECHNIQUE – PLAN D eFONA The current guidelines for optimal technique are based on expert consensus opinion. The UK professional bodies (including DAS and RCoA) recommend Scalpel Cricothyrotomy – the “Scalpel-

bougie-tube” technique, which is outlined below.
This video from DAS shows all the steps in action: https://das.uk.com/content/video/fona Relevant anatomy The cricothyroid membrane should be identified in all patients before induction of anaesthesia, awake intubation techniques or before extubation in ICU. DAS recommend the three-step “laryngeal handshake” technique to identify the cricothyroid membrane. Failure to palpate anatomical landmarks because of overlying tissue should lead to an alternative technique involving a “cut-down” and blunt dissection to then identify the structures beneath. Another option, if skilled and equipment is immediately available, identification of landmarks can be carried out by ultrasound.
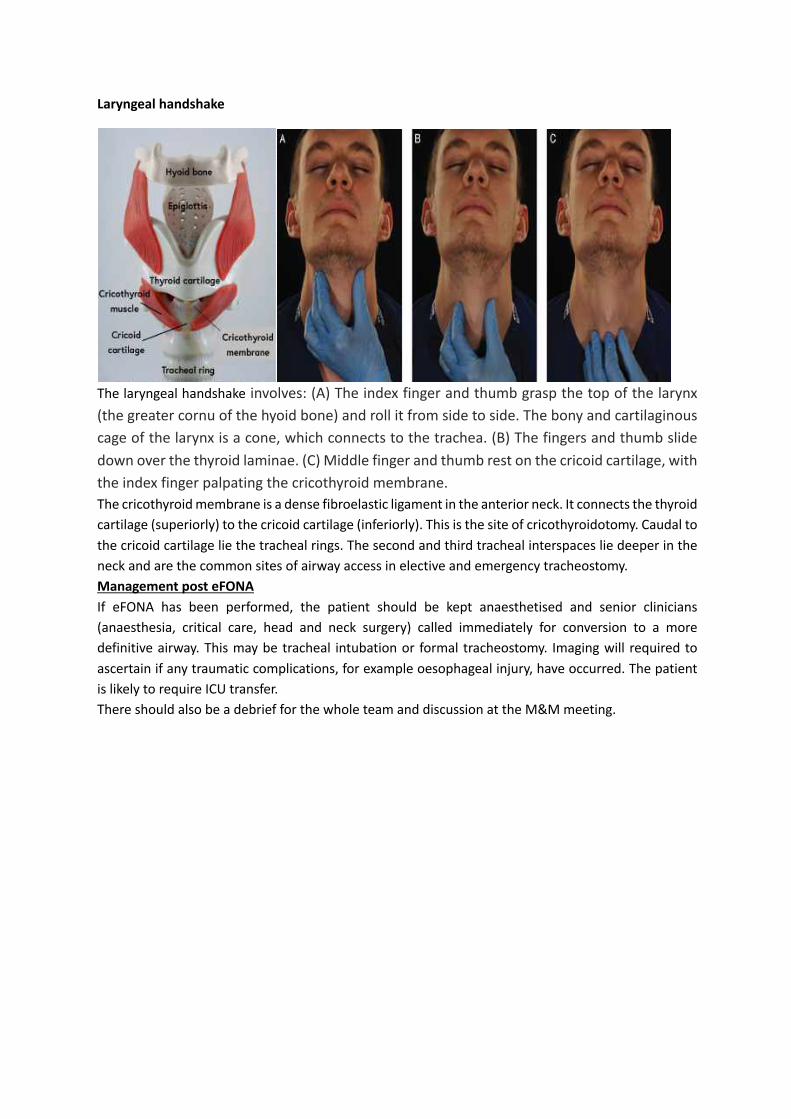
Laryngeal handshake
The laryngeal handshake involves: (A) The index finger and thumb grasp the top of the larynx (the greater cornu of the hyoid bone) and roll it from side to side. The bony and cartilaginous cage of the larynx is a cone, which connects to the trachea. (B) The fingers and thumb slide down over the thyroid laminae. (C) Middle finger and thumb rest on the cricoid cartilage, with the index finger palpating the cricothyroid membrane. The cricothyroid membrane is a dense fibroelastic ligament in the anterior neck. It connects the thyroid cartilage (superiorly) to the cricoid cartilage (inferiorly). This is the site of cricothyroidotomy. Caudal to the cricoid cartilage lie the tracheal rings. The second and third tracheal interspaces lie deeper in the neck and are the common sites of airway access in elective and emergency tracheostomy. Management post eFONA If eFONA has been performed, the patient should be kept anaesthetised and senior clinicians (anaesthesia, critical care, head and neck surgery) called immediately for conversion to a more definitive airway. This may be tracheal intubation or formal tracheostomy. Imaging will required to ascertain if any traumatic complications, for example oesophageal injury, have occurred. The patient is likely to require ICU transfer. There should also be a debrief for the whole team and discussion at the M&M meeting.

BIBLIOGRAPHY Cook TM, Woodall N, Frerk C. Fourth National Audit Project of the Royal College of Anaesthetists and Difficult Airway Society. In: Cook TM, Woodall N, Frerk C, editors. Major complications of airway management in the United Kingdom. Report and findings. London: Royal College of Anaesthetists; 2011. Price TM, McCoy EP. Emergency front of neck access in airway management. BJA Educ 2019;19(8):246e253. Frerk C, Mitchell VS, McNarry AF, et al. Difficult Airway Society 2015 guidelines for the management of unanticipated difficult intubation in adults. Br J Anaesth 2015;115:827e48.

Unanticipated Difficult Airway Checklist Date:
Trainee name: Tutor:
Step 1st attempt 2nd attempt Pre-procedure
Assessment of patient and airway Ensure trained assistant and senior supervision Confirm airway plan with anaesthetic assistant Perform WHO sign in Full monitoring including capnography Ensure patent IV access
Procedure Plan A 1st attempt 2nd attempt Optimise head and neck position Preoxygenate Adequate neuromuscular blockade Laryngoscopy & intubation (Max 3 + 1 attempts) Calls for help Tries to improve view between attempts (BURP, GEB, changes laryngoscope)
Maintain oxygenation and anaesthesia Plan A – SUCCEED 1st Att. 2nd Att. Plan A – Failure 1st Att. 2nd Att. Confirms tracheal intubation with capnography
Declares “failed intubation”
Suggests proceeding with surgery or waking patient
Moves to Plan B
Plan B – SAD Insertion 1st attempt 2nd attempt Attempt insertion of second-generation SAD (Max 3 attempts) Plan A – SUCCEED 1st Att. 2nd Att. Plan A – Failure 1st Att. 1st Att. Confirm ventilation with capnography Declares “failed SAD
ventilation”
Wake the patient Moves to Plan C Suggests intubation via SAD Proceed without intubation Plan C – Face mask ventilation 1st attempt 2nd attempt Attempts face mask ventilation Ensures adequate paralysis Uses 2-person technique
Plan A – SUCCEED 1st Att. 2nd Att. Plan A – Failure 1st Att. 1st Att. Confirms ventilation Declares “can’t
intubate can’t oxygenate
Wakes the patient up Moves to Plan D

Plan D – eFONA 1st attempt 2nd attempt Locates cricothyroid membrane Scalpel – makes transverse incision and twists scalpel Bougie – inserts GEB Tube – railroads well lubricated size 6.0 mm ETT Confirms ventilation with capnography
Post-procedure Formulates immediate airway management plan Monitors for complications Suggests completing airway alert form Suggests explaining to patient in person & writing once awake Suggests writing to GP
Throughout Demonstrates effective leadership and communication Recognises a deteriorating situation early Demonstrates good decision making
Comments

eFONA Checklist: Date:
Trainee name: Tutor:
Step 1st attempt 2nd attempt Pre-procedure
Attempts at rescue oxygenation via upper airway Declares CICO Ensure neuromuscular blockade Stand on patients left hand side if you are right-handed (reverse if left-handed)
Ensure the patients head is extended Procedure
Performs a laryngeal handshake to identify the laryngeal anatomy
Stabilises larynx and identifies cricothyroid Scalpel – makes a transverse incision Twists scalpel 90 degrees and applies traction towards them
Swaps scalpel to opposite hand Bougie – inserts down side of scalpel, advances 10 cm towards patients feet
Removes scalpel Tube – railroads a lubricated size 6.0 mm over the bougie
Removes the bougie Inflates the cuff and confirms ventilation with capnography
Secures the tube Post-procedure
Postpones surgery unless immediately life threatening
Organises urgent surgical review of cricothyroidotomy site
Documentation of airway management Throughout
Appropriate communication with assistant/team Aware of CICO scenario and the need to restore oxygenation promptly
Pass mark:19/21
Comments