introduction materials and chemicals safety rules experiment i “lime” as a binder for mortars...
TRANSCRIPT

1/2
EXPERIMENT I
“Lime” as a Binder for Mortars – But Which One?
Introduction Different substances can be used to bind mortar or concrete, for example cement or “lime”. In this context, “lime” is understood as “burnt lime” or “slaked lime”. Divided into 4 groups, pupils should investigate which of these substances are suitable as a binder and examine whether they also fulfil their function in other environments (under water, in the absence of air).
Materials and Chemicals Filling knife, 4 plastic bowls, 4 plastic cups (200 ml), measuring cylinder, 4 glasses with screw tops, overhead projector pens (OHP), balance, Slaked lime (Ca(OH)2), limestone (CaCO3), burnt lime (CaO), cement, water, bird sand, pieces of brick & tile (approx. 4 cm²)
Safety RulesBurnt lime (C, causes burns), slaked lime (Xi, irritating) Activities with the chemicals used are subject to restrictions for pupils up to the 4th grade.
Ca(OH)2: H318; P280-305+351+338-313
CaO: H318; P260-280-305+351+338
Duration of the Experiment60 minutes
Execution−GroupA:30gbirdsand,10gcement,15mlwater−GroupB:30gbirdsand,10gslakedlime,15mlwater−GroupC:30gbirdsand,10glimestone,15mlwater−GroupD:30gbirdsand,10gburntlime,15mlwater
The chemicals named in each group are weighed, placed in a plastic bowl and mixed together with a filling knife until a uniformly mixed, thick-liquid paste results. A portion of the mortar is used to connect two pieces of brick or tile to each other. This procedure is repeated two more times so that there are three, “glued together“ workpieces. The first sample is left in the air, the second is carefully placed in a glass with a screw top and the top closed and the third sample is laid in a plastic cup which has been filled with water, however, the level of water should not reach the mortar. Afterwards, all of the sample containers are labelled and allowed to stand for several days.

2/2
EXPERIMENT I
“Lime” as a Binder for Mortar – But Which One?
Observation
* With the samples under water, make sure that the mortar is not rinsed off the pieces of tile. ** The mortar with limestone does dry in air and seems to be hard but is not very stable and crumbles at the slightest touch.
+ sets // – remains liquid
In air Absence of air Under water
GroupA + + +*
GroupB + – –
GroupC –* – –
GroupD +** – –
Evaluation
Setting processes that take place in air and under water differ (setting vs. hydration).
The cement sets due to hydration processes without carbon dioxide by storing water, during which calcium silicate hydrates are converted into calcium silicate.
Carbondioxide,whichisfoundinair,isneededforcalciumhydroxidetosetbutthereisnotasufficientquantityofthisinthescrew top glass (depending on the volume of the screw top glass).
With reference to the cycle of lime it can be shown why burnt lime sets and shell limestone does not: shell limestone (calcium carbonate) only decomposes at 900 °C; calcium oxide, on the other hand, is immediately converted to slaked lime by the waterandthusproducesthesameresultsasinGroupB.
Disposal During the next class, the set samples can be disposed of with the disposable plastic bowls together with domestic waste.
Literature Keune, H.; Boeck, H. (publisher): Chemische Schulexperimente Band 2. Organische Chemie. Berlin: Verlag Volk und Wissen, 1998, S. 134f
1/3
EXPERIMENT II
The Effect of Admixtures on Concrete
IntroductionConcrete is used in the building industry in various applications under the most different environmental conditions. These versatile possibilities for use can only be realised through the use of different types of additives. This experiment serves as a model to show the modes of action of four different types of concrete admixtures.
Materials and Chemicals Plastic cups, spatula, filling knife, plastic bowls, measuring cylinder, balance, beakers (50 ml) Cement, sand, water, sucrose (crystal sugar), aluminium sulphate, surface active agents (detergent), methyl cellulose (wall paper glue)
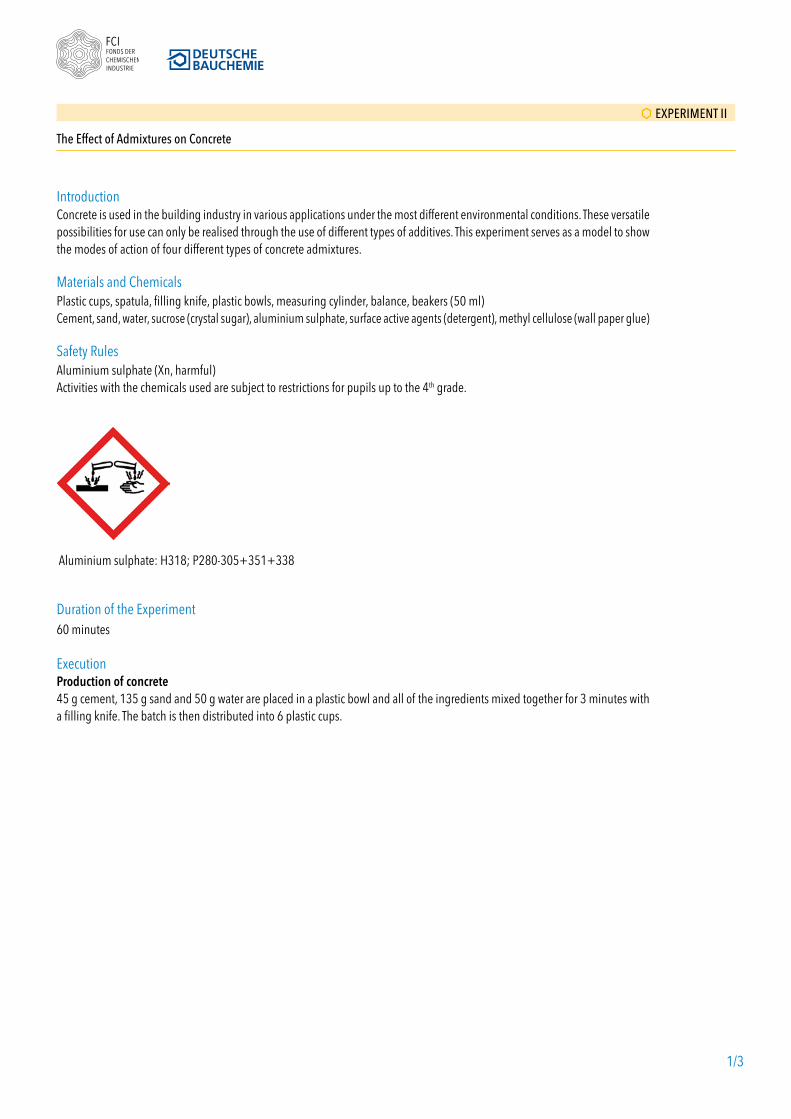
Safety RulesAluminium sulphate (Xn, harmful) Activities with the chemicals used are subject to restrictions for pupils up to the 4th grade.
Aluminium sulphate: H318; P280-305+351+338
Duration of the Experiment60 minutes
ExecutionProduction of concrete 45 g cement, 135 g sand and 50 g water are placed in a plastic bowl and all of the ingredients mixed together for 3 minutes with a filling knife. The batch is then distributed into 6 plastic cups.

2/3
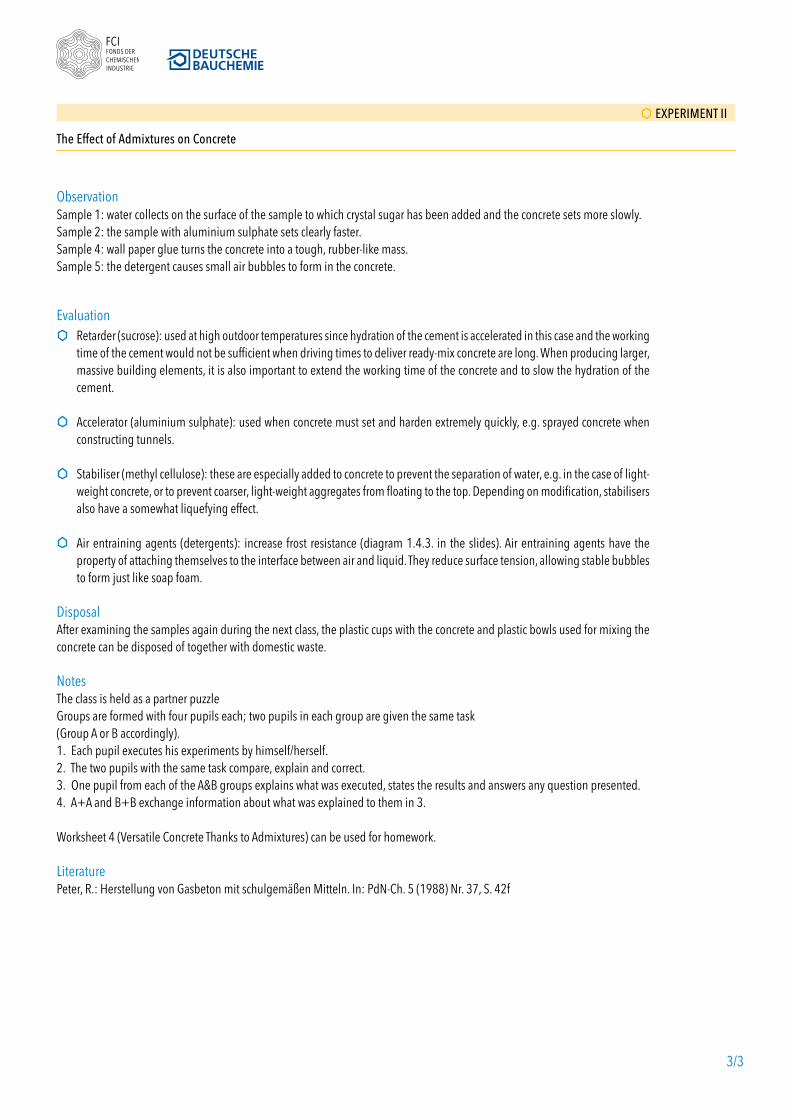
Group A: Addition of the admixtures – sugar and aluminium sulphate 1 g crystal sugar is placed in the first plastic cup and 1 g aluminium sulphate in the second plastic cup; the concrete in the third plastic cup serves as a comparison sample.
Group B: Addition of the admixtures – wall paper glue and detergent 10 ml of wall paper glue are placed in the fourth plastic up and 5 ml of detergent in the fifth plastic cup;the concrete in the sixth plastic cup serves as a comparison sample.
The mixtures in each cup are stirred until the respective admixture has been evenly distributed in the concrete. The concrete samples are then allowed to set for five minutes. Beyond just observing the contents, it is also helpful to sway the plastic cups, to press the material in the cup or poke a glass rod into the material to determine differences in consistence and strength.
The mixtures in each cup are stirred until the respective admixture has been evenly distributed in the concrete. The concrete samples are then allowed to set for five minutes. Beyond just observing the contents, it is also helpful to sway the plastic cups, to press the material in the cup or poke a glass rod into the material to determine differences in consistence and strength.
EXPERIMENT II
The Effect of Admixtures on Concrete
Al2(SO4)3
21
sugar
3
no admixture
wall paper glue
4 5
detergent
6
no admixture
3/3
EvaluationRetarder (sucrose): used at high outdoor temperatures since hydration of the cement is accelerated in this case and the working time of the cement would not be sufficient when driving times to deliver ready-mix concrete are long. When producing larger, massive building elements, it is also important to extend the working time of the concrete and to slow the hydration of the cement.
Accelerator (aluminium sulphate): used when concrete must set and harden extremely quickly, e.g. sprayed concrete when constructing tunnels.
Stabiliser (methyl cellulose): these are especially added to concrete to prevent the separation of water, e.g. in the case of light-weight concrete, or to prevent coarser, light-weight aggregates from floating to the top. Depending on modification, stabilisers also have a somewhat liquefying effect.
Air entraining agents (detergents): increase frost resistance (diagram 1.4.3. in the slides). Air entraining agents have the property of attaching themselves to the interface between air and liquid. They reduce surface tension, allowing stable bubbles to form just like soap foam.
DisposalAfter examining the samples again during the next class, the plastic cups with the concrete and plastic bowls used for mixing the concrete can be disposed of together with domestic waste.
NotesThe class is held as a partner puzzle Groups are formed with four pupils each; two pupils in each group are given the same task (Group A or B accordingly). 1. Each pupil executes his experiments by himself/herself. 2. The two pupils with the same task compare, explain and correct. 3. One pupil from each of the A&B groups explains what was executed, states the results and answers any question presented. 4. A+A and B+B exchange information about what was explained to them in 3.
Worksheet 4 (Versatile Concrete Thanks to Admixtures) can be used for homework.
Literature Peter, R.: Herstellung von Gasbeton mit schulgemäßen Mitteln. In: PdN-Ch. 5 (1988) Nr. 37, S. 42f
EXPERIMENT II
The Effect of Admixtures on Concrete
ObservationSample 1: water collects on the surface of the sample to which crystal sugar has been added and the concrete sets more slowly. Sample 2: the sample with aluminium sulphate sets clearly faster. Sample 4: wall paper glue turns the concrete into a tough, rubber-like mass. Sample 5: the detergent causes small air bubbles to form in the concrete.

1/2
EXPERIMENT III
Presentation of Polyurethane
Teacher demonstration experiment
IntroductionPolyurethane results through a reaction of a diol with a diisocyanate. The molecules cross-link through polyaddition in just a few seconds and the polyurethane cures. The name is derived from the “urethane group” (-NH-CO-O-) through which the diol and diisocyanate molecules cross-link.
Materials and Chemicals Paper cups, wooden sticks (for stirring) Desmophen (diol), Desmodur 44V (diphenylmethane-4,4‘-diisocyanate)
Safety RulesDiphenylmethane-4,4‘-diisocyanate (harmful, irritating, carcinogenic, sensitising) H351-332-373-319-335-315-334-317; P281-308+313-305+338+351-302+352-304+341 Desmophen (diol): Desmophen is offered in different product forms. Notes on safety and labelling are found in the Safety Data Sheet issued by the respective manufacturer.
Duration of Experiment20 minutes
ExecutionWear protective clothing and gloves. Carry out the experiment under an extractor hood.
Desmophen and Desmodur are mixed in an approximate volume ratio of 1:1 by adding Desmophen first (approx. 1 cm high) in a paper cup and then adding Desmodur 44V. The two substances are stirred with a wooden stick until gas begins to develop.

2 0 C O
H
H2N NH2C
H
+
H
O C N N C OC
HH H
O+
H
NH CC
H
NHC
O O
HO OH
2/2
EXPERIMENT III
Presentation of Polyurethane
ObservationThe reaction mixture heats while forming a yellowish foam that hardens after cooling. A comparison of the initial volume of the liquids with the volume of the resulting foam shows an increase in volume by approximately 30 times.
EvaluationThe diol Desmophen reacts with the diisocyanate Desmodur in a polyaddition to become a polyurethane, which is characterised by the “urethane group” (-NH-CO-O-). The development of gas is caused by a reaction of the water in Desmophen with Desmodur. During this reaction, carbon dioxide is released which acts as a propellant and increases the volume of the polyurethane.
General reaction equation
Reaction equation of the propellant reaction
DisposalThe Safety Data Sheet issued by the manufacturer should be observed for disposal.
Literature Keune, H.; Just, M.: Chemische Schulexperimente. Band 2. Volk & Wissen, Berlin 1999, S.294f. Bader, H.J. (publisher): Handbuch der experimentellen Schulchemie – Band 12: Kunststoffe, Recycling, Alltagschemie. Aulis Verlag, Köln 1997, S.14ff; 71f.
* Ethane-1,2-diol is used instead of a diol to demonstrate the reaction equation.
Polyurethane groups
Polyurethane
NH C O CH2 CH2 O C NH
O
O
H
O C N N C OC
H
Desmodur
HO OH
CH2 CH2
Desmophen*
+

1/3
EXPERIMENT IV
Construction of a Model House and Its Aging
IntroductionEvery house ages over the course of years and every building material has a different service life. But the durability of a building material or the state of a building also depends on how strongly they are utilised. Office buildings and industrial structures are subjected to heavier loads than a weekend house, of course. Location also plays a role in the aging of buildings since different environmental influences, e.g. intensive sunlight or salty air at the ocean, have an effect on the resistance of a building material. In this experiment, which is carried out on a model, the experiment mainly focuses on dealing with the building materials lime, wood, concrete, loam and gypsum and their application. Negative environmental influences on the respective building material are also examined.
Note on Methodology In this experiment, the experimental sequence and the evaluation sequence differ. During the experimental sequence, the class is divided into four expert groups corresponding to the environmental influences to be examined (cold group, heat group, moisture group, acid group). Each of the four groups is responsible for the production of rectangles of a specified size made of different building materials and the construction of their model house so that four model houses are built in total by the class. In the evaluation sequence, the pupils work together according to the building material group they worked with (lime, gypsum, concrete, wood, loam – see Worksheet 1).
Materials and Chemicals Beakers (500 ml), moulds for the standard ashlars (approx. 6 x 10 x 2 cm), hot-melt glue gun, drying oven, gas burner, freezer, water bath, fire proof base Lime, wood, concrete, loam and gypsum (all of these building materials can be purchased in a do-it-yourself store), hydrochloric acid (c = 1 mol/l; Xi, irritating), water.
Safety RulesThe Safety Data Sheets for the binders used should be observed. Pupil and teacher experiments with the materials to be used are permitted without restrictions.
Duration of Experiment90 minutes/24 hours drying
Group puzzle
Expert group Building material group

Ill. 1: Floor plan of the model house Ill. 2: Oblique view
2/3
EXPERIMENT IV
Construction of a Model House and Its Aging
ExecutionA model house is built using the five different building materials wood, loam, lime, gypsum and concrete according to Ill. 1 and 2. One of the five building materials is used for each side of the house.The lime, concrete and gypsum are mixed according to the instructions given for the product, poured into the moulds for producing the rectangles (approx. 6 x 10 x 2 cm) and allowed to set at room temperature. Genuine wood panels are cut in the form of a rectangle and loam is formed in the shape of a rectangle (both approx. 6 x 10 x 2 cm) and allowed to dry. The individual rectangles are then joined to form a pentagon – the actual model house – with a hot-melt glue gun.
In the experiment, each of the model houses is exposed to an environmental influence. All of the simulated environmental influences (with the exception of fire) are long-term experiments and the model houses must be subjected to the respective environmental influence for several days or weeks to achieve good results. The following environmental influences can be simulated at a school level:
Temperature a) Heat, e.g. sun, fire The model house is placed in a drying oven and subjected to intensive heat. The influence of fire is simulated by directly subjecting the model house, which has been placed on a fire-proof base, to a flame from a gas burner for a longer period. This experiment should only be demonstrated by the teacher.
b) Cold, e.g. frost The influence of cold can be simulated in a freezer. To create stress cracks, the model house is placed in a water bath first for several minutes and then placed in a freezer with temperatures below zero.
c) Moisture: e.g. rain, humidity The model house is placed in a water bath to show the direct influence of moisture. As an option, damp cloths or a spray bottle filled with water can be used.
d) “Acid”: e.g. acid rain To examine the effects of acids on the model house, hydrochloric acid is poured into a pneumatic basin and brought in contact with the model house.

Lime Wood Reinforced concrete Loam Gypsum
Cold x x x
Heat x x x x
Moisture x x x x
Acid x x x x x
3/3
EXPERIMENT IV
The Construction of a Model House and Its Aging
ObservationPupils should record the changes to the building materials throughout the duration of the test.The table presented below shows which environmental influences have a negative effect on the building material.
x = Change to the material
EvaluationThe model experiments can be evaluated within the group using posters. Each group compiles the experimental results of their building material and also finds information on the areas their building material is most commonly used and the reasons for this.
DisposalThe equipment and chemicals used can be disposed of with domestic waste.
Literaturehttps://en.wikipedia.org/wiki/Calcium_oxidehttp://www.concretenetwork.com/concrete-information/ https://en.wikipedia.org/wiki/gypsumhttp://en.wikipedia.org/wiki/woodhttp://en.wikipedia.org/wiki/Loam

1/3
IntroductionIn old buildings that have not been waterproofed properly, moisture can penetrate from the outside into walls and transport salts dissolved in the water through the masonry to the surface of the wall (salination of the masonry work). If the salts crystallise, large areas of the render spall. But there is a good solution for such problems: restoration render. The effect of restoration render is based on its inability to conduct moisture through capillaries. Since the render cannot conduct the moisture, the water with the dissolved salts in the masonry cannot reach the surface of the wall. It evaporates at the render base and escapes through pores. The dissolved salts crystallise and remain in the pore space of the layer of render. The effects described here are demonstrated by the following model experiment.
Materials and Chemicals 3 flower pots made of clay (interior diameter 15-25 cm), 3 beakers (1000 ml), spatula, rubber stoppers, 3 large crystallising dishes Sodium chloride, water, restoration render, conventional render
Safety RulesPupil and teacher experiments with the substances used in the experiment are permitted without restrictions.
Duration of Experiment45 minutes / 1 week action time
ExecutionIn a first step the restoration render is mixed with water in the first beaker. 500 g of restoration render are placed in the beaker and the quantity of water recommended by the manufacturer added. The restoration render is then stirred until the material is uniform with a consistence proper for application with a brush. The viscosity of the render can be varied by adding water or restoration render. The conventional render is mixed in an identical manner. If there are holes in the bottom of the flower pots, they should be closed with the rubber stoppers to prevent leaks. The mixed restoration render and conventional render respectively are applied to the inside wall and bottom of a flower pot and allowed to dry (notes on drying time given by manufacturer should be observed). After the renders have hardened, a saturated sodium chloride solution is produced. 600 ml of water are poured into a beaker and sodium chloride is added until the saturation concentration has been achieved. The sodium chloride solution is then evenly distributed between the three crystallisation dishes. The two treated flower pots as well as the untreated flower pot are each placed in one of the three crystallisation dishes.
EXPERIMENT IX
Restoration Render in a Model Experiment

2/3
All of the flower pots show crystallisation of sodium chloride on their external walls. (Ill. 1). Furthermore, crystallisation of sodium chloride can also be seen inside the flower pot without render and the flower pot treated with a conventional render (Ill. 2 and 3). But absolutely no sodium chloride crystals are seen on the inside of the flower pot that was treated with the restoration render (Ill. 4). The photographs with magnification clearly illustrate this effect.
Observation
Ill. 1: Flower pots viewed from the side
EXPERIMENT IX
Restoration Render in a Model Experiment
Ill. 2: without render Ill. 3: conventional render Ill. 4: restoration render
without render conventional render restoration render

3/3
EvaluationThe problem of damp masonry work and the use of restoration render as a remedy for this are shown more clearly by the following illustrations. The actual problem and its solution are compared in the model illustrations. In this experiment, the flower pot is used to simulate masonry work and the sodium chloride solution is used as a replacement for salts dissolved in water.
Reality
Among other reasons, walls can become damp because a horizontal barrier is missing (2). Without a horizontal barrier, water including salts dissolved in the water can penetrate into the masonry work (1) and rise (3). The salts then crystallise at the surface of the masonry work which causes the render and paint to break apart and fall off (4) which destroys the surface of the masonry and eventually the entire masonry work (5).
Model: A flower pot does not have a horizontal barrier and is thus permeable (2). The sodium chloride solution can penetrate into the flower pot (1) and rise through the walls (3). Crystallising salt causes the render to crumble (4). Due to the limited action time, destruction of the flower pot cannot be simulated.
Reality
The problem is solved by using restoration render. By applying a restoration render, a pore structure is created (1) through which water can evaporate more easily and faster (2). The salts dissolved in the water crystallise in the restoration render (3). This lowers the moisture zone (4) and the render and paint remain dry and intact (5).
Model: The restoration render applied to the inside of the flower pot (1) forms a pore structure through which water can evaporate more easily and faster (2). This lowers the moisture zone (3). The sodium chloride dissolved in the water crystallises in the restoration render (4) without damaging the render (5).
DisposalThe equipment and chemicals used can be disposed of with domestic waste.
NoteSee Worksheet 12
EXPERIMENT IX
Restoration Render in a Model Experiment
1
3
2
4
1
3
2
4

Ca(OH)2 + CO2 CaCO3 + H2O
1/2
EXPERIMENT V
Experimental Proof of Carbonation
IntroductionDuring the hydration of cement, the chemical reaction that takes place between cement and water, calcium hydroxide (Ca (OH)2) results along with other reaction products. Through contact with carbon dioxide (CO2) in the air, calcium carbonate (CaCO3) forms and water is released. This reaction is called carbonation:
The calcium hydroxide gives concrete its natural alkaline environment with a pH value of at least 12.65 which is the same as a saturated calcium hydroxide solution. The formation of calcium carbonate leads to a slow decline of the pH value and, in conjunction with this, “acidification” of the concrete. The alkaline environment that normally protects steel reinforcement in intact reinforced concrete (passive protection) is slowly lost.
The consequence of carbonation in concrete is corrosion of the steel reinforcement in reinforced concrete, a composite working material.
Materials and Chemicals Concrete, carbon dioxide, thymolphthalein solution Desiccator, plastic cups, metal saw, spray bottle
Safety RulesPupil and teacher experiments with the materials used are permitted without restrictions. The Safety Data Sheet of the concrete used should be observed.
Duration of Experiment30 minutes / 3 weeks action time
ExecutionThe concrete is mixed according to the instructions given for the product, poured into a plastic cup and allowed to dry at room temperature. After drying, the concrete sample is taken out of the plastic cup and placed in a desiccator flooded with carbon dioxide for 3 weeks. After the action time the concrete sample is cut in half with a metal saw and the inside and outside of both halves are sprayed with a thymolphthalein solution.

2/2
EXPERIMENT V
Experimental Proof of Carbonation
Observation
EvaluationThe carbonation process can be seen in the photograph above. The transition to carbonated concrete is obvious through the change in colour. The non-coloured area shows the carbonated area of the concrete sample. The blue area shows the alkaline environment of the concrete which has not carbonated. The area where the thymolphthalein changes lies between pH 9.0 and pH 10.5.
DisposalThe equipment and chemicals used can be disposed of with domestic waste.
NoteIf the subject is to be dealt with in more detail, Worksheet 8 can be used: Corrosion of Reinforced Concrete through Carbonation.
Concrete that is not carbonated
Carbonated concrete

1/2
EXPERIMENT VI
Hydrophobization of Building Materials
IntroductionWhen it comes to effective protection of buildings, moisture is one of the most serious problems for planners, contractors and house owners. Among other materials, silicone oils are used to hydrophobize building materials. They are mainly made of polysiloxanes. Polysiloxanes have unbranched chains which are made up of alternating silicon and oxygen atoms and their free valences are saturated with organic side groups. This experiment shows the hydrophobization of building materials using a silicone building protection agent.
Materials and Chemicals Beakers (100 ml), glass rod, brush, spray bottle (water) Silicone building protection agent (available in do-it-yourself stores), brick (optional: aerated concrete blocks, sand-lime brick, etc.)
Safety RulesObserve the Safety Data Sheet for the silicone building protection agent used.
Duration of Experiment45 minutes / 2 – 3 days of drying
ExecutionA beaker is filled with 50 ml of water. While continuously stirring, 5 g of the silicone building protection agent are added and stirred until the solution is homogeneous. The solution is then applied to one half of a brick using a brush.Drying time: 2 – 3 days. After drying, water is sprayed on the stone using a spray bottle and the behaviour of the drops of water on the treated as well as the untreated surface examined.

2/2
EXPERIMENT VI
Hydrophobization of Building Materials
ObservationThe treated surface of the brick shows a strong water repelling effect while the untreated surface becomes wet from the sprayed water.
EvaluationThe hydrophilic molecule components of the polysiloxane are aligned on the surface of the building material in such a manner that the inorganic parts of the silicones attach to the structurally similar building material. The water repelling effect occurs because the organic side groups are hydrophobic and form a barrier that prevents water from penetrating.
DisposalThe equipment and chemicals used can be disposed of with domestic waste.
NoteThe treated brick can be stored for several years for demonstration purposes. However, the emulsion solution itself is only stable for approximately 24 hours, after which time is loses its effectiveness.
Literature Praxis der Naturwissenschaften – Chemie in der Schule. Themenheft Silicone. Heft 7/2002.
OO
R
Si
OO
R
Si
OO
R
Si
H2O H2O
Building material

1/4
EXPERIMENT VII
Lotus Effect in a Model Experiment
IntroductionThe lotus effect is decisively dependent on two factors. First of all, the lotus plant creates a waxy cuticula on the surface of its leaves which has a hydrophobizing effect and second, the surface of the leaf also has papillae that are 10 to 20 µm high and 10 to 15 µm apart. They reduce the contact surface and therefore the adhesion surface for a drop of water. The synergy from both effects, hydrophobization and micro-roughness, lead to what is called superhydrophobicity which will be shown by the model experiment.
Illustration. 1: Model of a superhydrophobic surface
As an introduction, the lotus effect can be demonstrated on the following selected plants: e.g. nasturtium (Tropaeolum), reed (Phragmites), white cabbage (Brassica), water lettuce (Pistia stratiotes), Lady’s mantle (Alchemilla) or columbine (Aquilegia).
Materials Force gauge in newtons (2 N), beaker 500 ml, cord, medium density fibreboard (MDF board) with boreholes, fluted wood dowels
Safety Rules Pupil and teacher experiments with the materials used are permitted without restrictions.
Duration of Experiment20 minutes
hydrophobic & rough “superhydrophobic”
rolling dropsliding drop
hydrophobic & smooth

Measurement 2 Measurement 3 Measurement 4 Measurement 5Measurement 1
20 mm
20 mm
ExecutionA force gauge in newtons is connected to a beaker using a cord. The beaker is then filled with water until it has a total mass of 500 g. A total of 5 measurements are taken. The diagram shows a 20 x 20 mm large cut section of prepared MDF board. In a first step, the force that is required to pull the beaker across the smooth wood surface is measured (measurement 1). In the next step, appropriate sized wood dowels are inserted in all of the boreholes in the MDF board and the procedure just described repeated (measurement 2). The individual wood dowels are then successively removed and the required force again measured (measurements 3–5). All of the values of the force measured and the contact surface of the beaker are recorded.
2/4
EXPERIMENT VII
Lotus Effect in a Model Experiment

3/4
EvaluationThe values of the force measured are entered alongside the values of the contact surface. In general, the result should show a proportional relationship since the force that is required to move an object is proportional to its contact surface. However, since the beaker does not have a 100 percent contact surface due to unevenness, this connection can only be described here qualitatively. There is a general decrease in force that correlates to a reduction of the contact surface. At this point, a connection can be made between the plant kingdom and construction chemistry. The setup of the model experiment shows structural properties similar to those found on the surface of the leaves of the lotus plant. Since the contact surface is reduced, dirt particles cannot adhere as well to the surface of the leaf or a treated brick and are more easily removed.
NotesYou can easily produce the objects required for this experiment yourself by following the instructions given below. The photo-graphs show the finished experimental setup.
1. Mark horizontal and vertical lines with a distance of 20 mm on the MDF board (thickness of the MDF board 20 – 40 mm). 2. The corner and centre points of the resulting squares (20 x 20 mm) serve as drilling points. 3. The diameter of the wood drill used must correspond to the diameter of the fluted wood dowels (ø 6 mm, 35 – 40 mm long). 4. A stationary drill press should be used to drill the holes since all holes should have the same depth and be vertical (bore depth
10 – 15 mm). 5. The fluted wood dowels can now be inserted into the boreholes.
ObservationThe table presented below shows the values that resulted in the model experiment with a beaker filled with water (m = 500 g). The theoretical contact surface refers to a 2 x 2 cm large cut section of the MDF board.
EXPERIMENT VII
Lotus Effect in a Model Experiment
Measurement Force (in N) Contact surface (in cm²)
1 1.00 4.00
2 0.70 0.40
3 0.65 0.20
4 0.60 0.15
5 0.50 0.10

Illustration 2: Creating a textured surface analogous to the lotus effect – model experiment
4/4
EXPERIMENT VII
Lotus Effect in a Model Experiment
20 mm
20 mm
300 mm
300 mm

1/2
Introduction As a rule, the surfaces of mineral building materials are hydrophilic, i.e. hygroscopic. Structurally they consist of different clay minerals which mainly have tetrahedron layers with SiO2 tetrahedrons or octahedron layers with AlO6 octahedrons as a structure. It is meanwhile possible to mask these hydrophilic groups so that the surfaces of buildings can be hydrophobized.
The following experiment shows a simple method for hydrophobizing a surface.
Materials and Chemicals 2 pieces of a clay roof tile (10 x 10 cm), spray bottle, Water, paraffin candle
Safety RulesPupil and teacher experiments with the substances to be used are permitted without restrictions.
Duration of Experiment20 minutes
ExecutionA piece of an untreated clay roof tile is held over a burning candle until it is covered with a layer of soot (carbon black). After the clay roof tile has cooled, the soot-covered as well as the untreated clay roof tile are sprayed with water.
EXPERIMENT VIII
Self-Cleaning Surfaces through Hydrophobization

2/2
ObservationDroplets of water form on the clay roof tile covered with soot which immediately run off without wetting the clay roof tile. A uniform film of water forms on the untreated clay roof tile.
EvaluationIncomplete combustion of the candle produces particles of carbon (soot) and unburned paraffin that deposit on the clay roof tile in a very thin layer. Because of the hydrophobic property of the paraffin, the water cannot wet the clay roof tile and the droplets of water immediately run off in the form of pearls. Clay is made up of different clay minerals which mainly have tetrahedron layers with SiO4 tetrahedrons or octahedron layers with AlO6 octahedrons as their structural elements. This structure allows water to wet the untreated clay roof tile.
DisposalThe equipment and chemicals used can be disposed of with domestic waste.
EXPERIMENT VIII
Self-Cleaning Surfaces through Hydrophobization

1/2
Introduction“Building is always a battle against water!” That is one of construction professionals’ most important principles.
One of the most effective “weapons” that construction engineers have for their “battle” against water are waterproofing grouts. These are probably one the most unusual types of mortars. Thanks to their often very high polymer content of up to 40 percent, they are more like a polymer coating than a classic mineral mortar in the applied state. Professionals refer to these as “flexible” or “highly flexible waterproofing grouts”. They are highly elastic and yet so durable that they can even bridge cracks up to several millimetres wide without tearing. When dealing with massive, solid substrates that do not normally crack (for example basement walls), “rigid mineral waterproofing grouts” with a higher cement content and a much lower polymer content are used.
In this experiment, the water repelling effect of waterproofing grouts is demonstrated on a model basement.
Materials and Chemicals 2 flower pots made of clay (interior diameter 16-18 cm), 1 beaker (1000 ml), spatula, hot-melt glue gun, 2 large metal bowls, waterproofing grout (can be purchased in any do-it-yourself store)
Safety RulesPupil and teacher experiments with the materials used are permitted without restrictions.
Duration of Experiment45 minutes/3 days drying time/1-2 days action time
ExecutionIn a first step the waterproofing grout is mixed with water in a beaker. 500 g of waterproofing grout are placed in a beaker and the quantity of water recommended by the manufacturer added. The waterproofing grout is mixed until the right consistence for application with a brush has been achieved. The viscosity of the mixture can be varied by adding water or waterproofing grout. It there are holes in the bottom of the flower pots, these must be closed with glue from a hot-melt glue gun so that no water can enter through the hole. The mixed waterproofing grout is applied to the outside wall and bottom of a flower pot. After the waterproofing grout has dried (see drying time given by manufacturer), the treated flower pot is placed in a crystallising dish filled with water. The untreated flower pot is then placed in the other crystallising dish filled with water which is then used for comparison in the evaluation.
EXPERIMENT X
Waterproofing Grouts – To Keep Water Out

2/2
The photographs show the result of the model basement experiment. While water was able to penetrate into the inside of the untreated flower pot, the inside of the flower pot sealed with waterproofing grout remains dry. After 24 hours, the water level on the inside of the untreated flower pot had risen to 1 cm.
Observation
EXPERIMENT X
Waterproofing Grouts – To Keep Water Out
Illustration 1: Flower pots, side view (left: untreated flower pot, right: treated flower pot
Illustration 2: untreated flower pot Illustration 3: treated flower pot
EvaluationWaterproofing grouts form an effective barrier against water. Typical application areas are basement walls, damp rooms, swimming pools, balconies and terraces where they act as a water repelling layer.
DisposalThe equipment and chemicals used can be disposed of with domestic waste.

1/3
IntroductionIn Germany it is estimated that more than 50 percent of all residential units are not sufficiently insulated. If these flats were thermally insulated with rigid foam panels made of polystyrene (Styropor), the consumption of heating oil per square metre could be reduced by two-thirds.In chemistry, the term calorimeter is often used to determine the amount of heat that is released during chemical, biological or physical processes. Good thermal insulation is also decisive to ensure a precise experimental result. In this experiment, pupils build model houses made of polystyrene panels and determine the change in temperature with a thermometer,similartohowthisisdonewithacalorimeter.The objective of this experiment is to build a model house that is insulated as well as possible and to characterise heat bridges.
Materials and Chemicals Polystyrene adhesive, hot-melt glue gun, thermometer, infrared thermometer, beaker (500 ml), knife, different sized wood panels*, plastic pipe** (Ø = 20 mm), polystyrene panels*** (20 mm thick), microscope slides, wood bars (cross section 10 x 10 mm)****, aluminium sheets (2- 4 mm thick)*****
* Wood panels: 1 base panel (50 x 50 cm) Roof construction: 2 panels (30 x 15 cm); Drill a hole with a 10 mm diameter in one wood panel used for the roof construction and a hole with 25 mm diameter in the other panel ** Plastic pipe: The plastic pipe is used for the construction of a chimney. *** Polystyrene panels: 2 panels (25 x 30 cm), 2 panels (25 x 20 cm), 1 panel (18 x 18 cm) The polystyrene panels are used to build the walls of the model house. The following sizes are required: 0.5 m² polystyrene panel **** Windows: The wood bars and microscope slides are used to build the windows. Single as well as double glazing can be simulated. ***** Doors : The 2 aluminium sheets are used for the construction of doors (10 x 5 cm).
Safety RulesObserve the Safety Data Sheet for the polystyrene adhesive used.
Duration of Experiment90 minutes
Execution In general, a polystyrene adhesive is used to connect two polystyrene panels to each other. The other elements of the model house (wood, glass and aluminium constructions) are fixed in place on the polystyrene panels with the hot-melt glue gun.
The illustration of the model house shows one possibility for constructing the house, seen from the front (the back side is constructed just the opposite).The polystyrene panels are cut by the pupils. Areas are also cut out for the windows and doors. The house elements are glued together as shown in the illustration of the model house. The floor slab serves as a base but is not glued to the polystyrene panels. Athermometer(10 mmborehole)andthechimney(25mmborehole)areintegratedinthemodelhousethroughtheholesdrilledin the roof construction. 300 ml of water are then heated in a 500 ml beaker to the boiling point and placed in the model house. The thermometer should be immersed in the water in the beaker.The temperature curve is recorded over a period of 15 minutes. Heat bridges around windows, chimney and the roof can be identified with an infrared thermometer.
EXPERIMENT XI
The Insulating Property of Polystyrene

2/3
Illustration: Instructions for building a model house
EXPERIMENT XI
The Insulating Property of Polystyrene
Basic dimensions of the model house:
Chimney
Wood panel(30 x 15 cm)
Polystyrene panel
Slidesin wood frames (approx. 7.5 x 7.5 cm)
Aluminium sheet (10 x 5 cm)
Base plate (50 x 50 cm)
30 cm
20 cm

3/3
ObservationsDepending on the type of model house built, the temperature falls faster or slower. Heat bridges are especially found on the roof, around doors, windows and chimney.
EvaluationOne of the most effective methods to reduce energy consumption in buildings is to insulate the facade. This prevents heat from the rooms inside from being given off towards the outside directly through the walls. With the aid of an infrared thermometer, pupils can determine at which places heat bridges have formed in the house. The thermal conductivity of the materials used also plays a decisive role (λ: aluminium > glass > wood > polystyrene). To demonstrate this, photographs of house facades taken with a thermal imaging camera can also be shown to make this effect clearly visible.
DisposalThe house should be kept for following learning groups.
NotePupils can be divided into several groups and each group constructs its own model house as a joint project.
EXPERIMENT XI
The Insulating Property of Polystyrene