introduction before getting started with srx connect
TRANSCRIPT

INTRODUCTIONJBL SRX Connect is a tablet application for controlling a number of JBL SRX800 series powered loudspeakers in a sound reinforcement environment.
BEFORE GETTING STARTED WITH SRX CONNECTSRX Series loudspeakers first need to be connected to the same Wi-Fi network as SRX Connect on the iOS or
Android device. Once they’re all successfully connected, launch SRX Connect and it will find the loudspeakers in your system.
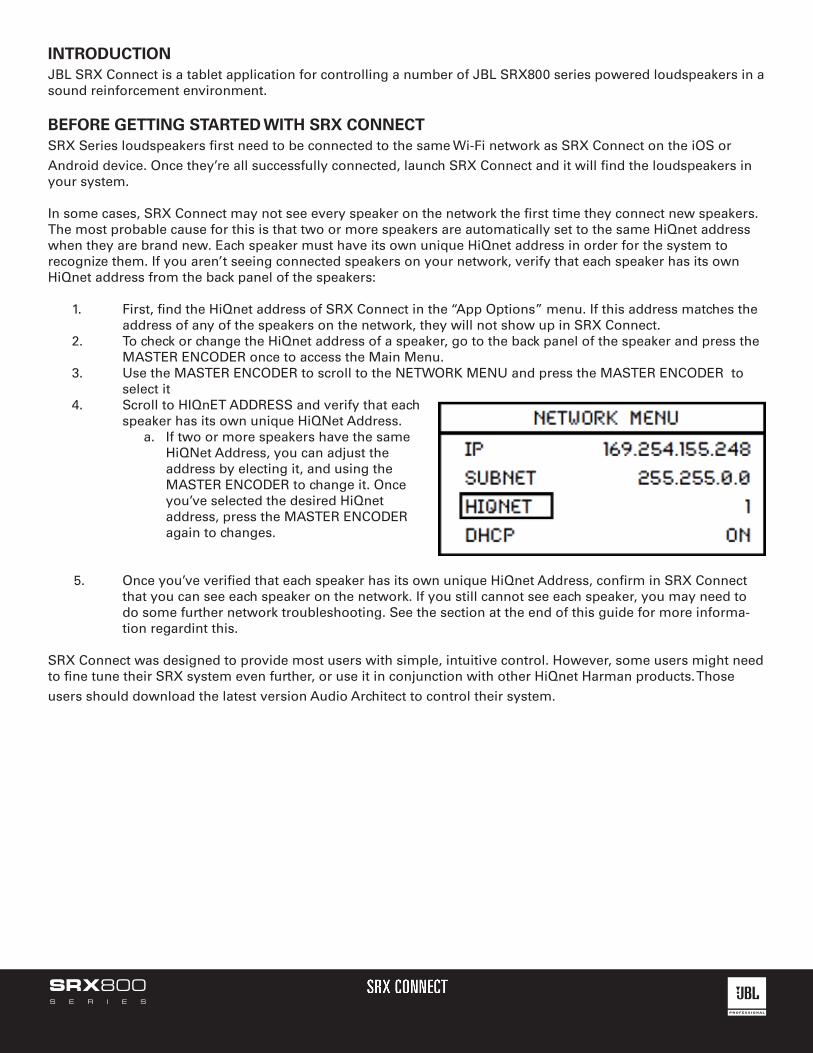
In some cases, SRX Connect may not see every speaker on the network the first time they connect new speakers. The most probable cause for this is that two or more speakers are automatically set to the same HiQnet address when they are brand new. Each speaker must have its own unique HiQnet address in order for the system to recognize them. If you aren’t seeing connected speakers on your network, verify that each speaker has its own HiQnet address from the back panel of the speakers:
1. First, find the HiQnet address of SRX Connect in the “App Options” menu. If this address matches the address of any of the speakers on the network, they will not show up in SRX Connect.
2. To check or change the HiQnet address of a speaker, go to the back panel of the speaker and press the MASTER ENCODER once to access the Main Menu.
3. Use the MASTER ENCODER to scroll to the NETWORK MENU and press the MASTER ENCODER to select it
4. Scroll to HIQnET ADDRESS and verify that each speaker has its own unique HiQNet Address.
a. If two or more speakers have the same HiQNet Address, you can adjust the address by electing it, and using the MASTER ENCODER to change it. Once you’ve selected the desired HiQnet address, press the MASTER ENCODER again to changes.
5. Once you’ve verified that each speaker has its own unique HiQnet Address, confirm in SRX Connect that you can see each speaker on the network. If you still cannot see each speaker, you may need to do some further network troubleshooting. See the section at the end of this guide for more informa- tion regardint this.
SRX Connect was designed to provide most users with simple, intuitive control. However, some users might need to fine tune their SRX system even further, or use it in conjunction with other HiQnet Harman products. Those
users should download the latest version Audio Architect to control their system.
S E R I E S
SRX800

USING CREATE SYSTEM MODE TO SET UP A SYSTEM WITH NO LOUDSPEAKERS CONNECTEDIf you wish to create your system without being connected to SRX Series loudspeakers, simply tap the CREATE
button in the ‘Devices’ window. Here you will be able to add any of the SRX Series loudspeakers to any of the appropriate groups in the main window.
If you have any left / right groups linked in the OPTIONSmenu, any loudspeakers you add to one side will automatically be added to the other side also to make setup even quicker!
The ability to rename and delete loudspeakers is also available using this mechanism of creating a system, just as with
designing a system with networked loudspeakers.
Note:- only 812P and 815P models can be added to the Monitors group- only 818 and 828 sub models can be added to the Left Subs and Right Subs groups- sub models cannot be added to the Left Fills, Right Fills or Rear fills groups
RENAMING LOUDSPEAKERSLoudspeakers can be renamed by selecting the RENAME option from the menu
launched by pressing and hold a loudspeaker.
DELETING LOUDSPEAKERSLoudspeakers can be removed from the design and returned to the FOUND window byselecting the DELETE option from the menu launched by pressing and holding aloudspeaker.
RENAMING A SHOWA show can be renamed at any time by pressing and holding the show name at the top
and selecting RENAME from the pop-up menu.
SAVING AND LOADING A SHOWA show can be saved and loaded at any time using the SAVE SHOW and LOAD SHOW buttons at the top of
the app. Each of these brings up a window to enable you to save and load shows.
S E R I E S
SRX800
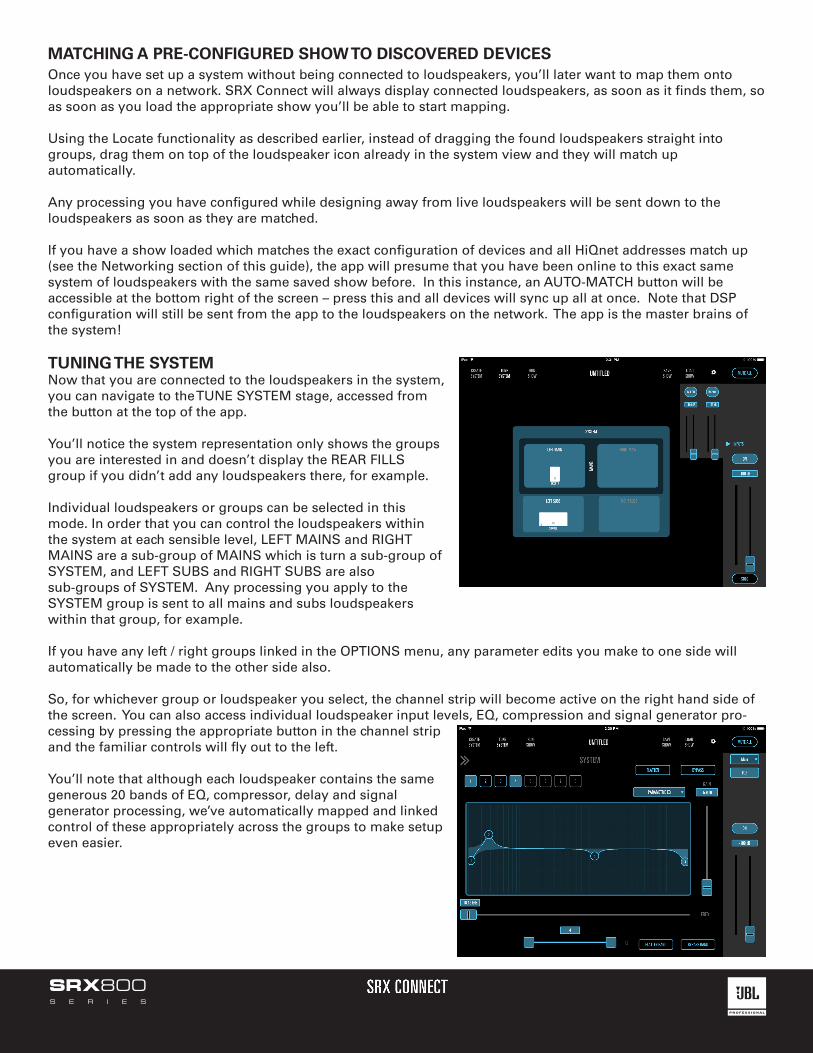
TUNING THE SYSTEMNow that you are connected to the loudspeakers in the system, you can navigate to the TUNE SYSTEM stage, accessed from the button at the top of the app.
You’ll notice the system representation only shows the groups you are interested in and doesn’t display the REAR FILLS group if you didn’t add any loudspeakers there, for example.
Individual loudspeakers or groups can be selected in this mode. In order that you can control the loudspeakers within the system at each sensible level, LEFT MAINS and RIGHT MAINS are a sub-group of MAINS which is turn a sub-group of SYSTEM, and LEFT SUBS and RIGHT SUBS are alsosub-groups of SYSTEM. Any processing you apply to theSYSTEM group is sent to all mains and subs loudspeakers within that group, for example.
If you have any left / right groups linked in the OPTIONS menu, any parameter edits you make to one side will automatically be made to the other side also.
So, for whichever group or loudspeaker you select, the channel strip will become active on the right hand side of the screen. You can also access individual loudspeaker input levels, EQ, compression and signal generator pro-cessing by pressing the appropriate button in the channel strip and the familiar controls will fly out to the left.
You’ll note that although each loudspeaker contains the samegenerous 20 bands of EQ, compressor, delay and signalgenerator processing, we’ve automatically mapped and linked control of these appropriately across the groups to make setup even easier.
MATCHING A PRE-CONFIGURED SHOW TO DISCOVERED DEVICESOnce you have set up a system without being connected to loudspeakers, you’ll later want to map them onto loudspeakers on a network. SRX Connect will always display connected loudspeakers, as soon as it finds them, so as soon as you load the appropriate show you’ll be able to start mapping.
Using the Locate functionality as described earlier, instead of dragging the found loudspeakers straight into groups, drag them on top of the loudspeaker icon already in the system view and they will match upautomatically.
Any processing you have configured while designing away from live loudspeakers will be sent down to theloudspeakers as soon as they are matched.
If you have a show loaded which matches the exact configuration of devices and all HiQnet addresses match up (see the Networking section of this guide), the app will presume that you have been online to this exact samesystem of loudspeakers with the same saved show before. In this instance, an AUTO-MATCH button will beaccessible at the bottom right of the screen – press this and all devices will sync up all at once. Note that DSPconfiguration will still be sent from the app to the loudspeakers on the network. The app is the master brains of the system!
S E R I E S
SRX800
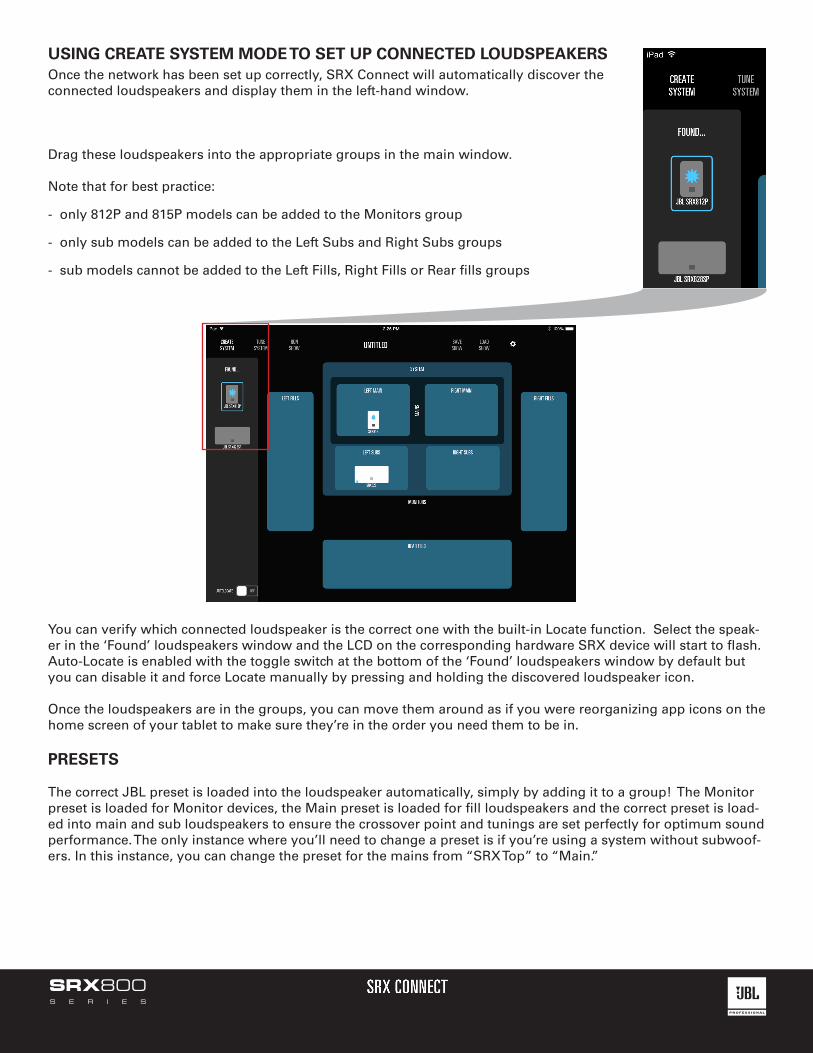
USING CREATE SYSTEM MODE TO SET UP CONNECTED LOUDSPEAKERSOnce the network has been set up correctly, SRX Connect will automatically discover theconnected loudspeakers and display them in the left-hand window.
Drag these loudspeakers into the appropriate groups in the main window.
Note that for best practice:
- only 812P and 815P models can be added to the Monitors group
- only sub models can be added to the Left Subs and Right Subs groups
- sub models cannot be added to the Left Fills, Right Fills or Rear fills groups
You can verify which connected loudspeaker is the correct one with the built-in Locate function. Select the speak-er in the ‘Found’ loudspeakers window and the LCD on the corresponding hardware SRX device will start to flash. Auto-Locate is enabled with the toggle switch at the bottom of the ‘Found’ loudspeakers window by default but you can disable it and force Locate manually by pressing and holding the discovered loudspeaker icon.
Once the loudspeakers are in the groups, you can move them around as if you were reorganizing app icons on the home screen of your tablet to make sure they’re in the order you need them to be in.
PRESETS
The correct JBL preset is loaded into the loudspeaker automatically, simply by adding it to a group! The Monitor preset is loaded for Monitor devices, the Main preset is loaded for fill loudspeakers and the correct preset is load-ed into main and sub loudspeakers to ensure the crossover point and tunings are set perfectly for optimum sound performance. The only instance where you’ll need to change a preset is if you’re using a system without subwoof-ers. In this instance, you can change the preset for the mains from “SRX Top” to “Main.”
S E R I E S
SRX800
COPYING AND PASTING SETTINGSIndividual processing can be copied and pasted from and to individual loudspeakers and from and to groups from
the COPY / PASTE options in the press-and-hold menu.
THE ON BUTTONThe ON button in the channel strip mutes the loudspeaker or group of loudspeakers when disabled and unmutes them when enabled.
THE SOLO BUTTONThe SOLO button in the channel strip mutes all the loudspeakers or group of loudspeakers which aren’t soloed when enabled, leaving only the soloed loudspeakers active.
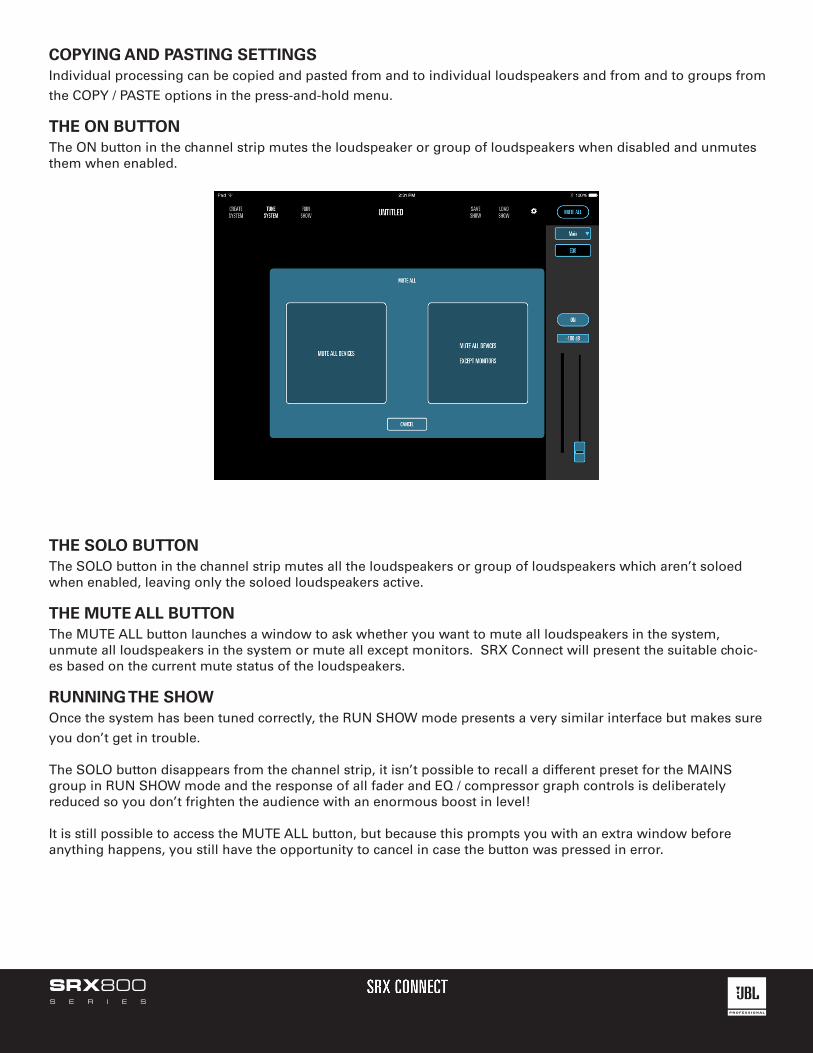
THE MUTE ALL BUTTONThe MUTE ALL button launches a window to ask whether you want to mute all loudspeakers in the system,unmute all loudspeakers in the system or mute all except monitors. SRX Connect will present the suitable choic-es based on the current mute status of the loudspeakers.
RUNNING THE SHOWOnce the system has been tuned correctly, the RUN SHOW mode presents a very similar interface but makes sure
you don’t get in trouble.
The SOLO button disappears from the channel strip, it isn’t possible to recall a different preset for the MAINS group in RUN SHOW mode and the response of all fader and EQ / compressor graph controls is deliberatelyreduced so you don’t frighten the audience with an enormous boost in level!
It is still possible to access the MUTE ALL button, but because this prompts you with an extra window beforeanything happens, you still have the opportunity to cancel in case the button was pressed in error.
S E R I E S
SRX800
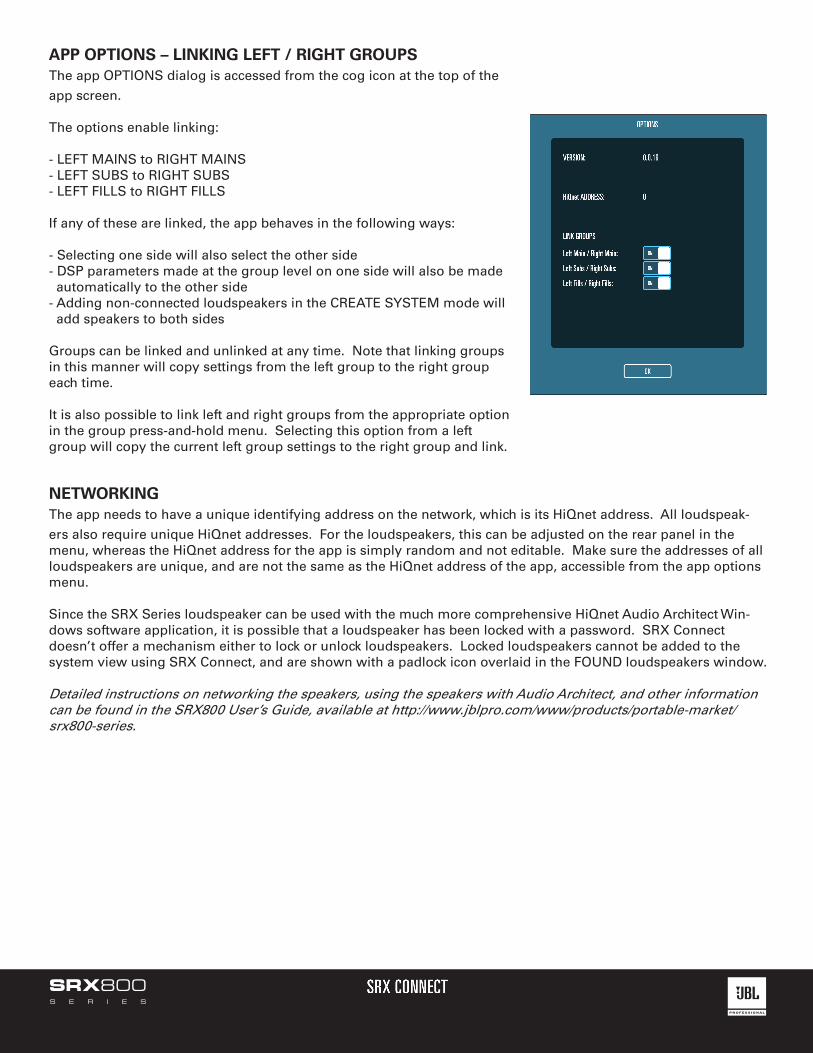
APP OPTIONS – LINKING LEFT / RIGHT GROUPSThe app OPTIONS dialog is accessed from the cog icon at the top of the
app screen.
The options enable linking:
- LEFT MAINS to RIGHT MAINS- LEFT SUBS to RIGHT SUBS- LEFT FILLS to RIGHT FILLS
If any of these are linked, the app behaves in the following ways:
- Selecting one side will also select the other side- DSP parameters made at the group level on one side will also be made automatically to the other side- Adding non-connected loudspeakers in the CREATE SYSTEM mode will add speakers to both sides
Groups can be linked and unlinked at any time. Note that linking groups in this manner will copy settings from the left group to the right group each time.
It is also possible to link left and right groups from the appropriate option in the group press-and-hold menu. Selecting this option from a left group will copy the current left group settings to the right group and link.
NETWORKINGThe app needs to have a unique identifying address on the network, which is its HiQnet address. All loudspeak-
ers also require unique HiQnet addresses. For the loudspeakers, this can be adjusted on the rear panel in the menu, whereas the HiQnet address for the app is simply random and not editable. Make sure the addresses of all loudspeakers are unique, and are not the same as the HiQnet address of the app, accessible from the app options menu.
Since the SRX Series loudspeaker can be used with the much more comprehensive HiQnet Audio Architect Win-dows software application, it is possible that a loudspeaker has been locked with a password. SRX Connect doesn’t offer a mechanism either to lock or unlock loudspeakers. Locked loudspeakers cannot be added to the system view using SRX Connect, and are shown with a padlock icon overlaid in the FOUND loudspeakers window.
Detailed instructions on networking the speakers, using the speakers with Audio Architect, and other information can be found in the SRX800 User’s Guide, available at http://www.jblpro.com/www/products/portable-market/srx800-series.
S E R I E S
SRX800