introducing adobe prelude cs6 - adobe: creative, · pdf fileintroducing adobe prelude cs6 ......
TRANSCRIPT
Introducing Adobe Prelude CS6
Adobe Prelude CS6 software provides a unified interface for ingest and logging workflows, allowing you to work faster, stay organized, and streamline your production process. Copy and transcode to your storage infrastructure and begin logging immediately, intuitively adding searchable markers and other temporal metadata. Create rough cuts with post-production notes that flow into Adobe Premiere Pro CS6, communicating the vision for the project through final editing.
With its elegant user interface, Adobe Prelude CS6 gives you the tools to define and shape the visual narrative. Start your review before or after you transfer the files from your camera in your preferred format. Use intuitive, keyboard-driven logging to add searchable markers and metadata that travel with the footage through post-production. Complete ingest and logging, and then package the project for final editing in Adobe Premiere® Pro CS6 software or Final Cut Pro 7 XML.
For example, if you are a producer, you can open your laptop in the field and immediately begin prepping raw news reports on the way back to the office. If you are a director, you can create dailies and distribute them to reviewers and editors on the spot, without the overhead of a full-blown nonlinear editing system (NLE). These are just two ways you can use Prelude. Whether you are a long-time professional video editor or “just” the person who shoots the killer footage, it’s easy and efficient to show how the story should be told.
Adobe® Prelude™ CS6Jump-start your production
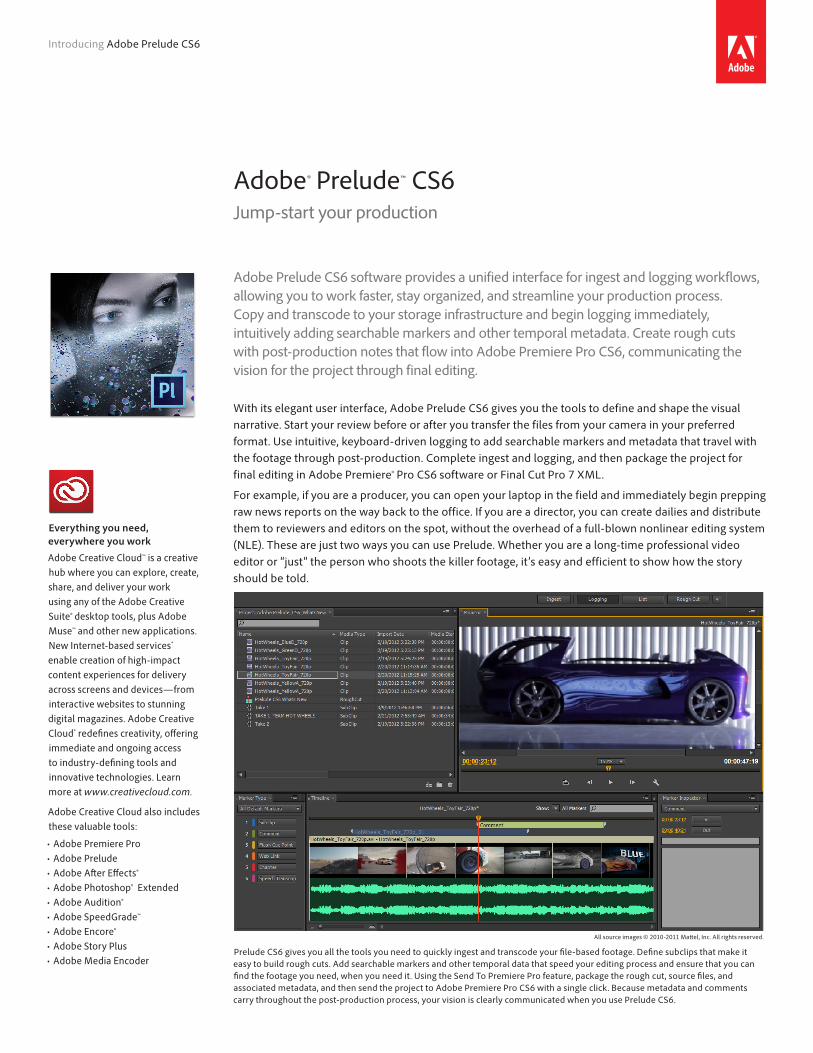
All source images © 2010-2011 Mattel, Inc. All rights reserved.
Prelude CS6 gives you all the tools you need to quickly ingest and transcode your file-based footage. Define subclips that make it easy to build rough cuts. Add searchable markers and other temporal data that speed your editing process and ensure that you can find the footage you need, when you need it. Using the Send To Premiere Pro feature, package the rough cut, source files, and associated metadata, and then send the project to Adobe Premiere Pro CS6 with a single click. Because metadata and comments carry throughout the post-production process, your vision is clearly communicated when you use Prelude CS6.
Contents
Top features of Adobe Prelude CS6 2
Full and partial ingest 2
Transcoding during ingest 3
Searchable temporal markers and metadata 4
Rough cut that open in Adobe Premiere Pro CS6 6
Thumbnail scrubbing 7
Write confirmation 7
Speech transcription 7
About Adobe Systems Incorporated 8
Everything you need, everywhere you work
Adobe Creative Cloud™ is a creative hub where you can explore, create, share, and deliver your work using any of the Adobe Creative Suite® desktop tools, plus Adobe Muse™ and other new applications. New Internet-based services* enable creation of high-impact content experiences for delivery across screens and devices—from interactive websites to stunning digital magazines. Adobe Creative Cloud* redefines creativity, offering immediate and ongoing access to industry-defining tools and innovative technologies. Learn more at www.creativecloud.com.
Adobe Creative Cloud also includes these valuable tools:
•AdobePremierePro•AdobePrelude•AdobeAfterEffects®•AdobePhotoshop®Extended•AdobeAudition®•AdobeSpeedGrade™•AdobeEncore®•AdobeStoryPlus•AdobeMediaEncoder

2Introducing Adobe Prelude CS6
Top features•Fullorpartialingest(Page2)
•Transcodingtomultipleformats(Page3)
•Keyboard-drivenlogging(Page4)
•Searchabletemporalmarkers andmetadata(Page4)
•Easyassemblyofroughcuts (Page6)
•ProjectexporttoAdobePremierePro(Page6)
•Thumbnailscrubbingforfastmediareview(Page7)
•Writeconfirmation(Page7)
•Speechtranscriptionnotes(Page7)
•Customizablemarkers,metadataimport, and extensibility† (Page8)
With Adobe Prelude CS6, you can:
Ingest footage quickly and easily—Get to work faster with easy ingest of file-based footage, including the ability to duplicate, transcode, and verify virtually all formats.
Log footage and focus on what’s most important—Benefit from intuitive, keyboard-driven logging. Create metadata and subclips without taking your eyes off your footage, with all controls accessible from the keyboard.
Create rough cuts—Get a head start on editing by combining clips and subclips, complete with all related markers and comments. With a single click, send your footage to Adobe Premiere Pro CS6 for final editing.
Integrate into virtually any workflow—Integrate Prelude CS6 software with your existing media asset management systems (MAM) and workflows. Built as an XMP-based open platform, Prelude CS6 supports extensibility and custom integration with third-party technologies.†
Top features of Adobe Prelude CS6
Full or partial ingestWith Prelude CS6, you can jump-start your production beginning with the ingest of your files. When you finish shooting your video, you need to get the files off your camera, log the footage, and then prepare for handoff to post-production. Prelude CS6 allows you to ingest all your footage at once, or to select and ingest just a portion of it. You also have the option to transcode the files to your preferred format.
Full ingest
Performing a full ingest in Prelude CS6 means that you are transferring your entire video file to your hard drive and preparing it for logging and handoff. In its simplest form, you open the Ingest workspace, navigate to your files, select the files to ingest, and then click the Ingest button.
All source images © 2010-2011 Mattel, Inc. All rights reserved.
Ingest buttonSelect individual files or click Check All.

3Introducing Adobe Prelude CS6
All source images © 2010-2011 Mattel, Inc. All rights reserved.
It takes just a few clicks to perform a partial ingest in Prelude CS6.
Partial ingestLet’s say you were on location and shot three hours of footage at a five-alarm fire. In the end, your video will end up as a 30-second story on the 5:00 news. Instead of ingesting the entire three hours of footage, you can preview and ingest only those segments that best illustrate the event.
Performing a partial ingest is quite simple. Open the Ingest panel, navigate to your files, and click on the video’s thumbnail. While watching the video, drag the playhead and press the I key to set the In point. Drag the playhead to the desired Out point and press the O key. Click the Transcode option, and then click the Ingest button. Your partially ingested video clip is now listed in the Project panel. This is the file you will send for editing.
Transcoding during ingestPrelude CS6 gives you the option of transcoding footage to your preferred editing format. Transcoding allows you to optimize storage by importing your file in the correct format. You select the Transcode option in the Transfer Options panel. You are then given the option to select the format and presets for the file.
Select the file format for your file transcode. After you select the format, select from presets specific to this file format.
When transferring your file, you can
select the Transcode option, and then
choose the file format and preset.
You can transcode your footage to one or more additional formats by clicking
the Add Destination button, and then
following the same process for choosing
file format and preset.

4Introducing Adobe Prelude CS6
Keyboard-driven logging
Intuitive keyboard-driven logging in Prelude CS6 speeds up your workflow and helps you work more efficiently. All controls are accessible from the keyboard, so you can insert temporal metadata, add comments, define subclips, and step through your video frame by frame—all without taking your eyes off the footage. For example, you have full keyboard control over the video player using the J-K-L keys. Press J to shuttle left, K to toggle play or stop, or L to shuttle right.
Searchable temporal markers and metadataLogging by inserting time-based markers is one of the most powerful and handy features in Prelude CS6. When you insert metadata using Prelude, it is logged with time-code accuracy. Metadata embedded in the video allows you to easily communicate about a specific frame, quickly explain your take on the story to the production editor, or remind yourself later why this shot is so great. Entering time-based metadata allows you and your team to locate the relevant footage in a flash—now or any time in the future.
Inserting time-based metadata and searchable markers while logging helps you work faster and stay organized, and helps the post-production team understand your intent. Perhaps more importantly, the metadata ensures that the right information is linked to your footage so you can find what you need at any time. Metadata entered in Adobe Prelude is carried into Adobe Premiere Pro, allowing time-accurate communication throughout the workflow.
You can perform a keyword search and quickly find the shot or footage you need. This is how the metadata you enter helps you stay organized and streamlines your production. A search field is available in both the Timeline and Project panels.
Comment markers
Adding comments to your video is easy and efficient in Prelude CS6. Each comment marker travels with your video. You can tell your editor what’s important, what to emphasize, and how you see the story unfolding. Each marker is searchable so you can easily locate your footage later.
Keyboard shortcuts at a glance
You can view the list of keyboard shortcuts, modify them, or enter shortcuts of your own by choosing KeyboardShortcutsfromtheEditmenu(Windows®)orthePreludemenu(MacOS®).
All source images © 2010-2011 Mattel, Inc. All rights reserved.
Marker Type
panel
Logging workspace
Playhead
Monitor panel and controls
Search field in Project
panel
Search field in Timeline panel
Marker Inspector panel

5Introducing Adobe Prelude CS6
Marker Inspector panel
In the Marker Inspector panel, you can modify any marker—such as edit comments and descriptions, change subcliptitles,adjustInandOuttimes.
Inserting comment markers is simple. When the video is playing, press the I key to set the In point at the desired spot in the video, and then press 2 to insert a Comment marker. Type a description, and then press Enter to save. Restart the video by pressing the spacebar, and then press the O key to set the Out point. With all controls accessible from the keyboard, Prelude CS6 gives you the tools you need to stay focused on logging as you shape your narrative.
Subclip markers
Pinpointing the most important parts of a video by setting subclip markers can save you and the editor a whole lot of time. Because subclips are designated by markers and comments, there’s no need for Prelude to create a separate file for each subclip. Instead, all subclips remain as part of the original video, with the subclip markers referencing the specific section of the footage. This allows you to hand off fewer files and reduces storage requirements.
It’s easy to set subclip markers. You open a video in the Project panel, go the point in the video where you want the subclip to begin, and press the I key to set the In point. Next, you press the 1 key to insert the Subclip marker. You can accept the default name (name of clip, with underscore and incrementing number) or provide a new name. Press Enter, press the spacebar to start the video again, and then press the O key to set the Out point. Then choose File > Save. Your subclip is now listed in the Project panel.
You can modify subclip marker settings in the Marker Inspector panel. You can also drag the handles on either end of a Subclip marker to change the In and Out points. This high level of flexibility in Prelude CS6 makes it easy to adapt your workflow to the situation and task at hand.
All source images © 2010-2011 Mattel, Inc. All rights reserved.
You can also modify a comment’s location by dragging the handles on either end of the Comment marker or by modifying In and Out times in the Marker Inspector panel.
All source images © 2010-2011 Mattel, Inc. All rights reserved.
You can rename the inserted Subclip marker (blue) or accept the default name.
Prelude CS6 provides the info you need at the exact point that
you need it. Numbers listed beside each
marker in the Marker Type panel
specify the keyboard shortcut for inserting
that marker.

6Introducing Adobe Prelude CS6
Once you have saved a set of subclips, you can assemble them into a rough cut to show how you see your story unfolding.
Rough cuts that open in Adobe Premiere Pro CS6In Prelude CS6, you can get a jump-start on editing by assembling a rough cut—combining clips that play in the order that you specify. The rough cut will display all markers and metadata on the clip, without niceties like transitions or special effects. The rough cut acts like a storyboard, making it easy to communicate to the production editor how the story should be told.
Creating a new rough cut is as simple as choosing File > Create Rough Cut.
After you provide a filename and double-click the rough cut in the Project panel, the Monitor and Timeline are empty. Drag subclips onto the Timeline in your preferred order, and that’s it. You have built a rough cut. It’s raw, it has no special effects, but it very effectively shows your thinking for the story. You can export the rough cut by packaging it up with the source files for your editor in Prelude CS6. Or, you can choose File > Send To Premiere Pro to open it immediately in Adobe Premiere Pro CS6.
You can also send the rough cut to other NLEs. It will not contain the metadata, but is still a big time-saver.
All source images © 2010-2011 Mattel, Inc. All rights reserved.Comments and other metadata travel with the rough cut.
All source images © 2010-2011 Mattel, Inc. All rights reserved.
As soon as you provide a name and save the file, the new rough cut is listed in the Project panel.

7Introducing Adobe Prelude CS6
Thumbnail scrubbingWith thumbnail scrubbing in Prelude CS6, you can quickly review your video and locate the right segments. Several different methods are available to meet your workflow needs.
You can scrub (or skim) video thumbnails in the Ingest panel. Just hover over a thumbnail with your mouse. When you move the mouse, the video moves backward or forward.
You can also click a thumbnail and start the video player, which displays a playhead and play track. What’s important about this type of thumbnail scrubbing is that it also provides audio during playback. This can be helpful when you are reviewing the video and identifying the section to ingest.
You can also grab the playhead with the mouse and drag backward and forward in the video. You can do this with video thumbnails and in the Monitor panel.
Write confirmationThe Verify option in the Ingest panel provides write confirmation for file size and file content. These options help you confirm that the transfer of files from your removable media (such as a memory card or memory stick) to your hard drive is successful and accurate.
File Size is a very simple check that compares the file size of each asset copied by Prelude to verify that it matches with the original source video.
File Content performs a much deeper check. It compares binary values of source and destination files after copying. If any values do not match, Prelude CS6 displays an error.
Speech transcriptionIn Adobe Premiere Pro CS6 and Adobe Audition CS6 software, you can transcribe speech from audio and video files and turn it into text. Each spoken word is assigned a start time and duration, creating a Speech Transcription marker. These markers are added to the metadata for the clip, exactly like the markers that you create in Prelude CS6. When you import a clip into Prelude that includes Speech Transcription markers, Prelude will display the speech markers in the Timeline panel and in Marker List view.
Prelude CS6 also has the Speech Transcription marker type available in the Marker Type panel. You can use this marker to manually insert a word that was not picked up by Adobe Premiere Pro CS6 or Audition CS6. You can enter the transcribed speech to a video that was not processed in Adobe Premiere Pro CS6 or Audition CS6. You can also select an existing Speech Transcription marker and edit its contents—adding words, changing words, correcting the speaker attribution, and so on.
All source images © 2010-2011 Mattel, Inc. All rights reserved.
All source images © 2010-2011 Mattel, Inc. All rights reserved.You can edit the contents of a Speech Transcription marker (color-coded as pink).

Adobe Systems Incorporated 345 Park Avenue San Jose, CA 95110-2704 USA www.adobe.com
*Internetconnectionrequired.Adobeonlineservices,includingtheAdobeCreativeCloudservice,areavailableonlytousers13andolderandrequireagreementtoadditionaltermsandAdobe’sonlineprivacypolicy(seewww.adobe.com/misc/privacy.html).Theapplicationsandonlineservicesarenotavailableinallcountriesorlanguages,mayrequireuserregistration,andmaybesubjecttochange or discontinuation without notice. Additional fees or subscription charges may apply.
† CustomizationofPreludeisavailabletoAdobetechnicalpartnersthroughtheuseofthePreludeSDK.
Adobe, the Adobe logo, Adobe Audition, Adobe Muse, Adobe Premiere, After Effects, Creative Cloud, the Creative Cloud logo, Creative Suite, Encore, Flash, Photoshop, Prelude, and SpeedGrade are either registered trademarks or trademarks of Adobe Systems Incorporated in the United States and/or other countries. HOT WHEELS and the Flame Logo are trademarks of Mattel, Inc., registered in the United States and other countries. Microsoft and Windows are either registered trademarks or trademarks of Microsoft Corporation in the United States and/or other countries. Mac and Mac OS are trademarks of Apple Inc., registered in the U.S. and other countries. Intel and Pentium are trademarks of Intel Corporation in the U.S. and other countries. AMD and AMD Athlon are trademarks or registered trademarks of Advanced Micro Devices, Inc. All other trademarks are the property of their respective owners.
© 2012 Adobe Systems Incorporated and its licensors. All rights reserved.
Expected release dateSecond quarter 2012
For more informationProduct details: www.adobe.com/prelude
System requirements
Windows
•Intel®Pentium®4orAMDAthlon®64processor
•Microsoft®Windows®XPwithServicePack2(ServicePack3recommended)orWindows7
•1GBofRAM(2GBrecommended)
•1GBofavailablehard-diskspaceforinstallation;additionalfreespacerequiredduringinstallation(cannotinstallonremovableflashstoragedevices)
•1280x1024displaywith16-bitvideocard
•DVD-ROMdrive
•Thissoftwarewillnotoperatewithoutactivation.BroadbandInternetconnectionandregistrationarerequiredforsoftwareactivation,validationofsubscriptions,andaccesstoonlineservices.*Phoneactivationisnotavailable.
Mac OS
•MulticoreIntel®processor
•MacOSXv10.6orv10.7
•1GBofRAM(2GBrecommended)
•1GBofavailablehard-diskspaceforinstallation;additionalfreespacerequiredduringinstallation(cannotinstallonavolumethatusesacase-sensitivefilesystemoronremovableflashstoragedevices)
•1280x1024displaywith16-bitvideocard
•DVD-ROMdrive•Thissoftwarewillnotoperatewithoutactivation.BroadbandInternetconnectionandregistrationarerequiredforsoftwareactivation,validationofsubscriptions,andaccesstoonlineservices.* Phoneactivationisnotavailable.
Forupdatestosystemrequirements,visit www.adobe.com/go/prelude_systemreqs.
Customizable markers, metadata import, extensibility †
You can merge Prelude CS6 into your organization’s existing media asset management systems for an integrated, simplified workflow. Prelude CS6 is designed as an XMP-based open platform that supports custom integration with third-party technologies. With the Prelude CS6 SDK (available to Adobe technical partners), you can customize metadata import, create your own custom marker types, and modify the Project panel to display your media asset manager. You can also insert or customize content panels to display information that meets your organization’s specific process needs.
Customizable markers
Using the Prelude CS6 SDK, you can develop and add custom markers to the Marker Type panel, and define the type of information that the markers collect from users. When Prelude CS6 is launched, these custom markers are automatically added to the Marker Type panel.
Customizable metadata import
When ingesting a video, your organization may require information to populate specific fields in a particular way. This information is then written to the ingested clips as static metadata. Prelude CS6 extensibility (with the Prelude SDK) makes it possible to create a custom form that appears within a dialog box when the Ingest button is clicked. When the custom form (built as a Flash® application window) opens, you fill it out according to your organization’s requirements.
Extensibility with Project panel replacement
Connect Prelude to your organization’s media asset manager (MAM) by writing a Flash application that displays the contents of your MAM. This Flash application is then loaded into Prelude and replaces the Project panel. The Library API (available from the Prelude SDK) communicates with Prelude CS6 and drives the metadata exchange between Prelude and the MAM.
Extensibility with custom content panels
With Prelude CS6 (and Adobe Premiere Pro CS6), you can create your own Flash applications that appear as panels. These custom panels call available APIs or simply display additional information to the user. This same customization model is used across the Adobe product line for standardized development extensibility.
About Adobe Systems IncorporatedAdobe is changing the world through digital experiences. For more information, visit www.adobe.com.