intro to lighting classes
DESCRIPTION
Classes for lighting at South Puget Sound Studio PhotographersTRANSCRIPT
South Puget Sound Studio Photographers Present
Jack Kegley An introduction to basic camera and lighting techniques in a studio environment. Some of the topics to be discussed: aperture, shutter speed, ISO/ASA, Natural Light, Artificial Light. Lighting Ratios, Single Light Setup, Multiple Light Setup, Reflectors, Grids, Gobos, Masks. This will be a combination teaching and hands on group of sessions allowing everyone the opportunity to practice what they have just learned.
Introduction to Lighting
S o u t h P u g e t S o u n d S t u d i o P h o t o g r a p h e r s
1 3 1 0 3 9 t h A v e S E , P u y a l l u p . W A 9 8 3 7 4
1. Week One: Introduction a. What’s it all about? An Introduction to the classes b. The Camera
i. Point and Shoot 1. Advantage 2. Disadvantage
ii. Consumer 1. Advantage 2. Disadvantage
iii. Prosumer 1. Advantage 2. Disadvantage
iv. Professional 1. Advantage 2. Disadvantage
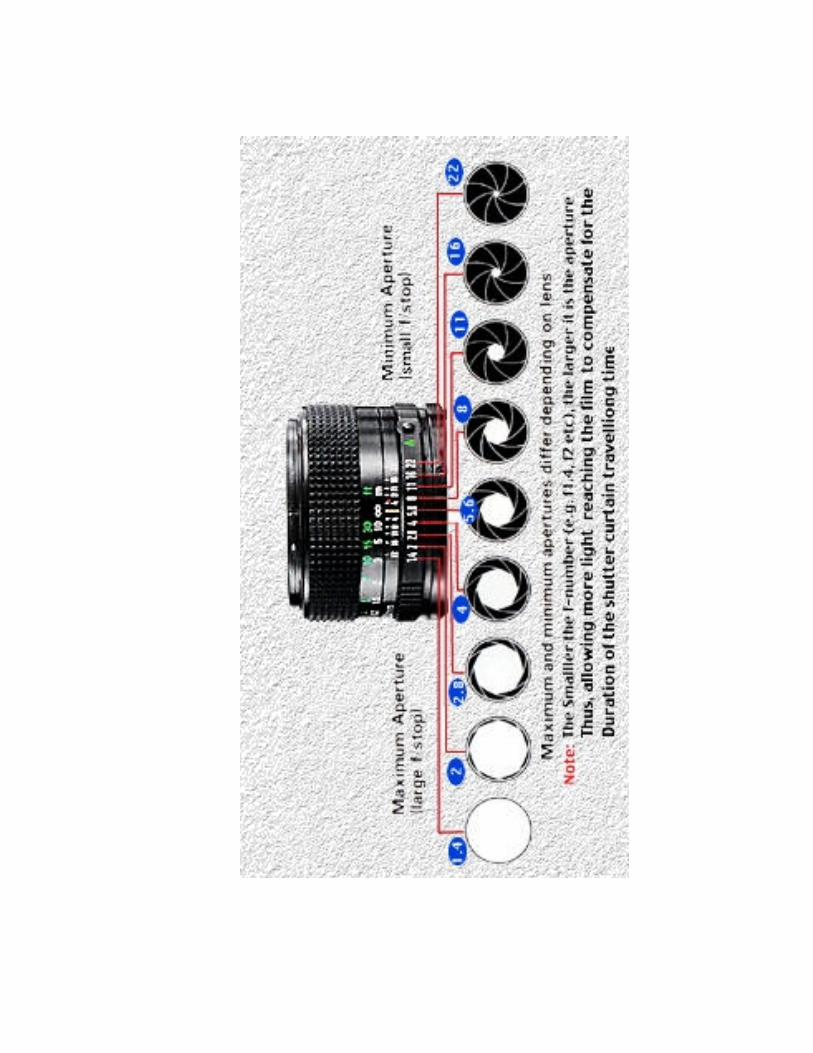
c. Common Camera Terminology i. Aperture/F-Stop
1. Controls the amount of light passing through lens 2. One F-Stop up: twice as much light 3. One F-Stop down: ½ as much light 4. Some digital cameras allow ½ or 1/3 F-Stop settings
ii. Shutter Speed 1. Controls amount of light reaching sensor or film
iii. ISO iv. Aperture Priority v. Shutter Priority vi. Program Mode vii. Manual Mode viii. Incident Light ix. Reflected Light x. Analog/Film xi. Digital xii. Record Books xiii. Visual Diaries xiv. What makes you unique?
d. Hands-on Exercises i. Changing Aperture ii. Changing Sutter speed iii. Changing ISO iv. Using Manual Mode on Camera v. Taking Notes
e. Critique Section i. What did we learn? ii. How does it change how we take pictures? iii. Be prepared to bring photo log, idea book to next session
2. Week Two: Light:
a. Source: What is our perspective on light? i. Natural Lighting
1. The Sun 2. Reflections off of Snow, Buildings, Water
ii. Unnatural Lighting 1. Wrong Direction 2. Wrong Color 3. Wrong Intensity
b. Types of Light i. Ambient
1. What our eyes really see 2. Combination of all light sources
ii. Daylight 1. Early Morning 2. Morning Magic Hour 3. Midday 4. Afternoon Magic Hour 5. Dusk
iii. Tungsten 1. Incandescent 2. Photo Flood 3. Continuous light
iv. Fluorescent 1. Standard Fluorescent
a. Shades to Green 2. Photo Fluorescent
a. Color Corrected v. Strobes
c. Intensity, Quality, Color, Direction, Contrast i. Intensity depends on three things:
1. Output of the source 2. How the light is modified 3. Distance from the subject
ii. Color 1. Digital cameras see Red, Green and Blue 2. They combine these colors to form all others
d. Hands-On exercises i. Light Direction
1. Move lights keep same distance ii. Light Distance
1. Keep same location change distance iii. Mixed Light Sources
1. Use Continuous light with flash 2. Use Flash with ambient light
3. Use Continuous light with ambient light iv. Light Color
1. Mix Tungsten and continuous light v. Natural and Unnatural lighting
1. Change light location or direction to non-natural place e. Critique of images taken
i. What did you learn ii. How will it affect the way you take pictures
3. Week Three: Lighting Accessories
a. Scrims i. a piece of fabric used as a drop, border, or the like, for
creating the illusion of a solid wall or backdrop under certain lighting conditions or creating a semitransparent curtain when lit from behind
b. Reflectors i. An object used specifically to reflect light from one direction
to another direction. Reflectors can be material, solid objects or existing walls, ceiling, floors, etc.
c. Masks i. Sold objects, sometimes on frames, used to block light from
a specific area d. Gobos
i. Oddly shaped masks used to create specific or random areas of light and shadow as part of the image
e. Grids i. Specific grid work designed to direct light from a strobe or a
soft box to narrow its focus and impact. Grids for Strobes are normally rated in percentages of light trapped: 20%, 30%, 40%, etc
f. Snoots i. Attachment for strobe lights, an inverted cone that focuses
the light beam in a very narrow path, utilized for hair lights or for lighting a specific object while not lighting others near it.
g. Gels i. Sheets of colored material (usually plastic) used to apply a
specific color to an image or background. There are specific gels to change daylight to tungsten type lighting and vice versa. Also neutral density gels to reduce overall exposure.
h. Barn-Doors i. Similar to masks which attach directly to lights and act as
light blockers in specific areas i. Light Meters
i. Incident Light Metering ii. Reflected Light Metering iii. Spot Metering iv. In Camera metering versus Hand Held Meter
j. Hands-on exercises i. Take a model and any combination of light modifiers ii. Create a specific image based on your vision iii. Be prepared to explain both what you used and why you
used it k. Critique
i. What did you learn
ii. How will it change the way you take pictures
4. Week Four: Single Light Setup:
a. Placing the Model: i. Place your subject on a stool about 8 feet from a wall or
background. This accomplishes two things: 1) it causes the wall to be out of focus and 2). Allows for the wall to be lighter, darker or of a different color than that lighting the model
b. Placing the Main Light: i. For your main light, place it so it sits just above and to the
front of the subject and just slightly to her left bouncing into a large reflective umbrella aimed at her face.
c. Using Reflectors and Masks: i. Place a large reflector about 3 feet to the subjects right and
a smaller one at about her waist level pointing up to reflect light under her chin and nose to reduce some shadows. You can even have your subject hold that reflector if you don’t have a stand.
d. Using a Light Meter for Proper Exposure: i. Meter the light reaching the model from a point just under
the chin in the beginning of the shadow area. e. Setting Shutter Speed and Aperture:
i. For this shot, your shutter speed doesn’t come into play much because we are not using any ambient or natural light, so setting it somewhere around 50-125 of a sec. should be good. You will have to adjust your aperture depending on the power of your strobe to properly expose your subject. The distance from the wall also causes the wall to become darker. If you want it lighter you can move your subject a little closer to the wall.
f. Bracketing the Exposure: i. Photograph the model using 1 stop less exposure. This can
be accomplished by increasing the shutter speed or closing down the shutter one stop.
ii. Photograph the model using 1 stop more exposure. This can be accomplished by opening up the shutter one stop or reducing the shutter speed
g. Hands-on Exercises i. Create a portrait using the technique described above,
including bracketed images ii. Change the position of the reflectors. Change the distance
of the main light. How does this impact the image h. Critique
i. What did we learn?
5. Week Five: Multiple Light Setup:
a. Build you own lighting Setup i. You have learned to use the lights and all of the accessories,
now it is time to build a photograph using what you have learned so far
b. Pre-Processing i. What are you going to shoot?
1. People 2. Product 3. A combination
ii. How may lights are you going to use? 1. Single light 2. Multiple Lights
a. How many b. Where will they be placed c. Why are you placing then where you are?
iii. Accessories 1. What accessories will you need
a. Reflectors b. Masks c. Grids d. Snoots e. Gels f. Props g. Backdrop
2. Will you need an assistant? iv. Writing it all down
1. What are the distances for each light and the object being photographed?
2. What are the light meter readings? 3. What lens or Lenses are you using? 4. Why are you using that specific lens? 5. How long will this take to set up? 6. Do you know where everything is?
c. Taking the picture i. The Setup ii. Changes to the setup iii. Did you achieve your goal? iv. If not, what needs to be changed?
d. Critique i. What was your goal ii. Did you achieve your goal (why or why not) iii. What would you do differently next time

6. Week Six: Studio Portrait Lighting
a. Single Individual i. What are you going to shoot?
1. People 2. Product 3. A combination
ii. How may lights are you going to use? 1. Single light 2. Multiple Lights
a. How many b. Where will they be placed c. Why are you placing then where you are?
iii. Accessories 1. What accessories will you need
a. Reflectors b. Masks c. Grids d. Snoots e. Gels f. Props g. Backdrop
2. Will you need an assistant? iv. Writing it all down
1. What are the distances for each light and the object being photographed?
2. What are the light meter readings? 3. What lens or Lenses are you using? 4. Why are you using that specific lens? 5. How long will this take to set up? 6. Do you know where everything is?
b. Taking the picture i. The Setup ii. Changes to the setup iii. Did you achieve your goal? iv. If not, what needs to be changed? v.
c. Multiple People i. What are you going to shoot?
1. People 2. Product 3. A combination
ii. How may lights are you going to use? 1. Single light 2. Multiple Lights
a. How many
b. Where will they be placed c. Why are you placing then where you are?
iii. Accessories 1. What accessories will you need
a. Reflectors b. Masks c. Grids d. Snoots e. Gels f. Props g. Backdrop
2. Will you need an assistant? iv. Writing it all down
1. What are the distances for each light and the object being photographed?
2. What are the light meter readings? 3. What lens or Lenses are you using? 4. Why are you using that specific lens? 5. How long will this take to set up? 6. Do you know where everything is?
d. Taking the picture i. The Setup ii. Changes to the setup iii. Did you achieve your goal? iv. If not, what needs to be changed? v.
7. Week Seven: Copying the Masters: Hollywood Lighting
a. The 1920s b. The 1930s c. The 1940s d. The 1950s
8. Week Eight: Location Lighting-When the Studio Won’t Work
a. Portable Flash Units b. Mixing Sun and Flash c. Light Modifiers