interscopeplus user manual - nc
TRANSCRIPT

InterscopePlus User Manual (Electrical Inspections and Certificates - Release 1.6)
Table of Contents I. Overview ............................................................................................................................................... 2
II. Creating an Electrical Certificate or Inspection..................................................................................... 3
Step 1 – Select the Package .................................................................................................................. 3
Step 2 – Select the Electrical Contractor ............................................................................................... 6
Step 3 – Verify the contractor’s license status ..................................................................................... 8
Step 4 – Complete the data entry ....................................................................................................... 10
Step 5 – Save the record ..................................................................................................................... 12
Step 6 – Submit the Certificate or Inspection ..................................................................................... 13
Step 7 – Print the document ............................................................................................................... 14
III. Maintaining Electrical Contractor Profiles ...................................................................................... 16

InterscopePlus User Manual – Electrical Certificates and Inspections
2 [Rev. 1 – March 30th, 2016]
I. Overview
Interscope was originally created in 1999 for the State Construction Office for internal use in
tracking projects as they moved through the office. In 2012, the decision was made to
incorporate the functionality of the University System’s “CAPSTAT” Capital Project Status
software into Interscope, and then further to create a state-wide Capital Project System that
would be used by the University System, Community College System, and all State Agencies.
InterscopePlus is now that system. Screen representations shown throughout this manual
currently reflect the Interscope system label, but will be subsequently modified to reflect the
new name.
InterscopePlus is designed to track the life cycle of Capital Projects from the time they are
authorized until they are closed out, including funding sources and HUB data. It is not intended
to be an accounting system.
This addendum to the User Manual covers the entry, update and submission of Electrical
Inspections and Certificates.
The intended user base for these features are the electrical inspectors that are employees of the
State Construction Office and the electrical contractors involved in the associated capital
improvement projects.

InterscopePlus User Manual – Electrical Certificates and Inspections
3 [Rev. 1 – March 30th, 2016]
II. Creating an Electrical Certificate or Inspection
Step 1 – Select the Package To initiate the process of creating an electrical certificate, click on the desired option under “New” on
the main menu:
This will display the input form:
The first step in creating a record is to locate the Package for which this certificate or inspection applies.

InterscopePlus User Manual – Electrical Certificates and Inspections
4 [Rev. 1 – March 30th, 2016]
Use the “Find Package” button to display the Package Search page for locating and selecting the
package.
Enter any search criteria that is useful in locating the package. The following example uses the Project ID
# to locate a list of packages for selection:

InterscopePlus User Manual – Electrical Certificates and Inspections
5 [Rev. 1 – March 30th, 2016]
Click on the SCO ID# field to select the target package. The search screen will close showing the selected
package on the input screen.
To change the package, simply click on the “Find Package” button and repeat the search and selection
steps above.

InterscopePlus User Manual – Electrical Certificates and Inspections
6 [Rev. 1 – March 30th, 2016]
Step 2 – Select the Electrical Contractor The next step is to select the Electrical Contractor.
Use the “Find Contractor” button to display the Electrical Contractor Search page for locating and
selecting the contractor.
Enter any search criteria that is useful in locating the contractor in the Interscope database. The
following example uses the contractor Name to locate a list of contractors for selection:

InterscopePlus User Manual – Electrical Certificates and Inspections
7 [Rev. 1 – March 30th, 2016]
Click on the CONTRACTOR field to select the contractor for this record. The search screen will close
showing the selected contractor information on the input screen.

InterscopePlus User Manual – Electrical Certificates and Inspections
8 [Rev. 1 – March 30th, 2016]
Step 3 – Verify the contractor’s license status To check the current status of the selected contractor’s license, click on the “Popup NCBEEC Search”
button to display a browser tab containing the search page at the NC State Board of Examiners of
Electrical Contractors (www.ncbeec.org).
Enter any search criteria that is useful in locating the contractor in the NCBEEC database. The following
example uses the contractor Name to locate a list of contractors:

InterscopePlus User Manual – Electrical Certificates and Inspections
9 [Rev. 1 – March 30th, 2016]
Click on the “Detail” button to display the contractor’s license status.
Verify that the license status is “ACTIVE” or “ACTIVE IN RENEWAL”.
To return to Interscope, click on the browser tab “ElectricalDetail”. The “License Lookup” tab may
remain active for subsequent searches.

InterscopePlus User Manual – Electrical Certificates and Inspections
10 [Rev. 1 – March 30th, 2016]
Step 4 – Complete the data entry Finish entering the following fields on the form:
Date – this field is prepopulated with the current date
Utility Work Order – this field is optional
Disposition – this field is required
Comments – this field is required if Disposition = “Approved w/Notes”
Alert Email – this field is pre-populated with the email that is on file for the contractor. If the
alert should be sent to a different email, enter this email in the Alert Email field.
Special Note – enter any note to be communicated to the monitor assigned to the package.
Then check “Send Special Note to Project Monitor?” to notify the monitor.
Figure 1 – Completed Certificate ready to be created.

InterscopePlus User Manual – Electrical Certificates and Inspections
11 [Rev. 1 – March 30th, 2016]
Figure 2 – Completed Inspection ready to be created
InterscopePlus User Manual – Electrical Certificates and Inspections
12 [Rev. 1 – March 30th, 2016]
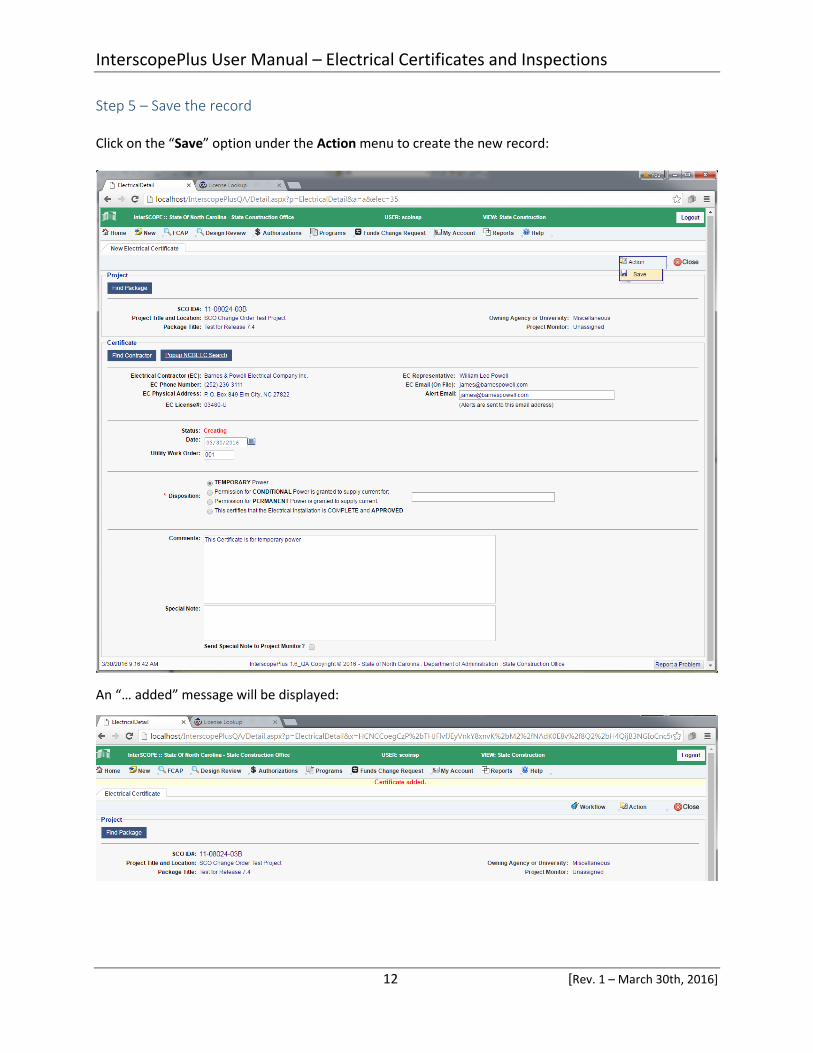
Step 5 – Save the record Click on the “Save” option under the Action menu to create the new record:
An “… added” message will be displayed:

InterscopePlus User Manual – Electrical Certificates and Inspections
13 [Rev. 1 – March 30th, 2016]
Step 6 – Submit the Certificate or Inspection To complete the processing of the certificate or inspection, click on the “Submit” option under the
Workflow menu.
This action will finalize the data entry and notify the contractor, designer and project monitor via email
alerts of the completed document.
A message will be displayed listing the users alerted:

InterscopePlus User Manual – Electrical Certificates and Inspections
14 [Rev. 1 – March 30th, 2016]
Step 7 – Print the document To print a PDF copy of the completed document, click on the “Print” option under the Action menu.
A PDF copy will appear in a new browser tab.
To return to Interscope, click on the “ElectricalDetail” tab.

InterscopePlus User Manual – Electrical Certificates and Inspections
15 [Rev. 1 – March 30th, 2016]

InterscopePlus User Manual – Electrical Certificates and Inspections
16 [Rev. 1 – March 30th, 2016]
III. Maintaining Electrical Contractor Profiles

InterscopePlus User Manual – Electrical Certificates and Inspections
17 [Rev. 1 – March 30th, 2016]

InterscopePlus User Manual – Electrical Certificates and Inspections
18 [Rev. 1 – March 30th, 2016]

InterscopePlus User Manual – Electrical Certificates and Inspections
19 [Rev. 1 – March 30th, 2016]