internet explorer try mobility for firefox avaya aura ... · 1 try mobility for avaya aura...
TRANSCRIPT

1
Try Mobility for Avaya Aura Conferencing
SIGNING IN
PC
Internet Explorer
Firefox
Installing Plugins
iOS
IOS Highlights
Android
Android Highlights
SET-UP GUIDE
COLLABORATION AT A GLANCE
Scheduling a Meeting
Inviting a Guest
Best Practices
Sharing Content
Annotation
Whiteboard
Messaging
Collaboration Icons
NEED HELP?
Support Password Change Enabling External Camera Important Messages

INTERNET EXPLORER
Requirements
Internet Explorer 8.0 – 11.0
See section Installing Plugin if you do not see “Download the Sharing
and Collaboration Plugin” in step 3
MS Windows Vista 7 and 8 (32 and 64 bit)
Adobe Flash version 11.2.0+
Java 6 update 18 (1.6.0_18)+
Allow all popups and enable plugins
Depending on your browser version and settings you may not see all of
the following screens
1. Click “Collaboration URL” link in your welcome letter 2. Click “Always Allow” in the popup message, then click “here”
3. “Download the Sharing and Collaboration Plugin”
4. Click “Run”
Main Menu

3
5. Read and accept the License Agreement and click “Install”, YES to proceed
6. If you receive a message that the application must be closed first, click “Force close”, “OK”, or “OK” and close Internet Explorer
6a. Click “OK” to confirm.
7. Click “Finish” to complete the installation; close browser 8. Launch Internet Explorer and click “Download the Enhanced Audio and Video
Plugin”
Main Menu

9. Click “Run” 10. Accept the License Terms and click “Install”; “Finish”
11.At the Login window select “Member Login”
12.Enter your User Name and Password, check “Remember Me”, and select “Login”
13. Select the “My Conference” button and then “Start My Conference”
Main Menu
5
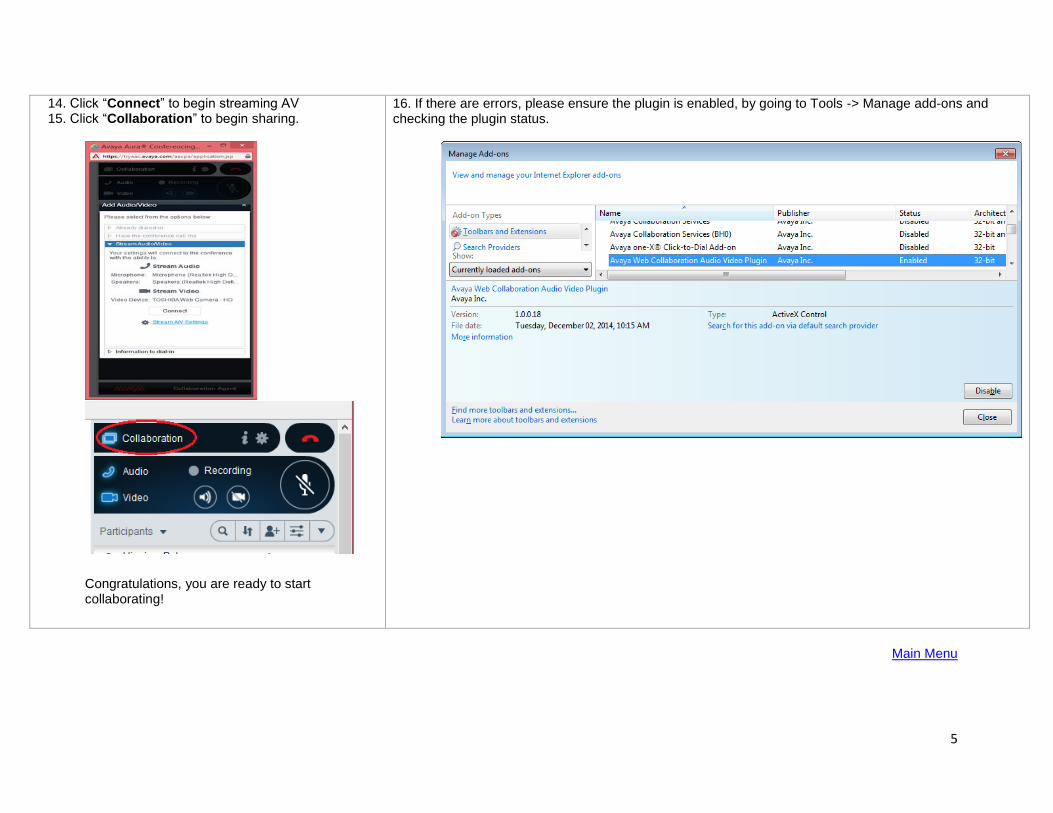
14. Click “Connect” to begin streaming AV 15. Click “Collaboration” to begin sharing.
Congratulations, you are ready to start collaborating!
16. If there are errors, please ensure the plugin is enabled, by going to Tools -> Manage add-ons and checking the plugin status.
Main Menu
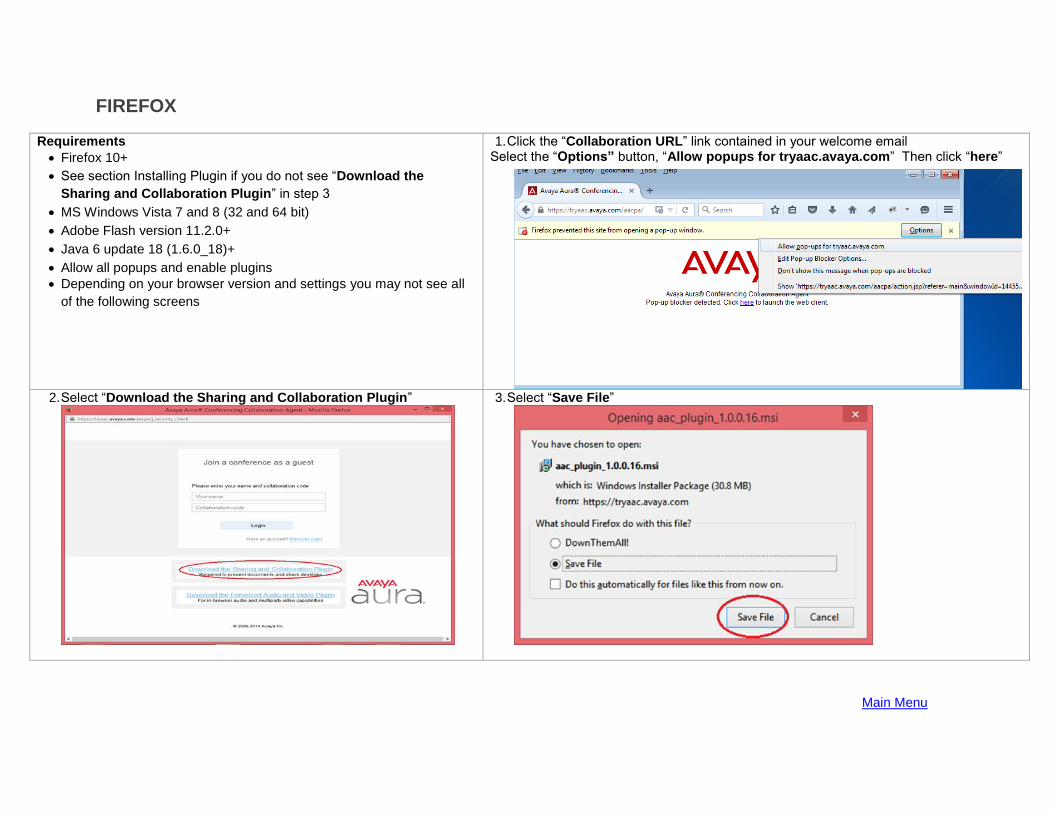
FIREFOX
Requirements
Firefox 10+
See section Installing Plugin if you do not see “Download the
Sharing and Collaboration Plugin” in step 3
MS Windows Vista 7 and 8 (32 and 64 bit)
Adobe Flash version 11.2.0+
Java 6 update 18 (1.6.0_18)+
Allow all popups and enable plugins
Depending on your browser version and settings you may not see all
of the following screens
1. Click the “Collaboration URL” link contained in your welcome email Select the “Options” button, “Allow popups for tryaac.avaya.com” Then click “here”
2. Select “Download the Sharing and Collaboration Plugin”
3. Select “Save File”
Main Menu

7
4. Select “Save”
5. When the download completes go the Downloads folder and Double Click the file
6. Read and accept the License Agreement then click “Install”
7. Click “Yes” to install 8. Click “Finish”; close and re-open browser
Main Menu

9. Close the login window. 10. Return to the Login window by pasting the Collaboration URL, click
“Download the Enhanced Audio and Video Plugin”
11.Click “Save File”
12. Click “Save”
13.After the download is completes Double Click the file
Main Menu
9
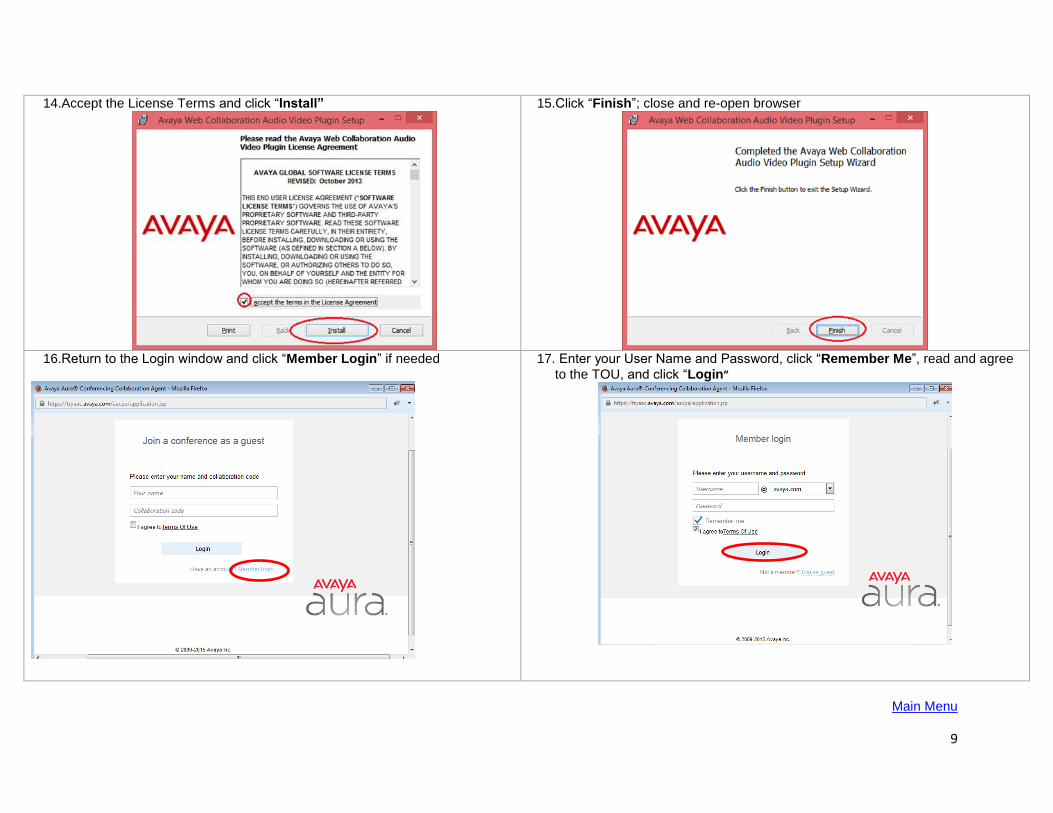
14.Accept the License Terms and click “Install”
15.Click “Finish”; close and re-open browser
16.Return to the Login window and click “Member Login” if needed
17. Enter your User Name and Password, click “Remember Me”, read and agree
to the TOU, and click “Login”
Main Menu

18. If necessary, Click “My Conference”
19. If necessary, Click “Start My Conference”
20. If you receive a message that the plugin is currently disabled, click “Allow…“ 21. Click “Allow and Remember” for each plugin and then click “OK”
22. If there are errors, please ensure the plugins are enabled, by going to Tools -> Add-ons and checking the plugin status. Select “Always Activate”.
Main Menu
11
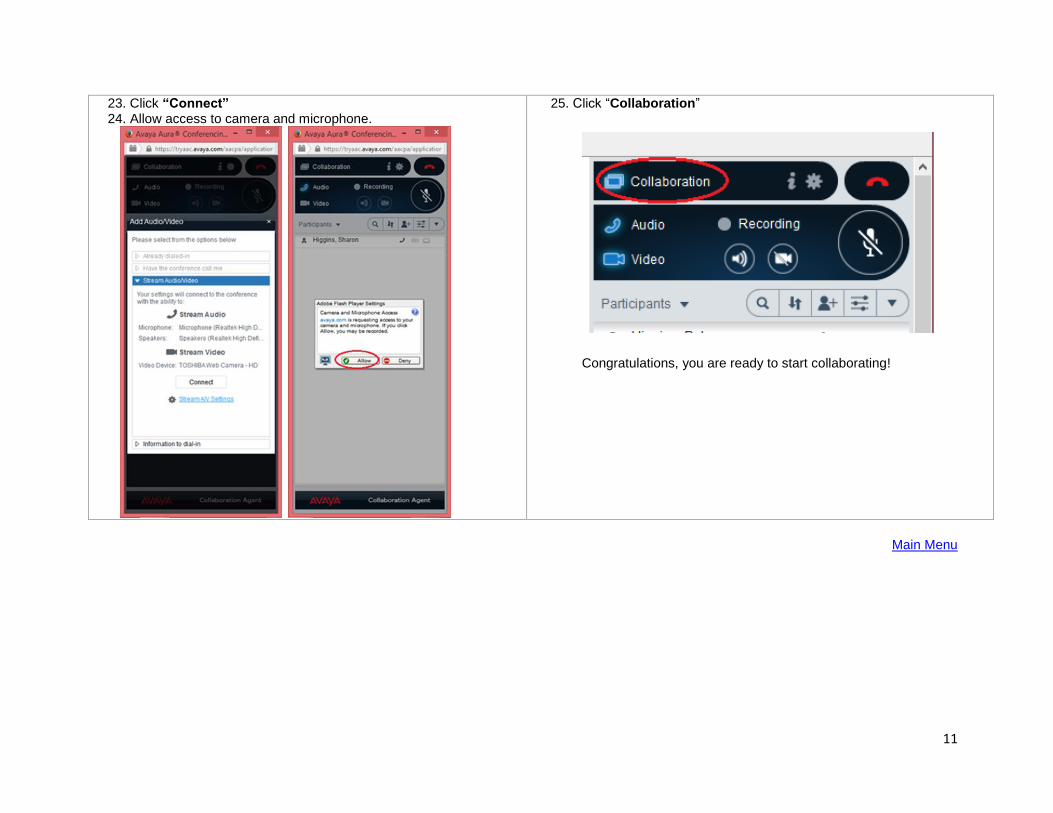
23. Click “Connect” 24. Allow access to camera and microphone.
25. Click “Collaboration”
Congratulations, you are ready to start collaborating!
Main Menu

INSTALLING PLUGINS
Depending on your browser version, plugins may not appear at the login window
Depending on your browser settings, you may need to allow activation of the plugin and access to your microphone and camera The operation system firewall might display a warning when you download the
plugin
Click the appropriate option for the firewall to allow access to the plugin
Choose always allow popups if prompted
1. Enter your User Name and Password, read and accept the terms of use, click “Remember Me”, and click “Login”
2. Click “install the AV plugin”
3. Download and install the plugin; click “Save, Run, Accept the Terms of Use, Install, and Finish”
4. Close the Add Audio and Video window by selecting the “x” in the upper RH corner
Main Menu

13
5. On the Collaboration Agent, click Collaboration
6. From the drop-down list, click Download Collaboration Plugin.
7. Install the plugin when prompted; click “Save, Run, Accept the TOU, Install,
and Finish” If you get a message that your browser must be closed, close the browser and complete the installation
8. Re-open your browser if necessary, and return to the Collaboration Agent using your Collaboration URL
9. Click “Stream A/V Settings”, check your settings and choose Connect.
Main Menu

10. Click “Collaboration”
Congratulations, you are ready to start collaborating!
Main Menu
15
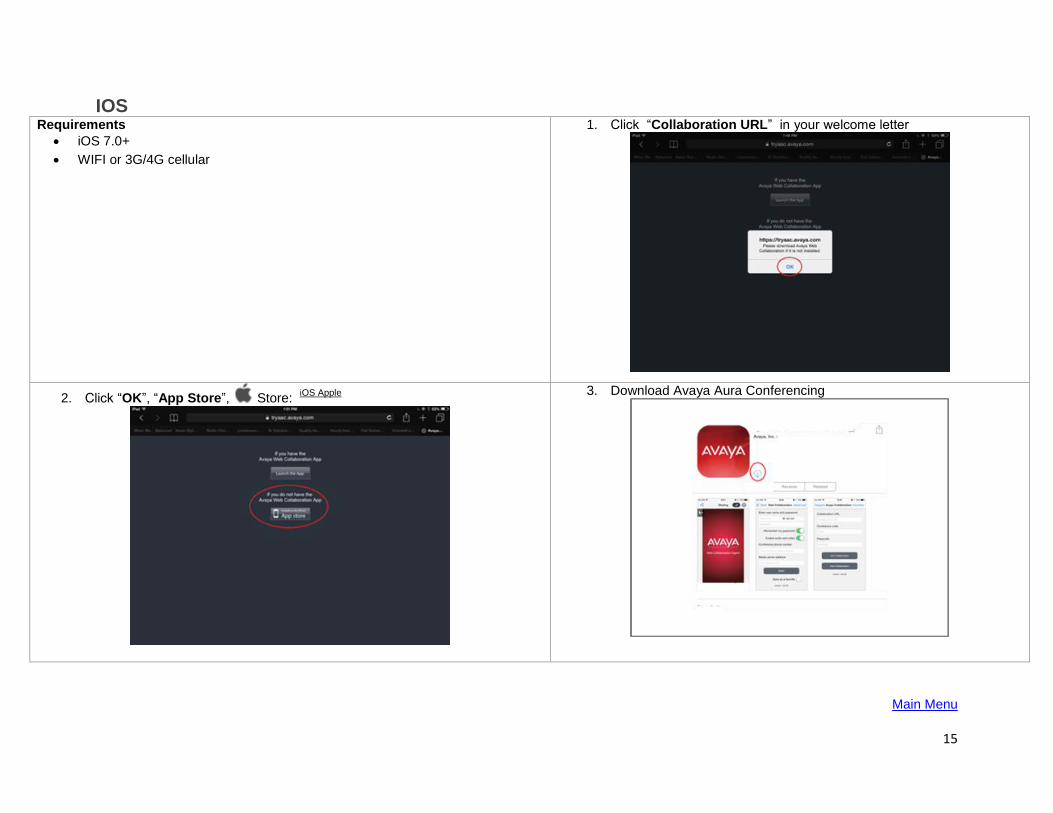
IOS Requirements
iOS 7.0+
WIFI or 3G/4G cellular
1. Click “Collaboration URL” in your welcome letter
2. Click “OK”, “App Store”, Store: iOS Apple
3. Download Avaya Aura Conferencing
Main Menu
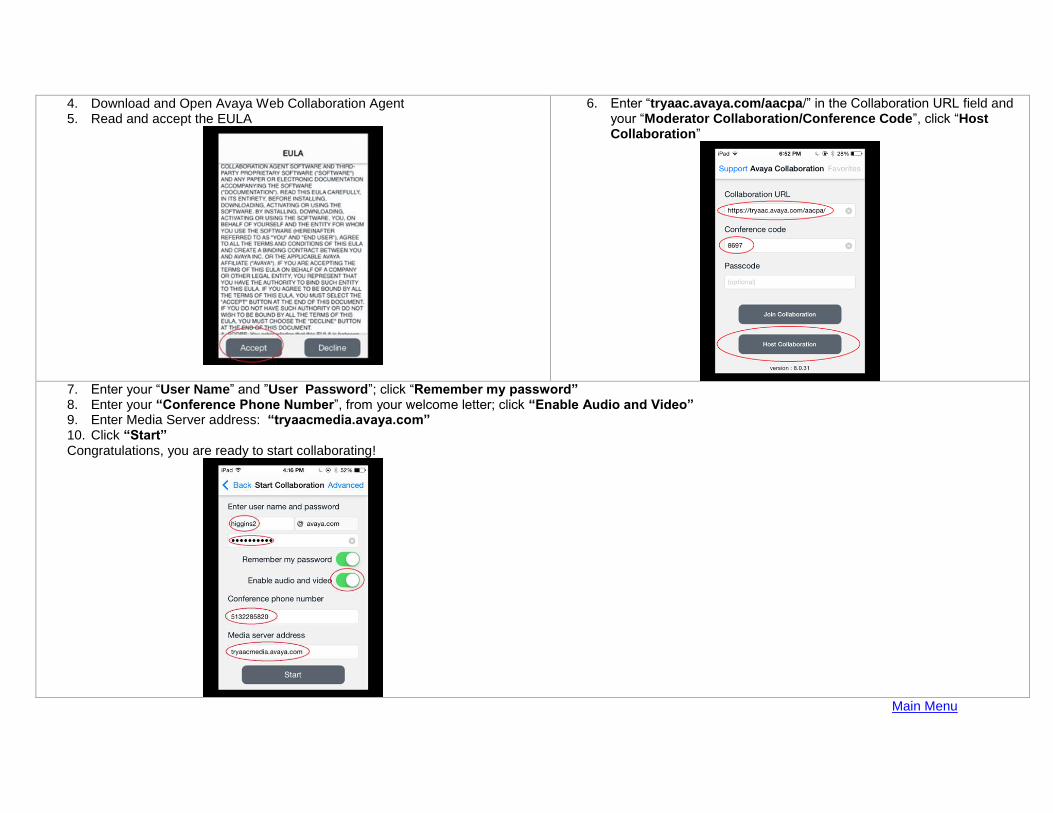
4. Download and Open Avaya Web Collaboration Agent 5. Read and accept the EULA
6. Enter “tryaac.avaya.com/aacpa/” in the Collaboration URL field and your “Moderator Collaboration/Conference Code”, click “Host Collaboration”
7. Enter your “User Name” and ”User Password”; click “Remember my password” 8. Enter your “Conference Phone Number”, from your welcome letter; click “Enable Audio and Video” 9. Enter Media Server address: “tryaacmedia.avaya.com” 10. Click “Start” Congratulations, you are ready to start collaborating!
Main Menu

17
IOS – Highlights Moderator Streaming Audio and Video
1. Click “Phone Icon”, “Stream Audio and Video” or “Stream Audio”
Share Content 1. Click “Library Icon”, “Presentation” , open file 2. Click “Preview” to view file name and “Share”; expand annotation
ribbon
Note: Content can only be uploaded to the library by logging into your Avaya Aura® Conferencing account with Avaya Collaboration Agent using a PC. This must be performed before you can share content on iOS.

Messaging 1.. Click “Message Icon”, click “Message Field” 2. Enter message and click “Send”
Join a Conference - Guest 1. Launch Avaya Aura Conferencing on your IOS device 2. Enter “Collaboration URL” and “Conference Code”, click “Join
Collaboration” 3. Click “Joint as a guest” 4. Enter “Guest Name” 5. Click “Save Favorite”, “Join” Note: Guest cannot stream video
Main Menu
19
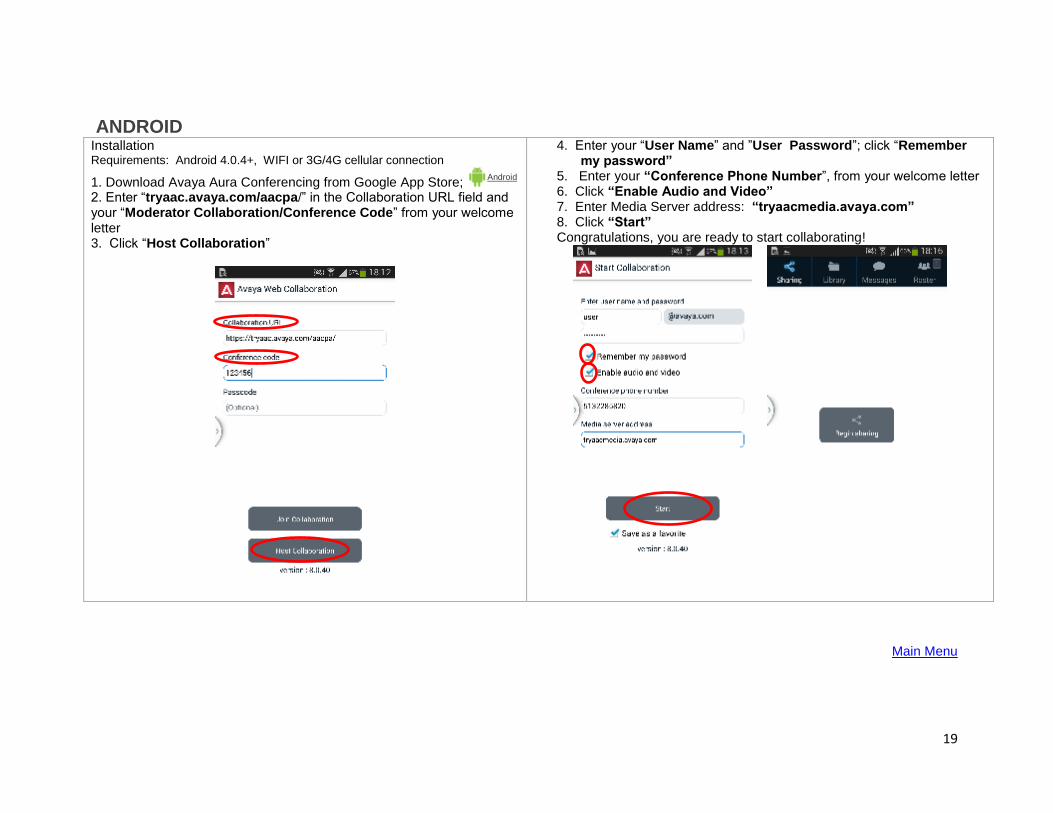
ANDROID Installation Requirements: Android 4.0.4+, WIFI or 3G/4G cellular connection
1. Download Avaya Aura Conferencing from Google App Store; Android
2. Enter “tryaac.avaya.com/aacpa/” in the Collaboration URL field and your “Moderator Collaboration/Conference Code” from your welcome letter 3. Click “Host Collaboration”
4. Enter your “User Name” and ”User Password”; click “Remember my password”
5. Enter your “Conference Phone Number”, from your welcome letter 6. Click “Enable Audio and Video” 7. Enter Media Server address: “tryaacmedia.avaya.com” 8. Click “Start” Congratulations, you are ready to start collaborating!
Main Menu

ANDROID – Highlights
Moderator Streaming Audio and Video Using integrated audio 1. Click the menu icon of the device 2. Click “Audio” and “OK” 3. In the Web Collab screen, click “OK” to enable microphone 4. Mute: Click the “menu” icon and “microphone” 5. Enable speakerphone: Click the “menu” icon and “speakerphone” 6. End Call: Click “menu” icon and drop call
Sharing Content and Messaging Upload content to the library with a PC or MAC.
1. Click “Library Icon”, content type and select file 2. Click “Menu” and “Share”; expand annotation ribbon to add text or
draw…
Messaging 1. Click “Message Icon”, click “Message Field” 2. Enter message and click “Send”
Main Menu

21
Moderator Conference Controls (via clicking on the menu of the device)
Join a Conference - Guest Important note: guests cannot stream audio or video on android
1. Launch Avaya Aura Conferencing 2. Enter “Collaboration URL” and “Conference Code”, click “Join Collaboration” 3. Click “Join as a guest” 4. Enter “Guest name” 5. Click “Save” 6. Click “Join”
Main Menu
SCHEDULING A MEETING GUEST LOGIN
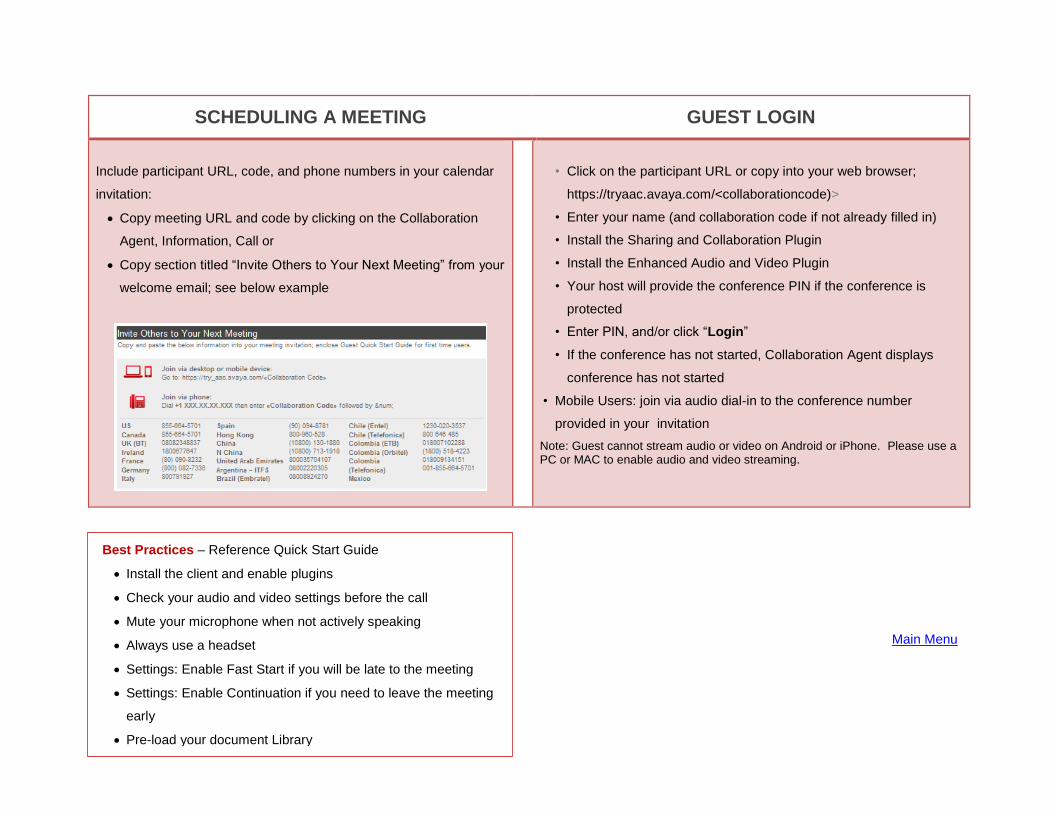
Include participant URL, code, and phone numbers in your calendar
invitation:
Copy meeting URL and code by clicking on the Collaboration
Agent, Information, Call or
Copy section titled “Invite Others to Your Next Meeting” from your
welcome email; see below example
• Click on the participant URL or copy into your web browser;
https://tryaac.avaya.com/<collaborationcode)>
• Enter your name (and collaboration code if not already filled in)
• Install the Sharing and Collaboration Plugin
• Install the Enhanced Audio and Video Plugin
• Your host will provide the conference PIN if the conference is
protected
• Enter PIN, and/or click “Login”
• If the conference has not started, Collaboration Agent displays
conference has not started
• Mobile Users: join via audio dial-in to the conference number
provided in your invitation
Note: Guest cannot stream audio or video on Android or iPhone. Please use a PC or MAC to enable audio and video streaming.
Main Menu
Best Practices – Reference Quick Start Guide
Install the client and enable plugins
Check your audio and video settings before the call
Mute your microphone when not actively speaking
Always use a headset
Settings: Enable Fast Start if you will be late to the meeting
Settings: Enable Continuation if you need to leave the meeting
early
Pre-load your document Library

23
UPLOADING AND SHARING FILES
Upload file to your document Library; 50 files max
Click “Library” from the conference log-in screen or
Click “Collaboration”, “My Library”, upload document
Document must be closed; not password enabled
Less than 300 pages, and less than 30MB in size
Login-in Screen
Collaboration
Exit Library
Click “Sharing” on the Collaboration screen
Share your screen
Select document from Library
Main Menu
Collaboration Screen
Document Library
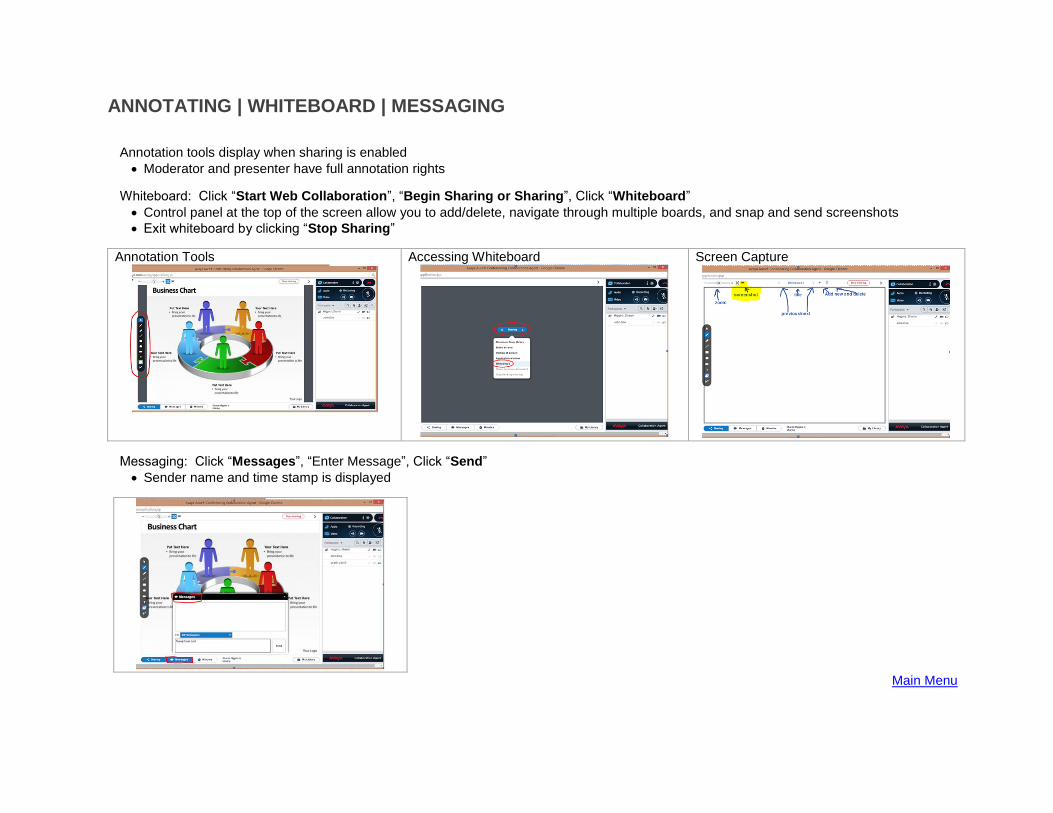
ANNOTATING | WHITEBOARD | MESSAGING
Annotation tools display when sharing is enabled
Moderator and presenter have full annotation rights
Whiteboard: Click “Start Web Collaboration”, “Begin Sharing or Sharing”, Click “Whiteboard”
Control panel at the top of the screen allow you to add/delete, navigate through multiple boards, and snap and send screenshots
Exit whiteboard by clicking “Stop Sharing”
Annotation Tools
Accessing Whiteboard
Screen Capture
Messaging: Click “Messages”, “Enter Message”, Click “Send”
Sender name and time stamp is displayed
Main Menu

25
COLLABORATION ICONS
Number Name
1 Add Participants
2 Start Web Collaboration 3 Conference Controls 4 Mode bar
5 Default Settings
6 Exit
7 Information
8 Recent Talkers
9 Mute myself
10 Moderator Features
11 Participants List
12 Show Dropped Participants 13 Sort Participants
14 Sort Participants By Join Time
15 Participants Search
Main Menu

PASSWORD CHANGE
Click settings icon at the login or Web Collaboration screen
Enable video and click “Save”
Click “Change Password”
Enter and confirm new password, click “Save”, and “Done” to return to the previous screen
Login Screen
Web Collaboration Screen
Password Change Screen
Main Menu

27
ENABLING EXTERNAL CAMERA
Click “Video” icon and “Stream A/V Setting”
Video Devices: Click “Select Your Video Camera” and “Update”
Main Menu

SUPPORT
Support is available via email at: [email protected]
PC 1. Click “Information” icon on the Web
Collaboration screen 2. Click “Documentation and Help” for
the complete User Guide
iPhone 1. Click “Support”, “User Guide”
Android 1. Click on “More Options”, click
“Support Information”
Note features not supported in this Pilot phase are: Outlook plugin, dial out, ad hoc, and event conferencing.
Main Menu

29
IMPORTANT
MESSAGES
Features not supported in this Pilot are:
Outlook Plugin
Dial Out
Ad Hoc
Event Conferencing
Whitelist Try Mobility for Avaya Aura Conferencing
See support section for list of trusted IPs
