intellilcd user's manual - comfile techcomfiletech.com/content/display/e_itl_manual.pdf · *...
TRANSCRIPT

1
IntelliLCD
User’s Manual, Version 2.6.8a (compatible with firmware v2.6.8)
March 13, 2014
IntelliLCD is a graphic display engine. It displays the result of a user’s command, sent through an RS-
232C interface, on an LCD screen. It is an effective tool for putting together a simple graphic user
interface.
IntelliLCD can display 260,000 colors. It also supports TrueType fonts and is capable of touchpad input.
It further sports additional features as follows:
● Windows-based TrueType font can be directly used on IntelliLCD.
● BMP files can be displayed on its LCD screen.
● For storing large-size BMP files and font file and etc, it supports SD cards.
● By connecting to a PC through a USB cable, IntelliLCD’s Flash memory or SD card storage area can
be managed (ActiveSync).
● It has a sizable 7-inch/10.2-inch wide (800 x 480) TFT LCD screen.
IntelliLCD models
Models iTL710/740A iTL840K/S Cuwin’s iTL mode
Screen size 7 inches 10.2 inches 7 / 10.2 inches
Resolution 800 x 480 800 x 480 800 x 480
Supported no. of colors 260,000 260,000 260,000
RTC battery, sound Not supported Not supported Supported
* When you purchase the Starter Kit, the accessories (i.e., the manual, cables and a 1 GB SD card) are
included, but for a mass purchase, only the main modules are delivered without the accessories.
* If you want sound and RTC feature, purchase CUWIN series, which supports IntelliLCD mode.

2
== How to use IntelliLCD in the CUWIN that does not support IntelliLCD mode ==
You can run IntelliLCD in Cuwin 5000/6000/CWV even though they don't support iTL mode.
1. Setting Baud-rate (Only in firmware 2.6.5 or later)
Rename the *.dat file to IntelliLCD.exe and copy it to the “Flash Disk\Autorun” folder. The baud rate
cannot be modified by the Cuwin's dip switches, but it can be modified by creating a UserConfig.ini file
the root “Flash Disk” folder. An example is shown below:
[Comm]
Baudrate=3
3 correspond to baud rate 38400.
Other options are 1 (9600), 2 (19200), and 4 (115200)
2. Adding fonts manually (Only in firmware 2.6.8 or later)
You can add additional fonts manually to Cuwin 5000/6000/CWV series in which fonts are not installed
automatically from Storage Card/Fonts folder.
Procedure
(1) Make a text file named 'FontList.txt' in a text editor as shown below:
Example)
Storage Card\LBRITE.TTF
Storage Card\fonts\times.ttf
Flash Disk\gulim.ttc
(2) Copy it to the root of Flash Disk, and copy those font files (TTC or TTF format) to
corresponding paths.
Fonts can be obtained from the TTC and TTF files in your PC's c:\windows\fonts folder.
* COMFILE Technology does not assume responsibilities for illegal use of copyrighted fonts.

3
Table of Content
IntelliLCD models ................................................................................................................................................ 1
Table of Content .................................................................................................................................................. 3
Chapter 1. IntelliLCD’s Structure ....................................................................................................................... 5
1-1. The Names of the Parts ...................................................................................................................... 5
Chapter 2. IntelliLCD Communications ............................................................................................................ 10
2-1. Setting the Options ............................................................................................................................ 10
2-1-1. Communications Settings ....................................................................................................... 10
2-1-2. How to connect the ports ....................................................................................................... 11
Chapter 3. The Syntax of IntelliLCD Commands ............................................................................................. 12
3-1. The Basic Syntax ............................................................................................................................... 12
3-2. List of Commands .............................................................................................................................. 13
3-2-1. Graphic commands .................................................................................................................. 13
3-2-2. Text commands ....................................................................................................................... 19
3-2-3. Control-related commands .................................................................................................... 22
3-2-4. File-access commands ........................................................................................................... 31
3-2-5. Variable-access commands ................................................................................................... 34
3-2-6. Image-access commands ....................................................................................................... 37
3-2-7. Environment setting commands ............................................................................................. 40
3-2-8. Batch execution commands .................................................................................................... 43
3-2-9. Arbitrary data sending commands ......................................................................................... 46
3-2-10. Commands related to command buffer ................................................................................ 47
3-2-11. Time-related commands ...................................................................................................... 49
3-2-12. Screen-related commands ................................................................................................... 51
* How to Write Screen Script .................................................................................................................. 52
3-2-13. Other commands ................................................................................................................... 54
3-3. Events ................................................................................................................................................. 56
3-3-1. ASCII Mode and Binary Mode ................................................................................................ 56
3-3-2. Events related to Control Input .............................................................................................. 58
3-3-3. Events for Returning User’s Input ......................................................................................... 59
3-3-4. RTC events .............................................................................................................................. 60
3-3-5. Screen Events ......................................................................................................................... 61
3-3-6. Other Events ........................................................................................................................... 62
3-3-7. Flexible-Length Event (advanced) ........................................................................................ 64
Chapter 4. Additional Features ......................................................................................................................... 65
4-1. USB ports for Keyboard and Mouse ................................................................................................. 65
4-2. SD Memory Card ................................................................................................................................ 65

4
4-3. Firmware Upgrade ............................................................................................................................. 66
4-4. Adding Extra Fonts by the User ....................................................................................................... 67
4-5. How to use ActiveSync...................................................................................................................... 68
4-6. Execution of ActiveSync ................................................................................................................... 70
4-7. Accessing the IntelliLCD’s Storage Device ...................................................................................... 72
4-8. Customizing Initial Demo ................................................................................................................... 74
Chapter 5. Using IntelliLCD with CUBLOC ...................................................................................................... 75
5-1. Connecting the CUBLOC Studyboard and IntelliLCD....................................................................... 75
5-2. Sending a command from CUBLOC to IntelliLCD ............................................................................ 76
5-3. How to Receive an Event on CUBLOC ............................................................................................. 80
Chapter 6. IntelliLCD Simulator ........................................................................................................................ 81
Chapter 7. IntelliLCD TestBox ......................................................................................................................... 82
Chapter 8. IntelliLCD Unicode Generator ........................................................................................................ 83
8-1. Installing Font ..................................................................................................................................... 83
8-2. Installing IME ..................................................................................................................................... 84
Chapter 9. System Variable .............................................................................................................................. 88
9-1. Basic System Variables ..................................................................................................................... 88
9-2. Event-related System Variables ....................................................................................................... 88

5
Chapter 1. IntelliLCD’s Structure
1-1. The Names of the Parts
[iTL710]

6
[iTL740A/iTL840]
* Make sure the polarity is correct when you connect the power to the system. Otherwise, the system
may incur damage.
* Autio-Out connector is supported on CUWIN series.
1-2. Hardware Specification
- 32-bit RISC CPU (ARM920T Core) running at 266MHz
- RAM: 64MB, NAND Flash memory: 64 MB, NOR Flash memory: 1 MB
- TFT Color LCD (260,000 colors)
- iTL710/740A: 7 Inch Wide (800 x 480)
iTL840K/S: 10.2 Inch Wide (800 x 480)
- LED Backlight
- 2 Serial ports (RS-232C and 5V-TTL)
- Touch Pad
- USB (Host, Device), supports USB memory stick
- Storage : Supports up to 2 GB SD memory card
- Input power: DC 9~24V (500mA)
- Temperature range: 0 to 70 C (32 to 158 F)

7
1-3. External Dimensions
[iTL710]

8
[iTL740A]

9
[iTL840]

10
Chapter 2. IntelliLCD Communications
2-1. Setting the Options
2-1-1. Communications Settings
- Port: 8-bit data bits, no parity, 1 stop bit, no flow control
- Supported Baud rates: 115,200, 38,400, 19,200, 9,600 bps (bits/sec)
- How to change the Baud rate:
The Baud rate can be changed by altering the dip switch setting as shown below. Note that the new
setting becomes effective only AFTER the power is turned off and then on again.
The 115200 baud rate cannot guarantee stability when mass data come in continuously.
[iTL710]

11
[iTL740A/840]
The DIP switch of iTL740A/840 or CUWIN series is located at right side and the number is 5 and 6.
2-1-2. How to connect the ports
- IntelliLCD has communication port: RS-232C port.
As shown below, before connecting the system with another device, make sure they have an electrically
compatible specification.
- Using the cable that comes with IntelliLCD for connecting is recommended.
- The pin configuration of each connector of the system board.
[RS232C Connector]
DIP switch Baud Rate

12
Chapter 3. The Syntax of IntelliLCD Commands
3-1. The Basic Syntax
Each command should begin with one command word where optional parameters can follow with commas
delimiting the parameters. The number of parameters can be variable. The command word and the
parameter(s) are delimited by a blank. The command statement is NOT case-sensitive.
Line 100,200,10,30 ;
Command Space Parameter Semicolon (End)
The maximum length of each command statement (including the parameter list) is 1024 characters (i.e.,
1024 bytes). If the parameter list goes beyond 1024 bytes, the excess portion will be ignored.
Each command should end with a semicolon (;), and after the semicolon another command can be
appended. If a semicolon is omitted, an unpredictable, serious error may occur. Note that you can use a
slash (/) instead of the semicolon as an end-marker of a command.
Example: Box 50,50,100,100;Line 20,20,40,40;

13
3-2. List of Commands
3-2-1. Graphic commands
PSet
Usage: PSet x1, y1
This command draws a point at the coordinate (x1, y1).
Example: PSet 42,56;
BoxFill
Usage: BoxFill [x1, y1, x2, y2] [,border_colorstyle] [,border_dotsize] [,border_depth]
This command draws a filled rectangular box defined by the upper left corner (x1, y1) and the lower right
corner (x2, y2). If the optional parameter border_colorstyle is specified, a border is drawn in the
specified color. Besides a normal color specification (e.g., &H0000FF for red), one of the two special
parameter values can be specified for a special 3-D effect: $push (for a pushed in look) and $pop (for a
popped out look). When the optional border_dotsize is specified, the thickness of the border can be
controlled; when not provided, the default thickness is 1 pixel. Also, the optional border_depth value,
ranging from 1 (minimally protruding) to 100 (maximally protruding) can be specified to set the degree of
3-D effect; the default value is 50. When parameters x1, y1, x2, y2 are omitted, the entire screen area is
filled; i.e., it has the identical effect of specifying x1, y1, x2, y2 values as 0, 0, 799, 479, respectively, in
the case of a 7-inch screen model. (Similarly, in a 5.7-inch screen model, the default values will be 0, 0,
639, 479, respectively.)
Example: BoxFill 30,30,150,150;
BoxFill 30,30,150,150,&H00FF40,3;
BoxFill 30,30,150,150,$pop,5,60;

14
Box
Usage: Box x1, y1, x2, y2
This command draws a rectangular box defined by the upper left corner (x1, y1) and the lower right
corner (x2, y2).
Example: Box 30,30,150,150;
Line
Usage: Line x1, y1,x2, y2
This command draws line between two points: (x1, y1) and (x2, y2).
Example: Line 30,30,200,200;
MoveTo
Usage: MoveTo x, y
This command moves or designates a start point of a line. And a subsequent LineTo command will finish
drawing the line.
Example: MoveTo 300,300;

15
LineTo
Usage: LineTo x, y
This command draws a line starting from the previously set (e.g., by a MoveTo command) start point to
(x, y).
Example: LineTo 300,300;
DotSize
Usage: DotSize value
This command pre-designates the diamter of a round dot to be drawn later by a graphic command. The
value parameter, which designates the diamer of the round dot, ranges from 1 to 255, except for Arc and
Bezier commands, for which the maximum value is limited to 1.
Example: DotSize 4;
Color
Usage: Color color
This command sets a color to be used by a subsequent command. No immediate display change or effect
is caused by this command. The color parameter MUST be expressed in a 6-digit hexadecimal number
preceded by &H. (24 bits)
Bit23 - bit16 Bit15 - bit8 Bit7 - bit0
BLUE color Green color Red color
Example:
Color &H0000FF; red
Color &H00FF00; green
Color &HFF0000; blue
Color &HFF00FF; purple
Each two digits (i.e., 8 bits) from the lower places are assigned R, G, B, respectively. Higher the value,
brighter the displayed color is. E.g., FFFFFF displays white and 000000 displays black.

16
RoundBox
Usage: RoundBox x1, y1, x2, y2, corner_width [, corner_height]
This command draws a rectangular box defined by the upper left corner (x1, y1) and the lower right
corner (x2, y2), where the four corners of the rectangle are rounded. The width and height of the
rounded corners can be specified respectively by corner_width and corner_height. When the corner
height is omitted, it is assumed to have the same value as the corner width.
Example: RoundBox 30,30,150,150,4;
RoundBox 30,30,150,150,4,7;
RoundBoxFill
Usage: RoundBoxFill x1, y1, x2, y2, corner_width [, corner_height] [,border_colorstyle] [,border_depth]
This command draws a filled rectangular box defined by the upper left corner (x1, y1) and the lower right
corner (x2, y2), where the four corners of the rectangle are rounded. The width and height of the
rounded corners can be specified respectively by corner_width and corner_height. When the corner
height is omitted, it is assumed to have the same value as the corner width.
If you specify the border_colorstyle value, a border with 1-pixel width is drawn in the specified color:
e.g., &HFF0000 for blue. Besides a normal color specification (e.g., &H0000FF for red), one of the two
special parameter values can be specified for a special 3-D effect of 1-pixel width: $push (for a pushed
in look) and $pop (for a popped out look). The optional border_depth value, ranging from 1 to 100 can be
specified to set the degree of 3-D effect; the default value is 50.
Example: RoundBoxFill 30,30,150,150,4;
RoundBoxFill 30,30,150,150,4,5,&HDFFF00;
RoundBoxFill 30,30,150,150,4,5,$pop,60;

17
Circle
Usage: Circle x1, y1, x2, y2
This command draws a circle that inscribes a square, defined by the upper left corner (x1, y1) and the
lower right corner (x2, y2).
Example: Circle 30,30,150,150;
CircleFill
Usage: CircleFill x1, y1, x2, y2 [,border_color] [,border_dotsize]
This command draws a filled circle that inscribes a square, defined by the upper left corner (x1, y1) and
the lower right corner (x2, y2). When the border_color value is specified, a border is drawn in the given
color. The border will have a thinkness of border_dotsize, which defaults to 1 pixel when absent.
Example: CircleFill 30,30,150,150;
CircleFill 30,30,150,150,&HA0B030,5;

18
Arc
Usage: Arc x1, y1, x2, y2, start_angle, end_angle
This command draws an arc beginning at (x1, y1) and ending at (x2, y2). The arc is confined to a
rectangle, defined by the upper left corner (x1, y1) and the lower right corner (x2, y2). The beginning
angle is start_angle and ending angle is end_angle, where both angles range from 0 to 360. The dot size
has to be preset to 1 by a DotSize command.
Example: Arc 30,30,150,150,60,320;
Bezier
Usage: Bezier x1, y1, x2, y2, x3, y3, x4, y4
This command draws a Bezier line with respect to the given 4 points (x1, y1), (x2, y2), (x3, y3) and (x4,
y4). The dot size has to be preset to 1 by a DotSize command.
Example: Bezier 30,30,50,60,120,80,100,130;
Clear
Usage: Clear [back_color]
This command resets the display to the initial default state while deleting all control settings. When the
optional back_color parameter is provided, the screen backround is set to that color. The initial (e.g.,
default) background color is white.
Example: Clear;
Clear &HA00000;

19
3-2-2. Text commands
Usage: Print string [,x , y]
This command outputs text string. The string has to be enclosed within single quotation marks (‘ ’). The
maximum length of the text is 1024 characters (bytes) including the two quote marks. When the optional
x and y values are specified, it becomes a one-time start point (i.e., the upper left corner) of the text to
be outputted. When these values are absent, the text’s start point becomes the point previously set by a
TextPos command.
Line breaks are supported. You can use ASCII codes 13 10, or the text “<CRLF>” for line breaks.
Example: Print ‘Hello! Comfile Technology’;
Print ‘Hello! Comfile Technology’,50,50;
SetVar #value,’Hello’; Print #value,50,50;
Print 'Hello!<CRLF>Comfile Technology';
* Multi-language support
The IntelliLCD supports printing all the languages over the world only if user installs the appropriate
font, using UNICODE. For further information, please refer to <Chapter 7. IntelliLCD Unicode Generator>.
Example: Print 'U::66 5B 1F 75';
Print 'U::665B1F75';
Print 'U::66,5B,1F,75';
Print 'U::66-5B-1F-75';
PrintChr
Usage: PrintChr asc_value [,x , y]
This command outputs one character. The asc_alue is an ASCII value ranging from 32 to 255. When the
optional x and y values are specified, it becomes a one-time start point (i.e., the upper left corner) of the
text to be outputted. When these values are absent, the text’s start point becomes the point previously
set by a TextPos command.
Example: PrintChr 96;
PrintChr 65,200,100;

20
TextPos
Usage: TextPos x1, y1 [,x2 , y2][,xalign] [,yalign]
This command sets the start (i.e., upper left corner) position of a text to be displayed subsequently. When
only x1 and y1 values are specified, those specify the upper left corner of the text to be outputted; when
the optional x2 and y2 values are also specified, the text to be displayed will be output within the
rectangle defined by the two points.
The optional xalign value can be one of $left, $center and $right. The initial value is $center, and when
omitted, it defaults to the most recently setting.
The optional yalign value can be one of $top, $center and $bottom. The initial value is $center, and when
omitted, it defaults to the most recently setting.
This command takes effect only when used BEFORE using a Print or a PrintChr command; an already
outputted text’s position cannot be moved by a TextPos command.
Example: TextPos 30,30;
TextPos 30,30,200,70,$center,$top;
TextFont
Usage: TextFont [ font_size, font_face, font_bold, font_italic, font_underlined ]
This command sets the font of the text to be displayed. The optional parameters are in the order of the
font size, font face, and then whether to make bold, to italicize and to underline. The font_face value has
to be enclosed in singe quotes and the rest of the parameter takes either of 1(true) or 0(false) values. If
you want some parameter value unchanged, you can omit specifying that parameter (or parameters); yet,
you still need to use comma(s) to express the absence of the preceding parameter place. (See the
examples below for better understanding.) There are 25 built-in font faces including Tahoma, Courier
New, Times New Roman; and more fonts can be made available through the use of an SD card.
Note that this command takes effect only if it is used BEFORE the Print or PrintChr command is used. An
already printed text’s font(s) cannot be altered.
Example: TextFont 12,‘Courier New’;
TextFont ,,,,1;
TextFont ,’Tahoma’,,1;
The 25 built-in fonts (without SD card):
Arial, Arial Black, AvantGarde Bk BT, BankGothic Md BT, Agency FB, Book Antiqua,
Courier New, BoomBox, Copperplate Gothic Light, Georgia, Franklin Gothic Demi,
Freestyle Script, Gil Sans MT, Gloucester MT Extra Condensed
Impact, Haettenschweiler, Humanst521 BT, Matchworks, Kabel Bk BT,
Koshgarian-Ligh, Maiandra GD, Rockwell, Times New Roman, SerpentineDBol, Tahoma

21
TextColor
Usage: TextColor [ font_color, back_color ]
This command designates the font color and background color of the text to be displayed. Each color
parameter MUST be expressed in a 6-digit hexadecimal number preceded by &H. When the background
color is transparent, the value of $transparent should be used.
Note that this command takes effect only if it is used BEFORE a Print or PrintChr command is used. The
color(s) of an already printed text cannot be altered.
Example: TextColor &HFF0000;
TextColor ,$transparent;
TextColor &H000000,&HA0A0A0;

22
3-2-3. Control-related commands
(What is a control? Control is an object with independent functions that is generated and displayed on the
screen. For instance, buttosns and checkbox are controls. A control object may be called “control” for
short from here on.)
DelCtrl
Usage: DelCtrl id
This command completely and immediately deletes the specified control object, and its ID number id is
also deleted to become reusable. If a non-existing control object is deleted by mistake, no error will be
generated.
Example: DelCtrl 5;Button 5,30,30,200,200;
DelCtrlAll
Usage: DelCtrlAll
This command deletes all control objects and unregisters them. Even if there is no control and you try to
delete, no error occurs.
Example: DelCtrlAll;
Button
Usage: Button id, x1, y1, x2, y2 [,caption] [,chattering_delay]
This command generates a button object of a rectangular shape, defined by the upper left corner (x1, y1)
and the lower right corner (x2, y2). The button is assigned an ID numbers id, which can range from 1 to
255 and not overlap with any previously assigned ID number of other control objects. The initial content
to be displayed on the button can be specified by caption, which has to be enclosed with single quotes.
To prevent chattering (unwanted continuous touch), specify the chattering_delay value in millisecond
(default=0). Also, this does not apply when the ButtonAutoRepeat feature is activated. (For related events,
see $on_click.)
Example: Button 1,40,40,120,60,‘Start’;
Button 1,40,40,120,60,‘Start’,800;
A caption for more than one line is possible, where different lines are delimited by the ‘|’ character.
Example: Button 1,40,40,120,100,‘Start|now’;

23
Toggle
Usage: Toggle id, x1, y1, x2, y2 [,caption][,chattering_delay]
This command generates a toggle button object of a rectangular shape, defined by the upper left corner
(x1, y1) and the lower right corner (x2, y2). A toggle button is a button where its pushed state is
maintained; i.e., if it is clicked once, the pushed in state is maintained, and if it is clicked again, the
popped up state is maintained.
To prevent chattering (unwanted continuous touch), specify the chattering_delay value in millisecond
(default=0).
Its appearance is like a button but its functions and events are similar with checkbox. (For related events,
see $on_click.)
Example: Toggle 1,40,40,120,60,‘Start’;
ButtonStyleNormal
Usage: ButtonStyleNormal
This command sets the external style of the Button and Toggle control objects to the “basic state.” The
basic state means the control object has a simple 3-D look, and its pushed state and the un-pushed state
have different 3-D looks. When no additional settings were carried out, the basic state is the initial
powered-on state. Note that this command takes effect only if it was issued before a button or a toggle
control was created. The style of an already created button or a toggle cannot be changed.
Example: ButtonStyleNormal;

24
ButtonStyleSolid
Usage: ButtonStyleSolid [push_font_color] [,push_back_color][,border_color]
This command sets the external color/style of button and toggle controls to be of a single solid color.
Without any 3-D feel, the buttons and toggles are expressed in the same single color whether they are
pushed in or popped out. The font color and the background color in the pushed in state can be
designated by the optional push_font_color and push_back_color; and when these values are not specified,
the inverted color of the color specified by the CtrlColor command is used as the push_font_color and
push_back_color values.
The color for the popped out state of the buttons and toggles need not be specified separately. That color
is set by the CtrlColor command. If the optional border_color value is specified, the border is drawn in
that color; when omitted, no border is drawn. Note that this command takes effect only if it was issued
before a button or a toggle control was created. The style of an already created button or a toggle cannot
be changed.
Example: ButtonStyleSolid &H000000,&H00FFFF;
ButtonStyleSolid ,&H00FFFF,&H0000A0;
ButtonStyleImage
Usage: ButtonStyleImage pop_file_name [,push_file_name] [,border_color]
This command sets the external style of button and toggle controls, where the popped-out state image
and pushed-in state image are respectively defined in the pop_file_name and,push_file_name files. These
files are stored on the SD card.
When the optional push_file_name is omitted, the pop_file_name’s image is borrowed instead. If the
optional border_color value is specified, the border is drawn in that color; when omitted, no border is
drawn. Note that this command takes effect only if it was issued before a button or a toggle control was
created. The style of an already created button or a toggle cannot be changed.
Example: ButtonStyleImage ‘button_image.bmp’;
ButtonStyleImage ‘pop_image.bmp’,’push_image.bmp’;

25
ButtonAutoRepeat
Usage: ButtonAutoRepeat id [,enable, wait_time, repeat_time ]
This command enables pushing down on a button be interpreted as repeatedly clicking the button. This
auto-repeat feature is triggered only after the button is pushed down for more than a specified length of
time. When the enable value is 1, the auto-repeat feature is turned on; when 0 the feature is turned off.
When this value is omitted, it defaults to 1; but the initial state after power-up is 0. The wait_time
specifies how long the button has to be pushed down initially to trigger the auto-repeat. Its unit is 1/1000
second; when absent it defaults to 1200 (i.e., 1.2 seconds). The repeat_time is used for specifying the
period of the auto-repeat cycle. Its unit is also 1/1000 second; when absent defaults to 300 (i.e., 0.3
second). When this command is issued with the enable value set to 1, the chattering_delay value specified
when the button was created loses its effect.
Example: ButtonAutoRepeat 1;
ButtonAutoRepeat 12,1,1000,300;
CheckBox
Usage: CheckBox id, x1, y1, x2, y2 [,caption]
This command generates a checkbox object of a rectangular shape, defined by the upper left corner (x1,
y1) and the lower right corner (x2, y2). The checkbox is assigned an ID numbers id, which can range
from 1 to 255 and not overlap with any previously assigned ID number of other control objects. The initial
content to be displayed on the checkbox can be specified by caption, which has to be enclosed with
single quotes. (For related events, see $on_click.)
Example: CtrlColor ,&H0000FF;
Checkbox 2,100,315,170,135,’Auto Mode’;
Static
Usage: Static id, x1, y1, x2, y2 [,caption] [,align]
This command generates a static control of a rectangular shape, defined by the upper left corner (x1, y1)
and the lower right corner (x2, y2). The id value ranges from 1 to 255, and cannot overlap with other
controls’ ID number. The align value designates the horizontal alignment mode, and can be one of $left,
$center or $right. The vertical alignment is fixed to be the “up” and cannot be changed.
Example: CtrlColor &H000000,&HD0D0D0;
Static 1,250,100,375,130,’COMFILE’,$center;

26
XProgress
Usage: XProgress id, x1, y1, x2, y2, max_range
This command generates a horizontal progress bar control of a rectangular shape, defined by the upper
left corner (x1, y1) and the lower right corner (x2, y2). This control is used for displaying an ongoing
progress situation. The id value ranges from 1 to 255, and cannot overlap with other controls’ ID number.
Note that the max_range value ranges from 1 to 65535 and that the number is not an actual pixel value
but a virtual number. To express a progress value, the SetCtrl command is used. The higher the progress
value, the more to the right is the progressed state.
Example: XProgress 4,250,100,315,120,10000;
SetCtrl 4,$position,5000;
YProgress
Usage: YProgress id, x1, y1, x2, y2, max_range
This command works the same way as the XProgress command except that the generated progress bar
control is vertical instead of horizontal. To express a progress value, the SetCtrl command is used. The
higher the progress value, the higher is the progressed state.
Example: YProgress 4,250,100,275,180,10000;
SetCtrl 4,$position,5000;

27
XSlider
Usage: XSlider id, x1, y1, x2, y2, max_range [,highlight_color] [,track_width] [,grip_color]
This command generates a horizontal slider control within an invisible rectangle, defined by the upper left
corner (x1, y1) and the lower right corner (x2, y2). The id value ranges from 1 to 255, and cannot
overlap with other controls’ ID number. Note that the max_range value ranges from 1 to 65535 and that
the number is not an actual pixel value but a virtual number. To express a progress value, the SetCtrl
command is used. The higher the progress value, the more to the right is the progressed state. When the
optional highlight_color value is assigned, the progress portion on the leftside of the grup is colored in
that color. The optional track_width value can be assigned, which defaults to 4 when absent. Also, the
optional grip_color value can be assigned, which defaults to grey color when absent. (For related events,
see $on_position.)
Example: CtrlColor ,&HD0D0D0; XSlider 4,250,100,315,120,10000;
SetCtrl 4,$position,5000;
YSlider
Usage: YSlider id, x1, y1, x2, y2, max_range [,highlight_color] [,track_width] [,grip_color]
This command works the same way as the XSlider command except that the displayed direction is
vertical instead of horizontal. The higher the progress value, the higher is the progressed state.
Example: CtrlColor ,&H0000FF; YSlider 4,250,100,275,180,10000,&H4040D0;
SetCtrl 4,$position,5000;

28
CtrlFont
Usage: CtrlFont [ font_size, font_face, font_bold, font_italic, font_underlined]
This command sets the font to be used within the control object(s) to be displayed later. The usage of the
parameter list is the same as the case of the TextFont command.
Note that this command takes effect only if it is used BEFORE a control object is generated. The font of an
already generated control object cannot be altered.
CtrlColor
Usage: CtrlColor [ font_color, back_color ]
This command sets the font color and the background color within a control object. Each color parameter
MUST be expressed in a 6-digit hexadecimal number preceded by &H. The background color cannot be
transparent.
Note that this command takes effect only if it is used BEFORE a control object is generated. The color of
an already generated control object CAN be altered by using the SetCtrl command.
The controls which font_color can be applied: Button, Checkbox, Toggle and Static.
The controls which back_color can be applied: Button, Checkbox, Static, Toggle, XSlider and YSlider.
Example: CtrlColor &HFF0000;
CtrlColor &H000000, &H0000FF;
CtrlColor , &H0000FF;
GetCtrl
Usage: GetCtrl id, event
This command requires an event to be occurred, in order to get attribute value of control.
Event Value
$on_check Whether a Checkbox or a Toggle control object is checked (1) or not (0).
$on_position
or $position
The position (i.e., progress) value of the XSlider or YSlider control.
Example: GetCtrl 1,$on_check;
GetCtrl 2,$on_position;

29
SetCtrl
Usage: SetCtrl id, field, value
This command changes an attribute (specified by field) value of a control object with the ID number id.
Field Value
$caption The text string to be displayed on the Static, Checkbox or Button control objects,
which needs to be enclosed within single quotes.
$position or
$on_position
The current progress value of the XProgress, YProgress, XSlider, or YSlider control.
This is not an actual pixel value but a virtual value.
$fontcolor The font color for the Button, Checkbox or Static control.
$backcolor The background color for the Button, Checkbox, Static, XSlider or YSlider control.
$align The Static control’s alignment mode. It takes on the value of $left, $center or $right.
$on_check The checked state of the Checkbox or the Toggle control object. The value of 1 is for
the checked state, 0 is for the unchecked state.
Example: SetCtrl 1,$caption,’Next’;
SetCtrl 1,$position,550;
SetCtrl 3,$backcolor,&H000000;
SetCtrl 5,$align,$left;
MoveCtrl
Usage: MoveCtrl id, x1, y1 [,x2, y2]
This command adjusts the position of a control object on the screen. When x2 and y2 values are omitted,
the control object (with the ID number id) is moved so that the upper left corner of it will be (x1, y1).
When x2 and y2 values are specified, the control object is moved to a rectangular area defined by the
upper left corner (x1, y1) and the lower right corner (x2, y2).
Example: MoveCtrl 1,200,200;
MoveCtrl 1,200,200,300,250;
ShowCtrl
Usage: ShowCtrl id, show
This command displays or hides a control object with the ID number id. If the show value is 1, it is
displayed; and when 0, it is hidden. Since this command merely shows and hides an existing control on
the screen, all attribute values of the control are preserved even when hidden; and a new control object
of the same ID number id cannot be created.
Example: ShowCtrl 5,0;

30
EnableCtrl
Usage: EnableCtrl id, enable
This command enables or disables the manipulation (i.e., change of its attribute values) of a control object.
When the enable value is 1, the manipulation is enabled; and when it is 0, disabled. When a control object
is in a disabled state, its color changes to light grey.
Example: EnableCtrl 5,0;
SetGroupToggle
Usage: SetGroupToggle ctrl_id_list, group_id (,default_toggled_id)
This command makes a group for toggles. Once a group is made, only one of the toggles can be turned on.
If one of the toggles is turned on, the others are turned off automatically.
If you push a toggle to turn it on, the $on_check event occurs, while others don’t make any events.
Even if you try to turn on a toggle which is already turned on, no event occurs.
You can make group even before toggles are created.
If you call ‘DelCtrlAll’ or ‘Clear’ command, every group is removed, while ‘DelCtrl’ command changes
nothing.
The ctrl_id_list is the toggle IDs which are linked with comma(,).
The group_id is the identifier of group and is sent along with $on_check event.
The default_toggled_id is the initial toggle ID which will be selected at the beginning and if you omit it,
the first one in ctrl_id_list is chosen.
Example: clear; setgrouptoggle ‘1,2’,1; toggle 1,30,30,60,60; toggle 2,100,100,130,130;
GetGroupToggle
Usage: GetGroupToggle group_id
This command examines the state of group toggle.(requires $on_check event to be sent)
You can get which toggle is pressed in group.
Refer to $on_check event for more info.
Example: GetGroupToggle 1;

31
3-2-4. File-access commands
FCreate
Usage: FCreate file_name [,content]
This command creates a specific file with the file name file_name. If a file with the same name already
exists, the new file replaces the old file. Here the file_name indicates a file stored on the SD card’s root
directory (i.e., the folder name is “storage card”). When the optional parameter content value is specified,
that content is stored in the file; otherwise a new file of zero size is newly created. Both the file_name
and content should be enclosed within single quotes.
Example: FCreate ‘record.dat’,’279432’;
SetVar #data,’hello’; FCreate ‘record.dat’,#data;
FAppend
Usage: FAppend file_name ,content
This command appends the content to the “back” of the file named file_name, which can be a path
including a file name. When such file does not exist, a new file is created. Here the file_name indicates a
file stored on the SD card’s root directory (i.e., the folder name is “storage card”). Both the file_name and
content should be enclosed within single quotes. If the content value of $newline is specified, CR and LF
is written to the file.
Example: FAppend ‘record.dat’,’279432’;
FAppend ‘record.dat’,$newline;
SetVar #data,’hello’; FAppend ‘record.dat’,#data;
FWrite
FWrite file_name, content, [,start_pos]
Changes contents of a file.
The FAppend command can only concatenate to a file. FWrite adds the ability to add content at any
position in the file.
file_name is the path to the file.
start_pos is the position in the file, in bytes, to begin writing. (0 if omitted)
Example) FWrite ‘data.bin’, 'abc’, 5;

32
FDelete
Usage: FDelete file_name
This command delete the named file. Here the file_name indicates a file stored on the SD card’s root
directory (i.e., the folder name is “storage card”). And the file_name should be enclosed within single
quotes.
Example: FDelete ‘record.dat’;
FRead
Usage: FRead file_name [,start_pos] [,max_bytes] [,query_id]
This command reads a file and responds by serial command.
When this command is executed, the $on_file_read event is occurred, and the content is informed.
file_name refers to the file on the root directory of SD card (folder name is ‘storage card’)
start_pos refers to the starting position to read in byte. (0 if omitted)
max_bytes refers to the total bytes that you want to read. (read to the end if omitted)
query_id refers to the value to confirm when $on_file_read event arrives. (0 if omitted)
Example: FRead ‘record.bin’;
FRead ‘record.txt’,100,20;
FRead ‘record.txt’,,50;
FCopy
Usage : FCopy existing_file_name, new_file_name
This command copies a file. It replaces existing file.
Both existing_file_name and new_file_name should be enclosed within single quotes, and they indicate
the files stored on the SD card’s root directory (i.e., the folder name is “storage card”).
Example: FCopy ‘file1.bin’,’file2.bin’;

33
FReadToVar
Usage: FReadToVar file_name, var_key, [,start_pos] [,max_bytes]
This command reads a file and assigns a variable.
This command does not invoke any events.
var_key refers to the key (name) of the variable, and should begin with the character ‘#’.
file_name refers to the file on the root directory of SD card (folder name is ‘storage card’).
start_pos refers to the starting position to read in byte. (0 if omitted)
max_bytes refers to the total bytes that you want to read. (read to the end if omitted)
Example: FReadToVar ‘record.bin’,#string2;
FReadToVar ‘record.txt’,#string2,100,20;
FReadToVar ‘record.txt’,#string,,50

34
3-2-5. Variable-access commands
The IntelliLCD internal memory can be used to store user variables to be written and read.
SetVar
Usage 1 : SetVar var_key, var_value
Usage 2 : Set var_key, var_value
This command assigns a string value to a variable on memory.
The variables will be removed when the LCD power is off and on again.
var_key refers to the key (name) of the variable, and should begin with the character ‘#’.
var_value refers to the value of the variable. It is assumed to be a string value if enclosed with single
quotes, and a digit value if not enclosed with any character (minus number is supported).
var_value can refer to other variable key.
All the variables can be used in all the parameters of IntelliLCD commands, regardless whether the
parameter require string value or digit value.
Example: SetVar #a,’hello’; print #a;
SetVar #b,#a;
Set #left,30; line #left,30,200,200;
DelVar
Usage: DelVar var_key
This command deletes a variable from memory.
var_key refers to the key name of the variable, and should begin with the character ‘#’.
Example: DelVar #value1;
DelVarAll
Usage: DelVarAll
This command deletes all the variables from memory.
Example: DelVarAll;

35
Add
Usage: Add var_key, value
This command adds a number value to a variable.
var_key refers to the key name of the variable, and should begin with the character ‘#’.
value should be integer or another variable name.
Example: Add #my_value,3;
Add #my_value,#k;
Sub
Usage: Sub var_key, value
This command subtracts a value from a variable.
var_key refers to the key name of the variable, and should begin with the character ‘#’.
value should be integer or another variable name.
Example: Sub #my_value,3;
Sub #my_value,#k;
Mul
Usage: Mul var_key, value
This command multiplies a variable by a value.
var_key refers to the key name of the variable, and should begin with the character ‘#’.
value should be integer or another variable name.
Example: Mul #my_value,3;
Mul #my_value,#k;
Div
Usage: Div var_key, value
This command divides a variable by a value.
var_key refers to the key name of the variable, and should begin with the character ‘#’.
value should be integer or another variable name.
Example: Div #my_value,3;
Div #my_value,#k;

36
Mod
Usage: Mod var_key, value
This command divides a variable by a value, and sets the remainder to the variable.
var_key refers to the key name of the variable, and should begin with the character ‘#’.
value should be integer or another variable name.
Example: Mod #my_value,3;
Mod #my_value,#k;
Attach
Usage: Attach var_key, string
This command attaches a string to the end of a variable.
var_key refers to the key name of the variable, and should begin with the character ‘#’.
string should be a quoted string value or another variable name.
Example: SetVar #a,’pine’; Attach #a,’apple’; print #a;
SetVar #a,’pine’; SetVar #b,’apple’; Attach #a,#b; print #a;
AttachChr
Usage: Attach var_key, asc_value
This command attaches a string which consists of a single character to the end of a variable.
var_key refers to the key name of the variable, and should begin with the character ‘#’.
asc_value should be an ASCII value or even another variable name.
Example: SetVar #a,’pine’; Attach #a,’apple’; print #a;
SetVar #a,’PINEAPPL’; Attach #a,69; print #a;
FormatVar
Usage: FormatVar var_key, digits [,radix]
Changes the number format of a variable.
You can specify the number of digits and the radix. Radix defaults to 10.
The high remnant positions are filled with leading zeros.
Example) FormatVar #a,3,16;
FormatVar #b,12;

37
3-2-6. Image-access commands
DrawImage
Usage: DrawImage file_name [,x , y] [,transparent_color]
This command outputs an image stored in the file file_name where the image should be in BMP (bitmap)
format. Here the file_name indicates a file stored on the SD card’s root directory (i.e., the folder name is
“storage card”). And the file_name should be enclosed within single quotes. When the x and y values are
specified, it designate the point (x, y) as the upper left corner of the image to be displayed; when absent,
the upper left corner defaults to (0, 0). When the optional transparent_color value is specified, the pixels
which would have been normally displayed in that color are displayed transparent. Note that a speed way
to repeat outputting the same image is to utilize the commands CaptureFile and Paste.
<Advanced feature> When DrawImage is called to output an image from the SD card, the image is cached
in memory, so suqsequent calls will not read from the SD card resulting in faster display. To use, create a
list of comma-separted image file names for the DrawImage command to cache (e.g. a.bmp, b.bmp,
c.bmp) and save the file as Preload.txt to the SD Card.
Example: DrawImage ‘logo.bmp’;
DrawImage ‘logo.bmp’,50,50;
DrawImage ‘logo.bmp’,50,50,&HFF00FF
SaveImage
Usage: SaveImage file_name [,bitmap_id]
This command saves the image in a virtual space to BMP file.
This command is contrary to the CaptureFile command.
file_name refers to the file on the root directory of SD card (folder name is ‘storage card’).
file_name should be enclosed within single quotes.
It replaces the existing file.
The images on virtual space can be made by the CaptureScreen or CaptureFile command.
Example: SaveImage ‘image1.bmp’;
SaveImage ‘image1.bmp’,3;

38
Paste
Usage: Paste [ put_x, put_y, bitmap_id, crop_x1, crop_y1, crop_x2, crop_y2 ] [,transparent_color]
This command outputs an image previously saved at a virtual memory space (which is addressed by
bitmap_id) at position (put_x, put_y). Here (put_x, put_y) is the upper left corner position of the image to
be displayed. The bitmap_id value can range from 0 to 9; when absent, the value defaults to 0. When the
upper left corner position (put_x, put_y) values are omitted, they default to the position set by the most
recently used CaptureScreen command. The initial position defaults to (0, 0).
When the crop area parameters crop_x1, crop_y1, crop_x2, crop_y2 are omitted, the entire image is
outputted; if specified, the cropped image is outputted. When the optional transparent_color value is
specified, the pixels which would have been normally displayed in that color are displayed transparent.
Example: Paste;
Paste 200,200,0;
Paste ,,0,40,40,300,300;
CaptureScreen
Usage: CaptureScreen [ x1, y1, x2, y2, bitmap_id ]
This command captures the area of a rectangle, defined by the upper left corner (x1, y1) and the lower
right corner (x2, y2), and saves in a virtual space (i.e., memory). The bitmap_id value can range from 0 to
255; when absent, the value defaults to 0. When x1, y1, x2, y2 are omitted, the entire screen space
becomes the default retangle. Note that this command does NOT capture the control objects but only the
“pure graphics.”
Example: CaptureScreen;
CaptureScreen 0,0,200,200;
CaptureScreen ,,,,9;
CaptureFile
Usage: CaptureFile file_name, [ x1, y1, x2, y2, bitmap_id ]
This command captures the area of a rectangle within the image file (stored on the SD card), where the
rectangle is defined by the upper left corner (x1, y1) and the lower right corner (x2, y2); and saves the
captured portion in a virtual space (i.e., memory). The bitmap_id value can range from 0 to 9; when
absent, the value defaults to 0. When x1, y1, x2, y2 are omitted, the entire BMP image is captured.
Currently only images of BMP (bitmap) format are supported. The execution of the CaptureFile command
is slower than that of the CaptureScreen command. This command is contrary to the SaveImage command.
Example: CaptureFile ‘image.bmp;
CaptureFile ‘image.bmp’,,,,,9;
CaptureFile ‘image.bmp’,0,0,199,199,9;

39
DefineAnimation
Usage: DefineAnimation file_name_list [,elapse] [,animation_id] [,transparent_color]
This command defines a graphic animation, which uses BMP files to show them in turns at a specified
interval.
The file_name_list is the list of BMP file names in SD card linked with comma(,).
The elapse is the cycle of each frame in millisecond.(default=500)
The animation_id is the identifier of the animation(1~255, default=1).
The transparent_color is the color to indicate transparent area.
Example: DefineAnimation ‘image1.bmp,image2.bmp,image3.bmp’,300,1,&HFF00FF
StartAnimation
Usage: StartAnimation [animation_id] [,left] [,top]
This command starts the animation defined by ‘DefineAnimation’.
The animation_id is the identifier of the animation(1~255, default=1).
left and top is the coordinate value to display (default left=0, top=0)
Example: StartAnimation 1;
StartAnimation 1,30,30;
EndAnimation
Usage: EndAnimation [animation_id]
This command ends the animation defined by ‘DefineAnimation’ and started by ‘StartAnimation’.
The animation_id is the identifier of the animation(1~255, default=1).
Example: EndAnimation 1;

40
3-2-7. Environment setting commands
EnableDemo
Usage: EnableDemo [enable]
This command decides whether the demo will be shown when the system is turned on. When the enable
value is 1, the demo is shown; when 0, it is not shown. Note that there is no immediate effect displayed
on the screen when this command is issued. This setting is remembered even when the system is turned
off.
Example: EnableDemo;
EnableDemo 0;
SetRecvMode
Usage: SetRecvMode mode
This command determines the mode in which an event will be received. The change takes effect
immediately. When the mode value is 1 the receive mode is ASCII, and 2 designates the Binary mode.
The initial mode value is 1 (i.e., ASCII), however if changed, the changed setting is remembered even
when the system is turned off; Note that there is no immediate change or effect on the display.
Example: SetRecvMode 1;
SetRecvMode 2;
ShowCursor
Usage: ShowCursor
This command makes the cursor visible on the screen ONLY WHEN the mouse is connected to the
IntelliLCD system (via the USB port).
Example: ShowCursor;
HideCursor
Usage: HideCursor
This command hides the cursor on the screen. When the system is powered on, the default is always to
hide the cursor.
Example: HideCursor;

41
SetBufferWarning
Usage: SetBufferWarning [ bytes ]
If the data which came to the LCD and is not yet parsed reaches a specified amount of the data buffer,
the $on_buffer_warning event occurs. This command sets the buffer size at which the event occurs. The
maximum bytes size is 1 MB (i.e., 1048576 bytes), and the initial default value is 0.5 MB (i.e., 524288
bytes). When the buffered data amount exceeds the maximum buffer size of 1 MB, the excessive packets
are lost, the ‘Buffer Overflow’ message is displayed on the screen for a short while and an
$on_buffer_overflow event occurs.
Example: SetBufferWarning 10000;
SetDrawingSpeed
Usage: SetDrawingSpeed speed
This command sets the drawing speed to a value ranging from 0 to 200. Higher the number, faster the
drawing speed, but the drawing becomes more unnatural. Lower the number, slower the drawing speed,
but the drawing becomes smoother. When the speed is not specified (i.e., when this command is never
used), the default speed is 25, which is the recommended speed. The fastest speed can be up to 3 times
as fast as the slowest speed.
Backlight
Usage: Backlight [enable]
This command immediately turns on or off the LCD backlight.
Example: Backlight;
Backlight 0;
BacklightMode
Usage: BacklightMode wakeup_mode
This command determines the details of the backlight mode.
wakeup_mode = 0 : You can turn on the backlight only by serial command.
wakeup_mode = 1 (default) : You can turn on the backlight by touching LCD also, not only by serial
command.
Example: BacklightMode 1;

42
EnableSysMsg
EnableSysMsg [enable]
This command determines whether to show system messages, such as error message or notice.
This command may take some time.
This setting is remembered even when the power is off.
enable = 0 : Hide system messages.
enable = 1 : Show system messages. (default)
Example: EnableSysMsg;
EnableSysMsg 0;
SetRtsDelay [ for RS485 mode only ]
SetRtsDelay [delay_time]
When an IntelliLCD event to client is occurred and the communication mode is RS485, use this
command to set delay time (ms) concerning RS485 mode.
(You should SetRtsDelay 0 or should not use this command when you use RS232 communication)
IntelliLCD follows these steps when it sends event to client :
1. Turn on RTS signal
2. Send data
3. Delay ←
4. Turn off RTS signal
The delay time at the third step is what we should define.
If omitted, the value defaults to 50, and you can use 0~300.
The initial value when powered on is 0;
Example: SetRtsDelay;
LockEvent
Usage: LockEvent [enable],[event],[condition]
This command prevents event occurrence.
enable : 1 – lock, 0 – unlock. If omitted, the value is 1.
event : the event name of target. If omitted, it applies to all events.
condition : 0 – locks always, 1 – locks only when ‘busy’ state (it means when the process of command is
not done completely yet). If omitted, the value is 0.
Example: LockEvent; Locks all events always
LockEvent 1,$on_touch; Locks touch-event always
LockEvent ,$on_click,1; Locks click-event conditionally when ‘busy’ state

43
3-2-8. Batch execution commands
FileCmd
Usage: FileCmd file_name
After IntelliLCD commands are saved in a text file (named file_name) and this command is issued, the
result of executing the content of the file is displayed on the screen. For example, if the content of a file
named “graphic1.txt” is as follows,
TextColor &HFF0000;
RoundBoxFill 30,30,150,150,4,5,&HDFFF00;
Line 30,30,200,200;
and the “FileCmd ‘graphic1.txt’” command is executed, the commands in the file are executed. The file
extension (e.g., “txt” in this case) does not matter, as it is ignored.
Example: FileCmd ‘graphic1.txt’;
Let’s imagine that we are about to draw a complicated background on the scene. Often one needs to send
a 1000 byte data from a CUBLOC (or another embedded computer) through the RS-232 interface. If the
data is to be stored at the CUBLOC (or another embedded computer), some memory space is needed and
the data needs to be transmitted. In such a situation, the FileCmd command can be very useful. First, the
commands to draw the background should be saved to a text file in a SD card installed on the system.
Now when a FileCmd command is executed, the content of the file is carried out and the result is
displayed on the screen. That way, the memory space of the CUBLOC (or a embedded computer) is saved
and there can be one less data transmission.
VarCmd
Usage: VarCmd var_key
After IntelliLCD commands are saved in variable by SetVar command, (the variable name is var_key) and
this command is issued, the content of the variable is executed. This command is similar to FileCmd,
however the FileCmd uses files for storing commands while VarCmd uses the variables.
If you want to enhance speed while using FileCmd, it is recommended to use FReadToVar and VarCmd
together.
Example: SetVar #myvar,’Clear;’; VarCmd #myvar;
FReadToVar ‘myfile.txt’,myvar; VarCmd #myvar;

44
FileEventOn
Usage: FileEventOn event, file_name [,condition]
(Advanced feature)
This command makes the commands in a file to be executed automatically when a specified event occurs.
(Please refer to the command ‘FileCmd’)
You can set up some conditions for executing the file by the third parameter condition which describes
the comparison(s) of the variables or values.
This command does not prohibit RS-232C event from occuring, so if you want to disable the real event of
serial communication, please use ‘LockEvent’ command together.
How to use comparative statement:
A is equal to B : A=B
A is greater than B : A>B
A is less than B : A<B
A is equal to or greater than B : A>=B
A is equal to or less than B : A<=B
A is not equal to B : A<>B
The statements can have multiple comparisons and can be linked by ‘and’ or ‘or’.
right) #sys_touch_x>100
right) #a>1 and #b>2 and #c>#k
wrong) #a>1 and #b>2 or #c<>#k
Example 1: FileEventOn $on_click, ‘process1.txt’;
Example 2: FileEventOn $on_touch, ‘process2.txt’, #sys_down=1;
Example 3: FileEventOn $on_touch, ‘process2.txt’, #sys_down=1 and #sys_touch_x<#var2;
FileEventOff
Usage: FileEventOff event
This command closes file event item.
Example : FileEventOff $on_click;

45
FileEventClear
Usage: FileEventClear
This command closes all file events.
Example : FileEventClear;

46
3-2-9. Arbitrary data sending commands
SendByte
SendByte value
This command sends a specified value through RS-232C communication.
The output value is a binary value of one byte.
Example : SendByte 65; ← ‘A’ will be sent
Set #b,66;SendByte #b; ← ‘B’ will be sent.
SendStr
SendStr string
This command sends a specified value through RS-232C communication.
The output value is a string.
Example : SendStr ‘Hello’; ← ‘Hello’ will be sent.
Set #str,’Hi!’; SendStr #str; ← ‘Hi!’ will be sent.
SendHex
SendHex value, digits
This command sends a specified value through RS-232C communication.
The output value is in hexadecimal format, and the digits can be designated.
The empty digits are filled with zeros.
Example : SendHex 255,3; ← ‘0FF’ will be sent.
SendHex 255,4; ← ‘00FF’ will be sent.
SendHex 255,5; ← ‘000FF’ will be sent.
Set #a,16;SendHex #a,2; ← ‘10’ will be sent.
SendDec
SendDec value [,digits]
This command sends a specified value through RS-232C communication.
The output value is in decimal format, and the digits can be designated or omitted.
Example : SendDec 255; ← ‘255’ will be sent.
SendDec 255,4; ← ‘0255’ will be sent.
SendDec 255,5; ← ‘00255’ will be sent.
Set #a,16;SendDec #a,2; ← ‘16’ will be sent.

47
3-2-10. Commands related to command buffer
Dump
Usage: Dump [ enable ]
This command determines whether the communicated commands will be written to a file for debugging
purpose. The enable value being 1 means this feature is turned on, and 0 means it is turned off. Since the
the dump contents are written to the comfile_dump_rx.txt (i.e., the received data) and the
comfile_dump_tx.txt (i.e., the sent data) within a folder of the SD storage card, an SD card must be
installed before this command is sent. The initial default state of the enable parameter is 0 (i.e., no dump).
Since the dump operation slows down the entire system, use this command only when necessary.
Example: Dump;
Dump 0;
!@!@;
Usage: !@!@
This command resets the parsing state of the command currently coming to the IntelliLCD.
While the system is turned on, if the transmission of a command from a client device is momentarily cut
off or reset, a situation may happen where the transmission of the preceding command is incomplete but
the transmission of the subsequent command begins at the client device. In such a situation, the
IntelliLCD system might receive an erroneous command and then display an unexpected result or an
error message on the screen. To prevent such an undesirable situation, if !@!@; is issued after the reset,
the command currently being parsed is abandoned and it turns to the state of waiting for the head of the
new coming command.
Const Device = CB280
Dim I As Integer
Opencom 1,9600,3,80,180
@ "!@!@;CLEAR;"
@ "TEXTFONT 64,'Tahoma';"
@ "PRINT 'The Land of Morning Calm',10,50;"

48
#@#@;
Usage: #@#@
When !@!@; is insufficient you can use this command.
Because !@!@; resets the parsing system and ignores only one current command which was being parsed
but never erases any commands which have never been parsed.
However, #@#@; resets the parsing system and ignores currently-parsing command and erase all the
remaining untreated commands in buffer.
So, #@#@ reacts promptly always while !@!@ may not.
Note that #@#@; can affect autorun commands to erase the latter part of the autorun content.
Cs
Usage: Cs checksum
This command sends the checksum about the subsequent command, in advance. The checksum feature is
not an obligation. You may attach checksum to some commands, and some not.
The ASCII values of all the alphabets (case-sensative), spaces, and semi-colons consisting the
subsequent command should be added up, to make a value, and the value should be divided by 256 and
the remainder is checksum.
The checksum can be expressed in decimal or hexa format. (Hexa format needs ‘&H’ at the beginning)
If the checksum mismatches, the command is not executed.
Example: Cs 106;PSet 2,5;
CS &H6A;PSet 2,5;
Explanation: 80(‘P’)+83(‘S’)+101(‘e’)+116(‘t’)+32(space)+50(‘2’)+44(‘,’)+53(‘5’)+59(‘;’) = 618
The remainder after 618 is divided by 256 is 106.
The 6A is the hexa format of 106.
CsErrNoticeMode
Usage: CsErrNoticeMode [show_msgbx], [send_event]
This command defines what to do when the checksum mismatches.
If show_msgbx is 1 : Shows a message box for a while on the LCD. The default/initial value is 1.
If send_event is 1 : Sends the success event ($on_checksum_error). The default/initial value is 1.
If send_event is 2 : Sends the fail event ($on_checksum_success), as well as success event.
Example: CsErrNoticeMode 1,0;

49
3-2-11. Time-related commands
GetDate
Usage: GetDate
Caution : If the battery is not supported on RTC, the time setting is lost after rebooting
(Cuwin’s iTL mode supports battery but iTL710/740A/840 does not)
This command invokes $on_date event, which returns current date (year, month, day).
Refer to the $on_date event.
Example : GetDate;
GetTime
GetTime
Caution : If the battery is not supported on RTC, the time setting is lost after rebooting
(Cuwin’s iTL mode supports battery but iTL710/740A/840 does not)
This command invokes $on_time event, which returns current time (hour, minute, second).
Refer to the $on_time event.
Example : GetTime;
SetClock
SetClock year, month, day, hour, minute, second
Caution : If the battery is not supported on RTC, the time setting is lost after rebooting
(Cuwin’s iTL mode supports battery but iTL710/740A/840 does not)
This command modifies the current clock.
The range of hour is 0~23.
Example : SetClock 2007,1,1,12,30,33;

50
Delay
Delay [delay_time]
This command makes IntelliLCD wait for the next command doing nothing.
delay_time is in millisecond and can be 0~5000.
The default value is 50 when omitted.
Example: Delay 100;
SetTimer
SetTimer elapse, file_name [,time_id]
This command sets a timer which execute FileCmd by periods.
It is applied instantly and lasts until the KillTimer is called.
The time_id should be1 or more(default=1).
The elapse is a cycle in millisecond. Too low value makes the system go slower.
The file_name is the name of the file which will be executed by periods.
This timer is not so accurate and should not be used for precise task.
Caution: We don’t recommend using graphic commands on the timer when any of graphic attributes (for
example, color or font size, etc..) are different with main commands, because the main-commands and
timer-commands are executed at the same time and we cannot predict the exact moment of each timer
execution.
Example: SetTimer 300,’action.txt’,1;
KillTimer
KillTimer [time_id]
This command removes the timer set by SetTimer command.
The time_id should be1 or more(default=1).
Example: KillTimer 1;

51
3-2-12. Screen-related commands
The ‘Screen’ is, a UI frame adopting one BMP image file of full size, to define control-like regions in it.
This idea is different from that of existing button controls.
You can define such screens in specified file formats and call them as you want one by one.
DefineScreen
DefineScreen script_file_name [, screen_id ]
Defines a screen.
script_file_name : this file contains the script of the screen details and should be in SD card.
screen_id : the identifier of screen(1~255, 1 if omitted)
Example : DefineScreen ‘script1.txt’;
DefineScreen ‘Storage Card\screen2\script2.txt’,2;
StartScreen
StartScreen [ screen_id ]
This command activates a screen.
If a screen is activated by this command and user touches on the screen, the pressed graphic effect is
displayed on the screen and the event $on_screen_touch event containing screen ID and area ID occurs.
Note that you should call DefineScreen command first to use StartScreen command
Example : StartScreen 1;
EndScreen
EndScreen [ screen_id ]
This command deactivates any screen which is activated by StartScreen command.
Even if there is no screen activated and you try EndScreen, no error occurs.
Example : EndScreen 2;

52
SetArea
SetArea area_id, field, value
Modify the attributes of a screen area.
Field Value
$check or $on_check The state of screen toggle. 1 means ON, 0 means OFF.
$enable_touch_check Defines whether to make it possible to turn on the toggle by touching the LCD.
1 means possible, 0 means impossible.
$enable_touch_uncheck Defines whether to make it possible to turn off the toggle by touching the LCD.
1 means possible, 0 means impossible.
예) SetArea 1,$on_check,1;
* How to Write Screen Script
Create a file (regardless of file name and extension, i.e: script1.txt) and copy it to Storage Card
folder.
Example of the file content)
common main_image=full1.bmp
area id=1;rect=30,30,200,150;press_image=button_push1.bmp;
area id=2;rect=100,100,150,150;press_image=full_size_press.bmp;clip_mode=yes;
Every line consists of
header + space + parameter settings
Parameter settings consists of
parameter=value;parameter=value;parameter=value …
The header which represents control-like area is ‘area’.
The header for global setting is ‘common’.
The main image file can be defined under ‘common’ header by the parameter ‘main_image’.
All the files refered in script should be in the same directory with script file.
53
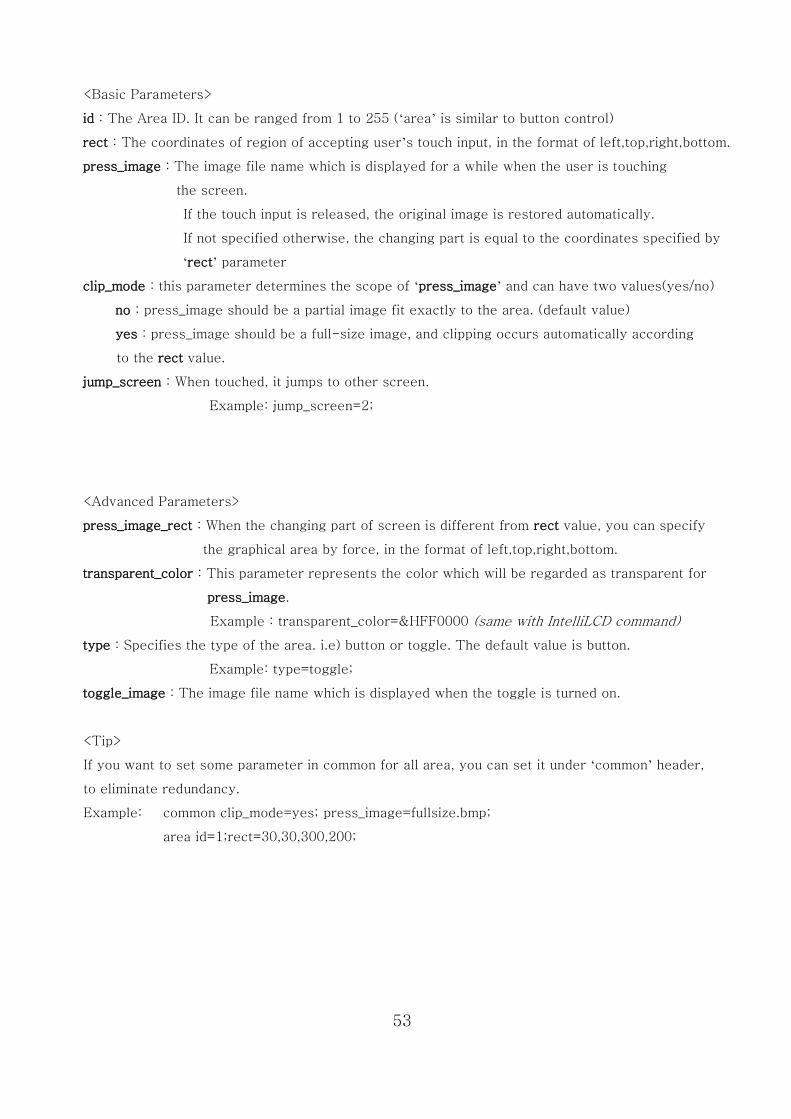
<Basic Parameters>
id : The Area ID. It can be ranged from 1 to 255 (‘area’ is similar to button control)
rect : The coordinates of region of accepting user’s touch input, in the format of left,top,right,bottom.
press_image : The image file name which is displayed for a while when the user is touching
the screen.
If the touch input is released, the original image is restored automatically.
If not specified otherwise, the changing part is equal to the coordinates specified by
‘rect’ parameter
clip_mode : this parameter determines the scope of ‘press_image’ and can have two values(yes/no)
no : press_image should be a partial image fit exactly to the area. (default value)
yes : press_image should be a full-size image, and clipping occurs automatically according
to the rect value.
jump_screen : When touched, it jumps to other screen.
Example: jump_screen=2;
<Advanced Parameters>
press_image_rect : When the changing part of screen is different from rect value, you can specify
the graphical area by force, in the format of left,top,right,bottom.
transparent_color : This parameter represents the color which will be regarded as transparent for
press_image.
Example : transparent_color=&HFF0000 (same with IntelliLCD command)
type : Specifies the type of the area. i.e) button or toggle. The default value is button.
Example: type=toggle;
toggle_image : The image file name which is displayed when the toggle is turned on.
<Tip>
If you want to set some parameter in common for all area, you can set it under ‘common’ header,
to eliminate redundancy.
Example: common clip_mode=yes; press_image=fullsize.bmp;
area id=1;rect=30,30,300,200;

54
3-2-13. Other commands
Sound [ Available on CUWIN’s iTL mode ]
Sound file_name
This command is available on the sound-supported models.
(Cuwin’s iTL mode supports sound but iTL710/740A/840 does not)
This command plays a sound file, and the supported format is WAV.
file_name refers to the file name on Storage Card folder, and should be quoted.
Example : Sound ‘ring.wav’;
StopSound [ Available on CUWIN’s iTL mode ]
StopSound;
This command is available on the sound-supported models.
(Cuwin’s iTL mode supports sound but iTL710/740A/840 does not)
This command ends the currently playing sound.
Example : StopSound;
TouchAutoRepeat
Usage: TouchAutoRepeat [enable, wait_time, repeat_time ]
This command is similar to the ButtonAutoRepeat command except that here a touchpad is touched
instead of pushing down a button. When the enable value is 1, the auto-repeat feature is turned on; when
0 the feature is turned off. When this value is omitted, it defaults to 1; but the initial state after power-up
is 0. The wait_time specifies how long the button has to be pushed down initially to trigger the auto-
repeat. Its unit is 1/1000 second; when absent it defaults to 1200 (i.e., 1.2 seconds). The repeat_time is
used for specifying the period of the auto-repeat cycle. Its unit is also 1/1000 second; when absent
defaults to 300 (i.e., 0.3 second).
Example: TouchAutoRepeat;
TouchAutoRepeat 1,1000,300;
TouchAutoRepeat 0;
ButtonAutoRepeat 2,0;

55
GetLcdState
Usage: GetLcdState
This command inquires the current LCD state. The result is responded by $on_lcd_state event
immeadiately.
Note that the event does not occur while the power of LCD is off or the firmware is not loaded completely.
Example: GetLcdState;

56
3-3. Events
An event is a process of the IntelliLCD transmitting a signal through its RS-232C interface, triggered
primarily by a touch input. Besides a touch input, the need inform the system state to the user can trigger
an event to happen.
3-3-1. ASCII Mode and Binary Mode
First, you have to choose between the ASCII mode and the Binary mode. Based on the processor and the
compiler you use, you can choose between the two modes.
To those who use CUBLOC, we recommend using the ASCII mode because CUBLOC has the feature
where the end code is detected to trigger an interrupt event. For those who use a widely used 8-bit MCU,
using the binary mode is recommended. The binary mode is easier to be dealt in an assembly language or
C language.
a) The Protocol Structure
There are two modes – ASCII and Binary – for receiving commands, and the user can choose between
the two, using the SetRecvMode command.
(1) ASCII Mode (This is the default and what we recommend.)
* Fixed-length event: The total length of the event is fixed to 11 bytes.
This is what most events use.
STX (&H02) Event Number
(2 bytes of hexadecimal
number)
7 bytes of parameters
(consists mostly of hexadecimal
numbers)
ETX
(&H03)
* Flexible-length event (advanced): The total length is flexible.
STX (&H02) ‘FF’
2 bytes
Length of
STX~ETX:
4 bytes of
hexadecimals.
Event Number:
2 bytes of
hexadecimals
Content:
Length is
flexible
ETX
(&H03)

57
(2) Binary Mode
* Fixed-length event: The total length is fixed to 8 bytes. This is what most events use.
STX (&H02) Event
Number:
1 byte
Param:
5 byte
ETX
(&H03)
* Flexible-length event (advanced): The total length is flexible.
STX (&H02) &HFF
1 byte
Length of
STX~ETX:
Upper byte
Length of
STX~ETX:
Lower byte
Event
Number:
1 byte
Content:
Length is
flexible
ETX
(&H03)
* On the other hand, the tramitting commands are all in ASCII mode. Even if the ASCII mode is
changed to Binary mode, the transmitting commands will still be ASCII mode.

58
3-3-2. Events related to Control Input
When a control object is clicked on the LCD screen, some of the subsequent events happens to inform the
user that the clicked control was manipulated.
b) The List of Events
(1) $on_click: This event happens when a button control is clicked.
ASCII:
&H02 ‘8’
(&H38)
‘1’
(&H31)
Control ID:
2 bytes of
hexadecimal
‘1’ (&H31) means pushed
down,
‘0’ (&H30) means
released.
1 byte
‘*’ (&H2A)
4 bytes continuous
&H03
Binary:
&H02 &H81 Control ID:
1 byte
&H01 means pushed
down,
&H00 means released
1 byte
&H00 &H00 &H00 &H03
(2) $on_check: This event happens when a checkbox or a toggle button control is checked or
unchecked.
ASCII:
&H02 ‘8’
(&H38)
‘2’
(&H32)
Control ID:
hexadecimal
2 bytes
‘1’ (&H31)
means checked,
‘0’ (&H30)
means unchecked.
1 byte
4 bytes of ‘*’ (&H2A). &H03
If it is group toggle,
2 bytes of group ID(hex) +
2 bytes of ‘*’
Binary:
&H02 &H82 Control ID:
1 byte
&H01 means checked,
&H00 means unchecked
1 byte
&H00 &H00 &H00 &H03
If it is group toggle,
1 byte for group ID
(3) $on_position: This event happens when the position value of a slide control needs to be informed.
ASCII:
&H02 ‘8’
(&H38)
‘3’
(&H33)
Control ID:
hexadecimal 2 bytes
Position Value:
hexadecimal 4 bytes
‘*’
(&H2A)
&H03
Binary:
&H02 &H83 Control ID:
1 byte
Position
Value
Upper byte
Position
Value
Lower byte
&H00 &H00 &H03

59
3-3-3. Events for Returning User’s Input
When an area unoccupied by any control (i.e., an empty spot of the screen) is clicked, these events are
used to send the (x, y) coordinates of the clicked spot.
(4) $on_touch: This event happens when a mouse button or touch pad is pushed down or released.
ASCII:
&H02 ‘8’
(&H38)
‘4’
(&H3
4)
‘1’(&H31)means
pushed down,
‘0’(&H30)means
released.
1 byte
X coordinate:
hexadecimal
3 bytes
Y coordinate:
hexadecimal
3 bytes
&H03
Binary:
&H02 &H84 &H01 means pushed
down,
&H00 means released.
1 byte
x value
upper byte
x value
lowerbyte
y value
upper byte
y value
lowerbyte
&H03
To IntelliLCD a PC keyboard can be connected. When a user make a keyboard input, the following events
happen.
(5) $on_key_press: This event happens when a key is pressed. (when a keyboard is connected)
ASCII:
&H02 ‘8’
(&H38)
‘5’
(&H35)
ASCII code
(case-sensitive)
‘*’ (&H2A)
6 bytes continuous
&H03
Binary:
&H02 &H85 ASCII code
(case-sensitive)
&H00 &H00 &H00 &H00 &H03

60
3-3-4. RTC events
Cuwin’s iTL mode supports memorizing of time by RTC-batery after rebooting.
iTL710/740A/840 does not have the battery.
(6) $on_date – The response for querying the current date.
ASCII :
&H02 ‘8’
(&H38)
‘6’
(&H36)
year:
hexadecimal
2 bytes
month:
hexadecimal
1 byte
day:
hexadecimal
2 bytes
‘*’
(&H2A)
&H03
Binary :
&H02 &H86 year
hi-byte
year
lo-byte
month
1 byte
day
1 byte
&H00 &H03
(7) $on_time – The response for querying the current time.
ASCII :
&H02 ‘8’
(&H38)
‘7’
(&H37)
hour:
hexadecimal
2 bytes
minute:
hexadecimal
2 byte
second:
hexadecimal
2 bytes
‘*’(&H2A) &H03
Binary :
&H02 &H87 hour:
1 byte
minute:
1 byte
second:
1 byte
&H00 &H00 &H03

61
3-3-5. Screen Events
IntelliLCD has a ‘Screen’ feature by which you utilize areas like as button controls adopting full-size bmp
file.
(8) $on_screen_touch – This event occurs when an area on a screen is touched.
The $on_touch event does not occurr when this event occurs.
To use ‘released’ command than ‘pressed’ event is recommended.
ASCII :
&H02 ‘8’
(&H38)
‘C’
(&H36)
screen ID:
hexa
2 bytes
area ID:
hexa
2 bytes
‘1’(&H31)
means
pressed,
‘0’(&H30)
means
released
1 byte
<when button>
‘*’ (&H2A)
<when toggle>
‘1’(&H31) means checked
‘0’(&H31) means unchecked
‘*’ (&H2A)
1 bytes
&H03
Binary:
&H02 &H8C screen ID:
1 byte
area ID:
1 byte
&H01 means pressed,
&H00 means released
1 byte
<when button>
&H00
<when toggle>
&H01 means checked
&H00 means unchecked
&H00
1 bytes
&H03

62
3-3-6. Other Events
IntelliLCD has a receive buffer which maximum size is 1MB. To prevent the buffer from being overflow
or inform that the buffer is already overflowing, the following events may occur.
(9) $on_buffer_warning: This event happens when the size of untreated command buffer reaches to a
certain warning level or above it.
(The warning level can be designated by a user, using the SetBufferWarning command.) The received
data packet after this event happens is not thrown away. When the client device receives this event, if it
temporarily stops transmitting more commands and resumes the transmission later, a more reliable
operation can be rendered.
ASCII:
&H02 ‘8’
(&H38)
‘8’
(&H38)
‘*’ (&H2A)
7 bytes continuous
&H03
Binary:
&H02 &H88 &H00 &H00 &H00 &H00 &H00 &H03
(10) $on_buffer_overflow: This event happens when an overflow actually happens at the receive buffer
over 1MB.
Since the packets sent by the client device after the overflow are thrown away, the graphics displayed on
the screen may be corrupted.
User must prevent this event from being occured anyhow.
ASCII:
&H02 ‘8’
(&H38)
‘9’
(&H39)
‘*’ (&H2A)
7 bytes continuous
&H03
Binary:
&H02 &H89 &H00 &H00 &H00 &H00 &H00 &H03

63
(11) $on_lcd_state – This event tells the state of LCD, as the response of the command ‘GetLcdState’.
Note that the event does not occur while the power of LCD is off or the firmware is not loaded completely,
and the event cannot occur more than once in a second.
This event automatically occurs once right after the LCD is powered on, without any request from client.
ASCII :
&H02 ‘8’
(&H38)
‘A’
(&H41)
LCD state
‘1’ : Normal,
‘0’ : Abnormal
1byte
‘*’ (&H2A)
6 bytes continuous
&H03
Binary :
&H02 &H8A LCD state
&H01 : Normal,
&H00 : Abnormal
1byte
&H00
4 bytes continuous
&H03
(12) $on_checksum_error – This event occurs when the checksum error(mismatch) happens.
ASCII :
&H02 ‘8’
(&H38)
‘B’
(&H42)
‘*’ (&H2A)
7 bytes continuous
&H03
Binary :
&H02 &H8B &H00
5 bytes continous
&H03
(13) $on_checksum_success – This event occurs when the checksum is successful.
ASCII :
&H02 ‘8’
(&H38)
‘D’
(&H44)
‘*’ (&H2A)
7 bytes continuous
&H03
Binary :
&H02 &H8D &H00
5 bytes continous
&H03

64
3-3-7. Flexible-Length Event (advanced)
(13) $on_file_read: This event happens when there is a need to read a file and inform its contents.
Usually this is a response to the FRead command.
ASCII:
STX
(&H02)
‘F’
(&H46)
‘F’
(&H46)
Length of
STX~ETX:
hexadecimal
4 bytes
‘4’
(&H3
4)
‘1’
(&H31)
Query ID:
hexadecima
l
2 bytes
‘1’ means
success,
‘0’ means
failure.
1 byte
A string of
hexadecimals of
the file content
(which will be
empty if failed):
Flexible length
ETX
(&H03)
* Query ID:
This is a parameter value sent with the FRead command and is used to check whether the request
and the response match.
* A string of hexadecimals of the file content:
In ASCII mode, a 3-byte data such as &H30,&H2A,&HF7 will be expressed as ‘302AF7’ (6 bytes).
Binary:
STX
(&H02)
&HFF STX~ETX
Length’s
upper byte
STX~ETX
Length’s
lower byte
&H41 Query ID:
1 byte
‘1’ means
success,
‘0’ means
failure.
1 byte
File content
in binary
(which will
be empty if
failed):
Flexible
length
ETX
(&H03)

65
Chapter 4. Additional Features
4-1. USB ports for Keyboard and Mouse
The USB host and the device each has one USB port and they are of USB version 1.1. The host port
accepts either a mouse or a keyboard. If you want to use both at the same time, you have to use a USB
hub. We recommend using a version 1.1 USB hub. The USB port on the device side is for active sync.
See how to use the ActiveSync.
Warning: Use a USB Mouse that is PS2-compatible.
4-2. SD Memory Card
IntelliLCD supports use of a SD memory card (which should be separately acquired) of a capacity of up to
2 GB. IntelliLCD utilizes the SD memory space as follows:
This is where the user can store his/her data. For example:
A BMP image can be stored as a file in advance on the SD card and it can be displayed on the screen.
Data generated during system operation can be saved as a file on the SD card.
TrueType fonts besides the builtin fonts can be added by the user by storing them on the SD card.
- When one store the additional fonts at the pre-designated folder (“Storage Card\Fonts”) on the SD
card and reboot the system, the new fonts are automatically recognized.
Tip: When one uses a FAT file system, where files have been written and erased over a long period of
time, some files could be fragmented. Fragmentation can make IntelliLCD’s recognition time longer. In
such a situation, if defrangmentation is done on the PC, the recognition time can be optimally shortened.

66
4-3. Firmware Upgrade
For IntelliLCD’s feature improvement and bug correction, we made it so that users can upgrade the
firmware on their own. Accordingly, users need not send the system to us or visit our company, but
perform the upgrade at home themselves. Firmware upgrade happens through the use of an SD memory
card and the upgrade file can be downloaded from our company’s website: www.comfiletech.com
<How to upgrade the Firmware>
Download the updated, new firmware file from our company’s website.
Copy the file into the SD memory card’s root directory without changing the file name.
When your PC does not have an SD Card Reader, use ActiveSync instead. (See how to use ActiveSync
below.)
After the copying is completed, install the SD card on IntelliLCD and turn the power off and on; the
following message will appear on the screen, informing that the update is completed.
Note 1: The original update firmware file on the SD card will be deleted automatically.
Note 2: Though the purchased IntelliLCD will have the most recent firmware installed based on its
manufacture date, we recommend checking our website if any newer firmware version has been uploaded.
Note 3: If you don’t have SD card, using Flash Disk is okay.

67
4-4. Adding Extra Fonts by the User
1. Copy TrueType fonts into the SD card’s Fonts folder.
- The file names of the fonts should have one of two extensions: .TTF or .TTC. Note that the fonts
installed on your PC can be directly used without any change, and should not have read-only attribute.
Fonts on your Windows PC are located in the Fonts folder under the Windows folder.
2. After the new fonts are added, when the IntelliLCD system is turned off and turned on again, the new
font list will be outputted.
- The font names outputted at this time are the fonts name to be used as parameter values for
commands such as TextFont, where the pertinent parameter is font_face.
3. Built-in Font List (Available without SD card)
- Arial
- Arial Black
- AvantGarde Bk BT
- BankGothic Md BT
- Agency FB
- Book Antiqua
- Courier New
- BoomBox
- Copperplate Gothic Light
- Georgia
- Franklin Gothic Demi
- Freestyle Script
- Gil Sans MT
- Gloucester MT Extra Condensed
- Impact
- Haettenschweiler
- Humanst521 BT
- Matchworks
- Kabel Bk BT
- Koshgarian-Ligh
- Maiandra GD
- Rockwell
- Times New Roman
- SerpentineDBol
- Tahoma
4. The entire available font list (built-in + extended) is shown on the upper part of the initial LCD
screen.

68
4-5. How to use ActiveSync
The ActiveSync is software for connecting IntelliLCD to PC.
You can download from the Microsoft website.
http://www.microsoft.com or
http://www.cubloc.com/download/intellilcd/activesync45_eng.msi
ActiveSync program can be found elsewhere on the Internet thourgh search engines such as Google.com.
It is a public domain software. We will explain how to use ActiveSync based on its version 4.5.
1. Do not connect IntelliLCD and PC until ActiveSync is installed.
2. If you double-click the downloaded ActiveSync file, progress is made as shown below.
Click “NEXT”.
3. After the program is installed, an end-user license agreement window such as below will appear. Click
Yes/Agree and click NEXT.

69
4. Input user information and click NEXT.
5. After you clicked NEXT in the Step 4, in the following window will appear where you can decide in
which folder you would like to install the program. (We recommend you simply click NEXT to install in
the default folder.)
6. If you click NEXT again, installation progresses as below.
7. When the installation is completed, the following screen will be shown.

70
4-6. Execution of ActiveSync
1. After the installation of ActiveSync is completed, now connect IntelliLCD and the PC with the provided
USB cable.
USBCABLE
INTELLILCD
PC
2. When the connection is completed, the following window will appear. (if a ‘new partnership message
window’ appears, Click No.)
3. Now the IntelliLCD-PC connection is completed and one can see the storage contents of the IntelliLCD
from the PC’s screen.
If the connection does not work even if you tried to do as above, please check the following:
Click the right mouse button on the ActiveSync’s tray icon and select the Connection Settings.

71
Check if your setting is the same as follows:
Or disconnect and re-connect the USB cable.

72
4-7. Accessing the IntelliLCD’s Storage Device
1. Click the Explorer icon.
2. When clicked, an Explorer window such as below open up.
The explorer window works the same way as the Window’s Explorer window. If you drag the files on
your PC to this folder, they are copied to IntelliLCD. And if you drag some files in the IntelliLCD folder to
a certain folder on the PC, the IntelliLCD files are copied to the PC. Note that you should NOT alter
anywhere else other than the “Storage Card” folder. (The “Storage Card” folder is the SD card.) You can
copy Fonts files or BMP image files onto the SD card.

73
The figure shows the contents of the
Storage Card folder. To add more
fonts, copy the font files into the Fonts
folder..
After you copy a BMP image file into
this SD card’s root folder and issue a
DrawImage command with the file
name and the (x, y) coordinates, the
image will be displayed on the screen
at that position.
Also for firmware upgrade, you should
copy the updated firmware file into
this root folder and reboot the system.
3. Explanation of the Folders
- Flash Disk: This is a built-in Flash memory reserved for system use.
- Storage Card: This floder represents the SD card, where a user can freely write onto or delete a file
from. During the firmware update, the new firmware file should be copied into the “Storage Card” folder
which is SD card.
This Explorer window is that of the PC. If you drag a
file here and drop it into the explorer window on the
right, the file is copied to the IntelliLCD.
This Explorer window is
that of the IntelliLCD.
Through the use of
ActiveSync, it looks as if it
is one of the PC’s hard
drive.

74
Tip : If the command parameter wants to specify the file path under sub directory of storage card,
you can write like this for example : DrawImage ‘Storage Card\My Image\image.bmp’;
4-8. Customizing Initial Demo
1. Removing Demo
IntelliLCD plays demo repeatedly right after the power is on.
If you do not want to play demo, send the command like the following:
EnableDemo 0;
This command applies to the next boot.
2. Changing demo
If you want to play your own demo instead of the existing demo play, follow these steps:
1) Write your own commands in notepad by PC.
Example : color &H000000;boxfill 0,0,800,480;
2) Save it to PC as the file name is autorun.txt.
3) Copy the file to Storage Card folder of IntelliLCD (or Flash Disk will be OK too)

75
Chapter 5. Using IntelliLCD with CUBLOC
5-1. Connecting the CUBLOC Studyboard and IntelliLCD
One needs to connect CUBLOC and IntelliLCD so that a command on CUBLOC can be transmitted to
IntelliLCD. As explained previously, IntelliLCD receives date through its RS-232 interface. Thus, one
needs to connect IntelliLCD with one of the CUBLOC’s RS-232 channels.
The following is how to connect to IntelliLCD using the Cubloc Study Board-1. As shown below, Study
Board-1’s RS-232 port and IntelliLCD’s port are both of female type.
Thus, a 1:1 cable cannot be used; instead a male-to-male cross cable (which is provided) should be used.
1
2
3
4
5
1
2
3
4
5
6
7
8
9
6
7
8
9

76
5-2. Sending a command from CUBLOC to IntelliLCD
The following is an example of manipulating IntelliLCD through CUBLOC. (CUBLOC is an “embedded
computer” made by Comfile Technology, which can be programmed by BASIC and Ladder Logic
languages. For details, see www.comfiletech.com.)
For use with IntelliLCD, the Set iLcd command was added. (starting from Cubloc Studio v. 2.1.F.)
If your version of Cubloc Studio is of a version older than v. 2.1.F, download the most recent version
from www.comfiletech.com.
Set iLcd port_number
This command sets the RS-232 channel number. When the paramenter value port_number is omitted, it
defaults to 1.
Example: Set iLcd 1
This command outputs the IntelliLCD command through channel 1.
Based on the CUBLOC model you are using, the available RS-232 channels are different. In case of the
CB280 model, RS-232 channels 0 and 1 can be used. In case of the CB405 model, channels 0 through 3
are available.

77
The following program is a very simple example, which displays the text string “COMFILE” on the
IntelliLCD’s screen.
You will notice that an @ precedes all IntelliLCD commands. @ is the shorthand for PutStr command.
Next is a program which renders the same results as the above program.
If @ is not used, there is the inconvenience that the PutStr command (which sends the RS-232 data) and
the WaitTx command (which makes the system wait until the data in the transmission buffer is completely
transmitted) has to be used in every place where @ is used.
Next is a program which displays a character in sequence.
Const Device = CB280
Dim ai As Integer
Dim x1 As Integer, x2 As Integer, y1 As Integer, y2 As Integer
Dim fname As String * 20, Str As String * 90
'Set ilcd 1
Const waittime = 5000
Opencom 1,9600,3,80,180
Do
@ "Clear;"
‘ Draw 3 bmp images which were stored in SD card @ "DrawImage '05.bmp';"
Wait waittime
@ "DrawImage '07.bmp';"
Wait waittime
@ "DrawImage '08.bmp';"
Wait waittime
xxx1:
@ "Clear;"
@ "Textpos 10,5;"
44
fname = "Tahoma"

78
Str = "COMFILE Techonology"
y1 = 8
x1 = 5
Gosub strprint
y1 = 16
Gosub strprint
y1 = 24
Gosub strprint
Str = "COMFILE Techonology"
y1 = 48
Gosub strprint
y1 = 60
Gosub strprint
y1 = 80
Gosub strprint
Str = "COMFILE Techonology"
y1 = 100
x1 = x1 + 10
Gosub strprint
Wait waittime
'--------------------------------------------
@ "Clear;"
@ "Textpos 10,5;"
fname = "Courier New"
Str = "COMFILE Techonology"
y1 = 8
x1 = 5
Gosub strprint
y1 = 16
Gosub strprint
y1 = 24
Gosub strprint
Str = "COMFILE Techonology"
y1 = 48
Gosub strprint
y1 = 60
Gosub strprint
y1 = 80
Gosub strprint
Str = "COMFILE Techonology"
y1 = 100
x1 = x1 + 10
Gosub strprint
Wait waittime
'--------------------------------------------
@ "Clear;"
45
@ "Textpos 10,5;"
fname = "Arial"
Str = "COMFILE Techonology"
y1 = 8
x1 = 5
Gosub strprint
y1 = 16
Gosub strprint
y1 = 24
Gosub strprint
Str = "COMFILE Techonology"
y1 = 48
Gosub strprint
y1 = 60

79
Gosub strprint
y1 = 80
Gosub strprint
Str = "COMFILE Techonology"
y1 = 100
x1 = x1 + 10
Gosub strprint
Wait waittime
'--------------------------------------------
@ "Clear;"
@ "Textpos 10,35;"
@ "TEXTFONT 280,'Arial';"
@ "PRINT 'COMFILE';"
Wait WAITTIME
Loop
Do
Loop
strprint:
@ "Textpos 10,",Dp(x1),";"
@ "TEXTFONT ",Dp(y1),",'",fname,"';"
x1 = x1 + y1 + 15
@ "Print '",Str,"';"
Return
Tips
When you want to include the CUBLOC’s parameter value in an IntelliLCD command,
express it as follows:
@ "Textpos 10,",Dp(x1),";"
The Dp function converts a number (e.g. hexadecimal) into a decimal number.

80
5-3. How to Receive an Event on CUBLOC
We recommend using ASCII receive mode on CUBLOC. You may not need to change the mode, as
IntelliLCD’s initial default state is in ASCII mode. If you write a code as follows, an interrupt is generated
whenever the end code (03h) is detected, to call the “receive” routine. Next is a program code that
receives an event and displays it on the Debug terminal.
The 1st data field of the event is always 02h. Then the 2nd and 3rd fields are read to tell what kind of an
event this is. (An IF statement or a Select Case statement is used.) Then the entailing data is read to
determine the state of the event.

81
Chapter 6. IntelliLCD Simulator
The IntelliLCD Simulator is a LCD-emulator executable within CUBLOC Studio.
We already explained that the Set iLCD is the command that sets the RS-232 channel to transmit an
IntelliLCD command. Channel 0 means the RS-232 channel that is connected with the PC. Thus, if we
issue the command
Set iLCD 0
that means the IntelliLCD command will be sent to the PC. From then on the “IntelliLCD Simulator” is
executed.
Even though you do not have an IntelliLCD product, you can see the same effect on your PC if you use
this method.
When you use the IntelliLCD Simulator, you cannot use the Debug command. You need to issue the Set
Debug Off command so that all Debug commands are unexecutable.
Note that the display speed of the simulator on the PC is faster than that of the IntelliLCD. This is due to
the hardware difference between the PC and IntelliLCD. When you use the IntelliLCD Simulator, keep in
mind that there could be other differences besides the display speed.

82
Chapter 7. IntelliLCD TestBox
The TestBox is a utility program that enables a user to test the IntelliLCD’s operation status or function
while IntelliLCD system is connected to a PC. This program can be downloaded from
www.comfiletech.com for free. The PC and the IntelliLCD should be connected via 1:1 serial cable.
Before connecting, make sure you check the PC’s Com port first. When the TestBox program is executed,
the following screen will be displayed.
After you select the PC’s Com Port and
Baud rate, if you click the Open Port
button, you can start using the Testbox.
If you click any of the button here, you
can see the execution screen of the
related function on the IntelliLCD
screen.
You can confirm the contents of the
command sent from PC to IntelliLCD in
this area.
When an event happens, you can see
the contents of the event in this area.
The TextBox program can also be used to check whether IntelliLCD is operating normally.

83
Chapter 8. IntelliLCD Unicode Generator
The Unicode Generator is a PC utility to help you write multi-language ‘Print’ command using UNICODE.
This program can be downloaded from www.comfiletech.com for free.
To execute the Unicode Generator properly, you need to do two tasks beforehand as the following.
8-1. Installing Font
1) On PC (To execute Unicode Generator)
The font file which extension is TTF or TTC (i.e. msmincho.ttf) should be copied to the
Windows/Fonts folder.
2) On IntelliLCD (To execute IntelliLCD)
The same font file (*.TTF or *.TTC) used in PC should be copied to the <Storage Card/Fonts>
directory and rebooted.

84
8-2. Installing IME
1. Click <Control Panel> on the Windows Startup menu.
2. Select <Regional Options> on the Control Panel

85
3. Click [Details] on the [Languages] tab.
4. Click [Add…] Button on the [Settings] tab.

86
5. Select the language you want and click [OK] button.
6. Confirm that the input method is added.
7. Run Unicode Generator, and choose the language you want to input text.

87
8. Input the text.
9. Confirm that the result of command is created.

88
Chapter 9. System Variable
System Variable is the variables that the IntelliLCD system sets automatically, while general variables
are set by user using SetVar command.
For example, if you touch on the LCD, the system generates #sys_touch_x and #sys_touch_y variables
automatically for representing the coordinates of the touched point.
The name of system variables begins with the prefix #sys_, and they cannot be deleted by DelVar or
DelVarAll command.
The following is the system variable list which are currently supported :
9-1. Basic System Variables
Variable Name Explanation
#sys_fw_ver Firmware version (i.e: 194 for version 1.94, 200 for version 2.00)
#sys_screen_width The pixel count of width (i.e: 800)
#sys_screen_height The pixel count of height (i.e: 480)
#sys_tick_count The total elapsed time(seconds) since power is on.
#sys_untreated_buffer The buffer size in bytes of the commands which are not parsed.
If this value exceeds 1MByte, commands begin to be lost.
9-2. Event-related System Variables
Events related Variable Name Explanation
common #sys_ctrl_id The control ID the user manipulated recently
#sys_down The pressed state of touch, button, checkbox, or screen
area, which was manipulated recently
1 is down, 0 is released
$on_position #sys_position The position value of the slider contorl which was
manipulated recently
$on_touch #sys_touch_x The x-coordinate of touch point which was pressed or
released recently
#sys_touch_y The y-coordinate of touch point which was pressed or
released recently
$on_key_press #sys_ascii The ASCII code of the key which was pressed recently
$on_screen_touch #sys_screen_id The screen ID which was pressed recently
#sys_area_id The area ID of screen which was pressed recently
<THE END>