intelligent keyboard e-200/e-100 - roland...
TRANSCRIPT

ent with a superior Roland sound source, an intuitive user interface, a USB port, V-LINK compatibility and a
rvice, we urge you to read through this Owner’s Manual thoroughly. To avoid confusion, let’s agree to use to the E-200/E-100’s keyboard.
e information concerning the proper operation of the E-200/E-100. Be sure to keep this manual in a safe
his publication may be reproduced in any form without the written permission of Roland Europe S.p.a.
E-200_US Page 1 Tuesday, January 27, 2004 4:01 PM
rE-200/E-100InteLLIGENT KEYBOARD
Owner’s Manual
Thank you for choosing a Roland E-200/E-100 Intelligent Keyboard, a novel instrumhost of other useful functions.
To get the most out of the E-200/E-100 and to ensure many years of trouble-free sethe word “button” for all keys on the front panel, and use “key” only when referring
Before using this instrument, carefully read the “Important notes” (p. 5). They providplace for future reference.
Copyright © 2004 ROLAND EUROPE. All rights reserved. No part of t
r
E-200/E-100
Su
St
Fl
N
Microsoft and Windows are registered trademarks of Microsoft Corporation USA in the United States and other countries.Apple and Macintosh are registered trademarks of Apple Computer Corpora-tion USA in the United states and other countries.Mac OS is a registered trademark of Apple Computer Corporation.Other names of companies, products, or standards are the trademarks or reg-istered trademarks of their respective owners.
E-200_US Page 2 Tuesday, January 27, 2004 4:01 PM
2
perior sound sourceThe E-200/E-100’s sounds are based on full-length (uncom-pressed) waveforms, which is unique in this price range. This produces vibrant, realistic sounds quite unlike anything you would expect from a budget-friendly arranger keyboard. The E-200/E-100’s tone generator is 64-voice polyphonic.Combined with the new amplification system and Digital Bass Enhancer function, the E-200/E-100 sounds truly amazing, with a clear high end and a powerful low range.
ylist functionThe E-200/E-100 is Roland’s first arranger keyboard to sport the acclaimed Cover function found on the DisCover 5 and DisCover 5M. Simply by pressing one of the STYLIST buttons, you can change the orchestration of Standard MIDI Files – and now also of Music Styles.
ash memory and USBThe E-200/E-100 comes with 84 Music Styles in ROM, 19 additional Music Styles and several Standard MIDI Files. The additional Styles and SMFs reside in the E-200/E-100’s Flash memory area, whose contents can be expanded and man-aged via a USB connection with your PC or Macintosh com-puter.
ew conceptThe E-200/E-100 is 19-part multitimbral, with 3 parts that can be played via the keyboard (Main, Split and Dual). The Main part can be used to play melodies or for drumming, while the Split and Dual parts allow you to quickly add a sec-ond sound to your solo playing.Furthermore, the E-200/E-100 provides a new selection rou-tine for Music Styles, Tones, songs, and User Programs: the FAMILY [√][®] buttons can be used for selecting specific groups, while the SELECT [√][®] buttons allow you to choose a setting within the selected group.
Excellent ArrangerThe E-200/E-100 comes loaded with 103 all-new Music Styles prepared by Roland’s legendary Style foundry. As usual, several patterns are available (INTRO, ORIGINAL, VARI-ATION, FILL and ENDING), with additional options via the BAND ORCHESTRATOR buttons.
And much, much more…A metronome and several educational functions are pro-vided, while three digital effects processors (Reverb, Chorus and MFX) can be used to further enhance the already amaz-ing sound quality.The E-200/E-100 can play back GM, GM2, GS and XG song data, so that you can virtually use any Standard MIDI File available at your Roland dealer or on the Internet.Note: The E-200/E-100 supports XG Light and therefore only provides the basic set of compatible functions.
The E-200 is also equipped with a floppy disk drive (2DD/2HD) for data management and importing Music Styles pre-pared for older Roland arranger instruments.
Have fun!
Features
E-200/E-100
3
• In households with small children, an adult should provide supervi-sion until the child is capable of following all rules essential for the safe operation of the E-200/E-100.
......................................................................................................................................
• Protect the unit from strong impact.(Do not drop it!)
......................................................................................................................................
• Do not force the E-200/E-100’s adapter to share an outlet with an unreasonable number of other devices. Be especially careful when using extension cords—the total power used by all devices you have connected to the extension cord’s outlet must never exceed the power rating (watts/amperes) for the extension cord. Excessive loads can cause the insulation on the cord to heat up and eventu-ally melt through.
......................................................................................................................................
• Before using the E-200/E-100 in a foreign country, consult with your retailer, the nearest Roland Service Center, or an authorized Roland distributor, as listed on the “Information” page.
......................................................................................................................................
• The E-200/E-100 should be located so that its location or position does not interfere with its proper ventilation.
......................................................................................................................................
• This unit for use only with Roland keyboard stand KS-12. Use with other stands is capable of resulting in instability causing possible injury.
......................................................................................................................................
to things that must be g that must be done is ned within the circle. In t means that the power-rom the outlet.
o important instructions ning of the symbol is contained within the bol at left, it is used for
alerts to danger.
to items that must never . The specific thing that by the design contained of the symbol at left, it be disassembled.
E-200_US Page 3 Tuesday, January 27, 2004 4:01 PM
• Before using this instrument, make sure to read the instructions below, and the Owner’s Manual.
......................................................................................................................................• Do not open or perform any internal modifications on the unit.
......................................................................................................................................• Do not attempt to repair the E-200/E-100, or replace parts within it
(except when this manual provides specific instructions directing you to do so). Refer all servicing to your retailer, the nearest Roland Service Center, or an authorized Roland distributor, as listed on the “Information” page.
......................................................................................................................................• Never use or store the E-200/E-100 in places that are:
• Subject to temperature extremes (e.g., direct sunlight in an enclosed vehicle, near a heating duct, on top of heat-generating equipment); or are
• Damp (e.g., baths, washrooms, on wet floors); or are• Humid; or are• Exposed to rain; or are• Dusty; or are• Subject to high levels of vibration.
......................................................................................................................................
• This unit should be used only with a rack or stand that is recom-mended by Roland.
......................................................................................................................................
007• Make sure you always have the unit placed in such a way that it is
level and sure to remain stable. Never place it on stands that could wobble, or on inclined surfaces.
.....................................................................................................................................• The instrument should only be connected to a power supply of the
type described in the operating instructions, or as marked on the adapter supplied with the E-200/E-100.
.....................................................................................................................................
• Do not excessively twist or bend the adapter’s power cord, nor place heavy objects on it. Doing so can damage the cord, producing severed elements and short circuits. Damaged cords are fire and shock hazards!
.....................................................................................................................................• This instrument, either alone or in combination with an amplifier
and headphones or speakers, may be capable of producing sound levels that could cause permanent hearing loss. Do not operate for a long period of time at a high volume level, or at a level that is uncomfortable. If you experience any hearing loss or ringing in the ears, you should immediately stop using the unit, and consult an audiologist.
.....................................................................................................................................• Do not allow any objects (e.g., flammable material, coins, pins); or
liquids of any kind (water, soft drinks, etc.) to penetrate the unit.
.....................................................................................................................................
Used for instructions intended to alert the user to the risk of injury or material damage should the unit be used improperly.
* Material damage refers to damage or other adverse effects caused with respect to the home and all its furnishings, as well to domestic animals or pets.
Used for instructions intended to alert the user to the risk of death or severe injury should the unit be used improperly.
The � symbol alerts the usercarried out. The specific thinindicated by the design contaithe case of the symbol at left, icord plug must be unplugged f
The symbol alerts the user tor warnings.The specific meadetermined by the design triangle. In the case of the symgeneral cautions, warnings, or
The symbol alerts the user be carried out (are forbidden)must not be done is indicated within the circle. In the case means that the unit must never

r
E-200/E-100
...
...
...
...
...
...
...
...
12. Working with User Programs . . . . . . . . . . . . . . . . . . . . . . . 41
Writing your settings to a User Program. . . . . . . . . . . 41
Selecting a User Program . . . . . . . . . . . . . . . . . . . . . . . . . . . . . .41
13. MIDI functions . . . . . . . . . . . . . . . . . . . . . . . . . . . . . . . . . . . 4314. Data management. . . . . . . . . . . . . . . . . . . . . . . . . . . . . . . . 45
Working with the Flash memory . . . . . . . . . . . . . . . . . . 45
Archiving data using a computer (USB) . . . . . . . . . . . . . . . . . .47Disk functions [E-200 only] . . . . . . . . . . . . . . . . . . . . . . . . . . . .48
15. Using the outputs and an optional footswitch . . . . . . . . 5116. Miscellaneous. . . . . . . . . . . . . . . . . . . . . . . . . . . . . . . . . . . . 52
Functions for educational purposes . . . . . . . . . . . . . . . 52Initializing your E-200/E-100 (Factory) . . . . . . . . . . . . 52
17. Specifications. . . . . . . . . . . . . . . . . . . . . . . . . . . . . . . . . . . . 5318. Lists . . . . . . . . . . . . . . . . . . . . . . . . . . . . . . . . . . . . . . . . . . . . 54
Tones selectable via the front panel . . . . . . . . . . . . . . . 54
Drum Kits. . . . . . . . . . . . . . . . . . . . . . . . . . . . . . . . . . . . . . . . . . . .57Music Styles. . . . . . . . . . . . . . . . . . . . . . . . . . . . . . . . . . . . . . . . . .60Chord Intelligence . . . . . . . . . . . . . . . . . . . . . . . . . . . . . . . . . . . .61MIDI Implementation Chart . . . . . . . . . . . . . . . . . . . . . . . . . . . .63
E-200_US Page 4 Tuesday, January 27, 2004 4:01 PM
4
• Always grasp only the plug on the adapter when plugging into, or unplugging from, an outlet or this unit.
...................................................................................................................................• Try to prevent cords and cables from becoming entangled. Also, all
cords and cables should be placed out of the reach of children.
...................................................................................................................................• Never climb on top of, nor place heavy objects on the unit.
...................................................................................................................................• Never handle the adapter’s power cord or its plugs with wet hands
when plugging into, or unplugging from, an outlet or this unit.
...................................................................................................................................• If you need to move the instrument, take note of the precautions
listed below. Make sure to have a firm grip, to protect yourself from injury and the instrument from damage.• Disconnect the adapter.• Disconnect all cords coming from external devices.• Remove the music stand.
...................................................................................................................................• Before cleaning the unit, turn off the power and unplug the
adapter from the outlet.
...................................................................................................................................• Whenever you suspect the possibility of lightning in your area, dis-
connect the adapter from the outlet.
...................................................................................................................................• Should you remove screws, make sure to put them in a safe place
out of children’s reach, so there is no chance of them being swal-lowed accidentally.
...................................................................................................................................
1. Important notes . . . . . . . . . . . . . . . . . . . . . . . . . . . . . . . . . . .52. Panel descriptions. . . . . . . . . . . . . . . . . . . . . . . . . . . . . . . . . .73. First steps. . . . . . . . . . . . . . . . . . . . . . . . . . . . . . . . . . . . . . . .10
Setting up. . . . . . . . . . . . . . . . . . . . . . . . . . . . . . . . . . . . . . 10Demo songs . . . . . . . . . . . . . . . . . . . . . . . . . . . . . . . . . . . . 10Playing without accompaniment. . . . . . . . . . . . . . . . . . 11
4. Playing with accompaniment (Arranger) . . . . . . . . . . . . . .13Selecting Music Styles . . . . . . . . . . . . . . . . . . . . . . . . . . . 14Balance . . . . . . . . . . . . . . . . . . . . . . . . . . . . . . . . . . . . . . . . 15
5. Playing back songs . . . . . . . . . . . . . . . . . . . . . . . . . . . . . . . .166. Changing the Music Style or song orchestration . . . . . . .20
Stylist function . . . . . . . . . . . . . . . . . . . . . . . . . . . . . . . . . 20Using the Band Orchestrator function . . . . . . . . . . . . . 20
7. Recording your music. . . . . . . . . . . . . . . . . . . . . . . . . . . . . .228. Additional Music Style functions . . . . . . . . . . . . . . . . . . . .26
One Touch (OTP) . . . . . . . . . . . . . . . . . . . . . . . . . . . . . . . . 26Using the Music Assistant . . . . . . . . . . . . . . . . . . . . . . . . 26Melody Intelligence . . . . . . . . . . . . . . . . . . . . . . . . . . . . . 27Bass Inversion (Bass Inv) . . . . . . . . . . . . . . . . . . . . . . . . . 27
9. Keyboard part functions . . . . . . . . . . . . . . . . . . . . . . . . . . .28Selecting sounds for the Main, Split and Dual parts . 28Drum sounds and sound effects (“SFX”) . . . . . . . . . . . . 29Transpose . . . . . . . . . . . . . . . . . . . . . . . . . . . . . . . . . . . . . . 30Octave settings . . . . . . . . . . . . . . . . . . . . . . . . . . . . . . . . . 30
10. Performance functions and effects . . . . . . . . . . . . . . . . . .31Performance functions . . . . . . . . . . . . . . . . . . . . . . . . . . 31Using effects . . . . . . . . . . . . . . . . . . . . . . . . . . . . . . . . . . . 32V-LINK function . . . . . . . . . . . . . . . . . . . . . . . . . . . . . . . . 35
11. Function menu . . . . . . . . . . . . . . . . . . . . . . . . . . . . . . . . . . .37KB SET parameters . . . . . . . . . . . . . . . . . . . . . . . . . . . . . . . . . .37METRONOM parameters . . . . . . . . . . . . . . . . . . . . . . . . . . . . .38OCTAVE parameters . . . . . . . . . . . . . . . . . . . . . . . . . . . . . . . . .38VOLUME parameters . . . . . . . . . . . . . . . . . . . . . . . . . . . . . . . .38ARR SET parameters . . . . . . . . . . . . . . . . . . . . . . . . . . . . . . . .39EFFECTS parameters. . . . . . . . . . . . . . . . . . . . . . . . . . . . . . . . .39KB SCALE parameters . . . . . . . . . . . . . . . . . . . . . . . . . . . . . . .40
Contents

E-200/E-100
5
]
• When the E-200/E-100 is used at excessive volumes, the protection system of its power amplifier stage may come on and mute the speakers. In that case, reduce the volume setting and wait a few seconds.
Before using floppy disks (handling the floppy disk drive) [E-200 only]
• Install the unit on a solid, level surface in an area free from vibra-tion. If the unit must be installed at an angle, be sure the installation does not exceed the permissible range: upward, 2°; downward, 18°.
• Avoid using the E-200 immediately after it has been moved to a location with a level of humidity that is greatly different than its former location. Rapid changes in the environment can cause con-densation to form inside the drive, which will adversely affect the operation of the drive and/or damage floppy disks. When the E-200 has been moved, allow it to become accustomed to the new envi-ronment (allow a few hours) before operating it.
• To insert a disk, push it gently but firmly into the drive—it will click into place. To remove a disk, press the EJECT button firmly. Do not use excessive force to remove a disk which is lodged in the drive.
• Never attempt to remove a floppy disk from the drive while the drive is operating (the indicator is lit); damage could result to both the disk and the drive.
• Remove any disk from the drive before switching the instrument on or off.
• To prevent damage to the disk drive’s heads, always try to hold the floppy disk in a level position (not tilted in any direction) while inserting it into the drive. Push it in firmly, but gently. Never use excessive force.
• To avoid the risk of malfunction and/or damage, insert only floppy disks into the disk drive. Never insert any other type of disk. Avoid getting paper clips, coins, or any other foreign objects inside the drive.
E-200_US Page 5 Tuesday, January 27, 2004 4:01 PM
In addition to the items listed under “” (p. 3), please read and observe the following:
Power supply• Do not use this instrument on the same power circuit with any
device that will generate line noise (such as an electric motor or variable lighting system).
• Before connecting the E-200/E-100 to other devices, turn off the power to all units. This will help prevent malfunctions and/or dam-age to speakers or other devices.
Placement• Using the E-200/E-100 near power amplifiers (or other equipment
containing large power transformers) may induce hum. To alleviate the problem, change the orientation of this instrument or move it further away from the source of interference.
• This instrument may interfere with radio and television reception. Do not use it in the vicinity of such receivers.
• Observe the following when using the unit’s floppy disk drive. For further details, refer to “Before using floppy disks (handling the floppy disk drive) [E-200 only]”.
• Do not place the unit near devices that produce a strong mag-netic field (e.g., loudspeakers).
• Install the E-200/E-100 on a solid, level surface.
• Do not move the unit or subject it to vibration while the drive is operating.
• Do not expose the E-200/E-100 to direct sunlight, place it near devices that radiate heat, leave it inside an enclosed vehicle, or oth-erwise subject it to temperature extremes. Excessive heat can deform or discolor the instrument.
• To avoid possible breakdown, do not use the unit in a wet area, such as an area exposed to rain or other moisture.
• Do not allow objects to remain on top of the E-200/E-100. This can be the cause of malfunction.
Maintenance• For everyday cleaning wipe the E-200/E-100 with a soft, dry cloth or
one that has been slightly dampened with water. To remove stub-born dirt, use a mild, non-abrasive detergent. Afterwards, be sure to wipe the instrument thoroughly with a soft, dry cloth.
• Never use benzene, thinner, alcohol or solvents of any kind, to avoid the possibility of discoloration and/or deformation.
Repairs and data• Please be aware that all data contained in the instrument’s memory
may be lost when it is sent for repairs. In certain cases (such as when circuitry related to memory itself is out of order), we regret that it may not be possible to restore the data. Roland assumes no liability concerning such loss of data.
Additional precautions• Please be aware that the memory contents can be irretrievably lost
as a result of a malfunction, or the improper operation of the instru-ment.
• Use a reasonable amount of care when using the instrument’s but-tons, other controls, and jacks/connectors. Rough handling can lead to malfunctions.
• Never strike or apply strong pressure to the display.
• When connecting/disconnecting cables, grasp the connector itself—never pull on the cable. This way you will avoid causing shorts, or damage to the cable’s internal elements.
• A small amount of heat will radiate from the instrument during nor-mal operation. This is perfectly normal.
• To avoid disturbing your neighbors, try to keep the instrument’s vol-ume at reasonable levels. You may prefer to use headphones, so you do not need to be concerned about those around you (especially late at night).
• When you need to transport the instrument, package it in the box (including padding) that it came in. Otherwise, you will need to use equivalent packaging materials, or a flightcase.
• Use only a recommended footswitch (DP-2, DP-6, sold separately). By connecting any other footswitch, you risk causing malfunction and/or damage to the E-200/E-100.
1. Important notes

r
E-200/E-100
E-200_US Page 6 Tuesday, January 27, 2004 4:01 PM
6
Handling floppy disks [E-200 only]• Floppy disks contain a plastic disk with a thin magnetic coating.
Microscopic precision is required to enable storage of large amounts of data on such a small surface area. To preserve their integrity, please observe the following when handling floppy disks:
• Never touch the magnetic medium inside the disk.
• Do not use or store floppy disks in dirty or dusty areas.
• Do not subject floppy disks to temperature extremes (e.g., direct sunlight in an enclosed vehicle). Recommended temperature range: 10°~50°C (50°~122°F).
• Do not expose floppy disks to strong magnetic fields, such as those generated by loudspeakers.
• Floppy disks have a “WRITE” tab which can protect the disk from accidental erasure. It is recommended that the tab be kept in the PROTECT position, and moved to the WRITE position only when you wish to write new data onto the disk.
• Disks containing important performance data for this instrument should always be locked (have their write protect tab slid to the PROTECT position) before you insert them into the drive of another instrument.
• The identification label should be firmly affixed to the disk. If the label comes loose while the disk is in the drive, it may be difficult to remove the disk.
• Put the disk back into its case for storage.
Liability and copyright• Should data contained and stored on a floppy disk be lost, it is
unfortunately impossible to restore them. Roland Europe S.p.a. assumes no liability concerning such loss of data.
• Unauthorized recording, distribution, sale, lending, public perfor-mance, broadcasting, or the like in whole or in part, of a work (musi-cal composition, video, broadcast, public performance, or the like) whose copyright is held by a third party is prohibited by law.
• Do not use this unit for purposes that could infringe on a copyright held by a third party. Roland assumes no responsibility whatsoever with regard to any infringements of third-party copyrights arising through your use of this unit.
Rear side of the disk
WRITE(you can save data to the disk)
PROTECT(you cannot save data)
Protect tab

E-200/E-100
7
K
[V-LINK] button
Press this button to take advantage of the E-200/E-100’s V-LINK functionality for controlling video material via cer-tain performance functions and the right-most keys on the E-200/E-100’s keyboard. By using V-LINK-compatible video equipment, visual effects can be easily linked to, and made part of the expressive elements of a performance. By con-necting the E-200/E-100 to an optional Edirol DV-7PR or V-4, you can switch images in synchronization with music, or use the E-200/E-100’s performance functions or right-most keys to switch clips, control playback speed, etc.During song and Music Style playback, this button flashes to indicate the tempo and beats (BEAT function).
L
KEYBOARD CONTROL section
Press the
[SPLIT]
button to play different sounds with your left and right hands. Press the
[DUAL]
button to play two sounds simultaneously. Press the
[TRANSPOSE]
button to transpose the keyboard (see p. 30).
U
Y
Q
R
S
T
V
W
X
E-200_US Page 7 Tuesday, January 27, 2004 4:01 PM
Front panelA [POWER ON] button
Press this button to switch the E-200/E-100 on and off.
B BENDER/MODULATION leverBy performing left/right movements, you can bend your solo notes down (left) or up (right). Press this lever towards the rear of the instrument to add modulation (usually vibrato) to the notes you are playing.
C PHONES 1/2 sockets [E-200 only]This is where you can connect two pairs of optional head-phones (Roland RH-25 or RH-50). By doing so, you switch off the E-200’s speakers.
D VOLUME knobUse this knob to set the global volume of your E-200/E-100.
E BALANCE [ACCOMP] [KEYBOARD] buttonsUse the BALANCE buttons to change the volume of the cor-responding section (accompaniment/song, or the parts you play on the keyboard).
F [TAP TEMPO] buttonPress this button at least twice to set the Arranger’s or Recorder’s playback tempo.
G [METRONOME] buttonThis button allows you switch the metronome on and off. Holding it for more than one second calls up a FUNCTION parameter you can set.
H [MELODY INTELLIGENCE] buttonThis button allows you to switch the Melody Intelligence function on/off. Melody Intelligence is a function that adds a harmony part to your melody playing. See p. 27. Holding it for more than one second calls up a FUNCTION parameter you can set for selecting the harmony type.
I [USB] buttonThis button allows you to select the function of the USB port: mass storage (archiving and retrieving settings to/from a computer). See page 47 for details. Press it together with [KEYBOARD¥TOUCH] to select the E-200/E-100’s demo function (see p. 10).
J [KEYBOARD TOUCH] buttonPress this button to switch the keyboard’s velocity sensitivity on or off. When it is switched off, you can specify the fixed velocity value that should be used for all notes you play.
2. Panel descriptions
A
B
C
D
E
F I J
L
M O
K
G
H
N P
Z

r
E-200/E-100
STYLE buttons:
These buttons allow you to select Style families and can also be used for entering numbers and characters when writing names. After double-clicking the
[STYLE]
,
[TONE]
,
[SONG]
or
[MUSIC¥ASSISTANT]
button, they also allow you to select the desired memory/entry.The TEMPO/DATA
[NO/–]
/
[YES/+]
buttons allow you to set the arranger or Song tempo and the value of the selected FUNC-TION parameter.
Note:
The E-100 doesn’t have a disk drive. That is why the
[DISK]
button (disk Style selection) is called
[USER¥STL]
. (It allows you to select the Style family of the same name.)
V
[FUNCTION] button
This button provides access to the FUNCTION menu. You can use the FAMILY and SELECT
[√][®]
buttons to select the desired function.
W
[DISK] button
[E-200 only]
Press this button to access the Disk functions. They are used for loading data from floppy, saving data to disk, and man-aging floppy disks. See p. 48.
Note:
You can also save and load data via USB.
X
[USER PROGRAM/WRITE] button
Press this button whenever you want to select a User Pro-gram (a set of registrations). Press and hold it to save the current panel and parameter settings to a User Program. See page 41.
Y
TONE section
These buttons allow you to select the “best” sound of the indicated family (i.e. the “best” piano, organ, guitar/bass, etc. sound). After selecting one of these favorites, you can use FAMILY
[√][®]
and SELECT
[√][®]
to select other families and other Tones within the active family.
Z
Disk drive
[E-200 only]
, in the middle below the keyboard (not pictured)
This is where you insert floppy disks with Standard MIDI Files or Music Styles you may already own. The drive accepts 2DD (720kB) and 2HD (1.44MB) floppy disks.
E-200_US Page 8 Tuesday, January 27, 2004 4:01 PM
8
M BAND ORCHESTRATOR sectionPress one of these buttons to choose the desired orchestra-tion for the selected Music Style. See page 20.
N ARRANGER & SONG CONTROLS section[SYNC¥START/MARKER¥A–B] button: This button performs two functions: In Arranger mode (while using the automatic accompaniment), it allows you to switch the SYNC START function on and off.In Song mode, it can be used to specify the beginning (“A”) and end (“B”) of the passage that should be repeated.The remaining buttons in this section allow you to control Arranger or Recorder playback. See pages 13 and 16.
O STYLIST sectionThe buttons in this section provide access to pre-pro-grammed templates that allow you to quickly modify Music Styles’ or Standard MIDI File’s character. See page 20.When the Minus One function is on, these buttons allow you to quickly mute several Standard MIDI File parts (these mute functions are not available while you are using the Arranger function).
P ONE TOUCH PROGRAM sectionThese buttons allow you to quickly configure the E-200/E-100 for use with ([ARRANGER]) or without ([PIANO]) auto-matic accompaniment. At power-on, the E-200/E-100 selects the PIANO SOLO mode. Press the [OTP1/OTP2] button to select the desired One Touch settings. These two memories (“1” and “2”) contain a number of settings that complement the currently selected Music Style. There are two One Touch memories per Music Style. See p. 26.
Q [MUSIC ASSISTANT] buttonThis button allows you to work with pre-programmed regis-trations (additional User Programs). See p. 26.Note: Press this button twice in succession (“double-click”) so that it flashes to select the desired memory using the numeric buttons.
R [SONG] buttonThis button allows you to select the E-200/E-100’s Song mode and to specify that the [INTRO], [ORIGINAL], etc., but-tons should be used to operate the on-board Recorder. Note: Press this button twice in succession (“double-click”) so that it flashes to select the desired memory using the numeric buttons.
S [STYLE] buttonPress this button if you want to select Music Styles. By acti-vating this button, you also specify that the [INTRO], [ORIGINAL], etc., buttons are used for selecting a Style Divi-sion, while the numeric buttons can be used to select the desired Style family. Note: Press this button twice in succession (“double-click”) so that it flashes to select the desired memory using the numeric buttons.
T [TONE] buttonPress this button if you want to use the FAMILY and SELECT [√][®] for assigning a sound (“Tone”) or Drum Set to the Main, Split or Dual part. See p. 28.Note: Press this button twice in succession (“double-click”) so that it flashes to select the desired memory using the numeric buttons.
U DATA ENTRY buttonsFAMILY and SELECT [√][®] buttons: The FAMILY and SELECT [√][®] buttons are used to select Tones, Styles, Music Assistant memories, Songs, and Function parameters. The FAMILY [√][®] buttons allow you to select a group. You can press them, hold them, or press one while holding the other to change the scrolling speed.The SELECT [√][®] buttons allow you to choose items within the selected group or family. You can press them, hold them, or press one while holding the other to change the scrolling speed. After selecting the last item of the currently selected group, pressing [®] again takes you to the first entry of the following group. Conversely, pressing [√] again after select-ing the first entry of a group takes you to the last entry of the preceding group.

E-200/E-100
9
D
MIDI OUT/IN sockets
Connect the MIDI OUT socket to the MIDI IN jack of your computer (or MIDI instrument) to transfer MIDI data from the E-200/E-100 to the computer or external MIDI instru-ment. Connect the MIDI IN socket of the E-200/E-100 to the computer’s MIDI OUT jack to receive data from the com-puter.
E
USB port
The USB port can be used for archiving purposes with a com-puter.
E-200_US Page 9 Tuesday, January 27, 2004 4:01 PM
Rear panel
A OUTPUT R, L/MONO socketsThese sockets allow you to connect the E-200/E-100 to your HiFi amplifier, a mixer, a cassette deck, a keyboard amplifier, etc. If the external amplifier is mono, be sure to connect it to the OUTPUT L/MONO socket.
PHONES 1/2 sockets [E-100 only](Next to the OUTPUT sockets) This is where you can connect two pairs of optional headphones (Roland RH-25 or RH-50). By doing so, you switch off the E-100’s speakers.
B DC IN socketThis is where you need to connect the supplied adapter (PSB-4U for the E-200, ACO for the E-100). After connecting the adapter cable, wind it around the cord hook to the socket’s right to prevent accidental power failures.Note: Be sure to only use the adapter supplied with your E-200/E-100. Other adapters may damage your Intelligent Keyboard.
C FOOTSWITCH socketThis is where you can connect an optional DP-2, DP-6, or BOSS FS-5U footswitch that allows you to hold (“sustain”) the notes you play with your right hand. It can also be used for controlling other parameters (see “FSW° (Footswitch Assign)” (p. 38)).
A B C D E F

r
E-200/E-100
(1(2
(3
(4
(5
Playing back a Tone demo song(1) Press the [TONE] button.
Playback of the Tone demo song starts automatically.
You can now press [START÷STOP] to stop playback of the currently selected Tone song. If you press this button again, the next Tone demo song will be played back.
(2) Press [START÷STOP] to stop Tone demo song playback.
Playback of a Style demo song(1) Press the [STYLE] button.
Playback of the Style demo song starts automatically.You can now press [START÷STOP] to stop playback of the currently selected Style demo song. If you press this button again, the next Style demo song will be played back.
(2) Press [START÷STOP] to stop Style demo song playback.
TONE
=DemStyle 146
STYLE
E-200_US Page 10 Tuesday, January 27, 2004 4:01 PM
10
Setting upThe first thing you need to do is connect the supplied PSB-4U (E-200) or ACO (E-100) adapter to a suitable wall outlet.) Unpack the E-200/E-100 and place it on a stable surface.) Connect the small end of the adapter cable to the E-200/
E-100’s DC IN jack, and the other end to a suitable wall outlet.
) Press the [POWER¥ON] button to switch on the E-200/E-100.
) Use the [VOLUME] knob to set the E-200/E-100’s output volume.
Note: When the E-200/E-100 is used at excessive volumes, the protection system of its power amplifier stage may come on and mute the speakers. In that case, reduce the volume setting and wait a few seconds.
) Press [POWER¥ON] again to switch the E-200/E-100 back off again.If you wish to connect the E-200/E-100 to a keyboard or HiFi amplifier, do so before performing step (3) and switch on the amp before performing step (4).
Demo songsYour E-200/E-100 comes with 1 song demo, 8 Tone demos, var-ious Style demos, and 1 Stylist demo.• The song demo illustrates the possibilities of the E-200/
E-100 as a whole.• Tone demos show off the E-200/E-100’s amazing sound
quality.• Style demos give you an impression of the quality of the
on-board Music Styles.• The Stylist demo shows you how easily the orchestration of
a Music Style can be changed.
(1) Hold down the [USB] button while pressing [KEYBOARD¥TOUCH].
(2) If necessary, use the [VOLUME] control to change the playback volume.
(3) Press [START÷STOP] to stop playback.
3. First steps
POWER ON
VOLUME
=DemoSong 120 001

E-200/E-100
11
(3) If necessary, select another sound by pressing one of the 8 TONE buttons. See p. 28 for details.
(4) If necessary, you can hold down the [TONE] button and use BALANCE [ACCOMP] (softer) or [KEYBOARD] (louder) to change the Main part’s volume.
Note: Unlike previous Roland arranger instruments, the E-200/E-100 no longer distinguishes between “melodic” parts and a Manual Drums part. You can therefore also play a Drum Kit with the Main part.Note: You can also press the [START÷STOP] button to add a rhythm accompaniment to your playing. This is based on the currently selected Music Style. See p. 14 for how to select a dif-ferent one.Note: See p. 13 and “Automatic playback start (Sync Start)” (p. 14) for other ways to start Music Style playback (the drums, that is).
GUITAR/BASS
BALANCEACCOMP KEYBOARD
TONE
E-200_US Page 11 Tuesday, January 27, 2004 4:01 PM
Playback of a Stylist demo song(1) Press one of the STYLIST buttons to select a Stylist demo
song.
Playback of the Stylist demo song starts automatically.(2) Use the STYLIST buttons to select other Stylist settings.
This is not really necessary, as the E-200/E-100 changes them automatically during this demo.
(3) Press [START÷STOP] to stop Stylist demo song playback.
Leaving the Demo mode(1) Hold down the [USB] button while pressing
[KEYBOARD¥TOUCH] to leave the Demo mode.
Playing without accompanimentWhen you switch on the E-200/E-100, it select the PIANO SOLO mode. This means that you can use the E-200/E-100 like a digi-tal piano, or a synthesizer.The accompaniment function (called “Arranger”) and [ONE¥TOUCH] button are not available in PIANO SOLO mode, while only the Main part is active.The E-200/E-100 provides three parts for your live playing (and many more for Arranger backing and Song playback):
Using the Main part(1) To activate the Main part and assign it to the entire key-
board, press the [PIANO] button.
The icon disappears, the Arranger stops (if it was playing), and the E-200/E-100 automatically selects a piano sound for you.
(2) Play a few notes on the keyboard.
=DemStLis 86
POP
Main As its name suggests, this is the most important part. As long as the Split part is off, the Main part is assigned to the entire keyboard.
Split When you switch on this part, it is assigned to the left half of the keyboard, while the Main part can be played with your right hand.
Dual This part can be added to the Main part and is also assigned to the entire keyboard. This allows you to play two sounds simultaneously.
ARRANGER

r E-200/E-100
U(1
(2
(3
(4
Using the metronomeYou can switch on the metronome when practising a new song.
(1) Press the [METRONOME] button.
The icon appears in the display and you hear the metro-nome sound.
(2) Press and hold [METRONOME] to select the Metro TS function.
(3) Use the [NO/–]/[YES/+] buttons to set another time signa-ture.The possibilities are: 1/4, 2/4, 3/4, 4/4, 5/4, 6/4, 6/8, 9/8.
(4) Press another “big” button in the DATA ENTRY section to leave this function.
(5) Press the [METRONOME] button again to switch the met-ronome off.
METRONOME
E-200_US Page 12 Tuesday, January 27, 2004 4:01 PM
12
sing the Main and Split parts) If you wish to play different sounds with your left and
right hands, press the [SPLIT] button.
The icon appears and the E-200/E-100 now automati-cally selects a sound for the Split part that complements the sound assigned to the Main part.
) Play a few notes on the keyboard.
At first, the keyboard is split at the C4 (note number “60”). If necessary, you can select a different split point. See “KeySplit* (Split point)” (p. 38).To change the balance between the Main and Split sounds, proceed as follows:
) Hold down the [SPLIT] button and use BALANCE [ACCOMP] (decrease) or [KEYBOARD] (increase) to change the Split part’s volume.
) To assign another sound to the Split part, hold down the [SPLIT] button and proceed like for the Main part (page 11).
Alternatively, press and hold one of the eight TONE buttons (Main part) while pressing another TONE button (Split part).Note: You cannot assign Drum Kits to the Split part.Note: You can also add a monophonic bass part (“Auto Bass”) to the Split part. See “Auto Bass*: status and volume” (p. 39).
Using the Main and Dual parts(1) If you wish to play two sounds simultaneously, press the
[DUAL] button.
The icon appears and the E-200/E-100 now automati-cally selects a sound for the Dual part that complements the sound assigned to the Main part.You can also activate the Dual mode by holding down one of the eight TONE buttons while pressing another. The first TONE button’s sound is then assigned to the Main part, while the second sound is assigned to the Dual part.
(2) Play a few notes on the keyboard.To change the balance between the Main and Dual sounds, proceed as follows:
(3) Hold down the [DUAL] button and use BALANCE [ACCOMP] (decrease) or [KEYBOARD] (increase) to change the Dual part’s volume.
(4) To assign another sound to the Dual part, hold down the [DUAL] button and proceed like for the Main part (page 11).Note: You cannot assign Drum Kits to the Dual part.
SPLIT
SPLIT
Split Main
BALANCEACCOMP KEYBOARD
SPLIT
DUAL
DUAL

E-200/E-100
13
Button Function
INTRO Playback of an introduction. This is automati-cally switched on when you press the [ARRANGER] button while the Arranger is stopped.
ORIGINAL Simple accompaniment version.
FILL Transition (“Fill In”) to VARIATION or ORIGINAL.
VARIATION Slightly more complex accompaniment ver-sion.
ENDING Phrase that indicates the end of the song. Use this button instead of [START÷STOP] to stop playback.
E-200_US Page 13 Tuesday, January 27, 2004 4:01 PM
Let us now take advantage of the E-200/E-100’s accompaniment function. This function is called “Arranger”.
Starting/using the Arranger(1) Press the [ARRANGER] button.
The icon appears in the display and the key-board is split into two halves. The keys you press in the left half are used to specify the key of the accompaniment. The right half of the keyboard allows you to play a tune to the accompaniment. This also switches on the Sync Start (see p. 14), Intro (see p. 13) and OT1 functions.
(2) Press the [START÷STOP] button (or play a note/chord with your left hand) to start Arranger playback.The [V-LINK] button now flashes to indicate the tempo and beats (BEAT function).Note: If the icon is displayed (and if you switched off the Sync Start function), playing in the left half of the keyboard while the Arranger is stopped, will sound a stereo string sound (to which you can add a monophonic bass sound, see “Auto Bass*: status and volume” (p. 39)). The left half of the keyboard is thus not muted (like on previous Roland arranger instruments). This “EP Chord” function can be switched off, however (page 39).
(3) Play a chord (or just one note) with your left hand.
(4) Play another chord (or note) to change the Arranger’s key.(5) Press the following buttons to use other patterns of the
currently selected Music Style:
These buttons select Music Style “patterns”. The icon corre-sponding to the button you press appears in the display.Also, the ARRANGER chord field in the display indicates the name of the chord you played last. This chord is used by the accompaniment.As soon as you feel comfortable with the Arranger, you should try to play a melody with your right hand while using your left for specifying Arranger chords.
4. Playing with accompaniment (Arranger)
ARRANGER
ARRANGER
ARRANGER
M

r E-200/E-100
C(6
A
Selecting Music StylesThe E-200 provides three memory areas for Music Styles (the E-100 has two):USER STL: (Memory 000) This is where a Music Style loaded from the Flash memory or floppy disk (MSA, MSD and MSE series, optional [E-200 only]) is temporarily stored. The data in this RAM memory are erased when you switch off the E-200/E-100. (The E-100 doesn’t have a floppy disk drive.)POP (001~019), BALLAD (020~031), OLDIES (032~041), COUNTRY (042~046), SWING (047~053), LATIN (054~063), GOSPEL (064~068),TRADIT (069~078): These are the Style families in the E-200/E-100’s internal ROM mem-ory. These Styles cannot be erased (but you can modify them in realtime using the Stylist and Band Orchestrator functions, see pages 20 and 20). FLASH: (Memories 101~199) This is a Flash area inside the E-200/E-100 that already contains 16 Styles when the E-200/E-100 is shipped. You can expand the number of Styles in this area by copying more Styles from your computer (via USB) or by saving the Styles loaded from disk [E-200 only]. There are 99 Flash memory slots in all, but the actual number of Styles you can save there depends on the data size of the Styles.[E-200 only] DISK: (Memories 201~…) This area refers to a floppy disk you inserted into the E-200’s drive. The number of available Styles depends on the floppy disk, of course. The Style you select is transferred to the E-200’s USER STL memory (see above), which is why it takes a little longer before you can use it. (You could, however, save it to a Flash memory, see p. 45.)
(1) Press the [ARRANGER] button.Check whether the and a
icon are displayed. (2) Press the [STYLE] button.
(3) If you want to use a style on floppy disk [E-200 only], insert the disk into the drive.
ARRANGER
INTRO ORIGINAL FILL VARIATION ENDING
STYLE
E-200_US Page 14 Tuesday, January 27, 2004 4:01 PM
14
hanging the tempo) Use the TEMPO/DATA buttons to decrease ([–]) or increase
([+]) the tempo (if necessary).
To return to the Music Style’s default tempo, simultaneously press [–] and [+].You can also press the [TAP¥TEMPO] button several times at the desired tempo.
utomatic playback start (Sync Start)Press [SYNC¥START] (if the icon is not yet dis-played). “Sync Start” means that the Arranger starts playing back the selected Music Style as you play a note or a chord with your left hand (to the left of the split point).
Note: This function is automatically activated when you press the [ARRANGER] button while Style playback is stopped.
Stopping Arranger playback(7) Press [START÷STOP] again to stop playback.
You can also press [ENDING]. In that case, you first hear an ending phrase. When it is finished, Arranger playback stops automatically.
TEMPO / DATA
NO YES
TAPTEMPO
SYNC START
SYNCSTART

E-200/E-100
15
BalanceThe BALANCE [√][®] buttons allow you to change the volume balance between the Arranger (or Song) parts and the Keyboard parts (the ones you can play yourself).
(1) Press BALANCE [ACCOMP] if the Arranger (or Song parts) are too soft.
(2) Press BALANCE [KEYBOARD] if you think your solo playing should be louder.By holding down [SPLIT] (or [DUAL]) while pressing these but-tons, you can modify the volume of those Keyboard parts. Note: See p. 38 for setting the volume of individual parts.
BALANCEACCOMP KEYBOARD
=Balance 80a10
E-200_US Page 15 Tuesday, January 27, 2004 4:01 PM
(4) Use FAMILY [√][®] or the STYLE buttons to select the mem-ory area that contains the desired Music Style.
The FAMILY buttons allow you to jump to the desired “fam-ily” (which also include the Flash and USER STL areas).
The display now shows the name of the selected family.
(5) Use the STYLE buttons to select an internal (or the DISK) family:
If you use these buttons, the family name is not displayed. Instead, you will see the name of the first Style within the selected family. Here is an example: if you press the BALLAD button, the display will show “020 PianoBall”.Note: On the E-100, the [DISK] button is called [USER¥STL]. It allows you to select the family of the same name.
(6) Use SELECT [√][®] to specify the desired Style within the selected group.
The first press of SELECT [®] (or [√]) shows the name of the first Music Style within the selected group. It is already selected, so if you need the first Style, there is actually no need to press SELECT [®]. You must use SELECT [√] or [®], however, to select another Style within the same group. You can also use the numeric buttons to select Styles. To do so, first “double-click” (press twice) the [STYLE] button (it starts to flash), then enter the number. (Press another button in the DATA ENTRY section to leave this “numeric selection state”.) See also “Working with the FAMILY and SELECT but-tons” (p. 17). After selecting memory 101 (Flash) or 201 (first disk memory [E-200 only]), the display shows a flashing Yes message.Note: If you select a Style while the Arranger is stopped, the E-200/E-100 automatically activates the OT1 memory.
Note: If you forgot to insert a floppy disk into the drive, the dis-play shows “No Disk” when you attempt to select the “disk family”.
(7) If necessary, confirm your selection by pressing the [+/YES] button.The display briefly shows “LOADING” (only after selecting a Style from the inserted floppy disk).[E-200 only] If you selected a Music Style on floppy disk, the
icon now flashes, and the E-200 automatically selects the USER STL memory that now contains the Music Style you loaded from floppy disk.If you press [+/YES] during Arranger playback, the new Style is used at the next downbeat (1st beat of the next measure). Otherwise, the E-200/E-100 displays its name and uses that Style when you press [START÷STOP].Note: [E-200 only] See page 45 for how to save the Music Style in the USER STL memory to the Flash memory.
FAMILY
=POP 73
=FLASH 132
SELECT

r E-200/E-100
Th saved to disk or to the E-200/E-100’s Flash memory. Your ow tware).
(1
(2
(4) Use SELECT [√][®] to specify the desired song within the selected group.This is only necessary for the Flash memory or a floppy disk (there is only one USERSONG memory).The first press of SELECT [®] (or [√]) shows the name of the first song within the selected group. It is already selected, so if you need the first song, there is actually no need to press SELECT [®]. You must use SELECT [√] or [®], however, to select another song within the same group. After selecting memory 101 (the first Flash memory), the display looks as follows.
You can also use the numeric buttons to select songs. To do so, first “double-click” (press twice) the [SONG] button (it starts to flash), then enter the number. (Press another button in the DATA ENTRY section to leave this “numeric selection state”.) See also “Working with the FAMILY and SELECT but-tons” below.
SELECT
=1000Mils101
E-200_US Page 16 Tuesday, January 27, 2004 4:01 PM
16
e E-200/E-100 allows you to play back commercially available music data files (called Standard MIDI Files) or your own songs youn songs are saved as Standard MIDI Format 0 files and can also be played back using any other SMF compatible sequencer (or sof
Basic song playback) Press the [SONG] button (it lights) to switch to Song
mode.
This is necessary because, otherwise, pressing the [START÷STOP] button will start Arranger playback. So be sure to check whether the [SONG] button lights and whether the
and icons are no longer displayed. Only then will the ARRANGER & SONG CONTROLS buttons allow you to control song playback (see above).
) [E-200 only] If you want to play back a song from floppy disk, insert the disk into the drive (front right).
(3) Use FAMILY [√][®] to select the memory area that contains the song you wish to play back.
The E-200/E-100 provides three memory areas for songs:USERSONG: (Memory 000) This where the song data you record are temporarily stored. The data in this RAM memory are erased when you switch off the E-200/E-100.FLASH: (Memories 101~199) This is the Flash area inside the E-200/E-100 that already contains several songs when the E-200/E-100 is shipped. You can expand the number of songs in this area by copying more songs from your com-puter (via USB). There are 99 Flash memory slots in all, but the actual number of songs you can save there depends on the data size of the songs.[E-200 only] DISK: (Memories 201~…) This area refers to a floppy disk you insert into the E-200’s drive. The number of available songs depends on the floppy disk, of course.
5. Playing back songs
SONG
ARRANGER INTRO ORIGINAL FILL VARIATION ENDING
FAMILY

E-200/E-100
17
Additional playback functionsThe [INTRO], [ORIGINAL], etc. buttons have two functions: one in Style mode (printed above the buttons), and another one in Song mode (printed below the buttons).
Selecting the Song modeThe ARRANGER & SONG CONTROLS buttons have two functions: they can be used for selecting Music Style patterns (when the
icon is displayed), or for Song navigation (when the [SONG] button lights).
To select the Song mode (and the SONG CONTROL func-tions), you need to press the [SONG] button. Only then will the following functions be available.
Fast Forward, Rewind, and Reset
• To fast forward (jump to a measure later in the song), press [‰].
• To rewind (return to a measure that lies before the current position), press [º].The measure indication in the upper right corner of the dis-play will help you locate the measure you need.
• Press [|√] (Reset) to jump back to the first measure of the song. You need to stop playback before using the [|√] button.
ARRANGER
SONG
E-200_US Page 17 Tuesday, January 27, 2004 4:01 PM
You can press FAMILY [√] or [®] either repeatedly (brief presses) to go back or advance, or hold down [√] or [®] to quickly select another family. The fastest way to scroll through the available families is by holding down [√] while pressing [®] (go backwards), or by holding down [®] while pressing [√] (advance). The same methods are available for the SELECT [√][®] buttons. As a reminder: the FAMILY buttons are used for selecting groups, while the SELECT buttons allow you to select items within a group.If you prefer to use the numeric buttons, enter three fig-ures (e.g. “001” for entry “1”). If you only enter two figures (or only one), the E-200/E-100 takes slightly longer to pro-cess your entry.Note: If the number you enter lies beyond the last available entry, the E-200/E-100 does not change.Note: Enter “000” (or “0”) to select the USERSONG memory.
After selecting memory 101 (Flash) or 201 (first disk memory [E-200 only]), the display shows a flashing Yes message. You can ignore this if you like, and proceed with the next step (or you can press [YES/+] and then proceed).Note: If you forgot to insert a floppy disk into the drive, the dis-play shows “No Disk” when you attempt to select a file on disk.
(5) After making sure that the correct song has been selected, you can press [START÷STOP] (now called [®÷ª]) to load it and immediately start playback.
The [V-LINK] button now flashes to indicate the tempo and beats (BEAT function).You can already select a new song while the current one is still playing back. If you want to listen to it before the cur-rent song is finished, stop playback by pressing [START÷STOP], then press that button again. Otherwise, wait until the current song is finished, then press the [START÷STOP] button to start playback of the new song.Note: Please bear in mind that starting playback of the selected song on disk will erase the song in the USERSONG memory. Be sure to save it to disk before proceeding (see p. 49).
(6) You can change the song tempo with the [NO/–]/[YES/+] buttons or [TAP¥TEMPO].Doing so, however, means that the tempo will still change if the song you are playing back contains tempo change mes-sages. Furthermore, every time you jump back to the begin-ning or another position of the song using [|√], [º] or [‰], the programmed song tempo is reset.
(7) Feel free to experiment with the STYLIST function (see p. 20).Note: In Song mode, the E-200/E-100 automatically selects the PIANO SOLO keyboard mode. If you like, you can play along with the song (and even use the Split or Dual part).Note: In certain cases, the display may show the message XG Light or GM2 rather than a Tone name. Such a message means that the E-200/E-100 is using a Tone that cannot be selected via the front panel. There are 798 such “hidden” Tones whose sole purpose is to ensure XG/GM2 playback compatibility.
Working with the FAMILY and SELECT buttons
START / STOP
r E-200/E-100
Lo
(1
(2
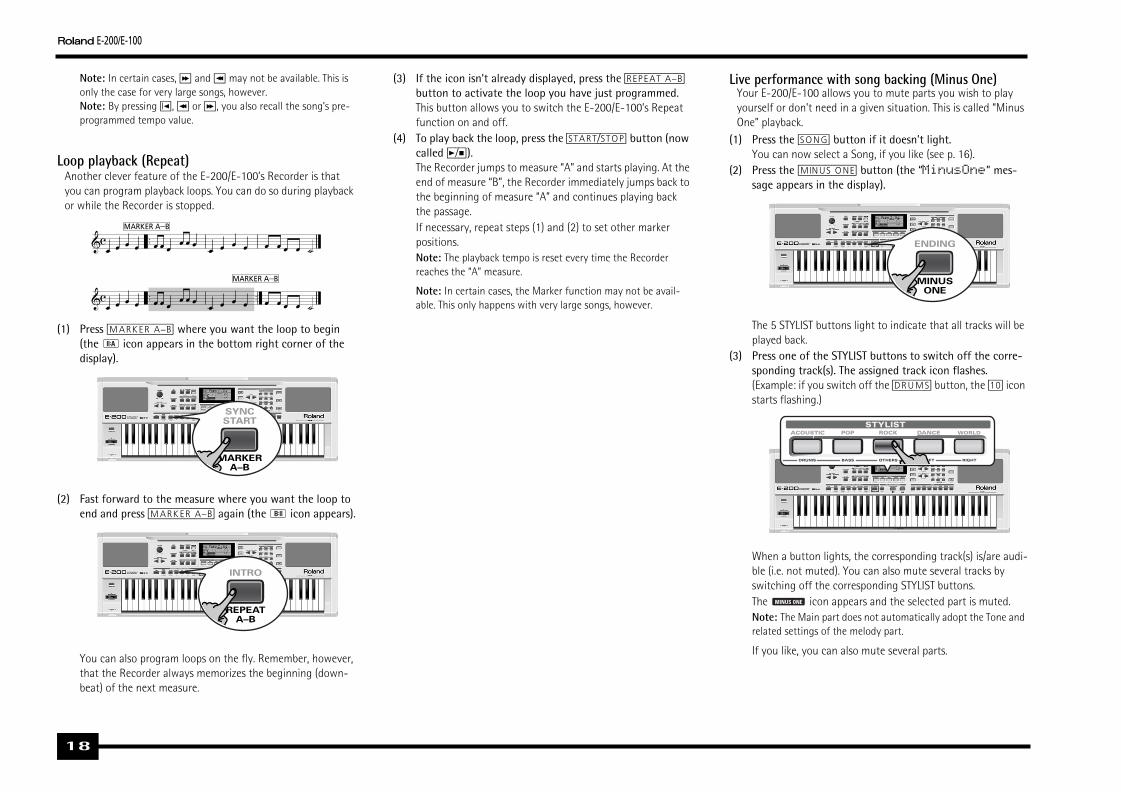
Live performance with song backing (Minus One)Your E-200/E-100 allows you to mute parts you wish to play yourself or don’t need in a given situation. This is called “Minus One” playback.
(1) Press the [SONG] button if it doesn’t light.You can now select a Song, if you like (see p. 16).
(2) Press the [MINUS¥ONE] button (the “MinusOne” mes-sage appears in the display).
The 5 STYLIST buttons light to indicate that all tracks will be played back.
(3) Press one of the STYLIST buttons to switch off the corre-sponding track(s). The assigned track icon flashes.(Example: if you switch off the [DRUMS] button, the [10] icon starts flashing.)
When a button lights, the corresponding track(s) is/are audi-ble (i.e. not muted). You can also mute several tracks by switching off the corresponding STYLIST buttons.The icon appears and the selected part is muted.Note: The Main part does not automatically adopt the Tone and related settings of the melody part.
If you like, you can also mute several parts.
MINUSONE
ENDING
MINUS ONE
E-200_US Page 18 Tuesday, January 27, 2004 4:01 PM
18
Note: In certain cases, [‰] and [º] may not be available. This is only the case for very large songs, however.Note: By pressing [|√], [º] or [‰], you also recall the song’s pre-programmed tempo value.
op playback (Repeat)Another clever feature of the E-200/E-100’s Recorder is that you can program playback loops. You can do so during playback or while the Recorder is stopped.
) Press [MARKER¥A–B] where you want the loop to begin (the icon appears in the bottom right corner of the display).
) Fast forward to the measure where you want the loop to end and press [MARKER¥A–B] again (the icon appears).
You can also program loops on the fly. Remember, however, that the Recorder always memorizes the beginning (down-beat) of the next measure.
(3) If the icon isn’t already displayed, press the [REPEAT¥A–B] button to activate the loop you have just programmed.This button allows you to switch the E-200/E-100’s Repeat function on and off.
(4) To play back the loop, press the [START÷STOP] button (now called [®÷ª]).The Recorder jumps to measure “A” and starts playing. At the end of measure “B”, the Recorder immediately jumps back to the beginning of measure “A” and continues playing back the passage.If necessary, repeat steps (1) and (2) to set other marker positions.Note: The playback tempo is reset every time the Recorder reaches the “A” measure.
Note: In certain cases, the Marker function may not be avail-able. This only happens with very large songs, however.
A
MARKERA–B
SYNCSTART
B
REPEATA–B
INTRO

E-200/E-100
19
Changing the track assignmentsIf the song files you are using do not use the GM system (and therefore do not correspond to the RIGHT, LEFT, BASS or DRUM assignments of the Minus One function), you can proceed as follows to assign other tracks (MIDI channels) to the STYLIST [RIGHT], [LEFT], [BASS] and [DRUMS] buttons:
(1) Press the [MINUS¥ONE] button to activate the function of the same name.
(2) Press and hold the [RIGHT], [LEFT], [BASS] or [DRUM] button.(3) While holding that button, use the [NO/–]/[YES/+] buttons
to assign the desired MIDI channel to the button you are holding.Example: To assign MIDI channel “10” to the [RIGHT] button, press DATA ENTRY [+] until the display looks as follows:
(4) Press [MINUS¥ONE] again (or one of the “big” DATA ENTRY buttons) to switch the function of the same name back off again.Note: The Minus One setting can be saved along with the selected song and its Stylist settings. See page 45.
RIGHT
E-200_US Page 19 Tuesday, January 27, 2004 4:01 PM
Songs you record with the E-200/E-100, and the Standard MIDI Files you play back can consist of up to 16 tracks (i.e. MIDI channels). In many instances, only certain tracks are used, but the following are almost certainly present in every Standard MIDI File:Track 2: bassTrack 4: melodyTrack 10: drumsThe STYLIST buttons allow you to mute the following tracks:[RIGHT]–Refers to track “4” of the selected Standard MIDI File. Music data for educational purposes (especially piano music) use this track for the right-hand part. Mute this track to play the right hand yourself while listening to the left-hand part of the Standard MIDI File. The E-200/E-100 con-tains an excellent stereo piano Tone you could use.[LEFT]–Refers to track “3” of the selected Standard MIDI File. Music data for educational purposes (especially piano music) use this track for the left-hand part. See also above.[OTHERS]–Mutes all tracks that cannot be muted with the remaining STYLIST buttons, more specifically: 1, 3, 6~9, 12~16.[BASS]–Mutes track “2”, which is assigned to the bass part of a Standard MIDI File.[DRUMS]–Mutes track “10”, which is assigned to the drum part of a Standard MIDI File.Note: You also switch off several buttons simultaneously.
(4) Press [|√] and [®÷ª] to start playback.(5) Press [®÷ª] again to stop playback.(6) Press [MINUS¥ONE] again (or one of the “big” DATA ENTRY
buttons) to switch the function of the same name back off again.Note: The Minus One setting can be saved along with the selected song and its Stylist settings. See page 45.
What are tracks?The term “track” is used only for your convenience. We bor-rowed it from tape recorders that allow for recording sev-eral musical parts by the same person (one part after the other).In the case of the E-200/E-100, the term is only used to indicate that we are dealing with separate musical parts. Here indeed (like with computer-based sequencers) what really counts are the MIDI channels.

r E-200/E-100
Yo ngs you play back via easy-to-use routines.
(1
Note: It is also possible to switch off ALL Stylist buttons to return to the original song or Music Style orchestration.Note: The STYLIST information is part of the song data only the E-200/E-100 understands. You can still play back the newly saved version of this song on another sequencer or SMF player (after transferring it to your computer via USB, for example), but the STYLIST information will be ignored.
Using the Band Orchestrator functionThe Band Orchestrator function allows you to vary the accom-paniment patterns played by the Arranger. You can leave out parts, thin out the drum part, etc. – in real-time (i.e. while you are playing).
(1) Press the [ARRANGER] button to select the Arranger mode.
(2) Select the Music Style you wish to use for playing (or use the one that is currently selected).See page 14.
(3) Press one of the following buttons to select the desired level of musical “complexity” (the corresponding icon is displayed):
DRUM & BASS
BAND ORCHESTRATOR
COMBO FULL BAND
E-200_US Page 20 Tuesday, January 27, 2004 4:01 PM
20
ur E-200/E-100 is a novel arranger instrument and Standard MIDI File player with two functions for “customizing” the Styles or so
Stylist functionThe Stylist function is derived from Roland’s revolutionary DisCover 5 keyboard. The E-200/E-100 provides five different templates you can select via the following buttons: [ACOUSTIC], [POP], [ROCK], [DANCE], and [WORLD].The Stylist function is available both for Style (see p. 13) and song playback (see p. 16). It provides “masks” that change the instrumentation of the selected song. Simply by selecting another preset, you can cause a reggae song (or Style) to be played back by a heavy metal band, etc. Even though the arrangement (rhythm, riffs) does not change, the overall char-acter can be modified beyond recognition.
) Press one of the STYLIST buttons.
That button now lights (there is no indication in the display).
The STYLIST buttons have the following meanings. You may notice that their function is akin to the EQ presets found on a ghetto blaster or similar device (except that they change the sounds themselves rather than the tone color).
(2) Press the [START÷STOP] button to start song (if the [SONG] button lights) or Arranger playback (if the [SONG] button is dark).
(3) If you like the new version better than the original one, you can save the song in the E-200/E-100’s Flash memory (page 45).Stylist changes to a Music Style need to be written to a User Program.Please note the following for the Stylist settings and Style selection: Whenever you select another Music Style, it is used without Stylist setting (STYLIST is reset).
6. Changing the Music Style or song orchestration
Button Function
ACOUSTIC Adds an “unplugged” touch to the song or Music Style.
POP Uses an orchestration that resembles the hits you hear on the radio.
ROCK Adds a rather “heavy” character to the song or Music Style.
DANCE Produces an “electronic” character.
WORLD Changes the song’s or Music Style’s mood to a something akin to world-music.
START / STOP
E-200/E-100
21
E-200_US Page 21 Tuesday, January 27, 2004 4:01 PM
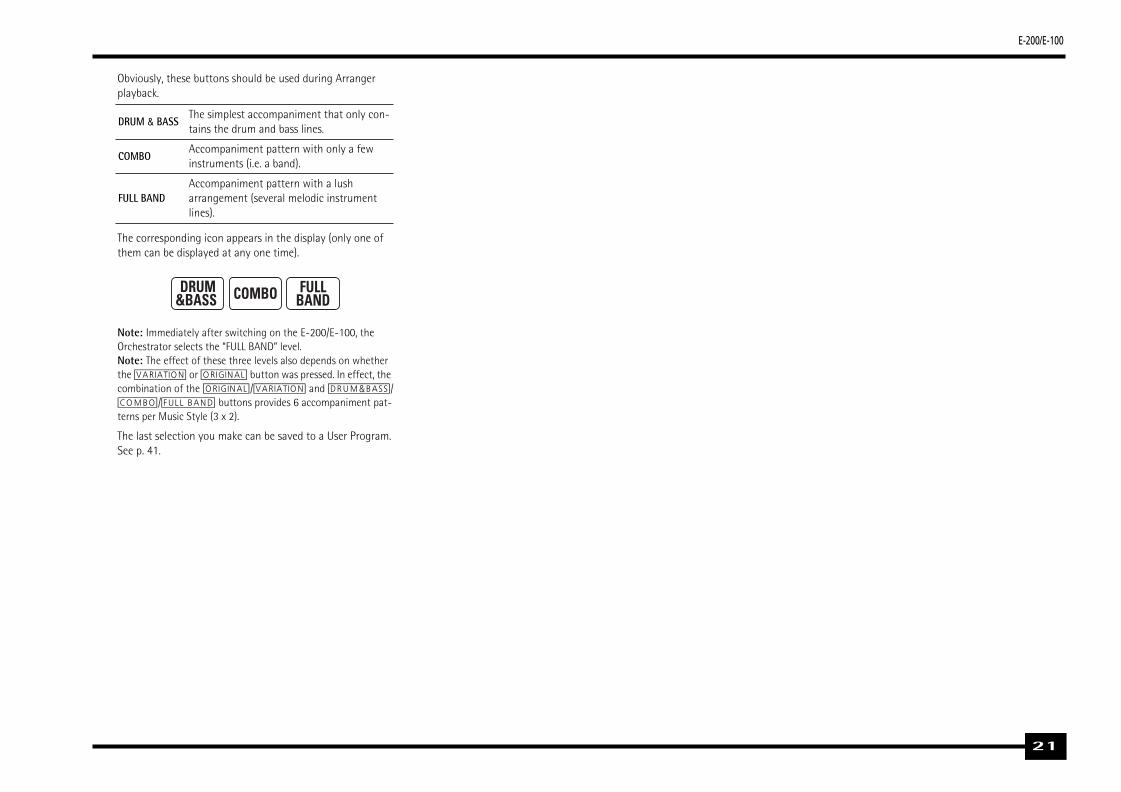
Obviously, these buttons should be used during Arranger playback.
The corresponding icon appears in the display (only one of them can be displayed at any one time).
Note: Immediately after switching on the E-200/E-100, the Orchestrator selects the “FULL BAND” level.Note: The effect of these three levels also depends on whether the [VARIATION] or [ORIGINAL] button was pressed. In effect, the combination of the [ORIGINAL]/[VARIATION] and [DRUM&BASS]/[COMBO]/[FULL¥BAND] buttons provides 6 accompaniment pat-terns per Music Style (3 x 2).
The last selection you make can be saved to a User Program. See p. 41.
DRUM & BASSThe simplest accompaniment that only con-tains the drum and bass lines.
COMBOAccompaniment pattern with only a few instruments (i.e. a band).
FULL BANDAccompaniment pattern with a lush arrangement (several melodic instrument lines).

r E-200/E-100
Yo
B
(1
(2
(3
(4(5
(6(7
• Press the [START÷STOP] button to start Arranger playback with the selected Division.
The [V-LINK] button now flashes to indicate the tempo and beats (BEAT function).Note: If you start recording without the Arranger and want to bring it in at a later stage, it would be a good idea to switch on the metronome by pressing the [METRONOME] button.
• Activate the [SYNC¥START] button (if it is off) and press one or several keys to the left of the Split point. Note: It is also possible to record in PIANO SOLO mode (after pressing the button of the same name). In that case, you should definitely use the metronome. The song’s time signature can be set with the MetroTS function. See page 12.
(10) Stop recording in one of the following ways:• Press [START÷STOP].• Press the [ENDING] button to start the Ending phrase. As
soon as it ends, Arranger playback and song recording stop.
START / STOP
ORIGINAL
|√
E-200_US Page 22 Tuesday, January 27, 2004 4:01 PM
22
ur E-200/E-100 contains a 16-track Recorder you can use for recording your own songs.
asic song recordingLet us first look at the most straight-forward way of recording your renditions with Arranger backing.) Press the [ARRANGER] button.
The icon appears. You can now use your left hand for transposing the Arranger’s key in realtime.
) Press the [STYLE] button and select a Music Style (or select a Music Assistant memory).
) Select the desired Arranger division by pressing [INTRO], [ORIGINAL] or [VARIATION].Note: [INTRO] is automatically selected when you press [ARRANGER].
) Press the [START÷STOP] button.) Use [TAP¥TEMPO] or the [NO/–]/[YES/+] buttons to set
desired tempo.) Press [START÷STOP] again to stop Arranger playback.) Assign the desired Tone to the right half of the keyboard.
Press [TONE] and use the FAMILY & SELECT [√][®] buttons or the buttons in the TONE section. See also page 28.Note: After pressing [ARRANGER], the OTP1 memory automati-cally assigns a suitable sound to the Main part.
(8) Press the [REC≈∏] button.
The display should look as shown above (if it doesn’t, use the FAMILY [√][®] buttons (“REC MODE”) to select REC All):(The [RECORD≈∏] and [1]~[16] icons flash.) You are now in ALL mode, which means that everything you and the E-200/E-100’s Arranger play will be recorded.
Note: If you select “REC ALL” with the FAMILY buttons, the song in the E-200/E-100’s USERSONG memory is erased. You may want to save the current song first (see p. 45). If you only pressed [REC≈∏], the E-200/E-100 selects the Single mode if the USERSONG memory already contains data. See page 24 for details about that mode.
(9) Start recording in one of the following ways:
7. Recording your music
ARRANGER
� REC
INTRO
FULLBAND
=
19
210
311
412
513
614
715
816
ORCHESTRATOR BEAT
ALL 120 001

E-200/E-100
23
Conversely, you cannot select “Single” or “Punch I/O” if the USERSONG memory doesn’t yet contain data.And finally: playing back a Standard MIDI File erases the song in the E-200/E-100’s memory. In return, the SMF data will be available (and can be supplemented with your own renditions in “Single” or “Punch I/O” mode).
More about ALL modeIn addition to what you learned on p. 22, here are a few consid-erations:After pressing the [REC≈∏] button, the 16 track and [RECORD∏] icons start flashing, signalling that all 16 tracks are available for recording.
Here is what the tracks correspond to (after recording a song with Arranger backing):
For your convenience, the Keyboard parts are flagged with a “k” symbol in the above graphic.Parts you do not hear during recording are not recorded. The track icons [1]~[16] thus do not show you what will be recorded, but rather what can be recorded.
INTRO
FULLBAND
=
19
210
311
412
513
614
715
816
ORCHESTRATOR BEAT
ALL 120 001
1 92 103 114 125 136 147 158 16
Accomp 1Arranger bass
Accomp 2
kMain
Accomp 3kDual*
Accomp 4
Accomp 5
Accomp 6Arranger drums
kSplit*
kAuto Bass* (see p. 39)
Melody Intell. (see p. 27)
(kMain**)
(*) Only one of these can be used alongside the Main part.(**) If you assign a Drum Kit to the Main part. In that case, track 4 is
not used.
E-200_US Page 23 Tuesday, January 27, 2004 4:01 PM
Listening to your song(1) Press the [SONG] button.(2) Press [START÷STOP] to start playback.(3) Press [START÷STOP] once again to stop playback.(4) Press [|√] to return to the beginning of the song.
Other recording functionsThe E-200/E-100’s 16-track Recorder can be used in several ways. Let us therefore have a look at the other recording modes.
About the recording modes�Modes
The E-200/E-100 provides two modes for recording new music, and two for adding parts or correcting passages of existing music:
Note: Every time you select the ALL or Keyboard mode, the data in the USERSONG memory are erased.
�Recorder memoryThe E-200/E-100 provides one “live” song memory, which can contain one song at a time. After completing a song, you should save it (see p. 49).To keep you from accidentally erasing the song in the E-200/E-100’s internal memory, the E-200/E-100 automatically selects Single after your first recording. Bear in mind that selecting “ALL” or “Keyboard” will erase the song in the USERSONG memory. Do not select “ALL” or “Keyboard” for adding parts to an existing song – use “Single” or “Punch I/O” instead.
Recording a new song:
ALL In this mode, you can record everything you and the E-200/E-100 can play simultaneously:• Arranger (accompaniment).• Keyboard parts (Main and Split or Dual).• Changes to the STYLIST settings for the
Music Style.
Keyboard In this mode, you can record using the Key-board parts. The track can be freely selected.• Main and Split or Dual
Adding parts to an existing song
Single In this mode you can record onto one track at a time. The track can be freely selected.
Punch I/O This mode allows you to re-record a short sec-tion of an otherwise perfect part.

r E-200/E-100
K
(1(2
(3(4
Si
(1(2(3
(1) Press the [REC≈∏] button.(2) Press FAMILY [√][®] to make the display look as follows:
The flashing track icon (only one) depends on the first track that already contains data. In the above example, track 1 contains data, which is why its icon flashes.
(3) Use the SELECT [√][®] buttons to select the track you wish to record to.
You can only select one track at a time.(4) Press [START÷STOP] to start playback of the (old) song
data.The icon and the icon of the selected track flash.
(5) When the Recorder reaches the measure where you wish to start recording, press [REC≈∏] again.The icon now lights steadily.
(6) Play the passage you want to redo.(7) Press [REC≈∏] again to deactivate recording.
Song playback still continues, so…(8) Press [START÷STOP] to stop playback.(9) Press [START÷STOP] to listen to the new version.
If you are not satisfied, return to step (3) above. Return to step (3) to correct another track.
INTRO
FULLBAND
=
1
ORCHESTRATOR BEAT
PunchI/O 120 001
SELECT
RECORD
RECORD
E-200_US Page 24 Tuesday, January 27, 2004 4:01 PM
24
eyboard recording modeIn Keyboard mode, you can record the Keyboard parts. The Arranger is not available. Essentially, this mode allows you to record either one layered part using up to two sounds (Main + Dual) or two parts (Split to the left, Main to the right). If you select a Drum Kit for the Main part, you can only record a drum part. Note: When you select the Keyboard mode, song data in the E-200/E-100’s internal memory will be overwritten by your new recording.
) Press the [REC≈∏] button.) Press FAMILY [√][®] to make the display look as follows:
The and track icons flash. ) To create a split, press the [SPLIT] button.) Activate the metronome (if necessary), and set the desired
tempo with the [TAP¥TEMPO] button or [NO/–]/[YES/+].You can also record without metronome if you like.Note: If you assign a Drum Kit to the Main part, your drum per-formance is recorded onto track 16.
ngle recording modeThis mode is only available if the E-200/E-100’s song memory already contains data. When you press [REC≈∏], the icon and the icon of the first empty track flash. You could therefore record a new part straight away. (If all tracks already contain data, Track 1 will be selected.)You can, however, also substitute an already recorded part with a new version.
) Press the [REC≈∏] button.) Press FAMILY [√][®] to select “Single”.) Use the SELECT [√][®] buttons to select the track you wish
to record to.You can only select one track at a time (hence the name “Single”). If you select a track that already contains data, your new version will overwrite the existing one.
(4) If necessary, assign the desired Tone to the part you are about to record (see p. 28).If you select track [10], you can select Drum Kits rather than Tones. Track 10 is reserved for drum parts.Note: If you use the Single recording mode for adding parts to a Standard MIDI File recorded with another instrument or sequencer, track 16 (or any other track defined as “second drum track”) may also use a Drum Kit that can be changed.Note: Even though the Main part can be used for recording all tracks in Single mode, the MFX only applies to track/MIDI chan-nel 4.
(5) Press [START÷STOP] to start recording.After a two-measure count-in (see p. 38), you will hear all parts that have already been recorded. Start playing (and recording) your new part.
(6) Press [START÷STOP] to stop recording.(7) Return to step (3) to record additional parts.
Punch I/OIn this mode, you can re-record part of a track (the second chorus, for example). The important aspect of this mode is that newly recorded material does not erase the material before or after the passage you redo.
By contrast, in Single mode, the entire track you record is replaced by your new material. (So if you don’t play anything during recording, the entire track will be empty afterwards.)Like the Single mode, Punch I/O can only be selected if the E-200/E-100’s memory already contains song data.
INTRO
FULLBAND
=
19
210
311
412
513
614
715
816
ORCHESTRATOR BEAT
Keyboard 120 001
RECORD
RECORD
Original track
This passage is redone

E-200/E-100
25
E-200_US Page 25 Tuesday, January 27, 2004 4:01 PM
You can also use an optional footswitch for starting and stopping recording. Doing so has the advantage that you can use both hands for playing (or the left hand for Pitch Bend/Modulation effects and the right for playing the melody.)
• Connect an optional DP-2, DP-6, or BOSS FS-5U footswitch to the FOOTSWITCH socket on the E-200/E-100’s rear panel.
• Press the [FUNCTION] button (it must light).
• Use FAMILY [√][®] to select “KB SET”.The E-200/E-100’s Function parameters are divided into 9 logical “families”. For the following, we need to select the group that contains the global keyboard settings.
• Use SELECT [√][®] to select the “FSW” parameter.
Note: See also “Working with the FAMILY and SELECT buttons” (p. 17).
• Use the [NO/–]/[YES/+] buttons to select “Punch I/O”.• Press [SONG] to return to the recording function.• Continue with step (1) under “Punch I/O”.
In steps (5) and (7), press the footswitch (rather than the [REC≈∏] button).
Using a footswitch for punching in/out
FUNCTION
SELECT
Sustain

r E-200/E-100
Ap s. Most of the following functions are only available after pr
(1
(2
(3
The following families are available: Ballad, Ballroom, Dancing, Easy List, Evrgreen, JazzSwng, and PopHit.
(3) Use SELECT [√][®] to specify the desired Music Assistant memory within the selected family.The first press of SELECT [®] (or [√]) shows the name of the first Music Assistant setting within the selected group. It is already selected, so if you need the first setting, there is actually no need to press SELECT [®]. You must use SELECT [√] or [®], however, to select another Music Assistant setting within the same group. You can also use the numeric buttons to select Music Assis-tant memories. To do so, first “double-click” (press twice) the [SONG] button (it starts to flash), then enter the number. (Press another button in the DATA ENTRY section to leave this “numeric selection state”.) See also “Working with the FAMILY and SELECT buttons” below.Note: If necessary, you can now change the settings you do not like (e.g. select another sound for the Main part, etc.) and then save your new version to a User Program (see p. 41).
=BALLROOM 102
E-200_US Page 26 Tuesday, January 27, 2004 4:01 PM
26
art from the basic Music Style functions covered on page 13 and following, your E-200/E-100 also provides the following functionessing the [ARRANGER] button (the icon must be displayed).
One Touch (OTP)The One Touch function automates quite a few tasks:• Suitable Reverb and Chorus settings.• The E-200/E-100 selects sounds for the Main, Split and Dual
parts that are is suitable for the selected Style.There are 2 One Touch memories per Style with different settings for the above parameters. Here is how to select one:
) Select the desired Music Style (see p. 14).If the Arranger is stopped, the E-200/E-100 also loads the corresponding OT1 memory.
) Press the [OTP1/OTP2] button.
The number field in the upper left corner reads “OT2” (second One Touch memory).
If the DATA ENTRY [TONE] button lights, the display now shows a Tone name.
) Press the [OTP1/OTP2] button again if you need “OT1” again. Note: One Touch is also available for Flash and disk Styles, but it is less meaningful.
Using the Music AssistantAnother practical function for quickly making the right settings for a song you want to play is to take advantage of the E-200/E-100’s novel MUSIC ASSISTANT function. It prepares every-thing for working with the Arranger (Style, Tones, effects, etc.). The Music Assistant is not available for song playback.The following parameters are changed automatically when you select a Music Assistant memory:
(1) Press the [MUSIC¥ASSISTANT] button.
It lights and the display shows the name of the last Music Assistant setting you selected (or of the first Music Assistant memory).
(2) Use FAMILY [√][®] to select the “family” (i.e. genre) that contains the desired Music Assistant settings.
8. Additional Music Style functions
ARRANGER
OTP1
OTP2
Piano 2
• Music Style• Tempo• Sounds for the Main, Split
and Dual parts
• Effect settings• Band Orchestrator• Keyboard Touch
MUSIC
ASSISTANT
FAMILY

E-200/E-100
27
Note: The Melody Intelligence setting can be saved to a User (3) Use SELECT [√][®] to select the “BassInv” parameter.
(4) Press the [+] button to select “ON” for “VALUE”.Note: See also “Working with the FAMILY and SELECT buttons” (p. 17).
(5) Press another “big” button in the DATA ENTRY section to leave this function.Note: This setting can be saved to a User Program (see p. 41).
More Music Style functionsHere are yet other functions related to Music Styles. These can be set via the FUNCTION menu, or are covered elsewhere:• Balance between the Keyboard parts and the Music Style
parts (see p. 15)• Volume of certain Music Style parts (see p. 39)• Arranger split point (see p. 38)• Hold function for the Arranger notes (see p. 39).
SELECT
MINTRO
FULLBAND
=
ORCHESTRATOR BEAT
BassInv 12000 001
E-200_US Page 27 Tuesday, January 27, 2004 4:01 PM
Melody IntelligenceThe Melody Intelligence function adds a second voice (harmony notes) to the melodies you play with your right hand. In fact, the Melody Intelligence function uses both halves of the key-board to determine which notes to play:• It looks at the melody notes in the right half; and…• It analyzes the chords you play in the left half to see which
notes it must add to your melody.
Press the [MELODY¥INTELLIGENCE] button so that the corre-sponding icon (see right illustration) appears in the display.
Changing the Melody Intelligence harmony typeThe E-200/E-100 contains 18 different voicings (harmony types) for the MELODY INTELLIGENCE function. These voic-ings specify the number of harmony notes and the way in which they are added to your melody.To select a different harmony type, press an hold the [MELODY¥INTELLIGENCE] button until the “MI” message appears in the upper left corner of the display.
Then use the [NO/–]/[YES/+] buttons to select the desired voicing. The available types are:
Program memory.
Bass Inversion (Bass Inv)Use this function to change the way in which the Arranger reads the chords you play.When this function is off (default), the Acc Bass part plays the root of the chords that feed the Arranger. If you play a “C” (or C chord), the bass sounds a “C”; if you play an A minor chord (or if you press “A” and the “C” to its right), the bass sounds an A, etc.By activating Bass Inversion, you can specify the note played by the A. Bass part (the lowest note of your chords). Switch on Bass Inversion for songs that rely on bass rather than on chord pat-terns (for example C – C/B – C/Bb, etc.).
(1) Press the [FUNCTION] button.
(2) Use FAMILY [√][®] to select “ARR SET”.
The E-200/E-100’s Function parameters are divided into 9 logical “families”. As the Bass Inversion parameter is an Arranger function, you need to select the Arranger settings (hence ARR SET).
MELODYINTELLIGENCE
MINTRO
FULLBAND
=
ORCHESTRATOR BEAT
Traditnl 12000 001
1 Duet2 Organ3 Combo4 Strings5 Choir
6 Block7 BigBand8 Country9 Traditnl10 Broadway
11 Gospel12 Romance13 Latin14 CntrGuit15 CntrBald
16 WltzOrg17 OctvTpe118 OctvTpe2
FUNCTION
FAMILY

r E-200/E-100
Se
(1
(2
(3
Using the TONE buttonsThe TONE buttons allow you to select 7 melodic sounds and one Drum Kit directly (without using [TONE], the FAMILY, SELECT and/or numeric buttons).
These buttons are assigned to our “favorite” sounds for the indi-cated categories, thus allowing you to quickly select “a piano”, “a string sound”, etc. The assignments to these buttons can be changed.Note: The TONE [DRUMS] button is only available for the Main part.
Assigning another Tone to a TONE buttonTo assign another sound to one of the 8 TONE buttons, first select it using the procedure described above, the press and hold the desired TONE button. The display briefly shows the message “Memrized”.Note: You can only assign Tones of the following families to the various buttons:[PIANO]: Piano, E.Piano, Keyboard, Chr Perc[ORGAN]: Organ, Accordion[GUITAR/BASS]: A. Guitar, E. Guitar, Bass[STRINGS]: Strings[VOCAL]: Vocal[SAX/BRASS]: Sax, Wind, Acc. Brass[SYNTH/OTHER]: Syn Brass, Syn Lead, Poly Syn, Pad, Ethnic, Prc-ssion, SFX + all other sounds[DRUMS]: Drums.
Note: These assignments are saved (and loaded) along with the User Program data (page 49).
E-200_US Page 28 Tuesday, January 27, 2004 4:01 PM
28
Selecting sounds for the Main, Split and Dual partsThe E-200/E-100 contains about 470 melodic sounds you can use for playing melodies (others are more like sound effects). Those sounds need to be assigned to a Keyboard part, of which there are three: Main, Split and Dual (see also p. 11).
lecting any of the available soundsUnlike previous arranger-type instruments, the E-200/E-100 no longer works with banks, numbers and variations: all available sounds can be selected via the same streamlined procedure.
) Press the DATA ENTRY [TONE] button (it must light).
) To assign another sound to the Split or Dual part, hold the [SPLIT] or [DUAL] button while performing the following steps.
) Use FAMILY [√][®] to select the desired Tone family.
By selecting another family, you immediately jump to the first sound of that group.
Note: See page 54 for a list of the available sounds.
(4) Use SELECT [√][®] to specify a sound within the selected family.The first press of SELECT [®] (or [√]) shows the name of the first Tone within the selected group. It is already selected, so if you need the first sound, there is actually no need to press SELECT [®]. You must use SELECT [√] or [®], however, to select another Tone within the same group. Note: This only selects the “best” sounds within the current family.Note: This setting can be saved to a User Program (see p. 41).
You can also use the numeric buttons to select sounds. To do so, first “double-click” (press twice) the [TONE] button (it starts to flash), then enter the number. You’ll find a list of the selectable Tones and their numbers on p. 54. (Press another button in the DATA ENTRY section to leave this “numeric selection state”.)See also “Working with the FAMILY and SELECT buttons” (p. 17), but replace “song” with “sound” in the explanations.
9. Keyboard part functions
TONE
FAMILY
• PIANO (001~004)• E.PIANO (005~011)• KEYBOARD (012~015)• CHR PERC (016~025)• ORGAN (026~041)• ACCORDN (042~045)• A.GUITAR (046~053)• E.GUITAR (054~062)• BASS (063~073)• STRINGS (074~084)• VOCAL (085~089)
• SAX (090~095)• WIND (096~102)• AC BRASS (103~112)• SYNBRASS (113~116)• SYNLEAD (117~131)• POLY SYN (132~138)• PAD (139~155)• ETHNIC (156~169)• PERCUSSION (170~173)• SFX (174~188)• OTHER (189~510• DRUM KIT (511~530)

E-200/E-100
29
(1) Press the [SPLIT] button.(2) Decide whether you want to play the sound effect or per-
cussion sound with your left or right hand.If you want to use your left hand, assign a sound effect to the Split part. To play the effect with your right hand, assign it to the Main part.
(3) Change the split point (page 38) in such a way that only a few keys are assigned to the percussion sound/sound effect (“C6” for right-hand effect playing, “C3” for left-hand effect playing).
(4) To obtain a meaningful effect, you may also have to change the MAIN Oct or SPLT Oct setting (page 38).If you assign a sound effect/percussion sound to the Split part, the key ranges could be set as shown below.
E-200_US Page 29 Tuesday, January 27, 2004 4:01 PM
Drum sounds and sound effects (“SFX”)
Drum KitsThe last 20 “sounds” (511~530) are so-called “Drum Kits”. When you select such a Kit, every key is assigned to a different sound. With the left-most key, you can play a bass drum sound (also called “kick”). The white key next to it triggers a snare drum sound, etc. Try it out by pressing several keys, either in succes-sion or simultaneously.
Drum Kits are collections of over 90 sounds, each assigned to a different key. Note: Drum Kits can only be assigned to the Main part (so neither to the Split, nor the Dual part).
Note: One Kit (530) is actually a sound effects (SFX) kit that cannot be used for “drumming” but rather for triggering various sound effects.
Note: This setting can be saved to a User Program (see p. 41).
Sound effects (“SFX”)The E-200/E-100 also contains individual sound effects (like “Train, “Kitty”, “HrseGllp”, etc.) and individual drum and percus-sion sounds that are assigned to the entire range of the part you select them for (Main, Split or Dual).Note that those sounds do not work like the Drum Kits: only one sound is assigned to the keyboard – and can be played melodi-cally (though “Train” melodies are probably “interesting” at best).It might therefore be a good idea to proceed as follows:C2 C3
IPop
Kik3
6 IP
opCS
tk37
st
IPop
Sn38
st
IPop
GstS
39st
IP
opSn
40st
IP
opTo
mLF
l41
IPop
Hat1
_42
IPop
Tom
L43
IPop
Hat2
_44
IPop
Tom
MFl
45
IPop
Hat3
_46
IPop
Tom
M47
IP
opTo
mHF
l48
IPop
Cym
l2_5
2 IP
opTo
mH5
0
Split part (sound effect/percussion sound) Main part (melodic sound)

r E-200/E-100
(1
(2
Octave settingsThe E-200/E-100 allows you to transpose the Keyboard parts (Main, Split, Dual) up or down by 4 octaves.To change the octave transposition of a part, hold down [TONE] (Main part), [SPLIT] (Split part) or [DUAL] (Dual part), while press-ing [–] (down) or [+] (up).
Other Keyboard part functionsHere are yet other functions related to the Keyboard parts. These can be set via the FUNCTION menu, or are covered else-where:• Keyboard velocity (see p. 31)• Master Tune (see p. 37)• Volume of the Keyboard parts (see p. 38)• Intelligence function for the Split part (see p. 38)• Hold function for the Split part (see p. 38).
TEMPO / DATA
NO YES
E-200_US Page 30 Tuesday, January 27, 2004 4:01 PM
30
TransposeThe Transpose function changes the pitch of the notes and chords you play. Instead of figuring out what other keys you need to press to accommodate the singer or an instrumentalist, you can set the required Transpose value and go on playing the song the way you practised it, while sounding in a different key. See the example above.) Press the [TRANSPOSE] button.
The display now looks as follows:
) Use the [NO/–]/[YES/+] and/or numeric buttons ([0]~[9]) to set the desired transposition interval.The setting range is –12~12 semitones. A “semitone” is one step between a white and a black key (or two adjacent white keys, i.e. between “E”/“F” and “B”/“C”).Press [+] or [–] repeatedly to transpose the keyboard up or down.
You can also directly enter the desired interval by pressing the corresponding numeric key.
To transpose the keyboard down, hold down [–] while press-ing [0]~[9] (in that case, you can transpose the pitch down by up to 9 semitones)Here’s an example: if you want to hear an “E” every time you play a “C”, select “4”. All other notes will be shifted by the same amount, so that you end up sounding in E major when you actually play in C major, etc.
The corresponding value and the icon appear in the display.
(3) To switch the Transpose function back off, repeat steps (1) and (2), this time selecting the value “0” (no transposi-tion).Note: This setting can be saved to a User Program (see p. 41).Note: There is also a function that allows you to specify which section(s) the Transpose function should apply to. See “Trans-Mod*” (p. 37).
TRANSPOSE
MINTRO
FULLBAND
=
ORCHESTRATOR BEAT
Transpos 12000 001
TEMPO / DATA
NO YES
No transposition (C major)
Transpos= 4 (E major)
TRANSPOSE
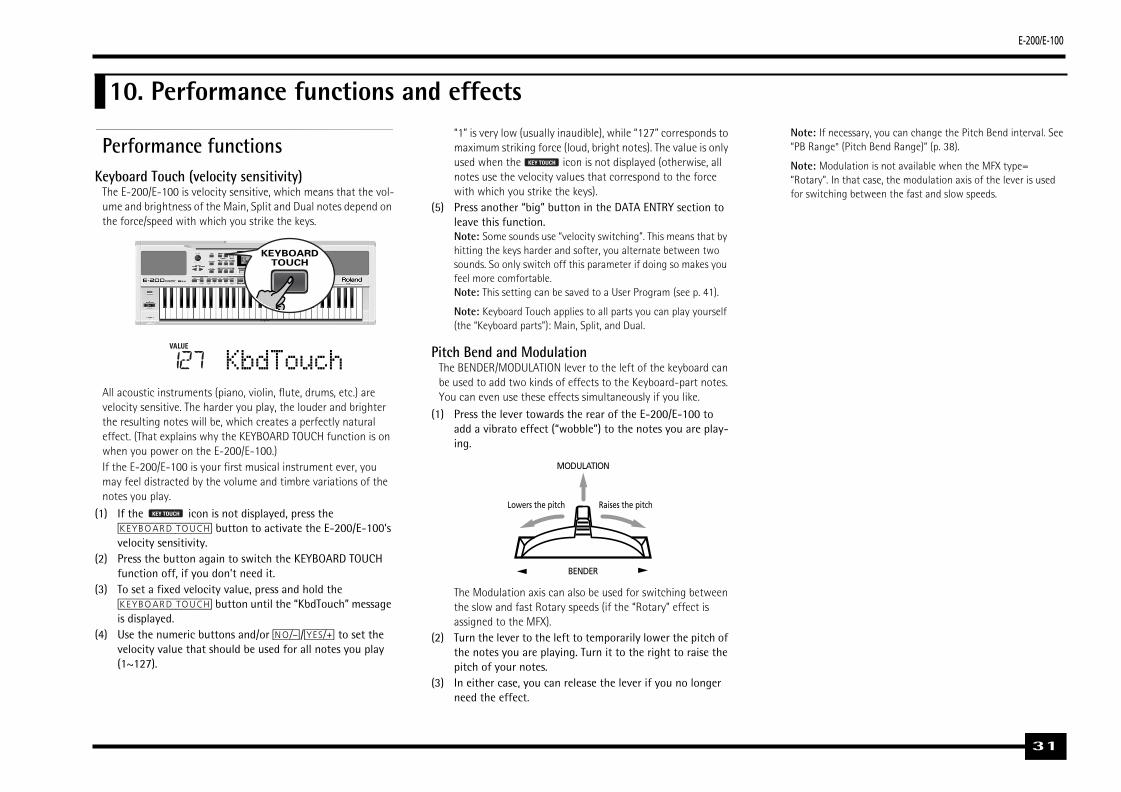
E-200/E-100
31
Note: If necessary, you can change the Pitch Bend interval. See “PB Range° (Pitch Bend Range)” (p. 38).
Note: Modulation is not available when the MFX type= “Rotary”. In that case, the modulation axis of the lever is used for switching between the fast and slow speeds.
E-200_US Page 31 Tuesday, January 27, 2004 4:01 PM
Performance functionsKeyboard Touch (velocity sensitivity)
The E-200/E-100 is velocity sensitive, which means that the vol-ume and brightness of the Main, Split and Dual notes depend on the force/speed with which you strike the keys.
All acoustic instruments (piano, violin, flute, drums, etc.) are velocity sensitive. The harder you play, the louder and brighter the resulting notes will be, which creates a perfectly natural effect. (That explains why the KEYBOARD TOUCH function is on when you power on the E-200/E-100.)If the E-200/E-100 is your first musical instrument ever, you may feel distracted by the volume and timbre variations of the notes you play.
(1) If the icon is not displayed, press the [KEYBOARD¥TOUCH] button to activate the E-200/E-100’s velocity sensitivity.
(2) Press the button again to switch the KEYBOARD TOUCH function off, if you don’t need it.
(3) To set a fixed velocity value, press and hold the [KEYBOARD¥TOUCH] button until the “KbdTouch” message is displayed.
(4) Use the numeric buttons and/or [NO/–]/[YES/+] to set the velocity value that should be used for all notes you play (1~127).
“1” is very low (usually inaudible), while “127” corresponds to maximum striking force (loud, bright notes). The value is only used when the icon is not displayed (otherwise, all notes use the velocity values that correspond to the force with which you strike the keys).
(5) Press another “big” button in the DATA ENTRY section to leave this function.Note: Some sounds use “velocity switching”. This means that by hitting the keys harder and softer, you alternate between two sounds. So only switch off this parameter if doing so makes you feel more comfortable. Note: This setting can be saved to a User Program (see p. 41).
Note: Keyboard Touch applies to all parts you can play yourself (the “Keyboard parts”): Main, Split, and Dual.
Pitch Bend and ModulationThe BENDER/MODULATION lever to the left of the keyboard can be used to add two kinds of effects to the Keyboard-part notes. You can even use these effects simultaneously if you like.
(1) Press the lever towards the rear of the E-200/E-100 to add a vibrato effect (“wobble”) to the notes you are play-ing.
The Modulation axis can also be used for switching between the slow and fast Rotary speeds (if the “Rotary” effect is assigned to the MFX).
(2) Turn the lever to the left to temporarily lower the pitch of the notes you are playing. Turn it to the right to raise the pitch of your notes.
(3) In either case, you can release the lever if you no longer need the effect.
10. Performance functions and effects
KEYBOARDTOUCH
KbdTouch00
KEY TOUCH
KEY TOUCH
BENDER
MODULATION
Lowers the pitch Raises the pitch

r E-200/E-100
Fo
(1
(2
(3(4
(5
Overdrv1~4: Overdrive creates a soft distortion similar to that produced by tube amplifiers. Several types of overdrive are available: (1) Small combo amp, (2) Combo amp, (3) Large double-stack amp (2 cabinets), (4) Large double-stack amp (3 cabinets).Distort1~4: This effect produces a more intense distortion than Overdrive. The numbers refer to different kinds of dis-tortion.Phaser: Adds a phase-shifted sound to the original sound, producing a twisting modulation that creates spaciousness and depth.AutoWah: The Auto Wah cyclically controls a filter to create cyclic change in timbre.Rotary: Simulates the sound of a classic rotary speaker. This effect is most suitable for electric organ. If you select this type, you can use the MODULATION axis of the BENDER/MODULATION lever for switching between the slow and fast modulation speeds: press the lever towards the back of the E-200/E-100 to alternate between slow and fast undula-tions.StFlangr: This is a stereo Flanger. It produces a metallic res-onance that rises and falls like a jet airplane taking off or landing.SpFlangr: A Step Flanger is a Flanger effect with clearly noticeable steps rather than continuous pitch changes. Compress: A compressor reduces signal peaks and boosts low levels, smoothing out unevenness in volume.Limiter: A limiter prevents the volume from exceeding a cer-tain level without boosting low levels.HexaCho: Hexa Chorus uses six layers of chorused sound to give richness and spatial spread to the sound.Trem Cho: Tremolo Chorus is a chorus effect with added Tremolo (cyclic modulation of the volume).StChorus: This is a stereo chorus.Space-D: A multiple Chorus that gives no impression of modulation, but produces a transparent Chorus effect (the perfect “stereo maker”).StDelay: Delay is an effect that allows you repeat the input signal, thus creating echoes (repetition).Mod Dly: This effect adds modulation to the delayed sound, producing an effect similar to a Flanger.
E-200_US Page 32 Tuesday, January 27, 2004 4:01 PM
32
otswitchThe E-200/E-100’s FOOTSWITCH socket (rear panel) allows you to connect optional DP-2, DP-6, or BOSS FS-5U footswitch.The footswitch can be used for sustaining the notes you are playing (default), as Soft or Sostenuto pedal, to switch the Rotary effect speed (MFX), and more. See “FSW° (Footswitch Assign)” (p. 38) and “Using the outputs and an optional foot-switch” (p. 51).To use it for holding the notes you are playing, proceed as fol-lows:
) Connect a DP-2, DP-6, or BOSS FS-5U footswitch to the FOOTSWITCH jack.
) Play a note with your right hand.
) Press the footswitch.) Release the key.
The note(s) you played keep on sounding after you release the corresponding keys.
) To stop the note(s) from sounding, release the footswitch.
Using effectsThe E-200/E-100 contains digital Reverb and Chorus effects processors. You can switch them on/off and select other types. You can also set the Send level (the amount of Reverb or Cho-rus) to be applied to the various Keyboard parts. Please bear in mind that the Chorus effect cannot be combined with the MFX (so you need to choose between Chorus or MFX for the Main part).
Using the multi-effects processor (MFX)The multi-effects (MFX) processor can be used for processing the Main part. It can generate various effects (47), some of which are combinations of two effects, while the Reverb and Chorus processors only generate effects that are somehow related to ambiance (REV) or modulation (CHR).
(1) Press the [FUNCTION] button (it must light).
(2) Use FAMILY [√][®] to select “EFFECTS”.The E-200/E-100’s function parameters are divided into 9 logical “families”. For the following, we need to select the effects group.
(3) Use SELECT [√][®] to select the “MFX” parameter.
Note: See also “Working with the FAMILY and SELECT buttons” (p. 17).
The “Off” message means that the MFX is not being used. (4) To switch on the MFX, select one of the remaining 47
types using the [NO/–]/[YES/+] buttons.Off: The MFX is off.Enhancer: An Enhancer controls the overtone structure of the high frequencies, adding sparkle and tightness to the sound.
FUNCTION
Off00

E-200/E-100
33
ReverbReverb is an effect that gives you the impression of playing in a concert hall, a room or another acoustic environment that reflects the sounds that are being produced.When you switch on the E-200/E-100, all three Keyboard parts (Main, Dual, Split) as well as the Arranger and Song parts are processed by the internal Reverb effect.If you don’t need that, you can either switch off the Reverb pro-cessor (in which case none of the E-200/E-100’s 19 parts are processed) or prevent just one Keyboard part from being pro-cessed. You cannot change the amount of Reverb that is added to the Arranger or pre-recorded Song parts.
�Switching the Reverb on/offUse the following procedure if you want no Reverb at all (for none of the E-200/E-100’s parts), or to select another Reverb type.
(1) Press the [FUNCTION] button (it must light).
(2) Use FAMILY [√][®] to select “EFFECTS”.The E-200/E-100’s function parameters are divided into 9 logical “families”. For the following, we need to select the effects group.
(3) Use SELECT [√][®] to select the “REV” parameter.
Note: See also “Working with the FAMILY and SELECT buttons” (p. 17).
FUNCTION
Hall 200
E-200_US Page 33 Tuesday, January 27, 2004 4:01 PM
3Tap Dly: The Triple Tap Delay produces three delay sounds; center, left and right.4Tap Dly: Delay with four repetition lines.TmCtrDly: This effect controls the delay time in realtime.Reverb: A nice Reverb effect.GteRevNr: Gate Reverb is a special type of Reverb in which the reverberant sound is suddenly cut off (and does not gradually decrease).GteRevRv: A gated Reverb effect that sounds “backwards”.GteRevS1: The reverberant sound moves from right to left.GteRevS2: The reverberant sound moves from left to right.2PtchShf: A Pitch Shifter changes the pitch of the original sound. This 2-voice effect has two pitch shifters, and adds two transposed copies to the original sound.FbPtchShf: Pitch Shifter with several echoes.OD®Chors: This effect connects an Overdrive and a Chorus in series. (“Series” means that the first effect is also pro-cessed by the second.)OD®Flger: This effect connects an Overdrive and a Flanger in series.OD®Delay: This effect connects an Overdrive and a Delay in series.DS®Chors: This effect connects distortion and a Chorus in series.DS®Flger: This effect connects distortion and a Flanger in series.DS®Delay: This effect connects distortion and a Delay in series.EH®Chors: This effect connects an Enhancer and a Chorus in series.EH®Flger: This effect connects an Enhancer and a Flanger in series.EH®Delay: This effect connects an Enhancer and a Delay in series.Cho®Dly: This effect connects a Chorus and a Delay in series.FL®Delay: This effect connects a Flanger and a Delay in series.Cho®Flgr: This effect connects a Chorus and a Flanger in series.
Cho/Dly: This effect connects a Chorus and a Delay in paral-lel. (“Parallel” means that the input signal is processed by two effects that do not interact.)FL/Delay: This effect connects a Flanger and a Delay in par-allel.Cho/Flgr: This effect connects a Chorus and a Flanger in par-allel.Note: This setting can be saved to a User Program (see p. 41).Note: By default, MFX type selection is linked to Tone selection for the Main part. This can be switched off, however, see “Tone MFX°” (p. 39). Note that this does not apply to all Tones.
(5) While selecting an MFX type, play a few notes on the key-board to audition the effect.
(6) Press another “big” button in the DATA ENTRY section to leave this function.Note: If the MFX is on, the Main part is no longer processed by the Chorus effect. But the MFX also contains Chorus algorithms (either in isolation or in combination with other effects).

r E-200/E-100
(4
(5
(6
(7
ChorusChorus broadens the spatial image of the sound and creates a stereo impression. You can choose from 8 types.When you switch on the E-200/E-100, none of the three Key-board parts (Main, Dual, Split) are processed by the internal Chorus effect. Note also that the Chorus effect doesn’t affect the Main part if the MFX is set to anything but “Off”.If you don’t need Chorus, you can either switch off the Chorus processor (in which case none of the E-200/E-100’s 19 parts are processed) or prevent just one Keyboard part from being pro-cessed. You cannot change the amount of Chorus that is added to the Arranger or pre-recorded Song parts.
�Switching the Chorus effect on/offUse the following procedure if you want no Chorus at all (for none of the E-200/E-100’s parts), or to select another Chorus type.
(1) Press the [FUNCTION] button (it must light).
(2) Use FAMILY [√][®] to select “EFFECTS”.(3) Use SELECT [√][®] to select the “CHR” parameter:
Note: See also “Working with the FAMILY and SELECT buttons” (p. 17).
(4) Use the [NO/–]/[YES/+] buttons to select “Off” if you don’t need the Chorus processor. Otherwise, select one of the eight available types:
(5) Play a few notes on the keyboard to audition the effect.
FUNCTION
Chorus 300
Chorus 1Chorus 2Chorus 3
Chorus 4FB ChorusFlanger
S-DelaySDelayFb
E-200_US Page 34 Tuesday, January 27, 2004 4:01 PM
34
) Use the [NO/–]/[YES/+] buttons to select “Off” if you don’t need the Reverb processor. Otherwise, select one of the eight available types:
) Play a few notes on the keyboard to audition the effect.
�Changing the amount of Reverb processing for the Keyboard partsTo change the Reverb depth (i.e. how much Reverb is added to a part), proceed as follows:
) If the [FUNCTION] button still lights, use SELECT [√][®] to select one of the following parameters.
(If [FUNCTION] doesn’t light, first perform steps (1) and (2) above.)
) Use [NO/–]/[YES/+] to select “0” if you don’t want the selected Keyboard part to be processed by the Reverb effect. Otherwise, set the desired value.
If you selected an MFX type (see p. 32), the Rev MAIN parameter no longer affects the Main part directly, but rather the MFX signal.
“Rev Main= 100” then means: Reverb depth of the pro-cessed Main signal coming out of the MFX. This can be used for a variety of interesting applications: Distortion (MFX) + Reverb (REV), Rotary (MFX) + Plate (REV), etc.
(8) Play a few notes on the keyboard to audition the effect.Do not forget to activate the Split or Dual part if you wish to audition its Reverb depth.Note: This setting can be saved to a User Program (see p. 41).
(9) Press another “big” button in the DATA ENTRY section to leave this function.
Type Explanation
Room 1~3 These types simulate the Reverb characteris-tics of a room. The higher the number (1, 2, or 3), the “bigger” the room becomes.
Hall 1, 2 These types simulate the Reverb of a small (1) or large (2) concert hall and thus sound far “bigger” than the Room types above.
Plate Digital simulation of a metal plate that is sometimes used for creating Reverb effects. Works well for percussive sounds.
Delay A Delay effect (no Reverb). Works a lot like an echo effect and thus repeats the sounds.
Pan Delay This is a stereo version of the preceding Delay effect. It creates repetitions that alternate between the left and right channels.
Rev MAIN
Rev DUAL
Rev SPLIT
Reverb depth of the Main part.
Reverb depth of the Dual part.
Reverb depth of the Split part.
Main Reverb
MFX “Off”
Main Reverb
MFX
When the MFX is set to “Off”
When the MFX is set to any other type
Rev MAIN=Reverb for Main
Rev MAIN= Reverb for Main + MFX

E-200/E-100
35
(2) .Press the [V-LINK] button (it lights blue).
(3) Use the BENDER, the assigned buttons or “V-LINK” keys (highest octave) to manipulate the video pictures in sync with your music (see below).
(4) Press [V-LINK] again to switch off this function (the button goes dark).
V-LINK functions that the E-200/E-100 can control (and corresponding MIDI messages)The E-200/E-100 provides the following functions for con-trolling V-LINK compatible video equipment.
• Keyboard: Clip 1~8→ Program Change: 00H~08HPress the keys in the highest octave to switch clips.
• Keyboard velocity: Dissolve Time→ CC23The velocity of the keys in the highest octave controls the speed of transition between images.
• [1]~[0] buttons (if the [USER¥PROGRAM] button lights): Pal-ette 1~10→ CC00 (Bank Select)/00H~09HWhile the [V-LINK] button lights, press buttons [1]~[0] to switch palettes 1~10. (The numeric buttons also perform their “normal” functions.)
• BENDER axis of the BENDER/MODULATION lever: Playback Speed→ Pitch BendMoving the lever toward the right will speed up playback, and moving it toward the left will slow down playback. At the center position, playback speed will be normal.
• MODULATION axis of the BENDER/MODULATION lever: Clip color→ CC24 (Color CB), CC25 (Color CR)Press the lever towards the rear of the E-200/E-100 to change the color. There are five steps that can be selected by pressing the lever several times: green, violet, blue, red, orig-inal clip color.
BEAT
E-200_US Page 35 Tuesday, January 27, 2004 4:01 PM
�Changing the amount of Chorus processing for the Keyboard partsTo change the Chorus depth (i.e. how much Chorus is added to a part), proceed as follows:
(6) If the [FUNCTION] button still lights, use SELECT [√][®] to select one of the following parameters.
(If [FUNCTION] doesn’t light, first perform steps (1) and (2) above.)
(7) Use [NO/–]/[YES/+] to select “0” if you don’t want the selected Keyboard part to be processed by the Chorus effect. Otherwise, set the desired value.If you selected an MFX type (see p. 32), the Chr MAIN parameter has no effect (even though it is displayed).
(8) Play a few notes on the keyboard to audition the effect.Do not forget to activate the Split or Dual part if you wish to audition its Chorus depth.Note: This setting can be saved to a User Program (see p. 41).
(9) Press another “big” button in the DATA ENTRY section to leave this function.
V-LINK functionV-LINK is a function that provides for the integration of music and visual material. By using V-LINK-compatible video devices (i.e. an Edirol DV-7PR), visual effects can be easily linked to, and made part of the expressive elements of a performance.By using the E-200/E-100 with an Edirol DV-7PR, you can:• Use the E-200/E-100’s keyboard (highest octave) to switch
images (clips). Press and hold a key for longer transition (“fade”). Briefly press a key for fast transitions.
• The numeric buttons [0]~[9] are used for switching palettes (only if the [USER¥PROGRAM] button lights).
• Use the BENDER axis of the BENDER/MODULATION lever to change the playback speed of the picture material or to select a different color.
• Use the STYLIST buttons to change the effect (VFX1~4).Note: V-Link signals can be transmitted via MIDI OUT.
(1) Connect the E-200/E-100’s MIDI OUT socket to the MIDI IN socket of the external video processor (or to a UM-1 interface).
Chr MAIN
Chr DUAL
Chr SPLIT
Chorus depth of the Main part*.
Chorus depth of the Dual part.
Chorus depth of the Split part.
(*) Though this parameter is displayed even when MFX is set to something else than “Off”, the Main part is not processed by the Chorus effect.
MainReverb
Chorus
Reverb
Chorus
MFX “Off”
Main
MFX
When the MFX is set to “Off”
When the MFX is set to any other type
Edirol DV-7PREdirol UM-1
MIDI OUT
REMOTE

r E-200/E-100
E-200_US Page 36 Tuesday, January 27, 2004 4:01 PM
36
• STYLIST buttons: VFX1~4, None (ACOUSTIC= None, POP= V-FX 1, ROCK= V-FX 2, DANCE= V-FX 3, WORLD= V-FX 4)Use these buttons to change the video effects. This function is not available if the receiving video processor is already set to “Off”.Note: VFX2 is not supported by the DV-7.Note: All V-LINK messages are transmitted on MIDI channels 13 and 14.

E-200/E-100
37
your instrument’s response. It would therefore be a good idea to (“°”) are saved to the Flash memory when you leave the Function
(6) Continue with step (3).(7) Press another “big” button in the DATA ENTRY section to
leave this function.
KB SET parameters� Kbd Touch*(1~127, Default setting: 110) Use this parameter to set the E-200/E-100’s fixed velocity value that will be used when the
icon is not displayed. See p. 31.Note: This parameter can also be selected by pressing and holding [KEYBOARD¥TOUCH].
� MstrTune° (Master Tune)(427.4~452.6, Default setting: 440.0) This parameter allows you to change the E-200/E-100’s overall tuning, which may be nec-essary when you accompany a singer, an acoustic instrument, or when you play to a recording on CD or cassette.
� Transpos*(–12~12, Default setting: 0) Use this parameter to transpose the E-200/E-100 in semitones. If you’re not sure what transpo-sition is, see p. 30. This parameter can also be selected by press-ing the [TRANSPOSE] button.
� TransMod*(Default setting: Int+Song) This parameter allows you to spec-ify which parts should be affected by the Transpose setting:Int: The Keyboard and Arranger parts will be transposed. Notes received via MIDI, however, will be played without change.Song: Only the Song parts will be transposed. This is only meaningful when you play back a Standard MIDI File or one of your own songs with the E-200/E-100’s Recorder.MIDI: Only the notes received via MIDI will be transposed.Int+Sng, Int+MIDI, Sng+MIDI, All: These are combinations of the above. Int could be useful to transpose only the Keyboard parts so that you can play to a Recorder song in “your” key but sound in the song’s key.
KEY TOUCH
E-200_US Page 37 Tuesday, January 27, 2004 4:01 PM
The E-200/E-100’s Function mode contains more advanced settings you may not need every day. They allow you to fine-tunefamiliarize yourself with these parameters. Most settings (“*”) can be written to a User Program (see p. 41). Other parameters mode.
Editing parameters (general procedure)You can edit the E-200/E-100’s Function parameters via the dis-play. Here is a general outline of the procedure for all parame-ters discussed below:
(1) Press [FUNCTION].
(2) Use FAMILY [√][®] to select the Function group that con-tains the desired parameter:
� KB SET: KbdTouch, MsterTune, Transpos, TransMod, PB Range, KeySplit, SpltHold, SpltInt, FSW� METRONOM: Mtro TS, MetroVol, Count-In� OCTAVE: MAIN Oct, DUAL Oct, SPLT Oct� VOLUME: Main Vol, Dual Vol, SplitVol, Auto Bass, AccDrums, AccBass, Accomp� ARR SET: ArrChord, Arr Hold, IntMode, EP Chord, Bass Inv, MI (Melody Intelligence)
� EFFECTS: REV (Reverb), CHR (Chorus), MFX, Tone MFX, Rev MAIN, Chr MAIN, Pan MAIN, Rev DUAL, Chr DUAL, Pan DUAL, RevSPLIT, ChrSPLIT, PanSPLIT� KB SCALE: Scale C/C#/D/Eb/E/F/F#/G/Ab/A/Bb/B, Scale Mode� MIDI: Local, MidiTxRx, Sync Rx, Style PC, LyricsTx, NTARx14, PicthBnd, Modulatn, ProgChng, Velo Rx, Clock Tx, StartStp, SongPosP� UTILITY: InitFLASH, Resume� WriteSNG (see p. 45)� WriteSTL (see p. 45)� RemoveSNG (see p. 46)� Remove STL (see p. 46)
(3) Use SELECT [√][®] to select the parameter you wish to edit (see below).
Note: In FUNCTION mode, SELECT [√][®] do not allow you to jump from one family to the next.
The “VALUE” message and a setting appear to signal that you can change (“edit”) the selected parameter.
(4) Use the DATA ENTRY [NO/–]/[YES/+] buttons to modify the setting of the selected parameter.Note: See also “Working with the FAMILY and SELECT buttons” (p. 17).Note: To return to the default value of the currently selected parameter, press [+] and [–] simultaneously.
(5) Use FAMILY [√][®] to select another Function parameter.
11. Function menu
FUNCTION
FAMILY
SELECT

r E-200/E-100
� Count-In(On/Off, Default setting: Off) This parameter allows you to switch the count-in function for punch-in and normal record-ing (see p. 24) on or off. When on, the metronome will count down two measures (8 beats for a song with a 4/4 time signa-ture).Note: At power-on, the Count-In function is reset to “Off”.
OCTAVE parameters� MAIN Oct*, DUAL Oct*, SPLIT Oct* (octave transposition)(–4~0~4, Default setting: 0) These three parameters allow you to shift the octave of the part in question (Main, Split, or Dual) up or down by up to four octaves. This can be useful for Techno/Dance songs where you need a piano sound that plays in two different octaves. To achieve this, assign two different (or the same) piano sounds to Main and Dual, activate the [DUAL] button, and set DUAL Octv to “–1” (or “1”).Note: When a Drum Kit is assigned to the Main part, the pitch of the drum/percussion sounds is not transposed. Instead, the keys are assigned to other drum/percussion sounds (“shifted”). Example: after setting “MAIN Oct” to “–1”, the bass drum can be played with the C3 key (rather than the C2), while other sounds are available to the left of the C3.
VOLUME parameters� Main Vol*, Dual Vol*, SpltVol*: volume
(0~127, Default setting: 127 Main/110 Dual/100 Split) These three parameters allow you to set the volume of the Main, Dual, and Split parts respectively. Please note that the settings you make here have no effect if you used BALANCE [ACCOMP] to set the maximum volume for the Arranger/Song parts.Note: The volume of the Dual part can also be set by holding down [DUAL] while pressing [ACCOMP] or [KEYBOARD]. The same is true of the Split part, except that you need to press and hold [SPLIT].
Main Vol
E-200_US Page 38 Tuesday, January 27, 2004 4:01 PM
38
� PB Range° (Pitch Bend Range)(0~24, Default setting: 2) This parameter allows you to set the interval that will be used when you push the BENDER/MODU-LATION lever fully to the left or to the right (Pitch Bend effect). You can set this parameter in semitone steps, with a maximum of 24 semitones (2 octaves), the default value being “2”, which should be OK in most situations.Note: Pitch Bend is only available for the Main, Dual and Split parts. See also p. 31.
� KeySplit* (Split point)(48~84, Default setting: 60) Use this parameter to set the split point for the Arranger mode and the Split part. The note you set here is the lowest note you can play with the Main part. The number refers to a note. “60” corresponds to the note “C4”.Note: You can also select this parameter by pressing and holding the [ARRANGER/BAND] button.
� SpltHold* (Hold function for the Split part)(On/Off, Default setting: Off) The SpltHold function memorizes the chords you play while the Split part is on and holds the corresponding notes until you play another chord.
� Splt Int* (Split Chord Intelligence)(On/Off, Default setting: Off) When you activate the [SPLIT] but-ton, the E-200/E-100’s Split Chord Intelligence function allows you to play major chords by pressing just one key, minor chords by pressing two keys, and more complex chords by pressing three keys. This system thus follows Arranger control, which is why it would be a good idea to select “On” whenever you are using the Split part while the icon is displayed.
� FSW° (Footswitch Assign)
(Default setting: Sustain) After connecting an optional DP-2, DP-6, or BOSS FS-5U to the FOOTSWITCH socket on the rear panel, you can use this parameter for assigning a function to the footswitch.Sustain: Also called “Hold” or “Damper”, this function allows you to use the footswitch to hold the notes you play on the keyboard in much the same way as on an acoustic piano.
Sostenut: In this case, the footswitch functions as Sostenuto pedal (another pedal found on grand and digital pianos that allows you to sustain only those notes you played at the time you pressed the pedal).Note: This function only applies to the Keyboard parts.
Soft: In this case, the footswitch functions as Soft pedal (a pedal found on grand and digital pianos that reduces the vol-ume).Note: This function only applies to the Keyboard parts.
Rotary S/F: Allows you to select the slow or fast speed of the Rotary effect. This only works, if the “Rotary” type is assigned to the MFX (see p. 32).UsrPrgUp: Selects the next User Program (i.e. “10” if “9” is cur-rently active).UsrPrgDw: Selects the previous User Program (i.e. “1” if “10” is currently active). Start/Stop: Starts and stops Arranger or Song playback. Same function as the [START÷STOP] button.Bass Inv: Switches the Bass Inversion function on and off (see p. 27).Punch I/O: The footswitch can be used to activate and switch off punch in/out recording (see p. 25).
METRONOM parameters� Metro TS° (metronome time signature)(1/4~6/4, 6/8, 9/8, Default setting: 4/4) This parameter allows you to set the metronome’s time signature (number of beats per bar). Please bear in mind that this setting changes when-ever you select a Music Style with a different time signature. See also p. 12 for how to use the metronome. This parameter can also be selected by holding down the [METRONOME] but-ton.
� Metro Vol° (metronome volume)(0~127, Default setting: 100) Use this parameter whenever you think the metronome is too loud/soft with respect to the music. The default value is usually an appropriate setting.
ARRANGER
Sustain

E-200/E-100
39
� Bass Inv*(On/Off) Use this parameter to change the way in which the Arranger reads the chords you play. See p. 27.
� MI* (Melody Intelligence harmony type)(Default setting: Traditnl) This parameter allows you to select the desired harmony type for the Melody Intelligence function. Note: This parameter can also be selected by pressing and holding the [MELODY¥INTELL] button. See p. 27.
EFFECTS parameters� Rev* (Reverb Type)(Default setting: Hall 2) Use this parameter to select the kind of Reverb that best suits your musical purposes, or to switch the Reverb processor “Off”. See p. 33.
� Chr* (Chorus Type)(Default setting: Chorus 3) This parameter allows you to specify the type of Chorus effect, or to switch the Chorus processor “Off”. See p. 34.
� MFX* (MFX type)(Default setting: Rotary) This parameter allows you to select the desired MFX type and to switch the MFX processor off. See p. 32 for details about the MFX. Selecting “Off” means that the MFX is off.Note: MFX type selection can also be linked to Tone selection for the Main part.
� Tone MFX°(On/Off, Default setting: On) This parameter allows you to link the selection of an MFX type to the Tone you assign to the Main part. That way, a Distortion/Overdrive effect will be selected for a rock guitar sound, Rotary for an organ, etc.
� Rev MAIN*(0~127, Default setting: 100) This parameter allows you to set the Reverb Send Level for the Main part (i.e. how much Reverb should be added to the Main notes). Select “0” if the Main part may not be processed by this effect.
E-200_US Page 39 Tuesday, January 27, 2004 4:01 PM
� Auto Bass*: status and volume(OFF, 0~127, Default setting: OFF) Whenever the Split part is active, this parameter allows you to set the volume of the Auto Bass part (in which case the Auto Bass part is switched on). This part sounds monophonic bass notes based on the chords you play. If the Bass Inversion function (see p. 27) is off, the Auto Bass part sounds the root notes (fundamentals) of the chords you play with your left hand (using the Split part). The Auto Bass part can also be added to the EP Chord part (see below), and then follows the same rules as that part. The Auto Bass’ volume and status can be set independently for “Split use” and “EP Chord use”.In either case, select off if you don’t need the Auto Bass part.
� AccDrums*, AccBass*, Accomp*: volume(0~127, Default setting: 100 AccDrums/100 AccBass/100 Accomp) These three parameters allow you to set the vol-ume of three Music Style sections: the drums, the bass and the Accomp parts (1~6).Note: The “Accomp” parameter does not have the same function as the BALANCE [ACCOMP] button. The button applies to all Arranger parts (thus also to the “AccDrums” and “AccBass” param-eters).
ARR SET parameters� ChordInt* (Arranger Chord intelligence)(Md1, Md2, Off, Default setting: Md1) This parameter allows you to select the chord intelligence system to be used by the E-200/E-100: the Roland system (“Md1”, which makes more sense from an educational point of view, see page 61), or the “Md2” system, which can be used in the following way:
In either case, pressing just a few keys is therefore enough for obtaining full chords. If you are used to playing full chords, you can switch this function off.
� ArrHold* (Arranger Hold)(On/Off, Default setting: On) The Arranger Hold function mem-orizes the chords you play with your left hand and keeps play-ing the corresponding notes until you play another chord.If you switch off ArrHold, the melodic Arranger parts (A.Bass, Accomp) stop playing as soon as you release the key(s) in the left half of the keyboard, leaving you only with the drum accompaniment.For your convenience, this function is switched on every time you power on the E-200/E-100.
� EP Chord° (left-hand St. Strings + bass)(On/Off, Default setting: On) The EP Chord function (for “Edu-cational Purposes”) activates a stereo string sound and mono-phonic bass (if Auto Bass is set to “on”) whenever (a) the
icon is displayed, (b) the Arranger is stopped, and (c) [SYNC¥START] is off. This allows you to play chords (and a bass line) with your left hand in Arranger mode – without using the E-200/E-100’s accompaniment function. If you select “Off”, however, the left half of the keyboard will be muted when conditions (a) and (b) are met and if the icon is not displayed.
Major chords Press the key that corresponds to the chord’s fundamental.
Minor chords Fundamental + any black key to the left of the fundamental.
Seventh chords
Fundamental + any white key to the right of the fundamental.
Minor sev-enth chords
Fundamental + any black key to the left + any white key to the right.
ARRANGER
SPLIT

r E-200/E-100
UTILITY parameters
� InitFLSH (Flash initialization)This function initializes (formats) the E-200/E-100’s Flash memory, which is only necessary if the data in the Flash mem-ory become unreadable.Note: Executing this function erases all Standard MIDI Files and Music Styles in the E-200/E-100’s Flash area.
Press [YES/+] in response to the flashing Yes message. The “Sure?” message appears and the Yes message starts flash-ing. Press [YES÷+] to initialize the Flash area (or [NO/–] if you changed you mind).After showing the “Complete” message, the E-200/E-100 leaves this function.
� ResumeSelect this function to recall the E-200/E-100’s factory Func-tion settings. Note: Resume does not reset the MIDI parameters of the FUNC-TION mode (see p. 43).
Press [YES/+] in response to the flashing Yes message. After showing the “Complete” message, the E-200/E-100 leaves this function.Note: There is no “Sure?” question that gives you time to think. Only press [YES/+] if you are certain you want to recall ALL factory Function settings.
E-200_US Page 40 Tuesday, January 27, 2004 4:01 PM
40
� Chr MAIN*(0~127, Default setting: 0) This parameter allows you to set the Chorus Send Level for the Main part (i.e. how much Chorus should be added to the Main notes). If you want this part to be processed by the Chorus effect, you need to select a value dif-ferent from “0”. This parameter is only used when the MFX parameter is set to “Off”.
� Pan MAIN*(Rnd, R63~0~L63, Default setting: 0) This parameter allows you to set the stereo position of the Main part (i.e. its placement between the left and right speakers). “Rnd” means that the ste-reo position changes randomly for each note you play. Values starting with “L” correspond to the left speaker. “0” refers to the center, and values starting with “R” correspond to the right speaker.
� Rev DUAL*(0~127, Default setting: 100) This parameter allows you to set the Reverb Send Level for Dual part (i.e. how much Reverb should be added to the Dual notes). Select “0” if the Dual part may not be processed by this effect.
� Chr DUAL*(0~127, Default setting: 0) This parameter allows you to set the Chorus Send Level for the Dual part (i.e. how much Chorus should be added to the Dual notes). If you want this part to be processed by the Chorus effect, you need to select a value dif-ferent from “0”.
� Pan DUAL*(Rnd, R63~0~L63, Default setting: 0) This parameter allows you to set the stereo position of the Dual part (i.e. its placement between the left and right speakers). “Rnd” means that the ste-reo position changes randomly for each note you play. Values starting with “L” correspond to the left speaker. “0” refers to the center, and values starting with “R” correspond to the right speaker.
� Rev SPLIT*(0~127, Default setting: 100) This parameter allows you to set the Reverb Send Level for the Split part. Select “0” if the Split part may not be processed by this effect.
� Chr SPLIT*(0~127, Default setting: 0) This parameter allows you to set the Chorus Send Level for the Split part. If you want this part to be processed by the Chorus effect, you need to select a value dif-ferent from “0”.
� Pan SPLIT*(Rnd, R63~0~L63, Default setting: 0) This parameter allows you to set the stereo position of the Split part (i.e. its placement between the left and right speakers). “Rnd” means that the ste-reo position changes randomly for each note you play. Values starting with “L” correspond to the left speaker. “0” refers to the center, and values starting with “R” correspond to the right speaker.
KB SCALE parameters� Scale C*~Scale B* (Scale Tune)(–64~63, Default setting: 0 for all notes) These parameters allow you to stray away from the usual semitone-interval scale (used in western music) by changing the pitch of the notes so as to accommodate other musical cultures or tuning methods (oriental, baroque music, etc.).As you will notice, you can change the pitch of every note of one octave (C, C#, D, Eb, E…). The settings you make here apply to all notes of the same name (i.e. to every “C”, every “C#”, etc.). Most of the time, you will probably select the value “50” or “–50” as they correspond exactly to half a semitone up or down (quarter tone). Other settings may also be interesting, though.
� Scl Mode*(MN, ALL, Default setting: MN) This parameter allows you to specify which parts the Scale settings (see above) should apply to: only the Main part (“MN”) or all parts (“ALL”). In some cases, choosing “ALL” may produce a more satisfactory result.
MIDI parametersSee page 43.

E-200/E-100
41
make on the front panel and via the Function menu (see p. 37).
Selecting a User ProgramThough the User Program memory you specified above is already selected, there will be times when you need to select another memory. In that case, here is what you need to do:
(1) Briefly press [USER¥PROGRAM/WRITE] (it lights). Do not hold this button down because doing so will start the Write procedure (see above).
The display now shows the number of the User Program you selected last, or “1” if you have not yet selected a User Pro-gram since switching on the E-200/E-100.
The asterisk “*” indicates that the E-200/E-100 is still using the last manual changes you may have made before select-ing the User Program function. The number to the left of the USERPROG message therefore only means “this is the last memory you selected”.None of its settings are being used for the time being. By pressing another “big” button in the DATA ENTRY section, you can leave the User Program mode without changing your manual settings. This may be important to remember if you were about to write your settings and accidentally pressed the wrong button (or didn’t press it long enough).
To actually select a User Program…(2) Press one numeric button [0]~[9] to select the memory.
USER
PROGRAM
USERPROG
E-200_US Page 41 Tuesday, January 27, 2004 4:01 PM
The E-200/E-100 is equipped with 10 User Program memories that allow you to store almost all settings (or registrations) youNote: MIDI settings (see p. 43) are not saved to a User Program because the E-200/E-100 memorizes them automatically.
Writing your settings to a User ProgramIt is a good idea to write your settings frequently, even if you still need to do some editing afterwards. Those intermediary saves allow you to return to the previous stage whenever you do not like your last modifications.
(1) Press and hold the [USER¥PROGRAM/WRITE] button.The E-200/E-100 now displays “-Write ?”.
(2) Keep holding the [USER¥PROGRAM/WRITE] button while pressing a numeric button [0]~[9] to select the memory.
The display now responds with the “Complete” message.(3) Release the [USER¥PROGRAM/WRITE] button.
Notes about writing User ProgramsLeaving the User Program environmentPress any other “big” DATA ENTRY button to leave the User Program environment.
Meaning of the asterisk
At some stage, you may come across an asterisk message next to the User Program number.It means that the last User Program you selected is still in effect but that the current settings no longer correspond to the ones in that memory. Such changes may include the sta-tus of the Reverb or Chorus effect, a changed volume value, etc.Before selecting another User Program or switching off the E-200/E-100, you should therefore write these settings to the same (or a different) User Program if you want to keep them. Otherwise, you lose these changes.
Mode selectionThe mode (Arranger, p. 13, Piano, p. 11) is also memorized when you write a User Program.
User Programs and the USER STL memoryThe last Music Style you selected before writing a User Pro-gram is also memorized. This even applies to the USER STL memory that may contain a Style loaded from floppy disk [E-200 only] or the Flash memory (see p. 16).[E-200 only] The 10 User Programs can be saved to floppy disk as a set (see p. 49).
12. Working with User Programs
USER
PROGRAM
USERPROG

r E-200/E-100
(3
E-200_US Page 42 Tuesday, January 27, 2004 4:01 PM
42
The settings of the selected User Program will be recalled.Note: You can also use the FAMILY and SELECT [√][®] buttons to select User Programs.Note: As soon as you modify any setting (on the front panel or in the Function menu), the asterisk appears next to the User Program number.
) Press any other “big” button in the DATA ENTRY section to leave this mode.

E-200/E-100
43
Note: The setting of this parameter is not memorized when you switch the E-200/E-100 off.
� MIDI TxRx° (MIDI transmission and reception)This parameter allows you to specify which E-200/E-100 parts should transmit and receive MIDI messages:
� Sync Rx° (MIDI synchronization)Use this parameter to specify how the E-200/E-100 should be synchronized (as slave) to an external MIDI sequencer, com-puter, drum machine, etc. “Synchronization” is a learned term for the fact that one device (or function) is set to start and stop at the same time as another device (or function), and to run at the same tempo (BPM).
The E-200/E-100 receives data
The E-200/E-100 transmits data
External MIDI instrument/computer
Option Meaning
ALL All parts.
KBD Only the Keyboard parts (see k in the table above).
STL Only the Arranger parts (AccDrums~Accomp 6).
SNG Only the Song parts (1~16).
OFF None of the E-200/E-100’s parts transmits/receives MIDI messages.
E-200_US Page 43 Tuesday, January 27, 2004 4:01 PM
MIDI is short for “Musical Instrument Digital Interface”. The word refers to many things, the most obvious being a connector type that is used by musical instruments and other devices to exchange messages relating to the act of making music. Each time you play on the E-200/E-100’s keyboard or start the Arranger (or Song), your instrument transmits MIDI data to its MIDI OUT. If you connect the MIDI OUT socket to the MIDI IN socket of another instrument, that instrument may play the same notes as one of the E-200/E-100’s parts, select sounds, etc. MIDI is a universal standard, which means that musical data can be sent to and received by instruments of different types and manufacturers. Furthermore, MIDI allows you to connect your E-200/E-100 to a computer or hardware sequencer.Connect your E-200/E-100 as shown to the right.
ChannelsMIDI can simultaneously transmit and receive messages on 16 channels, so that up to 16 instruments can be controlled. Nowa-days, most instruments –like your E-200/E-100– are multitim-bral, which means that they can play several musical parts with different sounds.Note: All E-200/E-100 parts are set to receive MIDI messages. If they do not seem to respond to the messages you send from the external controller, you should check whether the external control-ler’s MIDI OUT is connected to the MIDI INput of your E-200/E-100.
The E-200/E-100’s transmit and receive channels of all parts have been set in keeping with a tacit Roland standard and are therefore shared by all recent EM, E, G, and RA series instru-ments. You cannot change them. They also correspond to the track assignments of the 16-track Recorder:
MIDI Function parametersSee “Editing parameters (general procedure)” (p. 37) for how to select and set these Function parameters (they belong to the “MIDI” family).Note: With the exception of “Local”, all MIDI parameter settings are saved as soon as you leave the Function mode.
� Local(On/Off, Default setting: On) The Local parameter allows you to establish or remove the connection between the E-200/E-100’s keyboard/Recorder and the internal tone generator.When set to “ON” (default), playing on the E-200/E-100’s key-board or playing back a Recorder song will cause the corre-sponding notes to sound. If you select “OFF”, the corresponding MIDI messages are no longer sent to the internal tone genera-tor – but they are still transmitted to the MIDI OUT port and hence to external MIDI instruments.
13. MIDI functions
E-200/E-100
1 92 103 114 125 136 147 158 16
Accomp 1Arranger bass
Accomp 2
kMain
Accomp 3kDual
Accomp 4
Accomp 5
Accomp 6Arranger drums
kSplit
kAuto Bass
V-LinkV-Link
Melody Intell. (see p. 27)
(kMain*)
(*) If you assign a Drum Kit to the Main part.
Sound source
MIDI OUT
LOCAL ON LOCAL OFF
MIDI OUT
Sound sourceSound source Sound source

r E-200/E-100
� StartStp° (Start/Stop/Continue) (On/Off, Default setting: On) This option allows you to specify whether or not the Arranger and Recorder send Start/Stop/Continue messages when you start or stop them. Select “Off” when you wish to control the tone generator of a MIDI organ, etc., without starting or stopping its automatic accompani-ment.
� Song PosP° (Song Position Pointer) (On/Off, Default setting: On) The E-200/E-100’s Recorder also sends and receives Song Position Pointer messages that indi-cate the exact location of the notes that are being played back. Select “OFF” if you don’t want the Recorder to send or receive these messages.
E-200_US Page 44 Tuesday, January 27, 2004 4:01 PM
44
Please note that synchronization is only possible when you connect the external device’s MIDI OUT socket to the E-200/E-100’s MIDI IN socket (though you can also work the other way around; in that case, see the sequencer’s manual for details).
� Style PC° (Style Select TxRx Channel) (OFF, 1~16, Default setting: 10) As its name implies, the Style Select channel is used to receive and transmit program changes that cause the E-200/E-100 or the external instrument to select another Music Style.
� Lyrics Tx° (Transmit Lyrics messages)(On/Off, Default setting: Off) The E-200/E-100 can transmit Lyrics messages contained in Format 0 Standard MIDI Files you play back. It cannot display them, but it allows you to transmit them to a device capable of displaying Lyrics messages (such as the Roland LVC-1). This filter allows you to enable (On) or dis-able (Off) the transmission of Lyrics data.
� NTA Rx14° (Note-to-Arranger reception on/off)(On/Off, Default setting: On) NTA is short for “Note-to-Arranger”, or the notes you play in the left half of the keyboard to feed the Arranger with chord information. These notes can also be received via MIDI (from an accordion, a digital piano, an organ, for example). If you want to use the Arranger without playing on the E-200/E-100’s keyboard, you must transmit these notes on MIDI channel 14 (from your computer or exter-nal MIDI instrument to the E-200/E-100) and select “On” here.
NTA notes can only be received (they are not transmitted). The notes you play on the E-200/E-100’s keyboard are indeed transmitted to the Arranger, from there to the Arranger parts, and used to play the accompaniment in the right key. Since all Music Style notes are transmitted via MIDI, there is no need to send the NTA notes separately.
� PitchBnd° (Pitch Bend)(On/Off, Default setting: On) This filter allows you to enable (On) or disable (Off) the transmission and reception of Pitch Bend messages. These messages are used to temporarily increase or decrease the pitch of the Keyboard-part notes (Main, Dual, Split).
� Modulatn° (Modulation)(On/Off, Default setting: On) This filter allows you to enable (On) or disable (Off) the transmission and reception of Modula-tion messages. These messages are used to add vibrato to the notes you play (control change CC01).
� ProgChng° (Program Change)(On/Off, Default setting: On) This filter allows you to enable (On) or disable (Off) the transmission and reception of Program Change messages. These messages are used to select Tones, Styles, or User Programs.
� Velo Rx° (Receive Velocity)(On, 1~127, Default setting: On) This filter allows you to enable (On) or disable the reception of velocity messages. This only applies to note messages received via MIDI. Choose the velocity value to be substituted for the actual values the E-200/E-100 receives (1~127), or select “On” to use the velocity values as is.
� Clock Tx° (synchronization)(On/Off, Default setting: On) This parameter allows you to determine whether (On) or not (Off) the Arranger and Recorder send MIDI Clock messages when you start them. These mes-sages are necessary for synchronizing external MIDI instru-ments/sequencers/software to the E-200/E-100.
Off In this case, the E-200/E-100 is not synchronized with other MIDI devices. It is thus impossible to start/stop it via MIDI.
On Arranger playback and Song recording/playback are synchronized if the E-200/E-100 receives MIDI Start and Stop messages followed by MIDI Clock signals. If the E-200/E-100 receives only a Start message, it will wait a moment to see if there are also MIDI Clock mes-sages coming.If there are, it will synchronize to them. If there are no MIDI Clock messages, it will follow its own tempo. In either case, you can stop playback or recording with a MIDI Stop message.

E-200/E-100
45
Saving Styles to a Flash memory [E-200 only]Music Styles you load from floppy disk (and which are copied to the USER STL memory at that time) can be saved to a Flash memory.
(1) Press [FUNCTION].(2) Use FAMILY [√][®] to select the “WriteSTL” parameter.
Wait until the display looks as follows, then proceed with the next step:
The E-200 automatically selects a Flash destination memory that doesn’t yet contain data. (The first character flashes.)Note: If no vacant Flash memory remains or if the memory capacity is exhausted, the display shows the “Mem Full” message when you select this function. In that case, it will be impossible to save the Music Style. You can, however, delete another Style (“Remove”) and repeat step (2) and following.Note: The “No Style” message means that there are no Style data that could be saved.
(3) If necessary, use the SELECT [√][®] buttons to move the cursor to another character position (that character flashes).
(4) Use the numeric buttons to assign a character to that position.The available characters are:
(5) Repeat steps (3) and (4) to assign the desired characters to the remaining positions.Note: Each time you press another numeric button (for entering characters), the cursor advances automatically to the next posi-tion. This works like a mobile phone.
(6) After entering the name, press the [YES/+] button to save the Style to the E-200’s Flash memory.
=TANGO yes
_ ! # $ % & ’ - @ ^ ‘
0 1 2 3 4 5 6 7 8 9
A B C D E F G H I J K L M
N O P Q R S T U V W X Y Z
E-200_US Page 45 Tuesday, January 27, 2004 4:01 PM
Working with the Flash memoryLet us first have a look at the remaining Function parameters. They allow you to save newly recorded songs and Styles loaded from a floppy disk [E-200 only] to the E-200/E-100’s Flash mem-ory, and to remove such files.
Saving songs to a Flash memorySongs you record or edit with the E-200/E-100’s Recorder (or that you modify using the Stylist functions) can be saved to its Flash memory or floppy disk [E-200 only]. See page 49 for how to save them to floppy and page 16 for how to select songs in the Flash memory.
(1) Press [FUNCTION].
(2) Use FAMILY [√][®] to select the “WriteSNG” parameter.Wait until the display looks as shown above, then proceed with the following step.
The E-200/E-100 automatically selects a Flash memory that doesn’t yet contain data. (The first character, “S”, flashes.)Note: If no vacant Flash memory remains or if the memory capacity is exhausted, the display shows the “Mem Full” message when you select this function. In that case, it will be impossible to save your song. You can, however, delete another song (“Remove”) and repeat step (2) and following.Note: The “No Song” message means that there are no song data that could be saved.
(3) If necessary, use the SELECT [√][®] buttons to move the cursor to another character position (that character flashes).
(4) Use the numeric buttons to assign a character to that position.
The available characters are:
Note: Each time you press another numeric button (for entering characters), the cursor advances automatically to the next posi-tion. This works like a mobile phone.
(5) Repeat steps (3) and (4) to assign the desired characters to the remaining positions.
(6) After entering the name, press the [YES/+] button to save the song to the E-200/E-100’s Flash memory.The display now counts down:
At the end of the saving operation, the display briefly shows the “Complete” message.Note: Press [NO/–] if you do not wish to save the song after all.
(7) Press another “big” button in the DATA ENTRY section to leave this function.
14. Data management
FUNCTION
=SONG 001 yes
_ ! # $ % & ’ - @ ^ ‘
0 1 2 3 4 5 6 7 8 9
A B C D E F G H I J K L M
N O P Q R S T U V W X Y Z
Writing
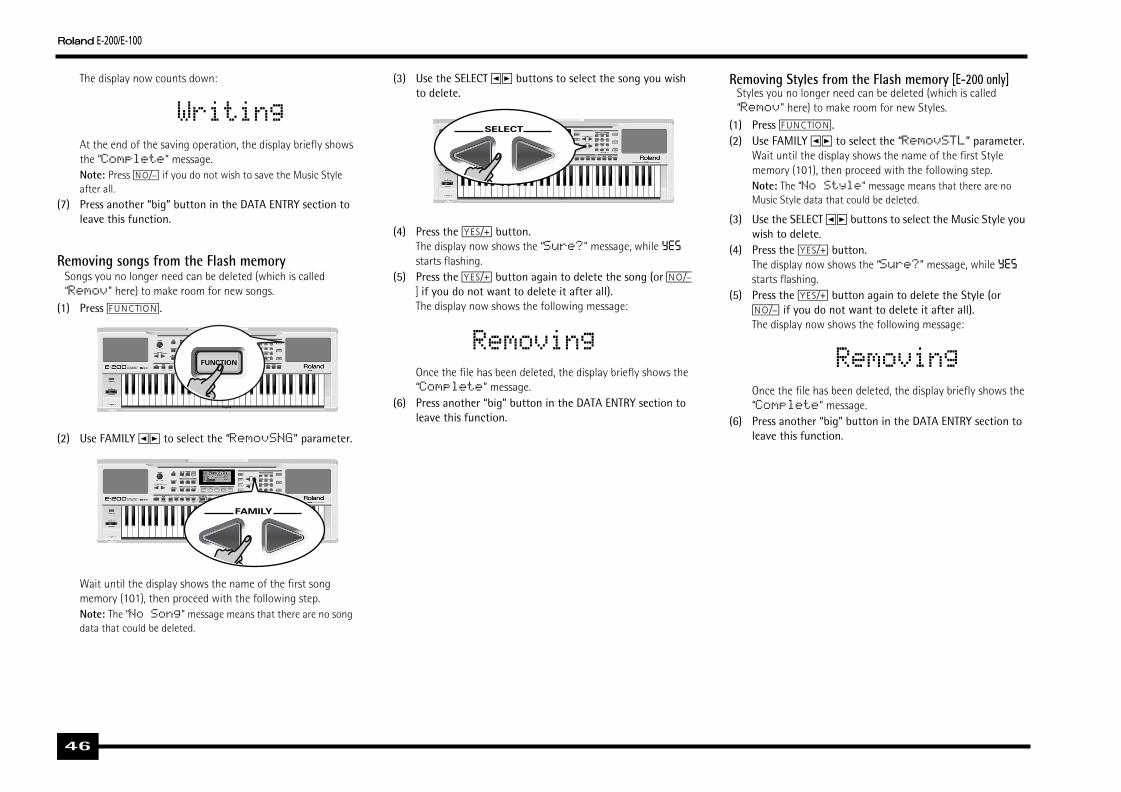
r E-200/E-100
(7
R
(1
(2
Removing Styles from the Flash memory [E-200 only]Styles you no longer need can be deleted (which is called “Remov” here) to make room for new Styles.
(1) Press [FUNCTION].(2) Use FAMILY [√][®] to select the “RemovSTL” parameter.
Wait until the display shows the name of the first Style memory (101), then proceed with the following step.Note: The “No Style” message means that there are no Music Style data that could be deleted.
(3) Use the SELECT [√][®] buttons to select the Music Style you wish to delete.
(4) Press the [YES/+] button.The display now shows the “Sure?” message, while Yes starts flashing.
(5) Press the [YES/+] button again to delete the Style (or [NO÷–] if you do not want to delete it after all).The display now shows the following message:
Once the file has been deleted, the display briefly shows the “Complete” message.
(6) Press another “big” button in the DATA ENTRY section to leave this function.
Removing
E-200_US Page 46 Tuesday, January 27, 2004 4:01 PM
46
The display now counts down:
At the end of the saving operation, the display briefly shows the “Complete” message.Note: Press [NO/–] if you do not wish to save the Music Style after all.
) Press another “big” button in the DATA ENTRY section to leave this function.
emoving songs from the Flash memorySongs you no longer need can be deleted (which is called “Remov” here) to make room for new songs.
) Press [FUNCTION].
) Use FAMILY [√][®] to select the “RemovSNG” parameter.
Wait until the display shows the name of the first song memory (101), then proceed with the following step.Note: The “No Song” message means that there are no song data that could be deleted.
(3) Use the SELECT [√][®] buttons to select the song you wish to delete.
(4) Press the [YES/+] button.The display now shows the “Sure?” message, while Yes starts flashing.
(5) Press the [YES/+] button again to delete the song (or [NO÷–] if you do not want to delete it after all).The display now shows the following message:
Once the file has been deleted, the display briefly shows the “Complete” message.
(6) Press another “big” button in the DATA ENTRY section to leave this function.
Writing
FUNCTION
FAMILY
SELECT
Removing

E-200/E-100
47
Note: Never switch off the E-200/E-100 while the “Writing” message is displayed, because doing so would damage all data in the E-200/E-100’s Flash area. (See “InitFLSH (Flash initialization)” (p. 40) if you need to repair the Flash area after an erroneous operation.)
For all operating systems:Note: If you press the [USB] button without connecting the USB cable, the display shows the error message “No Cable” to signal that USB communication is impossible. Connect a cable to cause this message to disappear.
(5) Open the “My Computer” window (Windows) and check whether your computer has found an “E200_E100” drive.
(6) Open that drive by double-clicking on its icon.(7) Open either the “Style” or the “Song” folder.
This depends on whether you want to delete/rename/add Music Styles or Standard MIDI Files.
(8) Do one of the following:• Copy the desired Music Styles from the “Style” folder to your
computer’s hard disk using drag & drop.• Copy the desired songs from the “Song” folder to your com-
puter’s hard disk using drag & drop.• Copy the desired Music Styles from your computer’s hard
disk to the “Style” folder using drag & drop. (See also the explanation below step (10).)
• Copy the desired songs from your computer’s hard disk to the “Song” folder using drag & drop.
• Rename the desired Style or song files in the “Style” or “Song” folder.
• Delete the files you no longer need.Note: While the “PC<>E200” message is displayed, all of the E-200/E-100’s buttons and keys are blocked.
(9) To disconnect the E-200/E-100 from your computer:• Macintosh: Drag the “E200_E100” (or “Removable Disk”)
icon to the trash.—OR—
E-200_US Page 47 Tuesday, January 27, 2004 4:01 PM
Archiving data using a computer (USB)The E-200/E-100’s USB port can be used for exchanging files with a computer.As long as the icon is not displayed, the USB port is not used.If the icon is displayed, however, your E-200/E-100 will appear as an external drive on your PC’s or Mac’s desktop:
The drive letter (“E:” in the above illustration) depends on the number of drives recognized by Windows (and is of no impor-tance for MacOS).Note: Data transfer is possible with Windows 2000/Me/XP or later/Mac OS 9.04 or later. If you encounter problems with your system, please contact your nearest Roland service center for details.
Once recognized, you can copy files to the “Song” or “Style” folder by dragging and dropping them using the usual routines. The “Style” and “Song” folders cannot be deleted and must not be renamed. You can empty them by dragging all files they contain to the trash, though.
Proceed as follows (Windows XP):
(1) Restart your PC.(2) Switch on your E-200/E-100.(3) Press the E-200/E-100’s [USB] button.
The display shows the error message “No Cable” to sig-nal that USB communication is impossible.
(4) Connect the E-200/E-100’s USB port to a free USB port of your computer using the supplied cable.
The icon appears and the display shows “PC<>E200” (or “PC<>E100”).Note: If you do not connect a USB cable within 15 seconds, the E-200/E-100 returns to its normal mode.
Note: Never switch off the E-200/E-100 while the “Writing” message is displayed, because doing so would damage all data in the E-200/E-100’s Flash area. (See “InitFLSH (Flash initialization)” (p. 40) if you need to repair the Flash area after an erroneous operation.)Note: The “Wait… Connection Proceding” mes-sage may appear when you press the [USB] button.
Proceed as follows (other operating systems):
(1) Switch on your Mac or PC if it isn’t on already.(2) Switch on your E-200/E-100 if it isn’t on already.(3) Press the E-200/E-100’s [USB] button.
The display shows the error message “No Cable” to sig-nal that USB communication is impossible.Note: If you do not connect a USB cable within 15 seconds, the E-200/E-100 returns to its normal mode.
(4) Connect the E-200/E-100’s USB port to a free USB port of your computer using the supplied cable.The icon appears and the display shows “PC<>E200” (or “PC<>E100”). If you prefer to use another cable, choose one with the cor-rect USB jack types (a “square” one for the E-200/E-100 and probably a “flat” one for your computer).Note: Do not connect the E-200/E-100 to a USB hub. Always connect it directly to your computer.
E-200/E-100 Computer

r E-200/E-100
(1
(1
(3) Use SELECT [√][®] to select the User Program Set you wish to load.
The Yes message next to it starts flashing.(4) Press the [YES÷+] button to load the selected file.
Note: Press [NO÷–] if you do not want to load the selected file after all.
If you pressed [YES÷+], the display now shows the message “Loading”. Once the data have been loaded, the “Complete” message briefly appears.
(5) Press another “big” button in the DATA ENTRY section to leave this function.
Possible error messages
No Disk You forgot to insert a floppy disk into the drive.
No Files The disk you inserted contains no User Program data.
NoFormat The floppy disk is either not formatted or uses a format the E-200 doesn’t recognize. Press [YES÷+] to format it now (careful: this will erase all data on disk).
Disk Err The disk is probably damaged and cannot be used.
File Err The file you selected is damaged and cannot be loaded.
SELECT
YES
E-200_US Page 48 Tuesday, January 27, 2004 4:01 PM
48
• Windows: Click on the removal icon on the task bar. Wait until a drop-down menu appears and select the entry that says something to the effect of “Stop USB disk E200_E100”. You should now see a window that says something to the effect of “The USB device XX can now be safely removed from the system”. Click on the [OK] button.
—THEN—• Disconnect the USB cable from your computer and the
E-200/E-100.0) Press the [USB] button again.
The display shows the “Sure?” message.1) Press [YES/+] (the icon disappears).
(Press [NO/–] to remain in USB mode.)If you copied Music Styles from your computer to the Flash area, the display now shows “Wait… Converting Styles” to indicate that files with the extension “.STL” are converted to the E-200/E-100’s Music Style format (“.STH”).Note that this conversion is only necessary for Music Styles in the E-200/E-100’s Flash area that do not yet have the “.STH” extension.Note: This operation adds a few bytes to every converted Music Style. In rare circumstances (when the Flash area is nearly full), this may lead to the impossibility to convert all Styles that still have the extension “.STL”. The E-200/E-100 then displays the “MemFull” message to signal that the conversion was aborted before reaching the last “.STL” file. All Styles up to that point have been converted, though, and can be used.
Disk functions [E-200 only]The E-200’s Disk functions allow you to save the Recorder Song in the USER SNG memory to disk, to save and load your files to and from disk, to delete files on a floppy disk, and format disks. Though you can use 2DD or 2HD floppies, 2HD disks have twice the capacity of 2DD disks, so use 2HDs whenever you can.Whenever the disk drive writes data to or reads data from disk, the Disk icon ( ) flashes in the display. Do not remove the floppy disk while this icon is displayed as that may damage both the disk drive and the disk (so that it becomes unreadable).
Loading User Programs from diskThis load function is called LOAD Upr. It allows you to trans-fer a set of 10 User Programs (i.e. for all memories) to the E-200’s internal memory. This will overwrite the User Programs that currently reside in the internal memories.Note: If you wish to use the User Programs in the internal memory at a later stage, first save them to disk before proceeding. See p. 49.
Note: The User Program set data also contain the TONE button assignments (page 28). After loading a User Program set, the eight TONE buttons may therefore select other sounds than before.
(1) Insert a disk into the drive.(2) Press [DISK] to select the Disk mode.
The “LOAD Upr” function is already selected, so there is nothing else you need to do. (Otherwise, use FAMILY [√][®] to select this parameter.)
DISK

E-200/E-100
49
Note: If you select “SPACE” ([0] button), the display will insert a “_”. That’s because MS-DOS® does not allow you to use spaces.
(6) After entering the name, press the [YES/+] button to save the data to floppy disk.The display now looks as follows:
At the end of the saving operation, the display briefly shows the “Complete” message.Note: If the message “Protect” appears, you forgot to switch off the disk’s Write protection. Press the EJECT button of the disk drive, remove the floppy and close the tab, insert the disk again and press [YES÷+].Note: Press [NO/–] if you do not want to save the selected file after all.
(7) Press another “big” button in the DATA ENTRY section to leave this function.
Possible error messages
No Disk You forgot to insert a floppy disk into the drive.
Protect See above.
Disk Full The remaining disk capacity does not allow to save your data to this disk.
NoFormat The floppy disk is either not formatted or uses a format the E-200 doesn’t recognize. Press [YES÷+] to format it now (careful: this will erase all data on disk).
Disk Err The disk is probably damaged and cannot be used.
OverWrt? The name you assigned to the data already exists on the floppy disk you inserted. If you press [YES÷+] to continue, the file on disk will be overwritten (and the corresponding data will be erased). Either insert another floppy disk, or press [DISK] and enter another name for the data you want to save.
Saving
E-200_US Page 49 Tuesday, January 27, 2004 4:01 PM
Loading songs from diskLOAD Sng allows you to load a song on floppy disk into the E-200/E-100’s User memory.
(1) Insert a disk into the drive.(2) Press [DISK] to select the Disk mode.(3) Select the “LOAD Sng” function using FAMILY [√][®].(4) Use SELECT [√][®] to select the song you wish to load.
The Yes message next to it starts flashing.(5) Press the [YES÷+] button to load the selected file.
Note: Press [NO÷–] if you do not want to load the selected file after all.
If you pressed [YES÷+], the display now shows the message “Loading”. Once the data have been loaded, the “Complete” message briefly appears.
(6) Press another “big” button in the DATA ENTRY section to leave this function.Note: See also “Possible error messages” above.
Loading Music Styles from diskLOAD Stl allows you to load a Music Style on floppy disk into the E-200/E-100’s User memory.
(1) Insert a disk into the drive.(2) Press [DISK] to select the Disk mode.(3) Select the “LOAD Stl” function using FAMILY [√][®].(4) Use SELECT [√][®] to select the Music Style you wish to
load.The Yes message next to it starts flashing.
(5) Press the [YES÷+] button to load the selected file.Note: Press [NO÷–] if you do not want to load the selected file after all.
If you pressed [YES÷+], the display now shows the message “Loading”. Once the data have been loaded, the “Complete” message briefly appears.
(6) Press another “big” button in the DATA ENTRY section to leave this function.Note: See also “Possible error messages” (p. 48).
Saving files to diskThe E-200 provides the following Save functions:SAVE Upr: Use this function to save the contents of the internal User Program memories (all 10 of them) to a floppy disk.Note: The User Program set data also contain the TONE button assignments (page 28).
SAVE Sng: This allows you to save the song in the USERSONG memory to a floppy disk. A song saved to disk becomes a Standard MIDI File.
(1) Insert a disk into the drive.Every floppy contains a square tab that allows you to “close” a little window. With the tab in that position, you can save data to the disk. Do not forget to write-enable the disk by closing this little window prior to inserting the floppy disk.
(2) Press [DISK] and use SELECT [√][®] to select “SAVE Upr” or “SAVE Sng”.
(3) If necessary, use the SELECT [√][®] buttons to move the cursor to another character position (that character flashes).Note: Each time you press another numeric button (for entering characters), the cursor advances automatically to the next posi-tion.
(4) Use the numeric buttons to assign a character to that position.
The available characters are as shown above.(5) Repeat steps (3) and (4) to assign the desired characters to
the remaining positions.Though you could save the file with the current default name (“SONG_001”, or “USPR_000”), a proper name will help you identify the file at all times. We therefore sug-gest you take the time to specify a meaningful name.
r E-200/E-100
D
(1
(2(3(4
(5
(6
(7
FormatBefore being able to save files to a disk, you need to prepare a floppy disk. This is called “formatting”. If the floppy you are about to use is IBM PC formatted, there is no need to format it, though disk access is faster with disks formatted on the E-200. Otherwise proceed as follows:
(1) Insert a disk into the drive.Every floppy contains a square tab that allows you to “close” a little window. With the tab in that position, you can format the disk. Do not forget to write-enable the disk by closing this little window prior to inserting the floppy disk.
(2) Press [DISK] to select the Disk mode.(3) Use FAMILY [√][®] to select “FORMAT”. The “Sure?”
message appears and the Yes message starts flashing.(4) Press [YES÷+] to format the disk.
Note: If you do not want to format your floppy, press [NO÷–].Note: By formatting a disk, you erase all files it contains. It would be a good idea to first check what it contains (e.g. on your PC).
The value to the left of the “Formatng” message now counts from “1” to “100” while the disk icon flashes to indi-cate that the disk is being accessed. When the disk is format-ted, the message “Complete” is briefly displayed.
E-200_US Page 50 Tuesday, January 27, 2004 4:01 PM
50
eleting files on diskThe Delete functions allow you to erase files from the inserted floppy disk. This may be necessary to make room for new files (e.g. when the “Disk Full” message appears). Be careful, though, to only delete files you are absolutely (positively) sure you will never need again. Once a file has been deleted, it is gone for-ever.Note: As a rule, you should first make a backup copy of your disk on your computer. After all, files really only become indispensable once they are no longer available…
DEL Upr: Use this function to delete a User Program Set from disk. Be aware that by doing so, you actually erase 10 User Program settings. DEL Sng: This allows you to delete a song file on disk.
) Insert the disk with the file you want to delete into the drive.
) Press [DISK] to select the Disk mode.) Use SELECT [√][®] to select “DEL Upr” or “DEL Sng”. ) Use SELECT [√][®] to select the file you wish to delete
(example: “USPR_005”). The Yes message starts flash-ing.
) Press the [YES÷+] button.To be on the safe side, the E-200 now asks you whether you really want to delete the file (“Sure?”).
) Press [YES÷+] to delete the file, or [NO÷–] to abort the oper-ation.If you pressed [YES÷+], the display now shows the message “Deleting”. Once the data have been deleted, the “Complete” message briefly appears.
) Press another “big” button in the DATA ENTRY section to leave this function.
Possible error messages
No Disk You forgot to insert a floppy disk into the drive.
Protect You forgot to switch off the disk’s Write pro-tection. Press the EJECT button of the disk drive, remove the floppy and close the tab, insert the disk again and press [YES÷+].
NoFormat The floppy disk is either not formatted or uses a format the E-200 doesn’t recognize. Press [YES÷+] to format it now (careful: this will erase all data on disk).
Disk Err The disk is probably damaged and cannot be used.
No Files The disk contains no files of the selected type. Insert another disk.

E-200/E-100
51
the E-200/E-100’s OUTPUT sockets to the external device’s REC IN
-6, or BOSS FS-5U footswitch
E-200_US Page 51 Tuesday, January 27, 2004 4:01 PM
If you like, you can also record your performance (or a Recorder songs) to cassette, MD, etc. To this end, you need to connect jacks.
Use a standard 1/4” phone cable for doing so. Another use for these outputs is to connect the E-200/E-100 to your HiFi or key-board amplifier (such as the Roland KC-550/350/150). Using a HiFi amplifier requires the use of an adapter plug (phono/RCA→ 1/4” jack). If you like, you can also purchase two Roland PJ-1M cables.
Note: By connecting the OUTPUT jacks, you do not switch off the E-200/E-100’s amplification system.
You can connect an optional DP-2, DP-6, or BOSS FS-5U foot switch to the FOOTSWITCH jack in order to hold the notes even after releasing the keys, or to perform other functions (see p. 38).
15. Using the outputs and an optional footswitch
Cassette deck, power amplifier, HiFi amplifier, MA series active speakers, etc.
DP-2, DP

r E-200/E-100
D
(1(2
D
(1(2
Initializing your E-200/E-100 (Factory)After working extensively with your E-200/E-100, you may want to recall the original factory settings. Note that the Recorder song will be empty and that the User Programs contain factory settings after initializing your E-200/E-100.Here is how to initialize your E-200/E-100:
(1) Power off your E-200/E-100.(2) Hold down the [USER¥PROGRAM/WRITE] button while
turning your E-200/E-100 back on again. The message “Factory” informs you that the E-200/E-100 has been initialized.Note: This does not affect the data in the E-200/E-100’s Flash memory. See page 40 for how to initialize that area.
E-200_US Page 52 Tuesday, January 27, 2004 4:01 PM
52
Functions for educational purposesThe E-200/E-100 provides two functions that may come in handy for music teachers or for those who use the E-200/E-100 in class:
eactivating or activating the Demo functionThe E-200/E-100’s Demo function can be switched off so that pressing [USB]+[KEYBOARD¥TOUCH] will have no effect at all. This may be useful in situations where the E-200/E-100 is used in class. Here is how to deactivate the Demo function:
) Switch off the E-200/E-100.) Hold down the [USB], [KEYBOARD¥TOUCH] and [ACOUSTIC]
buttons while switching the E-200/E-100 back on again.The display briefly shows “DISABLED”.This setting is remembered, so that next time you want to listen to a demo song, you have to repeat the above proce-dure.
eactivating or activating the ArrangerUse the following procedure to ensure that the Arranger cannot be started or stopped:
) Switch off the E-200/E-100.) Hold down the [ACOUSTIC] and [ARRANGER] buttons while
you switch the E-200/E-100 back on again.The display briefly shows “DISABLED”. It is now impossi-ble to start/stop the Arranger using the [START÷STOP] but-ton.Repeat the above procedure when you want to use the Arranger again.
Deactivating or activating the Arranger and Demo functions
A third “educational” option is to switch off both the Demo and the Arranger functions in one go:
(1) Switch off the E-200/E-100.(2) Hold down the [ACOUSTIC] and [START÷STOP] buttons
while you switch the E-200/E-100 back on again.The display briefly shows “DISABLED”. It is now impossi-ble to start/stop the Arranger or demo song playback. Repeat the above procedure when you want to use the Arranger and Demo function again.
16. Miscellaneous

E-200/E-100
53
Connections: USB: file transfer, MIDI IN, OUTOutputs: L/Mono, Right (1/4” phone jacks), Phones 1/2, DC IN (adapter)Others: E-200→ Output Power: 10W+10W with “Digital Bass Enhancer”, Stereo Speakers: x ø13cm, Bass ReflexE-100→ Output Power: 5W+5W with “Digital Bass Enhancer”, Stereo speakers: 2 x ø12cmPower supply: 12V/3.5A (E-200), 12V/1A (E-100)Dimensions: 1020 x 355 x 132 mmWeight: 8kg (E-200), 7kg (E-100)Supplied accessories: E-200→ Owner’s Manual, PSB-4U adapter, music rest, USB cableE-100→ Owner’s Manual, ACO adapter, music rest, USB cable
Note: Specifications are subject to change without prior notice.
E-200_US Page 53 Tuesday, January 27, 2004 4:01 PM
E-200/E-100 Intelligent KeyboardKeyboard: 61 keys, velocity sensitiveSound source: PCM samplesMax polyphony: 64 voicesTones: 510 panel sounds + 542 XG compatible voices + 256 GM2 compatible soundsDrum Kits: 20 Drum Kits, 11 XG-compatible Drum Kits + 9 GM2-compatible Drum Kits Multitimbral parts: 19Compatibility: GM2, GS, XG LiteDisplay type: New large backlit custom displayPanel controls: VOLUME knob, ACCOMP/KEYBOARD BALANCE but-tons, TEMPO/DATA buttons, BENDER/MODULATION lever, FAMILY buttons, SELECT buttons, 10 Style family buttons (plus numeric but-tons [0]~[9]), 8 assignable TONE family buttonsMusic Styles: 94 Styles in Flash memory (78 factory + 16 change-able)One Touch: 2 x 78Orchestrator: 3 levels: Drum&Bass, Combo, Full BandStylist: 5: Acoustic, Pop, Rock, Dance, WorldSongs: Realtime SMF player16-track Recorder: 4 easy modes (ALL, Keyboard, Single, Punch In/Out)
Song Stylist: 5: Acoustic, Pop, Rock, Dance, WorldFlash Memory: For Music Styles and SongsUser Programs: 10Effects: Reverb: 8 types, Chorus: 8 types, Multi-FX: 47 typesData storage: E-200→ FDD 3.5” 2HD/2DD (Styles, Songs/SMF, User Programs)E-100 & E-200→ File save & load from PC via USB (Style, Song)Metronome: Time Signature setting (1/4, 2/4, 3/4, 4/4, 5/4, 6/4, 6/8, 9/8), Volume settingOther functions: 2 easy modes: Piano, Arranger, Music Assistant: 106 settings, Split (2 Tones: Split [L] + Main [R]), Dual (2 Tones: Main + Dual), Melody Intelligence: 18 types, Octave (–4~4), Transpose (–12~12), V-LinkSystem updates: Yes
17. Specifications
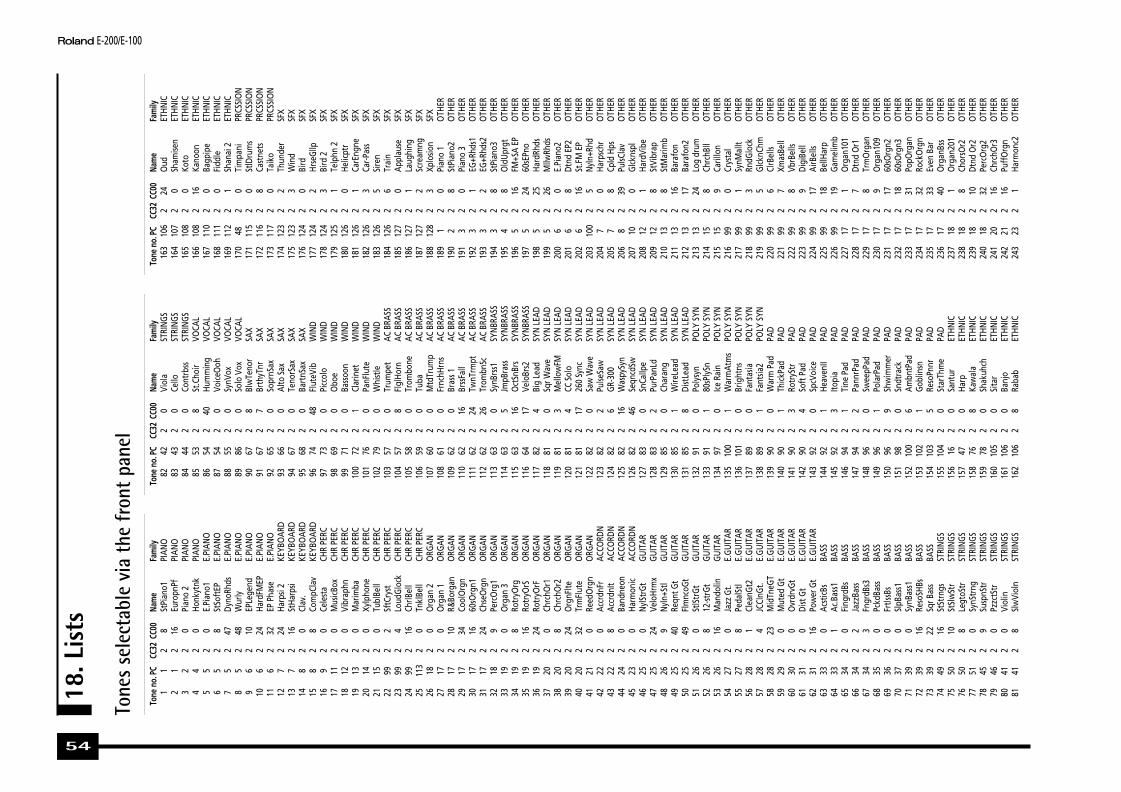
r E-200/E-100
5427
20
Jazz
Gt.
E.GU
ITAR
5527
28
Peda
lStl
E.GU
ITAR
5628
21
Clea
nGt2
E.GU
ITAR
5728
24
JCCl
nGt.
E.GU
ITAR
5828
223
Mid
TneG
TE.
GUIT
AR59
292
0M
uted
Gt
E.GU
ITAR
6030
20
Ovr
drvG
tE.
GUIT
AR61
312
0Di
st G
tE.
GUIT
AR62
312
16Po
wer
Gt
E.GU
ITAR
6333
20
Acst
icBs
BASS
6433
21
Ac.B
ass1
BASS
6534
20
Fing
rdBs
BASS
6634
22
Jazz
Bass
BASS
6734
23
Fngr
dBs3
BASS
6835
20
Pckd
Bass
BASS
6936
20
Frtls
sBs
BASS
7037
20
SlpB
ass1
BASS
7139
20
SynB
ass1
BASS
7239
216
Reso
SHBs
BASS
7339
222
Sqr B
ass
BASS
7449
216
StSt
rngs
STRI
NGS
7550
210
StSl
wSt
rST
RING
S76
502
8Le
gtoS
trST
RING
S77
512
0Sy
nStr
ngST
RING
S78
452
9Su
spnS
trST
RING
S79
462
0Pz
zctS
trST
RING
S80
412
0Vi
olin
STRI
NGS
8141
28
Slw
Viol
nST
RING
S
135
100
21
War
mAt
ms
POLY
SYN
136
101
20
Brig
htns
POLY
SYN
137
892
0Fa
ntas
iaPO
LY S
YN13
889
21
Fant
sia2
POLY
SYN
139
902
0W
arm
Pad
PAD
140
902
1Th
ickPa
dPA
D14
190
23
Rotr
yStr
PAD
142
902
4So
ft P
adPA
D14
392
20
SpcV
oice
PAD
144
922
1He
aven
IIPA
D14
592
23
Itopi
aPA
D14
694
21
Tine
Pad
PAD
147
942
2Pa
nnrP
adPA
D14
896
20
Swee
pPad
PAD
149
962
1Po
larP
adPA
D15
096
29
Shw
imm
erPA
D15
198
20
Sndt
rack
PAD
152
100
26
Ambn
tPad
PAD
153
102
21
Gobl
insn
PAD
154
103
25
Reso
Pnnr
PAD
155
104
20
Star
Thm
ePA
D15
616
20
Sant
urET
HNIC
157
472
0Ha
rpET
HNIC
158
762
8Ka
wal
aET
HNIC
159
782
0Sh
akuh
chET
HNIC
160
105
20
Sita
rET
HNIC
161
106
20
Banj
oET
HNIC
162
106
28
Raba
bET
HNIC
216
992
0Cr
ysta
lO
THER
217
992
1Sy
nMal
ltO
THER
218
992
3Rn
dGlo
ckO
THER
219
992
5Gl
cknC
hmO
THER
220
992
6Cl
rBel
lsO
THER
221
992
7Xm
asBe
llO
THER
222
992
8Vb
rBel
lsO
THER
223
992
9Di
giBe
llO
THER
224
992
17Ai
rBel
lsO
THER
225
992
18Be
llHar
pO
THER
226
992
19Ga
mel
imb
OTH
ER22
717
21
Org
an10
1O
THER
228
172
7Dt
nd O
r1O
THER
229
172
8Tr
mO
rgan
OTH
ER23
017
29
Org
an10
9O
THER
231
172
1760
sOrg
n2O
THER
232
172
1860
sOrg
n3O
THER
233
172
31Po
pOrg
anO
THER
234
172
32Ro
ckO
rgn
OTH
ER23
517
233
Even
Bar
OTH
ER23
617
240
Org
anBs
sO
THER
237
182
1O
rgan
201
OTH
ER23
818
28
Chor
sOr2
OTH
ER23
918
210
Dtnd
Or2
OTH
ER24
018
232
Perc
Org
2O
THER
241
202
16Ch
rchO
r3O
THER
242
212
16Pu
ffO
rgn
OTH
ER24
323
21
Harm
onc2
OTH
ER
E-200_US Page 54 Tuesday, January 27, 2004 4:01 PM
54
Tone
s se
lect
able
via
the
fron
t pan
elTo
ne n
o.PC
CC32
CC00
Nam
eFa
mily
11
28
StPi
ano1
PIAN
O2
12
16Eu
ropn
PfPI
ANO
32
20
Pian
o 2
PIAN
O4
42
0Ho
nkyt
nkPI
ANO
55
20
E.Pi
ano1
E.PI
ANO
65
28
StSo
ftEP
E.PI
ANO
75
247
Dyno
Rhds
E.PI
ANO
85
248
Wur
lyE.
PIAN
O9
62
10EP
Lege
ndE.
PIAN
O10
62
24Ha
rdFM
EPE.
PIAN
O11
62
32EP
Pha
seE.
PIAN
O12
72
24Ha
rpsi
2KE
YBO
ARD
137
216
StHa
rpsi
KEYB
OAR
D14
82
0Cl
av.
KEYB
OAR
D15
82
8Co
mpC
lav
KEYB
OAR
D16
92
0Ce
lest
aCH
R PE
RC17
112
0M
usicB
oxCH
R PE
RC18
122
0Vi
brap
hnCH
R PE
RC19
132
0M
arim
baCH
R PE
RC20
142
0Xy
lpho
neCH
R PE
RC21
152
0Tu
blBe
llCH
R PE
RC22
992
2Sf
tCry
stCH
R PE
RC23
992
4Lo
udGl
ock
CHR
PERC
2499
216
ChrlB
ell
CHR
PERC
2511
32
0Tn
klBe
llCH
R PE
RC26
182
0O
rgan
2O
RGAN
2717
20
Org
an 1
ORG
AN28
172
10R&
Borg
anO
RGAN
2917
234
Cool
Org
nO
RGAN
3017
216
60sO
rgn1
ORG
AN31
172
24Ch
seO
rgn
ORG
AN32
182
9Pe
rcO
rg1
ORG
AN33
192
0O
rgan
3O
RGAN
3419
28
Rotr
yOrg
ORG
AN35
192
16Ro
tryO
rSO
RGAN
3619
224
Rotr
yOrF
ORG
AN37
202
0Ch
rchO
r1O
RGAN
3820
28
Chrc
hOr2
ORG
AN39
202
24O
rgnF
lteO
RGAN
4020
232
Trm
Flut
eO
RGAN
4121
20
Reed
Org
nO
RGAN
4222
20
Accr
dnFr
ACCO
RDN
4322
28
Accr
dnIt
ACCO
RDN
4424
20
Band
neon
ACCO
RDN
4523
20
Harm
onic
ACCO
RDN
4625
20
NylS
trGt
GUIT
AR47
252
24Ve
loHr
mx
GUIT
AR48
262
9Ny
ln+S
tlGU
ITAR
4925
240
Reqn
t Gt
GUIT
AR50
252
49Fl
mnc
oGt
GUIT
AR51
262
0St
lStr
GtGU
ITAR
5226
28
12-st
rGt
GUIT
AR53
262
16M
ando
linGU
ITAR
Tone
no.
PCCC
32CC
00Na
me
Fam
ily82
422
0Vi
ola
STRI
NGS
8343
20
Cello
STRI
NGS
8444
20
Cont
rbss
STRI
NGS
8553
28
St.C
hoir
VOCA
L86
542
40Hu
mm
ing
VOCA
L87
542
0Vo
iceO
ohVO
CAL
8855
20
SynV
oxVO
CAL
8986
20
Solo
Vox
VOCA
L90
672
8Bl
wTe
nor
SAX
9167
27
Brth
yTnr
SAX
9265
20
Sopr
nSax
SAX
9366
20
Alto
Sax
SAX
9467
20
Teno
rSax
SAX
9568
20
Bart
nSax
SAX
9674
248
Flut
eVib
WIN
D97
732
0Pi
ccol
oW
IND
9869
20
Obo
eW
IND
9971
20
Bass
oon
WIN
D10
072
21
Clar
inet
WIN
D10
176
20
PanF
lute
WIN
D10
279
20
Whi
stle
WIN
D10
357
20
Trum
pet
AC B
RASS
104
572
8Fl
glHo
rnAC
BRA
SS10
558
20
Trom
bone
AC B
RASS
106
592
0Tu
baAC
BRA
SS10
760
20
Mtd
Trum
pAC
BRA
SS10
861
20
Frnc
hHrn
sAC
BRA
SS10
962
20
Bras
s 1AC
BRA
SS11
062
216
Brss
Fall
AC B
RASS
111
622
24Tw
nTrm
ptAC
BRA
SS11
262
226
Trom
bnSc
AC B
RASS
113
632
0Sy
nBrs
s1SY
NBRA
SS11
463
25
JmpB
rass
SYNB
RASS
115
632
16O
ctSn
Brs
SYNB
RASS
116
642
17Ve
loBr
s2SY
NBRA
SS11
782
24
Big
Lead
SYN
LEAD
118
812
0Sq
r Wav
eSY
N LE
AD11
981
23
Mel
low
FMSY
N LE
AD12
081
24
CC S
olo
SYN
LEAD
121
812
1726
0 Sy
ncSY
N LE
AD12
282
20
Saw
Wav
eSY
N LE
AD12
382
22
Pulse
Saw
SYN
LEAD
124
822
6GR
-300
SYN
LEAD
125
822
16W
aspy
Syn
SYN
LEAD
126
822
46Se
qncd
SwSY
N LE
AD12
783
20
SnCa
llpe
SYN
LEAD
128
832
2Pu
rPan
LdSY
N LE
AD12
985
20
Char
ang
SYN
LEAD
130
852
1W
ireLe
adSY
N LE
AD13
185
28
Dist
Lead
SYN
LEAD
132
912
0Po
lysy
nPO
LY S
YN13
391
21
80sP
lySn
POLY
SYN
134
972
0Ice
Rai
nPO
LY S
YN
Tone
no.
PCCC
32CC
00Na
me
Fam
ily16
310
62
24O
udET
HNIC
164
107
20
Sham
isen
ETHN
IC16
510
82
0Ko
toET
HNIC
166
108
216
Kano
onET
HNIC
167
110
20
Bagp
ipe
ETHN
IC16
811
12
0Fi
ddle
ETHN
IC16
911
22
1Sh
anai
2ET
HNIC
170
482
0Ti
mpa
niPR
CSSI
ON
171
115
20
StlD
rum
sPR
CSSI
ON
172
116
28
Cast
nets
PRCS
SIO
N17
311
72
0Ta
iko
PRCS
SIO
N17
412
32
2Th
unde
rSF
X17
512
32
3W
ind
SFX
176
124
20
Bird
SFX
177
124
22
Hrse
Gllp
SFX
178
124
23
Bird
2SF
X17
912
52
1Te
lphn
2SF
X18
012
62
0He
licpt
rSF
X18
112
62
1Ca
rEng
neSF
X18
212
62
3Ca
r-Pas
sSF
X18
312
62
5Si
ren
SFX
184
126
26
Trai
nSF
X18
512
72
0Ap
plau
seSF
X18
612
72
1La
ughi
ngSF
X18
712
72
2Sc
ream
ngSF
X18
812
82
3Xp
losio
nSF
X18
91
20
Pian
o 1
OTH
ER19
02
28
StPi
ano2
OTH
ER19
13
20
Pian
o 3
OTH
ER19
23
21
EG+R
hds1
OTH
ER19
33
22
EG+R
hds2
OTH
ER19
43
28
StPi
ano3
OTH
ER19
54
28
Old
Uprg
tO
THER
196
52
16FM
+SA
EPO
THER
197
52
2460
sEPn
oO
THER
198
52
25Ha
rdRh
dsO
THER
199
52
26M
llwRh
dsO
THER
200
62
0E.
Pian
o2O
THER
201
62
8Dt
nd E
P2O
THER
202
62
16St
.FM
EP
OTH
ER20
310
02
5Ny
ln+R
hdO
THER
204
72
0Ha
rpsc
hrO
THER
205
72
8Cp
ld H
psO
THER
206
82
39Pu
lsCla
vO
THER
207
102
0Gl
ckns
plO
THER
208
122
1Ha
rdVi
beO
THER
209
122
8St
Vibr
apO
THER
210
132
8St
Mar
imb
OTH
ER21
113
216
Bara
fon
OTH
ER21
213
217
Bara
fon2
OTH
ER21
313
224
Log
drum
OTH
ER21
415
28
Chrc
hBll
OTH
ER21
515
29
Caril
lon
OTH
ER
18. L
ists

E-200/E-100
5530
239
220
Ham
mer
OTH
ER30
339
221
Jngl
Bass
OTH
ER30
439
223
PopS
ynBs
OTH
ER30
539
224
Lght
SnBs
OTH
ER30
639
225
FatT
BBss
OTH
ER30
740
20
SynB
ass2
OTH
ER30
840
21
SynB
s201
OTH
ER30
940
22
Mod
Bas
sO
THER
310
402
3Se
q Ba
ssO
THER
311
402
8Be
efFM
BsO
THER
312
402
9XW
r Bas
sO
THER
313
402
16Ru
bbrB
ssO
THER
314
402
17SH
101B
s1O
THER
315
402
18SH
101B
s2O
THER
316
402
19Sm
thBa
ssO
THER
317
402
20M
ildBa
ssO
THER
318
402
21De
tunB
ssO
THER
319
402
29At
tckP
lsO
THER
320
121
22
Str S
lap
OTH
ER32
112
12
5Ba
ssSl
dO
THER
322
562
10Do
ublH
itO
THER
323
412
1Vi
olin
2O
THER
324
412
9Sl
Viol
n2O
THER
325
422
1Vi
ola2
OTH
ER32
643
21
Cello
2O
THER
327
452
0Tr
em S
trO
THER
328
452
8Sl
wTr
mol
OTH
ER32
949
20
Strin
gsO
THER
330
492
1St
rings
2O
THER
331
492
8O
rchs
tra
OTH
ER33
249
29
Orc
hstr
2O
THER
391
632
3SY
Bras
sO
THER
392
632
4Ju
noBr
ssO
THER
393
632
8Sy
nBrs
s3O
THER
394
632
9Q
uakB
rss
OTH
ER39
563
218
Oct
v Br
sO
THER
396
642
0Sy
nBrs
s2O
THER
397
642
1So
ftBr
ssO
THER
398
642
8Sy
nBrs
s4O
THER
399
642
16Ve
loBr
s1O
THER
400
812
1Sq
uare
OTH
ER40
181
22
Hollw
Min
OTH
ER40
281
25
Shm
oog
OTH
ER40
381
26
LMSq
uare
OTH
ER40
481
28
Sine
Wav
eO
THER
405
812
16Di
stSq
reO
THER
406
822
1P5
Saw
OTH
ER40
782
23
Felin
eGR
OTH
ER40
882
25
Velo
Lead
OTH
ER40
982
27
LA S
awO
THER
410
822
8Dr
. Sol
oO
THER
411
822
9Sa
wW
ave2
OTH
ER41
282
210
Saw
OTH
ER41
382
236
Natr
Lead
OTH
ER41
483
21
Vent
Syn
OTH
ER41
584
20
Chiff
rLd
OTH
ER41
687
20
5thS
awW
vO
THER
417
872
1Bi
gFiv
esO
THER
418
882
0Bs
s&Le
adO
THER
419
882
1Bi
g&Ra
wO
THER
420
882
2Fa
t&Pr
kyO
THER
421
882
7Dl
ydLe
adO
THER
480
120
216
RevK
ick1
OTH
ER48
112
02
17Re
vCon
BDO
THER
482
120
224
RevT
om 1
OTH
ER48
312
02
25Re
vTom
2O
THER
484
122
20
BrtN
oise
OTH
ER48
512
22
1Fl
KClic
kO
THER
486
123
20
Seas
hore
OTH
ER48
712
32
1Ra
inO
THER
488
123
24
Stre
amO
THER
489
123
25
Bubb
leO
THER
490
124
21
Dog
OTH
ER49
112
42
4Ki
tty
OTH
ER49
212
42
5Gr
owl
OTH
ER49
312
52
0Te
lphn
1O
THER
494
125
22
Door
Crk
OTH
ER49
512
52
3Do
orO
THER
496
125
24
Scra
tch
OTH
ER49
712
52
5W
ndCh
ims
OTH
ER49
812
52
7Sc
ratc
h2O
THER
499
126
22
Car-S
top
OTH
ER50
012
62
4Ca
rCra
shO
THER
501
126
27
Jetp
lane
OTH
ER50
212
62
8St
arsh
ipO
THER
503
126
29
Burs
tNs
OTH
ER50
412
72
3Pu
nch
OTH
ER50
512
72
4He
artB
tO
THER
506
127
25
Foot
stps
OTH
ER50
712
72
6Ap
plau
s2O
THER
508
128
20
Gun
Shot
OTH
ER50
912
82
1M
achn
Gun
OTH
ER51
012
82
2La
serg
unO
THER
E-200_US Page 55 Tuesday, January 27, 2004 4:01 PM
Tone
no.
PCCC
32CC
00Na
me
Fam
ily24
425
28
Ukul
ele
OTH
ER24
525
216
Nylo
nGto
OTH
ER24
625
232
Nylo
nGt2
OTH
ER24
726
232
Stee
lGt2
OTH
ER24
826
233
Stl+
Body
OTH
ER24
932
20
GtHr
mnc
sO
THER
250
322
16Ac
GtHr
mx
OTH
ER25
110
02
0At
msp
her
OTH
ER25
210
02
2Ny
lnHa
rpO
THER
253
121
20
GtFr
tNoz
OTH
ER25
427
21
Mel
low
GtO
THER
255
272
2Ja
zzGt
.2O
THER
256
282
0Cl
eanG
t.O
THER
257
282
3O
penH
rd1
OTH
ER25
828
28
Chor
usGt
OTH
ER25
928
248
Clea
nGt3
OTH
ER26
029
21
Mt D
stBs
OTH
ER26
129
28
Funk
Pop
OTH
ER26
229
216
Funk
Gt2
OTH
ER26
329
224
Jazz
Man
OTH
ER26
430
24
Gt P
inch
OTH
ER26
531
21
Dist
.Gt2
OTH
ER26
631
22
Daze
d Gt
OTH
ER26
731
28
Fdbc
k Gt
OTH
ER26
831
29
Fdbc
kGt2
OTH
ER26
931
217
Pow
erGt
2O
THER
270
312
185t
h Di
stO
THER
271
312
24Ro
ckRh
ytO
THER
272
312
25Ro
ckRh
y2O
THER
273
312
26Ds
tRtm
GTO
THER
274
322
8Gt
Fdba
ckO
THER
275
121
21
GtCt
Noiz
OTH
ER27
612
12
3Gt
CtNo
z2O
THER
277
121
24
DstC
utNz
OTH
ER27
812
12
6Pi
ckSc
rpO
THER
279
332
2Ac
.Bas
s2O
THER
280
332
3Ac
.Bas
s3O
THER
281
342
1Fn
grdB
s2O
THER
282
342
4Fn
grdB
s4O
THER
283
342
7Fi
ngrS
lpO
THER
284
352
3Pc
kd B
s2O
THER
285
352
8M
t Pck
BsO
THER
286
362
1Fr
tlsBs
2O
THER
287
362
2Fr
tlsBs
3O
THER
288
362
3Fr
tlsBs
4O
THER
289
362
4Sn
Frtls
sO
THER
290
362
5M
rSm
ooth
OTH
ER29
136
28
Frtls
Bs5
OTH
ER29
236
248
FtFr
tlss
OTH
ER29
337
28
Reso
Slap
OTH
ER29
438
20
SlpB
ass2
OTH
ER29
539
21
SynB
s101
OTH
ER29
639
22
Juno
Bass
OTH
ER29
739
23
106B
ass
OTH
ER29
839
28
Acid
Bass
OTH
ER29
939
29
TB30
3Bss
OTH
ER30
039
210
Tekn
Bass
OTH
ER30
139
219
Clav
iBss
OTH
ER
Tone
no.
PCCC
32CC
00Na
me
Fam
ily33
349
210
Trem
Orc
hO
THER
334
492
11Ch
oirS
trO
THER
335
492
24Ve
loSt
rnO
THER
336
492
4060
Strin
gO
THER
337
502
0Sl
wSt
rng
OTH
ER33
850
21
Slw
Strn
2O
THER
339
502
9W
arm
Strn
OTH
ER34
051
21
OBS
trng
sO
THER
341
512
2Sy
nStr
n1O
THER
342
512
870
s Str
1O
THER
343
512
970
s Str
2O
THER
344
522
0Sy
nStr
n2O
THER
345
522
1Sy
nStr
n3O
THER
346
562
0O
rch
Hit
OTH
ER34
756
21
Bass
Hit
OTH
ER34
856
22
6th
Hit
OTH
ER34
956
23
Euro
Hit
OTH
ER35
056
24
Tech
nHit
OTH
ER35
156
28
Impc
tHit
OTH
ER35
256
29
Phlly
Hit
OTH
ER35
356
216
LoFi
Rave
OTH
ER35
453
20
Choi
rAah
OTH
ER35
553
29
Mel
loCh
rO
THER
356
532
32Ch
rAah
s2O
THER
357
552
8Sy
nVoi
ceO
THER
358
552
19An
aVoi
ceO
THER
359
100
23
Harp
vox
OTH
ER36
010
02
4Hl
lwRe
lsO
THER
361
652
8So
prSa
x2O
THER
362
662
1Al
toSa
x2O
THER
363
662
8Hy
prAl
toO
THER
364
672
1Te
nrSa
x2O
THER
365
672
9Sp
rTen
orO
THER
366
702
0En
glHo
rnO
THER
367
722
0Jz
Clrin
tO
THER
368
722
8Bs
Clar
ntO
THER
369
742
0Fl
ute
OTH
ER37
075
20
Reco
rder
OTH
ER37
177
20
Bott
lBlw
OTH
ER37
280
20
Oca
rina
OTH
ER37
357
21
Trum
pet2
OTH
ER37
457
22
Trum
pet3
OTH
ER37
557
23
DrkT
rmpt
OTH
ER37
657
224
Brig
htTp
OTH
ER37
757
225
War
m T
p.O
THER
378
582
1Tr
ombn
e2O
THER
379
582
2Tr
ombn
e3O
THER
380
582
4Br
ight
TbO
THER
381
592
1Tu
ba 2
OTH
ER38
260
22
MtT
rmpt
2O
THER
383
612
1Fr
.Hor
n2O
THER
384
612
8Fr
Horn
SlO
THER
385
612
16Ho
rnO
rch
OTH
ER38
662
21
Bras
s 2O
THER
387
622
8Br
ass 3
OTH
ER38
862
225
Twin
Bons
OTH
ER38
962
227
Trm
bnSc
2O
THER
390
632
1Po
lyBr
ssO
THER
Tone
no.
PCCC
32CC
00Na
me
Fam
ily42
297
21
Harm
Rain
OTH
ER42
397
22
Afric
nwd
OTH
ER42
497
28
Clav
iPad
OTH
ER42
598
28
Rave
OTH
ER42
690
22
Horn
Pad
OTH
ER42
790
25
Sine
Pad
OTH
ER42
893
20
Bow
dGlss
OTH
ER42
994
20
Met
alPa
dO
THER
430
952
0Ha
lo P
adO
THER
431
962
8Co
nver
geO
THER
432
962
10Ce
lstlP
dO
THER
433
982
1An
cest
rlO
THER
434
982
2Pr
olog
ueO
THER
435
102
20
Gobl
inO
THER
436
102
22
50sS
ciFi
OTH
ER43
710
32
0Ec
hDro
psO
THER
438
103
21
Echo
Bell
OTH
ER43
910
32
2Ec
ho P
anO
THER
440
103
23
Echo
Pan2
OTH
ER44
110
32
4Bi
gPan
nrO
THER
442
103
26
Wtr
Pian
oO
THER
443
104
21
StrT
hme2
OTH
ER44
416
21
Sant
ur 2
OTH
ER44
516
28
Cim
balo
mO
THER
446
472
24Ya
ng Q
inO
THER
447
105
21
Sita
r 2O
THER
448
105
22
DtnS
itar
OTH
ER44
910
52
8Ta
mbr
aO
THER
450
105
216
Tam
bour
aO
THER
451
106
21
Mtd
Banj
oO
THER
452
106
216
Gopi
chnt
OTH
ER45
310
72
1Ts
ugar
uO
THER
454
108
28
Taish
oKt
OTH
ER45
510
92
0Ka
limba
OTH
ER45
611
22
0Sh
anai
OTH
ER45
711
22
8Pu
ngi
OTH
ER45
811
22
16Hi
chrik
iO
THER
459
113
28
Bona
ngO
THER
460
113
29
Gend
erO
THER
461
113
210
Gam
lnGn
gO
THER
462
113
211
StGa
mel
nO
THER
463
113
216
RAM
ACyb
lO
THER
464
114
20
Agog
oO
THER
465
114
28
Atar
igan
OTH
ER46
611
62
0W
oodb
lckO
THER
467
117
28
Conc
rtBD
OTH
ER46
811
72
9Cn
crBD
Mt
OTH
ER46
911
82
0M
eloT
om1
OTH
ER47
011
82
1Re
al T
omO
THER
471
118
28
Mel
oTom
2O
THER
472
118
29
Rock
Tom
OTH
ER47
311
92
0Sy
ntDr
umO
THER
474
119
28
808
Tom
OTH
ER47
511
92
9El
ecPe
rcO
THER
476
120
20
Rev
Cym
OTH
ER47
712
02
1Re
v Cy
m2
OTH
ER47
812
02
8Re
v Sn
r1O
THER
479
120
29
RevS
nr 2
OTH
ER
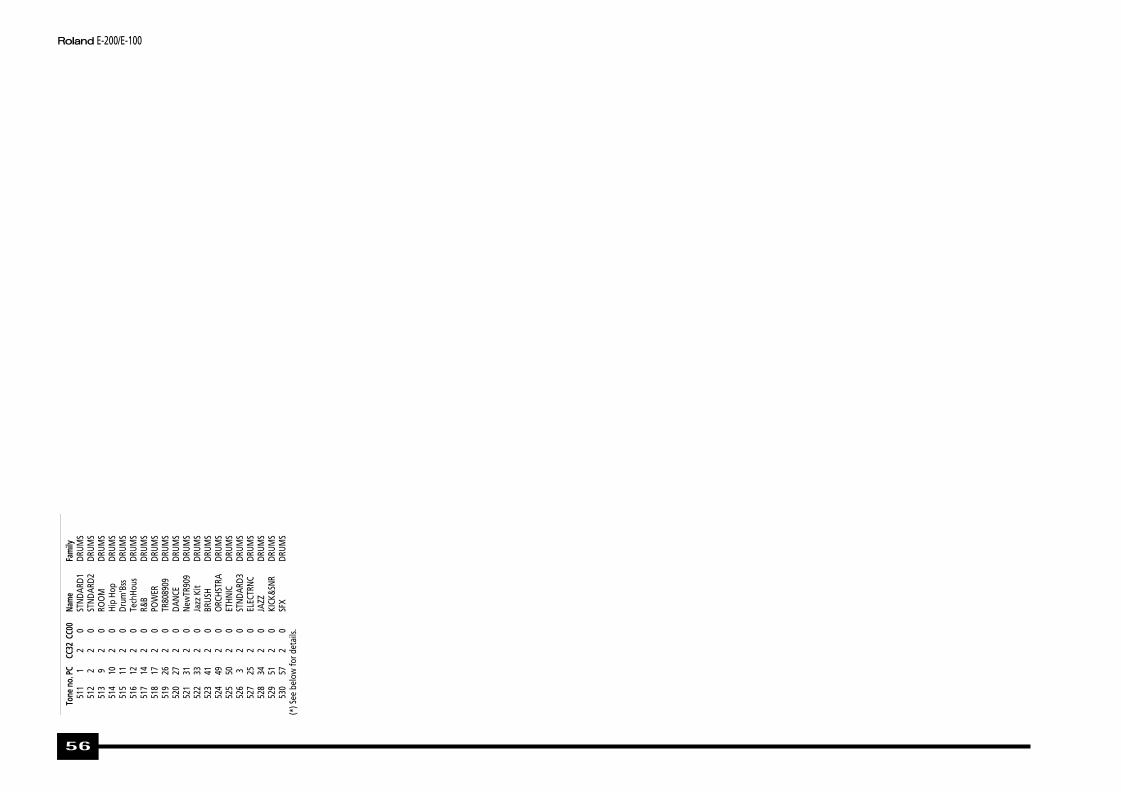
r E-200/E-100
E-200_US Page 56 Tuesday, January 27, 2004 4:01 PM
56
Tone
no.
PCCC
32CC
00Na
me
Fam
ily51
11
20
STND
ARD1
DRUM
S51
22
20
STND
ARD2
DRUM
S51
39
20
ROO
MDR
UMS
514
102
0Hi
p Ho
pDR
UMS
515
112
0Dr
um'B
ssDR
UMS
516
122
0Te
chHo
usDR
UMS
517
142
0R&
BDR
UMS
518
172
0PO
WER
DRUM
S51
926
20
TR80
8909
DRUM
S52
027
20
DANC
EDR
UMS
521
312
0Ne
wTR
909
DRUM
S52
233
20
Jazz
Kit
DRUM
S52
341
20
BRUS
HDR
UMS
524
492
0O
RCHS
TRA
DRUM
S52
550
20
ETHN
ICDR
UMS
526
32
0ST
NDAR
D3DR
UMS
527
252
0EL
ECTR
NCDR
UMS
528
342
0JA
ZZDR
UMS
529
512
0KI
CK&S
NRDR
UMS
530
572
0SF
XDR
UMS
(*) S
ee b
elow
for d
etai
ls.
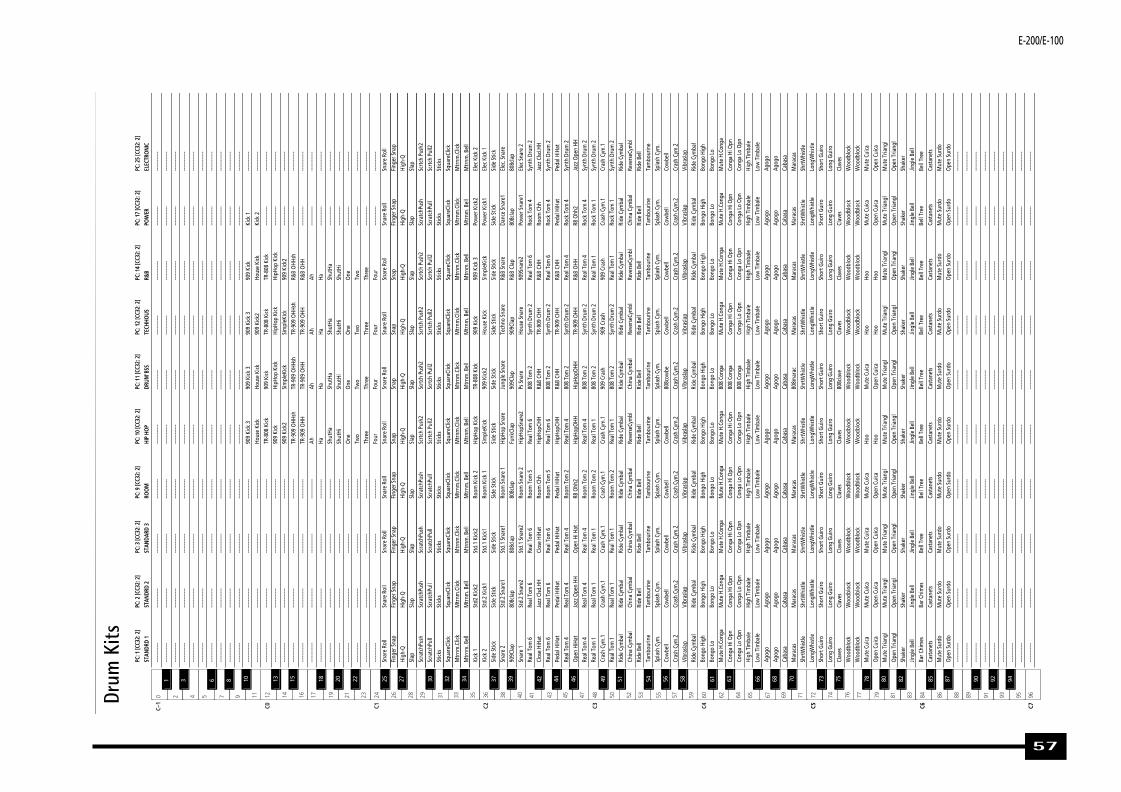
E-200/E-100
5764 65 67 69 71
63 66 68 70
C572 74 76 77 79 81 83
73 75 78 80 82
C684
C79686 88 89 91 93 95
85 87 90 92 94
Cong
a Hi
Opn
Cong
a Lo
Opn
High
Tim
bale
Low
Tim
bale
Agog
o
Agog
o
Caba
sa
Mar
acas
Shrt
Whi
stle
Long
Whi
stle
Shor
t Gui
ro
Long
Gui
ro
Clav
es
Woo
dblo
ck
Woo
dblo
ck
Mut
e Cu
ica
Ope
n Cu
ica
Mut
e Tr
iang
l
Ope
n Tr
iang
l
Shak
er
Jingl
e Be
ll
Bar C
him
es
Cast
anet
s
Mut
e Su
rdo
Ope
n Su
rdo
------
------
------
------
------
------
------
------
------
------
------
------
------
------
------
------
------
------
Cong
a Hi
Opn
Cong
a Lo
Opn
High
Tim
bale
Low
Tim
bale
Agog
o
Agog
o
Caba
sa
Mar
acas
Shrt
Whi
stle
Long
Whi
stle
Shor
t Gui
ro
Long
Gui
ro
Clav
es
Woo
dblo
ck
Woo
dblo
ck
Mut
e Cu
ica
Ope
n Cu
ica
Mut
e Tr
iang
l
Ope
n Tr
iang
l
Shak
er
Jingl
e Be
ll
Bell
Tree
Cast
anet
s
Mut
e Su
rdo
Ope
n Su
rdo
------
------
------
------
------
------
------
------
------
------
------
------
------
------
------
------
------
------
Cong
a Hi
Opn
Cong
a Lo
Opn
High
Tim
bale
Low
Tim
bale
Agog
o
Agog
o
Caba
sa
Mar
acas
Shrt
Whi
stle
Long
Whi
stle
Shor
t Gui
ro
Long
Gui
ro
Clav
es
Woo
dblo
ck
Woo
dblo
ck
Hoo
Hoo
Mut
e Tr
iang
l
Ope
n Tr
iang
l
Shak
er
Jingl
e Be
ll
Bell
Tree
Cast
anet
s
Mut
e Su
rdo
Ope
n Su
rdo
------
------
------
------
------
------
------
------
------
------
------
------
------
------
------
------
------
------
808
Cong
a
808
Cong
a
High
Tim
bale
Low
Tim
bale
Agog
o
Agog
o
Caba
sa
808m
arac
Shrt
Whi
stle
Long
Whi
stle
Shor
t Gui
ro
Long
Gui
ro
808c
lave
Woo
dblo
ck
Woo
dblo
ck
Mut
e Cu
ica
Ope
n Cu
ica
Mut
e Tr
iang
l
Ope
n Tr
iang
l
Shak
er
Jingl
e Be
ll
Bell
Tree
Cast
anet
s
Mut
e Su
rdo
Ope
n Su
rdo
------
------
------
------
------
------
------
------
------
------
------
------
------
------
------
------
------
------
Cong
a Hi
Opn
Cong
a Lo
Opn
High
Tim
bale
Low
Tim
bale
Agog
o
Agog
o
Caba
sa
Mar
acas
Shrt
Whi
stle
Long
Whi
stle
Shor
t Gui
ro
Long
Gui
ro
Clav
es
Woo
dblo
ck
Woo
dblo
ck
Hoo
Hoo
Mut
e Tr
iang
l
Ope
n Tr
iang
l
Shak
er
Jingl
e Be
ll
Bell
Tree
Cast
anet
s
Mut
e Su
rdo
Ope
n Su
rdo
------
------
------
------
------
------
------
------
------
------
------
------
------
------
------
------
------
------
Cong
a Hi
Opn
Cong
a Lo
Opn
High
Tim
bale
Low
Tim
bale
Agog
o
Agog
o
Caba
sa
Mar
acas
Shrt
Whi
stle
Long
Whi
stle
Shor
t Gui
ro
Long
Gui
ro
Clav
es
Woo
dblo
ck
Woo
dblo
ck
Mut
e Cu
ica
Ope
n Cu
ica
Mut
e Tr
iang
l
Ope
n Tr
iang
l
Shak
er
Jingl
e Be
ll
Bell
Tree
Cast
anet
s
Mut
e Su
rdo
Ope
n Su
rdo
------
------
------
------
------
------
------
------
------
------
------
------
------
------
------
------
------
------
Cong
a Hi
Opn
Cong
a Lo
Opn
High
Tim
bale
Low
Tim
bale
Agog
o
Agog
o
Caba
sa
Mar
acas
Shrt
Whi
stle
Long
Whi
stle
Shor
t Gui
ro
Long
Gui
ro
Clav
es
Woo
dblo
ck
Woo
dblo
ck
Mut
e Cu
ica
Ope
n Cu
ica
Mut
e Tr
iang
l
Ope
n Tr
iang
l
Shak
er
Jingl
e Be
ll
Bell
Tree
Cast
anet
s
Mut
e Su
rdo
Ope
n Su
rdo
------
------
------
------
------
------
------
------
------
------
------
------
------
------
------
------
------
------
E-200_US Page 57 Tuesday, January 27, 2004 4:01 PM
Drum
Kits
C236 38 40 41 43 45 47
37 39 42 44 46
C348 50 52 53 55 57 59
49 51 54 56 58
C460 62
61
C012 14 16 17 19 21 23
13 15 18 20 22
C–1
0 2 4 5 7 9 11
1 3 6 8 10
C124 26 28 29 31 33 35
25 27 30 32 34
PC: 1
[CC3
2: 2
]
STAN
DRD
1
------
------
------
------
------
------
------
------
------
------
------
------
------
------
------
------
------
------
------
------
------
------
------
------
------
------
------
------
------
------
------
------
------
------
------
------
------
------
------
------
------
------
------
------
------
------
------
------
------
------
Snar
e Ro
ll
Fing
er S
nap
High
-Q
Slap
Scra
tchP
ush
Scra
tchP
ull
Stick
s
Squa
reCl
ick
Mtr
nm.C
lick
Mtr
nm. B
ell
Kick
1
Kick
2
Side
Stic
k
Snar
e 2
909C
lap
Snar
e 1
Real
Tom
6
Clos
e Hi
Hat
Real
Tom
6
Peda
l HiH
at
Real
Tom
4
Ope
n Hi
Hat
Real
Tom
4
Real
Tom
1
Cras
h Cy
m.1
Real
Tom
1
Ride
Cym
bal
Chin
a Cy
mba
l
Ride
Bel
l
Tam
bour
ine
Spla
sh C
ym.
Cow
bell
Cras
h Cy
m.2
Vibr
asla
p
Ride
Cym
bal
Bong
o Hi
gh
Bong
o Lo
Mut
e H.
Cong
a
PC: 2
[CC3
2: 2
]
STAN
DRD
2
------
------
------
------
------
------
------
------
------
------
------
------
------
------
------
------
------
------
------
------
------
------
------
------
------
------
------
------
------
------
------
------
------
------
------
------
------
------
------
------
------
------
------
------
------
------
------
------
------
------
Snar
e Ro
ll
Fing
er S
nap
High
-Q
Slap
Scra
tchP
ush
Scra
tchP
ull
Stick
s
Squa
reCl
ick
Mtr
nm.C
lick
Mtr
nm. B
ell
Std2
Kick
2
Std.
2 Ki
ck1
Side
Stic
k
Std.
2 Sn
are1
808c
lap
Std.
2 Sn
are2
Real
Tom
6
Jazz
Clsd
.HH
Real
Tom
6
Peda
l HiH
at
Real
Tom
4
Jazz
Ope
n HH
Real
Tom
4
Real
Tom
1
Cras
h Cy
m.1
Real
Tom
1
Ride
Cym
bal
Chin
a Cy
mba
l
Ride
Bel
l
Tam
bour
ine
Spla
sh C
ym.
Cow
bell
Cras
h Cy
m.2
Vibr
asla
p
Ride
Cym
bal
Bong
o Hi
gh
Bong
o Lo
Mut
e H.
Cong
a
PC: 3
[CC3
2: 2
]
STAN
DARD
3
------
------
------
------
------
------
------
------
------
------
------
------
------
------
------
------
------
------
------
------
------
------
------
------
------
------
------
------
------
------
------
------
------
------
------
------
------
------
------
------
------
------
------
------
------
------
------
------
------
------
Snar
e Ro
ll
Fing
er S
nap
High
-Q
Slap
Scra
tchP
ush
Scra
tchP
ull
Stick
s
Squa
reCl
ick
Mtr
nm.C
lick
Mtr
nm. B
ell
Std.
1 Ki
ck2
Std.
1 Ki
ck1
Side
Stic
k
Std.
1 Sn
are1
808c
lap
Std.
1 Sn
are2
Real
Tom
6
Clos
e Hi
Hat
Real
Tom
6
Peda
l HiH
at
Real
Tom
4
Ope
n Hi
Hat
Real
Tom
4
Real
Tom
1
Cras
h Cy
m.1
Real
Tom
1
Ride
Cym
bal
Chin
a Cy
mba
l
Ride
Bel
l
Tam
bour
ine
Spla
sh C
ym.
Cow
bell
Cras
h Cy
m.2
Vibr
asla
p
Ride
Cym
bal
Bong
o Hi
gh
Bong
o Lo
Mut
e H.
Cong
a
PC: 9
[CC3
2: 2
]
ROO
M
------
------
------
------
------
------
------
------
------
------
------
------
------
------
------
------
------
------
------
------
------
------
------
------
------
------
------
------
------
------
------
------
------
------
------
------
------
------
------
------
------
------
------
------
------
------
------
------
------
------
Snar
e Ro
ll
Fing
er S
nap
High
-Q
Slap
Scra
tchP
ush
Scra
tchP
ull
Stick
s
Squa
reCl
ick
Mtr
nm.C
lick
Mtr
nm. B
ell
Room
Kick
2
Room
Kick
1
Side
Stic
k
Room
Sna
re 1
808c
lap
Room
Sna
re 2
Room
Tom
5
Room
Chh
Room
Tom
5
Peda
l HiH
at
Room
Tom
2
R8 O
hh2
Room
Tom
2
Room
Tom
2
Cras
h Cy
m.1
Room
Tom
2
Ride
Cym
bal
Chin
a Cy
mba
l
Ride
Bel
l
Tam
bour
ine
Spla
sh C
ym.
Cow
bell
Cras
h Cy
m.2
Vibr
asla
p
Ride
Cym
bal
Bong
o Hi
gh
Bong
o Lo
Mut
e H.
Cong
a
PC: 1
0 [C
C32:
2]
HIP
HOP
------
------
------
------
------
------
------
------
------
------
------
------
------
------
------
------
------
------
------
------
909
Kick
3
Hous
e Ki
ck
TR-8
08 K
ick
909
Kick
909
Kick
2
TR-9
09 O
HHsh
TR-9
09 O
HH
Ah Ha Shut
Ha
Shut
Hi
One
Two
Thre
e
Four
Snar
e Ro
ll
Snap
High
-Q
Slap
Scrt
ch P
ush2
Scrt
ch P
ull2
Stick
s
Squa
reCl
ick
Mtr
nm.C
lick
Mtr
nm. B
ell
HipH
op K
ick
Sim
pleK
ick
Side
Stic
k
HipH
op S
nare
Funk
Clap
HipH
opSn
are2
Real
Tom
6
HipH
opCH
H
Real
Tom
6
HipH
opCH
H
Real
Tom
4
HipH
opO
HH
Real
Tom
4
Real
Tom
1
Cras
h Cy
m.1
Real
Tom
1
Ride
Cym
bal
Reve
rseC
ymbl
Ride
Bel
l
Tam
bour
ine
Spla
sh C
ym.
Cow
bell
Cras
h Cy
m.2
Vibr
asla
p
Ride
Cym
bal
Bong
o Hi
gh
Bong
o Lo
Mut
e H.
Cong
a
PC: 1
1 [C
C32:
2]
DRUM
'BSS
------
------
------
------
------
------
------
------
------
------
------
------
------
------
------
------
------
------
------
------
909
Kick
3
Hous
e Ki
ck
909
Kick
HipH
op K
ick
Sim
pleK
ick
TR-9
09 O
HHsh
TR-9
09 O
HH
Ah
Ha Shut
Ha
Shut
Hi
One
Two
Thre
e
Four
Snar
e Ro
ll
Snap
High
-Q
Slap
Scrt
ch P
ush2
Scrt
ch P
ull2
Stick
s
Squa
reCl
ick
Mtr
nm.C
lick
Mtr
nm. B
ell
TR-8
08 K
ick
909
Kick
2
Side
Stic
k
Jung
le S
nare
909C
lap
Ps S
nare
808
Tom
2
R&B
CHH
808
Tom
2
R&B
CHH
808
Tom
2
HipH
opO
HH
808
Tom
2
808
Tom
2
909
Cras
h
808
Tom
2
Ride
Cym
bal
Chin
a Cy
mba
l
Ride
Bel
l
Tam
bour
ine
Spla
sh C
ym.
808c
owbe
Cras
h Cy
m.2
Vibr
asla
p
Ride
Cym
bal
Bong
o Hi
gh
Bong
o Lo
808
Cong
a
PC: 1
2 [C
C32:
2]
TECH
HOUS
------
------
------
------
------
------
------
------
------
------
------
------
------
------
------
------
------
------
------
------
909
Kick
3
909
Kick
2
TR-8
08 K
ick
HipH
op K
ick
Sim
pleK
ick
TR-9
09 O
HHsh
TR-9
09 O
HH
Ah Ha Shut
Ha
Shut
Hi
One
Two
Thre
e
Four
Snar
e Ro
ll
Snap
High
-Q
Slap
Scrt
ch P
ush2
Scrt
ch P
ull2
Stick
s
Squa
reCl
ick
Mtr
nm.C
lick
Mtr
nm. B
ell
909
Kick
Hous
e Ki
ck
Side
Stic
k
Tech
no S
nare
909C
lap
Hous
e Sn
are
Synt
h Dr
um 2
TR-9
09 C
HH
Synt
h Dr
um 2
TR-9
09 C
HH
Synt
h Dr
um 2
TR-9
09 O
HH
Synt
h Dr
um 2
Synt
h Dr
um 2
909
Cras
h
Synt
h Dr
um 2
Ride
Cym
bal
Reve
rseC
ymbl
Ride
Bel
l
Tam
bour
ine
Spla
sh C
ym.
Cow
bell
Cras
h Cy
m.2
Vibr
asla
p
Ride
Cym
bal
Bong
o Hi
gh
Bong
o Lo
Mut
e H.
Cong
a
PC: 1
4 [C
C32:
2]
R&B
------
------
------
------
------
------
------
------
------
------
------
------
------
------
------
------
------
------
------
------
909
Kick
Hous
e Ki
ck
TR-8
08 K
ick
HipH
op K
ick
909
Kick
2
R&B
OHH
sh
R&B
OHH
Ah Ha Shut
Ha
Shut
Hi
One
Two
Thre
e
Four
Snar
e Ro
ll
Snap
High
-Q
Slap
Scrt
ch P
ush2
Scrt
ch P
ull2
Stick
s
Squa
reCl
ick
Mtr
nm.C
lick
Mtr
nm. B
ell
909
Kick
3
Sim
pleK
ick
Side
Stic
k
R&B
Snar
e
R&B
Clap
909S
nare
2
Real
Tom
6
R&B
CHH
Real
Tom
6
R&B
CHH
Real
Tom
4
R&B
OHH
Real
Tom
4
Real
Tom
1
909
Cras
h
Real
Tom
1
Ride
Cym
bal
Reve
rseC
ymbl
Ride
Bel
l
Tam
bour
ine
Spla
sh C
ym.
Cow
bell
Cras
h Cy
m.2
Vibr
asla
p
Ride
Cym
bal
Bong
o Hi
gh
Bong
o Lo
Mut
e H.
Cong
a
PC: 1
7 [C
C32:
2]
POW
ER
------
------
------
------
------
------
------
------
------
------
------
------
------
------
------
------
------
------
------
------
Kick
1
Kick
2
------
------
------
------
------
------
------
------
------
------
------
------
------
------
------
------
------
------
------
------
------
------
------
------
------
------
Snar
e Ro
ll
Fing
er S
nap
High
-Q
Slap
Scra
tchP
ush
Scra
tchP
ull
Stick
s
Squa
reCl
ick
Mtr
nm.C
lick
Mtr
nm. B
ell
Pow
er K
ick2
Pow
er K
ick1
Side
Stic
k
Danc
e Sn
are1
808c
lap
Pow
er S
nare
1
Rock
Tom
4
Room
Chh
Rock
Tom
4
Peda
l HiH
at
Rock
Tom
4
R8 O
hh2
Rock
Tom
4
Rock
Tom
1
Cras
h Cy
m.1
Rock
Tom
1
Ride
Cym
bal
Chin
a Cy
mba
l
Ride
Bel
l
Tam
bour
ine
Spla
sh C
ym.
Cow
bell
Cras
h Cy
m.2
Vibr
asla
p
Ride
Cym
bal
Bong
o Hi
gh
Bong
o Lo
Mut
e H.
Cong
a
PC: 2
5 [C
C32:
2]
ELEC
TRO
NIC
------
------
------
------
------
------
------
------
------
------
------
------
------
------
------
------
------
------
------
------
------
------
------
------
------
------
------
------
------
------
------
------
------
------
------
------
------
------
------
------
------
------
------
------
------
------
------
------
------
------
Snar
e Ro
ll
Fing
er S
nap
High
-Q
Slap
Scrt
ch P
ush2
Scrt
ch P
ull2
Stick
s
Squa
reCl
ick
Mtr
nm.C
lick
Mtr
nm. B
ell
Elec
Kick
2
Elec
Kick
1
Side
Stic
k
Elec
. Sna
re
808c
lap
Elec
Sna
re 2
Synt
h Dr
um 2
Jazz
Clsd
.HH
Synt
h Dr
um 2
Peda
l HiH
at
Synt
h Dr
um 2
Jazz
Ope
n HH
Synt
h Dr
um 2
Synt
h Dr
um 2
Cras
h Cy
m.1
Synt
h Dr
um 2
Ride
Cym
bal
Reve
rseC
ymbl
Ride
Bel
l
Tam
bour
ine
Spla
sh C
ym.
Cow
bell
Cras
h Cy
m.2
Vibr
asla
p
Ride
Cym
bal
Bong
o Hi
gh
Bong
o Lo
Mut
e H.
Cong
a

r E-200/E-100
C572 74 76 77 79 81 83
73 75 78 80 82
C684
C79686 88 89 91 93 95
85 87 90 92 94
PC: 2
6 [C
C32:
2]
Shrt
Whi
stle
Long
Whi
stle
Shor
t Gui
ro
Long
Gui
ro
808c
lave
Woo
dblo
ck
Woo
dblo
ck
Mut
e Cu
ica
Ope
n Cu
ica
Mut
e Tr
iang
l
Ope
n Tr
iang
l
Shak
er
Jingl
e Be
ll
Bell
Tree
Cast
anet
s
Mut
e Su
rdo
Ope
n Su
rdo
------
------
------
------
------
------
------
------
------
------
------
------
------
------
------
------
------
------
PC: 2
7 [C
C32:
2]
Shrt
Whi
stle
Long
Whi
stle
Shor
t Gui
ro
Long
Gui
ro
Clav
es
Woo
dblo
ck
Woo
dblo
ck
Hoo
Hoo
Mut
e Tr
iang
l
Ope
n Tr
iang
l
Shak
er
Jingl
e Be
ll
Bell
Tree
Cast
anet
s
Mut
e Su
rdo
Ope
n Su
rdo
------
------
------
------
------
------
------
------
------
------
------
------
------
------
------
------
------
------
PC: 3
1 [C
C32:
2]
Shrt
Whi
stle
Long
Whi
stle
Shor
t Gui
ro
Long
Gui
ro
808c
lave
Woo
dblo
ck
Woo
dblo
ck
Mut
e Cu
ica
Ope
n Cu
ica
Mut
e Tr
iang
l
Ope
n Tr
iang
l
Shak
er
Jingl
e Be
ll
Bell
Tree
Cast
anet
s
Mut
e Su
rdo
Ope
n Su
rdo
------
------
------
------
------
------
------
------
------
------
------
------
------
------
------
------
------
------
PC: 3
3 [C
C32:
2]
Shrt
Whi
stle
Long
Whi
stle
Shor
t Gui
ro
Long
Gui
ro
Clav
es
Woo
dblo
ck
Woo
dblo
ck
Mut
e Cu
ica
Ope
n Cu
ica
Mut
e Tr
iang
l
Ope
n Tr
iang
l
Shak
er
Jingl
e Be
ll
Bell
Tree
Cast
anet
s
Mut
e Su
rdo
Ope
n Su
rdo
------
------
------
------
------
------
------
------
------
------
------
------
------
------
------
------
------
------
PC: 3
4 [C
C32:
2]
Shrt
Whi
stle
Long
Whi
stle
Shor
t Gui
ro
Long
Gui
ro
Clav
es
Woo
dblo
ck
Woo
dblo
ck
Mut
e Cu
ica
Ope
n Cu
ica
Mut
e Tr
iang
l
Ope
n Tr
iang
l
Shak
er
Jingl
e Be
ll
Bell
Tree
Cast
anet
s
Mut
e Su
rdo
Ope
n Su
rdo
------
------
------
------
------
------
------
------
------
------
------
------
------
------
------
------
------
------
PC: 4
1 [C
C32:
2]
Shrt
Whi
stle
Long
Whi
stle
Shor
t Gui
ro
Long
Gui
ro
Clav
es
Woo
dblo
ck
Woo
dblo
ck
Mut
e Cu
ica
Ope
n Cu
ica
Mut
e Tr
iang
l
Ope
n Tr
iang
l
Shak
er
Jingl
e Be
ll
Bell
Tree
Cast
anet
s
Mut
e Su
rdo
Ope
n Su
rdo
------
------
------
------
------
------
------
------
------
------
------
------
------
------
------
------
------
------
PC: 4
9 [C
C32:
2]
Shrt
Whi
stle
Long
Whi
stle
Shor
t Gui
ro
Long
Gui
ro
Clav
es
Woo
dblo
ck
Woo
dblo
ck
Mut
e Cu
ica
Ope
n Cu
ica
Mut
e Tr
iang
l
Ope
n Tr
iang
l
Shak
er
Jingl
e Be
ll
Bell
Tree
Cast
anet
s
Mut
e Su
rdo
Ope
n Su
rdo
Appl
ause
------
------
------
------
------
------
------
------
------
------
------
------
------
------
------
------
PC: 5
0 [C
C32:
2]
Bong
o Hi
gh
Bong
o Lo
Mut
e H.
Cong
a
Cong
a Hi
Opn
Cong
a M
tLow
Cong
a Sl
ap
Cong
a Lo
Opn
Cong
a Sl
ide
Mut
Pan
dier
o
Opn
Pan
dier
o
Ope
n Su
rdo
Mut
e Su
rdo
Tam
borim
Agog
o
Agog
o
Shak
er
Low
Whi
stle
Low
Whi
stle
Mut
e Cu
ica
Ope
n Cu
ica
Mut
e Tr
iang
l
Ope
n Tr
iang
l
Shor
t Gui
ro
Long
Gui
ro
Caba
sa U
p
Caba
sa D
own
PC: 5
1 [C
C32:
2]
Pow
er S
nare
1
Rev.
Snar
e
Pow
er S
nare
2
Elec
Sna
re 1
Danc
e Sn
are2
Elec
Sna
re 2
Hous
e Sn
are
Elec
. Sna
re
Elec
Sna
re 3
808
Snar
e 1
808
Snar
e 2
909
Snar
e 1
909
Snar
e 2
Brus
h Sw
irl
Brus
h Ta
p
Brus
h Sl
ap1
Brus
h Sl
ap2
Brus
h Sl
ap
Brus
h Sw
irl
Brus
h Sw
irl
Long
Sw
irl
------
------
------
------
------
------
------
------
------
------
PC: 5
7 [C
C32:
2]
Star
ship
Gun
Shot
Mac
hine
Gun
Lase
rgun
Expl
osio
n
Dog
Hors
e-Ga
llop
Bird
Rain
Thun
der
Win
d
Seas
hore
Stre
am
Bubb
le
Kitt
y
Bird
2
Grow
l
Appl
ause
2
Tele
phon
e 1
Tele
phon
e 2
------
------
------
------
------
------
------
------
------
------
------
------
E-200_US Page 58 Tuesday, January 27, 2004 4:01 PM
58
C236 38 40 41 43 45 47
37 39 42 44 46
C348 50 52 53 55 57 59
49 51 54 56 58
C460 62 64 65 67 69 71
61 63 66 68 70
C012 14 16 17 19 21 23
13 15 18 20 22
C–1
0 2 4 5 7 9 11
1 3 6 8 10
C124 26 28 29 31 33 35
25 27 30 32 34
TR-8
08/9
09
------
------
------
------
------
------
------
------
------
------
------
------
------
------
------
------
------
------
------
------
------
------
------
------
------
------
------
------
------
------
------
------
------
------
------
------
------
------
------
------
------
------
------
------
------
------
------
------
------
------
Snar
e Ro
ll
Fing
er S
nap
High
-Q
Slap
Scrt
ch P
ush2
Scrt
ch P
ull2
Stick
s
Squa
reCl
ick
Mtr
nm.C
lick
Mtr
nm. B
ell
TR-9
09 K
ick
TR-8
08 K
ick
808
Rim
shot
808
Snar
e 1
808c
lap
909
Snar
e 1
808
Tom
2
808_
_chh
808
Tom
2
808_
_chh
808
Tom
2
808_
_ohh
808
Tom
2
808
Tom
2
808
Cras
h
808
Tom
2
Ride
Cym
bal
Chin
a Cy
mba
l
Ride
Bel
l
Tam
bour
ine
Spla
sh C
ym.
808c
owbe
Cras
h Cy
m.2
Vibr
asla
p
Ride
Cym
bal
Bong
o Hi
gh
Bong
o Lo
808
Cong
a
808
Cong
a
808
Cong
a
High
Tim
bale
Low
Tim
bale
Agog
o
Agog
o
Caba
sa
808m
arac
DANC
E
------
------
------
------
------
------
------
------
------
------
------
------
------
------
------
------
------
------
------
------
------
------
------
------
------
------
------
------
------
------
------
------
------
------
------
------
------
------
------
------
------
------
------
------
------
------
------
------
------
------
Snar
e Ro
ll
Fing
er S
nap
High
-Q
Slap
Scrt
ch P
ush2
Scrt
ch P
ull2
Stick
s
Squa
reCl
ick
Mtr
nm.C
lick
Mtr
nm. B
ell
Danc
e Ki
ck 2
Elec
Kick
2
Side
Stic
k
Pow
er S
nare
2
808c
lap
Elec
Sna
re 1
Synt
h Dr
um 2
CR-7
8 ch
h
Synt
h Dr
um 2
808_
_chh
Synt
h Dr
um 2
CR-7
8 oh
h
Synt
h Dr
um 2
Synt
h Dr
um 2
Cras
h Cy
m.1
Synt
h Dr
um 2
Ride
Cym
bal
Reve
rseC
ymbl
Ride
Bel
l
Tam
bour
ine
Spla
sh C
ym.
Cow
bell
Cras
h Cy
m.2
Vibr
asla
p
Ride
Cym
bal
Bong
o Hi
gh
Bong
o Lo
Mut
e H.
Cong
a
Cong
a Hi
Opn
Cong
a Lo
Opn
High
Tim
bale
Low
Tim
bale
Agog
o
Agog
o
Caba
sa
Mar
acas
New
TR-
909
------
------
------
------
------
------
------
------
------
------
------
------
------
------
------
------
------
------
------
------
909
Kick
3
Hous
e Ki
ck
TR-8
08 K
ick
HipH
op K
ick
Sim
pleK
ick
TR-9
09 O
HHsh
TR-9
09 O
HH
Ah Ha Shut
Ha
Shut
Hi
One
Two
Thre
e
Four
Snar
e Ro
ll
Snap
High
-Q
Slap
Scrt
ch P
ush2
Scrt
ch P
ull2
Stick
s
Squa
reCl
ick
Mtr
nm.C
lick
Mtr
nm. B
ell
909
Kick
909
Kick
2
Side
Stic
k
909
Snar
e
909C
lap
909S
nare
2
808
Tom
2
TR-9
09 C
HH
808
Tom
2
TR-9
09 C
HH
808
Tom
2
TR-9
09 O
HH
808
Tom
2
808
Tom
2
909
Cras
h
808
Tom
2
Ride
Cym
bal
Chin
a Cy
mba
l
Ride
Bel
l
Tam
bour
ine
Spla
sh C
ym.
808c
owbe
Cras
h Cy
m.2
Vibr
asla
p
Ride
Cym
bal
Bong
o Hi
gh
Bong
o Lo
808
Cong
a
808
Cong
a
808
Cong
a
High
Tim
bale
Low
Tim
bale
Agog
o
Agog
o
Caba
sa
808m
arac
Jazz
Kit
------
------
------
------
------
------
------
------
------
------
------
------
------
------
------
------
------
------
------
------
------
------
------
------
------
------
------
------
------
------
------
------
------
------
------
------
------
------
------
------
------
------
------
------
------
------
------
------
------
------
Snar
e Ro
ll
Fing
er S
nap
High
-Q
Slap
Scra
tchP
ush
Scra
tchP
ull
Stick
s
Squa
reCl
ick
Mtr
nm.C
lick
Mtr
nm. B
ell
Jazz
Kick
2
Jazz
Kick
1
Side
Stic
k
Jazz
Sna
re 1
Hand
clap
2
Jazz
Sna
re
Real
Tom
6
Jazz
Clsd
.HH
Real
Tom
6
Jazz
Ped
l.HH
Real
Tom
4
Jazz
Ope
n HH
Real
Tom
4
Real
Tom
1
Cras
h Cy
m.1
Real
Tom
1
Ride
Cym
bal
Chin
a Cy
mba
l
Ride
Bel
l
Tam
bour
ine
Spla
sh C
ym.
Cow
bell
Cras
h Cy
m.2
Vibr
asla
p
Ride
Cym
bal
Bong
o Hi
gh
Bong
o Lo
Mut
e H.
Cong
a
Cong
a Hi
Opn
Cong
a Lo
Opn
High
Tim
bale
Low
Tim
bale
Agog
o
Agog
o
Caba
sa
Mar
acas
JAZZ
------
------
------
------
------
------
------
------
------
------
------
------
------
------
------
------
------
------
------
------
------
------
------
------
------
------
------
------
------
------
------
------
------
------
------
------
------
------
------
------
------
------
------
------
------
------
------
------
------
------
Snar
e Ro
ll
Fing
er S
nap
High
-Q
Slap
Scra
tchP
ush
Scra
tchP
ull
Stick
s
Squa
reCl
ick
Mtr
nm.C
lick
Mtr
nm. B
ell
Jazz
Kick
2
Jazz
Kick
1
Side
Stic
k
Jazz
Sna
re 1
Hand
clap
2
Jazz
Sna
re 2
Real
Tom
6
Jazz
Clsd
.HH
Real
Tom
6
Peda
l HiH
at
Real
Tom
4
Jazz
Ope
n HH
Real
Tom
4
Real
Tom
1
Cras
h Cy
m.1
Real
Tom
1
Ride
Cym
bal
Chin
a Cy
mba
l
Ride
Bel
l
Tam
bour
ine
Spla
sh C
ym.
Cow
bell
Cras
h Cy
m.2
Vibr
asla
p
Ride
Cym
bal
Bong
o Hi
gh
Bong
o Lo
Mut
e H.
Cong
a
Cong
a Hi
Opn
Cong
a Lo
Opn
High
Tim
bale
Low
Tim
bale
Agog
o
Agog
o
Caba
sa
Mar
acas
BRUS
H
------
------
------
------
------
------
------
------
------
------
------
------
------
------
------
------
------
------
------
------
------
------
------
------
------
------
------
------
------
------
------
------
------
------
------
------
------
------
------
------
------
------
------
------
------
------
------
------
------
------
Snar
e Ro
ll
Fing
er S
nap
High
-Q
Slap
Scra
tchP
ush
Scra
tchP
ull
Stick
s
Squa
reCl
ick
Mtr
nm.C
lick
Mtr
nm. B
ell
Jazz
Kick
2
Jazz
Kick
1
Side
Stic
k
Brus
h Sw
irl
Brus
h Sl
ap1
Brus
h Sw
irl
Lite
Tom
4
Brs C
hh
Lite
Tom
4
Peda
l HiH
at
Lite
Tom
4
Brus
h O
hh
Lite
Tom
4
Lite
Tom
4
Brus
h Cr
ash
Lite
Tom
4
Brus
h Ri
de
Chin
a Cy
mba
l
Brus
h Ri
deBL
Tam
bour
ine
Spla
sh C
ym.
Cow
bell
Cras
h Cy
m.2
Vibr
asla
p
Ride
Cym
bal
Bong
o Hi
gh
Bong
o Lo
Mut
e H.
Cong
a
Cong
a Hi
Opn
Cong
a Lo
Opn
High
Tim
bale
Low
Tim
bale
Agog
o
Agog
o
Caba
sa
Mar
acas
ORC
HEST
RA
------
------
------
------
------
------
------
------
------
------
------
------
------
------
------
------
------
------
------
------
------
------
------
------
------
------
------
------
------
------
------
------
------
------
------
------
------
------
------
------
------
------
------
------
------
------
------
------
------
------
Snar
e Ro
ll
Fing
er S
nap
Jazz
Clsd
.HH
Peda
l HiH
at
Jazz
Ope
n HH
Ride
Cym
bal
Stick
s
Squa
reCl
ick
Mtr
nm.C
lick
Mtr
nm. B
ell
Jazz
Kick
1
Conc
ert B
D
Side
Stic
k
Conc
ert S
nr
Cast
anet
s
Conc
ert S
nr
Tim
pani
Tim
pani
Tim
pani
Tim
pani
Tim
pani
Tim
pani
Tim
pani
Tim
pani
Tim
pani
Tim
pani
Tim
pani
Tim
pani
Tim
pani
Tam
bour
ine
Spla
sh C
ym.
Cow
bell
Con.
Cym
bal2
Vibr
asla
p
Conc
ert C
ym.
Bong
o Hi
gh
Bong
o Lo
Mut
e H.
Cong
a
Cong
a Hi
Opn
Cong
a Lo
Opn
High
Tim
bale
Low
Tim
bale
Agog
o
Agog
o
Caba
sa
Mar
acas
ETHN
IC
------
------
------
------
------
------
------
------
------
------
------
------
------
------
------
------
------
------
------
------
------
------
------
------
------
------
------
------
------
------
------
------
------
------
------
------
------
------
------
------
------
------
------
------
------
------
------
------
------
------
Fing
er S
nap
Tam
bour
ine
Cast
anet
s
Cras
h Cy
m.1
Snar
e Ro
ll
Conc
ert S
nr
Conc
ert C
ym.
Conc
ert B
D
Jingl
e Be
ll
Bell
Tree
Bar C
him
es
Wad
aiko
Wad
aiko
Rim
Shim
edai
ko
Atar
igan
e
Hyou
shig
i
Ohk
awa
H ko
tsuz
umi
L Ko
tsuz
umi
Ban_
Gu
Big
Gong
Smal
l Gon
g
Bend
Gon
g
RAM
A Cy
mba
l
RAM
A Cy
mba
l
Gam
elan
Gon
g
Udo_
Shor
t
Udo_
Long
Udo_
slap
Bend
ir
Req_
Dum
Req_
tik
Tabl
a_Te
Tabl
a_Na
Tabl
a_Tu
n
Tabl
a_Ge
Tabl
a Ge
Hi
Talk
ing
Drum
Bend
tlk_
drm
Caxi
xi
DJem
be
Djem
be_r
im
Low
Tim
bale
Tim
bl P
aila
High
Tim
bale
Cow
bell
KICK
& S
NARE
------
------
------
------
------
------
------
------
------
------
------
------
------
------
------
------
------
------
------
------
------
------
------
------
------
------
------
------
------
------
------
------
------
------
------
------
------
------
------
------
------
------
------
------
------
------
------
------
------
------
------
------
------
------
------
------
------
------
------
------
------
------
------
------
------
------
------
------
------
------
------
------
------
------
------
------
------
------
------
------
Std.
1 Ki
ck1
Std.
1 Ki
ck2
Std.
2 Ki
ck1
Std2
Kick
2
Kick
1
Kick
2
Soft
Kick
Jazz
Kick
1
Jazz
Kick
2
Conc
ert B
D
Room
Kick
1
Room
Kick
2
Pow
er K
ick1
Pow
er K
ick2
Elec
Kick
2
Elec
Kick
1
Elec
. Kick
TR-8
08 K
ick
TR-9
09 K
ick
Danc
e Ki
ck 2
Std.
1 Sn
are1
Std.
1 Sn
are2
Std.
2 Sn
are1
Std.
2 Sn
are2
Tigh
t Sna
re
Conc
ert S
nr
Jazz
Sna
re 1
Jazz
Sna
re 2
Room
Sna
re 1
Room
Sna
re 2
Danc
e Sn
are1
SFX
------
------
------
------
------
------
------
------
------
------
------
------
------
------
------
------
------
------
------
------
------
------
------
------
------
------
------
------
------
------
------
------
------
------
------
------
------
------
------
------
------
------
------
------
------
------
------
------
------
------
------
------
------
------
------
------
------
------
------
------
------
------
Scrt
ch P
ush2
Scrt
ch P
ull2
Gt.C
utNo
ise2
Gt.C
utNo
ise2
Dist
.Cut
Noiz
Dist
.Cut
Noiz
Bass
Slid
e
Pick
Scr
ape
High
-Q
Slap
Scra
tchP
ush
Scra
tchP
ull
Stick
s
Squa
reCl
ick
Mtr
nm.C
lick
Mtr
nm. B
ell
Gt.F
retN
oise
Gt.C
ut N
oise
Gt.C
ut N
oise
Strin
g Sl
ap
Fl.K
eyCl
ick
Laug
hing
Scre
amin
g
Punc
h
Hear
t Bea
t
Foot
step
s
Foot
step
s
Appl
ause
Door
Crea
king
Door
Scra
tch
Win
d Ch
imes
Car-E
ngin
e
Car-S
top
Car-P
ass
Car-C
rash
Sire
n
Trai
n
Jetp
lane
Helic
opte
r

E-200/E-100
59
E-200_US Page 59 Tuesday, January 27, 2004 4:01 PM
(C7)
(96)
98 100
101
103
105
107
97 99 102
104
106
C810
8
110
112
113
115
117
119
109
111
114
C9 G9
120
122
124
125
127
121
123
126
116
118
(Cab
asa
Dow
n)
Clav
es
Woo
dblo
ck
Woo
dblo
ck
------
------
------
------
------
------
------
------
------
------
------
------
------
------
------
------
------
------
------
------
------
------
------
------
------
------
------
------
------
------
------
------
------
------
------
------
------
------
------
------
------
------
------
------
------
------
------
------
------
------
------
------
------
------
------
------
PC: 5
0 [C
C32:
2]
ETHN
IC

r E-200/E-100
5030
BigB
nd *
120
4 / 4
51
BigB
and
*14
44
/ 4
52Ja
zz C
lub
150
4 / 4
53
Boog
ie15
04
/ 4
(*) T
he m
arke
d St
yles
hav
e tw
o in
tros
of d
iffe
rent
le
ngth
s. Yo
u ca
n se
lect
thes
e by
pre
ssin
g [C
OM
BO]
(shor
ter v
ersio
n ) o
r [FU
LL¥B
AN
D] (
long
er v
ersio
n).
E-200_US Page 60 Tuesday, January 27, 2004 4:01 PM
60
Mus
ic S
tyle
sNa
me
Tem
poTi
me
sign.
POP:
01Bi
gHou
se13
04
/ 4
02Eu
roDn
ce13
84
/ 4
0390
sHou
se13
24
/ 4
0470
sDisc
o *
126
4 / 4
05
70sD
ance
108
4 / 4
06
Twos
tep
*13
04
/ 4
07El
ecRo
ck *
124
4 / 4
08
Rock
120
4 / 4
09
Stiv
ie P
116
4 / 4
10
Hip’
nHop
*10
24
/ 4
11Co
ol R
ap94
4 / 4
12
Pian
oRap
*94
4 / 4
13
UsGr
oove
964
/ 4
14Gr
oovy
P10
04
/ 4
15Su
nnyP
op10
44
/ 4
16Fe
elGo
od98
4 / 4
17
Nigh
tPop
784
/ 4
1880
s Pop
101
4 / 4
19
Cute
Pop
108
4 / 4
BALL
AD:
20Pi
anoB
al56
4 / 4
21
Clas
sBal
624
/ 4
22St
oryB
al70
4 / 4
23
Stea
dyRk
734
/ 4
24W
ayUR
Pop
754
/ 4
25Ha
ppyB
al78
4 / 4
26
Sim
pleB
l80
4 / 4
27
Mor
ninB
l84
4 / 4
28
90s P
op88
4 / 4
29
Popp
inBl
924
/ 4
306_
8Bal
ld93
6 / 8
31
Balla
d75
4 / 4
OLD
IES:
32Lo
veSo
ng51
4 / 4
33
Cool
6_8
966
/ 8
34Sl
owDa
nc80
4 / 4
35
60s F
eel
884
/ 4
36Ea
rlyRc
k11
04
/ 4
3760
sBea
ch11
54
/ 4
38M
erse
yBt
130
4 / 4
39
50sD
ance
138
4 / 4
40
Twist
in16
24
/ 4
41Ro
ckin
’18
54
/ 4
COUN
TRY:
42Sl
ow O
ld64
4 / 4
43
EZ C
ntry
734
/ 4
44Cn
tryB
ld82
4 / 4
45
Cntr
yPop
105
4 / 4
46
New
Cntr
y11
34
/ 4
SWIN
G:47
JzBa
llad
704
/ 4
48Bg
BndB
ld82
4 / 4
49
Org
Swin
g10
94
/ 4
Nam
eTe
mpo
Tim
e sig
n.LA
TIN:
54Lu
vBos
sa13
64
/ 4
55M
idBo
ssa
150
4 / 4
56
UpBo
ssa
168
4 / 4
57
Latin
Pop
924
/ 4
58Bi
gSam
ba11
64
/ 4
59Ch
aCha
*13
04
/ 4
60M
ambo
*10
24
/ 4
61Sa
lsa10
04
/ 4
62M
eren
gue
124
4 / 4
63
Tang
o12
04
/ 4
GOSP
EL:
64Go
spel
606
/ 8
65So
ftGo
sp65
4 / 4
66
Gosp
lBld
128
6 / 4
67Go
splP
op14
34
/ 4
68Gs
pSho
ut15
04
/ 4
TRAD
ITIO
NAL:
69Ho
liday
111
54
/ 4
70Ho
liday
210
03
/ 4
71Ho
liday
312
04
/ 4
72Ki
ds12
04
/ 4
73Po
lkaP
op *
127
4 / 4
74
Foxt
rot
185
4 / 4
75
Swin
gFox
192
4 / 4
76
Haw
aiia
n10
94
/ 4
77En
gWltz
913
/ 4
78 W
’Wal
tz18
03
/ 4
FLAS
H:10
1Ire
land
125
3 / 4
102
Irish
131
4 / 4
10
3Te
jano
109
4 / 4
10
4US
Balla
d88
4 / 4
10
5Bl
ues
614
/ 4
106
R&B
105
4 / 4
10
7M
arch
4/4
125
4 / 4
10
8Po
lka
130
4 / 4
10
9Co
untr
y13
04
/ 4
110
Jazz
Wltz
100
3 / 4
111
Mus
ette
175
3 / 4
112
Char
lest
205
4 / 4
11
3Rh
umba
100
4 / 4
11
4Be
guin
e11
04
/ 4
115
SlW
altz
903
/ 411
6PD
oble
122
4 / 4

E-200/E-100
61
✭=
Keys
you
nee
d to
pre
ss to
hea
r thi
s cho
rd.
�=
Cons
titue
nt n
otes
of t
his c
hord
.
Cau
gC
#aug
Dau
gE
au
gE
aug
Fau
g
Csu
s4C
#sus
4D
sus4
E
sus4
Esu
s4F
sus4
C7s
us4
C#7
sus4
D7s
us4
E
7sus
4E
7sus
4F
7sus
4
E-200_US Page 61 Tuesday, January 27, 2004 4:01 PM
Chor
d In
telli
genc
e (“
Md1
” se
ttin
g)
Cm
7 (
5 )
CC
#D
E
EF
CM
7C
#M7
DM
7E
M
7E
M7
FM
7
C7
C#7
D7
E
7E
7F
7
Cm
C#m
Dm
E
mE
mF
m
Cm
7C
#m7
Dm
7E
m
7E
m7
Fm
7
Cdi
mC
#dim
Ddi
mE
di
mE
dim
Fdi
m
Dm
7 (
5 )
Em
7 (
5 )
Fm
7 (
5 )
E
m7
( 5
)C
#m7
( 5
)
Cm
M7
C#m
M7
Dm
M7
E
mM
7E
mM
7F
mM
7

r E-200/E-100
✭=
Keys
you
nee
d to
pre
ss to
hea
r thi
s cho
rd.
�=
Cons
titue
nt n
otes
of t
his c
hord
.
F#a
ugG
aug
A
aug
Aau
gB
au
gB
aug
F#s
us4
Gsu
s4A
su
s4A
sus4
B
sus4
Bsu
s4
F#7
sus4
G7s
us4
A
7sus
4A
7sus
4B
7s
us4
B7s
us4
E-200_US Page 62 Tuesday, January 27, 2004 4:01 PM
62
F#
GA
A
B
B
F#M
7G
M7
A
M7
AM
7B
M
7B
M7
F#7
G7
A
7A
7B
7
B7
F#m
Gm
A
mA
mB
m
Bm
F#m
7G
m7
A
m7
Am
7B
m
7B
m7
F#d
imG
dim
A
dim
Adi
mB
di
mB
dim
Gm
7 (
5 )
Am
7 (
5 )
Bm
7 (
5 )
B
m7
( 5
)A
m
7 (
5 )
F#m
7 (
5 )
F#m
M7
Gm
M7
A
mM
7A
mM
7B
m
M7
Bm
M7

E-200/E-100
63
Com
mon
Tune
XX
Sys
tem
R
eal T
ime
Clo
ckC
omm
ands
O*1
O*1
O O
Aux
M
essa
ges
All
Sou
nds
Off
Res
et A
ll C
ontr
olle
rsLo
cal O
n/O
ffA
ll N
otes
Off
Act
ive
Sen
seR
eset
X X O*1
X O X
O (
120,
126
, 127
)O
(12
1)O O
(12
3-12
5)O X
Not
es*1
O X
is s
elec
tabl
e*2
Rec
ogni
zed
as M
=1
even
if M
≠1
Mod
e 1:
OM
NI O
N, P
OLY
Mod
e 3:
OM
NI O
FF,
PO
LYM
ode
2: O
MN
I ON
, MO
NO
Mod
e 4:
OM
NI O
FF,
MO
NO
O: Y
esX
: No
E-200_US Page 63 Tuesday, January 27, 2004 4:01 PM
MID
I Im
plem
enta
tion
Char
t[In
telli
gent
Key
boar
d]D
ate:
Nov
embe
r 20
03M
odel
: E-2
00/E
-100
Ver
sion
: 1.0
1
Fun
ctio
n...
Tran
smitt
edR
ecog
nize
dR
emar
ks
Bas
icC
hann
elD
efau
ltC
hang
ed1~
161~
16, O
ff1~
161~
16, O
ff32
Par
ts2
Logi
cal P
arts
Mod
eD
efau
ltM
essa
geA
ltere
d
Mod
e 3
Mod
e 3,
4 (
M=
1)**
***
Mod
e 3
Mod
e 3,
4 (
M=
1)*2
Not
e N
umbe
rTr
ue V
oice
0~12
7**
***
0~12
70~
127
Vel
ocity
Not
e O
NN
ote
OF
FO X
O X
Afte
r To
uch
Key
’sC
h’s
X XO O
Pitc
h B
end
O*1
O*1
Con
trol
C
hang
e
0,32 1 5
6, 3
8 7 10 1122
, 23,
24,
25 64 65 66 67 84 91 93
98, 9
910
0, 1
01
O*1
O*1
O O O O O O O X O O O O O O O
O
*1O
*1O O O O O X O O O O O O
(R
ever
b)O
(C
horu
s)O O
Ban
k S
elec
tM
odul
atio
nP
orta
men
to T
ime
Dat
a E
ntry
Vol
ume
Pan
pot
Exp
ress
ion
V-L
ink
cont
rol
Hol
d 1
Por
tam
ento
Sos
tenu
toS
oft
Por
tam
ento
Con
trol
Effe
ct 1
Dep
thE
ffect
3 D
epth
NR
PN
LS
B, M
SB
RP
N L
SB
, MS
B
Pro
gram
C
hang
eTr
ue #
O*1
****
*O
*10~
127
Pro
gram
Num
ber
1~12
8
Sys
tem
Exc
lusi
veO
O
Sys
tem
S
ong
Pos
ition
Poi
nter
Son
g S
elO
*1X
O*1
X

r E-200/E-100
E-200_US Page 64 Tuesday, January 27, 2004 4:01 PM
64

E-200/E-100
65
As
of N
ovem
ber
1, 2
003
(Rol
and
)
TE
L: (
011)
450
8-27
00 B
RA
ZIL
Rol
and
Bra
sil L
tda
Rua
San
Jose
, 780
Sal
a B
Parq
ue In
dus
tria
l San
Jose
Cot
ia -
Sao
Paul
o - S
P, B
RA
ZIL
TE
L: (
011)
461
5 56
66
U. S.
A.
Rol
and
Cor
por
atio
n U
.S.
5100
S. E
aste
rn A
venu
eL
os A
ngel
es, C
A 9
0040
-293
8,U
. S. A
.T
EL
: (32
3) 8
90 3
700
Par
son
s M
usi
c L
td.
8th
Floo
r, R
ailw
ay P
laza
, 39
Cha
tham
Roa
d S
outh
, T.S
.T,
Kow
loon
, HO
NG
KO
NG
TE
L: 2
333
1863
IND
IAR
iver
a D
igit
ec (I
ndia
) Pvt
. Ltd
.40
9, N
irm
an K
end
ra M
ahal
axm
i Fl
ats
Com
poun
d O
ff. D
r. E
dw
in
Mos
es R
oad
, Mum
bai-
4000
11,
IND
IAT
EL
: (02
2) 2
493
9051
IND
ON
ESIA
PT
Cit
ra I
nti
Ram
aJ1
. Cid
eng
Tim
ur N
o. 1
5J-1
50
Jaka
rta
Pusa
tIN
DO
NE
SIA
TE
L: (
021)
632
4170
MA
LAY
SIA
BEN
TLE
Y M
USI
C S
DN
BH
D14
0 &
142
, Jal
an B
ukit
Bin
tang
55
100
Kua
la L
umpu
r,M
AL
AY
SIA
TE
L: (
03) 2
144-
3333
BA
HRA
INM
oon
Sto
res
No.
16, B
ab A
l Bah
rain
Ave
nue,
P.
O.B
ox 2
47, M
anam
a 30
4,
Stat
e of
BA
HR
AIN
TE
L: 2
11 0
05
Inst
rum
ents
Co.
L.L
.C.
Zab
eel R
oad,
Al S
hero
oq B
ldg.
, N
o. 1
4, G
rand
Flo
or, D
ubai
, U.A
.E.
TE
L: (
04) 3
3607
15
CY
PRU
SR
adex
Sou
nd E
quip
men
t Ltd
.17
, Dia
goro
u St
reet
, Nic
osia
, C
YPR
US
TE
L: (
022)
66-
9426
Rol
and
Fran
ce S
A4,
Rue
Pau
l Hen
ri S
PAA
K,
Parc
de
l'Esp
lana
de,
F 7
7 46
2 St
. T
hiba
ult,
Lag
ny C
edex
FR
AN
CE
TE
L: 0
1 60
0 73
500
FIN
LAN
DR
olan
d S
can
din
avia
As,
Fi
lial
Fin
lan
dE
lann
onti
e 5
FIN
-015
10 V
anta
a, F
INL
AN
DT
EL
: (0)
9 68
24
020
GER
MA
NY
Rol
and
Elek
tron
isch
e M
usik
inst
rum
ente
Hm
bH.
Ost
stra
sse
96, 2
2844
Nor
der
sted
t, G
ER
MA
NY
T
EL
: (04
0) 5
2 60
090
GREE
CE
ST
OL
LA
S S
.A.
Mu
sic
Sou
nd
Lig
ht
155,
New
Nat
iona
l Roa
dPa
tras
264
42, G
RE
EC
ET
EL
: 261
0 43
5400
HU
NG
ARY
Rol
and
Eas
t Eu
rop
e L
td.
War
ehou
se A
rea
‘DE
PO’ P
f.83
H-2
046
Tor
okba
lint,
HU
NG
AR
YT
EL
: (23
) 511
011
UK
RA
INE
TIC
-TA
CM
ira
Str.
19/
108
P.O
. Box
180
29
5400
Mun
kach
evo,
UK
RA
INE
TE
L: (
0313
1) 4
14-4
0 U
NIT
ED K
ING
DO
M
Rol
and
(U.K
.) L
td.
Atl
anti
c C
lose
, Sw
anse
a E
nter
pri
se P
ark,
SW
AN
SEA
SA7
9FJ,
U
NIT
ED
KIN
GD
OM
TE
L: (
0179
2) 7
0270
1
KO
REA
Cos
mos
Cor
por
atio
n14
61-9
, Seo
cho-
Don
g,Se
ocho
Ku,
Seo
ul, K
OR
EA
TE
L: (
02) 3
486-
8855
CH
ILE
Com
erci
al F
ancy
S
.A.
Rut
.: 96
.919
.420
-1N
atan
iel C
ox #
739,
4th
Flo
orSa
ntia
go -
Cen
tro,
CH
ILE
TE
L: (
02) 6
88-9
540
NO
RTH
AM
ERIC
A
MID
DLE
EA
ST
EL S
ALV
AD
OR
OM
NI
MU
SIC
75 A
veni
da
Nor
te y
Fin
al
Ala
med
a Ju
an P
ablo
,
Ed
ific
io N
o.40
10 S
an S
alva
dor
, E
L S
AL
VA
DO
RT
EL
: 262
-078
8
CO
STA
RIC
AJU
AN
Ban
sbac
h
Inst
rum
ento
s M
usi
cale
sA
ve.1
. Cal
le 1
1, A
part
ado
1023
7,Sa
n Jo
se, C
OST
A R
ICA
TE
L: 2
58-0
211
CA
NA
DA
R
olan
d C
anad
a M
usic
Ltd
.(H
ead
Off
ice)
5480
Par
kwoo
d W
ay R
ichm
ond
B
. C.,
V6V
2M
4 C
AN
AD
A
TE
L: (
604)
270
662
6 R
olan
d C
anad
a M
usic
Ltd
.(T
oron
to O
ffic
e)17
0 A
dm
iral
Bou
leva
rdM
issi
ssau
ga O
n L
5T 2
N6
CA
NA
DA
T
EL
: (90
5) 3
62 9
707
E-200_US Page 65 Tuesday, January 27, 2004 4:01 PM
Info
rmation
Whe
n yo
u ne
ed r
epai
r se
rvic
e, c
all y
our
near
est R
olan
d S
ervi
ce C
ente
r or
aut
hori
zed
Rol
and
dis
trib
utor
in y
our
coun
try
as
show
n be
low
.
ARG
ENTI
NA
Inst
rum
ento
s M
usi
cale
s S
.A.
Av.
Sant
a Fe
205
5 (1
123)
Bue
nos
Air
esA
RG
EN
TIN
A
MEX
ICO
Cas
a V
eerk
amp
, s.a
. de
c.v.
Av.
Tol
uca
No.
323
, Col
. Oliv
ar
de
los
Pad
res
0178
0 M
exic
o D
.F.
ME
XIC
OT
EL
: (55
) 566
8-66
99 P
AN
AM
AS
UP
RO
MU
ND
IAL
, S.A
.B
oule
vard
And
rew
s, A
lbro
ok,
Pana
ma
Cit
y, R
EP.
DE
PA
NA
MA
TE
L: 3
15-0
101
VEN
EZU
ELA
Mu
sicl
and
Dig
ital
C.A
.A
v. F
ranc
isco
de
Mir
and
a,C
entr
o Pa
rque
de
Cri
stal
, Niv
el
C2
Loc
al 2
0 C
arac
asV
EN
EZ
UE
LA
TE
L: (
212)
285
-858
6
AU
STRA
LIA
R
olan
d C
orp
orat
ion
A
ust
rali
a P
ty.,
Ltd
. 38
Cam
pbel
l Ave
nue
Dee
Why
Wes
t. N
SW 2
099
AU
STR
AL
IA
TE
L: (
02) 9
982
8266
NEW
ZEA
LAN
D
Rol
and
Cor
pora
tion
Ltd
.32
Sha
dd
ock
Stre
et, M
ount
Ed
en,
Auc
klan
d, N
EW
ZE
AL
AN
D
TE
L: (
09) 3
098
715
HO
NG
KO
NG
Tom
Lee
Mu
sic
Co.
, Ltd
. S
ervi
ce D
ivis
ion
22-3
2 Pu
n Sh
an S
tree
t, T
suen
W
an, N
ew T
erri
tori
es,
HO
NG
KO
NG
TE
L: 2
415
0911
PH
ILIP
PIN
ESG
.A. Y
upan
gco
& C
o. I
nc.
339
Gil
J. Pu
yat A
venu
eM
akat
i, M
etro
Man
ila 1
200,
PHIL
IPPI
NE
ST
EL
: (02
) 89
9 9
801
SIN
GA
PO
RE
Sw
ee L
ee C
omp
any
150
Sim
s D
rive
,SI
NG
APO
RE
387
381
TE
L: 6
846-
3676
TAIW
AN
RO
LA
ND
TA
IWA
N
EN
TE
RP
RIS
E C
O.,
LT
D.
Roo
m 5
, 9fl
. No.
112
Chu
ng S
han
N.R
oad
Sec
.2, T
aipe
i, T
AIW
AN
, R
.O.C
.T
EL
: (02
) 256
1 33
39 TH
AIL
AN
DT
hee
ra M
usi
c C
o. ,
Ltd
.33
0 V
erng
Nak
ornK
asem
, Soi
2,
Ban
gkok
101
00, T
HA
ILA
ND
TE
L: (
02) 2
2488
21 V
IETN
AM
Sai
gon
Mu
sic
Suit
e D
P-8
40 B
a H
uyen
Tha
nh Q
uan
Stre
etH
ochi
min
h C
ity,
VIE
TN
AM
Tel
: (08
) 930
-196
9
JORD
AN
AM
MA
N T
rad
ing
Age
ncy
24
5 Pr
ince
Moh
amm
ad S
t.,
Am
man
111
8, JO
RD
AN
TE
L: (
06) 4
64-1
200
KU
WA
ITE
asa
Hu
sain
Al Y
ousi
fi E
st.
Abd
ulla
h Sa
lem
Str
eet,
Safa
t, K
UW
AIT
TE
L: 2
43-6
399
LEBA
NO
NC
hah
ine
S.A
.L.
Ger
ge Z
eid
an S
t., C
hahi
ne B
ldg.
, A
chra
fieh
, P.O
.Box
: 16-
5857
Bei
rut,
LE
BA
NO
NT
EL
: (01
) 20-
1441
QA
TAR
Al E
mad
i Co.
(Bad
ie S
tud
io
& S
tore
s)P.
O. B
ox 6
2, D
oha,
QA
TA
RT
EL
: 442
3-55
4
SAU
DI A
RA
BIA
aDaw
liah
Uni
vers
al
Elec
tron
ics
APL
Cor
nich
e R
oad
, Ald
ossa
ry B
ldg.
, 1s
t Flo
or, A
lkho
bar,
SAU
DI A
RA
BIA
P.O
.Box
215
4, A
lkho
bar
3195
2SA
UD
I AR
AB
IA
TE
L: (
03) 8
98 2
081
TURK
EY
An
t Mu
zik
Ale
tler
i Ith
alat
V
e Ih
raca
t Ltd
Sti
Sira
selv
iler
Cad
des
i Sir
asel
vile
r Pa
saji
No:
74/
20
Tak
sim
- Is
tanb
ul, T
UR
KE
YT
EL
: (02
12) 2
4993
24 U
.A.E
.Z
ak E
lect
ron
ics
& M
usi
cal
EGY
PT
Al F
ann
y T
rad
ing
Off
ice
9, E
BN
Hag
ar A
1 A
skal
any
Stre
et,
AR
D E
1 G
olf,
Hel
iopo
lis,
Cai
ro 1
1341
, EG
YPT
TE
L: 2
0-2-
417-
1828
REU
NIO
NM
aiso
n F
O -
YA
M M
arce
l25
Rue
Jule
s H
erm
ann,
Cha
udro
n - B
P79
97 4
91St
e C
loti
lde
Ced
ex,
RE
UN
ION
ISL
AN
DT
EL
: (02
62) 2
18-4
29
SOU
TH A
FRIC
AT
hat
Oth
er M
usi
c S
hop
(P
TY
) Ltd
.11
Mel
le S
t., B
raam
font
ein,
Jo
hann
esbo
urg,
SO
UT
H A
FRIC
A
P.O
.Box
329
18, B
raam
font
ein
2017
Jo
hann
esbo
urg,
SO
UT
H A
FRIC
AT
EL
: (01
1) 4
03 4
105
Pau
l Bot
hn
er (P
TY
) Ltd
.17
Wer
dmul
ler
Cen
tre,
M
ain
Roa
d, C
lare
mon
t 770
8SO
UT
H A
FRIC
A
P.O
.BO
X 2
3032
, Cla
rem
ont 7
735,
SO
UT
H A
FRIC
AT
EL
: (02
1) 6
74 4
030
DEN
MA
RK
R
olan
d S
can
din
avia
A/S
Nor
dha
vnsv
ej 7
, Pos
tbox
880
,D
K-2
100
Cop
enha
gen
DE
NM
AR
K
TE
L: 3
916
6200
FRA
NCE
IREL
AN
DR
olan
d I
rela
nd
G2
Cal
mou
nt P
ark,
Cal
mou
nt
Ave
nue,
Dub
lin 1
2R
epub
lic o
f IR
EL
AN
DT
EL
: (01
) 429
4444
ITA
LYR
olan
d I
taly
S. p
. A.
Via
le d
elle
Ind
ustr
ie 8
, 20
020
Are
se, M
ilano
, IT
AL
YT
EL
: (02
) 937
-783
00 N
ORW
AY
Rol
and
Sca
nd
inav
ia A
vd.
Kon
tor
Nor
geL
illea
kerv
eien
2 P
ostb
oks
95
Lill
eake
r N
-021
6 O
slo
NO
RW
AY
TE
L: 2
273
0074
PO
LAN
DM
X M
US
IC S
P.Z
.O.O
.U
L. G
ibra
ltar
ska
4.PL
-036
64 W
arsz
awa
POL
AN
DT
EL
: (02
2) 6
79 4
4 19
PO
RTU
GA
LT
ecno
logi
as M
usic
a e
Aud
io,
Rol
and
Port
ugal
, S.A
.C
ais
Das
Ped
ras,
8/
9-1
Dto
4050
-465
PO
RT
OPO
RT
UG
AL
TE
L: (
022)
608
00
60
RU
SSIA
MuT
ek3-
Bog
atyr
skay
a St
r. 1
.k.l
107
564
Mos
cow
, RU
SSIA
T
EL
: (09
5) 1
69 5
043
SPA
INR
olan
d E
lect
ron
ics
de
Esp
aña,
S. A
. C
alle
Bol
ivia
239
, 080
20
Bar
celo
na, S
PAIN
TE
L: (
93) 3
08 1
000
SWIT
ZER
LAN
DR
olan
d (S
wit
zerl
and)
AG
L
and
stra
sse
5, P
ostf
ach,
CH
-445
2 It
inge
n,
SWIT
ZE
RL
AN
DT
EL
: (06
1) 9
27-8
383
SWED
EN
Rol
and
Sca
nd
inav
ia A
/S
SW
ED
ISH
SA
LE
S O
FFIC
ED
anvi
k C
ente
r 28
, 2 tr
. S-
131
30 N
acka
SW
ED
EN
T
EL
: (0)
8 70
2 00
20
AU
STRIA
Rol
and
Au
stri
a G
ES
.M.B
.H.
Siem
enss
tras
se 4
, P.O
. Box
74,
A-6
063
RU
M, A
UST
RIA
TE
L: (
0512
) 26
44 2
60 BE
LGIU
M/H
OLL
AN
D/
LUX
EMBO
URG
Rol
and
Ben
elu
x N
. V.
Hou
tstr
aat 3
, B-2
260,
Oev
el
(Wes
terl
o) B
EL
GIU
MT
EL
: (01
4) 5
7581
1 CZ
ECH
REP
.K
-AU
DIO
Kar
das
ovsk
a 62
6.C
Z-1
98 0
0 Pr
aha
9,C
ZE
CH
RE
P.T
EL
: (2)
666
105
29
AFR
ICA
URU
GU
AY
Tod
o M
usi
ca S
.A.
Fran
cisc
o A
cuna
de
Figu
eroa
177
1C
.P.:
11.8
00
Mon
tevi
deo
, UR
UG
UA
YT
EL
: (02
) 924
-233
5 EU
RO
PE
AU
STRA
LIA
/N
EW Z
EALA
ND
ASI
A
CEN
TRA
L/LA
TIN
AM
ERIC
A
AFR
ICA
RO
MA
NIA
FBS
LIN
ESPi
ata
Lib
erta
tii 1
,53
5500
Ghe
orgh
eni,
RO
MA
NIA
TE
L: (
266)
364
609
PA
RA
GU
AY
Dis
trib
uid
ora
De
Inst
rum
ento
s M
usi
cale
sJ.E
. Ole
ar y
ESQ
. Man
duv
ira
Asu
ncio
n PA
RA
GU
AY
TE
L: (
021)
492
-124
CR
IST
OFO
RI
MU
SIC
PT
E
LT
DB
lk 3
014,
Bed
ok In
dus
tria
l Par
k E
, #0
2-21
48, S
ING
APO
RE
489
980
TE
L: 6
243-
9555
IRA
NM
OC
O, I
NC
.N
o.41
Nik
e St
., D
r.Sh
ariy
ati A
ve.,
Rob
eroy
e C
erah
e M
ird
amad
Teh
ran,
IRA
NT
EL
: (02
1) 2
85-4
169
ISRA
ELH
alil
it P
. Gre
ensp
oon
&
Son
s L
td.
8 R
etzi
f Ha'
aliy
a H
ashn
ya S
t.T
el-A
viv-
Yaf
o IS
RA
EL
TE
L: (
03) 6
8236
66
SYRIA
Tec
hn
ical
Lig
ht &
Sou
nd
C
ente
rK
hale
d E
bn A
l Wal
id S
t.B
ldg.
No.
47,
P.O
.BO
X 1
3520
, D
amas
cus,
SY
RIA
TE
L: (
011)
223
-538
4
CH
INA
Rol
and
Sh
angh
ai E
lect
ron
ics
Co.
,Ltd
.5F
. No.
1500
Pin
glia
ng R
oad
Sh
angh
ai 2
0009
0, C
HIN
AT
EL
: (02
1) 5
580-
0800
Rol
and
Sh
angh
ai E
lect
ron
ics
Co.
,Ltd
.(B
EIJ
ING
OFF
ICE
)10
F. N
o.18
Anh
uaxi
liC
haoy
ang
Dis
tric
t, B
eijin
g 10
0011
C
HIN
AT
EL
: (01
0) 6
426-
5050
Rol
and
Sh
angh
ai E
lect
ron
ics
Co.
,Ltd
.(G
UA
NG
ZH
OU
OFF
ICE
)2/
F., N
o.30
Si Y
ou N
an E
r Ji
e Y
i X
iang
, Wu
Yan
g X
in C
heng
,G
uang
zhou
510
600,
CH
INA
Tel
: (02
0) 8
736-
0428

r E-200/E-100
E-200_US Page 66 Tuesday, January 27, 2004 4:01 PM
66