intel® matrix storage console reference content€¦ · how do i upgrade the intel® matrix...
TRANSCRIPT

Intel® Matrix Storage Console
Reference Content
January 2010
Revision 1.0

INFORMATION IN THIS DOCUMENT IS PROVIDED IN CONNECTION WITH INTEL® PRODUCTS. NO LICENSE, EXPRESS OR IMPLIED, BY
ESTOPPEL OR OTHERWISE, TO ANY INTELLECTUAL PROPERTY RIGHTS IS GRANTED BY THIS DOCUMENT. EXCEPT AS PROVIDED IN INTEL’S
TERMS AND CONDITIONS OF SALE FOR SUCH PRODUCTS, INTEL ASSUMES NO LIABILITY WHATSOEVER, AND INTEL DISCLAIMS ANY
EXPRESS OR IMPLIED WARRANTY, RELATING TO SALE AND/OR USE OF INTEL PRODUCTS INCLUDING LIABILITY OR WARRANTIES
RELATING TO FITNESS FOR A PARTICULAR PURPOSE, MERCHANTABILITY, OR INFRINGEMENT OF ANY PATENT, COPYRIGHT OR OTHER
INTELLECTUAL PROPERTY RIGHT. Intel products are not intended for use in medical, life saving, or life sustaining applications.
Intel may make changes to specifications and product descriptions at any time, without notice.
Designers must not rely on the absence or characteristics of any features or instructions marked "reserved" or "undefined." Intel reserves
these for future definition and shall have no responsibility whatsoever for conflicts or incompatibilities arising from future changes to them.
The Intel® Matrix Storage Manager may contain design defects or errors known as errata which may cause the product to deviate from
published specifications. Current characterized errata are available on request.
Contact your local Intel sales office or your distributor to obtain the latest specifications and before placing your product order.
Intel, Intel® Matrix Storage Manager, Intel® Matrix Storage Technology, Intel® Rapid Recover Technology, and the Intel logo are
trademarks or registered trademarks of Intel Corporation or its subsidiaries in the United States and other countries.
*Other names and brands may be claimed as the property of others.
Copyright © 2010, Intel Corporation. All rights reserved.

This document contains instructions on how to perform common tasks or resolve
issues using the Intel® Matrix Storage Console. It is intended for reference only, in
case you cannot (or do not plan to) upgrade to Intel® Rapid Storage Technology,
which has an entirely new user interface.
How do I:
• Move my RAID 1 volume to larger hard drives?
• Get a system report?
• Upgrade the Intel® Matrix Storage Manager software?
• Enable/disable the hard drive write-back cache?
• Verify or verify and repair RAID volume data?
• View recovery drive files?
• Update a recovery volume?
• Improve performance or protect files from a single hard drive failure?
• Convert a RAID 1 volume to a recovery volume?
• Create a recovery volume?
• Rebuild a degraded RAID volume after a failed drive is replaced?
• Disable the data protection balloon?
• Migrate from RAID 0, 1, or 10 to RAID 5?
• Create a second volume on a RAID array (i.e. matrix RAID)?
Problems, issues, and errors:
• Nothing happens when I select Update Volume
• Error message appears when Intel® Matrix Storage Console is launched
• Error message: Source Drive is a Dynamic Disk
• Cannot create recovery volume
• Intel® Matrix Storage Console is corrupted or non-functional
• Degraded RAID 1 volume will not rebuild after failed hard drive is replaced
• Degraded or failed RAID 5 volume
• Degraded or failed RAID 10 volume
• Degraded or failed RAID 1 volume

How do I move my RAID 1 volume to larger hard drives?
Use the following steps to move a RAID 1 volume to larger hard drives. The procedure will not require reinstallation of the operating system and will not compromise the current information on the RAID 1 volume.
1. Shut off the system and remove one of the hard drives. 2. Attach one of the large hard& drives in its place. 3. Turn on the system and boot into Windows*. 4. Open the Intel® Matrix Storage Console, right-click the new hard drive in the device tree
(shown in the Non-RAID Hard Drive section), and click Rebuild to this Hard Drive.
5. Allow the rebuild to complete. 6. Restart the system and enter the Intel® Matrix Storage Manager option ROM by pressing
Ctrl and i when prompted. 7. Click Reset Disks to Non-RAID.
Note You may see a dialog box warning you of data loss. This warning does not apply to RAID 1; you will still be able to access your data.
8. Click Yes to confirm. 9. Click Exit and shut off the system. 10. Remove the original (smaller) hard drive from the system. This will leave only the new
(larger) hard drive, acting as a single hard drive (it is no longer part of a RAID volume). 11. Turn on the system and boot into Windows. You may need to change the hard drive
priority in order to boot. 12. From within Windows, use the Windows computer management tools or third party
partitioning software in order to resize the hard drive partition so that it uses the entire capacity of the hard drive.
13. Turn off the system and attach the second large hard drive. 14. Turn on the system and boot into Windows. 15. Open the Intel Matrix Storage Console, click Actions (if you don't see an Actions menu,
first click Advanced mode in the View menu) and then click Create RAID Volume from

Existing Hard Drive.
16. Follow the prompts to create a new RAID 1 volume. Your data will then be migrated from
the single large hard drive to the new RAID 1 volume.
How do I get a system report? The Intel® Matrix Storage Console generates a report that includes information on the storage subsystem, physical and logical device configuration, etc. This information can be very useful when troubleshooting issues.
View System Report
Use the following steps to view the system report.
1. Open the Intel Matrix Storage Console (Start » Programs » Intel® Matrix Storage Manager » Intel® Matrix Storage Console).
2. Click View » System Report.
Print or Save System Report
Use one of the following methods to print or save the system report.
• View the system report and use the options on that window to print and save the report.
• Click Print System Report or Save System Report from the File menu.

How do I upgrade the Intel® Matrix Storage Manager software?
In order to upgrade to the latest version of the Intel® Matrix Storage Manager, use the following steps:
• Download the latest driver
• Run the executable from within Windows* to install the software
• Reboot the system
Uninstalling the older software is not required.
How do I enable/disable the hard drive write-back cache?
If you have a RAID volume on your system, you can use the Intel® Matrix Storage Console to enable or disable the hard drive write-back cache for all the hard drive members of that RAID volume.
If you do not have a RAID volume on your system, you can enable or disable the hard drive's write-back cache within the Microsoft Windows* operating system.
Enable/Disable Write-Back Cache Using Intel® Matrix Storage Console
If you have a RAID volume on your system, use the following steps to enable or disable the hard drive's write-back cache using the Intel® Matrix Storage Manager.
Note: This will enable or disable the cache for all the hard drives that are members of the RAID volume(s) in that array.
1. Open the Intel® Matrix Storage Console (Start » Programs » Intel® Matrix Storage Manager » Intel® Matrix Storage Console).
2. Click View » Advanced Mode. 3. Right-click the RAID array in the device tree and click Enable Hard Drive(s) Write
Cache or Disable Hard Drive(s) Write Cache.

How do I verify or verify and repair RAID volume data?
Verify RAID Volume Data
To verify RAID volume data, perform the following steps:
1. Open the Intel® Matrix Storage Console (Start » Programs » Intel® Matrix Storage Manager » Intel® Matrix Storage Console).
2. Click View » Advanced Mode. 3. Right-click on the RAID volume in the device tree and click Verify Volume Data.
During the verification process, a dialog will display progress, and the number of verification errors and blocks with media errors will be displayed in the parameter list. An example of this dialog follows.

When the verification process is complete, a dialog will be displayed that shows the total number of verification errors and blocks with media errors. An example of this dialog follows.
Verify and Repair RAID Volume Data
To verify and repair RAID volume data, perform the following steps:
1. Open the Intel® Matrix Storage Console (Start » Programs » Intel® Matrix Storage Manager » Intel® Matrix Storage Console).
2. Click View » Advanced Mode. 3. Right-click on the RAID volume in the device tree and select Verify and Repair Volume
Data.
During the verification and repair process, a dialog will display progress, and the number of verification errors and blocks with media errors will be displayed in the parameter list. An example of this dialog follows.

When the verification and repair process is complete, a dialog will be displayed that shows the total number of verification errors and blocks with media errors. An example of this dialog follows.
How do I view recovery drive files?
One of the benefits of using a recovery volume is that files on the recovery drive can be viewed using Microsoft Windows Explorer*.
To view the recovery drive files, do the following:
1. Open the Intel® Matrix Storage Console. (Start » All Programs » Intel® Matrix Storage Console » Intel® Matrix Storage Manager)
2. Select Advanced Mode from the View menu. 3. Right-click on the recovery volume in the device tree and select Access Recovery Drive
Files.
4. Select OK.

The files will then be visible using Microsoft Windows Explorer.
To hide the recovery drive files, right-click on the recovery volume and select Hide Recovery Drive Files.
Note: If you are booting to the recovery drive, you can view/hide the master drive files by using the above steps, replacing Recovery Drive with Master Drive.
How do I update a recovery volume?
A recovery volume can be updated using either Basic mode or Advanced mode of the Intel® Matrix Storage Console.
Update Volume Using Basic Mode
Use the following steps to update a recovery volume:
1. Open the Intel® Matrix Storage Console. (Start » All Programs » Intel® Matrix Storage Console » Intel® Matrix Storage Manager)
2. Select Update recovery volume now, as shown in the following example:

3. Select Yes to confirm volume update.
Update Volume Using Advanced Mode
Use the following steps to update a recovery volume:
1. Open the Intel® Matrix Storage Console. (Start » All Programs » Intel® Matrix Storage Console » Intel® Matrix Storage Manager)
2. Select Advanced Mode from the View menu. 3. Right-click on the recovery volume in the device tree and select Update Volume.

How do I improve performance or protect files from a single hard
drive failure?
You can improve storage performance or protect your files from a single hard drive failure by adding an additional hard drive to a RAID-Ready system and migrating the RAID-Ready system to a 2-drive RAID 1 or RAID 0 system.
• How do I know if I have a RAID-Ready system?
• Steps to migrate from a RAID-Ready system to a 2-drive RAID 1 or RAID 0 system
How do I know if I have a RAID-Ready system? If you have a RAID-Ready system, you will see the following status screen when you open the Intel® Matrix Storage Console ( Start » Programs » Intel® Matrix Storage Manager » Intel® Matrix Storage Console ).
Migration Steps Use the following steps to migrate from a RAID-Ready system to a 2-drive RAID 0 or RAID 1 system.
1. Turn off the system. 2. Install a second Serial ATA hard drive.
Note: For specific questions on this procedure, refer to Installing Serial ATA hard drives or see your computer/motherboard manufacturer.
3. Turn on the system. 4. Open the Intel Matrix Storage Console (Start » Programs » Intel® Matrix Storage
Manager » Intel® Matrix Storage Console).

5. Click Protect data from a hard drive failure with RAID 1 or Improve storage
performance with RAID 0 . 6. Depending on your selection in step 5, click Create a RAID 1 volume or Create a RAID
0 volume .

7. Click Yes to confirm volume creation.
How do I convert a RAID 1 volume to a recovery volume?
Use the following steps to convert a RAID 1 volume to a recovery volume.
1. Open the Intel® Matrix Storage Manager (Start » All Programs » Intel® Matrix Storage Manager » Intel® Matrix Storage Console).
2. Click the View menu, then click Advanced mode. 3. Right-click the RAID 1 volume in the device tree and click Convert to Recovery Volume.

4. Select Next to continue. 5. Modify the recovery volume name if desired. 6. Select which of the two RAID 1 member hard drives you want to use for the master hard
drive.
7. The other hard drive will be used for the recovery hard drive. If you wish to change this,
do so, then click Next. 8. Select an update policy for the recovery volume.

9. Click Finish to convert the RAID 1 volume to a recovery volume.
How do I create a recovery volume?
A recovery volume uses RAID 1 technology (mirroring) to copy data from a designated master drive to a designated recovery drive, either continuously or on request.
A recovery volume can be created using one of the following methods:
• Create recovery volume in Basic mode
• Create recovery volume in Advanced mode
• Convert a RAID 1 volume to a recovery volume
Create a Recovery Volume in Basic mode:
Note This option may or may not be available depending on your system configuration. If you do not see the option listed in step 2, use Advanced mode to create the recovery volume.
1. Open the Intel® Matrix Storage Manager (Start » All Programs » Intel® Matrix Storage Manager » Intel® Matrix Storage Console).

2. Click Protect data using Intel® Rapid Recover Technology, as shown in the following screen shot.
3. Click Yes to create the recovery volume.
Create a Recovery Volume in Advanced mode:
1. Open the Intel® Matrix Storage Manager (Start » All Programs » Intel® Matrix Storage Manager » Intel® Matrix Storage Console).
2. Click the View menu and then click Advanced Mode.
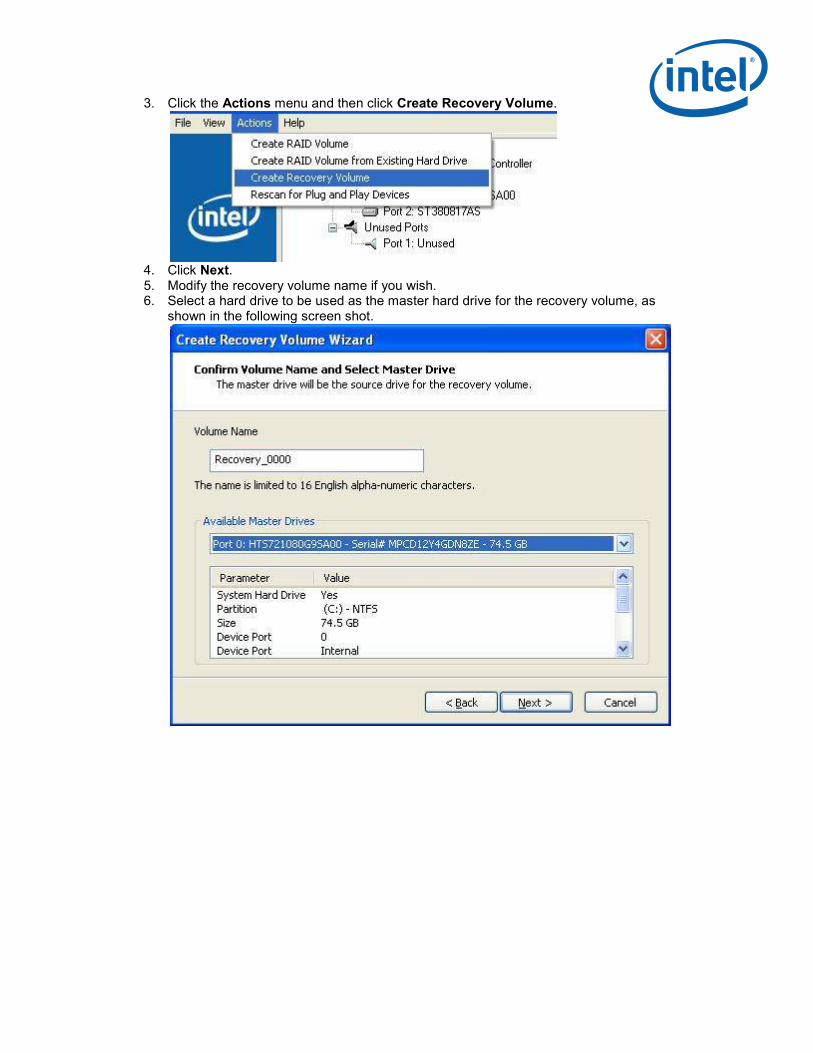
3. Click the Actions menu and then click Create Recovery Volume.
4. Click Next. 5. Modify the recovery volume name if you wish. 6. Select a hard drive to be used as the master hard drive for the recovery volume, as
shown in the following screen shot.

7. Select a hard drive to be used as the recovery hard drive for the recovery volume, as shown in the following screen shot.
8. Select an update policy. In Continuous mode, data on the master drive is copied to the
recovery drive automatically as long as both drives are connected to the system. In Update on request mode, data on the master drive is copied to the recovery drive on your request.
9. Click Finish to create the recovery volume.
How do I rebuild a degraded RAID volume after a failed drive is
replaced?
After replacing a failed hard drive from a redundant RAID volume (RAID 1/5/10), use the following steps to rebuild the volume.
1. Power on the system. 2. Click Start. 3. Click All Programs. 4. Click Intel® Matrix Storage Manager. 5. Click Intel® Matrix Storage Console. 6. Click on the View menu and select Advanced Mode. 7. Right-click on the non-RAID hard drive in the device tree and select Rebuild to this Hard
Drive.
How do I disable the data protection balloon?

You may see the following tray icon notification balloon each time you log onto your system.
This message indicates that you have a healthy RAID 1 volume. A healthy RAID 1 volume ensures that your data is protected from a single hard drive failure. To disable this message, right-click on the Intel® Matrix Storage Manager tray icon in the status bar and click Don't Show Data Protection Message at Startup .
How do I migrate from RAID 0, 1, or 10 to RAID 5?
Use the following steps to migrate from RAID 0, RAID 1, or RAID 10 to RAID 5.
1. Open the Intel® Matrix Storage Console (Start » All Programs » Intel® Matrix Storage Manager » Intel® Matrix Storage Console).
2. Select Advanced Mode in the View menu. 3. Right-click on the RAID 0/1/10 volume in the device pane and select Modify Volume.
4. Click Next to continue. The RAID 0/1/10 volume should already be selected as in the following example:

5. Click Next. 6. Modify the volume name if you wish. 7. Select RAID 5. 8. Select a strip size, and then click Next to continue. 9. Click Finish to migrate to RAID 5.
How do I create a second volume on a RAID array (i.e. matrix
RAID)?
If there is available capacity in a RAID array, it can be used to create a second RAID volume.
To create a second volume in a RAID array, use one of the following methods:
• Right-click option in Intel® Matrix Storage Console device tree
• Actions menu in Intel® Matrix Storage Console
Create Second RAID Volume Using Right-click Option in Device Tree To create a second volume on a RAID array using the right-click option, use the following steps:
1. Open the Intel® Matrix Storage Console (Start/All Programs/Intel® Matrix Storage Manager/Intel® Matrix Storage Console).
2. Select View » Advanced Mode to enter Advanced Mode. 3. Right-click on the array with available capacity in the device tree and select Create
Volume (see following example where Array 0 has 57.1GB of available capacity).

4. Enter the RAID volume name, select a RAID level, and select a strip size (if applicable); click Next to continue.
5. The array will be already be selected for you; click Next to continue. 6. Click Next since the volume will utilize all available capacity. 7. Click Finish to create the new RAID volume.
Create Second RAID Volume Using Actions Menu To create a second volume on a RAID array using the Actions menu, use the following steps:
1. Open the Intel® Matrix Storage Console (Start/All Programs/Intel® Matrix Storage Manager/Intel® Matrix Storage Console).
2. Select View » Advanced Mode to enter Advanced Mode. 3. Select Actions » Create RAID Volume. 4. Enter the RAID volume name, select a RAID level, and select a strip size (if applicable);
click Next to continue. 5. Select the array (see the following example where Array 0 is the name of the array with
available capacity); click Next to continue.

6. Click Next since the volume will utilize all available capacity. 7. Click Finish to create the new RAID volume.

Nothing happens when I select Update Volume
Description
Nothing happens when I select Update Volume from within the Advanced mode of the Intel® Matrix Storage Console.
Solution
This is expected behavior. It may occur for one of the following reasons.
• The recovery volume status may have said Volume Update in Progress for such a short time that it was not noticeable. While a recovery volume update is in progress, the tray icon will indicate that a volume update is in progress, and the recovery volume status will change from Needs Update to Volume Update in Progress. This is shown in the following example. However, if the number of changes that have been made are minimal, the tray icon status balloon may not appear, and the recovery volume status may say Volume Update in Progress for a very short period of time.
• Nothing will happen if Update Volume is selected but no updates have been made to the master drive since the last volume update. A recovery volume that is using the On Request policy will show a volume status of Needs Update even when no updates have been made to the master drive since the last volume update. This is shown in the following example.

Error message appears when Intel® Matrix Storage Console is
launched
Description
The first time you run the Intel® Matrix Storage Console (Start/Programs/Intel® Matrix Storage Manager/Intel® Matrix Storage Console), you may see an error message that states:
"The features supported by the BIOS do not match the features supported by this application. To ensure compatibility with the system BIOS, some application features may not be available."
Solution
This is expected behavior.
This error message will not impact system functionality. The error message appears because the features provided by the Intel Matrix Storage Manager are dependent on the chipset used. Newer features that require the Intel® 82801GR/GH I/O controller hub (ICH7R/DH) will not be available. As an example, Intel Matrix Storage Manager 5.0 will provide the same RAID features on ICH6R as Intel® Application Accelerator 4.7.
Error message: Source Drive is a Dynamic Disk
Description When attempting to migrate from a "RAID-Ready" configuration to a RAID configuration using the Intel® Matrix Storage Console, an error message is received that says the migration cannot continue because the source drive is a dynamic disk. However, the Windows* Disk Management utility lists the drive as a basic disk, not a dynamic disk. Solution If there is a single partition on the source hard drive, reducing the size of the partition by a few MBs may resolve the issue and allow the migration to occur. If there are multiple partitions on the source hard drive, reducing the size of the second partition by a few MBs may resolve the issue and allow the migration to occur. Cause This issue may occur if there is not enough space for the migration to successfully complete. Instead of reporting that there is not enough space, the Intel Matrix Storage Console reports that the migration cannot continue because the source drive is a dynamic disk. Note: This error is not related to the size of the destination hard drive(s); it may be received even if the destination hard drive(s) are equal to or greater in size than the source hard drive.
Cannot create recovery volume
Description

I cannot create a recovery volume even though my system has a controller that supports Intel® Rapid Recover Technology. I do not see any of the following options in the Intel® Matrix Storage Console:
• Protect data using Intel Rapid Recover Technology
• Create Recovery Volume
• Convert to Recovery Volume
There is no option to create a recovery volume (#4. Recovery Volume Options) in the Intel® Matrix Storage Manager option ROM. Solution
Intel Rapid Recover Technology requires support in the driver and the option ROM. The feature will not be available if an option ROM that includes support for Intel Rapid Recover Technology is not integrated into the system BIOS. Contact your system manufacturer for further information.
Intel® Matrix Storage Console is corrupted or non-functional
Description
One of the following issues is seen when opening the Intel® Matrix Storage Console:
• Corruption
• Non-functional items on screen
• No information is shown in console panes, even when the application size is increased
Solution
Use the following steps to uninstall and re-install the console application.
1. Click the uninstall option in the Start Menu (Start » All Programs » Intel® Matrix Storage Manager » Uninstall). This will not uninstall the driver; it will only uninstall non-required components such as the user interface and event notification service.
2. Download and install the latest version of the Intel® Matrix Storage Manager.
Degraded RAID 1 volume will not rebuild after failed hard drive is
replaced
Description If you replace a failed RAID 1 member hard drive with a new hard drive, the volume rebuild will not occur automatically; user action is required. Solution

To start a rebuild of a degraded RAID 1 volume to a replacement hard drive, use one of the following methods.
• Basic mode - Intel® Matrix Storage Console
• Advanced mode - Intel® Matrix Storage Console
• Intel® Matrix Storage Manager option ROM
Use Basic Mode of the Intel® Matrix Storage Console
1. Power off the system. 2. Replace the failed hard drive with a new one that is of equal or greater capacity. 3. Power on the system. 4. After the operating system is running, select the Intel Matrix Storage Console from the
Start Menu or click the Intel Matrix Storage Manager tray icon. 5. Click on the icon in front of Restore RAID 1 data protection, as displayed in the
following example:

6. Click on the icon in front of Rebuild RAID volume now, as displayed in the following example:
7. Select Yes to confirm.
Use Advanced Mode of the Intel® Matrix Storage Console
1. Power off the system. 2. Replace the failed hard drive with a new one that is of equal or greater capacity. 3. Power on the system. 4. After the operating system is running, select the Intel Matrix Storage Console from the
Start Menu or click the Intel Matrix Storage Manager tray icon. 5. Click on the View menu and select Advanced Mode. 6. Right-click on the non-RAID hard drive in the device tree and select Rebuild to this Hard
Drive, as displayed in the following example:

Degraded or failed RAID 5 volume
When one hard drive member of a RAID 5 volume fails or is disconnected, the RAID 5 volume will continue to function, but is in a degraded state. When two or more hard drive members fail or are disconnected, the volume has failed.
If one of these scenarios occurs, refer to the appropriate procedure below to recover or to recreate your configuration.
• Degraded RAID 5 volume
• Failed RAID 5 volume
Degraded RAID 5 Volume
Missing Hard Drive
1. Turn off the system. 2. Reconnect the missing hard drive. 3. Turn on the system. The rebuild will occur automatically.
Failed Hard Drive
1. Turn off the system. 2. Replace the failed hard drive with a new hard drive that is of equal or greater capacity. 3. Turn on the system. 4. When the operating system is running, select the Intel® Matrix Storage Console from
the Start Menu or click on the Intel® Matrix Storage Manager tray icon. 5. Click the View menu and click Advanced Mode. 6. Right-click the non-RAID hard drive in the device tree and click Rebuild to this Hard
Drive .
Failed RAID 5 Volume Failed Hard Drives
Note When more than one hard drive in a RAID 5 volume fails, the RAID 5 volume cannot be recovered and any data on that volume is lost. This procedure deletes the failed RAID 5 volume and creates a new RAID 5 volume.
1. Turn off the system. 2. Replace the failed hard drives with new hard drives that are of equal or greater capacity. 3. Turn on the system. 4. Press Ctrl-I to enter the Intel® Matrix Storage Manager option ROM when prompted
during system startup. 5. Select option 2. Delete RAID Volume in the main menu. 6. Use the up or down arrow keys to select the failed RAID 5 volume. 7. Press Delete to delete the volume. 8. Press Y to confirm the deletion.

9. Select option 1. Create RAID Volume to create a new RAID 5 volume. You will then need to reinstall the operating system on the new volume.
Degraded or failed RAID 10 volume
A RAID 10 volume will be reported as Degraded if one of the following conditions exists:
• One of the member hard drives fails or is disconnected.
• Two non-adjacent member hard drives fail or are disconnected.
A RAID 10 volume will be reported as Failed if one of the following conditions exists:
• Two adjacent member hard drives fail or are disconnected.
• Three or four member hard drives fail or are disconnected.
To restore the volume, refer to the applicable procedure below: Note: Recovering a RAID 10 volume (from the failed state to the degraded state) requires that at least two non-adjacent member hard drives be present and normal.
Degraded RAID 10 Volume Missing Member(s)
1. Make sure the system is powered off. 2. Reconnect the missing hard drive(s). 3. Power on the system. The rebuild will occur automatically.
Failed Member(s)
1. Make sure the system is powered off. 2. Replace the failed hard drive(s) with new hard drive(s) that are of equal or greater
capacity. 3. Power on the system. 4. After the operating system is running, select the Intel® Matrix Storage Console from the
Start Menu or click on the Intel® Matrix Storage Manager tray icon. 5. Click on the View menu and select Advanced Mode. 6. Right-click on the non-RAID hard drive in the device tree and select Rebuild to this Hard
Drive.
Failed RAID 10 Volume Note: When a RAID 10 volume is in the failed state, unless it is in the failed state because two adjacent member hard drives have been disconnected, the RAID 10 volume cannot be recovered and any data on the RAID 10 volume is lost. Two Missing Members
1. Make sure the system is powered off. 2. Reconnect the missing hard drives. 3. Power on the system. The rebuild will occur automatically.

Three or Four Missing Members Note: When a RAID 10 volume is in the failed state because three or four member hard drives have been disconnected, the RAID 10 volume cannot be recovered and any data on the RAID 10 volume is lost. This procedure deletes the failed RAID 10 volume.
1. Make sure the system is powered off. 2. Reconnect the missing hard drives. 3. Power on the system. During the system startup, the Intel Matrix Storage Manager option
ROM user interface will display the RAID 10 volume status as "Failed," prompting you to press Ctrl-I to enter the user interface.
4. Press Ctrl-I to enter the "Main Menu." 5. Select option 2: Delete RAID Volume in the main menu. 6. In the "Delete Volume Menu," use the up and down arrow keys to select the failed RAID
10 volume. 7. Press the Delete key to delete the volume. 8. Press Y to confirm the deletion. 9. Create a new RAID 10 volume. 10. You will then need to reinstall the operating system on the new volume.
Failed Members Note: When a RAID 10 volume is in the failed state because the member hard drives have failed, the RAID 10 volume cannot be recovered and any data on the RAID 10 volume is lost. This procedure deletes the failed RAID 10 volume.
1. Make sure the system is powered off. 2. Replace the failed hard drives with new hard drives that are of equal or greater capacity. 3. Power on the system. During the system startup, the Intel Matrix Storage Manager option
ROM user interface will display the RAID 10 volume status as "Failed," prompting you to press Ctrl-I to enter the user interface.
4. Press Ctrl-I to enter the "Main Menu." 5. Select option 2. Delete RAID Volume in the main menu. 6. In the "Delete Volume Menu," use the up and down arrow keys to select the failed RAID
10 volume. 7. Press the Delete key to delete the volume. 8. Press Y to confirm the deletion. 9. Create a new RAID 10 volume. 10. You will then need to reinstall the operating system on the new volume.
Degraded or failed RAID 1 volume
When a hard drive in a RAID 1 volume fails or is disconnected, the RAID 1 volume will continue to function but is in a degraded state. If both hard drives fail, the volume will fail. If one of these scenarios occurs, refer to the appropriate procedure below to recover or to recreate your configuration.
• Degraded RAID 1 volume
• Failed RAID 1 volume
Degraded RAID 1 Volume

Missing Hard Drive
1. Turn off the computer. 2. Reconnect the missing hard drive. 3. Turn on the computer. The rebuild will occur automatically.
Failed Hard Drive
Use one of the following methods to recover your failed RAID 1 volume.
• Basic mode of the Intel® Matrix Storage Console
• Advanced mode of the Intel® Matrix Storage Console
Use the following steps to recover your RAID 1 volume using Basic mode of the Intel® Matrix Storage Console.
1. Turn off the computer. 2. Replace the failed hard drive with a new hard drive that is of equal or greater capacity. 3. Turn on the computer. 4. Open the Intel® Matrix Storage Manager ( Start » All Programs » Intel® Matrix
Storage Manager » Intel® Matrix Storage Console ). 5. Click Restore RAID 1 data protection . 6. Click Rebuild RAID volume now . 7. Click Yes to rebuild your RAID 1 volume.
Use the following steps to recover your RAID 1 volume using Advanced mode of the Intel® Matrix Storage Console.
1. Turn off the computer. 2. Replace the failed hard drive with a new hard drive that is of equal or greater capacity. 3. Turn on the computer. 4. Open the Intel® Matrix Storage Manager ( Start » All Programs » Intel® Matrix
Storage Manager » Intel® Matrix Storage Console ). 5. Click the View menu and then click Advanced Mode . 6. Right-click on the non-RAID hard drive in the device tree and click Rebuild to this Hard
Drive .
Failed RAID 1 Volume

Note When both hard drives in a RAID 1 volume fail, the RAID 1 volume cannot be recovered and any data on that volume is lost. This procedure deletes the failed RAID 1 volume and creates a new RAID 1 volume.
1. Turn off the system. 2. Replace the failed hard drives with new hard drives that are of equal or greater capacity. 3. Turn on the system. 4. When prompted during system startup, press Ctrl and i at the same time to enter the
Intel Matrix Storage Manager option ROM user interface. 5. Click 2. Delete RAID Volume . 6. Use the up or down arrow keys to select the failed RAID 1 volume. 7. Press Delete to delete the volume. 8. Press Y to confirm the deletion. 9. Click 1. Create RAID Volume to create a new RAID 1 volume.