intel confidential, for internal use only intel® classmate pc classroom management* training foils...
TRANSCRIPT
INTEL CONFIDENTIAL, FOR INTERNAL USE ONLY
Intel® classmate PC
Classroom Management*Training Foils
Windows* 8 Desktop Version 1.0

INTEL CONFIDENTIAL
NOTICES & DISCLAIMERS
INFORMATION IN THIS DOCUMENT IS PROVIDED IN CONNECTION WITH INTEL® PRODUCTS. EXCEPT AS PROVIDED IN INTEL'S TERMS AND CONDITIONS OF SALE FOR SUCH PRODUCTS, INTEL ASSUMES NO LIABILITY WHATSOEVER, AND INTEL DISCLAIMS ANY EXPRESS OR IMPLIED WARRANTY RELATING TO SALE AND/OR USE OF INTEL PRODUCTS, INCLUDING LIABILITY OR WARRANTIES RELATING TO FITNESS FOR A PARTICULAR PURPOSE, MERCHANTABILITY, OR INFRINGEMENT OF ANY PATENT, COPYRIGHT, OR OTHER INTELLECTUAL PROPERTY RIGHT.
All products, dates, and figures specified are preliminary based on current expectations and are subject to change without notice. Availability in different channels may vary.
Intel, the Intel logo, Intel Atom, Intel Celeron, Intel Core are all trademarks or registered trademarks of Intel Corporation or its subsidiaries in the United States and other countries.
The hardware vendors of the bare bone notebooks and the interchangeable components remain solely responsible for the design, sale and functionality of their respective products, including any liability arising from product infringement and product warranty. Intel is not warranting the products of the hardware vendors.
Information regarding third-party products is provided solely for educational purposes. Intel is not responsible for the performance or support of third-party products and does not make any representations or warranties whatsoever regarding quality, reliability, functionality, or compatibility of these devices or products
Intel may make changes to specifications and product descriptions at any time, without notice. Designers must not rely on the absence or characteristics of any features or instructions marked "reserved" or "undefined." Intel reserves these for future definition and shall have no responsibility whatsoever for conflicts or incompatibilities arising from future changes to them. The information here is subject to change without notice. Do not finalize a design with this information.
The vendors of the Intel® Education Solutions and other components remain solely responsible for the design, sale and functionality of their respective products, including any liability arising from intellectual property infringement and/or product warranty. Information about these products is provided for informational purposes only; Intel is not recommending any particular third-party product, Intel is not responsible for the performance or support of third-party products, and Intel does not make any representations or warranties whatsoever regarding quality, reliability, functionality, or compatibility of these products. This document contains information on products in the design phase of development.
*Other names and brands may be claimed as the property of others.
Copyright (C) 2013 Intel Corporation. All rights reserved
INTEL CONFIDENTIAL
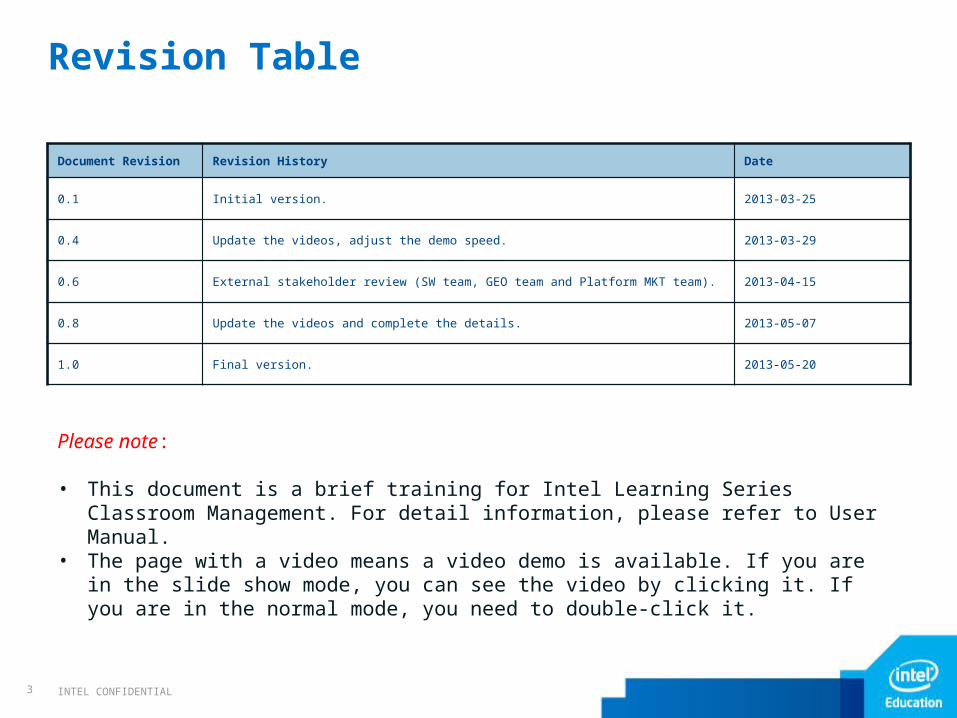
Revision Table
Document Revision Revision History Date
0.1 Initial version. 2013-03-25
0.4 Update the videos, adjust the demo speed. 2013-03-29
0.6 External stakeholder review (SW team, GEO team and Platform MKT team). 2013-04-15
0.8 Update the videos and complete the details. 2013-05-07
1.0 Final version. 2013-05-20
3
Please note:
• This document is a brief training for Intel Learning Series Classroom Management. For detail information, please refer to User Manual.
• The page with a video means a video demo is available. If you are in the slide show mode, you can see the video by clicking it. If you are in the normal mode, you need to double-click it.

INTEL CONFIDENTIAL
ContentPart 1
Pre-training
• Windows 8 operations• Connect to network
Overview• Value Proposition & Key Features• Audience & Objectives
Install & uninstall
• Hardware Requirements • Software Requirements• Install • uninstall
How to use
• Deploy • pre-class routine• Teaching• Interaction• Remote control• Testing• File transfer
INTEL CONFIDENTIAL
Agenda
5
Pre-Training
Overview
Install & Uninstall
How to Use
INTEL CONFIDENTIAL
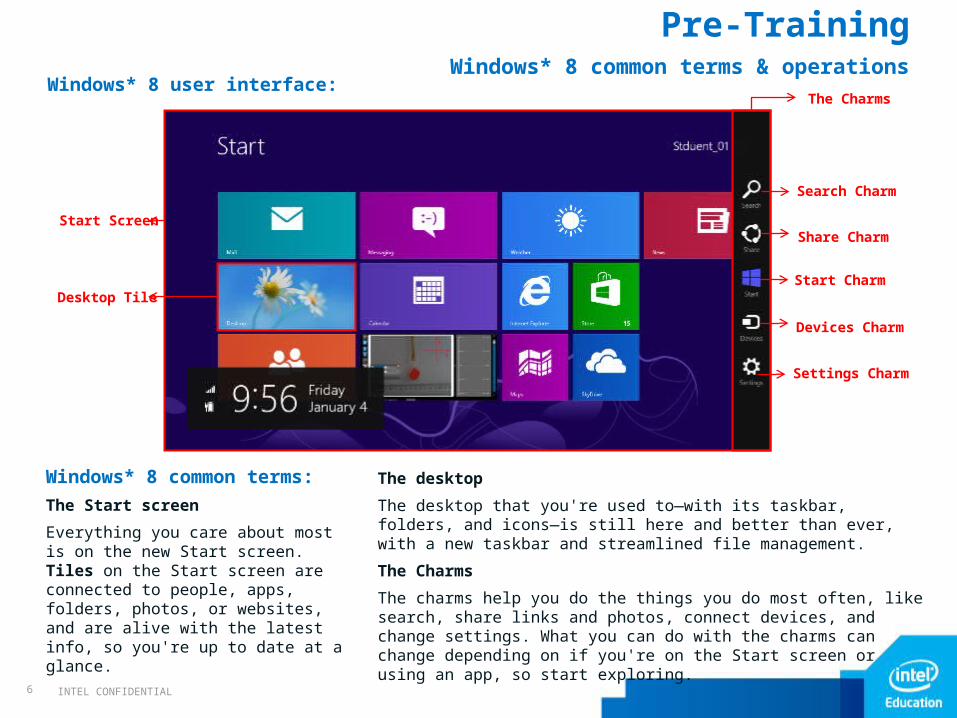
Pre-TrainingWindows* 8 common terms & operations
Windows* 8 user interface:
6
Windows* 8 common terms:
The Start screen
Everything you care about most is on the new Start screen. Tiles on the Start screen are connected to people, apps, folders, photos, or websites, and are alive with the latest info, so you're up to date at a glance.
Start Screen
Desktop Tile
The Charms
Search Charm
Share Charm
Start Charm
Devices Charm
Settings Charm
The desktop
The desktop that you're used to—with its taskbar, folders, and icons—is still here and better than ever, with a new taskbar and streamlined file management.
The Charms
The charms help you do the things you do most often, like search, share links and photos, connect devices, and change settings. What you can do with the charms can change depending on if you're on the Start screen or using an app, so start exploring.

INTEL CONFIDENTIAL
Windows* 8 common operations:
• How to go to desktop:
Click the Desktop Tile on the Start Screen.
• How to open the charms:
Move your pointer into the upper-right or lower-right corner, and then move it up or down to click the one you want.
• Ways to return to Start:
With a mouse, move the pointer into the lower-left corner. When Start appears, click in the corner.
With a keyboard, press the Windows logo key .
How to connect to network:
From Windows* 8 UI, you need to open the Settings Charm->Networks, select the network you wish to connect, then enter the network security key, click connect.
From Desktop, you shall click the Internet access icon on the system tray. The rest operations are the same with above.
7
Pre-TrainingWindows* 8 common terms & operations
You can click/double-click the button beside to see the detailed operations demo:

INTEL CONFIDENTIAL
Agenda
8
Pre-Training
Overview
Install & Uninstall
How to Use

INTEL CONFIDENTIAL
Overview
Audience
This training document is intended for Intel® marketing, Intel® GEO technical marketing engineers (TMEs), Intel® local field application engineers (FAEs), Local OEM technical staff, and other NDA-covered company staff who will work with teachers and students on the installation, implementation, and operation of Intel classmate PCs.
Course ObjectivesHow to install and uninstall the software stacks
Value proposition and key features of Classroom Management
How to use the application to realize the key features
INTEL CONFIDENTIAL
Agenda
10
Pre-Training
Overview
Install & Uninstall
How to Use

INTEL CONFIDENTIAL11
Install & Uninstall
Tutor and Student Hardware Requirements:
11
Classroom Management Tutor
• Requires a screen resolution of 1024 x 768 or above
• 120 Mbytes free disk space
• TCP/IP
Classroom Management Student
• Intel® classmate PC
• 50Mbytes free disk space
• TCP/IP

INTEL CONFIDENTIAL12
Tutor and Student Software Requirements:
12
Operating System
• Windows* 8/ Windows* 8 Pro (support 64bit only)
Software
• The applications are available in IBP. To access the portal, use the following URL: Businessportal.intel.com
Note: On this training foil, all screen shots are based on Win*8, but it supports
all OS as listed in Operating System. Some UI features may be different on
different OS, but the function is same.
Install & Uninstall

INTEL CONFIDENTIAL
Installation steps:
When installing Classroom Management you will be prompted for the type of installation
you wish to perform:
Tutor: The workstation that is used to take over another. Sometimes called the Viewer or Teacher. This feature, should be installed on workstations which will be used to remote control other PCs.
Student: The workstation that is to be taken over. This feature, sometimes called the Client, should be installed on workstations that will be remote controlled.
Enter your chosen room Name for the Tutor Program to search for Students.
13
Note: When you are installing, make sure that you are logged in as an Administrator.
Install & Uninstall

INTEL CONFIDENTIAL14
Uninstall steps:
To uninstall Intel Learning Series Classroom Management1.Go to Start Screen, then open the Search charm.
2.Enter Classroom Management in the search box. Right-click it in the results, then click Uninstall.
3.Select Classroom Management and click Uninstall. Click Yes to continue.
You can double-click the button beside to see the detailed operations demo:
Note: To completely remove all Intel Learning Series Classroom Management files, the workstations must be restarted.
Install & Uninstall

INTEL CONFIDENTIAL
Agenda
15
Pre-Training
Overview
Install & Uninstall
How to Use
INTEL CONFIDENTIAL
How to use-Deploy
INTEL CONFIDENTIAL
How to UseDeploy
Deploy
The Classroom Management Deploy Utility provides Network Administrators with the facility to install and configure Classroom Management on multiple workstations without the need to visit the machines individually.
Using deploy you can perform the following tasks remotely:
• Remotely Install a Classroom Management package on multiple workstations simultaneously.
• Create and download specific Client Configurations to multiple workstations.
• Remotely update Classroom Management License details on multiple workstations.
• Remotely Uninstall a Classroom Management package from multiple workstations simultaneously.
Note: Student should activate the hidden administrator account with this command: net user administrator /active:Yes

INTEL CONFIDENTIAL
How to use-Pre-class Routine
INTEL CONFIDENTIAL
How to UsePre-class Routine
Class Wizard
The Class Wizard enables you to enter the general properties of a lesson and allows you to choose how to locate and connect to your students.
Lesson Details
• You have the option to input the Teacher Name, Lesson Title and Lesson objectives.
What time does this Lesson finish?
• Enter the time you want the class to finish, a timer will appear while the lesson is in progress. If you do not want the lesson to be timed enable the Open Lesson option.
Create a Journal
• Allows you to start or open an existing Student Journal. The Journal is an electronic record of key information that has been covered during the lesson.
Create a Student Register
• Before the lesson starts you can prompt the Students to login with their names. These will be displayed at the Tutor instead of the machine names.

INTEL CONFIDENTIAL
Select Startup Mode
The Class Wizard enables the Tutor to select the connection mode that best suits their requirements. The Class Wizard is displayed when the Tutor program is initially started and when a class is restarted. There are 4 different ways that Tutor can connect to Students.
Room Mode
• Group computers into rooms or allow Students to join a room. Ideal for Teachers or Students using laptops. Enter your chosen room Name for the Tutor Program to search for Students.
PC Mode
• Create and connect to a fixed list of computers.
User Mode
• Create and connect to a fixed list of Students based on their logged on user name.
Browse Mode
• Browse the local network for Students using a naming convention.
How to UsePre-class Routine

INTEL CONFIDENTIAL
Class Manage
Connect to
When the connection mode has been defined it appears in the Class Wizard and is available for selection. Highlight the required mode and click Select, a green tick will appear showing that it is the current method of connection.
To End a Class List
• Choose School->Manage Class ->End Class from the Control window drop down menu. Your current class will be ended and the Class Wizard will appear allowing you to start a new lesson.
The Known List of Clients
• The Known List of Clients is a list of available Clients that have been found on the Network. The list can be updated in the Modify Known List dialog. Choose School->Manage Class->Modify Class from the Control window drop down menu.
Refresh
• If new Students want to join the class, select Manage Class from the toolbar and then click Refresh to display the Join Class dialog. The Student machines will only find the class if this dialog is active.
How to UsePre-class Routine

INTEL CONFIDENTIAL
How to UsePre-class Routine
Student Register
By default Classroom Management will display the computer name of the Client workstation in the Control window. However, there may be times when you want the control to display the actual name of the student and request additional information.
Sign In• Choose School->Student Register-> Sign In from the Control window drop down
menu. The Tutor can then select the information that the Student will be required to complete.
• The Student Register will also appear if you check Create a Student Register in the Class Wizard.
Registration Report
• Student registration and Printer usage details can be viewed in a report but this will be lost when the Control disconnects. Choose School->Student Register-> Registration Report from the Control window drop down menu.
Sign Out
• At the end of a lesson you can reset the Client Names using the Sign Out option.

INTEL CONFIDENTIAL
How to UsePre-class Routine
Groups
Classroom Management allows you to organize Clients into Groups for easier access and management.
To create a Group• Choose Group->New From the Dropdown menu. You can add one or more Clients to
your new group.
• Your newly created Group will appear as a tab on the Group bar for quick access.
To change the Properties of a Group• Choose Group->Properties from the Control window drop down menu. Choose the
Members tab and simply select the Client to be removed or added.
Remove group• If you no longer need a Group that you have defined you can remove the Group. This
will not affect the Clients that are members of the Group.
Group Randomly• Choose Group->Group Randomly from the Control window drop down menu.
Random groups of Students can be created. Students can be randomly assigned to a group or the Tutor can allow the Student to choose the group.

INTEL CONFIDENTIAL
Interface introduction
Once you have successfully logged into the Classroom Management Tutor Software, the program’s main window will be displayed on the screen, The main Classroom Management screen can be divided by its multiple functions.
The Standard Bar The Menu Bar The Toolbar The Quick View bar The Lesson Bar The Group Bar The List View
The List View• The List View displays the currently connected Clients or Groups. You can
switch the display mode between large icons and detailed view, from the Control window View drop down menu.
• Click on the individual icons on the left hand side of the Control window, or choose View->Normal/ Monitor/ Audio/ Q&A/Web/ Application/ Survey/ Print/ IM/ Device/Typing/Whiteboard View from the Control window drop down menu to change mode. The default View Mode is Normal View.
How to UsePre-class Routine

INTEL CONFIDENTIAL
Interface introduction Tutor Toolbar• The Tutor Toolbar provides details of the current lesson to the Tutor and
access to key Classroom Management functions when the Tutor program is minimized.
• To disable the Tutor Toolbar choose View->Current Settings ->User Interface from the Control window drop down menu and uncheck Show Tutor Toolbar on minimizing.
Student Toolbar• You can quickly show/hide the Student toolbar by selecting View->Student
Toolbar-> Show/Hide from the Control window drop down menu or by clicking the Toolbar icon on the Control window toolbar.
• The Student Toolbar provides feedback to the Student on the current lesson, time remaining, current websites and applications that are available, the status of messenger and keyboard monitoring and quick access to request help.
• All features included on the Toolbar can be customized by the Tutor. Choose View->Student Toolbar-> Configure from the Control window drop down menu.
How to UsePre-class Routine

INTEL CONFIDENTIAL
Interface introduction
Toolbars and customizing• To enable you to customize Classroom Management to your exact requirements,
a variety of User Interface customization features are available. One of these is the ability to set which icons you want to display on the Tutor Toolbar.
• To customize the Toolbar, Choose View->Toolbar->Customize from the Tutor Window drop down menus.
Customize Client and Group icons• Student and Group icons displayed in the Tutor Window can be customized to
suit your individual requirements. A choice of images can be selected and applied to the machine name or logged on user.
• Choose Student->Customize from the Tutor Window drop down menus. Select the Student name or Group and Click the Modify button. Browse for the required icon image.
• A number of default libraries (*.ncl) are provided in the Program Folder or you can select a picture of your own choosing.
How to UsePre-class Routine

INTEL CONFIDENTIAL
Interface introduction
Once you have selected a classroom or group, you can rearrange the individual Client icons in the Control List View to reflect the layout of the classroom.
To lock a layout• Arrange the Client icons in the required positions.
• Choose Layout->Lock Layout from the control window drop down menu.
• Client icons will be fixed in position and unable to be moved.
To arrange icons• Select the Client icon and drag it to the desired position.
Select Background • As well as tailoring the position of Client icons in the Control List View to reflect
the layout of the classroom you can choose alternative bitmaps to decorate the background and enhance the layout of the icons.
How to UsePre-class Routine

INTEL CONFIDENTIAL
How to UsePre-class Routine
Lesson Planer
Classroom Management Lesson Plan enables a Tutor to structure a session around a pre-defined set of tasks with appropriate timings and prompts allocated to each part of the plan.Common Classroom Management functionality can be built into the plan, such as run test, send/collect work, scan and show.
Create a Lesson Plan• The Lesson Plan window allows you to create the structure of your lesson.
Managing a Lesson Plan• When a lesson is activated a progress bar will appear at the Tutor. The Tutor will be
prompted before each task is due to begin and they can choose whether to continue or abort. At any point during a task you can use the tools on the Lesson bar to pause, skip to next item or abort the lesson.
The Lesson Plan Toolbar• The Lesson bar allows you to create a lesson and provides tools to manage the
lesson once in progress. A Progress bar will advise the Tutor on the current activity and time remaining.

INTEL CONFIDENTIAL
How to use-Teaching

INTEL CONFIDENTIAL
View students
Having connected to a Client, you can control it. This is called Viewing. The Client’s screen will be displayed in a window on the Control workstation. Classroom Management will allow you to View multiple Client screens, each in its own window, simultaneously.
The Quick View bar
• The Quick View bar is used to switch between currently connected Clients. Clicking on the button containing the required Client’s name, enables you to immediately View that Client’s window. By clicking on a button you will View the Clients screen, by clicking on the button while Viewing, the View window will be closed.
To Viewing a Student screen
• The View window for that Client will appear at the Control. To aid navigation of the Client screen, a thumbnail image of the screen is displayed enabling you to scroll the Client desktop more easily. Simply click and drag inside the thumbnail to view specific areas.
To Viewing multiple Students screen simultaneously
• Classroom Management enables you to View multiple Clients simultaneously, each in its own window. You can even scale their individual View Windows to fit on the Control’s screen.
How to UseTeaching

INTEL CONFIDENTIAL
To change the View mode
Select the mode Share, Watch or Control from the View Toolbar. You can View Clients in three modes:
Share
• The Client’s screen will be displayed at both the Control and the Client. Both the Control and the user at the Client will be able to enter keystrokes and mouse movements.
Watch
• The Client’s screen will be displayed at both the Control and the Client. Only the user at the Client will be able to enter keystrokes and mouse movements. The user at the Control will be locked out.
Control
• The Client's screen will be displayed at both the Control and the Client. Only the user at the Control will be able to enter keystrokes and mouse movements. The user at the Client will be locked out
How to UseTeaching

INTEL CONFIDENTIAL
Monitor
Monitor Mode, similar to the Scan feature, enables the Tutor to view multiple Student screens simultaneously.
Changing The Thumbnail Refresh Rate
• Depending on how closely you want to monitor Student activity you can adjust the frequency at which the thumbnails are refreshed.
• Choose Monitor->Update from the Control Window drop down menu.
Customize Thumbnail Size
• Student thumbnails can be resized to suit personal preferences. This is particularly useful when connected to large numbers of Student machines.
• Choose Monitor->Size from the Control Window drop down menu.
Auto-Fit Size of Student Thumbnail
• This option will automatically adjust the size of the displayed thumbnails to fit the window.
• Choose Monitor->Auto fit Students from the Control Window drop down menu.
How to UseTeaching

INTEL CONFIDENTIAL
Monitor
Zoom In
• The List View will display each Student thumbnail. By mouse over a thumbnail you can zoom into that screen. The Zoom In can be toggled on/off by clicking the ‘Zoom In’ icon at the bottom of the Control window.
Show Active Application
• When enabled, an icon will appear in the top left of each thumbnail indicating which application is currently active at the Student machine. In addition, if you have created approved and restricted application lists, a green (approved) or red (restricted) border will appear on the thumbnail alerting you to any potential misuse of applications.
Show Active Web Site
• Displays an icon in the top right of each thumbnail indicating which site the Student is currently visiting. If you have created approved and restricted web lists, a green (approved) or red (restricted) border will appear on the thumbnail alerting you to any potential misuse of the Internet.
How to UseTeaching

INTEL CONFIDENTIAL
Show Menu
The Show feature enables the Control user to emphasize key learning points by displaying the information on their screen to a selected Client or group of Clients.
To Show a Control screen
• Click the Show Menu icon on the Control toolbar and choose Show. Your desktop will be displayed to all connected Students.
To annotate a Show screen
• While Showing, right click on the Classroom Management Showing icon, and select Annotate Screen.
• The Annotate tools can be used to highlight the relevant part of the screen.
Show Leader
• During a Show, the Control can nominate a selected Client to take over the demonstration, making them the Show Leader.
• The Control can still interact simultaneously with the Show Leader and can suspend or end the session as required.
To End the Show
• Right click on the Classroom Management icon on the taskbar, and choose End Show.
How to UseTeaching

INTEL CONFIDENTIAL
Show Video
• Displays the Show Video dialog. From here you can select the required Video File and Clients you would like to Show the Video to. When the video file is launched, the Video Player Control Panel appears. Standard operations are available, Play, Stop, Pause etc.
Show Replay
• Click the Show Menu icon on the Control toolbar and choose Show Replay .Using Classroom Management’s Show feature, a Tutor can show a stored Replay File to any number of connected Students.
Show Application
• The Show feature enables you to display the Control screen to Students. However, if a number of programs are open at the Control, there may be occasions when you want to show a single application in isolation.
Exhibit
• With Classroom Management, it is possible to Show the Control’s screen to a number of connected Clients. It is also possible to show one Clients screen to other connected Clients, this is called Exhibit.
How to UseTeaching

INTEL CONFIDENTIAL
Scanning Students
The Scan function enables you to cycle through each connected Client in turn, displaying its screen on the Control.
Scan the following Clients• Choose Group->Scan from the Control window drop down menu. This list displays
all of the currently connected Clients and their descriptions. To include or exclude a Client from the Scan, click the check box next to it. Choose to include (green tick), or exclude ,the Client in the Scan.
Scan Interval• Use this slider control to specify the interval before the scan is advanced to the next
Client.
Display one Client at a time• Displays one Clients screen in the Scan window at a time.
Display multiple Clients at a time• Displays up to 16 Client screens in one Scan window at a time. To set the number of
Client screens in the Scan window, select from the drop down option, 2x2, 3x3, 4x4.
How to UseTeaching
INTEL CONFIDENTIAL
Replay Files
With the Replay Files feature the teachers can record all screen, keyboard and mouse activity-taking place within a remote control session on a student workstation. It is also possible to record audio enabling the tutor to record examples that can be later replayed to the class.
Record Replay Files at the Tutor
• Choose School->Replay Files from the Control window drop down menu.
• By default, filenames will be prefixed with ‘Local’ and the date and time of the recording. You can rename the file by over typing the default name.
Watching Replay Files
At the Tutor
• Choose School->Replay Files from the Control window drop down menu. Select the required Replay File and click Play Replay File.
At the Student
• Right-click on the Classroom Management Client icon in the system tray and choose Replay.
How to UseTeaching
Student.jpg
INTEL CONFIDENTIAL
JournalThe Journal feature within Classroom Management allows the Tutor to record
specific content of what happens within the lesson. The Journal is then saved as a
PDF file. The finished Student Journal will also be saved not only on the Tutor
Machine but also on the Student Machines, which they can then review.
Create New Journal
• Select Journal->Create New Journal from the control window drop down menu.
Open existing Journal
• If the Tutor Console is closed or the Student is restarted the current Journal will be closed. You can open an existing Journal, select Journal->Open existing Journal and choose the previous Journal from the drop down list and click Open.
Synchronize Journals
• You can synchronize the Tutor Journal with the Students to ensure the Student Journals are up-to-date. Any items that are missing will be added to the Student Journals, this will not affect any information that the Student has added. Select Journal->Synchronize Journals from the Control window drop down menu.
Note: This will open the current Journal on the Students machine. Note a PDF
reader is required on the Students machine to allow them to open there Journal.
How to UseTeaching