integration/powerpoint and the web - fcps · enhance the visual composition of slides, you can...
TRANSCRIPT

L E S S O N 6
Integration/PowerPoint and the WebIn this lesson, you will learn to use the features found in PowerPoint to integrate presentations with elements found in other applications. To enhance the visual composition of slides, you can import into PowerPoint charts and worksheets created in Excel and tables and outlines created in Word. You will also learn to work with PowerPoint and the Web.You will complete the following projects:I A presentation enhanced with objects from other Microsoft Office
applicationsI A presentation saved as a Web page
Upon completion of this lesson, you will have mastered the following skill setsI Share data between Office applicationsI Export a presentation to WordI Insert an Excel chart or worksheetI Insert a Word tableI Insert a slide from another presentationI Save a presentation as a Web pageI Preview a presentation as a Web pageI E-mail a presentation for review
TermsSoftware-related
Destination documentEmbedded objectFramesHTMLLinked objectMHTMLSource documentWeb server
C6529_PowerPoint 06.indd 281C6529_PowerPoint 06.indd 281 12/4/07 3:10:30 PM12/4/07 3:10:30 PM

282–PowerPoint Lesson 6 Integration/PowerPoint and the Web Tryout Task 1
TASK 1
GOALTo enhance presentation slides with objects from other Office applications, as shown in Figure 6.1I Share data between Office
applicationsI Export a presentation to WordI Insert an Excel chart or worksheetI Insert a Word tableI Insert a slide from another
presentation
Figure 6.1: Selected slides containing objects from other Microsoft Office applications
Inserted table from Word
Inserted chart from Excel
Inserted worksheet from Excel
C6529_PowerPoint 06.indd 282C6529_PowerPoint 06.indd 282 12/4/07 3:10:39 PM12/4/07 3:10:39 PM

Tryout Task 1 Integration/PowerPoint and the Web Lesson 6 PowerPoint–283
WHAT YOU NEED TO KNOW
Share Data between Office Applications�� As you learned previously, Microsoft Office 2007 allows you to easily share data between
applications. In PowerPoint, for example, you can insert data that has been created in Excel or Word to enhance your presentation.
�� When sharing data between applications, it is important to know where the data originated and where the data is going. The source document is the file from which the data originates. The destination document is the file that receives the data.
Export a Presentation to Word�� You can export slide text from a presentation to Word and format it to become notes pages or an
outline. When creating an outline from slide text, each slide title translates into level 1 headings; bulleted lists translate into level 2 headings. This is a useful option if you want to incorporate your presentation topics as an outline in Word, which can then be used as a basis for a report.
�� If you added notes to a presentation, you can export the slides and notes and select from different formatting options. This can be useful if you want to add information or comments about the slides and then save them or share the slides and added information with others.
�� If you did not add notes to a presentation, you can export the slides to Word and add blank lines next to the slides. You can then handwrite notes on the lines, if necessary.
HOW 1. Display the presentation. 2. Click the Office Button, point to Publish, then 3. click Create Handouts in Microsoft Office Word. 4. In the Send To Microsoft Office Word
dialog box that displays, as shown in Figure 6.2, 5. select an option, then 6. click OK. Word starts automatically, and the slide text exports to a new document in the format you chose.
Figure 6.2: Send To Microsoft Office Word dialog box
C6529_PowerPoint 06.indd 283C6529_PowerPoint 06.indd 283 12/4/07 3:10:42 PM12/4/07 3:10:42 PM

284–PowerPoint Lesson 6 Integration/PowerPoint and the Web Tryout Task 1
Insert an Excel Chart or Worksheet on a Slide�� In addition to creating a chart on a Content slide, you can insert a chart or worksheet that you
created in Excel. Charts and worksheets created in Excel and inserted into PowerPoint behave as an object. As with other objects, you can size, copy, move, edit, or delete them.
�� There are two ways to import an object—as an embedded object or as a linked object. Each method has a different effect on data.
�� With an embedded object, data in the destination file does not change if you modify the source file. Embedded objects become part of the destination file with no connection to the source file.
�� With a linked object, any change made to the source file is automatically updated in the destination file. The source and destination files are connected by the link.
HOW 1. Display the slide on which you want to add the object. 2. Click the Insert tab and in the Text group, 3. click the Object button. In the Insert Object dialog box
that displays, as shown in Figure 6.3, 4. click Create from file, then 5. click Browse, as shown in Figure 6.4. In the Browse dialog box that displays, 6. select the folder and filename that contains the chart or worksheet you want to insert, and 7. click OK. If you want to create a linked file, 8. click the Link check box, and 9. click OK. The imported chart or worksheet appears in a placeholder (if the slide contains one).
1. Open the data file p6-1.
2. Click the Office Button, point to Publish, and click Create Handouts in Microsoft Office Word.
3. Click Notes next to slides, if not already selected, and click OK. Notice that Word opens, and the slides and notes are exported and formatted with the slides on the left and the notes on the right, as shown in the thumbnail on the dialog
box in Figure 6.2. This may take a few minutes to export, so be patient!
4. Scroll through the file to view the seven slides with notes.
5. Print one copy of the handouts (slides with notes).
6. Close the Word file without saving it.
7. Close the PowerPoint file.
p6-1
Figure 6.3: Insert Object dialog box
Click to select object from
an existing file
C6529_PowerPoint 06.indd 284C6529_PowerPoint 06.indd 284 12/4/07 3:10:43 PM12/4/07 3:10:43 PM

Tryout Task 1 Integration/PowerPoint and the Web Lesson 6 PowerPoint–285
�� You can also use the copy and paste commands to insert an Excel chart or worksheet.
HOW 1. Open the Excel file from which you wish to copy the chart or worksheet. 2. Right-click the chart or selected cells on the worksheet, and 3. select Copy. 4. Switch to
PowerPoint, and select the slide on which you want to paste the chart or worksheet. 5. Click the Home tab, and in the Clipboard group, 6. click the Paste button list arrow, and choose Paste Special, as shown in Figure 6.5. In the Paste Special dialog box that displays, as shown in Figure 6.6, 7. select Microsoft Office Excel Worksheet Object (or Microsoft Office Excel 2003 Worksheet Object if you are using an .xls file, or Microsoft Office Graphic Object, if you are selecting a chart) if it is not already selected, and choose the Paste or Paste link options, then 8. click OK.
Figure 6.4: Insert Object dialog box after Create from file is selected
Enter filename or click Browse to find file
Click to link the object
Figure 6.5: Paste button, Paste Special command selected
Figure 6.6: Paste Special dialog box
Select a paste option
C6529_PowerPoint 06.indd 285C6529_PowerPoint 06.indd 285 12/4/07 3:10:44 PM12/4/07 3:10:44 PM

286–PowerPoint Lesson 6 Integration/PowerPoint and the Web Tryout Task 1
To edit an imported chart or worksheet that was embedded, double-click it. Excel will open, and you can edit the chart or worksheet directly on the slide.
To edit an imported chart or worksheet that was linked, 1. right-click the object, 2. point to Linked Worksheet (or Linked Chart) Object, then 3. select Open. (Either method will open Excel.) 4. Make your corrections in Excel. 5. Click the Office Button, click Close (or Exit Excel), and click Yes to save your changes. 6. Switch to PowerPoint. Your corrections will be reflected on the slide object (chart or worksheet).
1. Open a new blank presentation.
2. Apply the Title Only layout.
3. Click the Insert tab and in the Text group, click the Object button. The Insert Object dialog box opens.a. Click Create from file.b. In the File text box, enter the data
file location and the data filename, p6-2.xlsx (example: D:\p6-2.xlsx).
c. Click the Link option, then click OK. The Excel chart appears on the slide.
4. Drag a corner handle to size the chart to fill the slide area. Drag the object to the middle of the slide.
5. Double-click the object on the slide (this opens Excel). Click in Cell B5, and change the amount ($3,500.00) to $2,550.00.
6. Click the Office Button, click Close to close the Excel workbook, and then click Yes to save the changes. Close Excel. Notice that the $3,500.00 amount has been updated to $2,550.00 on the PowerPoint slide.
7. Right-click the worksheet on the PowerPoint slide. Select Linked Worksheet Object, and then click Open.
8. Click in Cell B5, and change the amount ($2,550.00) to $1,550.00.
9. Click the Office Button, click Close, and then click Yes to save the changes. Close Excel. Notice that the amount has been updated again on the PowerPoint Slide.
10. Close the file without saving the changes.
p6-2
C6529_PowerPoint 06.indd 286C6529_PowerPoint 06.indd 286 12/4/07 3:10:45 PM12/4/07 3:10:45 PM

Tryout Task 1 Integration/PowerPoint and the Web Lesson 6 PowerPoint–287
Insert a Word Table on a Slide�� As with charts and worksheets, you can insert tables you created in Word onto a slide. Once
inserted, tables also function like other objects—you can size, copy, move, edit, or delete them.�� The procedure for inserting a Word table as an embedded or linked object into PowerPoint is
the same as for charts and worksheets. Figure 6.7 shows a linked table on a slide that will be opened in Word for editing.
Figure 6.7: Linked table on a slide to be opened in Word for editing
HOW 1. Display the slide on which you want to insert the object (Word table). 2. Click the Insert tab and in the Text group, 3. click the Object button. In the Insert
Object dialog box that displays, 4. click Create from file (see Figure 6.3.). In the Insert Object dialog box which now displays (see Figure 6.4), and in the File text box, 5. enter the location and filename that contains the Word table you want to insert. If you are not sure where the file is located, click Browse, then navigate to and select the file, and click OK. If you want to create a linked file, click the Link check box, and then 6. click OK. The imported table appears in a placeholder (if the slide contains one).�� You can also use the copy and paste commands to insert a Word table onto a slide.
HOW 1. Open the Word file that contains the table you want to copy. 2. Select the table, 3. right-click, and select Copy. 4. Switch to PowerPoint, and select the
slide on which you want to paste the table. 5. Click the Home tab, and in the Clipboard group, 6. click the Paste button list arrow, and choose Paste Special (see Figure 6.5). In the Paste Special dialog box that displays (see Figure 6.6), 7. select Microsoft Office Word Document Object, if it is not already selected, 8. choose the Paste or Paste link option, then 9. click OK.
To edit a table that was embedded, 1. double-click it, and 2. edit the table directly on the slide.
To edit a table that was linked, 1. right-click the object, point to Linked Document Object, then select Open. 2. Make your corrections in Word. 3. Click the Office Button, click Close or Exit Word, and click Yes to save your changes. 4. Switch to PowerPoint. Your corrections will be reflected on the slide object.
C6529_PowerPoint 06.indd 287C6529_PowerPoint 06.indd 287 12/4/07 3:10:45 PM12/4/07 3:10:45 PM
288–PowerPoint Lesson 6 Integration/PowerPoint and the Web Tryout Task 1
1. Open a new blank presentation.
2. Apply a Title and Content slide layout.
3. Click the Title placeholder, and enter New Stores Coming Soon.
4. Click the Insert tab and in the Text group, click the Object button.
5. In the Insert Object dialog box:a. Click Create from file.b. In the File text box, enter the data
file location and the data filename, p6-3.docx (example: D:\p6-3.docx).
c. Click the Link option, then click OK.
6. Right-click the object, point to Linked Document Object, then select Open. The table opens in Word.
7. Click to change the White Plains date of arrival to March 22.
8. Click the Office Button, click Close to close the Word table, and click Yes to save the changes.
9. Switch to PowerPoint, if necessary, and note that the date of arrival on the slide has been updated.
10. On the Home tab and in the Slides group, click the New Slide button. Apply a Title Only slide layout.
11. Switch to Word, and open the data file p6-3a.docx.
12. Select the table. Right-click, and select Copy.
13. Switch to PowerPoint.a. Click the Home tab and in the
Clipboard group, click the Paste button list arrow.
b. Select Paste Special.c. In the Paste Special dialog box, click
the Paste link option, select Microsoft Office Word Document Object in the As list box, then click OK.
14. Double-click the object. Change the White Plains date of arrival to April 1.
15. Click the Office Button, click Close, and then click Yes to save the changes.
16. Switch to PowerPoint. Notice that the change to the date of arrival was made in the destination document.
17. Double-click the object. Notice that the change was made in the source document.
18. Close the files without saving the changes.
p6-3
C6529_PowerPoint 06.indd 288C6529_PowerPoint 06.indd 288 12/4/07 3:10:46 PM12/4/07 3:10:46 PM
Tryout Task 1 Integration/PowerPoint and the Web Lesson 6 PowerPoint–289
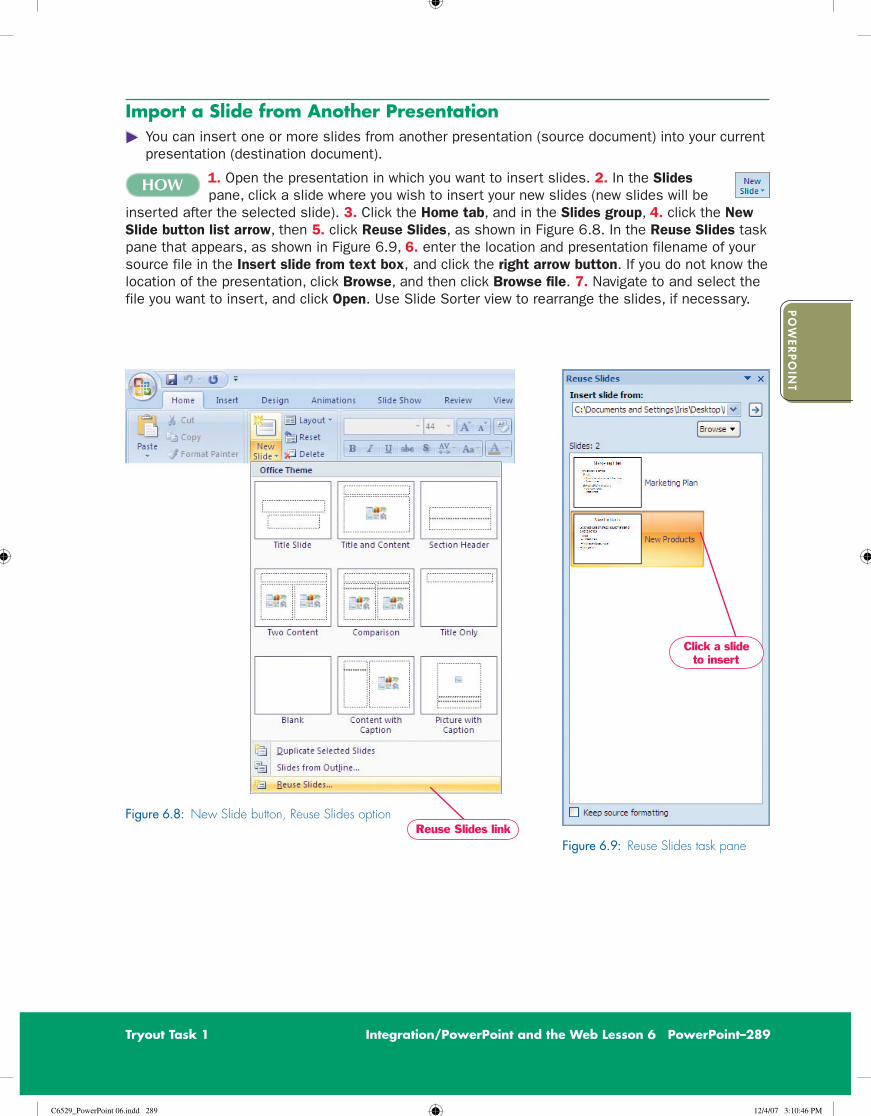
Import a Slide from Another Presentation�� You can insert one or more slides from another presentation (source document) into your current
presentation (destination document).
HOW 1. Open the presentation in which you want to insert slides. 2. In the Slides pane, click a slide where you wish to insert your new slides (new slides will be
inserted after the selected slide). 3. Click the Home tab, and in the Slides group, 4. click the New Slide button list arrow, then 5. click Reuse Slides, as shown in Figure 6.8. In the Reuse Slides task pane that appears, as shown in Figure 6.9, 6. enter the location and presentation filename of your source file in the Insert slide from text box, and click the right arrow button. If you do not know the location of the presentation, click Browse, and then click Browse file. 7. Navigate to and select the file you want to insert, and click Open. Use Slide Sorter view to rearrange the slides, if necessary.
Figure 6.9: Reuse Slides task pane
Click a slide to insert
Figure 6.8: New Slide button, Reuse Slides optionReuse Slides link
C6529_PowerPoint 06.indd 289C6529_PowerPoint 06.indd 289 12/4/07 3:10:46 PM12/4/07 3:10:46 PM

290–PowerPoint Lesson 6 Integration/PowerPoint and the Web Tryout Task 1
1. Open the data file p6-4.
2. Display the Slides tab pane, if necessary.
3. Click the last slide in the presentation.
4. Click the Home tab, and in the Slides group, click the New Slide button list arrow, then click Reuse Slides.
5. In the Reuse Slides task pane that appears at the right, click Open a PowerPoint File.
6. In the Browse dialog box that displays, double-click the presentation from which
you wish to insert slides (data file p6-4a). (The presentation selected appears in the Reuse Slides task pane.)
7. Click each slide to insert it.
8. Switch to slide sorter view, and notice that the two slides have been added to your presentation. If the slides are not in the correct order, you can move them.
9. Close the file without saving the changes.
p6-4
C6529_PowerPoint 06.indd 290C6529_PowerPoint 06.indd 290 12/4/07 3:10:47 PM12/4/07 3:10:47 PM

C6529_PowerPoint 06.indd 291C6529_PowerPoint 06.indd 291 12/4/07 3:10:47 PM12/4/07 3:10:47 PM

292–PowerPoint Lesson 6 Integration/PowerPoint and the Web Rehearsal Task 1
TASK 1
WHAT YOU NEED TO KNOW
�� Tables and charts can be used to support points made in a presentation. Linking them to their source prevents you from having to update each chart or table individually, thus narrowing the margin for error.
�� In this Rehearsal activity, you will enhance a presentation for All Sports Depot by inserting Excel data and a Word table onto slides. You will also import slides from another presentation to use as the last two slides in this presentation.
1. Open the data file p6r1-all sports financials. Apply any design theme.
2. Display the Slide Master. (Hint: Begin by clicking the View tab.)a. Insert an appropriate footer; include the
company name, slide number, and today’s date.b. Format the Slide Master with any fonts and
bullets.c. Apply animations to slide titles.d. Close Master View.
3. Insert clip art on slides where appropriate.
4. On Slide 4 (“Highlights”), insert the data file p6r1-table.docx (a Word table), as shown in Figure 6.10a. Link the table.
5. Open the data file p6r1-sales chart.xlsx (an Excel file).a. On Slide 5 (“Income”), insert the chart found
on the Column Chart tab of the Excel workbook (see Figure 6.10a).
b. On Slide 6 (“Income by Store”), insert and link the chart found on the Chart Data tab of the Excel workbook (see Figure 6.10b).
GOALTo enhance a presentation using an Excel chart, a Word table, and slides from another presentation, as shown in Figure 6.10
Continued on next pageFigure 6.10a: Selected slides from All Sports Financials final presentation
C6529_PowerPoint 06.indd 292C6529_PowerPoint 06.indd 292 12/4/07 3:10:55 PM12/4/07 3:10:55 PM

6. Switch to the Excel file p6r1-sales chart.xlsx.a. Click the Chart Data tab. Click Cell D6, and
change the Net Income from 92,000 to 81,171.b. Save and close the workbook.
7. Switch to PowerPoint.a. Notice that the pie chart on Slide 6 reflects
the change to Net Income (52% Montrose; 48% Barkley).
b. If the pie chart does not automatically reflect the change, right-click the chart on the slide, and select Update link.
8. Open the data file p6r1-sales chart.xlsx.a. On Slide 7 (“Consolidated Income Statement”),
insert the Consolidated Income Statement found on the Consolidated Income Statement tab, Cell A6 to Cell D29 (see Figure 6.10b). Hint: Use the Paste Special feature, and paste the income statement as a Microsoft Office Excel Worksheet Object.
b. Close the Excel file.
9. In the p6r1-all sports financials file:a. Insert the two slides from the data file
p6r1-year ahead as the last slides in the presentation.
b. Deselect the option to keep the source formatting, if necessary.
c. On Slide 3 (“Contents”), link “Looking Ahead” to its corresponding slide.
d. Apply a different slide background to the last three slides (“Looking Ahead”). (You might have to hide background graphics for your new slide background to appear.)
e. Save the presentation. Name it p6r1-all sports financials final.
Rehearsal Task 1 Integration/PowerPoint and the Web Lesson 6 PowerPoint–293
Figure 6.10b: Selected slides from All Sports Financials final presentation Continued on next page
C6529_PowerPoint 06.indd 293C6529_PowerPoint 06.indd 293 12/4/07 3:10:57 PM12/4/07 3:10:57 PM

10. Export the presentation to Word as handouts, and select the Blank lines next to slides formatting option.a. Save the Word file as 6r1-all sports handouts.b. Print one copy.
11. Run the slide show.
12. Exit Word, and close the PowerPoint file.
Export PowerPoint Slides to Word 1. Click the Office Button, point
to Publish, and click Create Handouts in Microsoft Office Word.
2. Click an option. 3. Click OK.
Insert an Object on a Slide 1. Display the slide on which to add a
chart, table, or worksheet. 2. Click the Insert tab, and
in the Text group, click the Object button.
3. Click Create from file. 4. Click Browse. 5. Select the file that contains
the appropriate chart, table, or worksheet, and click OK.
6. Click the Link check box to link the file.
7. Click OK.Or
1. Select the object from the source file.
2. Right-click, and select Copy.
3. Display the slide on which to place the object.
4. Click the Home tab and in the Clipboard group, click the Paste button list arrow, and select Paste Special.
5. Select the type of document you are pasting from the As list box.
6. Click Paste link to link the file. 7. Click OK.
Edit an Object 1. Double-click the object.
Or 1. Right-click the object, and select
Linked Worksheet (or Document) Object, Open.
2. Make the necessary changes. 3. Click on the slide to exit edit
mode.
Import a Slide from Another Presentation 1. Open the presentation in which
you want to insert slides. Click a slide where you wish to insert the next slide.
2. Click the Home tab and in the Slides group, click the New Slide button list arrow, and click Reuse Slides.
3. In the Reuse Slides task pane, click Open a PowerPoint File (if this is the first time using the feature), click OK, click Browse, select the appropriate presentation, and click Open.Or
3. In the Reuse Slides task pane, click Browse, Browse File or Browse File Library (if you have opened a presentation previously), select the appropriate presentation, and click Open.
4. Click the slides to insert. 5. Switch to Slide Sorter View, and
rearrange slides if necessary.
294–PowerPoint Lesson 6 Integration/PowerPoint and the Web Rehearsal Task 1
C6529_PowerPoint 06.indd 294C6529_PowerPoint 06.indd 294 12/4/07 3:10:58 PM12/4/07 3:10:58 PM

Performance Task 1 Integration/PowerPoint and the Web Lesson 6 PowerPoint–295
TASK 1
You work with Janet Russo, vice president of International Investments at Upton Investment Group. Ms. Russo has drafted a presentation to persuade clients to consider investment opportunities in New Zealand and has asked you to enhance and finalize it. The presentation reflects the latest statistics available at the time. She has given you several files that include charts, tables, and additional slides that she would like incorporated into the presentation.
Follow these guidelines:
1. Open the data file p6p1-new zealand data.
2. Apply any design theme, font theme, color scheme, and/or bullets to your slides.
3. Insert today’s date and the slide number on all slides except the title slide.
4. On Slide 2 (“Urban Population Growth”), insert the data file p6p1-population data.docx (a Word table).
5. Open the data file p6p1-new zealand stats.xlsx (an Excel spreadsheet).
6. On Slide 3 (“Top Export Markets as of May 2007”), insert and link the chart found on the Export Markets tab.
7. On Slide 4 (“Top Import Markets as of May 2007”), insert the chart found on the Import Markets tab of the p6p1-new zealand stats.xlsx data file.
8. On Slide 5 (“Gross Domestic Product (GDP)”), insert and link the chart found on the GDP tab of the p6p1-new zealand stats.xlsx data file.
9. Size charts and tables to fit appropriately on each slide.
10. On Slides 2–5, include the following footer: Source: Statistics New Zealand.
11. Switch to the p6r1-new zealand stats data file:a. Click the Export Markets tab. Add the following countries to the list and corresponding
amounts:Continued on next page
Germany $1,885
People’s Republic of Korea $1,267
United Kingdom $1,124
Thailand $1,014
Malaysia $1,019
C6529_PowerPoint 06.indd 295C6529_PowerPoint 06.indd 295 12/4/07 3:10:58 PM12/4/07 3:10:58 PM

296–PowerPoint Lesson 6 Integration/PowerPoint and the Web Performance Task 1
b. Edit the Excel chart to include these additional countries. Hint: To edit the chart, select the chart (which highlights the cells that are included in the chart) and drag the box to include the newly added data.
c. Click the GDP tab. • Add the following chart title: GDP as of March 2007. • Change the Retail percentage to 7.9%. • Change the Agriculture percentage to 4.6%.d. Save the file; make sure the charts in PowerPoint update to reflect these changes.
12. Insert two slides from data file p6p1-new zealand slides.a. Insert the first slide (“Why Invest in the New Zealand Economy”) as Slide 2 of your
presentation.b. Insert the second slide (“New Zealand: An Ideal Investment Location”) as Slide 8 of your
presentation (the second to last slide).
13. Insert clip art throughout the presentation where appropriate.
14. Apply a custom animation to slide titles and bulleted text.
15. Export the presentation to Word as handouts with blank lines below the slides.a. Save the Word document as 6p1-new zealand handouts.b. Print one copy.
16. Run the slide show.
17. Save the presentation as 6p1-new zealand final.
C6529_PowerPoint 06.indd 296C6529_PowerPoint 06.indd 296 12/4/07 3:10:59 PM12/4/07 3:10:59 PM
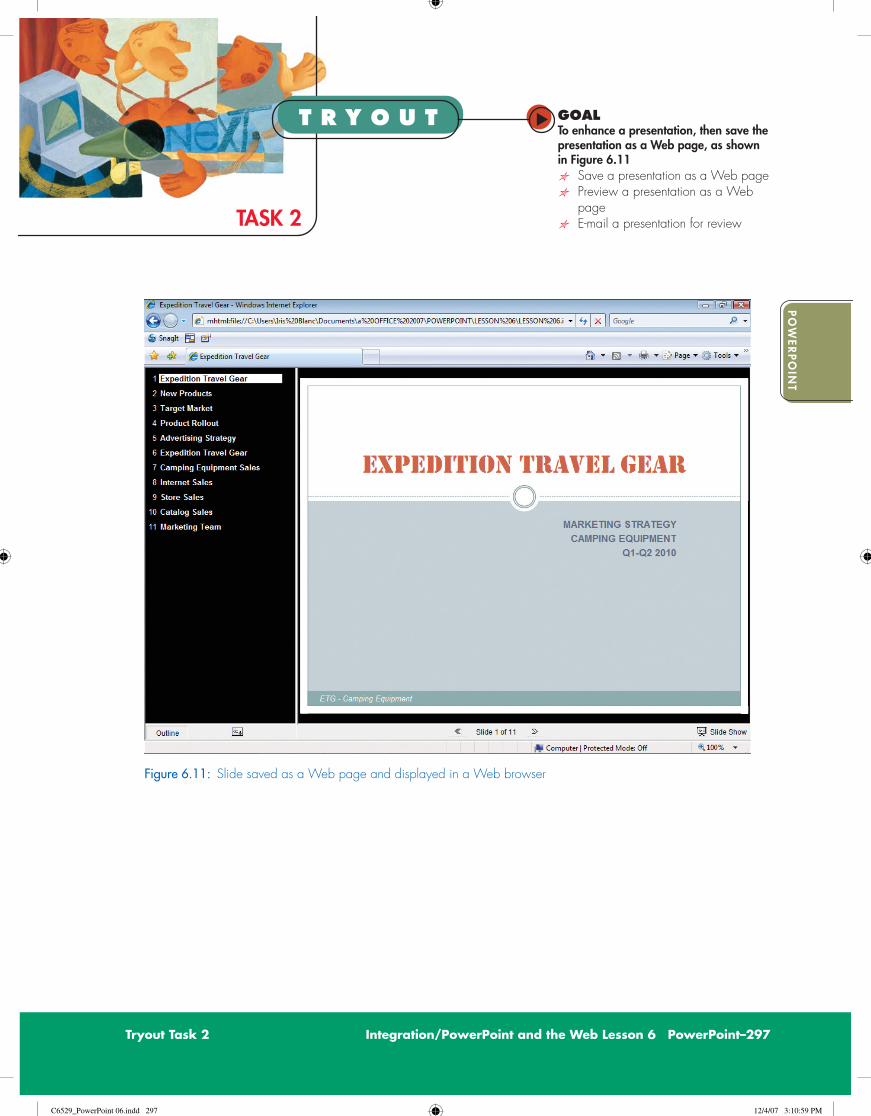
GOALTo enhance a presentation, then save the presentation as a Web page, as shown in Figure 6.11I Save a presentation as a Web pageI Preview a presentation as a Web
pageI E-mail a presentation for reviewTASK 2
Figure 6.11: Slide saved as a Web page and displayed in a Web browser
Tryout Task 2 Integration/PowerPoint and the Web Lesson 6 PowerPoint–297
C6529_PowerPoint 06.indd 297C6529_PowerPoint 06.indd 297 12/4/07 3:10:59 PM12/4/07 3:10:59 PM

Figure 6.12: Save As dialog box
298–PowerPoint Lesson 6 Integration/PowerPoint and the Web Tryout Task 2
WHAT YOU NEED TO KNOW
Save a Presentation as a Web Page�� You can save any presentation you create in PowerPoint as a Web page. A presentation saved
as a Web page can be published to a Web server so that others may view it online with a Web browser. Microsoft Internet Explorer is a common browser.
�� A presentation saved as a Web page is converted to HTML (Hypertext Markup Language) format, a programming language used by Web browsers to interpret and display Web pages. This format saves all the files required for your Web page (graphic images, sounds, and themes, for example) in a folder that is linked to the HTML file.
�� You can also save a presentation as a single file Web page. With this option, everything you need to run the presentation (including text and graphics) is saved in a single file rather than in a separate folder. This encapsulated aggregate document is an MHTML (Multipurpose Internet Mail Extension HTML) file type, a format that is supported by Internet Explorer 4.0 and higher. This presentation type is easier to share because there is no support folder. However, single file Web pages cannot be edited.
�� The filename you use to save your Web page automatically appears in the title bar of the Web browser. Therefore, you may not want to use the page filename as the Web page title. You can assign a different name as the page title during the save process.
HOW 1. Display the presentation you want to save. 2. Click the Office Button, 3. point to Save As, and click Other Formats. In the Save As dialog box that appears, as shown in
Figure 6.12, 4. enter a filename in the File name text box, 5. click the Save as type list arrow, then 6. select Web Page or Single File Web Page from the list that opens (see Figure 6.12). (Optional: In the Save As dialog box that now displays, as shown in Figure 6.13, 7. click the Change Title button, and in the Set Page Title dialog box, enter a Web page title in the Page title text box, and click OK.) Finally, 8. click Save.
C6529_PowerPoint 06.indd 298C6529_PowerPoint 06.indd 298 12/4/07 3:11:01 PM12/4/07 3:11:01 PM

Figure 6.13: Save As dialog box when Web Page File type is selected
Web file
Click to change title
1. Open the data file p6-5. Save the file as 6-5-yi in a location on your computer.
2. Click the Office Button, point to Save As, and select Other Formats.
3. In the Save As dialog box, click the Save as type list arrow, and select Web Page from the list.
4. Click the Change Title button.
5. In the Set Page Title dialog box, click OK to accept “Devon Mutual Fund” as the
page title to appear in the title bar of your browser.
6. In the Save As dialog box, click Save.
7. Click the Office Button, click Open. Change the view to All Files. Notice that the file saved with an .htm file extension and a separate folder containing related files has also been saved.
8. Click Cancel to close the Open dialog box, then close the file.
p6-5
Tryout Task 2 Integration/PowerPoint and the Web Lesson 6 PowerPoint–299
C6529_PowerPoint 06.indd 299C6529_PowerPoint 06.indd 299 12/4/07 3:11:01 PM12/4/07 3:11:01 PM

Preview a Presentation as a Web Page�� You can preview a presentation in your Web browser so that you can see how PowerPoint
positions backgrounds, text wraps, and graphics on a Web page (as opposed to the printed page).�� If you saved the presentation as a Web page, you can test any links while in the browser.�� You cannot edit a presentation in the browser if you saved it as a Single File Web Page.�� The presentation displays in the browser as a slide and outline pane, along with navigation
buttons at the bottom of the window, as shown in Figure 6.14.�� Saving a presentation as a Web page does not mean the page has been posted to the Web.
Publishing (or uploading) a page to the Web is an entirely separate process. To publish to the Web, it may be necessary to contact your Internet service provider or to install Web server software. A Web server is a computer with specialized software that manages Web sites.
300–PowerPoint Lesson 6 Integration/PowerPoint and the Web Tryout Task 2
Figure 6.14: Web page displayed in a browser
Expand/Collapse outline
Navigation frame
Slide Show icon
Show/Hide outline
Next slide iconNavigation controls to move from one slide
to another
C6529_PowerPoint 06.indd 300C6529_PowerPoint 06.indd 300 12/4/07 3:11:02 PM12/4/07 3:11:02 PM

HOW 1. Click the Office Button. 2. Click Open. In the Open dialog box that displays, 3. click the All files button list arrow, and select All Web Pages to display only the saved Web
page files, as shown in Figure 6.15. 4. Select the file to open. 5. Click the Open button list arrow, and 6. select Open in Browser (see Figure 6.15). This opens your presentation in Internet Explorer, the Web browser included with the Microsoft Office suite. 7. Click the navigation control Next Slide icon (see Figure 6.14) to navigate through the slides. 8. Click the Slide Show icon to display full-screen view. 9. Press [Escape] to stop the slide show.
Figure 6.15: Open dialog box
Tryout Task 2 Integration/PowerPoint and the Web Lesson 6 PowerPoint–301
1. Click the Office Button, and click Open.
2. Click the Files of type list arrow, and select All Web Pages.
3. Select the data file p6-6.htm.
4. Click the Open button list arrow, and select Open in Browser. Note: If prompted with a security warning about opening only trusted files after clicking Open in Browser, click Yes to continue. If your browser is set up to block ActiveX scripts, you may not have full access to the
navigation tools. If a message appears that says that Internet Explorer has restricted this Web page from running scripts or ActiveX controls, click the option to allow blocked content.
5. The presentation opens in the browser with the outline at the left. Click the Navigation control Next Slide button on the bottom of the browser window to navigate to Slides 2–5.
6. Close the browser, and close the file.
p6-6
C6529_PowerPoint 06.indd 301C6529_PowerPoint 06.indd 301 12/4/07 3:11:03 PM12/4/07 3:11:03 PM

E-Mail a Presentation for Review�� It is common practice to collaborate with others when developing a presentation. Doing so
often requires you to e-mail the presentation to one or more people for review. When you e-mail a presentation, the presentation will be attached as a PowerPoint file, and the filename automatically appears in the Subject text box, which you can change, of course (see Figure 6.16).
�� If you are sending the presentation to someone who might not have PowerPoint, you should save the presentation as a PowerPoint Show file. While this format opens your presentation as a Slide Show on any Windows computer, it does not allow you to use PowerPoint features, such as comments.
HOW 1. Open the presentation you want to e-mail. 2. Click the Office Button, 3. point to Send, and 4. click E-mail. 5. In the e-mail header window that opens, as shown in
Figure 6.16, 6. enter a recipient’s e-mail address in the To text box. 7. Enter a subject in the Subject text box. 8. Enter the text of a message you want to send in the body of the message, and 9. click Send. 10. Click the Close button to close the e-mail window, if necessary.
Figure 6.16: E-Mail window within PowerPoint
302–PowerPoint Lesson 6 Integration/PowerPoint and the Web Tryout Task 2
1. Open the data file p6-7.
2. Click the Office Button, point to Send, and click E-mail.
3. In the e-mail header window that opens, enter [email protected] in the To text box.
4. Enter Devon Mutual Fund - For Review in the Subject text box.
5. Enter Please review the attached in the message window, and sign your name to the message. Then click Send. Note: Since the e-mail address used in Step 3 is fictitious, the presentation will not actually be sent.
6. Click the Close button, if necessary, to close the e-mail window.
p6-7
C6529_PowerPoint 06.indd 302C6529_PowerPoint 06.indd 302 12/4/07 3:11:03 PM12/4/07 3:11:03 PM

C6529_PowerPoint 06.indd 303C6529_PowerPoint 06.indd 303 12/4/07 3:11:04 PM12/4/07 3:11:04 PM

304–PowerPoint Lesson 6 Integration/PowerPoint and the Web Rehearsal Task 1
WHAT YOU NEED TO KNOW
�� PowerPoint Web pages often display frames, which are regions or subwindows on the page. You can size and/or scroll through a frame, and a frame can have a border.
�� Action buttons can be inserted directly on slides as another navigation device.
1. Open the data file p6r2-etg market.
2. E-mail the file to your teacher or a friend, then close the E-mail window. Note: If your computer is not connected to an e-mail program, skip this step.
3. Save the file as a Single File Web page, as shown in Figure 6.17. Name it 6r2-etg market web.
4. Change the title to Expedition Travel Gear, if necessary. Remember that the title you use here is the title that will display in the title bar of the browser.
5. Click Save, then close the file.
6. Open 6r2-etg market web in your browser. Note: If you receive security prompts, click Yes, click OK, and continue to open the file. Allow blocked content, if necessary.
7. Click the navigation control Next Slide icon to display Slide 2.
8. Click the Slide Show button on the status bar to display full-screen view.
9. Click the forward action button on the slide to view the remaining slide show.
10. Close the browser.
11. Close all files.
304–PowerPoint Lesson 6 Integration/PowerPoint and the Web Rehearsal Task 2
TASK 2
GOALTo e-mail a presentation and save a presentation as a Web page
C6529_PowerPoint 06.indd 304C6529_PowerPoint 06.indd 304 12/4/07 3:11:06 PM12/4/07 3:11:06 PM

Figure 6.17: Last slide of a presentation saved as a Web page and displayed in a Web browser
Title bar
Navigation buttons
Save as a Web Page 1. Click the Office Button, point
to Save as, and select Other Formats.
2. Enter a filename in the File name text box.
3. Click the Save as type list arrow, and select Web Page or Single File Web Page.
Optional:• Click the Change Title button.• Enter the page title in the Page
title text box.• Click OK.
4. Click Save.
Preview a Presentation as a Web Page 1. Click the Office Button, then click
Open.
2. Click the All Files list arrow, and select All Web Pages.
3. Select a file to open. 4. Click the Open button list arrow,
and select Open in Browser. 5. Use Navigation buttons at the
bottom of the window to move through the slides.
Rehearsal Task 2 Integration/PowerPoint and the Web Lesson 6 PowerPoint–305
C6529_PowerPoint 06.indd 305C6529_PowerPoint 06.indd 305 12/4/07 3:11:07 PM12/4/07 3:11:07 PM

You work in the Marketing Department at EarthCare Services. You have been asked to create a presentation to persuade gardening and landscaping retailers to carry two new innovative software products: Landscape Helper and Garden Administrator. The Product Development Department has provided you with the information to create a presentation consisting of nine slides. You will enhance the presentation with relevant images (You may download images from the Web, if you want, or use those available in Office.) You will save your presentation as a Web page so that it can be published to the Web at a later date.
Follow these guidelines:
1. Read through the information provided on the next page to get a basic understanding of the content the presentation will cover.
2. Open a new blank presentation, and apply any design theme.
3. Apply a title slide layout as the first slide. A sample title slide shown in Figure 6.18 is provided as a guide.a. Apply any design theme.b. Enter the following as the slide title:
New Product Launch Landscape Helper & Garden Administrator
c. Include a picture of a tree or include a picture background.
4. Format the Slide Master with an appropriate footer.
5. Create slide text using the information on the next page. Each paragraph represents the content for a new slide. The titles for each slide are provided. Summarize the information into bullet points.
6. Apply any slide transitions and/or custom animations to the presentation.
7. Save the file. Name it 6p2-earthcare.
8. Save the file again as a Web page. Name it 6p2-earthcare web. Change the Web page title to EarthCare Services.
9. Preview the presentation as a Web page in your browser.
10. Right-click Screen, then click End Show to return to the browser.
11. Close all files.
TASK 2
306–PowerPoint Lesson 6 Integration/PowerPoint and the Web Performance Task 2
C6529_PowerPoint 06.indd 306C6529_PowerPoint 06.indd 306 12/4/07 3:11:08 PM12/4/07 3:11:08 PM

Figure 6.18: Sample title slide
Performance Task 2 Integration/PowerPoint and the Web Lesson 6 PowerPoint–307
Information for Slides
(Slide 2) Overview
EarthCare has just launched two new software products to help consumers landscape and plan a garden. These products help consumers decide what kind of garden to create, design a garden plan, and work within a budget. These software programs are for all types of gardeners.
(Slide 3) Features & Benefits
There are many features and benefits to using these software programs. Landscape Helper helps gardeners decide what kind of garden to create. From location (walkway, yard, along a fence or house) to specialty gardens (rose, cut flowers, herb/food) to theme gardens (Japanese, tropical, seasonal, color), Landscape Helper allows gardeners to make a well-informed choice. Landscape Helper also helps gardeners create a garden plan. Gardeners must specify garden size, whether they are using seeds or potted plants, and their preferred layout. This software also provides information on how to care for a garden (watering tips, fertilizers, and food) based on geographical conditions. The Garden Administrator program provides information on how to stick to a gardening budget and identifies the tools and supplies needed for different gardening projects and where to get them.
[Find a map of the United States of America that provides geographical conditions or climate zones for gardening and copy it onto this slide. Insert a hyperlink on the word “Japanese” that links to www.jgarden.org. Insert a hyperlink on the word “tropical” that links to www.htbg.com.]
(Slide 4) Garden Ideas
[Insert four different garden-related pictures on the slide. Format the pictures using any picture effect.]
Continued on next page
C6529_PowerPoint 06.indd 307C6529_PowerPoint 06.indd 307 12/4/07 3:11:08 PM12/4/07 3:11:08 PM

308–PowerPoint Lesson 6 Integration/PowerPoint and the Web Performance Task 2
(Slide 5) Applications
These software programs have many applications. They are good for beginner gardeners, as they make gardening fun and easy. They also provide helpful hints, especially for new gardeners. The software is also great for experienced gardeners, as these gardeners can use the advanced features of the software to design and plant various types of gardens as well as to strategically mix plant types. The software provides pictures of most plant types and colors. And best of all, the software allows you to see your garden before it’s planted!
(Slide 6) Pricing
The pricing for these programs is as follows: Landscape Helper is $39.95; Garden Administrator is $29.95. If you buy both, the price is only $59.95, plus you get 10% off your first purchase of plants and/or planting tools at EarthCare.
(Slide 7) Specifications
The software is available for PC or Mac computers. A tutorial teaches basic features of the software. The software is very easy to install. You can run the software from a CD or you can install it on your computer.
(Slide 8) Availability
The software is currently available in all EarthCare Services stores. [Insert the following table to show other distribution channels and rollout dates. Apply any table format you want.]
STORE AVAILABILITY DATE
Garden Depot May 15, 2010
Landscape Central June 30, 2010
Bob’s Better Home Store July 15, 2010
C6529_PowerPoint 06.indd 308C6529_PowerPoint 06.indd 308 12/4/07 3:11:09 PM12/4/07 3:11:09 PM

Encore Integration/PowerPoint and the Web Lesson 6 PowerPoint–309
E N C O R E
Act IYou work in the Marketing and Distribution Department at Newmark Productions. This department decides which films to buy from outside producers. Once it buys or acquires films, Newmark must then market and distribute them. Your department is meeting with producers who want to learn more about Newmark’s role as a distributor and marketer of films and TV shows.
You have been asked to create an informative presentation to convince producers that Newmark Productions has the marketing and distribution expertise to make a hit movie. Your boss has provided you with her notes and several files (Word and PowerPoint) to work with when creating the presentation. She would like you to include tables on some slides. Your presentation should have 10 slides.
Follow these guidelines:
1. Read through the information provided on the next page to get a basic understanding of the content the presentation will cover.
2. Open a new blank presentation.a. Provide an appropriate title for the first slide of the presentation. Include the name of the
department.b. Apply any design theme.
3. Create the remaining slides using the notes on the following page. Each paragraph contains information for one slide. Summarize the information into bullet points and create appropriate titles for each slide.
4. Search the Web for movie images, then copy them to the appropriate slides. Note: If you don’t have Internet access, search for relevant clip art from the Office clip art collection.
5. Apply slide transitions and custom animations. Add graphics where appropriate.
6. Create note pages for each slide using the notes shown on page 311.
7. Save the file. Name it 6e1-newmark.
8. Export the presentation to Word as handouts with notes next to slides.a. Save the Word document. Name it 6e1-newmark notes.b. Print one copy.
9. Make sure to embed the fonts in the presentation.
10. Run the slide show. Optional: Deliver the presentation, if time permits, and use the annotation pen to explain the tables.
11. Close the file.
C6529_PowerPoint 06.indd 309C6529_PowerPoint 06.indd 309 12/4/07 3:11:09 PM12/4/07 3:11:09 PM

310–PowerPoint Lesson 6 Integration/PowerPoint and the Web Encore
Information for Slides
(Slide 2)
Newmark Productions markets and distributes films and TV shows. We are known for our innovative marketing campaigns and promotions. In addition, we have extensive distribution channels, which are maintained by an outstanding sales force and our strong relationships in the industry.
(Slide 3)
Our experience in marketing and distribution speaks for itself. We market and distribute as many as 10 television shows and 30 films per year. Our products generate tremendous attention, and are consistently featured in trade publications and other print materials, as well as on television news and entertainment programs.
(Slide 4)
Our current television series, Undercover, is a top-ranked action hour. Since its season premiere, the national ratings of the show have grown significantly. Our success with this program is due to extensive promotions (sweepstakes and retail partnerships), and publicity from sci-fi magazines and television appearances.
(Slide 5, 6, and 7)
Please insert three slides from another presentation (data file p6e1-undercover).
(Slide 8)
Our films, released this past year, did exceptionally well. Because of wide distribution, we experienced high box office grosses and international recognition. Because of our marketing effort, we were able to heighten consumer awareness, thus increasing our box office grosses.
Please insert a Word Table (data file p6e1-box office.docx) on this slide as an embedded object.
(Slide 9)
Please insert a Word table (data file p6e1-release schedule.docx) on this slide as an embedded object. The table provides information about this year’s upcoming films.
(Slide 10)
Summarize the reasons why Newmark should be selected to market and distribute movies. Emphasize that we have extensive experience in marketing and distribution, our success has been proven over and over with our past and current products, we have the necessary relationships in the industry, and we are a fun, innovative company.
C6529_PowerPoint 06.indd 310C6529_PowerPoint 06.indd 310 12/4/07 3:11:13 PM12/4/07 3:11:13 PM
Encore Integration/PowerPoint and the Web Lesson 6 PowerPoint–311
Notes for Notes pages
(Slide 1)
Introduce yourself. Talk briefly about the history of Newmark Productions.
(Slide 2)
Introduce the members of the sales staff that are sitting in the audience.
(Slide 3)
Give the names of some of our current hit shows on the air and talk about Newmark’s recent feature article in Movie Magazine.
(Slide 4)
Talk about the success of the Go Undercover Sweepstakes, where one lucky viewer won a trip to Los Angeles and a walk-on role in an episode of Undercover. Also, discuss our in-store promotion with ABC Electronics.
(Slide 5)
Explain that Undercover is one of the few action hours to continue to show ratings growth.
(Slide 9)
Review preliminary publicity/promotions plans for upcoming films.
(Slide 10)
Talk about the corporate culture at Newmark and why Newmark has outstanding relationships with its business partners. Ask if anyone has questions.
Act IIYou work in the Accounting Department at Transport Travel Services. You and your colleagues have analyzed the income statement for the quarter ended June 30 and are ready to recommend a strategy to increase the company’s net income over the next few quarters. Your boss has asked you to create a presentation consisting of seven slides to be presented to the CEO (chief executive officer) and CFO (chief financial officer) of the company. He has provided you with his notes and several files (Excel and PowerPoint) to work with when creating the presentation. He would like you to include charts on some slides. You will use the notes provided as the basis for the first five slides. You will create the last two slides by importing (reusing) the slides from a previously created presentation. In addition, your boss then wants you to publish the presentation to the company’s intranet, so you will save a copy of the final presentation as a Web page.
C6529_PowerPoint 06.indd 311C6529_PowerPoint 06.indd 311 12/4/07 3:11:13 PM12/4/07 3:11:13 PM

312–PowerPoint Lesson 6 Integration/PowerPoint and the Web Encore
Follow these guidelines:
1. Read through the information provided on the next page to get a basic understanding of the content the presentation will cover.
2. Open a new blank presentation. Provide an appropriate title for the first slide of the presentation.
3. Create the remaining slides using the notes on the next page. Each paragraph contains information for one slide. Summarize the information into bullet points, and create appropriate titles for each slide.
4. Apply any design theme or picture background.
5. Include the date as a footer on the Slide Master.
6. Search the Web for pictures of San Diego, New York, Boston, or San Francisco, and copy them to the appropriate slides. Note: If you don’t have Internet access, search for relevant clip art from the Office clip art collection.
7. Apply slide transitions and custom animations.
8. Use various design elements you have learned (such as WordArt, and picture effects) to enhance the slides.
9. Write notes pages for each slide to help you deliver the presentation.
10. After you create and save the presentation, export the presentation to Word as handouts with notes next to the slides.a. Save the Word document. Name it 6e2-transport notes.b. Print a copy of the Word document.
11. Make sure to embed the fonts in the presentation.
12. Run the slide show.
13. Optional: Deliver the presentation, if time permits, and use the annotation pen to explain the tables.
14. Save the file. Name it 6e2-transport.
15. Save the presentation as a Web page. Name it 6e2-transport web. Change the web page title to: Transport Travel Services - Strategy.
16. Preview the presentation as a Web page.
C6529_PowerPoint 06.indd 312C6529_PowerPoint 06.indd 312 12/4/07 3:11:13 PM12/4/07 3:11:13 PM

Encore Integration/PowerPoint and the Web Lesson 6 PowerPoint–313
Information for Slides
(Slide 2)
At Transport Travel Services, our vision is to provide our clients outstanding travel services at low commissions. With the increasing amount of online travel bookings, we must meet market demands and ensure that our bottom line continues to increase.
(Slide 3)
We are way ahead of our competition. In 2009, we had more travel bookings than any of the top agencies. Please insert an Excel chart as a linked object. The chart can be found on the Competition tab of the data file p6e2-competition.xlsx.
(Slide 3)
Overall, our agencies are profitable, but some are much more so than others. Please insert an Excel chart as an embedded object. The chart can be found on the Analysis Bar chart tab of the data file p6e2-income.xlsx.
(Slide 4)
Please insert an Excel chart as an embedded object. The chart can be found on the Bar Chart tab of the data file p6e2-income.xlsx.
(Slide 5)
Our current situation shows that our Boston location has the lowest total income, whereas San Diego has the lowest net income. Please insert two Excel charts as embedded objects. The two pie charts can be found on the Optional Analysis chart tab of the data file p6e2-income.xlsx.
(Slide 6)
We need to reduce expenses to increase our net income. We are going to take you through the ways in which we plan to do this.
(Slides 7 and 8)
Please insert slides from a previous presentation (data file p6e2-strategy) as Slides 7 and 8. Hint: If the imported slides do not automatically take on the design theme formatting, right-click the imported slide and select Reset Slide.
(Slide 3 update)
Assume that you just received a copy of the 2009 Travel Review newsletter, which indicates that Transport Travel Services actually booked 14,635 trips that year, and 4-Seasons Travel booked 2,345 trips. Update the data on Slide 3 to reflect this change. Note that the change will be made to the chart and to the Excel file p6e2-competition.xlsx.
C6529_PowerPoint 06.indd 313C6529_PowerPoint 06.indd 313 12/4/07 3:11:13 PM12/4/07 3:11:13 PM