integration guide for ca clarity™ ppm (on demand) clarity agile 13 3 00... · · 2014-08-10a...
TRANSCRIPT
Demand) Release 13.3.00

This Documentation, which includes embedded help systems and electronically distributed materials, (hereinafter referred to as the “Documentation”) is for your informational purposes only and is subject to change or withdrawal by CA at any time. This Documentation is proprietary information of CA and may not be copied, transferred, reproduced, disclosed, modified or duplicated, in whole or in part, without the prior written consent of CA.
If you are a licensed user of the software product(s) addressed in the Documentation, you may print or otherwise make available a reasonable number of copies of the Documentation for internal use by you and your employees in connection with that software, provided that all CA copyright notices and legends are affixed to each reproduced copy.
The right to print or otherwise make available copies of the Documentation is limited to the period during which the applicable license for such software remains in full force and effect. Should the license terminate for any reason, it is your responsibility to certify in writing to CA that all copies and partial copies of the Documentation have been returned to CA or destroyed.
TO THE EXTENT PERMITTED BY APPLICABLE LAW, CA PROVIDES THIS DOCUMENTATION “AS IS” WITHOUT WARRANTY OF ANY KIND, INCLUDING WITHOUT LIMITATION, ANY IMPLIED WARRANTIES OF MERCHANTABILITY, FITNESS FOR A PARTICULAR PURPOSE, OR NONINFRINGEMENT. IN NO EVENT WILL CA BE LIABLE TO YOU OR ANY THIRD PARTY FOR ANY LOSS OR DAMAGE, DIRECT OR INDIRECT, FROM THE USE OF THIS DOCUMENTATION, INCLUDING WITHOUT LIMITATION, LOST PROFITS, LOST INVESTMENT, BUSINESS INTERRUPTION, GOODWILL, OR LOST DATA, EVEN IF CA IS EXPRESSLY ADVISED IN ADVANCE OF THE POSSIBILITY OF SUCH LOSS OR DAMAGE.
The use of any software product referenced in the Documentation is governed by the applicable license agreement and such license agreement is not modified in any way by the terms of this notice.
The manufacturer of this Documentation is CA.
Provided with “Restricted Rights.” Use, duplication or disclosure by the United States Government is subject to the restrictions set forth in FAR Sections 12.212, 52.227-14, and 52.227-19(c)(1) - (2) and DFARS Section 252.227-7014(b)(3), as applicable, or their successors.
Copyright © 2013 CA. All rights reserved. All trademarks, trade names, service marks, and logos referenced herein belong to their respective companies.

Contact CA Technologies
Contact CA Support
For your convenience, CA Technologies provides one site where you can access the information that you need for your Home Office, Small Business, and Enterprise CA Technologies products. At http://ca.com/support, you can access the following resources:
■ Online and telephone contact information for technical assistance and customer services
■ Information about user communities and forums
■ Product and documentation downloads
■ CA Support policies and guidelines
■ Other helpful resources appropriate for your product
Providing Feedback About Product Documentation
If you have comments or questions about CA Technologies product documentation, you can send a message to [email protected].
To provide feedback about CA Technologies product documentation, complete our short customer survey which is available on the CA Support website at http://ca.com/docs.

Contents 5
Contents
Chapter 1: Overview 7
About Third-Party Integrations .................................................................................................................................... 7
CA Clarity™ PPM Integration ................................................................................................................................. 7
Synchronization Jobs ............................................................................................................................................. 8
Tasktop Dev and Tasktop Sync for CA Clarity™ Agile ................................................................................................... 9
11
Integration Overview ................................................................................................................................................. 11
How to Integrate CA Clarity™ Agile with CA Clarity™ PPM ........................................................................................ 12
Configure the Agile Setup Page on CA Clarity™ PPM .......................................................................................... 12
Set Up Data Transfers from CA Clarity™ PPM ..................................................................................................... 14
Review the Project Integration Status ................................................................................................................ 20
Jobs Management ...................................................................................................................................................... 21
CA Clarity™ Agile Sync Jobs ................................................................................................................................. 22
Agile Product Sync Job ........................................................................................................................................ 22
Agile Timesheet Sync Job .................................................................................................................................... 23
Agile Requirement and Task Mapping Sync Job.................................................................................................. 23
Agile Role Sync Job .............................................................................................................................................. 23
Burndown Charts........................................................................................................................................................ 24
25
Project Mapping ......................................................................................................................................................... 25
Resource Mapping ..................................................................................................................................................... 26
Task Mapping ............................................................................................................................................................. 27
Task Worklog Mapping ............................................................................................................................................... 28
Impediment Mapping ................................................................................................................................................. 29


Chapter 1: Overview 7
Chapter 1: Overview
This section contains the following topics:
About Third-Party Integrations (see page 7) Tasktop Dev and Tasktop Sync for CA Clarity™ Agile (see page 9)
About Third-Party Integrations
You can configure CA Clarity™ Agile to integrate with the following CA products:
■ CA Clarity™ PPM: You can create and manage requirements in an agile environment while adhering to the traditional project governing process.
■ CA Software Change Manager: You can view details about CA Software Change Manager packages and package history information.
Best Practice: For each add-in, complete the following tasks to prevent invalid sessions:
■ Create separate system administrator or super user accounts per add-in.
■ Run the sync jobs for each add-in at different times.
■ If you are unable to create a separate system administrator account per add-in, run the sync jobs at different times. Do not overlap them.
CA
You can integrate CA Clarity™ Agile with CA Clarity™ PPM projects. CA Clarity™ Agile Enterprise Edition license is required. Using this integration, product owners can create and manage requirements in an agile environment while adhering to the traditional project governing process. You can integrate CA Clarity™ Agile Release 13.3.00 with the following releases of CA Clarity™ PPM:
■ 12.1.3
■ 13.0.x
■ 13.1.x
■ 13.2.00
■ 13.3.00

About Third-Party Integrations
8
The integration includes the following capabilities:
■ Create and manage CA Clarity™ Agile products and users from CA Clarity™ PPM.
■ Associate CA Clarity™ Agile requirements with CA Clarity™ PPM tasks
■ Build the CA Clarity™ PPM work breakdown structure (WBS) from Agile sprints, user stories, and tasks.
■ Auto-populate CA Clarity™ PPM timesheets using CA Clarity™ Agile task worklogs.
■ Download roles from CA Clarity™ PPM for use in CA Clarity™ Agile.
■ Synchronization jobs can run in the background at predefined intervals to transfer information between CA Clarity™ Agile and CA Clarity™ PPM.
Synchronization Jobs
The following synchronization jobs are available in CA Clarity™ PPM that run in the background at predefined intervals to transfer information between CA Clarity™ PPM and CA Clarity™ Agile.
■ Agile Product Sync job. This job synchronizes project and resource information from CA Clarity™ PPM to CA Clarity™ Agile. Also, this job uses sprints, user stories, and tasks from CA Clarity™ Agile to create the project work breakdown structure in CA Clarity™ PPM.
■ Agile Timesheet Sync job. This job uses task worklogs in CA Clarity™ Agile to populate the timesheets for corresponding resources in CA Clarity™ PPM.
■ Agile Requirement and Task Mapping Sync job. This job synchronizes CA Clarity™ Agile requirement and CA Clarity™ PPM task information for relevant releases.
■ Agile Role Sync job. This job downloads roles from CA Clarity™ PPM to CA Clarity™ Agile.
Chapter 1: Overview 9
Tasktop Dev and Taskt
Tasktop enables organizations to connect CA Clarity™ Agile with key project artifacts that are located in separate repositories. Using Tasktop’s Sync technology, CA Clarity™ Agile enable you to share artifacts such as user stories, tasks, and defects with other ALM products such as JIRA, HP Quality Center, and IBM Rational Team Concert (RTC). This integration provides you with the following benefits:
■ Keep planning connected with development, QA, and management.
■ Keep development focused on developing software by managing CA Clarity™ Agile artifacts directly from the IDE.
■ Increase the accuracy of data and help reduce possible errors that are caused by project information residing in separate repositories.
■ Gain unified visibility and reporting across the project team.
You can download the Tasktop connectors for CA Clarity™ Agile, and find the installation instructions at https://tasktop.com/connectors/ca-agile-vision/installation.
Note: For more information about Tasktop, see the Tasktop Help available at http://help.tasktop.com/help/.

Chapter 2 11
Chapter 2:
This section contains the following topics:
Integration Overview (see page 11) How to Integrate CA Clarity™ Agile with CA Clarity™ PPM (see page 12) Jobs Management (see page 21) Burndown Charts (see page 24)
Integration Overview
Terminology in CA Clarity™ PPM and in CA Clarity™ Agile varies slightly for the same object. A project in CA Clarity™ PPM is known as a release in CA Clarity™ Agile.
Before you can share information, associate a CA Clarity™ PPM project with CA Clarity™ Agile. Once you establish the association, the Agile subpage in CA Clarity™ PPM becomes available for you to specify CA Clarity™ Agile product and release details.
If you delete an associated CA Clarity™ PPM project, you cannot link another project to the same CA Clarity™ Agile release. You can link a new CA Clarity™ PPM project to another release and can move the details (user stories, tasks, or requirements) to the newly linked release.
When the integration is complete, jobs that run in CA Clarity™ PPM update and synchronize information in CA Clarity™ PPM and CA Clarity™ Agile. The jobs that run depend on the information that is being updated. You can set the jobs to run periodically, or you can run them manually from CA Clarity™ PPM, as needed. For more information about jobs for this integration, see Jobs Management (see page 21).
For a complete list of the fields that are updated between CA Clarity™ PPM and CA Clarity™ Agile, see CA Clarity™ PPM Field Mapping for CA Clarity™ Agile (see page 25).
12
Use the following steps to enable CA Clarity™ Agile and CA Clarity™ PPM to share data:
Administrator:
■ Configure CA Clarity™ PPM.
Project Manager:
■ Set up data transfers. (see page 14)
■ Review the integration status in CA Clarity™ PPM (see page 20).
Configure the Agile Setup Page o
You can set up CA Clarity™ PPM to link to CA Clarity™ Agile, so that they can communicate and transfer data.
Follow these steps:
1. Log in to the CA Clarity™ PPM and access the Administration Tool.
2. Click Administration, and from General Settings, click Agile Setup.
The Agile Admin Settings page appears.
3. Complete the following fields in the Agile Login Info section:
User Name
Defines the user name to login to CA Clarity™ Agile with system administrator privileges.
Password
Defines the password to login to CA Clarity™ Agile with system administrator privileges.

13
Security Token
Defines the security token used for server identification in case the login fails or if the CA Clarity™ PPM server is running from an untrusted network. You can retrieve this token from SalesForce.com from the Personal Setup Page. See the SalesForce.com online help for more information.
Agile Environment URL
Specifies the URL that CA Clarity™ PPM uses to access the CA Clarity™ Agile production or sandbox environment.
Production Environment
https://login.salesforce.com/services/Soap/u/27.0
Test Environment
https://test.salesforce.com/services/Soap/u/27.0
Agile URL
Specifies the URL that CA Clarity™ PPM uses to access the requirements list in CA Clarity™ Agile.
Important! Do not change the default URL.
4. Complete the following fields in the Proxy Server Info section:
Host Name
Defines the proxy server host name.
Port
Defines the proxy server port.
User Name
Defines the proxy server user name.
Password
Defines the proxy server password.
5. Save your changes.

How to Integrate CA Clarity
14
To set up data transfers, specify the CA Clarity™ Agile product details in a CA Clarity™ PPM project that you have associated. The following tasks show how to set up data transfers:
■ Link CA Clarity™ Agile Product and Release with CA Clarity™ PPM by one the following methods:
■ Create a product and release from CA Clarity™ PPM (see page 17).
■ Link to an existing product and release in CA Clarity™ Agile (see page 15).
■ Create a release in an existing CA Clarity™ Agile product (see page 16).
■ Map CA Clarity™ Agile task types to CA Clarity™ PPM charge codes (see page 18).
■ Link CA Clarity™ PPM tasks with CA Clarity™ Agile (see page 19).
■ Update Roles in CA Clarity™ Agile from CA Clarity™ PPM (see page 20)
The following rules apply for linking projects between CA Clarity™ PPM and CA Clarity™ Agile:
■ If you specify a product ID and a release name but leave the release ID blank, a new release is created for the specified product.
■ If you specify both product and release IDs and names, the names are ignored and the IDs are used for linking to an existing product.
■ The CA Clarity™ PPM project description is added as the description for the product or release when creating a product or release. A superuser can change this description, and can avoid having it overwritten from CA Clarity™ PPM.
■ If you leave all the fields blank, the synchronization job fails and nothing is created or linked in CA Clarity™ Agile.
Best Practice: To link a CA Clarity™ PPM project to CA Clarity™ Agile, verify the following prerequisites:
■ The option for automatic creation of effort tasks is turned off.
■ No tasks currently exist in the CA Clarity™ PPM project.
15
Link to an Existing Product and Release
You can link an existing CA Clarity™ Agile product and release to a CA Clarity™ PPM project by specifying the product ID and release ID. You can link to a product release or a master release. Link to a master release to see all the user stories and tasks that are assigned to the master release in CA Clarity™ PPM.
Follow these steps:
1. In CA Clarity™ PPM, open a project that you want to associate with Agile product.
The project properties appear.
2. Select the Linked to Agile checkbox and click Save.
3. Click Properties, and from General, click Agile.
The Agile properties page appears.
4. Complete the following fields:
■ If you are linking to a product release define the Agile Product ID and the Agile Release ID
■ If you are linking to an existing master release define the Agile Master Release ID. This value is used to link this project to an existing master release in CA Clarity™ Agile. If the link is established successfully, this field becomes display-only.
Source: Master Release ID field on the Master Release Detail page in CA Clarity™ Agile.
Note: Leave the following fields blank: Agile Product Name, Agile Release Name, and Product Prefix.
5. Submit your changes.
After the Agile Product Sync job runs, the following fields are automatically populated in CA Clarity™ PPM:
■ Agile Product Name
■ Agile Release Name
■ Product Prefix
16
Create a Release in an Existing Product
Create a release in an existing CA Clarity™ Agile product by specifying the product ID and release name in the CA Clarity™ PPM project. Leave the release ID, product name, and product prefix values undefined.
Follow these steps:
1. In CA Clarity™ PPM, open the project and associate it with CA Clarity™ Agile by selecting the Linked to Agile checkbox and clicking Save.
The project properties appear.
2. Click Properties, and from General, click Agile.
The Agile properties page appears.
3. Complete the following fields:
■ Agile Product ID
■ Agile Release Name
Note: Leave the following fields blank: Agile Release ID, Agile Product Name, and Product Prefix.
4. Submit your changes.
After the Agile Product Sync job runs, the following fields are automatically populated in CA Clarity™ PPM:
■ Agile Release ID
■ Agile Product Name
■ Product Prefix

PPM
17
You can create a project in CA Clarity™ PPM, and specify the product name and release name in the project. When the synchronization job runs, a release in CA Clarity™ Agile is created.
Follow these steps:
1. Log in to CA Clarity™ PPM.
2. Select Projects from the Portfolio Management menu.
The projects list page appears.
3. Click New to create a project, complete the required fields, and click Save.
The properties page appears.
4. Select the Linked to Agile check box, and click Save.
The Agile and Agile Task Type Mapping options become available in the Properties menu.
5. Click Properties, and from General, click Agile.
The Agile properties page appears.
6. Complete the following fields:
Agile Product Name
Defines the name of the new CA Clarity™ Agile product you want to create.
Agile Release Name
Defines the name of the new CA Clarity™ Agile release you want to create.
Product Prefix
Defines a unique prefix to add to the product name for the user stories and tasks. You cannot change the prefix after the product is created.
Limits: 6 characters
Note: Leave the following fields blank: Agile Product ID and Agile Release ID.
7. Submit your changes.
After the Agile Product Sync job runs, the following fields are automatically populated in CA Clarity™ PPM. The new product and release is created in CA Clarity™ Agile:
Agile Product ID
Displays the Agile product ID. This value is automatically populated from CA Clarity™ Agile.
Source: The Product ID field on the Product Detail page on CA Clarity™ Agile.

18
Agile Release ID
Displays the Agile release ID. This value is automatically populated from CA Clarity™ Agile.
Source: The Release ID field on the Release Detail page on CA Clarity™ Agile.
If you have assigned charge codes to your project tasks in CA Clarity™ PPM, you can map these charge codes to the CA Clarity™ Agile task types. Mapping the task types to charge codes allows you to assign appropriate charge codes to actuals on linked tasks. A project manager can map task types to charge codes and run the Populate Agile Task Types process, if they have the following global and instance access rights:
■ Task Type and Charge Code Mapping - Create
■ Task Type and Charge Code Mapping - Edit All
■ Process - Start
Best practices:
■ If you accidentally delete charge code mappings, run the Populate Agile Task Types process manually to retrieve the deleted mappings.
See the CA Clarity™ PPM Administration Guide for more information.
■ You can map a task type to only one charge code. If no task type is defined for a task in CA Clarity™ Agile, you can assign the Default charge code to it in CA Clarity™ PPM.
If you have a new task type in CA Clarity™ Agile, create a new charge code in CA Clarity™ PPM and map the new task type to the charge code.
Follow these steps:
1. In CA Clarity™ PPM, click Administration, and from Project Management, click Charge Codes.
2. Click New and complete the required fields.
3. Save your changes.
New Charge code is created.
After you have created a charge code, you can map it to the CA Clarity™ Agile task type.
Follow these steps:
1. In CA Clarity™ PPM, open the linked project.
The project properties appear.
19
2. Click Agile Task Type Mapping from Properties.
The Agile Task Type Mapping page for the project appears.
3. Click New.
The Create Agile Task Type and Charge Code Mapping page appears.
4. Complete the following fields and submit:
Task Type
Defines the CA Clarity™ Agile task type for a task.
Charge Code
Defines the CA Clarity™ PPM charge code for the same task.
5. Save your changes.
The CA Clarity™ PPM charge code is successfully mapped to the CA Clarity™ Agile task type.
You can link multiple tasks to a single requirement, and you can link multiple requirements to a single task.
Follow these steps:
1. In CA Clarity™ PPM, open the linked project.
The project properties appear.
2. Click the Tasks tab and click Gantt.
3. Locate the task and click the icon in the Mapped Requirements column.
The Mapped Task: Properties page appears with the Agile Requirement and Task Mapping List option selected in the menu.
4. Click New.
The Create Agile Requirement and Task Mapping page appears.
5. Click the Browse icon and select a CA Clarity™ Agile requirement to map to the task.
6. Click Save and Return.
The Mapped Task: Properties page appears with the requirement listed.
Note: After the requirement is added to the task, populate the requirement list with the CA Clarity™ Agile requirement information. If the list is empty, refresh the page.
How to Integra
20
7. Choose one of the following options:
■ Click New to map another requirement to the task.
■ Click Return to return to the Work Breakdown Structure.
CA Clarity™ Agile is updated with the information about linked tasks and requirements the next time the Agile Requirement and Task Mapping Sync job runs.
Note: The sync job does not synchronize the requirement version number and the version status from CA Clarity™ Agile to CA Clarity™ PPM.
You can download roles and role hierarchies from CA Clarity™ PPM to CA Clarity™ Agile. When you download roles, all roles in CA Clarity™ PPM are available in CA Clarity™ Agile.
To update roles in CA Clarity™ Agile from CA Clarity™ PPM roles, run the Agile Role Sync job.
Review the Project Integration Status
Review the integration status from the Agile properties page after linking a CA Clarity™ PPM project to CA Clarity™ Agile.
Follow these steps:
1. In CA Clarity™ PPM, open the project, and from the Properties, click Agile.
The Agile properties page for the project appears.
2. Review the information in the following fields:
Sync Status
Displays the status of the Agile Product Sync job as successful, pending, or failed.

Jobs Management
21
Sync Detail Information
Displays the details of the job status such as date and time when it was last run. If the job failed, displays details of the errors encountered.
A successful integration means that data is transferring between CA Clarity™ Agile and CA Clarity™ PPM. If the integration is not successful, it can mean one of the following issues:
■ The Salesforce.com or CA Clarity™ Agile credentials are incorrect on the admin setup page.
■ The Salesforce.com network is down.
■ The CA Clarity™ Agile product or release IDs are entered incorrectly.
■ The CA Clarity™ Agile product that you are trying to create exists.
■ The CA Clarity™ Agile release is already linked to another CA Clarity™ PPM project.
If any information is entered incorrectly, try integrating again by reentering the correct values and running the Agile Product Sync job.
Jobs Management
This section contains the following topics:
CA Clarity™ Agile Sync Jobs (see page 22) Agile Product Sync Job (see page 22) Agile Timesheet Sync Job (see page 23) Agile Requirement and Task Mapping Sync Job (see page 23) Agile Role Sync Job (see page 23)
Jobs Management
22
When you install the CA Clarity™ Agile Enterprise add-in, the following jobs become available and active in CA Clarity™ PPM:
■ Agile Product Sync
■ Agile Timesheet Sync
■ Agile Requirement and Task Mapping Sync
■ Agile Role Sync
By default, these jobs are scheduled to run automatically at predefined intervals (everyday at 9:00 AM). You can modify the default schedules of these jobs to suit the needs of your organization. You can also run the jobs immediately to move data over from CA Clarity™ Agile to CA Clarity™ PPM.
See the CA Clarity™ PPM Administration Guide for information about how to schedule and run jobs from CA Clarity™ PPM.
The CA Clarity™ Agile Sync jobs cannot run concurrently with the following CA Clarity™ PPM jobs:
■ Post Timesheets
■ Time Slicing
■ Update Earned Value Totals
■ Update Earned Value History
Agile Product Sync Job
The Agile Product Sync job synchronizes the following items:
■ Projects and resources from CA Clarity™ PPM to CA Clarity™ Agile.
■ Tasks from CA Clarity™ Agile to CA Clarity™ PPM.
Jobs Management
23
Agile Timesheet Sync Job
The Agile Timesheet Sync job populates the following items in CA Clarity™ PPM from CA Clarity™ Agile task work logs:
■ Actual hours on tasks
■ Hours that are worked and ETC for a resource for a given date in timesheets.
Each time the Agile Timesheet Sync job runs, this job overwrites any changes to timesheets made in CA Clarity™ PPM provided the timesheet is still open.
Best Practice: Make all your updates in CA Clarity™ Agile and the changes are updated in the CA Clarity™ PPM timesheet the next time the Timesheet Sync job runs. You do not need to update the CA Clarity™ Agile tasks in the CA Clarity™ PPM timesheet.
Agile Requirement and Task Mapping Sync Job
This job synchronizes the relationships between CA Clarity™ PPM project tasks and CA Clarity™ Agile requirements. The data flows from CA Clarity™ PPM to CA Clarity™ Agile and also from CA Clarity™ Agile to CA Clarity™ PPM.
Agile Role Sync Job
This job downloads all roles defined in CA Clarity™ PPM to CA Clarity™ Agile.
The Agile Role Sync Job contains the following parameter:
Overwrite Agile Roles
Specifies whether you can overwrite the roles already in CA Clarity™ Agile when the job runs. Select the check box to overwrite current roles.

Burndown Charts
24
Burndown Charts
As a CA Clarity™ PPM user, you can configure portlets for the dashboard to view the burndown charts of the projects. The portlets that you configure will not be visible to other users. Each user can configure their own portlet for the project they are a member of.
Note: For information about configuring portlets on CA Clarity™ PPM, see the Studio Developer's Guide.
The data for the chart will be available if you have linked the CA Clarity™ PPM project to CA Clarity™ Agile.
Following burndown charts are available for configuration:
■ Agile Daily Hours Burndown
■ Agile Daily Points Burndown
■ Agile Weekly Hours Burndown
■ Agile Weekly Points Burndown
■ Agile Monthly Hours Burndown
■ Agile Monthly Points Burndown
Note: The data point for the weekly burndown chart is calculated at the end of the week. Any changes in the middle of the week will show up towards end of the week. To view the burndown through a specific week, you can check the daily burndown chart and filter it by dates.
Best Practice:
■ To view the burndown for a limited range of dates, use the daily burndown charts.
■ To view the burndown for a longer period use the weekly or monthly burndown charts.
25
Appendix A:
This section contains the following topics:
Project Mapping (see page 25) Resource Mapping (see page 26) Task Mapping (see page 27) Task Worklog Mapping (see page 28) Impediment Mapping (see page 29)
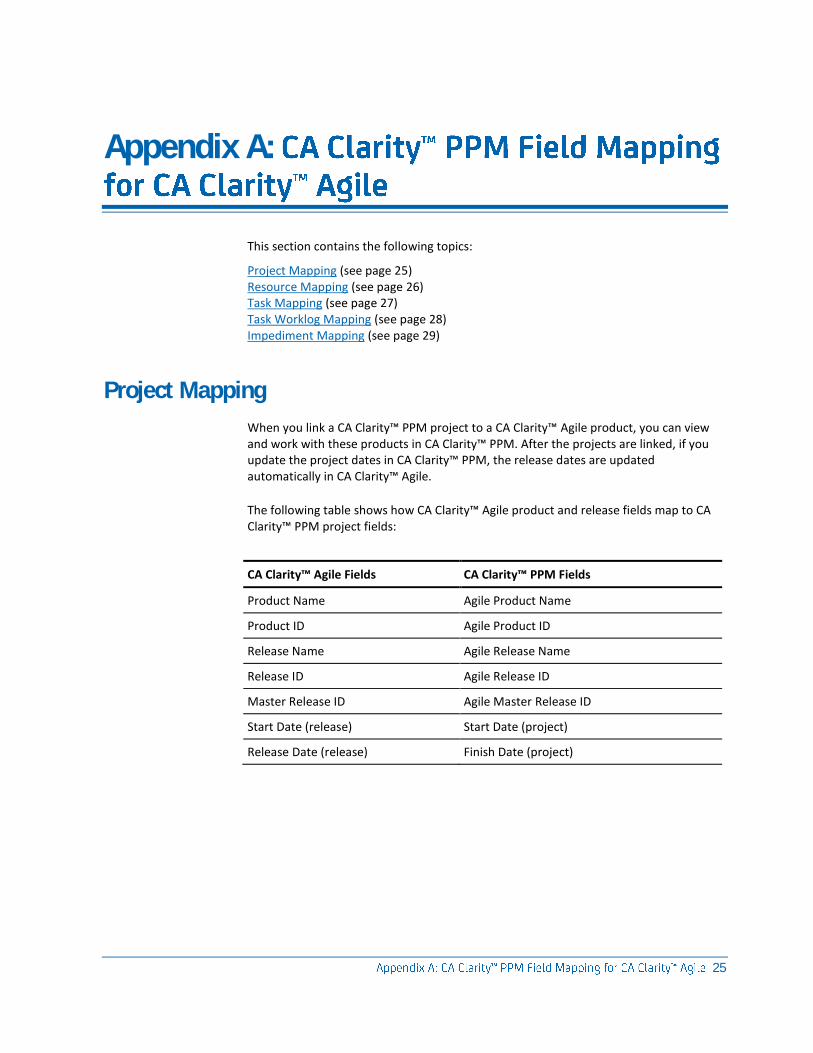
Project Mapping
When you link a CA Clarity™ PPM project to a CA Clarity™ Agile product, you can view and work with these products in CA Clarity™ PPM. After the projects are linked, if you update the project dates in CA Clarity™ PPM, the release dates are updated automatically in CA Clarity™ Agile.
The following table shows how CA Clarity™ Agile product and release fields map to CA Clarity™ PPM project fields:
CA Clarity™ Agile Fields CA Clarity™ PPM Fields
Product Name Agile Product Name
Product ID Agile Product ID
Release Name Agile Release Name
Release ID Agile Release ID
Master Release ID Agile Master Release ID
Start Date (release) Start Date (project)
Release Date (release) Finish Date (project)

Resource Mapping
26
Resource Mapping
When you add resources to the project team of the integrated CA Clarity™ PPM project, new accounts are created for users without Salesforce.com accounts. The resources are added as CA Clarity™ Agile users. Resources with existing Salesforce.com user accounts are added as CA Clarity™ Agile users and linked to the CA Clarity™ PPM project.
The employee number and email address for a resource is used to determine whether a Salesforce.com account exists for that resource.
When you mark a resource as inactive in CA Clarity™ PPM, the mapped Salesforce user also becomes inactive.

Task Mapping
27
Task Mapping
Create user stories and issues with tasks in CA Clarity™ Agile and assign them to sprints and releases (product, master, or both). Corresponding tasks are automatically created in the linked CA Clarity™ PPM project. Only user stories that are assigned to the master release display in the work breakdown structure if the CA Clarity™ PPM project is linked to a master release in CA Clarity™ Agile. All products that are associated to the master release appear at the top level.
The work breakdown structure of the CA Clarity™ PPM project tasks is built as follows:
■ The product name and release name appears as the top-level summary task with sprints, Kanban Board, user stories, or issues and tasks cascading below it.
■ If user stories are not assigned to a product release but to a master release, the top-level summary task appears as the product name.
■ If user stories are not assigned to a master release but to a product release, the top-level summary task appears as the release name.
■ Assigned user stories are grouped under sprints or Kanban Board.
■ Unassigned user stories are grouped as unscheduled tasks.
■ Tasks are grouped under user stories to which they are associated.
■ Issues are grouped under sprints, Kanban Board, or unscheduled tasks at the same level as user stories.
If the CA Clarity™ PPM project is linking to a master release in CA Clarity™ Agile, the WBS hierarchy looks like the following:
Product – Release
Sprint
User Story
Task
Product – Release
Kanban Board
User Story
Task
If the CA Clarity™ PPM project is linking to a product release in CA Clarity™ Agile, the WBS hierarchy looks like the following:
Sprint
User Story
Task
Kanban Board

Task Worklog Mapping
28
User Story
Task
Task Worklog Mapping
When you enter the hours worked on a task in CA Clarity™ Agile using the Task Worklog or the Virtual Wall, the following updates occur in CA Clarity™ PPM:
■ The user logging the time is added as an assignee to the linked task on the Assignments page (if they are not already an assignee on the CA Clarity™ PPM task).
■ The hours worked are added to the task actuals
■ The hours worked and remaining hours are populated in the CA Clarity™ PPM timesheet for the associated resource for the applicable date.
The following table shows how CA Clarity™ Agile task worklog information maps to CA Clarity™ PPM timesheets:
CA Clarity™ Agile Worklog CA Clarity™ PPM Timesheet
Agile User Name/Assigned To Resource Name
Hours Worked Hours logged for one day
Hours Remaining ETC
Work Date A day in the timesheet time period
Task Type Charge Code
Each time you update your worklog in CA Clarity™ Agile, the corresponding timesheet is updated in CA Clarity™ PPM as long as the timesheet is not in submitted status.
You can delete your worklog in CA Clarity™ Agile even if time has already been populated in a CA Clarity™ PPM timesheet. If the timesheet is currently not submitted, it is updated based on the latest updates from CA Clarity™ Agile. If the timesheet is already submitted, create a timesheet adjustment.

Impediment Mapping
29
Impediment Mapping
When you create an impediment in CA Clarity™ Agile, the following updates occur in CA Clarity™ PPM:
■ A CA Clarity™ PPM issue is created for the related CA Clarity™ PPM task.
■ The owner of the impediment is assigned, unless the CA Clarity™ Agile Owner user ID is an invalid CA Clarity™ PPM resource. Otherwise, the product assigns a valid resource, preferably the project manager. If the owner or the project manager user IDs are invalid, the product assigns the system administrator as the owner.
The following table describes the fields that map to CA Clarity™ PPM and sync each time the Agile Sync job runs.
CA Clarity™ Agile Impediment Field/Value
CA Clarity™ PPM Issue Field/Value
Title (255 chars) Name (80 chars)*
None, uses SFDC ID (18 chars) ID (18 chars)
Description (32000) Description (250)*
Assignee Owner
Due Date Target Resolution Date
Severity:
■ Blocker
■ Major
■ Minor
Priority:
■ High
■ Medium
■ Low
Status:
■ Open
■ In Progress
■ Resolved
■ Closed
Status:
■ Open
■ Work In Progress
■ Resolved
■ Closed
This value truncates in CA Clarity™ PPM if the number of characters exceeds the CA Clarity™ PPM character limit.