instructions: zipline for staff - washington.edu · web viewyou can use the review features in word...
TRANSCRIPT

Zipline Instructions for HSD StaffVersion 2.2, Updated 3/30/2018
Part I: Submission Intake and Assignment.................................................................................................5
INSTRUCTIONS: Incoming Items- New Studies............................................................................................5
INSTRUCTIONS: Assign IRB Coordinator......................................................................................................6
INSTRUCTIONS: Assign to Team..................................................................................................................7
INSTRUCTIONS: Assign Designated Reviewer..............................................................................................7
Part II: Common Actions Used During Review...........................................................................................8
INSTRUCTIONS: Request Clarification..........................................................................................................8
INSTRUCTIONS: View Changes to a Study....................................................................................................9
INSTRUCTIONS: Manage Ancillary Reviews (Staff Version)........................................................................10
INSTRUCTIONS: Edit Pre-Review................................................................................................................11
INSTRUCTIONS: Administrative Withdrawal..............................................................................................11
INSTRUCTIONS: Add Comment..................................................................................................................12
INSTRUCTIONS: Add Private Comment......................................................................................................12
Part III: Submitting Determinations and Reviews....................................................................................14
INSTRUCTIONS: Submit Not Research Determinations.............................................................................14
INSTRUCTIONS: Submit Not Human Subjects Determinations..................................................................15
INSTRUCTIONS: Submit Not Engaged Determinations..............................................................................16
INSTRUCTIONS: Submit Exempt Determinations.......................................................................................17
INSTRUCTIONS: Submit Expedited Review................................................................................................18
INSTRUCTIONS: Submit Pre-Review for Full Board Items..........................................................................22
INSTRUCTIONS: Resubmit Review to Correct an Error..............................................................................24
1

Part IV: Changing Determinations at the Time of Modification...............................................................26
INSTRUCTIONS: Changing Not Research, Not Human Subjects, or Not Engaged Determinations to IRB Review.......................................................................................................................................................26
INSTRUCTIONS: Changing an IRB Reviewed Study to a Not Research, Not Human Subjects, or Not Engaged Determination.............................................................................................................................26
INSTRUCTIONS: Not Human Subjects Modifications for IRB Reviewed Studies (No Change in Study Review Level).............................................................................................................................................28
INSTRUCTIONS: Changing an Expedited Study to Exempt or Changing an Exempt Study to Expedited....30
Part V: Post-Review..................................................................................................................................33
INSTRUCTIONS: Review Required Modifications.......................................................................................33
INSTRUCTIONS: Finalize Documents..........................................................................................................34
INSTRUCTIONS: Staff Data Entry................................................................................................................35
INSTRUCTIONS: Upload Shared Regulatory Documents............................................................................35
INSTRUCTIONS: Prepare and Send the Determination Letter....................................................................37
Part VI: IRB Meeting Preparation.............................................................................................................38
INSTRUCTIONS: Edit Meeting Attendance.................................................................................................38
INSTRUCTIONS: Remove Agenda Item......................................................................................................38
INSTRUCTIONS: Assign to Meeting............................................................................................................39
INSTRUCTIONS: Assign Reviewers for IRB Meetings..................................................................................39
INSTRUCTIONS: Prepare and Send the Meeting Agenda...........................................................................40
Part VII: During and Post IRB Meeting......................................................................................................42
INSTRUCTIONS: Convene Meeting............................................................................................................42
INSTRUCTIONS: Accept Meeting Minutes.................................................................................................42
INSTRUCTIONS: Submit Committee Review..............................................................................................43
INSTRUCTIONS: Prepare Meeting Minutes................................................................................................46
INSTRUCTIONS: Close Meeting..................................................................................................................47
2

Part VIII: Other IRB Committee Activities.................................................................................................48
INSTRUCTIONS: Edit Meeting Details........................................................................................................48
INSTRUCTIONS: Create New Meeting........................................................................................................48
INSTRUCTIONS: Update Committee Roster...............................................................................................49
INSTRUCTIONS: Resend Minutes to the Committee..................................................................................50
Part IX: Reports of New Information (RNI)...............................................................................................51
INSTRUCTIONS: Incoming Items- RNI........................................................................................................51
INSTRUCTIONS: Submit Report of New Information (RNI)........................................................................51
INSTRUCTIONS: Respond to Action Required............................................................................................54
INSTRUCTIONS: Add Related Submission..................................................................................................56
INSTRUCTIONS: Submit Not Non-Compliance Determination...................................................................57
INSTRUCTIONS: Submit Minor Non-Compliance Determination...............................................................58
INSTRUCTIONS: Designated Review of Reports of New Information (RNI)................................................59
INSTRUCTIONS: Submit RNI Designated Review........................................................................................60
INSTRUCTIONS: Submit RNI Pre-Review for Full Board.............................................................................61
INSTRUCTIONS: Submit RNI Committee Review........................................................................................62
INSTRUCTIONS: Review Required Actions.................................................................................................64
INSTRUCTIONS: RNI Data Entry.................................................................................................................65
Part X: External IRB...................................................................................................................................67
INSTRUCTIONS: Confirm External IRB........................................................................................................67
INSTRUCTIONS: External IRB Staff Data Entry............................................................................................68
INSTRUCTIONS: Update External IRB Status..............................................................................................68
Part XI: Study Closure, Termination, and Suspension..............................................................................70
INSTRUCTIONS: Study Closure...................................................................................................................70
INSTRUCTIONS: Administrative Closure....................................................................................................71
INSTRUCTIONS: Terminate Study..............................................................................................................71
INSTRUCTIONS: Suspend Study.................................................................................................................72
3

Appendix: Quick Steps for Common Activities.........................................................................................73
Quick Steps: Document Naming Conventions...........................................................................................73
Quick Steps: Finishing an Initial Expedited Review or Determination, Finishing an Expedited Modification or Continuing Review................................................................................................................................74
Quick Steps: Finishing a Conversion Application.......................................................................................75
Quick Steps: IRB Coordinator Steps for Full Board Items...........................................................................76
Quick Steps: IRB Meetings.........................................................................................................................77
4

Part I: Submission Intake and Assignment
INSTRUCTIONS: Incoming Items- New StudiesPurpose: Used to locate new Zipline studies and assign them for review
New studies that have been submitted to HSD in Zipline need to be triaged and assigned to a team for review. Continuing review reports and modifications are automatically assigned to the parent study’s team.
Conditional approval responses and deferral responses automatically go to the Inbox of the previously assigned IRB coordinator.
Reports of new information are managed by the compliance team directly. See INSTRUCTIONS: Incoming Items- RNI.
Incoming Items- New Incoming StudiesStep 1: Locate and open the new study
● In the “IRB Submissions” area, go to the “In-Review’ tab● To show only studies in Pre-Review:
o Filter by “State” and type “Pre-Review”● Click “Advanced” to add additional filters
o Filter by “Coordinator” and type “!=” to show studies that do not have an assigned coordinator
o Filter by “Submission Type” and type “Initial Submission” to show only studies and not follow-on submissions
●● Click the name of the first study that has not yet been assigned to a team
Step 2: Check to see if it is an external IRB application 2 Options:
● In the study’s workspace, look to see if “Confirm External IRB” is a possible activity in the “My Current Actions” column; OR
● Click “View Study” in the “My Current Actions” column to check the study SmartForm and see if the study team responded “Yes” to Question 8 on the “Basic Information” page● If the answer is “Yes” to either option, then the submission is an External IRB application-
SKIP TO STEP 4
5

Step 3: Determine the PI’s home department (Internal Studies Only)● In the study’s workspace, click “View Study” in the My Current Actions column ● On the “Basic Information” page, click the linked name for the Principal Investigator in Question
6 ● In the PI’s profile, make sure the “Detail” view is selected ● Locate the department listed in the “Employer” field
Step 4: Assign the study to a team● In the study’s workspace click “Assign to Team” in the My Current Actions column ● Select the appropriate team (based on the departmental distribution list for internal studies and
“Reliance” for external studies) in the Assign to Team popup window ● Click “OK” in the Assign to Team popup window
INSTRUCTIONS: Assign IRB CoordinatorPurpose: Used to assign or reassign a submission to a staff member for review
The IRB Coordinator is the HSD staff member responsible for the review of the submission. The IRB Coordinator should be assigned by the team operations lead (TOL) while the submission is in Pre-Review state, but may be reassigned as needed at any point in the submission workflow.
Assign IRB Coordinator StepsStep 1: Locate and open submissions that have been assigned to your team but still need to be assigned to an IRB Coordinator for review (for submissions that have not yet been assigned to an IRB coordinator)
● In the “IRB Submissions” area, go to the “In-Review” tab ● Use filters to show only submissions that are in Pre-Review and assigned to your team
o Filter by “Team” and type the letter for your teamo Click Advanced to add second filtero Filter by “State” and type “Pre-Review”
● Sort by the Coordinator column to show items that have not yet been assigned to a reviewer● Click the name of the submission to open it
Step 2: Use the Assign Coordinator activity to assign the submission to a reviewer● To go to the submission’s workspace, click the name of a submission that needs to be
assigned ● Click Assign Coordinator in the My Current Actions column● Select the assigned reviewer from the list in the Assign Coordinator popup window● Click OK in the Assign Coordinator popup window
6

INSTRUCTIONS: Assign to TeamPurpose: Used to assign a study to a team and to reassign a study to a new team as needed
The Assign to Team activity is available once the study has been submitted to HSD and is no longer in Pre-Submission state. It is typically used to assign a study to a team during the submission assignment process, but may also be used to reassign the study to a new team at any time. When a study is reassigned to a new team, all modifications and continuing review reports automatically transfer to the new team as well.
Assign to Team Steps1. Click Assign to Team in the parent study’s workspace2. Select the team that the study should be assigned to from the list3. Click OK
INSTRUCTIONS: Assign Designated ReviewerPurpose: Used to assign or change the designated reviewer for a submission
The Assign Designated Reviewer activity is available for all submissions that are in Pre-Review Completed State, Non-Committee Review State, or Committee Review State. This activity can be used as needed to add a designated reviewer or change the designated reviewer for a submission.
Assign Designated Reviewer Steps 1. Click Assign Designated Reviewer
NOTE: Depending on the state of the submission, you may see Assign to Designated Review instead of Assign Designated Reviewer. Complete the Assign to Designated Review activity and Assign Designated Reviewer will appear as an option.
2. Select the person assigned to completed the designated review from the dropdown list (Question 1)
3. If desired, add text notes (Question 2)4. If desired, click Add to upload a Supporting Document, including any consultations obtained (if
IRB Coordinator is not the Designated Reviewer)5. Click OK to complete and send a notification to the designated reviewer
7

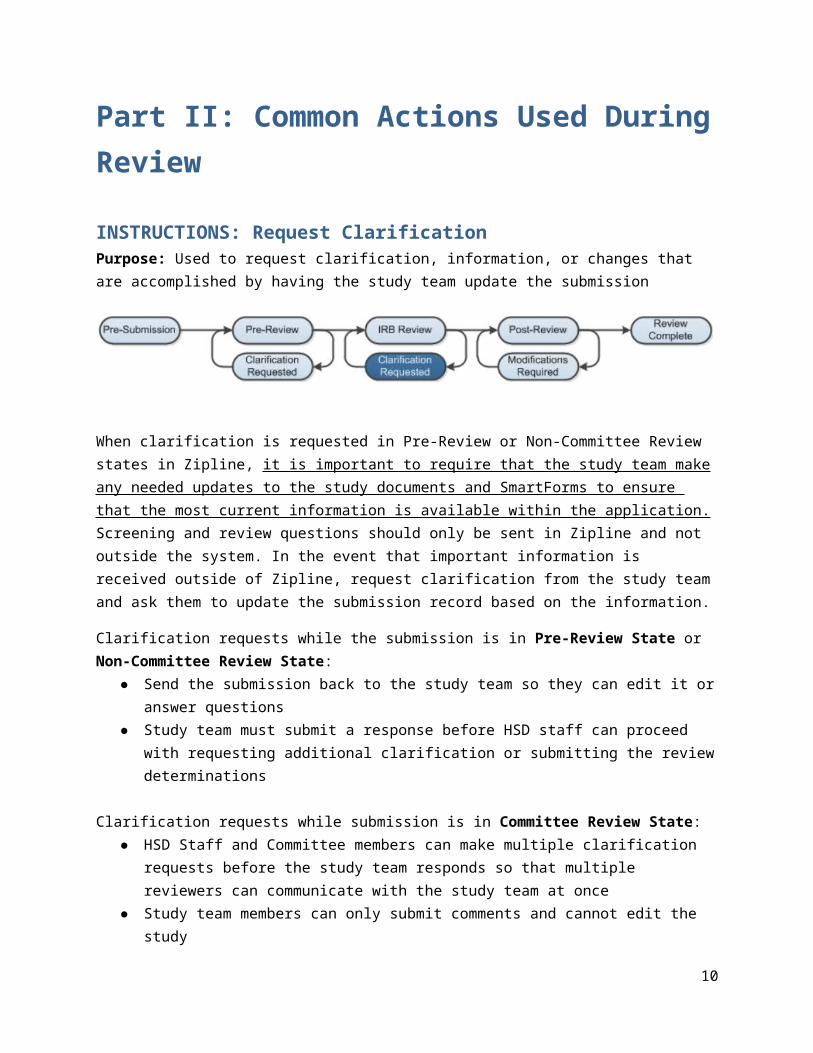
Part II: Common Actions Used During Review
INSTRUCTIONS: Request ClarificationPurpose: Used to request clarification, information, or changes that are accomplished by having the study team update the submission
When clarification is requested in Pre-Review or Non-Committee Review states in Zipline, it is important to require that the study team make any needed updates to the study documents and SmartForms to ensure that the most current information is available within the application. Screening and review questions should only be sent in Zipline and not outside the system. In the event that important information is received outside of Zipline, request clarification from the study team and ask them to update the submission record based on the information.
Clarification requests while the submission is in Pre-Review State or Non-Committee Review State:● Send the submission back to the study team so they can edit it or answer questions● Study team must submit a response before HSD staff can proceed with requesting additional
clarification or submitting the review determinations
Clarification requests while submission is in Committee Review State: ● HSD Staff and Committee members can make multiple clarification requests before the study
team responds so that multiple reviewers can communicate with the study team at once● Study team members can only submit comments and cannot edit the study
Prepare your Pre-Review Letter1. Use the Pre-Review letter template to create your letter
2. Save the created letter to a temporary location on your desktop for upload into Zipline using the naming convention.
Requesting Clarification Steps1. From the submission workspace, click Request Clarification
NOTE: The wording will vary depending on the state of the submission (Pre-Review, Non-Committee Review, or Committee Review)
2. Type “See attached” in the text box NOTE: Alternatively, brief requests may be entered directly in the text box
8

3. Upload the Pre-Review letter or other attachments (if any)a. Click Addb. Click Browse or Choose File (depending on your browser) and navigate to the document
to be uploadedc. Double click or click Open o select the appropriate document to attachd. Click OK
NOTE: Your document will not save as an attachment until you complete this step. It should now show as an attachment under Supporting Documents. Once your letter has been sent in Zipline it is a part of the study record and can be deleted from your computer.
4. Click OK to send your request to the study team
INSTRUCTIONS: View Changes to a Study Purpose: Used to locate and review changes made to a submission due to submission of a modification, requests for clarification or modification, conditional approval responses, or deferral responses
When a submission is in Clarification Requested State or Modifications Required State, the study team must submit a response before review can continue. Frequently, study team responses will include revisions to the original study. Study modifications also require that the study team revise the approved application and attached documents.
If the study team updates the attached study documents during review, they should contain tracked changes. You can use the review features in Word to toggle between showing the original and final versions of the document. Alternatively, you can use the Compare Documents feature to compare different versions. When the IRB approves the documents in Post-Review, all tracked changes will be accepted and comments removed in the final versions.
View Changes to a Study Steps
1. Locate the Response Submitted activity in the History tab (except for modifications)
2. In the Response Submitted activity, read any notes from the study team and click the link for any attachments to open them (except for modifications)
3. Click View Differences in the My Current Actions column
4. Next to Show Changes, select an older version to compare with the current version of the submission
9
5. Look for red and green changes in the current form
6. Click the arrow to show the details. The changes since the version you selected appear as follows:
a. Additions to text since that version are shown with green highlighting
b. Deletions to text show in a light red box below the current text
c. Additions and deletions of selectable items show the changes (such as old values) in a light red box after the current values that appear normally
7. Next to Changed Steps, click the arrow (or use the drop-down list) to view each of the other forms that have changed
8. Exit the View Differences screen by clicking Close on the right
INSTRUCTIONS: Manage Ancillary Reviews (Staff Version)Purpose: Used to add faculty advisor review to studies
The Manage Ancillary Reviews activity is used to track various reviews that may be required for a study in addition to the IRB review as determined using the Pre-Review worksheet.
NOTE: The researcher or study team should add the faculty advisor review (if applicable). If they forget this step, it is no longer available for the researcher or study team to complete and must be completed by staff.
Add Faculty Advisor StepsNOTE: If the study SmartForm indicates that the PI is a student, resident, fellow, or post-doc, the name of the faculty advisor should be listed in the IRB Protocol form. If no faculty advisor is listed, request clarification from the study team to get the faculty advisor’s name.
10

1. Click Manage Ancillary Reviews 2. Click Add to add a new review
Note: Click Update instead of Add if you need to revise an existing review3. Click Select next to Person (Question 1) 4. Select the faculty advisor on the list and click OK 5. Select Faculty Advisor for review type (Question 2)6. Indicate that a response is required and click OK (Question 3)
INSTRUCTIONS: Edit Pre-ReviewPurpose: Used to update information in the Submit Pre-Review activity if it has already been submitted during your review
The Edit Pre-Review activity is available once the Submit Pre-Review activity has been completed. Because pre-review information is preliminary it can be edited later in the review process as needed until the submission is in the Review Complete State. Note that the Submit Pre-Review activity and the Edit Pre-Review activity are read-only for continuing review submissions and for modification submissions that are limited to changes to the study roles.
Edit Pre-Review Steps 1. Click Edit Pre-Review 2. Update the information as needed 3. Click OK
INSTRUCTIONS: Administrative WithdrawalPurpose: Used to administratively withdraw a submission before the review has been submitted
The Administrative Withdrawal activity is available for all submissions before the final review has been submitted in Zipline. Alternatively, the study team can be instructed to discard the submission. Once a study is administratively withdrawn, it cannot be resubmitted by the study team. They can, however, copy it to a new application as a way of re-submitting it, if necessary. Do not administratively withdraw applications that need to go through the External IRB process.
If you withdraw a continuing review report or modification, it will not withdraw or affect the parent study.
11

Administrative Withdrawal Steps 1. Click Administrative Withdrawal 2. Select the reason the submission is being administratively withdrawn (Question 1)3. Enter an explanation to the PI in the text box (Question 1) 4. If there is supplementary documentation, Click Browse or Choose File (depending on your
browser) 5. Select the document from your computer and double click or click Open6. Click OK
The status of the submission should now be Administratively Withdrawn
INSTRUCTIONS: Add CommentPurpose: Used to add a public comment to a study, modification, continuing review, or report of new information
The Add Comment activity:● Adds comments that are viewable by anyone with access to the submission● Is available in all submission states● Appears in the History tab on the study, modification, continuing review, or report of new
information workspace● Is retained as a part of the study record
Add Comment Steps 1. Click Add Comment2. Add your comment in the text box (Question 1)3. Attach supporting documents, if needed (Question 2)4. Indicate who should receive an email notification about the comment5. Click OK
INSTRUCTIONS: Add Private CommentPurpose: Used to add a private comment to a study, modification, continuing review, or report of new information
The Add Private Comment activity
12

● Adds comments that are viewable by HSD staff and IRB committee members in the History tab● Is not viewable by the study team, faculty advisor, or users with read-only access to the
submission● Is available in all submission states
Add Private Comment Steps 1. Click Add Private Comment2. Add your comment in the text box (Question 1)3. Attach supporting documents, if needed (Question 2)4. Indicate who should receive an email notification about the comment (Question 3)5. Click OK
13

Part III: Submitting Determinations and Reviews
INSTRUCTIONS: Submit Not Research DeterminationsPurpose: Submitting determinations of “Not Research” for initial applications
Not Research determinations are made during the Pre-Review process.
When an initial application is found to be Not Research, this information must be entered into the Submit Pre-Review activity in Zipline to push the application forward in the workflow.
NOTE: Not Research determinations cannot be changed using a study modification. See INSTRUCTIONS: Changing Not Research, Not Human Subjects, or Not Engaged Determinations to IRB Review for more information.
During Initial Review1. Click Submit Pre-Review in the Study workspace2. Indicate the regulatory oversight (Question 1): This field is used for reporting purposes to
identify research that is governed by a particular set of laws or rules. Only select the regulations that apply to the study. See the Pre-Review Worksheet for additional guidance. NOTE: For Not Research determinations, in most cases no regulations will apply.
3. Under Special Determinations and Waivers (Question 2), select Not Research4. Leave risk level blank (Question 3) 5. Indicate the type of research (Question 4)6. Missing materials and final contingencies (Questions 5 and 6) will generally be blank but can be
used if needed7. Add supporting documents if needed (Question 7)
a. The Pre-Review Worksheet should NOT be attached b. Supporting documents may include any documents that support your determination,
such as an email from a consultant, as needed8. Indicate that you are ready to submit the pre-review (Question 8)
NOTE: To save entered pre-review information without submitting, indicate that you are not ready to submit pre-review and click OK
9. Click OK to save your changes and submit your review
14

NOTE: Study automatically transitions to Post-Review state after completion of the Submit Pre-Review Activity. See the Post-Review instructions for next steps.
INSTRUCTIONS: Submit Not Human Subjects DeterminationsPurpose: Submitting determinations of “Not Human Subjects” for initial applications
Not Human Subjects determinations are made during the Pre-Review process.
When an initial application is found to be Not Human Subjects, this information must be entered into the Submit Pre-Review activity in Zipline to push the application forward in the workflow.
NOTE: Not Human Subjects determinations cannot be changed using a study modification. See INSTRUCTIONS: Changing Not Research, Not Human Subjects, or Not Engaged Determinations to IRB Review for more information.
When a study is found to be “Not Human Subjects” during continuing review, the study should be closed. See INSTRUCTIONS: Study Closure.
During Initial Review1. Click Submit Pre-Review in the Study workspace2. Indicate the regulatory oversight (Question 1): This field is used for reporting purposes to
identify research that is governed by a particular set of laws or rules. Only select the regulations that apply to the study. See the Pre-Review Worksheet for additional guidance. NOTE: For Not Human Subjects determinations, in most cases no regulations will apply.
3. Under Special Determinations and Waivers (Question 2), select Not Human Subjects 4. Leave risk level blank (Question 3) 5. Indicate the type of research (Question 4)6. Missing materials and final contingencies (Questions 5 and 6) will generally be blank but can be
used if needed7. Add supporting documents if needed
a. The Pre-Review Worksheet should NOT be attached b. Supporting documents may include any documents that support your determination, such
as an email from a consultant, as needed8. Indicate that you are ready to submit the pre-review (Question 8)
NOTE: To save entered pre-review information without submitting, indicate that you are not ready to submit pre-review and click OK
9. Click OK to save changes and submit your review
15

NOTE: Study automatically transitions to Post-Review state after completion of the Submit Pre-Review Activity. See the Post-Review instructions for next steps.
INSTRUCTIONS: Submit Not Engaged DeterminationsPurpose: Submitting determinations of “Not Engaged” for initial applications
Not Engaged determinations are made during the Pre-Review process.
When an initial application is found to be Not Engaged, this information must be entered into the Submit Pre-Review activity in Zipline to push the application forward in the workflow.
NOTE: Not Engaged determinations cannot be changed using a study modification. See INSTRUCTIONS: Changing Not Research, Not Human Subjects, or Not Engaged Determinations to IRB Review for more information.
During Initial Review1. Click Submit Pre-Review in the Study workspace2. Indicate the regulatory oversight (Question 1): This field is used for reporting purposes to
identify research that is governed by a particular set of laws or rules. Only select the regulations that apply to the study. See the Pre-Review Worksheet for additional guidance. NOTE: For Not Engaged determinations, in most cases no regulations will apply.
3. Under Special Determinations and Waivers (Question 2), select UW Not Engaged4. Leave risk level blank (Question 3) 5. Indicate the type of research (Question 4)6. Missing materials and final contingencies (Questions 5 and 6) will generally be blank but can be
used if needed7. Add supporting documents if needed
a. The Pre-Review Worksheet should NOT be attached b. Supporting documents may include any documents that support your determination,
such as an email from a consultant, as needed8. Indicate that you are ready to submit the pre-review (Question 8)
NOTE: To save entered pre-review information without submitting, indicate that you are not ready to submit pre-review and click OK
9. Click OK to save your changes and submit your review
NOTE: Study automatically transitions to Post-Review state after completion of the Submit Pre-Review Activity. See the Post-Review instructions for next steps.
16

INSTRUCTIONS: Submit Exempt DeterminationsPurpose: Submitting exempt determinations for initial applications
Exempt determinations are made during the Pre-Review process but entered into the Submit Designated Review activity in Zipline.
When an initial application is found to be Exempt, the reviewer must submit pre-review and assign him or herself as a designated reviewer to enter the exempt determination in the Submit Designated Review activity in Zipline. If Pre-Review has already been submitted during your review and needs to be edited, see INSTRUCTIONS: Edit Pre-Review.
NOTE: If a study modification to an approved study changes the determination to exempt, follow INSTRUCTIONS: Changing an Expedited Study to Exempt or Changing an Exempt Study to Expedited.
During Initial Review1. Click Submit Pre-Review in the Study workspace2. Indicate the regulatory oversight (Question 1): This field is used for reporting purposes to
identify research that is governed by a particular set of laws or rules. Only select the regulations that apply to the study. See the Pre-Review Worksheet for additional guidance. NOTE: For Exempt determinations, in most cases no regulations will apply.
3. Skip Question 2 (Subject Populations, Determinations, and Waivers)4. Indicate no more than minimal risk level (exempt studies must be no more than minimal risk per
HSD policy)(Question 3) 5. Indicate the type of research (Question 4)6. Missing materials and final contingencies (Questions 5 and 6) will generally be blank but can be
used if needed7. Add supporting documents if needed
a. The Pre-Review Worksheet should NOT be attached b. Supporting documents may include any documents that support your determination,
such as an email from a consultant, as needed8. Indicate that you are ready to submit the pre-review (Question 8)9. Click OK
NOTE: To save entered pre-review information without submitting, indicate that you are not ready to submit pre-review and click OK
10. Click Assign Designated Reviewer11. Select yourself from the dropdown list and click OK 12. Click Submit Designated Review 13. Indicate that you do not have a conflicting interest (If you have a conflicting interest you cannot
submit designated review) (Question 1)
17

14. Select Approved for the Determination (Question 2) 15. Select Exempt and the appropriate categories as determined using the Exempt Determination
Worksheet (Question 3) 16. Select the date of exempt determination for the approval and effective dates (Question 4) 17. Clear the last day of approval period and leave it blank (Question 4) 18. Notes will generally be blank but can be used if needed (Question 6)19. Add supporting documents if needed
a. The Pre-Review Worksheet and Exempt Determination Worksheet should NOT be attached
b. Supporting documents may include any documents that support your determination, such as an email from a consultant, as needed
20. Indicate that you are ready to submit the pre-review (Question 8)21. Click OK
NOTE: Study automatically transitions to Post-Review state after completion of the Submit Designated Review Activity. See the Post-Review instructions for next steps.
INSTRUCTIONS: Submit Expedited ReviewPurpose: Used to submit expedited review determinations for initial applications, modifications, and continuing review reports in Zipline
When an initial application, modification, or continuing review report is found to be eligible for expedited review, the Submit Pre-Review activity must be completed in Zipline to push the application forward in the workflow. The submission should then be assigned to a designated reviewer. The Expedited Review determinations are submitted in the Submit Designated Review activity.
If Pre-Review has already been submitted during your review and needs to be edited, see INSTRUCTIONS: Edit Pre-Review.
REVIEWING MODIFICATIONS:ALL MODIFICATIONS:
The Submit Pre-Review activity is pre-populated with the most recently submitted pre-review information. For modifications that only change the study team roles, the Submit Pre-Review activity is read only and must be completed to push the modification forward in the workflow.
Do not uncheck any selections in regulatory oversight (Question 1 in Submit Pre-Review), and update any other information that has changed.
CHANGES TO PI:
18

The determination letter will generate with the name of the former PI BUT the notification will go to the new PI. Update the name on the letter to the new PI and notify the former PI of the approved change outside of Zipline (if needed).
CHANGES IN REVIEW LEVEL: If a study modification to an expedited study changes the determination to exempt,
follow INSTRUCTIONS: Changing an Expedited Study to Exempt or Changing an Exempt Study to Expedited.
Approval: During Initial Review and Modification Review1. Click Submit Pre-Review in the Study workspace2. Indicate the regulatory oversight (Question 1): This field is used for reporting purposes to
identify research that is governed by a particular set of laws or rules. Only select the regulations that apply to the study. See the Pre-Review Worksheet for additional guidance. NOTE: The HHS Subparts should not be selected for non-federal research or funding agencies that have not subscribed to a particular subpart. See the Pre-Review Worksheet for additional information.
3. Skip Question 2 (Subject Populations, Special Determinations and Waivers) 4. Indicate the risk level of the study (Question 3) 5. Indicate the type of research (Question 4)6. Missing materials and final contingencies (Questions 5 and 6) will generally be blank but can be
used if needed 7. Add supporting documents if needed
a. The Pre-Review Worksheet should NOT be attached b. Supporting documents may include any documents that support your determination,
such as an email from a consultant, as needed8. Indicate that you are ready to submit the pre-review (Question 8)
NOTE: To save entered pre-review information without submitting, indicate that you are not ready to submit pre-review and click OK
9. Click OK 10. Click Assign Designated Reviewer11. Choose the staff member completing expedited review (generally yourself) in the dropdown list
and click OK12. Click Submit Designated Review 13. Indicate that you do not have a conflicting interest (Question 1)
NOTE: If you do have a conflicting interest, the review must be assigned to a different IRB coordinator
14. Indicate “Approved” as the determination (Question 2) 15. Select Expedited as the review level and indicate the appropriate expedited categories as
determined using the Expedited Review Eligibility Worksheet (Question 3)16. Enter dates
a. Approval Date- Date of determinationb. Effective- Date of determination c. Last Day of Approval Period
19

MODIFICATIONS: Last Day of Approval Period is a required field. For modifications, the last day of approval period should be left as the last day of approval period for the study.
17. Add any needed notes 18. Upload the completed Master Checklist as a supporting document (Question 7)19. Indicate that you are ready to submit the review and click OK (Question 8)
Conditional Approval: During Initial Review and Modification Review1. Click Submit Pre-Review in the Study workspace2. Indicate the regulatory oversight (Question 1): This field is used for reporting purposes to
identify research that is governed by a particular set of laws or rules. Only select the regulations that apply to the study. See the Pre-Review Worksheet for additional guidance. NOTE: The HHS Subparts should not be selected for non-federal research or funding agencies that have not subscribed to a particular subpart. See the Pre-Review Worksheet for additional information.
3. Skip Question 2 (Subject Populations, Special Determinations and Waivers) 4. Indicate the risk level of the study (Question 3) 5. Indicate the type of research (Question 4)6. Missing materials and final contingencies (Questions 5 and 6) will generally be blank but can be
used if needed 7. Add supporting documents if needed
a. The Pre-Review Worksheet should NOT be attached b. Supporting documents may include any documents that support your determination,
such as an email from a consultant, as needed8. Indicate that you are ready to submit the pre-review (Question 8)
NOTE: To save entered pre-review information without submitting, indicate that you are not ready to submit pre-review and click OK
9. Click OK 10. Click Assign Designated Reviewer11. Choose the staff member completing expedited review (generally yourself) in the dropdown list
and click OK12. Click Submit Designated Review 13. Indicate that you do not have a conflicting interest (Question 1)
NOTE: If you do have a conflicting interest, the review must be assigned to a different IRB coordinator
14. Indicate Modifications Required to Secure Approved as the determination (Question 2) 15. Select Expedited as the review level and indicate the appropriate expedited categories as
determined using the Expedited Review Eligibility Worksheet (Question 3)16. Enter dates
a. Approval Date- Date of determinationb. Effective- Leave blank
20

c. Last Day of Approval PeriodMODIFICATIONS: Last Day of Approval Period is a required field. For modifications, the last day of approval period should be left as the last day of approval period for the study.
17. Indicate the conditions of approval (Question 5)NOTE: The conditions of approval are automatically pulled into the template letter generated during Post-Review.
18. Add any notes as needed (Question 6)19. Upload the completed Master Checklist as a supporting document using the document naming
convention (Question 7)NOTE: If the Master Checklist needs to be updated when the conditional approval is verified, the designated review must be resubmitted to update the checklist.
20. Indicate that you are ready to submit the review and click OK (Question 8)
Approval: During Continuing Review 1. Click Submit Pre-Review in the continuing review workspace
NOTE: Pre-Review is read only for continuing review reports and study team roles modifications2. Indicate you are ready to submit pre-review (Question 8)3. Click OK 4. Click Assign Designated Reviewer 5. Choose the staff member completing expedited review (generally yourself) in the dropdown list
and click OK6. Click Submit Designated Review 7. Indicate that you do not have a conflicting interest (Question 1)
NOTE: If you do have a conflicting interest, the review must be assigned to a different IRB coordinator
8. Indicate “Approved” as the determination (Question 2) 9. Update the selected review level to expedited and enter the categories as previously
determined using the Expedited Review Eligibility Worksheet (Question 3)10. Enter dates
a. Approval Date- Date of determinationb. Effective- Date of determination
NOTE: Zipline does not support the use of the 30 day rule to maintain approval date anniversaries at this time.
c. Last Day of Approval Period11. Add any needed notes (optional)12. Upload the completed Master Checklist as a supporting document using the document naming
convention (Question 7)13. Indicate that you are ready to submit the review and click OK (Question 8)
Conditional Approval: During Continuing Review 1. Click Submit Pre-Review in the continuing review workspace
21

NOTE: Pre-Review is read only for continuing review reports and study team modifications2. Indicate you are ready to submit pre-review (Question 8)3. Click OK 4. Click Assign Designated Reviewer 5. Choose the staff member completing expedited review (generally yourself) in the dropdown list
and click OK6. Click Submit Designated Review 7. Indicate that you do not have a conflicting interest (Question 1)
NOTE: If you do have a conflicting interest, the review must be assigned to a different IRB coordinator
8. Indicate Modifications Required to Secure Approved as the determination (Question 2) 9. Update the selected review level to expedited and enter the categories as previously
determined using the Expedited Review Eligibility Worksheet (Question 3)10. Enter dates
a. Approval Date- Date of determinationb. Effective- leave blank c. Last Day of Approval Period
11. Indicate the conditions of approval (Question 5)12. Add any needed notes (optional)13. Upload the completed Master Checklist as a supporting document using the document naming
convention (Question 7)NOTE: If the Master Checklist needs to be updated when the conditional approval is verified, the designated review must be resubmitted to update the checklist.
14. Indicate that you are ready to submit the review and click OK (Question 8)
INSTRUCTIONS: Submit Pre-Review for Full Board ItemsPurpose: Submitting pre-review determinations and completing pre-meeting activities in Zipline for initial applications, modifications, and continuing review reports that require full board review
Studies are determined to require full board review during the Pre-Review process.
When an initial application, modification, or continuing review report is found to require full board review, the Submit Pre-Review activity must be completed in Zipline to push the application forward in the workflow. The submission should then be assigned to a committee meeting using the Assign to Meeting Activity and the Pre-Review Note should be uploaded using the Add Reviewer Comments activity.
REVIEWING MODIFICATIONS:
22

ALL MODIFICATIONS: The Submit Pre-Review activity is pre-populated with the most recently submitted pre-review
information. For modifications that only change the study team roles, the Submit Pre-Review activity is read only and must be completed to push the modification forward in the workflow.
Do not uncheck any selections in regulatory oversight (Question 1 in Submit Pre-Review), and update any other information that has changed.
CHANGES TO PI: The determination letter will generate with the name of the former PI BUT the notification will
go to the new PI. Update the name on the letter to the new PI and notify the former PI of the approved change outside of Zipline (if needed).
If Pre-Review has already been submitted during your review and needs to be edited, see INSTRUCTIONS: Edit Pre-Review.
The Pre-Review Note and any other documents in the Add Reviewer Comments are not visible to the study team.
During Initial Review and Modification Review1. Click Submit Pre-Review in the Study workspaceFOR MODIFICATIONS: The Submit Pre-Review activity is pre-populated with the most recently
submitted pre-review information. Do not uncheck any selections in regulatory oversight (Question 1), and update any other information that has changed. Complete the Submit Pre-Review activity to push the modification forward in the workflow. For modifications that only change the study team roles, the Submit Pre-Review activity is read only and must be completed to push the modification forward in the workflow.
2. Indicate the regulatory oversight (Question 1): This field is used for reporting purposes to identify research that is governed by a particular set of laws or rules. Only select the regulations that apply to the study. See the Pre-Review Worksheet for additional guidance. NOTE: The HHS Subparts should not be selected for non-federal research or funding agencies that have not subscribed to a particular subpart. See the Pre-Review Worksheet for additional information.
3. Skip Question 2 (Subject Populations, Determinations, and Waivers) 4. Indicate the risk level of the study (Question 3)
NOTE: Alternately, risk level for items being sent to the committee can be left blank. If the risk level is entered in the Submit Pre-Review activity, it is automatically updated based on the committee’s determination when Committee Review is submitted.
5. Indicate the type of research (Question 4)6. Missing materials and final contingencies (Questions 5 and 6) will generally be blank but can be
used if needed7. Add supporting documents if needed
a. The Pre-Review Worksheet should NOT be attachedb. The Pre-Review Note should NOT be attached c. Supporting documents may include any documents that support your determination,
such as an email from a consultant, as needed8. Indicate that you are ready to submit the pre-review (Question 8)
23

NOTE: To save entered pre-review information without submitting, indicate that you are not ready to submit pre-review and click OK
9. Click OK to submit your pre-review and return to the submission workspace10. From the submission workspace, click Assign to Meeting
a. Select the meeting that the item should go to (based on discussion with the Team Operations Lead)
b. Click OK11. From the submission workspace, click Add Review Comments
NOTE: The IRB Coordinator and the Committee Administrator receive a notification when review comments are added.
a. Attach the Pre-Review note and any other documents used to aid the committee’s review, such as the Master Checklist, as supporting documents using the document naming convention (Question 3)
b. Click OK
NOTE: The study or modification automatically transitions to the Committee Review state after the item is assigned to a meeting. See INSTRUCTIONS: Submit Committee Review for more on submitting the committee’s review after the meeting.
During Continuing Review 1. Click Submit Pre-Review in the continuing review workspace
a. NOTE: Pre-Review is read only for continuing review reports and study team modifications
2. Indicate you are ready to submit pre-review (Question 8)3. Click OK to return to the submission workspace4. From the submission workspace, click Assign to Meeting
a. Select the meeting that the item should go to (based on discussion with the Team Operations Lead)
b. Click OK5. Click Add Review Comments
a. Attach the Pre-Review note and any other documents used to aid the committee’s review, such as the Master Checklist, as supporting documents using the document naming convention (Question 3)
b. Click OK
NOTE: The continuing review report automatically transitions to Committee Review state after the item is assigned to a meeting. See INSTRUCTIONS: Submit Committee Review for more on submitting the committee’s review after the meeting.
INSTRUCTIONS: Resubmit Review to Correct an ErrorPurpose: Used to resubmit the Submit Designated Review activity or the Submit Committee Review activity in order to correct an error
24

STUDIES:When the main study record needs to be corrected:
The “Submit Designated Review” activity or the “Submit Committee Review” activity can be resubmitted to correct errors when the study is in “Post-Review” or most “Review Complete” states
Review cannot be resubmitted to correct determinations of “Not Research,” “Not Human Research,” and “Human Research, Not Engaged”- consult TOL or ADO to determine how to proceed
MODIFICATIONS AND CONTINUING REVIEW: The “Submit Designated Review” activity or the “Submit Committee Review” activity can only be
resubmitted to correct errors when the submission is in “Post-Review” state Contact a site administrator to pull the submission back if a correction is needed to a submission
in “Review Complete” state
NOTE: If the review is resubmitted when the submission is in a review complete state, then the letter must be resent in Zipline in order to push the submission back to review complete. A comment should also be added to explain why the letter was resent to the study team.
Resubmit Designated Review Steps 1. Click Submit Designated Review2. Make the needed corrections to the Submit Designated Review form3. Indicate that the review is being resubmitted to correct an error on date (XX/XX/XXXX) and
provide an explanation of the error (Question 6)EXAMPLE: Designated review resubmitted to correct an error on 6/27/2016. Expedited category 5 was not selected in error.
4. Indicate that you are ready to submit the review (Question 8)5. Click OK
Resubmit Committee Review Steps 1. Click Submit Committee Review2. Make the needed corrections to the Submit Committee Review form3. Indicate that the review is being resubmitted to correct an error on date (XX/XX/XXXX) and
provide an explanation of the error (Question 8)EXAMPLE: Committee review resubmitted to correct an error on 6/27/2016. Master checklist was not uploaded.
4. Indicate that you are ready to submit the review (Question 10)5. Click OK
25

Part IV: Changing Determinations at the Time of Modification
INSTRUCTIONS: Changing Not Research, Not Human Subjects, or Not Engaged Determinations to IRB ReviewPurpose: Changing a Not Research, Not Human Subjects, or Not Engaged determination to IRB review
Not Research, Not Human Subjects, and Not Engaged determinations cannot be changed in Zipline once they have been submitted because there is no mechanism to update the submitted pre-review information in the parent study. If a researcher needs to make a change in a study with a Not Research, Not Human Subjects, or Not Engaged determination and the change will result in a need for IRB review, take the steps listed below.
Changing Not Research, Not Human Subjects, or Not Engaged Determinations to IRB Review Steps
1. If the study team has submitted a modification to the original study, use the Administrative Withdrawal activity to withdraw the modification and instruct the study team to submit their changes as a new study NOTE: The PI, any PI proxies, or the primary contact can use the Copy Submission activity and then make any needed changes to the copy. This can then be submitted as a new study.
2. Once the new study has been submitted, the HSD reviewer completes the review following the INSTRUCTIONS: Submit Expedited Review for studies that qualify for expedited review or INSTRUCTIONS: Submit Pre-Review for Full Board Items for studies that require full board review
INSTRUCTIONS: Changing an IRB Reviewed Study to a Not Research, Not Human Subjects, or Not Engaged DeterminationPurpose: Changing the determination for an expedited or full board study to Not Research, Not Human Subjects, or Not Engaged during the review of a modification
If a change made during a study modification results in the entire study being eligible for a Not Research, Not Human Subjects, or Not Engaged determination, HSD staff must first submit the
26

modification review and then make sure that the parent study record is appropriately updated to reflect the new determination.
Submitting Modification Review Instructions1. Click Submit Pre-Review in the modification workspace
a. Update the regulatory oversight (Question 1): This field is used for reporting purposes to identify research that is governed by a particular set of laws or rules. Only select the regulations that apply to the study. See the Pre-Review Worksheet for additional guidance. NOTE: For Not Research, Not Human Subjects, and Not Engaged determinations, in most cases no regulations will apply.
b. Under Special Determinations, Populations, and Waivers (Question 2), select Not Research, Not Human Subjects, or UW Not Engaged as appropriate and uncheck any boxes that no longer apply, such as Waiver of Consent
c. Clear the risk level so that it is blank (Question 3) d. Add supporting documents if needed (Question 7)
i. The Pre-Review Worksheet should NOT be attached ii. Supporting documents may include any documents that support your
determination, such as an email from a consultant, as needede. Indicate that you are ready to submit the pre-review and click OK (Question 8)
NOTE: The modification should now be in Post-Review State 2. Click Finalize Documents in the modification workspace
a. Only documents that have been added or changed in the modification should be finalized
b. Any other attachments should not be re-finalized3. Follow the steps to Prepare and Send the Determination Letter
a. Use the Not Research, Not Human Subjects, or Not Engaged template as appropriateb. In the template, add language to indicate that a new determination of Not Research,
Not Human Subjects, or Not Engaged was made for the study during the review of the modification
4. Update the Staff Data Entry Activity to reflect the new determination
The study modification will now show Not Research, Not Human Research, or UW Not Engaged as the modification status. However, the parent study will still show as Approved and must be updated separately.
Updating the Parent Study Instructions 1. Click Submit Designated Review in the parent study workspace
NOTE: If the study was originally reviewed by the full board, click Submit Committee Review in the parent study workspace
a. Select Not Human Research (for Not Research or Not Human Subjects) or Human Research, Not Engaged (for UW Not Engaged) as the new determination (Question 2)
27

b. Clear the review level and uncheck the corresponding categories (Question 3) c. Clear the last day of approval period (Question 4)d. Add a note that the study was found to be Not Research/Not Human Subjects/Not
Engaged during review of modification XEXAMPLE: The study was found to be Not Human Subjects during review of modification #5.
e. Delete the previous master checklist (Question 7)f. Indicate that you are ready to submit the review (Question 8) and click OK
NOTE: The parent study will now be in Post-Review state. The determination letter must be resent to push the study to review complete state.
2. Re-prepare and re-send the initial determination lettera. Open the original approval letter in Word format (can be found under Draft Letter in the
Prepare Letter activity)b. Add a line in the original letter indicating that the determination was changed to Not
Research/Not Human Subjects/Not Engaged during review of modification X and to see the modification letter for more information. EXAMPLE: During review of Modification #5, this study was found to be Not Human Subjects research. Please see the corresponding modification determination letter for more information.
c. Complete the steps to prepare and send the letter as indicated in INSTRUCTIONS: Prepare and Send Determination Letter (steps 5-12)
The parent study should now transition to Not Human Research for Not Research and Not Human Subjects Research determinations and UW Not Engaged for Not Engaged determinations.
INSTRUCTIONS: Not Human Subjects Modifications for IRB Reviewed Studies (No Change in Study Review Level)Purpose: Processing a Not Human Subjects modification that does not change the overall level of review for expedited or full board studies
With the exception of modifications that involve genomic data sharing, modifications that are “Not Human Subjects” do not need to be processed in Zipline. For modifications that do not involve genomic data sharing:
1. Request that the study team discard the submitted modification (or administratively withdraw the modification)
28

2. Provide any needed documentation to the study team via the Upload Regulatory Documents activity
3. Add a comment to tell the study team where to locate the needed documentation
If a modification that is Not Human Subjects and involves genomic data sharing is submitted for an expedited or full board study and the modification does not change the overall level of review for the study, the modification should be processed as Not Human Subjects. The parent study review must also be re-submitted in order to correct the pre-review information in the parent study Reviews Tab.
Submitting Modification Review Instructions (GDS Mods Only)1. Click Submit Pre-Review in the modification workspace
NOTE: Overall, the Pre-Review should indicate information that applies to the study as a whole. However, the Not Human Subjects determination must be indicated in Pre-Review to push the modification through the appropriate workflow.
a. Leave the regulatory oversight as previously determined (Question 1): This field is used for reporting purposes to identify research that is governed by a particular set of laws or rules. Only select the regulations that apply to the study. See the Pre-Review Worksheet for additional guidance.
b. Under Special Determinations, Populations, and Waivers (Question 2), select Not Human Subjects
c. Leave the risk level as previously determined (Question 3) d. Indicate that you are ready to submit the pre-review and click OK (Question 8)
NOTE: The modification should now be in Post-Review State 2. Click Finalize Documents in the modification workspace
a. Only documents that have been added or changed in the modification should be finalized
b. Documents that do not pertain to human subjects or to GDS should be removed during the review when possible
3. Follow the steps to Prepare and Send the Determination Letter a. In the Not Human Subjects letter template, add language to indicate that the
modification was determined to be Not Human Subjects and that the original determinations made for the study as a whole still apply
4. Update the Staff Data Entry Activity if needed
The study modification will now show Not Human Research as the modification status. The parent study status will still show as Approved but the review must be resubmitted in order to correct the Pre-Review information in the Reviews tab.
Updating the Parent Study Instructions 1. Click Submit Designated Review in the parent study workspace
NOTE: If the study was originally reviewed by the full board, click Submit Committee Review in the parent study workspace
a. Leave questions as completed in previous review
29

b. Add a note that the review is being resubmitted to update the pre-review information after processing modification X with a determination of Not Human Subjects
c. Indicate that you are ready to submit the review and click OK2. Click Edit Pre-Review in the parent study workspace
a. Uncheck Not Human Subjects in special determinations, populations, and waivers (Question 2)
b. Click OK 3. Click Send Letter and OK in the parent study workspace to push the study from Post-Review to
Approved 4. Click Add Comment
a. In the comment box, indicate that the original determination letter was resent to correct an administrative issue and that no changes to the letter were made (Question 1)
b. Indicate who should receive an email notification (Question 3)NOTE: The notification should be sent to the PI/PI Proxy/Primary Contact but may also be sent to the study team if appropriate.
The parent study should be in Approved state and the Reviews tab should no longer indicate Not Human Subjects in the Most Recent Pre-Review section.
INSTRUCTIONS: Changing an Expedited Study to Exempt or Changing an Exempt Study to Expedited Purpose: Changing the determination for an expedited study to exempt during review of a modification or changing the determination from exempt to expedited during review of a modification
If a change made during a study modification results in the level of review changing from expedited to exempt or vice versa, HSD staff must first submit the modification review indicating the new review level and then make sure that the parent study record is appropriately updated to reflect the updated review level.
Submitting Modification Review Instructions1. Click Submit Pre-Review in the modification workspace
a. Update the regulatory oversight (Question 1): This field is used for reporting purposes to identify research that is governed by a particular set of laws or rules. Only select the regulations that apply to the study. See the Pre-Review Worksheet for additional guidance.
30

NOTE: For Exempt determinations, in most cases no regulations will apply. For expedited determinations, the HHS Subparts should not be selected for non-federal research or funding agencies that have not subscribed to a particular subpart. See the Pre-Review Worksheet for additional information.
b. Skip Question 2 (Special Determinations, Populations, and Waivers) c. Add supporting documents if needed (Question 7)
i. The Pre-Review Worksheet should NOT be attached ii. Supporting documents may include any documents that support your
determination, such as an email from a consultant, as neededd. Indicate that you are ready to submit the pre-review and click OK (Question 8)
NOTE: The modification should now be in Pre-Review Completed State 2. Click Assign Designated Reviewer and assign yourself as the designated reviewer
NOTE: The modification should now be in Non-Committee Review state. 3. Click Submit Designated Review
a. Indicate that you do not have a conflicting interest (Question 1)NOTE: If you do have a conflicting interest, you cannot complete the review and the modification must be reassigned to another IRB Coordinator
b. Indicate Approved as the determination (Question 2)c. Indicate the new review level and categories (Question 3)d. Check the last day of approval period field (Question 4)
i. If the new review level is exempt, this should be blankii. If the new review level is expedited, the new expiration date should be entered
e. Upload the Master Checklist as a supporting document in Question 7 (Expedited Review ONLY)
f. Indicate that you are ready to submit the review and click OK (Question 8)4. Click Finalize Documents in the modification workspace
a. New Review Level is Exempt: Only finalize the IRB Protocol and other documents used to make the new determination (if any), any other attachments should not be re-finalized
b. New Review Level is Expedited: Finalize all documents- any documents that are not approved should be removed by the study team prior to submitting the designated review
5. Follow the steps to Prepare and Send the Determination Letter a. New Review Level is Exempt:
i. Use the Exempt Determination letter templateii. In the template, add language to indicate that a new determination of Exempt
was made for the study during review of the modificationb. New Review Level is Expedited
i. Use the Approval letter template ii. In the template, add language to indicate that the study was found to require
expedited review during review of the modification 6. Update the Staff Data Entry Activity to reflect the new review level
31

The study modification will now show the new review level and categories in the modification Reviews Tab. However, the review level does not automatically update appropriately in the parent study.
Updating the Parent Study Instructions 1. Click Submit Designated Review in the parent study workspace
a. Update the review level and categories as determined during review of the modification (Question 3)
b. Update the last day of approval period as appropriate (Question 4)i. If the new review level is exempt, this should be blank
ii. If the new review level is expedited, the new expiration date should be enteredc. Add a note that the study was found to require Exempt/Expedited review during the
review of modification Xi. If the study is going from exempt to expedited review, indicate that the master
checklist can be found with the modification review. EXAMPLE: The study was found to be eligible for an exempt determination during review of modification #5. EXAMPLE: The study was found to require expedited review during review of modification #1. The master checklist can be found with the modification review.
d. If the new review level is exempt, delete the previous master checklist (Question 7) e. Indicate that you are ready to submit the review (Question 8) and click OK
NOTE: The parent study will now be in Post-Review state. The determination letter must be resent to push the study to review complete state.
2. Re-prepare and re-send the initial determination letter a. Open the original approval letter in Word format (can be found under Draft Letter in the
Prepare Letter activity)b. Add a line in the original letter indicating that the study’s review level changed from
expedited to exempt/exempt to expedited during review of modification X and to see the modification letter for more information. EXAMPLE: During review of Modification #5, this study was found to be eligible for an exempt determination. Please see the corresponding modification determination letter for more information.EXAMPLE: During review of Modification #1, this study was found to require expedited review. Please see the corresponding modification determination letter for more information.
c. Complete the steps to prepare and send the letter
The parent study should now transition to Approved and the Review Tab should indicate the new level of review and categories.
32

Part V: Post-Review
INSTRUCTIONS: Review Required ModificationsPurpose: Verifying conditional approval responses for Zipline submissions
When the study team submits a Conditional Approval response, the submission goes to Modifications Submitted state in Zipline. If the conditional approval response cannot be verified, it can be sent back to the study team, to a designated reviewer, or to a committee meeting for additional review.
Review Required Modifications- Able to Verify1. Click Review Required Modifications 2. Update the dates if needed (Question 1)
a. Approval Date- Date the submission was conditionally approvedb. Effective Date- Date the conditional approval response is verified
NOTE: If an effective date was previously entered in during Committee Review, the new effective date will replace the old date.
c. Last Day of Approval Period- as determined during review3. Attach supporting documents, if any (Question 3)
NOTE: The Master Checklist is attached when the conditional approval determination is made, not when the conditional approval response is verified. If the Master Checklist needs to be updated, resubmit the designated review or the committee review to add the updated Checklist.
4. Indicate that the modifications were completed as required (Question 4)
Review Required Modifications- Unable to Verify- Return to Study Team1. Click Review Required Modifications 2. Update the dates if needed (Question 1)
a. Approval Date- Date the submission was conditionally approvedb. Effective Date- Blank c. Last Day of Approval Period- as determined during review
3. In the notes section, indicate why you were unable to verify that the modifications were completed as required
4. If needed, upload a letter outlining necessary changes 5. Indicate that the modifications were not completed as required (Question 4)
33

After the activity is completed, the PI, PI proxy, and primary contact receive a notification that modifications are required to secure approval. In the study workspace, they can view the notes and attached letter that were included in the Review Required Modifications activity.
Review Required Modifications- Unable to Verify- Assign for Additional Review
● Do NOT complete the Review Required Modifications activity● See INSTRUCTIONS Assign to Meeting to assign the conditional approval response to a
committee meeting for review. ● See INSTRUCTIONS Assign Designated Reviewer to assign the submission to a designated
reviewer.
INSTRUCTIONS: Finalize Documents Purpose: Used to watermark consent materials (consent forms, assent forms, and parental permission forms) and remove any tracked changes and comments from study documents after the final determination has been made
The Finalize Documents activity is available once a submission is in Post-Review State in Zipline. This activity (if applicable) should be completed before the final determination letter is prepared and sent, as it is no longer available once the submission is in Review Complete state. For example, when a submission is deferred or conditionally approved, the documents should not be finalized. Instead, they should be finalized once the submission is fully approved.
Finalizing the documents accepts the tracked changes and removes any comments to create a final version of the document. The draft version will still have the tracked changes. The draft and final documents appear on the Documents tab for the study. For any materials that were uploaded as consent forms by the study team, finalizing the document will apply the HSD approval stamp with the date of approval and convert the final version into a PDF.
Finalize Documents Steps 1. Click Finalize Documents2. Select the documents that are approved for the submission
NOTE: Uploaded Shared Regulatory Documents should NOT be finalized a. Initial Applications:
i. IRB Approval: Finalize all documents- in general any documents that are not approved should be removed by the study team prior to submitting the designated or committee review but exceptions may be made depending on the situation
34

ii. Not Research, Not Human Subjects, Not Engaged, and Exempt Determinations: Only finalize the IRB Protocol and other documents used to make the determination (if any)
1. Do NOT finalize consent materials for a determination2. Any other attachments should be left in draft form
b. Conversion Studies: The status report and any DSMB reports or other materials that are only part of the continuing review should not be finalized
c. Modifications: Only documents that have been added or changed in the modification should be finalizedNOTE: The documents tab indicates which documents were updated in the modification.
d. Continuing Review: No documents should be finalized3. Click OK
INSTRUCTIONS: Staff Data EntryPurpose: Used to enter and update required staff data entry for studies
The Staff Data Entry activity is intended to capture additional information for reporting purposes. It is available once a study is submitted to HSD and after the review has been completed. The Staff Data Entry activity is first completed during initial review, and updated as needed during continuing review and review of modifications. It is generally completed as part of Post-Review, but may be completed either before or after the determination letter is sent.
Staff Data Entry Steps 1. Click Staff Data Entry 2. Indicate or update responses to the questions on the form 3. Add supporting documents if needed using the document naming convention NOTE: Consultant emails that are relevant to the study as a whole should be uploaded here. 4. Click OK
INSTRUCTIONS: Upload Shared Regulatory DocumentsPurpose: Used to provide finalized regulatory documents such as Confidentiality Agreements and Authorization Agreements to the study team
35

The Upload Shared Regulatory Documents activity is intended to allow staff to easily upload regulatory documents that are visible to both HSD staff and the study team. Only HSD staff can upload documents using this activity- the study team cannot use this activity to upload. This activity is only available in the parent study and in reports of new information (RNI), and may be used any time after the study or RNI has been submitted to HSD. Uploaded regulatory documents are visible in the Documents tab.
NOTE: For a list of what documents HSD staff are responsible for uploading using the Upload Shared Regulatory Documents activity, see TABLE: Zipline Attachments.
Upload Shared Regulatory Documents Steps
TO ADD A NEW DOCUMENT:
1. Click Upload Shared Regulatory Documents 2. Use the Add button to upload a new shared regulatory document
a. Click Browse or Upload to select the appropriate fileb. Indicate the name of the documentc. Select the appropriate category for the documentd. If desired, include a version number
3. Click OK in the Add Attachment window and the Upload Shared Regulatory Documents window
TO ADD A NEW VERSION OF A PREVIOUSLY UPLOADED DOCUMENT: NOTE: The previous version remains available in the Document History.
1. Click Upload Shared Regulatory Documents 2. Click the Update button by the older document version
a. Click Browse or Upload to select the appropriate fileb. Indicate the name of the documentc. Select the appropriate category for the documentd. If desired, include a version number
3. Click OK in the Add Attachment window and the Upload Shared Regulatory Documents window
TO DELETE A PREVIOUSLY UPLOADED DOCUMENT:NOTE: Deleted documents can ONLY be found by clicking the Uploaded Shared Regulatory Documents activity in the History tab.
1. Click Upload Shared Regulatory Documents 2. Click the Delete button by the document to be deleted 3. Click OK in the Upload Shared Regulatory Documents window
36

INSTRUCTIONS: Prepare and Send the Determination Letter Purpose: Used to prepare and send the determination letter for all submissions in Zipline
The completion of this activity moves the submission to the Review Complete state.
Regardless of the determination, the steps to prepare and send the determination letter are the same. The letter templates available depend on the determination selected when submitting your review. If applicable, documents must be finalized before the determination letter is sent.
Prepare and Send the Determination Letter Steps 1. Make sure documents are finalized (if applicable)- See INSTRUCTIONS Finalize Documents2. Click Prepare Letter 3. Select the correct template from the dropdown list and click Generate 4. Click the link under draft letter to open the template5. Save the template to your computer and make all necessary revisions using the document
naming conventionNOTE: Changes to the template may need to be made depending on the submission type. For example, template language may need to be adjusted when sending an approval letter for a conversion study or a modification.
6. Close the revised letter7. In the Prepare Letter activity, click Upload Revision 8. Click Browse or Choose File (depending on your browser) and select your revised letter9. Remove the default title from the Prepare Letter window10. Click OK in the Prepare Letter window11. Click Send Letter 12. Open the PDF to confirm that the correct letter is attached13. Click OK to confirm that the letter should be sent
NOTE: The letter is not visible to the study team until the Send Letter activity is completed.
37

Part VI: IRB Meeting Preparation
INSTRUCTIONS: Edit Meeting Attendance Purpose: Used to manage IRB meeting attendance in Zipline
All committee members are able to confirm and decline attendance in Zipline, but committee member attendance information is collected outside of Zipline and entered by staff into the system using the Edit Meeting Attendance activity. HSD staff can edit reported meeting attendance as needed using the Edit Meeting Attendance activity. This activity is still available after the meeting is convened in Zipline.
Edit Meeting Attendance Steps1. In the meeting workspace, click Edit Meeting Attendance 2. Select the checkboxes for any members who have confirmed attendance outside of Zipline and
deselect the checkboxes for any members who have declined attendance outside of Zipline3. Click OK
INSTRUCTIONS: Remove Agenda Item Purpose: Used to remove an item from a meeting agenda
The Remove From Agenda activity is available for submissions that have been added to an IRB meeting in Zipline. After an item is removed from a meeting agenda, it must be assigned to a new meeting or to a designated reviewer as appropriate in order to complete the review.
Remove Agenda Item Steps1. In the submission workspace, click Remove From Agenda2. Notes and supporting documents may be added if needed but are not required3. Click OK
The submission will no longer appear in the meeting workspace but will still be in Committee Review state.
To reassign the item to a new meeting, see INSTRUCTIONS Assign to Meeting.
38

To assign the item to a designated reviewer, see INSTRUCTIONS Assign Designated Reviewer.
INSTRUCTIONS: Assign to MeetingPurpose: Used to assign or change the meeting at which the submission will be reviewed by the full board
The Assign to Meeting activity is available for all submissions that are in Pre-Review Completed State, Non-Committee Review State, or Committee Review State. This activity can be used to add the submission to an IRB meeting for review or to change the assigned meeting.
Assign to Meeting Steps
1. Click Assign to MeetingNOTE: Depending on the state of the submission, you may see Assign to Committee Review instead of Assign to Meeting. Complete the Assign to Committee Review activity and Assign to Meeting will appear as an option.
2. Select the appropriate meeting from the list3. Click OK
INSTRUCTIONS: Assign Reviewers for IRB Meetings Purpose: Used to assign reviewers for IRB meetings
Reviewers for IRB meeting agenda items can be added in 2 ways:● Use the Assign Reviewers activity in the meeting workspace to make assignments without going
into each submission workspace separately; OR● Use the Assign Reviewers activity within a submission workspace to make an assignment for one
submission onlyAfter a review assignment is made, the reviewer is not automatically notified. You can choose to notify assigned reviewers immediately after the assignment is made, or you can use the Notify Reviewers activity to send the notification at a later time.
39

Assign Reviewers from the Meeting Workspace Steps1. In the meeting workspace, click Assign Reviewers 2. Click Update by the an agenda item that needs a reviewer assigned3. Click Add 4. Click Select in the Add a Reviewer popup window, choose the reviewer from the list, and click
OK5. NOTE: The list displayed includes all committee members, regardless of attendance. 6. Select the role of the reviewer (Question 2) and click OK 7. Click OK in the Edit Agenda Item popup window8. Repeat steps 2-7 as needed for any remaining agenda items 9. Indicate whether or not you want to notify assigned reviewers at this time (Question 2)10. Click OK
The assigned reviewers should now show up in the reviewers/presenters column in the meeting workspace.
Assign Reviewers from the Submission Workspace Steps1. In the submission workspace, click Assign Reviewers 2. Click Add 3. Click Select in the Add a Reviewer popup window, choose the reviewer from the list, and click
OKNOTE: The list displayed includes all committee members, regardless of attendance.
4. Select the role of the reviewer (Question 2) and click OK 5. Click OK6. If desired, use the Notify Reviewers activity in the meeting workspace to send the assigned
reviewer a notification.
The assigned reviewer(s) should now show up in the reviewers/presenters column in the meeting workspace.
INSTRUCTIONS: Prepare and Send the Meeting Agenda Purpose: Used to prepare and send the IRB meeting agenda
The IRB meeting agenda is prepared using the Prepare Agenda activity in the meeting workspace. The agenda template merges assigned reviewer information, so reviewers should be assigned before the agenda is prepared. See INSTRUCTIONS Assign Reviewers for IRB Meetings.
40

The Prepare Agenda activity is also used to make any needed revisions to the agenda before the meeting- for example, if an item is added or removed to the agenda. It is available until the meeting is convened in Zipline.
After the Prepare Agenda activity has been completed, the Send Agenda activity becomes available. The Send Agenda activity notifies IRB committee members that the meeting agenda is ready for their review. If the agenda changes after it has been sent to the committee, the Send Agenda activity can be re-executed to send the updated agenda.
Prepare and Send the Agenda Steps1. In the meeting workspace, click Prepare Agenda2. Select the template from the dropdown list and click Generate 3. Click the link under draft agenda to open the template4. Save the template to your computer using the document naming convention and make all
necessary revisions 5. Close the revised agenda6. In the Prepare Agenda activity, click Upload Revision 7. Click Browse or Choose File (depending on your browser) and select the revised agenda8. Click OK in the Submit a Document window and the Prepare Agenda window9. Click Send Agenda10. Select yourself from the listNOTE: The meeting agenda should be forwarded to committee members with any additional information for the meeting.11. Click OK
41

Part VII: During and Post IRB Meeting
INSTRUCTIONS: Convene MeetingPurpose: Used to convene the IRB meeting in Zipline
The Convene Meeting activity should not be completed at the start of the IRB meeting. It should be completed as part of the post-meeting processing.
The Convene Meeting activity:
● Returns any submissions in the Clarification Requested state back to Committee Review so a decision can be recorded
● Removes the Prepare Agenda and Send Agenda activities
Convene Meeting Steps1. Click Convene Meeting
The meeting should now be in Meeting Convened state.
INSTRUCTIONS: Accept Meeting Minutes Purpose: Used to document the committee’s acceptance of the IRB meeting minutes
The Approve Meeting Minutes activity is available after the minutes have been generated and the meeting has been closed in Zipline. Meetings with minutes that are ready for the committee to review show up in the “Previous Meetings with Minutes for Approval” area in the next scheduled IRB meeting workspace. Once the committee has accepted the minutes, the Approve Meeting Minutes activity should be executed by HSD staff. This activity appears in the “Previous Meetings with Minutes for Approval” area in the current meeting and also in the meeting workspace for the minutes that are being accepted.
If the minutes have already been accepted but need to go back to the committee, see INSTRUCTIONS Resend Minutes to the Committee.
42
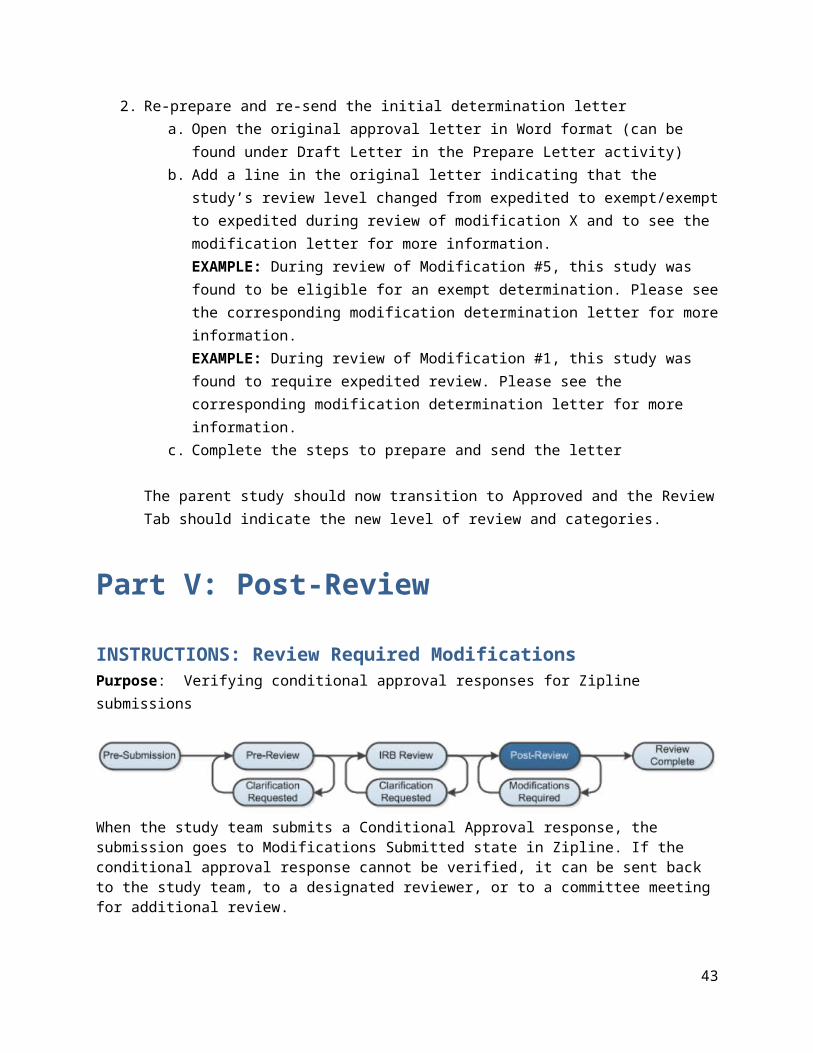
Accept Meeting Minutes Steps1. Click Approve Meeting Minutes 2. Select the checkbox to confirm acceptance3. Click OK
Once the minutes have been accepted, they will no longer appear in the “Previous Meetings with Minutes for Approval” area. If you need to re-access the approved minutes, navigate to the relevant meeting workspace and click the “Minutes” link near the top of the page.
INSTRUCTIONS: Submit Committee Review Purpose: Used to submit the committee’s review in Zipline after a committee meeting
The Submit Committee Review activity may be used to take notes during the committee meeting. When used to take meeting notes, the entered information should be saved but not submitted. The Committee Review is edited and submitted by HSD staff after the meeting.
Approval: Submit Committee Review Steps 1. Click Edit Pre-Review and make any changes (other than risk level) that were identified during
the meeting2. Click Submit Committee Review for the submission in either the meeting workspace or the
submission workspace 3. Select Approved as the Determination (Question 1)4. Indicate the risk level as determined by the committee (Question 2)
NOTE: This automatically overrides the risk level entered in the Submit Pre-Review activity5. Enter the dates
a. Approval Date- Date of meeting at which the item was approvedb. Effective Date- Same as approval date
NOTE: Zipline does not support the use of the 30 day rule to maintain approval date anniversaries at this time.
c. Last Date of approval period- As determined during review6. Enter or update the votes for the submission, including information about any substitutions or
partial attendance7. Enter or update any controverted issues and their resolutions (Question 6)
NOTE: If there are no controverted issues, indicate this. Do not leave this field blank. 8. Enter or update any determinations and findings that require documentation (Question 7)
NOTE: Indicate “None” if there are no additional determinations or findingsEXAMPLE: If they study involves children, include the category determined by the IRB.
9. Enter or update any additional information or notes (Question 8)
43

NOTE: Indicate “None” if there are no notes or additional informationEXAMPLE: If a consultant or prisoner advocate was involved in the review, this should be noted.
10. Attach supporting documents using the document file naming convention:a. Master Checklist b. Pre-Review Note (do not replace previous versions from past reviews of the item)c. Additional required checklists, if anyd. Any documents that support the committee’s determination, such as an email from a
consultant, as needed11. Indicate if you are ready to submit the review and click OK (Question 10)
NOTE: To save entered committee review information without submitting, indicate that you are not ready to submit and click OK
Conditional Approval: Submit Committee Review Steps1. Click Edit Pre-Review and make any changes (other than risk level) that were identified during
the meeting2. Click Submit Committee Review for the submission in either the meeting workspace or the
submission workspace 3. Select Modifications Required to Secure “Approved” as the Determination (Question 1)4. Indicate the risk level as determined by the committee (Question 2)
NOTE: This overrides the risk level entered in the Submit Pre-Review activity5. Enter the dates
a. Approval Date- Date of meeting at which the item was conditionally approvedb. Effective Date- Date of meeting at which the item was conditionally approved
NOTE: The system requires an effective date. This date will be updated when the conditional approval is verified.
c. Last Date of approval period- As determined during review6. Enter or update the votes for the submission7. Enter the conditions of approval, or write “See attached MRSA points” and add as a separate
supporting document (Question 5)NOTE: It is suggested that you write the conditions of approval in a separate Word document and paste them into this field after they have been finalized. Any needed review of the conditions of approval should take place outside of Zipline. This field is automatically merged into the determination letter and the minutes template, so the final version of the conditions of approval should be entered here and not the draft version.
8. Enter or update any controverted issues and their resolutions (Question 6)9. Enter or update any determinations and findings that require documentation (Question 7)
EXAMPLE: If they study involves children, include the category determined by the IRB. 10. Enter or update any additional information or notes (Question 8)
EXAMPLE: If a consultant or prisoner advocate was involved in the review, this should be noted. 11. Attach supporting documents using the document file naming convention:
a. Master Checklist
44

NOTE: If the master checklist needs to be updated when the conditional approval is verified, resubmit the committee review to update the checklist.
b. Pre-Review Note (do not replace previous versions from past reviews of the item)c. Additional required checklists, if anyd. Any documents that support the committee’s determination, such as an email from a
consultant, as needed12. Indicate if you are ready to submit the review and click OK (Question 10)
NOTE: To save entered committee review information without submitting, indicate that you are not ready to submit and click OK
Deferral: Submit Committee Review Steps1. Click Edit Pre-Review and make any changes (other than risk level) that were identified during
the meeting2. Click Submit Committee Review for the submission in either the meeting workspace or the
submission workspace 3. Select Deferred as the Determination (Question 1)4. Leave the risk level as determined in Pre-Review (Question 2)
NOTE: When the submission goes back to the committee, the risk level can be updated based on the committee’s determination
5. Enter the dates a. Approval Date- Leave blank b. Effective Date- Date of the meeting at which the item was deferred c. Last Date of approval period- Leave blank
6. Enter or update the votes for the submission7. Enter the deferral letter points, or write “See attached deferral points” and add as a separate
supporting document (Question 5)NOTE: It is suggested that you write the deferral points in a separate Word document and paste them into this field after they have been finalized. Any needed review of the deferral points should take place outside of Zipline. This field is automatically merged into the determination letter and the minutes template, so the final version of the deferral points should be entered here and not the draft version.
8. Enter or update any controverted issues and their resolutions (Question 6)9. Enter or update any additional information or notes (Question 8)
EXAMPLE: If a consultant or prisoner advocate was involved in the review, this should be noted. 10. Attach supporting documents using the document file naming convention:
a. Pre-Review Note (do not replace previous versions from past reviews of the item)11. Indicate that you are ready to submit the review and click OK (Question 10)
NOTE: To save entered committee review information without submitting, indicate that you are not ready to submit and click OK
45

Disapproval: Submit Committee Review Steps 1. Click Edit Pre-Review and make any changes (other than risk level) that were identified during
the meeting2. Click Submit Committee Review for the submission in either the meeting workspace or the
submission workspace 3. Select Disapproved as the Determination (Question 1)4. Leave the risk level as determined in Pre-Review (Question 2)5. Enter the dates
a. Approval Date- Leave blankb. Effective Date- Date of the meeting at which the item was disapproved c. Last Date of approval period- Leave blank
6. Enter or update the votes for the submission7. Enter or update any controverted issues and their resolutions (Question 6)8. Enter or update any determinations and findings that require documentation (Question 7) 9. Enter or update any additional information or notes (Question 8)
EXAMPLE: If a consultant or prisoner advocate was involved in the review, this should be noted. 10. Attach supporting documents using the document file naming convention:
a. Master Checklist b. Pre- Review Note (do not replace previous versions from past reviews of the item)c. Additional required checklistsd. Any documents that support the committee’s determination, such as an email from a
consultant, as needed11. Indicate if you are ready to submit the review and click OK (Question 10)
NOTE: To save entered committee review information without submitting, indicate that you are not ready to submit and click OK
INSTRUCTIONS: Prepare Meeting Minutes Purpose: Used to prepare the IRB meeting minutes
The Prepare Minutes activity is available in the meeting workspace.
Prepare Minutes Steps1. Click Prepare Minutes2. Select the template from the dropdown list and click Generate 3. Click the link under draft minutes to open the template4. Save the template to your computer using the document naming convention and make all
necessary revisions
46

a. In the voting member list, all full members and any present alternate members should be listed
b. INITIALS, MODIFICATIONS, AND CONTINUING REVIEW:i. The following RNI fields may be deleted for non-RNI submissions: RNI
Determinations (g), RNI action required (h), and RNI action plan (i)ii. The additional notes field may be deleted (m)
iii. All other fields should remainc. RNI:
i. Rename the Investigator field in the table as Submitterii. The following fields may be deleted: Motion (a), Risk Level (b), Last day of
approval period (c), Recommended changes and reasons (d), Determinations and findings that require documentation (f), and Additional notes (m)
iii. All other fields should remainiv. Minutes should point to any confidential information such as a consult or pre-
review note that was documented using a Private Comment5. Close the revised minutes6. In the Prepare Minutes activity, click Upload Revision 7. Click Browse or Choose File (depending on your browser) and select the revised minutes8. Click OK
The minutes will appear in the meeting workspace.
INSTRUCTIONS: Close MeetingPurpose: Used to close the IRB meeting in Zipline
The Close Meeting activity should be completed after all committee reviews have been submitted and the meeting minutes have been completed. Once the meeting is closed, the minutes will appear in the “Previous meetings with minutes for approval” area of the next meeting and the Approve Meeting Minutes activity becomes available.
Close Meeting Steps1. Click Close Meeting
The meeting should now be in Meeting Complete state.
47

Part VIII: Other IRB Committee Activities
INSTRUCTIONS: Edit Meeting DetailsPurpose: Used to edit details for previously created IRB meetings
IRB meeting dates are bulk uploaded by the site administrator. If the meeting date/time needs to be updated, the previously created meeting should be edited using the Edit Meeting Details activity. Meetings can only be deleted in Zipline by a site administrator. The meeting details can be edited until the meeting is convened in Zipline.
Edit Meeting Details Steps1. In the meeting workspace, click Edit Meeting Details 2. Update the meeting information as needed 3. Click OK
The meeting details should be updated in the meeting workspace.
INSTRUCTIONS: Create New MeetingPurpose: Used to create a new meeting that was not bulk uploaded
Meeting dates are typically bulk uploaded to Zipline so individual meetings do not need to be created.
If the meeting date/time needs to be updated, the previously created meeting should be edited instead of creating a new meeting. See INSTRUCTIONS Edit Meeting Details.
If a new meeting is needed in addition to the meetings already bulk uploaded, the Create New Meeting activity can be used.
Create New Meeting Steps1. Click Meetings in the lefthand navigation bar2. Click Create New Meeting under My Current Actions 3. Select the committee and enter the meeting information4. Click OK
48

The meeting should now be in created in Zipline.
INSTRUCTIONS: Update Committee Roster Purpose: Used to update the committee roster and designated reviewer list in Zipline
The committee roster can be updated as needed in Zipline. Before you can assign a person to a committee, the person's user account must include the IRB Committee Member role. Contact the Site Administrator to add this role to a user’s account.
In order to be selected as a Designated Reviewer, users must be included on at least one committee. In addition, a committee administrator must specify that a user is eligible to serve as a designated reviewer using the Update Eligible Designated Reviewers activity.
Update Committee Roster Steps1. Click Meetings in the lefthand navigation area 2. Select the Committees tab 3. Click the name of the committee to be updated4. Click Edit Members in the lefthand column 5. Use the Add, Remove, and Delete buttons to update the committee roster as needed for
committee administrators and committee members 6. When your revisions are complete, click OK in the Edit Members window
Update Designated Reviewer List Steps1. Click Meetings in the lefthand navigation area 2. Select the Committees tab 3. Click the name of the committee that requires updates to the designated reviewer list4. Click Update Eligible Designated Reviewers in the lefthand column 5. Use the checkboxes to make any needed revisions to the designated reviewer list
NOTE: Only users added to the committee roster in Zipline appear as eligible designated reviewers.
6. When your revisions are complete, click OK
49

INSTRUCTIONS: Resend Minutes to the CommitteePurpose: Used to resend previously accepted IRB meeting minutes to the committee
After the meeting minutes have been accepted using the Approve Meeting Minutes activity, the minutes can still be revised as needed using the Prepare Minutes activity.
Resend Minutes to the Committee Steps1. In the relevant meeting workspace, open the previously approved minutes that require revision
(under the Minutes heading at the top of the screen)2. Make any required revisions to the minutes document and save it to your computer using the
document naming convention3. In the relevant meeting workspace, click Prepare Minutes4. Click Upload Revision 5. Click Browse or Choose File (depending on your browser) and select the revised minutes6. Click OK
The minutes will automatically reappear in the “Previous Meetings with Minutes for Approval” area of the next IRB meeting workspace, prompting IRB members to review the revisions.
50

Part IX: Reports of New Information (RNI)
INSTRUCTIONS: Incoming Items- RNIPurpose: Used to locate and assign new Reports of New Information (RNI) submissions for review
Reports of new information are managed by the compliance team directly.
Incoming Items- RNI Steps
Step 1: Locate newly received RNI in Zipline● In the IRB Submissions area, go to the New Information Reports tab● Use filters to show only RNI in Pre-Review
o Filter by State- Pre-Review● Sort by the Coordinator column to show reports that have not yet been assigned to an IRB
coordinator for review● Click the name of the report to open
Step 2: Determine who should review the report of new information Do not assign to anyone who identifies as having a conflict of interest
Step 3: Assign the RNI to the appropriate reviewer● In the RNI workspace, click Assign Coordinator● Select the appropriate reviewer from the list and click OK ● The name of the assigned coordinator will now be listed in the RNI workspace
INSTRUCTIONS: Submit Report of New Information (RNI) Purpose: Used by HSD staff to submit a report of new information for review by the compliance team
A Report of New Information (RNI) is used by HSD staff to submit any IRB-related issues or relevant new information, including:
Breach (or risk of breach) of subject confidentiality or privacy (e.g. IRB failed to ensure Certificate of Confidentiality was in place before issuing IRB approval)
51

Inappropriate access of Protected Health Information (PHI) (e.g. IRB failed to grant a researcher-requested HIPAA waiver. Researcher subsequently accessed PHI.)
IRB Serious non-compliance IRB Continuing non-compliance
The RNI submitter may link the RNI to one or more studies when the RNI is submitted, but it is not required. The HSD Compliance Administrator can also link studies to a RNI at any time during review. The RNI submitter has full access to edit the RNI. However, the PI, any PI proxies, the primary contact, and study team members of all related (linked) studies are given read- only access to the RNI submission. The PIs, PI proxies, and primary contact receive the same e-mail notifications as the RNI submitter throughout the workflow.
Submit RNI Steps 1. From My Inbox, click Report New Information
NOTE: Reports of New Information can also be created from the study workspace once review is complete. This automatically associates (links) the RNI with the study.
2. Enter a short title for the submission (Question 1)NOTE: For most submissions we recommend using the following format:[PI Name]_[1-2 Word Descriptor of Event]e.g. Smith_CoC Missing, Smith_Missing IRB AA, Smith_HIPAA Waiver Not Granted
3. Enter the date you became aware of the information (Question 2)
4. In the description box, write, “see attached supplement” and upload the completed ZIPLINE SUPPLEMENT: IRB-related Report of New Information form. NOTE: If there is a related modification that will be submitted by the researcher, please note this here and associate (link) the RNI with the appropriate study(ies) in Question 5
52

5. Indicate your assessment of the RNI (Question 4) NOTE: The HSD compliance team may make a different determination after review of the RNI.
6. Add any related studies or modifications, if applicable (Question 5)NOTE: To add a related modification, first add the modification’s parent study. After adding the parent study, the RNI SmartForm must also be saved before the modification can be added.
a. Click Addb. Select the checkbox for the related study c. Click OK (may require scrolling)
7. Upload the ZIPLINE SUPPLEMENT: IRB-related Report of New Information (available on the F Drive) as a supporting document (Question 6)
8. Click Continue to automatically save the RNI and go to the RNI workspace NOTE: Click Save to save the RNI without going to the RNI workspace
9. If needed, click Edit RNI to make any needed changes to the form before submitting
10. Click Submit RNI and click OK to complete required verifications
53

The RNI does not go to the HSD Compliance Administrators for review until the Submit RNI activity has been completed. The RNI should transition from Pre-Submission state to Pre-Review state.
INSTRUCTIONS: Respond to Action RequiredPurpose: Used by HSD staff assigned as the responsible party to respond to required actions for Reports of New Information (RNI) that require further action
After reviewing a Report of New Information (RNI), the IRB or HSD Management may require specific actions to be taken in response to the reported issue. A responsible party is assigned by the IRB or HSD Management to complete the action. The responsible party can respond using the Submit Action Response activity when the action has been completed.
The system sends e-mail to notify the responsible party and the submitter of the RNI, as well as the PIs, PI proxies, and primary contacts of all related studies. The RNI also appears in My Inbox for the responsible party.
Respond to Required Actions1. View the details of the RNI submission and the action plan, as described here:
54

Read the letter: Click the letter link near the top of the RNI workspace. The letter typically contains the action plan and a summary of the IRB's or HSD Management’s decisions.
Review the action plan: Click the Action Plan tab and read the action plan listed there, plus any history of the action plan that might be helpful.
Review the RNI submission details: If you aren't already familiar with the details of the RNI, read it by clicking View RNI on the left side.
2. Take the actions required to complete the action plan
3. Prepare your written response as a document to upload or copy and paste into the activity
4. Click Submit Action Response to indicate that the action plan is complete
5. Add your written response in the notes field or as an attachment, including a summary of the actions taken to resolve the reported issue and complete the action plan
6. Click OK
55

INSTRUCTIONS: Add Related SubmissionPurpose: Used to add or remove a related submission to a report of new information
An RNI submission can be associated with one or more studies, or with no study at all. An RNI submission can also be associated with a modification to a study, such as a modification that is created in response to the reported information. When adding a related modification, you must add the study that is being modified first.
After creation of the RNI, the Add Related Submissions activity can be used to add related studies and modifications. The activity is available to the submitter, assigned IRB Coordinator, responsible party, and the PI or PI proxy of any study that is already related.
IMPORTANT: The study team of any related submissions is able to view the Submit RNI Pre-Review, Submit Designated Review, Submit Committee Review, and Assign Designated Reviewer activities in the history. Confidential material, such as pre-review notes or consults, should be documented in Zipline via a private comment.
Add Related Study Steps 1. In the RNI workspace, click Add Related Submission2. Click Add
NOTE: To remove a previously added submission, click Remove by that submission in the activity.
56

3. Click the checkbox for the study or studies that should be related4. Scroll down and click OK 5. Add any comments (Question 2) 6. Click OK
INSTRUCTIONS: Submit Not Non-Compliance DeterminationPurpose: Used by the Compliance Administrator to submit a determination of not non-compliance
Not non-compliance determinations are made during pre-review of RNI submissions.
See INSTRUCTIONS Request Clarification to follow up with the RNI submitter during your review.
When a RNI is found to be not non-compliance, this information must be entered into the Submit RNI Pre-Review activity in Zipline to push it forward in the workflow. If the RNI needs to be reviewed by the TOL or other review staff, indicate that additional review is required.
IMPORTANT: The study team of any related submissions is able to view the Submit RNI Pre-Review, Submit Designated Review, Submit Committee Review, and Assign Designated Reviewer activities in the history. Confidential material, such as pre-review notes or consults, should be documented in Zipline via a private comment.
Submit Not Non-Compliance Determination Steps 1. Click Submit RNI Pre-Review 2. Select “Allegation of non-compliance with no basis in fact” or “None of the above” as
appropriate (Question 1)NOTE: If the RNI needs to be reviewed by the TOL or other review staff, also check “additional review required”
3. Indicate if the RNI is in relation to an allegation of IRB non-compliance (Question 2)4. Enter an explanation of why the determination was made in the notes field (Question 3)
NOTE: Additional information pertinent to the review may be included in the notes field as needed. Note that this is visible to the study team of any related submissions.
5. Upload any supporting documents, if applicable (Question 4) NOTE: This is visible to the study team of any related submissions.
a. Click Addb. Click Browse or Choose File (depending on your browser)c. Select the supporting document from your computer and click Opend. Click OK
6. Indicate that you are ready to submit the review (Question 5)
57

NOTE: If you indicate no, the form will be saved without being submitted.7. Click OK to submit your determination
RNI that do not require additional review: Go directly to Acknowledged state Notifications are sent to the submitter and the PIs of any associated studies indicating that
review is complete A formal determination letter should be sent- See INSTRUCTIONS Prepare and Send
Determination Letter Require staff data entry- See INSTRUCTIONS RNI Data Entry
RNI that do require additional review: Go to Pre-Review Submitted State until the Compliance Administrator assigns a TOL or other
review staff as the designated reviewer- See INSTRUCTIONS Assign Designated Reviewer Note that the Assign Designated Reviewer activity is visible to the study team of any related
submissions
INSTRUCTIONS: Submit Minor Non-Compliance DeterminationPurpose: Used by the Compliance Administrator to submit a determination of minor non-compliance for a Report of New Information (RNI)
Minor non-compliance determinations are made during pre-review of RNI submissions.
See INSTRUCTIONS Request Clarification to follow up with the RNI submitter during your review.
When a RNI is found to be minor non-compliance, this information must be entered into the Submit RNI Pre-Review activity in Zipline to push it forward in the workflow. After the minor non-compliance determination is entered, the RNI should go to the Team Operations Lead (TOL) for review of the corrective action plan.
IMPORTANT: The study team of any related submissions is able to view the Submit RNI Pre-Review, Submit Designated Review, Submit Committee Review, and Assign Designated Reviewer activities in the history. Confidential material, such as pre-review notes or consults, should be documented in Zipline via a private comment.
Submit Minor Non-Compliance Determination Steps 1. Click Submit RNI Pre-Review 2. Select “Non-compliance that is neither serious nor continuing” AND “Additional review
required” (Question 1)
58

NOTE: If you do not select “Additional Review Required,” the RNI will go directly to Acknowledged state.
3. Indicate if the RNI is in relation to an allegation of IRB non-compliance (Question 2)4. Enter an explanation of why the determination was made in the notes field (Question 3)
NOTE: Additional information pertinent to the review may be included in the notes field as needed. Note that this information is visible to members of the study team of any related submissions.
5. Upload any supporting documents, if applicable (Question 4) a. Click Addb. Click Browse or Choose File (depending on your browser)c. Select the supporting document from your computer and click Opend. Click OK
6. Indicate that you are ready to submit the review (Question 5)NOTE: If you indicate no, the form will be saved without being submitted.
7. Click OK to submit your determinationNOTE: The RNI should now be in Pre-Review Completed state.
8. Click Assign Designated Reviewer9. Choose the appropriate TOL or other review staff from the dropdown list 10. Add any notes or supporting documents for the designated reviewerNOTE: This information is visible to members of the study team of any related submissions.11. Click OK
Once the TOL is assigned, the RNI should transition to Non-Committee Review and the assigned designated reviewer will receive an email notification.
INSTRUCTIONS: Designated Review of Reports of New Information (RNI)Purpose: Used by Team Operations Leads (TOLs) or other review staff to provide their review RNI, including review of items that are not considered non-compliance such as DSMB reports and review of corrective action plans associated with minor non-compliance
A RNI may be assigned to a designated reviewer, typically the Team Operations Lead (TOL), to review the corrective action plan for minor non-compliance or to review other information. Once the review is complete, the TOL should reassign the RNI to the Compliance Administrator assigned as IRB Coordinator and NOT complete the Submit Designated Review activity.
IMPORTANT: The study team of any related submissions is able to view the Submit RNI Pre-Review, Submit Designated Review, Submit Committee Review, and Assign Designated Reviewer activities in the
59

history. Confidential material, such as pre-review notes or consults, should be documented in Zipline via a private comment.
Designated Review of RNI Steps1. Review the information in the RNI
a. Click View RNI to view the submitted reportb. Click the Reviews tab to view the Compliance Administrator’s review
2. Determine whether you have a conflict of interest with reviewing the research. If so, re-assign the review back to the Compliance Administrator by clicking Assign Designated Reviewer and skip down to step 7 below.
3. Follow up with the RNI submitter as needed to request more information or request that a modification be submitted if applicablea. See INSTRUCTIONS: Request Clarification if the RNI is in Pre-Review or IRB Review statesb. See Review Required Actions- Action Not Completed, Follow Up with Submitter if the RNI is
in Post Review/Action Required states 4. After your review is complete, click Assign Designated Reviewer5. Select the reviewing Compliance Administrator as the Designated Reviewer6. In the notes for reviewer field, indicate your notes to the Compliance Administrator
EXAMPLE: “Corrective action plan is okay as described” or “We have requested that the study team submit a modification” or “This needs to go to IRB meeting X.”NOTE: This information is visible to the study team of any related submission.
7. In the notes for reviewer field, indicate whether you have a conflict of interest or not and if yes, describe the nature of the conflict.
8. Attach supporting documents, if any (Question 3)9. Click OK
INSTRUCTIONS: Submit RNI Designated Review Purpose: Used by the Compliance Administrator to submit designated review for a Report of New Information (RNI) that required designated review from the TOL or other review staff
After the Team Operations Lead (TOL) or other review staff completes designated review, the RNI is reassigned to the Compliance Administrator to submit the designated review and complete the RNI.
If the RNI should go to the full board, complete the Assign to Meeting activity and INSTRUCTIONS: Submit RNI Committee Review instead of following the instructions listed below.
IMPORTANT: The study team of any related submissions is able to view the Submit RNI Pre-Review, Submit Designated Review, Submit Committee Review, and Assign Designated Reviewer activities in the
60

history. Confidential material, such as pre-review notes or consults, should be documented in Zipline via a private comment.
Submit RNI Designated Review for Minor Non-Compliance Determinations Steps
1. Click Submit RNI Designated Review 2. Indicate that you do not have a conflicting interest (Question 1)
NOTE: If you do have a conflicting interest, you cannot submit designated review. 3. Leave the determinations and IRB non-compliance questions as previously determined
(Questions 2 and 3)4. Enter any notes (Question 4)5. Upload any supporting documents (Question 5)
NOTE: Any confidential documents should be documented in Zipline via a private commenta. Click Addb. Click Browse or Choose File (depending on your browser)c. Select the supporting document from your computer and click Opend. Click OK
6. Indicate that you are ready to submit the review NOTE: If you indicate no, the form will be saved without being submitted.
7. Click OK
The RNI will transition to Acknowledged state, but a formal letter should still be prepared and sent. See INSTRUCTIONS: Prepare and Send Determination Letter. RNI Data Entry should also be completed.
INSTRUCTIONS: Submit RNI Pre-Review for Full BoardPurpose: Used by the Compliance Administrator to submit determinations of unanticipated problem involving risks to subjects or others, suspension or termination of IRB approval, serious non-compliance, or continuing non-compliance
Determinations of unanticipated problem involving risks to subjects or others, suspension or termination of IRB approval, serious non-compliance, or continuing non-compliance are submitted in the Submit RNI Pre-Review activity in Zipline. When one of these determinations is entered, the RNI must go to an IRB meeting or a HSD Management Team meeting for review.
IMPORTANT: The study team of any related submissions is able to view the Submit RNI Pre-Review, Submit Designated Review, Submit Committee Review, and Assign Designated Reviewer activities in the history. Confidential material, such as pre-review notes or consults, should be documented in Zipline via a private comment.
61

Submit RNI Pre-Review for Full Board Steps 1. Click Submit RNI Pre-Review 2. Select “unanticipated problem involving risks to subjects or others,” “suspension or termination
of IRB approval,” “serious non-compliance,” and/or “continuing non-compliance” as appropriate (Question 1)
3. Indicate if the RNI is in relation to an allegation of IRB non-compliance (Question 2)4. Enter an explanation of why the determination was made in the notes field (Question 3)
NOTE: Additional information pertinent to the review may be included in the notes field as needed. Note that this information is visible to the study team of any related submissions
5. Upload any supporting documents, if applicable (Question 4) NOTE: Any confidential documents should be documented in Zipline via a private comment
a. Click Addb. Click Browse or Choose File (depending on your browser)c. Select the supporting document from your computer and click Opend. Click OK
6. Indicate that you are ready to submit the review (Question 5)NOTE: If you indicate no, the form will be saved without being submitted.
7. Click OK to submit your determinationNOTE: The RNI should now be in Pre-Review Completed state.
8. Click Assign to Meeting9. Choose the appropriate meeting (based on discussion with the TOL or with the Assistant
Director of Regulatory Affairs (ADRA) if it involves serious or continuing IRB non-compliance)10. Click OK 11. From the submission workspace, click Add Review Comments
a. Attach the Pre-Review note and any documentation of consultations as a supporting document to aid the committee’s review using the document naming convention (Question 3)
b. Click OK Once the meeting is assigned, the RNI should transition to Committee Review state.
INSTRUCTIONS: Submit RNI Committee Review Purpose: Used by the Compliance Administrator to submit committee review for a Report of New Information (RNI)
Determinations of unanticipated problem involving risks to subjects or others, suspension or termination of IRB approval, serious non-compliance, or continuing non-compliance are submitted in the
62

Submit RNI Pre-Review activity in Zipline. When one of these determinations is entered, the RNI must go to a full board meeting. RNI that do not involve one of these determinations can also be assigned to a full board meeting using the Assign to Meeting activity.
For full board RNI, the committee can indicate that follow-up action is required to resolve the reported issue, specify an action plan, and assign a responsible party for carrying out the plan.
IMPORTANT: The study team of any related submissions is able to view the Submit RNI Pre-Review, Submit Designated Review, Submit Committee Review, and Assign Designated Reviewer activities in the history. Confidential material, such as pre-review notes or consults, should be documented in Zipline via a private comment.
Submit RNI Committee Review- No Further Action Required Steps 1. Click Submit RNI Committee Review2. Leave the determinations and IRB non-compliance questions as determined previously
(Questions 1 and 3)3. Indicate that no further action was required (Question 3)4. Indicate the committee’s vote (Question 5)5. Enter additional notes, if needed (Question 6)
NOTE: This information is visible to the study team of any related submissions 6. Upload any supporting documents (Question 7)7. NOTE: Any confidential documents should be documented in Zipline via a private comment
a. Click Addb. Click Browse or Choose File (depending on your browser)c. Select the supporting document from your computer and click Opend. Click OK
8. Indicate that you are ready to submit the review (Question 8)NOTE: If you indicate no, the form will be saved without being submitted.
9. Click OK
The RNI transitions to Post-Review state. See INSTRUCTIONS Prepare and Send the Determination Letter for next steps.
Submit RNI Committee Review- Further Action Required Steps 1. Click Submit RNI Committee Review2. Leave the determinations and IRB non-compliance questions as determined previously
(Questions 1 and 3)3. Indicate that further action is required (Question 3)4. Indicate the responsible party and any additional responsible parties (Questions 4 and 5)
NOTE: Only the primary responsible party is able to submit the action response a. Click Select or Addb. Click the checkbox for the appropriate responsible partyc. Click OK
5. Describe the action plan (Question 6)
63

6. Indicate the committee’s vote (Question 7)7. Enter additional notes, if needed (Question 8)
NOTE: This information is visible to the study team of any related submissions 8. Upload any supporting documents, including the Pre-Review note when appropriate (Question
9)NOTE: Any confidential documents should be documented in Zipline via a private comment
a. Click Addb. Click Browse or Choose File (depending on your browser)c. Select the supporting document from your computer and click Opend. Click OK
9. Indicate that you are ready to submit the review (Question 10)NOTE: If you indicate no, the form will be saved without being submitted.
10. Click OK The RNI transitions to Post-Review state. See INSTRUCTIONS Prepare and Send the Determination Letter for next steps.
See INSTRUCTIONS Review Required Actions for next steps when the response is received.
INSTRUCTIONS: Review Required Actions Purpose: Used by the Compliance Administrator or the Team Operations Lead (TOL) to review the submitted required actions for reports of new information that the full board determined required further action
For RNI reviewed by the full board or the Management Team, the committee can indicate that follow-up action is required to resolve the reported issue, specify an action plan, and assign a responsible party for carrying out the plan. In Post-Review, the generated letter includes the action plan and is sent to the responsible party in addition to the other involved individuals.
If action is required, the submission transitions from Post-Review to Action Required when the letter is sent. The responsible party can respond using the Submit Action Response activity when the action has been completed. Then the completed action can be reviewed and verified in the Action Submitted state.
As the assigned IRB Coordinator, the Compliance Administrator receives notification when a response is submitted. The Compliance Administrator is ultimately responsible for completing the Review Required Actions activity once the completed action can be verified. The Compliance Administrator may also:
Assign the TOL or other review staff as a designated reviewer to review the response Assign the RNI back to the committee for review
64

To assist reviewers, the Action Plan tab displays the latest action plan and all activity history that may have specified or changed the action plan, reviewed the completed actions, or changed the responsible party.
Review Required Action- Actions Not Completed, Follow Up With Submitter Required Steps May be completed by Compliance Administrators, TOLs, or other review staff
1. Click Review Required Actions 2. Indicate that the actions were not completed as required (Question 1)3. Update the action plan as needed (Question 2) 4. Indicate any notes on what the responsible party must do to complete the action plan
NOTE: Alternatively, notes on what the submitter must do may be attached as a supporting document
5. Upload any supporting documents, if any (Question 5)6. Click OK
The RNI transitions back to Action Required state and reappears in the responsible party’s Inbox. The responsible party receives an email notification that additional action is required and can view the notes and attachments in the Review Required Action activity.
Review Required Action- Actions Completed Steps Only completed by Compliance Administrators
1. Click Review Required Actions 2. Indicate that the actions were completed as required (Question 1)
NOTE: The action plan field cannot be edited once you indicate that actions were completed as required.
3. Indicate any notes (Question 3) 4. Upload any supporting documents (Question 5)
a. Click Addb. Click Browse or Choose File (depending on your browser)c. Select the supporting document from your computer and click Opend. Click OK
5. Click OK
The RNI transitions to Post-Review state. See INSTRUCTIONS Prepare and Send the Determination Letter for next steps.
INSTRUCTIONS: RNI Data EntryPurpose: Used to enter and update required staff data entry for reports of new information (RNI)
65

The RNI Data Entry activity is intended to capture additional information for reporting purposes. It is available once a RNI is submitted to HSD and after the review has been completed. The RNI Data Entry activity is generally completed as part of Post-Review but can be updated as needed throughout the review.
RNI Data Entry Steps 1. Click RNI Data Entry 2. Indicate or update responses to the questions on the form 3. Add supporting documents if needed 4. Click OK
66

Part X: External IRB
INSTRUCTIONS: Confirm External IRBPurpose: Used to confirm that UW will rely on another IRB’s review for a study
The Confirm External IRB activity is available for studies that have indicated that an external IRB will act as the IRB of record for the study, as indicated in Question 8 on the Basic Information page of the study SmartForm. Any documents uploaded while completing the activity are available to staff and the research team in the Documents tab. After this activity is executed, the study goes immediately to External IRB state.
To send the application back to the research team for clarification or updates, see INSTRUCTIONS Request Clarification.
Steps When External IRB Cannot Be Confirmed1. If the study is not eligible for review by an external IRB and should not be reviewed by a UW IRB,
administratively withdraw the study2. If the study is not eligible for review by an external IRB because it requires review from a UW
IRB, complete the following steps:a. Request clarification from the study team and ask them to (1) update question 8 on the
Basic Information page to indicate that an external IRB will not act as the IRB of record and (2) edit their application for internal review, which includes completing and attaching the IRB Protocol form
b. When the study team responds after making the needed change:i. Use Assign to Team to assign the study to the appropriate review team based on
the PI’s departmentii. Use the Assign IRB Coordinator activity to assign the study to the appropriate
Team Operations Lead (TOL)iii. Use the Add Comment activity to inform the PI, Study Team, and IRB
Coordinator (TOL) that the study has been transferred to a UW review team for review because it is not eligible for review by an external IRB
Confirm External IRB Steps 1. In the study workspace, click Confirm External IRB 2. Add the completed IRB Reliance Agreement (if applicable), the Reliance Acknowledgement
Letter, the Checklist of Responsibilities, and any other needed documents a. Click Browse or Choose File (depending on your browser)b. Select the document from your computer c. Click OK in the Submit a Document window
67

d. The link to the uploaded agreement should now be displayed in the Confirm External IRB window
3. Click OK After the activity is completed, the study goes directly to External IRB state.
INSTRUCTIONS: External IRB Staff Data EntryPurpose: Used to enter and update required external IRB staff data entry for studies
The External IRB Staff Data Entry activity is intended to capture additional information for reporting purposes. It is available once a study is submitted to HSD and after the external IRB has been confirmed. The External IRB Staff Data Entry activity can be updated as needed during review, but it is generally completed as part of Post-Review.
External IRB Staff Data Entry Steps 1. Click External IRB Staff Data Entry 2. Indicate or update responses to the questions on the form
NOTE: The regulatory oversight field in Question 1 is used for reporting purposes to identify research that is governed by a particular set of laws or rules. Only select the regulations that apply to the study. The HHS Subparts should not be selected for non-federal research or funding agencies that have not subscribed to the particular subpart.
3. Add supporting documents if needed (Question 4)NOTE: Confidentiality Agreements should be uploaded as Shared Regulatory Documents
4. Click OK
INSTRUCTIONS: Update External IRB StatusPurpose: Used to update or close studies being reviewed by an external IRB
Once external IRB has been confirmed, both the study team and HSD staff are able to update the external IRB status as needed. This activity allows users to add or update any approval information from the external IRB, add any needed supporting documents, and close the study in Zipline. Any documents
68

that are uploaded in this activity are available in the Documents tab for both the study team and HSD staff.
Update External IRB Status Steps1. Click Update External IRB Status in the study workspace 2. Add or Upload Revision of the external IRB’s approval letter if desired (Question 2)
a. Click Browse or Choose File (depending on your browser)b. Select the approval letter from your computer c. Click OK in the Submit a Document windowd. The link to the letter should now be displayed in the Update External IRB Status window
3. Add or update the approval date information for the external IRB if desired (Question 3) 4. Add or Upload Revision of any supporting documents (Question 5)
a. Click Browse or Choose File (depending on your browser)b. Select the supporting document from your computer c. Click OK in the Submit a Document windowd. The link to the uploaded document should now be displayed in the Confirm External IRB
window 5. Indicate if the external IRB has closed the study (Question 6)
NOTE: If you indicate that the external IRB has closed the study, the study state transitions from External IRB to Closed.
69

Part XI: Study Closure, Termination, and Suspension
INSTRUCTIONS: Study ClosurePurpose: Used to close a study at the time of continuing review
When a continuing review report indicates that the top four research milestones listed on the SmartForm have been met, the parent study is closed automatically when the continuing review is approved. The top milestones indicate that all enrollment, interventions, and handling of subjects' private identifiable information is complete.
In the Post-Review state for a study being closed, the study closure letter template is presented instead of the approval template. The letter, along with the closure e-mail notification that is sent, informs the PI of the study closure.
Study Closure Steps1. If the study is eligible for closure, ensure that the research team has indicated that all 4 of the
top research milestones have been metNOTE: See INSTRUCTIONS: Request Clarification for how to request that the study team update the SmartForm if needed.
2. Click Submit Pre-Review NOTE: The Submit Pre-Review activity is read-only for continuing review reports.
3. Indicate that you are ready to submit the pre-review (Question 8)4. Click OK5. Click Assign Designated Reviewer6. Select yourself as the designated reviewer and click OK7. Click Submit Designated Review 8. Indicate that you do not have a conflicting interest (Question 1)9. Select “Approved” as the determination (Question 2)10. Leave the review level as previously determined (Question 3)
NOTE: For full board studies that were never reviewed under an expedited category, select “Expedited” for review level and “Other” as the category.
11. Select the date of closure for the approval date and the effective date (Question 4)12. Last day of approval period must be a future date- leave the date that is auto-generated
(Question 4)13. Enter notes about the closure, if any (Question 6)
70

14. Attach supporting documents, if any (Question 7)NOTE: Do not attach the Master Checklist for a study closure.
15. Indicate that you are ready to submit the review (Question 8)16. Click OK
The Study Closure template should be available in the Prepare Letter activity. After the letter is sent, the continuing review report will transition to Approved state, and the parent study will transition to Closed state.
INSTRUCTIONS: Administrative ClosurePurpose: Used by HSD staff to close an approved study without a continuing review report submission
The Close Study (Admin) activity is used to close an “Approved” study without requiring a continuing review report indicating closure from the study team. “Lapsed” studies do not require administrative closure in Zipline.
If the study is administratively closed, any open modifications or continuing review reports are automatically discarded in the system. RNI submissions will not be closed automatically.
Administrative Closure Steps1. Click Close Study (Admin) in the study workspace2. Indicate the reason for administrative closure in the Comments field3. Click OK4. Add a comment to inform the PI and the study team of the closure (an automatic notification is
not sent)
INSTRUCTIONS: Terminate StudyPurpose: Used to terminate approval for a study that has been approved
The Terminate activity is available for studies that have been approved in Zipline. Once a study is terminated, the study team is not allowed to take any further action on it in the system.
Terminate Study Steps 1. Click Terminate
71

2. Include the reason for termination in the notes field3. Click OK
INSTRUCTIONS: Suspend StudyPurpose: Used to suspend approval for a study that has been approved
The Suspend activity is available for studies that have been approved in Zipline. Once a study is suspended, the study team is not allowed to take any further action on it in the system until the review is resubmitted to lift the suspension.
Suspend Study Steps 1. Click Suspend 2. Include the reason for suspension in the comments field3. Click OK
72

Appendix: Quick Steps for Common Activities
Quick Steps: Document Naming ConventionsIn general all documents that HSD staff upload to Zipline should follow the same basic naming convention, but exceptions may be made
Naming Convention:
Letter/Document Type (include # if more than one)_Study ID_PI Last Name_Submission Type (for follow-on submissions, include the number included in the submission title, i.e., Mod #2)
Examples:
Pre-Review Letter_STUDY00000101_Simms_Modification2 Pre-Review Letter2_STUDY00000353_Fisher_Initial Approval_STUDY00000954_Smith_CRR4 Exempt_STUDY00000756_Jones_Initial NHS_STUDY00000324_Simms_Initial Master Checklist_STUDY00000465_Simms_Initial Authorization Agreement_STUDY00000465_Simms_Initial Confidentiality Agreement_STUDY00000465_Simms_Initial Approval_STUDY00000546_Jacobs_Conversion
For IRB Meeting Agendas and Minutes:
Naming Convention:
YYYY.MM.DD_Committee_Document Type
Examples:
2016.11.03_Committee J_Agenda 2016.05.23_Committee B_Minutes
73

Quick Steps: Finishing an Initial Expedited Review or Determination, Finishing an Expedited Modification or Continuing Review
1. Check for outstanding faculty advisor sign-off, if applicable (initial applications only)
2. Submit Pre-review Only select the regulations that apply to the study in the regulatory oversight field. The HHS
Subparts should not be selected for non-federal research or funding agencies that have not subscribed to a particular subpart.
Skip Special Determinations, populations, and waivers for exempt and expedited studies (Q2) Generally no supporting documentsFor Modifications: Leave regulatory oversight as previously checked and update other previously submitted Pre-Review if any changes are needed based on the modificationFor CRs and Study Roles Modifications: Submit Pre-Review is read-only
3. Assign designated reviewer (Generally assign to yourself- not needed for NR, NHS, Not Engaged)
4. Submit designated review (not needed for NR, NHS, Not Engaged)Attach master checklist here for expedited reviews
5. Finalize documents Initial Review:
NR, NHS, Not Engaged, Exempt: Finalize the IRB protocol and any other documents used to make your determination (no consent or recruitment docs should be finalized)Expedited: Finalize all documents
Modifications:Expedited: Only finalize any documents that changed in the modification- not necessary to complete if no documents change
CRs:Expedited: No documents should be finalized
6. Upload any Shared Regulatory Documents (Confidentiality Agreements, Authorization Agreements, etc.)Modifications: This activity is only available in the parent study. Update the activity in the parent study.
7. Staff data entry
8. Prepare and send letter File naming convention: Type_STUDYxxxx_last name_item.doc (example: Approval_STUDY00000012_Smith_Initial.doc)Modifications: Indicate risk level and whether a minor change on the letter. Only include determinations/waivers issued during review of the modification.
74

Quick Steps: Finishing a Conversion Application1. Submit Pre-review
Generally no supporting documents; please note that Pre-review is visible to researchers (bug) Skip Special Determinations, populations, and waivers (Question 2)
2. Assign designated reviewer (you)
3. Submit designated review: Attach Master Checklist here using the document naming convention
o If still conducting study procedures: select “Initial” and indicate “conversion” in the Notes section. Issue any waivers/determinations that are still applicable.
o For data analysis only conversions: select “CRR” Verify dates are correct
4. Finalize all documents: If still conducting study procedures: generally finalize everything except the status report For data analysis only conversions: generally do not finalize anything
5. Staff data entry
6. Upload Shared Regulatory Documents Upload a scan of relevant documents from the purple folder as a supporting document.
o Such as CoC’s, authorization agreements, Confidentiality Agreements
7. Prepare and send letter: Add anything noteworthy such as an IRB Authorization Agreement still being valid for the study
8. DORA data entry: SOP Zipline Conversion 3.5.8.2 says: “The Study Status for the corresponding DORA record should
be set to “Zipline” for studies converted into Zipline using an initial application and “Zipline Mod” for studies that are added as a modification to an existing Zipline record, (see Question 10 in the Conversion Casebook). In the Study Status Activity window that appears, select “initial” as the activity associated with the status change and then Save Study Status.”
9. Paper File: Put a green round sticker (with a Z written on it) on the all the file folders Full board conversions: shred the IRB copy
Quick Steps: IRB Coordinator Steps for Full Board Items1. Submit Pre-Review (step needed for new agenda items and for deferral responses)
75

Only select the regulations that apply to the study in the regulatory oversight field. The HHS Subparts should not be selected for non-federal research or funding agencies that have not subscribed to a particular subpart.
Skip Special Determinations, populations, and waivers (Question 2) For Modifications/ Deferral Responses: Update previously submitted Pre-Review if needed For CRs and Study Roles Modifications: Submit Pre-Review is read-only
2. Assign to Meeting
3. Upload the Pre-Review Note(Use the Add Review Comment activity and attach the note as a supporting document. If there is an older Pre-Review note from a previous review, do not replace the older version and attach a new version that is labelled with the new meeting date. The assigned IRB Coordinator and committee administrator receive an email notification when a review comment is added.)
4. Submit Committee Review (after the meeting)(Include finalized conditional approval and deferral points, if applicable)(Attach Master Checklist for MRSAs and Approvals)(Attach all pre-review memos for the committee)
5. Complete Post-Review Processing of the ItemDEFERRALS:
Prepare and Send the Determination Letter When the response is received, the item will return to Pre-Review state and appear in
the My Inbox area of the reviewing IRB Coordinator Follow Steps 1-3 to send a deferral response to an IRB meeting
CONDITIONAL APPROVALS: Prepare and Send the Determination Letter When the response is received, Review Required Modifications
FOR VERIFIED CONDITIONAL APPROVALS AND APPROVALS: Finalize Documents
o Initial Review: Finalize all documentso Modifications: Only finalize any documents that changed in the modificationo CRs: No documents should be finalized
Staff Data Entry Prepare and Send the Determination Letter
o Change the review date to the meeting date on the letterFile naming convention for letters: Type_STUDYxxxx_last name_item.doc (example: Approval_STUDY00000012_Smith_Initial.doc)
76

Quick Steps: IRB Meetings
BEFORE THE IRB MEETING:
1. Ensure attendance is correct in Zipline and edit if needed - Edit Meeting Attendance
2. Add or remove agenda items as needed- Remove Agenda Item or Assign to Meeting
3. Assign a primary reviewer and any other needed reviewers for each agenda item- Assign Reviewers
4. Prepare and send the meeting agenda - Prepare Agenda and Send Agenda (sends email notification with agenda to committee members)NOTE: If the agenda needs to be resent, just make the needed updates using the Prepare Agenda activity and send the new agenda using the Send Agenda activity.
5. Notify reviewers that they’ve been assigned an item a. Can be done as part of the Assign Reviewers activity before the agenda is sentb. Use the Notify Reviewers activity to send after the agenda is sent
6. Staff and committee members can request additional information from the study team before the meeting as needed- study team can provide a response but CANNOT edit the study
7. Request Clarification from Committee Member NOTE: We are recommending that committee members contact the TOL or assigned IRB Coordinator to send clarification requests on their behalf because these requests are not anonymous.
8. Staff and committee members can add review comments for others to read before the meeting- this includes the Pre-Review note
a. Add Reviewer Comments
RIGHT BEFORE AND DURING THE IRB MEETING:
1. If desired, download the minutes template to use for staff notes during the meetinga. Prepare Minutes to download template
NOTE: This must be done by someone listed as a Committee Administrator (generally the TOL or ADO)
2. Check to see if there are any agenda items in “Clarification Requested” statea. If needed, pull from the agenda by going into the submission workspace and clicking
“Remove from Agenda”
77

b. If it can stay on the agenda even though there’s an outstanding clarification request, no action is required
3. Edit Meeting Attendance to reflect actual attendance (if needed)
4. If applicable, indicate that the committee accepted past meeting minutesa. Approve Meeting Minutes
5. Project and take notes for each agenda item during the meeting
AFTER THE MEETING:
1. Convene meeting NOTE: The agenda cannot be updated once the meeting is convenedNOTE: Convening the meeting returns agenda items in the Clarification Requested state to Committee Review so that staff can take action on the study
2. Deferral/CA points reviewed by IRB Chair/IRB committee memberNOTE: It is recommended that staff write this in a separate Word document and that this occur via email- no need for this to be recorded in Zipline. The finalized deferral/CA points should be pasted into the Submit Committee Review activity
3. Submit Committee Review for agenda items- assigned IRB coordinator responsible NOTE: Committee Review must be submitted before the letters are sent and the minutes completed
4. Finalize documents for each agenda item (Approvals only)- assigned IRB coordinator responsible
5. Prepare and send determination letter for each agenda item- assigned IRB coordinator responsible
6. Draft the meeting minutes (All Committee Reviews must be submitted first)
7. Once minutes are complete, close the meeting to push the minutes to the next meeting’s workspace for the committee to review
78