instructions on creating computer- assisted music · 1 instructions on creating computer- assisted...
TRANSCRIPT
1
Instructions on Creating Computer- Assisted Music
Created by Barry Prophet using Audacity Software* for use in conjunction with the text Dance Composition: An Interrelated Arts Approach by Janice Pomer*Audacity music software is an open source freeware program developed by a team of designers led by Matt Burbeck, Joshua Haberman, and project leader Dominic Mazzoni.
2 Created by Barry Prophet for use with J. Pomer, 2009, Dance Composition: An Interrelated Arts Approach (Champaign, IL: Human Kinetics).
Download the stable version of Audacity (currently 1.2.6) from http://audacity.sourceforge.net. To create your sound library, perform the following steps:
1. Open the Audacity program. 2. Create a new folder and name it Book Sound Library. This folder should
be in the drive that you keep your projects in. 3. If you are using Mac OS X, insert the audio CD into your computer and
double-click on the CD icon to open the CD folder. 4. Select tracks 35 to 72 for import as WAV or AIFF files by clicking and
dragging the files from the CD disc folder to your newly created Book Sound Library folder.
If you are using a Windows operating system you will need to convert the files to WAV format. The more recent versions of Windows Media Player convert to WAV files, the earlier ones only convert to MP3. I recommend using iTunes but the choice is yours.
To choose AIFF and WAV import settings:
1. Choose iTunes > Preferences, click Advanced, and then click Import-ing.
2. Choose AIFF Encoder or WAV Encoder from the Import Using pop-up menu.
3. Choose Custom from the Setting pop-up menu. 4. In the dialog that appears, choose settings:
Sample Rate: The number of times per second the music waveforms •are captured digitally. The higher the sample rate, the higher the qual-ity and the larger the file size. Don’t choose a sample rate higher than the rate used to store the music originally or you’ll waste space. CD quality, for example, is 44.100 kHz, so choosing a higher rate when you’re encoding from a CD is unnecessary. In general, the best choice is Auto, which uses the same rate as the original music.
Sample Size: The number of bits used to store each sample taken as •the music is encoded. The higher the sample size, the better the qual-ity and the larger the file size.
5. Channels: If you don’t have stereo speakers or if your audio files are mon-aural (mono files are about half the size of stereo files), choose Mono. If you’ll be listening through headphones or a stereo system, choose Stereo or Auto. Auto converts monaural tracks into mono files and stereo tracks into stereo files.

3Created by Barry Prophet for use with J. Pomer, 2009, Dance Composition: An Interrelated Arts Approach (Champaign, IL: Human Kinetics).
The following list provides the name, description, and duration of each track. You may want to copy these names to your sound files for ease of identifica-tion.
35 Chinese Crash.wav 00:0636 Gong.wav 00:1137 Ride Cymbal Bell.wav 00:0738 Ride Cymbal.wav 00:0639 Splash Cymbal.wav 00:0640 Bass Drum Vintage.wav 00:0641 Snare Heavy.wav 00:0642 Tom Floor.wav 00:0643 Tom High.wav 00:0644 Tom Mid.wav 00:0645 Darbuka Phrase.wav 00:1146 Double Udu Sequence.wav 00:1447 Frame Drum Phrase.wav 00:0648 Japanese Tubular Bells.wav 00:1849 Junkbau Sequence.wav 00:0750 Percussion1.wav 00:0751 Santoor 3.wav 00:0752 Santoor Minor 1.wav 00:2153 Santoor Minor 2.wav 00:1154 Java 1.wav 00:0655 Java 2.wav 00:0656 Java 3.wav 00:0657 Java 4.wav 00:0658 Java 5.wav 00:0659 Java Roll 1.wav 00:0660 Java Roll 2.wav 00:0661 Java Roll 3.wav 00:0662 Java Roll 4.wav 00:0663 Java Roll 5.wav 00:0664 Four Footsteps on Gravel.wav 00:0665 Bottle Soccer Clip.wav 00:0666 Crash Carts Clip.wav 00:0667 Drops on Pipe.wav 00:1368 Factory Press.wav 00:3269 Pully Track Clip.wav 00:0670 Rain.wav 00:20

4 Created by Barry Prophet for use with J. Pomer, 2009, Dance Composition: An Interrelated Arts Approach (Champaign, IL: Human Kinetics).
Figure 1
71 Wire Res 2.wav 00:1672 Wire Res.wav 00:1473 Prophet Example.wav 00:38
When saving your Audacity projects, be sure to save in the same drive as the Sound Library. File management is very important when working with audio software, so it’s a good idea to create a folder named Audacity Projects now.
Listen to all the sounds through the computer’s media player. If you can’t hear the sounds, check that your computer sound card is functioning and that your speakers or headphones are connected. Take notes on which tracks are rhythmic, melodic, and atmospheric. Also note which sounds are of immediate interest to you.
Sample Rate and Bit FormatIf your sound file appears as a solid block of color instead of a waveform graphic, then the sound file bit rate is different from the software setting. Check Default Sample Format by clicking on Audacity in the top menu bar; go to Preferences, click on Quality, and confirm that the software Default Sample Format conforms to your sound file Default Sample Format (figure 1). All of the sound files in the Sound Library (CD) provided with this project have a sample format of 16 bits and a sample rate of 44100 Hz. Audacity’s default sample format is 24 bits and the default sample rate is 44100 Hz. Change the default sample format to 16 bits by clicking on the arrows and selecting 16-bit.

5Created by Barry Prophet for use with J. Pomer, 2009, Dance Composition: An Interrelated Arts Approach (Champaign, IL: Human Kinetics).
Think about the kind of dance you want to create, or think about the kind of music you would like to make to inspire the dance. Do you want the dance and music to work together or in contrast? The textural characteristics of the sounds chosen and how you organize them can create flow, tension, harmony, expectation, resolution, or surprise. After you have listened to all the sounds, open the Audacity program, go to the menu bar, click on File, and go to Save Project As.
Be sure to save this file in the folder you named Audacity Projects. (Failure to do this will allow the software to choose its own destination, usually the Book Sound Library folder but not always.) This is when good file management becomes important. A media folder with all your sounds named _data will be created immediately and stored in the Audacity Projects folder. Once the project file has been closed, reopened, and closed, a backup file with the extension .aup.bak will be created and stored with your project file and media folder. Do not open the media folder and take files out of it or use them as if they are sound files! Do not use the backup file unless your main project file with the extension .aup has been lost or will not open.
Name your project and ensure that the project destination is the Audacity Projects folder. Save. Confirm this procedure by going to the designated drive and viewing your Audacity Projects folder (figure 2). Observe the file extension .aup. This identifies the file as an Audacity project file.
Figure 2
6 Created by Barry Prophet for use with J. Pomer, 2009, Dance Composition: An Interrelated Arts Approach (Champaign, IL: Human Kinetics).
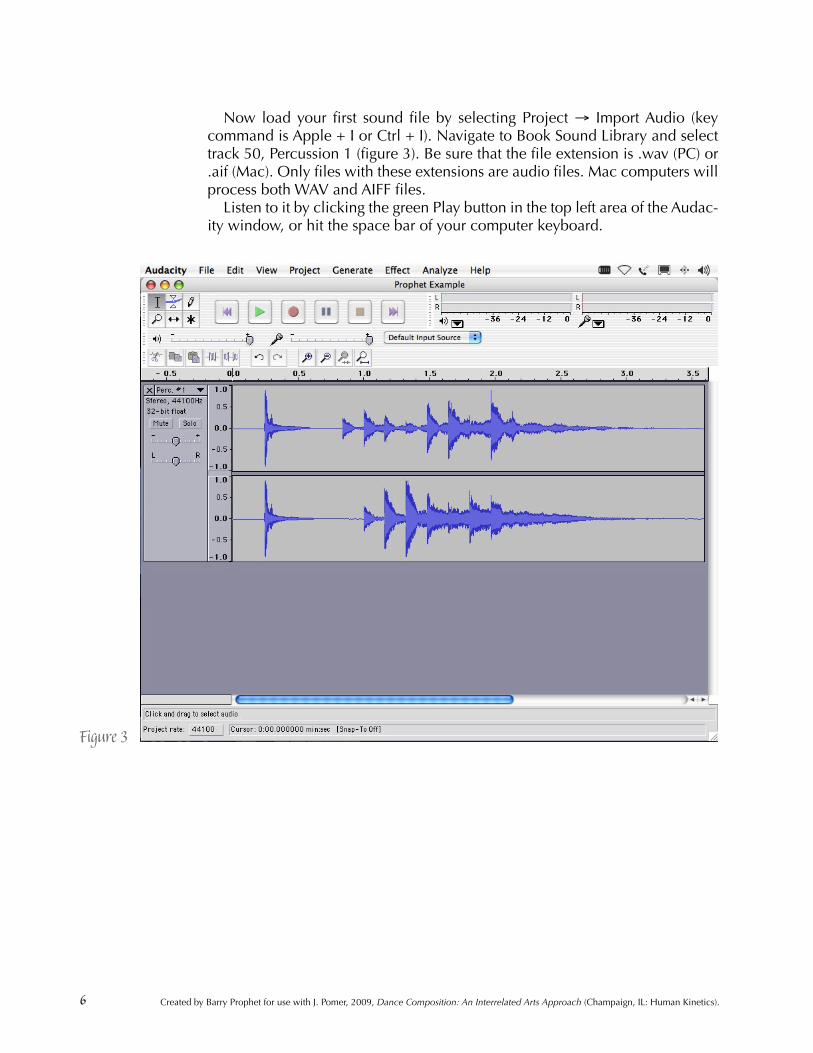
Now load your first sound file by selecting Project → Import Audio (key command is Apple + I or Ctrl + I). Navigate to Book Sound Library and select track 50, Percussion 1 (figure 3). Be sure that the file extension is .wav (PC) or .aif (Mac). Only files with these extensions are audio files. Mac computers will process both WAV and AIFF files.
Listen to it by clicking the green Play button in the top left area of the Audac-ity window, or hit the space bar of your computer keyboard.
Figure 3

7Created by Barry Prophet for use with J. Pomer, 2009, Dance Composition: An Interrelated Arts Approach (Champaign, IL: Human Kinetics).
If you see a stereo waveform but can’t hear anything, check sound card and audio out computer connections and Audacity Preferences → Audio I/O → Playback → Device (figure 4). If the track display is a pair of thin straight lines or a solid block of color, review the previous section regarding sample rate and bit format. If that doesn’t solve the problem, close the Audacity program without saving. Reopen Audacity and click Import Audio. If your audio file is still not working properly, click on a blank space in the Audacity window to ensure you are in the Audacity program, then go to Help in the menu bar.
Figure 4
There are many ways to start a composition. Some people like to start with a foundation of either rhythmic or atmospheric elements; others like to begin with a melodic or dominant motif. It’s your choice.
The following is a process journal of how I created Prophet Example. Read and perform all the following actions and you will create a copy of the Prophet Example.
Listen to track 73, Prophet Example, included on the music CD provided before you begin this exercise to hear the piece you will be making. Listen again when you’re finished to confirm successful completion.
The example contains the outcome of most functions and procedures you need in order to make your own composition. After completing this instruc-tional exercise, you will have the basic tools to create your own 2- to 3-minute composition.

8 Created by Barry Prophet for use with J. Pomer, 2009, Dance Composition: An Interrelated Arts Approach (Champaign, IL: Human Kinetics).
Since you’ve already loaded Percussion 1, click on Project → Import Audio → track 63, Java Roll 5 (figure 5). To fully view multiple tracks, go to View in the Audacity menu bar and select Fit Vertically. The View drop-down menu also provides the Fit in Window function with key commands.
All sound files start at zero. Some of the clips start with silences or fade-ins.Rarely is it effective to have two strong sounds occurring simultaneously. In
this case, the desired opening to the piece is Percussion 1 and then Java Roll 5. To determine where to place Java Roll 5, select the Solo button in the Percussion 1 track header and press Play. Listen to the sound and watch the time scale to see where the Java Roll 5 sound should begin. Move the cursor to the 3-second position in the Percussion 1 waveform area slightly below the time scale, and click on that spot to mark the location.
For precise positioning, use the cursor arrow keys on the computer keyboard. Deselect Percussion 1 solo button. Go to the toolbar in the top left corner and select Time Shift Tool; confirmation of this selection is the highlighting of the icon and text display in the bottom left corner. You can move the cursor over all the tools to learn their names and functions.
Figure 5

9Created by Barry Prophet for use with J. Pomer, 2009, Dance Composition: An Interrelated Arts Approach (Champaign, IL: Human Kinetics).
Using the Time Shift Tool, slide Java Roll 5 graphic into the 3-second posi-tion, which is marked by the vertical line extending from the time scale down to the bottom of Percussion 1 waveform. Click on View in the Audacity menu bar and select Fit Vertically and Fit in Window. Click on the Rewind and Play buttons to hear both tracks.
Save your work by keying Ctrl + S (on a PC) or Apple + S on a Mac, or select-ing File → Save Project regularly to protect the project against lost work in the event of a software freeze, crash, or user error. Audacity menu Edit → Undo (or keying Ctrl + Z on a PC or Apple + Z on a Mac) is unlimited and can be very useful. You can erase errors or retrace steps.
Go to Project → Import Audio → track 67, Drops on Pipe (figure 6). Drops on Pipe will benefit aesthetically through the application of fades to the begin-ning and end of the clip. Return to the toolbar in the top left corner and choose Selection Tool. Click on empty space to the left of the wave graphic to ensure the file is not highlighted. Take the cursor to the edge of the graphic and click and drag to highlight the first 0.2 second of the sound file. The readout is at the bottom of the Audacity window and is calibrated to a hundred-thousandth of a second (.000001). In this manual numbers are rounded to the tenth of a second. Go to the Audacity menu bar at the top of the window, click Effect, and select Fade In. You could repeat the process at the end of the sound file by applying the fade, but in this case it is better to wait until more of the piece is created. Save.
Figure 6
10 Created by Barry Prophet for use with J. Pomer, 2009, Dance Composition: An Interrelated Arts Approach (Champaign, IL: Human Kinetics).
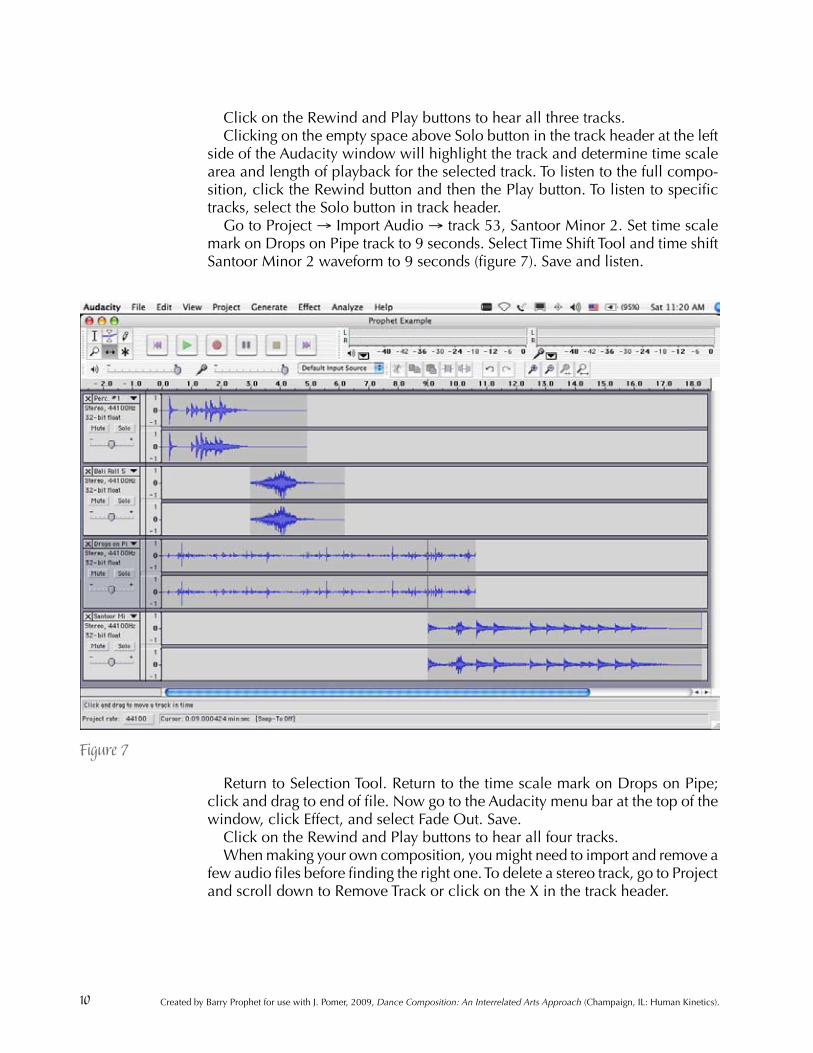
Click on the Rewind and Play buttons to hear all three tracks.Clicking on the empty space above Solo button in the track header at the left
side of the Audacity window will highlight the track and determine time scale area and length of playback for the selected track. To listen to the full compo-sition, click the Rewind button and then the Play button. To listen to specific tracks, select the Solo button in track header.
Go to Project → Import Audio → track 53, Santoor Minor 2. Set time scale mark on Drops on Pipe track to 9 seconds. Select Time Shift Tool and time shift Santoor Minor 2 waveform to 9 seconds (figure 7). Save and listen.
Return to Selection Tool. Return to the time scale mark on Drops on Pipe; click and drag to end of file. Now go to the Audacity menu bar at the top of the window, click Effect, and select Fade Out. Save.
Click on the Rewind and Play buttons to hear all four tracks.When making your own composition, you might need to import and remove a
few audio files before finding the right one. To delete a stereo track, go to Project and scroll down to Remove Track or click on the X in the track header.
Figure 7

11Created by Barry Prophet for use with J. Pomer, 2009, Dance Composition: An Interrelated Arts Approach (Champaign, IL: Human Kinetics).
Figure 8
Go to Project → Import Audio → track 71, Wire Res 2. Set time scale mark on Santoor Minor 2 track to 5 seconds. Select Time Shift Tool and time shift Wire Res 2 waveform to 5 seconds (figure 8). Save.
12 Created by Barry Prophet for use with J. Pomer, 2009, Dance Composition: An Interrelated Arts Approach (Champaign, IL: Human Kinetics).
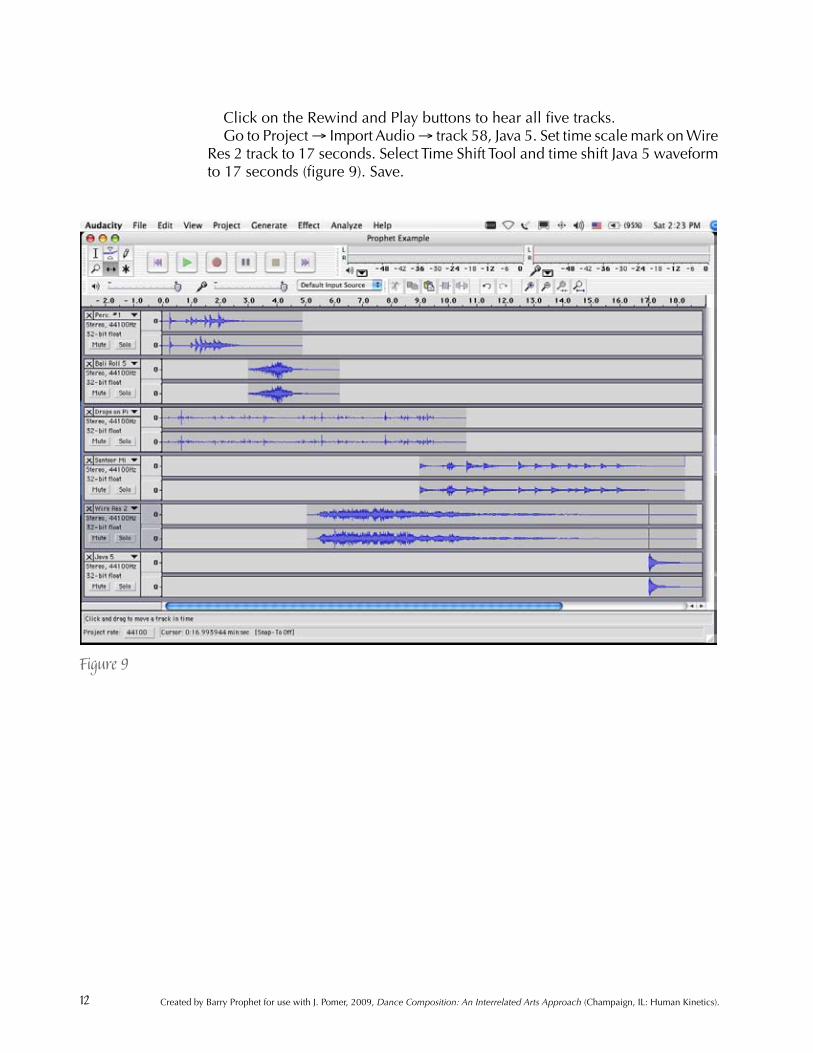
Click on the Rewind and Play buttons to hear all five tracks.Go to Project → Import Audio → track 58, Java 5. Set time scale mark on Wire
Res 2 track to 17 seconds. Select Time Shift Tool and time shift Java 5 waveform to 17 seconds (figure 9). Save.
Figure 9
13Created by Barry Prophet for use with J. Pomer, 2009, Dance Composition: An Interrelated Arts Approach (Champaign, IL: Human Kinetics).
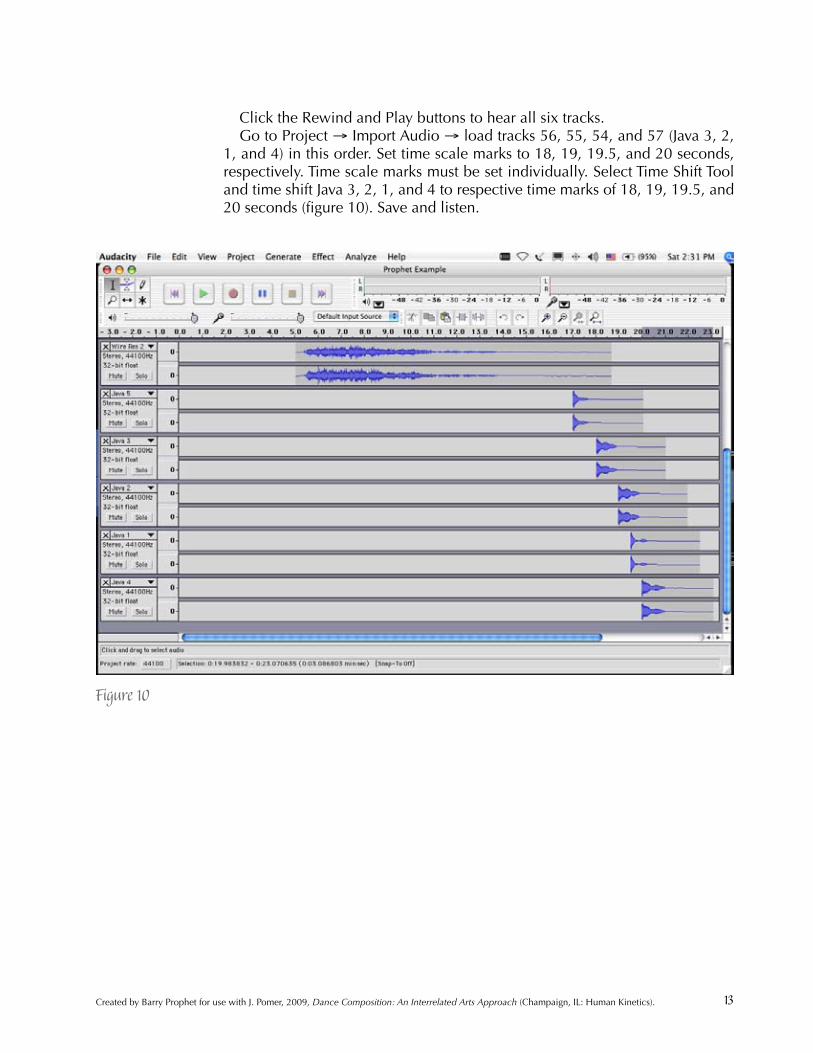
Click the Rewind and Play buttons to hear all six tracks.Go to Project → Import Audio → load tracks 56, 55, 54, and 57 (Java 3, 2,
1, and 4) in this order. Set time scale marks to 18, 19, 19.5, and 20 seconds, respectively. Time scale marks must be set individually. Select Time Shift Tool and time shift Java 3, 2, 1, and 4 to respective time marks of 18, 19, 19.5, and 20 seconds (figure 10). Save and listen.
Figure 10
14 Created by Barry Prophet for use with J. Pomer, 2009, Dance Composition: An Interrelated Arts Approach (Champaign, IL: Human Kinetics).
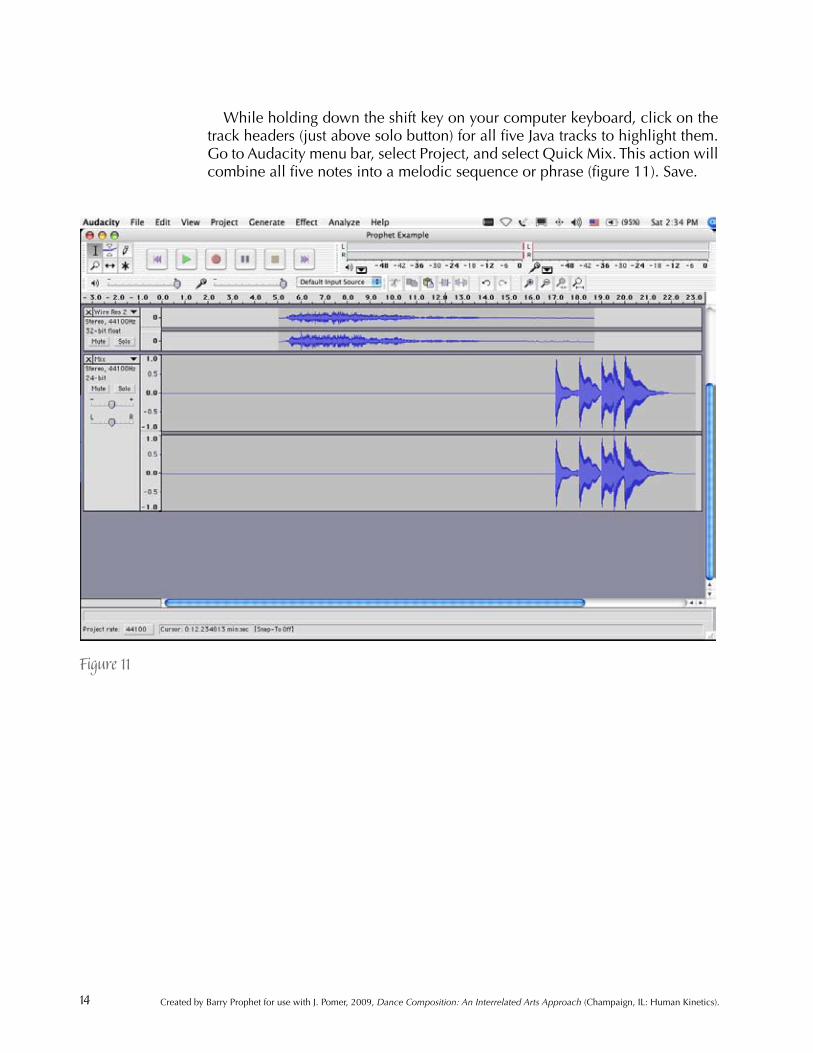
While holding down the shift key on your computer keyboard, click on the track headers (just above solo button) for all five Java tracks to highlight them. Go to Audacity menu bar, select Project, and select Quick Mix. This action will combine all five notes into a melodic sequence or phrase (figure 11). Save.
Figure 11

15Created by Barry Prophet for use with J. Pomer, 2009, Dance Composition: An Interrelated Arts Approach (Champaign, IL: Human Kinetics).
Click on the Rewind and Play buttons to hear all six tracks.Go to Project → New Stereo Track. Highlight the Mix track that was just cre-
ated out of the five Java Notes. Go to Edit → Copy. Click on empty space in the newly created Audio Track, and go to Edit → Paste. With the Time Shift Tool, nudge the new file to the right the smallest amount possible (figure 12). Save.
Figure 12
Click on the Rewind and Play buttons to hear all seven tracks.Fade out on Wire Res 2 from 17 seconds to the end. Save and listen.Rename the last two tracks and reduce Gain. If the window is set to fit in
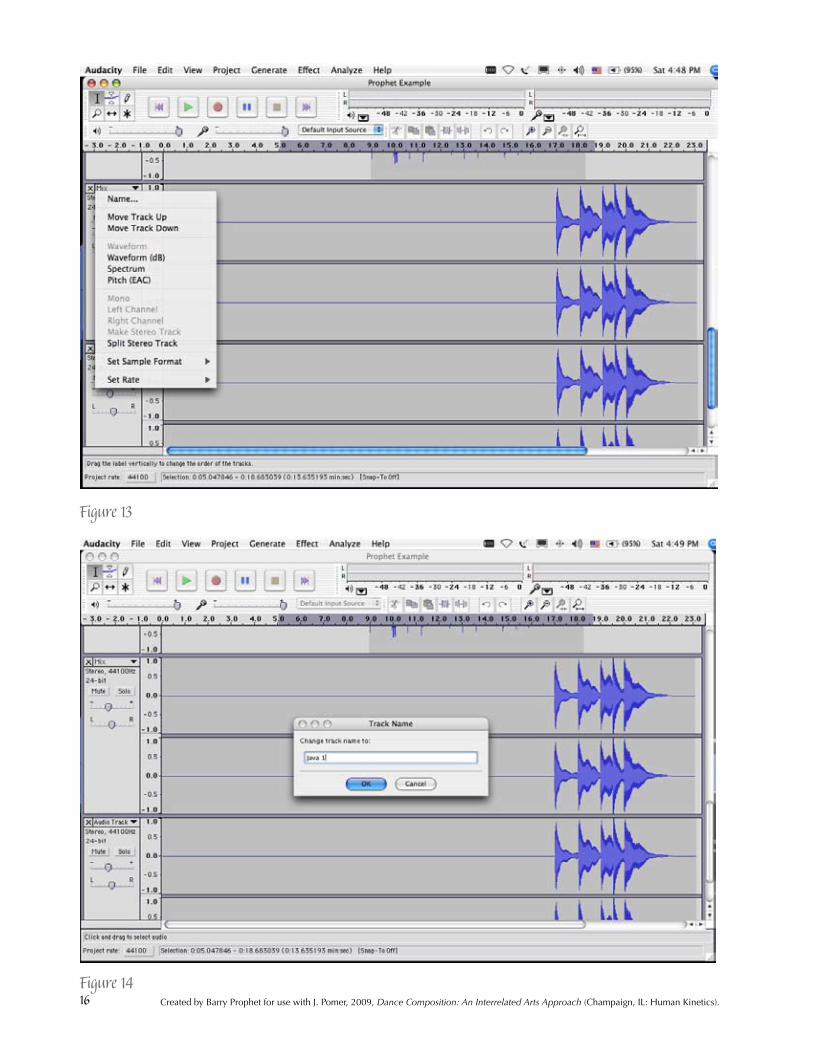
screen, save changes, close, and reopen. Now all track header controls are available. Click on the arrow beside the track name in the track header (figure 13). Select Name; rename the tracks Java 1 and Java 2 (figure 14). Click on slider with minus and plus signs on left and right, respectively (figure 15). Slide to Gain: −6 dB for both Java 1 and Java 2. Save and listen.
16 Created by Barry Prophet for use with J. Pomer, 2009, Dance Composition: An Interrelated Arts Approach (Champaign, IL: Human Kinetics).
Figure 13
Figure 14

17Created by Barry Prophet for use with J. Pomer, 2009, Dance Composition: An Interrelated Arts Approach (Champaign, IL: Human Kinetics).
These tracks were a bit loud in comparison to the other tracks. When working on your own composition, if you find that a track seems to change volume sud-
denly, it will be because you accidentally clicked on the track volume control. Depending on the size of your computer screen, this is more likely to happen when you’ve created more than four tracks and the gain control is dropped from track header display.
The effect created by the Java 1 and 2 tracks can be blended into one stereo track to save space and preserve the integrity of this motif. In percussion, two notes played very close together but not simultaneously are called a flam. This device is employed by percussionists in Indonesia and throughout the world. Highlight both tracks, go to Project → Quick Mix, and rename as Java Blend. Save and listen.
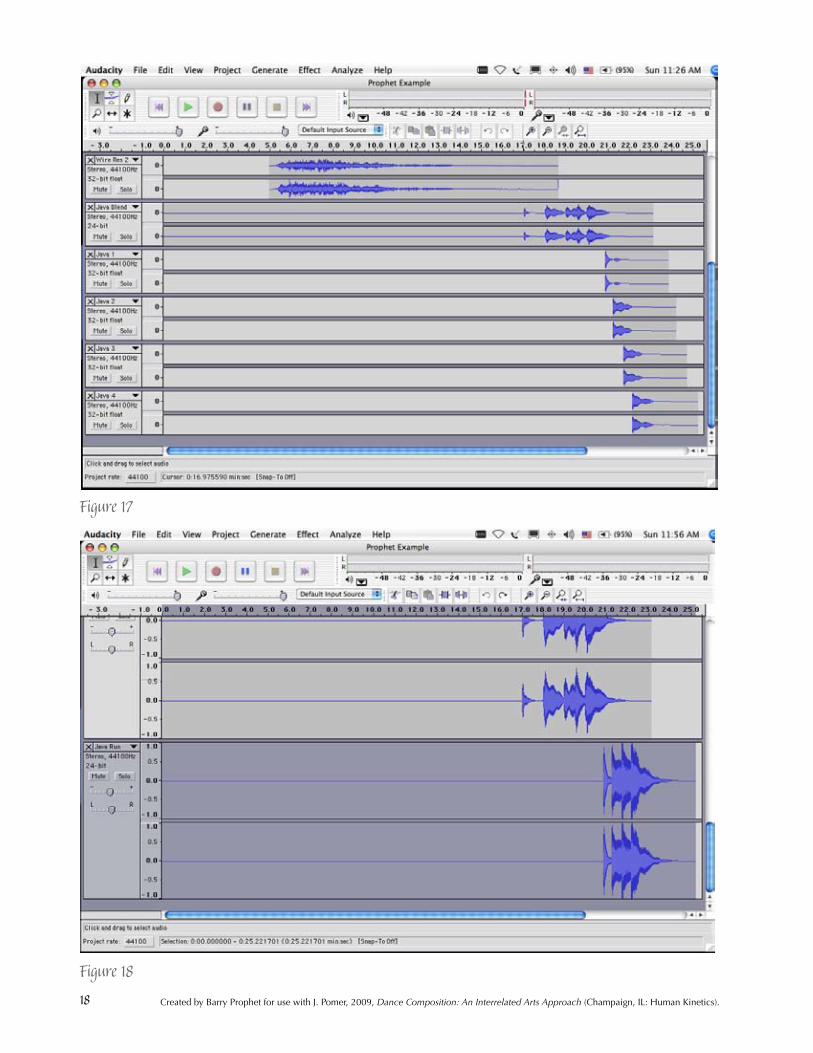
Go to Project → Import Audio. Choose tracks 54, 55, 56, and 57, Java 1, 2, 3, and 4 in this order. Set time scale marks to 20.83, 21.21, 21.69, and 22.13 seconds, respectively. Select Time Shift Tool and time shift Java 1, 2, 3, and 4 to respective time marks of 20.83, 21.21, 21.69, and 22.13 seconds (figure 17). Save and listen.
Highlight all four tracks, go to Project → Quick Mix, rename as Java Run, and reduce to Gain: −3 (figure 18). Save and listen.Figure 15
Figure 16
18 Created by Barry Prophet for use with J. Pomer, 2009, Dance Composition: An Interrelated Arts Approach (Champaign, IL: Human Kinetics).
Figure 17
Figure 18

19Created by Barry Prophet for use with J. Pomer, 2009, Dance Composition: An Interrelated Arts Approach (Champaign, IL: Human Kinetics).
Highlight and copy Java Run.Go to Project → New Stereo Track. Highlight the Mix track that was just cre-
ated out of the four Java Notes. Go to Edit → Copy. Click on empty space in the newly created Audio Track, and go to Edit → Paste.
Create a new stereo track and paste to new track and rename it Java Run 2.Set time scale to 1.75 seconds and time shift to that position. Reduce to Gain:
−3 (figure 19). Save and listen.
Figure 19
20 Created by Barry Prophet for use with J. Pomer, 2009, Dance Composition: An Interrelated Arts Approach (Champaign, IL: Human Kinetics).
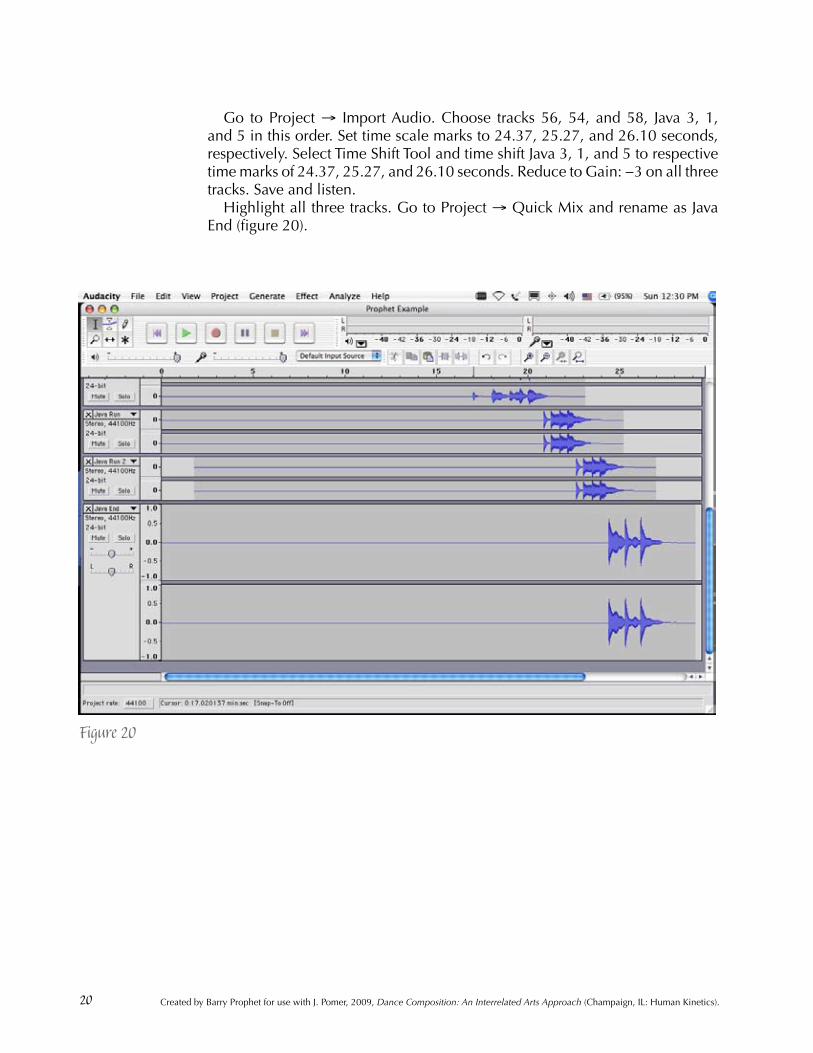
Go to Project → Import Audio. Choose tracks 56, 54, and 58, Java 3, 1, and 5 in this order. Set time scale marks to 24.37, 25.27, and 26.10 seconds, respectively. Select Time Shift Tool and time shift Java 3, 1, and 5 to respective time marks of 24.37, 25.27, and 26.10 seconds. Reduce to Gain: −3 on all three tracks. Save and listen.
Highlight all three tracks. Go to Project → Quick Mix and rename as Java End (figure 20).
Figure 20

21Created by Barry Prophet for use with J. Pomer, 2009, Dance Composition: An Interrelated Arts Approach (Champaign, IL: Human Kinetics).
Figure 21
Return to Java Run 2, highlight the track, and go to Effect drop-down menu and select Change Pitch. Select up, type 100 Percent Change, and click OK (figure 21). Save and listen.
Return to Java Run. Select the section of Java Run from 20.81 to 25.19, copy it, and paste it back into Java Run at 25.19 (figure 22). Save and listen.
Return to Java Run 2. Select the section of Java Run 2 from 22.52 to 26.94, copy it, and paste it back in to Java Run 2 at 26.94 (figure 23). Save and listen.

22 Created by Barry Prophet for use with J. Pomer, 2009, Dance Composition: An Interrelated Arts Approach (Champaign, IL: Human Kinetics).
Figure 22
Figure 23
23Created by Barry Prophet for use with J. Pomer, 2009, Dance Composition: An Interrelated Arts Approach (Champaign, IL: Human Kinetics).
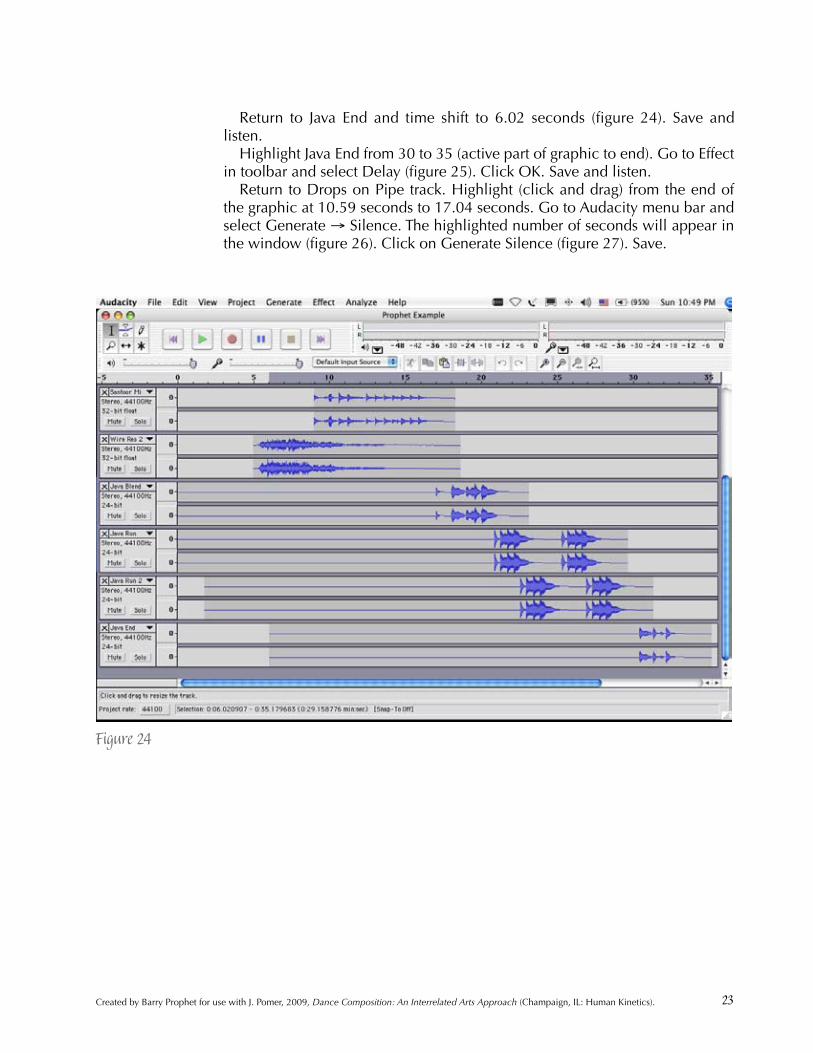
Return to Java End and time shift to 6.02 seconds (figure 24). Save and listen.
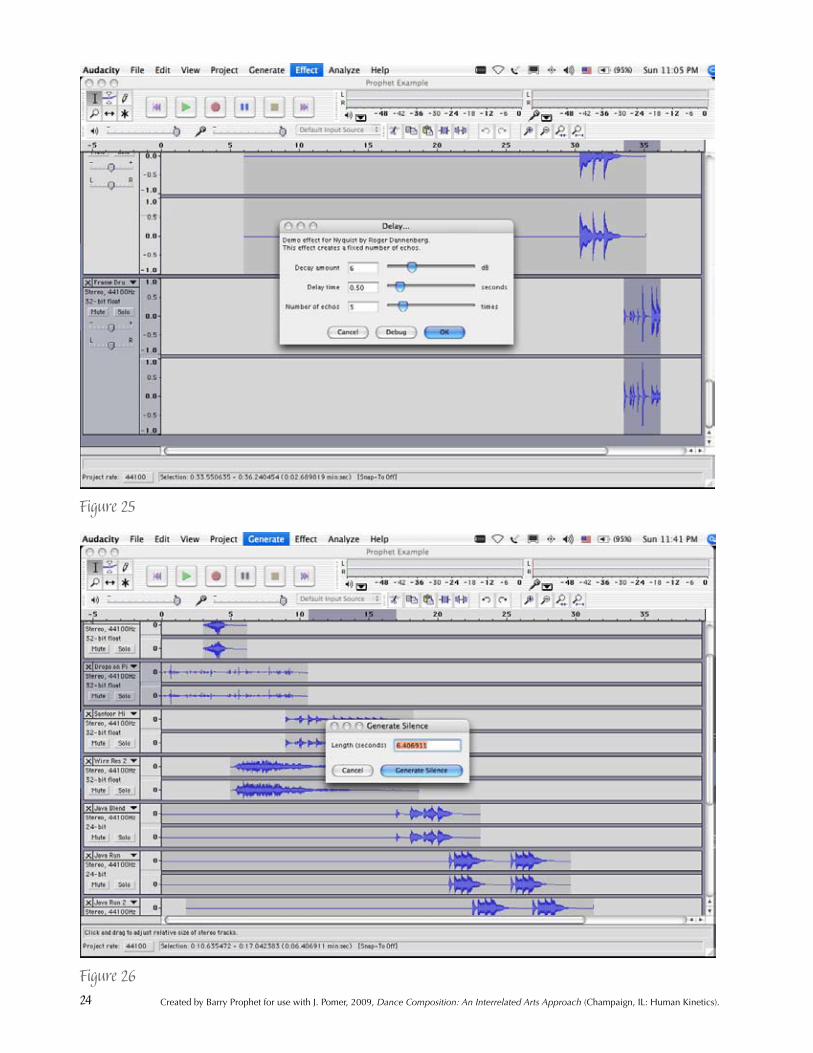
Highlight Java End from 30 to 35 (active part of graphic to end). Go to Effect in toolbar and select Delay (figure 25). Click OK. Save and listen.
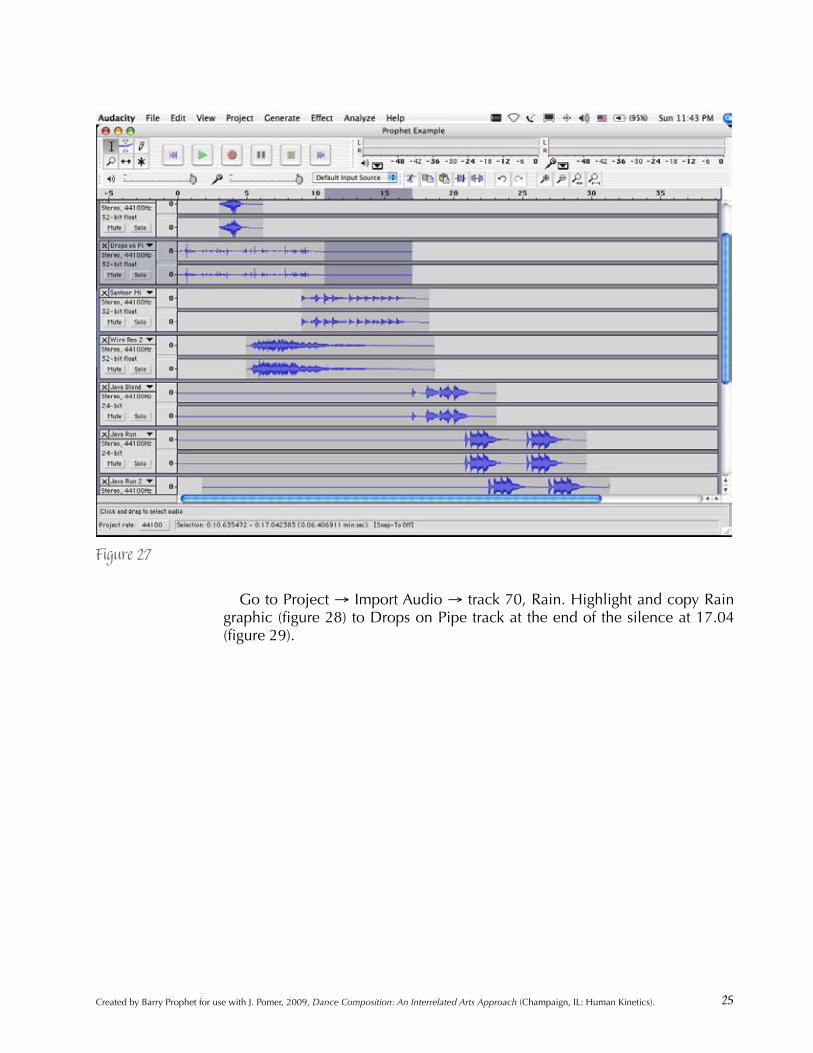
Return to Drops on Pipe track. Highlight (click and drag) from the end of the graphic at 10.59 seconds to 17.04 seconds. Go to Audacity menu bar and select Generate → Silence. The highlighted number of seconds will appear in the window (figure 26). Click on Generate Silence (figure 27). Save.
Figure 24
24 Created by Barry Prophet for use with J. Pomer, 2009, Dance Composition: An Interrelated Arts Approach (Champaign, IL: Human Kinetics).
Figure 25
Figure 26
25Created by Barry Prophet for use with J. Pomer, 2009, Dance Composition: An Interrelated Arts Approach (Champaign, IL: Human Kinetics).
Go to Project → Import Audio → track 70, Rain. Highlight and copy Rain graphic (figure 28) to Drops on Pipe track at the end of the silence at 17.04 (figure 29).
Figure 27

26 Created by Barry Prophet for use with J. Pomer, 2009, Dance Composition: An Interrelated Arts Approach (Champaign, IL: Human Kinetics).
Figure 28
Figure 29

27Created by Barry Prophet for use with J. Pomer, 2009, Dance Composition: An Interrelated Arts Approach (Champaign, IL: Human Kinetics).
Remove the newly imported Rain track. Highlight (click and drag) Rain graphic (in Drops on Pipe Track) from 17 seconds to 21 seconds and apply Fade In effect. Highlight Rain graphic from 30 seconds to 35 seconds and apply Fade Out effect. Save and listen.
Listen to the Prophet Example included on the music CD provided to confirm successful completion.
Go to File → Export as WAV. Confirm file destination as Audacity Projects (figure 30). Save.
Figure 30
Now you are ready to make your own 2- to 3-minute composition. Once you have completed your piece, simply burn it to a CD.