instructions of mobile phone monitoring
TRANSCRIPT
8/2/2019 Instructions of Mobile Phone Monitoring
http://slidepdf.com/reader/full/instructions-of-mobile-phone-monitoring 1/12
Instructions of Mobile Phone Monitoring
Our DVRs can support mobile phone monitoring as long as those phones have one of the 5
operating systems:WindowsMobile, Symbian3, Symbian5, Apple(IP-home), Blackberry, Google.
For example, all the following models can be used for monitoring: dopodP660, Blackberry
8900/8910/8980/9000/9630/9650/9700/9780/9800, Nokia N78/N95/E66/5800W, Iphone4 and soon.
Please refer to the specific operating steps bellow:
1.Setting methods of monitoring via mobile phones
1.1 DVR
Please make sure the DVR has the right settings:
User:admin
Password:88888888
Sever Port can be given from 1000 to 9999.The default port is 3357,which have to be mappedon the router.The mapping way is the same as that in the network settings of DVRs.
1.2 Mobile phones
1.2.1 Operating Steps for Windows Mobile
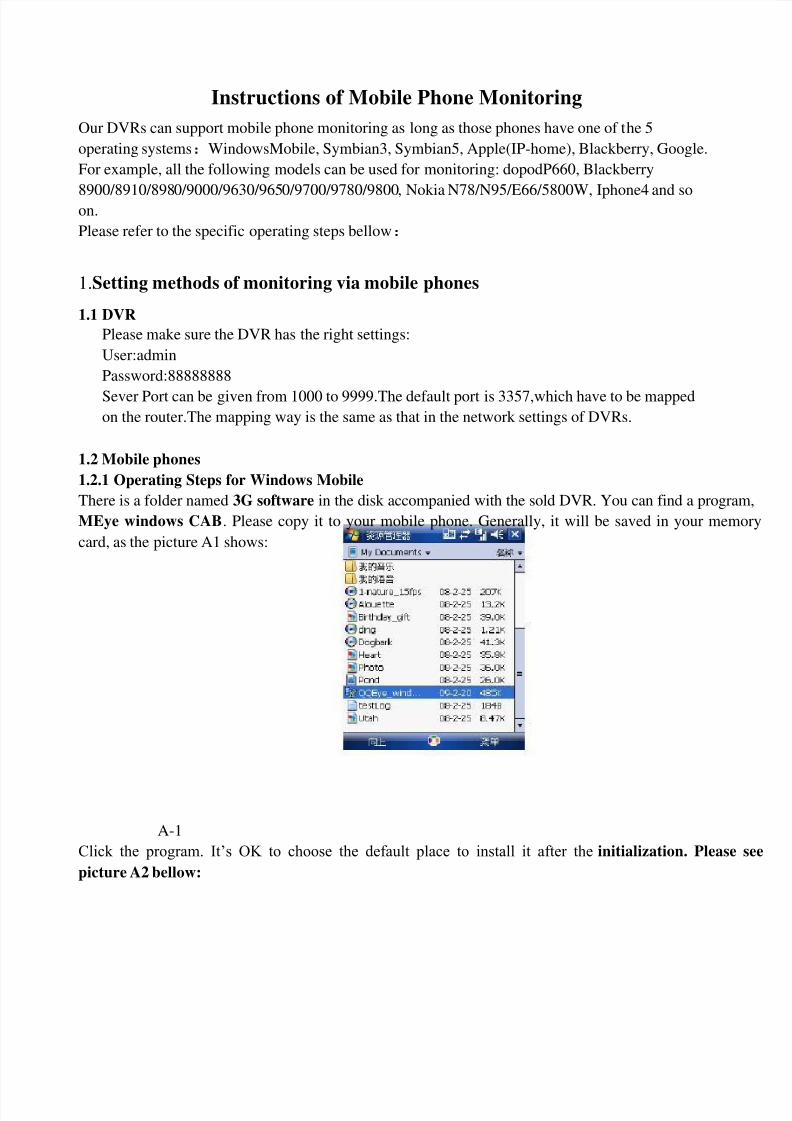
There is a folder named 3G software in the disk accompanied with the sold DVR. You can find a program,
MEye windows CAB. Please copy it to your mobile phone. Generally, it will be saved in your memory
card, as the picture A1 shows:
A-1
Click the program. It’s OK to choose the default place to install it after the initialization. Please see
picture A2 bellow:

8/2/2019 Instructions of Mobile Phone Monitoring
http://slidepdf.com/reader/full/instructions-of-mobile-phone-monitoring 2/12
A-2
When the installation finished, click the icon “Meye” to run the program as the image shows bellow.
The default main interface
[Channel]-Choose the video channel you want to connect;
[Connect]-Click to connect automatically to the real time image of the settled channel;
[Setup]-Click to set up parameters for mobile phone monitoring. There are buttons below the window.
From left to right, they are:
[Direction control for PTZ] (Move PTZ from left to right, up, down)
[Area selection] (Select zooming area)
[Focus] (Zoom in/ out)
[Aperture] (Zoom in/ out)
[Screenshots] Notes: If you want to control PTZ via mobile phone, please make sure the PTZ parameters in DVR are
setting correct, and then select the corresponding video channel in your phone. Screenshots are saved at the
installation location <the path is Resource Explorer/Program Files/Meye/Photo Folder>.If you use it for
the first time or you need to revise parameters, please click the button[Setup] to set it. Or, you can click
[Connect] to enter the monitor screen.
User: the same as that settled at [mobile phones monitoring name] in your DVR
Password: the same password as given at [monitor via mobile phone password] in your DVR.
Server: the IP address or DDNS of the public network your DVR connected to.Server Port: the same as that settled at [monitor via mobile phone] in your DVR
Channel No.: Set the default channel of monitoring

8/2/2019 Instructions of Mobile Phone Monitoring
http://slidepdf.com/reader/full/instructions-of-mobile-phone-monitoring 3/12
When all of these above are set and save correct, click [OK] to return to the previous main interface.
Two modes of video displaying are opotional: normal and full screen. You can click the screen to change
between them.
2 Operating Steps for Symbian
Please copy the MEYE_ZSXW_3rd.sisx or MEYE_ZSXW_5rd.sisx from the file named 3G Software in
our Disk to your phone. Generally, it will be saved in your memory card. (Refer to the picture A1)
A1 A2 A3
⑴Double click to install the program as the image A2⑵Two installation locations are available, the memory card or SD card, as shown in image A3
Select “Next” in the dialogue box to make sure the program will get access to the network. Please refer
to the image A4.
8/2/2019 Instructions of Mobile Phone Monitoring
http://slidepdf.com/reader/full/instructions-of-mobile-phone-monitoring 4/12
A4 A5
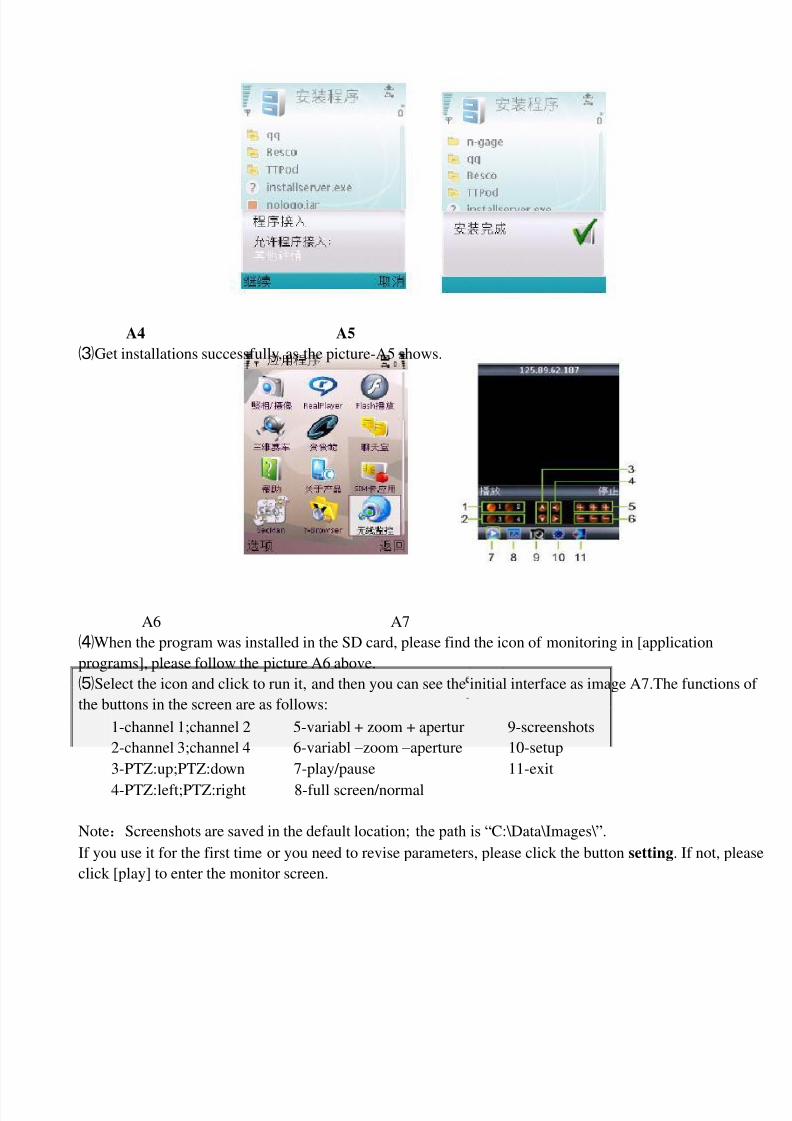
⑶Get installations successfully, as the picture-A5 shows.
A6 A7
⑷When the program was installed in the SD card, please find the icon of monitoring in [application
programs], please follow the picture A6 above.
⑸Select the icon and click to run it, and then you can see the initial interface as image A7.The functions of
the buttons in the screen are as follows:
1-channel 1;channel 2 5-variabl + zoom + apertur 9-screenshots
2-channel 3;channel 4 6-variabl – zoom – aperture 10-setup
3-PTZ:up;PTZ:down 7-play/pause 11-exit
4-PTZ:left;PTZ:right 8-full screen/normal
Note:Screenshots are saved in the default location; the path is “C:\Data\Images\ ”.
If you use it for the first time or you need to revise parameters, please click the button setting. If not, please
click [play] to enter the monitor screen.

8/2/2019 Instructions of Mobile Phone Monitoring
http://slidepdf.com/reader/full/instructions-of-mobile-phone-monitoring 5/12
⑹The reason why software can not be installed into mobile phones: The software can not be trusted by
mobile phones for its self-signed certificate. We can solve this problem by doing the setting bellow:enter
Menu->Tools->Setup->Application Program->Program Management->Software Installation->Select All⑺ Setup of client software
①Select the default access point: CMNET. GPRS. 3G
②Server Address: the IP address of DVR (e.g.:121.34.39.29)
③Server Port: the information port of DVR(Default:3357)
④User: admin
⑤Password: the password for hard disk formatting in DVR (default:88888888)
⑻Mobile phone models supported by the program:
symbian s60 v3.0 N71、N73、N75、 N76、N77、N78、N80、N81、
N91、N92、N93、N93i、N95、 N96、N97、E50、
E61 、E61i、E62、E60、E70、E71、E66、E90、
6110、6120、6220、6121、6122、6290、6110Navig
N80、3250、5500、5700、5320、5800、6210N、
6650F、E63.E66、E71、N79、N85、N96、E61i
symbian s60 v5.0 5800XM N97
symbian s60 v I400、i408、i450、i458、i500、i550、i520、i560、
i558、G810、G818、I8510
8/2/2019 Instructions of Mobile Phone Monitoring
http://slidepdf.com/reader/full/instructions-of-mobile-phone-monitoring 6/12
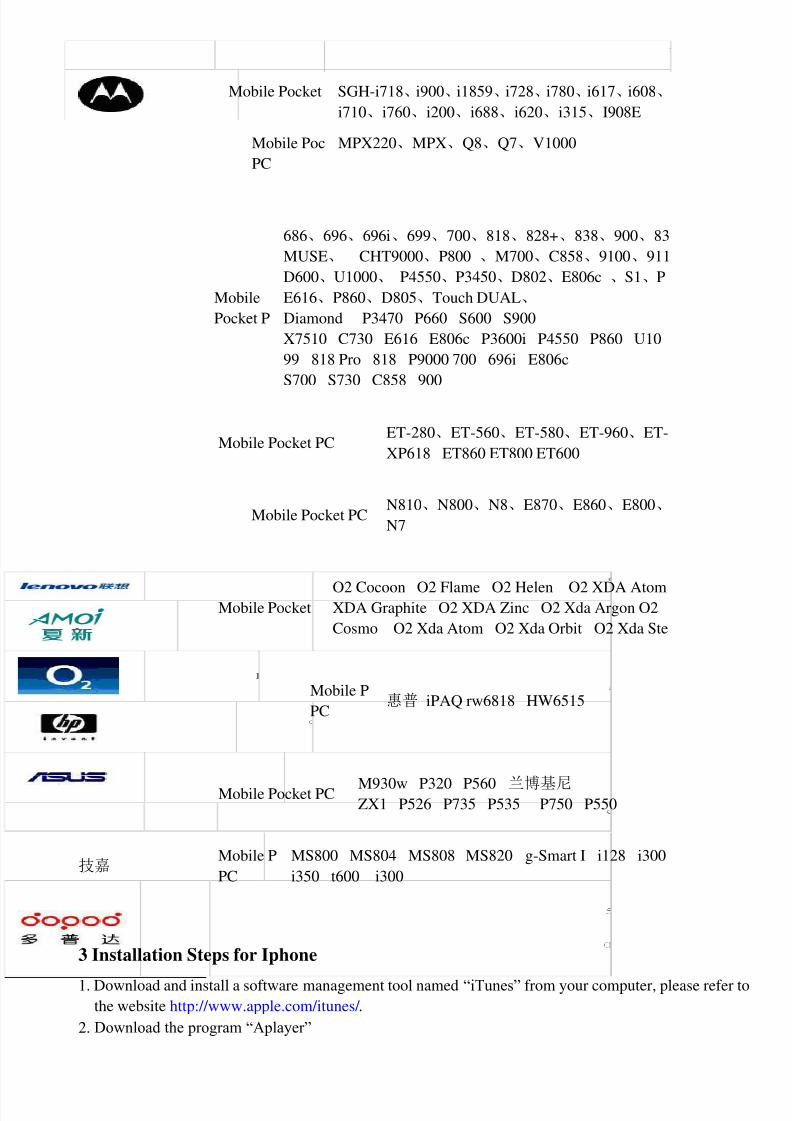
Mobile Pocket SGH-i718、i900、i1859、i728、i780、i617、i608、
i710、i760、i200、i688、i620、i315、I908E
Mobile Poc
PC
MPX220、MPX、Q8、Q7、V1000
Mobile
Pocket P
686、696、696i、699、700、818、828+、838、900、83
MUSE、 CHT9000、P800 、M700、C858、9100、911
D600、U1000、 P4550、P3450、D802、E806c 、S1、P
E616、P860、D805、Touch DUAL、
Diamond P3470 P660 S600 S900
X7510 C730 E616 E806c P3600i P4550 P860 U10
99 818 Pro 818 P9000 700 696i E806c
S700 S730 C858 900
Mobile Pocket PCET-280、ET-560、ET-580、ET-960、ET-
XP618 ET860 ET800 ET600
Mobile Pocket PCN810、N800、N8、E870、E860、E800、
N7
Mobile PocketO2 Cocoon O2 Flame O2 Helen O2 XDA AtomXDA Graphite O2 XDA Zinc O2 Xda Argon O2
Cosmo O2 Xda Atom O2 Xda Orbit O2 Xda Ste
Mobile P
PC惠普 iPAQ rw6818 HW6515
Mobile Pocket PC M930w P320 P560 兰博基尼ZX1 P526 P735 P535 P750 P550
技嘉 Mobile P
PC
MS800 MS804 MS808 MS820 g-Smart I i128 i300
i350 t600 i300
3 Installation Steps for Iphone
1. Download and install a software management tool named “iTunes” from your computer, please refer tothe website http://www.apple.com/itunes/ .
2. Download the program “Aplayer”

8/2/2019 Instructions of Mobile Phone Monitoring
http://slidepdf.com/reader/full/instructions-of-mobile-phone-monitoring 7/12
⑴Double click “iTunes” and open it, and then click “iTunes Store” on the left side of the window.
When the content of “Store” appear s, please input “APlay” to search it, as shown in the following
picture.
Click icon “Aplayer”, the left image bellow will popup. Then click “GET APP”, you will see the logininterface to download the software, as the right picture below.
If you have an Apple account, input the account and password. You can download “APlayer” after clicking
“GET ”. The progress bar will appear as follows.
If you don’t have an Apple account, you can click "Create New Account" to apply an ID. Please see
the specific steps bellow:
⑴ Click “Create New Account”. When the welcome interface comes out, please click
“Continue”. Tick in the Pop-ups, click “Continue”.
8/2/2019 Instructions of Mobile Phone Monitoring
http://slidepdf.com/reader/full/instructions-of-mobile-phone-monitoring 8/12
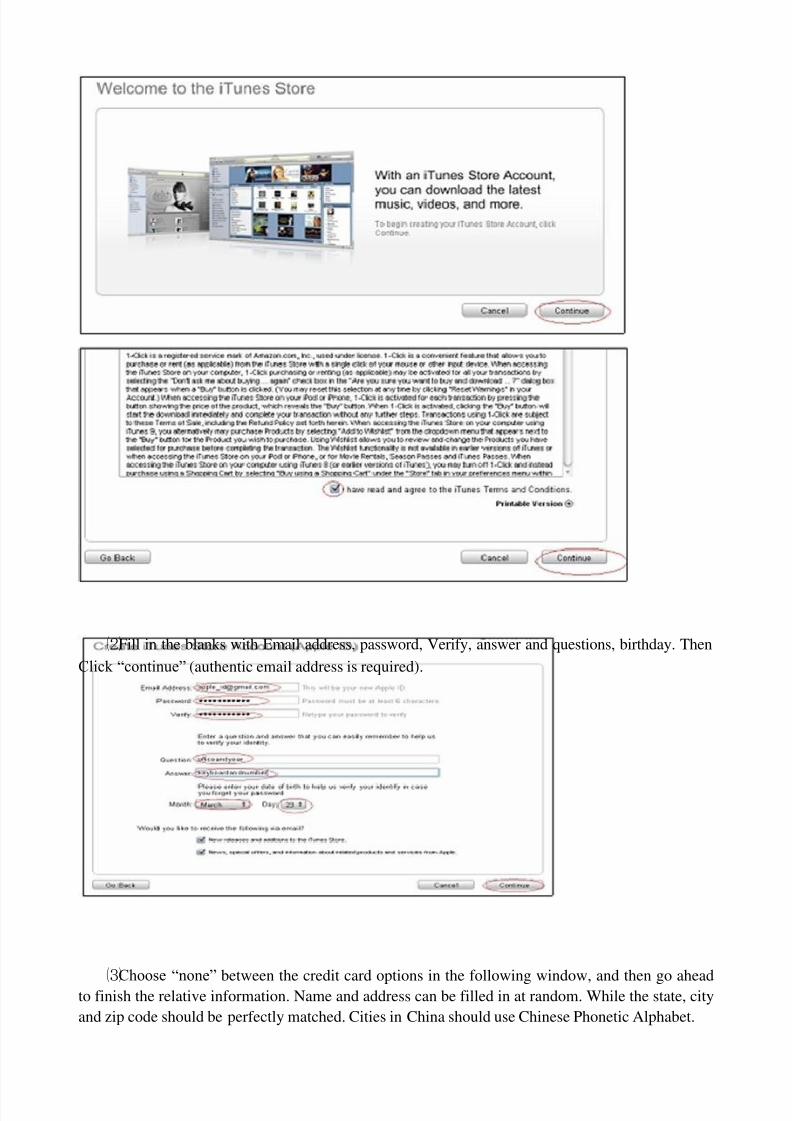
⑵Fill in the blanks with Email address, password, Verify, answer and questions, birthday. Then
Click “continue” (authentic email address is required).
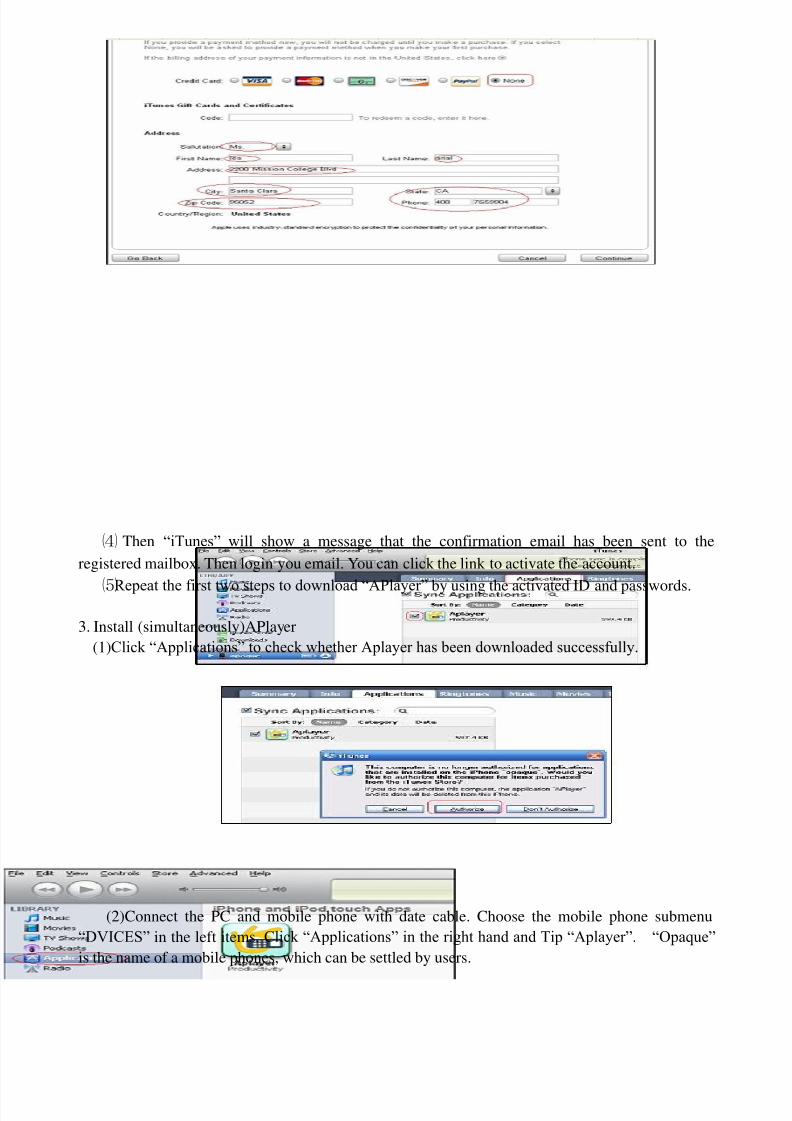
⑶Choose “none” between the credit card options in the following window, and then go ahead
to finish the relative information. Name and address can be filled in at random. While the state, city
and zip code should be perfectly matched. Cities in China should use Chinese Phonetic Alphabet.
8/2/2019 Instructions of Mobile Phone Monitoring
http://slidepdf.com/reader/full/instructions-of-mobile-phone-monitoring 9/12
⑷ Then “iTunes” will show a message that the confirmation email has been sent to the
registered mailbox. Then login you email. You can click the link to activate the account.
⑸Repeat the first two steps to download “APlayer” by using the activated ID and passwords.
3. Install (simultaneously)APlayer
(1)Click “Applications” to check whether Aplayer has been downloaded successfully.
(2)Connect the PC and mobile phone with date cable. Choose the mobile phone submenu
“DVICES” in the left items. Click “Applications” in the right hand and Tip “Aplayer”. “Opaque”
is the name of a mobile phones, which can be settled by users.

8/2/2019 Instructions of Mobile Phone Monitoring
http://slidepdf.com/reader/full/instructions-of-mobile-phone-monitoring 10/12
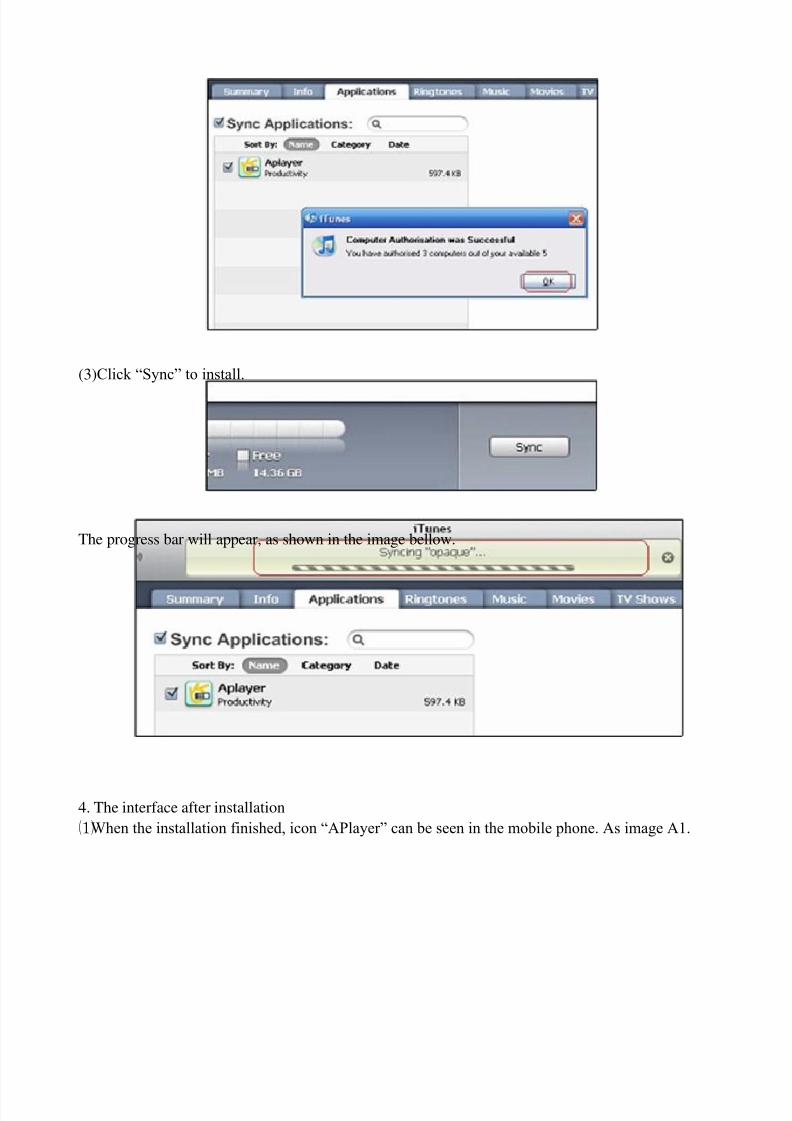
At this time, PC may popup a message for authorization required. We can use the applied apple ID and
password to authorize. Please refer to the following image.
8/2/2019 Instructions of Mobile Phone Monitoring
http://slidepdf.com/reader/full/instructions-of-mobile-phone-monitoring 11/12
(3)Click “Sync” to install.
The progress bar will appear, as shown in the image bellow.
4. The interface after installation
⑴When the installation finished, icon “APlayer” can be seen in the mobile phone. As image A1.

8/2/2019 Instructions of Mobile Phone Monitoring
http://slidepdf.com/reader/full/instructions-of-mobile-phone-monitoring 12/12
⑵Introduction of the function keys (refer to image A2)
①Direction control keys for PTZ (Up, Down, Left, Right)
②PTZ lens control(enlarge, minimize),(focus+, focus-),(aperture +,aperture -).③Selectable channels for monitoring
④Button function from left to right: pause, snapshot, a set of choices for monitoring in full screen,
connection settings of monitoring.
⑤Exit key: in the middle key of mobile phone.
⑶Settings of monitory point are as same as Sybian and Windows Mobile. (As shown in image A3)
①IP address of monitory point or Domain address
②Mapping port
③User
④Password
⑤Channel selection