instructions for users
DESCRIPTION
Instructions for users. This slide presentation provides an overview of performing a lumbar puncture. Below many of the slides, there are notes to explain the information in the slide. You should adapt the presentation for your own use. Diagnosing Encephalitis: Review of Lumbar Puncture (LP). - PowerPoint PPT PresentationTRANSCRIPT
Instructions for users
• This slide presentation provides an overview of performing a lumbar puncture.
• Below many of the slides, there are notes to explain the information in the slide.
• You should adapt the presentation for your own use.
Diagnosing Encephalitis:Review of Lumbar Puncture (LP)

Learning Objectives
Participants will:
• Know how to prepare a patient for LP.
• Revise the steps for safely performing an LP.
• Know what tests can be performed on CSF that is collected.

Relative contraindications to lumbar puncture
• Evidence of a space-occupying lesion such as tumor or brain abscess.
• Signs of increased intracranial pressure.
— Unequal pupils, elevated blood pressure, slow heart rate, irregular breathing, posturing
• Cardiopulmonary instability.
• Soft tissue infection at puncture site.
• Significant, uncontrolled bleeding disorder.
*See note
Steps in performing a lumbar puncture
1. Obtain informed consent.
2. Gather materials.
3. Position patient.
4. Administer local anesthetic.
5. Insert needle with sterile technique.
6. Measure opening pressure.
7. Collect cerebrospinal fluid (CSF).

Informing the patient
• Reason for the lumbar puncture:— Collection and testing of spinal fluid are standard management
for encephalitis patients to direct treatment (e.g., if CSF profile suggests bacterial infection).
• Potential complications:— The most common side effect is a headache which occurs in 10-
30% of adult patients. It is managed with bed rest and analgesics and usually disappears in a few days.
— Soreness of the lower back may also occur.
— Other risks, including infection, bleeding, leakage of spinal fluid or
damage to the spinal cord, are extremely rare.
• Children tolerate lumbar punctures really well.
Materials to prepare• Materials for sterile technique (gloves, mask)
• Spinal needle
• Manometer (typically used in patients > 2 years of age)
• Three-way stop-cock
• Sterile drapes
• Anesthetic
• Solutions for skin sterilization
• Adhesive dressing
• Sponges
• Get assistant (to help position patient and handle equipment)

1. Place the patient in the left lateral position
• The lower back should be as close to the edge of the bed as possible.
• Ask the patient to curl up and hug his knees as close to the chest as possible (“fetal position”).
• The neck should be flexed forward.
• If physician is left-handed, the right lateral position should be used.
• The patient may also be positioned sitting upright. However, the lateral position is preferred for accurate measurement of opening pressure.
Note: The most important part of performing a successful lumbar puncture is good position! Be sure you give feedback to your assistant to ensure the patient is in proper fetal position.

2. Locate the site
• Find and palpate the posterior iliac crest.
• Move your finger down and palpate the L4 spinous process.
• Mark the puncture site at L4-5 or L3-4 (e.g. put a slight indent in the skin with your finger nail).
The diagrams on the following slides provide illustrations
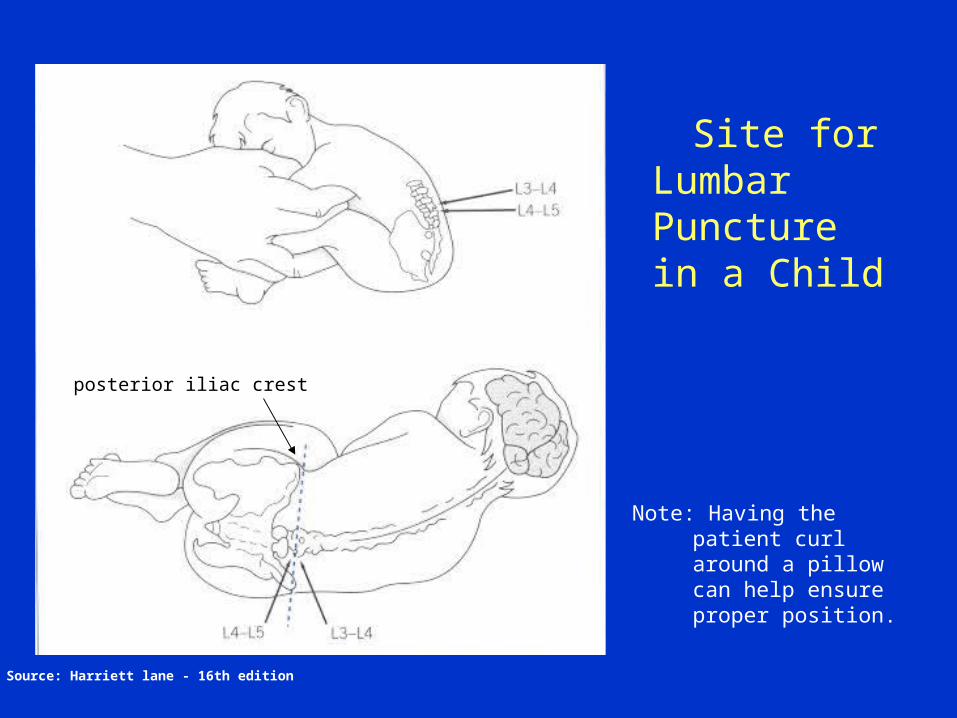
Site for Lumbar Puncture in a Child
Source: Harriett lane - 16th edition
Note: Having the patient curl around a pillow can help ensure proper position.
posterior iliac crest

Site for Lumbar puncture in an Adult
Source: http://www.postgradmed.com

Indicating site of posterior iliac crest and puncture site
Source: http://www.emedicinehealth.com

3. Prepare sterile area
• Use iodine to swab in a circle from the L4-5 area outwards.
• Cover an area of 20cm diameter.
• Once dried, remove the iodine with alcohol (to avoid introduction of iodine into the subarachnoid space).
• Put on sterile gloves.
• Drape the patient.

4. Anesthetize the area
• Anesthetize the skin.
• Anesthetize between the spinous processes.
— Insert the needle.
— Draw back to ensure it has not reached the subarachnoid space.
— Gradually withdraw the syringe while slowly injecting anesthetic into the interspace.
Note: For infants local anesthetic is not needed. Instead, may give sugar water solution orally to help soothe.

5. Insert the lumbar puncture needle
• Insert the LP needle, with stylet, in the midline.
• Direct the point of the needle to the umbilicus.
• Keep the needle parallel to the ground.
• Continue to insert until a slight pop is felt.
• Withdraw the stylet slightly to be sure the needle is in the subarachnoid space.
• If there is no CSF return, advance the needle about 2-3mm, and withdraw the stylet again.
• When CSF begins to flow, attach a three-way stop-cock.
Note: Only remove the spinal needle when the stylet is inserted.
Notes on LP needle insertion
• If the needle strikes bone, withdraw it to just below the skin, then reinsert.
• If blood slowly drips from the needle when the stylet is removed, discard the needle and start again.
• Never aspirate CSF with a syringe, as a nerve root may be trapped against the needle and injured.
• If you are unsuccessful in reaching subarachnoid space check:
— Is the needle aimed towards the umbilicus?
— Is the needle in the midline?
— Is the needle parallel to the ground?

6. Measure the pressure
• Attach a manometer to the hub of the needle (via three-way stop-cock).
• Have your assistant gently extend the patient’s leg and return his neck to a neutral position.
• Ensure the patient is relaxed and watch for good respiratory variation of the fluid level as the patient breathes normally.
• Check the CSF pressure.
• Remove the manometer.
Note: Typically used in patients older than 2 years of age.

Measuring opening pressure
Source: http://www.emedicinehealth.com

7. Collect cerebrospinal fluid (CSF)
• Allow CSF to flow into sterile tubes.
• Rubbing the fontanel of an infant may help increase flow of CSF.
• CSF can be collected for— Chemistry
— Microbiology
— Antibody testing (in particular Japanese Encephalitis IgM)
• Collect extra tube of CSF to hold in lab for possible later testing.

Collecting CSF into sterile tubes
Source: http://www.emedicinehealth.com

8. Final steps
• Replace stylet and withdraw the needle.
• Massage the puncture point with a sterile sponge.
• Cover with a Band-Aid.
• Advise adult patients to lie flat in bed for 3 hours and limit activity for 24 hours to minimize headache.
Note: Children may resume their usual activity.

9. Recording
• Label tubes with patient information and date of collection.
• Record immediate results.
— Appearance of CSF
– ?clear ?turbid
— Pressure of CSF
Note: pressures over 200mm H2O are probably abnormal
Laboratory tests on CSF
• Cell count, differential
• Glucose
• Protein
• Gram stain
• India ink preparation
• Stain for acid-fast bacilli
• Viral, bacterial, and fungal cultures
• Anti-JEV IgM ELISA
• JEV RT-PCR (If available)

Normal Bacterial Viral TB
Cells 0-5 WBC/mm3 >1000/mm3 <1000/mm3 25-500/mm3
Polymorphs 0 predominate early +/- increased
Lymphocytes 5 late predominate increased
Glucose 40-80 mg/dl decreased normal decreased
66% < 40% Normal < 30%
Protein 5-40 mg/dl increased +/-increased increased
Culture negative positive negative +TB
Gram stain negative positive negative positive
CSF plasma : glucose ratio
Summary of typical CSF findings
Acknowledgements
Please include the following acknowledgement if you use this slide set:
This slide set was adapted from a slide set prepared by PATH’s Japanese Encephalitis Project.
For information: www.JEproject.org