instructions for installing the safari montage® superset...
TRANSCRIPT

© 2017 Library Video Company Page 1
G1582 Rev. J
Instructions for Installing the
SAFARI Montage® SuperSet XXXVI Content Drive
CONTENTS:
• SAFARI Montage SuperSet XXXVI Content Drive(s)
PLEASE READ THESE INSTRUCTIONS IN THEIR ENTIRETY BEFORE YOU BEGIN:
• SuperSet XXXVI requires SAFARI Montage version 6.5.28 or later. If you are currently running a version prior to
6.5.28, you will need to upgrade your server before installing your new content drives.
• Please contact Technical Support if you have any questions regarding the current status of your SAFARI Montage
server, to schedule an upgrade, or to review any questions you may have before installing your new content drives.
• SAFARI Montage Technical Support is available Monday – Friday from 8 a.m. to 6 p.m. Eastern Time, and they may be contacted by telephone at 800-782-7230 or online via http://www.safarimontage.com/support.
UPGRADE INSTRUCTIONS:
1. Shut down the SAFARI Montage server:
a. If performing the server shut down from the web interface:
i. Navigate to ADMIN > Tools > Reboot and Shut Down.
ii. Click on the Shut Down button
iii. Click Shut Down again to verify that you wish to shut down the server.
b. If performing the server shut down from the console:
i. Select option #3 Advanced, followed by option #7 Shut Down.
2. Remove all prior SuperSet content drives from the server. Do NOT remove CreationStation drives.
3. Drive configuration requirement vary depending on your server model. Identify your server model and follow the
appropriate instructions below.
a. Dell-manufactured servers: If installing content drive(s) in one of the following models, please proceed to page
5 to complete additional drive configuration steps, before returning here to continue at step 4.
• T-420 • RM-440X • WAN-880X
• T-440X • RM-640 • WAN-1240
• T-86X • RM-640X • WAN-1210X
• RM-126X • WAN-1216X • WAN-1212X
• RM-128X • WAN-1220X • *WAN-1220
* The WAN-1220 is not a Dell manufactured server, but the Mega-RAID BIOS interface has been updated to resemble and
function similarly to Dell’s Virtual Disk Management.
© 2017 Library Video Company Page 2
G1582 Rev. J
b. WAN-1212: If installing content drive(s) in a WAN-1212, please proceed to page 6 to complete additional drive
configuration steps, before returning here to continue at step 4.
c. If installing in any other model server:
i. Insert the received SuperSet XXXVI Content Drive(s) into the next available open bay(s) of the server. Make
certain that each drive sled latch clicks into place, ensuring proper drive seating.
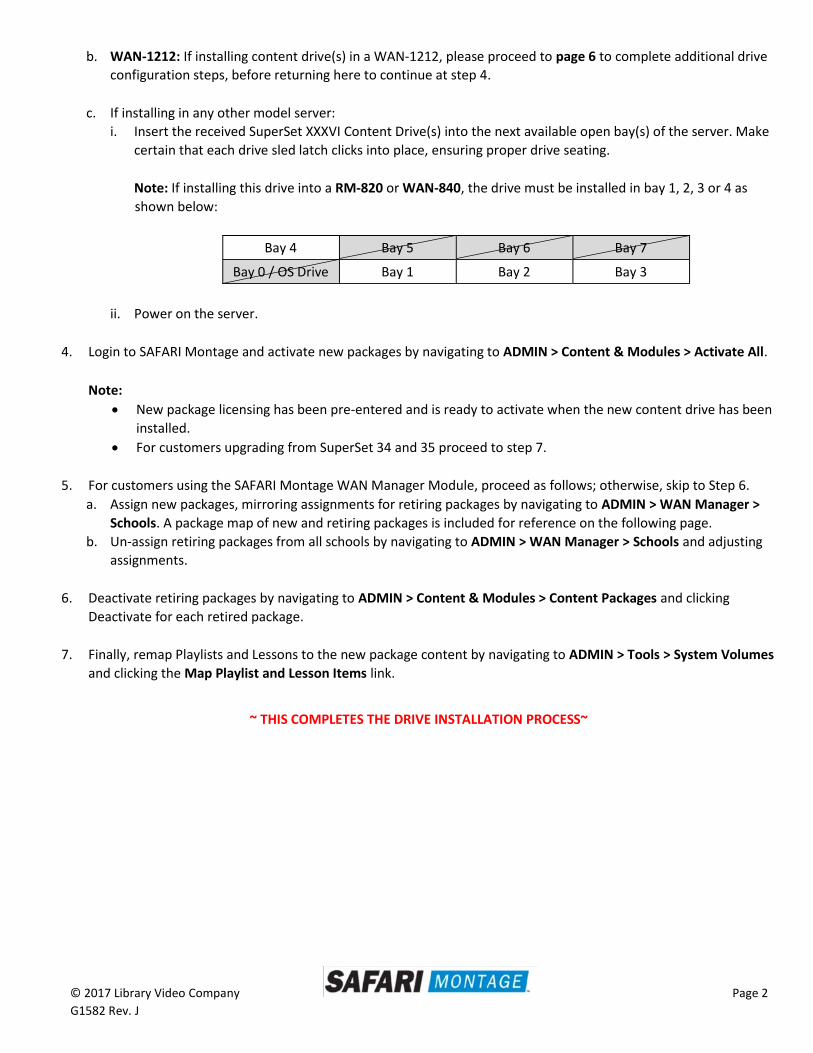
Note: If installing this drive into a RM-820 or WAN-840, the drive must be installed in bay 1, 2, 3 or 4 as
shown below:
ii. Power on the server.
4. Login to SAFARI Montage and activate new packages by navigating to ADMIN > Content & Modules > Activate All.
Note:
New package licensing has been pre-entered and is ready to activate when the new content drive has been
installed.
For customers upgrading from SuperSet 34 and 35 proceed to step 7.
5. For customers using the SAFARI Montage WAN Manager Module, proceed as follows; otherwise, skip to Step 6.
a. Assign new packages, mirroring assignments for retiring packages by navigating to ADMIN > WAN Manager >
Schools. A package map of new and retiring packages is included for reference on the following page.
b. Un-assign retiring packages from all schools by navigating to ADMIN > WAN Manager > Schools and adjusting
assignments.
6. Deactivate retiring packages by navigating to ADMIN > Content & Modules > Content Packages and clicking
Deactivate for each retired package.
7. Finally, remap Playlists and Lessons to the new package content by navigating to ADMIN > Tools > System Volumes
and clicking the Map Playlist and Lesson Items link.
~ THIS COMPLETES THE DRIVE INSTALLATION PROCESS~
Bay 4 Bay 5 Bay 6 Bay 7
Bay 0 / OS Drive Bay 1 Bay 2 Bay 3

© 2017 Library Video Company Page 3
G1582 Rev. J
PACKAGE MAP
Notes:
• Older 300k, 800k, and Spanish packages may be deactivated for all new packages below as Spanish
titles are included in new packages.
• Each package listed below refers to all formats and bitrates for the noted package.
New Packages, Which Will Activate Upon "Activate All"
Replaces These Package(s), Which Are to Be Unassigned & Deactivated
G112908x – Core K-8 Content Package > All prior versions of Core K-8 Content Packages, Reading Rainbow Content Packages, Eyes on the Prize Content
Packages
G198006x – K-8 Super Core > All prior versions of Core K-8, K-8 Super Core, Reading
Rainbow, Eyes on the Prize and K-6 Supplemental, whose
new name is K-8 Expansion.
G198105x – K-8 Expansion > All prior versions of K-6 Supplemental
All prior versions of K-8 Expansion
G113307x - Core 9-12 Content Package > All prior versions of 9-12 Core Content Packages and Eyes on
the Prize Content Packages
G129808x - 9-12 Super Core Content Package >
All prior versions of 9-12 Super Core Content Packages, Eyes on the Prize Content Packages
All versions of G1121 - Additional SM 9-12
G1298S02MN - 9-12 Super Core Content Package (Spanish)
G129408x – 9-12 Expansion Content Package > All prior versions of 9-12 Expansion
All versions of G1121 - Additional SM 9-12
G112508x - Core K-12 Content Package > All prior versions of Core K-12 Content Packages, Rainbow Content Packages and Eyes on the Prize Content Packages
G131808x - K-12 Super Core Content Package >
All prior versions of Core K-12 Content Packages, K-12 Super
Core Content, Reading Rainbow Content Packages and Eyes
on the Prize Content Packages All versions of G1121 - Additional SM 9-12
G1311S02MN K-12 Super Core Content Package (Spanish)
G126405xx - Cyber-Science Interactive 3D Model Package (2014) >
All prior versions of Cyber-Science Interactive 3D Model Package
Note: Remap prior package titles using Admin > Tools > System Volumes > Map Playlist and Lesson Items to Cyber- Science 2014 Package
G974310x - American Schools Overseas K-8 > All prior versions of American Schools Overseas K-8
G974710x - American Schools Overseas 9-12 > All prior versions of American Schools Overseas 9-12
G975610x - American Schools Overseas K-12 > All prior versions of American Schools Overseas K-12
G122502 – Visual Dictionary Interactive Image Package (2014) >
Prior version of Visual Dictionary Interactive
Note: All prior version references will be mapped to Visual
Dictionary 2014 references
© 2017 Library Video Company Page 4
G1582 Rev. J
Package Map Continued:
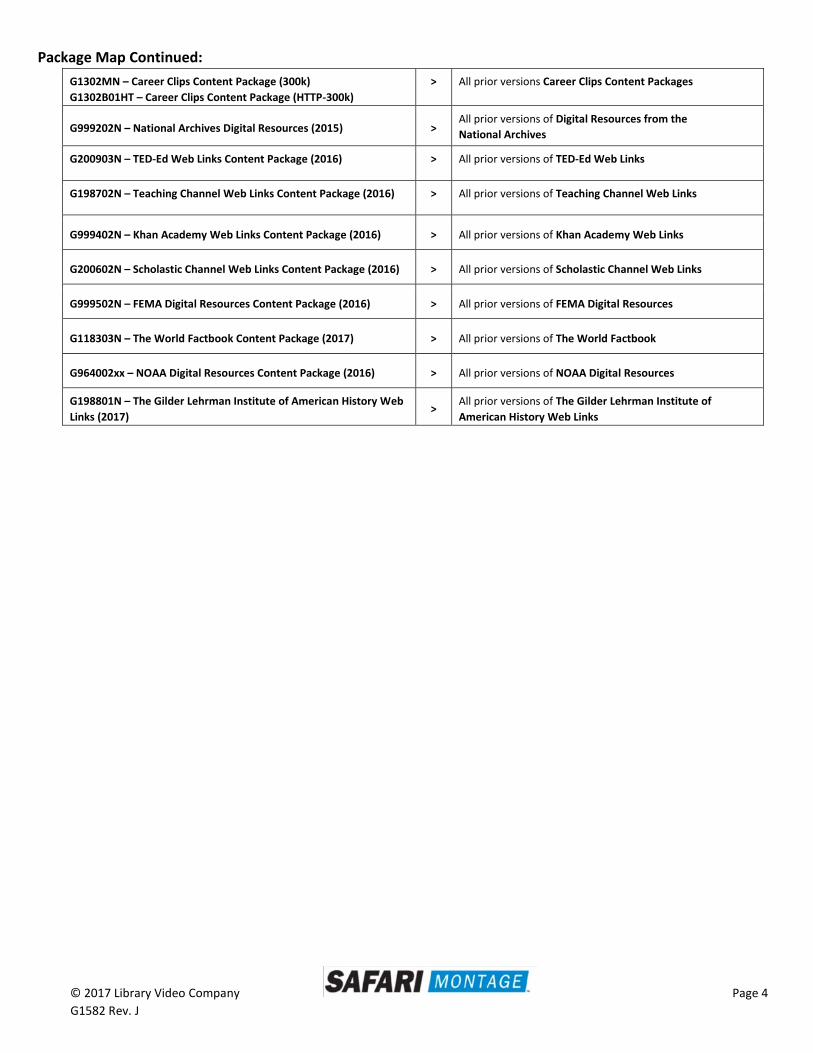
G1302MN – Career Clips Content Package (300k)
G1302B01HT – Career Clips Content Package (HTTP-300k) > All prior versions Career Clips Content Packages
G999202N – National Archives Digital Resources (2015) > All prior versions of Digital Resources from the National Archives
G200903N – TED-Ed Web Links Content Package (2016) > All prior versions of TED-Ed Web Links
G198702N – Teaching Channel Web Links Content Package (2016) > All prior versions of Teaching Channel Web Links
G999402N – Khan Academy Web Links Content Package (2016) > All prior versions of Khan Academy Web Links
G200602N – Scholastic Channel Web Links Content Package (2016) > All prior versions of Scholastic Channel Web Links
G999502N – FEMA Digital Resources Content Package (2016) > All prior versions of FEMA Digital Resources
G118303N – The World Factbook Content Package (2017) > All prior versions of The World Factbook
G964002xx – NOAA Digital Resources Content Package (2016) > All prior versions of NOAA Digital Resources
G198801N – The Gilder Lehrman Institute of American History Web
Links (2017) >
All prior versions of The Gilder Lehrman Institute of
American History Web Links

© 2017 Library Video Company Page 5
G1582 Rev. J
Dell Manufactured Servers – Additional Content Drive Configuration
For the following servers, Virtual Disk Management will need to be configured:
• T-420 • RM-440X • WAN-880X
• T-440X • RM-640 • WAN-1240
• T-86X • RM-640X • WAN-1210X
• RM-126X • WAN-1216X • WAN-1212X
• RM-128X • WAN-1220X • *WAN-1220
To do so, perform the following on system boot:
1. Insert all new content drive(s) into the next available open bay(s) of the server. Make certain that each drive sled
latch clicks into place, ensuring proper drive seating.
2. Power on the server.
3. When prompted, press <CTRL>+<R> to access Virtual Disk Management. If prompted, press <C> and/or <Y> when
accessing Virtual Disk Management.
4. Use the arrow keys and navigate the Virtual Disk Management screen and select the PERC controller (top node).
5. Press <F2> to open the properties sub-menu and choose “Foreign Config” and press <Enter>.
a. If “Foreign Config” is un-selectable and “Unconfigured Physical Disks” appear in Virtual Disk Management,
continue to step 8
6. Select Clear from the Foreign Config sub-menu.
7. Use the arrow keys to select “Yes” and press <Enter>.
a. “Unconfigured Physical Disks” will appear in Virtual Disk Management
8. Use the arrow keys and navigate the Virtual Disk Management screen and select the PERC controller (top node).
9. Press the <F2> to open the properties sub-menu and choose “Create New VD”.
10. Using the <Tab> key, navigate to the “Physical Disk” list and select the first disk in the list (use the spacebar to
select).
11. Using the <Tab> key, navigate to “OK” and press <Enter>.
12. Use the arrow keys to select “Yes” and press <Enter> when prompted about skipping initialization.
a. New VD will appear in Virtual Disk Management.
13. Repeat steps 6 through 10 for all remaining “Unconfigured Physical Disks”. When all unconfigured disks have been
added as Virtual Disks, continue to step 12.
14. Press <ESC> key and select “OK” to exit Virtual Disk Management.
15. Press <CTRL +ALT+DEL> to reboot the server.
16. Return to step 4 on page 2.
* The WAN-1220 is not a Dell manufactured server, but the Mega-RAID BIOS interface has been updated to resemble and
function similarly to Dell’s Virtual Disk Management.

© 2017 Library Video Company Page 6
G1582 Rev. J
WAN-1212 Server – Additional Content Drive Configuration
For the WAN-1212 server, the MegaRAID BIOS will need to be configured. To do so, perform the following on system boot prior to installing any new drives:
1. Access the LSI MegaRAID SAS controller BIOS by pressing <Ctrl>+<H> when prompted during boot up.
2. Click the Start button to access MegaRAID BIOS Config Utility.
3. Insert a single new content drive into the next available open bay of the server. Make certain that each drive sled
latch clicks into place, ensuring proper drive seating.
Wait approximately 30 seconds and then click the Scan Devices link from Navigation to access to the Foreign
Configuration page.
Note: If you have more than one new drive you will repeat steps 3 through 15 for each drive.

© 2017 Library Video Company Page 7
G1582 Rev. J
4. When prompted, click on the Clear button to clear the foreign configuration of the drive. Then click Yes to confirm
and return to the Logical View.
5. Click Configuration Wizard link from Navigation to access the Configuration Wizard.

© 2017 Library Video Company Page 8
G1582 Rev. J
6. Select Add Configuration and click Next to continue.
7. Select Manual Configuration under the Configuration Method and click Next to continue.

© 2017 Library Video Company Page 9
G1582 Rev. J
8. Select the newly installed hard drive from the Drives list and click the Add To Array button.
9. Click on the Accept DG button, to accept the Drive Group from under the Drive Groups and click Next to continue.
© 2017 Library Video Company Page 10
G1582 Rev. J
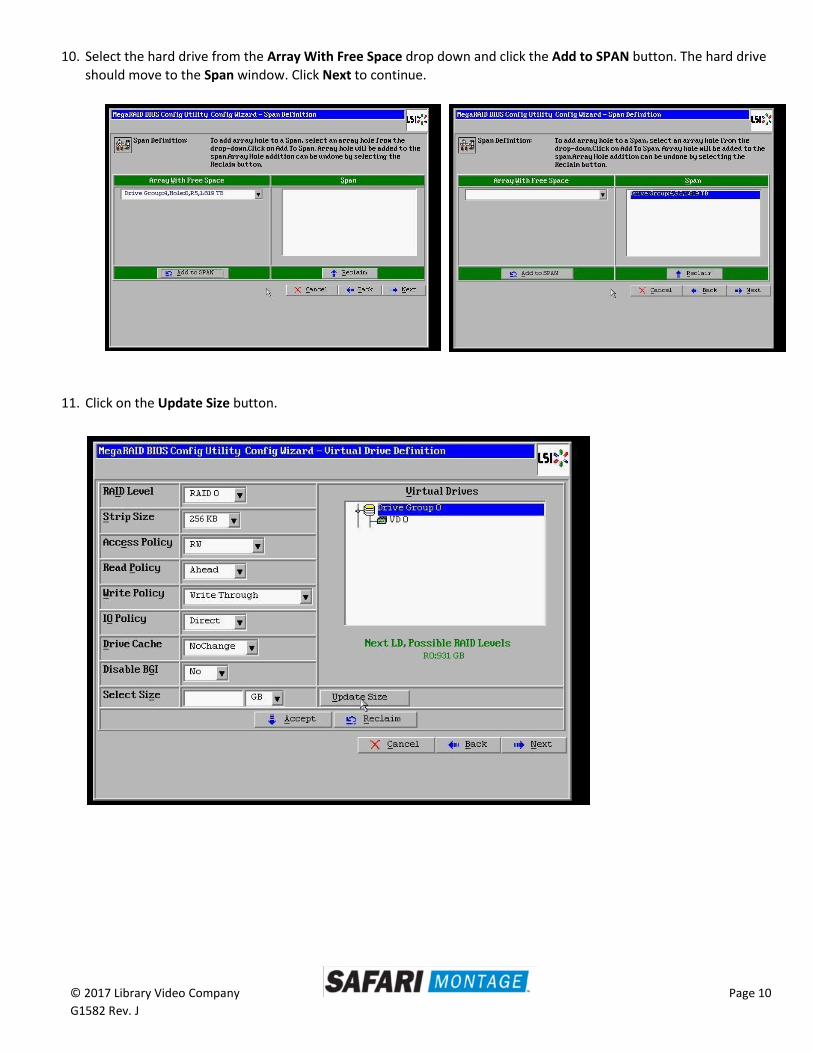
10. Select the hard drive from the Array With Free Space drop down and click the Add to SPAN button. The hard drive
should move to the Span window. Click Next to continue.
11. Click on the Update Size button.

© 2017 Library Video Company Page 11
G1582 Rev. J
12. Click on the Accept button to save the drive configuration. Click on the Yes button when prompted regarding use of
Write Through mode. Click on Next to continue.
13. Click Accept to save the virtual drive configuration and then click Yes to confirm.

© 2017 Library Video Company Page 12
G1582 Rev. J
14. Click Cancel when asked to enable SSD caching.
15. Click No when asked to initialize the virtual drive.
Note: If installing multiple drives return to step 3 now and repeat for each new drive.

© 2017 Library Video Company Page 13
G1582 Rev. J
16. When all new content drives have been configured, click the Exit link in the left-hand navigation and then Yes to confirm.
17. Press <CTRL>+<ALT>+<DELETE> to restart the server.
18. Return to step 4 on page 2.