instructional management program & academic communication...
TRANSCRIPT
Instructional Management Program & Academic Communication Tool
Registration, Enrollment, and Student Demographics User Guide
10/14/2014
Version 9.0 FINAL

Page Intentionally Left Blank
Registration, Enrollment and Student Demographics User Guide Instructional Management Program and
Academic Communication Tool
TABLE OF CONTENTS Introduction ......................................................................................................... 1
SIM Basics: Navigating and Performing Student Searches ........................................................ 1
Register and Enroll a New Student ................................................................... 2
Update Student Demographic and Contact Information ................................. 8
Update Demographic Information ................................................................................................ 8
Medical and Legal Alerts .......................................................................................................... 8
Student Home Phone Number .................................................................................................. 9
Update Contact Information ......................................................................................................... 9
Add/Edit Homeroom Information ................................................................................................ 10
Grade Code 20 (Ungraded) Students ..................................................................................... 10
Schedule Students ..................................................................................................................... 11
Withdraw and Transfer Students .................................................................... 12
Overview of Student Enrollment (History) Page ......................................................................... 12
Withdraw a Student .................................................................................................................... 14
Transfer a Student (between a Chicago Charter, Contract, Public School) ............................... 15
The Sending School ............................................................................................................... 15
The Receiving School ............................................................................................................. 16
Generate Reports ............................................................................................. 18
*** Note***
This module was updated in IMPACT Student Information Management (SIM) version 8.4.1. There may be slight differences between screens in this lesson compared to the screens in the actual CPS IMPACT environment. All screens were captured in Windows using Internet Explorer; Macintosh views may differ.
© 2005 CHICAGO PUBLIC SCHOOLS – IMPACT, PEARSON SOFTWARE
i (v9.0 FINAL)

Registration, Enrollment and Student Demographics User Guide Instructional Management Program and
Academic Communication Tool
Introduction The Registration and Enrollment process in SIM has been streamlined and enhanced. A user can now register a student, add contact information, and enroll the student in a single process.
This user guide is geared towards staff with the Status Coordinator role. It covers the basics of how to:
Register and enroll new students
Update student demographic and contact information for existing students
Withdraw and transfer students
SIM Basics: Navigating and Performing Student Searches For users new to using SIM, the Introduction to SIM quick guide is recommended as it covers the basics of navigating SIM and how to perform student searches. This quick guide is located on the IMPACT Website, under SIM Documents and Publications (http://impact.cps.k12.il.us/downloads/QuickGuide_SIMupgrade.pdf)
In addition to the Introduction to SIM Quick Guide, on-line Help documentation is available in SIM. On the Header, next to your name, click Help, as seen in the screen capture below.
1 (v9.0 FINAL)
Registration, Enrollment and Student Demographics User Guide Instructional Management Program and
Academic Communication Tool
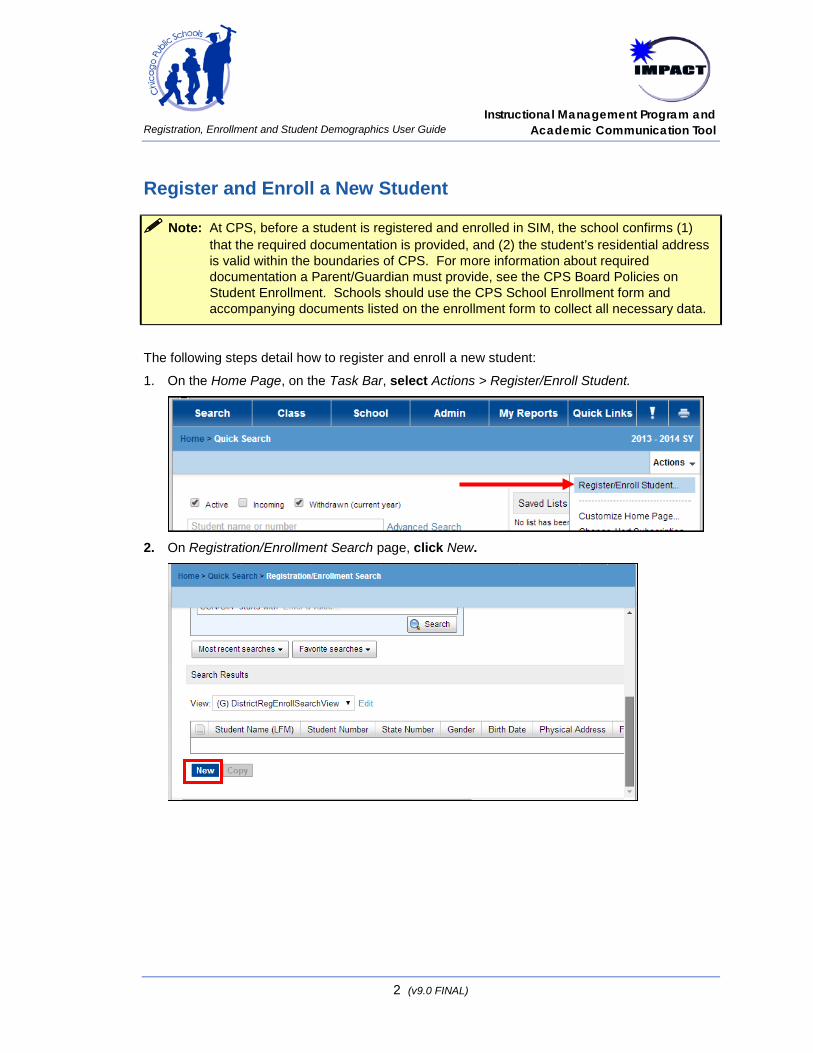
Register and Enroll a New Student
Note: At CPS, before a student is registered and enrolled in SIM, the school confirms (1) that the required documentation is provided, and (2) the student’s residential address is valid within the boundaries of CPS. For more information about required documentation a Parent/Guardian must provide, see the CPS Board Policies on Student Enrollment. Schools should use the CPS School Enrollment form and accompanying documents listed on the enrollment form to collect all necessary data.
The following steps detail how to register and enroll a new student:
1. On the Home Page, on the Task Bar, select Actions > Register/Enroll Student.
2. On Registration/Enrollment Search page, click New.
2 (v9.0 FINAL)
Registration, Enrollment and Student Demographics User Guide Instructional Management Program and
Academic Communication Tool
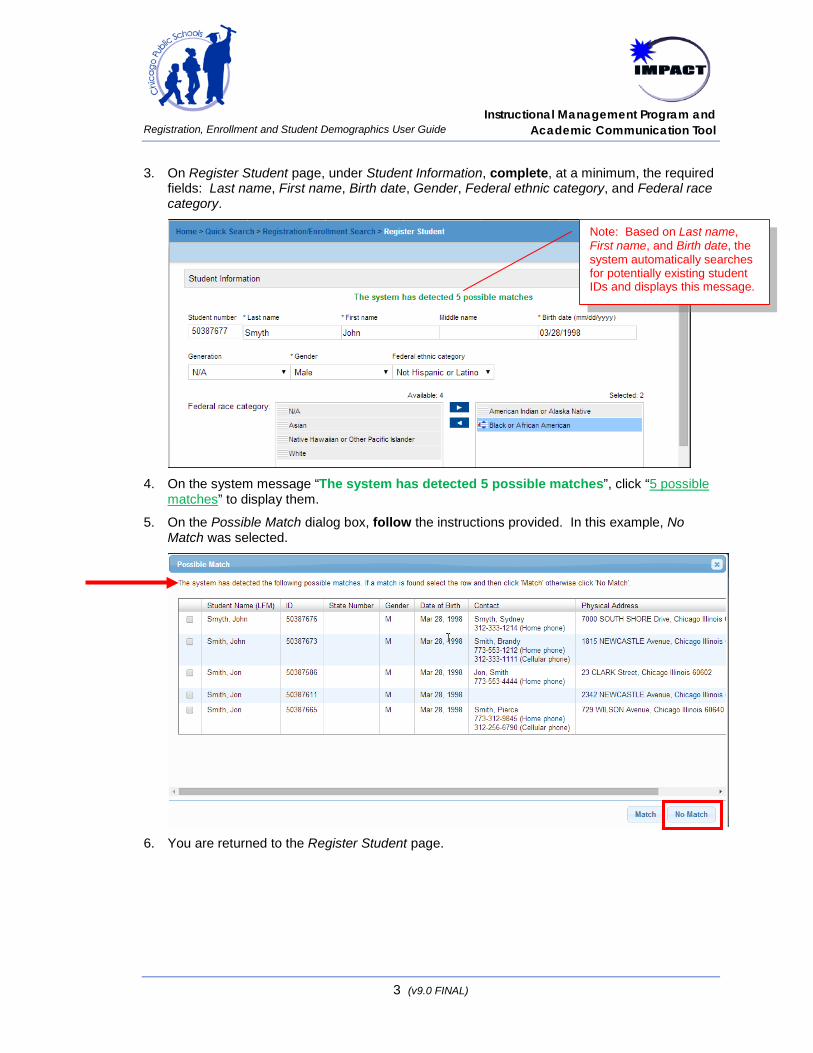
3. On Register Student page, under Student Information, complete, at a minimum, the required fields: Last name, First name, Birth date, Gender, Federal ethnic category, and Federal race category.
4. On the system message “The system has detected 5 possible matches”, click “5 possible
matches” to display them.
5. On the Possible Match dialog box, follow the instructions provided. In this example, No Match was selected.
6. You are returned to the Register Student page.
Note: Based on Last name, First name, and Birth date, the system automatically searches for potentially existing student IDs and displays this message.
3 (v9.0 FINAL)
Registration, Enrollment and Student Demographics User Guide Instructional Management Program and
Academic Communication Tool
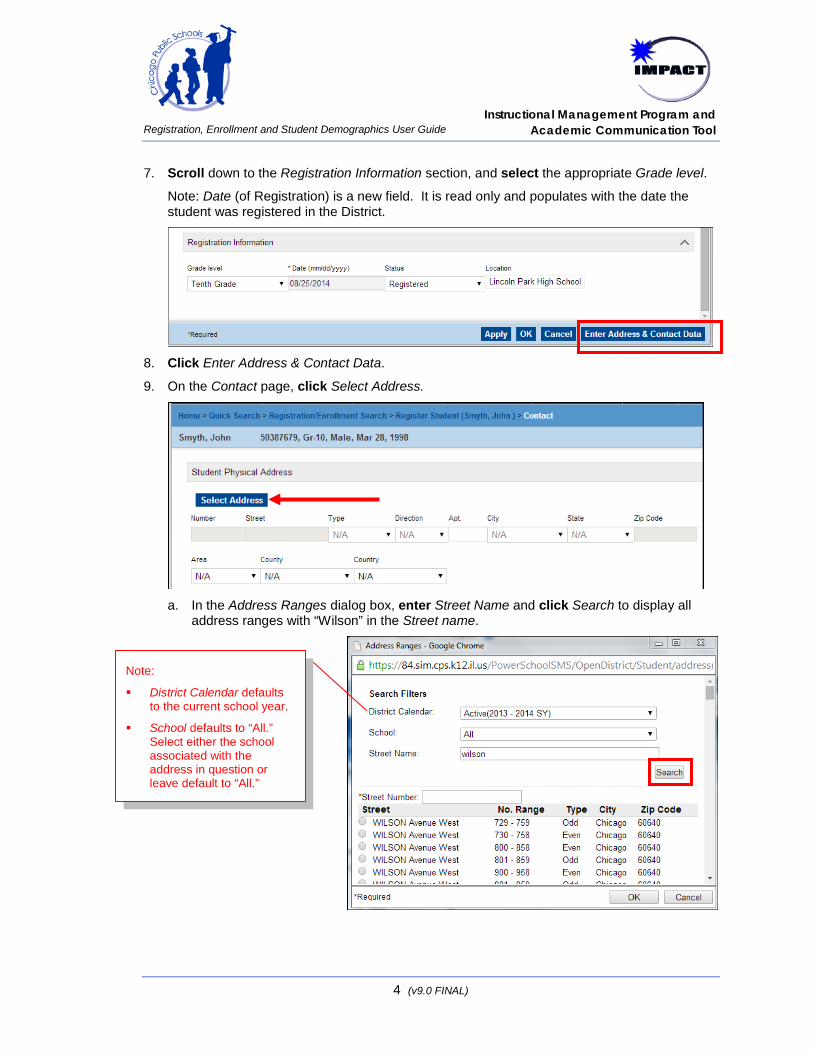
7. Scroll down to the Registration Information section, and select the appropriate Grade level.
Note: Date (of Registration) is a new field. It is read only and populates with the date the student was registered in the District.
8. Click Enter Address & Contact Data.
9. On the Contact page, click Select Address.
a. In the Address Ranges dialog box, enter Street Name and click Search to display all
address ranges with “Wilson” in the Street name.
Note:
District Calendar defaults to the current school year.
School defaults to “All.” Select either the school associated with the address in question or leave default to “All.”
4 (v9.0 FINAL)
Registration, Enrollment and Student Demographics User Guide Instructional Management Program and
Academic Communication Tool
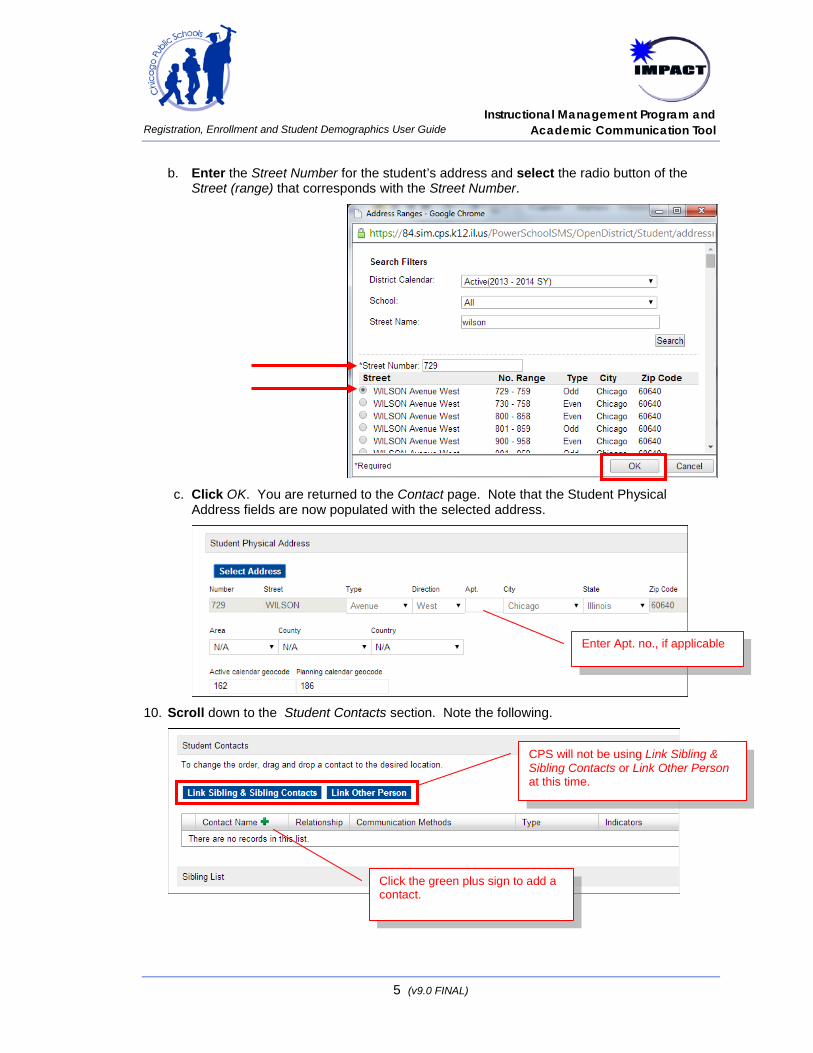
b. Enter the Street Number for the student’s address and select the radio button of the Street (range) that corresponds with the Street Number.
c. Click OK. You are returned to the Contact page. Note that the Student Physical
Address fields are now populated with the selected address.
10. Scroll down to the Student Contacts section. Note the following.
CPS will not be using Link Sibling & Sibling Contacts or Link Other Person at this time.
Click the green plus sign to add a contact.
Enter Apt. no., if applicable
5 (v9.0 FINAL)
Registration, Enrollment and Student Demographics User Guide Instructional Management Program and
Academic Communication Tool
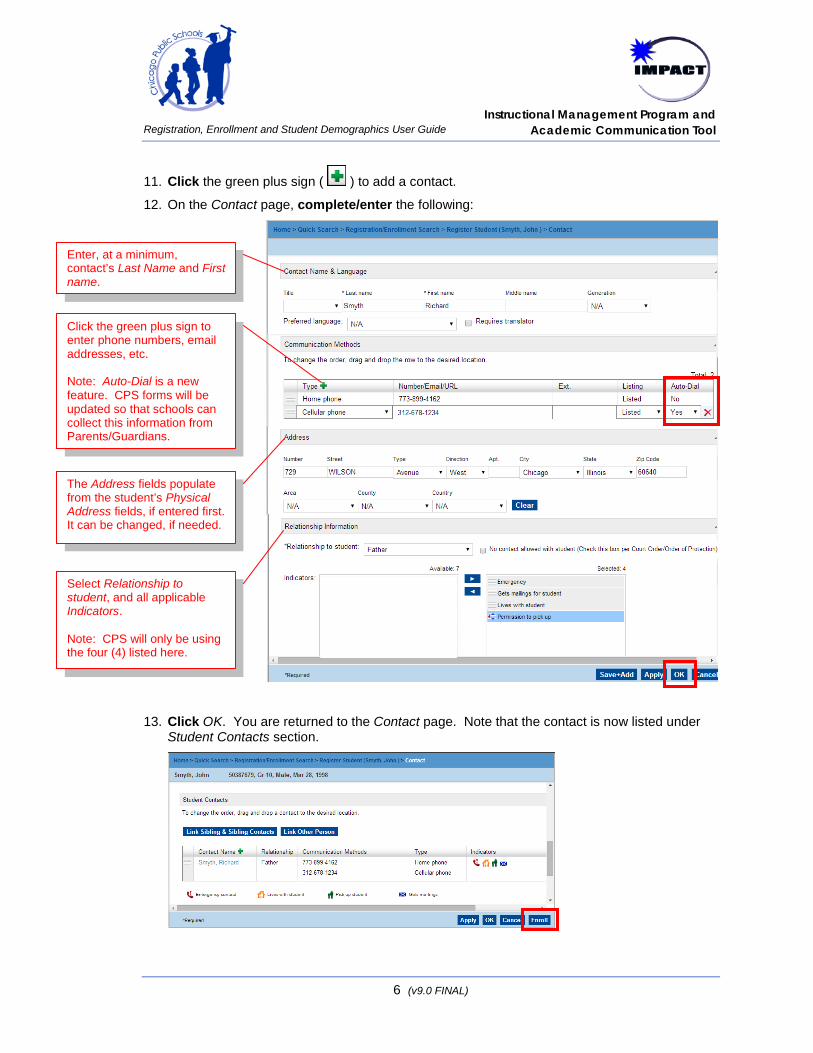
11. Click the green plus sign ( ) to add a contact.
12. On the Contact page, complete/enter the following:
13. Click OK. You are returned to the Contact page. Note that the contact is now listed under Student Contacts section.
Enter, at a minimum, contact’s Last Name and First name.
Click the green plus sign to enter phone numbers, email addresses, etc. Note: Auto-Dial is a new feature. CPS forms will be updated so that schools can collect this information from Parents/Guardians.
The Address fields populate from the student’s Physical Address fields, if entered first. It can be changed, if needed.
Select Relationship to student, and all applicable Indicators. Note: CPS will only be using the four (4) listed here.
6 (v9.0 FINAL)
Registration, Enrollment and Student Demographics User Guide Instructional Management Program and
Academic Communication Tool
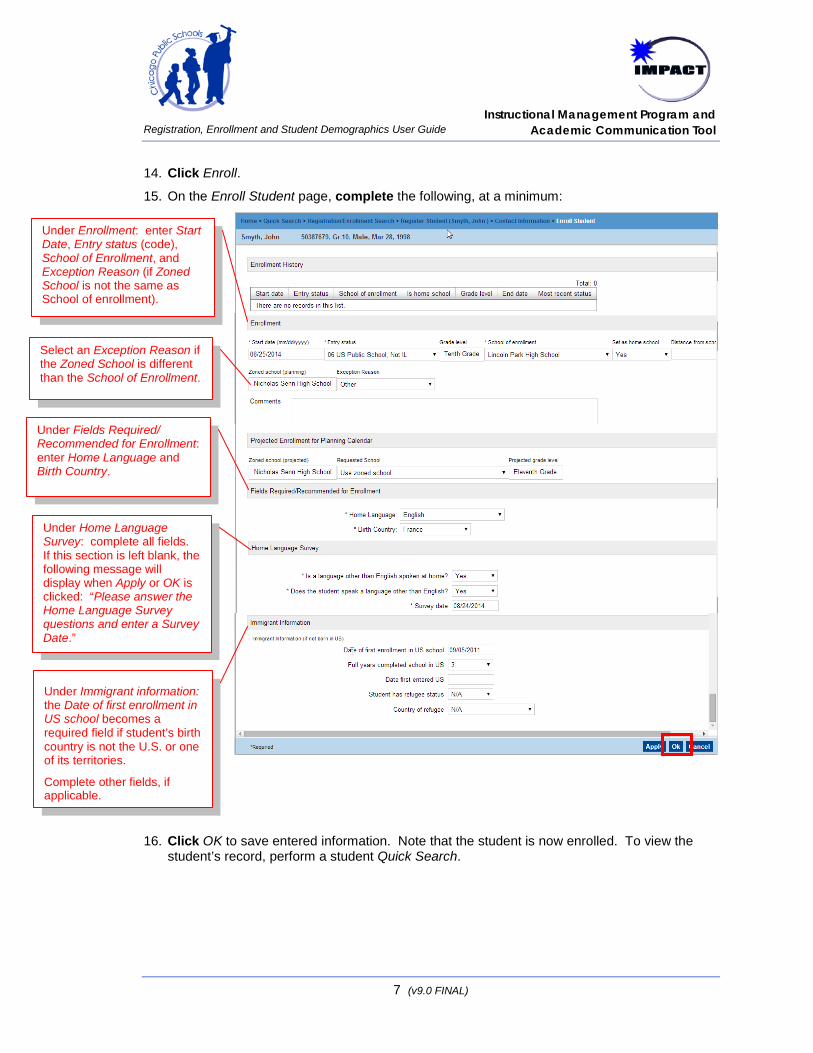
14. Click Enroll.
15. On the Enroll Student page, complete the following, at a minimum:
16. Click OK to save entered information. Note that the student is now enrolled. To view the student’s record, perform a student Quick Search.
Under Enrollment: enter Start Date, Entry status (code), School of Enrollment, and Exception Reason (if Zoned School is not the same as School of enrollment).
Under Fields Required/ Recommended for Enrollment: enter Home Language and Birth Country.
Under Home Language Survey: complete all fields. If this section is left blank, the following message will display when Apply or OK is clicked: “Please answer the Home Language Survey questions and enter a Survey Date.”
Under Immigrant information: the Date of first enrollment in US school becomes a required field if student’s birth country is not the U.S. or one of its territories.
Complete other fields, if applicable.
Select an Exception Reason if the Zoned School is different than the School of Enrollment.
7 (v9.0 FINAL)
Registration, Enrollment and Student Demographics User Guide Instructional Management Program and
Academic Communication Tool
Update Student Demographic and Contact Information The following section describes how to review and update, as needed, student demographic and contact information about students enrolled in your school.
Reminder: To help ensure that each school has current student health and contact information and to maintain the accuracy of student records, CPS recommends that student contact information be updated at least twice each school year. Use the Request for Emergency and Student Health Information Form to collect this information and then update SIM as needed.
Update Demographic Information
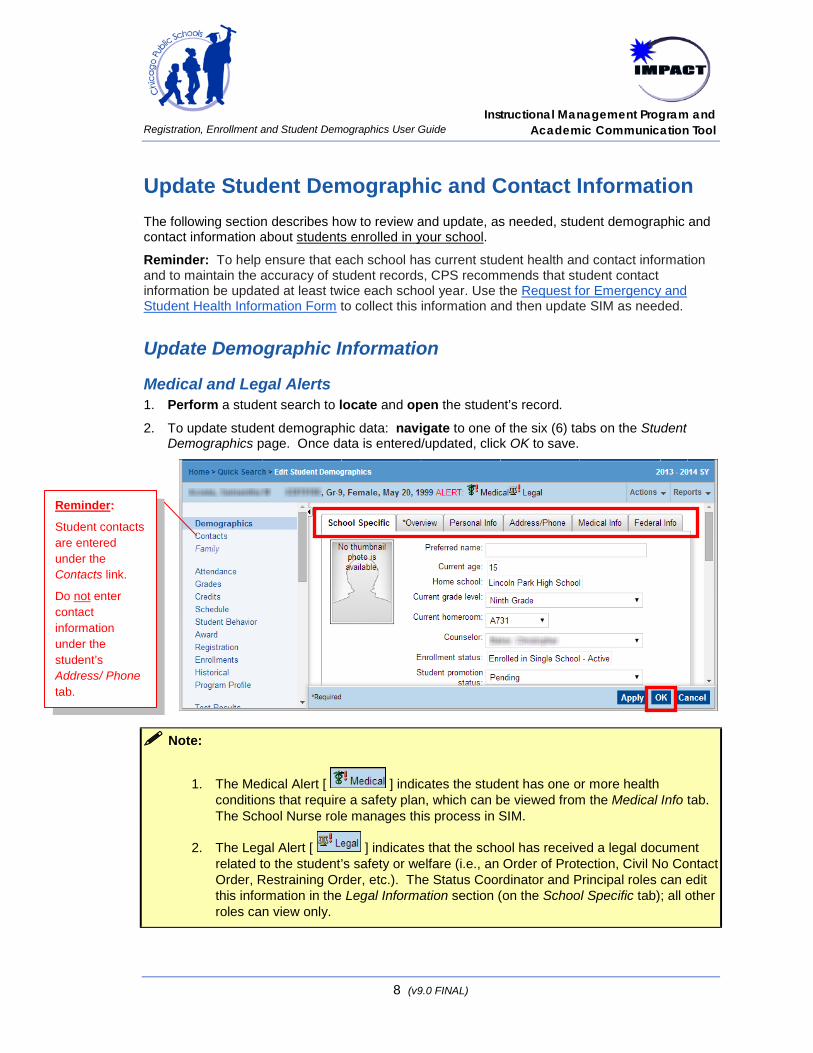
Medical and Legal Alerts 1. Perform a student search to locate and open the student’s record.
2. To update student demographic data: navigate to one of the six (6) tabs on the Student Demographics page. Once data is entered/updated, click OK to save.
Note:
1. The Medical Alert [ ] indicates the student has one or more health conditions that require a safety plan, which can be viewed from the Medical Info tab. The School Nurse role manages this process in SIM.
2. The Legal Alert [ ] indicates that the school has received a legal document related to the student’s safety or welfare (i.e., an Order of Protection, Civil No Contact Order, Restraining Order, etc.). The Status Coordinator and Principal roles can edit this information in the Legal Information section (on the School Specific tab); all other roles can view only.
Reminder:
Student contacts are entered under the Contacts link.
Do not enter contact information under the student’s Address/ Phone tab.
8 (v9.0 FINAL)
Registration, Enrollment and Student Demographics User Guide Instructional Management Program and
Academic Communication Tool
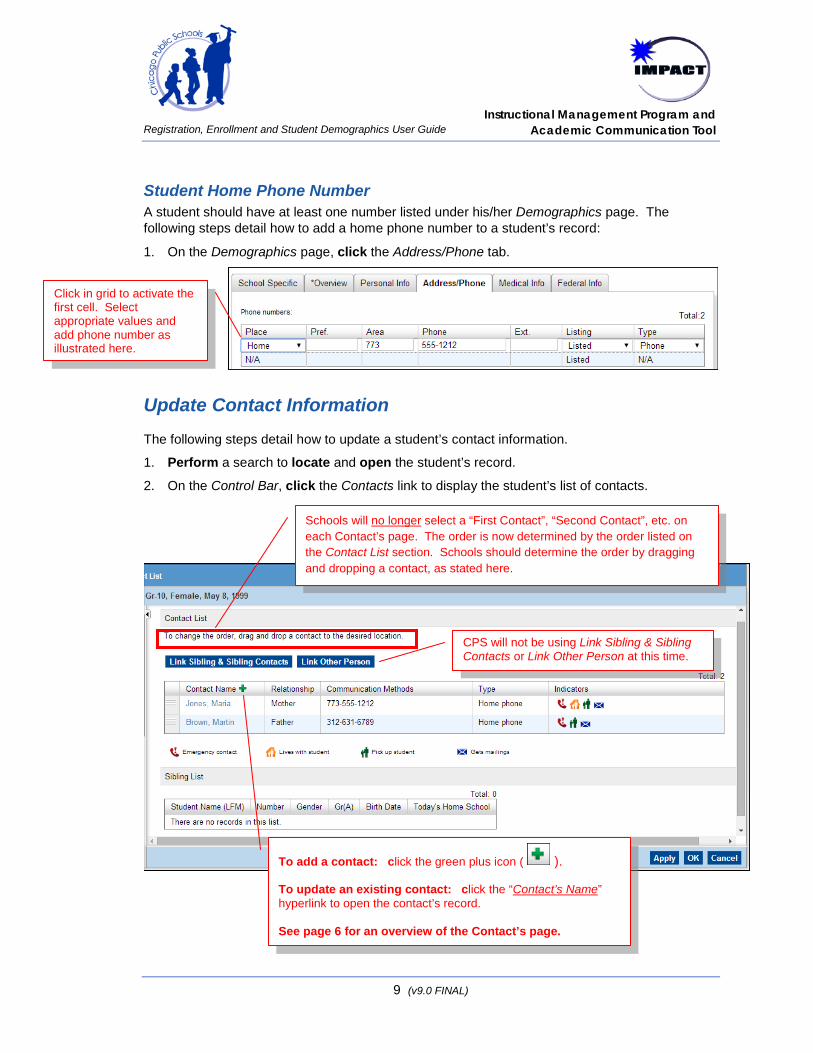
Student Home Phone Number A student should have at least one number listed under his/her Demographics page. The following steps detail how to add a home phone number to a student’s record:
1. On the Demographics page, click the Address/Phone tab.
Update Contact Information The following steps detail how to update a student’s contact information.
1. Perform a search to locate and open the student’s record.
2. On the Control Bar, click the Contacts link to display the student’s list of contacts.
To add a contact: click the green plus icon ( ). To update an existing contact: click the “Contact’s Name” hyperlink to open the contact’s record. See page 6 for an overview of the Contact’s page.
Schools will no longer select a “First Contact”, “Second Contact”, etc. on each Contact’s page. The order is now determined by the order listed on the Contact List section. Schools should determine the order by dragging and dropping a contact, as stated here.
CPS will not be using Link Sibling & Sibling Contacts or Link Other Person at this time.
Click in grid to activate the first cell. Select appropriate values and add phone number as illustrated here.
9 (v9.0 FINAL)

Registration, Enrollment and Student Demographics User Guide Instructional Management Program and
Academic Communication Tool
Add/Edit Homeroom Information It is extremely important that all students, except Grade Code 20 (Ungraded) are assigned to a “Demographics” homeroom. This information is used in various CPS reports. If left blank, these reports will not generate correctly for the student.
Grade Code 20 (Ungraded) Students Grade code 20 (ungraded) students should NOT be assigned to homerooms. These are non-attending students who are enrolled in a school to either receive or be evaluated for special education services. Attendance is not taken, nor should they be assigned classes to receive grades.
The following steps detail how to add/edit homeroom information to a student’s record.
1. Perform a search to locate and open the student’s record.
2. On the School Specific tab, from the Current Homeroom field drop-down menu, select the homeroom to which the student should be assigned and click OK.
Note: Based on the grade level selected in the Current grade level field, only the homerooms associated with that grade level are available in the Current Homeroom field drop-down.
10 (v9.0 FINAL)

Registration, Enrollment and Student Demographics User Guide Instructional Management Program and
Academic Communication Tool
3. On the Change Options – Web Page Dialog page,
Schedule Students
Although both Status Coordinator and Scheduler roles can perform the following tasks on the student’s Schedule page, it is at the discretion of the school to determine which role should be responsible. See SIM on-line Help for steps to perform these tasks.
Scheduling Task Elementary School High School
Assign Default Classes
Add/Drop/Transfer a Class for a specific student
Add and delete Resource Assignments for a specific student
Scheduler role only
Add and end Subject Exceptions for a specific student
Lock/Unlock all classes Scheduler Role only
Transfer homeroom
View change history of a student
View and/or print Student Schedule
Select the appropriate Effective Date and Change Reason. Comments are optional. Click OK to save your information.
11 (v9.0 FINAL)
Registration, Enrollment and Student Demographics User Guide Instructional Management Program and
Academic Communication Tool
Withdraw and Transfer Students
Note: When withdrawing a student, ensure the proper use of CPS leave codes. Reference the SIM Enrollment and Leave Code Quick Guide posted on the IMPACT website.
ISBE publishes a dropout rate for all schools on the State School Report Card. Some CPS schools may have significantly higher drop-out rates due to the improper use of leave codes in IMPACT SIM. Improper use may also create future problems that cannot be corrected.
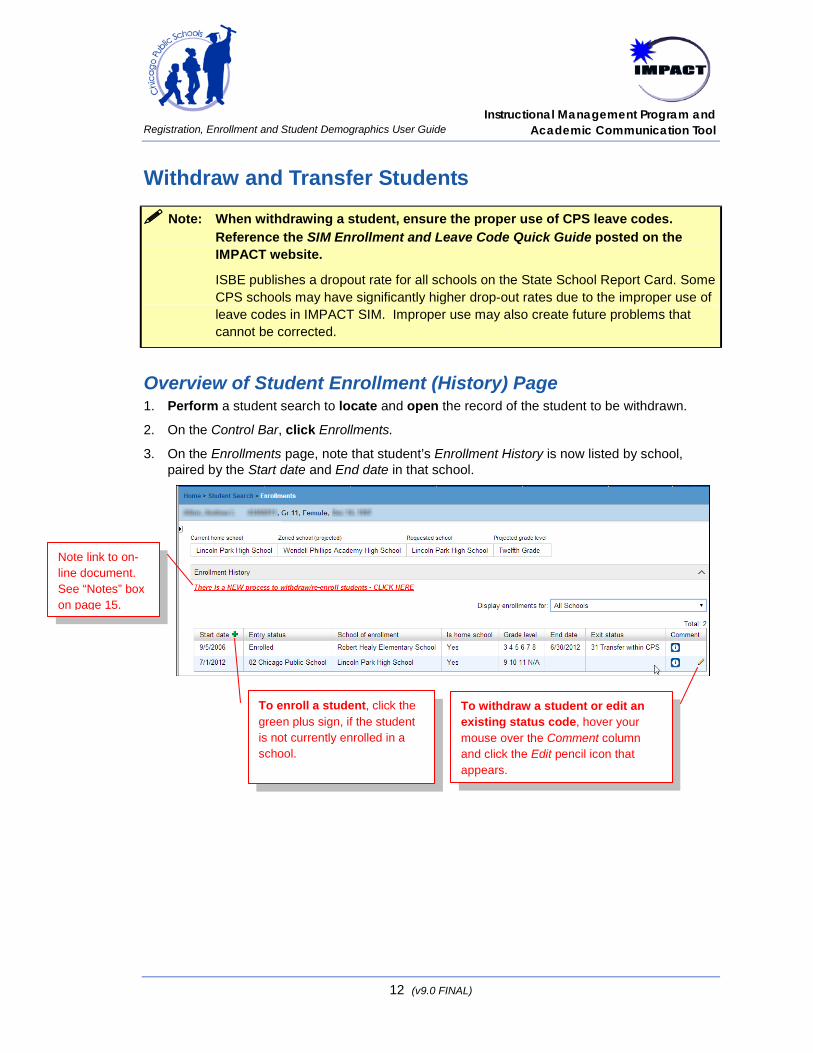
Overview of Student Enrollment (History) Page 1. Perform a student search to locate and open the record of the student to be withdrawn.
2. On the Control Bar, click Enrollments.
3. On the Enrollments page, note that student’s Enrollment History is now listed by school, paired by the Start date and End date in that school.
To withdraw a student or edit an existing status code, hover your mouse over the Comment column and click the Edit pencil icon that appears.
To enroll a student, click the green plus sign, if the student is not currently enrolled in a school.
Note link to on-line document. See “Notes” box on page 15.
12 (v9.0 FINAL)

Registration, Enrollment and Student Demographics User Guide Instructional Management Program and
Academic Communication Tool
4. After clicking the Edit pencil icon, the Edit School Enrollment page appears. Scroll down and note the Withdraw button.
5. Scroll down the Edit School Enrollment page and note the Status Code History section, which lists the student’s entry and exit codes for a particular school.
Example for adding an additional status code:
When Withdraw is clicked, two fields appear: End date and Most recent status (drop-down contains CPS withdraw codes).
To add an additional status code, click the green plus sign.
To edit an existing status code, click the Edit pencil icon for the code in question.
A student was code 99 at the beginning of school. The school receives notification that the student has transferred to a school in another state, effective 10/1/2014. The school will click the green plus sign and add a code 33, effective 10/1/2014.
Note student’s enrollment information when first enrolled into the school.
13 (v9.0 FINAL)
Registration, Enrollment and Student Demographics User Guide Instructional Management Program and
Academic Communication Tool
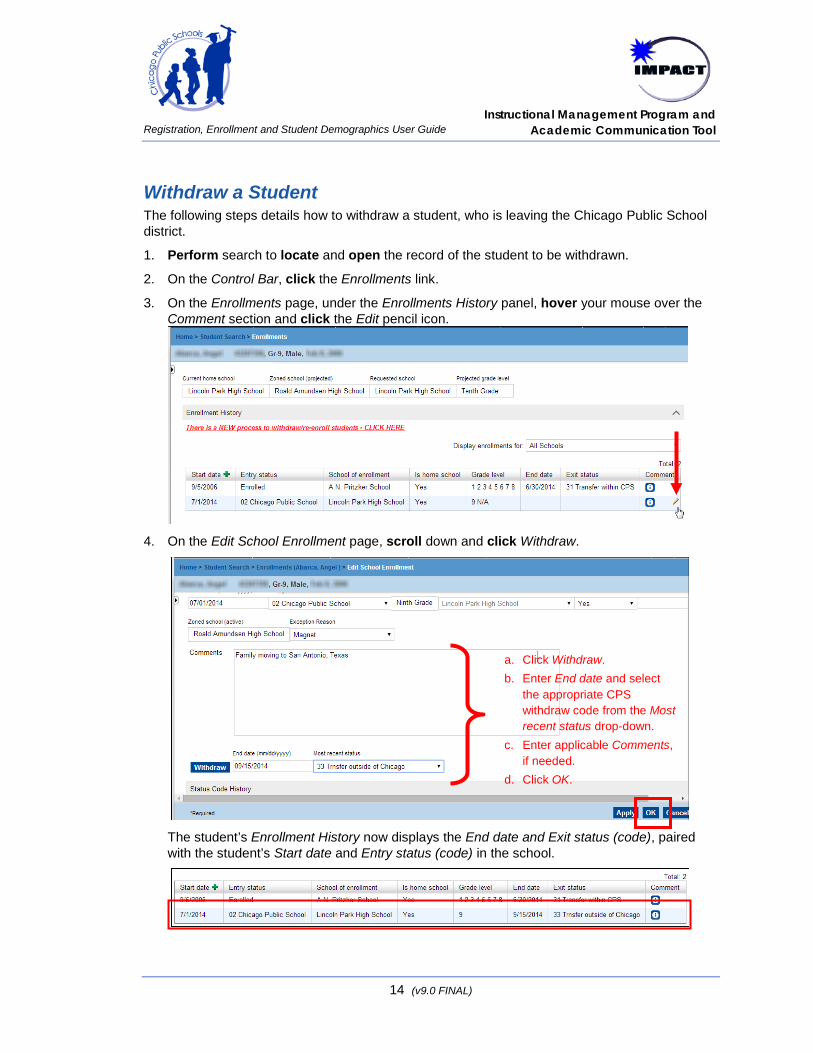
Withdraw a Student The following steps details how to withdraw a student, who is leaving the Chicago Public School district.
1. Perform search to locate and open the record of the student to be withdrawn.
2. On the Control Bar, click the Enrollments link.
3. On the Enrollments page, under the Enrollments History panel, hover your mouse over the Comment section and click the Edit pencil icon.
4. On the Edit School Enrollment page, scroll down and click Withdraw.
The student’s Enrollment History now displays the End date and Exit status (code), paired with the student’s Start date and Entry status (code) in the school.
a. Click Withdraw. b. Enter End date and select
the appropriate CPS withdraw code from the Most recent status drop-down.
c. Enter applicable Comments, if needed.
d. Click OK.
14 (v9.0 FINAL)

Registration, Enrollment and Student Demographics User Guide Instructional Management Program and
Academic Communication Tool
Transfer a Student (between a Chicago Charter, Contract, Public School)
Note: The CPS Transfer process is a “Withdraw/Re-enroll” process. The process can NO LONGER take place on the same date in SIM. The dates must be consecutive.
The “Sending” School is the school the student is leaving. The Sending School withdraws the student from their school based on the last date of attendance submission for the student (to include suspensions, absences, etc.).
It is the Sending School’s responsibility to track the student until that student is re-enrolled into another school in the District.
The “Receiving” School is the school to which the student is transferring. The Receiving School re-enrolls the student into their school based on the first date of attendance submission for the student.
The Sending School To withdraw the student:
1. The Sending School performs the steps described in the previous section, “Withdraw a Student”, page 14.
Reminders:
• Enter End date based on student’s last date of attendance submission (to include suspensions, absences, etc.).
• CPS withdraw code 31 should always be used when transferring a student to a Chicago Public, Charter and Contract school.
2. After the student is withdrawn, the student’s Enrollment History displays the student’s End date, as shown in the following screen capture:
15 (v9.0 FINAL)
Registration, Enrollment and Student Demographics User Guide Instructional Management Program and
Academic Communication Tool
The Receiving School
Notes:
1. When the student appears at the Receiving School, the school verifies that the student has the appropriate information in order to be re-enrolled, in accordance with CPS Board Policies on student enrollment
2. CPS policy stipulates that the student needs to present the appropriate documentation in order to be re-enrolled in school.
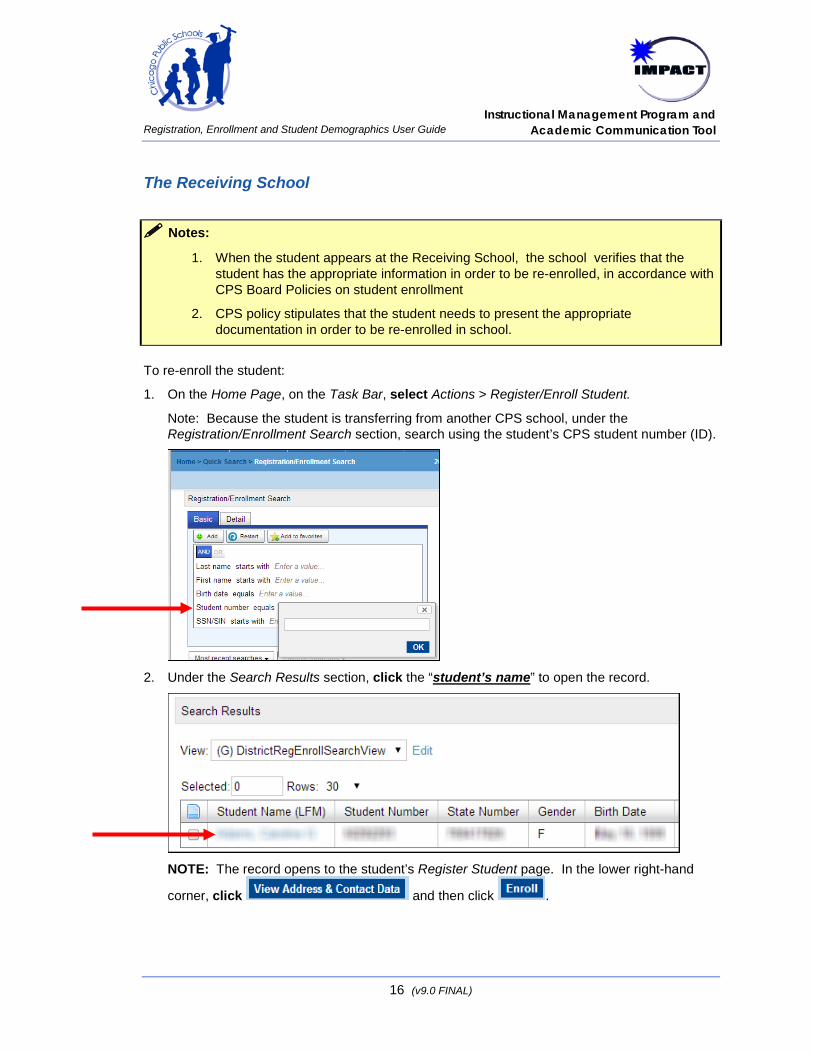
To re-enroll the student:
1. On the Home Page, on the Task Bar, select Actions > Register/Enroll Student.
Note: Because the student is transferring from another CPS school, under the Registration/Enrollment Search section, search using the student’s CPS student number (ID).
2. Under the Search Results section, click the “student’s name” to open the record.
NOTE: The record opens to the student’s Register Student page. In the lower right-hand
corner, click and then click .
16 (v9.0 FINAL)
Registration, Enrollment and Student Demographics User Guide Instructional Management Program and
Academic Communication Tool
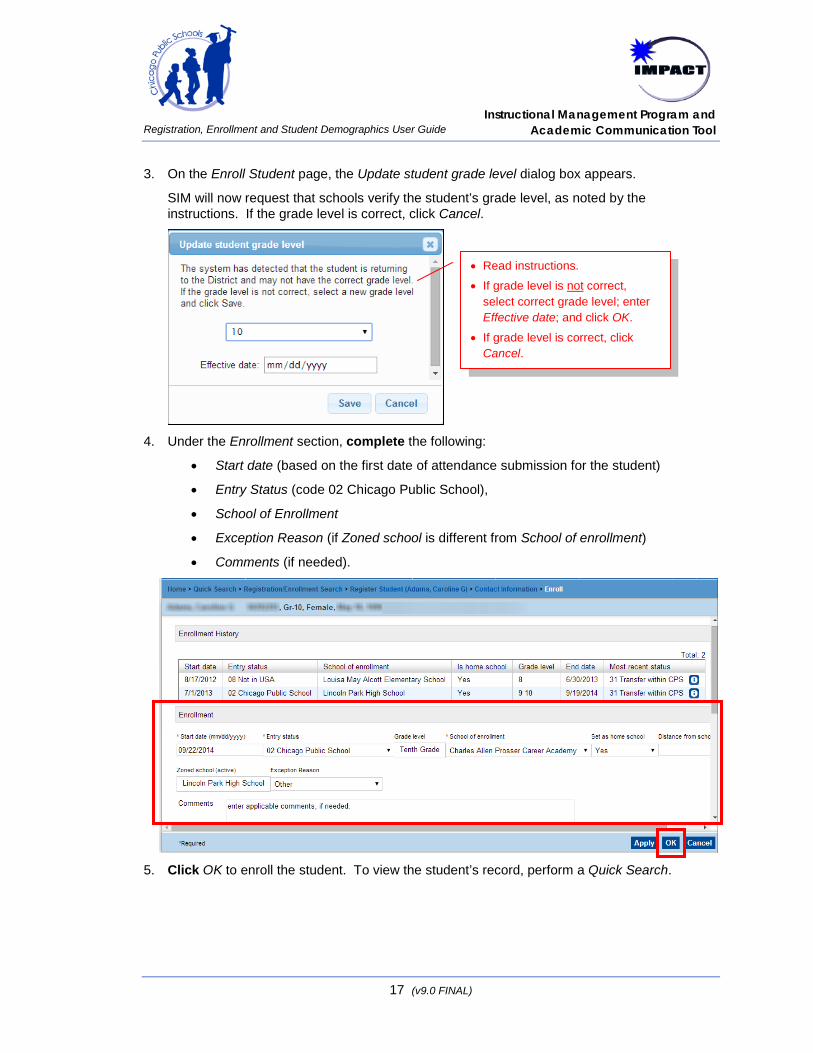
3. On the Enroll Student page, the Update student grade level dialog box appears.
SIM will now request that schools verify the student’s grade level, as noted by the instructions. If the grade level is correct, click Cancel.
4. Under the Enrollment section, complete the following:
• Start date (based on the first date of attendance submission for the student)
• Entry Status (code 02 Chicago Public School),
• School of Enrollment
• Exception Reason (if Zoned school is different from School of enrollment)
• Comments (if needed).
5. Click OK to enroll the student. To view the student’s record, perform a Quick Search.
• Read instructions.
• If grade level is not correct, select correct grade level; enter Effective date; and click OK.
• If grade level is correct, click Cancel.
17 (v9.0 FINAL)
Registration, Enrollment and Student Demographics User Guide Instructional Management Program and
Academic Communication Tool
Generate Reports The following is a list of forms/reports that are helpful during the Registration and Enrollment process. Note that unless otherwise stated, all reports are available in SIM on the School Reports page. Reference this page in SIM for the list of all reports available to the Status Coordinator role.
Report Name Description
CPS School Enrollment form Use this form when enrolling a student new to the District. Parent/Guardian should complete both this form and the CPS Request for Emergency and Student Health Information form.
This form is located on the IMPACT website and is available in English, Spanish, and Polish.
Request for Emergency and Student Health Information Form
Use this form (1) when enrolling a student new to the District OR (2) when verifying information for existing students.
This form is located on the IMPACT website and is available in English, Spanish, and Polish.
CPS Transfer Report Use this form when a student is transferring to another Chicago Public, Charter or Contract School.
CPS ISBE Transfer Report Use this form when a student is transferring out of the Chicago Public School System
The following steps provide an example of how to generate reports. The report in this example is the CPS Student Alpha List.
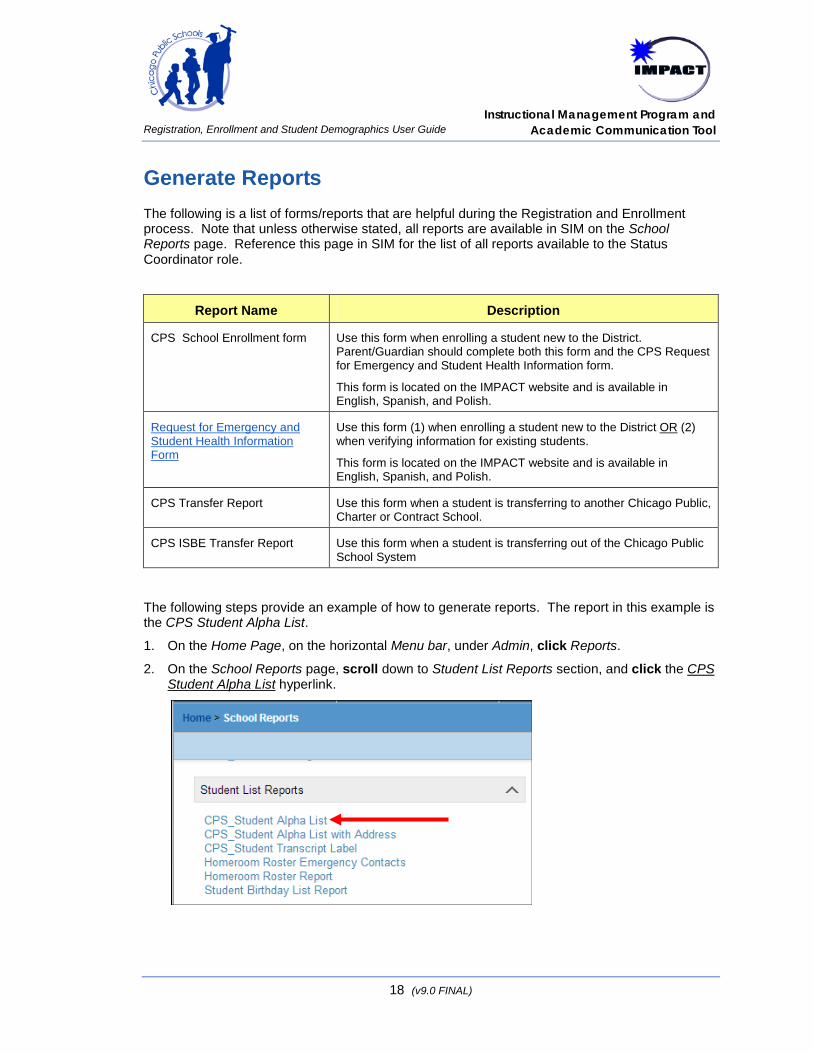
1. On the Home Page, on the horizontal Menu bar, under Admin, click Reports.
2. On the School Reports page, scroll down to Student List Reports section, and click the CPS Student Alpha List hyperlink.
18 (v9.0 FINAL)

Registration, Enrollment and Student Demographics User Guide Instructional Management Program and
Academic Communication Tool
3. On the Reports Options page, click Run.
4. The report displays in a PDF format in a new window.
Note: Options on the Reports Options page may vary depending on the report selected. Some reports offer three (3) to four (4) sections, as follows: • Preferences section – allows the
user to select options specific to that report (such as, Sorting, Reporting Date, etc.)
• Filters section – allows the user to select filters that best delineate what information is needed in the report (such as, run for a particular homeroom or grade level only).
• Scheduling Options section – allows the user to determine when or how often the report should run.
• Output section – allows the user to determine the format for the report, such as Adobe Acrobat, Excel, Word, etc. The default is Adobe Acrobat.
19 (v9.0 FINAL)