instruction manual - anti-siphon ejector chlorine & sulfur...
TRANSCRIPT

Anti-Siphon Ejector 122.6015.0Instruction Manual
Instruction Manual - Anti-Siphon EjectorChlorine & Sulfur Dioxide 500 PPD (10 kg/h) Maximum Capacity
250 & 500 PPD (5 & 10 kg/h) Chlorine orSulfur Dioxide
100 PPD (2 kg/h) Chlorine or Sulfur Dioxide

These instructions generally describe the installation, operation and maintenance of subject equipment. De Nora Water Technologies, Inc. reserves the right to make engineering refinements that have not been described herein. Questions that cannot be answered specifically by these instructions should be directed to your local sales representative or De Nora Water Technologies.
De Nora Water Technologies takes all possible precautions in packaging each item to prevent shipping damage. Carefully inspect each item and report damages to the shipping agent for equipment shipped F.O.B. Colmar, or to De Nora Water Technologies for equipment shipped F.O.B. job site. Do not install any damaged equipment.
Follow instructions given on labels and attached tags. Carefully inspect all packing materials before discarding to prevent loss of accessories, mounting hardware, spare parts, or instructions.
122.6015.0 - 2 - Anti-Siphon EjectorInstruction Manual

Table of Contents1 INTRODUCTION. . . . . . . . . . . . . . . . . . . . . . . . . . . . . . . . . . . . . . . . . . . . . 5
1.1 General . . . . . . . . . . . . . . . . . . . . . . . . . . . . . . . . . . . . . . . . . . . . . 51.2 Specifications . . . . . . . . . . . . . . . . . . . . . . . . . . . . . . . . . . . . . . . . . . 6
2 OPERATION . . . . . . . . . . . . . . . . . . . . . . . . . . . . . . . . . . . . . . . . . . . . . . . 72.1 General . . . . . . . . . . . . . . . . . . . . . . . . . . . . . . . . . . . . . . . . . . . . . 72.2 Installation . . . . . . . . . . . . . . . . . . . . . . . . . . . . . . . . . . . . . . . . . . . . 72.3 Ejector Vacuum . . . . . . . . . . . . . . . . . . . . . . . . . . . . . . . . . . . . . . . . . 82.4 Piping . . . . . . . . . . . . . . . . . . . . . . . . . . . . . . . . . . . . . . . . . . . . . 92.5 Vacuum Connections . . . . . . . . . . . . . . . . . . . . . . . . . . . . . . . . . . . . . . 9
3 START-UP . . . . . . . . . . . . . . . . . . . . . . . . . . . . . . . . . . . . . . . . . . . . . . . 113.1 Vacuum Check . . . . . . . . . . . . . . . . . . . . . . . . . . . . . . . . . . . . . . . . . 11
4 SERVICE . . . . . . . . . . . . . . . . . . . . . . . . . . . . . . . . . . . . . . . . . . . . . . . . 134.1 Nozzle Cleaning . . . . . . . . . . . . . . . . . . . . . . . . . . . . . . . . . . . . . . . . . .4.2 O-Ring Replacement. . . . . . . . . . . . . . . . . . . . . . . . . . . . . . . . . . . . . . 134.3 Functional Test . . . . . . . . . . . . . . . . . . . . . . . . . . . . . . . . . . . . . . . . . 134.4 Recommended Torque Values . . . . . . . . . . . . . . . . . . . . . . . . . . . . . . . . . 14
5 TROUBLESHOOTING CHART . . . . . . . . . . . . . . . . . . . . . . . . . . . . . . . . . . . . 17
FIGURES1 Open Tank Installation . . . . . . . . . . . . . . . . . . . . . . . . . . . . . . . . . . . . . . 52 Pipeline Installation . . . . . . . . . . . . . . . . . . . . . . . . . . . . . . . . . . . . . . . 53 Anti-Siphon Ejector Flow Diagram . . . . . . . . . . . . . . . . . . . . . . . . . . . . . . . . 74 Gas Feed System Flow Diagram . . . . . . . . . . . . . . . . . . . . . . . . . . . . . . . . 85 Dimensions . . . . . . . . . . . . . . . . . . . . . . . . . . . . . . . . . . . . . . . . . . . 106 100 PPD (2 kg/h) Anti-Siphon Ejector Components . . . . . . . . . . . . . . . . . . . . . . 147 250 & 500 PPD (5 & 10 kg/h) Anti-Siphon Ejector Components . . . . . . . . . . . . . . . . 15
Anti-Siphon Ejector - 3 - 122.6015.0Instruction Manual

122.6015.0 - 4 - Anti-Siphon EjectorInstruction Manual
1 INTRODUCTION
1.1 General
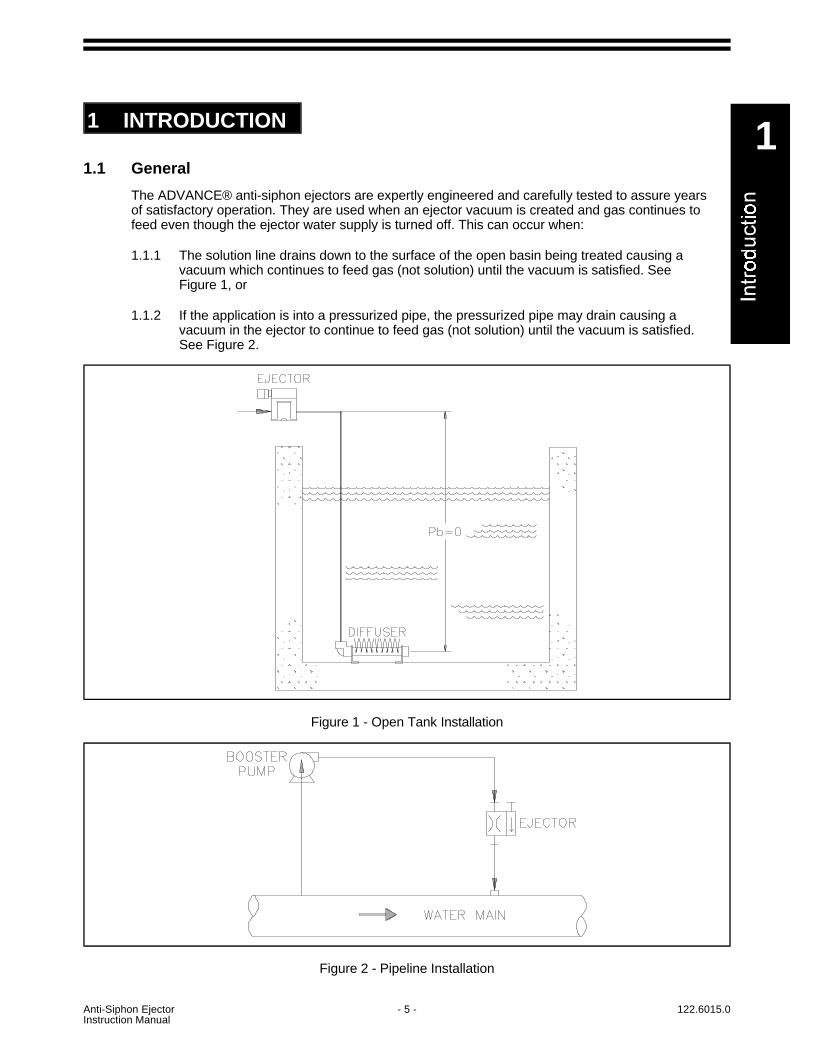
The ADVANCE® anti-siphon ejectors are expertly engineered and carefully tested to assure yearsof satisfactory operation. They are used when an ejector vacuum is created and gas continues tofeed even though the ejector water supply is turned off. This can occur when:
1.1.1 The solution line drains down to the surface of the open basin being treated causing avacuum which continues to feed gas (not solution) until the vacuum is satisfied. SeeFigure 1, or
1.1.2 If the application is into a pressurized pipe, the pressurized pipe may drain causing avacuum in the ejector to continue to feed gas (not solution) until the vacuum is satisfied.See Figure 2.
Anti-Siphon Ejector - 5 - 122.6015.0Instruction Manual
Figure 1 - Open Tank Installation
Figure 2 - Pipeline Installation
1

The Capital Controls anti-siphon ejector consists of a pair of spring-loaded assemblies and a nozzleand diffuser. The spring loaded assembly above the nozzle is the DIAFRAMLESS® check valve; thespring loaded assembly below the nozzle is a watertight diaphragm assembly with movable push pinrods. The nozzle is specifically designed for use with the anti-siphon ejector. The inlet provides ableed port for the passage of water to and from the cavity above the lower diaphragm.
The anti-siphon ejector may be used with all gas feeders up to and including 500 PPD (10 kg/h)chlorine and sulfur dioxide.
Capacities available (as chlorine):
100 PPD (2 kg/h)250 PPD (5 kg/h)500 PPD (10 kg/h)
Anti-siphon ejectors are constructed of the finest materials available for gas service. Correctinstallation and proper care will ensure best operation. Read these instructions carefully and save forfuture reference.
This instruction manual only covers the Capital Controls Anti-siphon ejector (Reference 122.3013).
NOTE: ADVANCE ejectors are designed for use with ADVANCE® gas feeders.
1.2 Specifications
1.2.1 Gas Flow - Chlorine and Sulfur Dioxide
Capacity Vacuum TubingSize
Inlet Nozzle Outlet Throat
100 PPD (2 kg/h) 3/8" 3/4" hose1" hose3/4" NPT
Universal - 3/4" NPT, sprayor open-end, or 1" hose
250 PPD (5 kg/h) 1/2" 1 1/4" NPT1 1/2" hose
1 1/4" NPT1 1/2" hose500 PPD (10 kg/h) 5/8"
Different inlet nozzle and diffuser combinations are available for the ejectors. Your particularcombination was chosen for your application.
1.2.2 A universal diffuser can be used either as a spray diffuser, an open-end diffuser, a 3/4"threaded connection, or a 1" hose connection. Choose the type suited for the installation(spray is recommended for good mixing). If other than spray is desired, modify by cuttingoff the closed end.
1.2.3 The ejector (nozzle and check valve assembly) may be located near the vacuum regulator. A wall mounting bracket is available for field assembly, and the universal diffuser can bemodified for a pipe or hose connection.
122.6015.0 - 6 - Anti-Siphon EjectorInstruction Manual

2 OPERATION
2.1 General
The DIAFRAMLESS ejector check valve assembly “D” is mechanically locked in a closed positionby the push pin rods “C” (attached to diaphragm assembly “B”) in the absence of water pressure in the ejector nozzle. Application of water pressure to the nozzle will fill cavity “E” through the nozzlebleed hole compressing spring “A” by the action of diaphragm assembly “B”. Push pin rods “C” are pulled away and the ejector check valve assembly “D” is free to open upon the creation of avacuum by the nozzle. The anti-siphon ejector check valve assembly maintains a tight closure to30" of mercury vacuum. (Figure 3)
2.2 Installation - Figure 4
The ejector may be installed in any position, since the check valve is spring actuated (however,downward water flow may cause cavitation and poor vacuum). Wall mounting is satisfactory(Figure 5).
The point of injection should be carefully chosen so the water back pressure into which the gas isfed is as low as possible. If the ejector is installed in a pipe, the ejector/diffuser should not beinstalled in the top of the pipe where gas may discharge and collect in an empty area of the pipe.Diffuser penetration into the pipe should not exceed 1/3 the diameter of the pipe.
The ejector (nozzle and check valve assembly) may be located near the vacuum regulator. A wallmounting bracket is available for field assembly, and the universal diffuser can be modified for apipe or hose connection.
2.2.1 Unscrew the diffuser from the assembly. Do NOT install ejector with the diffuser attached,or damage may occur.
Anti-Siphon Ejector - 7 - 122.6015.0Instruction Manual
Figure 3 - Anti-Siphon Ejector Flow Diagram
2

2.2.2 If installed in pipeline, put teflon tape on the diffuser pipe threads and screw the diffuserinto the pipe by hand. Tighten carefully with pliers. (Make sure that the holes in the spraytube diffuser are in the main stream). If the diffuser is modified to provide an open end, the end of the diffuser should not allow strong chemical solution to come in contact with pipeor fittings. (This can cause serious corrosion).
2.2.3 Re-connect nozzle and check valve assembly to diffuser. The nozzle may extend throughthe assembly from either side. A gasket should be on each side. Screw the nozzle into the diffuser HAND TIGHT.
2.3 Ejector Vacuum
The ejector creates a vacuum only when water pressure is applied to the inlet nozzle and when sufficientpressure differential exists between the ejector inlet water versus the water outlet pressure. Vacuum will be lost when the water supply is shut off.
For example, if the diffuser were discharging into an empty basin (zero back pressure), the supplypressure to the nozzle requires about 25 psig (2 bar) to create enough vacuum to operate a 50 PPD(1 kg/h) vacuum regulator. A lower supply pressure or a higher back pressure would reduce the gasflow rate.
The water supply line to the nozzle must be large enough to allow sufficient water flow (3/4" or largerpipe is recommended) and minimize friction losses. It should be at least the size of the nozzleconnection. Is there is a solution line, this line should be less than the diameter of the ejector outlet.Depending upon the distance to the point of application, this line may have to be larger in diameter tominimize hydraulic losses.
122.6015.0 - 8 - Anti-Siphon EjectorInstruction Manual
Figure 4 - Gas Feed System Flow Diagram

2.4 Piping
For most installations, the ejector water supply line should be brought to within 4-6 ft. (1-2 m) of thenozzle with rigid copper or iron pipe. A shutoff valve followed by a Y-strainer, and a hose adaptershould be installed. A pressure gauge between the Y-strainer and the ejector can be a useful servicetool. A Y-strainer is not necessary for all applications particularly if the water is clean and free ofmaterials that could cause nozzle pluggage.
Connect the hose between the hose adapter and the ejector nozzle. If a hose connection is used,clamp the hose securely at both ends with single or double clamps.
If the water supply piping is used, a threaded inlet connection on the inlet nozzle is required andthe piping does not need a hose adaptor. A union connection is employed to permit servicing andthe piping is plumbed accordingly.
2.5 Vacuum Connections
See Figure 4 and Specification section.
Black polyethylene tubing is normally used for the vacuum line between the vacuum regulator andejector. Use a sufficient length of tubing for each line to allow vacuum regulator movement fromone container to another.
Once the tubing length has been established, remove the connector nut from the vacuumregulator and ejector connections and slip each nut onto the tubing. Push the tubing onto eachconnector and tighten connector nuts HAND TIGHT.
NOTE: The upper connection on the vacuum regulator is for vacuum tubing to ejector.
Do not kink the tubing nor run the tubing near hot piping which could melt the polyethylene tubing.
Anti-Siphon Ejector - 9 - 122.6015.0Instruction Manual
2

122.6015.0 - 10 - Anti-Siphon EjectorInstruction Manual
Figure 5 - Typical Dimensions

3 START-UP
3.1 Vacuum Check
The ejector, its water supply and solution lines, must be properly installed and checked beforeoperating the vacuum regulator. Unless the ejector is creating a vacuum, the vacuum regulator will not work.
3.1.1 Disconnect the vacuum tubing from the ejector.
3.1.2 Open the ejector water supply valve. The ejector should now be in operation and creatinga vacuum.
3.1.3 Put your finger on the vacuum connector opening and feel the vacuum. Your finger shouldbe held tight to the connector by the vacuum as an indication that sufficient vacuum exists. If there is no vacuum, be certain the supply pressure is sufficient and the nozzle or pipingis not plugged. Correct the condition and obtain proper vacuum before proceeding withvacuum regulator operation. (Reference vacuum regulator instruction manual)
3.1.4 Reconnect the vacuum tubing to the ejector. Leave the ejector running.
Anti-Siphon Ejector - 11 - 122.6015.0Instruction Manual
3

122.6015.0 - 12 - Anti-Siphon EjectorInstruction Manual

4 SERVICE
4.1 Nozzle Cleaning
4.1.1 Shut off the water supply valve and remove the ejector. Refer to Figures 6 and 7 andremove the nozzle as follows:
a. Remove the connecting hose or piping to the ejector assembly.
b. For 100 PPD (2 kg/h) chlorine or sulfur dioxide ejectors, rotate the complete ejectorbody counter-clockwise. This loosens the threaded portion of the nozzle from thediffuser, eliminating the need for pliers on the hose connection which may damage theplastic.
For 250 & 500 PPD (5 & 10 kg/h), remove the two (2) screws and loosen the flange toremove the nozzle.
NOTE: Nozzle plugging can be caused by foreign material (pipe scale, stone, dirtaccumulation). This can usually be blown out or pushed out with a wire.
Build-up of deposits may caused by iron, manganese or other material can usually beremove by immersing the nozzle in muriatic acid and rinsing. Some waters may causean inoperable ejector and require nozzle cleaning every two months.
NOTE: Do not use a sharp object (screwdriver, awl, etc.) to clean the inside of thenozzle as this may cause damage to the nozzle and alter its vacuum producingcharacteristics.
c. To re-install the nozzle, insert the nozzle through the ejector body and fasten to thediffuser using new gaskets, or o-rings on each side of the ejector body.
NOTE: These parts are plastic and excessive tightening may cause breakage. For 100PPD (2 kg/h) chlorine or sulfur dioxide ejectors, tighten only hand tight with the ejectorbody 90° to the left of its final position, then turn the complete assembly 90°.
d. Re-install the ejector supply hose or pipe and vacuum tubing.
4.2 O-Ring Replacement
Anti-siphon ejectors are designed for on/off application, but will require occasional maintenance ofthe diaphragm bolt/o-ring assembly. On a regular basis, this o-ring should be checked and theo-ring/diaphragm bolt assembly replaced as necessary.
4.3 Functional Test
When the ejector is re-assembled, a functional test of the check valve assembly is recommendedto check for proper ejector assembly and prevent future flooding of the vacuum regulator.
4.3.1 Do not connect vacuum tubing to vacuum regulator.
4.3.2 Turn on water supply.
4.3.3 Verify vacuum at ejector.
4.3.4 Turn water supply off for approximately 5 minutes. If ejector is assembled properly, nowater will leak from vacuum tubing.
Anti-Siphon Ejector - 13 - 122.6015.0Instruction Manual
4

4.4 Recommended Torque Values
Torque values of 14 inch pounds for ejector body screws on units up to 500 PPD/10 kg/h are used atthe factory, and are recommended guidelines for re-assembly of a repaired unit.
122.6015.0 - 14 - Anti-Siphon EjectorInstruction Manual
Figure 6 - 100 PPD (2 kg/h) Anti-Siphon Ejector Components

Anti-Siphon Ejector - 15 - 122.6015.0Instruction Manual
Figure 7 - 250 & 500 PPD (5 & 10 kg/h) Anti-Siphon EjectorComponents
4

122.6015.0 - 16 - Anti-Siphon EjectorInstruction Manual

5 TROUBLESHOOTING CHART
Trouble Probable Cause Corrective Action
1. No ejector vacuum a. Faulty lower diaphragm pins.
b. Damaged lower diaphragm.
c. Plugged bleed hole.
a. Disassemble ejector body andexamine pins.b. Disassemble ejector body andexamine lower diaphragm.c. Clean bleed hole.NOTE: When reassembling,ensure pins reach diaphragm.
2. Insufficient ejector vacuum. a. Y-strainer in water supply dirty.b. Supply pressure too lowc. Back pressure too high
1. Solution valve, if supplied, notfully open.
2. Solution line if present,partially blocked.d. Velocity too low (cavitation)e. Nozzle
1. Flow restricted2. Worn or damaged
f. Incorrect nozzle sizeg. Improper installation
a. Clean Y-strainer.b and c. Open solution valve,clean line, correct back pressurecondition.
d. Increase pressure to ejectore - g. Clean nozzle and/or throat.See Service section and Bulletin123.3001.
3. Flooded flowmeter. a. Dirt on o-ring.
b. Improperly seated or defectiveo-ring.c. Improper application.
a. Clean or replace o-ring. SeeService section.b. Replace o-ring. See Servicesection.c. See Bulletin 123.3001 onhydraulic conditions.
Anti-Siphon Ejector - 17 - 122.6015.0Instruction Manual
5

SEP 2015
De Nora Water Technologies3000 Advance Lane Colmar, PA 18915 ph +1 215 997 4000 • fax +1 215 997 4062 web: www.denora.commail: [email protected]
®Registered Trademark. © 2015. All Rights Reserved.
122.6015.0 - 18 - Anti-Siphon EjectorInstruction Manual
Represented by: