instruction handbook km-6230 (kme) / 131 please read the instruction handbook before using the...
TRANSCRIPT
2A080030AKM-6230 (KME)
/ 131
Please read the instruction handbook before using the copier. Keep it in the
designated location for inside front cover.
INSTRUCTION HANDBOOK

2A080030AKM-6230 (KME)
/ 131
As an ENERGY STAR Partner, KYOCERA MITA CORPORATION has determinedthat this product meets the ENERGY STAR guidelines for energy efficiency.The ENERGY STAR program is an energy reduction plan introduced by the UnitedStates Environmental Protection Agency in response to environmental issues and forthe purpose of advancing the development and utilization of more energy efficientoffice equipment.* ENERGY STAR is a U.S. registered mark.
The Auto-Shut-off time setting becomes 15 to 120 minutes in the areas
corresponding to the Swiss Energy 2000 program.
All rights reserved. No part of this material may be reproduced or transmitted in anyform or by any means, electronic or mechanical, including photocopying, recordingor by any information storage and retrieval system, without permission in writing fromthe Publisher.
Legal Restriction On Copying• It may be prohibited to copy copyrighted material without permission of the copy-
right owner.• It is prohibited under any circumstances to copy domestic or foreign currencies.• Copying other items may be prohibited.
2A080030AKM-6230 (KME)
/ 131
Please read the instruction handbook before using the copier. Keep it in the designated location for
easy reference.
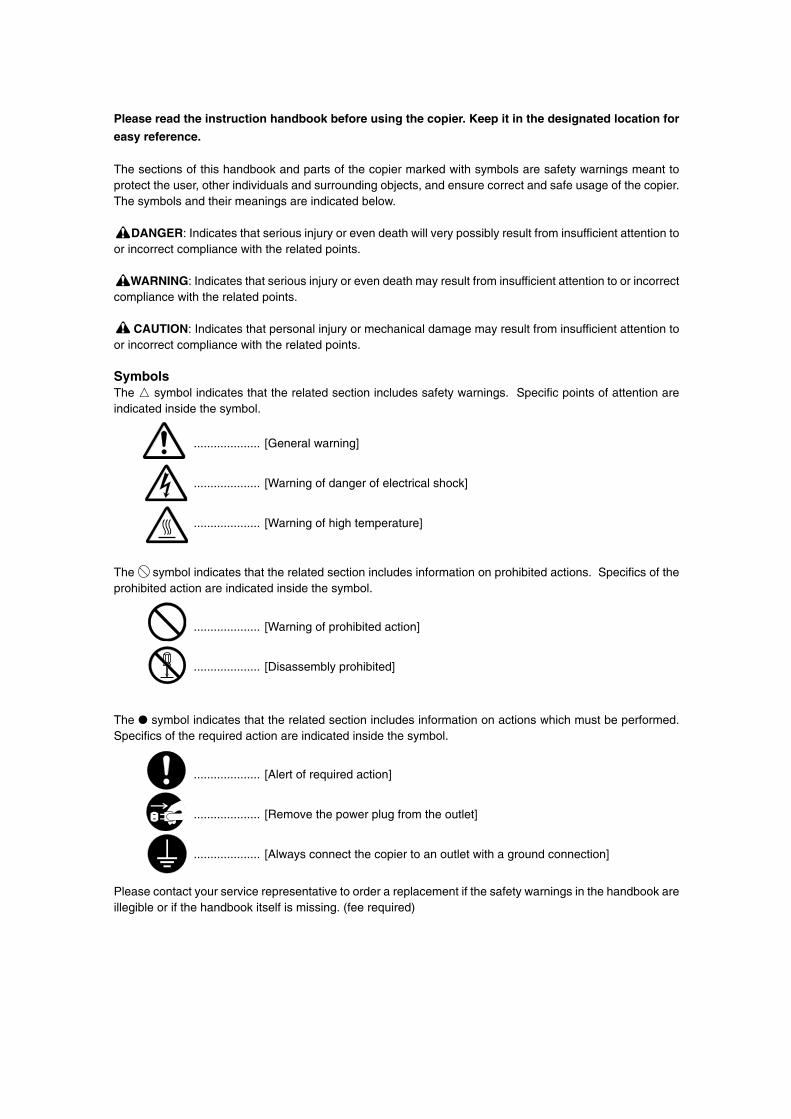
The sections of this handbook and parts of the copier marked with symbols are safety warnings meant toprotect the user, other individuals and surrounding objects, and ensure correct and safe usage of the copier.The symbols and their meanings are indicated below.
DANGER: Indicates that serious injury or even death will very possibly result from insufficient attention toor incorrect compliance with the related points.
WARNING: Indicates that serious injury or even death may result from insufficient attention to or incorrectcompliance with the related points.
CAUTION: Indicates that personal injury or mechanical damage may result from insufficient attention toor incorrect compliance with the related points.
SymbolsThe m symbol indicates that the related section includes safety warnings. Specific points of attention areindicated inside the symbol.
.................... [General warning]
.................... [Warning of danger of electrical shock]
.................... [Warning of high temperature]
The symbol indicates that the related section includes information on prohibited actions. Specifics of theprohibited action are indicated inside the symbol.
.................... [Warning of prohibited action]
.................... [Disassembly prohibited]
The � symbol indicates that the related section includes information on actions which must be performed.Specifics of the required action are indicated inside the symbol.
.................... [Alert of required action]
.................... [Remove the power plug from the outlet]
.................... [Always connect the copier to an outlet with a ground connection]
Please contact your service representative to order a replacement if the safety warnings in the handbook areillegible or if the handbook itself is missing. (fee required)

2A080030AKM-6230 (KME)
/ 131

2A080030AKM-6230 (KME)
/ 131
i
CONTENTS Section 1 IMPORTANT! PLEASE READ FIRST ............. 1-1
CAUTION LABELS .................................................................. 1-1
INSTALLATION PRECAUTIONS ............................................. 1-2
PRECAUTIONS FOR USE ...................................................... 1-3
Section 2 NAMES OF PARTS ........................................ 2-1
(1) Main body .................................................................................. 2-2(2) Operation panel ......................................................................... 2-3(3) Basic screen on the touch panel ............................................... 2-4(4) Optional units ............................................................................. 2-5
� Finisher .................................................................................. 2-5� Side Deck ............................................................................... 2-6
Section 3 PREPARATIONS ............................................ 3-1
1. Loading paper ............................................................................. 3-1(1) How to load copy paper ......................................................... 3-1
1 Loading paper into the drawers ......................................... 3-12 Loading paper into the Front Deck .................................... 3-23 Loading paper into the stack bypass tray .......................... 3-24 Loading paper into the Side Deck (option) ........................ 3-3
2. Setting originals .......................................................................... 3-41 What is the DF for? ................................................................ 3-42 Originals that can be set in the DF… ..................................... 3-43 Cautions when using the DF .................................................. 3-44 Setting originals in the DF ...................................................... 3-45 Auto selection mode ............................................................... 3-56 Setting originals on the platen ................................................ 3-5
3. Adding toner ................................................................................ 3-5
Section 4 BASIC OPERATION ....................................... 4-1
(1) Basic copying procedure ........................................................... 4-1(2) Enlargement/reduction .............................................................. 4-3
1 Auto magnification selection mode ....................................... 4-32 Zoom copy mode .................................................................. 4-33 Standard zoom mode ............................................................ 4-44 Fixed-size zoom mode .......................................................... 4-45 XY zoom mode ..................................................................... 4-5
(3) Two-sided copying from various originals[Two-sided copy mode] .............................................................. 4-5� Two-sided copying from two-sided originals ........................... 4-5� Two-sided copying from two-page [open-face] originals ......... 4-6� Two-sided copying from one-sided originals ........................... 4-6
(4) Interrupt copying ........................................................................ 4-7(5) Rotate copy ............................................................................... 4-8(6) Before you make a large number of copies at one time
[Test copying] .............................................................................. 4-8(7) Recall mode ............................................................................... 4-9(8) Change settings function ........................................................... 4-9(9) Energy-saving (auto preheat) function .................................... 4-10(10) Auto shut-off function ............................................................. 4-10
Section 5 OTHER CONVENIENT FUNCTIONS ............. 5-1
(1) Making a margin space in the copies for binding, etc. [Margin mode] ............................................................................ 5-1� Left margin .............................................................................. 5-1� Top margin .............................................................................. 5-1� Front & back margin ............................................................... 5-1
(2) Printing page numbers on the copies [Print page numbers] ...... 5-3(3) Copying each side of two-page [open-face] originals onto
separate sheets [Page separation mode] ................................. 5-5� Page separation from two-page [open-face] originals ........... 5-5� Page separation from two-sided originals ....................................
(4) Erasing the edges around copies from books, etc. [Border erase mode] ................................................................. 5-6� Erasing blemishes from the edges of copies (Sheet) ............ 5-6� Erasing blemishes from the edges and middle of copies (Book) ...... 5-6� Selecting the area to be erased (Custom) ............................. 5-6
(5) Adding covers for or insert sheets between copies[Sheet copy mode] ..................................................................... 5-71 Submodes ............................................................................ 5-8
� Cover mode ...................................................................... 5-8� Insert mode ...................................................................... 5-8� Chapter mode ................................................................... 5-9
2 Combining modes ............................................................... 5-103 Making copies with the sheet copy mode ........................... 5-10
(6) Making handout materials together withTransparencies[Presentation mode] ................................................................. 5-13� Presentation mode (copying onto the backing sheet) .......... 5-13� Presentation mode (leaving the backing sheet blank) ......... 5-14
(7) Feeding paper as a backing sheet for transparencies[Transparency + backing sheet modes] ................................... 5-16� Copying onto the backing sheet ........................................... 5-16� Leaving the backing sheet blank .......................................... 5-16
(8) Overlaying images [Form overlay] ........................................... 5-18(9) Copying the images from either two or four originals onto a
single copy sheet [Combine copy] ........................................... 5-191 Combination styles .............................................................. 5-192 Borderline indication ........................................................... 5-20
(10) Making a booklet (sheet originals) [Booklet copy] ................. 5-21(11) Making a booklet (two-page [open-face] originals)
[Booklet + cover copy mode] .................................................. 5-22(12) Copying and binding into a booklet (sheet originals)
[Binding mode] ........................................................................ 5-24(13) Inverting black and white [Invert copy mode] ........................ 5-26(14) Making mirror-image copies [Mirror image mode] ................. 5-26(15) Automated sorting [Sort copy] ............................................... 5-27(16) Memorizing frequency used settings [Program mode] .......... 5-27
1 Registering various settings as an single program ........... 5-272 Copying with a registered program .................................. 5-28
Section 6 ADVANCED COPY MODES ........................... 6-1
(1) Scheduling one copy job during copying of another[Job reservation] ........................................................................ 6-1� The job reservation screen ..................................................... 6-11 Adding a job .......................................................................... 6-12 Modifying the settings for a reserved job .............................. 6-23 Deleting a reserved job ......................................................... 6-24 Changing the order of reserved jobs ..................................... 6-3
(2) Copying various originals in one batch [Job build function] ....... 6-31 Memory copying from the DF or platen ................................. 6-3
� Large number of originals ................................................. 6-3� Uniform copy size [Auto size] ............................................ 6-3� Continuous manual scanning [Choose size] ..................... 6-3
2 Two-sided copies from a mixture of one-sided and two-sidedoriginals ................................................................................ 6-6� Making copies like the originals [Print as originals] .......... 6-6� Two-sided copies from all types of originals
[Duplex All Originals] ........................................................ 6-6� Copying onto the front side of specified pages
[Chapterize] ....................................................................... 6-63 Batch copy from the platen ................................................... 6-8
� Sheet originals only .......................................................... 6-8� Two-page [open-face] originals ........................................ 6-8� Sheet & book originals ..................................................... 6-8
Section 7 DOCUMENT MANAGEMENT FUNCTIONS .. 7-1
(1) Registering an image for form overlay ....................................... 7-11 Registering an image ............................................................ 7-12 Checking registered images ................................................. 7-23 Deleting an image ................................................................. 7-24 Modifying information for an image ....................................... 7-3
(2) Repeat copying .......................................................................... 7-4(3) Quick copying ............................................................................ 7-4
1 Printing out data .................................................................... 7-42 Checking data for a print job ................................................. 7-53 Deleting data for a print job ................................................... 7-6
2A080030AKM-6230 (KME)
/ 131
ii
Contents
(4) Shared data box ........................................................................ 7-61 Registering shared data ........................................................ 7-72 Printing out shared data ........................................................ 7-73 Checking shared data ........................................................... 7-84 Deleting shared data ............................................................. 7-95 Modifying information for shared data ................................. 7-10
(5) Synergy print boxes ................................................................. 7-101 Registering originals in a synergy print box ......................... 7-112 Printing out more than one set of originals from a synergy
print box .............................................................................. 7-123 Checking originals in a synergy print box ........................... 7-134 Deleting originals from a synergy print box ......................... 7-145 Changing the order of printing ............................................ 7-156 Modifying information for a registered synergy print box .... 7-15
(6) Virtual mailboxes ..................................................................... 7-171 Printing out all of the originals in a virtual mailbox .............. 7-172 Changing the password ...................................................... 7-183 Deleting data from a virtual mailbox .................................... 7-18
Section 8 COPIER MANAGEMENT ............................... 8-1
(1) Copy management .................................................................... 8-11 The copy management procedures and settings ................. 8-1
� Registering new department codes .................................. 8-1� Deleting department codes .............................................. 8-1� Changing limits ................................................................. 8-1� Clearing copy counts ........................................................ 8-1� Checking copy counts ...................................................... 8-1� Printing out the copy management report ........................ 8-1� Turning copy management ON/OFF ................................ 8-1
2 How to enter the copy management select mode ................ 8-13 How to register the various management settings ............... 8-24 Making copies when copy management is turned ON ......... 8-6
(2) Weekly timer .............................................................................. 8-71 The weekly timer procedures and settings ........................... 8-7
� Setting the time ................................................................. 8-7� Programming the weekly timer ......................................... 8-7� Canceling the timer function ............................................. 8-7� Turning the weekly timer ON/OFF .................................... 8-7
2 How to enter the weekly timer select mode .......................... 8-73 How to register the various timer settings ............................. 8-84 Making copies after the copier has been turned OFF by the
weekly timer ........................................................................ 8-10(3) Default settings and procedures .............................................. 8-10
[1] Machine defaults ................................................................. 8-11� Types of machine defaults ............................................... 8-11
1 Custom size paper in stack bypass ............................ 8-112 Automatic drawer switching ON/OFF ......................... 8-113 Drawer paper size ...................................................... 8-114 Special paper designation .......................................... 8-115 APS mode for special paper ....................................... 8-116 Key sound ON/OFF .................................................... 8-117 Auto preheat time ....................................................... 8-118 Auto shut-off time ....................................................... 8-119 Management pin code change ................................... 8-110 Auto shut-off ON/OFF ................................................. 8-11! Date & time ................................................................. 8-11
� Accessing the machine default setting mode ................. 8-12� Changing the default settings ......................................... 8-12
[2] Copy-related defaults ......................................................... 8-15� Types of copy defaults .................................................... 8-15
1 Exposure mode ......................................................... 8-152 Exposure step ........................................................... 8-153 Toner economy mode ................................................ 8-154 Auto exposure adjustment ......................................... 8-155 Manual exposure adjustment .................................... 8-166 Copy quality mode ..................................................... 8-167 Sort mode ON/OFF ................................................... 8-168 Paper selection .......................................................... 8-169 Job Programming ...................................................... 8-160 Default drawer ........................................................... 8-16
! Zoom mode ............................................................... 8-16@ Copy limit ................................................................... 8-16# Custom border erase size ......................................... 8-16$ Front & back margin key ON/OFF ............................. 8-16% Drawer for insert sheets ............................................ 8-16^ Drawer for cover sheet ............................................... 8-16& Rotate-sort ................................................................. 8-16* Repeat copying .......................................................... 8-16( Create shortcut (#1, #2) ............................................. 8-16) Customize function display screen (#1 - #5) .............. 8-16
� Accessing the copy default setting mode ....................... 8-17� Changing the default settings ......................................... 8-18
[3] Box management procedures ............................................ 8-23� Types of box management procedures .......................... 8-23
1 Reset box (delete all) ................................................ 8-232 Box name & password / Clear data in box ................ 8-233 Box default ................................................................ 8-234 Document list ............................................................. 8-23
� Accessing the box management procedures ................. 8-24� Procedures ..................................................................... 8-24
[4] Deleting stored data ........................................................... 8-27[5] Toner usage information ..................................................... 8-28
(4) Touch panel language selection .............................................. 8-28(5) Entering characters ................................................................. 8-29
1 Character input screen ....................................................... 8-292 Name registration example ................................................ 8-29
Section 9 OPTIONAL EQUIPMENT ............................... 9-1
(1) Finisher ...................................................................................... 9-11 Selecting the desired mode .................................................. 9-12 Copying in the Sort mode ..................................................... 9-23 Copying in the Group mode .................................................. 9-24 Copying in the Sort-Staple mode .......................................... 9-35 Copying in the Hole Punch mode ......................................... 9-46 Copying in the Non-sort mode .............................................. 9-57 Stacking mode ...................................................................... 9-58 Acceptable capacity for the Sort and the Non-sort trays ....... 9-59 Stapling Unit .......................................................................... 9-60 Refilling the Stapling Unit ...................................................... 9-6! Clearing a staple jam ............................................................ 9-8@ Disposing of hole-punch scraps ............................................ 9-9
(2) Booklet Stitcher ....................................................................... 9-10(3) Side Deck ................................................................................. 9-11(4) Key Counter .............................................................................. 9-11(5) Mailbox Unit ............................................................................. 9-12(6) Print/Scan System ................................................................... 9-12(7) Tandem Board ......................................................................... 9-12
Section 10 TROUBLESHOOTING................................ 10-1
1. Messages during copying ......................................................... 10-12. Replacing the waste toner tank ................................................. 10-33. If paper misfeeds ...................................................................... 10-4
(1) Misfeed location indicators .................................................. 10-4(2) Cautions ............................................................................... 10-4(3) Removal procedures ............................................................ 10-5
4. Troubleshooting tables ............................................................ 10-185. Cleaning the copier ................................................................. 10-20
Section 11 SPECIFICATIONS ...................................... 11-1
Laser safety ................................................................................... 11-2
2A080030AKM-6230 (KME)
/ 131
iii
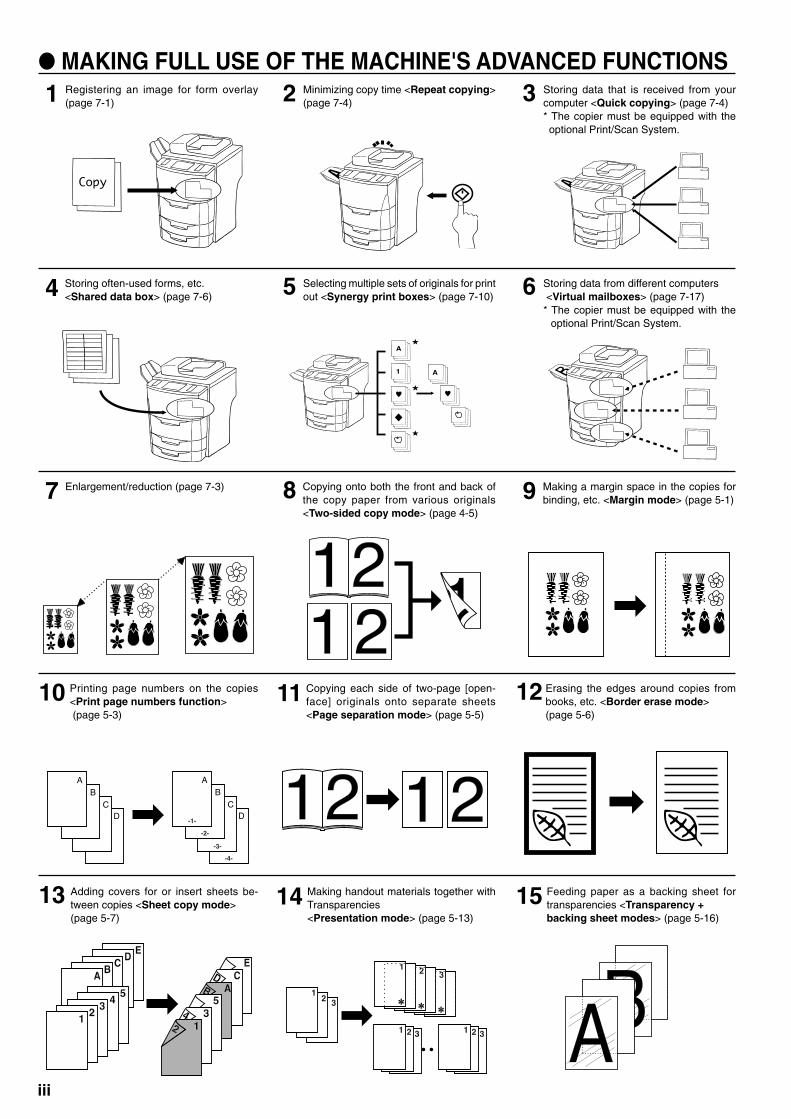
Registering an image for form overlay(page 7-1)
Storing data that is received from yourcomputer <Quick copying> (page 7-4)* The copier must be equipped with theoptional Print/Scan System.
Minimizing copy time <Repeat copying>(page 7-4)
Storing often-used forms, etc.<Shared data box> (page 7-6)
Storing data from different computers <Virtual mailboxes> (page 7-17)* The copier must be equipped with the
optional Print/Scan System.
Selecting multiple sets of originals for printout <Synergy print boxes> (page 7-10)
Enlargement/reduction (page 7-3) Making a margin space in the copies forbinding, etc. <Margin mode> (page 5-1)
Copying onto both the front and back ofthe copy paper from various originals<Two-sided copy mode> (page 4-5)
Printing page numbers on the copies<Print page numbers function> (page 5-3)
Erasing the edges around copies frombooks, etc. <Border erase mode>(page 5-6)
Copying each side of two-page [open-face] originals onto separate sheets<Page separation mode> (page 5-5)
Adding covers for or insert sheets be-tween copies <Sheet copy mode>(page 5-7)
Feeding paper as a backing sheet fortransparencies <Transparency +backing sheet modes> (page 5-16)
Making handout materials together withTransparencies<Presentation mode> (page 5-13)
1 2
7 8 9
10 11 12
13 14 15
3
4 5 6
� MAKING FULL USE OF THE MACHINE'S ADVANCED FUNCTIONS

2A080030AKM-6230 (KME)
/ 131
iv
Overlaying images <Form overlaymode> (page 5-18)
Making a booklet (sheet originals)<Booklet copy mode> (page 5-21)
Copying the images from either two orfour originals onto a single copy sheet<Combined copy mode> (page 5-19)
Making a booklet (two-page [open-face]originals) <Booklet + cover copy mode>(page 5-22)
Automated sorting <Sort copy mode>(page 5-27)
Copying and binding into a booklet (sheetoriginals) <Binding mode> (page 5-24)* The copier must be equipped with theoptional Booklet Stitcher.
Changing the direction of the copy imagefor easy sorting <Rotate-Sort copymode> (page 5-27)
Making mirror-image copies<Mirror image mode> (page 5-26)
Inverting black and white <Invert copymode> (page 5-26)
Memorizing frequency used settings <Program mode> (page 5-27)
Setting different size originals at the sametime <Auto selection> (page 3-5)
Copying various originals in one batch<Job build function> (page 6-3)
Using department codes to manage thenumber of copies made by each depart-ment <Copy management mode>(page 8-1)
Changing the language used on the touchpanel <Touch panel languageselection> (page 8-27)
Turning the main switch ON/OFF auto-matically <Weekly timer> (page 8-7)
16 17 18
19 20 21
22 23 24
25 26 27
28 29 30
� MAKING FULL USE OF THE MACHINE'S ADVANCED FUNCTIONS
2A080030AKM-6230 (KME)
/ 131
v
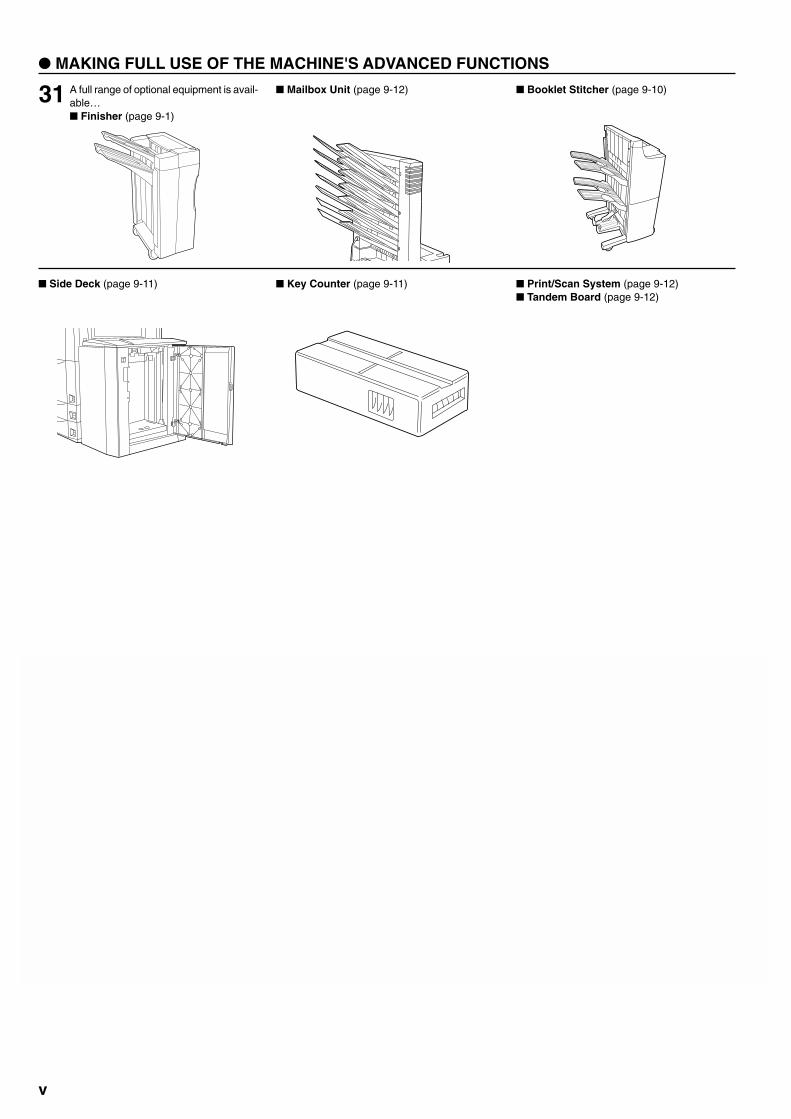
A full range of optional equipment is avail-able…� Finisher (page 9-1)
� Booklet Stitcher (page 9-10)� Mailbox Unit (page 9-12)
� Side Deck (page 9-11) � Key Counter (page 9-11) � Print/Scan System (page 9-12)� Tandem Board (page 9-12)
31� MAKING FULL USE OF THE MACHINE'S ADVANCED FUNCTIONS

2A080030AKM-6230 (KME)
/ 131
Caution labels have been attached to the copier at the following locations for safety purposes.BE SUFFICIENTLY CAREFUL to avoid fire or electric shock when removing a paper jam orwhen replacing toner.
CAUTION LABELS
NOTE: DO NOT remove these labels.
Label 2High temperature inside. Do not touchparts in this area, because there is a dan-ger of getting burned. ...............................
Label 1High voltage inside. NEVER touch partsin this area, because there is a danger ofelectric shock. ...........................................
Label 3High temperature inside. Do not touchparts in this area, because there is a dan-ger of getting burned. ...............................
Section 1 IMPORTANT! PLEASE READ FIRST.
1-1
2A080030AKM-6230 (KME)
/ 131
1-2
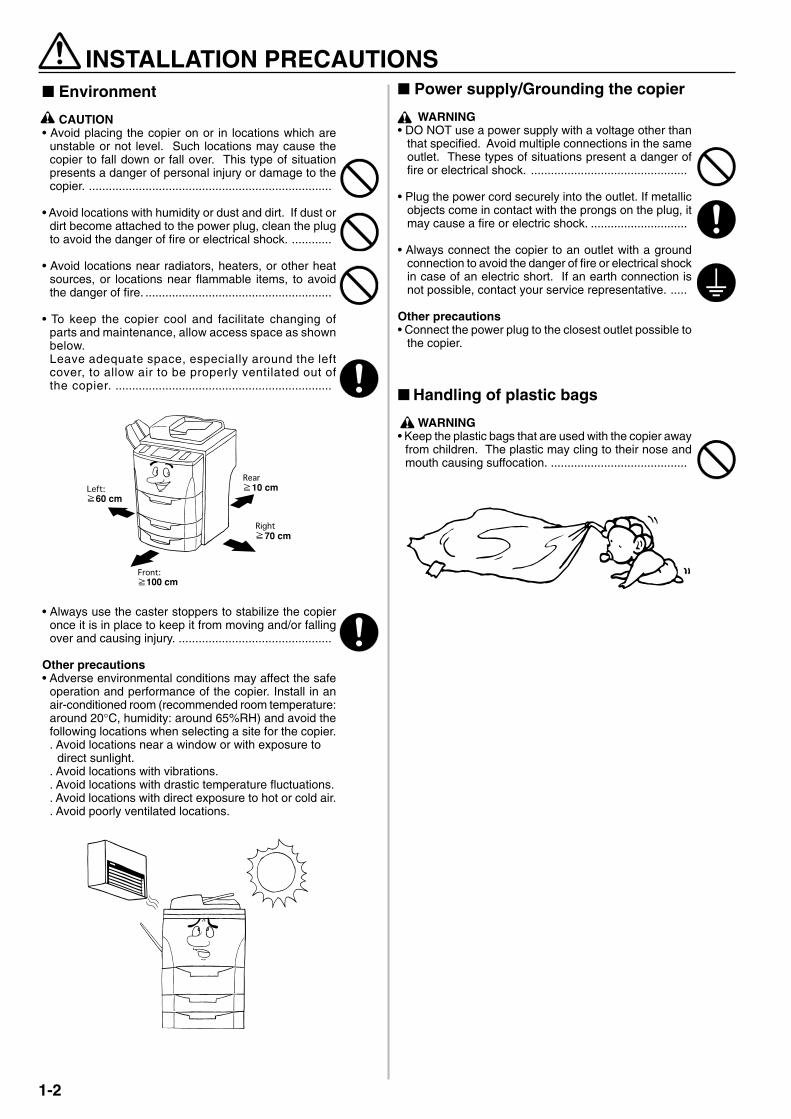
INSTALLATION PRECAUTIONS� Environment
CAUTION• Avoid placing the copier on or in locations which are
unstable or not level. Such locations may cause thecopier to fall down or fall over. This type of situationpresents a danger of personal injury or damage to thecopier. .........................................................................
• Avoid locations with humidity or dust and dirt. If dust ordirt become attached to the power plug, clean the plugto avoid the danger of fire or electrical shock. ............
• Avoid locations near radiators, heaters, or other heatsources, or locations near flammable items, to avoidthe danger of fire. ........................................................
• To keep the copier cool and facilitate changing ofparts and maintenance, allow access space as shownbelow.Leave adequate space, especially around the leftcover, to allow air to be properly ventilated out ofthe copier. .................................................................
• Always use the caster stoppers to stabilize the copieronce it is in place to keep it from moving and/or fallingover and causing injury. ..............................................
Other precautions• Adverse environmental conditions may affect the safe
operation and performance of the copier. Install in anair-conditioned room (recommended room temperature:around 20°C, humidity: around 65%RH) and avoid thefollowing locations when selecting a site for the copier.. Avoid locations near a window or with exposure to
direct sunlight.. Avoid locations with vibrations.. Avoid locations with drastic temperature fluctuations.. Avoid locations with direct exposure to hot or cold air.. Avoid poorly ventilated locations.
� Power supply/Grounding the copier
WARNING• DO NOT use a power supply with a voltage other than
that specified. Avoid multiple connections in the sameoutlet. These types of situations present a danger offire or electrical shock. ...............................................
• Plug the power cord securely into the outlet. If metallicobjects come in contact with the prongs on the plug, itmay cause a fire or electric shock. .............................
• Always connect the copier to an outlet with a groundconnection to avoid the danger of fire or electrical shockin case of an electric short. If an earth connection isnot possible, contact your service representative. .....
Other precautions• Connect the power plug to the closest outlet possible to
the copier.
� Handling of plastic bags
WARNING• Keep the plastic bags that are used with the copier away
from children. The plastic may cling to their nose andmouth causing suffocation. .........................................

2A080030AKM-6230 (KME)
/ 131
PRECAUTIONS FOR USE� Cautions when using the copier
WARNING• DO NOT place metallic objects or containers with water
(flower vases, flower pots, cups, etc.) on or near thecopier. This type of situation presents a danger of fireor electrical shock should they fall inside. ...................
• DO NOT remove any of the covers from the copier asthere is a danger of electrical shock from high voltageparts inside the copier. ................................................
• DO NOT damage, break or attempt to repair the powercord. DO NOT place heavy objects on the cord, pull it,bend it unnecessarily or cause any other type of dam-age.These types of situations present a danger of fire orelectrical shock. ..........................................................
• NEVER attempt to repair or disassemble the copier orits parts as there is a danger of fire, electrical shock ordamage to the laser. If the laser beam escapes, thereis a danger of it causing blindness. .............................
• If the copier becomes excessively hot, smoke appearsfrom the copier, there is an odd smell, or any otherabnormal situation occurs, there is a danger of fire orelectrical shock. Turn the main switch OFF (O)immediately, remove the power plug from the outlet andcontact your service representative. ...........................
• If anything harmful (paper clips, water, other fluids, etc.)falls into the copier, turn the main switch OFF (O)immediately. Next, remove the power plug from theoutlet to avoid the danger of fire or electrical shock. Thencontact your service representative. ...........................
• DO NOT remove or connect the power plug with wethands, as there is a danger of electrical shock. ..........
• ALWAYS contact your service representative formaintenance or repair of internal parts. ......................
CAUTION• DO NOT pull the power cord when removing it from the
outlet. If the power cord is pulled, the wires may becomebroken and there is a danger of fire or electrical shock.(ALWAYS grasp the power plug when removing thepower cord from the outlet.) ........................................
• ALWAYS remove the power plug from the outlet whenmoving the copier. If the power cord is damaged, thereis a danger of fire or electrical shock. .........................
• If the copier will not be used for a short period of time(overnight, etc.), turn the main switch OFF (O).If it will not be used for an extended period of time(vacations, etc.), remove the power plug from the outletfor safety purposes during the time the copier is not inuse. .............................................................................
• ALWAYS hold the designated parts only when lifting ormoving the copier. .......................................................
• For safety purposes, ALWAYS remove the power plugfrom the outlet when performing cleaning operations. ..
• If dust accumulates within the copier, there is a dangerof fire or other trouble. It is therefore recommended thatyou consult with your service representative in regardto cleaning of internal parts. This is particularly effectiveif accomplished prior to seasons of high humidity.Consult with your service representative in regard tothe cost of cleaning the internal parts of the copier. ...
• DO NOT leave the document feeder open as there is adanger of personal injury. ...........................................
Other precautions• DO NOT place heavy objects on the copier or cause
other damage to the copier.
• DO NOT open the front cover, turn off the main switch,or pull out the power plug during copying.
• During copying, some ozone is released, but the amountdoes not cause any ill effect to one's health. If, however,the copier is used over a long period of time in a poorlyventilated room or when making an extremely largenumber of copies, the smell may become unpleasant.To maintain the appropriate environment for copy work,it is suggested that the room be properly ventilated.
• When lifting or moving the copier, contact your servicerepresentative.
• Do not touch electrical parts, such as connectors orprinted circuit boards. They could be damaged by staticelectricity.
• DO NOT attempt to perform any operations notexplained in this handbook.
• CAUTION : Use of controls or adjustments orperformance of procedures other than those specifiedherein may result in hazardous radiation exposure.
� Cautions when handlingconsumables
CAUTION• Avoid inhalation, ingestion, skin or eye contact. If
ingestion occurs, dilute stomach contents thoroughlywith water and seek medical treatment. If skin contactoccurs, wash with soap and water. If contact with eyesoccurs, flush thoroughly with water and seek medicaltreatment. ....................................................................
• Prolonged inhalation of excessive dusts may cause lungdamage. Use of this product, as intended, does not resultin inhalation of excessive dusts. .................................
• Keep away from children. ...........................................
• Do not incinerate toner and toner containers. Dangeroussparks may cause burn. ..............................................
Other precautions• Always read the safety instructions which are included
in the box or printed on the container when handlingconsumables.
• Dispose of the toner or toner containers in accordancewith Federal, State and Local rules and regulations.
• Store consumables in a cool, dark location.
• If the copier will not be used for an extended period oftime, remove the paper from the cassette, return it to itsoriginal package and reseal it.
1-3

2-1
2A080030AKM-6230 (KME)
/ 131
E_Sec2_Name.PM6 10/13/00, 13:361

Section 2 NAMES OF PARTS
2A080030AKM-6230 (KME)
/ 131
Section 2 NAMES OF PARTS
2-1
E_Sec2_Name.PM6 10/13/00, 13:362

Section 2 NAMES OF PARTS
2A080030AKM-6230 (KME)
/ 131
(1) Main body1 Front cover2 Operation panel3 Original size indicator lines
(When setting an original on the platen, align it with the appropriatelines.)
4 Platen5 Cover on the right side of the operation panel
(Open this cover when adding toner.)6 Original tray
(Depending upon the country or region where you purchased yourcopier, this part may not be included.)
7 Right upper cover(Open this cover if paper misfeeds in the paper feed section.)
8 Right lower cover(Open this cover if paper misfeeds in the paper feed section.)
9 Front Deck(Holds up to 3,000 sheets of standard [75 g/m2 or 80 g/m2] paper.)
0 Drawer 1(Holds up to 500 sheets of standard [75 g/m2 or 80 g/m2] paper.)
! Drawer 2(Holds up to 500 sheets of standard [75 g/m2 or 80 g/m2] paper.)
@ Paper width guides# Paper length guide$ Stack bypass tray
(Load paper here when copying onto small-size or special paper.)% Support extension^ Insert guides
& Paper feed section knob(Turn this knob to remove paper that has been misfed in the paperconveyor section.)
* Paper conveyor section( Paper conveyor section release lever
(Operate this lever if paper misfeeds in the paper conveyor section.)) Fixing unit⁄ Fixing unit knob
(Turn this knob to remove paper that has been misfed in the fixingunit.)
¤ Total counters(The number displayed on the upper line indicates the number of origi-nals that have been scanned for copying. The bottom line indicatesthe number of copies made.)
‹ Instruction handbook box(Keep the instruction handbook here.)
› Transport handles(Use these handles when moving this machine. There are a total offour transport handles in all.)
fi Paper ejection cover(Open this cover if paper misfeeds in the fixing unit or ejection sec-tion.)
fl Main switch(Turn this switch ON ( | ) before copying.)
‡ Waste toner tank cover(Open this cover when replacing the waste toner tank.) Waste toner tank
● DF (Document Feeder)(Automatically feeds and scans each original, one by one, for copying.)· Original table
(Set the originals that you want to copy on this table.)‚ Original insert guides
(Adjust these guides to match the width of the originals set in the DF.)ΠOriginal set indicator
(Indicates the status of the originals in the DF.)Lights green: The originals are set properly. Press the Start key to startcopying.Blinks green: The originals are not set properly. Reset the originals inthe DF.Blinks red: An original has been misfed. See page 10-11 and removethe misfed originals.)
„ DF open/close handle(Hold this handle when opening and closing the DF.)
´ Original ejection table(Copied originals are stored here.)
‰ Original reversing cover(Open this cover if an original misfeeds in the DF.)
ˇ Original ejection guide(Open this guide when copying from originals of 8-1/2" x 14" [A4] orlarger.)
● Duplex unit(Paper is turned over in this unit when you make two-sided copies.)Á Re-feeding section¨ Duplex cover
(Open this cover if paper misfeeds in the duplex unit.)
2-2
E_Sec2_Name.PM6 10/13/00, 13:363
Section 2 NAMES OF PARTS
2A080030AKM-6230 (KME)
/ 131
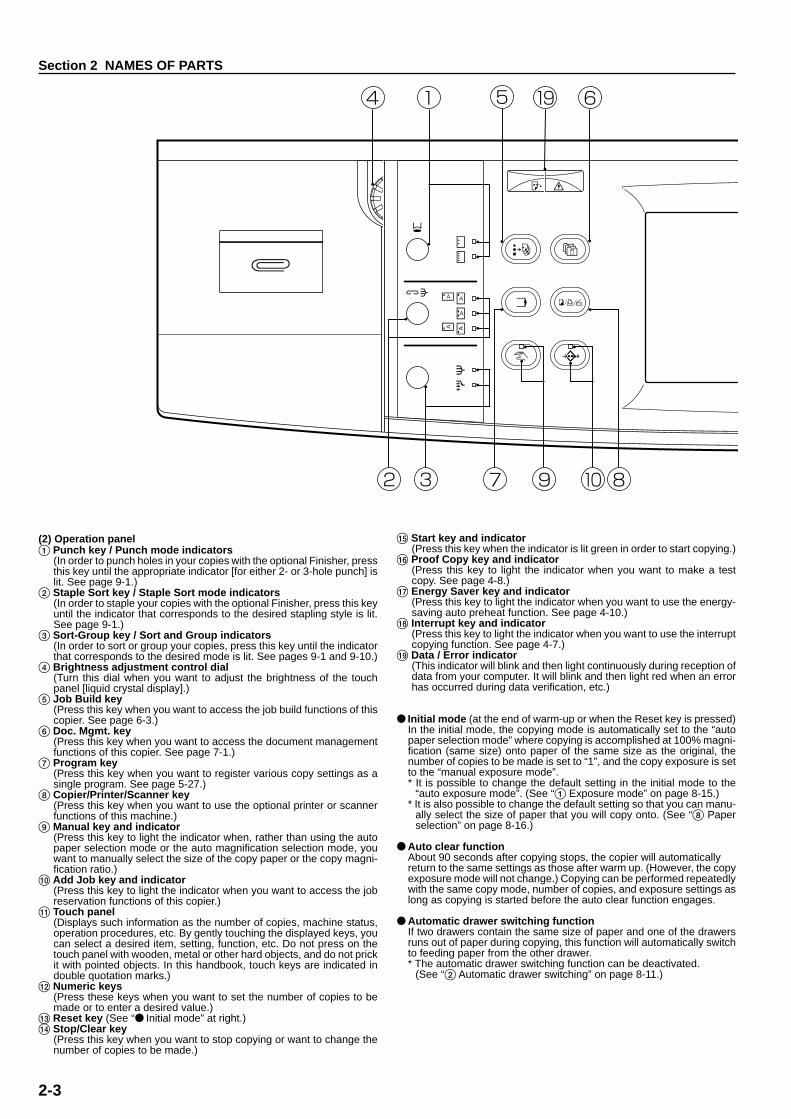
(2) Operation panel1 Punch key / Punch mode indicators
(In order to punch holes in your copies with the optional Finisher, pressthis key until the appropriate indicator [for either 2- or 3-hole punch] islit. See page 9-1.)
2 Staple Sort key / Staple Sort mode indicators(In order to staple your copies with the optional Finisher, press this keyuntil the indicator that corresponds to the desired stapling style is lit.See page 9-1.)
3 Sort-Group key / Sort and Group indicators(In order to sort or group your copies, press this key until the indicatorthat corresponds to the desired mode is lit. See pages 9-1 and 9-10.)
4 Brightness adjustment control dial(Turn this dial when you want to adjust the brightness of the touchpanel [liquid crystal display].)
5 Job Build key(Press this key when you want to access the job build functions of thiscopier. See page 6-3.)
6 Doc. Mgmt. key(Press this key when you want to access the document managementfunctions of this copier. See page 7-1.)
7 Program key(Press this key when you want to register various copy settings as asingle program. See page 5-27.)
8 Copier/Printer/Scanner key(Press this key when you want to use the optional printer or scannerfunctions of this machine.)
9 Manual key and indicator(Press this key to light the indicator when, rather than using the autopaper selection mode or the auto magnification selection mode, youwant to manually select the size of the copy paper or the copy magni-fication ratio.)
0 Add Job key and indicator(Press this key to light the indicator when you want to access the jobreservation functions of this copier.)
! Touch panel(Displays such information as the number of copies, machine status,operation procedures, etc. By gently touching the displayed keys, youcan select a desired item, setting, function, etc. Do not press on thetouch panel with wooden, metal or other hard objects, and do not prickit with pointed objects. In this handbook, touch keys are indicated indouble quotation marks.)
@ Numeric keys(Press these keys when you want to set the number of copies to bemade or to enter a desired value.)
# Reset key (See “● Initial mode” at right.)$ Stop/Clear key
(Press this key when you want to stop copying or want to change thenumber of copies to be made.)
% Start key and indicator(Press this key when the indicator is lit green in order to start copying.)
^ Proof Copy key and indicator(Press this key to light the indicator when you want to make a testcopy. See page 4-8.)
& Energy Saver key and indicator(Press this key to light the indicator when you want to use the energy-saving auto preheat function. See page 4-10.)
* Interrupt key and indicator(Press this key to light the indicator when you want to use the interruptcopying function. See page 4-7.)
( Data / Error indicator(This indicator will blink and then light continuously during reception ofdata from your computer. It will blink and then light red when an errorhas occurred during data verification, etc.)
● Initial mode (at the end of warm-up or when the Reset key is pressed)In the initial mode, the copying mode is automatically set to the “autopaper selection mode” where copying is accomplished at 100% magni-fication (same size) onto paper of the same size as the original, thenumber of copies to be made is set to “1”, and the copy exposure is setto the “manual exposure mode”.* It is possible to change the default setting in the initial mode to the
“auto exposure mode”. (See “1 Exposure mode” on page 8-15.)* It is also possible to change the default setting so that you can manu-
ally select the size of paper that you will copy onto. (See “8 Paperselection” on page 8-16.)
● Auto clear functionAbout 90 seconds after copying stops, the copier will automaticallyreturn to the same settings as those after warm up. (However, the copyexposure mode will not change.) Copying can be performed repeatedlywith the same copy mode, number of copies, and exposure settings aslong as copying is started before the auto clear function engages.
● Automatic drawer switching functionIf two drawers contain the same size of paper and one of the drawersruns out of paper during copying, this function will automatically switchto feeding paper from the other drawer.* The automatic drawer switching function can be deactivated.
(See “2 Automatic drawer switching” on page 8-11.)
2-3
E_Sec2_Name.PM6 10/13/00, 13:364

Section 2 NAMES OF PARTS
2A080030AKM-6230 (KME)
/ 131
(3) Basic screen on the touch panel
1 “BASIC” key(Touch this key when you want to return to the basic screen.)
2 “ZOOM” key(Touch this key when you want to change the copy magnificationratio. See page 4-3.)
3 “FUNCTION” key(Touch this key when you want to select the copy function. The func-tion select screen will appear.)
4 “SPECIAL” [Management mode] key(Touch this key when you want to change the language used on thetouch panel or to set the weekly timer, etc. The management modeselect screen will appear.)
5 Message display(Displays messages on how to operate the machine and shows indi-cations of the machine’s status.)
6 Copy number display(Displays, at the start and end of copying, the number of copies thatwere set. During copying, it displays the number of copies that havebeen finished to that point and, above that, the number of copies thatwere set.)
7 Copy magnification ratio display(Displays the selected copy magnification ratio.)
8 Copy quality mode selection keys(Touch either the “MIXED” (text and photos), “TEXT” or “PHOTO”keys to select the mode that corresponds to the content of the origi-nals being used. The highlighted key indicates the currently selectedmode. See page 4-2.)
9 Copy exposure scale(Appears in the manual exposure mode. Move the scroll box withinthe exposure scale to the right to make darker copies, and move it toleft to make lighter copies. The total number of exposure steps canbe set to either 7 or 13. See “2 Exposure steps” on page 8-15.)
0 Copy exposure adjustment keys(Touch the appropriate key when you want to manually adjust thecopy exposure. Touch the “LIGHTER” key to lighten the exposureand the “DARKER” key to darken it. )
! “AUTO” [Auto/manual exposure mode selection] key(Touch this key when you want to switch between the auto exposuremode and manual exposure mode. When the key is highlighted, theauto exposure mode is selected. When the manual exposure modeis selected, the copy exposure scale will be displayed.)
@ “ECO” key(Touch this key to highlight it when you want to enter the tonereconomy mode where the exposure level will be lowered and tonerconsumption reduced. Use this mode as well for test printing and thelike when high quality printing is not a requirement. In order to selectwhether you want this key to be displayed or not, see “3 Tonereconomy mode” on page 8-15.)
# Stack bypass key(Touch this key when you want to copy onto paper that is set in thestack bypass tray.)
$ Paper size keys(Display the size of paper that is set in each of the drawers. Whenyou want to select the drawer from which paper will be fed, touch theappropriate key to highlight that key.)
% “DUPLEX” key(Touch this key when you want to make settings for two-sided copy-ing. The two-sided copy set-up screen will appear. See page 4-6.)
^ Paper size key(This key will only be displayed when the copier is equipped with theoptional Side Deck.)
& Copy time display(Displays the amount of time that elapsed from the start to finish ofeach copy job.)
○
○
○
○
○
○
○
○
○
○
○
○
○
○
○
○
○
○
○
○
2-4
/
E_Sec2_Name.PM6 10/13/00, 13:365
Section 2 NAMES OF PARTS
2A080030AKM-6230 (KME)
/ 131
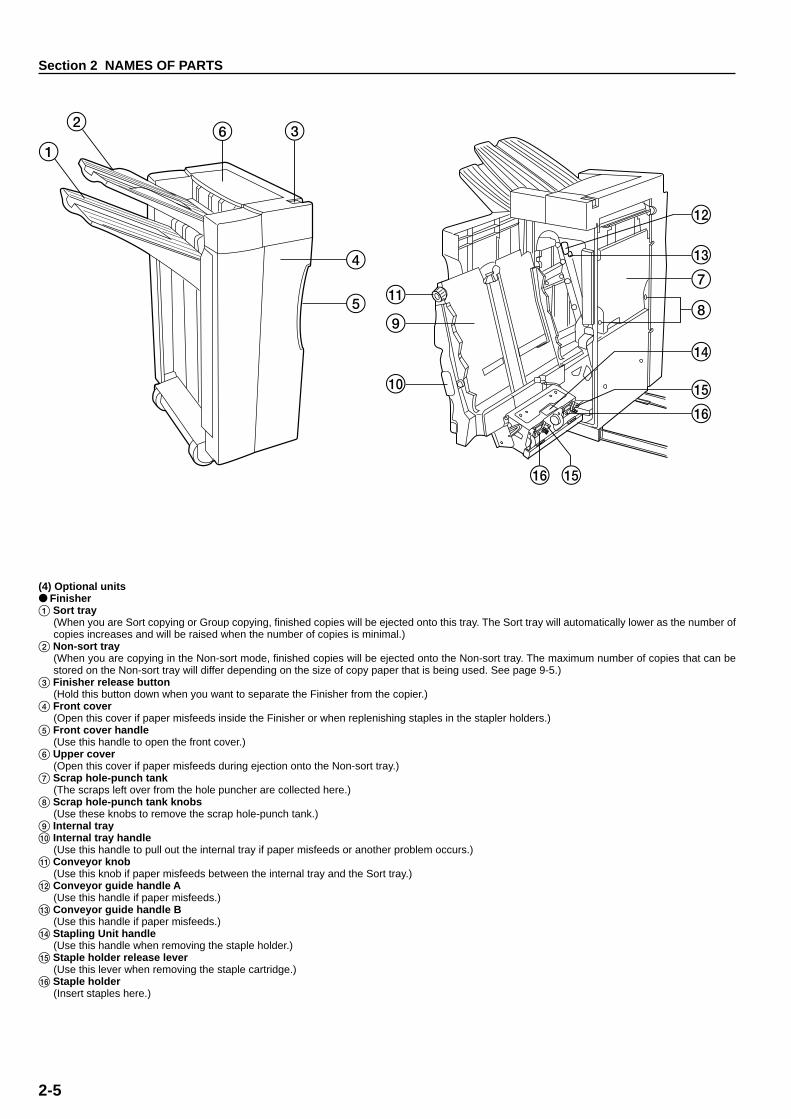
(4) Optional units● Finisher1 Sort tray
(When you are Sort copying or Group copying, finished copies will be ejected onto this tray. The Sort tray will automatically lower as the number ofcopies increases and will be raised when the number of copies is minimal.)
2 Non-sort tray(When you are copying in the Non-sort mode, finished copies will be ejected onto the Non-sort tray. The maximum number of copies that can bestored on the Non-sort tray will differ depending on the size of copy paper that is being used. See page 9-5.)
3 Finisher release button(Hold this button down when you want to separate the Finisher from the copier.)
4 Front cover(Open this cover if paper misfeeds inside the Finisher or when replenishing staples in the stapler holders.)
5 Front cover handle(Use this handle to open the front cover.)
6 Upper cover(Open this cover if paper misfeeds during ejection onto the Non-sort tray.)
7 Scrap hole-punch tank(The scraps left over from the hole puncher are collected here.)
8 Scrap hole-punch tank knobs(Use these knobs to remove the scrap hole-punch tank.)
9 Internal tray0 Internal tray handle
(Use this handle to pull out the internal tray if paper misfeeds or another problem occurs.)! Conveyor knob
(Use this knob if paper misfeeds between the internal tray and the Sort tray.)@ Conveyor guide handle A
(Use this handle if paper misfeeds.)# Conveyor guide handle B
(Use this handle if paper misfeeds.)$ Stapling Unit handle
(Use this handle when removing the staple holder.)% Staple holder release lever
(Use this lever when removing the staple cartridge.)^ Staple holder
(Insert staples here.)
2-5
E_Sec2_Name.PM6 10/13/00, 13:366
Section 2 NAMES OF PARTS
2A080030AKM-6230 (KME)
/ 131
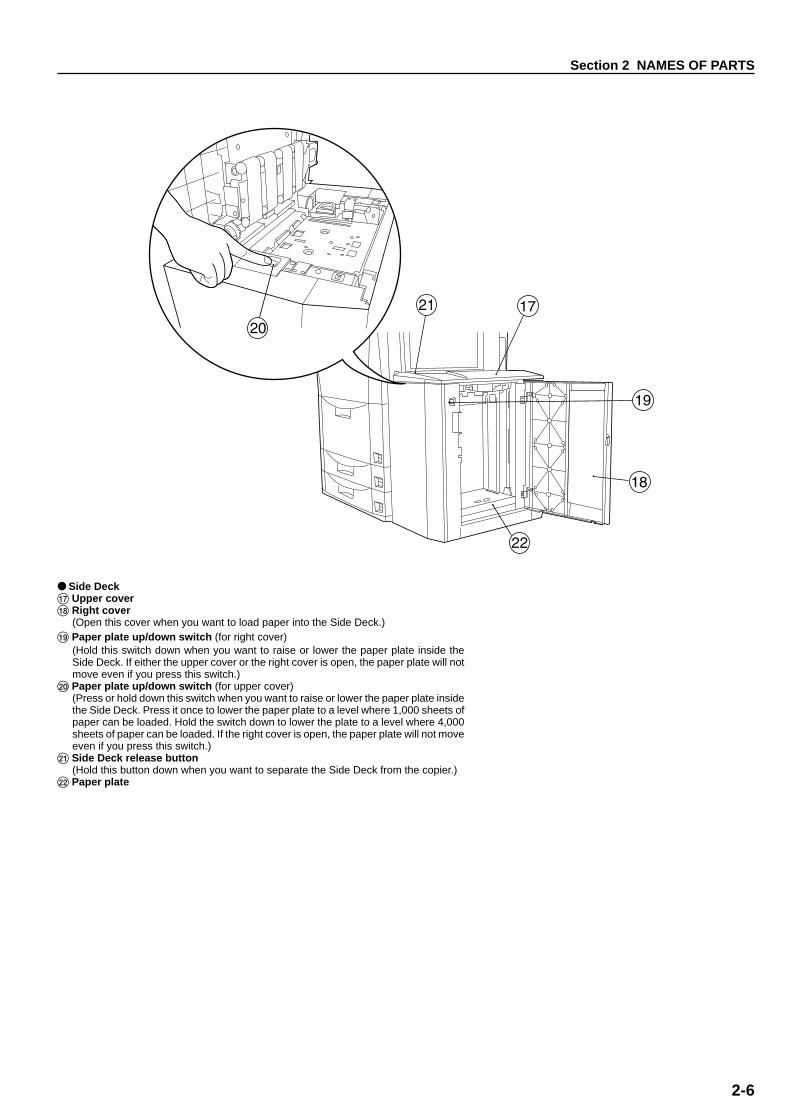
● Side Deck& Upper cover* Right cover
(Open this cover when you want to load paper into the Side Deck.)( Paper plate up/down switch (for right cover)
(Hold this switch down when you want to raise or lower the paper plate inside theSide Deck. If either the upper cover or the right cover is open, the paper plate will notmove even if you press this switch.)
) Paper plate up/down switch (for upper cover)(Press or hold down this switch when you want to raise or lower the paper plate insidethe Side Deck. Press it once to lower the paper plate to a level where 1,000 sheets ofpaper can be loaded. Hold the switch down to lower the plate to a level where 4,000sheets of paper can be loaded. If the right cover is open, the paper plate will not moveeven if you press this switch.)
⁄ Side Deck release button(Hold this button down when you want to separate the Side Deck from the copier.)
¤ Paper plate
2-6
E_Sec2_Name.PM6 10/13/00, 13:367

3-1
2A080030AKM-6230 (KME)
/ 131
Section 3 PREPARATIONS
2A080030AKM-6230 (KME)
/ 131
�������
�������������
����
������
1. Loading paper
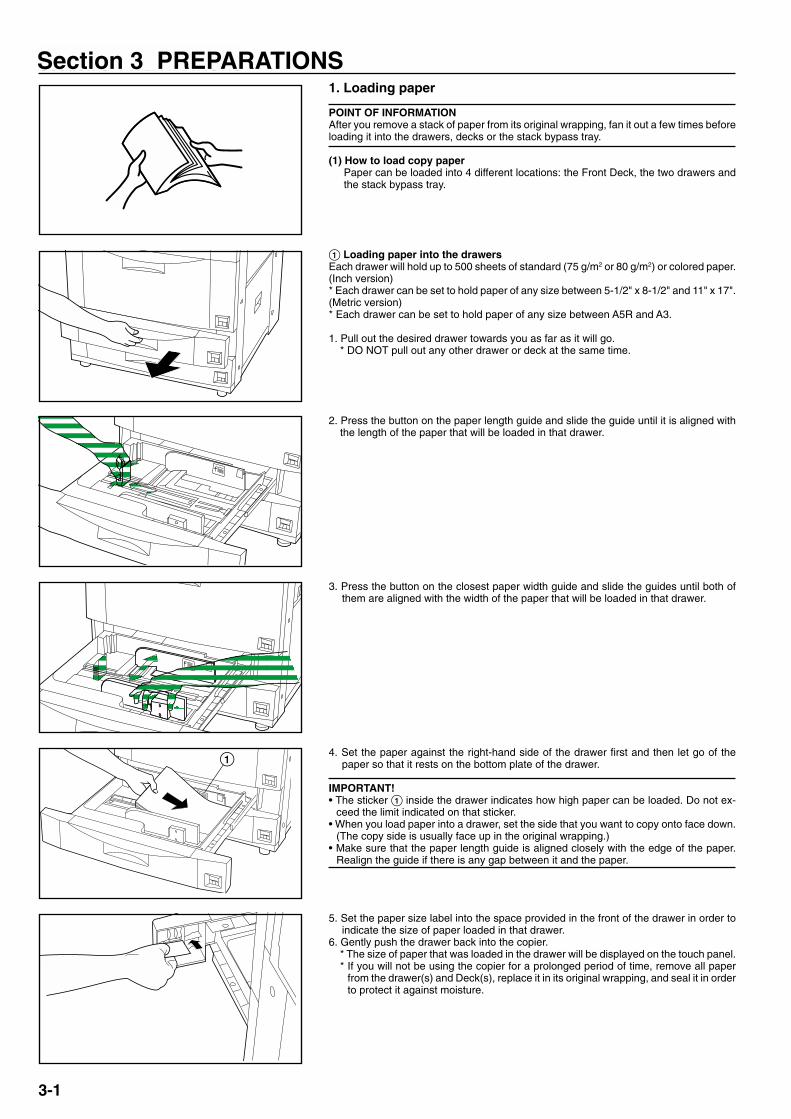
POINT OF INFORMATIONAfter you remove a stack of paper from its original wrapping, fan it out a few times beforeloading it into the drawers, decks or the stack bypass tray.
(1) How to load copy paperPaper can be loaded into 4 different locations: the Front Deck, the two drawers andthe stack bypass tray.
1 Loading paper into the drawersEach drawer will hold up to 500 sheets of standard (75 g/m2 or 80 g/m2) or colored paper.(Inch version)* Each drawer can be set to hold paper of any size between 5-1/2" x 8-1/2" and 11" x 17".(Metric version)* Each drawer can be set to hold paper of any size between A5R and A3.
1. Pull out the desired drawer towards you as far as it will go.* DO NOT pull out any other drawer or deck at the same time.
2. Press the button on the paper length guide and slide the guide until it is aligned withthe length of the paper that will be loaded in that drawer.
3. Press the button on the closest paper width guide and slide the guides until both ofthem are aligned with the width of the paper that will be loaded in that drawer.
4. Set the paper against the right-hand side of the drawer first and then let go of thepaper so that it rests on the bottom plate of the drawer.
IMPORTANT!• The sticker 1 inside the drawer indicates how high paper can be loaded. Do not ex-
ceed the limit indicated on that sticker.• When you load paper into a drawer, set the side that you want to copy onto face down.
(The copy side is usually face up in the original wrapping.)• Make sure that the paper length guide is aligned closely with the edge of the paper.
Realign the guide if there is any gap between it and the paper.
5. Set the paper size label into the space provided in the front of the drawer in order toindicate the size of paper loaded in that drawer.
6. Gently push the drawer back into the copier.* The size of paper that was loaded in the drawer will be displayed on the touch panel.* If you will not be using the copier for a prolonged period of time, remove all paper
from the drawer(s) and Deck(s), replace it in its original wrapping, and seal it in orderto protect it against moisture.
Section 3 PREPARATIONS
3-1

Section 3 PREPARATIONS
2A080030AKM-6230 (KME)
/ 131
2 Loading paper into the Front DeckThe Front Deck will hold up to 1,500 sheets of 11" x 8-1/2" [A4] size standard (75 g/m2 or80 g/m2) or colored paper in each of its two rows for a total capacity of 3,000 sheets.
1. Pull the Front Deck out towards you as far as it will go.* DO NOT pull out any of the drawers when the Front Deck is open.
2. Load the paper in both rows.
IMPORTANT!The sticker inside the Front Deck indicates how high paper can be loaded. Do not ex-ceed the limit indicated on that sticker.
3. Gently push the Front Deck back into the copier.
3 Loading paper into the stack bypass trayThe stack bypass will hold up to 100 sheets of standard (75 g/m2 or 80 g/m2) paper. Thepaper can be of any size between 5-1/2" x 8-1/2" and 11" x 17" [A6R and A3]. Whencopying onto special paper, always use this tray to feed the paper.* If you want to copy onto non-standard size paper, register the size of paper that you
want to use in advance. See “� How to register a custom size” on page 8-12.
* Types of paper and the number of sheets that can be set in the stack bypass tray:• Tracing paper: 1 sheet• Letterhead: 100 sheets• Envelopes: 10 envelopes• Color paper: 100 sheets• Standard (120 g/m2, 160 g/m2) paper: 25 sheets• Transparencies: 25 sheets (When copying onto transparencies, fan them out at leastonce before setting them in the stack bypass tray.)
1. Open the stack bypass tray.
* When setting large size paper such as 8 1/2" x 11", A4R or larger, pull out the supportextension.
2. Adjust the insert guides to fit the width of the paper to be loaded.
3-2

Section 3 PREPARATIONS
2A080030AKM-6230 (KME)
/ 131
3. Slide the paper along the guides and into the stack bypass tray, as far as they will go.
IMPORTANT!When you set paper into the stack bypass tray, set the side that you want to copy ontoface up. (The copy side is usually face up in the original wrapping.)
� Using envelopesIt is possible to print onto envelopes by feeding them from the stack bypass tray whenyou are using the optional printer functions of this machine.
POINT OF INFORMATIONThe stack bypass tray can hold up to ten COM-10, Monarch, DL or C5 envelopes at onetime.
1. Open the stack bypass tray.2. Adjust the insert guides to fit the width of the envelopes to be loaded.
3. Close the flap on the envelopes and, with the envelopes face up (flap side down)and the flap towards the rear of the copier, slide them along the guides and into thestack bypass tray, as far as they will go.* If you do not set the envelopes in the proper orientation, printing may be carried out
onto the wrong side or in the wrong direction.* To register the size of envelopes that you want to use, see “� How to register a
custom size” on page 8-12.
4 Loading paper into the Side Deck (option)The optional Side Deck will hold up to 4,000 sheets of 11" x 8-1/2" [A4] size standard (75g/m2 or 80 g/m2) paper.
1. Hold down the paper plate up/down switch to lower the paper plate inside the SideDeck to its lowermost position.* If either the upper cover or the right cover of the Side Deck is open, the paper plate
will not move even if you press this switch.2. Open the right cover of the Side Deck.
IMPORTANT!Fan out all stacks of paper before loading them in the Side Deck.
3. Load paper onto the paper plate.
IMPORTANT!BE SURE to load paper all the way into the Side Deck as far as it will go.
4. Close the right cover.* If you will not be using the copier for a prolonged period of time, remove all paper
from the drawer(s) and Deck(s), replace it in its original wrapping, and seal it in orderto protect it against moisture.
3-3
� Loading paper from the top of the Side Deck1. Open the upper cover of the Side Deck.2. Press the paper plate up/down switch to lower the paper plate inside the Side Deck.3. Load paper onto the paper plate.4. Close the upper cover.
Section 3 PREPARATIONS
2A080030AKM-6230 (KME)
/ 131
3-4
2. Setting originals
1 What is the DF for?The DF (Document Feeder) automatically feeds and scans each original, one by one, forcopying. When you make copies from two-sided originals, it will automatically turn theoriginals over in order to copy the reverse side as well.
2 Originals that can be set in the DF…• Sheet originals• Thickness:
One-sided originals: between 35 g/m2 - 160 g/m2
Two-sided originals: between 50 g/m2 - 120 g/m2
• Size: Max. 11" x 17" (A3) - Min. 5-1/2" x 8-1/2" (A5R)• Number of sheets:
100 sheets (11" x 8-1/2" [A4] or smaller [75 g/m2 or 80 g/m2])70 sheets (8-1/2" x 14" [B4] or larger [75 g/m2 or 80 g/m2])(However, 30 sheets maximum when using the auto selection mode)
3 Cautions when using the DFDO NOT set originals of the follow types in the DF. In addition, when using perforatedsheets or originals with punch holes, DO NOT insert the end with the perforations orholes first.• Transparencies• Carbon paper, crumpled originals or originals with strong folds, and soft originals such
as vinyl• Originals which are not rectangular, wet originals, and originals with adhesive tape or
glue• Originals with clips or staples (In order to use such originals, remove the clips or staples
and straighten any crumples or folds before using them.)• Clippings or originals with very slippery surfaces• Originals with wet correction fluid• Originals with folds (If you must use such originals, smooth out the folded portions
before setting them in the DF.)
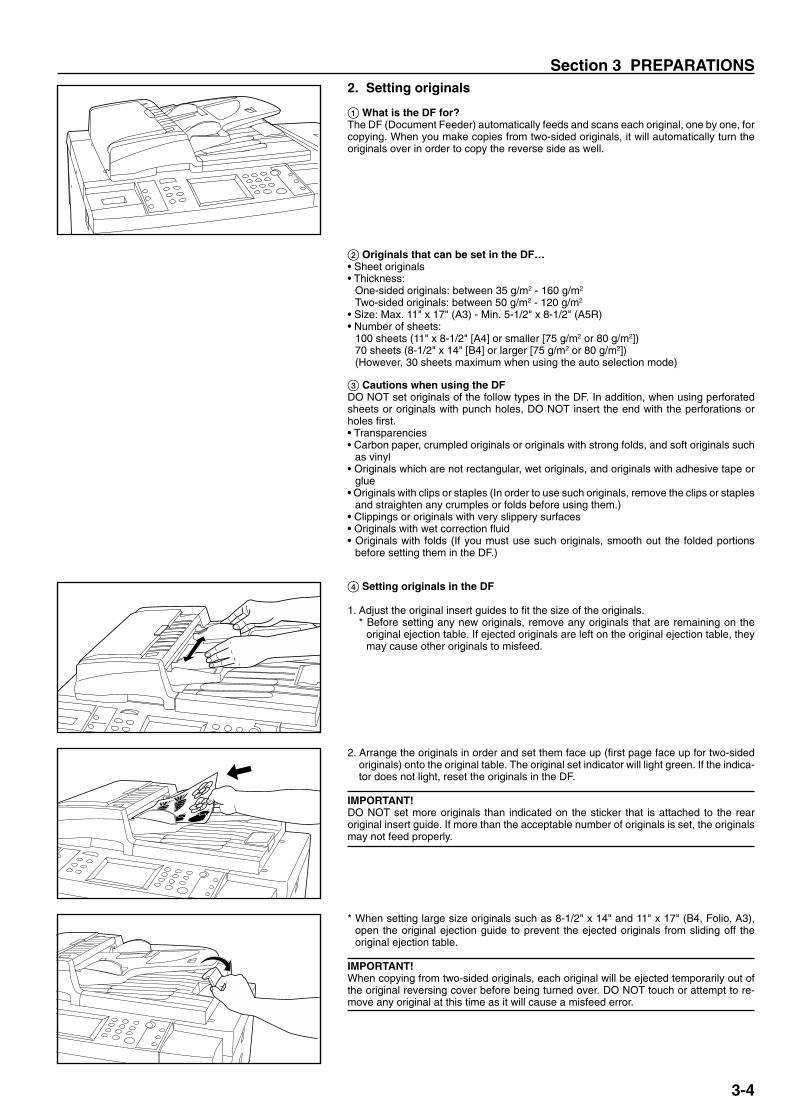
4 Setting originals in the DF
1. Adjust the original insert guides to fit the size of the originals.* Before setting any new originals, remove any originals that are remaining on the
original ejection table. If ejected originals are left on the original ejection table, theymay cause other originals to misfeed.
2. Arrange the originals in order and set them face up (first page face up for two-sidedoriginals) onto the original table. The original set indicator will light green. If the indica-tor does not light, reset the originals in the DF.
IMPORTANT!DO NOT set more originals than indicated on the sticker that is attached to the rearoriginal insert guide. If more than the acceptable number of originals is set, the originalsmay not feed properly.
* When setting large size originals such as 8-1/2" x 14" and 11" x 17" (B4, Folio, A3),open the original ejection guide to prevent the ejected originals from sliding off theoriginal ejection table.
IMPORTANT!When copying from two-sided originals, each original will be ejected temporarily out ofthe original reversing cover before being turned over. DO NOT touch or attempt to re-move any original at this time as it will cause a misfeed error.

Section 3 PREPARATIONS
2A080030AKM-6230 (KME)
/ 131
6 Setting originals on the platenTo make copies from originals that cannot be set in the DF (books, magazines, etc.), liftopen the DF and set one original at a time on the platen.
1. Hold the DF open/close handle and lift the DF open.* Before opening the DF, remove any originals that are on the original table and the
original ejection table to prevent them from falling off the DF when it is opened.
2. Set the original face down on the platen and align it with original size indicator lines.
3. Hold the DF open/close handle and close the DF.
IMPORTANT!Avoid placing excessive pressure on the platen when closing the DF. Too much pressureon the platen may cause the glass to break.
3. Adding tonerAdd toner when “ADD TONER TO RESUME COPYING.” appears in the message dis-play.* DO NOT add toner unless this message is displayed.* Touch the “? TONER” key on the touch panel to display the procedure for adding toner.
5 Auto selection modeThe copier will automatically detect the size of each original and select paper of thatsame size to copy onto.
POINT OF INFORMATION• A maximum of 50 originals can be set in DF at one time with this mode.• The size of originals that can be used in this mode is limited to 11" x 17" and
11" x 8-1/2" (A3 and A4) and all originals must be of the same width.
1. Touch the “FUNCTION” key.The function select screen will appear.
2. Touch the “AUTO SELECTION” key. (If that key is not displayed, touch the “�” key orthe “�” key until it is displayed.)The touch panel will return to the basic screen.
3-5
CAUTIONDO NOT leave the document feeder open as there is a danger of personalinjury.
CAUTIONDo not incinerate toner and toner containers. Dangerous sparks may causeburns.

Section 3 PREPARATIONS
2A080030AKM-6230 (KME)
/ 131
3-6
1. Open the cover on the right side of the operation panel.
2. Turn the new toner bottle upside down and tap the bottom about 10 times or so.3. Hold the bottle firmly and shake up the contents by turning it upside down and then
right-side up 10 or more times in the manner shown in the illustration.4. Next, hold the bottle horizontally and shake it back and forth 10 or more times.
5. Fit the hole in the toner bottle (located below the �) over the metal pin 1 that isprotruding out of the toner supply slot.
6. Turn the bottle clockwise 90 degrees and the toner in the bottle will be emptied into thecopier.* Be sure to turn the bottle all the way until it stops, so that the � on the bottle is
aligned with the � on the main body of the copier.
7. Wait about 60 seconds and then tap the sides of the bottle in order to get all of theremaining toner out.
8. Turn the toner bottle back counterclockwise to its original position and slowly removeit from the toner supply slot.
9. Close the cover on the right side of the operation panel.

4-1
2A080030AKM-6230 (KME)
/ 131
Section 4 BASIC OPERATION
4-2
(1) Basic copying procedure
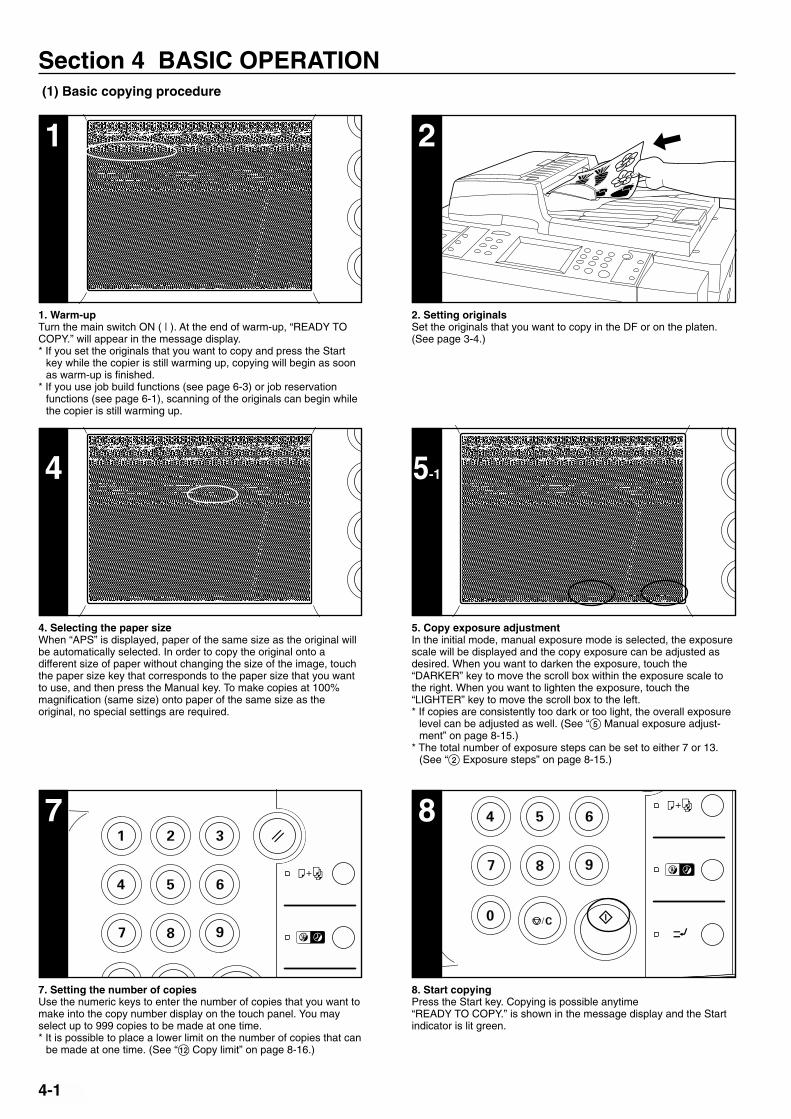
1. Warm-upTurn the main switch ON ( | ). At the end of warm-up, “READY TOCOPY.” will appear in the message display.* If you set the originals that you want to copy and press the Start
key while the copier is still warming up, copying will begin as soonas warm-up is finished.
* If you use job build functions (see page 6-3) or job reservationfunctions (see page 6-1), scanning of the originals can begin whilethe copier is still warming up.
2. Setting originalsSet the originals that you want to copy in the DF or on the platen.(See page 3-4.)
4. Selecting the paper sizeWhen “APS” is displayed, paper of the same size as the original willbe automatically selected. In order to copy the original onto adifferent size of paper without changing the size of the image, touchthe paper size key that corresponds to the paper size that you wantto use, and then press the Manual key. To make copies at 100%magnification (same size) onto paper of the same size as theoriginal, no special settings are required.
5. Copy exposure adjustmentIn the initial mode, manual exposure mode is selected, the exposurescale will be displayed and the copy exposure can be adjusted asdesired. When you want to darken the exposure, touch the“DARKER” key to move the scroll box within the exposure scale tothe right. When you want to lighten the exposure, touch the“LIGHTER” key to move the scroll box to the left.* If copies are consistently too dark or too light, the overall exposure
level can be adjusted as well. (See “5 Manual exposure adjust-ment” on page 8-15.)
* The total number of exposure steps can be set to either 7 or 13.(See “2 Exposure steps” on page 8-15.)
7. Setting the number of copiesUse the numeric keys to enter the number of copies that you want tomake into the copy number display on the touch panel. You mayselect up to 999 copies to be made at one time.* It is possible to place a lower limit on the number of copies that can
be made at one time. (See “@ Copy limit” on page 8-16.)
8. Start copyingPress the Start key. Copying is possible anytime“READY TO COPY.” is shown in the message display and the Startindicator is lit green.
21
4 5-1
87
2A080030AKM-6230 (KME)
/ 131
4-1

Section 4 BASIC OPERATION
4-3
6. Selecting the copy qualityTouch the “TEXT”, “PHOTO”, or “MIXED” key, as desired, until thatkey is highlighted.TEXT: For originals that consist primarily of textPHOTO: For originals that consist primarily of photos and other half-
tone imagesMIXED: For originals with both text and photos* It is possible to select the default copy quality mode.
(See “6 Copy quality mode” on page 8-16.)
9
� Various functions• Enlargement/reduction• Two-sided copying from various originals• Interrupt copying• Making a margin space for binding, etc.• Printing page numbers on the copies• Copying each side of two-page [open-face] originals onto
separate sheets• Erasing the edges around copies from books, etc.• Adding covers for or insert sheets between copies• Making copies onto transparencies• Feeding paper as a backing sheet for transparencies• Overlaying images• Copying the images from either two or four originals onto a
single copy sheet• Making a booklet (sheet originals)• Making a booklet (two-page [open-face] originals)• Copying and binding into a booklet (sheet originals)• Inverting black and white• Making mirror-image copies• Automated sorting• Memorizing frequent used settings
9. End of copyingFinished copies will be ejected onto the installed option (the CopyTray, Finisher or Booklet Stitcher).* Depending upon the copy mode, the copies may be ejected face
up or face down.* If the copier is equipped with the optional Copy Tray, a maximum of
250 copies can be stored at one time.
3. Selecting the desired functionsSelect from among the copier’s various functions.* Touch the “�” key or the “�” key to access all of the available
functions.* It is possible to select the functions that will be displayed on the
screen that appears when you touch the “FUNCTION” key. (See“) Customize function display screen (#1 - #5)” on page 8-16.)
When the “AUTO” key is highlighted on the touch panel, the autoexposure mode is selected. In the auto exposure mode, theexposure of original will be detected and the optimum exposureautomatically selected. It is also possible to increase the contrastand thereby have the copier erase the background color of theoriginals in order to make clearer copies.* If copies are consistently too dark or too light, the overall exposure
level can be adjusted as well. (See “4 Auto exposure adjustment”on page 8-15.)
* It is possible to change the exposure mode in the initial mode from“MANUAL” to “AUTO”. (See “1 Exposure mode” on page 8-15.)
CAUTIONIf the copier will not be used for a short period of time (over-night, etc.), turn the main switch OFF (O). If it will not beused for an extended period of time (vacations, etc.), re-move the power plug from the outlet for safety purposesduring the time the copier is not in use.
3
5-26
2A080030AKM-6230 (KME)
/ 131
4-2
Section 4 BASIC OPERATION
4-4
2A080030AKM-6230 (KME)
/ 131
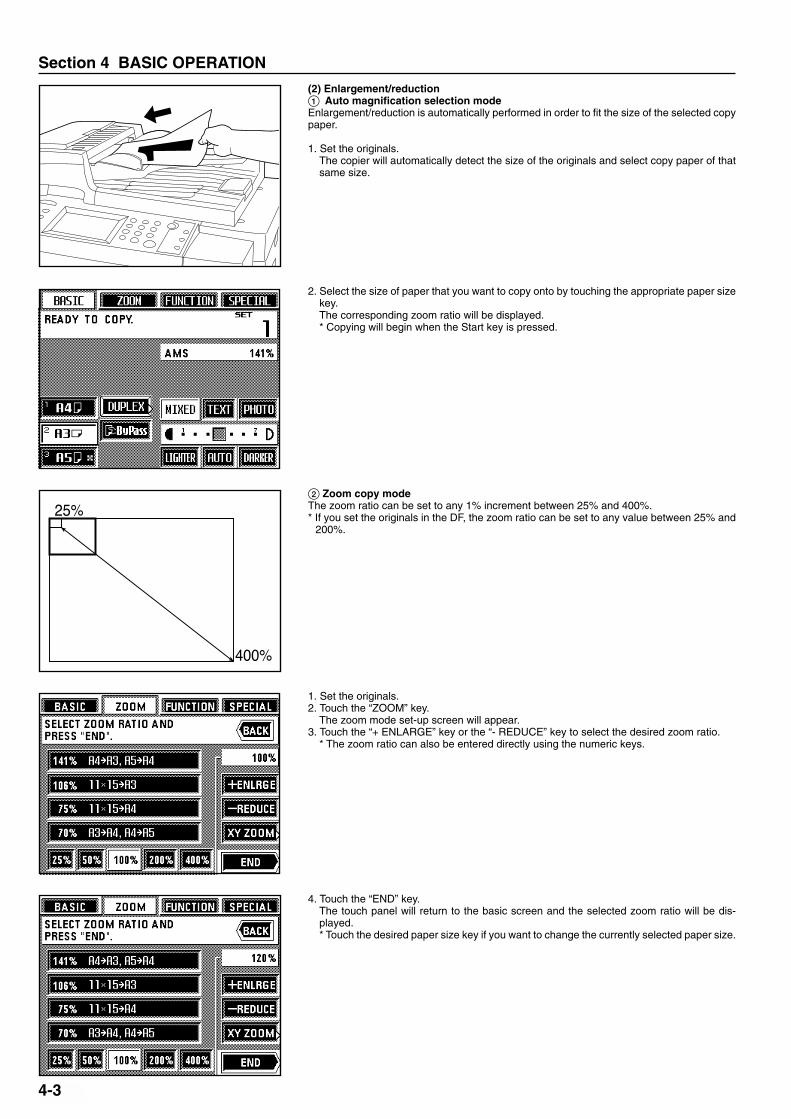
(2) Enlargement/reduction1 Auto magnification selection modeEnlargement/reduction is automatically performed in order to fit the size of the selected copypaper.
1. Set the originals.The copier will automatically detect the size of the originals and select copy paper of thatsame size.
4. Touch the “END” key.The touch panel will return to the basic screen and the selected zoom ratio will be dis-played.* Touch the desired paper size key if you want to change the currently selected paper size.
2 Zoom copy modeThe zoom ratio can be set to any 1% increment between 25% and 400%.* If you set the originals in the DF, the zoom ratio can be set to any value between 25% and
200%.
2. Select the size of paper that you want to copy onto by touching the appropriate paper sizekey.The corresponding zoom ratio will be displayed.* Copying will begin when the Start key is pressed.
1. Set the originals.2. Touch the “ZOOM” key.
The zoom mode set-up screen will appear.3. Touch the “+ ENLARGE” key or the “- REDUCE” key to select the desired zoom ratio.
* The zoom ratio can also be entered directly using the numeric keys.
4-3

Section 4 BASIC OPERATION
4-5
2A080030AKM-6230 (KME)
/ 131
3 Standard zoom modeThe corresponding zoom ratio will be automatically displayed once the size of the originals tobe copied and the desired size of copy paper are selected.* In order to use this mode, it is necessary in advance to select “STANDARD ZOOM” under
“! Zoom mode” on page 8-16.1. Set the originals.
2. Touch the “ZOOM” key.The zoom mode set-up screen will appear.
3. Select the size of originals being copied.If the appropriate size is not displayed, touch the “�” key until it is displayed.
4. Select the desired size of copy paper.If the size of copy paper that you want to copy onto is not displayed, touch the “�” key untilit is displayed.* Once the desired paper size is selected, the corresponding copy zoom ratio will be
displayed.5. Touch the “END” key.
The touch panel will return to the basic screen and selected the zoom ratio will bedisplayed.* Touch the desired paper size key if you want to change the currently selected paper size.
4 Fixed-size zoom modeEnlargement/reduction is automatically performed to one of the following pre-set ratios: 25%,50%, 70%, 75%, 106%, 141%, 200% or 400%.* In order to use this mode, it is necessary in advance to select “Size zoom” under “! Zoom
mode” on page 8-16.1. Set the originals.
2. Touch the “ZOOM” key.The zoom mode set-up screen will appear.
3. Touch the key that corresponds to the desired ratio.The selected ratio key will be highlighted.
4. Touch the “END” key.The touch panel will return to the basic screen and the selected zoom ratio will be dis-played.* Touch the desired paper size key if you want to change the currently selected paper size.
4-4

Section 4 BASIC OPERATION
4-6
2A080030AKM-6230 (KME)
/ 131
5 XY zoom modeIt is possible to set the zoom ratio for the length and the width of the copy independently.Each zoom ratio can be set to any 1% increment between 25% and 400% (between 25% and200% when using the DF).
1. Set the originals.
2. Touch the “ZOOM” key.The zoom mode set-up screen will appear.
3. Touch the “XY ZOOM” key.
4. Touch the upper “+” key or “-” key to set the zoom ratio for the length. Once you touch oneof these keys and thereby highlight the length field, the desired zoom ratio can also beentered directly using the numeric keys.* Touch the “100%” key if you want to return the zoom ratio to 100%.
5. Touch the lower “+” key or “-” key to set the zoom ratio for the width. Once you touch oneof these keys and thereby highlight the width field, the desired zoom ratio can also beentered directly using the numeric keys.* Touch the “100%” key if you want to return the zoom ratio to 100%.
6. Touch the “END” key.The touch panel will return to the basic screen and the selected zoom ratios for both thelength and width will be displayed.* Touch the desired paper size key if you want to change the currently selected paper size.
(3) Two-sided copying from various originals [Two-sided copy mode]Two-sided copies can be made from various types of originals, such as two-page [open-face]originals and one-sided originals.
POINT OF INFORMATIONThe paper size that can be used in this mode is limited to sizes between A3 and A5R.
� Two-sided copying from two-sided originalsTwo-sided (front and back) originals are used to produce two-sided copies that look the sameas the originals.
4-5

Section 4 BASIC OPERATION
4-7
2A080030AKM-6230 (KME)
/ 131
� Two-sided copying from one-sided originalsThe images from one-sided originals are copied onto both sides (front and back) of the copypaper. When there is an odd number of originals, the back side of the last copy will be blank.
* It is also possible to have the image on the back side of the copy rotated 180 degrees.1 LEFT: The image will be copied in its current direction.2 TOP: The image will be rotated 180 degrees and copied. Thus, if the finished copies are
then bound at the top edge of the copy set, all of the images can be viewed in thesame direction when the pages are opened, just as they are on a wall calendar.
1. Set the originals.2. Touch the “DUPLEX” key.
The two-sided copy set-up screen will appear.* The same screen will also appear if you touch the “DUPLEX” key on the function select
screen.
3. Specify the type of the originals that are being used.If you selected “DUPLEX”, the touch panel will return to the basic screen.If you selected “BOOK”, go to the next step.If you selected “1-SIDED”, go to step 5.
4-6
� Two-sided copying from two-page [open-face] originalsEach page of two-page [open-face] originals, such as magazines and books, is copied onseparate sides of the copy paper with a single press of the Start key.In this operation it is necessary to specify the binding orientation of the originals:1 LEFT: The left page of the originals is copied first followed by the right page.2 RIGHT: The right page of the originals is copied first followed by the left page.
POINT OF INFORMATIONThe size of originals that can be used in this mode is limited to A3, A4R and A5R.

Section 4 BASIC OPERATION
4-8
2A080030AKM-6230 (KME)
/ 131
4. Specify the binding orientation of the originals.The touch panel will return to the basic screen.
5. Select the direction of copying that you want for the back side of the copies.The touch panel will return to the basic screen.
(4) Interrupt copyingThe interrupt copying function is useful when you want to make copies from new originalsand at different settings when another copying operation is already in progress. If you want tomake copies from originals that were registered using the job reservation function, you canuse the copy modes, etc., that were already selected for that job. Once the interrupt copyingjob is finished, the operation that was interrupted will resume at the same settings it wasusing before the interruption.
1. Press the Interrupt key. The Interrupt indicator will blink.
* If there are any originals that were registered using the job reservation function, “SELECTINTERRUPT MODE” will be displayed. If you want to make copies from those registeredoriginals, touch the “PRIORITY OUTPUT” key and go to step 5. If you want to make copiesfrom different originals, touch the “INTERRUPT COPY” key and go to the next step.
4-7

Section 4 BASIC OPERATION
4-9
2A080030AKM-6230 (KME)
/ 131
2. Wait until “INTERRUPT MODE.” is displayed and the Interrupt indicator lights continu-ously.
3. Remove the originals that were being copied and put them aside, then set the new origi-nals and perform the desired copy procedure.
4. Once copying is finished, press the Interrupt key once again and replace the newly copiedoriginals with the ones you removed. Then press the Start key to resume the interruptedcopy job.
5. A list of originals that were registered using the job reservation function will appear. Selectthe originals that you want to copy.* If you want to check the information regarding those originals, touch the “RECALL” key.
6. Touch the “START” key to begin copying the registered originals.* Once copying of the selected originals is finished, the interrupted copy job will be
resumed automatically,
(5) Rotate copyWhen the orientation of the originals is different than that of the paper loaded in the drawers,the image will be turned 90 degrees counterclockwise for copying. No special setting isrequired to use this function.
POINT OF INFORMATIONThe size of paper that can be used in this mode is limited to A4, A5 and A6.
(6) Before you make a large number of copies at one time [Test copying]Use this procedure to carry out a test print and check whether or not the current settings areappropriate before you make a large number of copies. Even you make a test copy, the fullnumber of copies that was originally selected will be madeafter that. It is also possible tochange the settings before making the actual copies.
1. Press the Proof Copy key to light the Proof Copy indicator.
4-8

Section 4 BASIC OPERATION
4-10
2A080030AKM-6230 (KME)
/ 131
2. Select the desired copy modes and settings on the operation panel.3. Set the originals that you want to copy and press the Start key. The test copy will be printed
out.
4. Once the test copy has been made, a screen will be displayed that will let you select howyou want the copies to be finished. Change any of the settings as desired.* If you want to cancel the copy operation, touch the “CANCEL” key.
5. Touch the “END” key to make the full number of copies that you selected.
(7) Recall modeOnce the copy mode is selected, the “RECALL” key will be displayed on the basic screen.Touch the “RECALL” key if you want to check and/or change any of the current settings.
* Once you are finished checking the settings, touch the “CHECK” key and the touch panelwill return to the basic screen.
* If you want to change any of the settings, touch the corresponding function key on the touchpanel and then touch the “CHANGE” key after that. The function select screen will appear.Change the desired settings by following the appropriate procedure for that function.
(8) Change settings functionThe “PAUSE” key will be displayed on the basic screen during copying. Touch the “PAUSE”key if you want to suspend copying in order to change the number of copies. (Only availablein the Sort mode.)* If the copier is equipped with the optional Finisher, it is also possible to change the Staple-
Sort mode and the Hole Punch mode settings as well. If the copier is equipped with theoptional Booklet Stitcher, it is the Staple-Sort mode settings that can also be changed.
1. Touch the “PAUSE” key.The copy operation will be suspended and the change setting screen will appear on thetouch panel.
4-9

Section 4 BASIC OPERATION
4-11
2A080030AKM-6230 (KME)
/ 131
2. Change the number of copies by touching the “+” key or “-” key.* If the copier is equipped with the optional Finisher, it is also possible to change the
Staple-Sort mode and the Hole Punch mode settings as well. If the copier is equippedwith the optional Booklet Stitcher, it is the Staple-Sort mode settings that can also bechanged.
3. Touch the “END” key to resume copying.* The copy job will be resumed from the point it was suspended using the newly selected
settings.
(9) Energy-saving (auto preheat) functionThis function allows you to save energy by simply pressing the Energy Saver key and shut-ting down the copier, even though the main switch is still turned ON. When the auto preheatfunction is engaged, the Energy Saver indicator will be the only lit indication on the operationpanel.
* To resume copying after the auto preheat function has engaged, press the Energy Saverkey once again. The time for recovery from this energy-saving state is 30 seconds or below.
* It is also possible to set the auto preheat function to engage automatically if the copier is notused for a certain period of time. (See “7 Auto preheat time” on page 8-11.)
(10) Auto shut-off functionThis function automatically turns the main switch OFF (O) if the copier is not used for adesignated period of time (between 15 and back 240 minutes). To make copies again, turnthe main switch ON ( | ).
� More about the auto shut-off functionThe auto shut-off function is an energy-saving function that automatically turns the mainswitch OFF (O) if a designated amount of time elapses without the copier being used.Copiers generally spend more time in a standby mode than they do in actual copying opera-tion, and the amount of power consumed in this standby mode is a large part of the overallpower consumption of the copier. Having the copier turned OFF automatically will reduceunnecessary power consumption while it is in this standby mode, as well as if it is left on atnight, thereby resulting in a reduction in power costs.* To change the amount of time that will elapse before the auto shut-off function engages, see
“8 Auto shut-off time” on page 8-11. To deactivate the auto shut-off function, see “0 Autoshut-off ON/OFF” on page 8-11.
4-10

6-1
2A080030AKM-6230 (KME)
/ 131
E_Sec5_Kinou.PM6 10/16/00, 7:131

Section 5 OTHER CONVENIENT FUNCTIONS
2A080030AKM-6230 (KME)
/ 131
(1) Making a margin space in the copies for binding, etc. [Margin mode]● Left marginThe image of the original will be shifted to the right in order to make a margin for binding onthe left side of the copy paper. The margin width can be set between 6 mm and 18 mm in1 mm increments.
POINT OF INFORMATIONIf you select to make a left margin when you are making two-sided copies, a right margin – ofthe same width as you select for the front side – will automatically be set for the back side.
● Top marginThe image of the original will be shifted downward in order to make a margin for binding onthe top side of the copy paper. The margin width can be set between 6 mm and 18 mm in1 mm increments.
* The margin position that is available for the back side will differ depending upon the margin position that is selected for the front side.The circle (“❍ ”) indicates the possible settings.
● Front & back marginWhen you are making two-sided copies, the margin positions and margin width can be se-lected separately for the front and back sides of the copies. The margin width can be setbetween 1 mm and 18 mm in 1 mm increments.* In order to set the front and back margins separately, it is necessary in advance to select“ON” under “$ Front & back margin key ON/OFF” on page 8-16.
“LEFT M.” “RIGHT” “TOP M.” “BOTTOM” “NO”
Front side
“LEFT M.”
“RIGHT”
“TOP M.”
“BOTTOM”
“NO MARGIN”
Back side
❍
❍
❍
❍
❍
❍
❍
❍
❍❍
❍
❍
❍
❍
❍
5-1
Section 5 OTHER CONVENIENT FUNCTIONS
E_Sec5_Kinou.PM6 10/16/00, 7:132

Section 5 OTHER CONVENIENT FUNCTIONS
2A080030AKM-6230 (KME)
/ 131
1. Set the originals.
POINT OF INFORMATIONWhen you set the originals be sure that their top (or left) side is set towards the rear of the DFor the platen. If you do not set the originals in the proper direction, the margin may be createdin the wrong location.
2. Touch the “FUNCTION” key.The function select screen will appear.
3. Touch the “MARGIN” key. (If that key is not displayed, touch the “▼” key or the “▲” key untilit is displayed.)The margin copy set-up screen will appear.If you want to select a left or top margin, go to the next step.If you want to select both a front and back margin, go to step 6.
4. If you want to change the width of the margin, touch the “+” key or the “-” key until thedesired width is displayed.The margin width can be set between 6 mm and 18 mm in 1 mm increments.* The previously selected value is set as the default for the margin width. Change this
setting as desired.* If you do not want to change the current margin width, go to the next step.
5. Select the margin position that you want by touching either the “LEFT MARG.” or “TOPMARGIN” key. The touch panel will return to the basic screen.
6. To change the settings for the front and back margins, touch the “CHANGE #” key and goto the next step.Otherwise, touch the “F&B MARGIN” key. The touch panel will return to the basic screen.* The previously selected values are set as the default for the front and back margins.
Change these settings as desired.
5-2
E_Sec5_Kinou.PM6 10/16/00, 7:133

Section 5 OTHER CONVENIENT FUNCTIONS
2A080030AKM-6230 (KME)
/ 131
7. Select the margin width that you want for the front side by touching the “+” key or the “-”key under the “Margin” field until the desired width is displayed.The margin width can be set between 1 mm and 18 mm in 1 mm increments.* If you do not want to change the current margin width, go to the next step.
8. Select the margin position that you want for the front side.The margin position can be set to “LEFT M.”, “RIGHT”, “TOP M.” or “BOTTOM”.If you do not want to make a margin on the front side, touch the “NO MARGIN” key.
9. Select the margin width that you want for the back side by touching the “+” key or the “-”key under the “MARGIN W.” field until the desired width is displayed.The margin width can be set between 1 mm and 18 mm in 1 mm increments.* If you do not want to change the current margin width, go to the next step.
10. Select the margin position that you want for the back side.If you do not want to make a margin on the back side, touch the “NO” key. The marginposition that is available for the back side will differ depending upon the margin positionthat is selected for the front side.Once the settings are finished, the touch panel will return to the basic screen and copyingwill be possible.
(2) Printing page numbers on the copies [Print page numbers]This function can be used to assign page numbers in sequence from the top original firstwhenever you make copies from multiple originals.There are three types of numbering styles: “-1-”, “P.1” and “1/5”.* If you select “1/5”, the actual number of total pages will be displayed in the denominator (in
place of the “5”).
* It is possible to select the location on the copies where you want the page numbers to beprinted. (The arrow in the illustration indicates the direction that the originals are being fed.)
1 LONG EDGE: The page number will be printed in the middle of the long edge of the copy.2 SHORT EDGE: The page number will be printed in the middle of the short edge of the
copy.
1. Set the originals.2. Touch the “FUNCTION” key.
The function select screen will appear.
5-3
E_Sec5_Kinou.PM6 10/16/00, 7:134

Section 5 OTHER CONVENIENT FUNCTIONS
2A080030AKM-6230 (KME)
/ 131
3. Touch the “PAGE #” key. (If that key is not displayed, touch the “▼” key or the “▲” key untilit is displayed.)The print page number set-up screen will appear.
4. If you want to change which sheet the page numbering will start from, touch the “+” key orthe “-” key under the “1ST PAGE” field.You can select the page numbers to start from any sheet between “-10” and “999”.* It is not possible to select “0”.
POINT OF INFORMATION• If you enter a minus (-) figure, it will mean that the printing of page numbers will not begin
until that number of originals have been copied. In other words, after the number of origi-nals that is designated (with the minus number) are finished being copied, the page num-ber on the copies that are made from the next original will be shown as page one. Forexample, when you want the copies for the third original to be designated as page one,enter “-2” under the “1ST PAGE” field.
• In order to have the first original designated as a page number other than one, enter thenumber (a positive number) that you want to use. For example, when you want the copiesfor the first original to be designated as page three, enter “3” under the “1ST PAGE” field.
5. Select the numbering style that you want to use from among “-1-”, “P.1” and “1/5”.If you selected “-1-” or “P.1”, go to step 8.If you selected “1/5”, go to the next step.
6. Touch the “+” key or the “-” key under the “LAST PAGE” field in order to enter the totalnumber of originals being copied. (You can select any number between “1” and “999”.)* If you want the copier to automatically count the total number of pages when the originals
are scanned and set the number in the “LAST PAGE” field as well, touch the “AUTO” key.7. Touch the “ENTER” key.
8. Select the location on the copies where you want the page numbers to be printed.The touch panel will return to the basic screen.
5-4
E_Sec5_Kinou.PM6 10/16/00, 7:135

Section 5 OTHER CONVENIENT FUNCTIONS
2A080030AKM-6230 (KME)
/ 131
(3) Copying each side of two-page [open-face] originals onto separate sheets [Pageseparation mode]
● Page separation from two-page [open-face] originalsTwo-page originals, such as magazines and books or the like, are copied onto two separatesheets of paper.
POINT OF INFORMATION• The size of originals that can be used in this mode is limited to A3, A4R or A5 and the paper
size is normally limited to A4. However, another paper size may be used if you select a copymagnification ratio that is appropriate to fit that specific size.
• In this operation it is necessary to specify the binding orientation of the originals:1 LEFT: The left page of the originals is copied first followed by the right page.2 RIGHT: The right page of the originals is copied first followed by the left page.
● Page separation from two-sided originalsEach side of two-sided originals is copied onto separate sheets of paper.
1. Set the originals.
POINT OF INFORMATION• When setting a two-page [open-face] original, set it as shown in the illustration.• Two-sided originals must be copied using the DF.
2. Touch the “FUNCTION” key.The function select screen will appear.
3. Touch the “DUPLEX” key. (If that key is not displayed, touch the “▼” key or the “▲” key untilit is displayed.)The page separation set-up screen will appear.
5-5
E_Sec5_Kinou.PM6 10/16/00, 7:136

Section 5 OTHER CONVENIENT FUNCTIONS
2A080030AKM-6230 (KME)
/ 131
4. Specify the type of the originals that are being used by touching either the “DUPLEX” or“BOOK” key.If you selected “BOOK”, go to the next step.If you selected “DUPLEX”, the touch panel will return to the basic screen.
5. Specify the binding orientation of the originals by touching either the “LEFT” or “RIGHT”key. The touch panel will return to the basic screen.
(4) Erasing the edges around copies from books, etc. [Border erase mode]● Erasing blemishes from the edges of copies (Sheet)Use to erase shadows, lines, etc., which occur around the edges of copies made from sheetoriginals.(The a in the illustration indicates the width of the border that will be erased.)
● Erasing blemishes from the edges and middle of copies (Book)Use for making neat copies from thick books, etc.(The a in the illustration indicates the width of the border that will be erased.)
● Selecting the area to be erased (Custom)For making neat, blemish-free copies from originals of non-standard sizes, i.e. sizes otherthan A4 etc. (The a in the illustration indicates the width of the border that will be erased)In this case, however, the size of the originals that you will use must be registered in ad-vance. (See “# Custom border erase size” on page 8-16.)
POINT OF INFORMATIONThe illustration indicates how the copies will be finished when the originals are set in the DF.When setting originals on the platen, the border area will be based on the left rear position of
5-6
E_Sec5_Kinou.PM6 10/16/00, 7:137

Section 5 OTHER CONVENIENT FUNCTIONS
2A080030AKM-6230 (KME)
/ 131
1. Set the originals.* When using a book as the original, set it on the platen as shown in the illustration.
2. Touch the “FUNCTION” key.The function select screen will appear.
3. Touch the “BORDER” key. (If that key is not displayed, touch the “▼” key or the “▲” keyuntil it is displayed.)The border erase set-up screen will appear.
4. If you want to change the width of the border that will be erased under “SHEET” or “BOOK”,touch the “+” key or the “-” key. The border width can be set to 6 mm, 12 mm or 18 mm.* In order to use the “CUSTOM” key with non-standard paper sizes, the size of the origi-
nals that you will use must be registered in advance. (See “# Custom border erase size”on page 8-16.)
5. Specify the type of the originals that are being used by touching either the “SHEET”,“BOOK” or “CUSTOM” key.The touch panel will return to the basic screen.
(5) Adding covers for or insert sheets between copies [Sheet copy mode]The sheet copy mode has three submodes: cover, insert and chapter.
5-7
E_Sec5_Kinou.PM6 10/16/00, 7:138
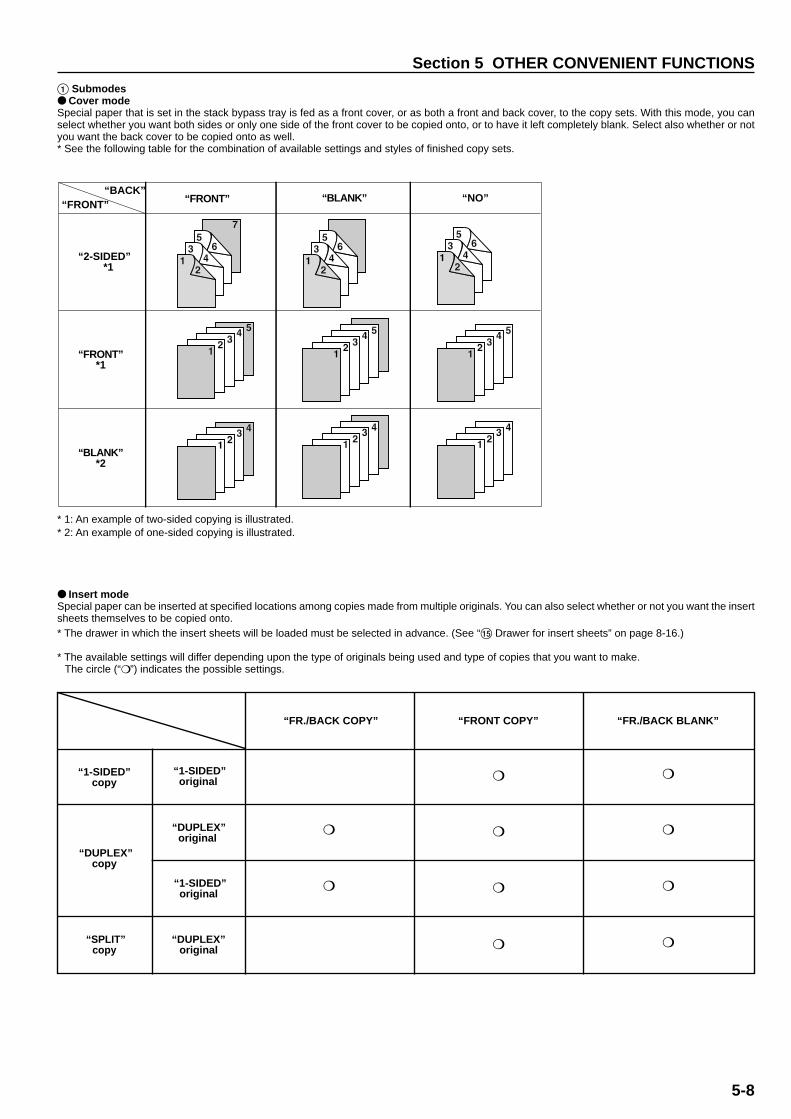
Section 5 OTHER CONVENIENT FUNCTIONS
2A080030AKM-6230 (KME)
/ 131
1 Submodes● Cover modeSpecial paper that is set in the stack bypass tray is fed as a front cover, or as both a front and back cover, to the copy sets. With this mode, you canselect whether you want both sides or only one side of the front cover to be copied onto, or to have it left completely blank. Select also whether or notyou want the back cover to be copied onto as well.* See the following table for the combination of available settings and styles of finished copy sets.
● Insert modeSpecial paper can be inserted at specified locations among copies made from multiple originals. You can also select whether or not you want the insertsheets themselves to be copied onto.* The drawer in which the insert sheets will be loaded must be selected in advance. (See “% Drawer for insert sheets” on page 8-16.)
* The available settings will differ depending upon the type of originals being used and type of copies that you want to make.The circle (“❍ ”) indicates the possible settings.
5-8
“FRONT”“BACK”
“FRONT” “BLANK”
“2-SIDED”*1
“FRONT”*1
“BLANK”*2
“NO”
“1-SIDED”copy
“1-SIDED”original
“DUPLEX”original
“1-SIDED”original
“DUPLEX”original
“SPLIT”copy
“DUPLEX”copy
“FR./BACK COPY” “FRONT COPY” “FR./BACK BLANK”
❍
❍
❍
❍
❍
❍
❍
❍
❍
❍
* 1: An example of two-sided copying is illustrated.* 2: An example of one-sided copying is illustrated.
E_Sec5_Kinou.PM6 10/16/00, 7:139
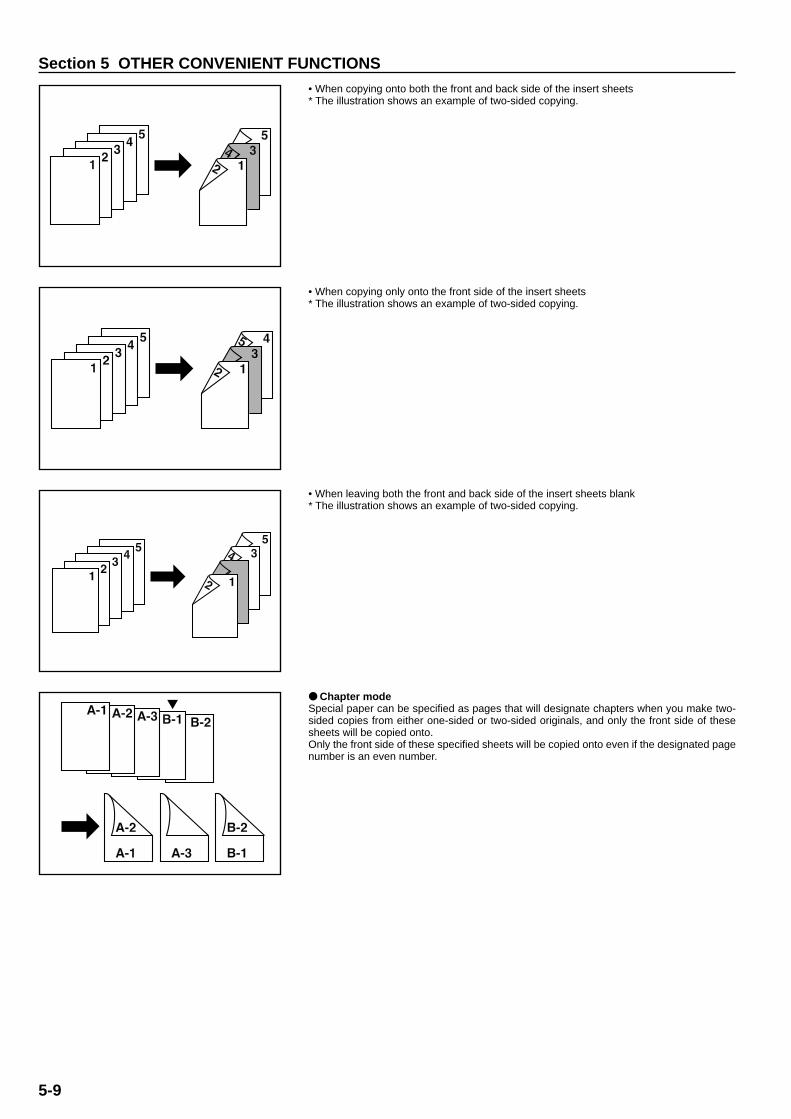
Section 5 OTHER CONVENIENT FUNCTIONS
2A080030AKM-6230 (KME)
/ 131
• When copying onto both the front and back side of the insert sheets* The illustration shows an example of two-sided copying.
• When copying only onto the front side of the insert sheets* The illustration shows an example of two-sided copying.
• When leaving both the front and back side of the insert sheets blank* The illustration shows an example of two-sided copying.
● Chapter modeSpecial paper can be specified as pages that will designate chapters when you make two-sided copies from either one-sided or two-sided originals, and only the front side of thesesheets will be copied onto.Only the front side of these specified sheets will be copied onto even if the designated pagenumber is an even number.
5-9
E_Sec5_Kinou.PM6 10/16/00, 7:1310
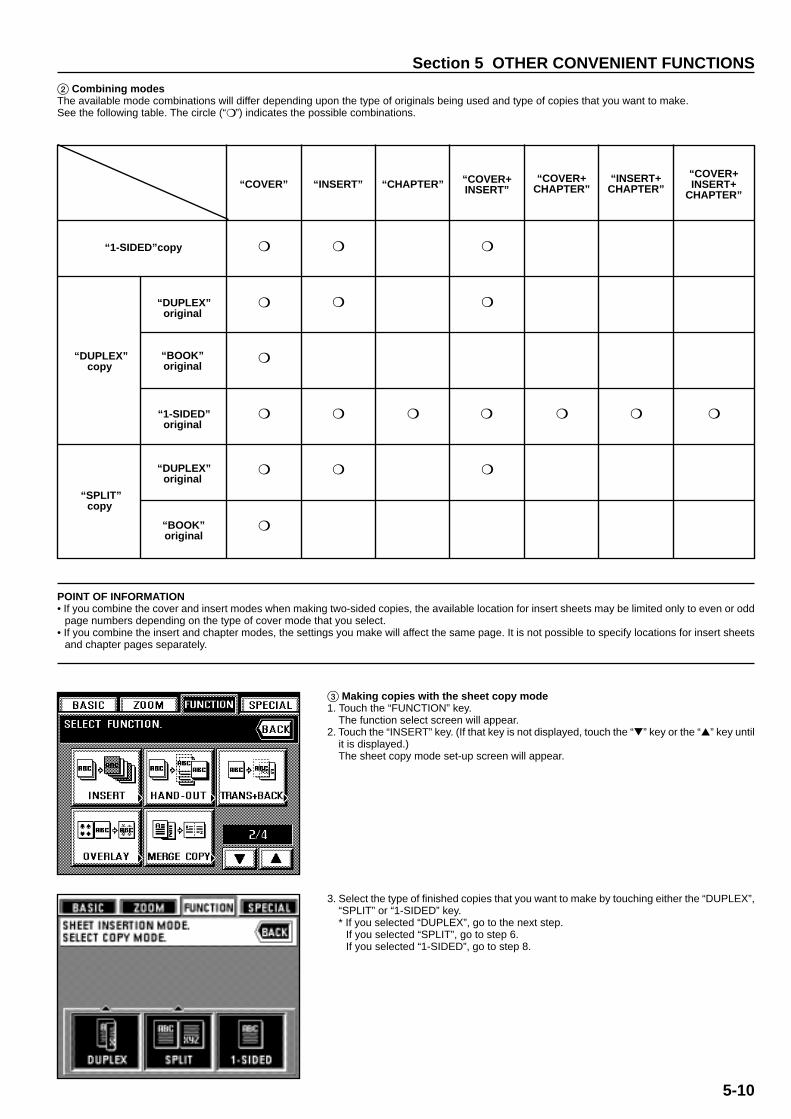
Section 5 OTHER CONVENIENT FUNCTIONS
2A080030AKM-6230 (KME)
/ 131
2 Combining modesThe available mode combinations will differ depending upon the type of originals being used and type of copies that you want to make.See the following table. The circle (“❍ ”) indicates the possible combinations.
POINT OF INFORMATION• If you combine the cover and insert modes when making two-sided copies, the available location for insert sheets may be limited only to even or odd
page numbers depending on the type of cover mode that you select.• If you combine the insert and chapter modes, the settings you make will affect the same page. It is not possible to specify locations for insert sheets
and chapter pages separately.
3. Select the type of finished copies that you want to make by touching either the “DUPLEX”,“SPLIT” or “1-SIDED” key.* If you selected “DUPLEX”, go to the next step.
If you selected “SPLIT”, go to step 6.If you selected “1-SIDED”, go to step 8.
3 Making copies with the sheet copy mode1. Touch the “FUNCTION” key.
The function select screen will appear.2. Touch the “INSERT” key. (If that key is not displayed, touch the “▼” key or the “▲” key until
it is displayed.)The sheet copy mode set-up screen will appear.
“COVER” “INSERT” “CHAPTER” “COVER+INSERT”
“COVER+CHAPTER”
“INSERT+CHAPTER”
“COVER+INSERT+
CHAPTER”
“1-SIDED”copy
“DUPLEX”original
“BOOK”original
“1-SIDED”original
“DUPLEX”original
“BOOK”original
“DUPLEX”copy
“SPLIT”copy
❍
❍
❍
❍
❍
❍
❍
❍
❍ ❍
❍
❍
❍
❍
❍
❍ ❍ ❍
5-10
E_Sec5_Kinou.PM6 10/16/00, 7:1311

Section 5 OTHER CONVENIENT FUNCTIONS
2A080030AKM-6230 (KME)
/ 131
4. Specify the type of the originals that are being used by touching either the “DUPLEX”,“BOOK” or “1-SIDED” key.* If you selected “DUPLEX”, go to step 8.
If you selected “BOOK”, go to step 7.If you selected “1-SIDED”, go to the next step.
5. Select the direction of copying that you want for the back side of the copies. Then go tostep 8.
LEFT: The image will be copied in its current direction.TOP: The image will be rotated 180 degrees and copied. Thus, if the finished copies arethen bound at the top edge of the copy set, all of the images can be viewed in the samedirection when the pages are opened, just as they are on a wall calendar.
6. Specify the type of the originals that are being used by touching either the “DUPLEX” or“BOOK” key.* If you selected “DUPLEX”, go to step 8.
If you selected “BOOK”, go to the next step.
7. Specify the binding orientation of the originals. Then go to the next step.LEFT: The left page of the originals is copied first followed by the right page.RIGHT: The right page of the originals is copied first followed by the left page.
* Once the copy mode setting is finished, the touch panel will switch back to the sheet copymode set-up screen. Make the settings that you want for the desired mode by following theappropriate procedure for that mode.
* It is also possible to combine different modes. (See “2 Combining modes” on page 5-10.)
5-11
E_Sec5_Kinou.PM6 10/16/00, 7:1412
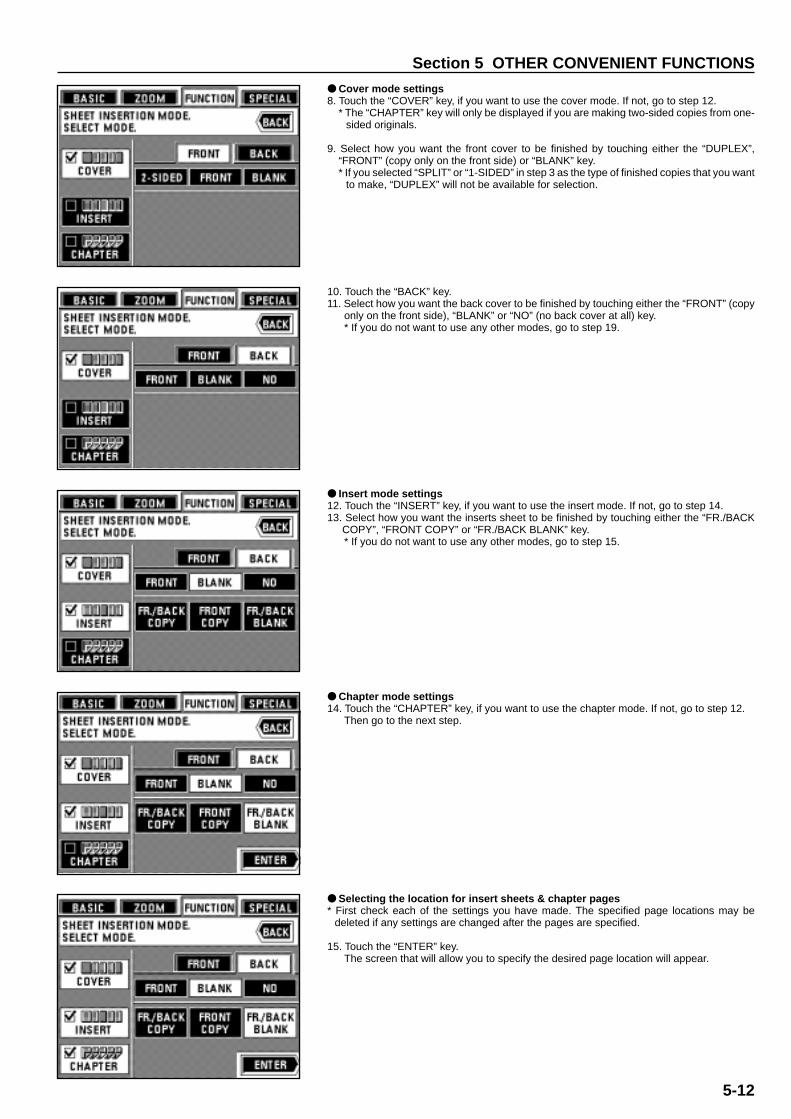
Section 5 OTHER CONVENIENT FUNCTIONS
2A080030AKM-6230 (KME)
/ 131
● Cover mode settings8. Touch the “COVER” key, if you want to use the cover mode. If not, go to step 12.
* The “CHAPTER” key will only be displayed if you are making two-sided copies from one-sided originals.
9. Select how you want the front cover to be finished by touching either the “DUPLEX”,“FRONT” (copy only on the front side) or “BLANK” key.* If you selected “SPLIT” or “1-SIDED” in step 3 as the type of finished copies that you want
to make, “DUPLEX” will not be available for selection.
10. Touch the “BACK” key.11. Select how you want the back cover to be finished by touching either the “FRONT” (copy
only on the front side), “BLANK” or “NO” (no back cover at all) key.* If you do not want to use any other modes, go to step 19.
● Insert mode settings12. Touch the “INSERT” key, if you want to use the insert mode. If not, go to step 14.13. Select how you want the inserts sheet to be finished by touching either the “FR./BACK
COPY”, “FRONT COPY” or “FR./BACK BLANK” key.* If you do not want to use any other modes, go to step 15.
● Chapter mode settings14. Touch the “CHAPTER” key, if you want to use the chapter mode. If not, go to step 12.
Then go to the next step.
● Selecting the location for insert sheets & chapter pages* First check each of the settings you have made. The specified page locations may be
deleted if any settings are changed after the pages are specified.
15. Touch the “ENTER” key.The screen that will allow you to specify the desired page location will appear.
5-12
E_Sec5_Kinou.PM6 10/16/00, 7:1413
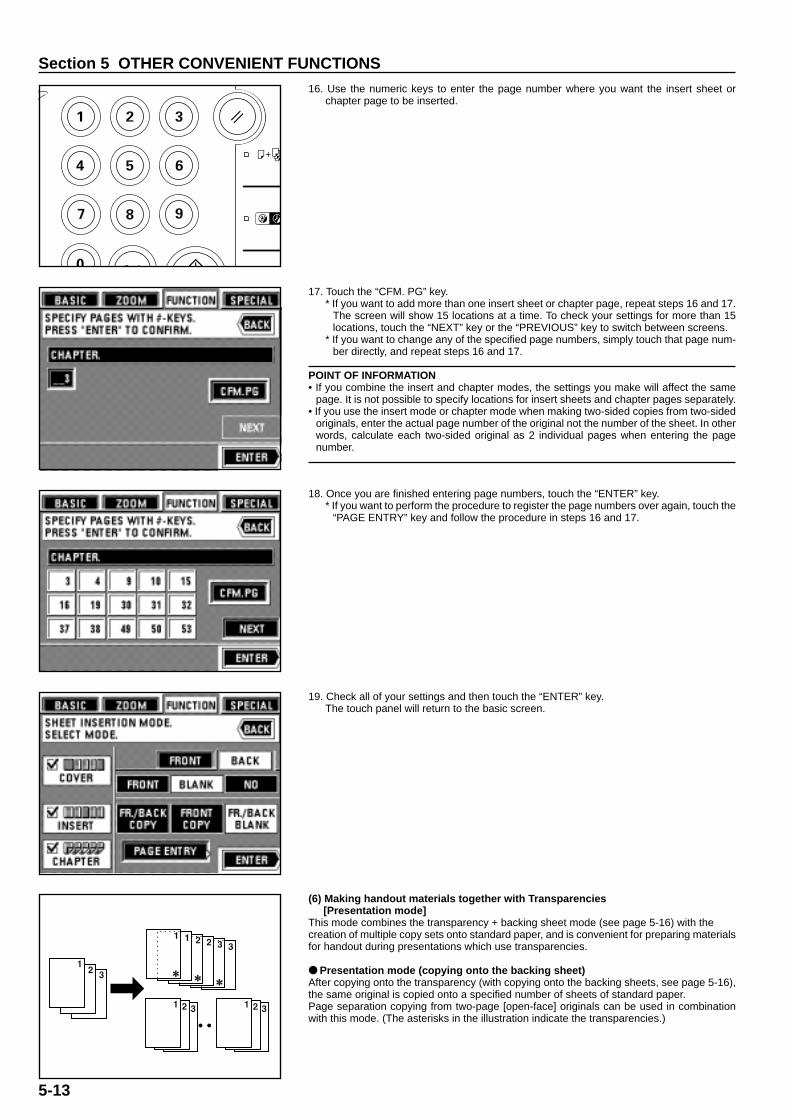
Section 5 OTHER CONVENIENT FUNCTIONS
2A080030AKM-6230 (KME)
/ 131
16. Use the numeric keys to enter the page number where you want the insert sheet orchapter page to be inserted.
17. Touch the “CFM. PG” key.* If you want to add more than one insert sheet or chapter page, repeat steps 16 and 17.
The screen will show 15 locations at a time. To check your settings for more than 15locations, touch the “NEXT” key or the “PREVIOUS” key to switch between screens.
* If you want to change any of the specified page numbers, simply touch that page num-ber directly, and repeat steps 16 and 17.
POINT OF INFORMATION• If you combine the insert and chapter modes, the settings you make will affect the same
page. It is not possible to specify locations for insert sheets and chapter pages separately.• If you use the insert mode or chapter mode when making two-sided copies from two-sided
originals, enter the actual page number of the original not the number of the sheet. In otherwords, calculate each two-sided original as 2 individual pages when entering the pagenumber.
18. Once you are finished entering page numbers, touch the “ENTER” key.* If you want to perform the procedure to register the page numbers over again, touch the
“PAGE ENTRY” key and follow the procedure in steps 16 and 17.
19. Check all of your settings and then touch the “ENTER” key.The touch panel will return to the basic screen.
(6) Making handout materials together with Transparencies[Presentation mode]
This mode combines the transparency + backing sheet mode (see page 5-16) with thecreation of multiple copy sets onto standard paper, and is convenient for preparing materialsfor handout during presentations which use transparencies.
● Presentation mode (copying onto the backing sheet)After copying onto the transparency (with copying onto the backing sheets, see page 5-16),the same original is copied onto a specified number of sheets of standard paper.Page separation copying from two-page [open-face] originals can be used in combinationwith this mode. (The asterisks in the illustration indicate the transparencies.)
5-13
E_Sec5_Kinou.PM6 10/16/00, 7:1414
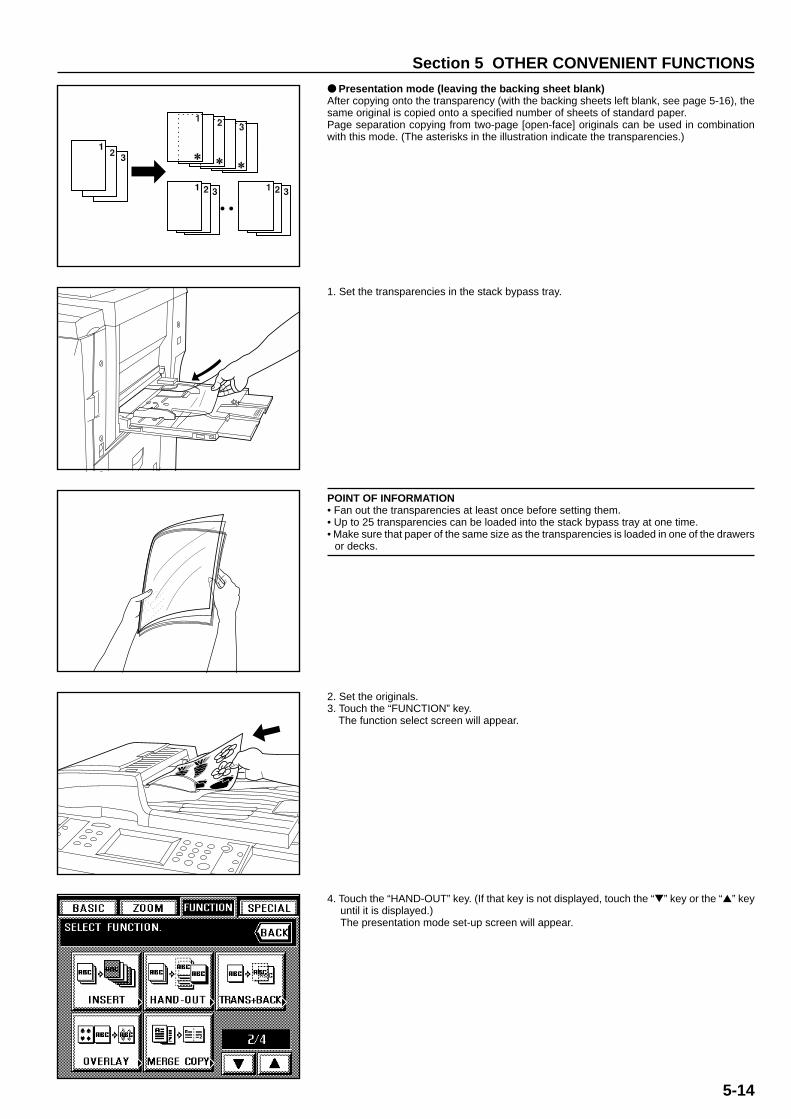
Section 5 OTHER CONVENIENT FUNCTIONS
2A080030AKM-6230 (KME)
/ 131
● Presentation mode (leaving the backing sheet blank)After copying onto the transparency (with the backing sheets left blank, see page 5-16), thesame original is copied onto a specified number of sheets of standard paper.Page separation copying from two-page [open-face] originals can be used in combinationwith this mode. (The asterisks in the illustration indicate the transparencies.)
1. Set the transparencies in the stack bypass tray.
POINT OF INFORMATION• Fan out the transparencies at least once before setting them.• Up to 25 transparencies can be loaded into the stack bypass tray at one time.• Make sure that paper of the same size as the transparencies is loaded in one of the drawers
or decks.
2. Set the originals.3. Touch the “FUNCTION” key.
The function select screen will appear.
4. Touch the “HAND-OUT” key. (If that key is not displayed, touch the “▼” key or the “▲” keyuntil it is displayed.)The presentation mode set-up screen will appear.
5-14
E_Sec5_Kinou.PM6 10/16/00, 7:1415

Section 5 OTHER CONVENIENT FUNCTIONS
2A080030AKM-6230 (KME)
/ 131
5. Touch the “COPIED” key if you want to copy onto the backing sheets, and touch the“BLANK” key if you want to leave the backing sheets blank.
6. Select the type of finished copies that you want to make by touching either the “DUPLEX”,“SPLIT” or “1-SIDED” key.* If you selected “DUPLEX”, go to the next step.
If you selected “SPLIT”, go to step 10.If you selected “1-SIDED”, the touch panel will return to the basic screen. In this case, goto step 12.
7. Specify the type of the originals that are being used by touching either the “DUPLEX”,“BOOK” or “1-SIDED” key.* If you selected “DUPLEX”, the touch panel will return to the basic screen. In this case, go
to step 12.If you selected “BOOK”, go to the next step.If you selected “1-SIDED”, go to step 9.
8. Specify the binding orientation of the originals.LEFT: The left page of the originals is copied first followed by the right page.RIGHT: The right page of the originals is copied first followed by the left page.The touch panel will return to the basic screen. Go to step 12.
9. Select the direction of copying that you want for the back side of the copies.LEFT: The image will be copied in its current direction.TOP: The image will be rotated 180 degrees and copied.The touch panel will return to the basic screen. Go to step 12.
5-15
E_Sec5_Kinou.PM6 10/16/00, 7:1416
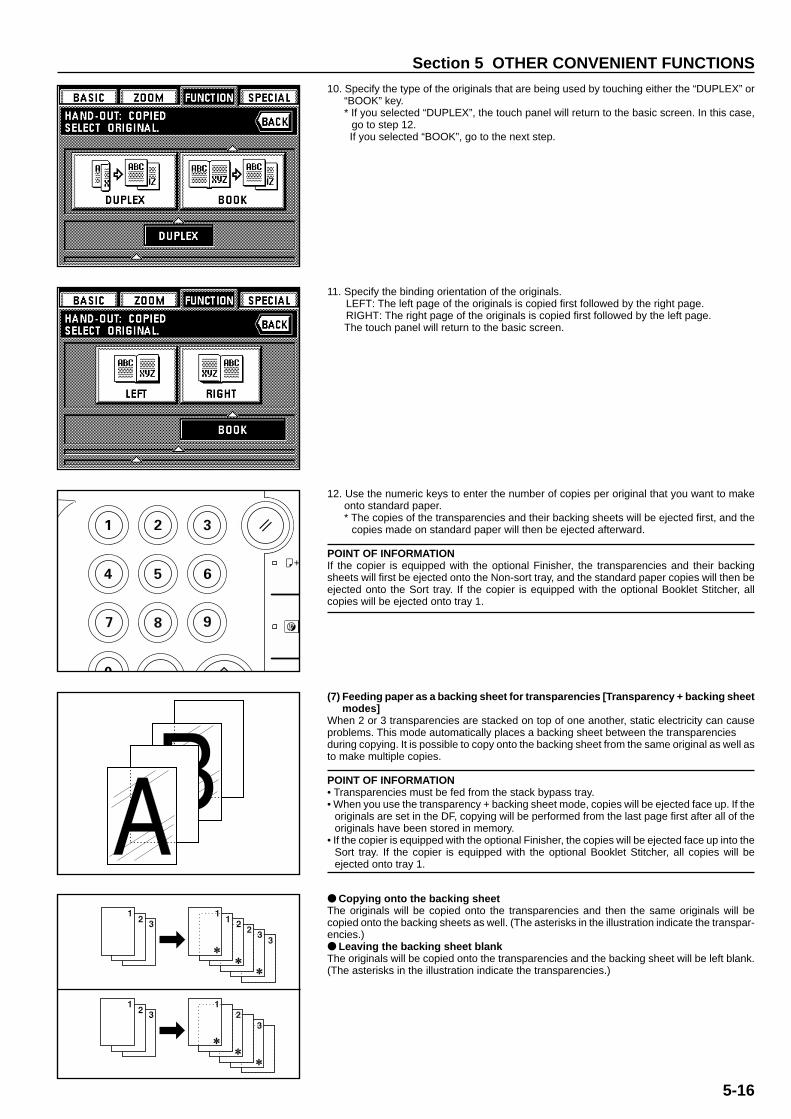
Section 5 OTHER CONVENIENT FUNCTIONS
2A080030AKM-6230 (KME)
/ 131
10. Specify the type of the originals that are being used by touching either the “DUPLEX” or“BOOK” key.* If you selected “DUPLEX”, the touch panel will return to the basic screen. In this case,
go to step 12.If you selected “BOOK”, go to the next step.
11. Specify the binding orientation of the originals.LEFT: The left page of the originals is copied first followed by the right page.RIGHT: The right page of the originals is copied first followed by the left page.The touch panel will return to the basic screen.
12. Use the numeric keys to enter the number of copies per original that you want to makeonto standard paper.* The copies of the transparencies and their backing sheets will be ejected first, and the
copies made on standard paper will then be ejected afterward.
POINT OF INFORMATIONIf the copier is equipped with the optional Finisher, the transparencies and their backingsheets will first be ejected onto the Non-sort tray, and the standard paper copies will then beejected onto the Sort tray. If the copier is equipped with the optional Booklet Stitcher, allcopies will be ejected onto tray 1.
(7) Feeding paper as a backing sheet for transparencies [Transparency + backing sheetmodes]
When 2 or 3 transparencies are stacked on top of one another, static electricity can causeproblems. This mode automatically places a backing sheet between the transparenciesduring copying. It is possible to copy onto the backing sheet from the same original as well asto make multiple copies.
POINT OF INFORMATION• Transparencies must be fed from the stack bypass tray.• When you use the transparency + backing sheet mode, copies will be ejected face up. If the
originals are set in the DF, copying will be performed from the last page first after all of theoriginals have been stored in memory.
• If the copier is equipped with the optional Finisher, the copies will be ejected face up into theSort tray. If the copier is equipped with the optional Booklet Stitcher, all copies will beejected onto tray 1.
● Copying onto the backing sheetThe originals will be copied onto the transparencies and then the same originals will becopied onto the backing sheets as well. (The asterisks in the illustration indicate the transpar-encies.)● Leaving the backing sheet blankThe originals will be copied onto the transparencies and the backing sheet will be left blank.(The asterisks in the illustration indicate the transparencies.)
5-16
E_Sec5_Kinou.PM6 10/16/00, 7:1417
Section 5 OTHER CONVENIENT FUNCTIONS
2A080030AKM-6230 (KME)
/ 131
1. Set the transparencies in the stack bypass tray.
POINT OF INFORMATION• Fan out the transparencies at least once before setting them.• Up to 25 transparencies can be loaded into the stack bypass tray at one time.• Make sure that paper of the same size as the transparencies is loaded in one of the drawers
or decks.
2. Set the originals.3. Touch the “FUNCTION” key.
The function select screen will appear.
4. Touch the “TRANS + BACK” key. (If that key is not displayed, touch the “▼” key or the “▲”key until it is displayed.)The transparency backing mode set-up screen will appear.
5. Touch the “COPIED” key if you want to copy onto the backing sheet, and the “BLANK” keyif you do not want to copy onto the backing sheet.
5-17
E_Sec5_Kinou.PM6 10/16/00, 7:1418

Section 5 OTHER CONVENIENT FUNCTIONS
2A080030AKM-6230 (KME)
/ 131
6. Specify the type of the originals that are being used by touching either the “DUPLEX” or“1-SIDED” key.The touch panel will return to the basic screen.
(8) Overlaying images [Form overlay]This mode can be used to read the first original into memory and have its image overlaid ontocopies made from subsequent originals. It is also possible to register and store in memory, inadvance, the images that you want to use as an overlay. The shading level of the overlayimage can be adjusted as well.* See “(1) Registering an image for form overlay” on page 7-1 for the procedure to register
images.
1. Touch the “FUNCTION” key.The function select screen will appear.
2. Touch the “OVERLAY” key. (If that key is not displayed, touch the “▼” key or the “▲” keyuntil it is displayed.)The form overlay mode set-up screen will appear.
3. Touch the key that corresponds to the level of shading that you want to use for the overlayimage.The shading level can be set to any 10% increment between 10% and 100%.
4. If you want to use a previously registered image, select the “LOADING FORM” check boxand touch the “ENTER” key.If you want to scan in a new image, make sure that the check box remains unchecked.* If you left the check box unselected, go to the next step.
To select a previously registered image, go to step 6.
5. Set the original that you want to use as an overlay and press the Start key. Then go tostep 7.
5-18
E_Sec5_Kinou.PM6 10/16/00, 7:1419

Section 5 OTHER CONVENIENT FUNCTIONS
2A080030AKM-6230 (KME)
/ 131
6. A list of registered images will appear. Select the image and touch the “ENTER” key.* If the image that you want to use is not displayed, touch the “▼” key or the “▲” key until
it is displayed.
7. Set the originals that you want to copy and press the Start key.Copying will begin.
(9) Copying the images from either two or four originals onto a single copy sheet[Combine copy]
This mode can be used to reduce the images from either 2 or 4 separate originals andcombine them onto a single copy.The borderline of each original can also be indicated with a dotted line, a solid line or regis-tration marks.
POINT OF INFORMATIONBoth the originals and the copy paper must be of standard paper sizes.
1 Combination styles● 2 in 1Use this mode to copy two originals onto one sheet. This mode can also be used togetherwith the two-sided copy mode to copy four originals onto one two-sided copy.(When setting originals on the platen, set them in the normal first-second order.)* The actual “2-IN-1” mode that you should use depends on the orientation in which the
originals are set.
● 4 in 1Use this mode to copy four originals onto one sheet. This mode can also be used togetherwith the two-sided copy mode to copy eight originals onto one two-sided copy.(When setting originals on the platen, set them in the normal first-through-fourth order.)* The actual “4-IN-1” mode that you should use depends on the orientation in which the
originals are set.
5-19
E_Sec5_Kinou.PM6 10/16/00, 7:1420
Section 5 OTHER CONVENIENT FUNCTIONS
2A080030AKM-6230 (KME)
/ 131
2 Borderline indicationA DOTTEDThe borderline of the originals will be indicated by a dotted line.B SOLIDThe borderline of the originals will be indicated by a solid line.C CROPMRKThe borderline of the originals will be indicated by registration marks.
1. Touch the “FUNCTION” key.The function select screen will appear.
2. Touch the “MERGE COPY” key. (If that key is not displayed, touch the “▼” key or the “▲”key until it is displayed.)The combine originals mode set-up screen will appear.
3. Select the combination style that you want to use by touching the “2-IN-1” key or the “4-IN-1” key.
POINT OF INFORMATION• The mode that you should use depends on the orientation in which the originals are set:
Depending upon the key that was touched during selection of the combination style in thepanel at left, the originals must be set as shown to the illustrations below.
If you selected “1” or “4”…
If you selected “2” or “3”…
4. Select the type of borderline that you want by touching either the “DOTTED”, “SOLID” or“CROPMRK” key. If you do not want a borderline on the copies, touch the “NONE” key.
5. Specify the type of the originals that are being used by touching either the “DUPLEX” or“1-SIDED” key.* If you selected “DUPLEX”, go to the next step.
If you selected “1-SIDED”, the touch panel will return to the basic screen. In this case, goto step 7.
5-20
11111 22222 33333 44444
E_Sec5_Kinou.PM6 10/16/00, 7:1421

Section 5 OTHER CONVENIENT FUNCTIONS
2A080030AKM-6230 (KME)
/ 131
6. Select the type of finished copies that you want to make by touching either the “DUPLEX”or “1-SIDED” key. The touch panel will return to the basic screen.* When selecting “DUPLEX” copies, choose between the left “DUPLEX” key for normal
copying (like in a bound book) and the right “DUPLEX” key for rotating the copying direc-tion on the back side of the copies (like on a calendar).
7. Set the originals.* When setting originals on the platen, make sure that you set them in the correct order.
(See page 5-19.)8. Touch the paper size key that corresponds to the paper that you want to copy onto.9. Press the Start key.
(10) Making a booklet (sheet originals) [Booklet copy]This mode can be used to copy one-sided or two-sided originals onto two-page [open-face],two-sided copies in such a way that the finished copies can be stacked and folded into abooklet format.
POINT OF INFORMATIONThe size of originals that can be used in this mode is limited to A4 and the paper size islimited to A3 or A4R.
1 Right-side binding orientationThe order of copying will be performed so that the stacked and folded pages of thefinished copies will read from right to left.
2 Left-side binding orientationThe order of copying will be performed so that the stacked and folded pages of thefinished copies will read from left to right.
5-21
E_Sec5_Kinou.PM6 10/16/00, 7:1422

Section 5 OTHER CONVENIENT FUNCTIONS
2A080030AKM-6230 (KME)
/ 131
(11) Making a booklet (two-page [open-face] originals) [Booklet + cover copy mode]This mode can be used to have covers, either blank or with an image copied onto the frontcover, included on the copy sets so that they can be bound in a booklet format.
POINT OF INFORMATIONThe size of originals and the copy paper that can be used in this mode is limited to A3 or A4R.
1. Touch the “FUNCTION” key.The function select screen will appear.
2. Touch the “BOOKLET” key. (If that key is not displayed, touch the “▼” key or the “▲” keyuntil it is displayed.)The booklet mode set-up screen will appear.
3. Specify the type of the originals that are being used by touching either the “DUPLEX” or“1-SIDED” key.
4. Select the binding orientation that you want for the finished copies by touching either the“LEFT” or “RIGHT” key.* If the copier is equipped with the optional Booklet Stitcher and more than one set of
copies is to be stapled, select the finishing settings that you want to use as well.
5. Set the originals.* When setting the originals on the platen, start with the first page.
6. Press the Start key.
5-22
E_Sec5_Kinou.PM6 10/16/00, 7:1423
Section 5 OTHER CONVENIENT FUNCTIONS
2A080030AKM-6230 (KME)
/ 131
● Copy onto the coverIf the original that will be copied onto the front cover is scanned in first, the paper onto whichit is copied will be in the front cover position after the copies are finished and folded in thecenter.
● Do not copy onto the coverWhen the finished copies are folded in the center, both the front and back covers will beblank.
1. Touch the “FUNCTION” key.The function select screen will appear.
2. Touch the “BOOK-BOOK” key. (If that key is not displayed, touch the “▼” key or the “▲”key until it is displayed.)The Book-Book mode set-up screen will appear.
3. Select the binding orientation that you want for the finished copies by touching either the“LEFT” or “RIGHT” key.
4. Select whether or not you want to copy onto the front cover.* If the copier is equipped with the optional Booklet Stitcher, select the finishing settings
that you want to use as well.
5-23
E_Sec5_Kinou.PM6 10/16/00, 7:1424
Section 5 OTHER CONVENIENT FUNCTIONS
2A080030AKM-6230 (KME)
/ 131
5. Set the original in a spread out position.* The originals can also be set in the DF. Be sure to set the original that will be copied onto
the front cover first.6. Press the Start key. The original will be scanned into memory.
* If you set the first original on the platen, go to the next step.* If you use the DF, all of the originals will be scanned and copying will be carried out
automatically.
7. Once the first original is completely scanned, set the next original and touchthe “CONTINUE” key.* Repeat this operation for all of the originals.
8. When all of the originals are completely scanned, touch the “TO PRINT” key. Copying willbegin. After copying is finished, the touch panel will return to the basic screen.
(12) Copying and binding into a booklet (sheet originals) [Binding mode]This mode can be used to copy one-sided or two-sided originals onto two-page [open-face],two-sided copies, to add a cover sheet and then staple the arranged copies into a bookletformat such as with a weekly magazine or a pamphlet.
POINT OF INFORMATION• To use this mode, it is necessary to select the drawer or deck from which the cover sheet
will be fed. (See “^ Drawer for cover sheets” on page 8-16.)• The size of originals that can be used in this mode is limited to A4 and the paper size is
limited to A3 or A4R.• To use this function, the copier must be equipped with the optional Booklet Stitcher.
• When you want to copy onto the front and the back of the cover sheet…The first page of the originals is copied onto the front of the front cover and the second pageonto the back (inside) of the front cover. Copies are then made so that the content can beread sequentially with the pages spread open.
• When you want to copy only onto the front of the cover sheet…The first page of the originals is copied onto the front of the front cover and the second pageonto the front of the page that comes after the cover sheet. Copies are then made so thatthe content can be read sequentially with the pages spread open.
21
43
109
65
87
1
32
98
54
76
5-24
E_Sec5_Kinou.PM6 10/16/00, 7:1425
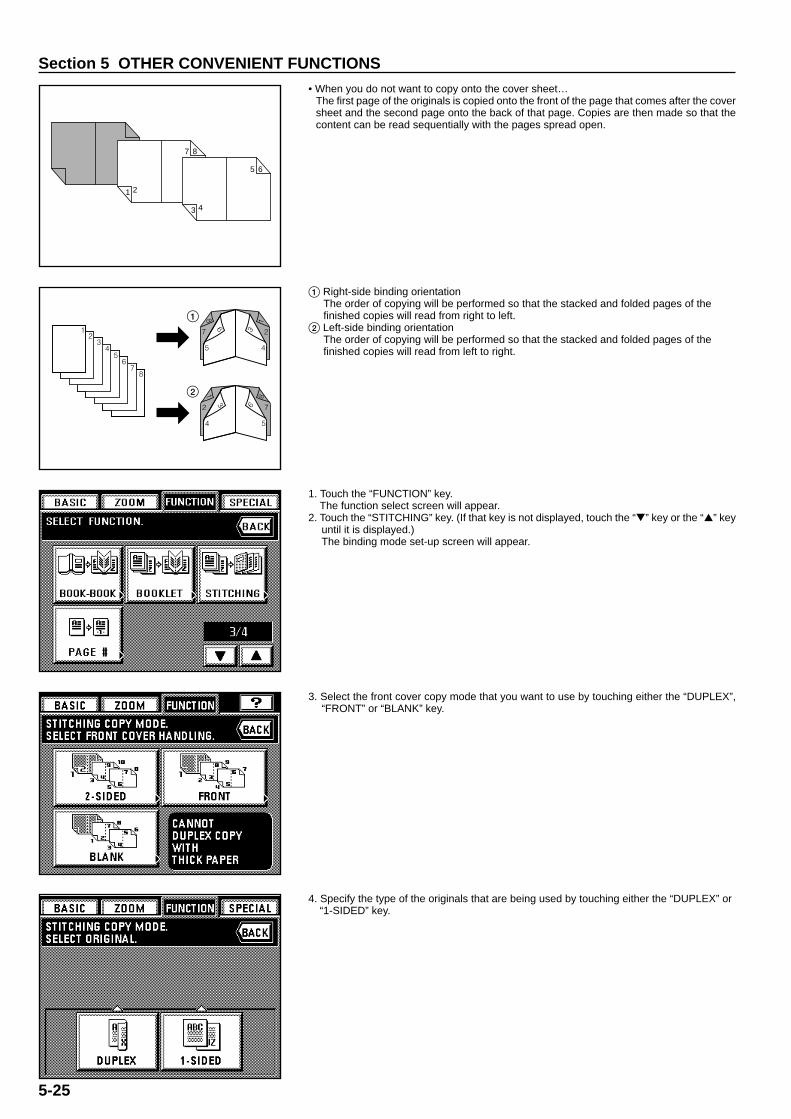
Section 5 OTHER CONVENIENT FUNCTIONS
2A080030AKM-6230 (KME)
/ 131
• When you do not want to copy onto the cover sheet…The first page of the originals is copied onto the front of the page that comes after the coversheet and the second page onto the back of that page. Copies are then made so that thecontent can be read sequentially with the pages spread open.
1 Right-side binding orientationThe order of copying will be performed so that the stacked and folded pages of thefinished copies will read from right to left.
2 Left-side binding orientationThe order of copying will be performed so that the stacked and folded pages of thefinished copies will read from left to right.
1. Touch the “FUNCTION” key.The function select screen will appear.
2. Touch the “STITCHING” key. (If that key is not displayed, touch the “▼” key or the “▲” keyuntil it is displayed.)The binding mode set-up screen will appear.
3. Select the front cover copy mode that you want to use by touching either the “DUPLEX”,“FRONT” or “BLANK” key.
4. Specify the type of the originals that are being used by touching either the “DUPLEX” or“1-SIDED” key.
21
87
43
65
5-25
E_Sec5_Kinou.PM6 10/16/00, 7:1426
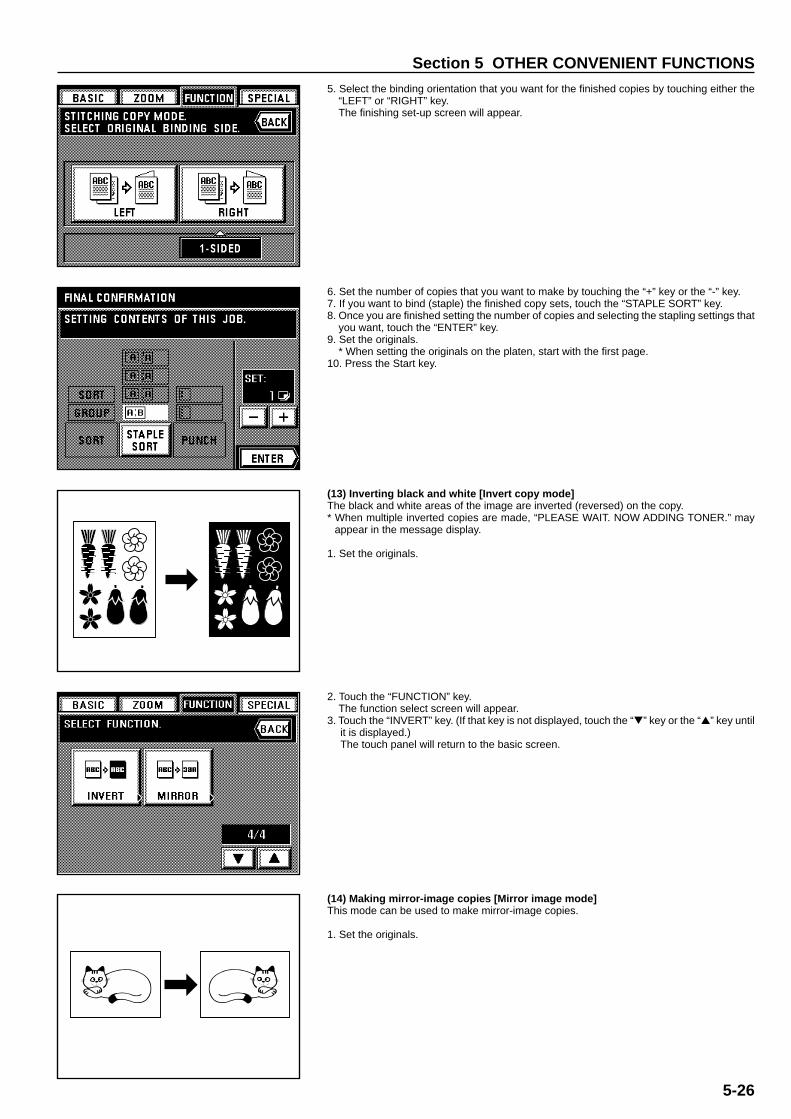
Section 5 OTHER CONVENIENT FUNCTIONS
2A080030AKM-6230 (KME)
/ 131
5. Select the binding orientation that you want for the finished copies by touching either the“LEFT” or “RIGHT” key.The finishing set-up screen will appear.
6. Set the number of copies that you want to make by touching the “+” key or the “-” key.7. If you want to bind (staple) the finished copy sets, touch the “STAPLE SORT” key.8. Once you are finished setting the number of copies and selecting the stapling settings that
you want, touch the “ENTER” key.9. Set the originals.
* When setting the originals on the platen, start with the first page.10. Press the Start key.
(13) Inverting black and white [Invert copy mode]The black and white areas of the image are inverted (reversed) on the copy.* When multiple inverted copies are made, “PLEASE WAIT. NOW ADDING TONER.” may
appear in the message display.
1. Set the originals.
2. Touch the “FUNCTION” key.The function select screen will appear.
3. Touch the “INVERT” key. (If that key is not displayed, touch the “▼” key or the “▲” key untilit is displayed.)The touch panel will return to the basic screen.
(14) Making mirror-image copies [Mirror image mode]This mode can be used to make mirror-image copies.
1. Set the originals.
5-26
E_Sec5_Kinou.PM6 10/16/00, 7:1427

Section 5 OTHER CONVENIENT FUNCTIONS
2A080030AKM-6230 (KME)
/ 131
2. Touch the “FUNCTION” key.The function select screen will appear.
3. Touch the “MIRROR” key. (If that key is not displayed, touch the “▼” key or the “▲” keyuntil it is displayed.)The touch panel will return to the basic screen.
(15) Automated sorting [Sort copy]Since copying is performed only after scanning multiple originals into memory, sorting of therequired number of copy sets is possible without the optional Finisher or the Booklet Stitcher.
POINT OF INFORMATION (Rotate sort copy)If “ON” is selected under “& Rotate-sort” on page 8-16 and the size of the copy paper isA4, the orientation of each ejected copy set will be shifted in order to make it easy to sort thecopies. However, in order to use this setting, there must be A4 size paper loaded both verti-cally and horizontally in the drawers and/or decks.
1. Set the originals.2. Press the Sort-Group key to light the Sort indicator.3. Press the Start key.
* If you set the originals in the DF, scanning will start and copying carried out automatically.* If you set the first original on the platen, “CONTINUE SCANNING DOCUMENT?” will be
displayed.
4. Set the next original and touch the “CONTINUE” key.* Repeat this operation for all of the originals.
5. When all of the originals are completely scanned, touch the “TO PRINT” key.Copying will be performed one set at a time.
(16) Memorizing frequency used settings [Program mode]Up to eight combinations of copy mode settings and functions displayed on the operationpanel can be registered as a single program.
1 Registering various settings as an single program1. Select the copy mode settings and functions that you want to register on the operation
panel and return to the basic screen.2. Touch the “SPECIAL” key.
The management mode select screen will appear.3. Touch the “REGISTER” key under “PROGRAM”.
5-27
E_Sec5_Kinou.PM6 10/16/00, 7:1428

Section 5 OTHER CONVENIENT FUNCTIONS
2A080030AKM-6230 (KME)
/ 131
4. Touch the program number (“1” to “8”) that you want to register the settings under.* If you also want to register a name for that program, touch the “NAME REGISTRATION”
key. (See page 8-29 for the procedure on entering the name.)
5. Touch the “END” key.The selected copy settings and functions will appear. If you want to check more specificsettings for each copy mode, touch the related function key. Once you are finished check-ing the settings, touch the “CHECK” key.
6. Touch the “REGISTER” key for final registration of the settings.The touch panel will return to the basic screen. Copying is now possible using the settingsthat are registered under that program number.
2 Copying with a registered program1. Press the Program key.
The program select screen will appear.* If “OFF THE PLATEN” is selected under “9 Job programming” on page 8-16 and there
are settings registered under program 1, those copy functions will be automatically dis-played. In this case, go to step 4.
* If “REGULAR” is selected under “9 Job programming” on page 8-16, you can select theprogram you want from among those registered. In this case, go to the next step.
2. Touch the number that corresponds to the program that you want to use.
3. The copy functions and settings registered under the selected program will be displayed.Touch the “COPY” key.The touch panel will return to the basic screen.
4. Set the originals and press the Start key to start copying with the displayed functions andsettings.
5-28
E_Sec5_Kinou.PM6 10/16/00, 7:1429

6-1
2A080030AKM-6230 (KME)
/ 131

Section 6 ADVANCED COPY MODES
6-2
2A080030AKM-6230 (KME)
/ 131
(1) Scheduling one copy job during copying of another [Job reservation]Copy jobs can be scheduled even while another copy job is in progress. Up to 9 different jobscan be registered (up to 4 of those from your computer). It is also possible to change whichjobs are scheduled and in which order they will be carried out.
� The job reservation screen1 Job icons: The indicates jobs scheduled from the copier and the indicates jobs
scheduled from your computer.2 Job number numbers: A job number is assigned (up to 99) to each job in order of registra-
tion. Even if the order is altered or a job is deleted, the job numbers will not change.Copying will be performed in order, starting the topmost job in the display downward.
3 No. of copies: Indicates the number of originals in the copy job.4 No. of originals: Indicates the number of copies that will be made.
2. Touch the “ADD” key.
1 Adding a job1. Press the Add Job key. A list of the currently reserved jobs will appear. If “ADDITION OF
JOB IS POSSIBLE” appears in the message display, additional jobs can be scheduled.* To stop job reservation, touch either the “END” or “BACK” key.
3. Select the settings and functions that you want to use for that copy job and press the Startkey. Scanning of the originals will start.
4. When all of the originals have been completely scanned, the touch panel will return to thescreen for step 2 .
5. Touch the “END” key. Copying will begin in the order that the job was reserved, once thepreviously reserved copy job is finished.
1
2
43
Section 6 ADVANCED COPY MODES
6-1
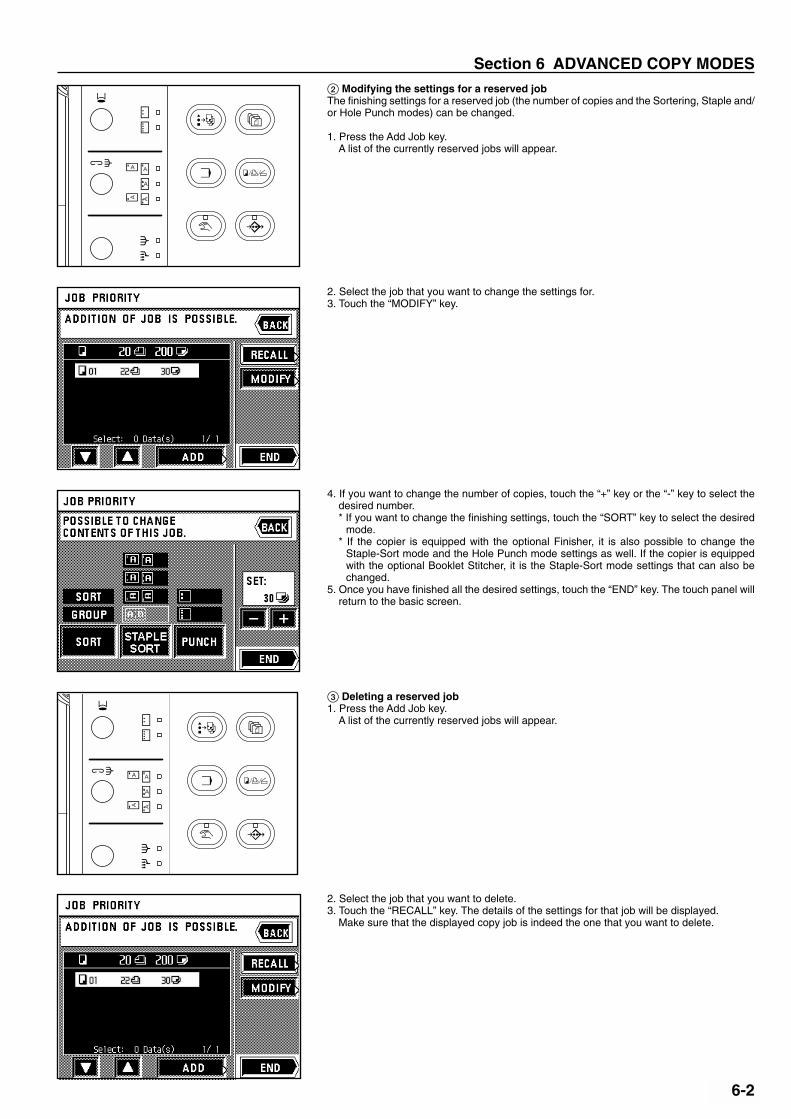
Section 6 ADVANCED COPY MODES
6-3
2A080030AKM-6230 (KME)
/ 131
2 Modifying the settings for a reserved jobThe finishing settings for a reserved job (the number of copies and the Sortering, Staple and/or Hole Punch modes) can be changed.
1. Press the Add Job key.A list of the currently reserved jobs will appear.
2. Select the job that you want to change the settings for.3. Touch the “MODIFY” key.
4. If you want to change the number of copies, touch the “+” key or the “-” key to select thedesired number.* If you want to change the finishing settings, touch the “SORT” key to select the desired
mode.* If the copier is equipped with the optional Finisher, it is also possible to change the
Staple-Sort mode and the Hole Punch mode settings as well. If the copier is equippedwith the optional Booklet Stitcher, it is the Staple-Sort mode settings that can also bechanged.
5. Once you have finished all the desired settings, touch the “END” key. The touch panel willreturn to the basic screen.
3 Deleting a reserved job1. Press the Add Job key.
A list of the currently reserved jobs will appear.
2. Select the job that you want to delete.3. Touch the “RECALL” key. The details of the settings for that job will be displayed.
Make sure that the displayed copy job is indeed the one that you want to delete.
6-2
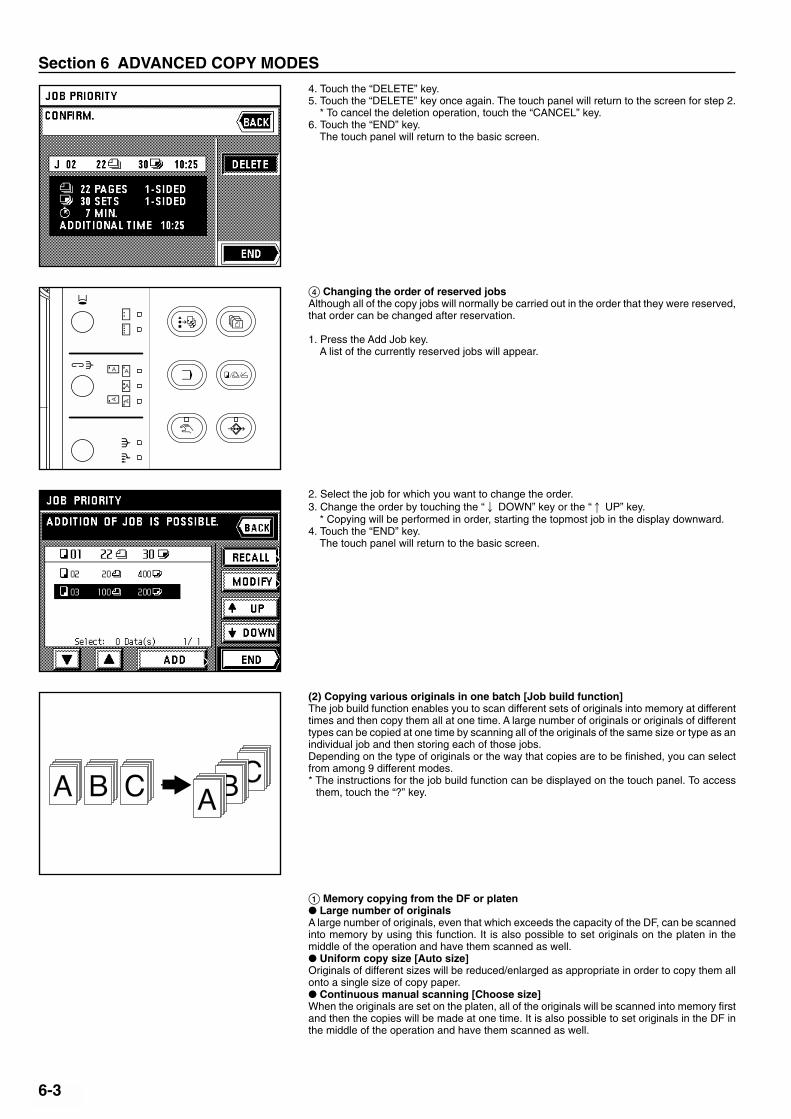
Section 6 ADVANCED COPY MODES
6-4
2A080030AKM-6230 (KME)
/ 131
4. Touch the “DELETE” key.5. Touch the “DELETE” key once again. The touch panel will return to the screen for step 2.
* To cancel the deletion operation, touch the “CANCEL” key.6. Touch the “END” key.
The touch panel will return to the basic screen.
4 Changing the order of reserved jobsAlthough all of the copy jobs will normally be carried out in the order that they were reserved,that order can be changed after reservation.
1. Press the Add Job key.A list of the currently reserved jobs will appear.
(2) Copying various originals in one batch [Job build function]The job build function enables you to scan different sets of originals into memory at differenttimes and then copy them all at one time. A large number of originals or originals of differenttypes can be copied at one time by scanning all of the originals of the same size or type as anindividual job and then storing each of those jobs.Depending on the type of originals or the way that copies are to be finished, you can selectfrom among 9 different modes.* The instructions for the job build function can be displayed on the touch panel. To access
them, touch the “?” key.
1 Memory copying from the DF or platen� Large number of originalsA large number of originals, even that which exceeds the capacity of the DF, can be scannedinto memory by using this function. It is also possible to set originals on the platen in themiddle of the operation and have them scanned as well.� Uniform copy size [Auto size]Originals of different sizes will be reduced/enlarged as appropriate in order to copy them allonto a single size of copy paper.� Continuous manual scanning [Choose size]When the originals are set on the platen, all of the originals will be scanned into memory firstand then the copies will be made at one time. It is also possible to set originals in the DF inthe middle of the operation and have them scanned as well.
6-3
2. Select the job for which you want to change the order.3. Change the order by touching the “Q DOWN” key or the “q UP” key.
* Copying will be performed in order, starting the topmost job in the display downward.4. Touch the “END” key.
The touch panel will return to the basic screen.

Section 6 ADVANCED COPY MODES
6-5
2A080030AKM-6230 (KME)
/ 131
1. Touch the Job Build key.The job build select screen will appear.
2. Make sure that the “MEMORY COPY FROM DF AND PLATEN” key is highlighted. If it isnot, touch that key until it is highlighted.
3. Select the desired function by touching either the “LARGE # OF ORIGINALS”, “AUTOSIZE” or “CHOOSE SIZE” key.
4. Specify the type of the originals that are being used by touching either the “2-SIDEDORIG.” or “1-SIDED ORIG.” key.
5. Select how you want the copies to be finished by touching either the “2-SIDED COPY” or“1-SIDED COPY” key.
6. The start scanning screen will appear.* Select the size of paper that you want to copy onto.* The auto magnification selection mode is the default setting in the initial mode. When
copying onto custom paper sizes or with a custom zoom ratio, press the Manual key until“1:1” appears on the copy magnification ratio display.
6-4

Section 6 ADVANCED COPY MODES
6-6
2A080030AKM-6230 (KME)
/ 131
* If you want to change the magnification ratio, touch the “+” key or the “-” key at the right ofthe copy magnification ratio display to select the desired ratio. If you want to change thezoom mode, such as selecting the standard zoom or XY zoom mode, touch the “ZOOM”key and follow the instructions from page 4-4.
* The settings for the zoom mode can be changed for each job.
* If you want to change the setting for the border erase mode, touch the “+” key or the “-” keyat the right of the border width display to select the desired width. The border width can beset to 6 mm, 12 mm or 18 mm.
* In this setting, only sheet originals can be selected for use in the border erase mode.* The settings for the border erase mode can be changed for each job.* If you touch the “FUNCTION” key, the following copy functions can be selected.• Margin mode: Touch the “MARGIN” key and follow the procedure from step 4 on page 5-2.• Combined copy mode: Touch the “MERGE COPY” key and follow the procedure from step
3 on page 5-20.• Print page numbers function: Touch the “PAGE #” key and follow the procedure from step 4
on page 5-4.
7. Set the originals.8. Press the Start key.
9. If you want to scan in more originals, touch the “CONTINUE” key and repeat the procedurefrom step 6.* Once all of the originals have been completely scanned, go to step 10.* To delete the last set of the originals that you scanned, touch the “CLEAR LAST JOB”
key.* If you want to make a test copy, touch the “TEST PRINT” key.
Once the test copy has been made, the touch panel will return to the screen for step 9.10. Touch the “TO PRINT” key.
11. Select how you want the copies to be finished.* If you want to change the Sorting mode, touch the “SORT” key to highlight the desired
mode (Sort or Group).* If the copier is equipped with the optional Finisher, it is also possible to change the
Staple-Sort mode and the Hole Punch mode settings.* If the copier is equipped with the optional Booklet Stitcher, it is the Staple-Sort mode
settings that can also be changed.12. Set the number of copies that you want to make by touching the “+” key or the “-” key. This
number can also be entered directly with the numeric keys.13. Touch the “END” key. Copying will begin.
6-5
Section 6 ADVANCED COPY MODES
6-7
2A080030AKM-6230 (KME)
/ 131
2 Two-sided copies from a mixture of one-sided and two-sided originals� Making copies like the originals [Print as originals]By specifying whether each set of originals is either one-sided or two-sided, each set will bescanned and all of the one-sided originals will be made into one-sided copies while the two-sided originals will be made into two-sided copies just like the corresponding originals.
� Two-sided copies from all types of originals [Duplex All Originals]By specifying whether each set of originals is either one-sided or two-sided, each set will bescanned and all of the originals will be made into two-sided copies without any blank pages.
� Copying onto the front side of specified pages [Chapterize]By scanning in each chapter separately, the front side of the first page of each chapter willalways be copied onto.
1. Touch the Job Build key.The job build select screen will appear.
2. Touch the “2-SIDED COPY” key.3. Select the desired function by touching either the “PRINT AS ORIGINALS”, “DUPLEX ALL
ORIGINALS” or “CHAPTERIZE 1/2 SIDED ORGNLS.” key.
6-6
Section 6 ADVANCED COPY MODES
6-8
2A080030AKM-6230 (KME)
/ 131
4. Specify the type of the originals that are being used by touching either the “2-SIDEDORIG.” or “1-SIDED ORIG.” key.
5. The start scanning screen will appear.* The auto magnification selection mode is the default setting in the initial mode. When
copying onto custom paper sizes or with a custom zoom ratio, press the Manual key until“1:1” appears on the copy magnification ratio display.
* If you want to change the magnification ratio, touch the “+” key or the “-” key at the right ofthe copy magnification ratio display to select the desired ratio. If you want to change thezoom mode, such as selecting the standard zoom or XY zoom mode, touch the “ZOOM”key and follow the instructions from page 4-4.
* The settings for the zoom mode can be changed for each job.
* If you want to change the setting for the border erase mode, touch the “+” key or the “-” keyat the right of the border width display to select the desired width. The border width can beset to 6 mm, 12 mm or 18 mm.
* In this setting, only sheet originals can be selected for use in the border erase mode.* The settings for the border erase mode can be changed for each job.* If you touch the “FUNCTION” key, the following copy functions can be selected.
• Margin mode: Touch the “MARGIN” key and follow the procedure from step 3 on page 5-2.• Combined copy mode: Touch the “MERGE COPY” key and follow the procedure from
step 3 on page 5-20.• Print page numbers function: Touch the “PAGE #” key and follow the procedure from step
4 on page 5-4.
6. Set the originals.* The originals that may be used for each individual batch of scanning is limited to the type
selected in step 4 and all of the originals for that batch must be of the same type. If youwant to scan in another type of original, it must be done in a different batch.
7. Press the Start key.
6-7
Section 6 ADVANCED COPY MODES
6-9
2A080030AKM-6230 (KME)
/ 131
8. If you want to scan in more originals, touch the “CONTINUE” key and repeating the proce-dure from step 4.* Once all of the originals have been completely scanned, go to step 9.* To delete the last set of the originals that you scanned, touch the “CLEAR LAST JOB”
key.* If you want to make a test copy, touch the “TEST PRINT” key.
Once the test copy has been made, the touch panel will return to the screen for step 8.9. Touch the “TO PRINT” key.
10. Select how you want the copies to be finished.* If you want to change the Sorting mode, touch the “SORT” key to highlight the desired
mode (Sort or Group).* If the copier is equipped with the optional Finisher, it is also possible to change the
Staple-Sort mode and the Hole Punch mode settings.* If the copier is equipped with the optional Booklet Stitcher, it is the Staple-Sort mode
settings that can also be changed.11. Set the number of copies that you want to make by touching the “+” key or the “-” key. This
number can also be entered directly with the numeric keys.12. Touch the “END” key. Copying will begin.
3 Batch copy from the platen� Sheet originals onlySheet originals or the like which cannot be set in the DF will be scanned into memory first andthen the copies will be made at one time. This mode is convenient for Sort copying of a largenumber of just such originals.� Two-page [open-face] originalsWhen copying a large number of two-page [open-face] originals, like books and magazines,the originals will be scanned into memory first for batch copying. This mode is convenient forSort copying of a large number of just such originals.� Sheet & book originalsBoth sheet and two-page [open-face] originals can be scanned into memory together forbatch copying. This mode is convenient for Sort copying of a large number of just suchoriginals.
1. Touch the Job Build key.The job build select screen will appear.
2. Touch the “BATCH COPY FROM PLATEN” key.3. Specify the type of the originals that are being used by touching either the “SHEET
ORIGINALS”, “BOOK ORIGINALS” or “SHEET & BOOK ORIGINALS” key.
6-8

Section 6 ADVANCED COPY MODES
6-10
2A080030AKM-6230 (KME)
/ 131
4. Select how you want the copies to be finished by touching either the “2-SIDED COPY” or“1-SIDED COPY” key.* If you selected “SHEET & BOOK ORIGINALS” in step 3, go to the next step. If you
selected “BOOK ORIGINALS”, go to step 6. If you selected “SHEET ORIGINALS”, go tostep 7.
5. Specify the type of the originals that are being used by touching either the “SHEET ORIGI-NAL” or “BOOK ORIGINAL” key.* If you selected “SHEET ORIGINAL”, go to step 7. If you selected “BOOK ORIGINAl”, go
to next step.
6. Specify the binding orientation of the originals.
7. The start scanning screen will appear.* The auto magnification selection mode is the default setting in the initial mode. When
copying onto custom paper sizes or with a custom zoom ratio, press the Manual key until“1:1” appears on the copy magnification ratio display.
* If you want to change the magnification ratio, touch the “+” key or the “-” key at the right ofthe copy magnification ratio display to select the desired ratio. If you want to change thezoom mode, such as selecting the standard zoom or XY zoom mode, touch the “ZOOM”key and follow the instructions from page 4-4.
* The setting of the zoom mode can be changed by each job.
6-9

Section 6 ADVANCED COPY MODES
6-11
2A080030AKM-6230 (KME)
/ 131
* If you want to change the setting for the border erase mode, touch the “+” key or the “-” keyat the right of the border width display to select the desired width. The border width can beset to 6 mm, 12 mm or 18 mm.
* In this setting, only sheet originals can be selected for use in the border erase mode.* The settings for the border erase mode can be changed for each job.* If you touch the “FUNCTION” key, the following copy functions can be selected.
• Margin mode: Touch the “MARGIN” key and follow the procedure from step 3 onpage 5-2.
• Combined copy mode: Touch the “MERGE COPY” key and follow the procedure fromstep 3 on page 5-20.
• Print page numbers function: Touch the “PAGE #” key and follow the procedure from step4 on page 5-4.
8. Set the originals.* Be sure to set the type of originals selected in steps 3 and 5.
9. Press the Start key.
10. If you want to scan in more originals, touch the “CONTINUE” key.* If you selected “SHEET & BOOK ORIGINALS” in step 3, continue scanning by repeat-
ing the procedure from step 5.If you selected “BOOK ORIGINALS”, continue scanning by repeating the procedurefrom step 6.If you selected “SHEET ORIGINALS”, continue scanning by repeating the procedurefrom step 7.
* Once all of the originals have been completely scanned, go to step 11.* To delete the last set of the originals that you scanned, touch the “CLEAR LAST JOB”
key.* If you want to make a test copy, touch the “TEST PRINT” key.Once the test copy has been made, the touch panel will return to the screen for step 10.
11. Touch the “TO PRINT” key.
12. Select how you want the copies to be finished.* If you want to change the Sorting mode, touch the “SORT” key to highlight the desired
mode (Sort or Group).* If the copier is equipped with the optional Finisher, it is also possible to change the
Staple-Sort mode and the Hole Punch mode settings.* If the copier is equipped with the optional Booklet Stitcher, it is the Staple-Sort mode
settings that can also be changed.13. Set the number of copies that you want to make by touch the “+” key or the “-” key. This
number can also be entered directly with the numeric keys.14. Touch the “END” key. Copying will begin.
6-10

7-1
2A080030AKM-6230 (KME)
/ 131

Section 7 DOCUMENT MANAGEMENT FUNCTIONS
2A080030AKM-6230 (KME)
/ 131
(1) Registering an image for form overlayIt is possible to register and store in the copier’s memory, in advance, images that you wantto use as an overlay in the form overlay mode (see page 5-18). This is especially convenient,for example, for registering images such as those that designate confidential documents, sothat everyone can use them. Up to 100 such images can be registered in this copier.* It is possible to delete at one time all of the images registered for form overlay. (See “1
Reset box (delete all)” on page 8-23.)* It is also possible to print out a list of all of the registered images. (See “4 Document list” on
page 8-23.)
1 Registering an image1. Press the Doc. Mgmt. key.
The document management screen will appear.
3. Touch the “REGISTER” key.4. Enter the name that you want to register for that image.
(See page 8-29 for the procedure on entering the name.)
2. Touch the “OVERLAY FORM STORAGE” key.
5. Set the originals.6. Make sure that “SET ORIGINAL, PRESS START KEY.” is displayed.
* Make sure that “AUTO” is displayed under “ORIGINAL”.* If you want to change the size of the copy paper, touch the “PAPER” key and select the
size of paper that you want.7. Press the Start key.
Section 7 DOCUMENT MANAGEMENT FUNCTIONS
7-1

Section 7 DOCUMENT MANAGEMENT FUNCTIONS
2A080030AKM-6230 (KME)
/ 131
8. Once scanning of the original is finished, a message that asks you whether or not you wantto continue registering other images will appear.Once you are finished registering images, touch the “END” key. The touch panel will returnto the basic screen.If you want to register other images, touch the “CONTINUE” key and repeat steps 4 - 7.
2 Checking registered imagesFollow the procedure below when you want to check the original size of registered imagesand the date that they were registered, as well as when you want to print out the actual imagefor verification purposes.
1. Press the Doc. Mgmt. key.The document management screen will appear.
2. Touch the “OVERLAY FORM STORAGE” key.A list of registered images will appear.
3. If you want to check the information regarding a specific image or to print it out, select thedesired image and touch the “RECALL” key.* If the image that you want to check is not displayed, touch the “�” key or the “�” key until
it is displayed.
4. Information about that image will be displayed. Once you are finished checking that infor-mation, touch the “END” key.* If you want to print out the image, touch the “FORM PRINT” key. Printing will begin and,
once it is finished, the touch panel will return to the screen for step 4.5. Touch the “END” key. The touch panel will return to the screen for step 3.
Once you are finished checking information, touch the “END” key. The touch panel willreturn to the basic screen.If you want to check the information for other images, repeat steps 3 and 4.
3 Deleting an imageFollow the procedure below when you want to delete from memory an image that you nolonger need.
1. Press the Doc. Mgmt. key.The document management screen will appear.
2. Touch the “OVERLAY FROM STOREGE” key.A list of registered images will appear.
7-2
Section 7 DOCUMENT MANAGEMENT FUNCTIONS
2A080030AKM-6230 (KME)
/ 131
3. Select the image that you want to delete and touch the “DELETE” key.* If the image that you want to delete is not displayed, touch the “�” key or the “�” key until
it is displayed.
4. If you are certain that you want to delete that image, touch the “DELETE” key once again.The touch panel will return to the screen for step 3.* If you do not want to delete that image, touch the “CANCEL” key.
5. If you want to delete other images, repeat steps 3 and 4. Once you are finished deletingimages, touch the “END” key. The touch panel will return to the basic screen.
4 Modifying information for an imageFollow the procedure below when you want to change the registered name of an image orchange the order in which the image names are displayed.
1. Press the Doc. Mgmt. key.The document management screen will appear.
2. Touch the “OVERLAY FROM STORAGE” key.A list of registered images will appear.
3. Touch the “MODIFY” key.4. Select the image that corresponds to the information that you want to modify.
* If the image that you want to modify the information for is not displayed, touch the “�” keyor the “�” key until it is displayed.
5. If you want to change the order in which the image name is displayed, touch the “q UP”key or the “QDOWN” key until that name is in the position that you want.* If you want to change the name of the image, touch the “RENAME” key. (See page 8-29
for the procedure on entering the name.) Once you are finished changing the name, thetouch panel will return to the basic screen.
6. Once you are finished modifying information, touch the “END” key. The touch panel willreturn to the basic screen.
7-3

Section 7 DOCUMENT MANAGEMENT FUNCTIONS
2A080030AKM-6230 (KME)
/ 131
(2) Repeat copyingIt is possible to make additional copies from the same originals, using the same copy settingsbut without the need to rescan the originals, as long as copying is started before the autoclear function engages.* It is also possible to disable repeat copying capabilities. (See “* Repeat copying” on page
8-16.)
1. Once copying is finished, touch the “MODIFY” key.* You can also press the Doc. Mgmt. key and then touch the “RETRY COPY” key. In this
case , if the “RETRY COPY” key is not displayed, then the auto clear function has al-ready engaged or the Reset key was pressed and, thus, the copy settings are no longerin memory.
2. Change any copy settings that you want, such as the number of copies to be made, etc.3. Touch the “START” key.
Copying will begin. Once copying is finished, the touch panel will return to the basic screen.
(3) Quick copyingIf the copier is equipped with the optional Print/Scan System that allows you to send datafrom your computer, that data is stored in the quick-print memory of the copier. Thus, it ispossible to reprint that same print job by selecting the corresponding data directly in thecopier.* Only the 20 most recent print jobs will be retained in quick-print memory.
IMPORTANT!Be aware that all data stored in quick-print memory will be lost whenever the main switch isturned OFF ( O ).
1 Printing out dataFollow the procedure below when you want to print out the same print job one more time.
1. Press the Doc. Mgmt. key.The document management screen will appear.
7-4

Section 7 DOCUMENT MANAGEMENT FUNCTIONS
2A080030AKM-6230 (KME)
/ 131
2. Touch the “QUICK PRINT” key.
3. Select the print job that you want to print out.* If the print job that you want to print out is not displayed, touch the “�” key or the “�” key
until it is displayed.4. Touch the “ENTER” key.
5. Change any copy settings that you want, such as the number of copies to be made, etc.6. Touch the “START” key.
Copying will begin. Once copying is finished, the touch panel will return to the basic screen.
2 Checking data for a print jobFollow the procedure below when you want to check certain information that correspondsto a specific print job.
1. Press the Doc. Mgmt. key.The document management screen will appear.
2. Touch the “QUICK PRINT” key.(If the “Quick Print” key is not displayed, there is no longer data for print jobs in memory.)
3. Select the print job that you want to check.* If the print job that you want to check is not displayed, touch the “�” key or the “�” key
until it is displayed.4. Touch the “RECALL” key.
The copy size and number of copies will be displayed.
7-5
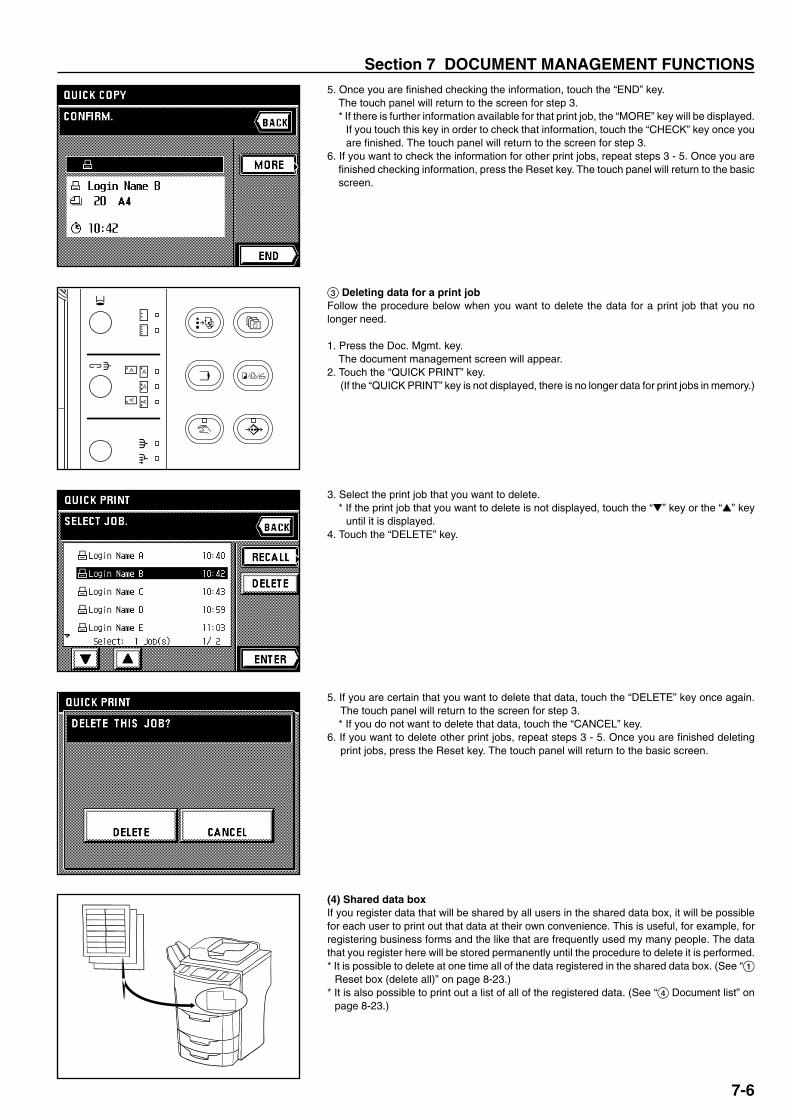
Section 7 DOCUMENT MANAGEMENT FUNCTIONS
2A080030AKM-6230 (KME)
/ 131
5. Once you are finished checking the information, touch the “END” key.The touch panel will return to the screen for step 3.* If there is further information available for that print job, the “MORE” key will be displayed.
If you touch this key in order to check that information, touch the “CHECK” key once youare finished. The touch panel will return to the screen for step 3.
6. If you want to check the information for other print jobs, repeat steps 3 - 5. Once you arefinished checking information, press the Reset key. The touch panel will return to the basicscreen.
3 Deleting data for a print jobFollow the procedure below when you want to delete the data for a print job that you nolonger need.
1. Press the Doc. Mgmt. key.The document management screen will appear.
2. Touch the “QUICK PRINT” key.(If the “QUICK PRINT” key is not displayed, there is no longer data for print jobs in memory.)
3. Select the print job that you want to delete.* If the print job that you want to delete is not displayed, touch the “�” key or the “�” key
until it is displayed.4. Touch the “DELETE” key.
5. If you are certain that you want to delete that data, touch the “DELETE” key once again.The touch panel will return to the screen for step 3.* If you do not want to delete that data, touch the “CANCEL” key.
6. If you want to delete other print jobs, repeat steps 3 - 5. Once you are finished deletingprint jobs, press the Reset key. The touch panel will return to the basic screen.
(4) Shared data boxIf you register data that will be shared by all users in the shared data box, it will be possiblefor each user to print out that data at their own convenience. This is useful, for example, forregistering business forms and the like that are frequently used my many people. The datathat you register here will be stored permanently until the procedure to delete it is performed.* It is possible to delete at one time all of the data registered in the shared data box. (See “1
Reset box (delete all)” on page 8-23.)* It is also possible to print out a list of all of the registered data. (See “4 Document list” on
page 8-23.)
7-6

Section 7 DOCUMENT MANAGEMENT FUNCTIONS
2A080030AKM-6230 (KME)
/ 131
1 Registering shared dataOriginals can be registered both from your computer as well as using the copier itself. Followthe procedure below when you want to use the copier to store the original.
1. Press the Doc. Mgmt. key.The document management screen will appear.
2. Touch the “STORED JOB BOX” key.3. Touch the “REGISTER” key.
4. Enter the name that you want to register for that data.(See page 8-29 for the procedure on entering the name.)
5. Set the originals.6. Make sure that “SET ORIGINAL. PRESS START KEY.” is displayed.
* Make sure that “AUTO” is displayed under “ORIGINAL”.* If you want to change the size of the copy paper, touch the “PAPER” key and select the
size of paper that you want.7. Press the Start key. Scanning of the originals will begin.8. Once scanning of the original is finished, a message that asks you whether or not you want
to continue registering other data will appear.Once you are finished registering data, touch the “END” key. The touch panel will return tothe basic screen.If you want to register other data, touch the “CONTINUE” key and repeat steps 5 - 7.
2 Printing out shared dataFollow the procedure below when you want to print out data that you have registered in theshared data box.
1. Press the Doc. Mgmt. key.The document management screen will appear.
2. Touch the “STORED JOB BOX” key.3. Touch the “STORAGE” key.
7-7
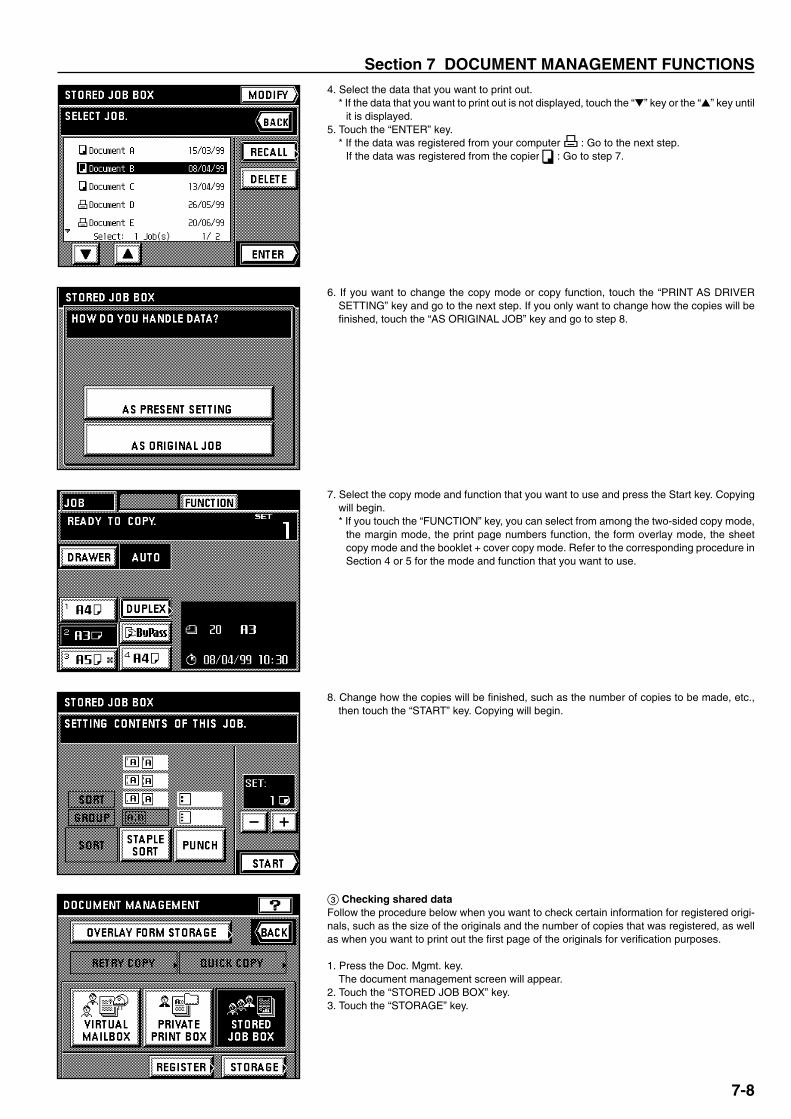
Section 7 DOCUMENT MANAGEMENT FUNCTIONS
2A080030AKM-6230 (KME)
/ 131
4. Select the data that you want to print out.* If the data that you want to print out is not displayed, touch the “�” key or the “�” key until
it is displayed.5. Touch the “ENTER” key.
* If the data was registered from your computer : Go to the next step.If the data was registered from the copier : Go to step 7.
6. If you want to change the copy mode or copy function, touch the “PRINT AS DRIVERSETTING” key and go to the next step. If you only want to change how the copies will befinished, touch the “AS ORIGINAL JOB” key and go to step 8.
7. Select the copy mode and function that you want to use and press the Start key. Copyingwill begin.* If you touch the “FUNCTION” key, you can select from among the two-sided copy mode,
the margin mode, the print page numbers function, the form overlay mode, the sheetcopy mode and the booklet + cover copy mode. Refer to the corresponding procedure inSection 4 or 5 for the mode and function that you want to use.
8. Change how the copies will be finished, such as the number of copies to be made, etc.,then touch the “START” key. Copying will begin.
3 Checking shared dataFollow the procedure below when you want to check certain information for registered origi-nals, such as the size of the originals and the number of copies that was registered, as wellas when you want to print out the first page of the originals for verification purposes.
1. Press the Doc. Mgmt. key.The document management screen will appear.
2. Touch the “STORED JOB BOX” key.3. Touch the “STORAGE” key.
7-8

Section 7 DOCUMENT MANAGEMENT FUNCTIONS
2A080030AKM-6230 (KME)
/ 131
4. Select the shared data that you want to check.* If the data that you want to check is not displayed, touch the “�” key or the “�” key until
it is displayed.5. Touch the “RECALL” key.
Information about that data will be displayed. Once you are finished checking that informa-tion, press the Reset key. The touch panel will return to the basic screen.* If there is further information available for that data, the “MORE” key will be displayed. If
you touch this key in order to check that information, touch the “CHECK” key, and thenpress the Reset key, once you are finished. The touch panel will return to the basicscreen.
* If you only want to print out the first page of the originals, touch the “HEAD PRINT” key.Once printing is finished, the touch panel will return to the screen that was displayed beforeprinting began. Once you are finished checking information, press the Reset key. The touchpanel will return to the basic screen.
6. If you want to check the information for other shared data, touch the “END” key and then,in the next screen, touch the “BACK” key and repeat steps 4 and 5.
4 Deleting shared dataFollow the procedure below when you want to delete shared data that you no longer need.
1. Press the Doc. Mgmt. key.The document management screen will appear.
2. Touch the “STORED JOB BOX” key.3. Touch the “STORAGE” key.
4. Select the shared data that you want to delete.* If the data that you want to delete is not displayed, touch the “�” key or the “�” key until
it is displayed.5. Touch the “DELETE” key.
7-9

Section 7 DOCUMENT MANAGEMENT FUNCTIONS
2A080030AKM-6230 (KME)
/ 131
6. If you are certain that you want to delete that data, touch the “DELETE” key once again.The touch panel will return to the screen for step 4.* If you do not want to delete that data, touch the “CANCEL” key.
7. If you want to delete other shared data, repeat steps 4 - 6. Once you are finished deletingdata, press the Reset key. The touch panel will return to the basic screen.
5 Modifying information for shared dataFollow the procedure below when you want to change the registered name of certain data orchange the order in which the names for the shared data are displayed.
1. Press the Doc. Mgmt. key.The document management screen will appear.
2. Touch the “STORED JOB BOX” key.3. Touch the “STORAGE” key.
4. Touch the “MODIFY” key.
5. Select the data that corresponds to the information that you want to modify.* If the data that you want to modify the information for is not displayed, touch the “�” key
or the “�” key until it is displayed.6. If you want to change the order in which the name for the shared data is displayed, touch
the “q UP” key or the “Q DOWN” key until that name is in the position that you want.* If you want to change the name of the data, touch the “RENAME” key. (See page 8-29 for
the procedure on entering the name.) Once you are finished changing the name, thetouch panel will return to the basic screen.
7. Once you are finished modifying information, touch the “END” key and then press theReset key. The touch panel will return to the basic screen.
(5) Synergy print boxesIf you store multiple sets of originals in a synergy print box, you can print out up to 10 of thesesets at one time. Up to 100 sets of originals can be registered in each synergy print box atone time, and it is possible to register a total combination of 100 synergy print boxes andvirtual mailboxes (see page 7-17).* Each synergy print box can have its own name and password for heightened security. It is
also possible to delete at one time all of the data registered in any one box. (See “2 Boxname & password / Clear data in box” on page 8-23.)
* It is possible as well to delete at one time all of the data registered in all of the synergy printboxes. (See “1 Reset box (delete all)” on page 8-23.)
7-10
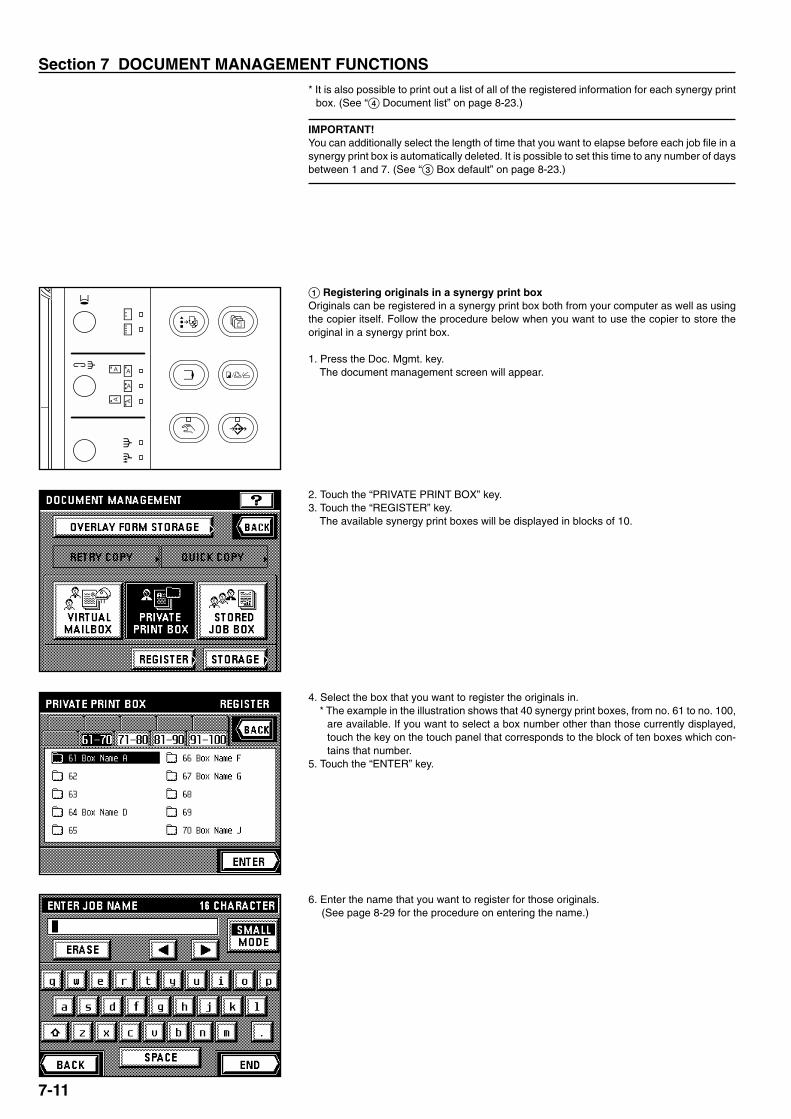
Section 7 DOCUMENT MANAGEMENT FUNCTIONS
2A080030AKM-6230 (KME)
/ 131
* It is also possible to print out a list of all of the registered information for each synergy printbox. (See “4 Document list” on page 8-23.)
IMPORTANT!You can additionally select the length of time that you want to elapse before each job file in asynergy print box is automatically deleted. It is possible to set this time to any number of daysbetween 1 and 7. (See “3 Box default” on page 8-23.)
1 Registering originals in a synergy print boxOriginals can be registered in a synergy print box both from your computer as well as usingthe copier itself. Follow the procedure below when you want to use the copier to store theoriginal in a synergy print box.
1. Press the Doc. Mgmt. key.The document management screen will appear.
2. Touch the “PRIVATE PRINT BOX” key.3. Touch the “REGISTER” key.
The available synergy print boxes will be displayed in blocks of 10.
4. Select the box that you want to register the originals in.* The example in the illustration shows that 40 synergy print boxes, from no. 61 to no. 100,
are available. If you want to select a box number other than those currently displayed,touch the key on the touch panel that corresponds to the block of ten boxes which con-tains that number.
5. Touch the “ENTER” key.
6. Enter the name that you want to register for those originals.(See page 8-29 for the procedure on entering the name.)
7-11

Section 7 DOCUMENT MANAGEMENT FUNCTIONS
2A080030AKM-6230 (KME)
/ 131
7. Set the originals.8. Make sure that “SET ORIGINAL. PRESS START KEY.” is displayed.
* Make sure that “AUTO” is displayed under “ORIGINAL”.* If you want to change the size of the copy paper, touch the “PAPER” key and select the
size of paper that you want.9. Press the Start key. Scanning of the originals will begin.10. Once scanning is finished, touch the “END” key. The touch panel will return to the basic
screen.To continue registering originals, set the new originals and touch the “CONTINUE” key.
2 Printing out more than one set of originals from a synergy print box
1. Press the Doc. Mgmt. key.The document management screen will appear.
2. Touch the “PRIVATE PRINT BOX” key.3. Touch the “STORAGE” key.
The available synergy print boxes will be displayed in blocks of 10.
4. Select the box that contains the corresponding originals.* The example in the illustration shows that 40 synergy print boxes, from no. 61 to no. 100,
are available. If you want to select a box number other than those currently displayed,touch the key on the touch panel that corresponds to the block of ten boxes which con-tains that number.
5. Touch the “ENTER” key.
6. If a password was registered for the selected box, the password input screen will appear.Enter the registered password (8 digits or less) and touch the “END” key.If there was no password registered for that box, go directly to the next step.
7-12
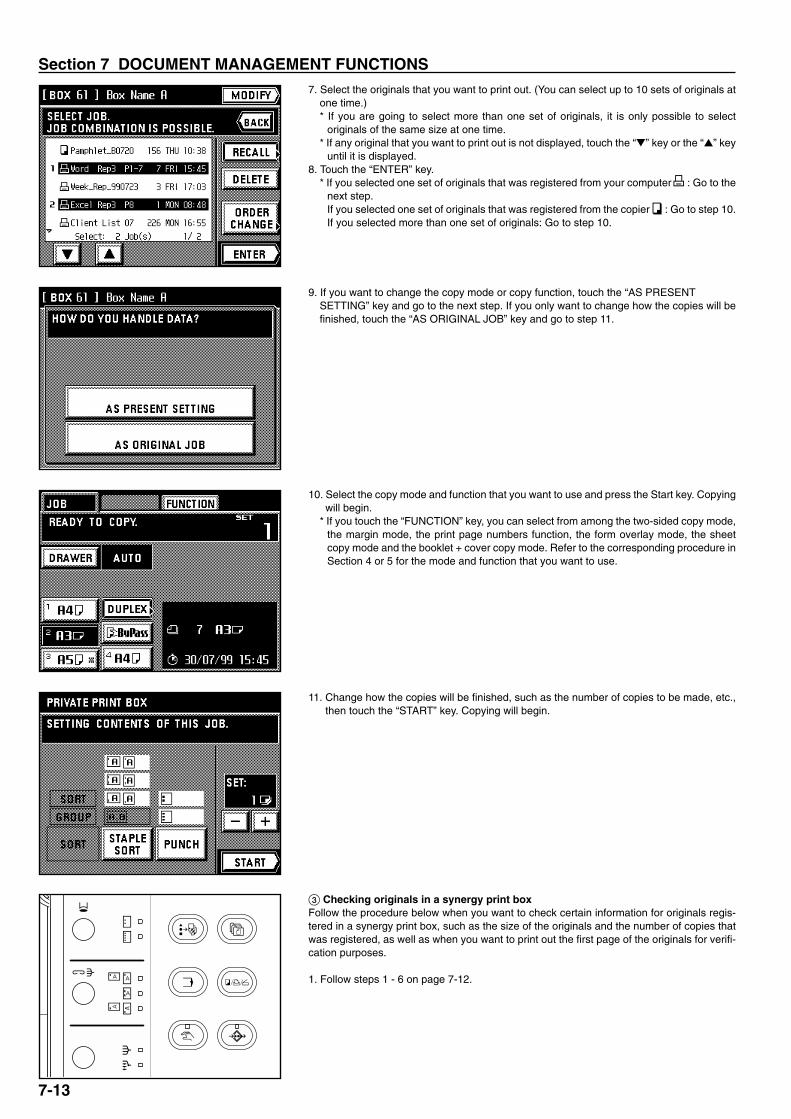
Section 7 DOCUMENT MANAGEMENT FUNCTIONS
2A080030AKM-6230 (KME)
/ 131
7. Select the originals that you want to print out. (You can select up to 10 sets of originals atone time.)* If you are going to select more than one set of originals, it is only possible to select
originals of the same size at one time.* If any original that you want to print out is not displayed, touch the “�” key or the “�” key
until it is displayed.8. Touch the “ENTER” key.
* If you selected one set of originals that was registered from your computer : Go to thenext step.If you selected one set of originals that was registered from the copier : Go to step 10.If you selected more than one set of originals: Go to step 10.
9. If you want to change the copy mode or copy function, touch the “AS PRESENTSETTING” key and go to the next step. If you only want to change how the copies will befinished, touch the “AS ORIGINAL JOB” key and go to step 11.
10. Select the copy mode and function that you want to use and press the Start key. Copyingwill begin.
* If you touch the “FUNCTION” key, you can select from among the two-sided copy mode,the margin mode, the print page numbers function, the form overlay mode, the sheetcopy mode and the booklet + cover copy mode. Refer to the corresponding procedure inSection 4 or 5 for the mode and function that you want to use.
11. Change how the copies will be finished, such as the number of copies to be made, etc.,then touch the “START” key. Copying will begin.
3 Checking originals in a synergy print boxFollow the procedure below when you want to check certain information for originals regis-tered in a synergy print box, such as the size of the originals and the number of copies thatwas registered, as well as when you want to print out the first page of the originals for verifi-cation purposes.
1. Follow steps 1 - 6 on page 7-12.
7-13
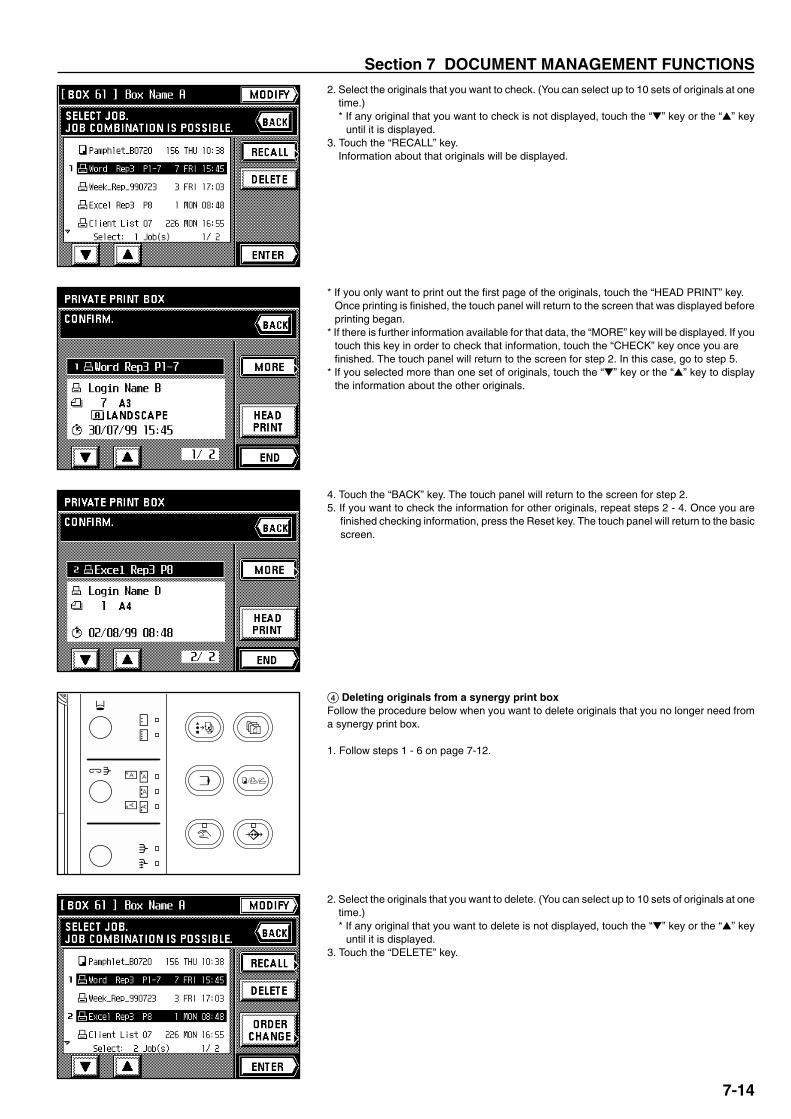
Section 7 DOCUMENT MANAGEMENT FUNCTIONS
2A080030AKM-6230 (KME)
/ 131
2. Select the originals that you want to check. (You can select up to 10 sets of originals at onetime.)* If any original that you want to check is not displayed, touch the “�” key or the “�” key
until it is displayed.3. Touch the “RECALL” key.
Information about that originals will be displayed.
* If you only want to print out the first page of the originals, touch the “HEAD PRINT” key.Once printing is finished, the touch panel will return to the screen that was displayed beforeprinting began.
* If there is further information available for that data, the “MORE” key will be displayed. If youtouch this key in order to check that information, touch the “CHECK” key once you arefinished. The touch panel will return to the screen for step 2. In this case, go to step 5.
* If you selected more than one set of originals, touch the “�” key or the “�” key to displaythe information about the other originals.
4. Touch the “BACK” key. The touch panel will return to the screen for step 2.5. If you want to check the information for other originals, repeat steps 2 - 4. Once you are
finished checking information, press the Reset key. The touch panel will return to the basicscreen.
4 Deleting originals from a synergy print boxFollow the procedure below when you want to delete originals that you no longer need froma synergy print box.
1. Follow steps 1 - 6 on page 7-12.
2. Select the originals that you want to delete. (You can select up to 10 sets of originals at onetime.)* If any original that you want to delete is not displayed, touch the “�” key or the “�” key
until it is displayed.3. Touch the “DELETE” key.
7-14
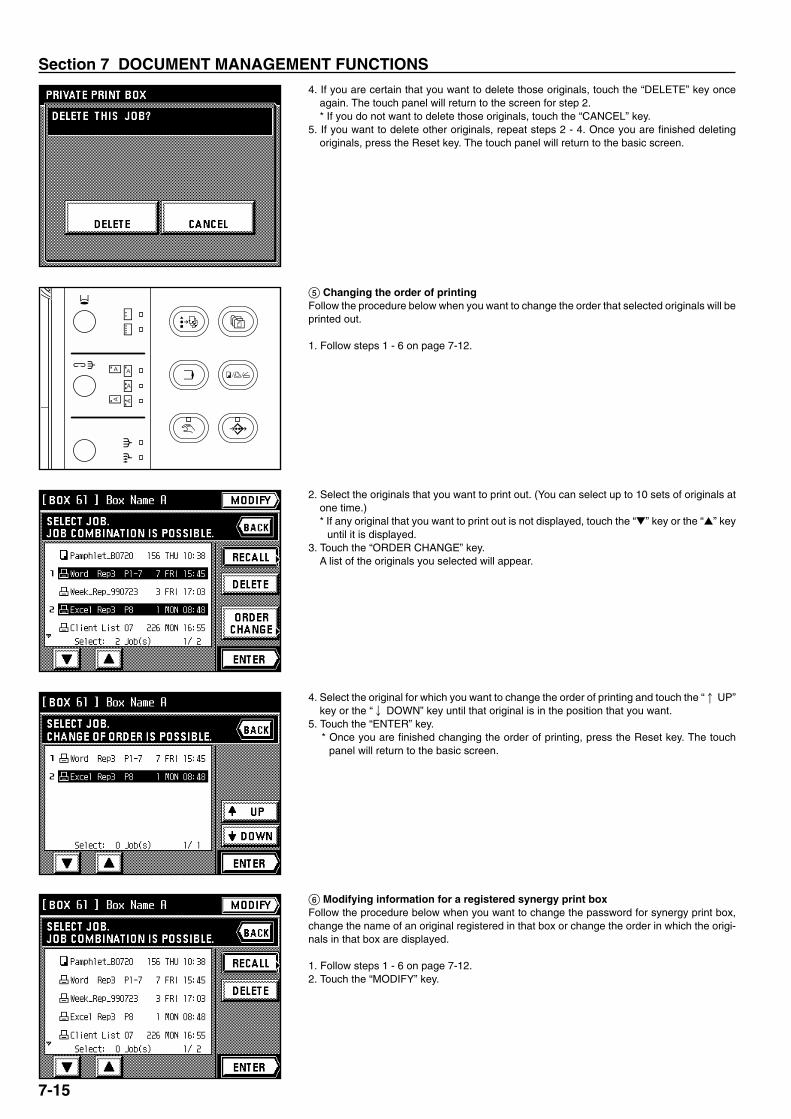
Section 7 DOCUMENT MANAGEMENT FUNCTIONS
2A080030AKM-6230 (KME)
/ 131
4. If you are certain that you want to delete those originals, touch the “DELETE” key onceagain. The touch panel will return to the screen for step 2.* If you do not want to delete those originals, touch the “CANCEL” key.
5. If you want to delete other originals, repeat steps 2 - 4. Once you are finished deletingoriginals, press the Reset key. The touch panel will return to the basic screen.
5 Changing the order of printingFollow the procedure below when you want to change the order that selected originals will beprinted out.
1. Follow steps 1 - 6 on page 7-12.
2. Select the originals that you want to print out. (You can select up to 10 sets of originals atone time.)* If any original that you want to print out is not displayed, touch the “�” key or the “�” key
until it is displayed.3. Touch the “ORDER CHANGE” key.
A list of the originals you selected will appear.
4. Select the original for which you want to change the order of printing and touch the “q UP”key or the “Q DOWN” key until that original is in the position that you want.
5. Touch the “ENTER” key.* Once you are finished changing the order of printing, press the Reset key. The touch
panel will return to the basic screen.
6 Modifying information for a registered synergy print boxFollow the procedure below when you want to change the password for synergy print box,change the name of an original registered in that box or change the order in which the origi-nals in that box are displayed.
1. Follow steps 1 - 6 on page 7-12.2. Touch the “MODIFY” key.
7-15

Section 7 DOCUMENT MANAGEMENT FUNCTIONS
2A080030AKM-6230 (KME)
/ 131
3. If you want to change the password for that synergy print box, touch the “PASSWORD”key.If you do not want to change the password, go to step 6.
4. Use the numeric keys to enter the new password. (Max. 8 digits)5. Touch the “END” key. The touch panel will return to the basic screen.
6. If you want to change the name of a set of originals, select the corresponding originals andtouch the “RENAME” key.If you do not want to change the name, go to step 8.* If the name that you want to change is not displayed, touch the “�” key or the “�” key
until it is displayed.
7. Enter the new name that you want to register for those originals.(See page 8-9 for the procedure on entering the name.)Once you are finished changing the name, the touch panel will return to the basic screen.
8. If you want to change the order in which the name of those originals are displayed, touchthe “q UP” key or the “Q DOWN” key until that name is in the position that you want.
9. Touch the “END” key and then press the Reset key. The touch panel will return to the basicscreen.
7-16
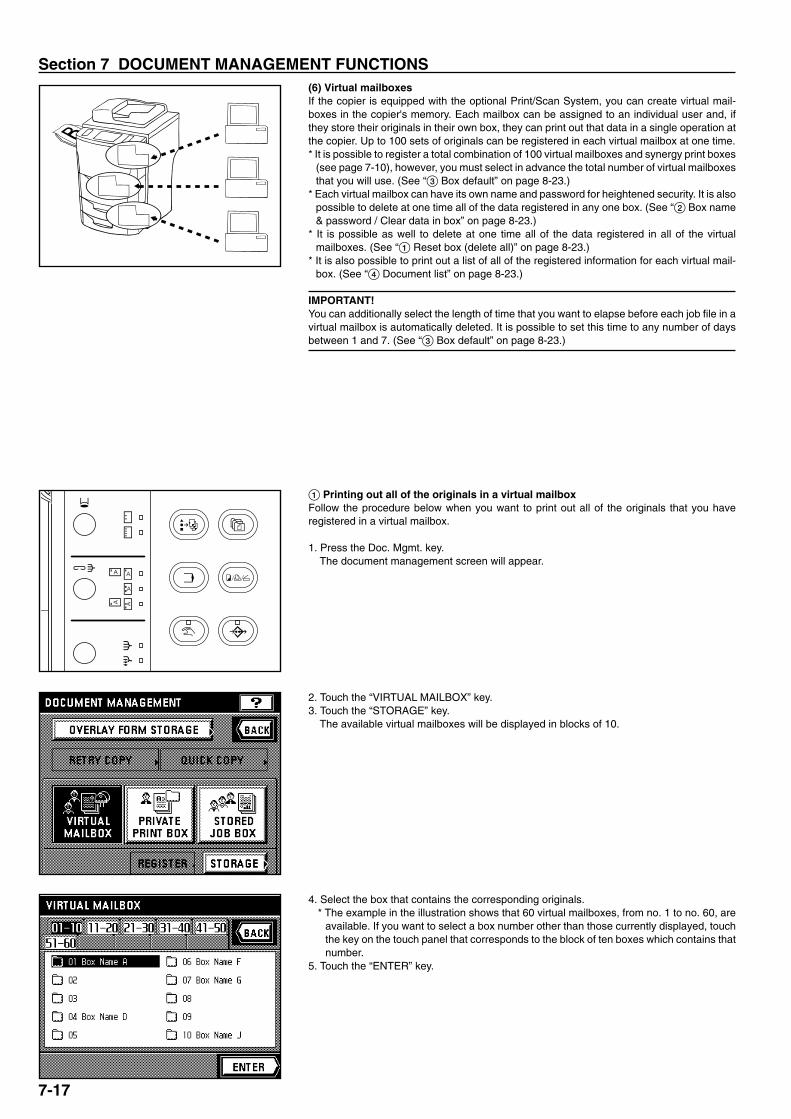
Section 7 DOCUMENT MANAGEMENT FUNCTIONS
2A080030AKM-6230 (KME)
/ 131
(6) Virtual mailboxesIf the copier is equipped with the optional Print/Scan System, you can create virtual mail-boxes in the copier's memory. Each mailbox can be assigned to an individual user and, ifthey store their originals in their own box, they can print out that data in a single operation atthe copier. Up to 100 sets of originals can be registered in each virtual mailbox at one time.* It is possible to register a total combination of 100 virtual mailboxes and synergy print boxes
(see page 7-10), however, you must select in advance the total number of virtual mailboxesthat you will use. (See “3 Box default” on page 8-23.)
* Each virtual mailbox can have its own name and password for heightened security. It is alsopossible to delete at one time all of the data registered in any one box. (See “2 Box name& password / Clear data in box” on page 8-23.)
* It is possible as well to delete at one time all of the data registered in all of the virtualmailboxes. (See “1 Reset box (delete all)” on page 8-23.)
* It is also possible to print out a list of all of the registered information for each virtual mail-box. (See “4 Document list” on page 8-23.)
IMPORTANT!You can additionally select the length of time that you want to elapse before each job file in avirtual mailbox is automatically deleted. It is possible to set this time to any number of daysbetween 1 and 7. (See “3 Box default” on page 8-23.)
1 Printing out all of the originals in a virtual mailboxFollow the procedure below when you want to print out all of the originals that you haveregistered in a virtual mailbox.
1. Press the Doc. Mgmt. key.The document management screen will appear.
2. Touch the “VIRTUAL MAILBOX” key.3. Touch the “STORAGE” key.
The available virtual mailboxes will be displayed in blocks of 10.
4. Select the box that contains the corresponding originals.* The example in the illustration shows that 60 virtual mailboxes, from no. 1 to no. 60, are
available. If you want to select a box number other than those currently displayed, touchthe key on the touch panel that corresponds to the block of ten boxes which contains thatnumber.
5. Touch the “ENTER” key.
7-17

Section 7 DOCUMENT MANAGEMENT FUNCTIONS
2A080030AKM-6230 (KME)
/ 131
6. If a password was registered for the selected box, the password input screen will appear.Enter the registered password (8 digits or less).If there was no password registered for that box, go directly to the next step.
7. If the password you entered matches the registered one, a list of the originals stored in thatvirtual mailbox will appear. Touch the “START” key. Copying will begin.* If you want to stop print out for the set of originals that are being processed at the mo-
ment or cancel print out completely, press the Stop/Clear key. Then, if you want to stopprinting completely, touch the “STOP” key. If you want to continue printing from the nextset of originals, touch the “CONTINUE FROM NEXT JOB” key.
2 Changing the password
1. Follow steps 1 - 6 on page 7-17.2. Touch the “PASSWORD” key.
3. Use the numeric keys to enter the new password. (Max. 8 digits)4. Touch the “END” key. The touch panel will return to the basic screen.
3 Deleting data from a virtual mailboxAny data stored in a virtual mailbox will be automatically deleted once it has been there forone week. However, if you want to force-delete all of the data in any virtual mailbox beforethat time, follow the procedure below.
1. Follow steps 1 - 6 on page 7-17.2. Touch the “DELETE” key.3. If you are certain that you want to delete those originals, touch the “DELETE” key once
again. The touch panel will return to the screen for step 2.* If you do not want to delete those originals, touch the “CANCEL” key.
7-18

8-1
2A080030AKM-6230 (KME)
/ 131

Section 8 COPIER MANAGEMENT
2A080030AKM-6230 (KME)
/ 131
(1) Copy managementYou can set 4-digit department code numbers for up to 1,000 departments in order to man-age the total number of copies made by each department. It is also possible to limit thenumber of copies that can be made by each department.
1 The copy management procedures and settings
2 How to enter the copy management select mode1. Touch the “SPECIAL” key.
The management mode select screen will appear.
Description Procedure or setting Page
� Deleting departmentcodes
� Registering new department codes
� Changing limits
� Clearing copy counts
� Checking copy counts
� Printing out the copymanagement report
� Turning copy managementON/OFF
Follow this procedure to delete registered department codes.
Follow this procedure to clear all the copy counts for all of the department codes at one time.Copy counts cannot be cleared for individual departments.
Follow this procedure to change the limit for the number of copies that can be made by one ormore departments, without need to delete and re-register the department codes.
Follow this procedure to check copy totals. It is possible to view the total number of copiesmade on the machine, the number of copies made for each paper size and the number ofcopies made by each department.
Follow this procedure to print out the number of copies made each department in report form.
Turn copy management ON in order to apply the management settings that you registered. Turnit OFF when those settings are not required.
Manage use of the copier by assigning 4-digit department codes to each department in yourorganization, and set limits for the number of copies that can be made by each department. Upto 1,000 department codes can be registered. Copy limits can be set in units of 1,000 sheets,up to a maximum of 999,000. Entering “0” enables unlimited copying.When a department reaches its limit, the copier will not make any more copies under thatdepartment code. 8-2
Section 8 COPIER MANAGEMENT
8-1
8-3
8-4
8-5
8-5
8-6
8-6

Section 8 COPIER MANAGEMENT
2A080030AKM-6230 (KME)
/ 131
2. Touch the “MANAGEMENT” key.
3. Use the numeric keys to enter the management pin code “6200”.If the pin code you entered matches the registered one, the screen will change to the copymanagement mode set-up screen. See “3 How to register the various management set-tings” in order to make the desired settings.* You can change the 4-digit management pin code as desired. (See “9 Management pin
code change” on page 8-11.)
3 How to register the various management settings� Registering new department codes1. Enter the copy management select mode. (See page 8-1.)2. Touch the “SET CODE” key.
3. Touch the “REGISTER” key.4. Use the numeric keys to enter the department code (4-digit) that you want to register.
5. Touch the “REGISTER” key.* If that department code has already been registered, “ID-CODE IS ALREADY IN USE.”
will appear in the message display. Press the “RE-ENTER” key and enter another de-partment code.
8-2

Section 8 COPIER MANAGEMENT
2A080030AKM-6230 (KME)
/ 131
6. Use the numeric keys to enter the limit for the number of copies that can be made by thatdepartment. The limit can be set in units of 1,000 sheets, up to a maximum of 999,000.* Enter “0” to enable unlimited copying.* If you want to clear the entered department code and enter a new code number, touch
the “CANCEL” key.
7. Touch the “REGISTER” key. The touch panel will return to the screen for step 4.* To register another department code, repeat steps 4 - 7.
8. Touch the “END” key.The touch panel will return to the screen for step 3.
9. Touch the “END” key.The touch panel will return to the copy management mode set-up screen.
10. Touch the “END” key.The touch panel will return to the basic screen.
� Deleting department codes1. Enter the copy management select mode. (See page 8-1.)2. Touch the “SET CODE” key.3. Touch the “DELETE” key.
4. Touch the department code that you want to delete. [It is possible to select more than onecode.] (If the code you want is not displayed, touch the “�” key or the “�” key until it isdisplayed.)
5. Once you are finished deleting department codes, touch the “END” key.The touch panel will return to the screen for step 3.
8-3

Section 8 COPIER MANAGEMENT
2A080030AKM-6230 (KME)
/ 131
6. Touch the “END” key.The touch panel will return to the copy management mode set-up screen.
7. Touch the “END” key.The touch panel will return to the basic screen.
� Changing limits1. Enter the copy management select mode. (See page 8-1.)2. Touch the “SET CODE” key.3. Touch the “CORRECTION” key.
4. Touch the department code for which you want to change the copy limit. (If the code youwant is not displayed, touch the “�” key or the “�” key until it is displayed.)
5. Use the numeric keys to change the limit for the number of copies that can be made underthat department code. The limit can be set in units of 1,000 sheets, up to a maximum of999,000.* Enter “0” to enable unlimited copying.
6. Touch the “REGISTER” key.The touch panel will return to the screen for step 4.* To change the copy limit for another department, repeat steps 4 - 6.
7. Touch the “END” key.The touch panel will return to the screen for step 3.
8. Touch the “END” key.The touch panel will return to the copy management mode set-up screen.
9. Touch the “END” key.The touch panel will return to the basic screen.
8-4

Section 8 COPIER MANAGEMENT
2A080030AKM-6230 (KME)
/ 131
� Clearing copy counts1. Enter the copy management select mode. (See page 8-1.)2. Touch the “SET CODE” key.
3. Touch the “CLEAR” key.4. Touch the “YES” key to clear all of the copy counts.
The touch panel will return to the screen for step 3.5. Touch the “END” key.
The touch panel will return to the copy management mode set-up screen.6. Touch the “END” key.
The touch panel will return to the basic screen.
� Checking copy counts1. Enter the copy management select mode. (See page 8-1.)2. Touch the “REFERENCE” key.
The numbers of copies made by each individual department will be displayed.
3. Touch the “TOTAL: ALL ID-CODES” key in order to view the total number of copies madeon the machine and the number of copies made for each paper size. (If the information youwant is not displayed, touch the “�” key or the “�” key until it is displayed.)
4. Once you have finished checking the copy counts, touch the “END” key.The touch panel will return to the copy management mode set-up screen.
5. Touch the “END” key.The touch panel will return to the basic screen.
8-5

Section 8 COPIER MANAGEMENT
2A080030AKM-6230 (KME)
/ 131
� Printing out the copy management report1. Enter the copy management select mode. (See page 8-1.)2. Make sure that A4 size paper is loaded in one of the drawers or decks. If not, load paper of
that size.
3. Touch the “PRINT MANAGEMENT LIST” key.Print out will begin.
4. After printing is finished, the touch panel will return to the screen for step 3.5. Touch the “END” key.
The touch panel will return to the basic screen.
� Turning copy management ON/OFF1. Enter the copy management select mode. (See page 8-1.)
2. To turn copy management ON, touch the “❏ ON” key.* To turn it OFF, touch the “❏ OFF” key.
POINT OF INFORMATIONTo turn copy management ON when you use this machine as a printer under the optionalPrint/Scan System, touch “❏ PRINTER” in order to put a checkmark in the check box. Acorresponding setting is also required in your computer. See the On-line Manual for theprinter for the procedure to set the management mode in your computer.
3. Touch the “END” key.The touch panel will return to the basic screen.
4 Making copies when copy management is turned ONWhen copy management is turned ON in the copier, “ENTER 4-DIGIT ID-CODE WITH # -KEYS.” will appear on the touch panel.
1. Enter the department code for your department.2. Once “READY TO COPY.” is displayed, you can make copies using the normal procedure.
* Once copying is finished, press the Energy Saver key or wait until the auto clear functionengages. The touch panel will return to the basic copy management screen.
8-6
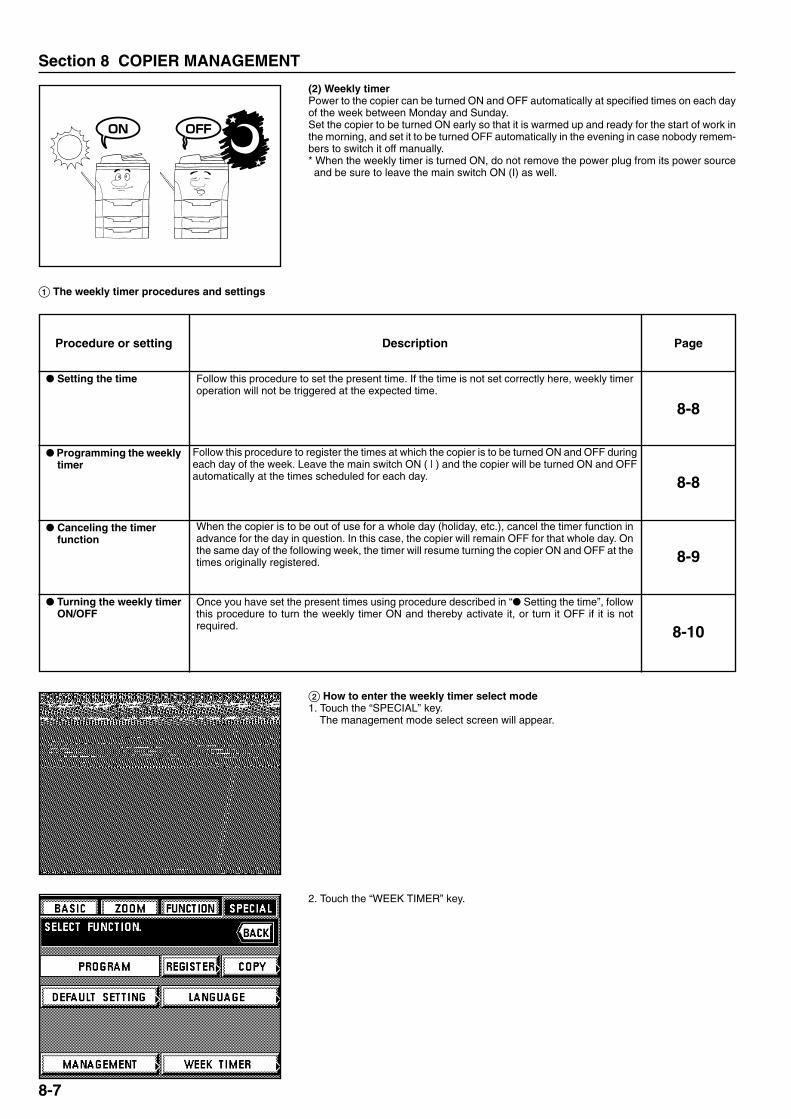
Section 8 COPIER MANAGEMENT
2A080030AKM-6230 (KME)
/ 131
(2) Weekly timerPower to the copier can be turned ON and OFF automatically at specified times on each dayof the week between Monday and Sunday.Set the copier to be turned ON early so that it is warmed up and ready for the start of work inthe morning, and set it to be turned OFF automatically in the evening in case nobody remem-bers to switch it off manually.* When the weekly timer is turned ON, do not remove the power plug from its power sourceand be sure to leave the main switch ON (I) as well.
1 The weekly timer procedures and settings
2 How to enter the weekly timer select mode1. Touch the “SPECIAL” key.
The management mode select screen will appear.
2. Touch the “WEEK TIMER” key.
DescriptionProcedure or setting Page
� Setting the time
� Programming the weeklytimer
� Canceling the timerfunction
� Turning the weekly timerON/OFF
Follow this procedure to set the present time. If the time is not set correctly here, weekly timeroperation will not be triggered at the expected time.
Follow this procedure to register the times at which the copier is to be turned ON and OFF duringeach day of the week. Leave the main switch ON ( | ) and the copier will be turned ON and OFFautomatically at the times scheduled for each day.
When the copier is to be out of use for a whole day (holiday, etc.), cancel the timer function inadvance for the day in question. In this case, the copier will remain OFF for that whole day. Onthe same day of the following week, the timer will resume turning the copier ON and OFF at thetimes originally registered.
Once you have set the present times using procedure described in “� Setting the time”, followthis procedure to turn the weekly timer ON and thereby activate it, or turn it OFF if it is notrequired.
8-8
8-8
8-9
8-10
8-7

Section 8 COPIER MANAGEMENT
2A080030AKM-6230 (KME)
/ 131
3 How to register the various timer settings� Setting the time1. Enter the weekly timer select mode. (See page 8-7.)2. Touch the “TIMER SET” key.
3. Set the present time by touching the “+” key or the “-” key for the hour and minutes.* Enter the time on the 24-hour basis (00:00 - 23:95).
4. Touch the “ENTER” key.The touch panel will return to the weekly timer set-up screen.
5. Touch the “END” key.The touch panel will return to the basic screen.
� Programming the weekly timer1. Enter the weekly timer select mode. (See page 8-7.)2. Touch the “WEEK TIMER” key.
3. Touch the day of the week that you want to set the ON and OFF times for.
3. Use the numeric keys to enter the management pin code “6200”.If the pin code you entered matches the registered one, the screen will change to theweekly timer set-up screen. See “3 How to register the various timer settings” in order tomake the desired settings.* You can change the 4-digit management pin code as desired. (See “9 Management pin
code change” on page 8-11.)
8-8
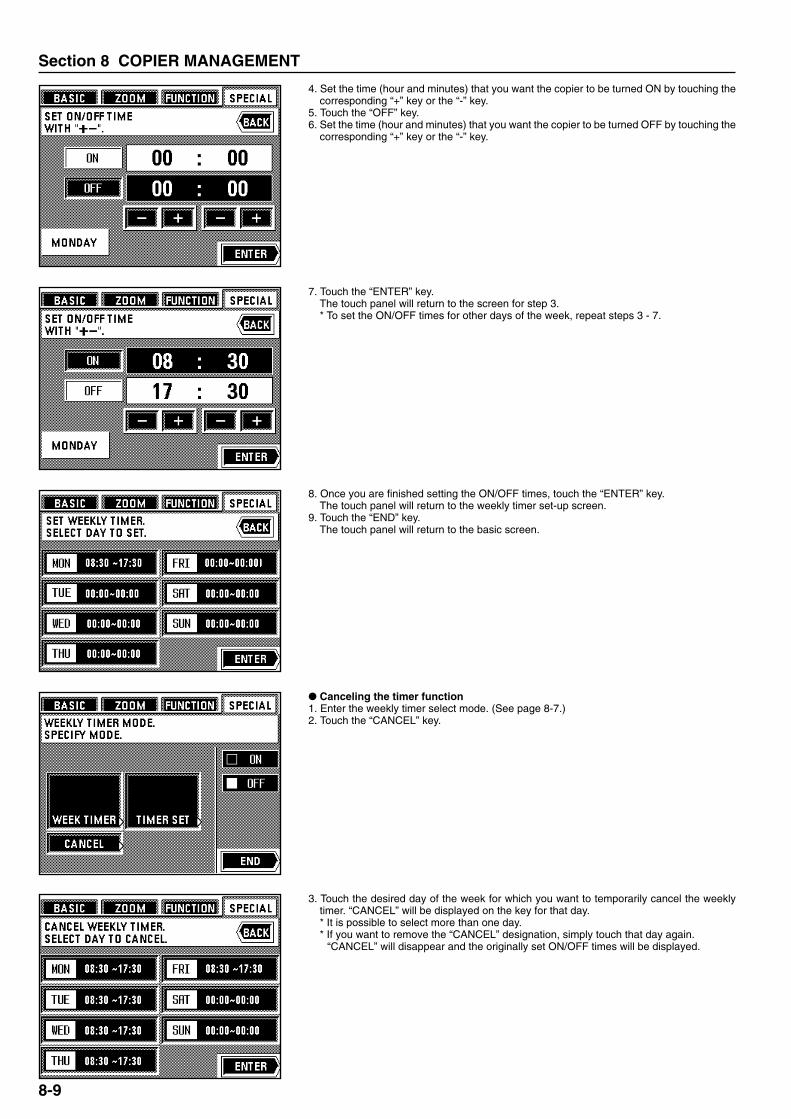
Section 8 COPIER MANAGEMENT
2A080030AKM-6230 (KME)
/ 131
4. Set the time (hour and minutes) that you want the copier to be turned ON by touching thecorresponding “+” key or the “-” key.
5. Touch the “OFF” key.6. Set the time (hour and minutes) that you want the copier to be turned OFF by touching the
corresponding “+” key or the “-” key.
7. Touch the “ENTER” key.The touch panel will return to the screen for step 3.* To set the ON/OFF times for other days of the week, repeat steps 3 - 7.
8. Once you are finished setting the ON/OFF times, touch the “ENTER” key.The touch panel will return to the weekly timer set-up screen.
9. Touch the “END” key.The touch panel will return to the basic screen.
� Canceling the timer function1. Enter the weekly timer select mode. (See page 8-7.)2. Touch the “CANCEL” key.
3. Touch the desired day of the week for which you want to temporarily cancel the weeklytimer. “CANCEL” will be displayed on the key for that day.* It is possible to select more than one day.* If you want to remove the “CANCEL” designation, simply touch that day again.
“CANCEL” will disappear and the originally set ON/OFF times will be displayed.
8-9

Section 8 COPIER MANAGEMENT
2A080030AKM-6230 (KME)
/ 131
4. Once you are finished setting the days on which the weekly timer will be canceled, touchthe “ENTER” key.The touch panel will return to the weekly timer set-up screen.
5. Touch the “END” key.The touch panel will return to the basic screen.
� Turning the weekly timer ON/OFF1. Enter the weekly timer select mode. (See page 8-7.)2. To turn the weekly timer ON, touch the “❏ ON” key.
* To turn it OFF, touch the “❏ OFF” key.3. Touch the “END” key.
The touch panel will return to the basic screen.
4 Making copies after the copier has been turned OFF by the weekly timerIf the Energy Saver indicator is lit but all other indications on the operation panel are out, theweekly timer has engaged. In this case, carry out the following procedure in order to makecopies.
1. Press the Energy Saver key. The Energy Saver indicator will blink.* Warm-up has begun. Wait a while.* Another way to start warm-up is to turn the main switch OFF (O) and then back ON ( | )
again.2. Once warm-up is finished, you can make copies using the normal procedure.3. Once copying is finished, press the Energy Saver key again. The Energy Saver indicator
will light continuously and the copier will once again enter the energy-saving mode.
(3) Default settings and proceduresThe state that the copier enters at end of warm-up or when the Reset key is pressed is calledthe “initial mode”. The functions and settings that are automatically pre-set for this initialmode are called the “default settings”. These default settings and related procedures aredivided into the following 5 categories and the corresponding settings can be changed asdesired to suit your specific copying needs.
[1] Machine defaults…Page 8-11[2] Copy-related defaults…Page 8-15[3] Box management procedures…Page 8-23[4] Deleting stored data…Page 8-27[5] Toner usage information…Page 8-28
8-10

Section 8 COPIER MANAGEMENT
2A080030AKM-6230 (KME)
/ 131
Default setting PPageExplanation
1 Custom size paper in stackbypass
Select whether you want to use custom size paper in the stack bypass tray or not. Touch the“ON” key to use custom size paper and the “OFF” key to have the standard paper size detectedautomatically.
2 Automatic drawer switchingON/OFF
Select whether you want the automatic drawer switching function (see page 2-3) to engage ornot.
3 Drawer paper size Select what paper size will be displayed on the touch panel for each drawer. When “APS” isselected, the paper size that is loaded in each drawer and each deck will be detected automati-cally and displayed on the touch panel.
4 Special paper designation Select whether or not you want an asterisk (*) to be displayed in the paper size key of the basicscreen in regard to those drawers that contain such special paper as colored paper or recycledpaper.
5 APS mode for special paper Select whether or not you want the paper in the drawer that was designated in “4 Specialpaper destination” to be used in the auto paper selection mode and for automatic drawer switching(see page 2-3).
6 Key sound ON/OFF Select whether you want the “beep” that sounds when you touch the touch panel to be turnedON or OFF.
7 Auto preheat time Select the length of time that you want to elapse – after copying ends – before the energy-saving auto preheat function (see page 4-10) is engaged. It is possible to set this time to any 5minute increment between 5 and 45 minutes.
8 Auto shut-off time Select the length of time that you want to elapse – when the copier is not used – before the autoshut-off function (see page 4-10) automatically turns the power to the copier OFF. It is possibleto set this time to any 15 minute increment between 15 and 240 minutes. It is also possible todeactivate the auto shut-off function. (See “0 Auto shut-off ON/OFF”.)The factory default setting is 60 minutes.* It is recommended that you extend the time before the auto shut-off function engages if the
copier is used relatively frequently, and shorten that time when it is used infrequently.
9 Management pin codechange
Change the pin code that gives you access to the various default settings and managementmodes, such as the weekly timer (see page 8-7) and copy management (see page 8-1).* If you do change the management pin code, however, be sure to keep a note of the new code.
If you do happen to forget the pin code, enter “6482”.
0 Auto shut-off ON/OFF Select whether you want to turn the auto shut-off function, which automatically turns the powerto the copier OFF if the copier is not used for a designated period of time, ON or OFF.* If the auto shut-off function interferes with your copying operations, you may consider turning
this function OFF so that it does not engage at all. However, it is recommended that you firstextend the time before it engages and see if that solution works better before you decide toturn it OFF completely.
Set the current date and time so that such functions as the weekly timer and certain documentmanagement settings will engage at the appropriate time.
! Date & time
[1] Machine defaults
� Types of machine defaultsThe 11 different default settings defined as “machine defaults” are described below. Changethe settings for any or all of them as appropriate to your desired copying conditions.
8-11
8-12
8-13
8-13
8-13
8-14
8-14
8-14
8-14
8-14
8-15
8-15

Section 8 COPIER MANAGEMENT
2A080030AKM-6230 (KME)
/ 131
� How to register a custom sizeWhen loading paper of other than a standard size such as A4 in the stack bypass tray, set thepaper size (custom size) in accordance with the following procedure.* In order to access this setting, “ON” must be selected under “1 Custom size paper in stack
bypass" above.1. Set the paper in the stack bypass tray (see page 34) and touch the stack bypass key on
the touch panel.2. Select the type of paper that will be set in the stack bypass tray by touching either the
“STANDARD SIZES” or "CUSTOM SIZES” key.* If you selected “STANDARD SIZES”, go to step 5.
If you selected “CUSTOM SIZES”, go to the next step.
� Accessing the machine default setting mode1. Touch the “SPECIAL” key.
The management mode select screen will appear.2. Touch the “DEFAULT SETTING” key.
3. Use the numeric keys to enter the management pin code “6200”.If the pin code you entered matches the registered one, the screen will change to thedefault select screen.* You can change the 4-digit pin code as desired. (See “9 Management pin code change”
on page 8-11.)
4. Touch the “MACHINE DEFAULT” key.5. Touch the “�” key and the “�” key as necessary to display the machine default setting that
you want to access and touch that item.* Follow the procedure below that corresponds to the setting that you want to change.
� Changing the default settings1 Custom size paper in stack bypass1. Select whether to use custom size paper in the stack bypass tray or not by touching the
“ON” key or the “OFF” key, as appropriate.* If you want to continue changing other default settings, follow the procedure that corre-
sponds to that setting. Once you are finished, touch the “END” key and then the “BASIC”key. The touch panel will return to the basic screen.
8-12
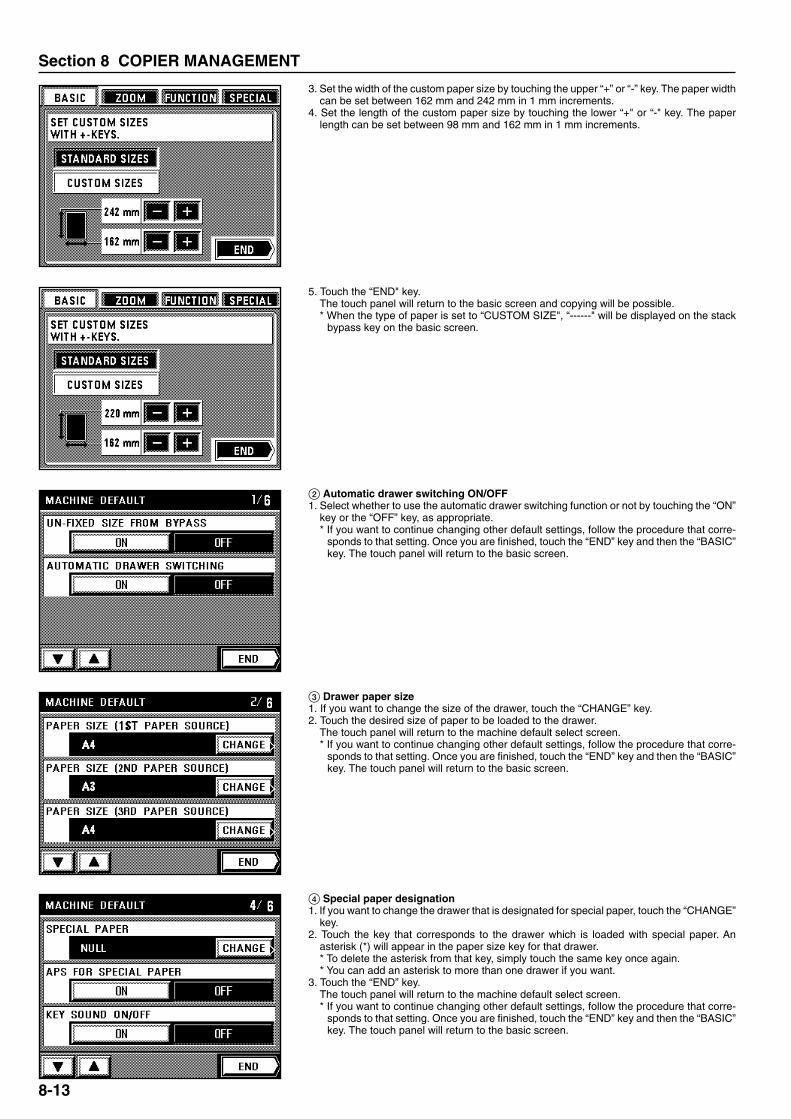
Section 8 COPIER MANAGEMENT
2A080030AKM-6230 (KME)
/ 131
3. Set the width of the custom paper size by touching the upper “+” or “-” key. The paper widthcan be set between 162 mm and 242 mm in 1 mm increments.
4. Set the length of the custom paper size by touching the lower “+" or “-" key. The paperlength can be set between 98 mm and 162 mm in 1 mm increments.
5. Touch the “END" key.The touch panel will return to the basic screen and copying will be possible.* When the type of paper is set to “CUSTOM SIZE", “------" will be displayed on the stack
bypass key on the basic screen.
2 Automatic drawer switching ON/OFF1. Select whether to use the automatic drawer switching function or not by touching the “ON”
key or the “OFF” key, as appropriate.* If you want to continue changing other default settings, follow the procedure that corre-
sponds to that setting. Once you are finished, touch the “END” key and then the “BASIC”key. The touch panel will return to the basic screen.
3 Drawer paper size1. If you want to change the size of the drawer, touch the “CHANGE” key.2. Touch the desired size of paper to be loaded to the drawer.
The touch panel will return to the machine default select screen.* If you want to continue changing other default settings, follow the procedure that corre-
sponds to that setting. Once you are finished, touch the “END” key and then the “BASIC”key. The touch panel will return to the basic screen.
4 Special paper designation1. If you want to change the drawer that is designated for special paper, touch the “CHANGE”
key.2. Touch the key that corresponds to the drawer which is loaded with special paper. An
asterisk (*) will appear in the paper size key for that drawer.* To delete the asterisk from that key, simply touch the same key once again.* You can add an asterisk to more than one drawer if you want.
3. Touch the “END” key.The touch panel will return to the machine default select screen.* If you want to continue changing other default settings, follow the procedure that corre-
sponds to that setting. Once you are finished, touch the “END” key and then the “BASIC”key. The touch panel will return to the basic screen.
8-13

Section 8 COPIER MANAGEMENT
2A080030AKM-6230 (KME)
/ 131
5 APS mode for special paper1. Select whether special paper will be used for such functions as automatic drawer switch-
ing or not by touching the “ON” key or the “OFF” key, as appropriate.* If you want to continue changing other default settings, follow the procedure that corre-
sponds to that setting. Once you are finished, touch the “END” key and then the “BASIC”key. The touch panel will return to the basic screen.
6 Key sound ON/OFF1. Select whether you want to hear the “beep” sound or not by touching the “ON” key or the
“OFF” key, as appropriate.* If you want to continue changing other default settings, follow the procedure that corre-
sponds to that setting. Once you are finished, touch the “END” key and then the “BASIC”key. The touch panel will return to the basic screen.
7 Auto preheat time1. Select the length of time that will elapse before the auto preheat function engages by
touching the “+” key or the “-” key, as appropriate.* If you want to continue changing other default settings, follow the procedure that corre-
sponds to that setting. Once you are finished, touch the “END” key and then the “BASIC”key. The touch panel will return to the basic screen.
8 Auto shut-off time1. Select the length of time that will elapse before the auto shut-off function engages by
touching the “+” key or the “-” key, as appropriate.* If you want to continue changing other default settings, follow the procedure that corre-
sponds to that setting. Once you are finished, touch the “END” key and then the “BASIC”key. The touch panel will return to the basic screen.
9 Management pin code change1. If you want to change the management pin code, touch the “CHANGE” key.2. Use the numeric keys to enter the new pin code (4 digits).3. Touch the “CHANGE” key.
* If you want to continue changing other default settings, follow the procedure that corre-sponds to that setting. Once you are finished, touch the “END” key and then the “BASIC”key. The touch panel will return to the basic screen.
8-14

Section 8 COPIER MANAGEMENT
2A080030AKM-6230 (KME)
/ 131
0 Auto shut-off ON/OFF1. Select whether to use the auto shut-off function or not by touching the “ON” key or the
“OFF” key, as appropriate.* If you want to continue changing other default settings, follow the procedure that corre-
sponds to that setting. Once you are finished, touch the “END” key and then the “BASIC”key. The touch panel will return to the basic screen.
! Date & time1. If you want to change the currently displayed date and time, touch the “CHANGE” key.
2. Change the year, month, date and time by touching the corresponding “+” key or “-” key, asappropriate.* Be sure to enter the time on a 24-hour basis (00:00 - 23:59).
3. Once you are finished, touch the “END” key.4. A message that checks to make sure that you want to register this change will appear. This
is because there is a possibility that the data for certain copy jobs saved within synergyprint boxes and virtual mailboxes might be deleted if you change the currently registeredtime. If you are certain that you want to change the time, touch the “OK” key.* If you want to continue changing other default settings, follow the procedure that corre-
sponds to that setting. Once you are finished, touch the “END” key and then the “BASIC”key. The touch panel will return to the basic screen.
[2] Copy-related defaults
� Types of copy defaultsThe 20 different default settings defined as “copy defaults” are described below. Change the settings for any or all of them as appropriate to yourdesired copying conditions.
Default setting PageExplanation
1 Exposure mode Specify which copy exposure mode you want to be automatically selected each time the copieris turned ON, the auto exposure mode (see page 4-2) or the manual exposure mode (see page4-1).
2 Exposure step Select how many exposure levels you want there to be in the manual exposure mode: 7 or 13.
3 Toner economy mode Specify whether you want the toner economy mode to be automatically selected or not eachtime the copier is turned ON. It is also possible to disable selection of the toner economy mode.
4 Auto exposure adjustment Adjust the overall exposure level for the auto exposure mode.
8-15
8-18
8-18
8-18
8-18

Section 8 COPIER MANAGEMENT
2A080030AKM-6230 (KME)
/ 131
5 Manual exposure
adjustment
Adjust the overall exposure level for the manual exposure mode. The exposure level can be setseparately for each copy quality mode: “TEXT”, “PHOTO” and “MIXED”.
6 Copy quality mode Specify the copy quality mode (see page 4-2) that you want be automatically selected eachtime the copier is turned ON.
7 Sort mode ON/OFF Select “SORT:ON” to have the Sort mode selected automatically each time the copier is turned ON.If the copier is equipped with the optional Finisher, the finished copies will be stored in the Non-sorttray. If you select “SORT:OFF”, the sort mode will be OFF when the copier is turned ON. To use theSort mode in this case, press the Sort-Group key to light the Sort indicator.
8 Paper selection Specify whether you want paper of the same size as the originals to be automatically selectedeach time originals are set, or whether you want to manually select the paper size.
9 Job Programming Specify whether you want program number “1” to be automatically selected (“OFF THEPLATEN”), or whether you want to manually select from between program numbers “1” - “8”(“REGULAR”), each time the Program key is pressed.
0 Default drawer Set the most frequently used drawer to be automatically selected before any other drawer.* The stack bypass tray cannot be selected as the default drawer.
! Zoom mode Specify which mode you want to be automatically selected for enlargement/reduction (zoom)copying: the fixed-size zoom mode (see page 4-4) or the standard zoom mode (see page 4-4).
@ Copy limit Set a limit on the number of copies that can be made at one time (1 - 999).
# Custom border erase size Select the size of the area to be designated for the “CUSTOM” setting of the border erasemode (see page 5-6). It is the area outside that defined size that will be erased.
$ Front & back margin keyON/OFF
Select whether you want the key that allows you to set the front and back page margin sepa-rately to be displayed in the margin copy set-up screen or not (see page 5-1).
% Drawer for insert sheets Specify which drawer you want the insert sheets to be fed from in the insert mode (see page 5-8).
^ Drawer for cover sheet Specify which drawer you want the cover sheets to be fed from in the binding mode (see page 5-24).* This setting will only appear if the copier is equipped with the optional Booklet Stitcher.
& Rotate-sort Select which mode you want to be designated any time the Sort-Group key is pressed, thenormal Sort mode or the Rotate-Sort mode.* This setting will not appear if the copier is equipped with the optional Finisher.
* Repeat copying Select whether you want to allow repeat copying (see page 7-4) or not.
( Create shortcut (#1, #2) By selecting in advance here certain functions that are normally available only when you touchthe “FUNCTION” key, they will be displayed as shortcut keys directly on the basic screen.
) Customize function displayscreen (#1 - #5)
Select the five functions that you want to be displayed when you touch the “FUNCTION” key. Ifyou register your most frequently used functions here, they will be easier to access. (The“STITCHING” key will only appear if the copier is equipped with the optional Booklet Stitcher.)
8-16
Default setting PageExplanation
8-19
8-19
8-19
8-19
8-20
8-20
8-20
8-20
8-20
8-21
8-21
8-21
8-22
8-22
8-22
8-23
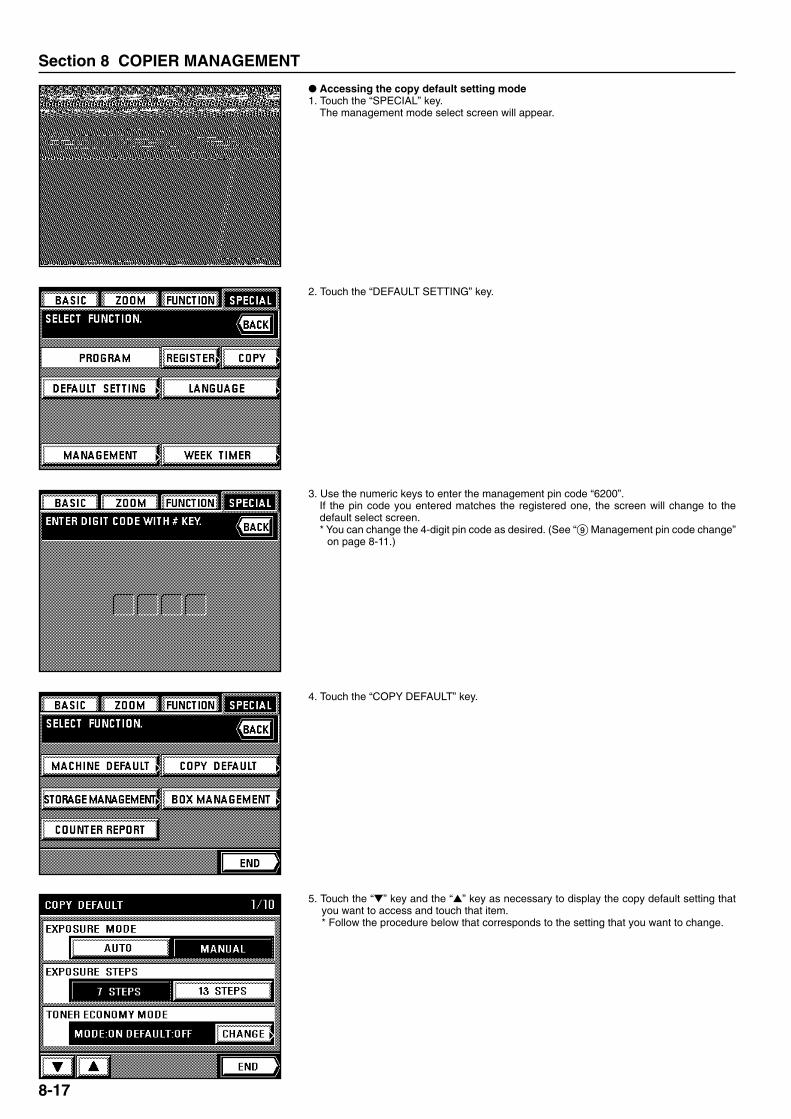
Section 8 COPIER MANAGEMENT
2A080030AKM-6230 (KME)
/ 131
� Accessing the copy default setting mode1. Touch the “SPECIAL” key.
The management mode select screen will appear.
2. Touch the “DEFAULT SETTING” key.
3. Use the numeric keys to enter the management pin code “6200”.If the pin code you entered matches the registered one, the screen will change to thedefault select screen.* You can change the 4-digit pin code as desired. (See “9 Management pin code change”
on page 8-11.)
4. Touch the “COPY DEFAULT” key.
5. Touch the “�” key and the “�” key as necessary to display the copy default setting thatyou want to access and touch that item.* Follow the procedure below that corresponds to the setting that you want to change.
8-17

Section 8 COPIER MANAGEMENT
2A080030AKM-6230 (KME)
/ 131
� Changing the default settings1 Exposure mode1. Select the default copy exposure mode by touching the “AUTO” key or the “MANUAL” key,
as appropriate.* If you want to continue changing other default settings, follow the procedure that corre-
sponds to that setting. Once you are finished, touch the “END” key and then the “BASIC”key. The touch panel will return to the basic screen.
2 Exposure step1. Select the number of exposure steps by touching the “7 STEPS” key or the “13 STEPS”
key, as appropriate.* If you want to continue changing other default settings, follow the procedure that corre-
sponds to that setting. Once you are finished, touch the “END” key and then the “BASIC”key. The touch panel will return to the basic screen.
3 Toner economy mode1. If you want to change the toner economy mode settings, touch the “CHANGE” key.
2. Select whether you want the “Eco” key (which allows selection of the toner economymode) to be displayed or not by touching the “ON” key or the “OFF” key, as appropriateunder “TONER ECO MODE”.
3. Select the default setting for the toner economy mode by touching the “ON” key or the“OFF” key, as appropriate under “ECONOMY/DEFAULT”.
4. Touch the “END” key. The touch panel will return to the copy default select screen.* If you want to continue changing other default settings, follow the procedure that corre-
sponds to that setting. Once you are finished, touch the “END” key and then the “BASIC”key. The touch panel will return to the basic screen.
4 Auto exposure adjustment1. If you want to change the exposure level for the auto exposure mode, touch the “CHANGE”
key.2. Touch the “LIGHTER” key or the “DARKER” key to move the scroll box within the exposure
scale. Move it to the right in order to darken the exposure and to the left in order to lightenthe exposure.
3. Touch the “END” key. The touch panel will return to the copy default select screen.* If you want to continue changing other default settings, follow the procedure that corre-
sponds to that setting. Once you are finished, touch the “END” key and then the “BASIC”key. The touch panel will return to the basic screen.
8-18
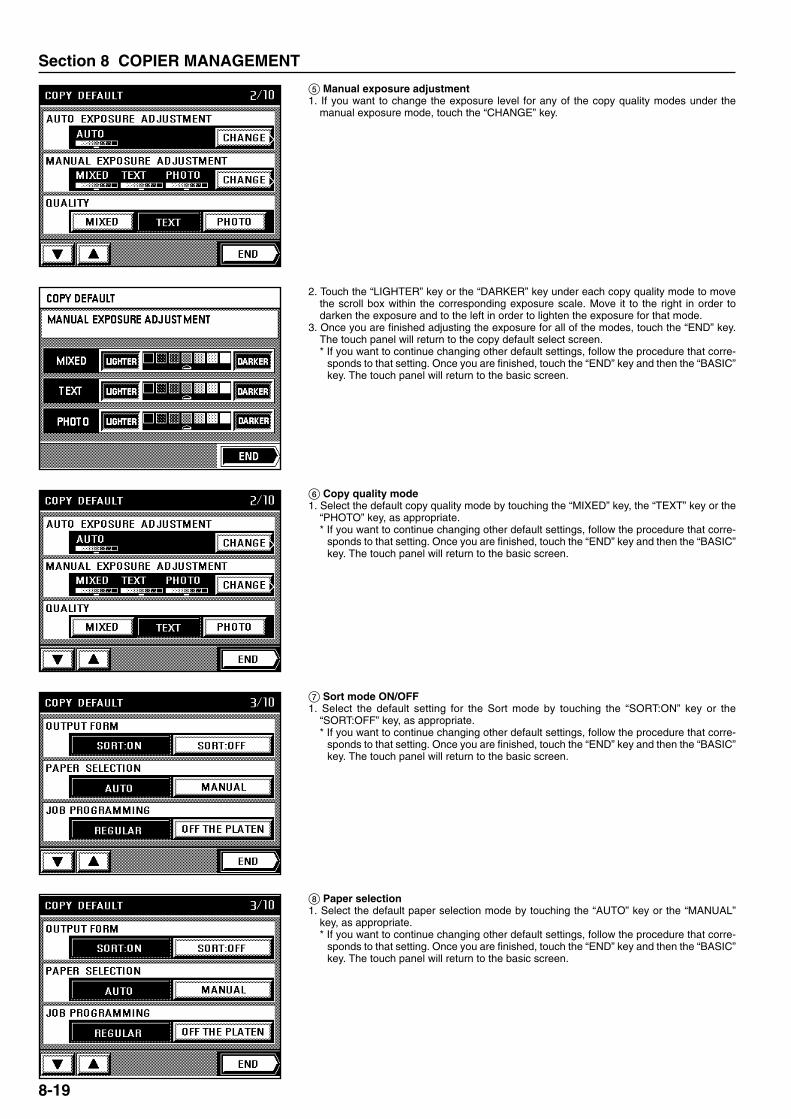
Section 8 COPIER MANAGEMENT
2A080030AKM-6230 (KME)
/ 131
5 Manual exposure adjustment1. If you want to change the exposure level for any of the copy quality modes under the
manual exposure mode, touch the “CHANGE” key.
2. Touch the “LIGHTER” key or the “DARKER” key under each copy quality mode to movethe scroll box within the corresponding exposure scale. Move it to the right in order todarken the exposure and to the left in order to lighten the exposure for that mode.
3. Once you are finished adjusting the exposure for all of the modes, touch the “END” key.The touch panel will return to the copy default select screen.* If you want to continue changing other default settings, follow the procedure that corre-
sponds to that setting. Once you are finished, touch the “END” key and then the “BASIC”key. The touch panel will return to the basic screen.
6 Copy quality mode1. Select the default copy quality mode by touching the “MIXED” key, the “TEXT” key or the
“PHOTO” key, as appropriate.* If you want to continue changing other default settings, follow the procedure that corre-
sponds to that setting. Once you are finished, touch the “END” key and then the “BASIC”key. The touch panel will return to the basic screen.
7 Sort mode ON/OFF1. Select the default setting for the Sort mode by touching the “SORT:ON” key or the
“SORT:OFF” key, as appropriate.* If you want to continue changing other default settings, follow the procedure that corre-
sponds to that setting. Once you are finished, touch the “END” key and then the “BASIC”key. The touch panel will return to the basic screen.
8 Paper selection1. Select the default paper selection mode by touching the “AUTO” key or the “MANUAL”
key, as appropriate.* If you want to continue changing other default settings, follow the procedure that corre-
sponds to that setting. Once you are finished, touch the “END” key and then the “BASIC”key. The touch panel will return to the basic screen.
8-19

Section 8 COPIER MANAGEMENT
2A080030AKM-6230 (KME)
/ 131
9 Job programming1. Select whether program number “1” will be automatically designated or not by touching the
“OFF THE PLATEN” key or the “REGULAR” key, as appropriate.* If you want to continue changing other default settings, follow the procedure that corre-
sponds to that setting. Once you are finished, touch the “END” key and then the “BASIC”key. The touch panel will return to the basic screen.
0 Default drawer1. If you want to change the drawer that is automatically selected, touch the “CHANGE” key.2. Touch the key that corresponds to the drawer that you want as the default.
The touch panel will return to the copy default select screen.* If you want to continue changing other default settings, follow the procedure that corre-
sponds to that setting. Once you are finished, touch the “END” key and then the “BASIC”key. The touch panel will return to the basic screen.
! Zoom mode1. Select the default zoom mode by touching the “SIZE ZOOM” key or the “STANDARD
ZOOM” key, as appropriate.* If you want to continue changing other default settings, follow the procedure that corre-
sponds to that setting. Once you are finished, touch the “END” key and then the “BASIC”key. The touch panel will return to the basic screen.
@ Copy limit1. If you want to change the limit on the number of copies that can be made at one time,
touch the “CHANGE” key.2. Use the numeric keys to enter the new limit.3. Touch the “CHANGE” key. The touch panel will return to the copy default select screen.
* If you want to continue changing other default settings, follow the procedure that corre-sponds to that setting. Once you are finished, touch the “END” key and then the “BASIC”key. The touch panel will return to the basic screen.
# Custom border erase size1. If you want to change the size of the area to be designated for the border erase mode,
touch the “CHANGE” key.
8-20
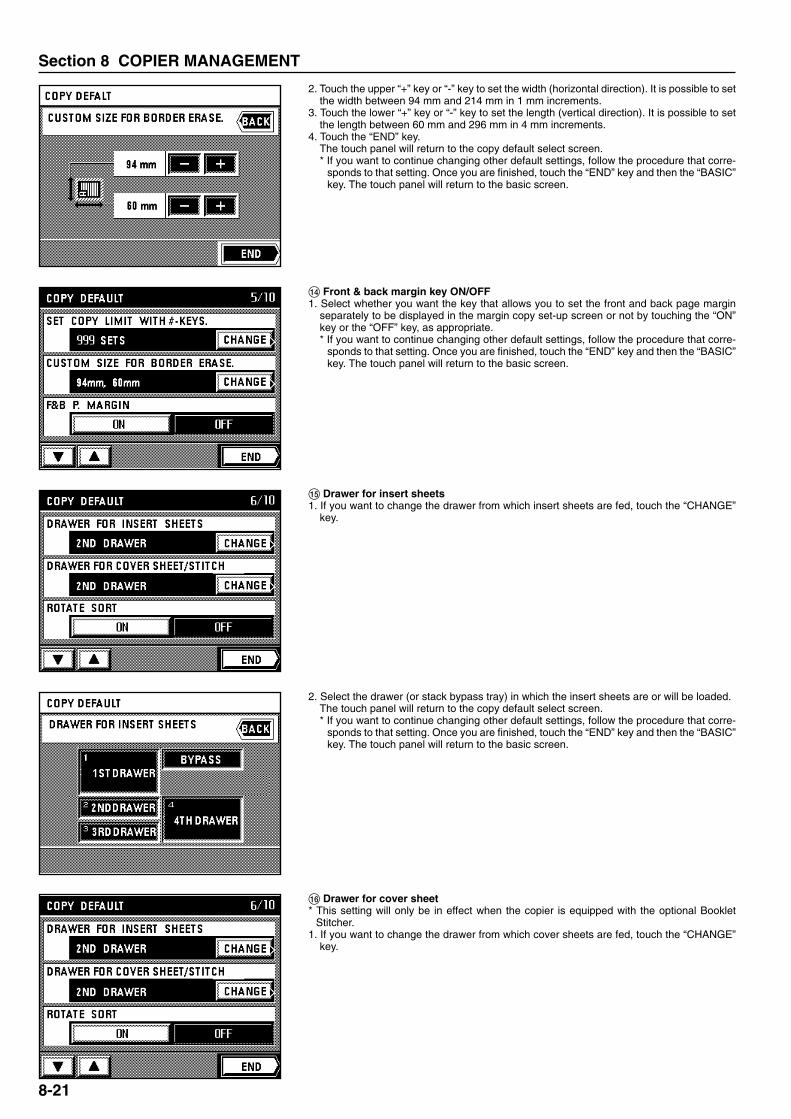
Section 8 COPIER MANAGEMENT
2A080030AKM-6230 (KME)
/ 131
2. Touch the upper “+” key or “-” key to set the width (horizontal direction). It is possible to setthe width between 94 mm and 214 mm in 1 mm increments.
3. Touch the lower “+” key or “-” key to set the length (vertical direction). It is possible to setthe length between 60 mm and 296 mm in 4 mm increments.
4. Touch the “END” key.The touch panel will return to the copy default select screen.* If you want to continue changing other default settings, follow the procedure that corre-
sponds to that setting. Once you are finished, touch the “END” key and then the “BASIC”key. The touch panel will return to the basic screen.
$ Front & back margin key ON/OFF1. Select whether you want the key that allows you to set the front and back page margin
separately to be displayed in the margin copy set-up screen or not by touching the “ON”key or the “OFF” key, as appropriate.* If you want to continue changing other default settings, follow the procedure that corre-
sponds to that setting. Once you are finished, touch the “END” key and then the “BASIC”key. The touch panel will return to the basic screen.
% Drawer for insert sheets1. If you want to change the drawer from which insert sheets are fed, touch the “CHANGE”
key.
2. Select the drawer (or stack bypass tray) in which the insert sheets are or will be loaded.The touch panel will return to the copy default select screen.* If you want to continue changing other default settings, follow the procedure that corre-
sponds to that setting. Once you are finished, touch the “END” key and then the “BASIC”key. The touch panel will return to the basic screen.
^ Drawer for cover sheet* This setting will only be in effect when the copier is equipped with the optional Booklet
Stitcher.1. If you want to change the drawer from which cover sheets are fed, touch the “CHANGE”
key.
8-21
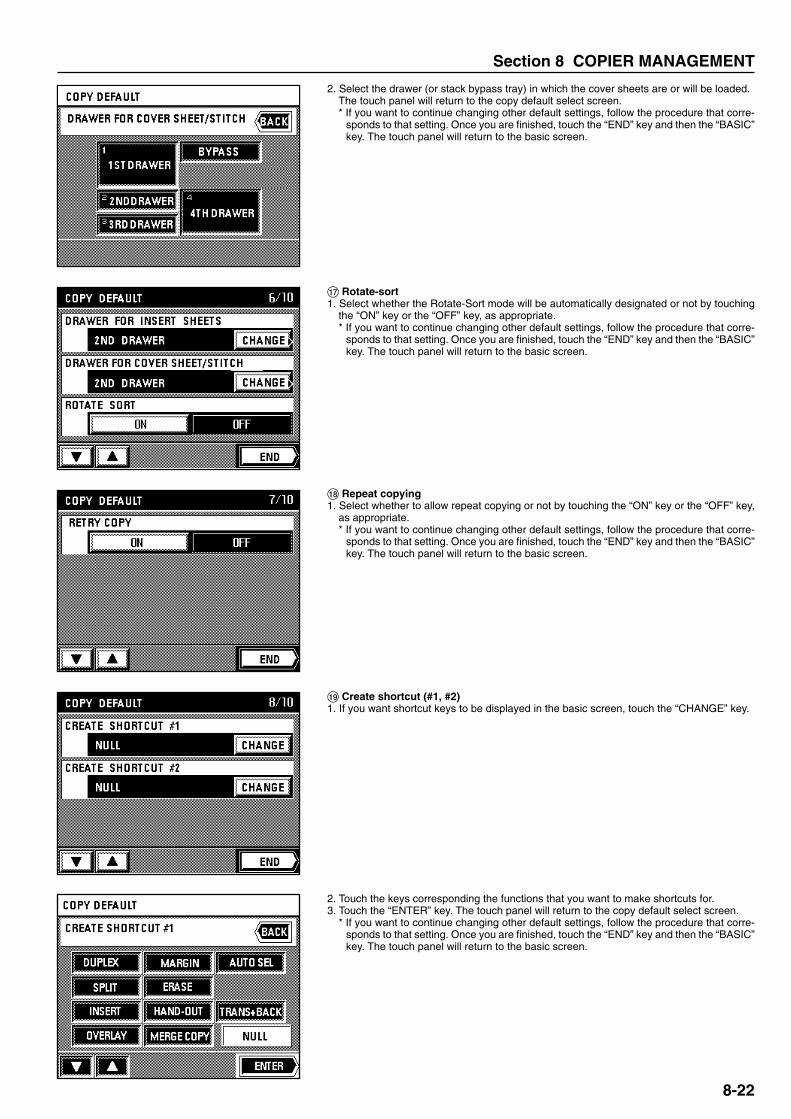
Section 8 COPIER MANAGEMENT
2A080030AKM-6230 (KME)
/ 131
2. Select the drawer (or stack bypass tray) in which the cover sheets are or will be loaded.The touch panel will return to the copy default select screen.* If you want to continue changing other default settings, follow the procedure that corre-
sponds to that setting. Once you are finished, touch the “END” key and then the “BASIC”key. The touch panel will return to the basic screen.
& Rotate-sort1. Select whether the Rotate-Sort mode will be automatically designated or not by touching
the “ON” key or the “OFF” key, as appropriate.* If you want to continue changing other default settings, follow the procedure that corre-
sponds to that setting. Once you are finished, touch the “END” key and then the “BASIC”key. The touch panel will return to the basic screen.
* Repeat copying1. Select whether to allow repeat copying or not by touching the “ON” key or the “OFF” key,
as appropriate.* If you want to continue changing other default settings, follow the procedure that corre-
sponds to that setting. Once you are finished, touch the “END” key and then the “BASIC”key. The touch panel will return to the basic screen.
( Create shortcut (#1, #2)1. If you want shortcut keys to be displayed in the basic screen, touch the “CHANGE” key.
2. Touch the keys corresponding the functions that you want to make shortcuts for.3. Touch the “ENTER” key. The touch panel will return to the copy default select screen.
* If you want to continue changing other default settings, follow the procedure that corre-sponds to that setting. Once you are finished, touch the “END” key and then the “BASIC”key. The touch panel will return to the basic screen.
8-22

Section 8 COPIER MANAGEMENT
2A080030AKM-6230 (KME)
/ 131
) Customize function display screen (#1 - #5)1. If you want to change the functions that appear in the first display of the function select
screen, touch the “CHANGE” key.
2. Touch the keys that correspond to the functions that you want to appear in that first display.3. Touch the “ENTER” key. The touch panel will return to the copy default select screen.
* If you want to continue changing other default settings, follow the procedure that corre-sponds to that setting. Once you are finished, touch the “END” key and then the “BASIC”key. The touch panel will return to the basic screen.
[3] Box management procedures
� Types of box management proceduresThe 4 different settings defined as “box management procedures” are described below.
Procedure PageExplanation
1 Reset box (delete all)
2 Box name & password /Clear data in box
3 Box default
4 Document list This procedure will allow you to print out a list of all of the images registered in memory for theform overlay mode, the data registered in the shared data box, and the information registered
This procedure will delete at one time all of the data registered in any one box. However, sinceeach synergy print box and virtual mailbox can have its own name and password, if you regis-ter a password for any of these boxes you will need to enter the registered password in order toaccess the data within that box.
• This procedure will allow you to select the length of time that will elapse before each job file ina synergy print box or virtual mailbox is automatically deleted. Set this time to any number ofdays between 1 and 7.* This setting cannot be made independently for each box.
• You must select in advance the total number of virtual mailboxes that you will use. It is pos-sible to register up to 100 boxes in increments of 10.* The total combined number of synergy print boxes and virtual mailboxes that you can create
is 100.
This procedure will delete all of the image data that is registered in one of the various types ofstorage areas in the copier such as the memory for the form overlay mode, the shared databox, the synergy print boxes and the virtual mailboxes. Make absolutely certain that you do notneed the corresponding data before you attempt to delete it.
8-23
8-24
8-25
8-26
8-27
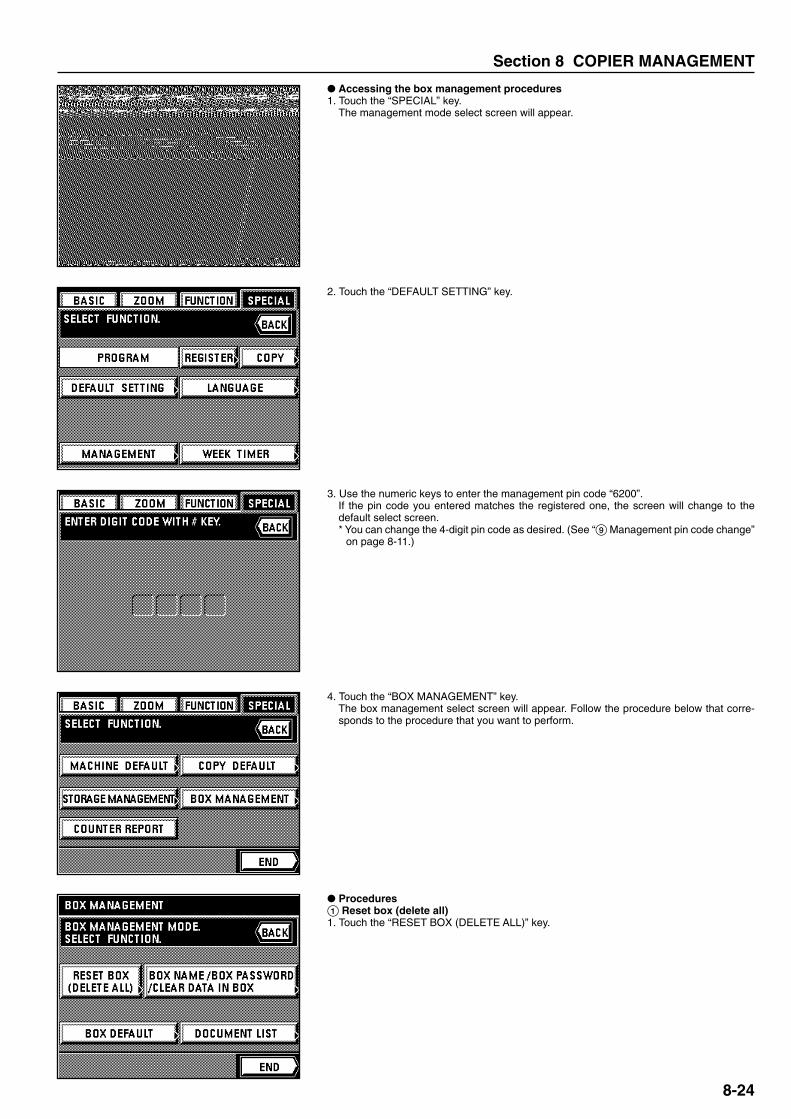
Section 8 COPIER MANAGEMENT
2A080030AKM-6230 (KME)
/ 131
� Accessing the box management procedures1. Touch the “SPECIAL” key.
The management mode select screen will appear.
2. Touch the “DEFAULT SETTING” key.
3. Use the numeric keys to enter the management pin code “6200”.If the pin code you entered matches the registered one, the screen will change to thedefault select screen.* You can change the 4-digit pin code as desired. (See “9 Management pin code change”
on page 8-11.)
4. Touch the “BOX MANAGEMENT” key.The box management select screen will appear. Follow the procedure below that corre-sponds to the procedure that you want to perform.
� Procedures1 Reset box (delete all)1. Touch the “RESET BOX (DELETE ALL)” key.
8-24

Section 8 COPIER MANAGEMENT
2A080030AKM-6230 (KME)
/ 131
2. Select the type of box for which you want to delete all of the data.
3. A message that checks to make sure that you want to delete the data will appear.If you are certain that you want to delete the data, touch the “DELETE” key.* You can continue to perform other box management procedures. Once you are finished,
touch the “END” key and then, in the next screen, touch the “BASIC” key. The touchpanel will return to the basic screen.
2 Box name & password / Clear data in box1. Touch the “BOX NAME/BOX PASSWORD/CLEAR DATA IN BOX” key.
2. Select the number of the box (001 - 100) that you want to access by touching the “+” keyor the “-” key, as appropriate.
3. Touch the “END” key.
4. If you want to register a name for that box, touch the “BOX NAME” key.5. Enter the name that you want to register for that box.
(See page 8-29 for the procedure on entering the name.)* Once you are finished and have touched the “END” key, the touch panel will return to the
screen for step 4.
8-25

Section 8 COPIER MANAGEMENT
2A080030AKM-6230 (KME)
/ 131
6. If you want to register a password for that box, touch the “BOX PASSWORD” key.
7. Use the numeric keys to enter the desired password. (Max. 8 digits)8. Touch the “ENTER” key and the touch panel will return to the screen for step 4.
9. If you want to delete all of the data in that box, touch the “CLEAR DATA IN BOX” key.10. If you are certain that you want to delete that data, touch the “DELETE” key. The touch
panel will return to the screen for step 4.11. Touch the “END” key. The touch panel will return to the screen for step 2.
If you want to continue making settings for other boxes, repeat steps 2 - 11.* Once you are finished, touch the “END” key and then, in the next screen, touch the
“BASIC” key. The touch panel will return to the basic screen.
3 Box default1. Touch the “BOX DEFAULT” key.
2. Select the number of days that you want each job file to be saved by touching the “+” keyor the “-” key, as appropriate, under “AUTO DELETE DOCUMENT”.
3. Set the number of virtual mailboxes you want to use by touching the “+” key or the “-” key,as appropriate, under “VIRTUAL MAILBOX COUNT”. (This setting must be an incrementof 10.)
4. Touch the “END” key.* You can continue to perform other box management procedures. Once you are finished,
touch the “END” key and then, in the next screen, touch the “BASIC” key. The touchpanel will return to the basic screen.
8-26

Section 8 COPIER MANAGEMENT
2A080030AKM-6230 (KME)
/ 131
4 Document list1. Touch the “DOCUMENT LIST” key.
2. Select the type of data for which you want to print out the document list.* Once printing is finished, the touch panel will return to the screen for step 2.
You can continue to print out a document list for other types of data. Once you arefinished, touch the “END” key and then press the Reset key. The touch panel will returnto the basic screen.
[4] Deleting stored dataThis procedure checks the conditions of use on your hard disk and deletes any erroneousdata on the disk.
IMPORTANT!The process to delete all of the data can take between 20 to 30 minutes. (Normally is notnecessary to delete stored data.)
1. Touch the “SPECIAL” key.The management mode select screen will appear.
2. Touch the “DEFAULT SETTING” key.
3. Use the numeric keys to enter the management pin code “6200”.If the pin code you entered matches the registered one, the screen will change to thedefault select screen.* You can change the 4-digit pin code as desired. (See “9 Management pin code change”
on page 8-11.)
4. Touch the “STORAGE MANAGEMENT” key.Current information about your hard disk will be displayed.
5. If you want to delete any erroneous data, touch the “CLEAN UP STORAGE” key.Once the operation to delete the data is finished, the touch panel will return to the basicscreen.
8-27

Section 8 COPIER MANAGEMENT
2A080030AKM-6230 (KME)
/ 131
8-28
[5] Toner usage informationIt is possible to print out a report related to toner consumption. Checking the rate of toner useis useful in regard to regulating when toner must be added. For example, if it appears thattoner use is excessive, it is suggested that you utilize the toner economy mode (by touchingthe “Eco” key.)
1. Touch the “SPECIAL” key.The management mode select screen will appear.
2. Touch the “DEFAULT SETTING” key.
3. Use the numeric keys to enter the management pin code “6200”.If the pin code you entered matches the registered one, the screen will change to thedefault select screen.* You can change the 4-digit pin code as desired. (See “9 Management pin code change”
on page 8-11.)
4. Touch the “COUNTER REPORT” key.An assessment report will be printed out. Once printing is finished, the touch panel willreturn to the basic screen.
(4) Touch panel language selectionSelect the language that you want to use on the touch panel: either English, French,Spanish, German or Italian.
1. Touch the “SPECIAL” key.The management mode select screen will appear.
2. Touch the “LANGUAGE” key.The available languages will be displayed.
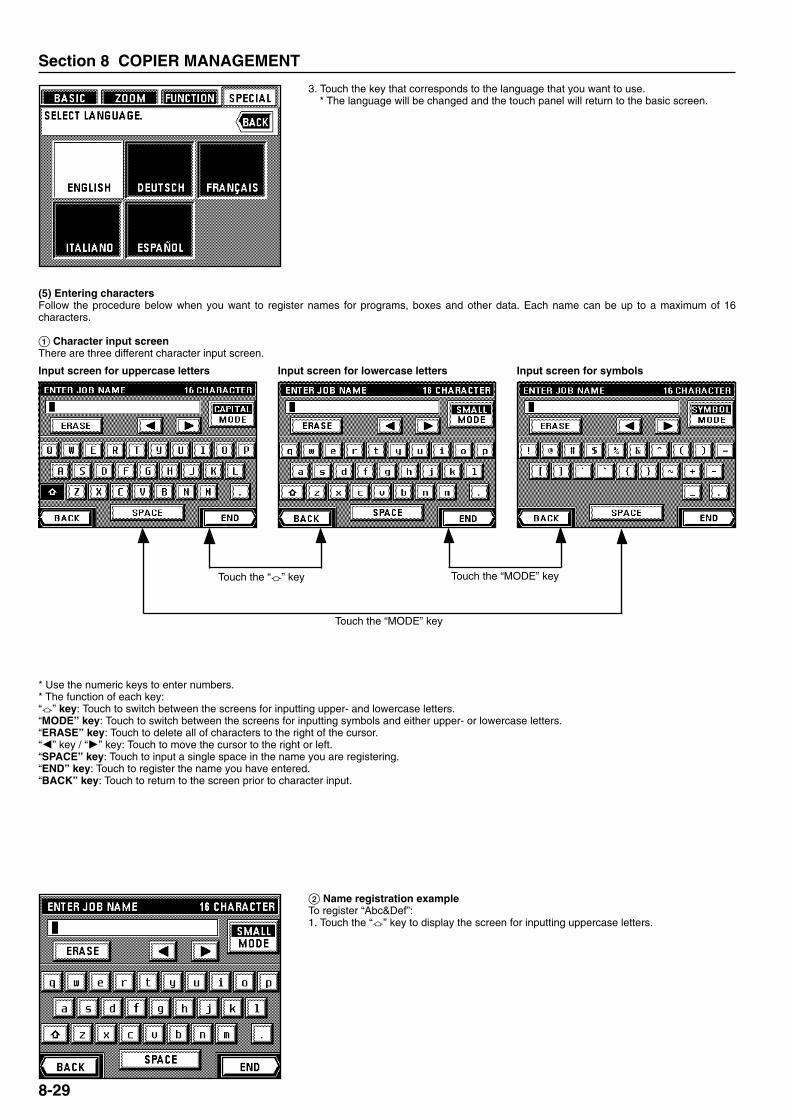
Section 8 COPIER MANAGEMENT
2A080030AKM-6230 (KME)
/ 131
3. Touch the key that corresponds to the language that you want to use.* The language will be changed and the touch panel will return to the basic screen.
(5) Entering charactersFollow the procedure below when you want to register names for programs, boxes and other data. Each name can be up to a maximum of 16characters.
1 Character input screenThere are three different character input screen.
Input screen for uppercase letters Input screen for lowercase letters Input screen for symbols
Touch the “a” key
Touch the “MODE” key
* Use the numeric keys to enter numbers.* The function of each key:“a” key: Touch to switch between the screens for inputting upper- and lowercase letters.“MODE” key: Touch to switch between the screens for inputting symbols and either upper- or lowercase letters.“ERASE” key: Touch to delete all of characters to the right of the cursor.“O” key / “P” key: Touch to move the cursor to the right or left.“SPACE” key: Touch to input a single space in the name you are registering.“END” key: Touch to register the name you have entered.“BACK” key: Touch to return to the screen prior to character input.
2 Name registration exampleTo register “Abc&Def”:1. Touch the “a” key to display the screen for inputting uppercase letters.
Touch the “MODE” key
8-29

Section 8 COPIER MANAGEMENT
2A080030AKM-6230 (KME)
/ 131
2. Touch the “A” key.3. Touch the “a” key to switch to the screen for inputting lowercase letters.
4. Touch the “b” and “c” keys, in that order.5. Touch the “MODE” key to switch to the screen for inputting symbols.
6. Touch the “&” key.7. Touch the “MODE” key to switch back to the screen for inputting lowercase letters.
8. Touch the “a” key to switch to the screen for inputting uppercase letters.9. Touch the “D” key.
8-30
10. Touch the “a” key to switch back to the screen for inputting lowercase letters.11. Touch the “e” and “f” keys, in that order.12. Touch the “END” key. The name you have entered will be registered and the touch panel
will return to the procedure that you were registering characters for.

9-1
2A080030AKM-6230 (KME)
/ 131
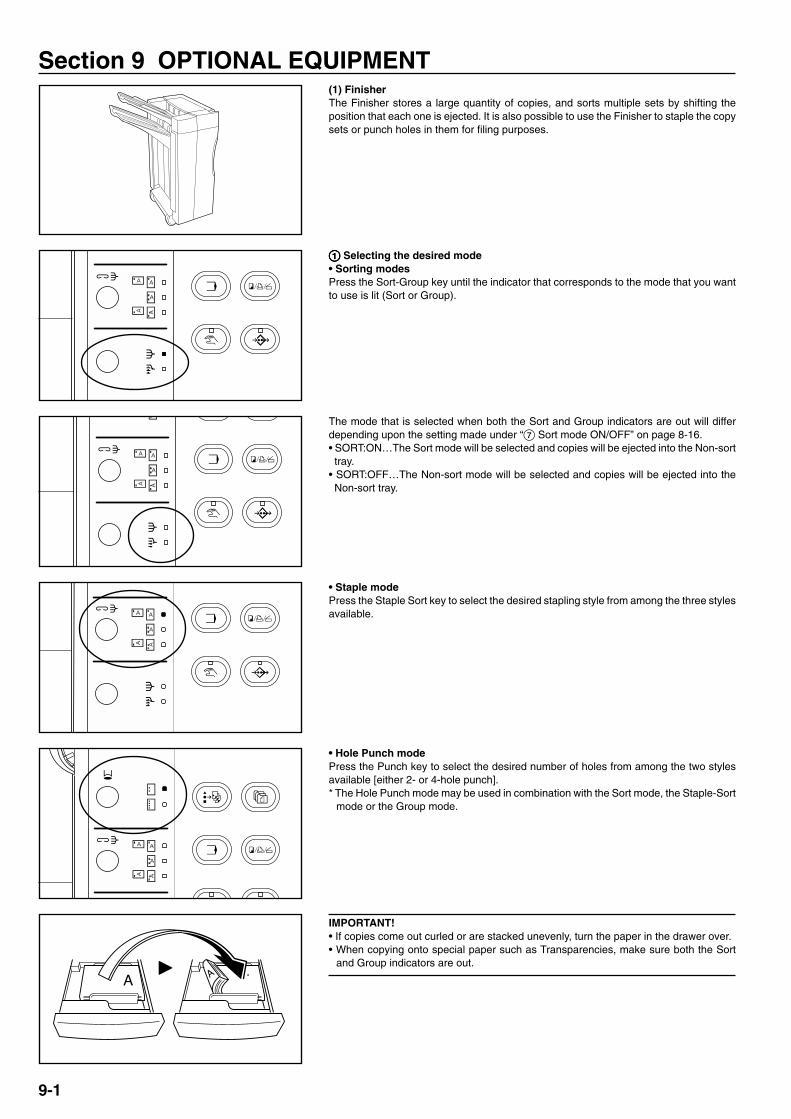
Section 9 OPTIONAL EQUIPMENT
2A080030AKM-6230 (KME)
/ 131
(1) FinisherThe Finisher stores a large quantity of copies, and sorts multiple sets by shifting theposition that each one is ejected. It is also possible to use the Finisher to staple the copysets or punch holes in them for filing purposes.
11111 Selecting the desired mode• Sorting modesPress the Sort-Group key until the indicator that corresponds to the mode that you wantto use is lit (Sort or Group).
The mode that is selected when both the Sort and Group indicators are out will differdepending upon the setting made under “7 Sort mode ON/OFF” on page 8-16.• SORT:ON…The Sort mode will be selected and copies will be ejected into the Non-sorttray.
• SORT:OFF…The Non-sort mode will be selected and copies will be ejected into theNon-sort tray.
• Staple modePress the Staple Sort key to select the desired stapling style from among the three stylesavailable.
• Hole Punch modePress the Punch key to select the desired number of holes from among the two stylesavailable [either 2- or 4-hole punch].* The Hole Punch mode may be used in combination with the Sort mode, the Staple-Sort
mode or the Group mode.
IMPORTANT!• If copies come out curled or are stacked unevenly, turn the paper in the drawer over.• When copying onto special paper such as Transparencies, make sure both the Sort
and Group indicators are out.
Section 9 OPTIONAL EQUIPMENT
9-1
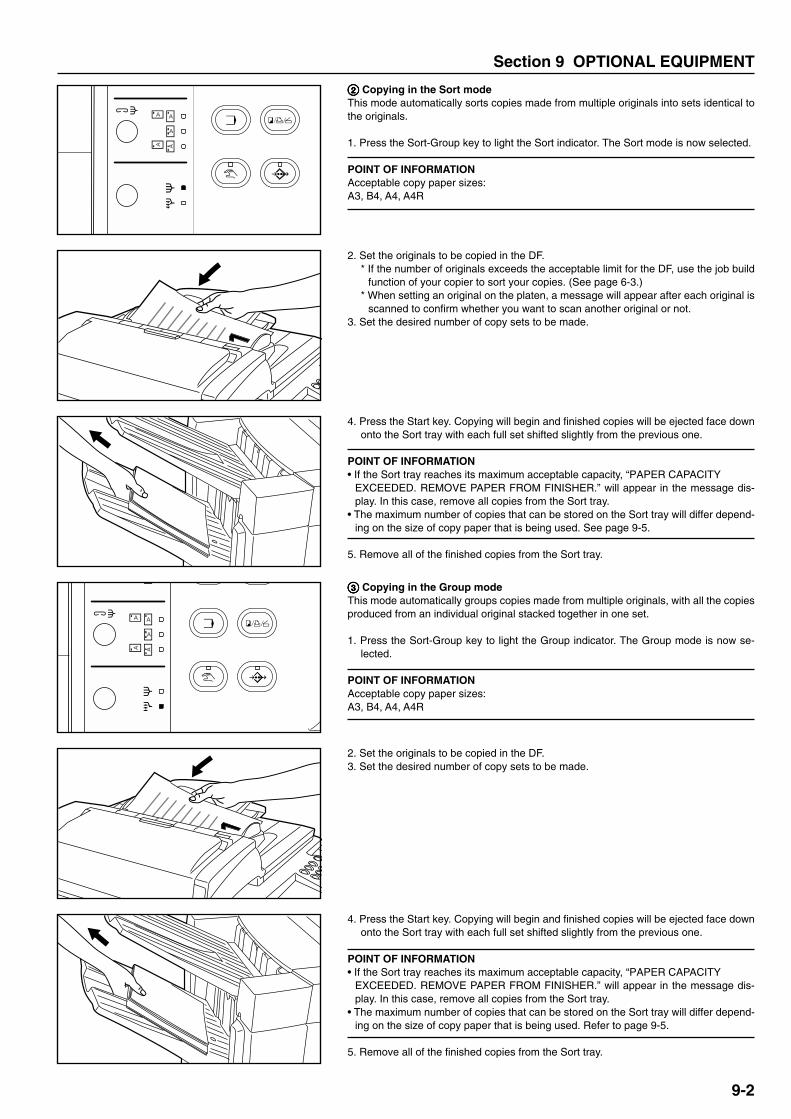
Section 9 OPTIONAL EQUIPMENT
2A080030AKM-6230 (KME)
/ 131
22222 Copying in the Sort modeThis mode automatically sorts copies made from multiple originals into sets identical tothe originals.
1. Press the Sort-Group key to light the Sort indicator. The Sort mode is now selected.
POINT OF INFORMATIONAcceptable copy paper sizes:A3, B4, A4, A4R
2. Set the originals to be copied in the DF.* If the number of originals exceeds the acceptable limit for the DF, use the job build
function of your copier to sort your copies. (See page 6-3.)* When setting an original on the platen, a message will appear after each original is
scanned to confirm whether you want to scan another original or not.3. Set the desired number of copy sets to be made.
4. Press the Start key. Copying will begin and finished copies will be ejected face downonto the Sort tray with each full set shifted slightly from the previous one.
POINT OF INFORMATION• If the Sort tray reaches its maximum acceptable capacity, “PAPER CAPACITY
EXCEEDED. REMOVE PAPER FROM FINISHER.” will appear in the message dis-play. In this case, remove all copies from the Sort tray.
• The maximum number of copies that can be stored on the Sort tray will differ depend-ing on the size of copy paper that is being used. See page 9-5.
5. Remove all of the finished copies from the Sort tray.
33333 Copying in the Group modeThis mode automatically groups copies made from multiple originals, with all the copiesproduced from an individual original stacked together in one set.
1. Press the Sort-Group key to light the Group indicator. The Group mode is now se-lected.
POINT OF INFORMATIONAcceptable copy paper sizes:A3, B4, A4, A4R
2. Set the originals to be copied in the DF.3. Set the desired number of copy sets to be made.
4. Press the Start key. Copying will begin and finished copies will be ejected face downonto the Sort tray with each full set shifted slightly from the previous one.
POINT OF INFORMATION• If the Sort tray reaches its maximum acceptable capacity, “PAPER CAPACITY
EXCEEDED. REMOVE PAPER FROM FINISHER.” will appear in the message dis-play. In this case, remove all copies from the Sort tray.
• The maximum number of copies that can be stored on the Sort tray will differ depend-ing on the size of copy paper that is being used. Refer to page 9-5.
5. Remove all of the finished copies from the Sort tray.
9-2

Section 9 OPTIONAL EQUIPMENT
2A080030AKM-6230 (KME)
/ 131
44444 Copying in the Sort-Staple modeThis mode automatically sorts and then staples each copy set.
1. Press the Staple Sort key until the indicator that corresponds to the desired staplingstyle is lit. The Staple-Sort mode is now selected.
POINT OF INFORMATIONAcceptable copy paper sizes:A3, B4, A4, A4R
* Stapling will be accomplished as shown in the illustration at left (as viewed from thefront of the copies).
* Acceptable copy paper sizes (1-position stapling):A3, B4, A4, A4R
* Acceptable copy paper sizes (2-position stapling):A3, B4, A4
2. Set the originals to be copied in the DF.* When setting an original on the platen, a message will appear after each original is
scanned to confirm whether you want to scan another original or not.
POINT OF INFORMATIONA maximum of fifty A4 or A4R size copies can be stapled at one time. Up to thirty A3 orB4 size copies can be stapled at one time.
3. Set the desired number of copy sets to be made.
4. Press the Start key. The copies will be automatically stapled and ejected face downonto the Sort tray.
POINT OF INFORMATION• If the Sort tray reaches its maximum acceptable capacity, “PAPER CAPACITY
EXCEEDED. REMOVE PAPER FROM FINISHER.” will appear in the message dis-play. In this case, remove all copies from the Sort tray.
• The maximum number of copies that can be stored on the Sort tray will differ depend-ing on the size of copy paper that is being used. Refer to page 9-5.
9-3

Section 9 OPTIONAL EQUIPMENT
2A080030AKM-6230 (KME)
/ 131
5. Remove all of the finished copies from the Sort tray.
55555 Copying in the Hole Punch modeCopies can be automatically hole punched.
1. Press the Punch key until the indicator that corresponds to the desired number ofholes is lit [either 2- or 4-hole punch]. The Hole Punch mode is now selected.* The Hole Punch mode may be used in combination with the Sort mode, the Staple-
Sort mode or the Group mode.
POINT OF INFORMATIONAcceptable copy paper weight:45 g/m2 - 120 g/m2
* Hole punching will be accomplished as shown in the illustration at left (as viewed fromthe front of the copies).
IMPORTANT!The position of the holes on each page may differ very slightly due to the fact that holesare punched in one sheet at a time.
2. Set the originals to be copied.
3. Set the desired paper size and number of copy sets to be made, etc.
POINT OF INFORMATIONAcceptable copy paper sizes for each hole punch style:• 2-hole punch: A3, B4, A4, A4R, A5R• 4-hole punch: A3, A4
(45 g/m2 - 120 g/m2 weight standard copy paper)
4. Press the Print key. The copies will be automatically hole punched and ejected ontothe Non-sort tray.
5. Remove all of the finished copies from the Non-sort tray.
9-4
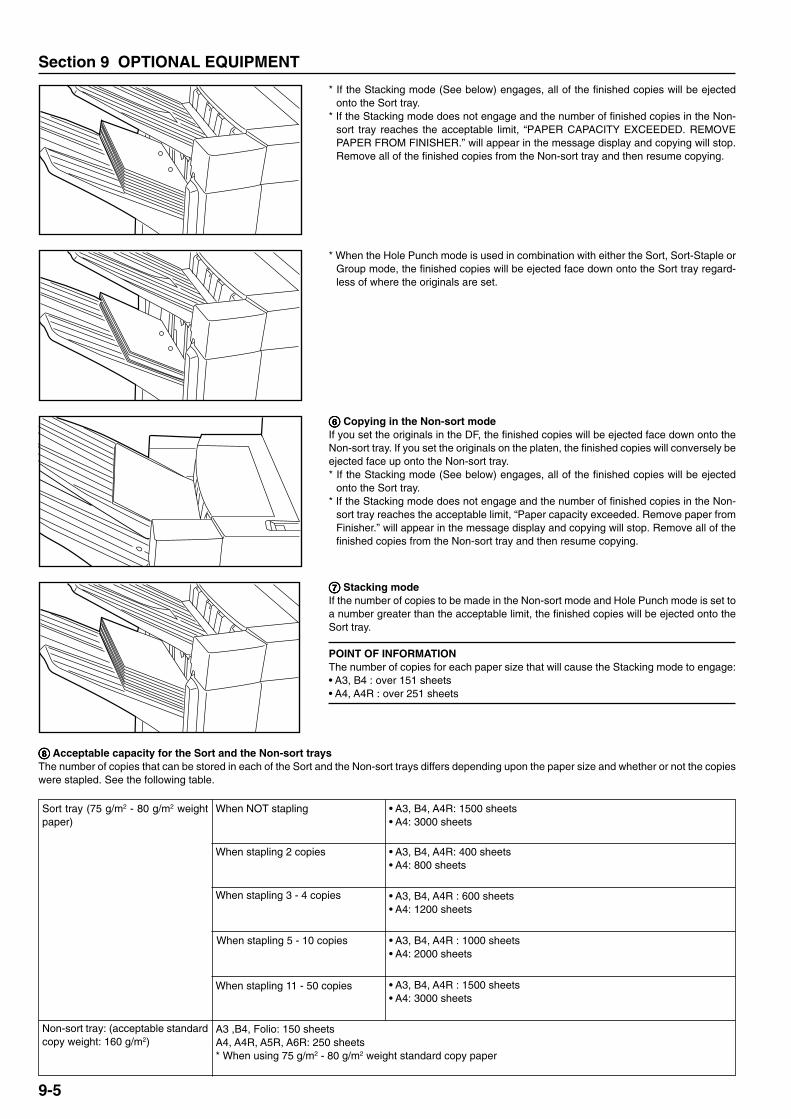
Section 9 OPTIONAL EQUIPMENT
2A080030AKM-6230 (KME)
/ 131
When stapling 2 copies
When stapling 5 - 10 copies • A3, B4, A4R : 1000 sheets• A4: 2000 sheets
When stapling 11 - 50 copies • A3, B4, A4R : 1500 sheets• A4: 3000 sheets
Non-sort tray: (acceptable standardcopy weight: 160 g/m2)
Sort tray (75 g/m2 - 80 g/m2 weightpaper)
When NOT stapling • A3, B4, A4R: 1500 sheets• A4: 3000 sheets
• A3, B4, A4R: 400 sheets• A4: 800 sheets
When stapling 3 - 4 copies • A3, B4, A4R : 600 sheets• A4: 1200 sheets
A3 ,B4, Folio: 150 sheetsA4, A4R, A5R, A6R: 250 sheets* When using 75 g/m2 - 80 g/m2 weight standard copy paper
77777 Stacking modeIf the number of copies to be made in the Non-sort mode and Hole Punch mode is set toa number greater than the acceptable limit, the finished copies will be ejected onto theSort tray.
POINT OF INFORMATIONThe number of copies for each paper size that will cause the Stacking mode to engage:• A3, B4 : over 151 sheets• A4, A4R : over 251 sheets
* If the Stacking mode (See below) engages, all of the finished copies will be ejectedonto the Sort tray.
* If the Stacking mode does not engage and the number of finished copies in the Non-sort tray reaches the acceptable limit, “PAPER CAPACITY EXCEEDED. REMOVEPAPER FROM FINISHER.” will appear in the message display and copying will stop.Remove all of the finished copies from the Non-sort tray and then resume copying.
* When the Hole Punch mode is used in combination with either the Sort, Sort-Staple orGroup mode, the finished copies will be ejected face down onto the Sort tray regard-less of where the originals are set.
66666 Copying in the Non-sort modeIf you set the originals in the DF, the finished copies will be ejected face down onto theNon-sort tray. If you set the originals on the platen, the finished copies will conversely beejected face up onto the Non-sort tray.* If the Stacking mode (See below) engages, all of the finished copies will be ejected
onto the Sort tray.* If the Stacking mode does not engage and the number of finished copies in the Non-
sort tray reaches the acceptable limit, “Paper capacity exceeded. Remove paper fromFinisher.” will appear in the message display and copying will stop. Remove all of thefinished copies from the Non-sort tray and then resume copying.
88888 Acceptable capacity for the Sort and the Non-sort traysThe number of copies that can be stored in each of the Sort and the Non-sort trays differs depending upon the paper size and whether or not the copieswere stapled. See the following table.
9-5

Section 9 OPTIONAL EQUIPMENT
2A080030AKM-6230 (KME)
/ 131
1. Grasp the front cover handle and open the front cover towards you.
2. Grasp the internal tray handle and carefully pull the internal tray out towards you.
99999 Stapling UnitThe Stapling Unit has two separate staplers for stapling documents in two different places.Accordingly, when staples run out in either stapler, they must be replenished separately.* If the staples run out, contact the service representative for your copier.
00000 Refilling the Stapling UnitIf a message appears on the copier indicating that staples have run out, the staple holder(s)need to be replenished with staples.* When “(FRONT)” appears in the message display, the front stapler is empty and when
“(REAR)” appears in the message display, the rear stapler is empty.* The procedure to refill either stapler is the same.
3. Grasp the Stapling Unit handle and lift up the Stapling Unit. The two staplers willbecome visible.
4. Pinch the staple holder release lever as shown in the illustration and lower it to releasethe lock.
9-6

Section 9 OPTIONAL EQUIPMENT
2A080030AKM-6230 (KME)
/ 131
5. Pull out the staple holder.
6. Remove the empty staple cartridge from the staple holder.
7. Hold the staple holder in one hand and the new staple cartridge in the other and insertthe new staple cartridge making sure the direction of insertion is correct.* The arrow on the staple cartridge indicates the correct direction of insertion.
8. Make sure the new staple cartridge is completely inserted all the way into the stapleholder and then remove the paper tape covering the staple cartridge.
9. Replace the staple holder back in its original position in the Stapling Unit. Once it hasbeen fully inserted, it will click into place.
10. Lift up the Stapling Unit slightly and then lower it into its original position.
9-7

Section 9 OPTIONAL EQUIPMENT
2A080030AKM-6230 (KME)
/ 131
11. Replace the internal tray in its original position all the way into the Finisher.12. Close the front cover securely.
!!!!! Clearing a staple jam1. Grasp the front cover handle and open the front cover towards you.2. Grasp the internal tray handle and carefully pull the internal tray out towards you.
3. Grasp the Stapling Unit handle and lift up the Stapling Unit. The two staplers willbecome visible.
4. Pinch the staple holder release lever as shown in the illustration and lower it to releasethe lock.
5. Pull out the staple holder.
6. Push up on the tab A on the protective faceplate in order to raise the faceplate.
9-8
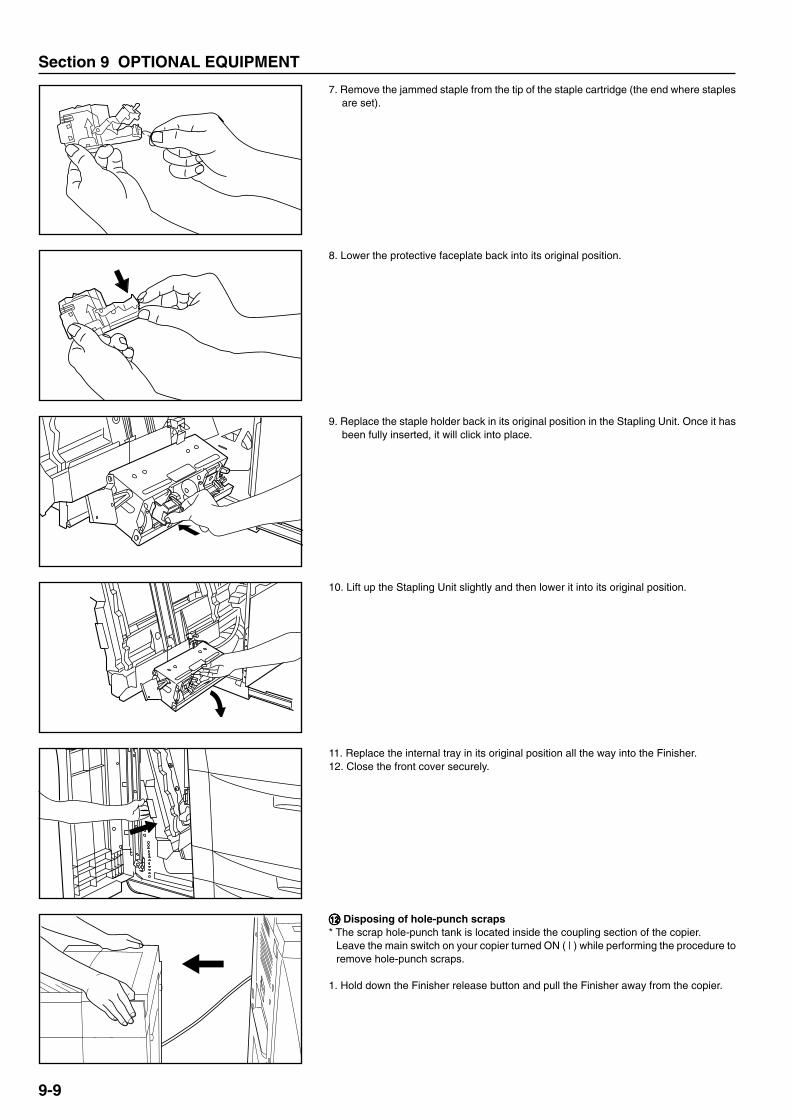
Section 9 OPTIONAL EQUIPMENT
2A080030AKM-6230 (KME)
/ 131
7. Remove the jammed staple from the tip of the staple cartridge (the end where staplesare set).
8. Lower the protective faceplate back into its original position.
9. Replace the staple holder back in its original position in the Stapling Unit. Once it hasbeen fully inserted, it will click into place.
10. Lift up the Stapling Unit slightly and then lower it into its original position.
11. Replace the internal tray in its original position all the way into the Finisher.12. Close the front cover securely.
@@@@@ Disposing of hole-punch scraps* The scrap hole-punch tank is located inside the coupling section of the copier.
Leave the main switch on your copier turned ON ( | ) while performing the procedure toremove hole-punch scraps.
1. Hold down the Finisher release button and pull the Finisher away from the copier.
9-9
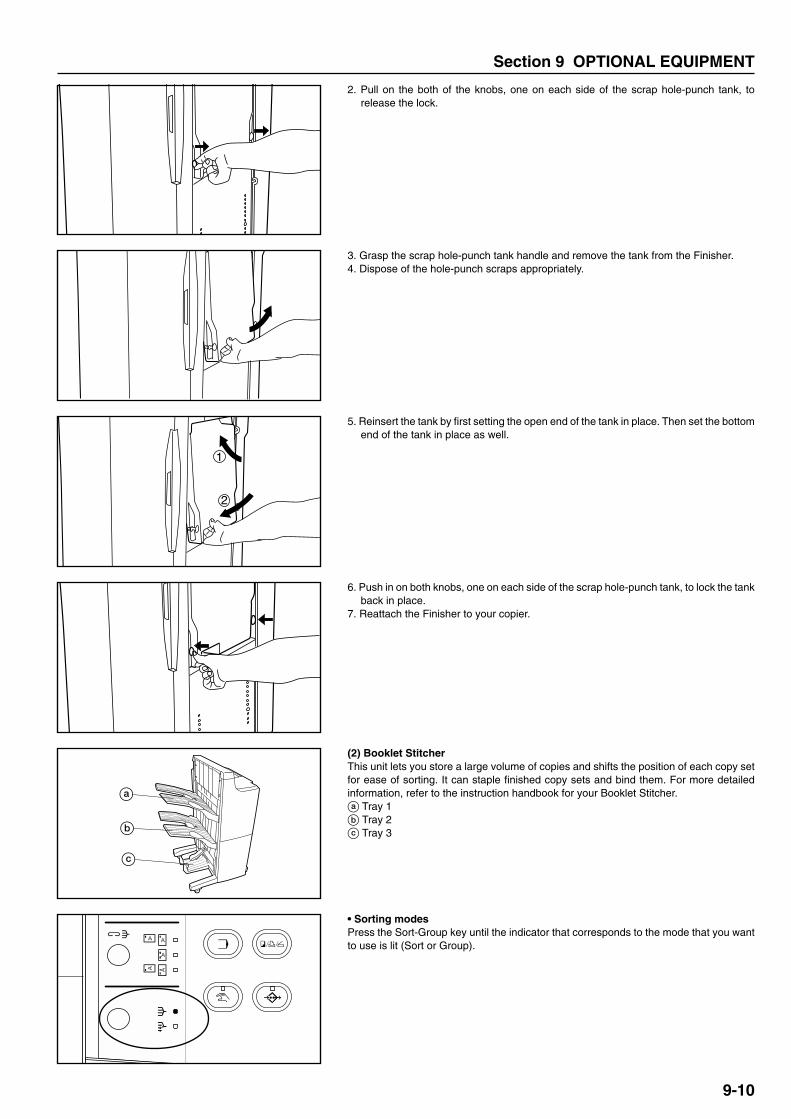
Section 9 OPTIONAL EQUIPMENT
2A080030AKM-6230 (KME)
/ 131
2. Pull on the both of the knobs, one on each side of the scrap hole-punch tank, torelease the lock.
3. Grasp the scrap hole-punch tank handle and remove the tank from the Finisher.4. Dispose of the hole-punch scraps appropriately.
5. Reinsert the tank by first setting the open end of the tank in place. Then set the bottomend of the tank in place as well.
6. Push in on both knobs, one on each side of the scrap hole-punch tank, to lock the tankback in place.
7. Reattach the Finisher to your copier.
(2) Booklet StitcherThis unit lets you store a large volume of copies and shifts the position of each copy setfor ease of sorting. It can staple finished copy sets and bind them. For more detailedinformation, refer to the instruction handbook for your Booklet Stitcher.a Tray 1b Tray 2c Tray 3
• Sorting modesPress the Sort-Group key until the indicator that corresponds to the mode that you wantto use is lit (Sort or Group).
9-10

Section 9 OPTIONAL EQUIPMENT
2A080030AKM-6230 (KME)
/ 131
The mode that is selected when both the Sort and Group indicators are out will differdepending upon the setting made under “7 Sort mode ON/OFF” on page 8-16.• SORT:ON…The Sort mode will be selected and copies will be ejected into tray 1.• SORT:OFF…The Non-sort mode will be selected and copies will be ejected into tray 1.
• Staple modePress the Staple Sort key to select the desired stapling style from among the three stylesavailable.
* The Booklet Stitcher is equipped with three storage locations: trays 1, 2, and 3. The tray into which the copies will be ejected and the direction of ejection (face up ordown) will differ depending upon the way the originals are set and the selected mode for finishing the copies. See the following table.
(3) Side DeckThis unit is an auxiliary paper feed unit that holds up to 4,000 sheets of standard [80 g/m2] A4 size copy paper.
(4) Key CounterThe Key Counter enables you to verify the number of copies that have been made. It isuseful for centralized management of the total number of copies made by differentdepartments, or by the company as a whole, etc.
� Setting the Key CounterInsert the Key Counter securely into the key counter slot.* When the copier is equipped with the optional Key Counter system, copying will only be
possible when the Key Counter is actually inserted into the copier. If the Key Counter isnot securely inserted into the slot, “INSERT KEY COUNTER.” will appear in the mes-sage display.
9-11
Non-sort mode Sort mode Group mode Booklet stitching
DF
Platen
Ejected from the first page,
face down into tray 1
Ejected face up into tray 1
Ejected from the first page,
face down into tray 1Ejected to tray 3
Original setlocation
Finishing Mode

Section 9 OPTIONAL EQUIPMENT
2A080030AKM-6230 (KME)
/ 131
(5) Mailbox UnitThis unit is convenient when you want to use the copier as a printer. If multiple computerusers utilize it as a network printer, print jobs will be ejected into the mailbox tray that isdesignated specifically for that user. For more detailed information, refer to the instruc-tion handbook for your Mailbox Unit.
(6) Print/Scan SystemIf the copier is equipped with the Print/Scan System, the copier can be used as a printer.For more detailed information, refer to the printer edition of your instruction handbook.
9-12
(7) Tandem BoardThe Tandem Board is required when two copy machines are connected together. Con-necting two copy machines will increase copy management speed two-fold. In addition,for example, if copying is stopped in one copier due to insufficient toner or other suchreason, the remaining copies will be automatically produced in the other copier.

10-1
2A080030AKM-6230 (KME)
/ 131
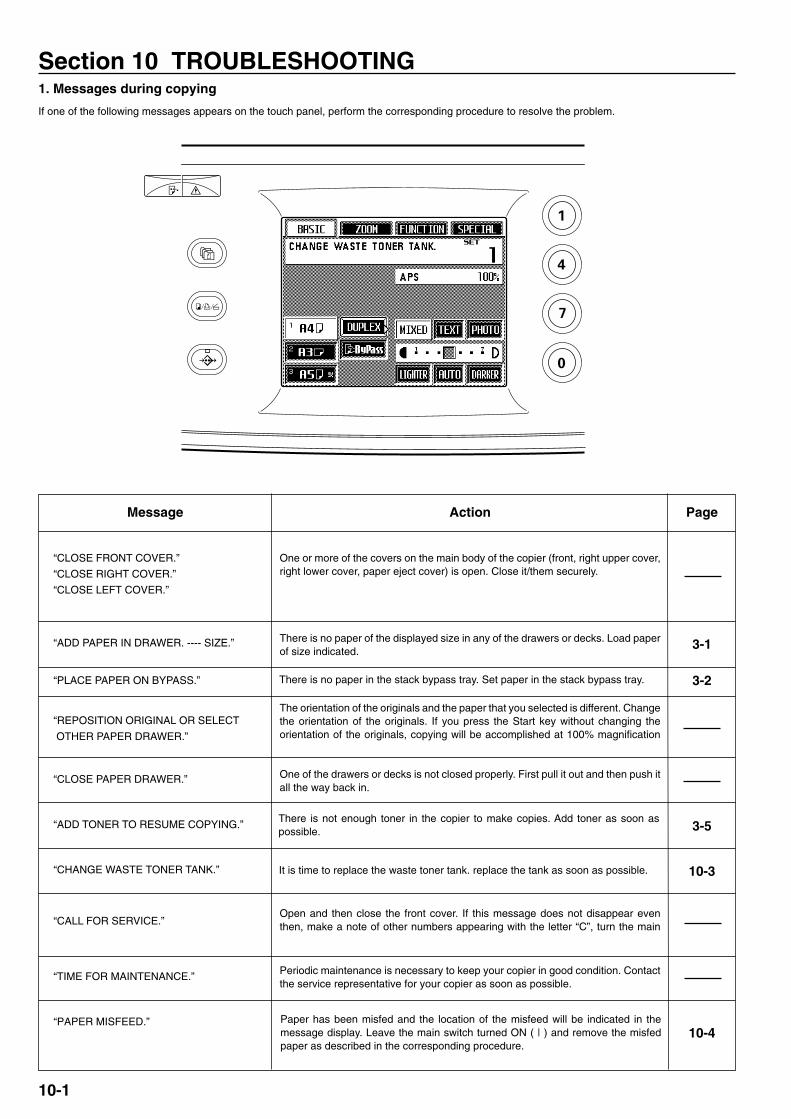
Section 10 TROUBLESHOOTING
2A080030AKM-6230 (KME)
/ 131
Action Page
“CALL FOR SERVICE.”Open and then close the front cover. If this message does not disappear eventhen, make a note of other numbers appearing with the letter “C”, turn the main
“TIME FOR MAINTENANCE.” Periodic maintenance is necessary to keep your copier in good condition. Contactthe service representative for your copier as soon as possible.
“PAPER MISFEED.” Paper has been misfed and the location of the misfeed will be indicated in themessage display. Leave the main switch turned ON ( | ) and remove the misfedpaper as described in the corresponding procedure.
10-4
“CHANGE WASTE TONER TANK.” It is time to replace the waste toner tank. replace the tank as soon as possible. 10-3
“ADD PAPER IN DRAWER. ---- SIZE.” There is no paper of the displayed size in any of the drawers or decks. Load paperof size indicated.
3-1
“PLACE PAPER ON BYPASS.” There is no paper in the stack bypass tray. Set paper in the stack bypass tray. 3-2
“REPOSITION ORIGINAL OR SELECT
OTHER PAPER DRAWER.”
The orientation of the originals and the paper that you selected is different. Changethe orientation of the originals. If you press the Start key without changing theorientation of the originals, copying will be accomplished at 100% magnification
“CLOSE PAPER DRAWER.” One of the drawers or decks is not closed properly. First pull it out and then push itall the way back in.
“ADD TONER TO RESUME COPYING.” There is not enough toner in the copier to make copies. Add toner as soon aspossible. 3-5
1. Messages during copying
Message
“CLOSE FRONT COVER.”
“CLOSE RIGHT COVER.”
“CLOSE LEFT COVER.”
One or more of the covers on the main body of the copier (front, right upper cover,right lower cover, paper eject cover) is open. Close it/them securely.
If one of the following messages appears on the touch panel, perform the corresponding procedure to resolve the problem.
Section 10 TROUBLESHOOTING
10-1

Section 10 TROUBLESHOOTING
2A080030AKM-6230 (KME)
/ 131
Action Page
“PUNCH HOLE CONTAINER FULL.” The hole-punch waste tank in the optional Finisher is full. Dispose of the punchwaste.
3-3
“STAPLER EMPTY. ADD STAPLES.” The optional Finisher has run out of staples. Replace the staple cartridge.
“PAPER DRAWER IS OUT OF ORDER.
SELECT OTHER PAPER DRAWER.”
The drawer currently in use is out of order and cannot be used at the moment.
“CANNOT BE COMBINED.” The functions that you selected on the touch panel cannot be combined. Selectother functions.
“COPY LIMIT FOR THIS ID-CODE IS
REACHED. NO COPYING POSSIBLE.”
The number of copies that was allotted for that department code under the copy
“DUPLEX UNIT IS OUT OF ORDER.
1-SIDED COPYING IS POSSIBLE.”
There is a problem in the duplex unit. Two-sided copying is not possible. Contactthe service representative for your copier as soon as possible.
8-1
“PAPER CAPACITY EXCEEDED. REMOVEPAPER FROM FINISHER.”
The number of sheets in the optional Finisher exceeds the acceptable capacity.Remove all finished copies and press the Start key.
8-27
Message
“RESET ALL ORIGINALS IN FEEDER
AND PRESS START KEY.”
The first original was not fed correctly into the DF. Remove all originals and thenset them in the DF once again.
10-2
“MEMORY FULL.” The corresponding box has reached its acceptable limit of data under the copymanagement function. In order to register new data into one of the boxes, it is 8-23
“SYSTEM ERROR. MAIN SWITCH OFF/ON.”
“PLEASE WAIT. NOW MAINTAININGSTORED DATA.”
“FELT CLEANING MAINTENANCE.”
An error has occurred during data management. Turn the main switch OFF (O)and then back ON ( | ) again, then attempt the procedure again from the
beginning.
The hard disk is now being optimized. Please wait until optimization is complete.
It is time to replace certain parts in the copier. Contact the service representativefor your copier as soon as possible.
“CHANGE FELT CLEAN. -(F.UNIT) CANNNOTCOPY.”
It is time to replace certain parts in the copier. Contact the service representative
“SCANNER IS OUT OF ORDER.
CALL FOR SERVICE.”
“TOO MUCH PAPER IN DRAWER.
REMOVE PAPER ABOVE RED LINE.”
There is a problem with the scanning function of the optional Print/Scan System.Contact the service representative for your copier as soon as possible.
The amount of paper loaded in the optional Side Deck exceeds the acceptablecapacity of that deck. Remove some of the paper from the Side Deck.
9-6
9-9

Section 10 TROUBLESHOOTING
2A080030AKM-6230 (KME)
/ 131
2. Replacing the waste toner tank
If “CHANGE WASTE TONER TANK.” appears in the message display, replace the wastetoner tank as soon as possible.* DO NOT replace the waste toner tank unless this message is displayed.
1. If the copier is equipped with the optional Finisher, first detach it from the main body ofthe copier.
2. Open the waste toner tank cover.
3. Remove the waste toner tank.
4. Close the opening of the waste toner tank with the attached seal.
IMPORTANT!• Waste toner is NOT reusable.• Give the old waste toner tank to the service representative for your copier.
CAUTIONDo not incinerate toner and toner containers. Dangerous sparks may causeburns.
5. Set the new waste toner tank.6. Close the waste toner tank cover and, if the copier is equipped with the optional
Finisher, reattach it to the copier.
10-3
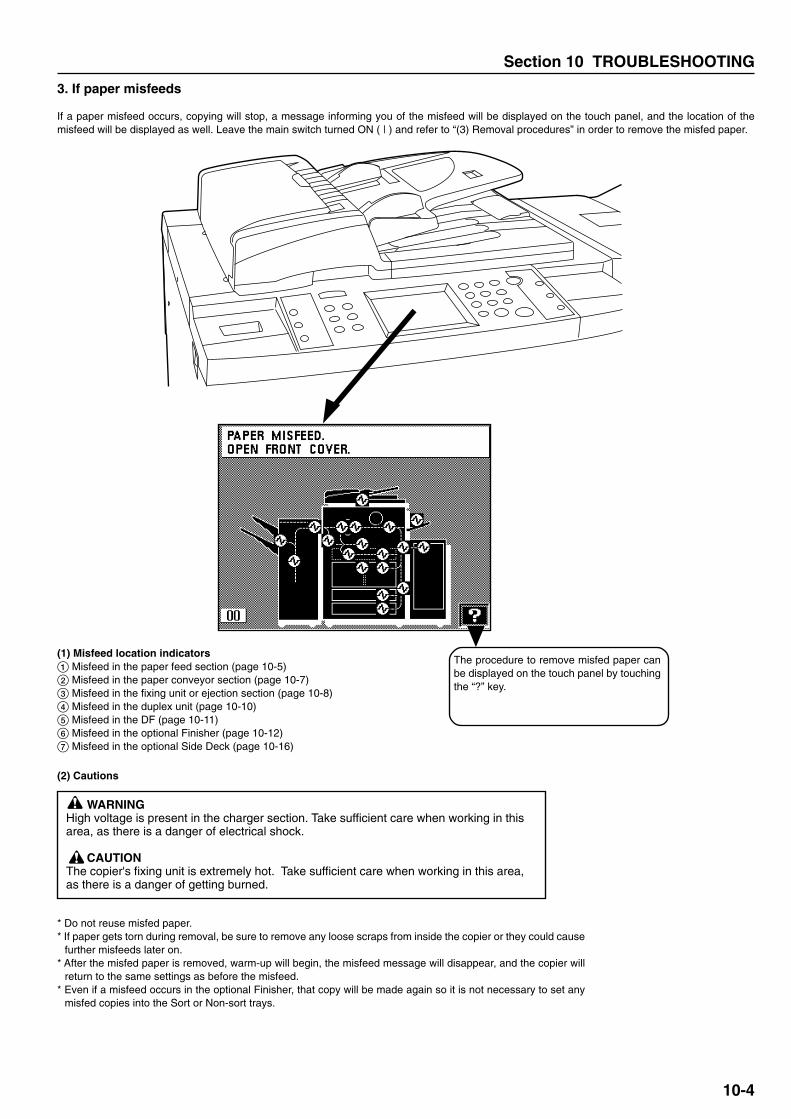
Section 10 TROUBLESHOOTING
2A080030AKM-6230 (KME)
/ 131
3. If paper misfeeds
If a paper misfeed occurs, copying will stop, a message informing you of the misfeed will be displayed on the touch panel, and the location of themisfeed will be displayed as well. Leave the main switch turned ON ( | ) and refer to “(3) Removal procedures” in order to remove the misfed paper.
(1) Misfeed location indicators1 Misfeed in the paper feed section (page 10-5)2 Misfeed in the paper conveyor section (page 10-7)3 Misfeed in the fixing unit or ejection section (page 10-8)4 Misfeed in the duplex unit (page 10-10)5 Misfeed in the DF (page 10-11)6 Misfeed in the optional Finisher (page 10-12)7 Misfeed in the optional Side Deck (page 10-16)
The procedure to remove misfed paper canbe displayed on the touch panel by touchingthe “?” key.
(2) Cautions
WARNINGHigh voltage is present in the charger section. Take sufficient care when working in thisarea, as there is a danger of electrical shock.
CAUTIONThe copier's fixing unit is extremely hot. Take sufficient care when working in this area,as there is a danger of getting burned.
* Do not reuse misfed paper.* If paper gets torn during removal, be sure to remove any loose scraps from inside the copier or they could cause
further misfeeds later on.* After the misfed paper is removed, warm-up will begin, the misfeed message will disappear, and the copier will
return to the same settings as before the misfeed.* Even if a misfeed occurs in the optional Finisher, that copy will be made again so it is not necessary to set any
misfed copies into the Sort or Non-sort trays.
10-4
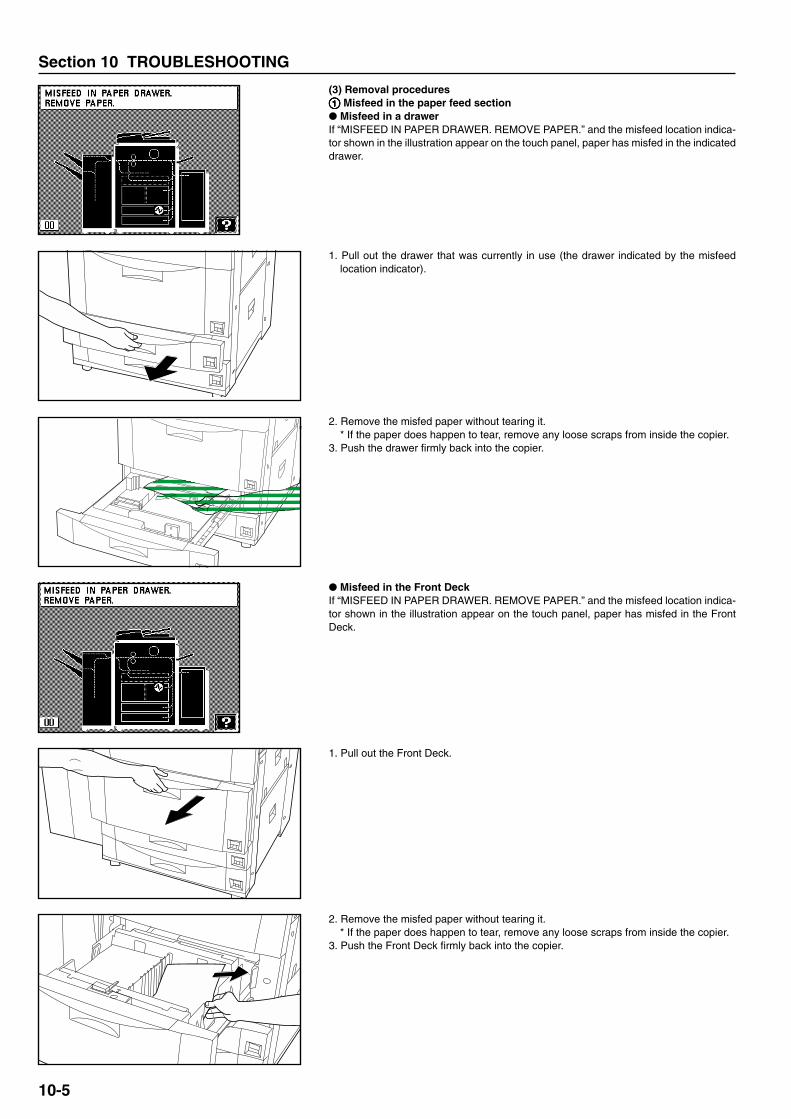
Section 10 TROUBLESHOOTING
2A080030AKM-6230 (KME)
/ 131
����������
(3) Removal procedures11111 Misfeed in the paper feed section� Misfeed in a drawerIf “MISFEED IN PAPER DRAWER. REMOVE PAPER.” and the misfeed location indica-tor shown in the illustration appear on the touch panel, paper has misfed in the indicateddrawer.
1. Pull out the drawer that was currently in use (the drawer indicated by the misfeedlocation indicator).
2. Remove the misfed paper without tearing it.* If the paper does happen to tear, remove any loose scraps from inside the copier.
3. Push the drawer firmly back into the copier.
� Misfeed in the Front DeckIf “MISFEED IN PAPER DRAWER. REMOVE PAPER.” and the misfeed location indica-tor shown in the illustration appear on the touch panel, paper has misfed in the FrontDeck.
1. Pull out the Front Deck.
2. Remove the misfed paper without tearing it.* If the paper does happen to tear, remove any loose scraps from inside the copier.
3. Push the Front Deck firmly back into the copier.
10-5
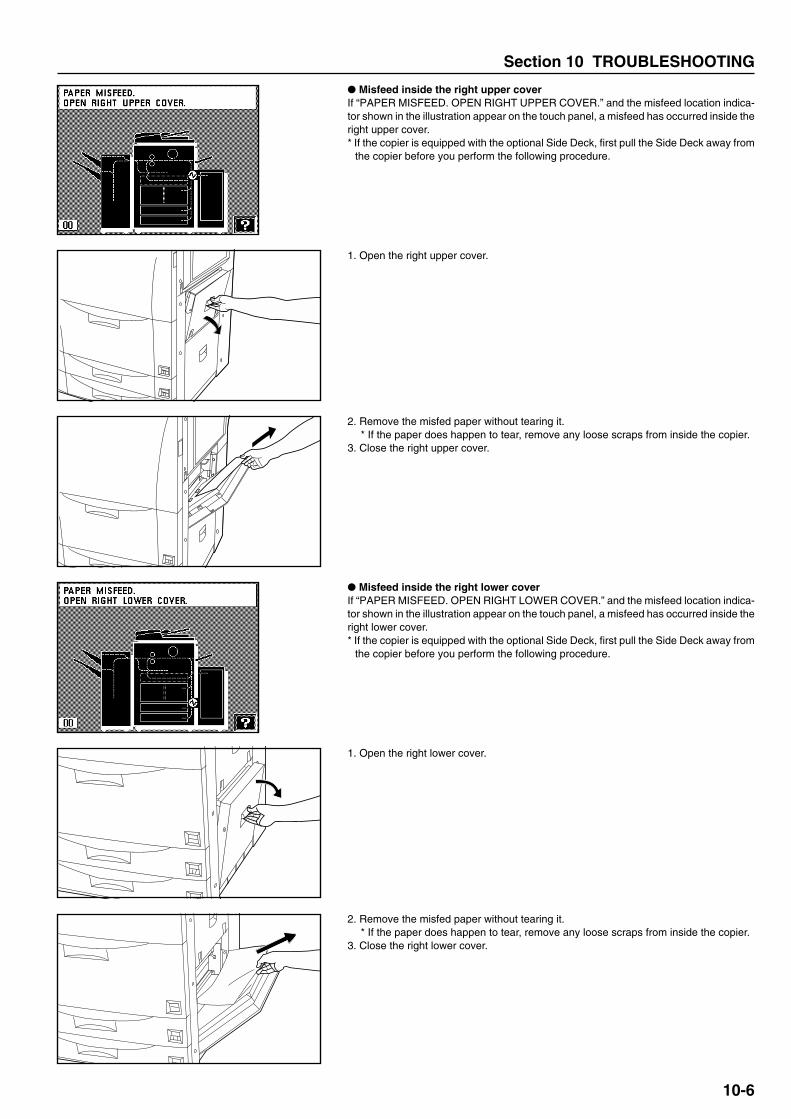
Section 10 TROUBLESHOOTING
2A080030AKM-6230 (KME)
/ 131
� Misfeed inside the right upper coverIf “PAPER MISFEED. OPEN RIGHT UPPER COVER.” and the misfeed location indica-tor shown in the illustration appear on the touch panel, a misfeed has occurred inside theright upper cover.* If the copier is equipped with the optional Side Deck, first pull the Side Deck away from
the copier before you perform the following procedure.
1. Open the right upper cover.
2. Remove the misfed paper without tearing it.* If the paper does happen to tear, remove any loose scraps from inside the copier.
3. Close the right upper cover.
� Misfeed inside the right lower coverIf “PAPER MISFEED. OPEN RIGHT LOWER COVER.” and the misfeed location indica-tor shown in the illustration appear on the touch panel, a misfeed has occurred inside theright lower cover.* If the copier is equipped with the optional Side Deck, first pull the Side Deck away from
the copier before you perform the following procedure.
1. Open the right lower cover.
2. Remove the misfed paper without tearing it.* If the paper does happen to tear, remove any loose scraps from inside the copier.
3. Close the right lower cover.
10-6

Section 10 TROUBLESHOOTING
2A080030AKM-6230 (KME)
/ 131
� Misfeed in the stack bypass trayIf “PAPER MISFEED IN STACK BYPASS. REMOVE PAPER.” and the misfeed locationindicator shown in the illustration appear on the touch panel, paper has misfed in thestack bypass tray.
1. Remove all the paper remaining in the stack bypass tray.* If the paper is difficult to remove, do not try to pull it out by force, but refer to
“2 Misfeed in the paper conveyor section” in order to remove the misfed paper.2. Make sure that the misfeed message has disappeared from the touch panel.
Then re-set the paper into the stack bypass tray.
22222 Misfeed in the paper conveyor sectionIf “PAPER MISFEED. OPEN FRONT COVER.” and the misfeed location indicator shownin the illustration appear on the touch panel, paper has misfed in the paper conveyorsection.
1. Open the front cover.
2. Lower the paper conveyor section release lever to the left.
WARNINGHigh voltage is present in the charger section. Take sufficient care whenworking in this area, as there is a danger of electrical shock.
3. Turn the paper feed section knob in the direction of the arrow to convey the misfedpaper to the conveyor section.
10-7

Section 10 TROUBLESHOOTING
2A080030AKM-6230 (KME)
/ 131
4. Carefully pull out the paper conveyor section.
5. Remove the misfed paper without tearing it.* If the paper does happen to tear, remove any loose scraps from inside the copier.
6. Open the fixing unit cover and check for the misfed paper. If the misfed paper isvisible, remove it without tearing it and then close the fixing unit cover.
CAUTIONThe copier's fixing unit is extremely hot. Take sufficient care when workingin this area, as there is a danger of getting burned.
7. Push the conveyor section all the way back into its original position in the copier andreturn the release lever to its original position as well.
8. Close the front cover.
33333 Misfeed in the fixing unit or ejection sectionIf “PAPER MISFEED. REMOVE PAPER FROM FIXING UNIT.” and the misfeed locationindicators shown in the illustration appear on the touch panel, paper has misfed in thefixing unit or the ejection section.
1. Open the front cover.2. Turn the fixing unit knob in the direction of the arrow to eject the misfed paper.
CAUTIONThe copier's fixing unit is extremely hot. Take sufficient care when workingin this area, as there is a danger of getting burned.
10-8
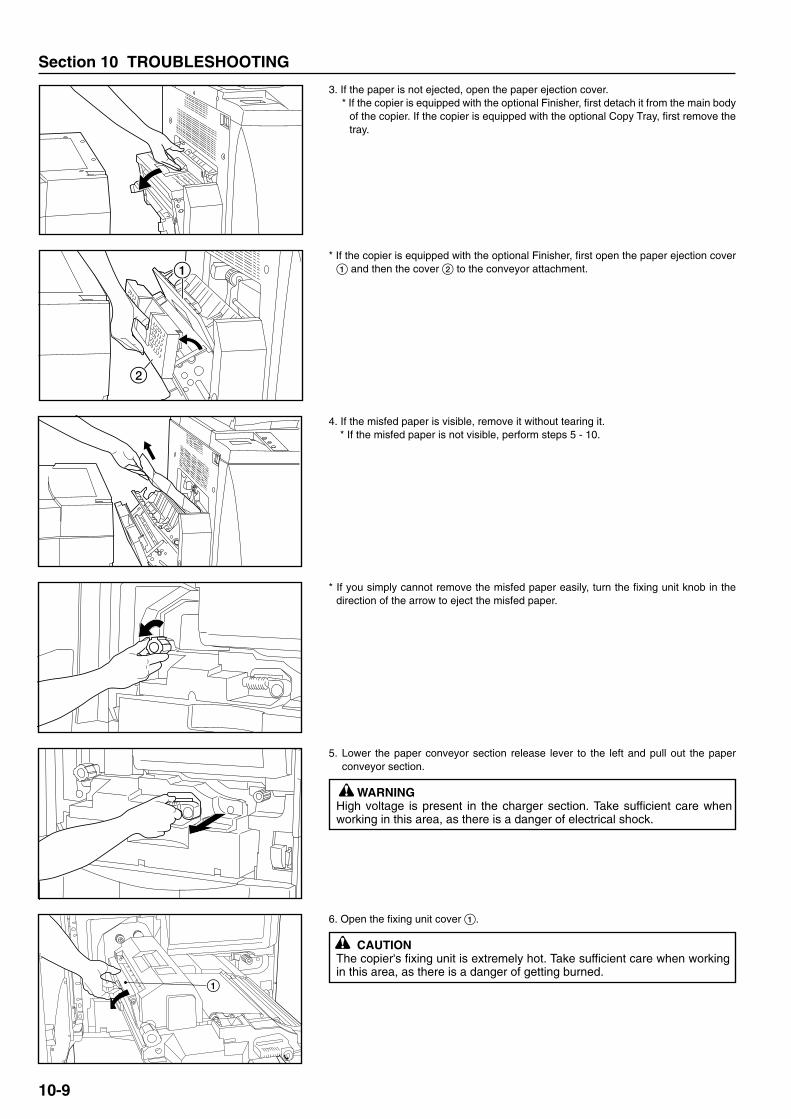
Section 10 TROUBLESHOOTING
2A080030AKM-6230 (KME)
/ 131
3. If the paper is not ejected, open the paper ejection cover.* If the copier is equipped with the optional Finisher, first detach it from the main body
of the copier. If the copier is equipped with the optional Copy Tray, first remove thetray.
* If the copier is equipped with the optional Finisher, first open the paper ejection cover1 and then the cover 2 to the conveyor attachment.
4. If the misfed paper is visible, remove it without tearing it.* If the misfed paper is not visible, perform steps 5 - 10.
* If you simply cannot remove the misfed paper easily, turn the fixing unit knob in thedirection of the arrow to eject the misfed paper.
5. Lower the paper conveyor section release lever to the left and pull out the paperconveyor section.
WARNINGHigh voltage is present in the charger section. Take sufficient care whenworking in this area, as there is a danger of electrical shock.
6. Open the fixing unit cover 1.
CAUTIONThe copier's fixing unit is extremely hot. Take sufficient care when workingin this area, as there is a danger of getting burned.
10-9
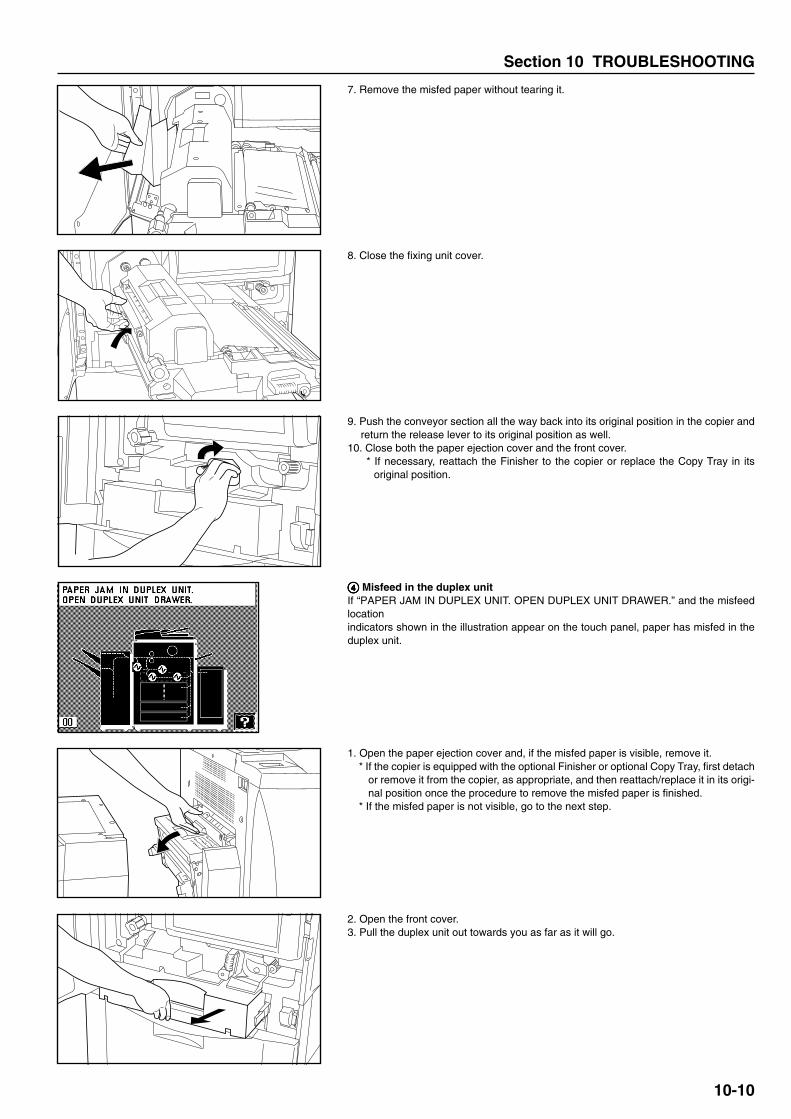
Section 10 TROUBLESHOOTING
2A080030AKM-6230 (KME)
/ 131
7. Remove the misfed paper without tearing it.
44444 Misfeed in the duplex unitIf “PAPER JAM IN DUPLEX UNIT. OPEN DUPLEX UNIT DRAWER.” and the misfeedlocationindicators shown in the illustration appear on the touch panel, paper has misfed in theduplex unit.
1. Open the paper ejection cover and, if the misfed paper is visible, remove it.* If the copier is equipped with the optional Finisher or optional Copy Tray, first detach
or remove it from the copier, as appropriate, and then reattach/replace it in its origi-nal position once the procedure to remove the misfed paper is finished.
* If the misfed paper is not visible, go to the next step.
2. Open the front cover.3. Pull the duplex unit out towards you as far as it will go.
10-10
8. Close the fixing unit cover.
9. Push the conveyor section all the way back into its original position in the copier andreturn the release lever to its original position as well.
10. Close both the paper ejection cover and the front cover.* If necessary, reattach the Finisher to the copier or replace the Copy Tray in its
original position.

Section 10 TROUBLESHOOTING
2A080030AKM-6230 (KME)
/ 131
4. If the misfed paper is in the re-feeding section, remove it.
5. If it is not in the re-feeding section, lift up on the duplex cover.6. If the misfed paper is under that cover, remove it.
Close the duplex cover and go to step 9.* If the misfed paper is still not visible, it should be under the paper reversing cover. In
this case, go to the next step.
7. Unscrew the two reversing cover screws a located on the left side of the duplex unit.The paper reversing cover b will open downwards.
8. Remove the misfed paper without tearing it. Close the paper reversing cover andfasten it with the same 2 screws.* If the paper does happen to tear, remove any loose scraps from inside the copier.
9. Push the duplex unit all the way back into its original position in the copier.10. Close the front cover.
55555 Misfeed in the DFIf “PAPER MISFEED.” and the misfeed location indicator shown in the illustration ap-pear on the touch panel, an original has misfed in the DF.
10-11
a
b
����

Section 10 TROUBLESHOOTING
2A080030AKM-6230 (KME)
/ 131
1. Remove all of the originals from the original table. If the original set indicator goes out,copying can be resumed. Reset the originals.* If the originals are difficult to remove, or if the original set indicator continues to blink
red even after the originals are removed, go to the next step.2. Remove all of the originals that have been ejected onto the original ejection table.
3. Open the original reversing cover.* When opening the original reversing cover, hold the cover by the center lever.
4. Remove any misfed originals without tearing them.
5. If you cannot remove the originals easily, open the reversing unit and remove themfrom there.
6. If you still cannot remove the originals easily, turn the original misfed release dial toconvey them to the position where they can be easily removed.
7. Once you have removed the misfed originals, close the reversing unit securely.8. Close the original reversing cover. (Press down on the center lever to close it
securely.)
66666 Misfeed in the optional Finisher� Misfeed in the coupling sectionIf “MISFEED IN FINISHER. REMOVE PAPER.” and the misfeed location indicator shownin the illustration appear on the touch panel, paper has misfed in the coupling sectionbetween the Finisher and the copier.
10-12

Section 10 TROUBLESHOOTING
2A080030AKM-6230 (KME)
/ 131
1. Hold down the Finisher release button and pull the Finisher away from the copier.
2. Remove the misfed paper from the coupling section without tearing it.
3. If the misfed paper cannot be removed from the coupling section, open the uppercover.
4. Remove the misfed paper from the conveyor section.5. Close the upper cover and reattach the Finisher to the copier.
� Misfeed in the Sort trayIf “MISFEED IN FINISHER. REMOVE PAPER.” and the misfeed location indicator shownin the illustration appear on the touch panel, paper has misfed in the conveyor section tothe Sort tray.
1. Lift up the Non-sort tray.
10-13

Section 10 TROUBLESHOOTING
2A080030AKM-6230 (KME)
/ 131
2. If the misfed paper is visible in the ejection slot, pull it out in the direction of ejectionwithout tearing it.
3. Grasp the front cover handle and open the front cover towards you.
4. Turn the conveyor knob in a clockwise direction. The misfed paper will be returned tothe internal tray and the internal tray can now be pulled out.
5. Grasp the internal tray handle and carefully pull the internal tray out towards you.
IMPORTANT!Once the internal tray is pulled out, DO NOT attempt to move the internal tray guides c.If these guides are moved, there is a danger of damage to the Finisher.
6. Remove the misfed paper without tearing it.
10-14

Section 10 TROUBLESHOOTING
2A080030AKM-6230 (KME)
/ 131
B
7. Replace the internal tray in its original position all the way into the Finisher.8. Close the front cover securely.
� Misfeed in the paper conveyor sectionIf “MISFEED IN FINISHER. REMOVE PAPER.” and the misfeed location indicator shownin the illustration appear on the touch panel, paper has misfed in the paper conveyorsection to the internal tray.
1. Grasp the front cover handle and open the front cover towards you.
2. Grasp the conveyor guide handle A and open the conveyor guide to the right.
3. If the misfed paper is visible, remove it without tearing it.
4. Grasp the conveyor guide handle B and open the conveyor guide to the right.
10-15

Section 10 TROUBLESHOOTING
2A080030AKM-6230 (KME)
/ 131
5. If the misfed paper is visible, remove it without tearing it.
6. Replace both conveyor guides in their original positions.
7. Grasp the internal tray handle and carefully pull the internal tray out towards you.
8. If there is any misfed paper visible in the internal tray, remove it without tearing it.9. Replace the internal tray in its original position all the way into the Finisher.10. Close the front cover securely.
77777 Misfeed in the optional Side DeckIf “MISFEED IN SIDE DECK. REMOVE PAPER.” and the misfeed location indicatorshown in the illustration appear on the touch panel, paper has misfed in the Side Deck.
1. Hold down the Side Deck release button and pull the Side Deck away from the copier.
10-16
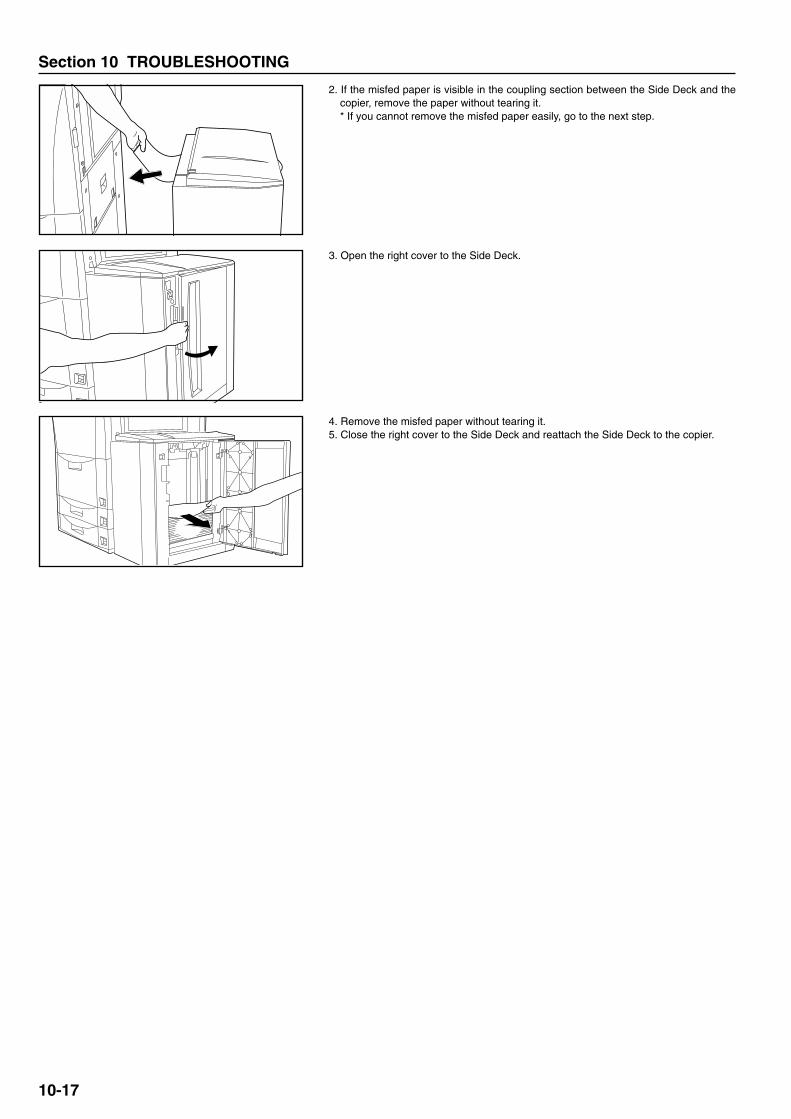
Section 10 TROUBLESHOOTING
2A080030AKM-6230 (KME)
/ 131
2. If the misfed paper is visible in the coupling section between the Side Deck and thecopier, remove the paper without tearing it.* If you cannot remove the misfed paper easily, go to the next step.
3. Open the right cover to the Side Deck.
4. Remove the misfed paper without tearing it.5. Close the right cover to the Side Deck and reattach the Side Deck to the copier.
10-17
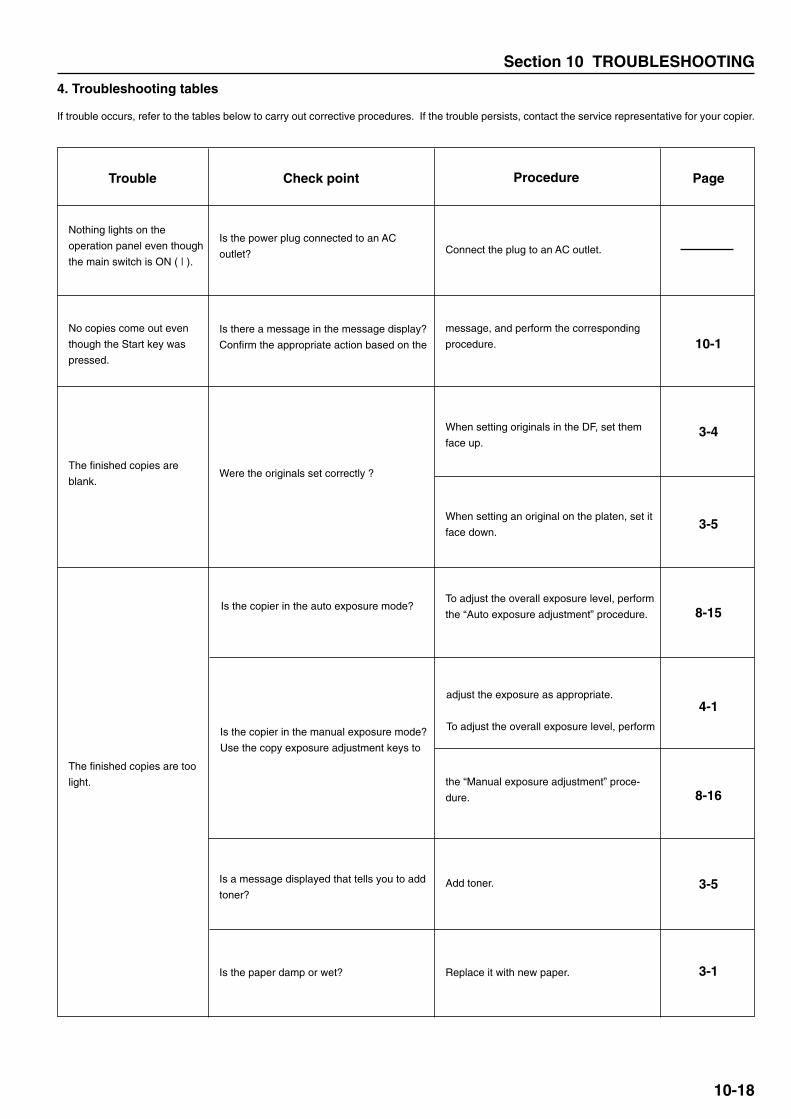
Section 10 TROUBLESHOOTING
2A080030AKM-6230 (KME)
/ 131
PageTrouble Check point Procedure
Nothing lights on the
operation panel even though
the main switch is ON ( | ).
Is the power plug connected to an AC
outlet? Connect the plug to an AC outlet.
No copies come out even
though the Start key was
pressed.
Is there a message in the message display?
Confirm the appropriate action based on the
message, and perform the corresponding
procedure. 10-1
The finished copies are
blank.Were the originals set correctly ?
When setting originals in the DF, set them
face up.3-4
When setting an original on the platen, set it
face down.3-5
The finished copies are too
light.
Is the copier in the auto exposure mode?To adjust the overall exposure level, perform
the “Auto exposure adjustment” procedure. 8-15
adjust the exposure as appropriate.
To adjust the overall exposure level, perform
4-1
the “Manual exposure adjustment” proce-
dure. 8-16
Add toner. 3-5
Is the copier in the manual exposure mode?
Use the copy exposure adjustment keys to
Is a message displayed that tells you to add
toner?
Replace it with new paper. 3-1Is the paper damp or wet?
4. Troubleshooting tables
If trouble occurs, refer to the tables below to carry out corrective procedures. If the trouble persists, contact the service representative for your copier.
10-18

Section 10 TROUBLESHOOTING
2A080030AKM-6230 (KME)
/ 131
Trouble Check point Procedure Page
The finished copies are too
dark.
Is the copier in the auto exposure mode?To adjust the overall exposure level, perform
the “Auto exposure adjustment” procedure. 8-15
The finished copies are dirty.
Is the copier in the manual exposure mode?
Use the copy exposure adjustment keys to
adjust the exposure as appropriate.4-1
The finished copy image is
askew.
Is the platen, the slit glass or the original
protector under the DF dirty?
To adjust the overall exposure level, perform
the “Manual exposure adjustment”
procedure.
8-16
Clean the platen, the slit glass and the
original protector under the DF.10-20
Paper is continually misfed.
Were the originals set correctly?
When setting an original on the platen, align
it properly with the appropriate original size
indicator lines.
3-5
When setting originals in the DF, align them
securely with the original insertion guides. 3-4
Set the paper correctly. 3-1
Replace it with new paper.3-1
Is the paper set correctly in the drawers or
decks?
Is the paper curled, folded or wrinkled?
Carry out the appropriate procedure to
remove the paper.10-4
Is there misfed paper or loose scraps of
paper remaining inside the copier?
10-19
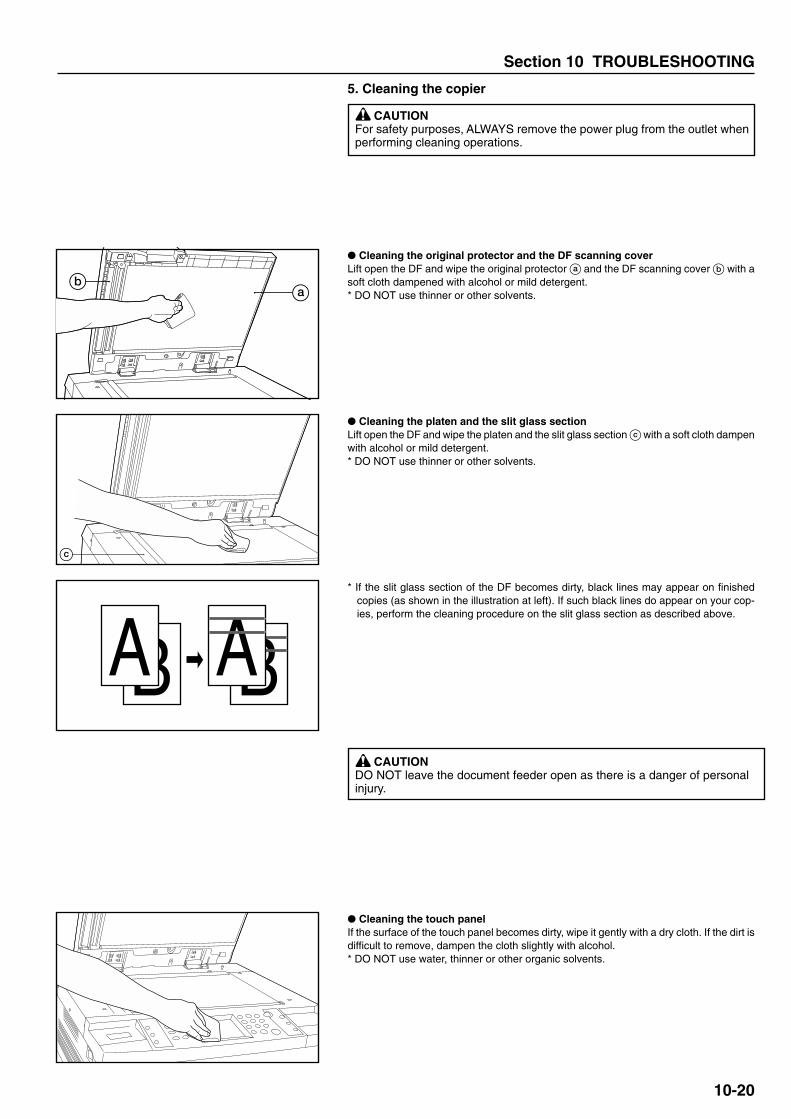
Section 10 TROUBLESHOOTING
2A080030AKM-6230 (KME)
/ 131
5. Cleaning the copier
CAUTIONFor safety purposes, ALWAYS remove the power plug from the outlet whenperforming cleaning operations.
� Cleaning the original protector and the DF scanning coverLift open the DF and wipe the original protector a and the DF scanning cover b with asoft cloth dampened with alcohol or mild detergent.* DO NOT use thinner or other solvents.
� Cleaning the platen and the slit glass sectionLift open the DF and wipe the platen and the slit glass section c with a soft cloth dampenwith alcohol or mild detergent.* DO NOT use thinner or other solvents.
* If the slit glass section of the DF becomes dirty, black lines may appear on finishedcopies (as shown in the illustration at left). If such black lines do appear on your cop-ies, perform the cleaning procedure on the slit glass section as described above.
CAUTIONDO NOT leave the document feeder open as there is a danger of personalinjury.
� Cleaning the touch panelIf the surface of the touch panel becomes dirty, wipe it gently with a dry cloth. If the dirt isdifficult to remove, dampen the cloth slightly with alcohol.* DO NOT use water, thinner or other organic solvents.
10-20

12-1
2A080030AKM-6230 (KME)
/ 131
Section 11 SPECIFICATIONS
2A080030AKM-6230 (KME)
/ 131
Type ................................................................... Desk-top
Original table ......................................................Stationary-type
Copying system ................................................. Indirect electrostatic
Acceptable originals ........................................... Platen: Sheets, books, 3-dimensional (Max. size: A3)
DF: Sheets (A3 - A5 [vertical-feed], Folio,
one-sided originals: 35 g/m2 - 160 g/m2, two-sided originals: 50 g/m2 - 120 g/m2)
Copy size ...........................................................One-sided copies: A3 - A6 [vertical-feed], envelopes [only when using the printer functions of
this machine]
Two-sided copies: A3 - A5 [vertical-feed]
Print margin loss ................................................ 0.5 mm - 5.5 mm
Copy speed ........................................................ Same-size/memory copying: A3- 32 copies/min., B4 (257 mm x 364 mm)- 38 copies/min.,
A4- 62 copies/min., A4 [vertical-feed]- 44 copies/min.
Warm-up time ..................................................... Within 360 sec. (room temperature: 20˚C, humidity: 65%RH), from energy saving preheat mode:
Within 30 sec. (room temperature: 20˚C, humidity: 65%RH)
First copy speed ................................................. 3.6 sec. (A4, manual exposure mode)
Copy magnification ratio .................................... Selectable to any 1% increment between 25% and 400% or to standard fixed ratios.
(Selectable between 25% and 200% when copying from the DF.)
Bitmap memory .................................................. 64 MB (Installed)
Image storage memory ...................................... 8.5 GB (Installed)
Resolution .......................................................... Scanning: 600 dpi x 600 dpi
Printing: 600 dpi x 600 dpi
Paper feed system ............................................. Automatic feed from drawers/deck (Two 550 sheet [80 g/m2] capacity drawers, one 3,000 sheet
[80 g/m2] capacity deck) and stack bypass tray (100 sheet [80 g/m2] capacity)
Acceptable copy paper ...................................... In drawers, decks, duplex unit: Standard (60 g/m2 - 160 g/m2) paper
In stack bypass tray: Standard (60 g/m2 - 200 g/m2) or special paper (letterheads, colored paper or
Transparencies, etc.), envelopes (DL, C5, COM-10, Monarch) [only when using the printer functions
of this machine]
Continuous copying ........................................... 1 - 999 sheets
Light source ....................................................... Inert-gas lamp
Developing system ............................................. Dual-component dry process
Toner replenishment system .............................. From toner bottle to waste toner tank
Fixing system ..................................................... Heat roller
Cleaning system ................................................Blade
Photoconductor .................................................. a-Si
Functions and modes ......................................... Self-diagnosis, auto preheat mode, auto exposure adjustment, original size detection, auto paper size
selection, auto magnification selection, zoom copy mode, fixed-size zoom mode, standard zoom mode,
XY zoom mode, photo mode, two-sided copy mode, margin mode, print page numbers function,
page separation mode, border erase mode, sheet copy mode, presentation mode, transparency +
backing sheet modes, form overlay mode, combined copy mode, booklet copy mode, booklet + cover
copy mode, sort copy mode, invert copy mode, mirror image mode, program mode, change settings
function, job build function, document management functions, copy management functions, weekly
timer mode, default settings, touch panel language selection
Power source ..................................................... 220 - 240 V AC, 50 or 60Hz, 8.5 A
Power consumption ........................................... Rated power consumption (Max. 2040 W)
Dimensions (W) x (D) x (H) ................................ 685 mm x 795 mm x 1170 mm
Weight ................................................................ Approx. 200 kg
Required space (W) x (D) .................................. 1369 mm x 795 mm
Optional equipment ............................................Side Deck, Finisher, Booklet Stitcher, Mailbox Unit, Key Counter, Print/Scan System, Tandem Board,
Copy Tray
(Specifications are subject to change without notice)
11-1
Section 11 SPECIFICATIONS

Section 11 SPECIFICATIONS
2A080030AKM-6230 (KME)
/ 131
Laser radiation could be hazardous to the human body. For this reason, laser radiation emitted inside this
machine is hermetically sealed within the protective housing and external cover. In the normal operation of
the product by user, no radiation can leak from the machine.
This machine is classified as Class 1 laser product under IEC 825.
CAUTION
Performance of procedures other than those specified in this manual may result in hazardous radiation
exposure.
This label is attached to the laser scanner unit inside the machine and is not in a user access area.
The labels shown below are attached on the rear side of the machine.
Laser Safety
CLASS 1 LASER PRODUCT
KLASSE 1 LASER PRODUKT

12-4
2A080030AKM-6230 (KME)
/ 131
AE
CAUTION!The power plug is the main isolation device! Other switches on the equipment are only
functional switches and are not suitable for isolating the equipment from the power source.
VORSICHT!Der Netzstecker ist die Hauptisoliervorrichtung! Die anderen Schalter auf dem Gerät sind
nur Funktionsschalter und können nicht verwendet werden, um den Stromfluß im Gerät
zu unterbrechen.
DECLARATION OF CONFORMITY
TO
89/336/EEC, 73/23/EEC, 93/68/EEC and 1999/5/EC
We declare under our sole responsibility that the product to whichthis declaration relates is in conformity with the following specifications.
Limits and methods of measurement for immunitycharacteristics of information technology equipment EN55024
Limits and methods of measurement for radio interferencecharacteristics of information technology equipment EN55022 Class B
Limits for harmonic currents emissionsfor equipment input current ≤ 16A per phase EN61000-3-2
Limitation of voltage fluctuations and flicker in low-voltagesupply systems for equipment with rated current ≤ 16A EN61000-3-3
Safety of information technology equipment,including electrical equipment EN60950
Radiation Safety of laser products, equipment classification,Çíequirements and user’s guide EN60825-1
The common technical regulation for the attachment requirementsfor connection to the analogue public switched telephone networks(PSTNs) of terminal equipment (excluding terminal equipmentsupporting the voice telephony justified case service) in whichnetwork addressing, if provided, is by means of dual tonemulch-frequency (DTMF) signaling CTR 21
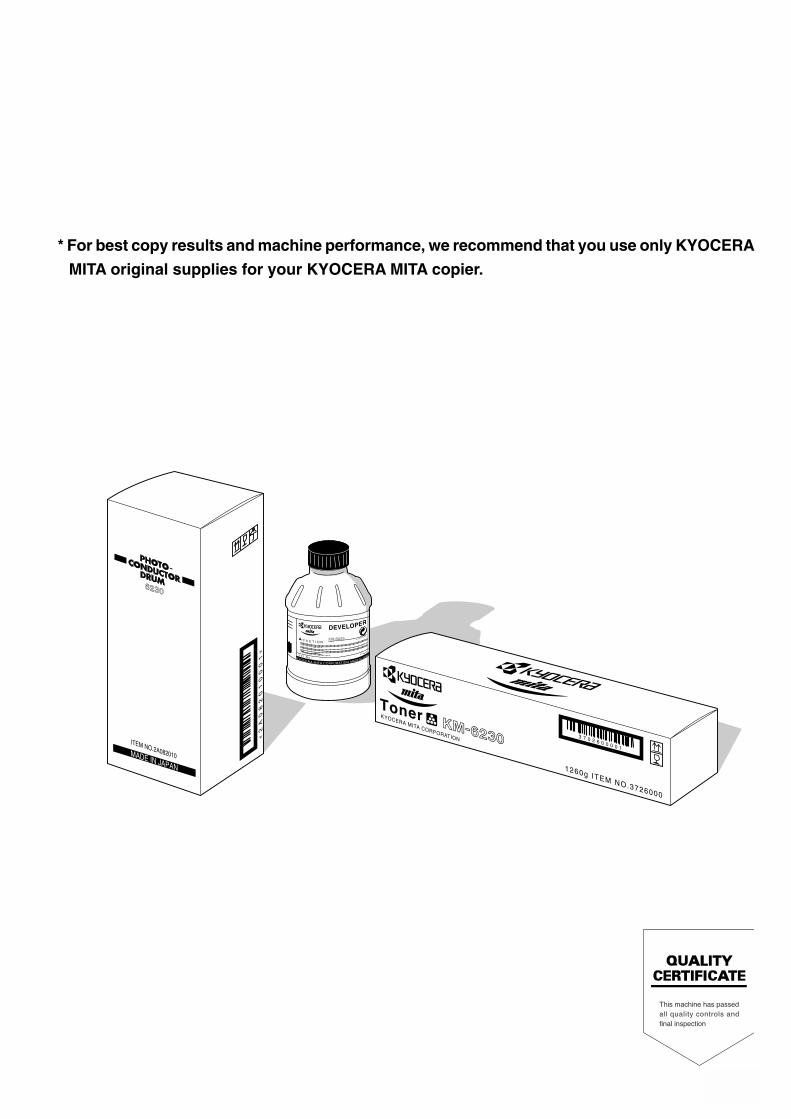
12-5
2A080030AKM-6230 (KME)
/ 131
* For best copy results and machine performance, we recommend that you use only KYOCERA
MITA original supplies for your KYOCERA MITA copier.

12-6
2A080030AKM-6230 (KME)
/ 131
©2000 KYOCERA MITA CORPORATION
is a trademark of Kyocera Corporation
is a registered trademark of KYOCERA MITA CORPORATION
2000. 52A080030A
KYOCERA MITA PORTUGAL LDA.CASCAISTOCK-Armazem nº8,Rua das Fisgas, Alcoitão,2765 Estoril, PortugalPhone: 1-4602221
KYOCERA MITA SOUTH AFRICA (PTY) LTD.Unit 3, "KYALAMI CRESCENT",KYALAMI BUSINESS PARK,1685 Midrand, South AfricaPhone: (011) 4663290
KYOCERA MITA AMERICA, INC.Headquarters:225 Sand Road, P.O. Box 40008Fairfield, New Jersey 07004-0008U.S.A.Phone: (973) 808-8444
KYOCERA MITA ASIA OCEANIA SALES DIVISION 2-28, 1-chome, Tamatsukuri, Chuo-ku,Osaka 540-8585, JapanPhone: (06) 6764-3668
KYOCERA MITA AUSTRALIA PTY.LTD.P.O. Box 211, Regents Park Estate Unit 2,Block V 391 Park Road,Regents Park N.S.W. 2143, AustraliaPhone: 61-2-9645-5100
KYOCERA MITA NEW ZEALAND LTD.5 Howe Street, Newton, Auckland 1,P.O. Box 68343,Auckland, New ZealandPhone: (09) 377-2088
KYOCERA MITA (THAILAND) CORP.,LTD.9/209 Ratchada-Prachacheun Road,Bang Sue, Bangkok 10800, ThailandPhone: (02) 586-0333
KYOCERA MITA SINGAPOREPTE LTD.121 Genting Lane, 3rd. Level,Singapore 349572Phone: 65-7418733
KYOCERA MITA HONG KONGLIMITED.11/F., Mita Centre,552-566 Castle Peak Road,Tsuen Wan, New Territories,Hong KongPhone: 852-2423-2163
KYOCERA MITA CORPORATION2-28, 1-chome, Tamatsukuri, Chuo-ku,Osaka 540-8585, JapanPhone: (06) 6764-3555Fax: (06) 6764-3981
KYOCERA MITA EUROPE B.V.Hoeksteen 40, 2132 MS Hoofddorp,The NetherlandsPhone: (020) 6540000Home page: http://www.mita.nl, Email: [email protected]
KYOCERA MITA NEDERLAND B.V.Gyroscoopweg 122, 1042 AZ Amsterdam,The NetherlandsPhone: (020) 5877200
KYOCERA MITA (U.K.) LTD.Mita House, Hamm Moor Lane,Addlestone, Weybridge,Surrey KT15 2SB, U.K.Phone: (01932) 858266
KYOCERA MITA ITALIA S.P.A.Via Marconi 8, 20041 Agrate Brianza,Milano, ItalyPhone: (039) 65641
S.A. KYOCERA MITA BELGIUM N.V.Hermesstraat 8A 1930 Zaventem, BelgiumPhone: (02) 7209270
KYOCERA MITA FRANCE S.A.R.L.1 Rue Pelloutier,77183 Croissy Beaubourg, FrancePhone: (1) 60175152
KYOCERA MITA ESPAÑA S.A.Edificio Mita, Avda. De Manacor Nº 2,Urb. Parque Rozas, Apartado De Correos 76,28230 Las Rozas, Madrid, SpainPhone: 34-91-631-8392
KYOCERA MITA FINLAND OYKirvesmiehenkatu 4, 00810 Helsinki,FinlandPhone: (09) 478 05200
KYOCERA MITA (SCHWEIZ) AGHölzliwisen Industriestrasse 28,8604 Volketswil, SwitzerlandPhone: (01) 9084949
KYOCERA MITA DEUTSCHLAND GMBHIndustriestrasse 17, D-61449 Steinbach/TS,GermanyPhone: (06171) 7005-0
KYOCERA MITA GMBH AUSTRIAEduard Kittenberger Gasse 95A-1230 Wien, AustriaPhone: (01) 86338 210
KYOCERA MITA SVENSKA ABSiktgatan 2162 26 Vällingby, SwedenPhone: (08) 4719999
KYOCERA MITA DANMARK A/SIndustrivej 11, DK-4632 Bjæverskov,DenmarkPhone: 56871100