instruction guide - oncoreepm.com guide commercia 3. ... with enhanced functionalities and an...
TRANSCRIPT

Instruction GuideEEPM 2.0
ENERGY EFFICIENCY PROGRAM
C O M M E R C I A L


M A I N S E C T I O N H E A D E RTA B L E O F C O N T E N T S
About EEPM 2.0 ...............................................................................................................................................................................4
Program Participation .....................................................................................................................................................................5
Service Provider Dashboard ..........................................................................................................................................................6
Program Option Activity ...................................................................................................................................................6
Eligible Programs ...............................................................................................................................................................6
Program Applications ........................................................................................................................................................7
Starting a New Commercial Project ...........................................................................................................................................10
My Projects ........................................................................................................................................................................11
Start a New Project ...........................................................................................................................................................12
Customers & Measures ....................................................................................................................................................13
Add Sites ............................................................................................................................................................................13
Add Measures ...................................................................................................................................................................16
Edit Site & Measure ..........................................................................................................................................................17
Upload Documents ..........................................................................................................................................................17
Review and Submit ...........................................................................................................................................................21
Editing a Project .............................................................................................................................................................................22
Recently Viewed Projects ................................................................................................................................................23
My Projects ........................................................................................................................................................................23
Request for Duplicate Approval .................................................................................................................................................24
INSTRUCTION GUIDE | COMMERCIAL 3

M A I N S E C T I O N H E A D E RA B O U T E E P M 2 . 0
A dedicated and secure online portal, EEPM 2.0 makes it easier for service providers to participate in Oncor’s
Energy Efficiency programs.
With enhanced functionalities and an enriched user interface, the portal allows service providers to create and
submit projects, and apply for incentives with minimal effort. The new and improved process will reduce the time
it takes to create and submit projects, and eliminate data entry errors in savings calculations. With the introduction
of the e-signature feature, service providers can now send system-generated documents—such as the host
customer agreement and installation notice certificate—to customers for their e-signature directly from the portal.
Whether you’re starting a new project or editing an existing one, this guide covers everything you need to know
when you log in to EEPM 2.0.
INSTRUCTION GUIDE | COMMERCIAL 4

Program ParticipationC O M M E R C I A L
P R O G R A M PA R T I C I PAT I O N
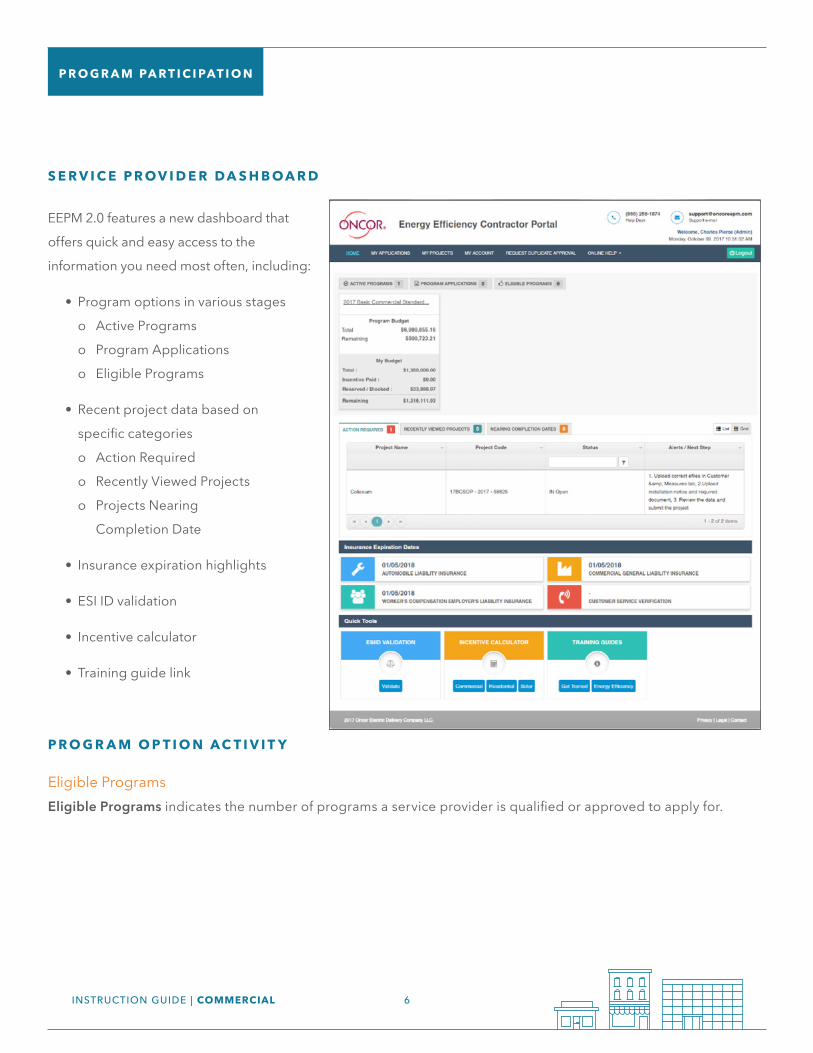
S E R V I C E P R O V I D E R D A S H B O A R D
EEPM 2.0 features a new dashboard that
offers quick and easy access to the
information you need most often, including:
• Program options in various stages
o Active Programs
o Program Applications
o Eligible Programs
• Recent project data based on
specific categories
o Action Required
o Recently Viewed Projects
o Projects Nearing
Completion Date
• Insurance expiration highlights
• ESI ID validation
• Incentive calculator
• Training guide link
P R O G R A M O P T I O N A C T I V I T Y
Eligible ProgramsEligible Programs indicates the number of programs a service provider is qualified or approved to apply for.
INSTRUCTION GUIDE | COMMERCIAL 6

• To view the specific programs, you’re eligible for, click on the Eligible Programs tab. o The corresponding programs will appear in a horizontal series. o If the program you want to apply for is not displayed, email the support desk/program manager.
• Navigate right or left using the arrow keys at the bottom.
• Click on Request Application to start the program application process.
• Once the time frame for the program application expires, the Request Application button will be disabled and service providers will no longer be able to apply.
Program Applications* Before you begin the Program Application process you must have your insurance agent submit valid insurance forms (auto, general liability and workers comp) to [email protected].
Program Applications will appear with the “Open” status as shown in the image below.
• Click on the Program Option link as shown in the above image to view the Program Applications screen.
• The Program Applications screen will appear.
INSTRUCTION GUIDE | COMMERCIAL 7

1. Check the box at the top right to have your company’s name added to the Oncor/TALOT website for customers.
2. Select (check the appropriate boxes) for Measures I can install.
3. Areas that I serve can be selected in two ways:
3a. Import the county list from previously submitted applications by selecting the appropriate item from the
drop-down menu.
3b. Select the county manually. Based on the county chosen, the corresponding cities and zip codes will be
automatically selected. You can uncheck any cities and zip codes that you do not serve.
4. Upload mandatory Documents such as:
o Program Addendum
o Financial References
5. Click on Submit Application.
1
2
3
4
5
3a3b
INSTRUCTION GUIDE | COMMERCIAL 8

If your application is denied by the program manager, it will be listed in the Program Applications tab with a “Rejected”
status. You would then need to correct any inaccurate or missing data and resubmit the application for review.
Applications can also be viewed from the My Applications tab, which displays a list of each program application and
its corresponding status, as shown below.
After you submit the program application, an Oncor program manager will review your submission. Once the review
is completed, you’ll receive an email notifying you of the decision on your application. If your application is approved,
you’ll have access to the program in the Active Programs list as shown below.
INSTRUCTION GUIDE | COMMERCIAL 9

Starting a New Commercial Project
C O M M E R C I A L
M A I N S E C T I O N H E A D E RS TA R T I N G A N E W C O M M E R C I A L P R OJ E C T
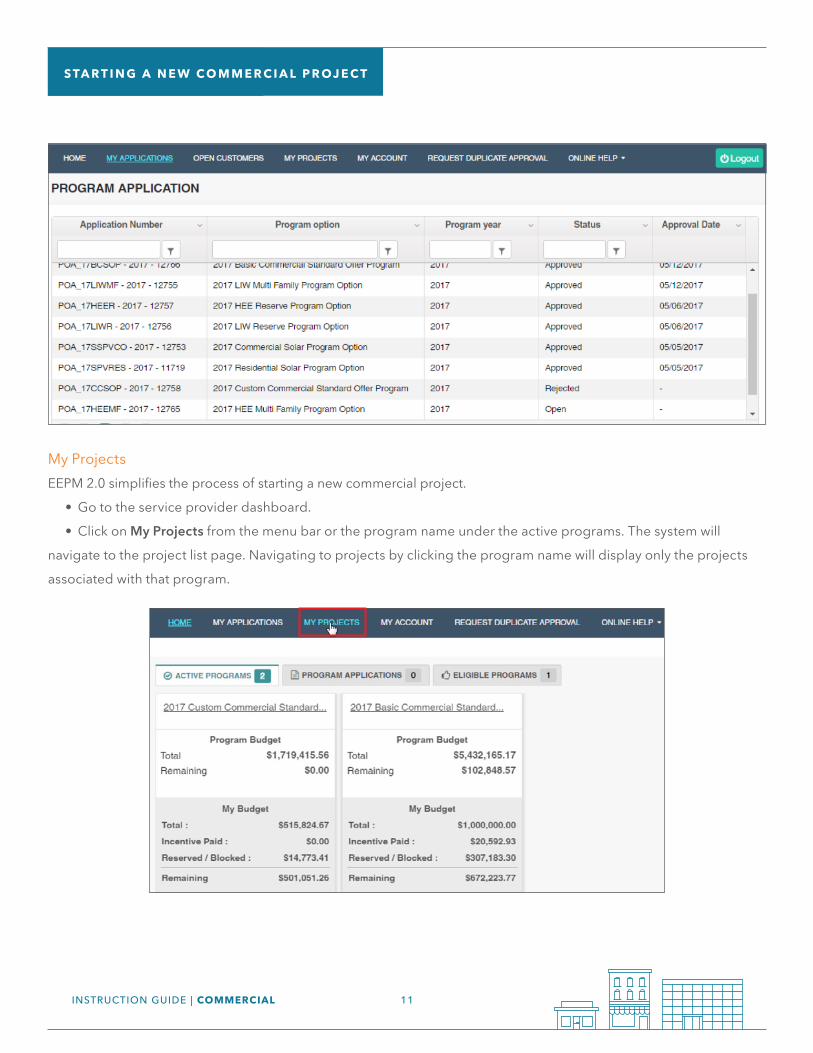
My ProjectsEEPM 2.0 simplifies the process of starting a new commercial project.
• Go to the service provider dashboard.
• Click on My Projects from the menu bar or the program name under the active programs. The system will
navigate to the project list page. Navigating to projects by clicking the program name will display only the projects
associated with that program.
INSTRUCTION GUIDE | COMMERCIAL 11

Start a New Project 1. From the main menu bar, click on My Projects.
2. Click on the Start a New Project button below the main menu bar.
Action Buttons
View: To view a project you’ve submitted, start with the My Projects table. Use the filter
options available in the column headers to refine your search. Then, click the “eye” icon in the
Action column. The row color will change to dark gray.
Edit: To edit your open projects, click on the “pen and paper” icon in the Action column.
Delete: To permanently delete a project, click on the “trash can” icon in the Action column.
The My Projects screen includes options to Start a New Project and view Historical Projects (projects from the previous
program year). The table will list all projects with details such as the project code, status and incentive amount.
1
2
INSTRUCTION GUIDE | COMMERCIAL 12

1. Select the program option from the Select Program drop-down menu.
2. Enter the Project Name.
3. Enter the Project Capital Cost.
4. Select Estimated Completion Date from the calendar.
5. Choose a project type from the Project Type drop-down menu.
6. Click on Save & Continue to save the project. The system will navigate to the next tab.
7. To discard the project, click on Cancel.
Customers & MeasuresThe Customers & Measures tab is used to add site and measure information. Follow the guidelines below when
adding sites and including measure information for a project.
Add SitesFrom the Customers & Measures tab, click on the Add Site button in the project information header to open a list of
fields related to the site information.
The system will navigate to the Start a New Project screen as shown below.
1 2 3
4 5
67
INSTRUCTION GUIDE | COMMERCIAL 13
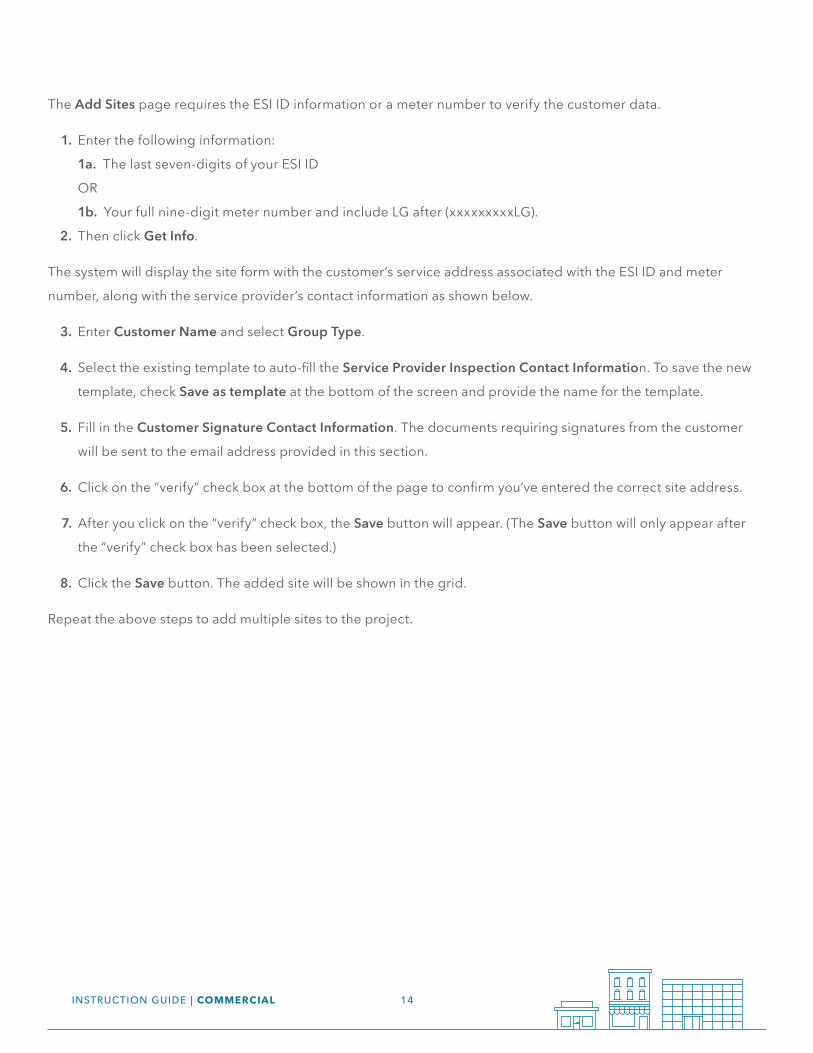
The Add Sites page requires the ESI ID information or a meter number to verify the customer data.
1. Enter the following information:
1a. The last seven-digits of your ESI ID
OR
1b. Your full nine-digit meter number and include LG after (xxxxxxxxxLG).
2. Then click Get Info.
The system will display the site form with the customer’s service address associated with the ESI ID and meter
number, along with the service provider’s contact information as shown below.
3. Enter Customer Name and select Group Type.
4. Select the existing template to auto-fill the Service Provider Inspection Contact Information. To save the new
template, check Save as template at the bottom of the screen and provide the name for the template.
5. Fill in the Customer Signature Contact Information. The documents requiring signatures from the customer
will be sent to the email address provided in this section.
6. Click on the “verify” check box at the bottom of the page to confirm you’ve entered the correct site address.
7. After you click on the “verify” check box, the Save button will appear. (The Save button will only appear after
the “verify” check box has been selected.)
8. Click the Save button. The added site will be shown in the grid.
Repeat the above steps to add multiple sites to the project.
INSTRUCTION GUIDE | COMMERCIAL 14

1
3
4
5
6
7 8
21a 1b
INSTRUCTION GUIDE | COMMERCIAL 15

Add Measures 1. Click Add Measure corresponding to the site added as shown below to upload the e-file.
2. Select the measure.
3. Attach and upload the e-file. *E-files can be located at oncoreepm.com/Commercial.aspx (scroll down and click on Standard E-Files).
4. Click on the Save button. The system will display a “success” message when the measure has been stored
successfully, along with the calculated kW & kWh savings and incentive amount.
5. Click Download Template to download the e-file template of the selected measure.
Repeat the above steps to add additional measures if necessary.
6. Click Save and Continue at the bottom of the Customers & Measures tab.
1
2
34
5
INSTRUCTION GUIDE | COMMERCIAL 16
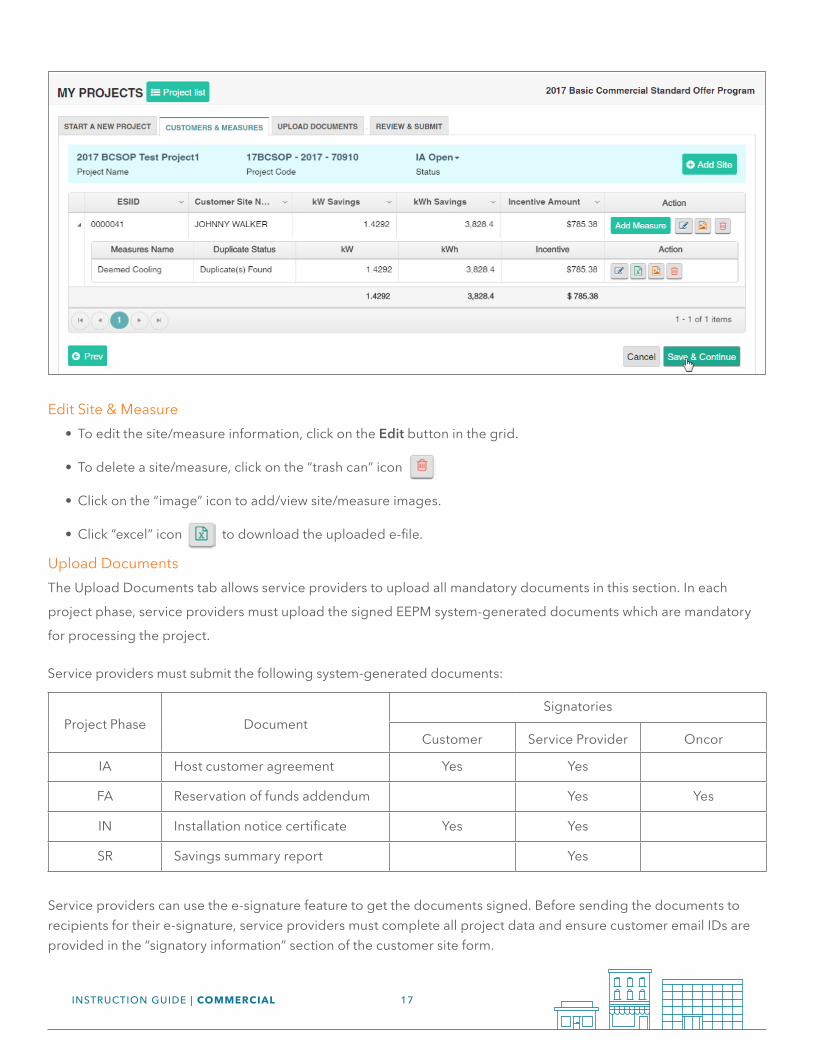
Edit Site & Measure • To edit the site/measure information, click on the Edit button in the grid.
• To delete a site/measure, click on the “trash can” icon
• Click on the “image” icon to add/view site/measure images.
• Click “excel” icon to download the uploaded e-file.
Upload DocumentsThe Upload Documents tab allows service providers to upload all mandatory documents in this section. In each
project phase, service providers must upload the signed EEPM system-generated documents which are mandatory
for processing the project.
Service providers must submit the following system-generated documents:
Project Phase DocumentSignatories
Customer Service Provider Oncor
IA Host customer agreement Yes Yes
FA Reservation of funds addendum Yes Yes
IN Installation notice certificate Yes Yes
SR Savings summary report Yes
Service providers can use the e-signature feature to get the documents signed. Before sending the documents to recipients for their e-signature, service providers must complete all project data and ensure customer email IDs are provided in the “signatory information” section of the customer site form.
INSTRUCTION GUIDE | COMMERCIAL 17

How to send documents for e-signatures1. Select the “e-sign” signature option to digitally sign the system-generated document.
2. Upload all of the required project support documents other than system-generated documents.
3. Click Save & Continue to navigate to the Review & Submit tab.
4. After clicking Submit in the Review & Submit tab, the project will move to the “Awaiting Signature” state.
An email containing a link to sign the document will be sent to the customer email ID provided in the
customer site form.
5. Once the customer e-signs the document, another email will be sent to the service provider for their signature.
6. Once both signatures are completed, the project workflow will update to the “Submitted” state and the
signed document will be updated in the portal.
7. When the “e-sign” signature option is selected, the system will not allow the user to manually upload
documents against the system-generated documents.
8. Service providers can check on the signature status of the document by clicking on the “pencil” icon.
9. Once the document is sent for e-signatures, the project will move into a non-editable mode.
10. To opt out of the e-signature feature after sending the document for e-signatures, click on the “trash” icon.
This action will trash the document and make the links inactive, and the project will move back to the “Open”
state. Service providers are advised to use the e-signature option only when all the signatories accepted the
use of e-signatures.
11. Refer to the separate guide for step-by-step instructions on signing the document received via Right Signature.
Work flow operations for e-signature:
INSTRUCTION GUIDE | COMMERCIAL 18

Signature option selection
Service providers can also complete a wet sign by manually downloading the document. Click the hyperlink and
upload the signed document under the SP Attachments section. For a manual signature, the “Wet sign” signature
option should be selected.
(★) symbol denotes mandatory documents.
INSTRUCTION GUIDE | COMMERCIAL 19

Document sent for signature
Signature status of document
INSTRUCTION GUIDE | COMMERCIAL 20
Following the program manager’s review, the project status will enter the following phases before approval:
• Initial application phase (IA)
• Final application phase (FA)
• Installation notice phase (IN)
• Savings report phase (SR)
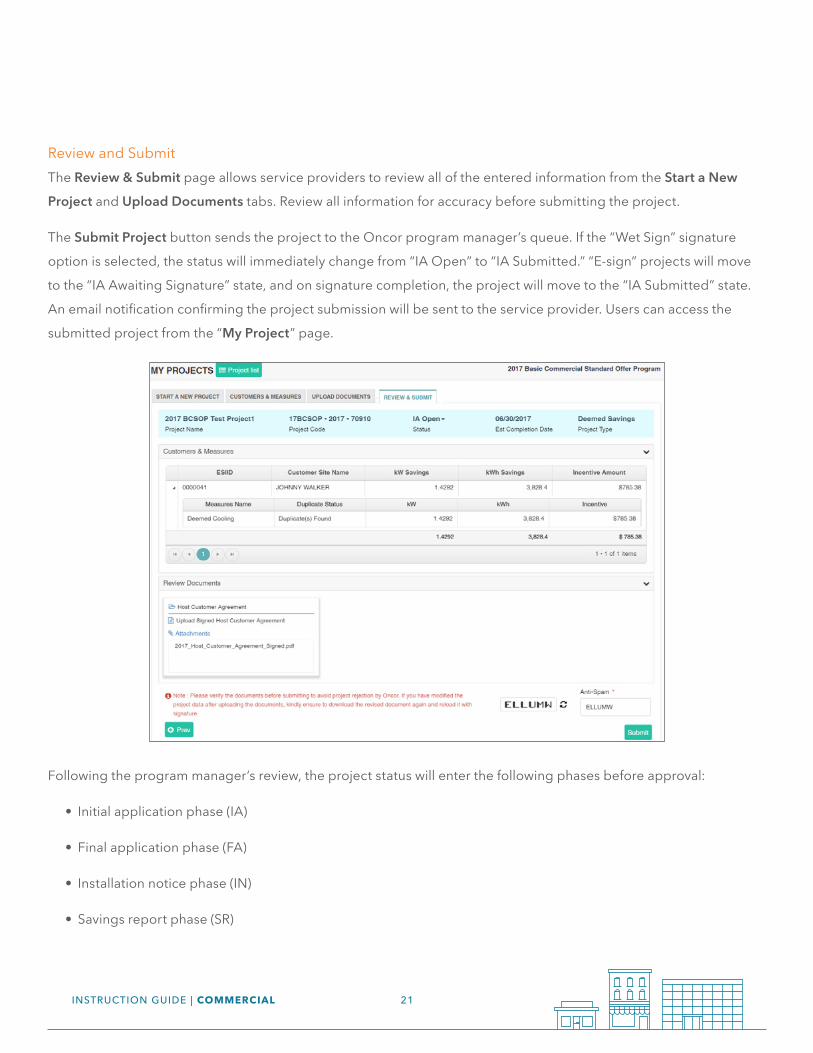
Review and SubmitThe Review & Submit page allows service providers to review all of the entered information from the Start a New
Project and Upload Documents tabs. Review all information for accuracy before submitting the project.
The Submit Project button sends the project to the Oncor program manager’s queue. If the “Wet Sign” signature
option is selected, the status will immediately change from “IA Open” to “IA Submitted.” “E-sign” projects will move
to the “IA Awaiting Signature” state, and on signature completion, the project will move to the “IA Submitted” state.
An email notification confirming the project submission will be sent to the service provider. Users can access the
submitted project from the “My Project” page.
INSTRUCTION GUIDE | COMMERCIAL 21

Editing a ProjectC O M M E R C I A L

E D I T I N G A P R OJ E C T
There are two ways to edit a project:
• Filter and browse Recently Viewed Projects.
• Search from the list in the My Projects table.
Recently Viewed Projects
The Recently Viewed Projects tab, located in the service provider dashboard menu, lists all recently viewed projects.
• Filter the project by status under the Status column header.
• Review the Project Name (first column) and Project Code (second column) for a specific project.
• Click on the Project Code hyperlink to view and edit the project.
My Projects
From the main menu, click on My Projects, located in the service provider dashboard menu.
• Search for the project using the Project Name or Project Code filters.
• Click on the corresponding icons under the Action column to view and edit the project.
INSTRUCTION GUIDE | COMMERCIAL 23

Request for Duplicate Approval
C O M M E R C I A L

M A I N S E C T I O N H E A D E RR E Q U E S T F O R D U P L I C AT E A P P R O VA L
Service providers are not allowed to submit the project if the measure added under the site is duplicated. Duplicate
measures must be approved by the Oncor program manager prior to project submission.
To send the measure duplicate approval request:
1. Navigate to Request Duplicate Approval from the main menu.
2. Select the site which has duplicate measure.
3. Enter the comment.
4. Click Request Duplicate Approval button. The request will be sent to the program manager for approval.
5. Click on Measure History to view complete details of the previously submitted measure.
Oncor Program manager reviews the request for duplicate measure and approves/rejects it. Service provider will be
notified via email and then can proceed to submit the project.
1
2
3 4
5
INSTRUCTION GUIDE | COMMERCIAL 25

Thank you for participating in Oncor’s
Energy Efficiency programs. If you have questions, please email
us at [email protected].
INSTRUCTION GUIDE | COMMERCIAL