instruction and recipe booklet - lowes...
TRANSCRIPT

INSTRUCTION AND RECIPE BOOKLET
International Chef™ Crêpe/Pizzelle/Pancake Plus CPP-200 Series
For your safety and continued enjoyment of this product, always read the instruction book carefully before using.
2
IMPORTANT SAFEGUARDSWhen using an electrical appliance, basic safety precautions should always be followed, including the following: 1. READ ALL INSTRUCTIONS. 2. Do not touch hot surfaces. Use handles
and dials. 3. To protect against fire, electrical shock,
and injury to persons, DO NOT IMMERSE CORD, PLUG, OR UNIT in water or other liquids.
4. Close supervision is necessary when any appliance is used by or near children.
5. Unplug from outlet when not in use and before cleaning. Allow to cool before putting on or taking off parts, and before cleaning appliance.
6. Do not operate any appliance with a damaged cord or plug or after the appli-ance malfunctions or has been damaged in any manner. Return appliance to the near-est Cuisinart Authorized Service Facility for examination, repair, or adjustment.
7. The use of accessory attachments not recommended by Cuisinart may result in fire, electric shock, or injury to persons.
8. Do not use outdoors. 9. Do not let power cord hang over edge of
table or counter, or touch hot surfaces.10. Do not place on or near a hot gas or elec-
tric burner, or in a heated oven.11. Do not use appliance for other than
intended use.12. Always unplug the unit when finished
cooking. 13. To safely disconnect power at any time,
remove the plug from the outlet.14. Extreme caution must be used when
moving an appliance containing hot oil or other hot liquids.
15. WARNING: TO REDUCE THE RISK OF FIRE OR ELECTRIC SHOCK, REPAIR SHOULD BE DONE ONLY BY AUTHORIZED PERSONNEL. NO USER- SERVICEABLE PARTS ARE INSIDE.
16. Do not operate your appliance in an appli- ance garage or under a wall cabinet. When storing in an appliance garage always unplug the unit from the electrical outlet. Not doing so could create a risk of fire, especially if the appliance touches the walls of the garage or the door touches the unit as it closes.
SAVE THESE INSTRUCTIONSFOR HOUSEHOLD USE ONLYSPECIAL CORD SET INSTRUCTIONSA short power-supply cord is provided to reduce the risks resulting from becoming entangled in or tripping over a longer cord.
Extension cords may be used if care is exer-cised in their use.
If an extension cord is used, the marked electrical rating of the extension cord should be at least as great as the electrical rating of the appliance, and the longer cord should be arranged so that it will not drape over the countertop or tabletop where it can be pulled on by children or animals, or tripped over.
NOTICEThis appliance has a polarized plug (one blade is wider than the other). To reduce the risk of electric shock, this plug will fit in a polarized outlet only one way. If the plug does not fit fully in the outlet, reverse the plug. If it still does not fit, contact a qualified electrician. Do not modify the plug in any way.
3
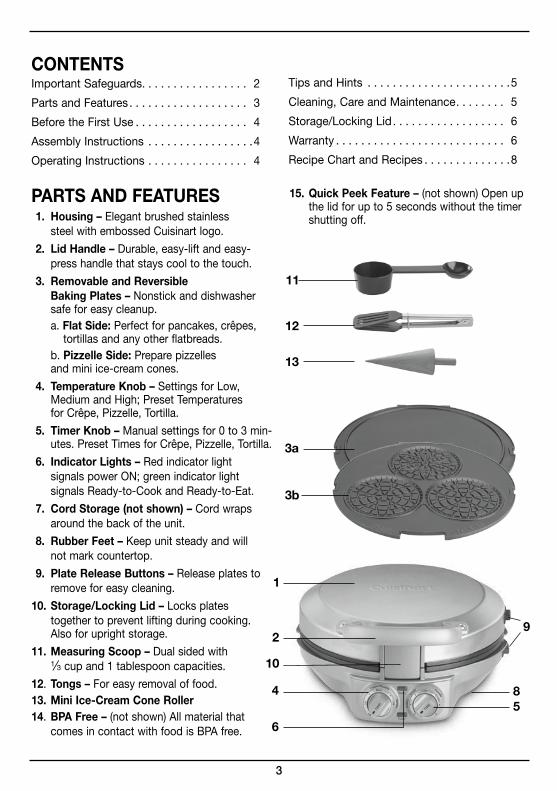
PARTS AND FEATURES 1. Housing – Elegant brushed stainless
steel with embossed Cuisinart logo.
2. Lid Handle – Durable, easy-lift and easy- press handle that stays cool to the touch.
3. Removable and Reversible Baking Plates – Nonstick and dishwasher safe for easy cleanup.
a. Flat Side: Perfect for pancakes, crêpes, tortillas and any other flatbreads.
b. Pizzelle Side: Prepare pizzelles and mini ice-cream cones.
4. Temperature Knob – Settings for Low, Medium and High; Preset Temperatures for Crêpe, Pizzelle, Tortilla.
5. Timer Knob – Manual settings for 0 to 3 min- utes. Preset Times for Crêpe, Pizzelle, Tortilla.
6. Indicator Lights – Red indicator light signals power ON; green indicator light signals Ready-to-Cook and Ready-to-Eat.
7. Cord Storage (not shown) – Cord wraps around the back of the unit.
8. Rubber Feet – Keep unit steady and will not mark countertop.
9. Plate Release Buttons – Release plates to remove for easy cleaning.
10. Storage/Locking Lid – Locks plates together to prevent lifting during cooking. Also for upright storage.
11. Measuring Scoop – Dual sided with 1⁄3 cup and 1 tablespoon capacities.
12. Tongs – For easy removal of food.13. Mini Ice-Cream Cone Roller14. BPA Free – (not shown) All material that
comes in contact with food is BPA free.
15. Quick Peek Feature – (not shown) Open up the lid for up to 5 seconds without the timer shutting off.
CONTENTSImportant Safeguards. . . . . . . . . . . . . . . . . 2
Parts and Features . . . . . . . . . . . . . . . . . . . 3
Before the First Use . . . . . . . . . . . . . . . . . . 4
Assembly Instructions . . . . . . . . . . . . . . . . .4
Operating Instructions . . . . . . . . . . . . . . . . 4
Tips and Hints . . . . . . . . . . . . . . . . . . . . . . .5
Cleaning, Care and Maintenance. . . . . . . . 5
Storage/Locking Lid. . . . . . . . . . . . . . . . . . 6
Warranty . . . . . . . . . . . . . . . . . . . . . . . . . . . 6
Recipe Chart and Recipes . . . . . . . . . . . . . .8
3a
3b
11
12
13
1
2
85
9
6
4
10

4
BEFORE THE FIRST USERemove all packaging and any promotional labels or stickers from your unit. Be sure that all parts (listed on Page 3, Parts and Features) have been included before discarding any pack-aging materials. You may want to keep the box and packing materials for use at a later date.
Before using your International Chef™ Crêpe/Pizzelle/Pancake Plus for the first time, wipe housing with a damp cloth and wash plates and accessories well to remove any dust from the warehouse or shipping.
Note: The International Chef™ Crêpe/Pizzelle/Pancake Plus has been treated with a special nonstick coating. Before the first use, we sug-gest you season the plates with flavorless veg-etable oil. Apply oil with a paper towel or pastry brush. You may find it helpful to repeat this pro-cess before each use.
ASSEMBLY INSTRUCTIONSPlace the International Chef™ Crêpe/Pizzelle/Pancake Plus on a clean flat surface where you intend to cook. It can be positioned in three ways:
Closed Position – Upper plate/cover rests flat on lower plate/base. This is your starting and heat-ing position. Always use caution when changing positions once the unit is preheated.
Open Position – Upper plate/cover is open and in the 105° position. Open the cover to this position before using the unit as a press or in the flat position.To adjust to this position, press the top of the locking latch and lift the handle until you feel it come to a locking position. The unit will stay in this position until you close the cover or con-tinue to open it to the flat position.
Flat Position – Upper plate/cover is level with lower plate/base. The upper and lower plates lie flat to double the cooking surface.
Start with the unit in the open posi-tion. Then, lift the handle vertically at a 90˚ angle. Push the handle back until the cover rests flat on the counter.
The unit will stay in this position until you lift the handle and cover to return it to the closed position.
To insert plates1. Adjust the unit to the flat position.2. Insert one plate at a time. The plate marked
LOWER is designed for the lower hous-ing. The plate marked UPPER is designed for the upper housing.
3. Locate the two holes in the hinge at the back of the housing. Tilt the back end of the plate and line up the pegs at the back of the plate with the holes in the hinge. Slide the plate into the holes and push down the front end of the plate. It will snap into place.
4. Repeat with second plate.To remove plates1. Locate the plate release buttons on the right
side of the unit. Press firmly on button and the plate will pop up slightly from the base.
2. Grasp the plate with two hands, slide it out from the holes, and lift it out of the base.
3. Press on the other plate release button to remove the other plate in the same manner.
OPERATING INSTRUCTIONS1. Plug the power cord into a standard electrical
outlet.
2. Adjust the Temperature Knob to the desired setting or to one of the preset temperatures if cooking crêpes, pizzelle, or tortillas. Be sure to close lid. Red Power-on light will illumi-nate.

5
3. If working in the closed position, adjust the Timer Knob to the desired time, or to one of the preset times if cooking crêpes, pizzelle, or tortillas.
4. When green light illuminates, plates have reached the selected temperature and you’re ready to cook. NOTE: Depending on tem-perature selected, heat-up times will vary.
5. Pour batter or place ingredients on plates. Green light will go off.
6. Close lid if not cooking on open griddle. When lid is closed and locked, timer will begin counting down. NOTE: If lid is opened for more than 5 seconds during cooking, timer will shut off.
7. When items are cooked and ready to eat, green light will illuminate and you will hear a beep tone.
8. Refer to the chart on page 8 for cooking tips and recommendations.
Caution: Always exercise caution when han-dling the unit during cooking as the housing will become very hot. Be sure to use an oven mitt to prevent burns. The handle stays cool for opening and closing during cooking.
Note: The first time you use your International Chef™ Crêpe/Pizzelle/Pancake Plus it may have a slight odor and may smoke a bit. This is nor-mal, and common to appliances with a nonstick surface.
TIPS AND HINTS1. The temperature control is used to set and
maintain the temperature of the cooking surface. You may vary the setting of the temperature control knob at any time during cooking, depending on the types of foods being prepared. Use our preset temperatures for crêpes, pizzelle, and tortillas.
2. Cooking is based on time. All recipes are given a recommended time for cooking and our preset times make cooking perfect crêpes, pizzelle, and tortillas easy. Times are approximate. Please refer to the Recipe Chart and Recipes for guidelines. Timer works only in the locked closed position.
3. For fastest preheat we recommend preheat-ing in the closed position. Be sure to use caution when adjusting to a different cooking position.
Helpful tips for crêpe making:1. Always allow the crêpe batter to rest in refrig-
erator before cooking. It is recommended to rest for at least 30 minutes (preferably overnight if time allows). Resting the batter gives time for the gluten in the flour to relax and the starch molecules to fully absorb the liquid. This creates a thicker batter and ultimately more even and delicate crêpes. A cooler, rested batter may also prevent any unnecessary overflow.
2. The best temperature setting for crêpes is the preset (medium). Should crêpes seem thick, or if you like them darker or lighter, the temperature may need to be adjusted.
3. Generally, crêpes take about 1½ minutes to cook, which is the preset time. Certain crêpe recipes, like the Crespelle, require less time. Also if lighter or darker crêpes are desired, adjust cooking time accordingly.
CLEANING, CARE AND MAINTENANCE• Never use metal utensils, as they will scratch
the nonstick plates. Instead, use the provided tongs, or wooden or heat-proof plastic utensils.
• Never leave plastic utensils in contact with the hot plates. This includes the provided tongs.
• Allow the unit to cool down completely (at least 30 minutes) before cleaning.
Once you have finished cooking, remove plug from electrical outlet. Leave lid open so plates begin to cool. Allow the unit to cool down com-pletely before handling.
Press the plate release buttons to remove plates from the housing. Be sure that the plates have cooled completely before handling (at least 30 minutes). The plates, measuring scoop and tongs can be washed in the dishwasher, the wooden mini ice cream cone roller should be handwashed. Do not use metal objects such as knives or forks for cleaning. Do not use a scouring pad for cleaning. The nonstick coating can be damaged.
To clean exterior, wipe with a soft damp cloth. Never use an abrasive cleanser or harsh pad.
NEVER IMMERSE CORD, PLUG OR UNIT IN WATER OR OTHER LIQUIDS.Any other servicing should be performed by an authorized service representative.

6
STORAGE/LOCKING LIDStore with plates inserted and cord wrapped securely around the back of the unit. For com-pact storage, stand the unit on its back end with control panel facing up. The unit has been designed with a special latching feature so the lid stays closed during storage.
WARRANTY Limited Three-Year WarrantyThis warranty is available to consumers only. You are a consumer if you own an International Chef™ Crêpe/Pizzelle/Pancake Plus that was purchased at retail for personal, family or household use. Except as otherwise required under applicable law, this warranty is not available to retailers or other commercial purchasers or owners.We warrant that your International Chef™ Crêpe/Pizzelle/Pancake Plus will be free of defects in materials and workmanship under normal home use for 3 years from the date of original purchase.We recommend that you visit our website, www.cuisinart.com for a fast, efficient way to complete your product registration. However, product registration does not eliminate the need for the consumer to maintain the original proof of purchase in order to obtain the warranty benefits. In the event that you do not have proof of purchase date, the purchase date for purposes of this warranty will be the date of manufacture. If your International Chef™ Crêpe/Pizzelle/Pancake Plus should prove to be defective within the warranty period, we will repair it, or if we think necessary, replace it. To obtain warranty service, simply call our toll-free number, 1-800-726-0190, for additional information from our Customer Service Representatives, or send the defective product to Customer Service at Cuisinart, 7475 North Glen Harbor Blvd., Glendale, AZ 85307.To facilitate the speed and accuracy of your return, please enclose $10.00 for shipping and handling of the product. Please pay by check
or money order (California residents need only supply proof of purchase and should call 1-800-726-0190 for shipping instructions).NOTE: For added protection and secure handling of any Cuisinart product that is being returned, we recommend you use a traceable, insured delivery service. Cuisinart cannot be held responsible for in-transit damage or for packages that are not delivered to us. Lost and/or damaged products are not covered under warranty. Please be sure to include your return address, daytime phone number, description of the product defect, product model number (located on bottom of product), original date of purchase, and any other information pertinent to the product’s return.Your International Chef™ Crêpe/Pizzelle/Pancake Plus has been manufactured to the strictest specifications and has been designed for use only in 120-volt outlets with the authorized accessories and replacement parts.This warranty expressly excludes any defects or damages caused by accessories, replacement parts, or repair service other than those that have been authorized by Cuisinart.This warranty does not cover any damage caused by accident, misuse, shipment or other than ordinary household use.This warranty excludes all incidental or consequential damages. Some states do not allow the exclusion or limitation of these damages, so these exclusions may not apply to you.CALIFORNIA RESIDENTS ONLY:California law provides that for In-Warranty Service, California residents have the option of returning a nonconforming product (A) to the store where it was purchased or (B) to another retail store that sells Cuisinart products of the same type.The retail store shall then, at its discretion, either repair the product, refer the consumer to an independent repair facility, replace the product, or refund the purchase price less the amount directly attributable to the consumer’s prior usage of the product. If the above two options do not result in the appropriate relief to the consumer, the consumer may then take the product to an independent repair facility if service or repair can be economically

7
accomplished. Cuisinart and not the consumer will be responsible for the reasonable cost of such service, repair, replacement, or refund for nonconforming products under warranty.California residents may also, according to their preference, return nonconforming products directly to Cuisinart for repair, or if necessary, replacement, by calling our Consumer Service Center toll-free at 1-800-726-0190. Cuisinart will be responsible for the cost of the repair, replacement, and shipping and handling for such products under warranty.
BEFORE RETURNING YOUR CUISINART PRODUCTIf you are experiencing problems with your Cuisinart product, we suggest that you call our Consumer Service Center at 1-800-726-0190 before returning the product to be serviced. If servicing is needed, a representative can confirm whether the product is under warranty and direct you to the nearest service location.Important: If the nonconforming product is to be serviced by someone other than Cuisinart’s Authorized Service Center, please remind the servicer to call our Consumer Service Center at 1-800-726-0190 to ensure that the problem is properly diagnosed, the product serviced with the correct parts, and the product is still under warranty.

8
Item Plate Position Temperature Batter/Dough Amount General Cooking Time
Pizzelle Pizzelle Closed + Locked
Pizzelle/Medium Small scoop 2 mins.
Sugar Cone Pizzelle
Closed +Locked
Medium Small scoop 2½ mins.
Pancake Flat Flat Medium-HighSilver dollar = small scoop Standard pancake = large
scoop
2 to 3 mins.per side
Crêpe FlatClosed +Locked
Crêpe/Medium Large scoop 1½ mins.
Tortilla Flat Closed + Locked Tortilla/High Dough stretched/rolled to
thin 6- to 8-inch disca. 30 secs
b. 4 to 6 mins.
Crackers Flat Closed High Dough stretched/rolled to very thin 8-inch disc 3 to 4 mins.
RECIPESSilver Dollar Pancakes ............................9
Sugar Cones............................................9
Chocolate Waffle Cones ........................10
Blini ........................................................10
Classic Pizzelle ......................................11
Sweet Chocolate Pizzelle ......................12
Basic Crêpes, with variations ................12
Buckwheat Crêpes ................................13
Crespelle ...............................................14
Blintzes ..................................................14
Socca ....................................................15
Potato Pancakes (Latkes) .....................15
Wine Crackers .......................................16
Flour Tortillas .........................................17
Arepas ...................................................17
Carne Mechada .....................................18
Pita Bread ..............................................19
Mandarin Pancakes with Mu Shu Pork ....20
Spring Rolls ...........................................21
Okonomiyaki (Japanese Pancakes) ......22
Naan ......................................................22
Chapati ..................................................23
Fresh Green Chutney ............................24
Dosa ......................................................24
Sambhar (South Indian Lentil Stew) ......25
Roti ........................................................26
Curried Chickpeas with Potatoes and Spinach ...........................26
Injera ......................................................27
Doro Wat (Ethiopian Chicken Stew) ......27
Niter Kibbeh ..........................................28
RECIPE CHART
Large Scoop = 1/3 cupSmall Scoop = 1 tablespoon

9
Silver Dollar PancakesThis is a great all-purpose pancake recipe to have up your sleeve for breakfast. It can be dressed up by mixing in fresh or frozen fruit,
or nuts and chocolate chips.
Makes about 24, two and a half-inch pancakes
2 large eggs 1½ cups buttermilk ½ teaspoon pure vanilla extract 1 tablespoon vegetable oil, or
melted and cooled butter1½ cups unbleached, all-purpose flour 1½ teaspoons baking powder ½ teaspoon baking soda 1 teaspoon granulated sugar ½ teaspoon ground cinnamon ¼ teaspoon kosher salt
1. Put the eggs, buttermilk and vanilla in a small bowl and whisk to blend until smooth. Whisk in oil; reserve.
2. Combine the dry ingredients in a medi-um bowl. Whisk to blend. Add to the liquid mixture and stir until just com-bined. Do not over-mix, or pancakes will be thin and tough – batter should be a bit lumpy.
3. Preheat the International Chef™ Crêpe/Pizzelle/Pancake Plus with the flat plates. Adjust temperature to Med-High. Once preheated, carefully open to the flat position.
4. Using the small scoop, drop batter onto preheated griddle, about 4 per plate (if you like extra-buttery pancakes, put about 1 teaspoon of butter on each plate and immediately drop batter on plates). Cook pancakes until bubbles form, about 2 to 3 minutes; flip and cook until done, another 2 minutes.
5. Transfer to warm plates to serve. As you finish each batch of pancakes, you can keep them warm on a wire rack placed on a baking sheet in a 200°F oven. Repeat until all the batter is used.
Nutritional information per serving (4 pancakes): Calories 150 (35% from fat) • carb. 20g • pro. 4g • fat 6g • sat. fat 3g • chol. 74mg • sod. 453mg
• calc. 83mg • fiber 0g
Sugar ConesYou may find that these cones disappear
before you even add the ice cream.
Makes 15 cones
½ cup unbleached, all-purpose flour¼ teaspoon kosher salt2 large egg whites½ cup granulated sugar6 tablespoons unsalted butter, melted and slightly cooled½ teaspoon pure vanilla extract1. Stir together the flour and salt in a
small bowl. In a medium bowl whisk together the egg whites with the sugar until incorporated. Whisk in the butter and vanilla extract and then finally the dry ingredients.
2. Preheat the International Chef™ Crêpe/Pizzelle/Pancake Plus fitted with the piz-zelle plates by adjusting the tempera-ture to Medium. Set the timer to 2½ minutes.
3. Using the small scoop, put the batter in the middle of each pizzelle/cone mold on the hot plate. Close cover and lock to activate timer and begin cooking. Tone will sound when time has expired.
4. Using tongs very carefully (cones will be hot ) remove one cone at a time and place on a flat work surface. Place the cone mold in the center of the circle and wrap one side on top of the mold and then roll it on the work surface to meet the other side. Press the mold down on the counter using the tongs with the seam side down to seal. Carefully remove and repeat with remaining cones.
4. Repeat with remaining batter.

10
Nutritional information per cone:Calories 82 (48% from fat) carb. 9g • pro. 1g
• fat 4g • sat. fat 3g • chol 12mg • sod. 47mg • calc. 0mg • fiber 0g
Chocolate Waffle ConesThick and chocolate, what could go better
with your favorite ice cream?
Makes 12 cones
½ cup confectioners’ sugar2 tablespoons Dutch processed cocoa2 large egg whites6 tablespoons unsalted butter, melted and slightly cooled2⁄3 cup unbleached, all-purpose flour ¼ teaspoon kosher salt
1. In a small bowl, sift together the sugar and cocoa. In a medium bowl, whisk together the egg whites with the sugar/cocoa until incorporated. Whisk in the butter and then finally whisk in the flour and salt.
2. Preheat the International Chef™ Crêpe/Pizzelle/Pancake Plus fitted with the pizzelle plates by adjusting the tem-perature to Medium. Set the timer to 2 minutes.
3. Using the small scoop, put the batter in the middle of each pizzelle/cone mold on the hot plate. Close cover and lock to activate timer and begin cooking. Tone will sound when time has expired.
4. Using tongs, (cones will be hot ) very carefully remove one cone at a time and place on a flat work surface. Place the cone mold in the center of the circle and wrap one side on top of the mold and then roll it on the work surface to meet the other side. Press the mold down on the counter using the tongs with the seam side down to
seal. Carefully remove and repeat with remaining cones.
5. Repeat with remaining batter.
Nutritional information per cone:Calories 98 (51% from fat) • carb. 10g • pro. 1g • fat 6g • sat. fat 4g • chol. 15 mg • sod. 54mg
• calc. 0mg • fiber 0g
BliniThe perfect cocktail party hors d’oeuvre,
these are traditionally topped with smoked salmon and caviar.
Makes about 32 two-inch blini
1 pound Yukon Gold potatoes½ teaspoon active dry yeast¾ cup unbleached, all-purpose
flour 1 teaspoon baking powder3 tablespoons sour cream2 large eggs1 large egg yolk2 tablespoons whole milk1¾ teaspoons kosher salt ground white pepper to taste 2 large egg whites
pinch cream of tartar vegetable oil or clarified butter,
for brushing plates
1. Put the potatoes into a large stockpot. Add cold water until potatoes are sub-merged. Bring to a boil and cook until potatoes are fully tender. Once cool enough to touch, press through a ricer or food mill. Transfer potatoes to a large mixing bowl (discard peels).
2. Add the yeast, flour and baking powder to the potatoes and stir to combine. Add the sour cream, eggs, egg yolk, milk, salt and pepper. Using a hand mixer, or the mixing paddle of a stand mixer, beat until mixture is very creamy and thor-oughly combined, about 3 to 5 minutes.

11
3. In a large, clean bowl, whip the 2 egg whites with the cream of tartar to soft peaks (egg whites should droop a bit when lifted with the whisk. You do not want them to be too stiff). Lighten the potato mixture by gently stirring about 1⁄3 of the whipped egg whites into it. Fold the remaining whites into the lightened potato mixture.
4. Preheat the International Chef™ Crêpe/Pizzelle/Pancake Plus fitted with the flat plates by adjusting the temperature to High. Once preheated, carefully open to the flat position. Brush liberally with oil or clarified butter. Once oil/butter is hot, use the small scoop to drop 6 rounds of batter per plate. Cook about 6 min-utes per side or until golden brown and cooked through. Keep warm on serving plate.
5. Repeat with remaining batter.
6. To serve: Top with smoked salmon, cavi-ar, horseradish sauce, smoked trout and/or crème fraîche and chopped chives.
Nutritional information per blini:Calories 36 (30% from fat) • carb. 5g • pro. 1g
• fat 1g • sat. fat 0g • chol. 18mg • sod. 150mg • calc. 7mg • fiber 0g
Classic PizzelleOur basic pizzelle recipe is flavored with the universally popular vanilla. You may
vary the flavor by using other extracts such as anise, almond or lemon.
Makes about 28 pizzelle
1¾ cups unbleached, all-purpose flour
2 teaspoons baking powder3 large eggs¾ cup granulated sugar½ cup (1 stick) unsalted butter,
melted and cooled1 teaspoon pure vanilla extract vegetable oil, for brushing plates
1. Put flour and baking powder in a small bowl and stir to combine. Put eggs and sugar in a medium bowl. Using a hand mixer, beat until thickened. While mix-ing on low, gradually add the melted butter and vanilla and mix until com-bined, about 15 seconds. Add the dry ingredients and mix until just combined, about 10 to 15 seconds; do not over-mix. (Alternately, this can be done by hand with a whisk – be sure there are no lumps in the batter.)
2. Preheat the International Chef™ Crêpe/Pizzelle/Pancake Plus fitted with the piz-zelle plates in the closed position with the temperature set to Pizzelle (Medium).Adjust the timer to Pizzelle (2 minutes).
3. Once preheated, use the small scoop and dollop batter onto the center of each pizzelle circle. Close cover and lock to activate timer and begin cook-ing. A tone will sound when time has expired. Pizzelle should be lightly gold-en, but still pliable. If pizzelle seem too light, add a minute or two extra to the cooking time.
4. Carefully remove and transfer to a flat cooling rack. Repeat with remaining batter.
5. Serve pizzelle by breaking any excess cookie away from the classic pizzelle design, making 3 per round.
Note: This recipe is perfect for making cannoli shells! They have to be formed immediately after removing from the plates, so be quick. Form into a cylindri-cal shape, like a tunnel. Allow to rest until set and crispy.
Nutritional information per pizzelle: Calories 104 (50% from fat) • carb. 11g • pro. 1g • fat 6g • sat. fat 3g • chol. 30mg • sod. 44mg
• calc. 9mg • fiber 0g

12
Sweet Chocolate PizzelleA more decadent take on the classic,
these are great when served with fresh fruit or ice cream.
Makes about 28 pizzelle
12⁄3 cups unbleached, all-purpose flour
¼ cup unsweetened cocoa powder2 teaspoons baking powder¼ teaspoon kosher salt3 large eggs1 cup granulated sugar½ cup (1 stick) unsalted butter,
melted and cooled1 teaspoon pure vanilla extract vegetable oil, for brushing plates
1. Put the flour, cocoa, baking powder and salt into a small bowl; stir to combine and reserve. Put eggs and sugar into a medium bowl. Using a hand mixer, mix until thickened. While mixing on low, gradually add the melted butter and vanilla and mix until combined, about 15 seconds. Add the flour mixture and blend until just combined, about 10 to 15 seconds; do not over-mix. (Alternately, this can be done by hand with a whisk – be sure there are no lumps in the batter.)
2. Preheat the International Chef™ Crêpe/Pizzelle/Pancake Plus fitted with the piz-zelle plates in the closed position. Set the temperature to Pizzelle (medium). Set timer to Pizzelle (2 minutes).
3. Once preheated, use the small scoop and dollop batter onto the center of each pizzelle circle. Close cover and lock to activate timer and begin cook-ing. A tone will sound when time has expired.
4. Carefully remove and transfer to a flat cooling rack. Repeat with remaining batter.
Nutritional information per pizzelle: Calories 108 (47% from fat) • carb. 13g • pro. 2g • fat 6g • sat. fat 3g • chol. 29mg • sod. 62mg
• calc. 9mg • fiber 0g
Basic CrêpesEvery corner of the world has their own
variation of the crêpe. Here we give you the classic followed by a couple of our sweeter favorites. Experiment with filling options to create your own – from simple and sweet
to savory, they are all delicious.
Makes about 8 crêpes
1 cup whole milk4 tablespoons (½ stick) unsalted
butter, plus more for brushing plates
¾ cup unbleached, all-purpose flour½ teaspoon kosher salt3 large eggs
1. Put the milk and butter into a small saucepan over low heat until butter has just melted. Remove and allow to cool to room temperature.
2. Put the flour and salt into a mixing bowl and whisk to combine. Add the eggs and whisk until batter is smooth – it will be very thick and sticky. Gradually whisk in the milk and butter until the batter is smooth. Cover the bowl with plastic and let batter rest in the refrigerator for at least 30 minutes, preferably overnight if time allows. Batter is best used within 3 days.
3. Preheat the International Chef™ Crêpe/Pizzelle/Pancake Plus fitted with the flat plates in the closed position by adjusting the temperature to Crêpe (Medium). Set the timer to Crêpe (1½ min).
4. Once preheated, use the large scoop and pour batter onto the hot plate. Close cover and lock to activate timer and begin cooking. Tone will sound

13
when time has expired. Crêpe should be light with minimal golden color, if at all. Remove crêpe and repeat with remaining batter.
5. Serve immediately with your favorite fillings.
Note: For sweet crêpes, add a teaspoon of granulated sugar to the batter.
Nutritional information per crêpe: Calories 106 (56% from fat) • carb. 8g • pro. 4g • fat 7g • sat. fat 4g • chol. 71mg • sod. 148mg
• calc. 38mg • fiber 0g
Variations:
Pannkakor (Sweden)Serve with butter, granulated sugar, powdered sugar, berries, and jam.
Palacsinta (Hungary)These crêpe-like pancakes from Hungary are traditionally served rolled. Here is just
one example of a sweet filling.
Filling:1½ cups toasted walnuts¼ cup granulated sugar 1 teaspoon ground cinnamon ½ teaspoon grated orange zest 1 tablespoon rum
1. Put all of the filling ingredients in a mini chopper or a food processor fitted with the metal chopping blade. Process until finely ground.
2. With a crêpe laid flat, sprinkle a small amount of the filling, about 1 to 2 table-spoons, over the crêpe. Tightly, but gen-tly, roll the crêpe. Sprinkle with confec-tioners’ sugar and serve immediately.
Buckwheat CrêpesA delicious alternative to traditional French
crêpes. A Test Kitchen favorite is filling them with sautéed spinach and garlic, goat cheese and topped with an egg. Delicious!
Makes about 10 crêpes
1¼ cups whole milk3 tablespoons unsalted butter,
plus more for brushing plates¾ cup buckwheat flour¼ cup unbleached, all-purpose flour½ teaspoon kosher salt3 large eggs
1. Put the milk and butter into a small saucepan over low heat until butter has just melted. Remove and allow to cool to room temperature.
2. Put the flours and salt into a mixing bowl and whisk to combine. Add the eggs and whisk until batter is incorporated – it will be very sticky and thick. Gradually whisk in the milk and melted butter until the batter is smooth. If time allows, let the batter rest in the refrigerator for at least 30 minutes. Batter is best used within 3 days.
3. Preheat the International Chef™ Crêpe/Pizzelle/Pancake Plus fitted with the flat plates in the closed position by adjust-ing the temperature to Crêpe (Medium). Adjust the timer to Crêpe (1½ minutes).
4. Once preheated, use the large scoop, and pour batter onto the hot, greased plate. Close cover and lock to activate timer and begin cooking. Tone will sound when time has expired. Crêpe should be just golden at the edges. If desired, increase cooking time. Remove and repeat with remaining batter.
5. Serve warm.
Nutritional information per crêpe: Calories 116 (45% from fat) • carb. 11g • pro. 5g • fat 6g • sat. fat 3g • chol. 69mg • sod. 154mg
• calc. 50mg • fiber 1g

14
CrespelleThe Italian version of crêpes, these are used
in many dishes and can be filled with savory fillings, such as ricotta in manicotti, or sweet fillings. These are slightly different from the French version because this recipe
does not call for butter in the batter.
Makes about 8 crespelle
1 cup unbleached, all-purpose flour pinch kosher salt1 cup whole milk2 large eggs, beaten vegetable oil, for brushing plates1. Put the flour and salt into a medium
bowl; whisk to combine.
2. Add the milk and eggs to the dry ingre-dients and beat until completely smooth.
3. Preheat the International Chef™ Crêpe/Pizzelle/Pancake Plus fitted with the flat plates in the closed position by adjusting the temperature to Crêpe (Medium). Set timer to 1 minute. (This recipe requires less time than the average crêpe).
4. Once preheated, brush the plates with a bit of oil (blot any excess off care-fully with a paper towel). Using the large scoop, pour the batter onto the hot greased plate. Close cover and lock to activate timer and begin cooking. Tone will sound when timer has expired. These should have NO browning to them. Remove and repeat with remaining batter.
5. Fill as desired and serve immediately.
Note: This recipe is easy to double if you are cooking for a crowd.
Nutritional information per crespelle:Calories 87 (23% from fat) • carb. 13g • pro. 4g• fat 2g • sat. fat 1g • chol. 51mg • sod. 71mg
• calc. 45mg • fiber 0g
Blintzes There are countless fillings for blintzes, so be creative. Here we have a classic filling of farmer’s cheese, but you can stir in jam
or preserves for a sweet twist.
Makes 8 blintzes
Blintzes:3 large eggs1¼ cups reduced-fat or whole milk2 tablespoons vegetable oil1 cup unbleached, all-purpose flour1 teaspoon granulated sugar¼ teaspoon kosher salt softened, unsalted butter or
vegetable oil, for brushing plates
Filling:1 pound farmer’s cheese (or ricotta)¼ cup whole milk2 tablespoons granulated sugar¼ teaspoon grated lemon zest1 to 2 pinches kosher salt
1. Make batter: In a blender, add the eggs, milk, oil, flour, sugar and salt and blend on low until smooth, scraping down as needed. Transfer batter to a bowl, cover with plastic wrap and allow to rest for a minimum of 30 minutes, or overnight.
2. Make filling: Using a hand mixer or a whisk, combine the filling ingredients until smooth. Set aside while the blintzes are being made.
3. Preheat the International Chef™ Crêpe/Pizzelle/Pancake Plus fitted with the flat plates in the closed position by adjusting the temperature to Crêpe (Medium). Set timer to 1 minute.
4. Once preheated, lightly grease plates with butter or oil. Using the large scoop, pour batter onto the hot greased plate. Close cover and lock to activate timer and begin cooking. Tone will sound when
15
timer has expired. Blintzes should have very little color. Transfer cooked blintzes to a serving plate, allowing them to over-lap slightly so they do not stick together. Line with wax paper or parchment every fifth blintz, if need be. Cover with plastic wrap or foil until ready to fill. Repeat with remaining batter, lightly greasing plates as needed to promote spreading of bat-ter.
5. To fill, spoon about 3 to 4 tablespoons of filling on each blintz toward the bot-tom. Fold the top over the bottom then the two ends to close.
6. Increase heat to High and open to the flat position. Brush plates well with but-ter, and place up to 3 filled blintzes on each plate. Cook about 3 to 4 minutes per side, or until nicely browned.
Nutritional information per filled blintz:Calories 302 (60% from fat) • carb. 19g
• pro. 12g • fat 20g • sat. fat 7g • chol. 96mg • sod. 213mg • calc. 243mg • fiber 0g
Socca Popular in the South of France, this flavor-ful snack crepe is crispy around the edges and best served hot off the griddle. While they can be filled with roasted or grilled
vegetables, they are traditionally served on their own as an appetizer alongside cold
drinks.
Makes about 5 socca
1¼ cups chickpea or garbanzo bean flour, sifted
1 teaspoon kosher salt½ teaspoon freshly ground black
pepper¼ teaspoon ground cumin1 cup warm water2 tablespoons olive oil, plus more
for brushing plates
1. Put the flour, salt and spices into a mix-ing bowl; whisk to fully combine. Slowly whisk in the water until homogenous,
and then whisk in the olive oil. Batter should be the consistency of heavy cream. If it is too thick, slowly whisk in additional warm water.
2. Preheat the International Chef™ Crêpe/Pizzelle/Pancake Plus fitted with the flat plates in the closed position by adjust-ing the temperature to High. Adjust timer to Crêpe (1½ minutes). Increase time if darker crêpe is preferred.
3. Once preheated, lightly brush the plates with olive oil. Using the large scoop, pour batter onto the hot greased plate. Close cover and lock to activate timer and begin cooking. Tone will sound when timer has expired. Remove and repeat with remaining batter.
Nutritional information per socca: Calories 159 (41% from fat) • carb. 18g • pro. 6g • fat 8g • sat. fat 1g • chol. 0mg • sod. 463mg
• calc. 3mg • fiber 5g
Potato Pancakes (Latkes)This no-fail recipe is great for the holidays
or any time of the year.
Makes 12 three-inch latkes
1 pound russet potatoes (about 1 medium-large potato), peeled and shredded½ medium onion, shredded2 tablespoons unbleached, all-purpose flour (you may use matzo meal)1 tablespoon chopped parsley 1 teaspoon kosher salt ¼ teaspoon freshly ground black pepper1 large egg, lightly beaten vegetable oil, for brushing plates
1. Squeeze all excess liquid out of the potato and onion by wrapping them in a clean towel and gently wringing. Transfer potato and onion to a bowl; add the flour, parsley, salt and pepper; toss to mix thoroughly. Stir in the egg.
16
2. Preheat the International Chef™ Crêpe/Pizzelle/Pancake Plus fitted with the flat plates by adjusting the temperature to High. Once preheated, carefully open to the flat position and brush the plates with the oil.
3. Using the large scoop, portion amounts of the potato mixture, continuing to squeeze out any excess liquid. Place three pancakes on each plate and cook for about 6 minutes on each side, until crispy and lightly browned.
4. Repeat with remaining pancake mixture, liberally brushing oil on the plates in between each round.
5. Transfer finished latkes to a paper-towel-lined tray or plate. You may keep latkes warm in a 200ºF oven until ready to serve.
Nutritional information per latke: Calories 62 (39% from fat) • carb. 8g • pro. 2g
• fat 3g • sat. fat 0g • chol. 16mg • sod. 198mg • calc. 9mg • fiber 1g
Wine Crackers Delectable with soft goat cheese and flaked sea salt, these are the perfect
accompaniment to a glass of wine. Top dough with any number of seeds or
spices, such as poppy, sesame or anise, before cooking.
Makes 8 eight-inch crackers
½ cup whole milk2 tablespoons unsalted butter1 teaspoon active dry yeast pinch granulated sugar2 tablespoons warm water (105˚F–110˚F)1½ cups unbleached, all-purpose flour½ cup rye flour¾ teaspoon kosher salt vegetable oil, for brushing plates flaked sea salt, for sprinkling assorted seeds for sprinkling
1. Put the milk and butter in a small saucepan over low heat until butter has
just melted; remove and reserve to cool slightly. In a small bowl dissolve yeast and sugar in warm water and set aside until foamy, about 5 minutes.
2. In the work bowl of a food proces-sor fitted with the dough or chopping blade, process the flours and salt to sift, about 10 seconds.
3. Combine the cooled butter/milk mix-ture with the proofed yeast. With the unit running, gradually pour the butter/milk through the feed tube, adding just enough liquid to form a dough that isn't sticking to the sides of the bowl. You may not need all the liquid. Once dough forms, knead in processor for an addi-tional minute.
4. Transfer dough to a clean bowl. Cover with plastic wrap and allow to rise until doubled in size, about 2 hours. Gently punch down and fold dough over. Let rise an additional hour, until doubled in size again.
5. Divide dough into 8 pieces and cover with plastic.
6. Preheat the International Chef™ Crêpe/Pizzelle/Pancake Plus fitted with the flat plates in the closed position by adjust-ing the temperature to High. Set timer to 3 minutes.
7. Roll each piece of dough into a very thin, 8-inch round. Once preheated, brush the bottom plate with oil and carefully place dough on the bottom plate. Brush the top of the dough with oil and sprinkle with salt and desired seeds or seasonings. Close cover and lock to activate timer and begin cooking. Tone will sound when timer has expired. Remove and reserve; repeat with remaining dough.
Nutritional information per cracker: Calories 158 (33% from fat) • carb. 24g
• pro. 4g • fat 6g • sat. fat 3g • chol. 10mg • sod. 294mg • calc. 19mg • fiber 2g

17
Flour TortillasIf you have never tasted fresh, homemade flour tortillas then we strongly suggest you give these a try. Simple and quick to pre-
pare, they will make store-bought tortillas a thing of the past.
Makes 10 six-inch tortillas
2½ cups unbleached, all-purpose flour
1 teaspoon kosher salt6 tablespoons vegetable shortening, room temperature¾ cup warm water vegetable oil, for brushing plates
1. Put the flour and salt in a medium bowl and stir to combine.
2. Using your fingertips, work the shorten-ing into the flour until well blended. Add the water and use your hands to work the dough into a ball. Transfer the dough to a lightly floured surface and knead until it becomes smooth.
3. Divide the dough into 10 equal pieces and shape into rounds. Loosely cover the rounds with plastic wrap and let them sit at room temperature for 30 minutes to 1 hour.*
4. Working with one dough ball at a time and keeping the rest covered, roll the dough into a 6-inch circle, about 1/8-inch thick.
5. Preheat the International Chef™ Crêpe/Pizzelle/Pancake Plus fitted with the flat plates in the closed position by adjust-ing the temperature to Tortilla (High). Set the timer to Tortilla (30 seconds). Once preheated, open the lid and lightly brush both plates with vegetable oil. Place the dough on the bottom plate, close cover, lock to activate timer and begin cooking. Tone will sound when timer has expired. Tortillas should be cooked through but pliable and light in color.
6. Remove the tortilla to a plate and cover with a damp paper towel or clean towel to keep warm. Continue cooking the remaining tortillas in the same manner. Serve with desired accompaniments.
* Tortilla dough rounds can be stored in the refrigerator for up to 5 days in a zip-top plastic bag. Let the dough come to room temperature before rolling out.
Note: The above method for making tor-tillas yields a tortilla that is more store bought in appearance. For a more tradi-tional, homemade-looking version cook the tortilla on High with the crepe maker open to the flat position. Cook the tortillas for about 4 to 6 minutes, flipping them every 1½ to 2 minutes.
Nutritional information per tortilla: Calories 190 (47% from fat) • carb. 22g • pro. 3g • fat 10g • sat. fat 2g • chol. 0mg • sod. 229mg
• calc. 1mg • fiber 1g
ArepasA traditional Latin American cornmeal
flatbread most commonly found in Venezuela and Colombia, arepas can be filled or served with a variety of differ-
ent foods. We love them filled with Carne Mechada (recipe follows).
Makes 6 arepas
2 cups masarepa*1 teaspoon kosher salt2 tablespoons olive oil, plus additional for brushing plates2 cups warm water1 recipe Carne Mechada, recipe follows
1. In a bowl stir together the masarepa and salt. Combine the olive oil and water and slowly add to the dry ingredients with a spoon. Mixture should come together in a solid, somewhat wet mass. Continue to mix as the masarepa continues to absorb the liquid. The final arepa dough should feel damp to the touch.

18
2. Gather dough with your hands and divide into 6 equal pieces and form each by hand into a flat disc, about 3 inches in diameter.
3. Preheat the International Chef™ Crêpe/Pizzelle/Pancake Plus fitted with the flat plates by adjusting the temperature to High. Once preheated, carefully open to the flat position and brush the plates well with olive oil. Add three arepas per plate and cook for about 5 to 6 minutes per side, so that they develop a crispy exterior and are cooked inside.
4. To serve, slice the arepas horizontally and fill with about ½ cup of the Carne Mechada. Serve as is or with desired toppings (e.g. crumbled cotija cheese, chopped cilantro, pickled red onion, avocado, etc.).
* Masarepa is a precooked ground corn flour. It can be found in most grocery stores in the Latin foods section.
Nutritional information per arepa: Calories 185 (32% from fat) • carb. 29g • pro. 4g • fat 7g • sat. fat 1g • chol. 0mg • sod. 385mg
• calc. 54mg • fiber 2g
Carne MechadaMakes about 3 cups
Carne:1½ pounds flank steak½ teaspoon kosher salt½ teaspoon freshly ground black
pepper1 teaspoon vegetable oil1 small onion, sliced4 garlic cloves, peeled and crushed1 large bay leaf¼ cup Worcestershire sauce1 cup beef broth
Sofrito:1 teaspoon vegetable oil1 small onion, finely chopped1 small to medium red bell pep-
per, cut into thin 1½-inch-long julienne strips
1 chipotle pepper, puréed4 garlic cloves, finely chopped2 tablespoons Worcestershire sauce¼ cup tomato sauce¾ cup reserved beef cooking liquid
1. Preheat oven to 275°F.
2. Season the beef on both sides with the salt and pepper. Cut the meat in half if necessary to fit into the sauté pan. Put the oil in a large sauté pan and place over medium heat. Once the pan is hot and the oil is shimmering, add the meat to brown, about 3 to 5 minutes per side (if necessary brown the meat in two batches).
3. Once meat is browned, remove and reserve. Add the onion and garlic to the pan, scraping up with a wooden spoon any browned bits that may remain on the bottom. Cook until soft and fragrant. Stir in the bay leaf, Worcestershire and beef broth. Bring mixture to a simmer and put meat back into the pan. Put pan into oven and cook uncovered for 2 hours.
4. Remove from oven. Allow to cool. For maximum flavor allow meat to chill in refrigerator in the cooking liquid over-night. Before using, shred meat into 1½ to 2-inch-long shreds with fork or your hands.
5. For the sofrito, put the oil into a separate sauté pan and place over medium heat. Once the oil shimmers in the pan, briefly brown the shredded beef in batches, about 3 minutes per batch. Remove and reserve the meat and add the onion, red pepper and garlic to the pan, scraping up any brown bits that may remain on the bottom. Stir in the chipotle then the Worcestershire, tomato sauce and cook-ing liquid.
6. Bring to a simmer and return the shredded beef to the pan. Simmer on low for about

19
10 minutes. Stir and cover; continue to simmer on low for an additional 10 to 15 minutes.
Nutritional information per ½-cup serving: Calories 215 (38% from fat) • carb. 7g • pro. 26g • fat 9g • sat. fat 3g • chol. 78mg • sod. 626mg
• calc. 47mg • fiber 1g
Pita BreadDo not be discouraged if your pitas do not puff during cooking, as the dough can be a bit temperamental. They may not have their signature “pocket” interior, but they will still
be delicious.
Makes 8 six-inch pita breads
1¾ teaspoons active dry yeast pinch granulated sugar1 cup warm water (105˚F–110˚F)2 cups unbleached, all-purpose
flour1 cup whole wheat flour1½ teaspoons kosher salt1 tablespoon olive oil vegetable oil, for brushing plates
1. In the bowl of a stand mixer fitted with the dough hook, combine the yeast, sugar and water and let stand for 5 to 10 minutes until foamy.
2. In a medium bowl, combine the flours. When the yeast is proofed, add all but ½ cup of the combined flour, salt and oil to the yeast mixture. Turn the mixer on the lowest speed and mix for 1 minute to combine. Gradually increase the speed to 4, adding the remaining flour until the dough forms a ball and begins to pull away from the sides of the bowl. You may not need all of the remaining flour. Once the dough forms a ball, reduce the speed to 3 and knead the dough for 5 to 6 min-utes until it is soft, smooth, and slightly tacky.
3. Lightly coat a medium bowl with oil and put the dough in the bowl, turning it to coat with the oil. Tightly cover the bowl with plastic wrap and let the dough sit at room temperature for about 1 hour, or until the dough has doubled in size.
4. Remove the plastic wrap and gently punch down the dough to deflate it. Divide the dough into 8 equal pieces and shape into rounds. Loosely cover the rounds with plastic wrap and let sit at room tempera-ture for 20 to 30 minutes.
5. Working with one round at a time, roll out each pita into a 6-inch circle, between 1⁄8-inch and ¼-inch thick. Keep all the dough under plastic wrap to keep from drying out.
6. Once about half the dough balls have been rolled out, preheat the International Chef™ Crêpe/Pizzelle/Pancake Plus fitted with the flat plates in the closed position by adjusting the temperature to High. Once preheated, carefully open to the flat position. Lightly brush the plates with a bit of oil. Place one of the rolled-out pita rounds onto each plate and cook for about 5 to 6 minutes, flipping every 1½ to 2 minutes, until pita is cooked through and browned in spots. The pitas should puff up while cooking.
7. Once cooked, remove the pita to a plate and cover with a clean towel to keep warm. Repeat with the rest of the dough, rolling out the remaining rounds while pitas cook.
Nutritional information per pita: Calories 199 (25% from fat) • carb. 33g • pro. 5g • fat 6g • sat. fat 1g • chol. 0mg • sod. 429mg
• calc. 6mg • fiber 2g

20
Mandarin Pancakes with Mu Shu Pork
The key to perfect pancakes is to roll them really thin before cooking. Our Mu Shu Pork is a fresher version of the take-out classic and the ideal companion to the pancakes.
Makes 8 pancakes and 4 cups Mu Shu Pork
Pancakes:2 cups unbleached, all-purpose
flour1 cup boiling water1 tablespoon sesame oil
Pork:1 pound boneless pork chops2 tablespoons plus ½ cup soy sauce, divided1 teaspoon plus 2 tablespoons cornstarch, divided1 teaspoon plus 1⁄3 cup rice wine, divided½ cup water¼ cup hoisin sauce2 teaspoons vegetable oil, divided2 large eggs, lightly beaten4 ounces shiitake mushrooms, cut into thin julienne strips½ ounce fresh ginger, peeled and
finely chopped1 garlic clove, finely chopped1 medium carrot, cut into thin julienne strips3 cups shredded napa cabbage (about 6-ounce piece)2 scallions, sliced
1. Prepare the pancake dough. Sift the flour into a medium mixing bowl. Pour the boil-ing water into the bowl while stirring with a spoon so that it forms a ball. Knead the ball on a well-floured surface for about 5 minutes until smooth. Put in a bowl, cover with plastic wrap, and let rest for at least one hour.
2. Roll the dough ball into a cylinder, about 12 inches long, and cut into 16 equal
pieces. Flatten each piece and on a well- floured surface, roll each using a rolling pin, into a flat, very thin circle (about 7 inches in diameter). When one pancake is rolled, brush the top with sesame oil. Place it, oiled side down, on a piece of waxed paper. Brush the top with sesame oil. Continue with remaining pieces of dough so that all sides of each pancake have been oiled.
3. Preheat the International Chef™ Crêpe/Pizzelle/Pancake Plus with the flat plates in the closed position by adjusting the temperature to Medium. Once preheated, carefully open to the flat position and light-ly oil both plates. Cook pancakes about 2 minutes per side so that pancakes remain pliable. Pancakes should bubble slightly before being flipped and pick up some brown speckles when cooked.
4. While dough for Mandarin Pancakes is resting, begin preparing the pork. Slice the pork into very thin matchstick-like strips. Toss with the 2 tablespoons of soy sauce, 1 teaspoon cornstarch and 1 teaspoon rice wine. Cover and place in the refrigera-tor for 30 minutes.
5. Stir together the ½ cup soy sauce, 2 tablespoons cornstarch, 1⁄3 cup rice wine, water, and hoisin; reserve.
6. Once the pork has rested, put 1 teaspoon of the oil into a large skillet and place over medium heat. Once oil is shimmering across the pan, add the eggs and stir until just cooked through. Remove and reserve. Add the pork in two batches and cook until lightly browned. Remove and reserve.
7. Wipe pan clean, add remaining teaspoon of oil and place over medium high heat. Once oil shimmers across the pan add the shiitake, ginger and garlic. Cook for about 2 minutes until fragrant. Stir in the car-rots and cabbage and cook for a minute or two before adding the scallions. Stir all ingredients together and cook for an additional 5 minutes. Add the soy sauce

21
mixture to the pan and bring to a simmer. Return the pork to the pan and stir in the eggs before serving. Serve each pancake with about ¼ cup of Mu Shu Pork filling.
Nutritional information per pancake: Calories 58 (14% from fat) • carb. 11g • pro. 2g
• fat 1g • sat. fat 0g • chol. 0mg • sod. 1mg • calc. 0mg • fiber 0g
Nutritional information per ¼ cup pork: Calories 91 (22% from fat) • carb. 10g • pro. 8g • fat 2g • sat. fat 1g • chol. 42mg • sod. 584mg
• calc. 14mg • fiber 1g
Spring RollsMake your favorite take-out dish at home –
these appetizers are packed with fresh ingredients and great flavor.
Makes 28 spring rolls
Wrappers: 1 large egg1 cup unbleached, all-purpose flour1 cup water¼ teaspoon kosher salt
Filling: 6 green cabbage leaves, shredded or finely sliced4 medium carrots, julienned1 1-inch piece fresh ginger, peeled and julienned3 scallions, thinly sliced½ cup fresh cilantro, chopped1/3 cup fresh basil leaves, thinly sliced ½ small green chile, like jalapeño or serrano, finely chopped1½ tablespoons fish sauce juice of ½ lime½ block extra-firm tofu, cut into 28 thick julienne strips vegetable oil, for brushing plates
and frying sweet chili sauce, for serving
1. Put all wrapper ingredients into a mixing bowl and whisk until completely smooth (if batter seems lumpy, pour through a fine mesh strainer – alternately, this can be processed in a blender). Reserve.
2. Mix all of the filling ingredients, except the tofu, in a bowl until thoroughly combined. Reserve.
3. Preheat the International Chef™ Crêpe/Pizzelle/Pancake Plus fitted with the flat plates in the closed position by adjusting temperature to High. Set timer to 1 min-ute. Once preheated, brush bottom plate with oil. Using the small scoop, pour one scoop of the batter onto the hot greased plate. Using a pastry brush, quickly and gently spread batter to thin it, being sure to keep a circular shape. Close and lock to activate timer and begin cooking. Tone will sound when timer has expired. Carefully remove and repeat with remaining batter.
4. Once all wrappers have been cooked, place 1 piece of tofu toward the bottom of each, and top with about 1 tablespoon of the filling. Fold the other long-sided flap over, then the two ends to close. Roll the spring roll tight to secure. Reserve and repeat with remaining wrappers.
5. Fill a large sauté pan or a small stockpot with about 2 inches of oil. Heat until a deep-fat thermometer registers 350°F. Once hot, carefully add spring rolls, a few at a time, depending on the size of the pot being used. Do not overcrowd the pan or the temperature will go down. Fry until all spring rolls are golden brown and crispy.
6. Serve immediately with a sweet chili sauce.
Nutritional information per spring roll: Calories 45 (43% from fat) • carb. 5g • pro. 2g • fat 2g • sat. fat 0g • chol. 7mg • sod. 95mg
• calc. 15mg • fiber 1g
22
Okonomiyaki (Japanese Pancakes)
More akin to pizza than pancake, this popular Japanese snack can be made with any type
of vegetable, meat or seafood that you desire – the dish’s name is derived from the word
okonomi, or “as you like.”
Makes 4 eight-inch pancakes
Sauce:2 tablespoons ketchup1 tablespoon Worcestershire sauce1½ teaspoons honey¾ teaspoon mirin½ teaspoon soy sauce
Pancakes:2½ cups finely shredded green cabbage1 cup carrot ribbons, about 2 inches x ¾-inch, made using a vegetable peeler ½ cup plus 2 tablespoons thinly sliced scallions, divided½ cup cooked shrimp, cut into ½-inch pieces¾ cup unbleached, all-purpose flour½ teaspoon kosher salt3 large eggs1 tablespoon water 1 tablespoon mirin2 teaspoons soy sauce1 teaspoon toasted sesame oil vegetable oil, for brushing plates Kewpie mayonnaise*, for serving gomasio* or sesame seeds, for serving bonito flakes*, for serving
1. In a small bowl, whisk together all sauce ingredients. Set aside.
2. In a large bowl, toss together the cab-bage, carrots, ½ cup scallions and shrimp. Add the flour and salt and toss to coat. Add the eggs, water, mirin, soy sauce and sesame oil and gently stir together until flour has dissolved and all ingredients are evenly coated in batter.
3. Preheat the International Chef™ Crêpe/Pizzelle/Pancake Plus fitted with the flat plates in the closed position by adjusting the temperature to High. Once preheated, brush both plates with oil. Pour a heaping ½ cup of batter onto the bottom plate and spread into a 6-inch circle. Gently close cover without locking. Cook for about 3½ minutes, until crisp and golden brown.
4. Open the unit and flip the pancake. Brush the top of the pancake all over with about 1 tablespoon of the prepared okonomiyaki sauce. Drizzle the mayonnaise on top in a cross-hatch pattern and sprinkle with the gomasio, bonito flakes, and reserved scallions. Transfer the pancake to a plate. Continue with remaining batter in the same manner. Cut finished pancakes into 4 wedges and serve.
* These Japanese condiments and ingredi-ents can be found in the ethnic food aisle of most grocery stores or in Asian markets.
Nutritional information per wedge (4 per pancake) with accompaniments:
Calories 78 (40% from fat) • carb. 8g • pro. 4g • fat 4g • sat. fat 0g • chol. 50mg • sod. 270mg
• calc. 24mg • fiber 1g
NaanA standard Indian bread served with just
about any main dish. The cumin is optional, but adds a nice spice to it.
Makes 8 breads
3½ cups unbleached, all-purpose flour 4 teaspoons granulated sugar1 teaspoon baking powder½ teaspoon kosher salt pinch ground cumin (optional)1 cup reduced-fat or whole milk¼ cup vegetable oil, plus more for
bowl clarified butter or ghee, for
brushing plates
1. In the work bowl of a food processor fit-ted with the dough or chopping blade, process the dry ingredients to sift, about

23
10 seconds. With the unit running, gradu-ally add the milk and oil through the feed tube until a dough forms. Let unit run for an additional minute to knead dough. Remove and on a lightly floured surface, knead a few times by hand.
2. Transfer the dough to a lightly oiled bowl and cover with plastic wrap. Allow to rest at room temperature for 15 minutes.
3. Divide the dough into 8 pieces. Keeping dough covered with plastic wrap while working, roll one piece into a 4-inch round then stretch to make a 6- to 8-inch circle. Repeat with remaining dough (this can be done while cooking initial rounds of dough).
4. Preheat the International Chef™ Crêpe/Pizzelle/Pancake Plus fitted with the flat plates by adjusting the temperature to High. Once preheated, carefully open to the flat position. Brush plates with clarified butter or ghee. Place a dough circle on each plate and brush surface with addi-tional butter. Cook for about 2 minutes per side, or until nicely browned in spots. Remove and reserve; repeat with remain-ing dough.
Nutritional information per naan: Calories 279 (31% from fat) • carb. 42g • pro. 6g • fat 10g • sat. fat 3g • chol. 9mg • sod. 195mg
• calc. 38mg • fiber 1g
Chapati Enjoy these thin Indian breads with our
delicious vegetable curry (page 26), or Fresh Green Chutney (recipe follows).
Makes 8 chapati
2 cups whole wheat pastry flour1 teaspoon kosher salt1 cup warm water clarified butter or ghee for
brushing plates
1. In the work bowl of a food processor fit-ted with the dough or chopping blade,
process the flour and salt to sift, about 10 seconds. With the unit running, gradu-ally add the water through the feed tube. Once dough comes together into a ball, knead in processor for 1 minute. Place on a lightly floured work surface and knead dough by hand a few times. Transfer dough to a bowl and cover with plastic wrap. Let dough rest at room temperature for a minimum of 30 minutes and up to 2 hours.
2. Divide dough into eight equal-size pieces. Flatten and roll each into thin 6- to 8-inch discs. Keep covered with plastic wrap while rolling out remaining dough.
3. Preheat the International Chef™ Crêpe/Pizzelle/Pancake Plus fitted with the flat plates in the closed position by adjusting the temperature to High. Once preheated, brush plates with clarified butter or ghee. Working with one disc at a time, put rolled dough on the bottom plate. Gently close, but do not lock. Allow to cook for about 30 to 40 seconds; open and brush the edges with butter. Use pressure while brushing to create steam pockets in the bread. Gently close and cook 10 sec-onds more until edges are just brown, but chapati is still pliable.
4. Remove and cover with a clean towel to keep warm and soft. Repeat with remain-ing dough.
5. Serve warm.
Nutritional information per chapati:Calories 130 (20% from fat) • carb. 23g • pro. 3g
• fat 3g • sat. fat 0g • chol. 0mg • sod. 286mg • calc. 1mg • fiber 4g
24
Fresh Green Chutney This chutney of southern Indian influence is perfect when paired with our naan or
chapati, as well as a topping for any curry.
Makes about ¾ cup
4 teaspoons fresh lime or lemon juice1 small tomato, chopped1 ½-inch piece fresh ginger, peeled and halved1 serrano or jalapeño seeded and cut into ½-inch pieces ½ teaspoon kosher salt¼ teaspoon ground cumin½ cup chopped cilantro¼ cup fresh mint ½ cup unsweetened, shredded
coconut
1. Put the first six ingredients into the jar of a blender. Run on High until well blended, about 1 minute. Scrape down and blend for an additional 20 seconds, if necessary. Add the cilantro, mint and coconut. Blend on High until smooth, about 1 minute. Stop to scrape down as needed.
2. If not using immediately, store in an airtight jar in the refrigerator for up to 2 weeks.
Nutritional information per serving (1 tablespoon): Calories 27 (69% from fat) • carb. 2g • pro. 0g • fat 2g • sat. fat 2g • chol. 0mg • sod. 98mg
• calc. 7mg • fiber 1g
DosaAllowing the batter to ferment overnight
develops the tangy flavor of this thin, crisp South Indian crêpe. Serve with our
Fresh Green Chutney (preceding recipe) or Sambhar (page 25) as is customary.
Makes 12 dosas
½ cup urad dal*, picked over, rinsed, and soaked overnight with the fenugreek seeds in water
to cover
¼ teaspoon fenugreek seeds, (soaked overnight with the urad dal)2 cups cold water, divided 1 cup white rice flour½ teaspoon kosher salt¼ yellow onion, for cooking¼ cup vegetable oil, for brushing
plates
1. Drain the dal and fenugreek and put into a food processor fitted with the chopping blade. Pulse 10 to 15 times, until evenly ground, scraping down the sides of the bowl as necessary with a spatula. Process the lentils, while slowly adding 1½ cups of the water through the feed tube. Blend until smooth, about 3 minutes, scraping the sides as necessary.
2. Pour the lentil mixture into a large bowl and add the rice flour and salt. Whisk well to form a smooth batter. Cover the bowl loosely with plastic wrap and let stand overnight at room temperature. The batter should double in volume overnight.
3. Preheat the International Chef™ Crêpe/Pizzelle/Pancake Plus fitted with the flat plates in the closed position by adjusting the temperature to High. While the unit is heating, gently re-whisk the batter, and add the remaining half-cup of water to achieve a thin, crêpe-batter-like consis-tency.
4. Once preheated, carefully stick a fork into the curved side of the onion. Dip the cut side of the onion in the oil and when the unit has preheated, use the onion to lightly grease both plates.
5. Fill the large scoop with batter and ladle it into the center of the bottom cooking plate. Using the bottom of the scoop, gen-tly spread out the batter from the center toward the edges into a circle as large and thin as possible. Cook the dosa in the open position for 25 to 30 seconds to set the batter, then close the lid gently without locking and cook for another 2½ to 3 min-
25
utes until the dosa is browned and crisp. Open the lid, flip and cook another 30 seconds. Remove the dosa to a plate and cover with a clean towel to keep warm.
6. Repeat with remaining batter, stacking the dosas as they finish cooking to keep warm.
*Note: Also known as split black lentils, urad dal can be found in most specialty grocery stores prepackaged or in bulk containers.
Nutritional information per dosa: Calories 99 (45% from fat) • carb. 12g • pro. 1g • fat 5g • sat. fat 0g • chol. 0mg • sod. 109mg
• calc. 3mg • fiber 1g
Sambhar (South Indian Lentil Stew)
An essential component of any South Indian meal, versions of this hearty dish abound, depending on the cook. This variation has
mild heat and is rich with vegetables. Serve over rice or as an accompaniment to breads.
Makes 4 cups
½ cup yellow split peas, picked over, rinsed and drained
4 cups water, divided1 tablespoon plus 1½ teaspoons vegetable oil ½ large jalapeño1 teaspoon ground coriander1 teaspoon chili powder¼ teaspoon ground turmeric¼ teaspoon ground cumin pinch asafetida ½ medium russet potato, peeled and cut into ½-inch dice (about ½ cup)½ medium sweet potato, peeled and cut into ½-inch dice (about ½ cup)1 medium onion cut into ½-inch dice1 medium plum tomato, chopped1 medium carrot, cut into ½-inch dice (about ½ cup)
½ cup cauliflower florets1¼ teaspoons kosher salt½ cup frozen green peas½ teaspoon whole mustard seeds1 bay leaf2 tablespoons fresh lemon juice
1. In a small saucepan combine the split peas with 1½ cups of the water. Bring to a boil, cover and reduce to a simmer. Cook until the split peas are very soft and water has been absorbed, about 40 to 45 min-utes. Set aside.
2. In a medium-large saucepan set over medium heat, add 1 tablespoon of the oil. When hot, add the jalapeño and ground spices. Cook for about 1 minute until fragrant. Add the potatoes, onion, tomato, carrot, cauliflower and salt. Stir to combine and add the remaining 2½ cups water. Bring to a boil and reduce to a sim-mer. Cook until the vegetables are tender, about 20 minutes.
3. When the split peas are cooked, remove from the heat and mash them with a wooden spoon, leaving some split peas whole. Stir the split peas into the veg-etable pot until evenly distributed. Simmer for another 10 to 12 minutes. Stir in the green peas during the last 1 to 2 minutes of cooking.
4. In a small skillet, heat the remaining 1½ tablespoons of oil. Once hot, carefully add the mustard seeds and bay leaf. Cook for about 5 seconds, until the mustard seeds pop. Add the seeds, bay leaf and oil directly to the stew and stir to combine. Stir in the lemon juice, remove from the heat and serve.
Nutritional information per ½-cup serving: Calories 106 (27% from fat) • carb. 15g • pro. 5g • fat 3g • sat. fat 0g • chol. 0mg • sod. 393mg
• calc. 27mg • fiber 3g

26
RotiRoti is a flatbread that can be found in
many regions of the globe. This recipe, along with the Curried Chickpeas (following recipe), is a street food commonly found in Trinidad.
Makes 8 shells
2 cups unbleached, all-purpose flour
½ teaspoon kosher salt¼ teaspoon baking soda1 tablespoon extra virgin olive oil2⁄3 cup water vegetable oil, for brushing plates
1. Sift the flour, salt and baking soda togeth-er in a mixing bowl. With a fork stir in the oil, then the water until a dough ball forms. The dough will appear quite shaggy at first. Continue to mix, then knead with hands to fully form the dough ball. Should the dough still be dry, add water 1 tea-spoon at a time until dough completely comes together. Knead the dough on a floured surface by hand for about 5 min-utes until smooth. Cover with plastic wrap and let dough rest for at least an hour.
2. Roll the dough into a cylinder about 12 inches long. Cut the dough into eight equal portions. Roll each portion into a ball, then roll each into a thin round, about 8 inches in diameter. Be sure to keep each rolled roti separate so that the dough does not stick together.
3. Preheat the International Chef™ Crêpe/Pizzelle/Pancake Plus fitted with the flat plates in the closed position by adjust-ing the temperature to High. Fold a damp paper towel into a small square for press-ing the roti. Once preheated, brush the bottom plate lightly with oil. Place a roti on the heated plate and with the paper towel square, press the roti all over its surface. Pressing will create steam pockets that are traditionally seen in roti. Cook roti about 2 minutes per side.
4. Continue with remaining roti and serve
with Curried Chickpeas with Potatoes and Spinach (recipe follows).
Nutritional information per roti: Calories 135 (27% from fat) • carb. 22g • pro. 3g • fat 4g • sat. fat 1g • chol. 0mg • sod. 181mg
• calc. 1mg • fiber 1g
Curried Chickpeas with Potatoes and Spinach
This simple curry can be enjoyed with any Indian flatbread.
Makes about 4 cups
2 teaspoons vegetable oil½ red onion, finely chopped1 Scotch bonnet chile (or habanero), seeded and finely chopped2 garlic cloves, finely chopped1 tablespoon mild curry powder½ teaspoon ground cumin½ teaspoon kosher salt1 can (15 ounces) chickpeas, drained2 cups chicken stock12 ounces white potatoes, cut into ½-inch dice1 cup packed fresh baby spinach
1. Put the oil into a medium sauté pan over medium heat. Once the oil shimmers across the pan, add the onion, chile and garlic. Cook until softened and fragrant, about 5 minutes. Add the curry powder, cumin and salt and stir well. Continue to cook for a few minutes.
2. Stir in the chickpeas and chicken stock and bring to a simmer. Maintain a slight simmer and cook for about 10 minutes. Add the potatoes and cover. Cook until potatoes are cooked through, about an additional 15 minutes.
3. Once the potatoes are cooked through, stir in the spinach and cook until wilted.

27
Taste and adjust seasoning accordingly. Serve with the roti.
Nutritional information per ½-cup serving: Calories 152 (20% from fat) • carb. 24g • pro. 7g • fat 3g • sat. fat 0g • chol. 0mg • sod. 443mg
• calc. 47mg • fiber 16g
InjeraThis traditional Ethiopian flatbread acts as both plate and utensil. Stews and salads
are served on top of the injera and eaten as small pieces of injera are torn off and used
to scoop up and eat the meal.
Makes about 8 to 9 injera
2 cups teff flour, divided3 cups water½ cup unbleached, all-purpose flour½ teaspoon kosher salt
1. In a bowl, stir 1 cup of the teff flour together with the water. Cover and leave at room temperature for about 24 hours. The surface of the mixture should be cov-ered with small bubbles.
2. Whisk in the remaining cup of teff flour, all-purpose flour and salt.
3. Heat the International Chef™ Crêpe/Pizzelle/Pancake Plus fitted with the flat plates in the closed position by adjusting the temperature to High. Once preheated, pour ½ cup of the injera batter over the center of the bottom plate and gently spread to the edges of the plate, creating an even, large circle. Cook in the open position for about one minute so that the bottom is set and tiny bubbles have formed over the surface of the injera. To finish cooking, hold the unit’s handle in position so that the top plate is just hover-ing over the bread, for about 30 seconds.
4. Serve on a plate with Doro Wat (recipe fol-lows) and/or a variety of Ethiopian dishes on top. Eat by tearing pieces of the injera off and using as a utensil to scoop up the food to eat.
Nutritional information per injera: Calories 123 (7% from fat) • carb. 24g • pro. 4g • fat 1g • sat. fat 0g • chol. 0mg • sod. 134mg
• calc. 2mg • fiber 4g
Doro Wat (Ethiopian Chicken Stew)
This stew uses the spice berbere* and niter kibbeh (recipe follows), a spiced clarified
butter, to give it a unique and utterly delicious flavor.
Makes about 8 servings
2 medium red onions, cut into 1-inch pieces5 to 6 garlic cloves, peeled1 1-inch piece of fresh ginger, peeled 4 ounces Niter Kibbeh (recipe follows)½ cup berbere*1 cup water2½ pounds bone-in, skin-on chicken
thighs
1. Put onions into a food processor fitted with the chopping blade. Pulse about 10 times to finely chop, scrape bowl and repeat 2 times so that onions are com-pletely chopped to the point of purée.
2. Place a large sauté pan or casserole over medium heat and add the onions. Cook, monitoring heat to maintain a slow, but steady heat to sweat the onions for about 15 to 20 minutes so they are completely soft and fragrant, but have not picked up any color.
3. While the onions are cooking, finely chop the garlic and ginger in the food proces-sor. Once the onions are cooked, add the garlic and ginger to the pan and continue to cook for an additional 25 minutes.
4. Add the niter kibbeh and berbere and simmer for an additional 10 minutes.
5. Stir in the water and add the chicken thighs. Be sure the thighs are almost
28
completely submerged. Cover and cook for about 40 minutes so that chicken is cooked through.
6. Serve on top of the injera.
* Berbere is a traditional Ethiopian spice blend that can be found in specialty stores or can be purchased online.
Nutritional information per serving: Calories 290 (48% from fat) • carb. 8g • pro. 29g
• fat 16g • sat. fat 8g • chol. 142mg • sod. 248mg • calc. 53mg • fiber 3g
Niter KibbehThis spice-infused clarified butter is worth
the extra step. It adds layers of flavor, plus it keeps for months in the refrigerator.
Makes 8 ounces
1 pound unsalted butter1 small onion, finely chopped4 garlic cloves, chopped1 1-inch piece fresh ginger, peeled
and chopped 1 cinnamon stick1 teaspoon toasted cardamom seeds2 whole cloves1 teaspoon fenugreek seeds1 bay leaf
1. Put all ingredients in a small saucepan and place over medium heat. When butter begins to bubble, reduce heat to maintain a very slight simmer. Skim any foam from the surface and discard.
2. Continue to cook over low heat for at least 30 minutes and up until 1 hour. Continue skimming so that ultimately the surface is clear and all milk solids have sunk to the bottom.
3. Remove from heat and line a fine mesh strainer with cheesecloth or a coffee filter. Slowly pour the butter through the strainer and discard all solids. Allow butter to cool; store in the refrigerator for up to two months.
Nutritional information per tablespoon: Calories 209 (97% from fat) • carb. 1g • pro. 0g • fat 22g • sat. fat 16g • chol. 61mg • sod. 1mg
• calc. 6mg • fiber 0g
IB-12950-ESP
©2014 Cuisinart 150 Milford Road
East Windsor, NJ 08520 Printed in China
14CE005623
Any other trademarks or service marks referred to herein are the trademarks or service marks of their respective owners.