installing wordpress on google cloud platform (gcp)
TRANSCRIPT
InstallingWordPressonGoogleCloudPlatform(GCP)
April2016

What’sCoveredWhat’sCoveredSlide Topic3 Introduction4 IaaS vs.PaaSvs.SaaS5 ArchitectureOverview7 Part One– CreateaComputeEngineinstance11 Part Two– ConfigureComputeEngine15 PartThree– CreateaCloudSQLinstance24 PartFour– InstallandConfigure WordPress30 NowWhat?

IntroductionIntroduction
ThepurposeofthistutorialisnotonlytoinstallWordPressbuttolearnmoreabouttheGoogleCloudPlatformConsole.Inaddition,learnhowtousesomeoftheresourcessuchasComputeEngineandCloudSQL.
ThiswillgiveyouagoodbasicunderstandingofGoogle’scloudoffering.
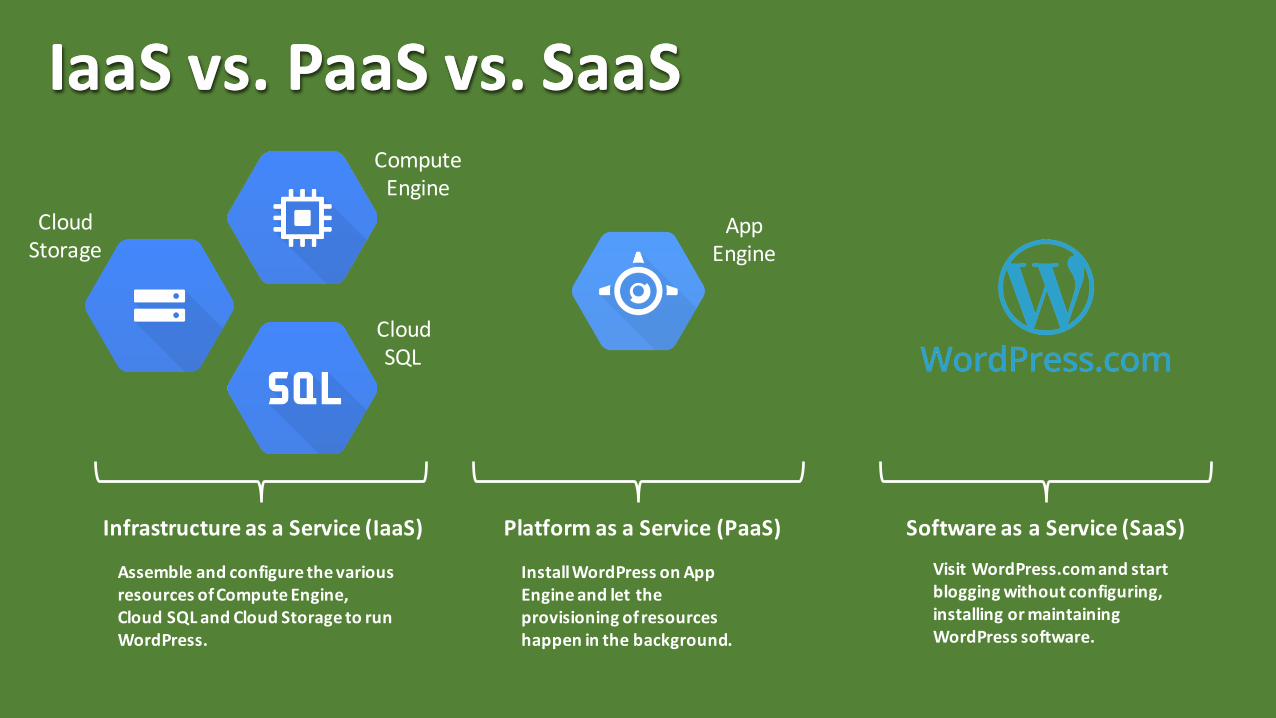
InfrastructureasaService(IaaS) PlatformasaService(PaaS) SoftwareasaService(SaaS)
IaaSvs.PaaSvs.SaaSIaaSvs.PaaSvs.SaaS
AssembleandconfigurethevariousresourcesofComputeEngine,CloudSQLandCloudStoragetorunWordPress.
InstallWordPressonAppEngineandlettheprovisioningofresourceshappeninthebackground.
VisitWordPress.comandstartbloggingwithoutconfiguring,installingormaintainingWordPresssoftware.
ComputeEngine
CloudSQL
CloudStorage
AppEngine
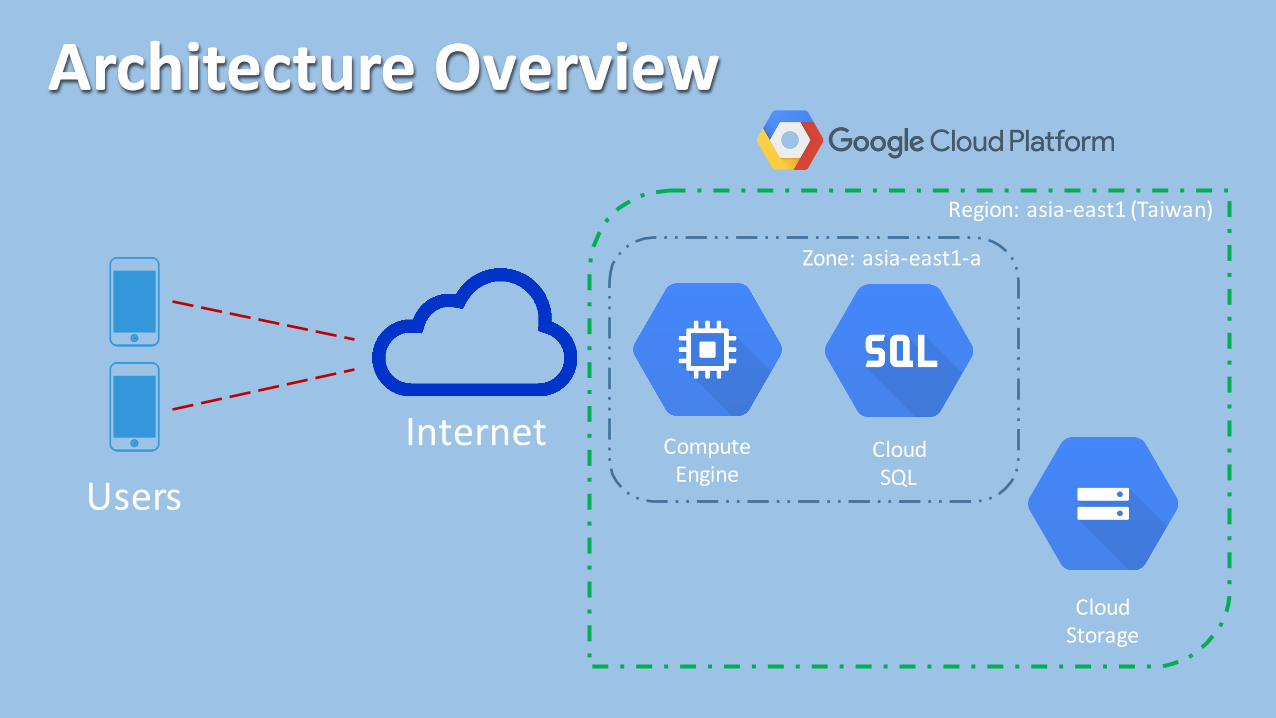
ArchitectureOverviewArchitectureOverview
UsersInternet
Region:asia-east1(Taiwan)
Zone:asia-east1-a
ComputeEngine
CloudSQL
CloudStorage

GetaFreeTrialGCPAccount@https://cloud.google.com/
PartOne:PartOne:CreateaComputeEngineInstanceCreateaComputeEngineInstance
Incloud-speakcreatinganewvirtualserveriscalledan“instance”.“Spinningupaninstance”isaphraseyouwillhearquiteoftenwhichjustreferstostartinganewComputeEngineinstance.

Step1:FromtheGCPConsole,clickonComputeEngine

Step2:ClickonCreateInstance

Step3:Enterinthedetails

PartTwo:PartTwo:ConfigureYourComputeEngineInstanceConfigureYourComputeEngineInstance
NowthattheComputeEngineinstancehasbeencreatedit’stimetoinstalltheLEMP(Linux,Nginx,MySQLandPHP)stackwhichwe’llneedbeforeyoucaninstallWordPress.TheLinuxkernelwaspreinstalledwhentheinstancewascreated.Nginx andPHPwillbeinstalledinthissection.MySQLwillbeinstalledinthenextsection.
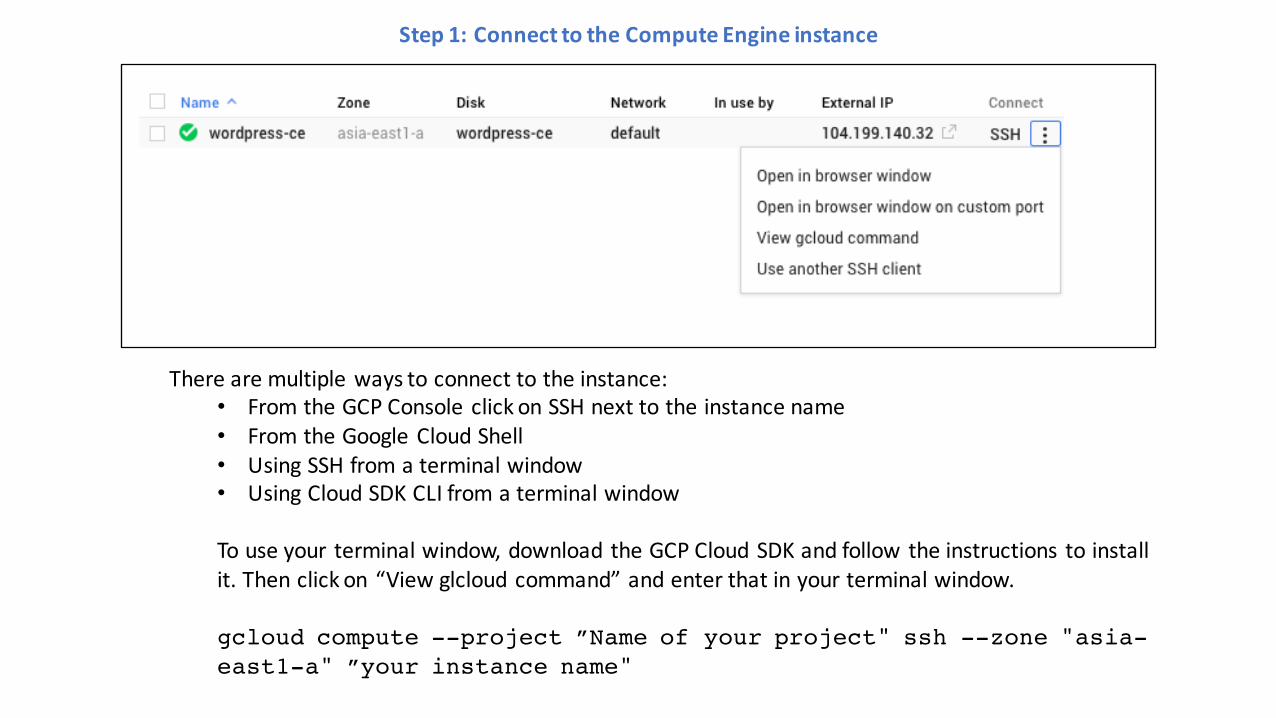
Step1:ConnecttotheComputeEngineinstance
Therearemultiplewaystoconnecttotheinstance:• FromtheGCPConsoleclickonSSHnexttotheinstancename• FromtheGoogleCloudShell• UsingSSHfromaterminalwindow• UsingCloudSDKCLIfromaterminalwindow
Touseyour terminalwindow,download theGCPCloudSDKandfollowtheinstructions toinstallit.Thenclickon“Viewglcloud command”andenterthatinyourterminalwindow.
gcloud compute --project ”Name of your project" ssh --zone "asia-east1-a" ”your instance name"

Step2:InstallNginx , PHPandMySQL
Onceconnectedtotheinstance,switchtosuperuser:sudo su
Installanynewupdates:apt-get update
InstallNginx , PHPandMySQLextension:apt-get install -y nginx php5-fpm php5-mysql mysql-client
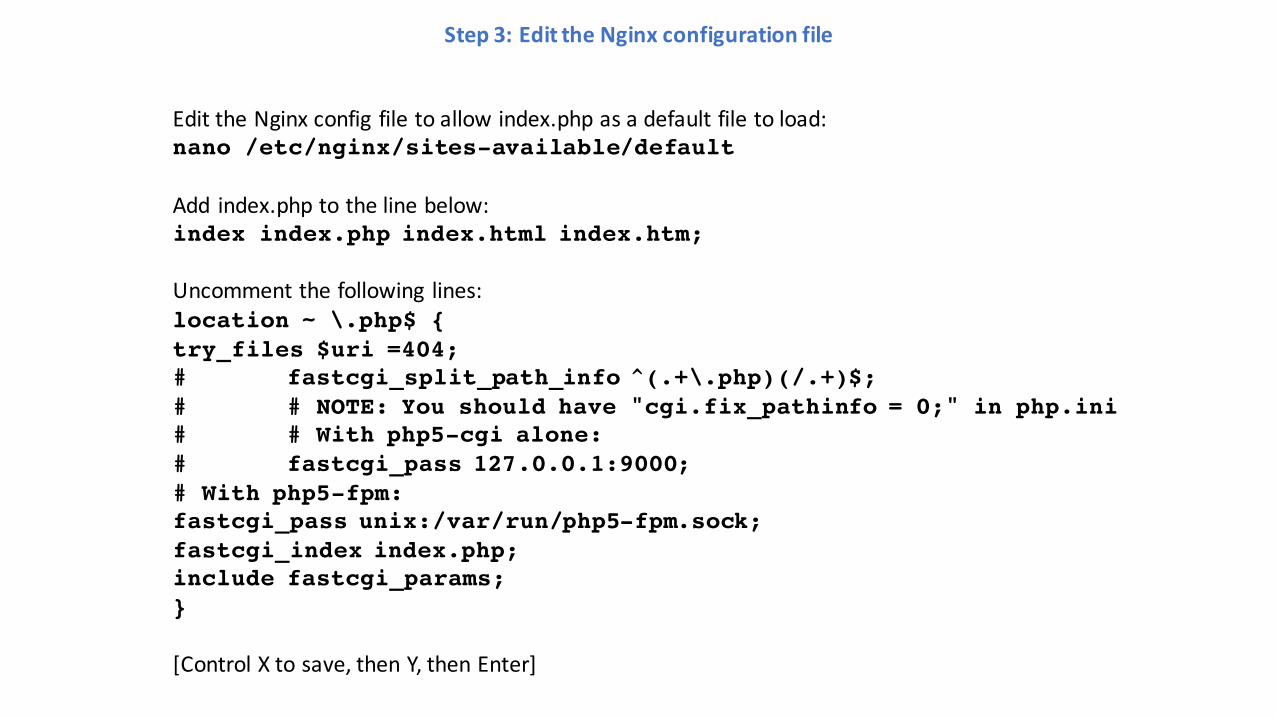
Step3:EdittheNginx configurationfile
EdittheNginx config filetoallowindex.php asadefaultfiletoload:nano /etc/nginx/sites-available/default
Add index.php tothelinebelow:index index.php index.html index.htm;
Uncommentthefollowing lines:location ~ \.php$ { try_files $uri =404; # fastcgi_split_path_info ^(.+\.php)(/.+)$; # # NOTE: You should have "cgi.fix_pathinfo = 0;" in php.ini# # With php5-cgi alone: # fastcgi_pass 127.0.0.1:9000;# With php5-fpm: fastcgi_pass unix:/var/run/php5-fpm.sock; fastcgi_index index.php; include fastcgi_params; }
[ControlX tosave,thenY,thenEnter]
PartThree:PartThree:CreateaCloudSQLInstanceCreateaCloudSQLInstance
InsteadofrunningMySQLonthesameComputeEngineinstancewewilluseCloudSQLtorunthedatabaseonaseparateserver.

Step1:FromtheGCPConsole,clickonSQL

Step2:ClickonCreateInstance

Step3:ClickonChooseSecondGeneration
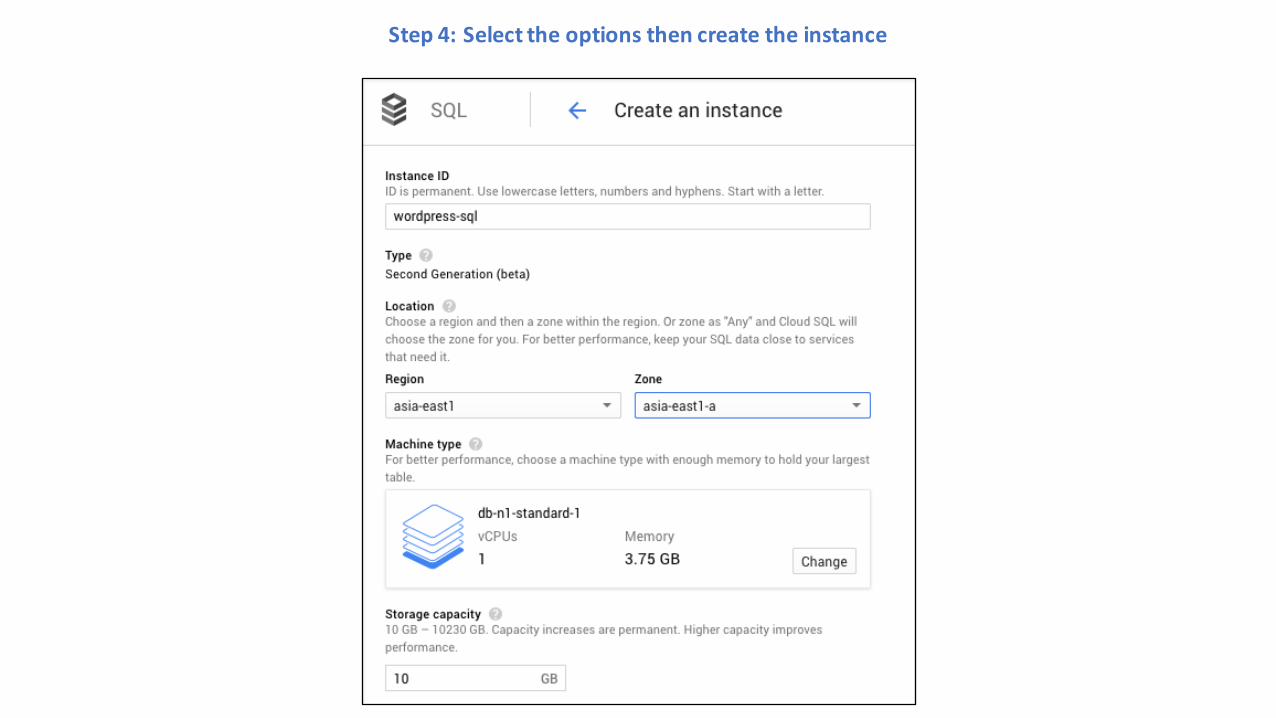
Step4:Selecttheoptionsthencreatetheinstance
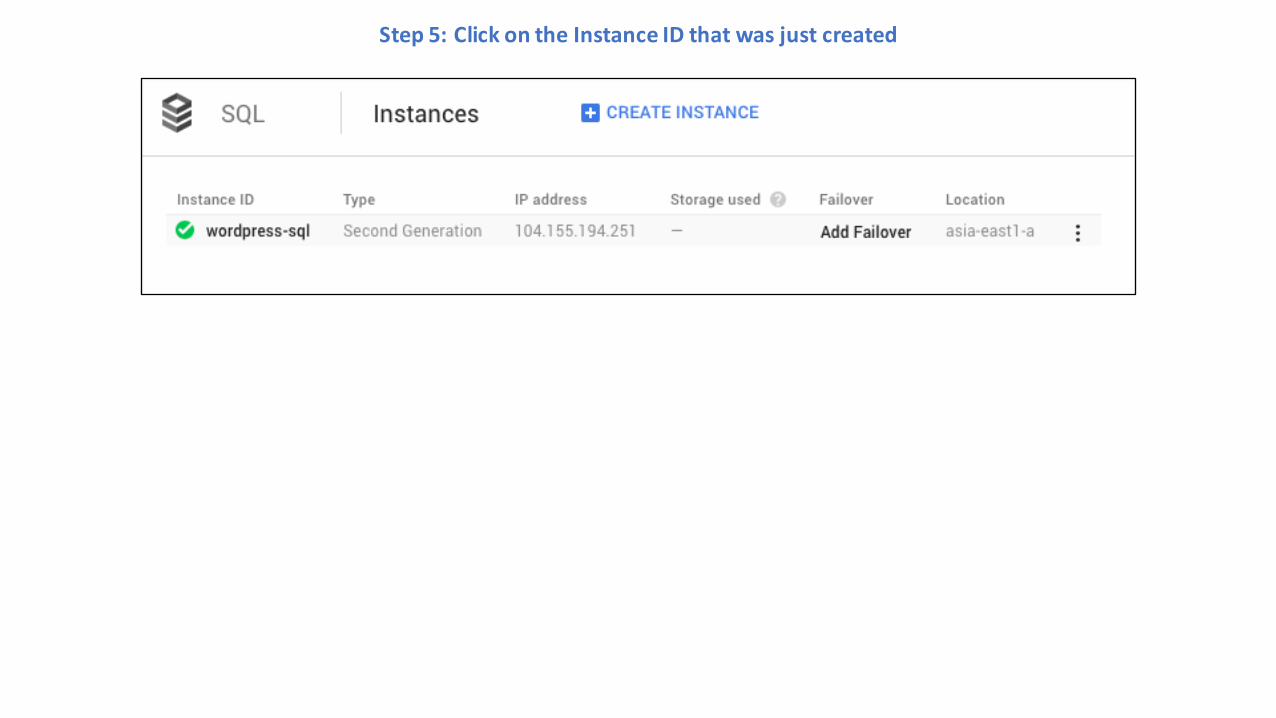
Step5:ClickontheInstanceIDthatwasjustcreated

Step6:Clickon“Additem”toaddtheIPaddressoftheComputeEnginethatyoucreated
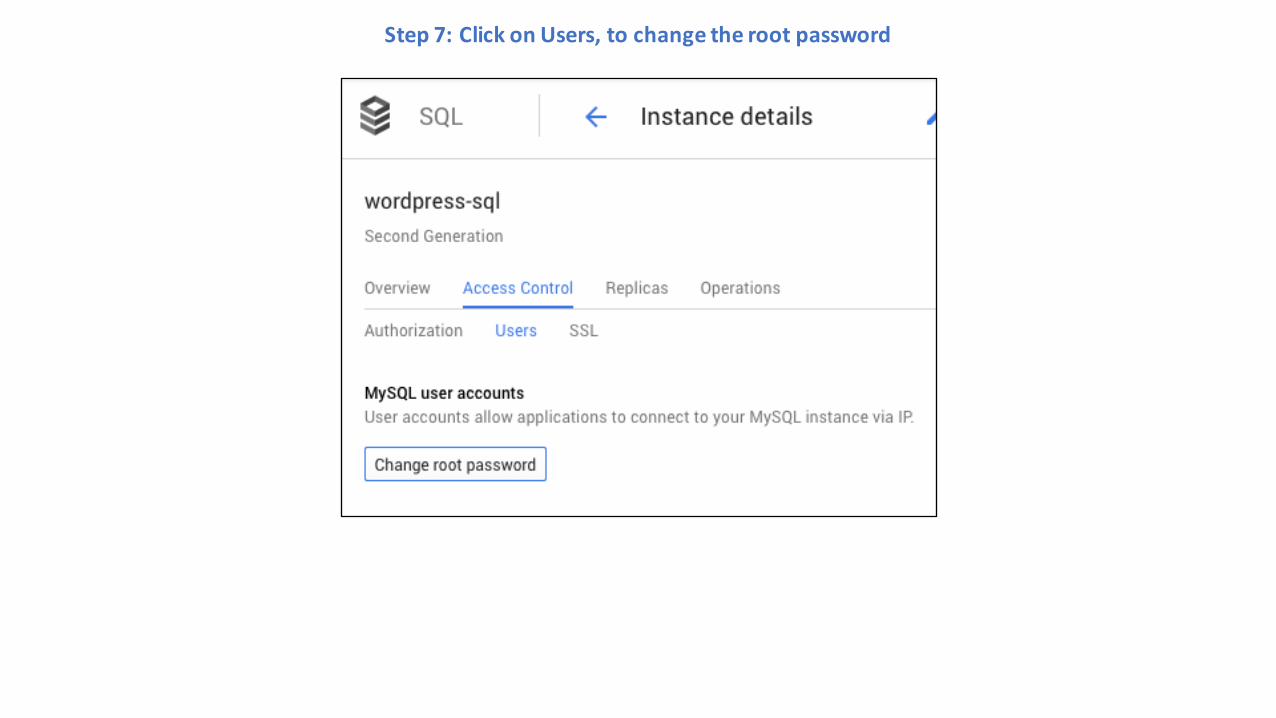
Step7:ClickonUsers,tochangetherootpassword

Step8:UsetheCloudSDKcommandlinetocreateadatabaseona2nd Geninstance
Connect to the Compute Engine instance, then type the following to connect to the Cloud SQL instance:mysql --host=<IP address of Cloud SQL> --user=root --password
At the mysql prompt:CREATEDATABASEwordpress;

PartFour:PartFour:InstallandConfigureWordPressInstallandConfigureWordPress

Step1:DownloadandInstallWordPress
Change to the root directory of Nginx:cd /usr/share/nginx/html
Download the latest WordPress package:wget http://wordpress.org/latest.tar.gz
Extract WordPress:tar -xzvf latest.tar.gz
Move WordPress to the default root folder: (rsync keeps the permissions)rsync -avP /usr/share/nginx/html/wordpress/ /usr/share/nginx/html/
Delete the WordPress tar filerm latest.tar.gz
Change permissions on the directory:chown -hR www-data:www-data /usr/share/nginx/htmlchmod -R g+rw /usr/share/nginx/html
Restart the Nginx serverservice nginx restart

Step2:PointyourbrowsertotheIPaddressoftheComputeEngine,thenselectthelanguage

Step3:EntertheMySQLdetails

Step4:EntertheWordPressdetails

Step5:VisittheIPAddressoftheComputeEngine.Theblogislive!

NowWhat?NowWhat?
MakethingsandbreakthingstolearnhowallthevariousservicesofGCPworktogether.
VisitGCPformoretutorialsat:https://cloud.google.com/docs/


AppendixAppendix
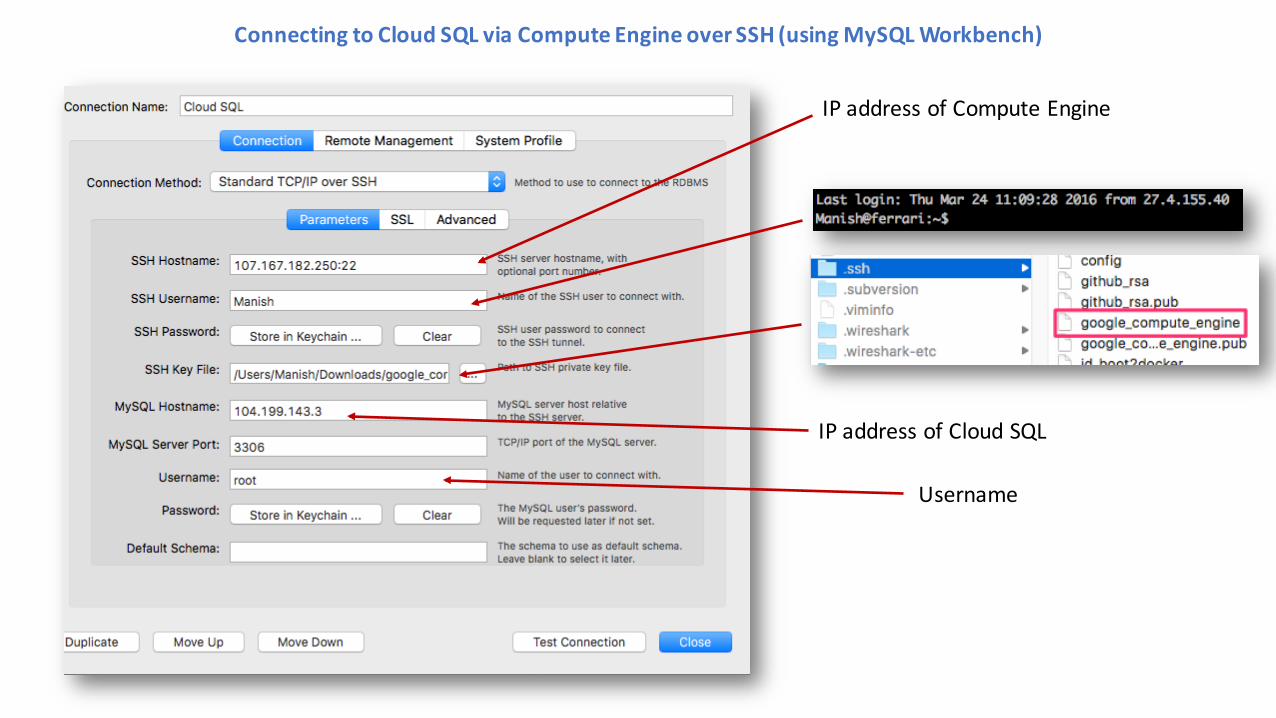
ConnectingtoCloudSQLviaComputeEngineoverSSH(usingMySQLWorkbench)
IPaddressofComputeEngine
IPaddressofCloudSQL
Username

UsingCyberduck toTransferFilestoGoogleCloudStorage– Step1
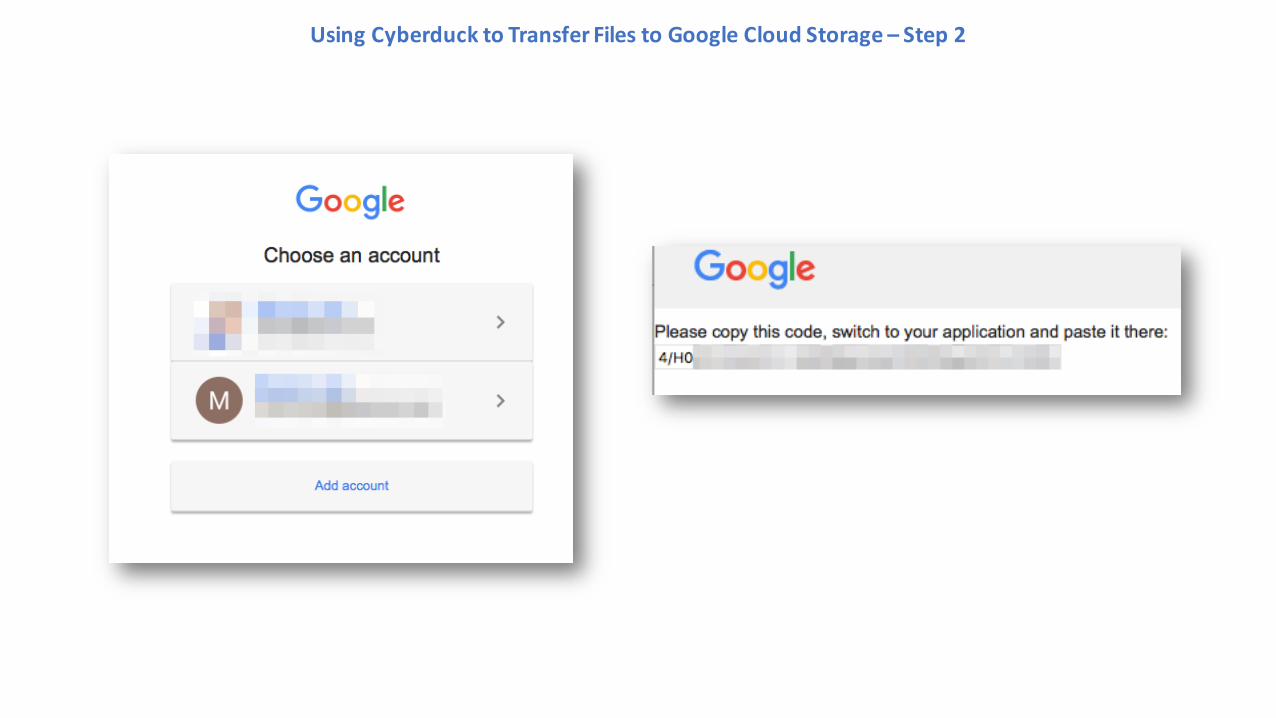
UsingCyberduck toTransferFilestoGoogleCloudStorage– Step2