installation manual - schneider electric 08 07/2008 9 about the book at a glance document scope this...
TRANSCRIPT

3500
6152
.08
www.schneider-electric.com
Communication DriversInstallation manual 07/2008 eng

2

Table of Contents
Safety Information . . . . . . . . . . . . . . . . . . . . . . . . . . . . . . . . . . . .7
About the Book . . . . . . . . . . . . . . . . . . . . . . . . . . . . . . . . . . . . . . .9
Chapter 1 Driver Installation . . . . . . . . . . . . . . . . . . . . . . . . . . . . . . . . . . . .11At a Glance . . . . . . . . . . . . . . . . . . . . . . . . . . . . . . . . . . . . . . . . . . . . . . . . . . . . . 11Driver Installation. . . . . . . . . . . . . . . . . . . . . . . . . . . . . . . . . . . . . . . . . . . . . . . . . 12The drivers and Unity Pro . . . . . . . . . . . . . . . . . . . . . . . . . . . . . . . . . . . . . . . . . . 15
Chapter 2 Modbus driver . . . . . . . . . . . . . . . . . . . . . . . . . . . . . . . . . . . . . . .17At a Glance . . . . . . . . . . . . . . . . . . . . . . . . . . . . . . . . . . . . . . . . . . . . . . . . . . . . . 17Configuration of the Modbus Driver . . . . . . . . . . . . . . . . . . . . . . . . . . . . . . . . . . 18Driver configuration screen . . . . . . . . . . . . . . . . . . . . . . . . . . . . . . . . . . . . . . . . . 19Driver Control Screen . . . . . . . . . . . . . . . . . . . . . . . . . . . . . . . . . . . . . . . . . . . . . 21Driver Debug Screen. . . . . . . . . . . . . . . . . . . . . . . . . . . . . . . . . . . . . . . . . . . . . . 23Information Screen . . . . . . . . . . . . . . . . . . . . . . . . . . . . . . . . . . . . . . . . . . . . . . . 25How to configure the Modbus modem with Windows . . . . . . . . . . . . . . . . . . . . . 26
Chapter 3 Uni-Telway Driver for Serial Port. . . . . . . . . . . . . . . . . . . . . . . .31At a Glance . . . . . . . . . . . . . . . . . . . . . . . . . . . . . . . . . . . . . . . . . . . . . . . . . . . . . 31Driver Configuration Screens . . . . . . . . . . . . . . . . . . . . . . . . . . . . . . . . . . . . . . . 32How to Configure the Driver . . . . . . . . . . . . . . . . . . . . . . . . . . . . . . . . . . . . . . . . 36
Chapter 4 PLC USB driver . . . . . . . . . . . . . . . . . . . . . . . . . . . . . . . . . . . . . .39At a Glance . . . . . . . . . . . . . . . . . . . . . . . . . . . . . . . . . . . . . . . . . . . . . . . . . . . . . 39Finalizing the Installation. . . . . . . . . . . . . . . . . . . . . . . . . . . . . . . . . . . . . . . . . . . 40State of the USB link . . . . . . . . . . . . . . . . . . . . . . . . . . . . . . . . . . . . . . . . . . . . . . 42
Chapter 5 TSX PCX 3030 / TSX C USB 485 / TSX C USB 232 Cable Drivers . . . . . . . . . . . . . . . . . . . . . . . . . . . . . . . . . . . . . . . . . . . .45At a Glance . . . . . . . . . . . . . . . . . . . . . . . . . . . . . . . . . . . . . . . . . . . . . . . . . . . . . 45How to install the drivers for TSX PCX 3030 / TSX C USB 485 / TSX C USB 232 cables. . . . . . . . . . . . . . . . . . . . . . . . . . . . . . . . . . . . . . . . . . . . 46Configuration screens for TSX PCX 3030 / TSX C USB 232 / TSX C USB 485 cable drivers. . . . . . . . . . . . . . . . . . . . . . . . . . . . . . . . . . . . . . . 52
35006152 08 07/2008 3

Chapter 6 XIP Driver on TCP/IP . . . . . . . . . . . . . . . . . . . . . . . . . . . . . . . . . 55At a Glance . . . . . . . . . . . . . . . . . . . . . . . . . . . . . . . . . . . . . . . . . . . . . . . . . . . . . 55Driver Configuration Screen. . . . . . . . . . . . . . . . . . . . . . . . . . . . . . . . . . . . . . . . . 56How to Configure the Driver. . . . . . . . . . . . . . . . . . . . . . . . . . . . . . . . . . . . . . . . . 59
Chapter 7 FIP Driver for TSX C USB FIP Card . . . . . . . . . . . . . . . . . . . . . 63At a Glance . . . . . . . . . . . . . . . . . . . . . . . . . . . . . . . . . . . . . . . . . . . . . . . . . . . . . 63Finalizing Installation . . . . . . . . . . . . . . . . . . . . . . . . . . . . . . . . . . . . . . . . . . . . . . 64Driver Configuration Screen. . . . . . . . . . . . . . . . . . . . . . . . . . . . . . . . . . . . . . . . . 66
Chapter 8 PCIWAY driver for Atrium TSX PCI 57 xxx processors . . . . . 67At a Glance . . . . . . . . . . . . . . . . . . . . . . . . . . . . . . . . . . . . . . . . . . . . . . . . . . . . . 67Driver Configuration Screen. . . . . . . . . . . . . . . . . . . . . . . . . . . . . . . . . . . . . . . . . 68How to Adjust the Parameters of the TSX PCI 57 xxx Card . . . . . . . . . . . . . . . . 70
Chapter 9 Drivers Manager. . . . . . . . . . . . . . . . . . . . . . . . . . . . . . . . . . . . . 73At a Glance . . . . . . . . . . . . . . . . . . . . . . . . . . . . . . . . . . . . . . . . . . . . . . . . . . . . . 73Management of X-Way drivers . . . . . . . . . . . . . . . . . . . . . . . . . . . . . . . . . . . . . . 74X-Way addressing modes . . . . . . . . . . . . . . . . . . . . . . . . . . . . . . . . . . . . . . . . . . 79
Chapter 10 Troubleshooting. . . . . . . . . . . . . . . . . . . . . . . . . . . . . . . . . . . . . 83At a Glance . . . . . . . . . . . . . . . . . . . . . . . . . . . . . . . . . . . . . . . . . . . . . . . . . . . . . 83Installation Troubleshooting . . . . . . . . . . . . . . . . . . . . . . . . . . . . . . . . . . . . . . . . . 84Configuration Troubleshooting. . . . . . . . . . . . . . . . . . . . . . . . . . . . . . . . . . . . . . . 86
Appendices . . . . . . . . . . . . . . . . . . . . . . . . . . . . . . . . . . . . . . . . . . . . . . .87At a glance. . . . . . . . . . . . . . . . . . . . . . . . . . . . . . . . . . . . . . . . . . . . . . . . . . . . . . 87
Appendix A Ethway Driver . . . . . . . . . . . . . . . . . . . . . . . . . . . . . . . . . . . . . . . 89At a Glance . . . . . . . . . . . . . . . . . . . . . . . . . . . . . . . . . . . . . . . . . . . . . . . . . . . . . 89How to Install the Driver. . . . . . . . . . . . . . . . . . . . . . . . . . . . . . . . . . . . . . . . . . . . 90Driver Configuration Tool . . . . . . . . . . . . . . . . . . . . . . . . . . . . . . . . . . . . . . . . . . . 92
Appendix B FIP Driver for TSX FPP 20 Card . . . . . . . . . . . . . . . . . . . . . . . . 95At a Glance . . . . . . . . . . . . . . . . . . . . . . . . . . . . . . . . . . . . . . . . . . . . . . . . . . . . . 95Driver configuration screen . . . . . . . . . . . . . . . . . . . . . . . . . . . . . . . . . . . . . . . . . 96Finalizing installation . . . . . . . . . . . . . . . . . . . . . . . . . . . . . . . . . . . . . . . . . . . . . . 97
Appendix C FIP Driver for TSX FPC 10 ISA Card. . . . . . . . . . . . . . . . . . . . . 99At a Glance . . . . . . . . . . . . . . . . . . . . . . . . . . . . . . . . . . . . . . . . . . . . . . . . . . . . . 99Finalizing the installation of the TSX FPC 10 Card . . . . . . . . . . . . . . . . . . . . . . 100How to Select the Hardware Type . . . . . . . . . . . . . . . . . . . . . . . . . . . . . . . . . . . 101How to Configure Hardware Parameters . . . . . . . . . . . . . . . . . . . . . . . . . . . . . . 104How to Adjust the TSX FPC 10 ISA Card Parameters . . . . . . . . . . . . . . . . . . . 107Driver configuration screen . . . . . . . . . . . . . . . . . . . . . . . . . . . . . . . . . . . . . . . . 109
4 35006152 08 07/2008

Appendix D ISAWAY driver for Atrium TPCX 57 processors . . . . . . . . . .111At a Glance . . . . . . . . . . . . . . . . . . . . . . . . . . . . . . . . . . . . . . . . . . . . . . . . . . . . 111Finalizing the installation . . . . . . . . . . . . . . . . . . . . . . . . . . . . . . . . . . . . . . . . . . 112How to select the hardware type. . . . . . . . . . . . . . . . . . . . . . . . . . . . . . . . . . . . 113How to configure hardware parameters . . . . . . . . . . . . . . . . . . . . . . . . . . . . . . 116How to adjust the ISA TPCX 57 card parameters . . . . . . . . . . . . . . . . . . . . . . . 119Configuration of ISAWAY driver . . . . . . . . . . . . . . . . . . . . . . . . . . . . . . . . . . . . 121
Appendix E Uni-Telway driver for TSX SCP 114 Card . . . . . . . . . . . . . . .127At a Glance . . . . . . . . . . . . . . . . . . . . . . . . . . . . . . . . . . . . . . . . . . . . . . . . . . . . 127Driver Configuration Screens . . . . . . . . . . . . . . . . . . . . . . . . . . . . . . . . . . . . . . 128Finalizing installation . . . . . . . . . . . . . . . . . . . . . . . . . . . . . . . . . . . . . . . . . . . . . 130
Index . . . . . . . . . . . . . . . . . . . . . . . . . . . . . . . . . . . . . . . . . . . . . 131
35006152 08 07/2008 5

6 35006152 08 07/2008

§
Safety InformationImportant Information
NOTICE Read these instructions carefully, and look at the equipment to become familiar with the device before trying to install, operate, or maintain it. The following special messages may appear throughout this documentation or on the equipment to warn of potential hazards or to call attention to information that clarifies or simplifies a procedure.
The addition of this symbol to a Danger or Warning safety label indicatesthat an electrical hazard exists, which will result in personal injury if theinstructions are not followed.
This is the safety alert symbol. It is used to alert you to potential personalinjury hazards. Obey all safety messages that follow this symbol to avoidpossible injury or death.
DANGER indicates an imminently hazardous situation, which, if not avoided, will result in death or serious injury.
DANGER
WARNING indicates a potentially hazardous situation, which, if not avoided, can result in death, serious injury, or equipment damage.
WARNING
CAUTION indicates a potentially hazardous situation, which, if not avoided, can result in injury or equipment damage.
CAUTION
35006152 08 07/2008 7

Safety Information
PLEASE NOTE Electrical equipment should be installed, operated, serviced, and maintained only by qualified personnel. No responsibility is assumed by Schneider Electric for any consequences arising out of the use of this material.
© 2008 Schneider Electric. All Rights Reserved.
8 35006152 08 07/2008

About the Book
At a Glance
Document Scope This document details the installation and configuration of communication drivers for Windows XP Professional Edition and Windows Vista Business Edition 32.
Operating System Compatibility Table.
Validity Note The data and illustrations found in this documentation are not binding. We reserve the right to modify our products in line with our policy of continuous product development.
The information in this document is subject to change without notice and should not be construed as a commitment by Schneider Electric.
Protocol / Hardware type Windows XP Professional Edition
Windows Vista Business Edition 32
ETHWAY - Ethernet Yes No
FIP - FPC10 ISA Card Yes No
FIP - FPP20 PCMCIA Card Yes No
FIP - CUSBFIP Adapter Yes Yes
ISAWAY - PCX57 ISA Card Yes No
MODBUS Serial - Port COM Yes Yes
PCIWAY - Atrium TPCI57 PCI Card
Yes Yes
UNI-TELWAY - Port COM Yes Yes
UNI-TELWAY - SCP114 PCMCIA Card
Yes No
USB for High End PLC Yes Yes
XIP - XWAY on TCP/IP Yes Yes
35006152 08 07/2008 9

About the Book
Product Related Warnings
Schneider Electric assumes no responsibility for any errors that may appear in this document. If you have any suggestions for improvements or amendments or have found errors in this publication, please notify us.
No part of this document may be reproduced in any form or by any means, electronic or mechanical, including photocopying, without express written permission of Schneider Electric.
All pertinent state, regional, and local safety regulations must be observed when installing and using this product.
For reasons of safety and to ensure compliance with documented system data, only the manufacturer should perform repairs to components.
When controllers are used for applications with technical safety requirements, please follow the relevant instructions.
Failure to observe this product related warning can result in injury or equipment damage.
User Comments We welcome your comments about this document. You can reach us by e-mail at [email protected]
10 35006152 08 07/2008

35006152.08 07/2008
1
Driver InstallationAt a Glance
Subject of this Chapter
This chapter describes how to install the drivers. The installation procedure is the same for all drivers, except for the Ethway driver and the TSX PCX 3030 / TSX C USB 485 / TSX C USB 232 cable driver. Refer to the relevant chapters on those drivers for specific installation instructions.
What's in this Chapter?
This chapter contains the following topics:
Topic Page
Driver Installation 12
The drivers and Unity Pro 15
11

Driver Installation
Driver Installation
At a Glance This is the procedure to install the drivers contained on the CD-ROM using Windows XP Professional Edition or Windows Vista Business Edition 32.
The Ethway driver and the TSX PCX 3030 / TSX C USB 485 / TSX C USB 232 cable driver require specific installation procedures. Refer to corresponding driver chapters for installation instructions.
12 35006152.08 07/2008

Driver Installation
Procedure The following procedure describes how to install a driver using the supplied CD-ROM. Example screens from Uni-telway drivers are used to illustrate the procedure. The screens shown may appear different according to the driver you are installing.
Step Description
1 Insert the CD-ROM in the CD-ROM drive.Result: the _Installdrivers.htm file launches automatically.If not: explore the CD content by double clicking on your CD-ROM drive in My Computer window. Launch the _Installdrivers.htm file by a double click.
2 Choose the driver you wish to install and click on the link of the driver according to the operating system currently running on your computer.Result: the Downloading files dialog box appears:
3 Choose Run.Result: the Safety Warning dialog box appears:
4 Click RUN to confirm your choice.Result: the Driver Setup window appears.Follow the instructions displayed in Windows Installation Wizard
File Download - Security Warning
Name: SchneiderUTW2KDriver.exe
Do you want to run or save this file?
Type: Application, 5,87MBFrom: E:\WEB
Run Save Cancel
While files from the internet can be useful, this file type canpotentially harm your computer. If you do not trust the source, do notrun or save this software.What’s the risk?
Internet Explorer - Security Warning
The publisher could not be verified. Are you sure you want to run thissoftware?
Name: SchneiderUTW2KDriver.exePublisher: Unknown Publisher
Run Don’t Run
This file does not have a valid digital signature that verifies its publisher. Youshould only run softwares from publisher you trust.How can Idecide what software to run?
35006152.08 07/2008 13

Driver Installation
5 Click Next to go ahead with the installation.Result: The driver installation is run.Another driver setup window may appear, click Install.
6 Once the installation has been run, a driver configuration window appears.To configure the installed driver now, refer to the specific chapter for the driver you are currently installing.
7 Once the driver configuration is done, the Driver Setup window appears to restart your computer.Choose Yes if you are done installing drivers, this will reboot your computer.Choose No if you need to install more drivers and repeat the installation procedure from Step 2:
Step Description
UNITELWAY WDM Driver Setup
InstallShield Wizard Complete
The InstallShield Wizard has successfully installedUNITELWAY WDM Driver. Before you can use the program,you must restart your computer.
Yes, I want to restart my computer now.
No, I will restart my computer later.
Remove any disks from their drives, and then click FInish tocomplete setup.
Next > Cancel< Back
14 35006152.08 07/2008

Driver Installation
The drivers and Unity Pro
Precautions To ensure correct operation of the drivers using the Unity Pro software range you should install or reinstall the drivers using the CD-ROM version ≥ V2.0.
Drivers that normally operate using the Unity Pro software range should also be installed using Windows XP Professional Edition or Windows Vista Business Edition 32.
35006152.08 07/2008 15

Driver Installation
16 35006152.08 07/2008

35006152.08 07/2008
2
Modbus driverAt a Glance
Subject of this Chapter
This chapter describes Modbus driver configuration.
Driver Installation
For installation information, see the Driver Installation Chapter (see Driver Installation, p. 11)
What's in this Chapter?
This chapter contains the following topics:
Topic Page
Configuration of the Modbus Driver 18
Driver configuration screen 19
Driver Control Screen 21
Driver Debug Screen 23
Information Screen 25
How to configure the Modbus modem with Windows 26
17

Modbus driver
Configuration of the Modbus Driver
Access to the Configuration Tool
The configuration tool can be accessed from the taskbar: Start → Settings → Control Panel → Driver Manager see Driver Manager Chapter (see Drivers Manager, p. 73).
Select the MODBUS SERIAL Driver tab to display the following window:
This window enables you to:
display the driver version installed,select the number of drivers to activate,display the status of each driver,access the configuration (see Driver configuration screen, p. 19) of each driver.
Management properties of SCHNEIDER drivers
DRIVERS Manager UNITELWAY Driver SCP114 Driver PCX57 Driver MODBUS SERIAL Driver FPC10 Driver XIP Driver MODBUS Test XWAY Test
MODBUS
[1] Configuration
OK
MODBUS Driver V1.7 IE31Copyright © 2002-06 Schneider Automation SASRunning driver Number:Driver 1 state: RunningDriver 2 state: RunningDriver 3 state: Not operationalDriver 4 state: Not operational
2
[2] Configuration
[4] Configuration
[3] Configuration
18 35006152.08 07/2008

Modbus driver
Driver configuration screen
At a Glance This chapter describes Modbus driver for Serial Port configuration.
The configuration tool is accessible from the Windows taskbar: Start → Settings → Control Panel → Driver Manager, then choose the Modbus Serial Driver tab and select one of the Configuration buttons corresponding to the four drivers.
Illustration The configuration screen dedicated to the Modbus driver looks like this:
DefaultUndoApply
OK
18
3000
ASCII (7 bits)
RTU (8 bits)
2 Bits
1 Bit
Stop Bits
Mode (Data Bits)
Parity
Global TimeOut
Inter-Chart TimeOutAutomatic
Even Odd None
COM Port
Baud Rate
COM 1
9600
Configuration Runtime Debug About
Modbus Driver - Modbus01
Serial Port
ms
ms
FPWFP
Use Modem
Flow ctrl None
Phone Number
35006152.08 07/2008 19

Modbus driver
Description This table describes the different areas which make up the configuration screen:
Modbus Instances
Once installed, configure the Modbus driver and reboot the computer. All Modbus instances that are activated in the driver manager are initialized.
For each Modbus instance configured a corresponding icon appears in the task bar.
Area Element
Serial Port If the Use Modem box is checked the list of all the modems configured on the PC is displayed in the Modem area (instead of COM Port. To configure the modem in Windows operating system refer to the page of configuration of the modem with Windows (see At a glance, p. 26).COM Port or Modem: provides a choice for the communication port to be used, by default COM1 or the modem to be used.Baud rate: provides a choice for transmission speed between 300 bits per second and 19200 bits per second, by default 9600 Bd.Flow ctrl: selects the flow control of the serial port (except for modem communication).
Stop bits Allows entry of the number of stop bits used for communication, by default 1 stop bit.
Parity Is used to set whether a parity bit is added or not, as well as its type, such as:
Even, for even parity (default selection), Odd, for odd parity, None, for no parity
Global TimeOut Allows Reception Time-Out to be defined (in milliseconds) while the driver is waiting for the response from the polled Modbus slave.
Inter-Char TimeOut
Allows quiet time to be defined (in milliseconds), permitting detection of a Modbus end delimiter.If the Automatic box is checked, the value is automatically calculated according to speed (Baud Rate).
Mode (Data Bits) RTU: the characters are coded on 8 bits in binary.This mode is the default mode.ASCII: the characters are coded on 7 bits in ASCII.
Phone number Number to dial when the communication port is connected to a modem.
Apply button Saves the configuration.
Undo button Cancels the latest modifications.
Default button Sets parameters for the different fields with default values.
OK button Allows configuration parameters to be acknowledged, and represents the window by an icon.
20 35006152.08 07/2008

Modbus driver
Driver Control Screen
At a Glance This screen is used to view information concerning driver operation.
The refreshment period for this information is defined in a driver screen. See Driver Debug Screen, p. 23.
Illustration You can access the control screen dedicated to the Modbus driver by selecting the Runtime tab in the Driver Configuration screen:
Configuration Runtime Debug About
Communication
Connections
Frames Sent
Bytes Sent
Frames Received
Bytes Received
Number of Timeouts
Checksum Errors
0
Mode RTU
0
0
0
0
0
0
OK
Reset
Modbus Driver - Modbus01
35006152.08 07/2008 21

Modbus driver
Description This table describes the different information concerning driver operation:
Element Description
Mode Displays the driver operating mode:RTU Mode,ASCII Mode.
Connections Contains the number of clients using the driver
Frames Sent Contains the number of frames sent since the last Reset.
Bytes Sent Contains the number of bytes sent since the last Reset.
Frames Received Contains the number of frames received since the last Reset.
Bytes Received Contains the number of bytes received since the last Reset.
Number of TimeOut Contains the number of Time-Outs reached; the value is defined in the "Global Delay" configuration screen.
Checksum Errors Contains the number of checksum errors detected.
Reset This button is used to reset the different counters in the control screen to 0.
OK This button allows the window to be represented as an icon.
22 35006152.08 07/2008

Modbus driver
Driver Debug Screen
At a Glance This screen is used to deactivate the saving of certain operations carried out by the communication driver in a trace file.
Illustration You can access the debug screen dedicated to the Modbus driver by selecting the Debug tab in the Driver Configuration screen:
Configuration Runtime Debug About
0 s (fastest
Full
OK
Browse
Modbus Driver - Modbus01
Thread Priority
Log File
Refresh Period (slowest) 1 s
D:\SNAPSHOTVIEWS\FPUI0...
Start Log
Empty
Low High
35006152.08 07/2008 23

Modbus driver
Description This table describes the different areas which make up the debug screen:
Area Description
Refresh Period Allows the screen refreshing period for the driver control screen to be defined within a range of 0s to 1s.
Log File This area contains:the description of the path where the trace file has been saved,a bar graph showing the fill level of the trace file.a button to start or stop saving in the trace file.
Thread Priority Adjusts the priority of the driver with regard to other tasks executed in Windows.The default setting is "Low" .
OK This button allows the window to be represented as an icon.
24 35006152.08 07/2008

Modbus driver
Information Screen
At a Glance This screen provides general information on the communication driver and on the operating system installed.
Illustration You can access the information screen dedicated to the Modbus driver by selecting the About tab in the Driver Configuration screen:
Description This table describes the different areas which make up the information screen:
Configuration Runtime Debug About
OK
Modbus Driver - Modbus01
WINDOWS NT V5.0 (Build 2195)
Extended Info : Service Pack 2
WINDOWS Sockets V1.1 (V2.2 detected)
Modbus Driver Info
System Info
WIN 32 Modbus Serial Driver
Release Version 1.7 (IE31 - Build 32)
Copyright© 2001-07 Schneider Automation
Modbus
Area Element
Modbus Driver Info This area contains:the driver version,the Schneider Electric Copyright.
System Info This area contains:the Windows operating system version,additional information,the Winsock interface version.
OK This button allows the window to be represented as an icon.
35006152.08 07/2008 25

Modbus driver
How to configure the Modbus modem with Windows
At a glance This section explains how to configure the Modbus modem with Windows Operating System when the check button Use Modem is selected in the driver configuration screen (see Driver configuration screen, p. 19).
Procedure In the Windows control panel, select the icon Phone and Modem options:
GoControl Panel
Control PanelFile Edit View Favorite Tools Help
LinksAddress
Configures your telephone dialing rules and modem properties
Back Search Folder
Accessibilityoptions
Add/RemoveHardware
Add/RemoveProgram
Administrativetools
Automaticupdates
Date/Time Display
Scanners andCameras
ScheduledTasks
Sounds andMultimedia
System Users andPasswords
DriversManager
Fax Folder Options Fonts GamingOptions
InternetOptions
Keyboard Mouse Network andDial-up Co...
Phone andModemOptions
Power Options Printers RegionalOptions
26 35006152.08 07/2008

Modbus driver
Open the tab Modems, then select the modem to configure from the list, and click on the Properties button:
The following modems are installed:
Gener GEN Indus Properties ?
OK Cancel
Dialing Rules Modems
Modem
Advanced
Apply
Add... Remove... Properties
Attached To
Gener GEN IndusMultitech System MT 5634SMI-V92
COM1Not present
Modem selected
Properties button
35006152.08 07/2008 27

Modbus driver
In the properties screen, enter (if needed) the hayes initialization string of the modem, then click on Change Default Preferences button:
|
Extra initialization commands:
Gener GEN Indus Properties ?
OK Cancel
General Diagnostics
Extra Settings
Advanced
Change Default Preferences...
Change DefaultPreferences button
28 35006152.08 07/2008

Modbus driver
In the Default preferences screen, enter the same speed as the modbus driver, uncheck the disconnection option, then click on the Advanced tab:
19200
30
60
Port speed:
Standard ECData Protocol:
Compression:
Flow control:
Disconnect a call if idle for more than
Cancel the call if not connected within secs
mins
Gener GEN Indus Default Preferences ?
Hardware
OK Cancel
General Advanced
Data Connection Preferences
Call preferences Disconnection
Port speed
option
35006152.08 07/2008 29

Modbus driver
Enter the same parameters as those entered in the driver Modbus configuration screen. Then click on OK button to validate the modifications:
The modem is now configured to use with Modbus driver.
8Data bits:
NoneParity:
Stop bits:
Modulation:
Gener GEN Indus Default Preferences ?
OK Cancel
General Advanced
Hardware settings
1
30 35006152.08 07/2008

35006152.08 07/2008
3
Uni-Telway Driver for Serial PortAt a Glance
Subject of this Chapter
This chapter describes configuration of the Uni-Telway driver communicating in slave mode on the serial port with a remote device.
Driver Installation
For installation information, see the Driver Installation Chapter (see Driver Installation, p. 11)
What's in this Chapter?
This chapter contains the following topics:
Topic Page
Driver Configuration Screens 32
How to Configure the Driver 36
31

Uni-TelwayDriver for Serial Port
Driver Configuration Screens
At a Glance The configuration tool is used to link a driver configuration profile to a remote device that communicates with the station.
The configuration tool can be accessed from the taskbar: Start → Settings → Control panel → Driver Manager see Driver Manager Chapter (see Drivers Manager, p. 73)
Select the tab corresponding to the driver to be configured in the Driver Manager window.
Illustration The screen dedicated to the Uni-Telway driver looks like this:
Description This table describes the different areas which make up the configuration screen:
OK
Uni-Telway Configuration
Station ID
Target Station:
Cancel Apply
[Default]
Add Modify Delete
Remote Password Ph
Station List
[Default] COM 1
1
2
3
45
6
7
Number Element
1 This field is used to display the active profile.
2 This list is used to display the driver profile associated with each remote device.
3 These buttons are used to select the driver profile.
4 This button is used to add new profiles to the list.
5 This button is used to modify the profile of the driver selected from the list.
6 This button is used to remove a profile from the list.
7 This button is used to make the profile selected with the cursor active.
32 35006152.08 07/2008

Uni-TelwayDriver for Serial Port
Uni-Telway Parameters
The parameters are presented in the Parameter of the station window.
This window is accessed by clicking Add on the Unitelway configuration screen (see Illustration, p. 32):
Description This table describes the different areas which make up the Uni-Telway tab in the Parameter of the station window:
Link Parameters
Station ID
COM Port
Uni-telway Slave address
Communication Modem
NumberBase
HayesTel No.Password
AdvancedUni-Telway
OK
Use Modem
Cancel
Parameters of the Station
[Default]
COM 1
1 3
Element Description
Station ID The Station ID is used to name the remote device assiociated with the driver configuration.
Com Port The Port Com is used to select the communication port used.
Uni-Telway Slave address
The Uni-telway Slave Address window is used to enter:the standard slave address of the driver,the number of slave addresses used by the driver.
Communication Modem
The Communication Modem window is useful when the local station is communicating via a modem. In this case, this window is used to enter:
the HAYES string to be sent to the modem in order to initialize it,the call number of the remote device,the password to be sent to the remote device, if it has been configured with a list of callers with passwords (e.g. TSX MDM 10 card configured with passwords).
35006152.08 07/2008 33

Uni-TelwayDriver for Serial Port
Link Parameters Select the tab corresponding to Link parameters in the Parameters of the station window.
The parameters are presented in the following manner:
Description This tab is used to configure the parameters linked to transmission:
Link Parameters
Speed
seconds
7 bits
AdvancedUni-Telway
OK Cancel
Parameters of the Station
9600 bits/s
Auto-Adaptation1Valid
Use CTS RTS/CTS Delay
X 100 ms
Default
Data Content Parity Stop Bits
8 bits
1 bit
2 bits
OddEvenWithout
1
Element Description
Speed This area enables to set transmission speed of between 300 bits per second and 115,200 bits per second.
Auto-Adaptation self-adaptation of speed (time during which the driver tries to connect at a given speed).
Data Content The Data Content specifies the size of the data exchanged over the line.
Parity This area is used to set whether a parity bit is added or not, as well as its type
Stop Bits This area is used to enter the number of stop bits used for communication.
RTS/CTS Delay This area enables the CTS signal to be used in the event of multidrop communication.
Default The Default button is used to reset all these parameters to their default value.
34 35006152.08 07/2008

Uni-TelwayDriver for Serial Port
Advanced Parameters
Select the tab corresponding to Advanced parameters in the Parameters of the station window.
The advanced parameters are presented in the following manner:
Description This tab is used to configure the link type:
Link Parameters AdvancedUni-Telway
OK Cancel
Parameters of the Station
TimeOut LinkRX/TX Delay
Type of link
Other
PC
Uni-Telway
NumPLC.
-1-1
Force Virtual Com Port
Element Description
PC Uses the driver to connect to a series 7 PLC terminal port.
Uni-Telway Default value, uses the driver to communicate in Uni-Telway.
Num PLC Uses the driver to connect to Num PLCsTimeout Link: By default set to -1; is used to set the maximum time for detecting the right transmission speed.RX/TX Delay: By default set to -1; is used to extend the return time (if the station is too fast)
Force Virtual Com Port
Must be checked if the Unit-Telway driver uses a virtual communication port except for use with the TSX PCX 0303 / TSXCUSB485 / TSXCUSB232 cables.
35006152.08 07/2008 35

Uni-TelwayDriver for Serial Port
How to Configure the Driver
At a Glance During driver installation, a default profile is proposed. This profile can be modified or a new one created.
How to Create a New Profile
From the driver Uni-telway configuration screen (see Illustration, p. 32):
How to Modify a Profile
From the Uni-telway configuration screen (see Illustration, p. 32):
Step Action
1 Click on the Add... button. see Uni-Telway Parameters, p. 33.
2 Enter station name.
3 Select COM port.
4 Define the driver slave address.
5 If the driver uses a modem to communicate, select the Use modem box and enter the different fields associated with it.
6 Select the Link parameters (see Link Parameters, p. 34) tab.
7 Configure the transmission parameters according to the remote device (baud rate, parity, data bits, etc.).
8 If the driver requires specific configuration, click on the Advanced (see Advanced Parameters, p. 35) tab and configure the parameters according to the remote device.
9 Accept the configuration by clicking on Ok.Result: the new configuration appears in the list.
Step Action
1 Select a configuration profile from the list.Result: the cursor moves to the selected line.
2 Click on the Modify button; see Uni-Telway Parameters, p. 33.
3 Modify the parameters according to the remote device.
4 Select the Link parameters (see Link Parameters, p. 34) tab and modify the transmission parameters according to the remote device (speed, parity, data, etc.).
5 If the driver requires specific configuration, click on the Advanced (see Advanced Parameters, p. 35) tab and modify the parameters according to the remote device.
6 Accept the configuration by clicking on Ok .Result: the new configuration appears in the list.
36 35006152.08 07/2008

Uni-TelwayDriver for Serial Port
How to Remove a Profile
From the Uni-telway configuration screen (see Illustration, p. 32):
How to Activate a Profile
From the Uni-telway configuration screen (see Illustration, p. 32):
Step Action
1 Select a configuration profile from the list.Result: the cursor moves to the selected line.
2 Click on Delete.
3 Press the Yes button to confirm your choice.Result: the configuration is removed from the list.
Step Action
1 Select a profile from the list.Result: the cursor moves to the selected line.
2 Click on the Apply button.
35006152.08 07/2008 37

Uni-TelwayDriver for Serial Port
38 35006152.08 07/2008

35006152.08 07/2008
4
PLC USB driverAt a Glance
Subject of this Chapter
This chapter describes how to finalize the installation and to verify the state of the PLC USB driver.
The PLC USB driver is used to connect with PLCs that are equipped with USB ports (such as Premium and Quantum)
Driver installation
For installation information, see the Driver Installation Chapter (see Driver Installation, p. 11)
What's in this Chapter?
This chapter contains the following topics:
Topic Page
Finalizing the Installation 40
State of the USB link 42
39

USB driver
Finalizing the Installation
Procedure After rebooting the PC you will have to configure the USB driver. The USB cable must be connected to the PLC, and then Windows will detect the PLC and install the driver.
Perform the following actions:
Step Action
1 The following screen will be displayed:
2 Click on YES:
USB Device
New Hardware Found
Digital Signature Not Found
NoYes More Info
The Microsoft digital signature affirms that software has been tested with Windows and that the software has not been altered since it was tested.
The software you are about to install does not contain a Microsoft digital signature. Therefore, there is no guarantee that this software works correctly with Windows.
PLC USB Device
If you want to search for Microsoft digitally signed software, visit the Windows Update Web site at http://windowsupdate.microsoft.com to to see if one is available.
Do you want to continue the installation?
40 35006152.08 07/2008

USB driver
3 An icon is displayed in the task bar. Double clicking on it when the USB link with the PLC is operational calls up the window:
Clicking on " Driver Manager " launches the tool.Clicking on "OK" makes an icon appear in the task bar.
Step Action
Driver Manager
OK
General
Period : 00.00.01Status : On-line
PLC USB DriverUS
Activity
35006152.08 07/2008 41

USB driver
State of the USB link
At a Glance A window showing the state of the USB link can be accessed from the taskbar:
Start → Settings → Control Panel → Driver Manager
With Windows XP Professional Edition, select the PLC USB Driver tab to display the following window:
Description for Windows XP Professional Edition:
Field Description
Virtual Port Name of the COM port used by the driver.
Status Contains: "Running" if the driver is operating. "Not operational" if the driver is not operating. "Disconnected" if the USB cable is not connected.
Remote IP\Local IP IP addresses used by the PC and PLC to communicate.
Log File Button allowing access to a *.log file containing connection/disconnection events on the USB line.
Management Properties of SCHNEIDER drivers
PCX57 Driver FPC10 Driver FPP20 Driver MODBUS Test XWayTestSCP114 DriverUNITELWAY DriverPLC USB DriverDRIVERS Manager
USBPLC USB Driver V1.2 IE17
Copyright © 2005 Schneider Automation SAS
Log File
Virtual Port : COM8Status : RunningRemote IP : 90.0.0.1Local IP : 90.0.01
OK
42 35006152.08 07/2008

USB driver
With Windows Vista Business Edition 32, select the PLC USB Driver tab to display the following window:
To see Diagnostic (Screen below) press the more... button.
Virtual Port : COM5
SCHNEIDER drivers management Properties
XIP Driver MODBUS Test XWayTestPLC USB Driver UNITELWAY DriverUSB-FIP Driver
USBPLC USB Driver V3.0 IE07
Copyright © 1999-2007, Schneider Automation SAS
More...
OK
DRIVERS ManagerMODBUS SERIAL Driver
35006152.08 07/2008 43

USB driver
With Windows Vista Business Edition 32, select the PLC USB Driver diagnostic:
Description for Windows Vista Business Edition 32:
Field Description
Virtual Port Name of the COM port used by the driver.
Status Contains: "Running" if the driver is operating. "Not operational" if the driver is not operating. "Disconnected" if the USB cable is not connected.
Remote IP\Local IP IP addresses used by the PC and PLC to communicate.
Log View Button allowing access to a *.log View containing connection/disconnection events on the USB line.
Log view
PLC USB Driver Diagnostic
USB
0: 2-5-2008 16h:37mn:20s:636ms-->USB OK
1: 2-6-2008 9h:10mn:13s:241ms-->Cable disconnected
2: 2-8-2008 11h:6mn:54s:169ms-->USB OK
OK
Status : Running
Remote IP : 90.0.0.1
Local IP : 90.0.0.2
Log view
44 35006152.08 07/2008

35006152.08 07/2008
5
TSX PCX 3030 / TSX C USB 485 / TSX C USB 232 Cable DriversAt a Glance
Subject of this Chapter
This chapter describes the installation and configuration of drivers for the TSX PCX 3030, TSX C USB 232, and TSX C USB 485 cables with Windows XP Professional Edition and Windows Vista Business Edition 32. These cables are USB/RS-485 or RS232 Serial link converters.
What's in this Chapter?
This chapter contains the following topics:
Topic Page
How to install the drivers for TSX PCX 3030 / TSX C USB 485 / TSX C USB 232 cables
46
Configuration screens for TSX PCX 3030 / TSX C USB 232 / TSX C USB 485 cable drivers.
52
45

TSX PCX 3030 / TSX C USB 485 / TSX C USB 232 cables
How to install the drivers for TSX PCX 3030 / TSX C USB 485 / TSX C USB 232 cables
At a Glance The TSX PCX 3030 / TSX C USB 232 / TSX C USB 485 cables are USB/RS-485 or RS232 serial link converters. They are used to connect a device with a USB port to a PLC using its terminal.
TSX PCX 3030 cable is not compatible with Windows Vista Business Edition 32, use the cable TSX C USB 485 instead.
The cables are "plug 'n' play". When you connect the cable via the USB port, Windows XP Professional Edition or Windows Vista Business Edition 32 finds a new device and tries to install the corresponding driver. It is necessary to install two drivers:
the USB bus driver,and the virtual serial port driver.
46 35006152.08 07/2008

TSX PCX 3030 / TSX C USB 485 / TSX C USB 232 cables
Installation Important: Before connecting the cables to the USB port on the PC, you must install the UNITELWAY driver (V1.8 minimum), or the MODBUS Serial line driver (V1.5 minimum). The cable drivers are pre-installed when installing the UNITELWAY or MODBUS driver.
The following table describes the procedure to install both drivers required to use the TSX PCX 3030, TSX C USB 232, or TSX C USB 485 cable.
Step Action
1 Connect the cable to the USB port of your device.Result: Windows detects the new hardware and displays the assistant for installing the device driver. Click "Next": The next window is displayed:
Next > Cancel<Previous
Hardware Detected Wizard
This wizard will help you install the software for
Add New Hardware Detected Wizard
TSX C USB 232
If an installation CD or diskette was provided with your peripheral, please insert it now
What task do you wish the Wizard to carry out? Install the software automatically (recommended)Install from a list or a specific location (experienced users)
To continue, click Next.
35006152.08 07/2008 47

TSX PCX 3030 / TSX C USB 485 / TSX C USB 232 cables
2 The first driver is installed. Click "Finish" to install the second driver by repeating steps 1 and 2:
Step Action
Finish Cancel<Previous
Hardware Detected Wizard
This wizard finished installing the software for:
End of the Add New Hardware Detected Wizard
TSX C USB 232
Click Finish to close the Wizard.
48 35006152.08 07/2008

TSX PCX 3030 / TSX C USB 485 / TSX C USB 232 cables
3 To determine the COM port that the cable was mapped to, you must open the "Device Manager" window. ("Properties" on "My Computer" then the "Hardware" tab and finally the "Device Manager" button.) The following window is displayed with the reference of the cable and the name of the COM port.:
Step Action
Device ManagerFile Action Display ?
???
ComputerDisk drivesDisplay adaptersDVD/CD-ROM drivesFloppy disk controllersFloppy disk drivesHuman Interface DevicesIDE ATA/ATAPI controllersKeyboardsMice and other pointing devicesModemsMonitorsNetwork adaptersPorts (COM & LPT)
Communications Port (COM1)ECP Printer Port (LPT1)TSX C USB 232 (COM8)
ProcessorsSound, video and game controllersSystem devicesUniversal Serial Bus controllers
SO-ROBIN
Cable reference and com port
35006152.08 07/2008 49

TSX PCX 3030 / TSX C USB 485 / TSX C USB 232 cables
COM port number
Changing the number of the COM port assigned to the cable:
When the driver is installed, you can assign it to another communication port.
Example: The TSX C USB 232 cable is on COM8. We will reconfigure it to COM13.
From the Device Manager, select the COM8 port and open the "properties" window to access the port settings:
Advanced...
Bits per second: 9600
Properties of TSX C USB 232 (COM8)
Data bits: 8
Parity: None
Stop bits: 1
Flow control: None
Restore Defaults
General Port Settings Driver
?
OK Cancel
50 35006152.08 07/2008

TSX PCX 3030 / TSX C USB 485 / TSX C USB 232 cables
In the "Port Settings" tab of the COM8 properties, click "Advanced...". The following window is displayed:
Select port COM13, and confirm with OK, then disconnect and reconnect the TSX C USB 232 cable in order to take the new settings into account.
OK
?Advanced Settings for COM8
COM Port Number: COM13
4096
Cancel
DefaultsSelect lower settings to correct performance problems at low baud rates:Select higher settings for faster performance.
Receive (Bytes)
Transmit (Bytes)
Select lower settings to correct response problems:
Latency Timer (msec)
Minimum Read Timeout (msec):
Minimum Write Timeout (msec):
Serial EnumeratorSerial Printer
Cancel If Power Off
Event On Surprise RemovalSet RST On Close
Disable Modem Ctrl At Startup
Miscellaneous Options BM Options
Timeouts
USB Transfer Sizes
4096
16
0
0
35006152.08 07/2008 51

TSX PCX 3030 / TSX C USB 485 / TSX C USB 232 cables
Configuration screens for TSX PCX 3030 / TSX C USB 232 / TSX C USB 485 cable drivers.
At a Glance When the drivers of the TSX PCX 3030, TSX C USB 232, and TSX C USB 485 cables are installed, you must select the cables with the drivers that can use them. The compatible drivers are:
Uni-Telway driver, version ≥ V1.5,Modbus driver, version ≥ V1.1.
52 35006152.08 07/2008

TSX PCX 3030 / TSX C USB 485 / TSX C USB 232 cables
Uni-Telway driver
The following table describes the procedure for declaring the cable with a Uni-Telway driver:
Step Action
1 Access the Drivers Manager from the taskbar: Start → Settings → Control Panel → Driver ManagerSee Driver Manager Chapter (see Drivers Manager, p. 73)
2 From the Drivers Manager, select the Uni-Telway Driver tab.
3 Click on the Configuration button.
4 Click on the Edit button.Result: the Station parameters window appears:
5 Select from the Com Port zone, the communication port associated with the cable. For example COM3 (TSX PCX 3030 Cable).
Link Parameters
Station ID
COM Port
Uni-Telway Slave address
Communication Modem
NumberBase
HayesTel No.Password
AdvancedUni-Telway
OK
Modem Used
Cancel
Parameters of the Station
[Default]
COM 3 (TSXPCX3030 Cable)
1 3
35006152.08 07/2008 53

TSX PCX 3030 / TSX C USB 485 / TSX C USB 232 cables
Modbus Driver The following table describes the procedure for declaring the cable with a Modbus driver:
Step Action
1 Access the Drivers Manager from the taskbar: Start → Settings → Control Panel → Driver Manager. See Driver Manager Chapter (see Drivers Manager, p. 73)
2 From the Drivers Manager, select the Modbus Serial Driver tab.
3 Click on the Configuration button.Result: the Modbus Driver window appears:
4 Select from the Serial Port zone, the communication port associated with the cable. For example COM3 (TSX PCX 3030 Cable).
DefaultUndoApply
Hide
18
3000
ASCII (7 bits)
RTU (8 bits)
2 bits
1 bit
Stop Bits
Mode (Data Bits)
Parity
Global TimeOut
Inter-Chart TimeOutAutomatic
Even Odd None
COM Port
Baud Rate
COM 3 (TSXPCX3030 Cable)
9600
Setting Up Runtime Debug About
Modbus Driver - Modbus01
Serial Port
ms
ms
FPWFP
54 35006152.08 07/2008

35006152 08 07/2008
6
XIP Driver on TCP/IPAt a Glance
Subject of this Chapter
This chapter describes driver configuration.
This driver is used to communicate via an Ethernet card using the X-Way protocol on TCP/IP.
Driver installation
For installation information, see the Driver Installation Chapter (see Driver Installation, p. 11)
What's in this Chapter?
This chapter contains the following topics:
Topic Page
Driver Configuration Screen 56
How to Configure the Driver 59
55

XIP Driver on TCP/IP
Driver Configuration Screen
At a Glance The configuration tool is used to link a driver configuration profile to a remote device that communicates with the station.
The configuration screen can be accessed by clicking: Start → Settings → Control Panel → Driver Manager. See Driver Manager Chapter (see Drivers Manager, p. 73)
Choose the tab corresponding to the driver to be configured and click configure.
Illustration The screen dedicated to the XIP driver looks like this:
Profile Local Host
New Remote Host
Configuration Xip Test Help
Schneider Automation CNFXIP
Bind.. XWAY addressXIP01
Station : DNS
XWAY address :
IP address :
0 . 63
0 . 1
192 . 168 . 2 . 1
Remote host configured000.001 192.168.002.001 Add
Update
Delete
Delete all
Save
Ready
1
2 3
4
5
6
8
7
Automatic presence control
56 35006152 08 07/2008

XIP Driver on TCP/IP
Description This table describes the different areas which make up the configuration screen:
Number Element
1 All software functions can be accessed using this menu bar:Configuration: creation or deletion of a profileXip: start, stop or reinitialize the driverTest: test request transmissions with options
UNI-TE Mirror Request (to send and receive a series of characters to/from a device supporting the UNI-TE protocolPing: Standard ping to test for the presence of the station on the network.
Help: information on the software
2 The profile used by the driver is selected from this list.
3 The X-Way address of the station is configured from this window.
4 OPens a dialog box to choose a network interface (IP address / network adapter) on which the profile will be linked. This interface will be used to communicate with with PLC’s.
5 The new remote host with remote devices associated with the driver are set from this window.By checking the Automatic presence control option, you confirm a control of the workstation on the network.
6 Remote host configured with remote devices can be viewed via this list. Using the character "*" allows you to make a multiple selection in the next screen 002. * stands for all stations on network 2.Note: If you wish to communicate with a station across one or more bridges, you must not only indicate the address of the station but also that of the first bridge crossed.
7 Connections can be added, removed or redefined with these buttons.
8 This status bar contains an operating indicator (driver stopped or started) with a comment zone.
35006152 08 07/2008 57

XIP Driver on TCP/IP
When clicking the Bind button , the following window appears:
List Box: Drop down menu containing IP adresses associated to the different network adapter installed on the computer.
Menu description:
DHCP : The IP address is assiociated to a DHCP Server(xxx.xxx.xxx.xxx): IP address.(xxxxxxxx xxxxxxx xxxx xxxxx): Adapter name
TCP/IP - Network AdapterXIP
DHCP(139.160.64.65)(Broadcom NetXtrem 57xx GigatXIP01
OK Cancel
XIP profil bind
List Box
58 35006152 08 07/2008

XIP Driver on TCP/IP
How to Configure the Driver
At a Glance During driver installation, a default configuration profile is proposed. You are able to modify this profile or create a new one.
How to Create a New Profile
From the driver configuration screen (see Driver Configuration Screen, p. 56):
How to Remove a Profile
From the driver configuration screen (see Driver Configuration Screen, p. 56):
Note: If all the network connections are in use or if there are none on the station, a profile cannot be created.
Step Action
1 Select the menu: Configuration → Create a profile.Result: The following window appears:
2 From the TCP/IP drop-down menu, select the TCP/IP connection to the network.
3 Click Ok .
Creation of a new XIP profile
XIP01OK
CancelADAPTER01(139.160.67.39)
XIP XIP/IP
Step Action
1 Select the menu: Configuration → Create a profile.
2 From the drop-down menu, select the profile to be removed.
3 Confirm deletion with Ok .
35006152 08 07/2008 59

XIP Driver on TCP/IP
Example The architecture below describes the addressing of stations on Ethernet and Fipway networks:
Access to Stations
To directly access all the stations on the Ethernet 1 network from station A, enter the X-Way address {1.*} and the IP address 84.0.1.1.
In order for station A to be able to access station B, enter for connection the X-Way address {1.2} and the IP address 84.0.1.2.
In order for station A to be able to access station B, enter the X-Way address {2.3} and the IP address of the bridge 84.0.1.2.
To directly acces all the station Fipway (2) network from station A, enter the Xway address {2.*} and the IP address of the first you cross.
Ethernet (1)
Fipway (2)
X-Way address {1.1}IP address 84.0.1.1
Station A
X-Way address {1.2}IP address 84.0.1.2
X-Way address {2.2}
X-Way address {2.3}
Station C
Station D
Station B**
** : Station B is configured as a Router (Bridge) between the Ethernet (1) networkand the Fipway (2) network. This configuration is set up using Unity Pro.
Note: When creating a bridje connection, you must configure the Xway addressof the recipient PLC by assigning it the IP address of the bridge you cross.
60 35006152 08 07/2008

XIP Driver on TCP/IP
How to Add a Connection
From the configuration screen (see Driver Configuration Screen, p. 56):
How to Remove a Connection
From the configuration screen (see Driver Configuration Screen, p. 56):
How to Modify a Connection
From the configuration screen (see Driver Configuration Screen, p. 56):
Step Action
1 In the New Remote Host window, enter:the name of the remote station or bridge,the address of the remote station or bridge,the IP address of the remote station or bridge,
2 Click Add.
3 Click Save.Note: The configuration is saved for the current profile.
Step Action
1 In the Remote Host Configured window, select the name of the remote station to be removed.
2 Click Delete.
3 Click Save.Note: The configuration is saved for the current profile.
Step Action
1 In the Remote Host Configured window, select the name of the remote station to be modified.
2 In the New Remote Host window, modify:the name of the remote station or bridge,the address of the remote station or bridge,the IP address of the remote station or bridge,
3 Click Update.
4 Click Save.Note: The configuration is saved for the current profile.
35006152 08 07/2008 61

XIP Driver on TCP/IP
How to change a network interface
From the configuration screen (see Driver Configuration Screen, p. 56):
XIP Instances Once installed, configure the XIP driver and reboot the computer. All XIP profile instances are initialized.
For each XIP profile configured a corresponding icon appears in the task bar.
Step Action
1 Select the profil to be modified in the Remote Host Configured window
2 Click on Bind.. to make the the XIP profil bind window appear.
3 Select the IP/Network address to be associated with the profile.
4 Click OK
5 Restart driver in the XIP menu to apply the modifications
62 35006152 08 07/2008

35006152.08 07/2008
7
FIP Driver for TSX C USB FIP CardAt a Glance
Subject of this Chapter
This chapter describes how to finalize the driver installation and to configure the driver used to communicate with the TSX C USB FIP on Fipway/Fipio network.
Driver installation
For installation information, see the Driver Installation Chapter (see Driver Installation, p. 11)
What's in this Chapter?
This chapter contains the following topics:
Topic Page
Finalizing Installation 64
Driver Configuration Screen 66
63

FIP Driver for TSX C USB FIP Card
Finalizing Installation
At a glance After the driver installation (see Driver Installation, p. 12) phase, the operating system automatically detects the TSX C USB FIP communication adapter and its driver.
64 35006152.08 07/2008

FIP Driver for TSX C USB FIP Card
Procedure To complete the installation:
Step Action
1 Connect the TSX C USB FIP communication adapter to the USB of the PC (or iPC).Result:The system detects automatically the USB device, and displays the dialog boxes to configure the driver in the Operating System.
2 Select No, not this time and click Next:
Note: In this example, the operating system is XP SP2
3 Select Install the software automatically (Recommended) and click Next:
4 Click Continue Anyway then Finish
35006152.08 07/2008 65

FIP Driver for TSX C USB FIP Card
Driver Configuration Screen
At a Glance With the driver configuration tool, you can configure the driver in Fipway network or Fipio network to use the TSX C USB FIP communication adapter.
The configuration tool can be accessed from the taskbar: Start → Settings → Control Panel → Driver Manager.
Select the tab corresponding to the driver to be configured
Illustration The card configuration screen looks like this:
Description This table describes the different areas which make up the configuration screen:
12
3
Number Element
1 This field is used to set the Network address (between 0 and 127).
2 This field is used to set the Station address (between 0 and 63).
3 This window is used to select the Connexion type (FIPWAY or FIPIO).
66 35006152.08 07/2008

35006152.08 07/2008
8
PCIWAY driver for Atrium TSX PCI 57 xxx processorsAt a Glance
Subject of this Chapter
This chapter describes how to configure the driver for TSX PCI 57 ••• processors on the PCI bus.
Driver installation
For installation information, see the Driver Installation Chapter (see Driver Installation, p. 11)
What's in this Chapter?
This chapter contains the following topics:
Topic Page
Driver Configuration Screen 68
How to Adjust the Parameters of the TSX PCI 57 xxx Card 70
67

PCIWAY driver
Driver Configuration Screen
Access to the configuration tool
The configuration tool can be accessed from the taskbar: Start → Settings → Control Panel → Driver Manager.See Driver Manager Chapter (see Drivers Manager, p. 73)
Select the PC I 57 Driver tab to display the following window:
This window shows information on the version and STATUS of the driver installed.
Properties Management of SCHNEIDER drivers
DRIVERS ManagerPCX57 Driver FPC10 Driver XIP Driver MODBUS Test X-Way Test
PLC USB Driver UNITELWAY Driver PCI 57 Driver
[1] PCI Properties
[2] PCI Properties
Status driver 1: Running
Status driver 2: Non operational
Driver PCI 57 V1.0 IE 01Copyright © 2002 Schneider Automation S.A.
PCI
OK
68 35006152.08 07/2008

PCIWAY driver
Properties Press the relevant PCI Properties button to display the following window:
The table below describes the different areas:
Area Description
Watchdog period Represents the refresh period of the watchdog.The Watchdog is a function enabling a non card activity alert which will be displayed in the software.
Input/Output Buffer Sizes
Allows the size of the buffers for the interface between the TSX PCI 57 card and the driver to be configured. The size may be set at between 160 bytes and 256 bytes.
OK Validates the configuration; the parameters displayed are stored and the previous screen is displayed.
Cancel Cancels a modification, and returns to the previous screen.
[1] PCI 57
Watchdog period: 500
256Input/Output Buffer Sizes: Bytes
ms
OK Cancel
35006152.08 07/2008 69

PCIWAY driver
How to Adjust the Parameters of the TSX PCI 57 xxx Card
At a Glance Before installing the TSX PCI 57 ••• card, you must:
install the PCI 57 driver,code the rack number on the X Bus,code the position of the processor in the rack.
Illustration This card comprises the following elements:
Note: TSX PCI 57 ••• cards are all "plug and play" meaning that once you have installed the driver you can simply insert the card in its slot and it will be automatically detected when the computer is next powered up.
Note: A maximum of two TSX PCI 57 ••• cards can be connected.
2
1
70 35006152.08 07/2008

PCIWAY driver
Numbers and ElementsThe following table describes the different parameters to be adjusted:
Procedure To adjust the parameters, proceed in the following manner:
Number Element
1 The address of the rack on the X Bus can be coded with the micro-switches.
2 The processor’s rack position can be coded with the micro-switches.
Step Action
1 Code the number of the rack on the X-Bus.
2 Code the position of the processor in the rack.
35006152.08 07/2008 71

PCIWAY driver
72 35006152.08 07/2008

35006152.08 07/2008
9
Drivers ManagerAt a Glance
Subject of this Chapter
This chapter describes the Drivers Manager management software and its functions.
Specific information on the configuration screens for individual drivers can be found in the chapters on those drivers. The remaining tabs in the Drivers Manager are described here.
What's in this Chapter?
This chapter contains the following topics:
Topic Page
Management of X-Way drivers 74
X-Way addressing modes 79
73

Drivers Manager
Management of X-Way drivers
At a Glance The X-Way drivers can be accessed using the Drivers Manager management tool.
This is used to install, update, configure and test the different drivers in a centralized manner.
Accessing the Drivers Management Tool
From the Start menu, go to: Start → Setting → Control Panel → Driver Manager.
Select the Drivers Manager tab, and the following window is displayed:
Drivers Manager tab
This tab (window above) is used to:
view the list of installed drivers,install or update a driver,delete a driver.
Management properties of SCHNEIDER drivers
MODBUS SERIAL DriverPCX57 Driver
UNITELWAY DriverFPC10 Driver FPP20 Driver MODBUS Test XWay Test
OK
Uni-Telway
Install/update
Uninstall this Driver
Drivers System Info
Windows NY V4.0 (Build 1381)
Further information: Service Pack 5
Winsock:
DLLx X-Way: V6. 0. 20. 2 :
There are 6 drivers installed
Driver Manager V2.0 IE 10
XIP Driver
CONFIGURAT
DRIVERS Manager
74 35006152.08 07/2008

Drivers Manager
X-Way Test Tab This tab is used to test the basic operation of an X-Way driver:
The table below describes the different zones of the window:
Driver Group
Field Description
Name Name of driver to be used for the test (Uni-Telway, FPC 10, etc).
Driver number Instance number of driver to be used for the test (usually 1).
Remote Address X-Way remote station address in the format "network.station.gate". The address "0.254.0" is the default address (terminal port for example). For a network connection, (such as Fipway), the user must complete this field: "3.5.0" to address station 5 of network 3. Gate 0 corresponds to the system server gate of the station in question. See X-Way addressing modes (see X-Way addressing modes, p. 79) page for more information. (see X-Way addressing modes, p. 79)
Local Address Internal address used locally by the driver. The driver completes this field automatically for information purposes when the connection becomes effective.
Management properties of SCHNEIDER drivers
MODBUS SERIAL DriverPCX57 Driver
UNITELWAY DriverFPC10 Driver FPP20 Driver MODBUS Test XWayTest
OK
MIRROR (3 bytes)
RequestRequest:
XIP DriverDRIVERS Manager
Uni-Telway
Driver
Name:3000
Status: disconnected
Type:Delay (ms)1Driver number:
0.254.0Remote address:
Local Address:
32WAY
Connect Launch Further information... About
35006152.08 07/2008 75

Drivers Manager
Request Group
Field Description
Request Name of driver to be used for the test (Uni-Telway, FPC 10).
Type Type of request. Different sizes of mirror requests are suggested, as well as reading the PLC system bit %S6.
Delay Wait timeout in ms for the response to the transmitted request (time out).
Status Status of connection, "disconnected", "connecting..." or "connected".
Command buttons
Object Description
Connect Opens an internal communication channel on the selected driver.
Launch Launch request transmission to the station defined in the Remote address field of the Driver group.
Further information...
Displays system information about the driver. This button is active in online mode only.
About Displays X-Way Manager version and copyright details.
76 35006152.08 07/2008

Drivers Manager
Modbus Test Tab This tab is used to test the basic operation of a Modbus driver:
The table below describes the different zones of the window:
Link Parameters Group
Field Description
Protocol Name of protocol used (USB, TCP, Serial Modbus, Modbus Plus).
Remote IP address
If TCP is being used, then the IP address or machine name is shown here
Slave No. If Serial Modbus protocol is being used, then the slave no. is shown here.
Master Path: DM If Modbus Plus protocol is being used, then the station address is shown here.
Request Group
Field Description
Request
Status Status of connection, "disconnected", "connecting..." or "connected".
Management properties of SCHNEIDER drivers
SCP114 Driver MODBUS SERIAL Driver PCX57 DriverUNITELWAY DriverPLC USB DriverDRIVERS Manager
FPC10 Driver FPP20 Driver MODBUS Test XWayTest
RequestsLink Parameters
OK
Connect Launch About
USBProtocol:
90.0.0.1Remote IP address:
1Slave no.:
0Master Path: DM 0 0 00
Request:
Status: Disconnected
35006152.08 07/2008 77

Drivers Manager
Other Tabs The windows corresponding to these tabs are described in the corresponding chapters for each driver:
for the Modbus Serial driver tab see, Configuration of the Modbus driver (see Configuration of the Modbus Driver , p. 18)for the Uni-Telway driver tab:
if using a serial port see Driver Configuration Screens, p. 32,if using a TSX SCP 114 card see Driver Configuration Screens, p. 128,
for the USB driver tab see State of the USB link, p. 42.for the XIP driver see Driver Configuration Screen, p. 56,for the TSX C USB FIP driver tab see ,Configuration of USB FIP driver (see Driver Configuration Screen, p. 66)for the FPP 20 driver tab see Driver configuration screen, p. 96,for the FPC 10 driver tab see Description, p. 109,for the PCI 57 driver tab see Driver Configuration Screen, p. 68,for the PCX 57 driver tab see Configuration of ISAWAY driver, p. 121
Command buttons
Object Description
Connect Opens an internal communication channel on the selected driver.
Launch Launch request transmission to the station defined in the Remote IP address field of the Link Parameters group.
About Displays X-Way Manager version and copyright details.
78 35006152.08 07/2008

Drivers Manager
X-Way addressing modes
Description Example of access through a network:
Addressing to 3 levels:
Allows a station connected to the network at any point of the X-Way communication architecture to be reached.
Illustration:
The Network and Station values make up the station address.
Network: value between [1.127] or 0 = my network.Station: value between [1.63] or 254 = my station or 255 = diffusion.
The value "Gate" refers to the communication entity within the station: system server (Gate 0, the most common), the terminal port (Gates 1,2,3), 1K asynchronous server (Gate 7), etc.
In the case of multiprocessor stations such as PLCs, each processor module built into the system can support communication entities, frame routing requiring supplementary addressing levels (inter-station routing capabilities). PLC "processor modules" are situated in the PLC's racks or offset on field buses.
Network 1
Address = 1.1.0 Address = 1.2.0 Address = 1.3.0
Station 1 Station 2 Station 3
Network Station Gate
35006152.08 07/2008 79

Drivers Manager
Addressing to 5 levels:
It is generally used for devices connected on a Uni-Telway bus.
Illustration:
Module: physical location of the communication module in the rack. Its value must be defined as follows: (Master rack number * 16) + Number of master module.Channel: address of the device connected to the communication module. Its value must be defined as follows: (Master channel number * 100) + slave Ad0 number.
Addressing to 6 levels:
This is similar to addressing to 5 levels. It was created for extended services (FIPIO, communication module integrated in rack).
Illustration:
Selector: designates a communication module on the CPU (2) or in a separate module (1).Connection point: device address, if the destination module is FIPIO. Physical positioning in the PLC rack, if the destination module is a PLC card.Reference: communication entity in the device (similar to the Gate number).
Network Station Gate=5 Module Channel
Network Station Gate=8 Selector ReferenceConn-ectionpoint
80 35006152.08 07/2008

Drivers Manager
Examples:
5 level addressing:
Network 1
Station 1 Station 2
Rack 0Masteraddress = 1.1.0
Rack 1
Master module 1
Slave 4
Slave address = 1.1.5.17.4 (if the master ison channel 0).Slave address = 1.1.5.17.104 (if the masteris on channel 1).
Module = 16*1 + 1 = 17
35006152.08 07/2008 81

Drivers Manager
6 level addressing:
For more information on the X-Way address, see "X-Way Communication" documentation, ref. TSX DR NET.
Note: In point to point connections (Uni-Telway, ISAway, PCIway), the default address 0.254.0 can be used to reference the PLC.0.254.0 can be used to access to the Fipio Master when we are connected through the privilegied terminal @630.254.5.17.104 can be used to access to the Uni-Telway slave @4 which is connected on the rack 1 module 1 channel 1 when we are connected on the local PLC.0.254.8.2.14.0 can be used to access to the Fipio connection point 14 when we are connected through the privilegied terminal @63.With Ethway and XIP, it is possible to use gate 7, which accepts large frames (up to 1024 bytes). In order to do this, the PL7 application must be configured in periodic mode (MAST task). The "1K service" option must be checked in the alias definition page.Example: normal address: XIP01:1.2, to use gate 7: XIP01:1.2.7
Network 1
Station 3
FIPIO
14
Network 1,Station 3,Gate 8 (FIPIO),Module 2 (CPU communication module,Address 14,Gate 0 (UNITE target PLC server),→ 1.3.8.2.14.0
82 35006152.08 07/2008

35006152 08 07/2008
10
TroubleshootingAt a Glance
Subject of this Chapter
This chapter contains 2 troubleshooting tables:
Installation troubleshooting.Configuration troubleshooting.
What's in this Chapter?
This chapter contains the following topics:
Topic Page
Installation Troubleshooting 84
Configuration Troubleshooting 86
83

Troubleshooting
Installation Troubleshooting
Introduction This troubleshooting table will help you find solutions to difficulties you might encounter during the installation of your device driver.
Difficulties and Solutions
Identify your difficulty in the left column then follow the corresponding solution instructions on the right:
Difficulty Solution
When the CD-ROM is inserted the driver web page does not open
Explore the CD-ROM content and double-click "_installdrivers.htm" to launch the web page.
During the installation, a driver setup dialog box appears "You are not administrator, you cannot install drivers"
You must be administrator in order to install drivers. Make sure you have administrator rights.
The driver does not install The drivers available on the CD are only compatible with Windows XP Professional Edition and Windows Vista Business Edition 32. Make sure your computer is currently running one of those operating systems.see Operating System Compatibility Table (see Document Scope, p. 9)
If this solution does not solve the problem, then:Check / change Driver Signing options in System1.From the Start menu go to: Start → Settings → Control panel2.Double-click System3.Choose the "Hardware" tab4.Click Driver Signing button5.Choose Warn - display6.Click OK7.Click OK to close the System window.Validation above does not work under Windows Vista Business Edition 32 (all drivers are already signed)
84 35006152 08 07/2008

Troubleshooting
When the USB device is connected, the Found New Hardware Wizard appears.
The driver may not be installed or not updated:1. 1. Click Cancel from the Found New Hardware Wizard2. Remove the device as follows:
a.From the Start menu go to: Start → Settings → Control Panelb.Double click Systemc.Choose the Hardware tabd.Click on the Device Manager button.e. Find the device with the yellow question mark.f. Right-click on that device and choose Uninstall.g. Click OK in the Confirm Device Removal dialog box.h. Disconnect the device.
3. Now install the requested driver with the supplied CD-ROM, following the Driver Installation Procedure (see Driver Installation, p. 12)
4. Reconnect the device.
While installing a driver, a dialog box appears indicating to Repair/Update or Remove the driver.
Choose Repair/Update and go to step 6 of the "Installation Procedure" in the Driver Installation (see Driver Installation, p. 12) chapter.
Difficulty Solution
35006152 08 07/2008 85

Troubleshooting
Configuration Troubleshooting
Introduction This troubleshooting table will help you find solutions to difficulties you might encounter during the configuration of your device driver.
Difficulties and solution
Identify your difficulty in the left column then follow the corresponding solution instructions on the right.
Difficuty Solution
The driver tab cannot be seen in the driver manager
The driver tabs correspond to the drivers currently installed on your computer. Install the required driver by following the driver installation procedure (see Driver Installation, p. 12).
The driver manager remains on the computer after uninstalling all the drivers
1. From the Start menu go to: Start → Settings → Front Panel → Add or Remove Programs2. Click on the Delete button corresponding to the driver manager.
The configuration window does not appear at the end of a driver installation
Double click on the driver manager shortcut on your desktop.If you have no shortcut, then:1. From the Start menu go to: Start → Settings → Front Panel.2. Double-click Driver Manager.3. Click on the tab corresponding to the driver to be configured.
86 35006152 08 07/2008

Appendices
At a glance
Overview This section describes how to finalize the installation and configure drivers for hardware that is no longer manufactured by Schneider Electric.
What's in this Appendix?
The appendix contains the following chapters:
Chapter Chapter Name Page
A Ethway Driver 89
B FIP Driver for TSX FPP 20 Card 95
C FIP Driver for TSX FPC 10 ISA Card 99
D ISAWAY driver for Atrium TPCX 57 processors 111
E Uni-Telway driver for TSX SCP 114 Card 127
35006152.08 07/2008 87

Appendices
88 35006152.08 07/2008

35006152.08 07/2008
A
Ethway DriverAt a Glance
Subject of this Chapter
This chapter describes how install and configure the Ethway driver.
This driver is used to communicate via an Ethernet card using the ETHWAY protocol.
What's in this Chapter?
This chapter contains the following topics:
Topic Page
How to Install the Driver 90
Driver Configuration Tool 92
89

Ethway Driver
How to Install the Driver
At a Glance The ETHWAY protocol is installed from the driver CD-ROM, but does not follow the standard driver installation procedure.
How to Install the Driver
The ETHWAY driver is installed in accordance with the following procedure:
Step Action
1 Insert the CD-ROM.
2 Access the Control Panel in Windows.
3 Double-click on the Network connections and Remote access icon.
4 Select the icon Local connection then by right-clicking select the command PropertieResult: The following window appears:
5 Click on the Install button.
Local Area Connection Properties ?
Uninstall
Connect using:
Properties
The selected components are used by this connection:
General
Display an icon in the Task bar once connected
3Com EtherLink XL PCI Combo NIC (3C900B-COMBO)
Configure
Install...
OK Cancel
DescriptionEnables you to access the resources on a Microsoft network.
Client for Microsoft NetworksFile and printer Sharing for Microsoft NetworksInternet Protocol (TCP/IP)
90 35006152.08 07/2008

Ethway Driver
6 In the Select Network Component Type window, select the type Protocol then click on Add.Result: The following window appears:
7 Click on Have Disk.
8 Select the access path of the files to be installed from the CD-ROM using the Browse button.
9 Click on Ok.
10 In this window select the ETHWAY Protocol then click on OK.
11 Select the ETHWAY protocol then click on Properties.
12 In the configuration screen (see Driver Configuration Tool, p. 92), configure the protocol then click on OK.
13 Complete the installation by clicking on OK.
Step Action
Selection of network protocol
Manufacturers:
Disk supplied...
Click on the network protocol you wish to install and then click on OK.If you have an installation disk for this component, click on the Disk supplied.
OK Cancel
Network protocol:
Network supervisor pilotDLC ProtocolNetBEUI ProtocolTransport Protocol compatible with NWLink IPX/OSI-LAN Protocol
MicrosoftSchneider Corporation
35006152.08 07/2008 91

Ethway Driver
Driver Configuration Tool
At a Glance The configuration tool is used to configure the Ethernet card to communicate according to the ETHWAY protocol.
How to Access the Configuration Tool
The ETHWAY driver configuration tool is accessed as follows:
Step Action
1 Access the Control Panel in Windows.
2 Double-click on the Network connections and Remote access icon.
3 Select the icon Local connection then by right-clicking select the command Properties.Result: The following window appears:
4 Select the ETHWAY protocol then click on Properties.Result: The Ethway Configuration Screen appears
Local Area Connection Properties ?
Uninstall
Connect using:
Properties
The selected components are used by this connection:
General
Display an icon in the Task bar once connected
3Com EtherLink XL PCI Combo NIC (3C900B-COMBO)
Configure
Install...
OK Cancel
DescriptionEnables you to access the resources on a Microsoft network.
Client for Microsoft NetworksFile and printer Sharing for Microsoft NetworksInternet Protocol (TCP/IP)Ethway protocol
92 35006152.08 07/2008

Ethway Driver
Illustration The card configuration screen looks like this:
ETHWAY Protocol Properties
Default
CancelOK
Receive
el3c5891
128
512
256
1024
Buffers
Acknowledgement (ms)
SizeSend
Retry Period Filter Period
TE MAC Address
Network Station
Export Name
Adapter Name
ETHWAY01
0 63
50
800
20
3000
1
2
3
4
5
6
ETHWAY -Parameters
?
35006152.08 07/2008 93

Ethway Driver
Description This table describes the different areas which make up the configuration screen:
Number Element
1 This field is used to select the Ethernet card (useful if there are several Ethernet cards). This field cannot be modified under Windows XP Professional Edition or Windows Vista Business Edition 32.
2 This field is used to select the ETHWAY driver instance. This field cannot be modified under Windows XP Professional Edition or Windows Vista Business Edition 32.
3 These windows are used to define the address {Network.Station} of the Ethernet card used.
4 This box is used to replace the Ethernet card’s MAC address with the SCHNEIDER MAC address (00 80 F4 Network Station).
5 This window is used to configure the reception acknowledgment by defining:the retransmission period between two frames if the remote device is not responding,the storage time of a frame originating from the remote device (useful for loaded networks).
Note: In general, storage time is three times the retransmission period.
6 This window is used to configure the transmission and reception buffer size in bytes.
94 35006152.08 07/2008

35006152.08 07/2008
B
FIP Driver for TSX FPP 20 CardAt a Glance
Subject of this Chapter
This chapter describes configuration of the driver used to communicate with the TSX FPP20 on Fipway\Fipio network.
Driver installation
For installation information, see the Driver Installation Chapter (see Driver Installation, p. 11)
What's in this Chapter?
This chapter contains the following topics:
Topic Page
Driver configuration screen 96
Finalizing installation 97
95

FIP Driver for TSX FPP 20 Card
Driver configuration screen
At a Glance The configuration tool is used to configure the driver to use the TSX FPP 20 card on Fipway or Fipio network.
The configuration tool can be accessed from the taskbar: Start → Settings → Control Panel → Driver Manager.
Select the tab corresponding to the driver to be configured, then click the Configuration button.
Illustration The screen dedicated to the card driver looks like this:
Description This table describes the different areas which make up the configuration screen:
This table describes the configuration tool is used to configure the driver to use the TSX FPP OZD 200:
Network Parameters
OK Cancel
TSXFPP20 Configuration
63
Network :
Station :
Network TypeFipway
Fipio
Fipway (World FIP)
Fipio (WORLD FIP)
Apply
01
2
3
Number Element
1 This field is used to set the network address (between 0 and 127).
2 This field is used to set the station address (between 0 and 63)
3 This window is used to select the type of Fipway or Fipio connection.
Number Element
1 This field is used to set the network address (between 0 to 127).
2 This field is used to set the station address (between 0 to 32).
96 35006152.08 07/2008

FIP Driver for TSX FPP 20 Card
Finalizing installation
At a Glance After the driver installation and configuration phase, the operating system shall recognize the TSX FPP 20 card and its driver.
How to Configure the Operating System
The following procedure describes how to configure the operating system:
Note: When configuring the system, it is not necessary to restart the station.
Step Action
1 Install and configure the driver.
2 Insert the PCMCIA card into its slot.Result: The system automatically detects the card and loads the card driver.
35006152.08 07/2008 97

FIP Driver for TSX FPP 20 Card
98 35006152.08 07/2008

35006152.08 07/2008
C
FIP Driver for TSX FPC 10 ISA CardAt a Glance
Subject of this Chapter
This chapter describes how to finalize the installation and to configure the driver used to communicate with the TSX FPC 10 ISA card on Fipway\Fipio network.
This chapter contains the following information:
Finalizing the installation.Configuration of the driver.
Driver installation
For installation information, see the Driver Installation Chapter (see Driver Installation, p. 11)
What's in this Chapter?
This chapter contains the following topics:
Topic Page
Finalizing the installation of the TSX FPC 10 Card 100
How to Select the Hardware Type 101
How to Configure Hardware Parameters 104
How to Adjust the TSX FPC 10 ISA Card Parameters 107
Driver configuration screen 109
99

FIP Driver for TSX FPC 10 ISA Card
Finalizing the installation of the TSX FPC 10 Card
At a Glance After the driver installation and configuration phase, the operating system does not automatically recognize the ISA TSX FPC 10 card and its driver.
Installation Principles
As this card is not automatically recognized by the operating system, the following phases must be carried out:
Step Action
1 Select the hardware type:See How to Select the Hardware Type, p. 101.
2 Configure the parameters of the operating system to recognize the card:See How to Configure Hardware Parameters, p. 104,
3 Switch off the PC.
4 Adjust the card parameters (See How to Adjust the TSX FPC 10 ISA Card Parameters, p. 107):
the standard I/O address,the IRQ interrupt address.
5 Connect the card to the ISA bus.
6 Turn the PC back on.Result: the driver is operational.
100 35006152.08 07/2008
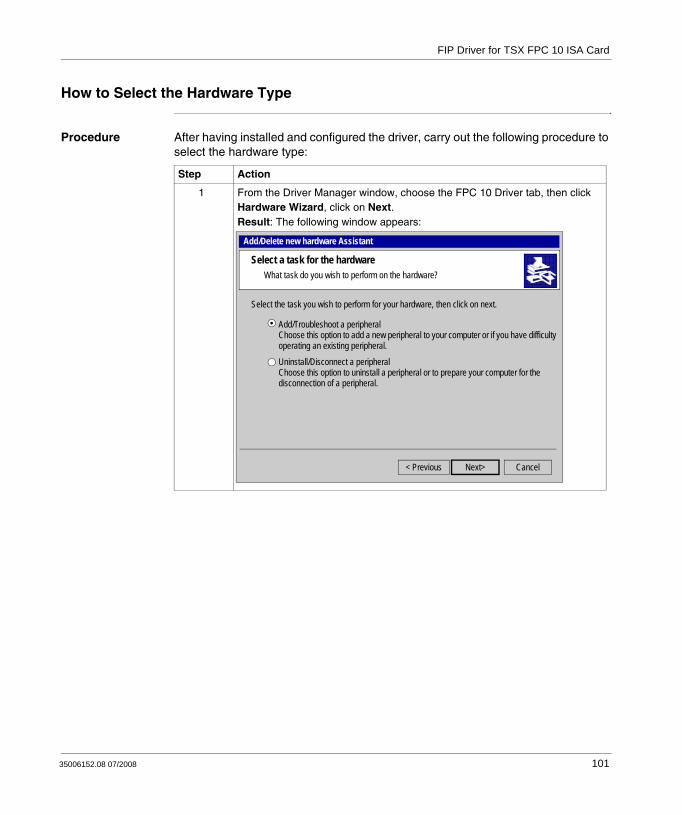
FIP Driver for TSX FPC 10 ISA Card
How to Select the Hardware Type
Procedure After having installed and configured the driver, carry out the following procedure to select the hardware type:
Step Action
1 From the Driver Manager window, choose the FPC 10 Driver tab, then click Hardware Wizard, click on Next.Result: The following window appears:
Add/Delete new hardware Assistant
CancelNext>< Previous
Uninstall/Disconnect a peripheralChoose this option to uninstall a peripheral or to prepare your computer for the disconnection of a peripheral.
Add/Troubleshoot a peripheralChoose this option to add a new peripheral to your computer or if you have difficulty operating an existing peripheral.
Select the task you wish to perform for your hardware, then click on next.
What task do you wish to perform on the hardware?Select a task for the hardware
35006152.08 07/2008 101

FIP Driver for TSX FPC 10 ISA Card
2 Select the option Add/Troubleshoot a peripheral then click Next.Result: The following window appears:
3 Select the option Add a new peripheral then click Next.
4 Answer No to the question Do you want Windows to search for your new hardware?
5 Click on Next.Result: The following window appears:
Step Action
Add/Delete new hardware Assistant
CancelNext>< Previous
The following hardware is already installed on your computer. If you encounterdifficulty with one of these peripherals, select the peripheral and click Next.
What hardware peripheral do you wish to troubleshoot?Selecting a hardware peripheral
If you try to add a peripheral and it doesn't appear below, select Add a new peripheral, then click Next. Peripherals
Add a new peripheralCOMPAQ 171 FSDisk driveCOMPAQ CRD-8320BWDC AC36400LES1869 Control Interface (WDM)ES1869 Plug and Play Audio Drive (WDM)
Add/Delete new hardware Assistant
CancelNext >< Previous
Select the hardware type you wish to install.
Which hardware type do you wish to install?Hardware type
Hardware types:PCX57 DevicePort (COM & LPT)PrintersSCSI and RAID controllersSound, video and game controllersSystems peripheralsTape drivesFPC10 Device
102 35006152.08 07/2008

FIP Driver for TSX FPC 10 ISA Card
6 Select FPC 10 Device from the list then click on Next.
7 Select FPC 10 WDM Device from the list then click on Next.Result: an information window appears.
8 A window informs the user that the hardware parameters of the card must be entered by the user. Click on OK and go to the next procedure: how to configure hardware parameters (see How to Configure Hardware Parameters, p. 104).
Step Action
35006152.08 07/2008 103

FIP Driver for TSX FPC 10 ISA Card
How to Configure Hardware Parameters
Procedure After having selected the hardware type, carry out the following procedure to configure the parameters:
Step Action
1 Click on the Resources button.
2 Click on Manual Configuration.Result: The following window appears:
3 Select Input/Output Range from the list.
4 Verify the box Use automatic settings is not checked.
Add new hardware Assistant Properties ?
OK
Standard configuration 0000
FPC10 WDM Device
Cancel
Modify the parameters...
Parameters based on:
List of peripherals in conflict:No conflict.
Resource parameters:
Resources
Type of Resource Parameter
Use the automatic parameters
Input/output range ?Interrupt Request (IRQ) ?
??
104 35006152.08 07/2008

FIP Driver for TSX FPC 10 ISA Card
5 Click on Change settings. Result: The following window appears:
6 From the Value list, select the non-conflicting address range.Note: Note the values because they must be coded onto the ISA card.
7 Confirm with OK.Result: a confirmation window appears.
8 Confirm with Yes.
9 Carry out steps 3 to 8 selecting Interrupt Request from the list.
Step Action
Modify input/output range
Enter the input/output range you wish to define for this peripheral.You can either enter a specific range and the closest valid rangewill be automatically selected, or select a range using the upper orlower indicator arrows.
This resource is assigned to the following child peripherals:
Value:
The parameter you have chosen is not in conflict with other peripherals.
OK Cancel
?
0210-021F Information concerning conflicts
No peripherals in conflict
35006152.08 07/2008 105

FIP Driver for TSX FPC 10 ISA Card
10 Accept the configuration with OK.Result: The following window appears:
11 Click on Finish to confirm hardware configuration.
Step Action
Add / Remove Hardware Wizard
Cancel Finish<Back
End of Add/Delete hardware Assistant
The following hardware has been installed:FPC10 WDM Device
Check the documentation of your hardware to know whether you should configure the new hardware manually. To operate the hardware you must restart the computer.
ResourcesTo display or modify the resources for this peripheral, click Resources.
To close the Assistant, click on Finish.
106 35006152.08 07/2008

FIP Driver for TSX FPC 10 ISA Card
How to Adjust the TSX FPC 10 ISA Card Parameters
At a Glance Before installing the TSX FPC 10 card, you must adjust the following parameters:
the standard I/O address,the IRQ interrupt address.
Illustration This card comprises the following elements:
Numbers and Elements
The following table describes the different parameters to be adjusted:
Procedure To adjust the parameters, proceed in the following manner:
1 2 3
Number Element
1 Jumpers (SW1) are used to select the DMA channel (Direct Memory Access) (no object).
2 A jumper (SW2) is used to select the IRQ (Interrupt Request) level.
3 The micro-switches (SW3) are used to select the standard address of the card in the I/O space.
Step Action
1 Set the IRQ interrupt jumper to comply with the address provided by the or Vista/XP (see How to Configure Hardware Parameters, p. 104) operating systems.
2 Code the standard I/O address provided by the operating system or Vista/XP (see How to Configure Hardware Parameters, p. 104) with the micro-switches.
35006152.08 07/2008 107

FIP Driver for TSX FPC 10 ISA Card
Example of IRQ Selection
The interrupt address provided by the system is 10:
Example of Standard Address Selection
The standard address provided by the system is equal to 210 in hexadecimal:
Note: The jumper must not be set in the IRQ position.3 5 10 11 15 IR
Q
1 2 3 4 5 6 7 8
ON
200
100
80 40 20 10
108 35006152.08 07/2008

FIP Driver for TSX FPC 10 ISA Card
Driver configuration screen
At a Glance The configuration tool is used to configure the driver in Fipway or Fipio mode to use a ISA TSX FPC 10 card on Fipway/Fipio network.
The configuration tool can be accessed from the taskbar: Start → Settings → Control Panel → Driver Manager.
Select the tab corresponding to the driver to be configured, then click [FIP01]/[FIP02] Properties.
Illustration The screen dedicated to the card driver looks like this:
Description This table describes the different areas which make up the configuration screen:
Network Parameters
OK Cancel
TSXFPPC10 Configuration
63
Network:
Station:
Network TypeFipway
Fipio
Fipway (World FIP)
Fipio (WORLD FIP)
Apply
01
2
3
Number Element
1 This field is used to set the network address.
2 This field is used to set the station address.
3 This window is used to select the type of Fipway or Fipio connection.
35006152.08 07/2008 109

FIP Driver for TSX FPC 10 ISA Card
110 35006152.08 07/2008

35006152.08 07/2008
D
ISAWAY driver for Atrium TPCX 57 processorsAt a Glance
Subject of this Chapter
This chapter describes how to finalize the installation and to configure the driver for the TPCX 57 processor.
This chapter contains the following information:
Finalizing the installationConfiguration of the driver
Driver installation
For installation information, see the Driver Installation Chapter (see Driver Installation, p. 11)
What's in this Chapter?
This chapter contains the following topics:
Topic Page
Finalizing the installation 112
How to select the hardware type 113
How to configure hardware parameters 116
How to adjust the ISA TPCX 57 card parameters 119
Configuration of ISAWAY driver 121
111

ISAWAY driver
Finalizing the installation
At a Glance After following the Driver Installation (see Driver Installation, p. 12) and configuration phase, the operating system does not automatically recognize the TPCX 57 card and its driver.
Installation principles
As this card is not automatically recognized by the operating system, the following phases must be carried out:
Step Action
1 Select the hardware type: See How to select the hardware type, p. 113.
2 Configure the parameters of the operating system to recognize the card:See How to configure hardware parameters, p. 116,
3 Switch off the PC.
4 Adjust the card parameters: See How to adjust the ISA TPCX 57 card parameters, p. 119.
the standard I/O address,the IRQ interrupt address.
5 Connect the card to the ISA bus.
6 Turn the PC back on.Result: the driver and theTPCX 57 card are operational.
112 35006152.08 07/2008

ISAWAY driver
How to select the hardware type
Procedure After having installed and configured the driver, carry out the following procedure to select the hardware type:
Step Action
1 From the Driver Manager window, choose the PCX 57 tab, then click Hardware Wizard followed by Next.Result: The following window appears:
Add/Delete new hardware Assistant
CancelNext>< Previous
Uninstall/Disconnect a peripheralChoose this option to uninstall a peripheral or to prepare your computer for the disconnection of a peripheral.
Add/Troubleshoot a peripheralChoose this option to add a new peripheral to your computer or if you have difficulty operating an existing peripheral.
Select the task you wish to perform for your hardware, then click on next.
What task do you wish to perform on the hardware?Select a task for the hardware
35006152.08 07/2008 113

ISAWAY driver
2 Select the option Add/Troubleshoot a peripheral then click Next.Result: The following window appears:
3 Select the option Add a new peripheral. Then click on Next.
4 Answer No to the question Do you want Windows to search for your new hardware?
5 Click on Next.Result: The following window appears:
Step Action
Add/Delete new hardware Assistant
CancelNext>< Previous
The following hardware is already installed on your computer. If you encounterdifficulty with one of these peripherals, select the peripheral and click Next.
What hardware peripheral do you wish to troubleshoot?Selecting a hardware peripheral
If you try to add a peripheral and it doesn't appear below, select Add a new peripheral, then click Next. Peripherals
Add a new peripheralCOMPAQ 171 FSDisk driveCOMPAQ CRD-8320BWDC AC36400LES1869 Control Interface (WDM)ES1869 Plug and Play Audio Drive (WDM)
Add/Delete new hardware Assistant
CancelNext >< Previous
Select the hardware type you wish to install.
Which hardware type do you wish to install?Hardware type
Hardware types:PCX57 DevicePort (COM & LPT)PrintersSCSI and RAID controllersSound, video and game controllersSystems peripheralsTape drivesFPC10 Device
114 35006152.08 07/2008

ISAWAY driver
6 Select PCX 57 Device from the list then click on Next.
7 Select PCX 57 WDM Device from the list then click on Next.
8 Go to the next procedure: how to configure hardware parameters (see How to configure hardware parameters, p. 116).
Step Action
35006152.08 07/2008 115

ISAWAY driver
How to configure hardware parameters
Procedure After having selected the hardware type, carry out the following procedure to configure the parameters:
Step Action
1 Click on the Resources button.
2 Click on Manual Configuration.Result: The following window appears:
Add new hardware Assistant Properties ?
OK
Standard configuration 0000
FPCX57 WDM Device
Cancel
Modify the parameters...
Parameters based on:
List of peripherals in conflict:No conflict.
Resource parameters:
Resources
Type of Resource Parameter
Use the automatic parameters
Input/output range ?Interrupt Request (IRQ) ?
??
116 35006152.08 07/2008

ISAWAY driver
3 Select Input/Output Range from the list.
4 Verify that the box Use automatic settings is not checked.
5 Click on Modify the parameters.... Result: The following window appears:
6 From the Value list, select the non-conflicting address range.Note: Note the values because they must be coded onto the ISA card.
7 Confirm with OK.Result: a confirmation window appears.
8 Confirm with Yes.
9 Carry out steps 3 to 8 selecting Interrupt Request from the list.
Step Action
Modify input/output range
Enter the input/output range you wish to define for this peripheral.You can either enter a specific range and the closest valid rangewill be automatically selected, or select a range using the upper orlower indicator arrows.
This resource is assigned to the following child peripherals:
Value:
The parameter you have chosen is not in conflict with other peripherals.
OK Cancel
?
0250-025F Information concerning conflicts
No peripherals in conflict
35006152.08 07/2008 117

ISAWAY driver
10 Accept the configuration with OK.Result: The following window appears:
11 Click on Finish to confirm hardware configuration.
Step Action
Add / Remove Hardware Wizard
Cancel Finish<Back
End of Add/Delete hardware Assistant
The following hardware has been installed:FPCX57 WDM Device
Check the documentation of your hardware to know whether you should configure the new hardware manually. To operate the hardware you must restart the computer.
ResourcesTo display or modify the resources for this peripheral, click Resources.
To close the Assistant, click on Finish.
118 35006152.08 07/2008

ISAWAY driver
How to adjust the ISA TPCX 57 card parameters
At a Glance Before installing the TPCX 57 card, you must adjust the following parameters:
the rack number and the processor position,the standard I/O address,the IRQ interrupt address.
Illustration This card comprises the following elements:
Numbers and elements
The following table describes the different parameters to be adjusted:
1
2
3
4
Number Element
1 The processor’s rack position can be coded with the micro-switches.
2 The address of the rack which contains the processor can be coded with the micro-switches.
3 The standard address of the processor can be coded on the ISA bus with the micro-switches.
4 The IRQ (Interrupt Request) level can be coded with the micro-switches.
35006152.08 07/2008 119

ISAWAY driver
Procedure To adjust the parameters, proceed in the following manner:
Example of standard address selection
The standard address provided by the system is equal to 250 in hexadecimal:
Example of IRQ selection
The interrupt address provided by the system is 10:
Step Action
1 Code the number of the rack which contains the processor.
2 Code the processor position.
3 Code the standard I/O address provided by the operating system with the micro-switches.
4 Code the interrupt level provided by the operating system with the micro-switches.
45678
0
91
Note: The jumper must not be set in the IRQ position.
35101115IRQ
120 35006152.08 07/2008

ISAWAY driver
Configuration of ISAWAY driver
At a Glance The configuration tool is used to configure the ISAWAY driver for the TPCX 57 card.
The configuration tool can be accessed from the taskbar: Start → Settings → Control Panel → Driver Manager. See Driver Manager Chapter (see Drivers Manager, p. 73)
Select the PCX 57 Driver tab to display the following window:
Elements The Properties button is used to access the driver configuration screen for card 1 and card 2 respectively.
The Hardware Wizard button is used to add or remove an ISA TPCX 57 card using the Add/Remove Hardware Wizard.
The Device Manager button activates the System Properties window and is used to view or modify the card hardware parameters.
Management properties of XWAY driversDRIVERS Manager
PCX57 Driver FPC10 Driver XWayTestUNITELWAY Driver
PCX57 Driver V1.1 IE06Copyright © 1998-1999 Schneider Automation S.A.
[1] PCX57 Properties
Hardware Wizard Use Hardware Wizard to add or remove a PCX57 card.
OK
Driver 1 state: Non operational
Driver 2 state: Non operational
Use Device Manager tomodify the hardware configuration of PCX57 cards.
PCX57 Driver
PCX57 Device Manager
FPWFPW
[2] PCX57 Properties
FPP20 DriverXIP Driver
Device Manager
Note: A maximum of two cards can be connected.
35006152.08 07/2008 121

ISAWAY driver
Properties configuration
From the PCX 57 tab in the Driver Manager, press the PCX 57 Properties button corresponding to your card in order to display the following window:
The table below describes the different commands in the tab "Devices":
Button Action
Add... Allows a TPCX 57 processor card with default parameters (IRQ =10, base address I/O=H’220’, timer=500ms, buffer size=256 bytes) to be added to the PC.The maximum number of cards is 2.
Remove Deletes the selected TPCX 57 processor card.
Properties Allows the properties of a processor card to be defined, see: Properties, p. 124.
Apply Allows configuration parameters to be applied; the tool saves the parameters, then reinitializes the driver.
Cancel Allows the user to exit without acknowledging the modified parameters.
OK Allows the user to exit while acknowledging the modified parameters.
Devices Driver
PCX57 ConfigurationPCX
Add... Remove Properties
OK Cancel Apply
List of PCX57 card configured:
[1] PCX57 Card
122 35006152.08 07/2008

ISAWAY driver
Click the "Driver" tab in the Properties Configuration window to display the following window:
This window displays general information on the driver.
PCX57 ConfigurationPCX
Devices Driver
Manufacturer: Schneider Automation
Version: V1.4 IE05
Current Files: DISAWAY
The driver is stopped
Driver Status
Driver Information
OK Cancel Apply
35006152.08 07/2008 123

ISAWAY driver
Properties Press the Properties button in the Properties configuration, p. 122 to display the following window:
The table below describes the different areas:
Area Description
I/O Base This is the address of the PCX 57 card in hexadecimal, which should correspond to the address configured on the processor card.
Timer(ms) Represents the watchdog refreshment period, which is updated by the driver.
IRQ Level Use to set the IRQ level
Default Displays the default configuration of the card (IRQ=10, I/O Base=H’220’, Timer=500ms).
Cancel Cancels a modification, and returns to the previous screen.
OK Validates the configuration; the parameters displayed are stored and the previous screen is displayed.
I/O Base
[2] PCX57 Configuration
Hardware Datagram
0x0220
Timer (ms) 500
IRQ Level
IRQ10
IRQ11
IRQ5
IRQ3
IRQ15
Default
OK Cancel
124 35006152.08 07/2008

ISAWAY driver
Click the Datagram tab to display the following window:
The table below describes the different areas:
Area Description
Input/Output buffer
Allows the size of the buffers for the interface between the PCX 57 card and the driver to be configured. The size may be set at between 160 bytes and 256 bytes.
Default Allows default selection of the card (256 bytes)
Cancel Cancels a modification, and returns to the previous screen.
OK Validates the configuration; the parameters displayed are stored and the previous screen is displayed.
[2] PCX57 Configuration
Hardware Datagram
Input/Output Buffers
Default
OK Cancel
256 BytesSize (bytes)
35006152.08 07/2008 125

ISAWAY driver
126 35006152.08 07/2008

35006152.08 07/2008
E
Uni-Telway driver for TSX SCP 114 CardAt a Glance
Subject of this Chapter
This chapter describes configuration of the Uni-Telway driver communicating in slave mode via the TSX SCP 114 PCMCIA card with a remote device.
Driver Installation
For installation information, see the Driver Installation Chapter (see Driver Installation, p. 11)
What's in this Chapter?
This chapter contains the following topics:
Topic Page
Driver Configuration Screens 128
Finalizing installation 130
127

Uni-Telway driver for TSX SCP 114 Card
Driver Configuration Screens
At a Glance The configuration tool is used to configure the TSX SCP 114 card Uni-Telway driver.
The configuration tool can be accessed from the taskbar: Start → Settings → Control Panel → Driver Manager.
Select the tab corresponding to the driver to be configured in the Driver Manager window.
Illustration The screen dedicated to the Uni-Telway driver looks like this:
Description This table describes the different areas which make up the configuration screen:
Link ParametersUni-Telway
OK Cancel
TSX SCP114 Configuration
Slave number (Ad0) Slave
1
Apply
1
2
3
Number Element
1 This window is used to set the standard slave address (Ad0) used by the card.
2 This button is used to recognize the address.
3 This tab is used to access the configuration of transmission parameters.
128 35006152.08 07/2008

Uni-Telway driver for TSX SCP 114 Card
Link Parameters To access the Link Parameters, select the Link Parameters tab:
Description This tab is used to configure the parameters linked to transmission:
Link Parameters
Speed
ms
7 bits
Uni-Telway
OK Cancel
Station Parameters
9600 bits/s
Delay10Default
RTS/CTS DelayX 100 ms
Default
Data Content Parity Stop Bits
8 bits
1 bit
2 bits
Even
Odd
Without
Cancel
1
Apply
Element Description
Speed transmission speed of between 300 bits per second and 19,200 bits per second
Delay sets the delay.
Data Content
specifies the size of the data exchanged over the line.
Parity is used to set whether a parity bit is added or not, as well as its type.
Stop Bits is used to enter the number of stop bits used for communication.
RTS/CTS Delay
enables the CTS signal to be used in the event of multidrop communication.
Default Button
button is used to reset all these parameters to their default value.
35006152.08 07/2008 129

Uni-Telway driver for TSX SCP 114 Card
Finalizing installation
At a Glance After the driver installation and configuration phase, the operating system shall recognize the TSX SCP 114 card and its driver.
How to Configure the Operating System
The following procedure describes how to configure the operating system:
Note: When configuring the system, it is not necessary to restart the PC.
Step Action
1 Install and configure the driver.
2 Insert the PCMCIA card into its slot.Result: The system automatically detects the card and loads the card driver.
130 35006152.08 07/2008

CBAIndex
Aaddressing
TPCX57, 119TSXPCI57, 70X-Way, 79
Atrium TPCX 57 processors, 111Atrium TSX PCI 57 xxx processors, 67
EEthway Driver, 89
IISAWAY
drivers, 111
Mmodem
modbus driver, 26
PPCIWAY
drivers, 67
TTSX C USB FIP Card, 63TSX FPC 10 ISA Card, 99
35006152.08 07/2008
TSX FPP 20 Card, 95TSX SCP 114 Card, 127TSXCUSB232, 45TSXCUSB485, 45TSXPCX3030, 45
UUSB
drivers, 40USB cables
drivers, 45
XXIP Driver, 55
131

Index
132
35006152.08 07/2008