installation manual en
TRANSCRIPT

Installation manual
TruTops ProductsPart 2: Installation and data backup
Version 5.6


Installation manual
TruTops Products Part 2: Installation and data backup
Edition: 2010-03-11
Version 5.6 C331en

Order Information Please specify when ordering this document: Installation manual TruTops Products 2010-03-11 C331en
Address for orders TRUMPF Werkzeugmaschinen GmbH + Co. KG Technische Redaktion Johann-Maus-Straße 2 D-71254 Ditzingen Fon: +49 7156 303-0 Fax: +49 7156 303-30540 Internet: http//www.trumpf.com E-Mail: [email protected]
© TRUMPF Werkzeugmaschinen GmbH + Co. KG

C331EN 2010-03-11 Before you proceed ... 5
Before you proceed ...
TruTops installation puts forth certain requirements for the hardware and software used. These requirements are described in the separate document "Installation manual TruTops Products Part 1: System prerequisites"1. This Installation manual is valid for the following products: • TruTops Version 2.1 or higher
– TruTops Laser Version 8.0 or higher. – TruTops Punch Version 7.0 or higher. – TruTops CAD Version 5.0 or higher. – TruTops Tube Version 7.0 or higher. – TruTops Bend Version 5.0 or higher
• 3D tube construction (TubeDesign) Version 1.0 or higher The following minimum requirements should be fulfilled when data is transferred from an existing TruTops version during installation: • TruTops Version 1.0 or higher
– TruTops Laser Version 6.0 or higher – TruTops Punch Version 5.0 or higher – TruTops CAD Version 3.0 or higher – TruTops Tube Version 5.0 or higher – TruTops Bend Version 4.0 or higher
• 3D tube construction Version 1.0 or higher
If the version is a lower version, it must be updated to the minimum required version before the installation. The software manuals of the individual TruTops products are provided in the following folder on the installation DVD:
'\PSPlugins\Vxxx\Setup\Documentation\' (<xxx> = TruTops version identification).
1 File "System_requirements_[language].pdf" on TruTops DVD.
System prerequisites
Valid versions
Update versions
Software manual

6 Table of contents 2010-03-11 C331EN
Table of contents 1. Operation modes and installation variants.....................9 1.1 Operation modes .................................................................9 1.2 Installation variants ........................................................... 10
TruTops as multi-user workstation in the network ........................................................................ 10 TruTops as single workstation..................................... 11
2. System components....................................................... 12 2.1 Notes................................................................................. 12 2.2 List of components............................................................ 12 2.3 Components with user intervention .................................. 14
Dongle server .............................................................. 14 FirePDM....................................................................... 15 Password ..................................................................... 15 Password Server ......................................................... 16
3. Ready2Install: Pretesting Installation........................... 17 3.1 Running Ready2Install...................................................... 17 3.2 Zipping the Ready2Install file............................................ 18
4. Initial installation in PDM mode .................................... 19 4.1 Necessary adjustments .................................................... 19
Before installation ........................................................ 19 After the installation ..................................................... 20
4.2 New installation of a PDM server ..................................... 22 4.3 New installation of a PDM client ....................................... 24 4.4 Initial installation of a PDM server and client on the
same computer ................................................................. 26
5. Update from PDM 2.x to PDM 2.x .................................. 28 5.1 PDM server update........................................................... 28
6. Update from PDM 1.x to PDM 2.x .................................. 30 6.1 Necessary modifications................................................... 30 6.2 PDM server update........................................................... 30 6.3 PDM client update ............................................................ 32
7. Initial installation in file system mode.......................... 34 7.1 Necessary adjustments .................................................... 34 7.2 Initial installation of a file system server ........................... 34 7.3 Initial installation of a file system client............................. 36 7.4 New installation of a server and client file system
on the same computer (multi-user)................................... 38

C331EN 2010-03-11 Table of contents 7
7.5 Initial installation of a server and client file system on the same computer (single workstation)...................... 40
8. File system update ......................................................... 42 8.1 File system server update................................................. 42 8.2 File system client update .................................................. 43
9. Uninstalling TruTops...................................................... 45
10. Special installations ....................................................... 46 10.1 Expert mode ..................................................................... 46 10.2 Conversion from file system to PDM ................................ 48
From single-user file system to PDM........................... 48 From multi-user file system to PDM ............................ 49
10.3 Reconfiguration of TruTops Cell from PDM 1 to file system............................................................................... 50
11. Data backup .................................................................... 51 11.1 Backing up PDM data ....................................................... 51
Backing up files............................................................ 51 Backing up the PDM database.................................... 51 Changing the storage location of the PDM database backup copy................................................. 52 Changing the PDM database backup schedule and frequency.............................................................. 53 Starting the PDM database backup manually ............. 54 Viewing the PDM database backup status.................. 54 Restoring backed up files from a PDM database backup copy................................................................. 55 Long-term backup........................................................ 57
11.2 Saving the complete TruTops Version automatically..................................................................... 58
Changing the data backup storage location ................ 58 Changing the data backup schedule and frequency ..................................................................... 59 Directly starting automatic data backup ...................... 59 Viewing the data backup status................................... 60
11.3 Saving the complete TruTops Version manually.............. 61 11.4 Restoring backup up TruTops version.............................. 62
12. Additional information and auxiliary programs........... 64 12.1 Starting the PDM migration manually ............................... 64 12.2 Modifying PDM file storage............................................... 64 12.3 Subsequently performing a database update................... 65 12.4 Copying and deleting machines ....................................... 66 12.5 Merging materials ............................................................. 67

8 Table of contents 2010-03-11 C331EN
12.6 Operating system and computer change during update ............................................................................... 69
Changing the operating system................................... 69 Computer change File system mode - local database (MS Access) with old directory structure ("TRUMPF" tree) .......................................... 69 Computer change file system mode – local database (MS Access) with new directory structure ("TRUMPF.NET" tree) .................................. 70 Computer change file system mode – multi-user installation (client & server) with SQL Server database and new directory structure ("TRUMPF.NET" tree) ................................................. 71 Computer change in PDM mode: update from PDM 1 to PDM 2.......................................................... 72
12.7 Installing Microsoft Loopback Adapter.............................. 75 12.8 Managing licenses (network dongle) ................................ 75
Displaying existing licenses......................................... 76 Installing new licenses................................................. 77 Slot assignment ........................................................... 78
12.9 Automatic services............................................................ 81
Index .......................................................................................... 82

C331EN 2010-03-11 2BOperation modes and installation variants 9
1. Operation modes and installation variants
1.1 Operation modes
There are two basic operation modes for the operation of TruTops: • TruTops in PDM mode
In PDM mode, all TruTops data (drawings, templates, sheet layouts, etc.) is stored in the file system and additionally monitored together with its properties and dependencies. This allows certain data to be searched for easily, quickly and efficiently. Due to the management of dependencies, all references between files are retained even after copying or moving them (e.g. sheet layout drawings). Detailed information about the PDM is provided in the software manual for the TruTops product2.
• TruTops in file system mode All files are stored in the file system without additional monitoring. Only Windows' customary search options are available.
The following table shows both of the modes and their characteristics:
PDM mode File system mode
Database Network (MS SQL Server) Network (MS SQL Server)
File access • PDM browser • Windows Explorer
Windows Explorer
Access by ToPs 100 lite/ToPs 2000 yes yes
Access by external programs yes yes
Management of dependencies yes no
Parts search according to characteristics
Yes, fast Yes, slowly
Licensing (dongle)
• Network • Local
• Network • Local
2 The software manuals of the individual TruTops products are located in the
following folder on the installation DVD: '\PSPlugins\V<xxx>\Setup\Documentation' (<xxx>: version identification)
Table 1

10 2BOperation modes and installation variants 2010-03-11 C331EN
1.2 Installation variants
There are different ways of installing TruTops. The installation primarily depends on whether TruTops is to be used as a single workstation on one computer or with several TruTops workstations in the network. TruTops as multi-user workstation in the network
TruTops is operated as a client/server system in the network. All data is stored centrally on the TruTops Server, the actual applications run on the clients and access the data of the server. There are two variants for the installation: • Client(s) and server(s) run on their own separate computers. • A client and server run on the same computer. Further clients
run on their own separate computers. This division helps attain maximum efficiency of the system, since every component has a separate computer.
TruTops Server
TruTops Clients
TruTopsLaser
TruTopsPunch
TruTopsBend
TruTops client/server system
Separate client and server (recommended)
Fig. 48596

C331EN 2010-03-11 2BOperation modes and installation variants 11
A client can also be installed on the server computer. However if the client installed on the server computer carries out intensive computing tasks, it can lead to a power loss (e.g. during nesting). This makes it more difficult for other clients to access the server data.
TruTops ServerTruTops Client
TruTops ClientsTruTops
Laser
TruTopsBend
TruTops client/server system TruTops as single workstation
If TruTops is to be used as a single workstation, its installation should be similar to that with Server+Client on a computer (see section 7.5, p. 40). Since other clients do not access the computer in this case, there is no power loss.
Client and server on the same computer
Fig. 48597

12 3BSystem components 2010-03-11 C331EN
2. System components
2.1 Notes
A number of additional system components are required in order to use TruTops. During the installation, the system checks whether these components have been installed. If not, they are installed automatically. The installation process is displayed on the screen. The computer automatically restarts after a few components are installed.
For this installation process, you should be aware of the following: • Unsaved data is lost after a restart. All open files and programs
should thus be closed before the installation. • If the installation is being carried out on an active server,
appropriate precautions must be taken for the server restart. 2.2 List of components
Information • The table contains all components available on the installation
DVD along with a brief description and installation notes. • The components that are actually installed depend on the
installation and the operation mode. They are displayed during the installation process.
• The components are listed in the table in alphabetical order. The actual order during the installation is displayed on the screen.
• The installation of some components requires user intervention. These components are described separately(see section 2.3, p. 14).
Restart
C331EN 2010-03-11 3BSystem components 13
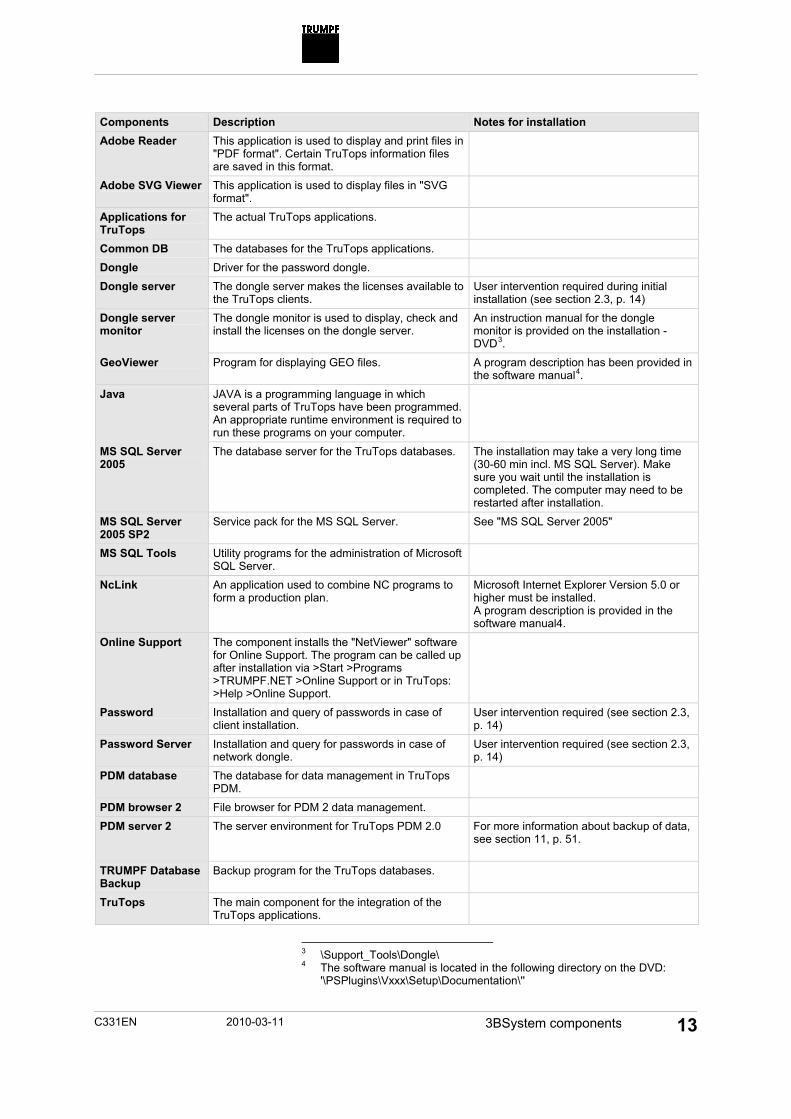
Components Description Notes for installation Adobe Reader This application is used to display and print files in
"PDF format". Certain TruTops information files are saved in this format.
Adobe SVG Viewer This application is used to display files in "SVG format".
Applications for TruTops
The actual TruTops applications.
Common DB The databases for the TruTops applications. Dongle Driver for the password dongle. Dongle server The dongle server makes the licenses available to
the TruTops clients. User intervention required during initial installation (see section 2.3, p. 14)
Dongle server monitor
The dongle monitor is used to display, check and install the licenses on the dongle server.
An instruction manual for the dongle monitor is provided on the installation -DVD3.
GeoViewer Program for displaying GEO files. A program description has been provided in the software manual4.
Java JAVA is a programming language in which several parts of TruTops have been programmed. An appropriate runtime environment is required to run these programs on your computer.
MS SQL Server 2005
The database server for the TruTops databases. The installation may take a very long time (30-60 min incl. MS SQL Server). Make sure you wait until the installation is completed. The computer may need to be restarted after installation.
MS SQL Server 2005 SP2
Service pack for the MS SQL Server. See "MS SQL Server 2005"
MS SQL Tools Utility programs for the administration of Microsoft SQL Server.
NcLink An application used to combine NC programs to form a production plan.
Microsoft Internet Explorer Version 5.0 or higher must be installed. A program description is provided in the software manual4.
Online Support The component installs the "NetViewer" software for Online Support. The program can be called up after installation via >Start >Programs >TRUMPF.NET >Online Support or in TruTops: >Help >Online Support.
Password Installation and query of passwords in case of client installation.
User intervention required (see section 2.3, p. 14)
Password Server Installation and query for passwords in case of network dongle.
User intervention required (see section 2.3, p. 14)
PDM database The database for data management in TruTops PDM.
PDM browser 2 File browser for PDM 2 data management. PDM server 2 The server environment for TruTops PDM 2.0 For more information about backup of data,
see section 11, p. 51.
TRUMPF Database Backup
Backup program for the TruTops databases.
TruTops The main component for the integration of the TruTops applications.
3 \Support_Tools\Dongle\ 4 The software manual is located in the following directory on the DVD:
'\PSPlugins\Vxxx\Setup\Documentation\''

14 3BSystem components 2010-03-11 C331EN
Components Description Notes for installation TruTops Convert Program used to convert various CAD formats. A program description is provided in the
software manual4. TruTops Common Libraries
File libraries that are required for TruTops operation.
TubeLink This is an application used to combine NC programs for tube processing machines to form a production package.
VC++ Redist Libs File libraries that are required for TruTops operation.
System components 2.3 Components with user intervention
Dongle server
The dongle server makes the licenses available to the TruTops clients.
Note The following description is required only during initial installation.
Additional equipment required • Dongle • Password files
1. Wait for the following message:
2. If the passwords are on an external storage medium (e.g. USB stick), connect/insert this storage medium.
3. Confirm the message with OK. 4. Select the password file with the extension ".alf" in the
selection dialog and confirm selection. The installation will begin.
Table 2
Fig. 37553

C331EN 2010-03-11 3BSystem components 15
FirePDM
In order to use TruTops PDM, it is necessary for some of the TruTops PDM applications to communicate with other computers in the network. All access is monitored and unknown applications are denied access if a firewall is installed. Windows has its own system firewall, which is active in the default settings. A check is made during installation to determine whether the operating system has a firewall of its own. If so, the following mask appears:
Firewall dialog (example)
Select OK. If a firewall from another provider has been installed, it must be manually configured (see section "After the installation" on p. 20). Password
Each TruTops production system, the postprocessors of the machines and the options are protected by passwords. Furthermore, each dongle has its own serial number. You will be asked to enter the password file ("tops_pwd") during the installation. The following options are available for organizing passwords: • Load passwords from a diskette or from another medium
The password file is on a storage medium which can be selected in the follow-up mask.
• Adopt available passwords Passwords from already installed products can be adopted. The path of the password file is entered in the follow-up mask.
Installation
Fig. 47634en
Setting up the firewall manually
Installation
16 3BSystem components 2010-03-11 C331EN
• Use passwords from the server In the case of a network dongle, the passwords from the dongle server are used. The server automatically detects that no additional entries are necessary.
• Installing without passwords (Time limit license)5 TruTops can be used for a limited time (30 days) without dongle and without passwords. The usage of this demo version is enabled when TruTops is started(for description, see software manual) .
Password Server
Each TruTops production system, the postprocessors of the machines and the options are protected by passwords. Furthermore, each dongle has its own serial number. You will be asked to enter the password file ("tops_pwd") during the installation. The following options are available for organizing passwords: • Load passwords from a diskette or from another medium
The password file is on a storage medium which can be selected in the follow-up mask.
• Adopt available passwords Passwords from already installed products can be adopted. The path of the password file is entered in the follow-up mask.
5 Only available when installed with a local dongle.
Installation

C331EN 2010-03-11 4BReady2Install: Pretesting Installation 17
3. Ready2Install: Pretesting Installation
The "Ready2Install" function can be used before the actual installation to check whether the system is suitable for the desired installation type. Here, installation is simulated without actually copying the data6 and without making any system entries. Ready2Install can either be started directly from the installation DVD or zipped into a zip file using a program of its own and copied to another medium (e.g. USB stick) (see Section 3.2, p. 18). 3.1 Running Ready2Install
Prerequisite • Installation DVD or zipped Ready2Install file.
1. If Ready2Install is available as a zip file, unzip it in a directory on the computer to be installed.
2. Start the '_READY_TO_INSTALL.BAT' file from the unzipped archive or from the installation DVD. The setup manager starts. If .NET-Framework is not installed on the computer, it is now installed. A message that the Ready2Install installation is being started is displayed.
3. Confirm the message with OK. The installation wizard starts. The title bar of the wizard has the additive "Ready2Install-Mode".
4. Configure the installation as in case of a real installation (see description from section 4, p. 19). After the configuration with the installation wizard, the prerequisites for the components are checked. Notes and errors are displayed as in case of a real installation. After the check is complete, a message to that effect is displayed.
6 Ready2Install requires runtime environments "Microsoft .NET Framework"
(V3.5, SP1) and "Microsoft Installer" (V3.1). If they are not available on the computer, they are automatically installed when starting.

18 4BReady2Install: Pretesting Installation 2010-03-11 C331EN
3.2 Zipping the Ready2Install file
In order to run Ready2Install on several computers without the installation DVD, the program with all the required files can be zipped and copied to a network drive or another medium (e.g. USB stick). 1. Start the 'Ready2InstallCreate.exe' file on the installation DVD.
The zip program starts and the start mask is displayed. 2. Select Continue.
The following mask is displayed:
Query .NET Framework
The installation manager requires the runtime environments "Microsoft .NET Framework" (Version 3.5 with SP1) and "Microsoft Installer" (Version 3.1). When the manager is started, it is checked whether these environments are available and if not, they are automatically installed. Both the runtime environments must be zipped into the Ready2Install archive if they are not present on the computer to be tested.
3. Mark the runtime environments that are to be zipped into the Ready2Install archive.
4. Select Continue. A mask is displayed in which the directory for the complete zip file can be specified. The TEMP directory of the logged-on user is pre-selected by default.
5. Select Select to change the target directory. 6. Select Continue.
A message is displayed if there is already a zipped Ready2Install file in the specified directory. A summary of the entries is displayed.
7. Select Finish. The zipping process starts. After completion, an appropriate message will appear on the screen.
Fig. 55257en

C331EN 2010-03-11 5BInitial installation in PDM mode 19
4. Initial installation in PDM mode
4.1 Necessary adjustments
Before installation
You should sort out and prepare the things described here, before beginning with the installation of your TruTops PDM system.
Tip Restart the computer before installation. The computers on which the PDM system is to be installed must fulfill the requirements from the "Installation manual TruTops Products, Part 1: System prerequisites". All of the data on the computer should be backed up prior to the installation. The computer has to be restarted after installing some components. All data, of any open programs which has not been saved, will be lost in the process. Therefore back up your data and close all open programs before the installation. Take appropriate precautions when installing on a running server. Installation via Remote Desktop or Terminal Server is not recommended, since the installation procedure is interrupted (the installation wizard starts, but the installation manager does not) in the event of certain security settings. You must observe the following things for the installation via a network (installation files are in the network): • The installation does not support any UNC paths. The directory
with the installation files must be connected to the computer to be installed with a drive letter.
• The path to the installation files must not contain any spaces. If TruTops is run on a computer without active network (e.g. Notebook), the "Microsoft Loopback Adapter" must first be installed before the installation (see section 12.7, p. 75) .
System prerequisites
Data backup
Automatic restart
Remote Desktop/ Terminal Server
Installation via network
Installation without network

20 5BInitial installation in PDM mode 2010-03-11 C331EN
After the installation
TruTops Cell can be installed in the PDM mode from version V03.11.00 onwards. If an older version is already installed in PDM 1 mode, it must be switched from the PDM mode to the file system mode after the installation of PDM 2 because PDM 1 and PDM 2 cannot be installed on one computer at the same time (see section 10.3, p. 50). Firewalls monitor access to and from a computer. Access to the computer by programs unknown to the firewall is blocked. If a firewall is installed, it must be configured accordingly to allow the TruTops PDM server to communicate with its clients without restriction.
Note You do not have to make any changes if your firewall is only set up to defend attacks from outside your company network. Windows XP firewall Windows XP has an integrated firewall which denies access to any unknown programs. This firewall can be configured automatically during the installation to allow TruTops PDM to work perfectly. Setting up a firewall If you have installed another personal firewall, you must allow server and client operation in your local network for the following applications: • Programs
If not indicated otherwise, paths on installation path '%TOPS_DRIVE%\TRUMPF.NET'. – \Applications\PDMServer2\bin\TruTopsPDM.exe – \Applications\PDMServer2\bin\TruTopsPDMservice.exe – \Applications\PDMServer2\bin\NT_Naming_Service.exe – \Utils\PDM2\bin\pdmBrowser.exe – \Utils\PDM2\bin\pdmCLI.exe – \Applications\ProgrammingSuite\bin\ProgrammingSuiteSta
rt.exe – \Applications\ToPs100\bin\t100.exe – \Applications\ToPs300\bin\t300.exe – \Applications\ToPs400\bin\t400.exe – \Applications\ToPs400CAD\bin\t400cad.exe – \Applications\ToPs600\bin\t600.exe – \Applications\ToPsCad\bin\tcad.exe – \Applications\ToPsNest\bin\tnest.exe – <WindowsSystem32>\HLS32SVC.EXE – <ProgramFiles>\Microsoft SQL Server\MSSQL.[x]\MSSQL\
Binn\sqlservr.exe
TruTops Cell
Configuring the firewall

C331EN 2010-03-11 5BInitial installation in PDM mode 21
TruTops PDM reacts to changes in TruTops files (e.g. GEO, .LST, etc.). These changes are made during normal use of TruTops applications but can also be caused by certain virus scanners. These additional changes can lead to the PDM system being blocked, thus leading to internal errors (called "Timeout" error in the PDM log files). The following settings should be configured in the virus scanners in order to prevent this:
1. Exclude the following file types from the access check of the virus scanners: .TMT, .GMT, .TAF, .GEO, .LST, .JOB, .PPJ, .PDF, .BMP.
2. Exclude the following processes on the server computer from the access check of the virus scanners (if not specified explicitly, then paths starting from '%TOPS_DRIVE%\TRUMPF.NET'): – \Utils\PDM2\bin\pdmBrowser.exe – \Utils\PDM2\bin\pdmCLI.exe – \Applications\PDMServer2\bin\TruTopsPDM.exe – \Applications\PDMServer2\bin\TruTopsPDMservice.exe – \Applications\PDMServer2\bin\NT_Naming_Service.exe – \Applications\ProgrammingSuite\bin\
ProgrammingSuiteStart.exe – %systemroot%\system32\HLS32SVC.EXE – %ProgramFiles%\Microsoft SQL Server\MSSQL.[x]\
MSSQL\Binn\sqlservr.exe 3. Exclude the following processes on the client computer from
the access check of the virus scanners (if not specified explicitly, then paths starting from '%TOPS_DRIVE%\TRUMPF.NET'): – \Utils\PDM2\bin\pdmBrowser.exe – \Utils\PDM2\bin\pdmCLI.exe – \Applications\ToPs100\bin\t100.exe – \Applications\ToPs300\bin\t300.exe – \Applications\ToPs400\bin\t400.exe – \Applications\ToPs400CAD\bin\t400cad.exe – \Applications\ToPs600\bin\t600.exe – \Applications\ToPsCad\bin\tcad.exe – \Applications\ToPsNest\bin\tnest.exe
For the installation of TruTops Tube, there is, in addition to the installation DVD for TruTops, also another DVD with the designation "#2". This DVD must also be installed but only after TruTops has been installed.
Configuring the virus scanner
TruTops Tube

22 5BInitial installation in PDM mode 2010-03-11 C331EN
If HTML setup plans are to be used in TruTops, then additional settings must be made in Internet Explorer.
1. Open Internet Explorer. 2. Select >Tools >Internet options >Security. 3. Select >Trusted sites. 4. Select Sites and add file://<server name> (<server
name> = name of the TruTops server). 5. Select OK. 6. Select >Local Intranet. 7. Disable "Activate protected mode". 8. Select OK. Automatic enablements for the group "Each" will be set up during the installation for the directories "Trumpf_PDM2" and "Trumpf_Licenses". If the "Each" group is to be removed from enablement, then it must be observed that instead the local account "System" will be included in the enablement with at least reading rights. Otherwise the PDM Server will not be able to monitor the directories. 4.2 New installation of a PDM server
Additional equipment required • With network dongle: dongle and ".alf" file. • Password file. • Installation DVD.
Prerequisite • Any TruTops programs (with network version, all clients, too)
which have already been installed are ended. • Any virus scanners installed are deactivated.
1. If a network dongle is used, plug it into the server computer. 2. Insert the installation DVD.
The installation will start. Start the 'Setup.exe' on the DVD if the installation does not begin automatically.
3. Select a language. A check is made as to whether the correct .NET framework7 is installed on the system. If not, then it will be installed. Afterwards, the Start mask for the installation wizard is displayed.
4. Select Continue. The license agreement mask is displayed.
5. Accept the license agreement and select Continue. 7 The .NET framework is a runtime environment which is required for the
installation.
Internet Explorer settings
Enablements
Starting the installation
Selecting the language

C331EN 2010-03-11 5BInitial installation in PDM mode 23
The wizard checks whether a TruTops product has already been installed. During a new installation, a message appears saying that no TruTops has been found and that a new installation is being performed.
6. Select Continue. The mask for selecting the installation drive is displayed. Note The mask only appears if no TruTops product has yet been installed on the computer.
7. Select the drive on which TruTops is to be installed. Note The drive selection also applies to every future installation. It can no longer be changed.
8. Select Continue. The operation mode selection window appears (PDM or file system).
9. Mark "PDM" and then select Continue. A selection window to select the type of subscriber to be installed will appear (client, server, client and server).
10. Mark "Server" and then select Continue. A selection window appears for the dongle operation mode (local, network).
11. Select the dongle operation mode: Note In order to install the demo version (Time limit license), the "local" dongle operation mode must be selected.
– Local Each client has its own dongle.
– Network dongle All clients are licensed via a single dongle, which is plugged into the server. Select the dongle server by using the Select button to search through the network environment.
12. Select Continue. The "Product integration" mask is displayed. The installation type of the individual products can be changed here (see section 10.1, p. 46).
13. Select Continue. The wizard will show a summary of the details entered.
14. Check the configuration and then select Finish. The installation wizard is ended and the installation manager begins with the installation of the system components (see section 2, p. 12).
15. After the installation, make any necessary adjustments (see section 4.1, p. 19).
16. Install the clients (see section 4.3, p. 24).
Selecting the installation drive
Selecting the operation mode
Selecting the network subscriber
Selecting the dongle operation mode
Defining product integration
Finishing the configuration
After the installation
24 5BInitial installation in PDM mode 2010-03-11 C331EN
4.3 New installation of a PDM client
Prerequisite • The TruTops PDM server has been installed on this computer
or on a different computer in the network. • Any virus scanners installed are deactivated.
1. If a network dongle is used, plug it into the server computer. If a local dongle is used, plug the dongle into the client computer.
2. Insert the installation DVD. The installation will start. Start the 'Setup.exe' on the DVD if the installation does not begin automatically.
3. Select a language. A check is made as to whether the correct .NET framework8 is installed on the system. If not, then it will be installed. Afterwards, the Start mask for the installation wizard is displayed.
4. Select Continue. The license agreement mask is displayed.
5. Accept the license agreement and select Continue. The wizard checks whether a TruTops/ToPs version has already been installed. During a new installation, a message appears saying that no TruTops has been found and that a new installation is being performed.
6. Select Continue. The mask for selecting the drive is displayed. Note The mask only appears if no TruTops product has been installed yet on the computer.
7. Select the drive, on which TruTops is to be installed. Note The drive selection also applies to every future installation. It can no longer be changed.
8. Select Continue. The operation mode selection window appears (PDM, file system).
9. Mark "PDM" and then select Continue. A selection window to select the type of subscriber to be installed will appear (client, server, client and server).
10. Select "Client" and search for PDM server computer in the network environment using the Select button.
11. Select Continue. An attempt will be made to establish a connection to the server. An error message is displayed if a connection cannot be established. If the connection is successful, then the mask for selecting the dongle operation mode will be displayed.
8 The .NET framework is a runtime environment which is required for the
installation.
Starting the installation
Selecting the language
Selecting the installation drive
Selecting the operation mode
Selecting the network subscriber

C331EN 2010-03-11 5BInitial installation in PDM mode 25
12. Select the dongle operation mode: Note In order to install the demo version (Time limit license), the "local" dongle operation mode must be selected.
– Local Each client has its own dongle.
– Network dongle All clients are licensed via a single dongle, which is plugged into the server. Select the dongle server by using the Select button to search through the network environment.
13. Select Continue. The "Product integration" mask is displayed. The installation type for individual products can be changed here (see section 10.1, p. 46).
14. Select Continue. The wizard shows a summary of the specifications.
15. Check the configuration and then select Finish. The wizard is ended and the installation manager begins with the installation of the system components (see section 2, p. 12).
16. Install further clients as required.
Selecting the dongle operation mode
Defining product integration
Finishing the configuration

26 5BInitial installation in PDM mode 2010-03-11 C331EN
4.4 Initial installation of a PDM server and client on the same computer
Additional equipment required • With network dongle: dongle and ".alf" file. • Password file. • Installation DVD.
1. If a network dongle is used, plug it into the computer. 2. Insert the installation DVD.
The installation will start. Start the 'Setup.exe' on the DVD if the installation does not begin automatically.
3. Select a language. A check is made as to whether the correct .NET framework9 is installed on the system. If not, then it will be installed. Afterwards, the Start mask for the installation wizard is displayed.
4. Select Continue. The license agreement appears.
5. Read and confirm the license agreement. Then select Continue. The wizard checks whether a TruTops product has already been installed. During a new installation, a message appears saying that no TruTops has been found and that a new installation is being performed.
6. Select Continue. The mask for selecting the installation drive is displayed. Note The mask only appears if no TruTops product has yet been installed on the computer.
7. Select the drive, on which TruTops is to be installed. Note The drive selection also applies to every future TruTops installation. It can no longer be changed.
8. Select Continue. A mask for selecting the operation mode (PDM/file system) appears.
9. Mark "PDM" and then select Continue. A mask for selecting the type of subscriber to be installed will appear (client/server/client and server).
10. Select "Client+Server" and select Continue. A message with information on network accessibilities is displayed.
9 The .NET framework is a runtime environment which is required for the
installation.
Starting the installation
Selecting the language
Selecting the installation drive
Selecting the operation mode
Selecting the network subscriber

C331EN 2010-03-11 5BInitial installation in PDM mode 27
11. Select Continue. A mask appears for the dongle operation mode (local/network).
12. Select the dongle operation mode: Note In order to install the demo version (Time limit license), the "local" dongle operation mode must be selected.
– Local dongle Each client has its own dongle.
– Network dongle All clients are licensed via a single dongle, which is plugged into the server. Enter the name of the dongle server in the field (TruTops Server name is suggested) or select it from the network environment using the Select button.
13. Select Continue. The "Product integration" mask is displayed. The installation type of the individual TruTops applications can be changed here (see section 10.1, p. 46).
14. Select Continue. The wizard will show a summary of the details entered.
15. Select Finish. The installation wizard is ended and the installation manager begins with the installation of the system components (see section 2, p. 12).
Selecting the dongle operation mode
Defining product integration
Finishing the configuration

28 6BUpdate from PDM 2.x to PDM 2.x 2010-03-11 C331EN
5. Update from PDM 2.x to PDM 2.x
Information This description is applicable only for: • Updates for the existing PDM 2 installations (PDM 110 ->
PDM 2 see section 6, p. 30, File system -> PDM 2 see section 10.2, p. 48).
• Updates without changing the computer. For updates with a change in the computer, see section 12.6, p. 69.
5.1 PDM server update
Prerequisite • Any TruTops/ToPs programs (with network version, all clients
too) which have already been installed are closed. • Any virus scanners installed are deactivated.
1. If a network dongle is used, plug it into the computer. 2. Insert the installation DVD.
The installation will start. Start the 'Setup.exe' on the DVD if the installation does not begin automatically.
3. Select a language. A check is made as to whether the correct .NET framework11 is installed on the system. If not, then it will be installed. Afterwards, the Start mask for the installation wizard is displayed.
4. Select Continue. The license agreement appears.
5. Read and confirm the license agreement. Then select Continue. The wizard checks whether a TruTops product has already been installed and displays the result. Note If an installation is not found or the found installation does not correspond to the desired one, the configuration must be changed (see section 10, p. 46).).
6. "Mark "Yes, adopt configuration" and select Continue. The mask for selecting the installation type is displayed.
10 PDM 1 was used in earlier versions. 11 The .NET framework is a runtime environment which is required for the
installation.
Starting the installation
Apply configuration

C331EN 2010-03-11 6BUpdate from PDM 2.x to PDM 2.x 29
7. Select "Update". Note For products that have been newly integrated in TruTops, the selected installation type may deviate from the general installation type. In such a case, activate the "Installation type…Select manually" box and select Continue. Then the mask for product integration follows (see section 10.1, p. 46).
8. Select Continue. The mask for securing the already installed products appears. Here you can select whether a backup of the already installed versions should be taken (recommended). The hard disk space needed for this will be displayed.
9. Select Continue. The wizard displays a summary of entries. The entries can be changed via the Continue button.
10. Select Finish. If the backup of the predecessor version was activated, then the backup will be started now. Next, the wizard is ended and the installation wizard begins with the installation of the system components (see section 2, p. 12).
Selecting the installation type
Backing up the predecessor version
Finishing the configuration

30 7BUpdate from PDM 1.x to PDM 2.x 2010-03-11 C331EN
6. Update from PDM 1.x to PDM 2.x
Information This description holds only for the following updates: • Updates for the existing PDM 112 installations (PDM 2 ->
PDM 2 see section 5, p. 28, File system -> PDM 2 see section 10.2, p. 48).
• Updates without changing the computer. For updates with a change in the computer, see section 12.6, p. 69.
6.1 Necessary modifications
PDM 2.0 monitors dependencies between files only within the PDM root directory (%TOPS_DRIVE%\TRUMPF.NET\DATA_PDM2). This also applies to files in the machine transfer directory. For PDM 2 this directory is therefore under '%TOPS_DRIVE%\TRUMPF.NET\DATA_PDM2\TRANSFER\maschxxx' as standard. For older installations this transfer directory was located under 'C:\users\maschxxx' as standard. If an update is to be carried out on PDM 2, the transfer directory in the TruTops settings must be changed after installation (see software manual). 6.2 PDM server update
Requirement • Any TruTops/ToPs programs (with network version, all clients
too) which have already been installed are closed. • Any virus scanners installed are deactivated.
1. If a network dongle is used, plug it into the computer. 2. Insert the installation DVD.
The installation will start. Start the 'Setup.exe' on the DVD if the installation does not begin automatically.
3. Select a language. A check is made as to whether the correct .NET framework13 is installed on the system. If not, then it will be installed. Afterwards, the Start mask for the installation wizard is displayed.
4. Select Continue. 12 PDM 1 was used for ToPs 100/300/400. 13 The .NET framework is a runtime environment which is required for the
installation.
Machine transfer directory
Starting the installation
C331EN 2010-03-11 7BUpdate from PDM 1.x to PDM 2.x 31
The license agreement appears. 5. Read and confirm the license agreement. Then select
Continue. The wizard checks whether a TruTops product has already been installed and displays the result. Note If an installation is not found or the found installation does not correspond to the desired one, the configuration must be changed (see section 10, p. 46).).
3. Select "Yes, adopt configuration" and select Continue. The mask for selecting the installation type is displayed.
4. Select "Update". Note For products that have been newly integrated in TruTops, the selected installation type may deviate from the general installation type. In such a case, activate the "Installation type…Select manually" box and select Continue. Then the mask for product integration follows (see section 10.1, p. 46).
5. Select Continue. The "Data transfer" mask is displayed. Here you can select whether a data transfer from the existing PDM system should be automatically started after the installation (recommended). For manual data transfer, see section 12.1, p. 64.
6. Select Continue. The wizard displays a summary of entries. The entries can be changed via Previous.
7. Select Finish. If the automatic data transfer was previously activated, then the transfer will be started now. If the option is not activated, the transfer should be manually started (see section 12.1, p. 64). The wizard is ended and the installation manager begins with the installation of the system components (see section 2, p. 12).
Apply configuration
Selecting the installation type
Defining data transfer
Finishing the configuration

32 7BUpdate from PDM 1.x to PDM 2.x 2010-03-11 C331EN
6.3 PDM client update
Additional equipment required • Password file.
Prerequisite • Any TruTops/ToPs programs (with network version, all clients
too) which have already been installed are closed. • Any virus scanners installed are deactivated. • PDM server update has been installed.
1. If a network dongle is used, plug it into the computer. 2. Insert the installation DVD.
The installation will start. Start the 'Setup.exe' on the DVD if the installation does not begin automatically.
3. Select a language. A check is made as to whether the correct .NET framework14 is installed on the system. If not, then it will be installed. Afterwards, the Start mask for the installation wizard is displayed.
4. Select Continue. The license agreement appears.
5. Read and confirm the license agreement. Then select Continue. The wizard checks whether a TruTops/ToPs version is already installed and shows the found installation. Note If an installation is not found or the found installation does not correspond to the desired one, the configuration must be changed (see section 10, p. 46).).
3. Select "Yes, adopt configuration" and select Continue. The mask "Backup of predecessor versions" appears.
Backup of predecessor versions
14 The .NET framework is a runtime environment which is required for the
installation.
Starting the installation
Apply configuration
Backing up the predecessor version
Fig. 50233en

C331EN 2010-03-11 7BUpdate from PDM 1.x to PDM 2.x 33
Here you can select whether a backup of the existing TruTops applications should be taken before the installation (recommended). In order to ensure that the backup versions are functional, you must switch from the PDM 1 mode to the file system mode (PDM 1 and PDM 2 cannot run on one computer at the same time). For this, a drive letter must be entered using which the client is supposed to connect to the server later.
5. Enter the drive letter and select Continue. The wizard displays a summary of entries. The entries can be changed via Previous.
6. Select Finish. If the backup of the predecessor versions was activated in the installation wizard, then the backup will be started now. Next, the wizard is ended and the installation manager begins with the installation of the system components (see section 2, p. 12).
Finishing the configuration

34 8BInitial installation in file system mode 2010-03-11 C331EN
7. Initial installation in file system mode
7.1 Necessary adjustments
The computers on which the TruTops system is to be installed must fulfill the requirements from the "Installation manual TruTops Products, Part 1: System prerequisites". All clients access the same file storage location on the server. The prerequisite for this is that the clients are connected to the server via a network drive. The same letter must be assigned to this drive at all clients. A drive letter should thus be defined before installation which is free on all client computers. If TruTops is run on a computer without active network (e.g. Notebook), the "Microsoft Loopback Adapter" must first be installed before the installation (see section 12.7, p. 75) . 7.2 Initial installation of a file system
server
Additional equipment required • With network dongle: dongle and ".alf" file. • Password file. • Installation DVD.
Prerequisite • Any TruTops/ToPs programs (with network version, all clients
too) which have already been installed are closed. • Any virus scanners installed are deactivated.
1. If a network dongle is used, plug it into the server computer. 2. Insert the DVD. Start the 'setup.exe' file if the installation does
not begin automatically. The installation wizard will start.
3. Select a language. The Start mask for the installation wizard is displayed.
4. Select Continue. The license agreement mask is displayed.
5. Accept the license agreement and select Continue. The wizard checks whether a TruTops product has already been installed. During a new installation, a message appears saying that no TruTops has been found and that a new installation is being performed.
System prerequisites
Consistent drive letter
Installation without network
Starting the installation
Selecting the language

C331EN 2010-03-11 8BInitial installation in file system mode 35
6. Select Continue. The mask for selecting the installation drive is displayed. Note The mask only appears if no TruTops product has yet been installed on the computer.
7. Select the drive, on which TruTops is to be installed. Note The drive selection also applies to every future installation. It can no longer be changed.
8. Select Continue. The operation mode selection window appears (PDM or file system).
9. Mark "File system" and then select Continue. A selection window to select the type of subscriber to be installed will appear (client, server, client and server).
10. Mark "Server" and then select Continue. A selection window appears for the dongle operation mode (local, network).
11. Select the dongle operation mode: Note In order to install the demo version (Time limit license), the "local" dongle operation mode must be selected.
– Local Each client has its own dongle.
– Network dongle All clients are licensed via a single dongle, which is plugged into the server. Select the dongle server by using the Select button to search through the network environment.
12. Select Continue. The "Product integration" mask is displayed. The installation type of the individual products can be changed here (see section 10.1, p. 46).
13. Select Continue. The wizard shows a summary of the specifications.
14. Check the configuration and then select Finish. The installation wizard is ended and the installation manager begins with the installation of the system components (see section 2, p. 12).
15. Install the clients (see section 7.3, p. 36).
Selecting the installation drive
Selecting the operation mode
Selecting the network subscriber
Selecting the dongle operation mode
Defining product integration
Finishing the configuration

36 8BInitial installation in file system mode 2010-03-11 C331EN
7.3 Initial installation of a file system client
Additional equipment required • With network dongle: dongle and ".alf" file. • Password file. • Installation DVD. Prerequisite • A TruTops PDM server has been installed on this computer or
on a different computer in the network. • Any virus scanners installed are deactivated.
1. Connect the client computer to the server computer via the previously defined network drive.
Information • The enabling directory "TRUMPF.NET" must be selected
on the server. • The same drive letter must be used by all clients. • In order to ensure a connection to the network drive even
after a restart, either activate the "Restore connection during logon" option or enter the connection in the logon script of the user.
1. If a network dongle is used, plug it into the server computer. 2. Insert the DVD. Start the 'setup.exe' file if the installation does
not begin automatically. The installation wizard will start.
3. Select a language. The Start mask for the installation wizard is displayed.
4. Select Continue. The license agreement mask is displayed.
5. Accept the license agreement and select Continue. The wizard checks whether a TruTops product has already been installed. During a new installation, a message appears saying that no TruTops has been found and that a new installation is being performed.
6. Select Continue. The mask for selecting the installation drive is displayed. Note The mask only appears if no TruTops product has yet been installed on the computer.
7. Select the drive, on which TruTops is to be installed. Note The drive selection also applies to every future installation. It can no longer be changed.
8. Select Continue. The operation mode selection window appears (PDM or file system).
Connecting the network drive
Starting the installation
Selecting the language
Selecting the installation drive

C331EN 2010-03-11 8BInitial installation in file system mode 37
9. Mark "File system" and then select Continue. A selection window to select the type of subscriber to be installed will appear (client, server, client and server).
10. Select "Client" and search for server computer in the network environment using the Select button.
11. Select Continue. An attempt will be made to establish a connection to the server. An error message is displayed if a connection cannot be established. Else, the mask for selecting the dongle operation mode is displayed.
12. Select the dongle operation mode: Note In order to install the demo version (Time limit license), the "local" dongle operation mode must be selected.
– Local Each client has its own dongle.
– Network dongle All clients are licensed via a single dongle, which is plugged into the server. Select the dongle server by using the Select button to search through the network environment.
13. Select Continue. The following mask is displayed:
Specifying the network drive
14. Enter the letter of the drive used to connect the client computer to the server computer.
15. Select Continue. The "Product integration" mask is displayed. The installation type of the individual products can be changed here (see section 10.1, p. 46).
16. Select Continue. The wizard shows a summary of the specifications.
Selecting the operation mode
Selecting the network subscriber
Selecting the dongle operation mode
Specifying the network drive
Fig. 50224en
Defining product integration

38 8BInitial installation in file system mode 2010-03-11 C331EN
17. Check the configuration and then select Finish. The installation wizard is ended and the installation manager begins with the installation of the system components (see section 2, p. 12).
7.4 New installation of a server and client
file system on the same computer (multi-user)
Additional equipment required • With network dongle: dongle and ".alf" file. • Password file. • Installation DVD.
1. If a network dongle is used, plug it into the server computer. 2. Insert the DVD. Start the 'setup.exe' file if the installation does
not begin automatically. The installation wizard will start.
3. Select a language. The Start mask for the installation wizard is displayed.
4. Select Continue. The license agreement mask is displayed.
5. Accept the license agreement and select Continue. The wizard checks whether a TruTops product has already been installed. During a new installation, a message appears saying that no TruTops has been found and that a new installation is being performed.
6. Select Continue. The mask for selecting the installation drive is displayed. Note The mask only appears if no TruTops product has yet been installed on the computer.
7. Select the drive, on which TruTops is to be installed. Note The drive selection also applies to every future installation. It can no longer be changed.
8. Select Continue. The operation mode selection window appears (PDM or file system).
9. Mark "File system" and then select Continue. A selection window to select the type of subscriber to be installed will appear (client, server, client and server).
Finishing the configuration
Starting the installation
Selecting the language
Selecting the installation drive
Selecting the operation mode

C331EN 2010-03-11 8BInitial installation in file system mode 39
10. Mark "Client+Server" and press Continue. A selection window appears for the dongle operation mode (local, network).
11. Select the dongle operation mode: Note In order to install the demo version (Time limit license), the "local" dongle operation mode must be selected.
– Local Each client has its own dongle.
– Network dongle All clients are licensed via a single dongle, which is plugged into the server. Select the dongle server by using the Select button to search through the network environment.
12. Select Continue. The "Network drive" mask is displayed. Here the letter of the drive is specified through which the client is connected to the server.
13. Enter the drive letters. 14. Select Continue.
The "Product integration" mask is displayed. The installation type of the individual products can be changed here (see section 10.1, p. 46).
15. Select Continue. The wizard shows a summary of the specifications.
16. Check the configuration and then select Finish. The installation wizard is ended and the installation manager begins with the installation of the system components (see section 2, p. 12).
17. Connect the released directory ("TRUMPF.NET") on the server via a network drive after the installation.
Note In order to ensure a connection to the network drive even after a restart, either activate the "Restore connection during logon" option or enter the connection in the logon script of the user.
Selecting the network subscriber
Selecting the dongle operation mode
Specifying the network drive
Defining product integration
Completing the installation
After the installation

40 8BInitial installation in file system mode 2010-03-11 C331EN
7.5 Initial installation of a server and client file system on the same computer (single workstation)
Note In case of an installation in the file system mode, data between the client and the server is exchanged over a previously defined drive letters. In case of a single workstation installation, the drive letter of the installation drive is automatically used. In this case, a system extension with more clients is possible only by means of a reconfiguration of the system. In order to keep the possibility of a system extension open, the installation type "Client+Server (multi-user)" should be selected (see section 7.4, p. 38). Additional equipment required • Dongle (only with network dongle). • Password file.
1. If a network dongle is used, plug it into the server computer. 2. Insert the DVD. Start the 'setup.exe' file if the installation does
not begin automatically. The installation wizard will start.
3. Select a language. The Start mask for the installation wizard is displayed.
4. Select Continue. The license agreement mask is displayed.
5. Accept the license agreement and select Continue. The wizard checks whether a TruTops product has already been installed. During a new installation, a message appears saying that no TruTops has been found and that a new installation is being performed.
6. Select Continue. The mask for selecting the installation drive is displayed. Note The mask only appears if no TruTops product has yet been installed on the computer.
7. Select the drive, on which TruTops is to be installed. Note The drive selection also applies to every future installation. It can no longer be changed.
8. Select Continue. The operation mode selection window appears (PDM or file system).
Starting the installation
Selecting the language
Selecting the installation drive

C331EN 2010-03-11 8BInitial installation in file system mode 41
9. Mark "File system" and then select Continue. A selection window to select the type of subscriber to be installed will appear (client, server, client and server).
10. Select "Single workstation" and select Continue. A selection window appears for the dongle operation mode (local, network).
11. Select the dongle operation mode: Note In order to install the demo version (Time limit license), the "local" dongle operation mode must be selected.
– Local Each client has its own dongle.
– Network dongle All clients are licensed via a single dongle, which is plugged into the server. Select the dongle server by using the Select button to search through the network environment.
12. Select Continue. The "Product integration" mask is displayed. The installation type of the individual products can be changed here (see section 10.1, p. 46).
13. Select Continue. The wizard shows a summary of the specifications.
14. Check the configuration and then select Finish. The installation wizard is ended and the installation manager begins with the installation of the system components (see section 2, p. 12).
Selecting the operation mode
Selecting the network subscriber
Selecting the dongle operation mode
Defining product integration
Completing the installation

42 9BFile system update 2010-03-11 C331EN
8. File system update
Note This description is applicable only when updating an existing file system installation on a new file system installation. 8.1 File system server update
Prerequisite • Any TruTops/ToPs programs (with network version, all clients
too) which have already been installed are closed. • Any virus scanners installed are deactivated.
1. If a network dongle is used, plug it into the computer. 2. Insert the installation DVD.
The installation will start. Start the 'Setup.exe' on the DVD if the installation does not begin automatically.
3. Select a language. A check is made as to whether the correct .NET framework15 is installed on the system. If not, then it will be installed. Afterwards, the Start mask for the installation wizard is displayed.
4. Select Continue. The license agreement appears.
5. Read and confirm the license agreement. Then select Continue. The wizard checks whether a TruTops product has already been installed and displays the result. Note If an installation is not found or the found installation does not correspond to the desired one, the configuration must be changed (see section 10, p. 46).).
6. "Mark "Yes, adopt configuration" and select Continue. The mask for selecting the installation type is displayed.
7. Select "Update". Note For products that have been newly integrated in TruTops, the selected installation type may deviate from the general installation type. In such a case, activate the "Installation type…Select manually" box and select Continue. Then the mask for product integration follows (see section 10.1, p. 46).
8. Select Continue. The mask for securing the already installed products appears.
15 The .NET framework is a runtime environment which is required for the
installation.
Starting the installation
Apply configuration
Selecting the installation type
Backing up the predecessor version

C331EN 2010-03-11 9BFile system update 43
Here you can select whether a backup of the already installed versions should be taken (recommended). The hard disk space needed for this will be displayed.
9. Select Continue. The wizard displays a summary of entries. The entries can be changed via the Continue button.
10. Select Finish. If the backup of the predecessor version was activated, then the backup will be started now. Next, the wizard is ended and the installation wizard begins with the installation of the system components (see section 2, p. 12).
8.2 File system client update
Additional equipment required • Password file.
Prerequisite • Any TruTops/ToPs programs (with network version, all clients
too) which have already been installed are closed. • Any virus scanners installed are deactivated. • Server update has been installed.
1. If a network dongle is used, plug it into the computer. 2. Insert the installation DVD.
The installation will start. Start the 'Setup.exe' on the DVD if the installation does not begin automatically.
3. Select a language. A check is made as to whether the correct .NET framework16 is installed on the system. If not, then it will be installed. Afterwards, the Start mask for the installation wizard is displayed.
4. Select Continue. The license agreement appears.
5. Read and confirm the license agreement. Then select Continue. The wizard checks whether a TruTops product has already been installed and displays the result. Note If an installation is not found or the found installation does not correspond to the desired one, the configuration must be changed (see section 10, p. 46).).
6. "Mark "Yes, adopt configuration" and select Continue. The mask for selecting the installation type is displayed.
16 The .NET framework is a runtime environment which is required for the
installation.
Finishing the configuration
Starting the installation
Apply configuration

44 9BFile system update 2010-03-11 C331EN
7. Select "Update". Note For products that have been newly integrated in TruTops, the selected installation type may deviate from the general installation type. In such a case, activate the "Installation type…Select manually" box and select Continue. Then the mask for product integration follows (see section 10.1, p. 46).
8. Select Continue. The mask for securing the already installed products appears. Here you can select whether a backup of the already installed versions should be taken (recommended). The hard disk space needed for this will be displayed.
9. Select Continue. The wizard displays a summary of entries. The entries can be changed via the Continue button.
10. Select Finish. If the backup of the predecessor version was activated, then the backup will be started now. Next, the wizard is ended and the installation wizard begins with the installation of the system components (see section 2, p. 12).
Selecting the installation type
Backing up the predecessor version
Finishing the configuration
C331EN 2010-03-11 10BUninstalling TruTops 45
9. Uninstalling TruTops
TruTops can be completely uninstalled. TruTops is uninstalled with all its installed applications (e.g. TruTops Laser, TruTops CAD etc.). Installations of third party providers (e.g. Adobe Reader, MS SQL Server, etc.) are retained. Note All TruTops applications are uninstalled and all the relevant data and directories are deleted (even the backups in the "TRUMPF.NET" directory). The uninstallation cannot be undone.
1. Insert the TruTops installation DVD. 2. If the setup starts automatically, end the setup. 3. Go to the '%TOPS_DRIVE%\Installation\Uninstall' directory. 4. Start the 'TruTopsUninstaller.exe' file.
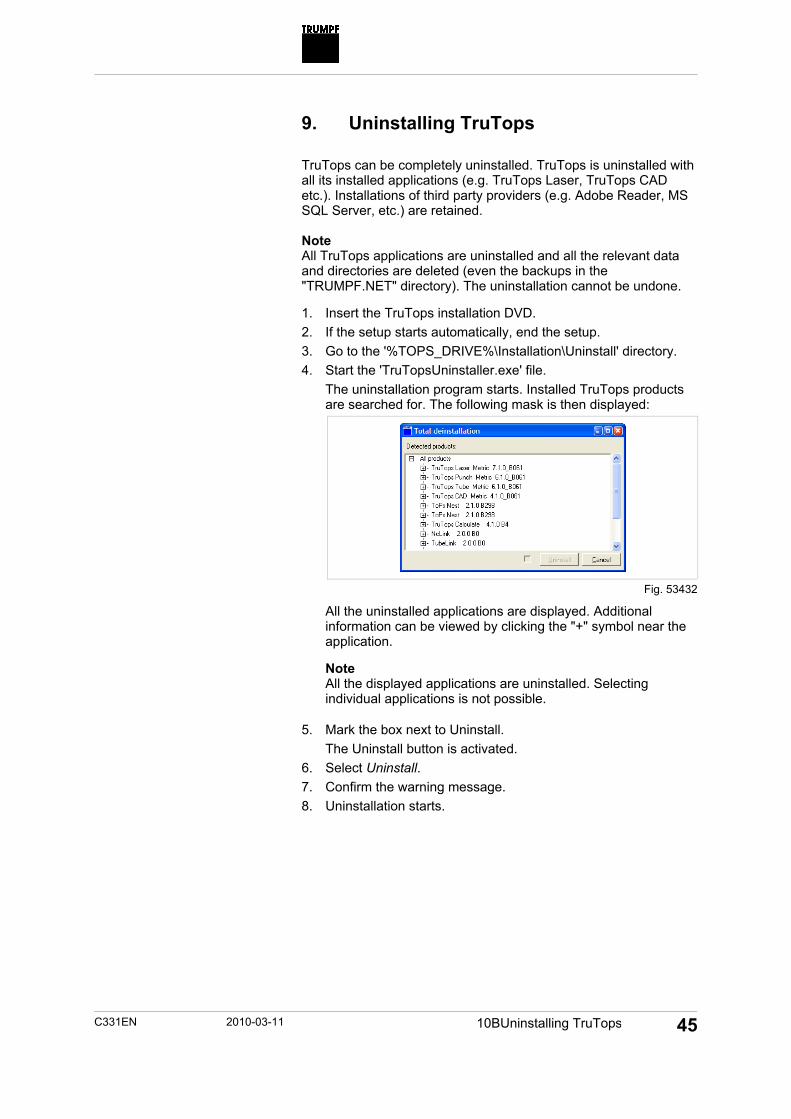
The uninstallation program starts. Installed TruTops products are searched for. The following mask is then displayed:
All the uninstalled applications are displayed. Additional information can be viewed by clicking the "+" symbol near the application.
Note All the displayed applications are uninstalled. Selecting individual applications is not possible.
5. Mark the box next to Uninstall. The Uninstall button is activated.
6. Select Uninstall. 7. Confirm the warning message. 8. Uninstallation starts.
Fig. 53432

46 11BSpecial installations 2010-03-11 C331EN
10. Special installations
10.1 Expert mode
The installation wizard provides the option of changing the suggested installation types and other basics for data transfer during updates and switchovers. This, for example, is necessary if • Data from one access database is to be transferred from
another computer. • Data from one TruTops version that is older than the last
installed version is to be transferred. • Data from another file system storage is to be transferred. The expert mode is called up in the installation wizard via the "Product integration" mask. 1. Start the installation with the desired configuration up to the
"Product integration" mask.
2. Select the Modify button next to the installation to be modified. The following dialog box is displayed:
Here, the installation type can be changed from Update to Initial installation (and vice versa).
3. In order to activate the "Expert mode", mark it (if it is already active).
Calling up expert mode
Fig. 50226en
Fig. 50237en

C331EN 2010-03-11 11BSpecial installations 47
The Edit button becomes active. 4. Select …Edit.
The following mask is displayed:
The dialog depends on the installed TruTops version. The following settings can be configured:
– "TRUMPF-specific files" For updating or switching an old TRUMPF environment, activate the box and select the path for data transfer. The drive of the current installation is used as default path.
– "Basis for updating the product database" Select the type of database (local, network) and specify the path to the database. Select the relevant option for initial installation of the database.
5. Select OK. If the configuration has been changed, the "Product integration" dialog displays the "Expert mode" installation type near the changed TruTops product. If the expert mode has been aborted, the originally suggested installation type is displayed once again.
Fig. 50225en

48 11BSpecial installations 2010-03-11 C331EN
10.2 Conversion from file system to PDM
When switching over from file system to PDM, a differentiation must be made between a single installation and a multi-user installation. From single-user file system to PDM
If a single-user system with a network database is installed (server and client on the same PC), the installation is applicable for a switchover from the multi-user file system to PDM (see the next section). When expanding a single workstation with local database to a client/server system, the database of the single workstation computer can be transferred during the installation. If several single workstations work with a local database and all stations are to be switched to PDM, a database must be defined before the installation from which data should be transferred. 1. Start the TruTops PDM update (see section 3, p. 17). 2. Activate expert mode in the "Product integration" mask (see
section 10.1, p. 46). 3. Enter the Access database from which the data is to be
transferred. 4. Continue the installation.
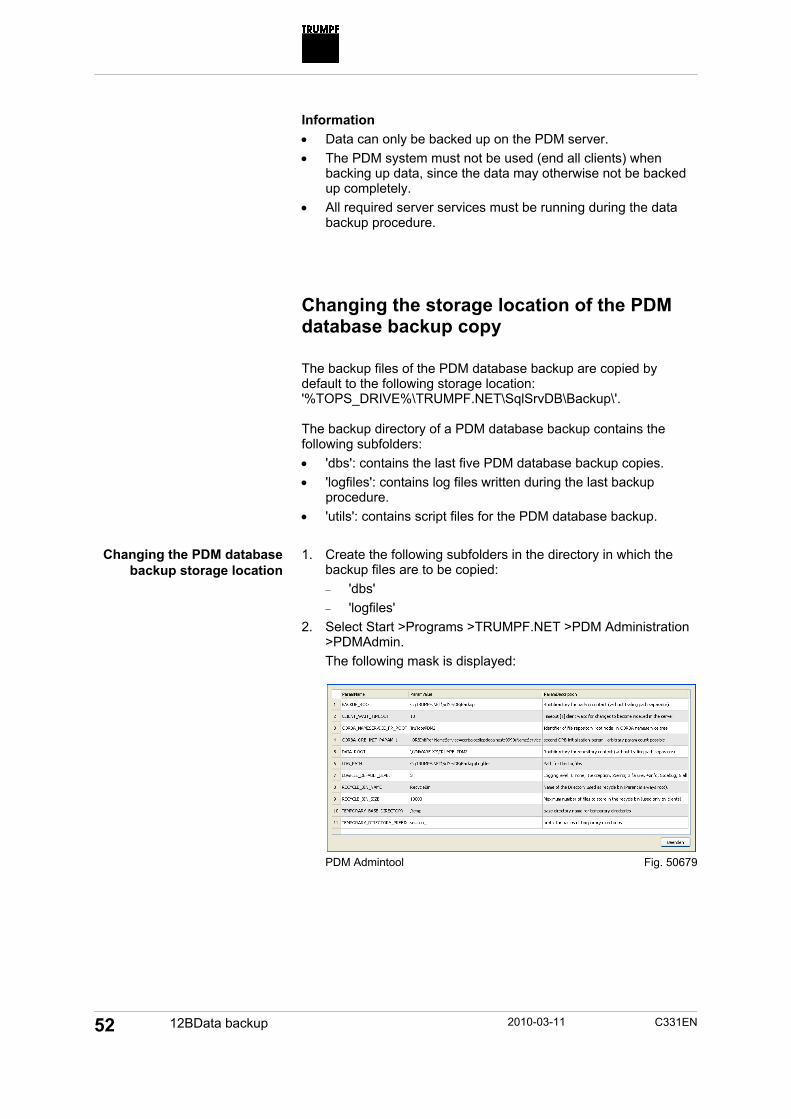
Network database
Adopting the database
Installation

C331EN 2010-03-11 11BSpecial installations 49
From multi-user file system to PDM
The following must be paid attention to before switching over to PDM: • The prerequisites and preparations that apply for the
conversion from file system to PDM are the same as those for a new PDM installation (see section 4, p. 19).
• Appropriate PDM installation must be carried for every network device (client, server) of the multi-user system (see section 4, p. 19).
• The current TruTops Server (network database) must be installed on the computer on which the TruTops PDM server is to be installed.
1. Start installation. 2. Select "Modify configuration" from the configuration mask and
select Continue. 3. Mark "PDM" and then select Continue.
A selection window appears for the network participant to be installed.
4. Select network device that is to be installed and select Continue .
Note The network device that was previously installed on the computer must be selected.
The selection of the dongle operation mode is displayed. 5. Select the dongle operation mode:
– Local Each client has its own dongle.
– Network dongle All clients are licensed via a single dongle, which is plugged into the server. Enter the server name or use the Select button to search through the network environment.
6. Select Continue. The "Product integration" mask is displayed.
7. Select Continue. The wizard shows a summary of the specifications.
8. Check the configuration and then select Finish. The wizard is ended and the installation manager begins with the installation of the system components (see section 2, p. 12).
Before installation
Installation
Selecting the operation mode
Selecting the network subscriber
Selecting the dongle operation mode
Defining product integration

50 11BSpecial installations 2010-03-11 C331EN
10.3 Reconfiguration of TruTops Cell from PDM 1 to file system
TruTops Cell can be installed in the PDM mode from version V03.11.00 onwards. If an older version is already installed in PDM 1 mode, it must be switched from the PDM mode to the file system mode after the installation of PDM 2 because PDM 1 and PDM 2 cannot be installed on one computer at the same time. Note The configuration must only be performed on the client computers.
Prerequisite • TruTops with PDM 2 is installed.
1. Connect the free drive letter on the PDM 1 computer (client) with the following release (the release is automatically set up during the installation of PDM 2): – '\\<PDM2 server17>\TRUMPF_PDM2'
2. Open the ini file of TruTops Bend / Cell (path to the file: Module Info >Files >Current TruTops INI file).
3. Search for the following entries in the ini file and change them as follows: – PdmServiceName =
Rear value "=" Delete or keep empty. – TOPS_SHARED = %TOPS_DRIVE%\TRUMPF.NET
<LW> = letter of drive connected in step 1.
17 The name of the PDM server without the "<" and ">" symbols.
Reorganizing the configuration
C331EN 2010-03-11 12BData backup 51
11. Data backup
11.1 Backing up PDM data
Backing up files
With the introduction of PDM 2, files from TruTops are no longer stored in encoded form in the PDM system. They are freely accessible in the Windows file system instead. As a result, no special data backup method is necessary for the stored files. The files can be backed up using any data backup program. The files whose backup is to be taken are located in the following directories on the PDM server: • '%TOPS_DRIVE%\TRUMPF.NET\DATA_PDM2'
(or via release name: \\<PDM server>\TRUMPF_PDM2) • %TOPS_DRIVE%\TRUMPF.NET\DATA_PDM2_Versions • %TOPS_DRIVE%\TRUMPF.NET\BACKUP_PDM2 • %TOPS_DRIVE%\TRUMPF.NET\SqlSrvDB\Backup Backing up the PDM database
The properties and dependencies of the TruTops data are saved in the PDM database. The "ToPsBackup" program is available to back up the database. The backup program creates a backup file of the complete PDM database in directory '%TOPS_DRIVE%\TRUMPF.NET\SqlSrvDB\Backup\DBs\TPDM_V03_V003'. The storage location is defined automatically during the installation. It can be changed as required after installing TruTops (see following section). An automatic service is created at the time that TruTops is installed (Windows XP: "Planned tasks", Windows Vista/7: "Task planning"). The service starts the data backup procedure, by default, once a day. The service can be individually adjusted (starting time, frequency, etc.).
The starting time and frequency of the data backup procedure can be changed after installing TruTops. The backup procedure can be started manually at any time.
Database backup
Data backup storage location
Data backup starting time and frequency
52 12BData backup 2010-03-11 C331EN
Information • Data can only be backed up on the PDM server. • The PDM system must not be used (end all clients) when
backing up data, since the data may otherwise not be backed up completely.
• All required server services must be running during the data backup procedure.
Changing the storage location of the PDM database backup copy
The backup files of the PDM database backup are copied by default to the following storage location: '%TOPS_DRIVE%\TRUMPF.NET\SqlSrvDB\Backup\'. The backup directory of a PDM database backup contains the following subfolders: • 'dbs': contains the last five PDM database backup copies. • 'logfiles': contains log files written during the last backup
procedure. • 'utils': contains script files for the PDM database backup. 1. Create the following subfolders in the directory in which the
backup files are to be copied: – 'dbs' – 'logfiles'
2. Select Start >Programs >TRUMPF.NET >PDM Administration >PDMAdmin. The following mask is displayed:
PDM Admintool
Changing the PDM database backup storage location
Fig. 50679

C331EN 2010-03-11 12BData backup 53
3. Change the value ("ParamValue") for the following entries: – BACKUP_ROOT
Master directory to which the backup files are copied. Information The path must lead to a local directory, since the database cannot be backed up on a network drive.
– LOG_PATH Directory in which the log files are to be written during the backup procedure.
4. Select Terminate after changing the storage location. Changing the PDM database backup schedule and frequency
An entry is made in Windows "Scheduled Tasks" during the installation of TruTops with PDM. The entry starts the full data backup procedure, by default, once a day.
You can adapt the entry to meet your requirements (starting time, frequency, etc.). Information • The PDM system must not be used when backing up the data,
since the data may otherwise not be backed up completely. • All required server services must be running during the data
backup procedure. 1. Use the Windows control panel to open "Planned tasks"
(Windows XP) or "Task planning" (Windows Vista/7). 2. Mark the "TruTops PDM 2.x Full Backup" service. 3. Modify the settings using the corresponding functions.

54 12BData backup 2010-03-11 C331EN
Starting the PDM database backup manually
Prerequisite • The logged-on user must be a member of the local
administrator group. Information • The PDM system must not be used when backing up the data,
since the data may otherwise not be backed up completely. • All required server services must be running during the data
backup procedure.
Either Use the control panel to open "Planned tasks" (Windows
XP) or "Task planning" (Windows Vista/7). Use the Service functions to start the "TruTops PDM 2.x
Full Backup" service. or
Enter the following command in Windows prompt (everything in one line; observe the spaces; replace <Drive> with drive letter):
%TOPS_DRIVE%\TRUMPF.NET\SqlSrvDB\backup\utils\ ToPsBackup.exe -d TPDM_Vxx_Vyyy -f -c -r. 18 Viewing the PDM database backup status
1. If the data backup was started as an automatic service, then the status will be displayed in the automatic services (Windows XP: "Planned tasks", Windows Vista/7: "Task planning").
2. Open the respective file ToPsBackupLog_[time stamp].txt (e.g. ToPsBackupLog_20050706103122.txt) in the '%TOPS_DRIVE%\TRUMPF.NET\SqlSrvDB\Backup\Logfiles\ TPDM_Vxx_Vyyy ' directory, if the data backup procedure was started manually. The progress of the data backup procedure can be viewed in the file (e.g. "ToPsBackup finished", i.e. data backup is finished).
18 Replace the directory with the actual storage location if the storage location
was changed (see p. 52): x/y: version code.
Starting the full backup manually
C331EN 2010-03-11 12BData backup 55
If 0 is not under DB backup started, SQLMAINT.EXE process exit code? the data backup was unsuccessful.
Open the corresponding file 'TPDM_Vxx_Vyyy_BACKUP_[time stamp].txt' (e.g. 'TPDM_Vxx_Vyyy_BACKUP_20050718020021.txt'. The file may contain error messages.
If 0 is not under DB reorg started, SQLMAINT.EXE process exit code? the data backup was unsuccessful.
Open the corresponding file 'TPDM_Vxx_Vyyy_REORG_[time stamp].txt' (e.g. 'TPDM_Vxx_Vyyy_REORG_20050718020021.txt'). The file may contain error messages.
Restoring backed up files from a PDM database backup copy
Prerequisite • The logged-on user must be a member of the local
administrator group. 1. Select >Start >Programs >Control Panel >Management
>Services. End the "TruTopsPDM2" service.
or Enter the following command in the Windows prompt: net Stop TruTopsPDM2
2. Copy the files backed up using the backup program in the following directory: – '%TOPS_DRIVE%\TRUMPF.NET\DATA_PDM_2'
(or release: \\<PDM2-Server>\TRUMPF_PDM2). – '%TOPS_DRIVE%\TRUMPF.NET\DATA_PDM2_Versions'
3. Select Start >Programs >TRUMPF.NET >MS SQL Server Tools >Backup & Restore DB. The backup program is started.
4. Select the TRUMPF server instance. 5. Select OK.
Ending the "TruTopsPDM2" system
service
Copying back the backed up files
Restoring the PDM database

56 12BData backup 2010-03-11 C331EN
The following mask is displayed:
Selecting PDM database (version specifications can deviate)
6. Under "Show", mark the option "TRUMPF single databases". 7. Select the PDM database to be restored from the left list
(TPDM_Vxx_Vyyy). 8. Either
If a backup history exists, mark Backup copy from the "Backup history" list.
Select Restore. The data will be restored. On completion, an appropriate message appears on the screen. or
If no backup history or the entire PDM database is not (no longer) available: Select <select backup file> from the "Backup history" list.
Select Restore. The following mask is displayed:
"Restore from…" (version specifications can deviate)
9. Select the database: – Select the Browse… button next to the input field. – Go to the following directory:
'%TOPS_DRIVE%\TRUMPF.NET\SqlSrvDB\Backup\backup\ dbs\TPDM_Vxx_Vyyy'.
– Mark the PDM database backup that is to be restored ('*.cbk'), and select Open.
Fig. 53436
Fig. 53435

C331EN 2010-03-11 12BData backup 57
All backup copies of this PDM database in the directory are displayed. – Mark the desired backup(s).
Note The Create 'TruDBUser' option must be activated.
– Select OK. The data will be restored. On completion, an appropriate message appears on the screen.
10. To start the "TruTopsPDM2" system service: Select Start >Programs >Control panel >Management
>Services. Restart "TruTopsPDM2".
or Enter the following command in the Windows prompt: net start TruTopsPDM2.
The data has now been restored. TruTops with PDM can be used again. Long-term backup
The backup directory which contains the full backup copy and the data directory ('%TOPS_DRIVE%\TRUMPF.NET\DATA_PDM2') must be backed up regularly by a standard backup (e.g. backup on tape). This ensures that your data can be restored after a drive or system crash. This standard backup must be organized and performed independently of TruTops.
Starting PDM services

58 12BData backup 2010-03-11 C331EN
11.2 Saving the complete TruTops Version automatically
All database of a TruTops version can be saved in a block. The following databases are currently backed up: • T100_[Version] TruTops Laser • T300_[Version] TruTops Punch • TCad_[Version] TruTops CAD • T400_[Version] TruTops Tube • T400CAD_[Version] TruTops TubeCAD • T600_[Version] TruTops Bend • TNest_[Version] Nester • TCommon_[version] Common data. • TText_[version] Text database. The storage location for the backed up databases is defined automatically and configured in an ini file during the installation of TruTops. It can be changed as required after installing TruTops (see corresponding section). An automatic service is created at the time that TruTops is installed (Windows XP: "Planned tasks", Windows Vista/7: "Task planning"). The service starts the data backup procedure, by default, once a day. The starting time and frequency of the data backup procedure can be changed after installing TruTops. Furthermore you can start the full backup procedure and the backup procedure in a file archive manually at any time. Changing the data backup storage location
The backup files are copied, by default, to the following storage location: '<ToPs drive>:\TRUMPF.NET\SQLSRVDB\backup'. The backup directory contains the following subfolders: • 'dbs': contains the last five database backup copies. • 'logfiles': contains log files written during the last backup
procedure. • 'utils': contains script files for the full backup. 1. Create the following subfolders in the directory in which the
backup files are to be copied: – 'dbs' – 'logfiles'
2. Open the following ini file with a text editor:
Data backup storage location
Data backup starting time and frequency
Changing the full backup storage location

C331EN 2010-03-11 12BData backup 59
'%TOPS_DRIVE%\TRUMPF.NET\SqlSrvDB\Backup\utils\ToPsBackup.ini'
3. Change the value for the following entries: – BACKUP_ROOT
Master directory to which the backup files are copied. Note The path must lead to a local directory, since the database cannot be backed up on a network drive.
– LOG_PATH Directory in which the log files are to be written during the backup procedure.
4. Save the file. Changing the data backup schedule and frequency
An automatic service is created at the time that TruTops is installed (Windows XP: "Planned tasks", Windows Vista/7: "Task planning"). The service starts the data backup procedure, by default, once a day. The service can be individually adjusted (starting time, frequency, etc.).
Note • TruTops must not be used during the data backup procedure,
since the data may otherwise not be backed up completely.
1. Use the Windows control panel to open "Planned tasks" (Windows XP) or "Task planning" (Windows Vista/7).
2. Mark the "TruTops Databases Backup" service. 3. Modify the settings using the corresponding functions. Directly starting automatic data backup
Prerequisite • The logged-on user must be a member of the local
administrator group. Information • TruTops must not be used during the data backup procedure,
since the data may otherwise not be backed up completely.
Either Use the control panel to open "Planned tasks" (Windows
XP) or "Task planning" (Windows Vista/7).
Starting the data backup procedure manually

60 12BData backup 2010-03-11 C331EN
Use the Service functions to start the "TruTops Databases Backup" service.
or Enter the following command in Windows prompt
(everything in one line; observe the spaces; replace <Drive> with drive letter):
%TOPS_DRIVE%\TRUMPF.NET\SqlSrvDB\Backup\utils\ToPsBackup.exe -c -r -o 2 Viewing the data backup status
1. If the data backup was started as an automatic service, then the status will be displayed in the automatic services (Windows XP: "Planned tasks", Windows Vista/7: "Task planning").
2. If the data backup procedure was started manually: open the respective file ToPsBackupLog_[time stamp].txt (e.g. ToPsBackupLog_20050706103122.txt) in the directory %TOPS_DRIVE%\TRUMPF.NET\SqlSrvDb\ backup\logfiles\Txxx_Vxx_Vxxx 19. The progress of the data backup procedure can be viewed in the file (e.g. "ToPsBackup finished", i.e. data backup is finished).
If 0 is not under DB backup started, SQLMAINT.EXE process exit code? the data backup was unsuccessful.
Open the respective file 'Txxx_Vxx_Vxxx_BACKUP_[time stamp].txt' (e.g. 'T100_V45_V600_BACKUP_20050718020021.txt'). The file may contain error messages.
If 0 is not under DB reorg started, SQLMAINT.EXE process exit code? The data backup was unsuccessful.
Open the respective file 'Txxx_Vxx_Vxxx_REORG_[time stamp].txt' (e.g. 'T100_V45_V600_REORG_20050718020021.txt'). The file may contain error messages.
19 Standard storage location if not changed (see p. 52).

C331EN 2010-03-11 12BData backup 61
11.3 Saving the complete TruTops Version manually
The "Backup & restore DB" program is available for backing up and restoring a TruTops version. The program can be called up via the Windows start menu after installation.
Prerequisite • The logged-on user must be a member of the local
administrator group.
1. Select Start >Programs >TRUMPF.NET >MS SQL Server Tools >Backup & Restore DB. The backup program is started.
2. Select the TRUMPF server instance. 3. Select OK.
The following mask is displayed:
Selecting a TruTops version (version specifications can deviate)
4. Mark the "TruTops versions" option under "Show". 5. Select the TruTops version to be backed up from the left-hand
list. 6. Select <select backup file...> from the "Backup history" list. 7. Select Backup -->.
A mask appears in which you can enter where the backup file is to be stored.
8. Select the storage location. 9. Select Save.
The backup procedure will be started. On completion, an appropriate message appears on the screen.
Fig. 53434

62 12BData backup 2010-03-11 C331EN
11.4 Restoring backup up TruTops version
Prerequisite • The logged-on user must be a member of the local
administrator group.
1. Select Start >Programs >TRUMPF.NET >MS SQL Server Tool >Backup & Restore DB. The backup program is started.
2. Select the TRUMPF server instance. 3. Select OK.
The following mask is displayed:
Selecting a TruTops version (version specifications can deviate)
4. Mark the "TruTops versions" option under "Show". 5. Select the TruTops Version to be restored from the left-hand
list. 6. Either
If a backup history exists: Mark the current backup copy from the "Backup history" list.
Select Restore. The data will be restored. On completion, an appropriate message appears on the screen. or
If no backup history or the TruTops database block is not (no longer) available: Select <select backup file> from the "Backup history" list.
Select Restore.
Restoring the database
Fig. 53434

C331EN 2010-03-11 12BData backup 63
The following mask is displayed:
"Restore from…" (version specifications can deviate)
7. Select the database: – Press the Browse… button next to the input field. – Go to the following directory:
'C:\TRUMPF.NET\SqlSrvDB\Backup\DBs\ Txxx_Vxx_Vxxx
– Select the current backup copy of the product database to be restored ('*.cbk').
– Select Open. All backup copies of this product database in the directory are displayed. – Mark the backup(s) desired (multiple selections are
possible).
Note The Create 'TruDBUser' option must be activated.
– Select OK. The data will be restored. On completion, an appropriate message appears on the screen.
Fig. 53435

64 13BAdditional information and auxiliary programs 2010-03-11 C331EN
12. Additional information and auxiliary programs
12.1 Starting the PDM migration manually
If the option "Start data transfer from PDM server immediately after setup" was deactivated during the installation of the PDM (see section 6, p. 30), the migration must be started manually after installation. Note The migration may take a very long time, depending on the data volume. The clients cannot access the server during this time.
Prerequisite • The virus scanners are deactivated.
1. Execute Start >Programs >TRUMPF.NET >PDM Administration >PDM Data Migration on the server computer.
2. Select a language and select OK. The migration tool starts. A message appears and the program stops if a migration has already been carried out. The program closes automatically after the successful migration procedure.
12.2 Modifying PDM file storage
The "PDM Change Repository" utility program is available for setting the PDM 2 file storage on another PC other than the PDM server PC.
Select >Start >Programs >Trumpf.NET >PDM Administration >PDM Change repository directory. The program starts. An Operator's manual is provided in the installation directory20.
20 <Drive>:\Trumpf.NET\ Applications\ PdmServer2\ Documentation\
PdmChangeRepository.pdf
Starting a program
Starting a program

C331EN 2010-03-11 13BAdditional information and auxiliary programs 65
12.3 Subsequently performing a database update
TruTops databases can also be updated directly after installation, without having to restart the entire installation again. Either all TruTops databases and applications can be updated, or data from individual applications can be transferred from an existing Access database. Prerequisite • The logged-on user is a member of the local administrator
group.
1. Insert the installation DVD. 2. Start the 'CommonDB\V[xx]\Setup\CommonDB.exe' file.
Available databases are searched for. The following message appears when TruTops database block update has been found:
Selecting a database update (version specifications can deviate)
3. Select the TruTops version for the update. Mark the version and select Yes to update all TruTops
databases and applications. or
Select No to transfer data from Access or individual SQL databases.
A message appears for each application whether data should be transferred.
Starting the database update
Fig. 53433

66 13BAdditional information and auxiliary programs 2010-03-11 C331EN
12.4 Copying and deleting machines
The "MachineCopy" program can be used to copy machines in TruTops (e.g. for testing different settings) or to delete already copied machines.
1. Start the file '%TOPS_DRIVE%\TRUMPF.NET \UTILS\DbTools\MachineCopy\MachineCopy.bat'.
2. Select language. The program starts.
3. Select the database in which machines are to be copied/deleted and select OK. The following mask is displayed:
4. Select the machine to be copied/deleted.
Note Machines of type 1 are standard machines of TruTops. These machines cannot be deleted.
5. Select Copy or Delete. The selected machine is copied/deleted. A message appears afterwards.
6. Select Terminate to close the program.
Starting a program
Fig. 51600en
Fig. 50677en

C331EN 2010-03-11 13BAdditional information and auxiliary programs 67
12.5 Merging materials
Before TruTops V1.0, the product databases of TruTops Laser and TruTops Punch were separate. It was possible for the same materials to be named differently in the two databases (e.g. "Stainless steel 1.4301" in ToPs 100 and "Stainless steel, 1.4301" in ToPs 300) due to the separate data management. Since the two databases have been merged from TruTops version 1.0 onwards, it is possible that there might be several entries in the common database for the same material. The "MaterialMergeTool" program can be used to find these double entries and allocate them to an existing material.
1. Start the '<TruTops drive>:\TRUMPF.NET\UTILS\DbTools\MaterialMergeTool\ MaterialMergeTool.exe' file on the client PC.
2. Select a language and select OK. The program starts.
All materials created in the database are listed in the left-hand column. All materials which you have created manually can be seen in the right-hand column.
3. Mark a material in the left column. The properties of the material are displayed in the bottom field.
4. Mark a material in the right-hand column. The properties of the material are displayed in the bottom field.
5. Compare the properties. 6. If both entries refer to the same material, mark the material to
be kept as entry in the left-hand column. 7. Mark the material in the right-hand column to be assigned the
material in the left-hand column. 8. Select the < button.
Starting a program
Fig. 50663en
Searching for redundant data
Assigning materials

68 13BAdditional information and auxiliary programs 2010-03-11 C331EN
The material from the right-hand column is displayed indented under the material in the left-hand column.
9. Assign all materials in this way. 10. Select Execute.
A summary of the assignments is displayed.
Note The assignment cannot be subsequently Undone. All assigned materials are deleted.
11. Check the assignments and then select OK. 12. The assignment is started.
Fig. 50664en
Fig. 50665en

C331EN 2010-03-11 13BAdditional information and auxiliary programs 69
12.6 Operating system and computer change during update
Changing the operating system
1. Install the new operating system and adapt it to TruTops (see document "Installation manual TruTops Products, Part 1: System prerequisites").
2. Install the new TruTops version as an update. The installation program makes all necessary adjustments during the normal update procedure.
Computer change File system mode - local database (MS Access) with old directory structure ("TRUMPF" tree)
A backup of the data on the old computer must be taken on a rewriteable medium (e.g. USB stick, CD-ROM) and it should then be copied to the new computer. 1. Copy the following directories:
– '<Drive>:\TRUMPF\ToPsX\' (ToPsX = previous name of your TruTops product)
– '<Drive>:\TRUMPF\Teile\' – '<Drive>:\TRUMPF\WZG\' – '<Drive>:\TRUMPF\ToPs_ZCH\' – '<Drive>:\TRUMPF\VORLAGEN\' – '<Drive>:\TRUMPF\MUSTER\'
Note The files and folders copied onto the new computer are not permitted to be write-protected.
2. Start the desired installation of the current TruTops version on the new computer (PDM, file system, server or client and server).
3. Activate expert mode for the product that is to be installed in the "Product integration" mask (see section 10.1, p. 46) .
4. As a basis for the update select the previously copied database21 and the copied files from the old computer.
Note If the current TruTops version is installed in the PDM mode and the job files are not saved in the TRUMPF directory, the files must either be imported into PDM via the PDM browser or
21 The database has the ending '*.mdb' and in the default settings is in the
directory: '<drive>:\TRUMPF\ToPsX\DB\' (ToPsX = previous name of your TruTops product).
Old computer
New computer

70 13BAdditional information and auxiliary programs 2010-03-11 C331EN
the PDM storage location must be changed (see section 12.2, S. 64).
The installation program makes all necessary adjustments during the update procedure.
5. If necessary install the current TruTops version on the clients. Computer change file system mode – local database (MS Access) with new directory structure ("TRUMPF.NET" tree)
1. Open the registry editor on the old computer. 2. Export the registration key
HKEY_LOCAL_MACHINE\SOFTWARE\Trumpf\ToPs<xxx> to the new computer in the file %TOPS_DRIVE%\TRUMPF.NET\TOPS<xxx>V<yyy>.reg (<xxx>,<yyy>=version code, e.g. TOPS100V600)
3. Copy the entire directory %TOPS_DRIVE%\TRUMPF.NET from the old computer to the new one. Note The files and folders copied onto the new computer are not permitted to be write-protected.
4. Update the registry: – Execute the registry file created under step 2 with a
double-click. The data is entered in the registry. – Open the registry editor. – Open the "HKLM\Software\TRUMPF" key. – Create a new entry "InstallDrive" of type "REG_SZ". – Enter the drive letter for TruTops installation in the new key
entry (e.g. : "C:"). 5. Change the ODBC shortcut:
– Open Control panel >Management >data sources (ODBC). – Create a new ODBC shortcut: – Assign the same name as on the old computer (e.g. for
ToPs 300 "T300_V45_V500") – Driver: MS Access Driver (*.mdb) – Data source:
'%TOPS_DRIVE%\TRUMPF.NET\Applications\tops<xxx>\db\T<xxx>_V<yy>_V<zzz>.mdb'
Old computer
New computer

C331EN 2010-03-11 13BAdditional information and auxiliary programs 71
6. Install the current TruTops version on the new computer as an update (optionally PDM, file system, server or server and client). The installation program makes all necessary adjustments during the normal update procedure.
Note If the current TruTops version is installed in the PDM mode and the job files are not saved in the TRUMPF directory, the files must either be imported into PDM via the PDM browser or the PDM storage location must be changed (see section 12.2, S. 64).
7. If necessary install the current TruTops version on the clients. Computer change file system mode – multi-user installation (client & server) with SQL Server database and new directory structure ("TRUMPF.NET" tree)
1. Create a backup for the individual product databases (Laser,
Punch, etc.): – Execute the scheduled task "TruToPs Databases Backup".
The created backups are in directory: '%TOPS_DRIVE%\TRUMPF.NET\Applications\SqlSrvDb\backup\dbs\'
2. Copy the entire directory '%TOPS_DRIVE%\TRUMPF.NET' excluding the subdirectories '\SqlSrvDb' and '\Applications' (if available) from the old server computer to the new one. Note The files and folders copied onto the new computer are not permitted to be write-protected.
3. Install the current TruTops version on the new server computer as an initial installation (file system, server or server and client).
4. Copy the backup databases (see step 1) from the old server computer onto the new one.
5. Restore the backup product databases on the new computer (see section 11.4, p. 62) .
6. Update the product database (see section 12.3, p. 65).
Old server computer
New server computer

72 13BAdditional information and auxiliary programs 2010-03-11 C331EN
Note If the current TruTops version is installed in the PDM mode and the job files are not saved in the TRUMPF directory, the files must either be imported into PDM via the PDM browser or the PDM storage location must be changed (see section 12.2, S. 64).
7. Update all clients. Computer change in PDM mode: update from PDM 1 to PDM 2
Prerequisite • A user defined installation must be performed in order to
change computers. A password, which can be obtained from TRUMPF CAD/CAM Service, is required to do this.
• The logged-on user is a member of the local administrator group.
• Any virus scanners installed are deactivated. 1. Run an initial installation of the current TruTops version on the
new computer (server or server+client). 2. Copy the PDM 1 file storage22 from the old computer to any
directory on the new computer. 3. Select >Start >Programs >TRUMPF.NET >MS SQL Server
Tools >Backup & Restore DB. The backup program is started.
4. Select the TRUMPF server instance. 5. Select OK.
The backup program is opened.
Backup program (display can deviate)
6. In the left-hand field select the database TPDM_V01_V001 and the right-hand field select the entry <custom>.
22 PDM file storage: <drive>:\TRUMPF.NET\PDM_Data
New server computer
Old server computer
Fig. 54231

C331EN 2010-03-11 13BAdditional information and auxiliary programs 73
7. Select Backup . A message appears in which you can enter where the backup file is to be saved.
8. Enter the storage location and select Save. The backup procedure will be started. On completion, an appropriate message appears on the screen.
9. Create a backup of the individual product databases (see section 11.4, p. 62).
10. Restore the backup PDM 1 database on the new computer (see section 11.4, p. 62).
11. Create a new ODBC entry23 for the PDM 1 database with the following properties on the new computer: – Type: System DSN – Driver: "SQL Server". – Name: Name of the PDM database
(e.g. "TPDM_V01_V001") – Server: "[Computer name]\TRUMPF"
(TRUMPF SQL instance) – Authentication: Windows NT authentication – Standard database: Name of the PDM database
(e.g. "TPDM_V01_V001"). 12. Select >Start >Programs >Microsoft SQL Server 2005
>SQL Server Management Studio.
Note This program must be started with the "Run as administrator…" option for Windows Vista.
SQL Server Management Studio
13. Select PDM 1 database (TPDM_V01_V001). 14. In the "Config" table change the entry "DATA_ROOT" to the
directory into which the PDM data was copied (step 2). 15. Close SQL-Server Management Studio. 16. Open the registry editor.
23 >Start >Settings >Control panel >Management >Data sources (ODBC)
New server computer
Fig. 54232
74 13BAdditional information and auxiliary programs 2010-03-11 C331EN
17. Recreate the following keys: – Key: HKLM\SOFTWARE\Trumpf\Migration Tool – Entry: MigrationState – Type: REG_SZ – Value: 2
Registry key
18. Select >Start >Programs >TRUMPF.NET >PDM Administration >PDM Data Migration. If the message "Windows service ToPsPDM cannot be completed", acknowledge the message with OK Data migration will begin. After successful completion, an appropriate message will appear on the mask.
19. Restore the backup product databases on the new computer (see section 11.4, p. 62).
20. Perform a subsequent product database update (see section 12.3, p. 65).
21. Restart TruTops installation with the previously selected configuration.
22. In the "Predecessor version" mask, select Update and follow the installation wizard instructions.
23. After terminating the installation wizard wait until the installation manager appears.
24. Press <Ctrl>+<A>. The installation manager menu bar will be active.
25. Select user defined and enter the password obtained from TRUMPF CAD/CAM-Service.
26. In the installation manager only select the "Applications for TruTops" components.
Installation manager (display can deviate)
Fig. 54233
Fig. 54234en
C331EN 2010-03-11 13BAdditional information and auxiliary programs 75
27. Select Start. The installation begins. After completing installation, exit the installation manager via Close. The installation of the server is now complete.
28. If necessary update all client computers. 12.7 Installing Microsoft Loopback Adapter
TruTops constantly requires an active network due to its system architecture. If TruTops is to be operated without a network connection (e.g. on one Notebook), the Microsoft Loopback Adapter that simulates an existing network must be installed. The loopback adapter belongs to the standard scope of Windows. 1. To install, start the wizard for adding new hardware:
– Windows XP: Select >Control panel >Hardware. – Windows Vista: Select >Control panel >Classic view >Add
hardware. – Windows 7: Select >Start >Devices and printers >Add
device. 2. Install the following new hardware with the aid of the wizard:
– Category: Network adapter – Manufacturer: Microsoft – Device: Microsoft Loopback Adapter
12.8 Managing licenses (network dongle)
The "Aladdin Monitor" program can be used to manage TruTops licenses with a network dongle. It is automatically installed during the installation of the TruTops Server. This program can be used to display all the currently installed licenses and to install new ones.
Aladdin Monitor

76 13BAdditional information and auxiliary programs 2010-03-11 C331EN
Displaying existing licenses
1. Select Start >Programs >Aladdin >Monitor >AKS Monitor on the TruTops Server. The program starts.
2. Select the TruTops Server computer in the left navigation bar under "HL server".
TruTops Server
3. Enter the number 21456 in the "Module address" field and press Add.
Module address
The module "21456" is displayed under the PC name.
Module 21456
4. Select the module "21456".
All license information concerning the module will be displayed.
License information
Each TRUMPF product licensed via the network dongle is assigned to a so-called "slot" on the dongle. The numbers of the slots are in the "Slot" column. The "Licenses" column contains the licenses available for the relevant slot and the "Used" column contains the licenses that have already been used.
Starting the license monitor
Fig. 38739
Entering the module address
Fig. 38740
Fig. 38933
Selecting the module
Fig. 38934

C331EN 2010-03-11 13BAdditional information and auxiliary programs 77
For encoding the slot numbers for the relevant TRUMPF products, see page 78. Installing new licenses
The following files are delivered by TRUMPF when ordering new licenses: • A file with the extension '*.vtc'.
Contains the license information for the network dongle. • 'tops_pwd' file.
Contains the new password information for TruTops. Both the files must be kept ready for the installation of new licenses. 1. Display the existing licenses in the Aladdin Monitor (see
previous section). 2. Press the Update button under the license information list.
The following dialog box is displayed:
License update
3. Select the "from file" option under "Write License Update (VTC) to Hardlock".
4. Select the new license file ('*.vtc') using the "..." button. 5. Press Write License Update.
The new licenses will be installed. 6. Press Done.
The dialog box is closed. 7. Copy the new file 'tops_pwd' onto the TruTops Server in the
folder '<Drive>:\TRUMPF.NET\Licenses\'. Overwrite the old file.
Slot assignment
Installing new licenses
Fig. 38935
Copying the 'tops_pwd' file
78 13BAdditional information and auxiliary programs 2010-03-11 C331EN
Slot assignment
The following table shows the slot assignment on the network dongle:
Slot number Slot designation
10 TOPS
10 TOPS100
15 TOPS100_LITE
20 TOPS150
25 TOPSCAD
30 TOPS200
35 TOPS200_LITE
40 TOPS250
45 TOPS250_LITE
46 TOPS300
47 TOPS300_LITE
48 TOPS300_BASIC
50 TOPS400
55 TOPS600
57 TOPS800
58 TOPS900
59 TOPS1000
60 IGES
65 SVG
70 DXF
75 DWG
80 MI
85 DSTV
86 GMV
90 FRNEST
91 TILE_NEST
92 TOPS_NEST
95 NEST_GMT
96 ORDER_IFACE
100 SIMILAR_SHEET
110 GTS
120 GTS150
130 HPGL
140 DIGIT
150 TRANSFER

C331EN 2010-03-11 13BAdditional information and auxiliary programs 79
Slot number Slot designation
155 MICROWELD
156 TUBEPROFILE
157 VECTORIZE
160 PP
170 FMC
172 GRIP
174 SORT
175 LIFTMASTER
176 SORTMASTER
180 AUTOTEC
190 API
195 NETWORK_DB
200 NC_EXPORT
201 SHA_EXPORT
205 AUTO_BEND
206 CALC_BEND
207 TOPS_UNFOLD
208 NC_CYBELEC_CONVERTER
209 BATCH_BEND
210 TUBE_DESIGN
211 TUBE_POS_AIDS
212 TUBE_INTERFACE_3D
213 TUBE_BENT_CONNECTION
220 MEASURING
230 PDM
240 TOPS900_EXPERT
241 TOPS900_CUSTOM
250 TOPS1000_CLIENT
260 TOPS1000_QUICKJOB
261 TOPS1000_TC_MACHINE_ONLINE
262 TOPS1000_TC_MACHINE_OFFLINE
263 TOPS1000_MACHINE_ONLINE
264 TOPS1000_PART_SEPARATION
265 TOPS1000_RAW_MAT_MANAGEMENT
266 TOPS1000_TC_CELL_INTERFACE
267 TOPS1000_LABELPRINT
270 TOPS1000_PRODUCTION
271 TOPS1000_SUB_ASSEMBLY
272 TOPS1000_PURCHASING

80 13BAdditional information and auxiliary programs 2010-03-11 C331EN
Slot number Slot designation
273 TOPS1000_STORAGE
274 MONITOR
280 TOPS1000_CUSTOMER
300 TIMS
400 SLM
500 NC_CONVERTER
505 ABC_TOOL
550 SOFTLOCK
555 CALCULATION
560 LABELPRINT
600 TQ_OFFLINE
601 ASCONA_REF
602 ASCONA_MES
603 ASCONA_DXF
701 TOPS800_EDU
705 LASER_3D
706 VORRICHTUNGSBAU
707 CATIA_V42_READ
708 CATIA_V42_WRITE
709 IGES_3D_READ
710 IGES_3D_WRITE
711 VDAFS_READ
712 VDAFS_WRITE
713 CATIA_V50_READ
714 CATIA_V50_WRITE
715 WELDING_3D
716 DMD
717 TLC
718 KUKA
719 ABB
720 MOTOMAN
721 REIS
722 STAEUBLI
723 FANUC
724 KAWASAKI
725 STEP_READ
726 STEP_WRITE
Slot assignment
Table 3

C331EN 2010-03-11 13BAdditional information and auxiliary programs 81
12.9 Automatic services
The following automatic services are created during the installation of TruTops via the Windows function "Planned Tasks" (Windows XP/2003), or "Task planning" (Windows Vista/7/2008): • TruTops Databases Backup
Starts the backup of the TruTops databases (see section 11.2, p. 58) .
• TruTops PDM Full Backup Starts the backup of the PDM database (see section 11.1, p. 51) .
• TruTops PDM Synchronize Directories Starts an alignment of the PDM database with the PDM file storage. Any inconsistencies which may be found will be recognized and eliminated. The service can run parallel with regular operations, although power losses could occur for the PDM service.
• TruTops PDM Cleanup Temp Directories Clears the temporary PDM directory of unnecessary files.
The time at which a service is run is pre-assigned a default value. All of the times should be selected in such a way that the computer is switched on at this time and operations are not disrupted.
Time of execution

82 13BAdditional information and auxiliary programs 2010-03-11 C331EN
Index
A Adobe Reader ...............................................13 Adobe SVG Viewer........................................13 Applications for TruTops................................13
C Changing a computer ....................................69 Changing the operating system.....................69 Common DB ............................................13, 65 Conversion • File system to PDM.................................48 • PDM to file system ..................................50 Copying machines .........................................66
D Data backup ..................................................51 • PDM data ................................................51 • TruTops...................................................61 • TruTops version ......................................58 Database update ...........................................65 Deleting machines .........................................66 Demo version ................................................16 Dongle ...........................................................13 Dongle server ..........................................13, 14 Dongle server monitor ...................................13 Drive letter .....................................................34
E Expert mode ..................................................46
F FirePDM.........................................................15 Firewall ..........................................................20
G GeoViewer .................................................... 13
I Initial installation • Client + server file system (single
workstation) ............................................ 40 Installation variants ....................................... 10
J Java .............................................................. 13
L Licenses........................................................ 75 • displaying................................................ 76 • Installing ................................................. 77 Long-term backup......................................... 57
M Machine transfer directory ............................ 30 Material merge tool ....................................... 67 Merging materials ......................................... 67 Microsoft Loopback Adapter ......................... 75 Migration, PDM ............................................. 64 Modifying the PDM file storage..................... 64 MS SQL Server 2005.................................... 13 MS SQL Server 2005 SP2............................ 13 MS SQL Tools............................................... 13 Multi-user workstation................................... 10

C331EN 2010-03-11 13BAdditional information and auxiliary programs 83
N NcLink............................................................13 New installation • Client + server file system (multi-user) ...38 • Client file system.....................................36 • File system..............................................34 • Server file system....................................34 Notebook .......................................................75
O Online Support...............................................13
P Password.................................................13, 15 Password entry..............................................15 Password file server ......................................16 Password Server ...........................................13 PDM browser 2..............................................13 PDM Change Repository...............................64 PDM client .....................................................24 PDM Data Migration ......................................64 PDM database...............................................13 PDM initial installation ...................................19 • PDM client...............................................24 • PDM server + client.................................26 PDM new installation • PDM server .............................................22 PDM server....................................................22 PDM server 2.................................................13
R Remote Desktop............................................19 Restoring data ...................................54, 55, 62
S Scheduled tasks...................................... 53, 59 Single workstation......................................... 11 Slot assignment ............................................ 78 Special installation ........................................ 46 Status, data backup ...................................... 54 Storage location • PDM data................................................ 52 • TruTops .................................................. 58 System components ..................................... 12
T Terminal Server ............................................ 19 Transfer directory.......................................... 30 TRUMPF Database Backup ......................... 13 TruTops......................................................... 13 TruTops Bend ............................................... 20 TruTops Cell ................................................. 20 TruTops Common Libraries .......................... 14 TruTops Convert ........................................... 14 TruTops Tube ............................................... 22 TubeLink ....................................................... 14
U Uninstallation ................................................ 45 Update • Client file system .................................... 43 • File system ............................................. 42 • PDM 1->2 ............................................... 30 • PDM 2->2 ............................................... 28 • Server file system................................... 42
V VC++ Redist Libs .......................................... 14 Versions .......................................................... 5