installation manual · before installing forex gump on your computer and commencing trading on a...
TRANSCRIPT

www.forexgump.eu
Copyright © 07/09/2018 1
Installation Manual
& User’s Guide
Forex Gump EA

www.forexgump.eu
Copyright © 07/09/2018 2
Welcome to Forex Gump!
Before installing Forex Gump on your computer and commencing trading on a real
account, read this carefully: it may be crucial for your future profits. Trading Forex
entails risk and each instance of negligence or inattention may lead to significant
loss!
We strongly recommend that you operate a demo account before trading with real
money. This will help you become familiar with the way Forex Gump operates
before you commit genuine funds to a real money account.
REQUIRMENTS AND RECOMMENDATIONS:
Forex Gump EA works on pairs: AUDUSD, EURCHF, EURGBP, EURJPY, EURUSD,
GBPUSD, USDCAD, USDCHF and USDJPY. Minimal needed deposit for currency
pairs is $4000 or $40 a micro(cent) account with lot 0.01. Recommended leverage is
1:100 and higher. Time frame of the EA is M1.
Manual Installation: https://youtu.be/pLL6d0eWIKM (VIDEO)
First you need to locate your Application Data folder of the MT4. To do this, go to the File menu in the MT4 platform and click on "Open Data Folder".
www.forexgump.eu
Copyright © 07/09/2018 3
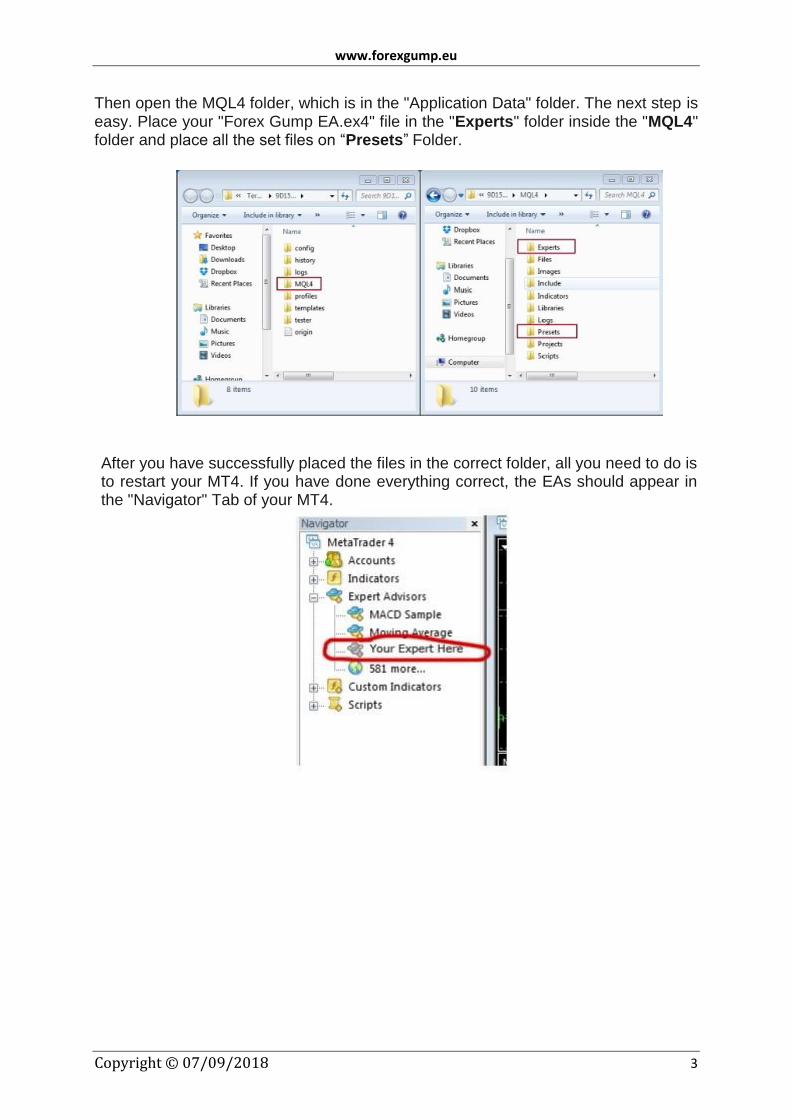
Then open the MQL4 folder, which is in the "Application Data" folder. The next step is easy. Place your "Forex Gump EA.ex4" file in the "Experts" folder inside the "MQL4" folder and place all the set files on “Presets” Folder.
After you have successfully placed the files in the correct folder, all you need to do is to restart your MT4. If you have done everything correct, the EAs should appear in the "Navigator" Tab of your MT4.

www.forexgump.eu
Copyright © 09/08/2018 4
Robot Setup:
Launch your MetaTrader4 Platform.
1. Create a new pairs 2x AUDUSD, 2x EURCHF, 2x EURGBP, 2x EURJPY, 2x
EURUSD, 2x GBPUSD, 2x USDCAD, 2x USDCHF and 2x USDJPY and Set it
to M1.
2. Use your mouse to drag the Forex Gump robot onto the chart.

www.forexgump.eu
Copyright © 09/08/2018 5
3. For each pair you need to set Only Long (buy trades). For example
EURUSD M1 - Only Long
4. For each pair you need to set Only Short (sell trades). For example
EURUSD M1 - Only Short

www.forexgump.eu
Copyright © 09/08/2018 6
5. The Expert Advisor Properties Page will open.
Verify all Common Settings are as shown above.
6. The Expert Advisor Inputs:

www.forexgump.eu
Copyright © 09/08/2018 7
Name_EA: The Expert Advisor Name
License: Locate in email: License that we sent as part of your installation package.
We use an expiration date to help secure the robot against piracy. If you are a
legitimate registered user, you will receive a replacement email before the expiration
date, if a new version update is not issued before then. Copy and Paste the number
into the License field of the Inputs tab as shown above.
Magic: A unique random Magic Number enables Forex Gump to distinguish its open
trade positions from those that were entered by other robots, or done manually. Any
number is acceptable as long is not the same number used by any other robot
running on this MetaTrader Platform. We recommend you change this number to
any other number to help hide the identity of your robot from your broker-dealer.
FirtsLot: Size of the first open lot.
Recommended Lot Size based upon the account balance.
Min. $Balance Std. Lot Size
4,000 0.01
8,000 0.02
40,000 0.1
80,000 0.2
160,000 0.4
Multi: Used to calculate lot size for next position.
Step: Dynamic step between individual trades in points. TakeProfit: Dynamic take profit all orders (in pips)
Slippage: Maximum difference between the order & fill price granted to the broker.
OpenOrdersLimit: limit the number of open orders
SafeEquityStopOut: (true/false option)
SafeEquityRisk: determines if Forex Gump closes all open trades when a
percentage of the account equity is in a floating loss.
www.forexgump.eu
Copyright © 09/08/2018 8
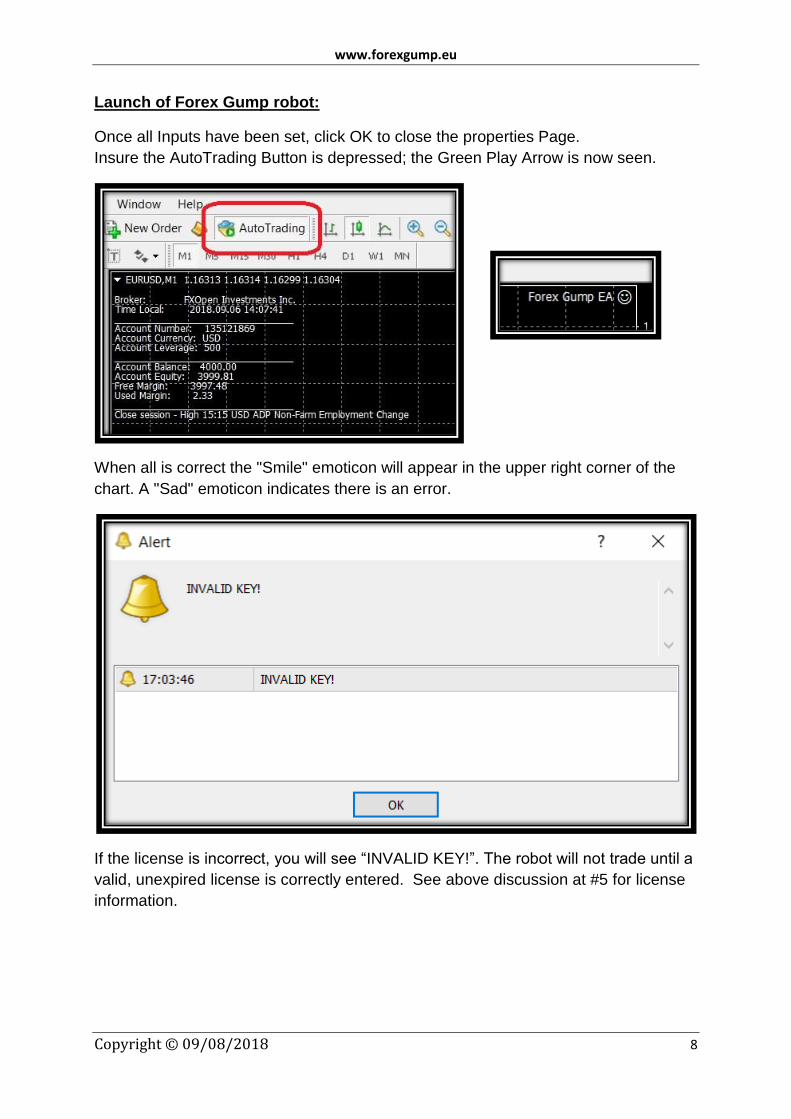
Launch of Forex Gump robot:
Once all Inputs have been set, click OK to close the properties Page.
Insure the AutoTrading Button is depressed; the Green Play Arrow is now seen.
When all is correct the "Smile" emoticon will appear in the upper right corner of the
chart. A "Sad" emoticon indicates there is an error.
If the license is incorrect, you will see “INVALID KEY!”. The robot will not trade until a
valid, unexpired license is correctly entered. See above discussion at #5 for license
information.
www.forexgump.eu
Copyright © 09/08/2018 9
In after reading this manual you have unanswered questions or
issues regarding the Forex Gump system, please contact us at
the following e-mail address:
We wish you Happy & Successful Trading!