installation instructions - westin automotive · installation instructions automotive products,...
TRANSCRIPT

1
Westin Automotive Products, Inc. 320 W. Covina Blvd San Dimas, Ca. 91773
Thank you for choosing Westin products for additional installation assistance please call
Customer Service (800) 793-7846 www.westinautomotive.com
P.N.: 75-0800-RevG ECO #: W17-0027 DATE: 3/15/17
INSTALLATION INSTRUCTIONS
AUTOMOTIVE PRODUCTS,
ITEM QUANTITY DESCRIPTION TOOLS NEEDED
1 1 ULTIMATE BULL BAR 18MM SOCKET
2,3 2 MOUNTING BRACKET, PASSENGER (2) AND DRIVER (3) SOCKET EXT.
4 2 PLASTIC PLUG 15MM SOCKET
5 4 RUBBER BUMPER 9/16” SOCKET
6 2 U-BOLT 9/16” WRENCH
7 4 3/8-16 X 1.25” HEX HEAD BOLT (STAINLESS STEEL) 13MM WRENCH
8 8 3/8” SAE FLAT WASHER (STAINLESS STEEL) RATCHET
9 4 3/8” USS FLAT WASHER (STAINLESS STEEL) TORQUE WRENCH
10 8 3/8” LOCK WASHER (STAINLESS STEEL)
11 8 3/8-16 HEX NUT (STAINLESS STEEL)
12 1 LED WIRING HARNESS (09-12000-1)
ANTI-SEIZE LUBRICANT MUST BE USED ON ALL STAINLESS STEEL FASTENERS TO PREVENT THREAD DAMAGE AND GALLING
ULTIMATE BULL BAR
APPLICATION:
2003-2014 Ford Expedition
2007-2014 Ford Expedition EL
2003-2014 Lincoln Navigator L 2/4WD
2009-2014 Ford F-150
2015-2017 Ford F-150
PART NUMBER:
32-2400, 32-2405, 32-2450, 32-2455, 32-2450L, 32-2455L, 32-2400L, 32-2405L
CARE INSTRUCTIONS
REGULAR WAXING IS RECOMMENDED. DO NOT USE ANY TYPE OF POLISH OR WAX THAT MAY CONTAIN ABRASIVES.
STAINLESS STEEL PRODUCTS CAN BE CLEANED WITH MILD SOAP AND WATER. STAINLESS STEEL POLISH SHOULD BE USED TO POLISH SMALL SCRATCHES.
GLOSS BLACK FINISHES SHOULD BE CLEANED WITH MILD SOAP AND WATER.
32-2400 / 32-2405 / 32-2450 / 32-2455 32-2400L, 32-2405L / 32-2450L, 32-2455L ITEM 1
ITEM 2 ITEM 3
ITEM 6
2
Westin Automotive Products, Inc. 320 W. Covina Blvd San Dimas, Ca. 91773
Thank you for choosing Westin products for additional installation assistance please call
Customer Service (800) 793-7846 www.westinautomotive.com
P.N.: 75-0800-RevG ECO #: W17-0027 DATE: 3/15/17
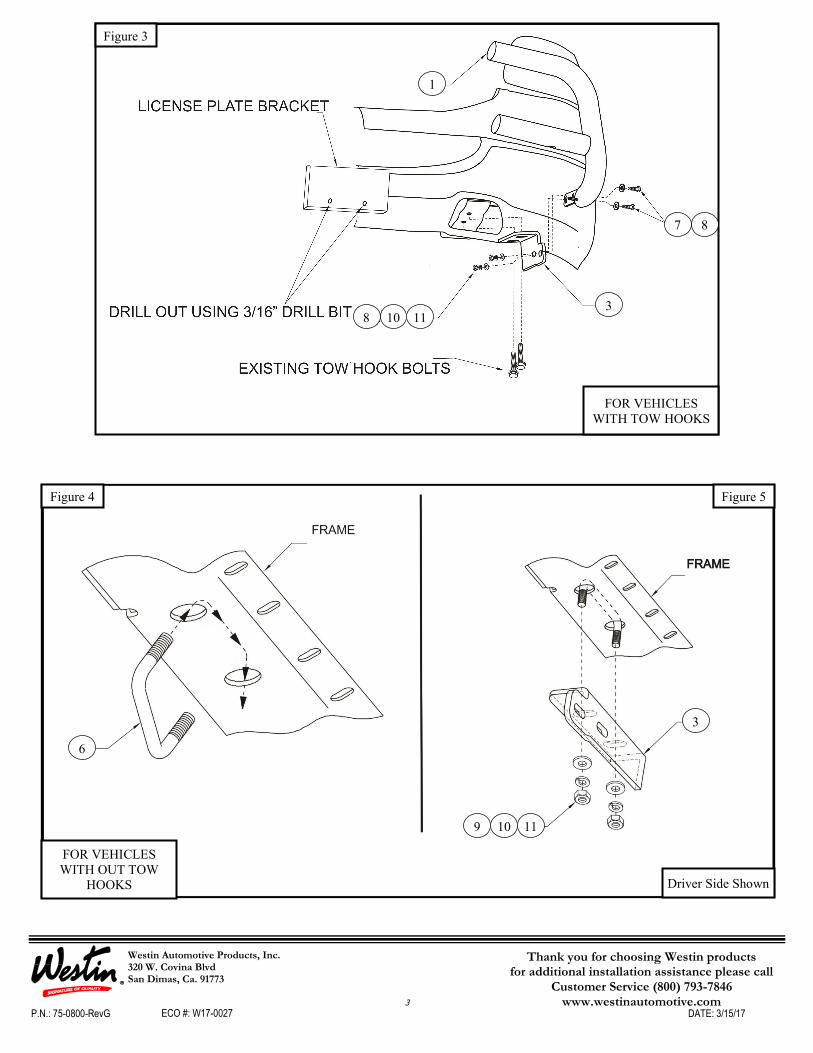
2. It will be necessary to remove the front license plate and bracket. Remove license plate from bracket. Using a 3/16” drill
bit, drill out the two pop rivets that hold the bracket to the bumper. If local/state laws requires a license plate, license plate
relocation kit 32-0055 is available. Note: It is usually easier to install relocator to Bull Bar before installing Bull Bar to
vehicle.
3. For vehicles with factory tow hooks remove tow hooks by removing front and rear bolts. Note: Tow hooks will not
be reinstalled. Make sure nut plate in frame stays aligned with holes.
4. For vehicles with factory tow hooks position bottom bracket up to bottom of frame and replace tow hook bolts. At-
tach brackets to frame using the existing tow hook bolts. See Figure 3.
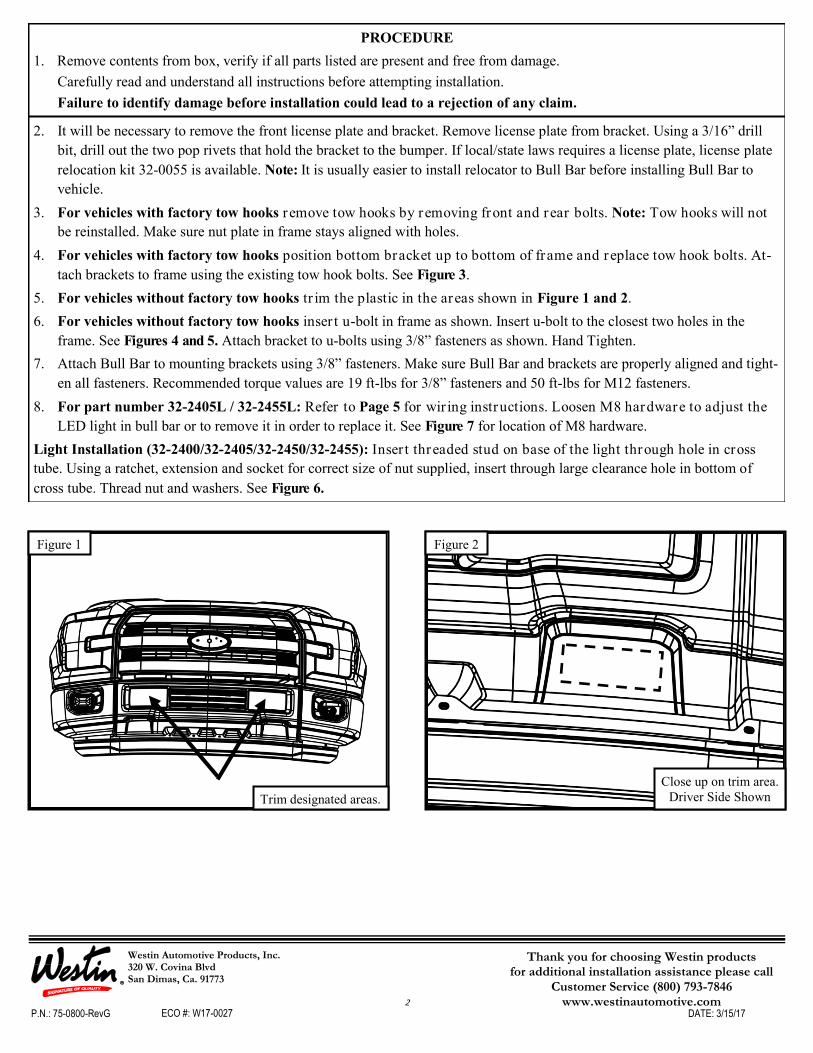
5. For vehicles without factory tow hooks tr im the plastic in the areas shown in Figure 1 and 2.
6. For vehicles without factory tow hooks inser t u-bolt in frame as shown. Insert u-bolt to the closest two holes in the
frame. See Figures 4 and 5. Attach bracket to u-bolts using 3/8” fasteners as shown. Hand Tighten.
7. Attach Bull Bar to mounting brackets using 3/8” fasteners. Make sure Bull Bar and brackets are properly aligned and tight-
en all fasteners. Recommended torque values are 19 ft-lbs for 3/8” fasteners and 50 ft-lbs for M12 fasteners.
8. For part number 32-2405L / 32-2455L: Refer to Page 5 for wir ing instructions. Loosen M8 hardware to adjust the
LED light in bull bar or to remove it in order to replace it. See Figure 7 for location of M8 hardware.
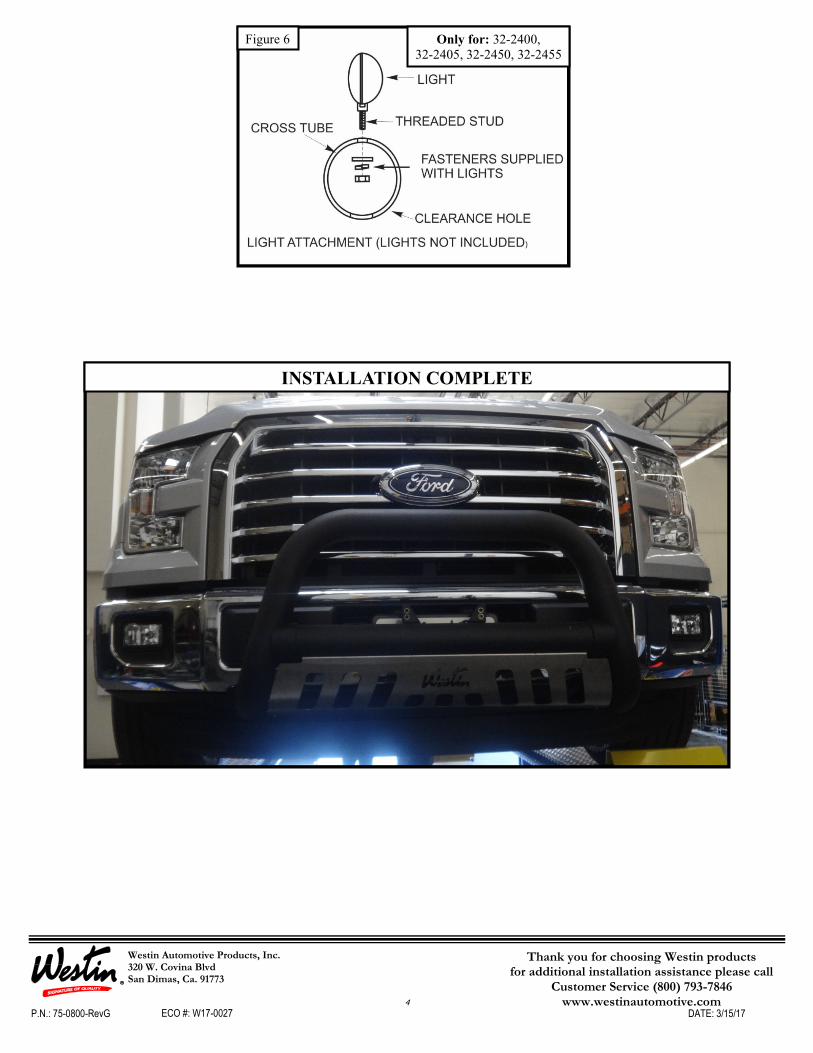
Light Installation (32-2400/32-2405/32-2450/32-2455): Inser t threaded stud on base of the light through hole in cross
tube. Using a ratchet, extension and socket for correct size of nut supplied, insert through large clearance hole in bottom of
cross tube. Thread nut and washers. See Figure 6.
PROCEDURE
1. Remove contents from box, verify if all parts listed are present and free from damage.
Carefully read and understand all instructions before attempting installation.
Failure to identify damage before installation could lead to a rejection of any claim.
Figure 2
Close up on trim area.
Driver Side Shown
Figure 1
Trim designated areas.
3
Westin Automotive Products, Inc. 320 W. Covina Blvd San Dimas, Ca. 91773
Thank you for choosing Westin products for additional installation assistance please call
Customer Service (800) 793-7846 www.westinautomotive.com
P.N.: 75-0800-RevG ECO #: W17-0027 DATE: 3/15/17
Figure 4 Figure 5
FOR VEHICLES
WITH OUT TOW
HOOKS Driver Side Shown
6
3
11 10 9
Figure 3
FOR VEHICLES
WITH TOW HOOKS
8 7
11 10 8
1
3
4
Westin Automotive Products, Inc. 320 W. Covina Blvd San Dimas, Ca. 91773
Thank you for choosing Westin products for additional installation assistance please call
Customer Service (800) 793-7846 www.westinautomotive.com
P.N.: 75-0800-RevG ECO #: W17-0027 DATE: 3/15/17
INSTALLATION COMPLETE
Figure 6 Only for: 32-2400,
32-2405, 32-2450, 32-2455

5
Westin Automotive Products, Inc. 320 W. Covina Blvd San Dimas, Ca. 91773
Thank you for choosing Westin products for additional installation assistance please call
Customer Service (800) 793-7846 www.westinautomotive.com
P.N.: 75-0800-RevG ECO #: W17-0027 DATE: 3/15/17
WIRING INSTRUCTIONS FOR 32-2455L AND 32-2405L:
WESTIN recommends using a professional for this installation.
CAUTION:
1. Disconnect ground connection from battery (-) to avoid accidental short circuits before attempting to connect electrical
wires.
2. When running wires, avoid areas of excessive heat, vibration, pinch or rotation when securing harness to vehicle.
3. Always use a fused (+) positive supply source.
4. This light becomes hot under continuous use. Do not remove or touch the casting for at least 30 minutes after the lamp has
been turned off.
Refer to Figure 8.
1. Locate wiring harness and mount the switch in a convenient location where it is easily accessible from the drivers seat.
Note: The switch will need to be removed from the wiring harness so that the rest of the harness can be routed from
the engine bay to the cabin.
2. Route the wiring harness wire, specifically the fuse and relay, from the positive battery terminal along the firewalls exist-
ing wire routes. Note: Tape as necessary to correct slack.
3. Secure the relay by either drilling or using a pre-existing bolt along the chassis that is not connected to any other wire.
4. Run the switch harness through the firewall preferably through the pre-existing rubber plug that is used to run the OEM
wiring harness from the engine bay to fuse box. Note: Reconnect the switch to the wiring harness.
5. Place the LED plug wire along the fender chassis where it will not get pinched and away from any moving parts (fan, pul-
leys etc.).
6. Run the attached wire from the LED Light Bar as previously mentioned away from any moving parts.
7. Connect both ends of wiring connectors from LED light bar and wiring harness.
8. Re-connect battery terminals, attach the Red (+) wire to battery positive, and the black (-) wire to ground. Note: Add die-
lectric grease (not supplied).
9. Turn on the switch to make sure if the lamp works. If not, please check carefully if the wiring installation is correct.
BatteryFuse
LED Light
RELAY 12V
Red(+)
White(+)
Red(+)
Black(-)
Black(-)
Blu
e(-)
Figure 8
Chassis Ground Figure 7
M8 hardware attaches LED light onto bull bar.

6
Westin Automotive Products, Inc. 320 W. Covina Blvd San Dimas, Ca. 91773
Thank you for choosing Westin products for additional installation assistance please call
Customer Service (800) 793-7846 www.westinautomotive.com
P.N.: 75-0800-RevG ECO #: W17-0027 DATE: 3/15/17
Failure to follow these instructions could lead to death, personal injury, and / or property damage.
FASTENERS: All Westin supplied fasteners must be utilized and installed in accordance with the installation in-structions and apply torque to the specifications as defined. DOUBLE CHECK ALL FASTENERS BEFORE INITIAL USE, AND PERIODICALLY IN THE FUTURE TO ENSURE PROPER FUNCTION AND SAFETY. DRILLING: Most Westin products do not require drilling for installation. If drilling is defined as required, use caution when drilling a vehicle. FAILURE TO REVIEW AN AREA TO BE DRILLED MAY RESULT IN PERSONAL INJURY AND/OR INJURY TO OTHERS AS WELL AS VEHICLE DAMAGE. EYE PROTECTION: ALWAYS WEAR SAFETY GLASSES OR GOGGLES DURING THE INSTALLATION PROCESS TO AVOID PERSONAL INJURY.
MAXIMUM TOWING/CARRYING CAPACITY: The Westin Receiver Hitches will have a visible tow rating label affixed directly on the product. Us-er should never exceed the vehicle manufacturers maximum tow and weight rating regardless of the capacity of the hitch. FAILURE TO FOLLOW THESE GUIDELINES WILL VOID THE WESTIN WARRANTY AND MAY RESULT IN PERSONAL INJURY AND/OR INJURY TO OTHERS AS WELL AS VEHICLE DAMAGE.
WARNING
AUTOMOTIVE PRODUCTS, INC.