installation instructions for sf331 colorado springs 6 ... · 2 visser l’ampoules dans les...
TRANSCRIPT
1
Installation Instructions for
Colorado Springs 6 Light Semi Flush Mount 1.0
SF331
Ceiling
SF331
G P I :ENERAL RODUCT NFORMATION
These fixtures are intended to be installed utilizing compliantNECjunction boxes.
This product is safety listed for damp locations.
This instruction shows a typical installation.
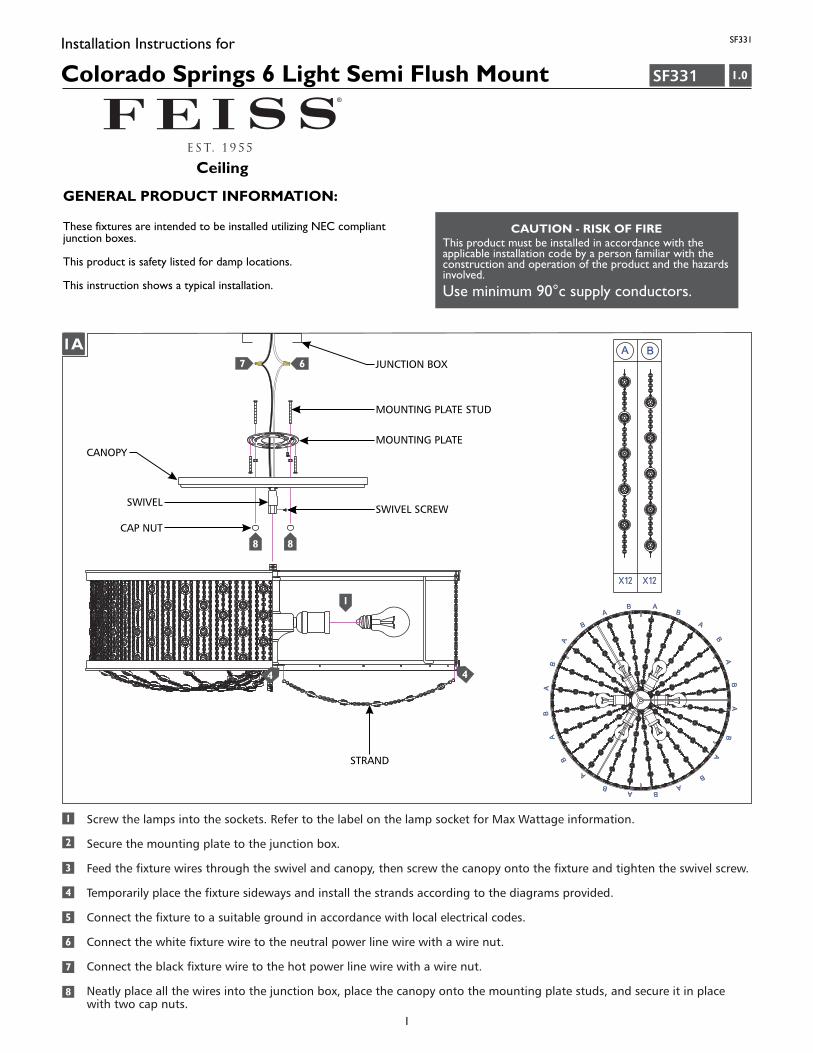
Screw the lamps into the sockets. Refer to the label on the lamp socket for Max Wattage information.
Secure the mounting plate to the junction box.
Feed the fixture wires through the swivel and canopy, then screw the canopy onto the fixture and tighten the swivel screw.
Temporarily place the fixture sideways and install the strands according to the diagrams provided.
Connect the fixture to a suitable ground in accordance with local electrical codes.
Connect the white fixture wire to the neutral power line wire with a wire nut.
Connect the black fixture wire to the hot power line wire with a wire nut.
Neatly place all the wires into the junction box, place the canopy onto the mounting plate studs, and secure it in placewith two cap nuts.
1
2
1A
3
CAUTION RISK OF FIRE-This product must be installed in accordance with theapplicable installation code by a person familiar with theconstruction and operation of the product and the hazardsinvolved.
Use minimum 90°c supply conductors.
4
5
6
CAP NUT
STRAND
CANOPYMOUNTING PLATE
MOUNTING PLATE STUD
JUNCTION BOX
7
8
8
SWIVELSWIVEL SCREW
7 6
8B
AB
A
B
A
BA B
A
B
A
BA
B
A
B
A
BAB
A
B
A
B
X12
A
X12
44
1

2
Visser l’ampoules dans les douilles. Reportez-vous à l'étiquette sur la douille de lampe pour obtenir des informations Max
Puissance.
Fixez la plaque de montage à la boîte de jonction.
Nourrir les fils de luminaire à travers le pivot et la dais, puis vissez la dais sur le luminaire et serrer la vis de pivot.
Placez temporairement le luminaire sur le côté et installer les brins selon les schémas fournis.
Connectez le luminaire à un terrain approprié conformément aux codes électriques locaux.
Connectez le fil blanc de luminaire au fil de la ligne d'alimentation neutre avec un écrou de fil.
Connectez le fil noir de luminaire au fil de la ligne d'alimentation chaude avec un écrou de fil.
Soigneusement placer tous les fils dans la boîte de jonction, placer la dais sur les goujons de montage et fixez-le en place
avec deux écrous capuchon.
MISE EN GARDE RISQUE INCENDIE- D'Ce produit doit être installé selon le code d’installation pertinent ,par une personne qui connaÎt bien le produit etson fonctionnement ainsi que les risques inhérents
Les fils d’alimentation doivent convenir pour 90°c.
1
2
3
4
5
6
ECROU CAPUCHON
DAISPLAQUE DE MONTAGE
GOUJON DE MONTAGE
BO TE DE JONCTIONÎ
7
8
PIVOTVIS DE PIVOT
1A
BRIN
8
7 6
8
BA
B
A
B
A
BA B
A
B
A
BA
B
A
B
A
BAB
A
B
A
B
X12
A
X12
44
1

3
Atornille las bombillas en los enchufes. Consulte la etiqueta en el casquillo de la lámpara para obtener información Max
Potencia.
Fije la placa de montaje a la caja de conexiones.
Pase los cables de la lámpara a través del giratorio y dosel, luego atornille el dosel en la lámpara y apriete el tornillo
giratorio.
Temporalmente coloque la lámpara de lado y instalar las hebras de acuerdo con los diagramas proporcionados.
Conecte la lámpara a una tierra adecuada, de acuerdo con los códigos eléctricos locales.
Conecte el cable blanco de la lámpara al cable de línea de energía neutra con una tuerca de cable.
Conecte el cable negro de la lámpara al cable de línea eléctrica caliente con una tuerca de cable.
Coloque cuidadosamente todos los cables en la caja de junctura, coloque el dosel en los esparragos de montaje y seguro
en su lugar con dos tuercas capuchon.
ADVERTENCIA RIESGO DE INCENDIO-Este productor debe ser instalado segun el codigo deinstalacion aplicable por una persona que conozca laconstussion y el funcionamiento del producto y los riesgosque supone.
Conductores de alimentacion 90°c Min.
1
2
3
4
5
6
TUERCA CAPUCHON
DOSELPLACA DE MONTAJE
ESPARRAGO DE MONTAJE
CAJA DE JUNCTURA
7
8
GIRATORIOTORNILLO DEL GIRATORIO
1A
STRAND
8
7 6
8
BA
B
A
B
A
BA B
A
B
A
BA
B
A
B
A
BAB
A
B
A
B
X12
A
X12
44
1

4
SAVETHESE INSTRUCTIONS!
7400 Linder Ave, Skokie, 60077IL800.323.3226 - 847.626.6300
www.Feiss.com© 2016 Feiss.All rights reserved.The "Feiss" graphic is aregistered trademark of Feiss. Feiss reserves the right tochange specifications for product improvements without notification.
A Generation Brands Company