installation instructions for part 99-4644metraonline.com/files/products/inst99-4644_web.pdf1. pull...
TRANSCRIPT

APPLICATIONS
METRA. The World’s best kits.™ metraonline.com1-800-221-0932 © COPYRIGHT 2004-2014 METRA ELECTRONICS CORPORATION
REV.
10/
14/2
014
INS
T99-
4644
CAUTION: Metra recommends disconnecting the negative battery terminal before beginning any installation. All accessories, switches, and especially air bag indicator lights must be plugged in before reconnecting the battery or cycling the ignition.
NOTE: Refer to the instructions included with the aftermarket radio.
INSTALLATION INSTRUCTIONS FOR PART 99-4644
• DINandISOradioprovisions• Also, for vehicles equipped with J-2000 panel-style
•A)Radiohousing•B)Flatfaceplate•C)1/2”Faceplate•D)1”Faceplate•E)Rearsupporttray•F)ISOtrimring•G)Bracketset#1•H)Bracketset#2•I)Bracketset#3•J)Bracketset#4•K)Bracketset#5•L)Bracketset#6•M)Bracketset#7•N)Bracketset#8•O)Bracketset#9•P)Bracketset#10•Q)ISObrackets•R)Bracket(L)S-10•S)(4)Carriagebolts/studs •T)(4)Nuts•U)(4)Hex-headscrews
KIT FEATURES
KIT COMPONENTS
•Panelremovaltool/flatheadscrewdriver•Torx-headscrewdriver•Socketwrench
TOOLS REQUIRED
GM 1982-200599-4644
See application list inside
B CA D E
G HF I J
L MK N O
Q SP T UR

99-4644
Applications
2
* Note: The factory mounting bracket(s) must be retained and used with this vehicle.
Buick Century*...................... 1982-1996
Electra*........................ 1984-1990
EstateWagon*............. 1984-1994
LeSabre*..................... 1984-1994
ParkAvenue*............... 1984-1994
Reatta*........................ 1990-1991
Regal*......................... 1984-1987
Riviera*........................ 1983-1985
Riviera*........................ 1990-1995
Roadmaster................ 1991-1994
Skyhawk*.................... 1982-1989
Skylark*....................... 1983-1995
Cadillac
Cimarron.................... 1982-1988
DeVille*........................ 1985-1995
Eldorado*..................... 1984-1991
Escalade..................... 1999-2002
Fleetwood*.................. 1985-1992
Seville*........................ 1984-1991
ChevroletAstro........................... 1985-2005Avalanche.................... 2002Beretta....................... 1991-1996
Blazer(full)*................. 1989-1991C/KPickup.................. 1995-2000Camaro....................... 1982-1992Camaro....................... 1997-2002Caprice....................... 1991-1996Cavalier...................... 1982-1999
Celebrity*..................... 1982-1990
CitationII*.................... 1985Corsica....................... 1991-1996
Corvette*..................... 1984-1989Corvette...................... 1997-2004EICamino................... 1986-1987Express....................... 1996-2000
G-SeriesVan................ 1988-1996Impala........................ 1994-1996Lumina....................... 1990-2001LuminaAPV................ 1990-1996
Chevrolet (continued)
Malibu........................ 1997-2000
MonteCarlo................ 1986-1988
MonteCarlo................ 1995-1999
Nova........................... 1985-1988
S-10Blazer................ 1982-1994
S-10Blazer................ 1998-2001
S-10Pickup................ 1982-1993
S-10Pickup................ 1998-2001
Silverado.................... 1999-2002
Suburban*................... 1989-1991
Suburban.................... 1995-2002
Tahoe......................... 1995-2002
Venture....................... 1997-1999
GMCC/KPickup................... 1995-2000G-SeriesVan................ 1988-1995
Jimmy(full)*................ 1989-1991
S-15Jimmy................ 1998-2001
S-15Jimmy................ 1982-1994
GMC (continued)
S-15Pickup................ 1982-1990Safari.......................... 1985-2005Savana....................... 1996-2000Sierra......................... 1999-2002Sonoma....................... 1991-1993Sonoma...................... 1998-2001
Suburban*................... 1989-1991Suburban.................... 1995-1999Yukon......................... 1995-2002
IsuzuHombre....................... 1998-2001
OldsmobileAchieva*...................... 1992-1995Bravada...................... 1991-1994
CutlassCalais*............. 1984-1991
CutlassCiera*.............. 1982-1996
CutlassSupreme*........ 1984-1988
Delta88*..................... 1986-1988
Firenza*....................... 1982-1988
Oldsmobile (continued)
Ninety-Eight*............... 1984-1990Omega........................ 1983-1984Silhouette................... 1990-1999Toronado.................... 1982-1985
Pontiac6000........................... 1982-1991
Bonneville*.................. 1982-1999
Fiero*.......................... 1984-1988Firebird....................... 1982-2002
GrandAm*................... 1985-1995GrandAm................... 1996-2000
GrandPrix*.................. 1985-1987GrandPrix................... 1990-2003Montana..................... 1999Sunbird**.................... 1982-1988Sunfire........................ 1995-1999TransSport.................. 1990-1998
Saturn(allmodels)................. 1991-1994
** Note: Vehicles are equipped with J-2000 panel style factory radios.

99-4644
Table of Contents
3
Dash Disassembly
- BuickCentury1982-1996.............................................................................................5
- BuickElectra1984-1990,BuickEstateWagon/LeSabre/ParkAvenue1984-1994..........5
- BuickReatta1990-1991...............................................................................................5
- BuickRegal1984-1987.................................................................................................6
- BuickRiviera1983-1985...............................................................................................6
- BuickRiviera1990-1995...............................................................................................6
- BuickRoadmaster1991-1994/ChevroletCaprice1991-1993........................................7
- BuickSyhawk1982-1989/OldsmobileFirenza1982-1988............................................7
- BuickSkylark1983-1986..............................................................................................8
- BuickSkylark1987-1989..............................................................................................8
- BuickSkylark1990-1995..............................................................................................8
- CadillacDeville1985-1995/Fleetwood1985-1992........................................................9
- CadillacEldorado/Seville1984-1991.............................................................................9
- CadillacEscalade,EscaladeEXT/ChevroletAvalanche,C-KPickup,Silverado,
Suburban,Tahoe/GMCC-KPickup,Sierra,Suburban,Yukon1995-2002........................9
- ChevroletAstro/GMCSafari1985-1989.......................................................................10
- ChevroletAstro/GMCSafari1990-1995.......................................................................10
- ChevroletAstro/GMCSafari1996-2005.......................................................................10
- ChevroletBeretta/Corsica1991-1996..........................................................................11
- ChevroletBlazer(full size)/Suburban/GMCJimmy (full size)/Suburban1989-1991..........11
- ChevroletS-10Blazer/S-10Pickup1998-2001,GMCS-15Jimmy/
Sonoma1998-2001,IsuzuHombre1998-2001...........................................................11
- ChevroletCamaro/PontiacFirebird1982-1984............................................................12
- ChevroletCamaro/PontiacFirebird1985-1992............................................................12
- ChevroletCamaro1997-2002.....................................................................................12
- ChevroletCaprice/Impala1994-1996..........................................................................13
- ChevroletCavalier1982-1990/CadillacCimarron1982-1988
PontiacSunbirdwith J-2000 panel style factory radio1982-1988......................................13
- ChevroletCavalier1991-1994.....................................................................................14
- ChevroletCavalier1995-1999.....................................................................................14
- ChevroletCelebrity1982-1983....................................................................................15
- ChevroletCelebrity1984-1990....................................................................................15
- ChevroletCitationII1985............................................................................................16
- ChevroletCorvette1984-1989.....................................................................................16
- ChevroletCorvette1997-2004.....................................................................................16
- ChevroletElCamino1986-1987,MonteCarlo1986-1988...........................................17
- ChevroletExpress/GMCSavana1996-2000.................................................................17
- ChevroletLumina1990-1994......................................................................................17

99-4644
Table of Contents
4
- ChevroletLumina1995-2001/MonteCarlo1995-1999................................................20
- ChevroletLuminaAPV/OldsmobileSilhouette/PontiacTransSport1990-1995...............18
- ChevroletLuminaAPV/OldsmobileSilhouette/PontiacTransSport1996........................18
- ChevroletMalibu1997-2000.......................................................................................18
- ChevroletNova1985-1988..........................................................................................19
- ChevroletS-10Pickup/S-10Blazer/GMCS-15Pickup/S-15Jimmy1982-1985...........19
- ChevroletS-10Pickup1986-1993/S-10Blazer1986-1994
GMCS-15Pickup1986-1990/S-15Jimmy1986-1994/Sonoma1991-1993,
OldsmobileBravada1991-1994..................................................................................19
- Chevrolet/GMCG-SeriesVan1988-1996.....................................................................20
- ChevroletVenture/OldsmobileSilhouette1997-1999,
PontiacMontana1999/Transport1997-1998...............................................................20
- OldsmobileNinety-Eight1984-1990/Delta881986-1988...........................................21
- OldsmobileAchieva1992-1995...................................................................................21
- OldsmobileCutlassCalais1984-1991.........................................................................21
- OldsmobileCutlassCiera1982-1996...........................................................................22
- OldsmobileCutlassSupreme1984-1988.....................................................................22
- OldsmobileOmega1983-1984....................................................................................22
- OldsmobileToronado1982-1985.................................................................................23
- Pontiac60001982-1991.............................................................................................23
- PontiacBonneville1987-1993.....................................................................................23
- PontiacBonneville1994-1999.....................................................................................24
- PontiacFiero1984-1988.............................................................................................24
- PontiacFirebird1993-2002.........................................................................................24
- PontiacGrandAm1985-1991......................................................................................25
- PontiacGrandAm1992-1995......................................................................................25
- PontiacGrandAm1996-1998......................................................................................25
- PontiacGrandAm1999-2000......................................................................................26
- PontiacGrandPrix1985-1987/Bonneville1982-1986.................................................27
- PontiacGrandPrix1990-1993.....................................................................................26
- PontiacGrandPrix1994-1996.....................................................................................26
- PontiacGrandPrix1997-2003.....................................................................................27
- PontiacSunfire1995-1999..........................................................................................28
- Saturn(allmodels)1991-1994....................................................................................28
Kit Assembly
- DINradioprovision......................................................................................................29
- ISOradioprovision.......................................................................................................30

5
1. Remove(4)screwsfromthetop-insideedgeofthedashtrimbezel.(FigureA)
2. Remove(5)screwsfrombothsidesofthesteeringcolumn.
3. Remove(3)Phillipsscrewssecuringtherockerswitchhousingandliftthehousingout.
4. Removethehardwaresecuringthefactorymountingbracketstothefactoryradio.(FigureB)
5. Removeandretainthebrackets.
Continue to kit assembly
Buick Century1982-1996
Buick Reatta1990-1991
Buick Electra 1984-1990Buick Estate Wagon/LeSabre/Park Avenue
1984-1994
(Figure A) (Figure B)
(S-10applicationshownasexample)
1. Unsnaptheclimatecontroltrimbezelandremove(4)star-drivescrewsexposed.(FigureA)
2. Pullthesteeringcollarbackandcarefullyunsnapthedashtrimbezel.
3. Removethehardwaresecuringthefactorymountingbracketstothefactoryradio.(FigureB)
4. Removeandretainthebrackets.
Continue to kit assembly
(Figure A) (Figure B)
(S-10applicationshownasexample)
1. Remove(2)torx-headscrewsabovetheinstrumentpanel.(FigureA)
2. Remove(1)torx-headscrewfromeachA/Cvent.(FigureA)
3. Unclipthedashtrimbezelandremove.
4. Removethehardwaresecuringthefactorymountingbracketstothefactoryradio.(FigureB)
5. Removeandretainthebrackets.
Continue to kit assembly
(Figure A) (Figure B)
(S-10applicationshownasexample)
Dash Disassembly 99-4644

6
1. Removetheradioknobsandcigarettelighter.
2. Gentlyuncliptheradiotrimbezelandremove.(FigureA)
3. Removethehardwaresecuringthefactorymountingbracketstothefactoryradio.(FigureB)
4. Removeandretainthebrackets.
Continue to kit assembly
Buick Regal1984-1987
Buick Riviera1990-1995
Buick Riviera1983-1985
1. Carefullypullandremovethedash trimbezel.(FigureA)
2. Remove(4)screwssecuringthefactoryradioanddisconnectthewiring.
3. Removethehardwaresecuringthefactorymountingbracketstothefactoryradio.(FigureB)
4. Removeandretainthebrackets.
Continue to kit assembly
1. Remove(2)torx-headscrewsabovetheinstrumentpanel.(FigureA)
2. Remove(1)torx-headscrewfromeachA/Cvent.(FigureA)
3. Unsnapthepanel.
4. Removethehardwaresecuringthefactorymountingbracketstothefactoryradio.(FigureB)
5. Removeandretainthebrackets.
Continue to kit assembly
(Figure A) (Figure B)
(S-10applicationshownasexample)
(Figure A) (Figure B)
(S-10applicationshownasexample)
(Figure A) (Figure B)
(S-10applicationshownasexample)
Dash Disassembly 99-4644

1. Remove(2)screwsfromthedriver’ssideservicepanelandunclipthepanel.
2. Pryoffthetrimpiecelocatedabovethegloveboxandremove(1)screw.
3. Remove(3)screwsfromthetopedgeofthedashtrimbezel.(FigureA)
4. Remove(1)screwfromthelower-leftcornerofthegloveboxand(1)screwfromtheparkingbrakerelease.
5. Removethedashtrimbezel.
6. CutandremoveallmountingtabsonBracket#4EXCEPTtabs“B”.(FigureB)
Note: Identify mounting tabs by the stamped letter on the back of each tab.
Continue to kit assembly
Buick Roadmaster 1991-1994Chevrolet Caprice 1991-1993
7
(Figure A)
(Figure B)
“B”
1. Removethegloveboxbyremovingthedoorstrapwireclipand(4)screws.(FigureA)
2. Remove(2)screwsbelowthecigarettelighterhousingand(3)screwsbelowthesteeringcolumn.(FigureA)
3. Remove(1)screwfromthetop-leftofthefactoryradioandunclipthedashtrimbezel.(FigureA)
4. Removethehardwaresecuringthefactorymountingbracketstothefactoryradio.(FigureB)
5. Removeandretainthebrackets.
Continue to kit assembly
Buick Syhawk 1982-1989/OldsmobileFirenza 1982-1988
(Figure A)
(Figure B)
(S-10applicationshownasexample)
Dash Disassembly 99-4644

8
1. Remove(4)screwsfromthetopedgeoftheinstrumentpanel.(FigureA)
2. Remove(1)screwfromthebottom-leftcornerofthepanel.(FigureA)
3. Remove(2)screwsfromthesteeringcolumntrimandremovethetrim.
4. Pullupandoutonthedashtrimbezelandremove.
5. Removethehardwaresecuringthefactorymountingbracketstothefactoryradio.(FigureB)
6. Removeandretainthebrackets.
Continue to kit assembly
Buick Skylark 1983-1986 Buick Skylark 1990-1995Buick Skylark1987-1989
1. Unsnapthegearshifterbezelfromthebaseoftheconsole.
2. Remove(2)screwssecuringthebottomofthedashtrimbezelandremovethebezel.(FigureA)
3. Removethehardwaresecuringthefactorymountingbracketstothefactoryradio.(FigureB)
4. Removeandretainthebrackets.
Continue to kit assembly
1. Pulloutontheashtrayandremove(2)screwsexposedintheashtraycavity.
2. Remove(2)screwssecuringthefrontoftheashtrayandlowersectionofthedashtrimbezel.(FigureA)
3. Usingapanelremovaltool,gentlypryoutonthetrimbezelandremove.
4. Remove(2)nutsfromthebottomofthefactoryradioanddisconnectthewiring.
5. Removethehardwaresecuringthefactorymountingbracketstothefactoryradio.(FigureB)
6. Removeandretainthebrackets. Continue to kit assembly
(Figure A) (Figure B)
(S-10applicationshownasexample)
(Figure A) (Figure B)
(S-10applicationshownasexample)
(Figure A) (Figure B)
(S-10applicationshownasexample)
Dash Disassembly 99-4644

9
1. Remove(2)screwsfromthetopoftheradiotrimbezel.
2. Pulloutonthetopedgeofthebezelandliftuptoremove.(FigureA)
3. Removethehardwaresecuringthefactorymountingbracketstothefactoryradio.(FigureB)
4. Removeandretainthebrackets.
Continue to kit assembly
Cadillac Deville 1985-1995Fleetwood 1985-1992
Cadillac Escalade, Escalade EXT/Chevrolet Avalanche,
C-K Pickup, Silverado, Suburban, Tahoe/GMC C-K Pickup, Sierra, Suburban,
Yukon 1995-2002
Cadillac Eldorado/Seville 1984-1991
1. Remove(2)PhillipsscrewsabovetheA/Cvents.(FigureA)
2. Pulloutonthetopedgeofthedashtrimbezelunhookthebottomedgeandremove.
3. Removethehardwaresecuringthefactorymountingbracketstothefactoryradio.(FigureB)
4. Removeandretainthebrackets.
Continue to kit assembly
1. Removethesteeringcolumnfillerpanelandtheashtray.(FigureA)
2. Unclipthedashtrimbezelandremove.3. Usingasmallflat-bladescrewdriver,press
downontheouterclipsofthefactoryradio(orpocket).
4. Disconnectthewiringandremovetheradio.LocateBracketSet#8.(FigureB)
Continue to kit assembly
(Figure A) (Figure B)
(S-10applicationshownasexample)
(Figure A) (Figure B)
(S-10applicationshownasexample)
(Figure A) (Figure B)
Dash Disassembly 99-4644

10
1. Remove(3)Phillipsscrewsfromthetopportionofthedashtrimbezel.(FigureA)
2. Openthegloveboxandremove(2)10mmboltsfromtheloweredgeofthetrimbezel.(FigureA)
3. Pulltheconsoletrimforwardandremove(2)7mmboltsexposed.
4. Gentlyunclipandremovethetrimbezel.Remove(2)7mmscrewsfromthefactoryradioanddisconnectthewiring.
5. CutandremoveallmountingtabsonBracket#3EXCEPTtabs“A”.(FigureA)
Note: Identify mounting tabs by the stamped letter on the back of each tab.
Continue to kit assembly
Chevrolet Astro/GMCSafari 1985-1989
Chevrolet Astro/GMCSafari 1996-2005
Chevrolet Astro/GMCSafari 1990-1995
1. Remove(2)screwsfromthebottomofthedashtrimbezel.(FigureA)
2. Gentlyunclipandremovethebezel.
3. Remove(4)screwsfromthefactoryradioanddisconnectthewiring.
4. CutandremoveallmountingtabsonBracket#1EXCEPTtabs“A”.(FigureB)
Note: Identify mounting tabs by the stamped letter on the back of each tab.
Continue to kit assembly
1. Placethegearselectorinitslowestposition.
2. Uncliptheperimeterofthedashtrimbezel.(FigureA)
3. DisconnecttherearA/Ccontrolharnessandtheheadlightswitchfromthebackofthedashtrimbezelandremovethebezel.
4. Usingaflat-bladescrewdriver,pressdownontheoutsideclipsofthefactoryradioandremove.
5. LocateBracketSet#8.(FigureB)
Continue to kit assembly
(Figure A) (Figure B) (Figure A) (Figure B) (Figure A) (Figure B)
“A”
“A”
“A”
Dash Disassembly 99-4644

11
1. Usingapanelremovaltool,pryoutwardonthedashtrimbezelandremove.(FigureA)
2. Remove(2)screwssecuringthefactoryradioanddisconnectthewiring.
3. LocateBracket#7.(FigureB)
Continue to kit assembly
Chevrolet Beretta/Corsica 1991-1996
Chevrolet S-10 Blazer/S-10 Pickup 1998-2001, GMC S-15 Jimmy/Sonoma 1998-2001, Isuzu Hombre
1998-2001
Chevrolet Blazer(fullsize)Suburban/GMC Jimmy (fullsize) Suburban 1989-1991
1. Remove(2)screwsfromtheradiotrimbezelandremovethebezel.(FigureA)
2. Remove(2)screwssecuringthefactoryradioanddisconnectthewiring.
3. Removethehardwaresecuringthefactorymountingbracketstothefactoryradio.(FigureB)
4. Removeandretainthebrackets.
Continue to kit assembly
1. Remove(2)9/32”hex-headscrewsfromthekneebolster.(FigureA)
2. Pulldownonthebolsterandremove9/32”screwsexposedonthebaseofthedashtrimbezel.
3. Remove(1)Phillipsscrewabovethe instrumentcluster.
4. Unclipthedashtrimbezelandremove.5. Remove(2)9/32”hex-headscrewssecuringthe
factoryradioanddisconnectthewiring.6. LocateBracketSet#10.(FigureB) Continue to kit assembly
(Figure A) (Figure B) (Figure A) (Figure B)
(S-10applicationshownasexample)
(Figure A) (Figure B)
Dash Disassembly 99-4644

12
1. Remove(4)star-drivescrewsfromthedashtrimbezelandremovethebezel.(FigureA)
2. Remove(4)screwssecuringthefactoryradioanddisconnectthewiring.
3. CutandremoveallmountingtabsonBracket#2EXCEPTthosetabswithholes“A”.(FigureB)
Note: Identify mounting tabs by the stamped letter on the back of each tab.
Continue to kit assembly
Chevrolet Camaro/PontiacFirebird 1982-1984
Chevrolet Camaro1997-2002
Chevrolet Camaro/PontiacFirebird 1985-1992
1. Remove(4)star-drivescrewsfromthedashtrimbezelandremovethebezel.(FigureA)
2. Remove(4)screwssecuringthefactoryradioanddisconnectthewiring.
3. CutandremoveallmountingtabsonBracket#2EXCEPTthosetabswithholes“B”.(FigureB)
Note: Identify mounting tabs by the stamped letter on the back of each tab.
Continue to kit assembly
1. Uncliptheradiotrimbezelandremove.(FigureA)
2. Remove(2)7mmhex-headscrewssecuringthefactoryradioanddisconnectthewiring.
3. LocateBracketSet#10.(FigureB)
Note: Identify mounting tabs by the stamped letter on the back of each tab.
Continue to kit assembly
(Figure A) (Figure B) (Figure A) (Figure B) (Figure A) (Figure B)
“A”
“B”
Dash Disassembly 99-4644

13
1. Remove(5)hex-headscrewsfromtheashtraycavity.(FigureA)
2. Remove(4)hex-headscrewsfromthebaseofthedashtrimbezel.(FigureA)
3. Unsnapthefuseboxcover andremove(1)hex-head screwexposed.
4. Remove(2)hex-headscrewsabovetheinstrumentcluster.(FigureA)
5. Placethegearselectorin “D1“.Pulloutontheclustertrimandremove.
6. Remove(1)hex-headscrewexposedontheleftedgeofthedashtrimbezel.
7. Unclipthedashtrimbezel(includingtheradiotrimbezel)andremove.
8. LocateBracketSet#10.(FigureB)
Continue to kit assembly
Chevrolet Caprice/Impala1994-1996
(Figure A)
(Figure B)
1. Remove(6)star-drivescrewsfromthedashtrimbezelandremovethebezel.(FigureA)
2. Remove(2)screwsfrom thefactoryradioanddisconnectthewiring.
3. CutandremoveallmountingtabsonBracket#4EXCEPTtabs“A”.(FigureB)
Note: Identify mounting tabs by the stamped letter on the back of each tab.
Continue to kit assembly
Chevrolet Cavalier 1982-1990,Cadillac Cimarron 1982-1988,
Pontiac Sunbird with J-2000 panel style factory radio 1982-1988
(Figure A)
(Figure B)
“A”
“A”
Dash Disassembly 99-4644

14
1. Usingapanelremovaltool,carefullypryoutonthedashtrimbezelandremove.(FigureA)
2. Remove(2)screwssecuringthefactoryradioanddisconnectthewiring.
3. CutandremoveallmountingtabsonBracket#3EXCEPTtabs“B”.(FigureB)
Note: Identify mounting tabs by the stamped letter on the back of each tab.
Continue to kit assembly
Chevrolet Cavalier1991-1994
Chevrolet Cavalier 1995-1999
1. Opendriversdoorandremovefusepanelonendofdashthenopenpassengerdoorandremovepanelonendofdash.
2. Remove(1)Phillipsscrewfromeachside,nowexposed.
3. Remove(3)7mmhex-headscrews fromthetopofthegloveboxliner.
4. Remove(2)7mmhex-headscrews fromthetop-leftcorneroftheglove boxcavity.
5. Remove(1)Phillipsscrewfromthedefrosterduct.
6. Removetheductworkand(1)Phillips screwexposed.
7. Removethedashpadand(3)Phillipsscrewsexposedatthetopoftheradiotrimbezel.(FigureA)
8. LocateBracketSet#10.(FigureB)
Continue to kit assembly
(Figure A) (Figure B) (Figure A) (Figure B)
“B”
“B”
Dash Disassembly 99-4644

15
1. RemovetheplasticplatenexttoeachA/Cventandremove(2)screwsexposed.(FigureA)
2. Remove(4)screwssurroundingthesteeringcolumn.(FigureA)
3. Depressthelightcontrolknobspringremovetheknobandliftthebezeloff.
4. Removethehardwaresecuringthefactorymountingbracketstothefactoryradio.(FigureB)
5. Removeandretainthebrackets.
Continue to kit assembly
Chevrolet Celebrity1982-1983
Chevrolet Celebrity 1984-1990
1. Removethegloveboxcompartmentbydepressingthecliponthebottomofthegloveboxlinerandremoving(6)nutsexposedabovetheopening.(FigureA)
2. Remove(6)Phillipsscrewsbelowthe steeringcolumn.
3. Removetheheadlightknobbydepressingthecliponthebackoftheknobandremovingthenut.
4. Removethecigarettelighteranddisconnectthewiring.
5. Graspthelightersocket,unscrewthebrassnutonthebackofthelighterandremovethesocket.
6. Removethedashtrimbezelanddisconnectthewiring.
7. Removethehardwaresecuringthefactorymountingbracketstothefactoryradio.(FigureB)
8. Removeandretainthebrackets.
Continue to kit assembly
(Figure A) (Figure A) (Figure B)(Figure B)
(S-10applicationshownasexample)
(S-10applicationshownasexample)
Dash Disassembly 99-4644

16
1. Remove(2)screwsfromthebottomsteeringcolumntrimpanelandremove.(FigureA)
2. Remove(6)screwsfromthedashtrimbezel,disconnectthewiringandremove.(FigureA)
3. Removethehardwaresecuringthefactorymountingbracketstothefactoryradio.(FigureB)
4. Removeandretainthebrackets.
Continue to kit assembly
Chevrolet Citation II1985
Chevrolet Corvette1997-2004
Chevrolet Corvette1984-1989
1. Remove(7)screwsfromthedashtrimbezel.(FigureA)
2. Movethegearshiftertothelowestposition.
3. Pulltherightedgeofthebezelforward,unhooktheleftsideandremove.
4. Removethehardwaresecuringthefactorymountingbracketstothefactoryradio.(FigureB)
5. Removeandretainthebrackets.
Continue to kit assembly
1. Pryoutontheridecontrolswitchanddisconnectthewiring.
2. Unsnaptheswitchtrimandremove(2)10mmhex-headboltsexposed.
3. Openthecenterconsoledoor,remove(4)screwsfromtheinnerhingeandremovethedoor.
4. Opentheashtrayandremove(1)screwexposed.Removetheashtrayand(1)screwexposed.
5. Unclipthesmallgrilletotheleftoftheignitionswitchandremove(1)screwexposed.
6. Unclipthebaseoftheradiotrimbezelandremove.(FigureA)
7. LocateBracketSet#10.(FigureB) Continue to kit assembly
(Figure A) (Figure B)
(S-10applicationshownasexample)
(Figure A) (Figure B)
(S-10applicationshownasexample)
(Figure A) (Figure B)
Dash Disassembly 99-4644

17
1. Remove(4)screwsfromthedashtrimbezel.(FigureA)
2. Removethebezelanddisconnectthecigarettelighterwiring.
3. CutandremoveallmountingtabsonBracket#2EXCEPTtabs“C”.(FigureB)
Note: Identify mounting tabs by the stamped letter on the back of each tab.
Continue to kit assembly
Chevrolet El Camino1986-1987, Monte Carlo
1986-1988
Chevrolet Lumina1990-1994
Chevrolet Express/GMC Savana 1996-2000
1. Uncliptheplastictrimpiecelocatedbelowthesteeringcolumn.
2. Unclipthedashtrimbezel.Pullthebezeloverthesteeringcolumnanddisconnectthewiring.(FigureA)
3. Usingaflat-bladescrewdriver,pressdownontheoutsideclipsofthefactoryradioandremove.
4. LocateBracketSet#8.(FigureB)
Continue to kit assembly
1. Remove(2)screwsfromthelowersteeringcolumnpanel.
2. Pullthepaneldowntoaccessthebottomportionoftheradiotrimbezel.(FigureA)
3. Pullthetopandbottomedgesofthebezel.(FigureA)
4. CutandremoveallmountingtabsonBracket#5EXCEPTtabs“A”.(FigureB)
Note: Identify mounting tabs by the stamped letter on the back of each tab.
Continue to kit assembly
(Figure A) (Figure B) (Figure A) (Figure B) (Figure A) (Figure B)
“C”
“C”
“A”
“A”
“A”“A”
Dash Disassembly 99-4644

18
1. Remove(2)screwssecuringthelowersteeringcolumnpanelandremove.
2. Remove(2)screwsexposedonthelefttaboftheradiotrimbezel.(FigureA)
3. Openthegloveboxandremove(2)screwsexposedontherighttabsoftheradiotrimbezel.
4. CutandremoveallmountingtabsonBracket#6EXCEPTtabs“B”.(FigureB)
Note: Identify mounting tabs by the stamped letter on the back of each tab.
Continue to kit assembly
Chevrolet Lumina APV/Oldsmobile Silhouette/
Pontiac TransSport1990-1995
Chevrolet Malibu1997-2000
Chevrolet Lumina APV/Oldsmobile Silhouette/Pontiac
TransSport 19961. Uncliptheradiotrimbezel
andremove.
2. Remove(2)9/32”hex-headscrewssecuringthefactoryradioanddisconnectthewiring.(FigureA)
3. LocateBracketSet#10.(FigureB)
Continue to kit assembly
(Figure A) (Figure B) (Figure B)
“B”
“B”
1. Remove(1)Phillipsscrewfromeachsideofthecenterconsole.
2. Openthegloveboxandremove(2)Phillipsscrewsexposed.(FigureA)
3. Remove(2)7mmhex-headscrewsand(1)pop-clipfromthelowersteeringcolumnpanel,and(2)Phillipsscrewsexposedneartheclimatecontrols.
4. Remove(1)7mmhex-headscrewundertheglovebox.
5. Pulloutonthecenterconsoleandremove.
6. CutandremoveallmountingtabsonBracket#6EXCEPTtabs“B”.(FigureB)
Note: Identify mounting tabs by the stamped letter on the back of each tab.
Continue to kit assembly
(Figure A) (Figure B)
“B”
“B”
(Figure A)
Dash Disassembly 99-4644

19
1. Removetheashtrayand(2)screwsfromtheashtraybracket.(FigureA)
2. Remove(2)screwsabovetheradioopeningandremovetheradiotrimbezel.(FigureA)
3. CutandremoveallmountingtabsonBracket#1EXCEPTtabs“B”.(FigureB)
Note: Identify mounting tabs by the stamped letter on the back of each tab.
Continue to kit assembly
Chevrolet Nova1985-1988
Chevrolet S-10 Pickup 1986-1993/S-10 Blazer 1986-1994, GMC S-15
Pickup 1986-1990/S-15 Jimmy 1986-1994/Sonoma
1991-1993, Oldsmobile Bravada 1991-1994
Chevrolet S-10 Pickup/S-10 Blazer 1982-1985
GMC S-15 Pickup/S-15 Jimmy 1982-1985
1. Remove(4)star-drivescrewsfromthecornersofthedashtrimbezel.(FigureA)
2. Remove(1)star-drivescrewfromthelower-rightcorneroftheinstrumentclusterpanelandremovethedashtrimbezel.
3. CutandremoveallmountingtabsonBracket#5EXCEPTtabs“B”.(FigureB)
Note: Identify mounting tabs by the stamped letter on the back of each tab.
Continue to kit assembly
1. Removetheashtrayand(1)screwinsidetheashtraycavity.
2. Openthegloveboxandremove(2)screwsexposedontheedgeofthedashtrimbezel.(FigureA)
3. LocateBracket#(L)S-10andtherightBracketfromBracketSet#5.
4. CutandremoveallmountingtabsontherightBracketEXCEPTtoptab“B”.(FigureB)
Note: Identify mounting tabs by the stamped letter on the back of each tab.
Continue to kit assembly
(Figure A) (Figure B) (Figure A) (Figure B) (Figure A) (Figure B)
“B”
“B”
“B”
“B”
Dash Disassembly 99-4644

20
1. Carefullyunsnaptheradiotrimbezelandremove.(FigureA)
2. Remove(2)screwssecuringthefactoryradioanddisconnectthewiring.
3. Disconnectthenegativebatteryterminaltopreventanaccidentalshortcircuit.
4. Removetheashtrayand(1)Phillipsscrewexposedintheashtraycavity.
5. Remove(1)Phillipsscrew
fromthecigarettelightercompartment.
6. Remove(2)Phillipsscrewssecuringthefactoryradioanddisconnectthewiring.
7. CutandremoveallmountingtabsonBracket#1EXCEPTtabs“C”.(FigureB)
Note: Identify mounting tabs by the stamped letter on the back of each tab.
Continue to kit assembly
Chevrolet/GMC G-Series Van1988-1996
Chevrolet Venture/Oldsmobile Silhouette
1997-1999, Pontiac Montana 1999/Transport
1997-1998
1. Removetheashtrayand(1)Phillipsscrewexposedintheashtraycavity.
2. Remove(1)Phillipsscrewfromthecigarettelightercompartment.
3. Remove(2)Phillipsscrewssecuringthefactoryradioanddisconnectthewiring.
4. LocateBracketSet#10.(FigureB)
Continue to kit assembly
(Figure A) (Figure B)
“C”
“C”
(Figure A) (Figure B)
1. Unclipthedashtrimbezelandremove(itmaybenecessarytoloosenthekneebolster).(FigureA)
2. Remove(2)7mmhex-headscrewssecuringthefactoryradioanddisconnectthewiring.
3. LocateBracketSet#10.(FigureB) Continue to kit assembly
Chevrolet Lumina 1995-2001/Monte Carlo 1995-1999
(Figure B)
(Figure A)
Dash Disassembly 99-4644

21
1. Placethegearshifterinlowandremovetherubbertrimbootfromthesteeringcolumn.
2. Remove(2)Phillipsscrewsfromtheradiotrimbezel.
3. Unhooktheashtray/lightwiringterminalandremovethetrimbezel.(FigureA)
4. Removethehardwaresecuringthefactorymountingbracketstothefactoryradio.(FigureB)
5. Removeandretainthebrackets.
Continue to kit assembly
Oldsmobile Ninety-Eight 1984-1990/Delta 88
1986-1988
Oldsmobile Cutlass Calais 1984-1991
Oldsmobile Achieva1992-1995
1. Remove(4)screwsfromthetopedgeofthedashtrimbezel.(FigureA)
2. Remove(2)screwsfromthebottomedgeofthebezel.(FigureA)
3. UnsnaptheA/Cducts,disconnectthelightswitchandremovethebezel.
4. Removethehardwaresecuringthefactorymountingbracketstothefactoryradio.(FigureB)
5. Removeandretainthebrackets.
Continue to kit assembly
1. Removetheconsole/gloveboxassemblyand(3)screwsbelowthebox.
2. Liftuptheparkingbraketrimandremove(2)screwsfromthegearshiftertrim.(FigureA)
3. Removetheashtrayfromthegearshifterareaand(2)7mmscrewsexposed.
4. Usingascrewdriver,depresstheretainertabsonthedashashtray,pulltheashtrayoutandremove(2)7mmhex-headscrewsfromtheashtraybracket.
5. Removethehardwaresecuringthefactorymountingbracketstothefactoryradio.(FigureB)
6. Removeandretainthebrackets. Continue to kit assembly
(Figure A) (Figure B)
(S-10applicationshownasexample)
(Figure A) (Figure B)
(S-10applicationshownasexample)
(Figure A) (Figure B)
(S-10applicationshownasexample)
Dash Disassembly 99-4644

22
1. Removetheashtrayand(2)screwsfromtheashtraylocation.(FigureA)
2. Remove(1)screwbelowand(2)screwsabovethesteeringcolumn.(FigureA)
3. PrytheA/Cventsoutandremovethescrewsexposedintheventcavities.
4. Remove(6)screwsfromtheedgeofthedashtrimbezelandremovethebezel.(FigureA)
5. Removethehardwaresecuringthefactorymountingbracketstothefactoryradio.(FigureB)
6. Removeandretainthebrackets.
Continue to kit assembly
Oldsmobile Cutlass Ciera 1982-1996
Oldsmobile Omega1983-1984
Oldsmobile Cutlass Supreme 1984-1988
1. Removetheradiotrimbezel,andthendisconnectthecigarettelighterconnector.(FigureA)
2. Removethehardwaresecuringthefactorymountingbracketstothefactoryradio.(FigureB)
3. Removeandretainthebrackets.
Continue to kit assembly
1. Remove(4)hex-headwasherscrewsfromthesteeringcolumntrimpanel,pulldownontherearedgeofthepanelandremove.
2. Remove(4)Phillipsscrewsfromthetopedgeofthedashtrimbezel.(FigureA)
3. Remove(2)hex-headwasherscrewsfromthebottomofthedashtrimbezelandremovethebezel.(FigureA)
4. CutandremoveallmountingtabsonBracket#2EXCEPTtabs“C”.
Note: Identify mounting tabs by the stamped letter on the back of each tab.
Continue to kit assembly
(Figure A) (Figure B)
(S-10applicationshownasexample)
(Figure A) (Figure B)
(S-10applicationshownasexample)
(Figure A) (Figure B)
“C”
“C”
“C”
“C”
Dash Disassembly 99-4644

23
1. Depressthecliplocatedbehindtheheadlightknobandremovetheknob.
2. Remove(3)screwssecuringthesteeringcolumntrimandremove.
3. Remove(4)screwsfromthebottomedgeofthedashtrimbezelandremove.(FigureA)
4. Removethehardwaresecuringthefactorymountingbracketstothefactoryradio.(FigureB)
5. Removeandretainthebrackets.
Continue to kit assembly
Oldsmobile Toronado 1982-1985
Pontiac Bonneville1987-1993
Pontiac 60001982-1991
1. Openthegloveboxandremove(1)screwfromthesideoftheradiotrimbezel.(FigureA)
2. Gentlyremovethebezelfromthedashandthedummyplatefromthebezel.
3. CutandremoveallmountingtabsonBracket#5EXCEPTtabs“A”.(FigureA)
Note: Identify mounting tabs by the stamped letter on the back of each tab.
Continue to kit assembly
1. Gentlyunsnapandremovethedashtrimbezel.(FigureA)
2. Removethescrewssecuringthefactoryradioanddisconnectthewiring.
3. Removethehardwaresecuringthefactorymountingbracketstothefactoryradio.(FigureB)
4. Removeandretainthebrackets.
Continue to kit assembly
(Figure A) (Figure B)
(S-10applicationshownasexample)
(Figure A) (Figure B) (Figure A) (Figure B)
(S-10applicationshownasexample)
“A”
“A”
Dash Disassembly 99-4644

24
1. Uncliptherightsideofthedashtrimbezel.(FigureA)
2. Uncliptheleftsideofthebezelandremove.(FigureA)
3. Remove(3)7mmhex-headscrewssecuringthefactoryradioanddisconnectthewiring.
4. LocateBracketSet#9.(FigureB)
Continue to kit assembly
Pontiac Bonneville1994-1999
Pontiac Firebird1993-2002
Pontiac Fiero 1984-1988
1. Remove(4)star-drivescrewsfromthedashtrimbezel.(FigureA)
2. Gentlypulloutonthetrimbezelandremove.
3. Remove(4)hex-headscrewsfromthefactoryradioanddisconnectthewiring.
4. Removethehardwaresecuringthefactorymountingbracketstothefactoryradio.(FigureB)
5. Removeandretainthebrackets.
Continue to kit assembly
1. Uncliptheradiotrimbezel.(FigureA)
2. Remove(4)7mm hex-headscrewssecuringthefactoryradioanddisconnectthewiring.
3. LocateBracketSet#9.(FigureB)
Continue to kit assembly
(Figure A) (Figure B) (Figure A) (Figure B)
(S-10applicationshownasexample)
(Figure A)
(Figure B)
Dash Disassembly 99-4644

25
1. Carefullyunsnapthefrontedgeofthegearshifterconsolepanel.
2. Unsnapandremovethedashtrimbezel.(FigureA)
3. Removethehardwaresecuringthefactorymountingbracketstothefactoryradio.(FigureB)
4. Removeandretainthebrackets.
Continue to kit assembly
Pontiac Grand Am1985-1991
Pontiac Grand Am1996-1998
Pontiac Grand Am1992-1995
1. Remove(6)7mmhex-headscrewsfromthedriver’ssidekneebolsterpanelandlowerthepanel.
2. Remove(4)Phillipsscrewsfromtheglovebox/cupholderassembly.
3. Remove(1)7mmhex-headscrewfromtheleftcornerofthedashtrimbezel.(FigureA)
4. Loosen(2)10mmnutsfromthetopofthefactoryradio,slidetheradiooutanddisconnectthewiring.(FigureA)
5. Removethehardwaresecuringthefactorymountingbracketstothefactoryradio.(FigureB)
6. Removeandretainthebrackets.
Continue to kit assembly
1. Remove(2)Phillipsscrewsfromthepocket.
2. Remove(2)Phillipsscrewsabovetheinstrumentcluster.(FigureA)
3. Unclipthedashtrimbezelandremove.
4. Remove(3)7mmhex-headscrewssecuringthefactoryradioanddisconnectthewiring.
5. LocateBracketSet#9.(FigureB)
Continue to kit assembly
(Figure A) (Figure B)
(S-10applicationshownasexample)
(Figure A) (Figure B)
(S-10applicationshownasexample)
(Figure A) (Figure B)
Dash Disassembly 99-4644

26
1. Uncliptheradiotrimbezel.(FigureA)
2. Remove(3)9/32”screwssecuringthefactoryradioanddisconnectthewiring.
3. LocateBracketSet#9.(FigureB)
Continue to kit assembly
Pontiac Grand Am1999-2000
Pontiac Grand Prix1994-1996
Pontiac Grand Prix1990-1993
1. Remove(1)9/32”hex-headscrewfromthecomputerdiagnosticplugandtwisttoaccess(1)9/32”screwonthetrimpanel.
2. Remove(3)9/32”screwsfromthebottomedgeofthe panelandremove.
3. Openthegloveboxandremove(4)9/32”screwsfromthedashtrimbezel.(FigureA)
4. CutandremoveallmountingtabsonBracket#6EXCEPTtabs“B”.(FigureB)
Note: Identify mounting tabs by the stamped letter on the back of each tab.
Continue to kit assembly
1. Usingasmallsetofpliers,grasptheretainingcliponthebackofthegearshifterhandleandremovetheclip.
2. Removethegearshifterhandle.Unclipthecenterconsoleandremove.
3. Remove(2)7mmhex-headscrewsexposedundertheclimatecontrols.(FigureA)
4. Uncliptheradiotrimbezelandremove.(FigureA)
5. Remove(2)7mmhex-headscrewssecuringthefactoryradioanddisconnectthewiring.
6. LocateBracketSet#9.(FigureB)
Continue to kit assembly
(Figure B) (Figure A) (Figure B) (Figure A) (Figure B)
“B”
“B”
(Figure A)
Dash Disassembly 99-4644

27
1. Uncliptheentiredashtrimbezel.(FigureA)
2. Removethescrewssecuringthefactoryradioanddisconnectthewiring.
3. LocateBracketSet#9.(FigureB)
Continue to kit assembly
Pontiac Grand Prix1997-2003
(Figure A)
Pontiac Grand Prix 1985-1987Bonneville 1982-1986
1. Remove(3)screwsfromthetopedgeofthedashtrimbezel.
2. Remove(4)screwsfromthemetalsteeringcolumntrimandremovethetrim.
3. Remove(4)screwsexposedatthebottomedgeofthedashtrimbezel.
4. Removethecigarettelighterandretainerringandremovethedashtrimbezel.(FigureA)
5. Removethehardwaresecuringthefactorymountingbracketstothefactoryradio.(FigureB)
6. Removeandretainthebrackets.
Continue to kit assembly
(Figure A) (Figure B)(Figure B)
Dash Disassembly 99-4644
(S-10applicationshownasexample)

28
Saturn (allmodels) 1991-1994
1. Gentlyunclipthedashtrimbezel.(FigureA)
2. Remove(2)screwsfromthefactoryradioanddisconnectthewiring.
3. CutandremoveallmountingtabsonBracket#6EXCEPTtabs“A”.(FigureB)
Note: Identify mounting tabs by the stamped letter on the back of each tab.
Continue to kit assembly
(Figure A) (Figure B)
“A”
“A”
Dash Disassembly 99-4644
Pontiac Sunfire 1995-1999
1. Openthegloveboxandremove(2)Phillipsscrewsexposedontherightedgeoftheradiotrimbezel.(FigureA)
2. Unclipthebezelandremove.
3. Remove(2)7mmhex-headscrewssecuringthefactoryradioanddisconnectthewiring.
4. LocateBracketSet#9.(FigureB)
Continue to kit assembly
(Figure A) (Figure B)
29
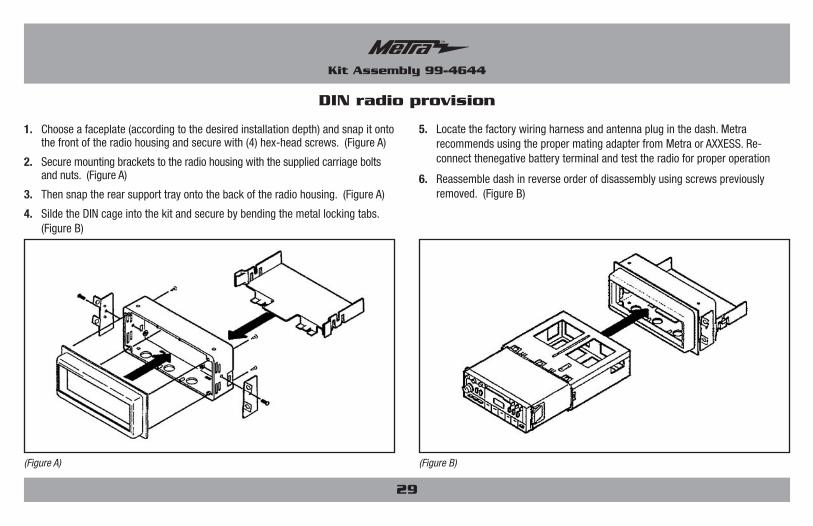
DIN radio provision
Kit Assembly 99-4644
(Figure B)(Figure A)
1. Chooseafaceplate(accordingtothedesiredinstallationdepth)andsnapitontothefrontoftheradiohousingandsecurewith(4)hex-headscrews.(FigureA)
2. Securemountingbracketstotheradiohousingwiththesuppliedcarriageboltsandnuts.(FigureA)
3. Thensnaptherearsupporttrayontothebackoftheradiohousing.(FigureA)
4. SildetheDINcageintothekitandsecurebybendingthemetallockingtabs.(FigureB)
5. Locatethefactorywiringharnessandantennapluginthedash.MetrarecommendsusingthepropermatingadapterfromMetraorAXXESS.Re-connectthenegativebatteryterminalandtesttheradioforproperoperation
6. Reassembledashinreverseorderofdisassemblyusingscrewspreviouslyremoved.(FigureB)

30
ISO radio provision
Kit Assembly 99-4644
(Figure B)(Figure A)
1. Chooseafaceplate(accordingtothedesiredinstallationdepth)andsnapitontothefrontoftheradiohousingandsecurewith(4)hex-headscrews.(FigureA)
2. SnaptheISOtrimringintothebackofthefaceplate.(FigureA)
3. Securemountingbracketstotheradiohousingwiththesuppliedcarriageboltsandnuts.(FigureA)
4. ThenslidetheISObracketsontothetherearsupporttrayandsnapthetrayontothebackoftheradiohousing.(FigureA)
4. Slidetheradiointotheradioopening,aligningtheholesintheradiototheholesintheISObrackets.Thensecuretheradiotothebracketswiththesuppledscrews.(FigureB)
5. Locatethefactorywiringharnessandantennapluginthedash.MetrarecommendsusingthepropermatingadapterfromMetraorAXXESS.Re-connectthenegativebatteryterminalandtesttheradioforproperoperation.
6. Reassembledashinreverseorderofdisassemblyusingscrewspreviouslyremoved.(FigureB)

Notes

METRA. The World’s best kits.™ metraonline.com1-800-221-0932 © COPYRIGHT 2004-2014 METRA ELECTRONICS CORPORATION
REV.
10/
14/2
014
INS
T99-
4644
KNOWLEDGE IS POWEREnhance your installation and fabrication skills by enrolling in the most recognized and respected mobile electronics school in our industry.Log onto www.installerinstitute.com or call 800-354-6782 for more information and take steps toward a better tomorrow.
Metra recommends MECP certified technicians
INSTALLATION INSTRUCTIONS FOR PART 99-4644