installation guide - voice communications inc. 7100 map install guide.pdf · vt100 maintenance...
TRANSCRIPT

INSTALLATION GUIDE

NOTICE
The information contained in this document is believed to be accurate in all respects but is not warrantedby Mitel Networks Corporation (MITEL®). The information is subject to change without notice andshould not be construed in any way as a commitment by MITEL or any of its affiliates or subsidiaries.MITEL and its affiliates and subsidiaries assume no responsibility for any error or omissions in thisdocument. Revisions of this document or new editions of it may be issued to incorporate any suchchanges.
Mitel and Mitel Networks are trademarks of Mitel Networks Corporation.
Other product names mentioned in this document may be trademarks of their respective companies andare hereby acknowledged.
Mitel Networks 7100 Management Installation GuideRelease 1.0, Revision A
December 2002
®, ™Trademark of MITEL Networks Corporation© Copyright 2002, MITEL Networks Corporation
All rights reserved

Table of Contents
- iii -
About this guide . . . . . . . . . . . . . . . . . . . . . . . . . . . . . . . . . . . . . . . . . . . . . . . . . . . . . . . 1Who this guide is for . . . . . . . . . . . . . . . . . . . . . . . . . . . . . . . . . . . . . . . . . . . . . . . . . . . . . . . . 1Where you can find more information . . . . . . . . . . . . . . . . . . . . . . . . . . . . . . . . . . . . . . . . . . . 1Important safety information . . . . . . . . . . . . . . . . . . . . . . . . . . . . . . . . . . . . . . . . . . . . . . . . . . 1
About the 7100 Management Access Point . . . . . . . . . . . . . . . . . . . . . . . . . . . . . . . . . 27100 MAP variants . . . . . . . . . . . . . . . . . . . . . . . . . . . . . . . . . . . . . . . . . . . . . . . . . . . . . . . . . 37100 MAP users . . . . . . . . . . . . . . . . . . . . . . . . . . . . . . . . . . . . . . . . . . . . . . . . . . . . . . . . . . . 3
Initial 7100 MAP setup overview . . . . . . . . . . . . . . . . . . . . . . . . . . . . . . . . . . . . . . . . . . 3
Installing the 7100 MAP . . . . . . . . . . . . . . . . . . . . . . . . . . . . . . . . . . . . . . . . . . . . . . . . . 4Installing the 7100 MAP . . . . . . . . . . . . . . . . . . . . . . . . . . . . . . . . . . . . . . . . . . . . . . . . . . . . . . 5
Accessing the 7100 MAP admin interface . . . . . . . . . . . . . . . . . . . . . . . . . . . . . . . . . . 7Accessing the 7100 MAP locally . . . . . . . . . . . . . . . . . . . . . . . . . . . . . . . . . . . . . . . . . . . . . . . 8
Indefinite access for local admin . . . . . . . . . . . . . . . . . . . . . . . . . . . . . . . . . . . . . . . . . . . . 8Accessing a local administration session (Ethernet connection) . . . . . . . . . . . . . . . . . . . . 8Accessing a local administration session (serial connection) . . . . . . . . . . . . . . . . . . . . . . . 8
Accessing the 7100 MAP remotely . . . . . . . . . . . . . . . . . . . . . . . . . . . . . . . . . . . . . . . . . . . . . 9Setting up the remote client station . . . . . . . . . . . . . . . . . . . . . . . . . . . . . . . . . . . . . . . . . . 9Creating a dial-up network connection and connecting to the 7100 MAP . . . . . . . . . . . . . 9Privileged access for remote engineer . . . . . . . . . . . . . . . . . . . . . . . . . . . . . . . . . . . . . . . . 11Enabling privileged (remote) access to the 7100 MAP Admin interface . . . . . . . . . . . . . . . 11Enabling and disabling privileged access from the Dial-in Network Access menu . . . . . . . 12Gaining privileged (remote) access to the 7100 MAP admin interface . . . . . . . . . . . . . . . . 12
Configuring the 7100 MAP . . . . . . . . . . . . . . . . . . . . . . . . . . . . . . . . . . . . . . . . . . . . . . . 13Local and remote configuration . . . . . . . . . . . . . . . . . . . . . . . . . . . . . . . . . . . . . . . . . . . . . . . . 13
An important note about committing changes . . . . . . . . . . . . . . . . . . . . . . . . . . . . . . . . . . 13Privileged access required for engineer . . . . . . . . . . . . . . . . . . . . . . . . . . . . . . . . . . . . . . . 14
Configuring the 7100 MAP . . . . . . . . . . . . . . . . . . . . . . . . . . . . . . . . . . . . . . . . . . . . . . . . . . . . 14Setting the clock . . . . . . . . . . . . . . . . . . . . . . . . . . . . . . . . . . . . . . . . . . . . . . . . . . . . . . . . . 14Changing the passwords . . . . . . . . . . . . . . . . . . . . . . . . . . . . . . . . . . . . . . . . . . . . . . . . . . 15Configuring the Ethernet devices . . . . . . . . . . . . . . . . . . . . . . . . . . . . . . . . . . . . . . . . . . . . 16Configuring the serial devices . . . . . . . . . . . . . . . . . . . . . . . . . . . . . . . . . . . . . . . . . . . . . . 17Committing your changes . . . . . . . . . . . . . . . . . . . . . . . . . . . . . . . . . . . . . . . . . . . . . . . . . . 18
Connecting to remote Mitel Networks™ systems . . . . . . . . . . . . . . . . . . . . . . . . . . . . 18Bookmarking IP addresses of managed devices . . . . . . . . . . . . . . . . . . . . . . . . . . . . . . . . 18Privileged access not required for engineer . . . . . . . . . . . . . . . . . . . . . . . . . . . . . . . . . . . . 19
Dial-up access to the 3300 or 3100 ICP via the 7100 MAP . . . . . . . . . . . . . . . . . . . . . . . . . . . 19Accessing 3300 or 3100 ICP Embedded System Management . . . . . . . . . . . . . . . . . . . . . 19Accessing the 3300 or 3100 ICP VxWorks shell . . . . . . . . . . . . . . . . . . . . . . . . . . . . . . . . 19
Dial-up access to OPS Manager via the 7100 MAP . . . . . . . . . . . . . . . . . . . . . . . . . . . . . . . . 20Dial-up access to 6500 Unified Communications via the 7100 MAP E/M/S . . . . . . . . . . . . . . 20Dial-up access to an SX-2000® or SX-200® PBX via the 7100 MAP E/M/S . . . . . . . . . . . . . . 20

7100 MAP
- iv -

- 1 -
About this guideThis guide provides a description of the Mitel Networks™ 7100 Management Access Point (MAP) and instructions for gaining access to a remote programming or maintenance session on Mitel Networks systems.
Who this guide is for
This guide is for certified technicians.
Where you can find more information
Refer to the 7100 Management Access Point Product Guide for further details about the information provided in this installation guide and for complete technical information.
Both the 7100 Management Access Point Product Guide and Installation Guide are shipped with the units. You can also access these guides through Mitel Online at www.mitel.com.
Important safety information
Failure to follow all instructions may result in improper equipment operation, risk of electrical shock, or both.
See the Safety Instructions that accompany the Mitel Networks SX-2000 system or the Mitel Networks 3100 ICP for complete safety information.
The following notices are used in this documentation:
WARNING: Warning indicates a potentially hazardous situation, which, if not avoided, could result in death or serious injury.
CAUTION: Caution indicates a potentially hazardous situation, which, if not avoided, may result in minor or moderate injury and/or damage to the equipment or property.
7100 MAP
- 2 -
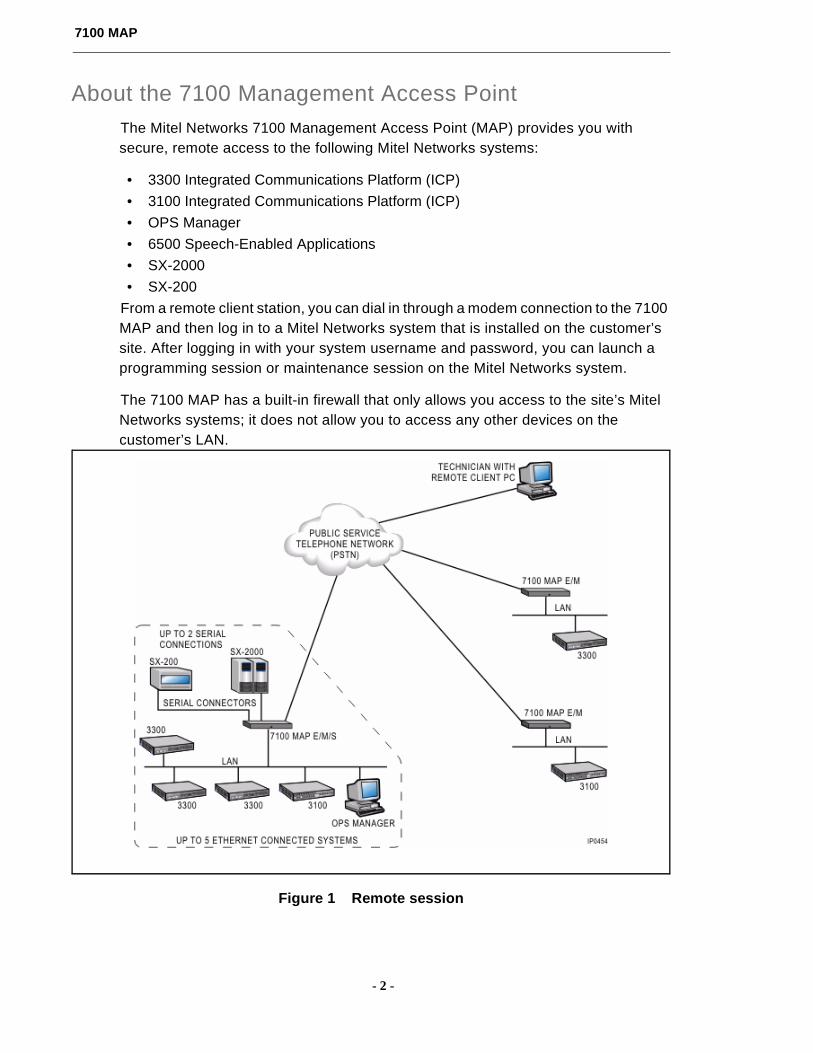
About the 7100 Management Access PointThe Mitel Networks 7100 Management Access Point (MAP) provides you with secure, remote access to the following Mitel Networks systems:
• 3300 Integrated Communications Platform (ICP)
• 3100 Integrated Communications Platform (ICP)
• OPS Manager
• 6500 Speech-Enabled Applications
• SX-2000
• SX-200
From a remote client station, you can dial in through a modem connection to the 7100 MAP and then log in to a Mitel Networks system that is installed on the customer’s site. After logging in with your system username and password, you can launch a programming session or maintenance session on the Mitel Networks system.
The 7100 MAP has a built-in firewall that only allows you access to the site’s Mitel Networks systems; it does not allow you to access any other devices on the customer’s LAN.
Figure 1 Remote session
- 3 -
Installation Guide
7100 MAP variants
There are three variants of the 7100 MAP:
• 7100 MAP E/M (Ethernet/Modem)
• 7100 MAP E/M/S (Ethernet/Modem/Serial)
• 7100 MAP E/M/S/U (Ethernet/Modem/Serial/UPS)
7100 MAP E/M supports remote connections through a standard dialup PSTN V.90 modem connection to up to five IP-based systems, via a single 10baseT Ethernet connection to the customer network. These systems can be installed on the same or separate subnets of an Ethernet LAN.
7100 MAP E/M/S also supports remote connections through a dial-up modem, to up to five IP-based systems. In addition, it supports connectivity to up to two serial port devices through RS-232 serial connections.
7100 MAP E/M/S/U provides the same IP- and serial-system access as the E/M/S and comes with an integrated 4-hour UPS battery. Note that in this document, all procedures concerning and references to the E/M/S also apply to the E/M/S/U.
7100 MAP users
There are three 7100 MAP users:
• ‘admin’
• ‘engineer’
• ‘collection’
Admin: The admin user (local or dial-in) can access the 7100 MAP user interface to configure the 7100 MAP itself. The admin can be an on-site user or an engineer who accesses the 7100 MAP from a remote client station to conduct an admin session.
Engineer: The engineer is a dial-in user who can access the 7100 MAP user interface to log in to an admin (configuration) session on the 7100 MAP and can also access to the Mitel Networks devices that are managed by the 7100 MAP.
Collection: The collection user is a dial-in user who can only access the 7100 MAP E/M/S data collection service on port 3000 to collect logging data from Mitel Networks serial devices managed by the 7100 MAP.
Initial 7100 MAP setup overviewDO NOT connect the 7100 MAP to the customer LAN until the 7100 MAP been assigned a valid IP address for the customer network. You assign the IP address during the configuration stage. See "Configuring the 7100 MAP" (p. 13).
7100 MAP
- 4 -
This installation guide takes you through the following procedures to complete the initial installation and configuration of a 7100 MAP and to connect to remote Mitel Networks systems. Note that these procedures must be completed in order:
1. Installing the 7100 MAP
2. Accessing the 7100 MAP admin interface
3. Configuring the 7100 MAP
4. Connecting to remote Mitel Networks systems
Installing the 7100 MAPBefore you begin
The 7100 MAP is shipped with the following documentation and hardware:
• 7100 MAP Installation Guide
• 7100 MAP Product Guide
• Power cord (see note below)
• One modem cable
• One CAT 5 patch cable
• One serial cable (7100 E/M/S and E/M/S/U only)
• Mounting brackets
Note about power cords: All units shipped outside North America include a power cord specifically for use in the United Kingdom. When ordering a 7100 MAP, customers outside NA or the UK must order the correct power cord for the country of installation.
To install and configure remote dial-up access at a customer’s site, you require the items and information listed in the table below. You should gather this information before beginning any of the procedures in this guide.
Table 1 Installation Requirements
Items and information required for site installationDedicated incoming external telephone line for connection to MAP modemvt100 maintenance terminal or a terminal emulator (such as Telnet)IP Address for the 7100 MAP unit (obtain from customer)Subnet mask address for the 7100 MAP unit (obtain from customer)Default gateway address for the MAP unit (obtain from customer)One CAT 5 crossover cable (optional)

- 5 -
Installation Guide
Installing the 7100 MAP
To install the 7100 MAP
1. Unpack the 7100 MAP.
2. Locate the 7100 MAP within 1.3 meters (4 feet) of a power source.
3. Place the 7100 MAP on a desk, or install it in a 19-inch rack, using the supplied mounting brackets. The mounting brackets fasten to the sides of the rack.
4. Connect the cables. Refer to Figure 2 for E/M connection or to Figure 3 for E/S/M connection.
For Ethernet-connected systems IP Address(obtain from customer)
Port(Accept the default (ALL) for Mitel Net-
works systems)Mitel Networks system 1 ALLMitel Networks system 2 ALLMitel Networks system 3 ALLMitel Networks system 4 ALLMitel Networks system 5 ALLFor Serially connected systems Port Settings
(obtain from customer)Port
(obtain from customer)Note: The 7100 MAP default port settings will work with most serial devices, but specific cus-tomer settings should be verified and applied.
Note: The port number is either 4001 or 4002.
Mitel Networks system 1
• Port usage
• Speed
• Data Bits
• Parity
• Handshake
Mitel Networks system 2• Port Usage • Speed• Data Bits• Parity• Handshake
Table 1 Installation Requirements (continued)

7100 MAP
- 6 -
5. Proceed to "Accessing the 7100 MAP admin interface" (p. 7)..
Figure 2 Connecting the cables to a 7100 MAP E/M
Connect the dedicated incoming line to the “Modem 1” port.
� Plug the RJ-45 connector on the CAT 5 patch cable into the “Ethernet 1” port.Connect the other end of the cable to the LAN switch.
� Plug the power cord into the “Power” receptacle on the rear panel. Plug theother end of the power cable into a power source.
�
- 7 -
Installation Guide
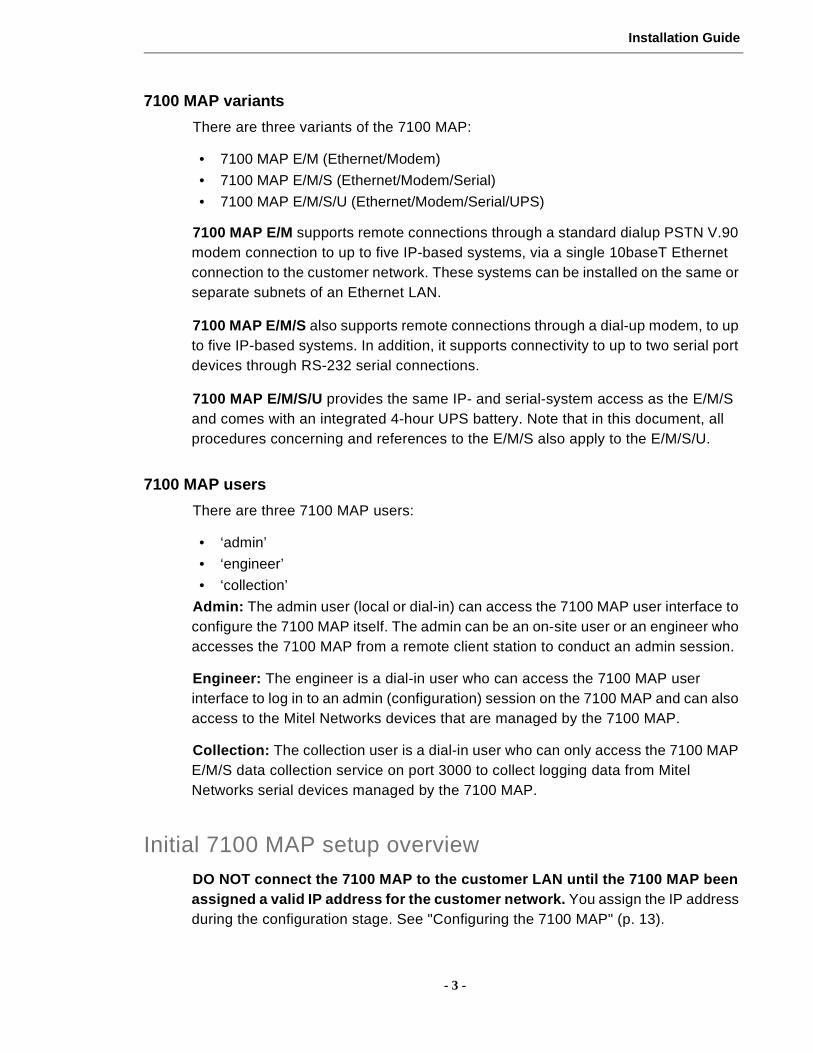
Figure 3 Connecting the cables to a 7100 MAP E/M/S or E/M/S/U
Accessing the 7100 MAP admin interfaceYou can access the 7100 MAP admin interface locally—or remotely with access permission from the customer—using a terminal emulator such as Telnet (local/remote) or HyperTerminal (local only).
Note: You can use Telnet with the 7100 MAP E/M, E/M/S, and E/M/S/U; however, HyperTerminal requires a serial connection and can, therefore, only be used with the E/M/S variants.
Plug the RJ-45 connector on the CAT 5 patch cable into the “Ethernet 1” port.Connect the other end of the cable to the LAN switch.
Connect the supplied RS-232 serial cable to the “COMMs” port on the 7100 MAP. Connect the other end to a serial port on a vt100 maintenance terminal or a PC that has a vt100-type emulation application.
Connect the RS-232 serial ports to the SX-2000 or SX-200 PBX maintenanceports.
Plug the power cord into the “Power” receptacle on the rear panel. Plug theother end of the power cable into a power source.
�
�
Connect the dedicated incoming line to the “Modem 1” port.
�
�
�

7100 MAP
- 8 -
Accessing the 7100 MAP locally
Indefinite access for local admin
The on-site admin user has indefinite access to the 7100 MAP on the LAN via a Telnet connection to the actual IP address of the 7100 MAP.
Accessing a local administration session (Ethernet connection)
The Ethernet cards on the remote PC and the 7100 MAP must have the same subnet address; if they do not, these two devices will be unable to communicate. The installer must specify an IP address for the PC network card to match the first three octets of the IP address of the 7100 MAP unit. For example, the factory default IP address for the 7100 MAP is 192.168.1.1, so you could specify 192.168.1.32 (where 32 is a variable) for the PC.
To access a local administration session through an Ethernet connection to the 7100 MAP
1. Connect your computer to the LAN or connect it directly to the Ethernet port on the 7100 MAP. Note that a crossover cable must be used if you are connecting directly to the Ethernet port on the 7100 MAP.
2. From the Start menu, click Programs, and then click Command Prompt.
Note: While the 7100 MAP and the managed device(s) must have the same subnet address, each must have a unique IP address.
3. At the command prompt, type telnet 192.168.1.1.
4. Type the user account name admin, and press ENTER. Note that the user account name and password are case-sensitive.
5. Type the Admin password (default admin), and press ENTER.
The main configuration menu is displayed.
6. Proceed to "Configuring the 7100 MAP (p. 14)".
Accessing a local administration session (serial connection)
To access a local administration session through a serial connection to the 7100 MAP E/M/S, using HyperTerminal
1. Use the supplied RS-232 serial cable to connect the COMMs port on the 7100 MAP E/M/S to the COM port on your PC.
2. From the Start menu, click Programs, click Accessories, click Communications, and then click HyperTerminal.
3. In the HyperTerminal folder, double-click Hypertrm.exe.
4. Enter a name for the connection (for example, MAP7100), and click OK.
5. In the Connect using field, select the COM port of the PC that you have connected to the 7100 MAP (for example, “Direct to COM1”), and click OK.

- 9 -
Installation Guide
6. In the drop-down menu for each, select the following port settings:
- Bits per second: 19200
- Data bits: 8
- Parity: None
- Stop Bits: 1
- Flow Control: None
7. Click OK.
8. Press ENTER to display the login prompt.
9. Type the Admin password (default admin) and login (default admin), and press ENTER. Note that the user account name and password are case-sensitive.
The 7100 MAP EMS Configuration Menu is displayed.
10.Proceed to "An important note about committing changes" (p. 13).
Accessing the 7100 MAP remotely
This section provides details on
• Setting up the remote client station
• Creating a dial-up network connection and connecting to the 7100 MAP
• Privileged access for the remote engineer
• Enabling privileged (remote) access to the 7100 MAP admin interface
• Enabling and disabling privileged access from the Dial-up Network Access menu
• Gaining privileged (remote) access to the 7100 MAP admin interface
Setting up the remote client station
The client station requires the following hardware, software, and information:
• PC or laptop equipped with modem and dial-up networking (for example MicrosoftDial-Up Networking)
• Connection to a telephone line (PSTN)
• Internet Explorer 5.5 or higher
• Microsoft® Windows 2000, NT, or XP (see note below)
• Telnet application
• Telephone number of the 7100 MAP modem
Note: Windows 95 and 98 are not supported for use with the 7100 MAP. If you are using either of these operating systems, consult Windows help to set up a dial-up networking connection and for any help with the user interface.
Creating a dial-up network connection and connecting to the 7100 MAP
Use the following procedure to set up the client station using Microsoft Windows 2000. The procedure is similar on Windows NT and XP. If you are using one of these

7100 MAP
- 10 -
other operating systems or a third-party software package to provide dial-up facilities on your PC, refer to the instructions accompanying that system.
When creating your new connection to the 7100 MAP, enter the following information if you are required to set connection preferences:
- Data bits: 8
- Parity: N (None)
- Stop bits: 1
To create a dial-up network connection
1. Connect the modem port on your PC to the telephone line jack.
2. Either
- double-click the My Computer icon, click Network and Dial-Up Connec-tions, and then double-click the Make New Connection icon. You see the Make New Connection Wizard.
OR
- click Start, click Accessories, click Communications, click Network and Dial-Up Connections, and then click Make New Connection. You see the Make New Connection Wizard.
3. Click Next.
4. Ensure that the Dial-up to private network radio button is selected, and click Next.
5. Enter the telephone number of the 7100 MAP in the Phone number field. If you wish to enter the area code separately, select the Use dialing rules check box, and enter the Country/Region code information, and click Next.
6. To make the connection available to all users on your PC, select the For all users radio button; otherwise, select Only for myself, and click Next.
7. Enter a name for the connection in the field highlighted in the Completing the Network Connection Wizard form. Select the option to add a shortcut to the connection to your desktop, if desired, and click Finish.
8. From the Network and Dial-up Connections window, right-click the new connection, and select Properties.
9. Select the Security tab.
- In Security Options, select Typical.
- Under the Validate my identity as follows heading, select Require a se-cure password from the drop-down menu.
- Ensure that no other options are selected.
10.Select the Networking tab.
- Under Type of dial-up server I am calling, select PPP: Windows 95/98/NT4/2000, Internet.

- 11 -
Installation Guide
- In the Components checked are used by this connection window, de-se-lect all options except Internet Protocol (TCP/IP), and then click Properties.
- Ensure that Obtain an IP address automatically and Obtain DNS server address automatically are selected.
- Click OK to return to the previous screen, and click OK again to complete the configuration.
11.From the Network and Dial-up Connections window, double-click your newly created connection icon.
12.When the connection dialog appears, type engineer as the user name and password as the default password. Note that user names and passwords are case-sensitive.
Tip: Select the Save password check box to avoid having to remember the engineer password. Be aware, however, that the password saved for this con-nection must match the engineer password that is configured in the 7100 MAP (whether it is a default or customized password). Once the engineer password is customized during a 7100 MAP admin session, it must be changed accord-ingly in your dial-up network connection.
During the PPP negotiation process, the 7100 MAP will assign IP addresses to each end of the dial-up network connection. The default addresses assigned are
• Remote PC: 192.168.10.1• 7100 MAP: 192.168.10.10
At this point, you have an authenticated dial-up network connection, but you are not logged in to the 7100 MAP. Although you have the IP address for the 7100 MAP, you will not be able to access it, or even ping it, until privileged access has been enabled. See "Enabling privileged (remote) access to the 7100 MAP Admin interface" (p. 11).
Privileged access for remote engineer
To access the 7100 MAP admin interface, the engineer must have privileged access enabled. With privileged access enabled, both the the engineer and local admin can connect to the 7100 MAP. With indefinite privileged access enabled, either the engineer or admin must reset privileged access to 0 to terminate the engineer’s indefinite access; see "Enabling and disabling privileged access from the Dial-in Network Access menu" (p. 12). While indefinite access is enabled, the engineer can disconnect and reconnect to the 7100 MAP any number of times.
Enabling privileged (remote) access to the 7100 MAP Admin interface
The engineer can access the 7100 MAP Admin interface from a remote location and change the configuration settings; however, this requires the co-operation of an admin at the customer site, who can enable privileged access in one of two ways:

7100 MAP
- 12 -
• CLEAR button: If the CLEAR button (inset) on the rear panel of the 7100 MAP ispressed, you can log in to the Admin interface from a remote location for the next30 minutes. After 30 minutes, the Admin interface is no longer accessible; however,after gaining access to the 7100 MAP, you can increase your access time from thePrivileged Access Control menu. Note that you must enter the admin password tolog in.
• Dial-in Network Access menu: Remote access can also be granted by someoneat the customer site, using the Dial-in Network Access menu of the 7100 MAP userinterface. From this menu, you can enable privileged access by specifying a timelimit of anywhere from 1 to 998 minutes or ‘indefinate’ (999) for the session; youcan also specify 0 (zero) to disable privileged access.
Enabling and disabling privileged access from the Dial-in Network Access menu
Unlike any other system changes, the enabling or disabling of privileged access and the specification of the time limit take effect immediately; you do not have to commit your changes.
To enable privileged access
1. In the main configuration menu, type either 3 (E/M) or 4 (E/M/S) for Dial-in Network Access.
2. In the Dial-in Network Access menu, type 3 (Control Privileged Access to 7100 MAP).
3. In the Privileged Access to 7100 MAP EM or EMS menu, type any number from 1 to 998 to specify a time limit in minutes, or type 999 to specify indefinate access, and then press ENTER.
To disable privileged access
1. In the Privileged Access to 7100 MAP EM or EMS menu, type 0, and press ENTER.
Note: You can also disable privileged access from the Dial-in PPP Sessions sub-menu. See “Dial-in Session Status” in the 7100 Management Access Point Product Guide.
Gaining privileged (remote) access to the 7100 MAP admin interface
To gain privileged access to the 7100 MAP admin interface
1. Call and instruct the on-site admin to enable either type of privileged access. See "Enabling privileged (remote) access to the 7100 MAP Admin interface" (p. 11).
2. Once privileged access is enabled, dial in to the 7100 MAP modem from a remote client station within the next 30 minutes (CLEAR-button access) or within the specified time frame (Dial-in Network Access), using your dial-up network connection to the 7100 MAP.
3. Telnet to the PPP IP address of the 7100 MAP, using the following steps:
- Click Start, and then click Run.

- 13 -
Installation Guide
- Type telnet 192.168.10.10 (default PPP IP address).
4. At the Telnet login prompt, type admin, and press ENTER.
5. Type the admin password (default admin), and press ENTER.
The main configuration menu (7100 MAP E/M or E/M/S) is displayed.
Note: After three login attempts with an invalid password, your remote connection will be lost.
Note: An inactivity timeout occurs after 10 minutes, terminating your session.
6. Proceed to "An important note about committing changes" (p. 13).
Configuring the 7100 MAPThis section provides details on
• Local and remote configuration
• Configuring the 7100 MAP
• Setting the clock
• Changing passwords
• Configuring Ethernet and serial devices (to be managed on the 7100 MAP)
• Committing your changes
For details on system settings not mentioned here as well as admin menus and general screen layouts, see the 7100 Management Access Point Product Guide.
Local and remote configuration
You can configure a 7100 MAP locally—or remotely with access permission from the customer—using a terminal emulator such as Telnet (local/remote) or HyperTerminal (local only).
Note: You can use Telnet with the 7100 MAP E/M/S, E/M/S/U, and E/M; however, HyperTerminal requires a serial connection and can, therefore, only be used with the E/M/S variants.
An important note about committing changes
CAUTION: Any changes made during a 7100 MAP admin configuration session must be committed before they will take effect. Once you Commit Changes & Restart (option 7 (E/M) or 8 (E/M/S) in the main configuration menus), you will lose your connection to the 7100 MAP. You will also lose any time remaining in your session, unless you have indefinite access (in which case, you can simply reconnect to the 7100 MAP). As a result, we recommend that you make all necessary changes before committing them. Make sure that you keep careful track of the time remaining in your session, and save 5 minutes at the end to commit your changes; your changes will be lost if your session times out before you commit them. See "Committing your

7100 MAP
- 14 -
changes" (p. 18).
Privileged access required for engineer
With privileged access enabled, the engineer can telnet to the 7100 MAP, log in as the admin user, and configure the 7100 MAP for the customer network. The easiest way to grant remote access for the initial configuration of the 7100 MAP is to press the CLEAR button. You can also grant access through the Dial-in Network Access menu, but this requires that the local admin match the IP address of their PC to that of the 7100 MAP in order to access the menu interface.
Configuring the 7100 MAP
At any time during the7100 MAP configuration, you can type a menu number followed by a question mark to get help on the possible selections.
1. At the main configuration menu, type 1 (System Settings), and press ENTER. The system settings are displayed. Enter the following information (note that this form is not case-sensitive):
- Station Identifier: Enter a name for the 7100 MAP. The name can be from 1 to 15 alpha-numeric characters in length.
- LAN-1 IP Address: Enter the IP address of the 7100 MAP.
- LAN-1 IP Mask: Enter the subnet mask for the 7100 MAP.
- Default Gateway: Enter an IP address of the default gateway or N for no gateway, for the 7100 MAP.
- Country of Installation: (see note below for valid country codes)
Note: The valid country codes for Canada, the United States, and the United Kingdom are Canada, USA, and UK. For additional country codes, see the System Settings options table in the 7100 Management Access Point Product Guide.
2. Enter x to return to the 7100 MAP Configuration Menu.
3. At the 7100 MAP EM Main Configuration Menu, type 2 (Managed LAN Devices), and press ENTER. Enter the IP address(es) of up to five managed device(s).
4. Enter x to return to the 7100 MAP EM Configuration Menu.
5. Proceed to "Setting the clock" (p. 14).
Note: For details on system settings, see the System Settings options table in the 7100 Management Access Point Product Guide.
Setting the clock
1. For the E/M variant, at the 7100 MAP EM Configuration Menu, type 4 (Set MAP Date & Time), and press ENTER.
OR

- 15 -
Installation Guide
For the E/M/S variants, at the 7100 MAP EMS Configuration Menu, type 5 (Set MAP Date & Time), and press ENTER.
2. Enter the date and time in the following format: DD/MM/YYYY HH:MM:SS
3. Type x, and press ENTER to return to the main configuration menu.
Changing the passwords
The Admin password (default admin) only allows access to a 7100 MAP administration session; the Engineer password (default password) only allows access to remote systems; and the Collection password (default collection) only allows access to the data collection service for serial devices. The Collection password only appears as an option in the E/M/S variants.
Note: Be sure to change and record the default passwords. Note that passwords are case-sensitive
Important note about password recovery: Carefully record all passwords and password changes. If the PPP (Engineer) password is forgotten, Mitel Networks security measures require that the 7100 MAP be shipped back to Mitel so that our technicians can restore the unit to its default configuration settings. Note that if the Administrator password is forgotten, the unit does not need to be shipped back to Mitel because a technician can restore the default configuration setting for this password remotely.
You can change the passwords at any time. You must commit any changes you make in order to activate the new passwords. If you are changing more than one password, you only need to commit once, after making all your changes. See "Committing your changes" (p. 18).
To change the ‘admin’ password
1. For the E/M variant, at the 7100 MAP EM Configuration Menu, type 5 (Change User Passwords), and press ENTER.
OR
For the E/M/S variants, at the 7100 MAP EMS Configuration Menu, type 6 (Change User Passwords).
Note: You can only change the Admin password from the Change User Pass-words menu.
2. At the Change User Passwords menu, type 1 (Change Admin Password), and press ENTER.
3. Type the new Admin password (5 to 16 alphanumeric characters), and press ENTER.
4. To confirm the password, re-type it and press ENTER.
5. Enter x until you return to the main configuration menu.

7100 MAP
- 16 -
6. Either proceed to change other passwords (see following procedures), or proceed to "Configuring the Ethernet devices" (p. 16) and "Configuring the serial devices" (p. 17).
To change the ‘engineer’ password
1. For the E/M variant, at the 7100 MAP EM Configuration Menu, type 3 (Dial-in Network Access), and press ENTER.
OR
For the E/M/S variants, at the 7100 MAP EMS Configuration Menu, press 4 (Dial-in Network Access), and press ENTER.
2. At the Dial-in Network Access menu, type 2 (Dial-in Users), and press ENTER.
3. At the Dial-in Users form, type 1 (Engineer), and press ENTER.
4. At the Dial-in User ‘engineer’ form, type 2 (PPP password), and press ENTER.
5. Type the new Engineer password (minimum of 5 alphanumeric characters), and press ENTER.
6. To confirm the password, re-type it, and press ENTER.
Tip: If you are using an E/M/S variant, you can proceed to change the Collec-tion password now by repeating steps 3 to 6. Ensure that in step 3, at the Dial-in Users form, you type 2 (Collection). The rest of the procedure is the same as for Engineer.
7. Enter x until you return to the main configuration menu.
8. Either proceed to change other passwords, or proceed to "Configuring the Ethernet devices" (p. 16) and "Configuring the serial devices" (p. 17).
To change the ‘collection’ password (E/M/S variants only)
1. In the 7100 MAP EMS Configuration Menu, type 4 (Dial-in Network Access), and press ENTER.
2. At the Dial-in Network Access menu, type 2 (Collection), and press ENTER.
3. At the Dial-in User ‘engineer’ form, type 2 (PPP password), and press ENTER.
4. Type the new Collection password (minimum of 5 alphanumeric characters), and press ENTER.
5. To confirm the password, re-type it, and press ENTER.
6. Enter x until you return to the main configuration menu.
7. Either proceed to change other passwords, or proceed to "Configuring the Ethernet devices (p. 16)" and "Configuring the serial devices (p. 17)".
Note: The default password for ‘collection’ is password.
Configuring the Ethernet devices
For information about direct and proxy modes, see the Managed LAN Devices menu and options table in the 7100 Management Access Poing Product Guide.
- 17 -
Installation Guide
1. For the E/M variant, at the 7100 MAP EM Configuration Menu, type 2 (Managed LAN Devices), and press ENTER.
OR
For the E/M/S variants, at the 7100 MAP EMS Configuration Menu, type 3 (Managed LAN Devices), and press ENTER.
2. At the Managed LAN Devices menu, type a number from 1 to 5 to configure a LAN device.
3. In the Managed LAN Device form, enter the following settings:
- Device Label (1–20 chars): <for example, 3300>
- Device IP address or (N)one: <enter the device IP address>
- Allow access to ports.. or (A)ll: <specify desired setting>
- Access mode - Direct/Proxy (D/P): <specify desired setting>
- Proxy IP address on MAP: <enter a proxy IP address with which this device can be accessed if Access mode is set to Proxy>
- Proxy subnet mask: 255.255.255.0 (This is the subnet mask to be used with the proxy IP address.)
4. Enter x to return to the Managed LAN Devices Menu.
5. Configure additional LAN devices, if desired.
6. Proceed to "Configuring the serial devices (p. 17)", if you have serial devices to configure.
7. Enter x to return to the main configuration menu.
Configuring the serial devices
1. At the 7100 MAP EMS Configuration Menu, type 2 (Serial Port Settings), and press ENTER. The Serial Port Settings menu is displayed.
2. At the Serial Port Settings menu, type 1 (Serial Port 1), and press ENTER. The Serial Port 1 Settings form is displayed.
Note: The Serial Port 1 Settings and Serial Port 2 Settings forms are dynamic, that is, the form options vary depending on the Port Usage (1) settings. For details about additional serial port settings, see Serial Port Settings and the options table in the 7100 Management Access Point Product Guide.
3. To connect this port to an SX-200 or SX-2000 maintenance port for remote access, enter the following settings (note that this menu is not case-sensitive):
- Port usage: M
- Speed: <Must match customer setting for serial device>
- Data Bits: <Must match customer setting for serial device>
- Parity: <Must match customer setting for serial device>
- Handshake: <Must match customer setting for serial device>
- Device label (1–20 chars): <for example, “Device on Serial 1”>
7100 MAP
- 18 -
- Inactivity timeout (1-999 minutes): <specify desired time>
- Audit file - Yes/No (Y/N): <specify desired setting>
Note: This form is dynamic; the setting options depend on the Port Usage set-ting. See the complete list and description of options in “Serial Port 1/2” of the 7100 Management Access Point Product Guide.
4. At the Serial Port Settings menu, type 2 (Serial Port 2), and press ENTER to get to the Serial Port 2 Settings form.
5. Enter the settings listed in step 3.
6. At the Serial Port Settings menu, enter x to return to the 7100 MAP EMS Configuration Menu.
Committing your changes
You must commit any changes you make to the 7100 MAP settings before they will take effect.
1. For the EM variant, at the 7100 MAP EM Configuration Menu, type 7(Commit Changes & Restart), and press ENTER.
OR
For the EMS variant, at the 7100 MAP EMS Configuration Menu, type 8 (Commit Changes & Restart), and press ENTER.
Your changes are saved, and the 7100 MAP restarts (after approximately 10 to 15 seconds) with the new configuration.
Connecting to remote Mitel Networks systemsThis following information and procedures explain how the engineer accesses the login pages of remote Mitel Networks devices, with access through the 7100 MAP. For information about conducting programming and maintenance sessions on specific Mitel Networks systems, refer to the system documentation.
Before you begin
• The 7100 MAP must be configured to accept incoming calls over its modem con-nection, and it must be configured to manage the device you wish to access. See"Configuring the 7100 MAP" (p. 13).
• You need the IP address of the managed device you wish to access.
Bookmarking IP addresses of managed devices
The engineer must know the destination IP addresses of devices managed by the 7100 MAP in order to access the managed systems. These IP addresses can be stored on the engineer’s PC as Internet Explorer bookmarks to facilitate address storage and dial-up connections to managed devices. You can create a folder for each customer site, and within that folder, store the bookmarks required to reach

- 19 -
Installation Guide
specific devices at each site. Note that once connected to a managed device, the engineer must still enter a valid username and password.
Privileged access not required for engineer
You only require privileged access to the admin interface of the 7100 MAP itself. It is not required to access a device managed by the 7100 MAP.
Dial-up access to the 3300 or 3100 ICP via the 7100 MAP
Accessing 3300 or 3100 ICP Embedded System Management
The 3300 and 3100 ICP ESM allows you to conduct system configuration, administration (programming), and maintenance and diagnostic sessions.
To access 3300 or 3100 ICP ESM
1. Double-click the dial-up connection to the 7100 MAP icon on your desktop.
The 7100 MAP will verify your username and password. Note that the 7100 MAP will only allow remote access to the “engineer.”
2. Launch a browser.
3. If you do not have the IP address bookmarked, type the IP address (direct or proxy) of the 3300 or 3100 Controller, and press ENTER.
You see the 3300 or 3100 ICP ESM login page. At this point, you can create a bookmark for this device if you do not already have one.
Note: If you are using the proxy address, you must add a routing entry in the managed device for the engineer. See 3300 or 3100 ICP documentation for more information.
Accessing the 3300 or 3100 ICP VxWorks shell
If a 7100 MAP E/M/S is connected to the serial port of a 3300 or 3100 Controller, you can access the VxWorks shell to issue VxWorks commands or custom commands and access the file system. To access the VxWorks shell, you must telnet to the 7100 MAP, to a specific port (either 4001 or 4002) that is connected to the serial port on the controller.
To access the VxWorks shell
1. Double-click the dial-up connection to the 7100 MAP icon on your desktop.
The 7100 MAP will verify your username and password. Note that the 7100 MAP will only allow remote access to the “engineer.”
2. Click Start, and then click Run.
7100 MAP
- 20 -
3. Telnet to the PPP address of the 7100 MAP plus the number of the serial port (either 4001 or 4002) that connects to the managed device. For example, type telnet xxx.xxx.xxx.x 4001 (where x is the PPP address of the 7100 MAP).
The VxWorks shell opens.
Dial-up access to OPS Manager via the 7100 MAP
The 7100 MAP provides access to the OPS Manager server but not to any of its network elements (devices managed by OPS Manager). If you need to manage any of these network elements, they must be added to the 7100 MAP device’s list of managed devices, and you must access them separately and directly through the 7100 MAP.
Note: You must configure the default gateway of the 7100 MAP device if the network element is on a different subnet. From the main configuration menu, go to System Settings, and configure the default gateway.
You must have an OPS Manager account to access the server. If you have a valid accound, with access to OPS Manager via the 7100 MAP, you can conduct MAC (Moves, Adds, and Changes) sessions as well as backups and restores of the OPS Manager database.
To access the OPS Manager server
1. Double-click the dial-up connection to the 7100 MAP icon on your desktop.
The 7100 MAP will verify your username and password. Note that the 7100 MAP will only allow remote access to the “engineer.”
2. Launch a browser.
3. If you do not have a bookmark for OPS Manager, type xxx.xxx.xxx.x/ops (where x is the direct or proxy IP address of OPS Manager), and press ENTER. This brings you to the OPS Manager server login page.
Note: OPS Manager may take some time to load.
Dial-up access to 6500 Unified Communications via the 7100 MAP E/M/S
1. Double-click the dial-up connection to the 7100 MAP icon on your desktop.
The 7100 MAP will verify your username and password. Note that the 7100 MAP will only allow remote access to the “engineer.”
2. Launch a browser.
3. Type xxx.xxx.xxx.x/default.asp (where x is the IP address of the device you wish to access), and press ENTER.
You see the 6500 Unified Communications login page.
Dial-up access to an SX-2000 or SX-200 PBX via the 7100 MAP E/M/S
You can access a serial device only if a serial port on the 7100 MAP E/M/S is

- 21 -
Installation Guide
connected to the serial port of the device you wish to access.
Through the 7100 MAP E/M/S, you can access SX-2000 and SX-200 Customer Data Entry, from which you can access CDE forms and conduct maintenance sessions.
1. Double-click the dial-up connection to the 7100 MAP icon on your desktop.
The 7100 MAP will verify your username and password. Note that the 7100 MAP will only allow remote access to the “engineer.”
2. Click Start, and then click Run.
3. Type either telnet xxx.xxx.xxx.x 4001 or telnet xxx.xxx.xxx.x 4002 (where x is the PPP IP address, and 4001 or 4002 is the serial port on the 7100 MAP E/M/S that is connected to the serial device you wish to access).
You see the login page of the SX-2000 or SX-200 CDE.

7100 MAP
- 22 -