installation guide - ima multimedia adapter rns 510florian.silim.free.fr/photo/00_utile/console...
TRANSCRIPT
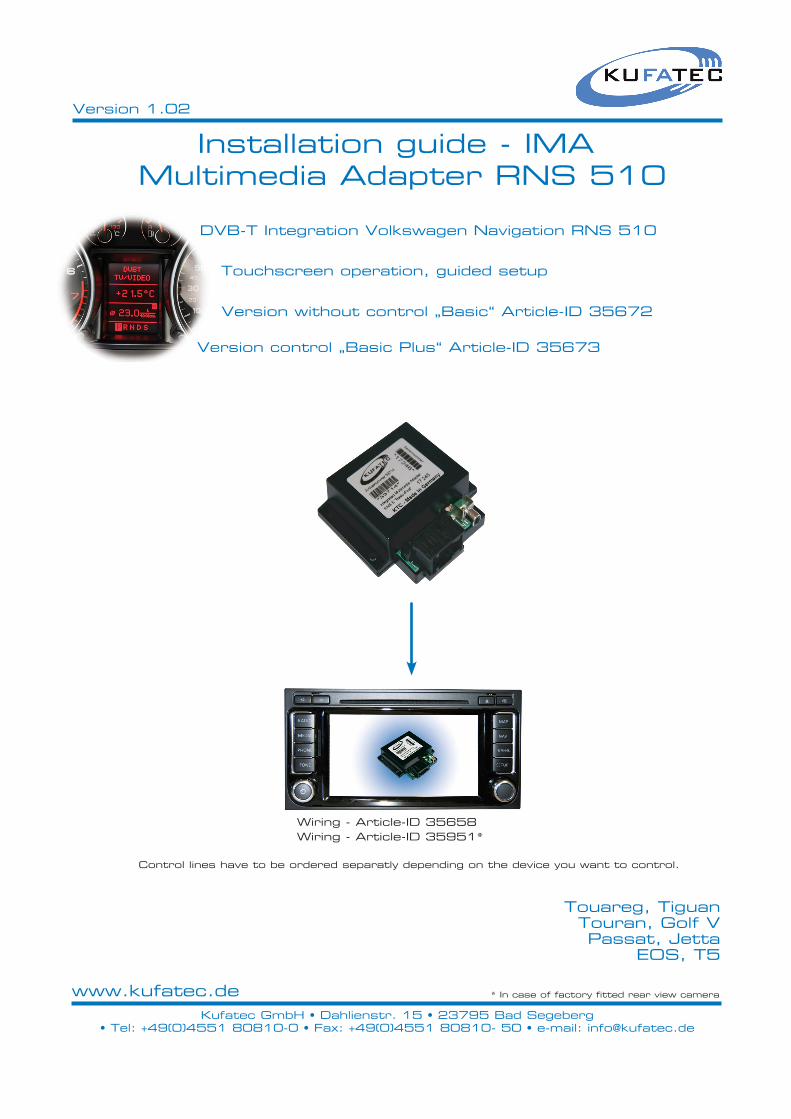
Installation guide - IMA Multimedia Adapter RNS 510
www.kufatec.deKufatec GmbH • Dahlienstr. 15 • 23795 Bad Segeberg
• Tel: +49(0)4551 80810-0 • Fax: +49(0)4551 80810- 50 • e-mail: [email protected]
Touareg, TiguanTouran, Golf VPassat, Jetta
EOS, T5
Version without control „Basic“ Article-ID 35672
Wiring - Article-ID 35658Wiring - Article-ID 35951*
* In case of factory fitted rear view camera
Touchscreen operation, guided setup
Version control „Basic Plus“ Article-ID 35673
DVB-T Integration Volkswagen Navigation RNS 510
Control lines have to be ordered separatly depending on the device you want to control.
Version 1.02

www.kufatec.deKufatec GmbH • Dahlienstr. 15 • 23795 Bad Segeberg
• Tel: +49(0)4551 80810-0 • Fax: +49(0)4551 80810- 50 • e-mail: [email protected]
Content
Safety instructions 01
Connection diagram 02
Specification 03
Controllinesspecifictodevices 04
Integrationrearviewcam(RVC) 05
Installation instruction 06
Guided setup Multimedia Adapter 07
Operating instruction 08

1
safety Instructions
CongratulationstoyournewIMA-Multimedia Adapter. Thank you for choosing
a product of Kufatec GmbH.
Pleasetakenotethattheinstallationcanonlybedonebyvehicleswhichareusinga12Vbattery.Inparticulartrucks,all-terrainvehiclesandcommercialdieselcarsincludingtaxisarerunningoftenwith24Vbatteriesandaninstallationisnotpossibleinthesekindofvehicles.
Takecaretoensurenodevicesareaffectedordamagedthatarerelevanttosecurityorsafeoperationofthevehicle.
Thisunitisonlyforuseinthefollowingvehicles.Onlyconnectionsdescribedwithinthisinstructionguideareallowedorrequiredtouseforinstallation.
Fordamageimpactcausedbyfaultyinstallation,unsuitableconnectionsinappropriatevehiclesKufatecGmbH assumes no liability.
WeadviseyouthattheseunitsprocessdatasoutoftheCAN-protocolfromthevehicle.Asthesupplierofthisdevicewedon‘tknowtheoverallsystemyouareworkingwith.IfourdevicecausesdamageduetootherchangesmadebytothevehicleKufatecGmbHassumesnoliability.
Ifthecarmanufaturer‘sdon‘tagreewiththeinstallationofourdevicebyreasonofwarrantytheKufatecGmbHassumesnoliability.Pleasecheckconditionsandwarrantybeforeyoubegintheinstallation.
KufatecGmbHsupplierreservestherighttochangethedevicespecificationswithoutnotice.
2
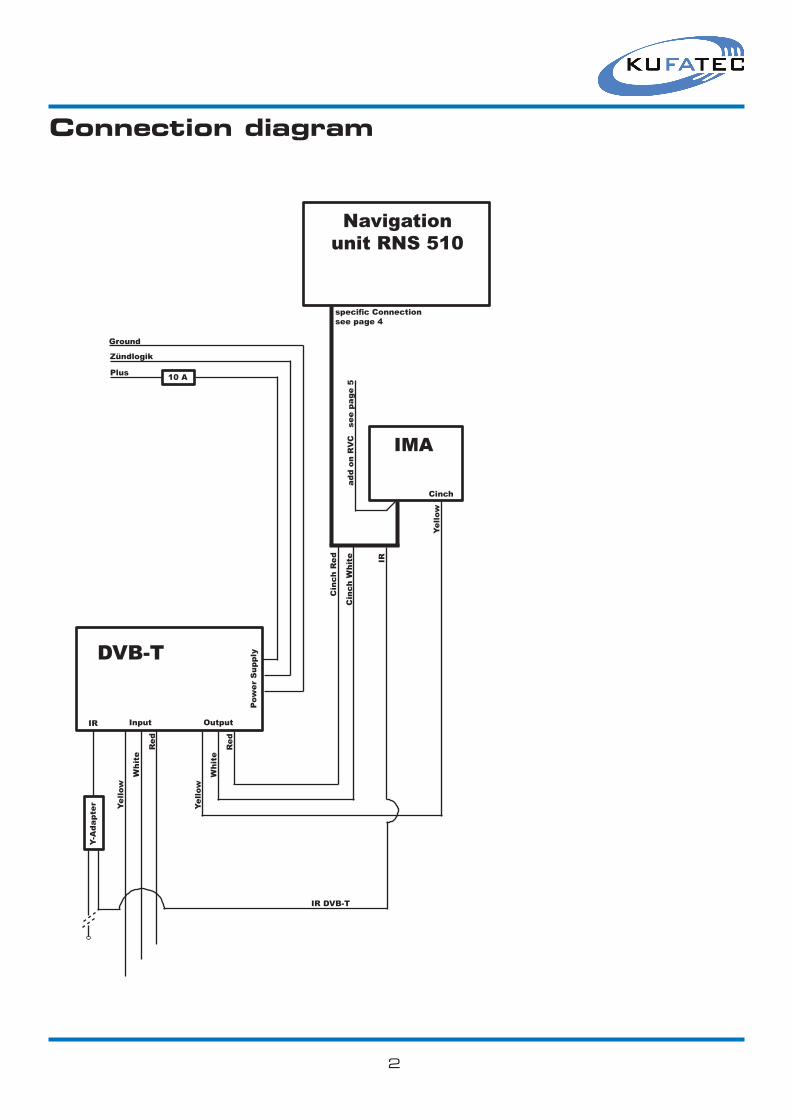
Connection diagram
Input OutputIR
Pow
er S
uppl
y
Ground
Zündlogik
Plus 10 A
IMA
Cinch
Yello
w
Yello
w
Red
Whi
te
Yello
w
Red
Whi
te
Cin
ch R
ed
Cin
ch W
hite
Navigationunit RNS 510
DVB-T
IR
specific Connectionsee page 4
add
on R
VC
se
e pa
ge 5
Y-A
dapt
er
IR DVB-T

Technical details Multimedia Adapter IMA
Title: Multimedia Adapter IMA
circuit board
99
6721,5
68
cover
connection18-pole
8
June 2007
Page 1/1
Specification
Specifications
3
powersupply - 12Volt(10-15Volts)powerinput - 170-190mAstandbycurrent - 4-6mAdimensionsinmm - 99x96,5x23weight - 100gvideosignals - PAL/NTSCRVCsignal - NTSC
4
Control lines specific to devices
InordertocontroltheDVB-TReceiverbyOEMNavigationyouneedtohaveaspecificcontrollinewhichhastobeconnectedbetweenthemainIMAwiringandtheIR-InputoftheDVB-T.
ThetablebelowshowsspecificcontrollineswhicharesuitabletotheparticularDVB-TReceiver.
DVB-TReceiver versioncontrolline Article-IDDVB-TReceiverAmpireDVBT200DVB-TReceiverAmpire100SLDVB-TReceiverAlpineTUET1500DVDVB-TReceiverCKO1080DVB-TReceiverBULLITDVB-TDVB-TReceiverEasternSE863-T
Westernsteckerversion1Jack3,5version4Jack2,5version1Westernsteckerversion1Westernsteckerversion1Westernstecker-Version2
355493560235547355493554935553
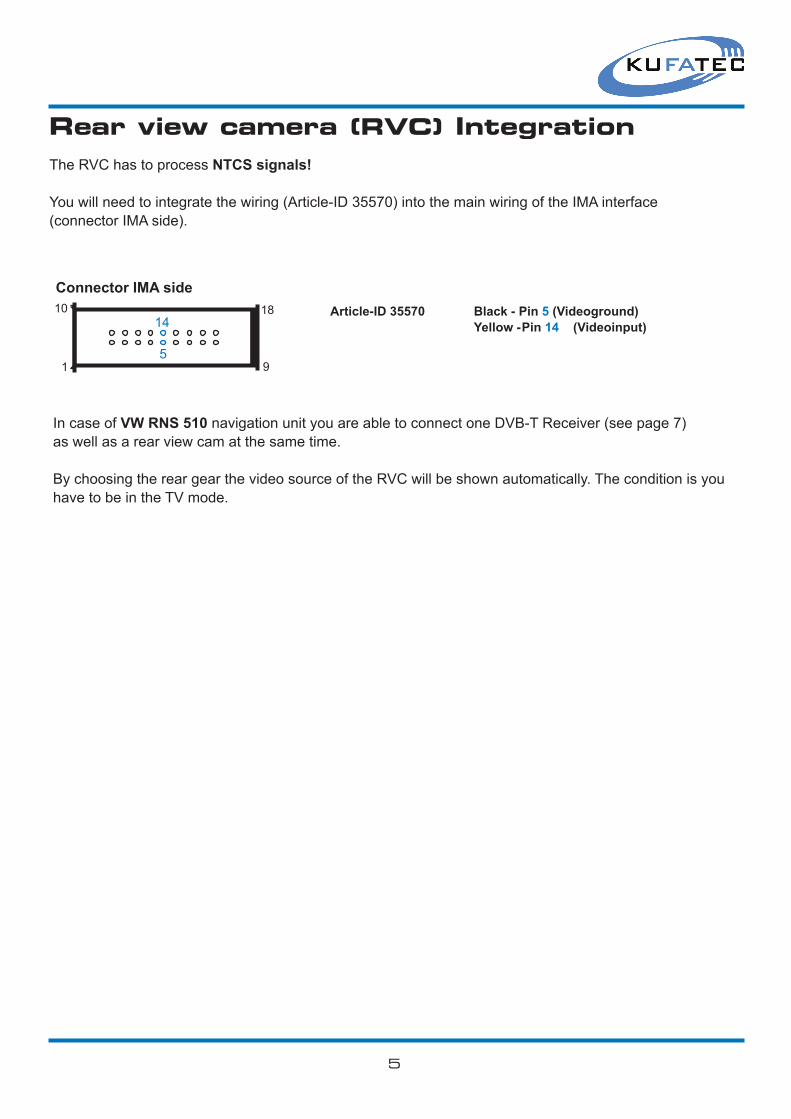
Rear view camera (RVC) Integration
Article-ID 35570 Black - Pin 5 (Videoground) Yellow - Pin 14 (Videoinput)
Connector IMA side
15
9
10 1814
In case of VW RNS 510navigationunityouareabletoconnectoneDVB-TReceiver(seepage7)aswellasarearviewcamatthesametime.
BychoosingthereargearthevideosourceoftheRVCwillbeshownautomatically.TheconditionisyouhavetobeintheTVmode.
TheRVChastoprocessNTCS signals!
Youwillneedtointegratethewiring(Article-ID35570)intothemainwiringoftheIMAinterface(connectorIMAside).
5

Installation instructions RNS 510NOTE: IncasethenavigationunitdoeshaveaSoftwareindex higher then 522theCAN-Gateway needtobecodedtoTV-Tuner: Inordertoidentifythesoftwareindexpleasepushthe„Setup“ - button of the head unit by turningonthedeviceforabout20seconds.Anotherscreemwillappearwhichisshowingthe softwareindexoftheheadunit.
• Tiguan, Golf 5, Touran, - Address 19 - Byte 3 - Bit 4 EOS, Jetta • Touareg (08), T5 (08) - Address 19 - Byte 4 - Bit 4
6
FUSE
1
4
5 9
10
12
13
QUAD-LOCK
FindasuitablepositionfortheIMAinterfacewithinthevehicle(glovebox).Ifeverythingisinstalledinthecorrectway,thenavigationwillshowanadditional„TV“-buttonundermenu„Media“.BychoosingthissourcethenavigationwilldisplaythescreenoftheconnectedDVB-TReceiver.MakesuretheDVB-TReceiverisconnectedproperlytotheIMAinterface.IncaseofIMA-version „Basic“ (withoutcontrol)youneedtoinstallanIR-connectioninordertocontroltheDVB-TReceiverwiththeremote.ThelocationoftheDVB-Twithinthevehicleisuptothecustomer.
Black/White - Can High Pin 9Black/Yellow - Can Low Pin 10Brown - Ground Pin 12Red - staedy plus source specific to the vehicle
Pleaseremovethenavigationunitusingsuitabletools,thendisconnectthewiringharnessfromthenavigationunit.
Withtheconnectionof4newwiresyouwillcompletethefittingoftheIMAinterface.Pleaseseeschemebelow(bluemarkedfigures).Inordertoachieveaproperconnectionwerecommendbothcrimpingandsoldingthenewwires.
NOTE: IsthecaralreadyequippedwithfactoryfittedRVCyouneedtocompletetheinstallationby usingwiringarticle-ID35951.Pleaseseemanual„IMA RVC“.
7
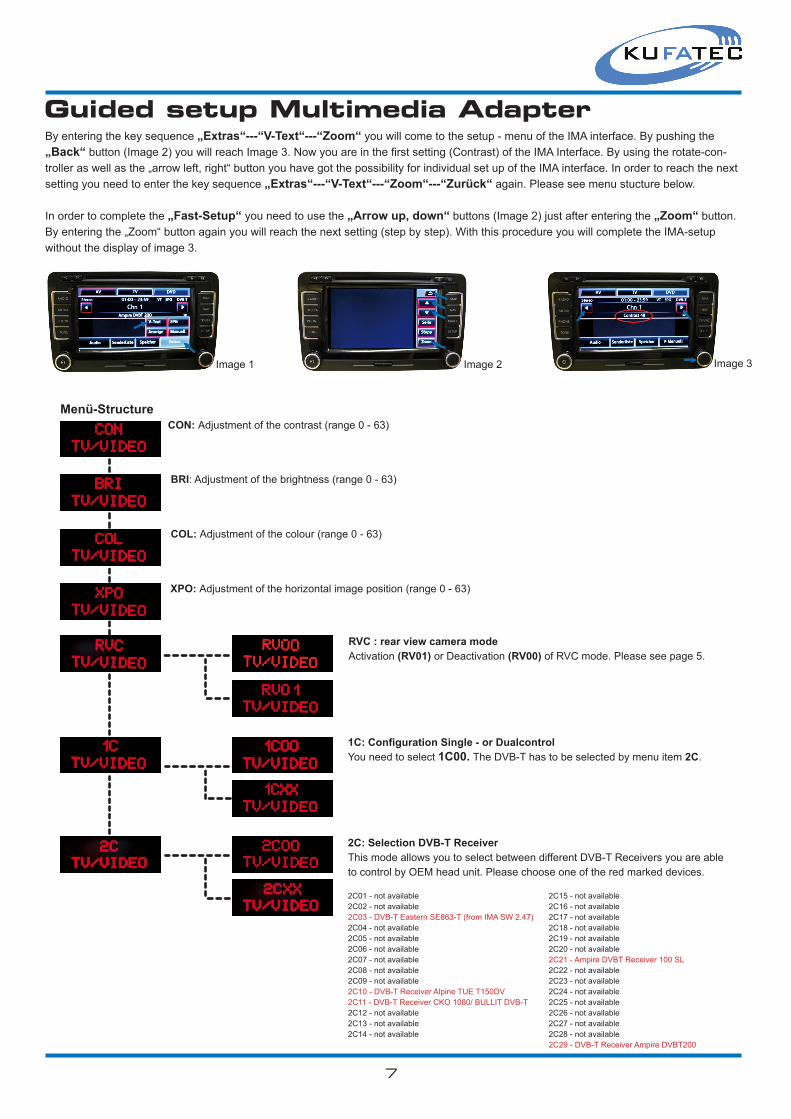
Guided setup Multimedia AdapterByenteringthekeysequence„Extras“---“V-Text“---“Zoom“ youwillcometothesetup-menuoftheIMAinterface.Bypushingthe„Back“button(Image2)youwillreachImage3.Nowyouareinthefirstsetting(Contrast)oftheIMAInterface.Byusingtherotate-con-trolleraswellasthe„arrowleft,right“buttonyouhavegotthepossibilityforindividualsetupoftheIMAinterface.Inordertoreachthenextsettingyouneedtoenterthekeysequence„Extras“---“V-Text“---“Zoom“---“Zurück“again.Pleaseseemenustucturebelow.
In order to complete the „Fast-Setup“ you need to use the „Arrow up, down“buttons(Image2)justafterenteringthe„Zoom“ button. Byenteringthe„Zoom“buttonagainyouwillreachthenextsetting(stepbystep).WiththisprocedureyouwillcompletetheIMA-setupwithoutthedisplayofimage3.
BRI:Adjustmentofthebrightness(range0-63)
CON: Adjustmentofthecontrast(range0-63)
COL: Adjustmentofthecolour(range0-63)
XPO: Adjustmentofthehorizontalimageposition(range0-63)
RVC : rear view camera modeActivation(RV01)orDeactivation(RV00)ofRVCmode.Pleaseseepage5.
Menü-Structure
1C: Configuration Single - or DualcontrolYou need to select 1C00. TheDVB-Thastobeselectedbymenuitem2C.
2C: Selection DVB-T ReceiverThismodeallowsyoutoselectbetweendifferentDVB-TReceiversyouareabletocontrolbyOEMheadunit.Pleasechooseoneoftheredmarkeddevices.
2C01-notavailable2C02-notavailable2C03-DVB-TEasternSE863-T(fromIMASW2.47)2C04-notavailable2C05-notavailable2C06-notavailable2C07-notavailable2C08-notavailable2C09-notavailable2C10-DVB-TReceiverAlpineTUET150DV2C11-DVB-TReceiverCKO1080/BULLITDVB-T2C12-notavailable2C13-notavailable2C14-notavailable
2C15-notavailable2C16-notavailable2C17-notavailable2C18-notavailable2C19-notavailable2C20-notavailable2C21-AmpireDVBTReceiver100SL2C22-notavailable2C23-notavailable2C24-notavailable2C25-notavailable2C26-notavailable2C27-notavailable2C28-notavailable2C29-DVB-TReceiverAmpireDVBT200
Image 1 Image 2 Image3
8
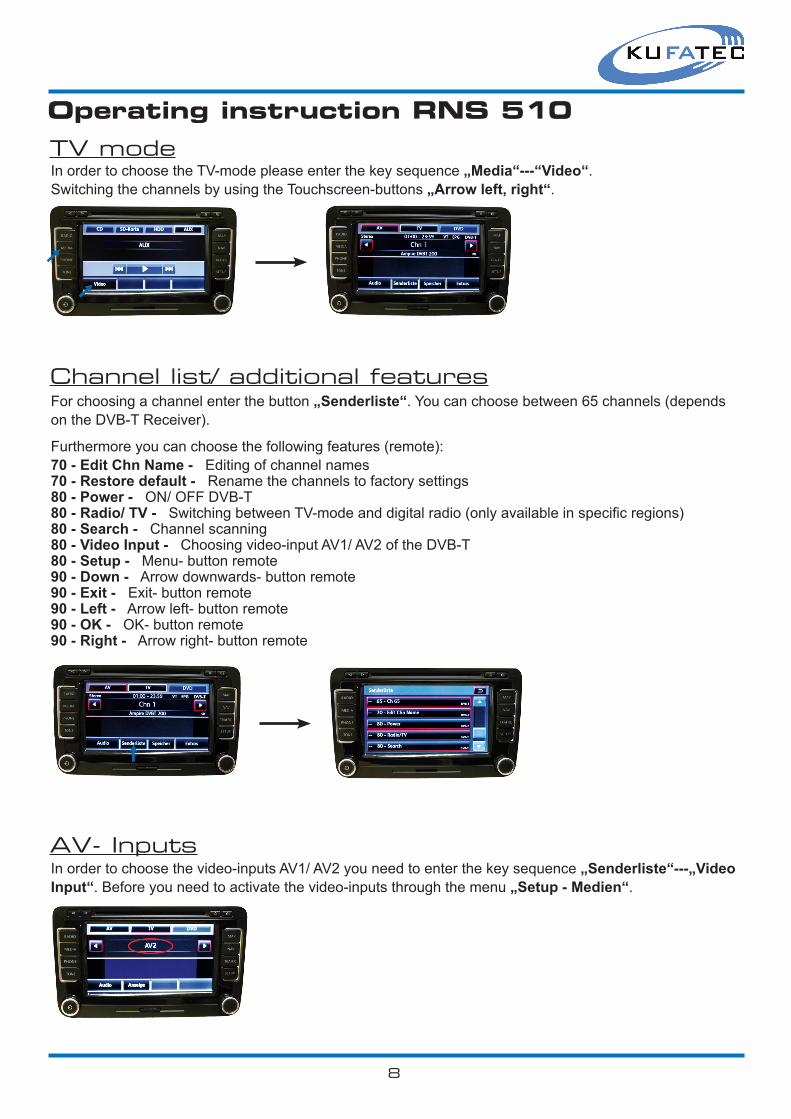
Operating instruction RNS 510TV modeInordertochoosetheTV-modepleaseenterthekeysequence„Media“---“Video“. SwitchingthechannelsbyusingtheTouchscreen-buttons„Arrow left, right“.
Channel list/ additional featuresFor choosing a channel enter the button „Senderliste“.Youcanchoosebetween65channels(dependsontheDVB-TReceiver). Furthermoreyoucanchoosethefollowingfeatures(remote):70 - Edit Chn Name -Editingofchannelnames70 - Restore default -Renamethechannelstofactorysettings80 - Power -ON/OFFDVB-T80 - Radio/ TV -SwitchingbetweenTV-modeanddigitalradio(onlyavailableinspecificregions)80 - Search - Channel scanning80 - Video Input -Choosingvideo-inputAV1/AV2oftheDVB-T80 - Setup -Menu-buttonremote90 - Down -Arrowdownwards-buttonremote90 - Exit -Exit-buttonremote90 - Left -Arrowleft-buttonremote90 - OK -OK-buttonremote90 - Right -Arrowright-buttonremote
AV- InputsInordertochoosethevideo-inputsAV1/AV2youneedtoenterthekeysequence„Senderliste“---„Video Input“.Beforeyouneedtoactivatethevideo-inputsthroughthemenu„Setup - Medien“.
8
Operating instruction RNS 510
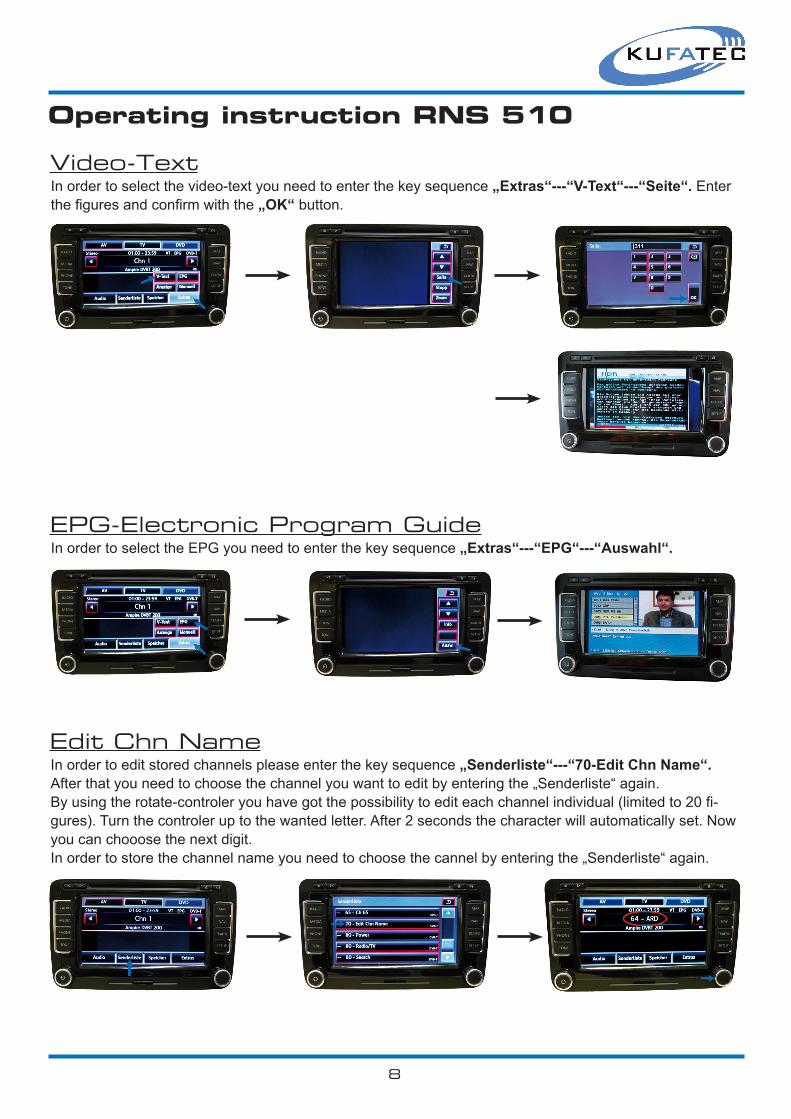
Video-TextInordertoselectthevideo-textyouneedtoenterthekeysequence„Extras“---“V-Text“---“Seite“.Enterthefiguresandconfirmwiththe„OK“ button.
EPG-Electronic Program GuideInordertoselecttheEPGyouneedtoenterthekeysequence„Extras“---“EPG“---“Auswahl“.
Edit Chn NameInordertoeditstoredchannelspleaseenterthekeysequence„Senderliste“---“70-Edit Chn Name“. Afterthatyouneedtochoosethechannelyouwanttoeditbyenteringthe„Senderliste“again.Byusingtherotate-controleryouhavegotthepossibilitytoediteachchannelindividual(limitedto20fi-gures).Turnthecontroleruptothewantedletter.After2secondsthecharacterwillautomaticallyset.Nowyoucanchooosethenextdigit.Inordertostorethechannelnameyouneedtochoosethecannelbyenteringthe„Senderliste“again.

9
Operating instruction RNS 510
Operation by stalkBypushingtheupperpartofthemultifunctionalstalkabout4secondsyouwillreachthemainmenuofthedriverinformationsystem.Pleasechoosethemenu„Audio“ andconfirmbypushingthebuttonunderneaththestalk.NowyoucanswitchbetweentheChannelsbyusingtheupanddownbuttonofthemultifunctional stalk.
Note: Pleaseswitchthechannelsinasteadypace.Fastchannelswitchingcouldcausetimedelays during channel display.