installation guide allati ide - polyglass spa · adhesive technology as well as substantial, proven...
TRANSCRIPT

InstalInstalInstalalInstalInstallatlatlatilatilatiion Guiddde
ww
w.p
olyg
lass
.com
POLYGLASS® USA, Inc.Corporate Office
1111 West Newport Center Drive Deerfield Beach, Florida 33442
Phone (954) 233-1330 - Fax (954) 418-4453 Toll Free (888) 410-1375
e-mail: [email protected]
Manufacturing FacilitiesFernley, Nevada 89408
Phone (775) 575-6007 - Fax (775) 575-2314 Toll Free (800) 222-9782
Hazleton, Pennsylvania 18202 Phone (570) 384-1230 - Fax (570) 384-3282
Toll Free (800) 894-4563
Winter Haven, Florida 33880 Phone (863) 297-5800 - Fax (863) 618-2193
Toll Free (866) 802-8017
for Self-Adhered Membranes Installation Guide
®
4AD
ESO
1 - 0
2/11
- 1
0,00
0- In
nerW
orki
ngs

02 03
ADESO ® Technology
Features and Advantages
Special Features
FASTLap® - SEALLap®
Tools and Accessories
Acceptable Substrates
Applications
Do's and Don'ts
Details
General Recommendations
Indexpage 04
page 05
page 07
page 09
page 14
page 15
page 31
page 06
page 07
page 08
The new generation of ADESO self-adhered membranes is the most innovative modified bitumen roofing product available in the industry.
ADESO self-adhered membranes are unique with years of proven performance in the field as experienced by contractors, buildings owners, architects and roofing professionals, placing Polyglass ahead of the competition.
ADESO self-adhered membranes comprise the latest in asphalt adhesive technology as well as substantial, proven waterproofing compounds available with different surfaces. Installed properly, ADESO products will provide long lasting and durable roof coverings.
This revolutionary method of manufacturing ADESO self-adhered membranes utilizing Polyglass’ patented dual compound technology, makes Polyglass the industry leader in self-adhered modified bitumen membranes for the residential and commercial roofing markets.
®

02 03
Installation Guide
ADESO ® Technology
Features and Advantages
Special Features
FASTLap® - SEALLap®
Tools and Accessories
Acceptable Substrates
Applications
Do's and Don'ts
Details
General Recommendations
Indexpage 04
page 05
page 07
page 09
page 14
page 15
page 31
page 06
page 07
page 08
The new generation of ADESO self-adhered membranes is the most innovative modified bitumen roofing product available in the industry.
ADESO self-adhered membranes are unique with years of proven performance in the field as experienced by contractors, buildings owners, architects and roofing professionals, placing Polyglass ahead of the competition.
ADESO self-adhered membranes comprise the latest in asphalt adhesive technology as well as substantial, proven waterproofing compounds available with different surfaces. Installed properly, ADESO products will provide long lasting and durable roof coverings.
This revolutionary method of manufacturing ADESO self-adhered membranes utilizing Polyglass’ patented dual compound technology, makes Polyglass the industry leader in self-adhered modified bitumen membranes for the residential and commercial roofing markets.
®

04 05
Selvage Film “Factory-Applied Treatment”
No Open Flames
SPECIAL FEATURES
As a manufacturer of ADESO self-adhered membrane. Polyglass offers a wide range of ADESO self-adhered membranes which are modified using true APP or SBS polymers on the top weathering surface, built with a reinforced polyester and/or reinforced fiberglass mat, and an aggressive self-adhesive formulation on the bottom surface.
ADVANTAGES • Safe • Easy to use • Quick end lap application with patented FASTLap • Quick & clean side lap with patented SEALLap • Adhere to a variety of substrates • Odorless • Install with hand tools • No open flames
FEATURES• A true APP or SBS compound on the top• Different finished surfaces (granules, reflective film or polyolefin film with lay lines printed)
• High performance reinforced polyester or reinforced fiberglass mat• Self-adhering compound on the bottom• Split release film on the bottom surface• Granule-free end lap with patented FASTLap• Quick & clean side lap application with patented SEALLap technology
Adhere to a variety of substrates
• Easy on your roofing projects, easy on you, Polyglass EASYBOX®. Packaging is designed to open easily on the roof.
ADESO Technology | Features Advantages | Special Features
®

04 05
Selvage Film “Factory-Applied Treatment”
No Open Flames
SPECIAL FEATURES
As a manufacturer of ADESO self-adhered membrane. Polyglass offers a wide range of ADESO self-adhered membranes which are modified using true APP or SBS polymers on the top weathering surface, built with a reinforced polyester and/or reinforced fiberglass mat, and an aggressive self-adhesive formulation on the bottom surface.
ADVANTAGES • Safe • Easy to use • Quick end lap application with patented FASTLap • Quick & clean side lap with patented SEALLap • Adhere to a variety of substrates • Odorless • Install with hand tools • No open flames
FEATURES• A true APP or SBS compound on the top• Different finished surfaces (granules, reflective film or polyolefin film with lay lines printed)
• High performance reinforced polyester or reinforced fiberglass mat• Self-adhering compound on the bottom• Split release film on the bottom surface• Granule-free end lap with patented FASTLap• Quick & clean side lap application with patented SEALLap technology
Adhere to a variety of substrates
• Easy on your roofing projects, easy on you, Polyglass EASYBOX®. Packaging is designed to open easily on the roof.
No Open Flames
ADESO Technology | Features Advantages | Special Features
Installation Guide®

06 07
• EASYBOX is precut on one side of the box.• Easy removal of roll from side of the box – no more strain
from lifting the roll out of the box.
• Easy folding process – the box is already flat – no more work wasted breaking down boxes.
• Easy stacking of flat boxes creates simple disposal – an end to scattered boxes littering your jobsite.
FASTLap Enhanced End LapsThe sealing of the end lap between two rolls of granular modified bitumen membranes has long been an arduous and troublesome operation. If granules are not heated and embedded satisfactorily, a reliable and durable seam may not be achieved. If the granular areas are overheated, the reinforcement may warp, be damaged or loss of modified adhesive may occur.
ACCEPTABLE SUBSTRATESAcceptable substrates for ADESO self-adhered applications:
- Polyisocyanurate
- GP Densdeck Prime (pre-primed board must still be primed) DuraGuard® USG SecureRock®
- Asphalt impregnated, six-sided Woodfiber Board
- Primed Concrete
- New Plywood Decking or Primed Existing Plywood
- Joints must be taped (When in doubt, prime)
- Polyglass Elastobase® Poly/Sand – Base sheet, mechanically attached, heat welded or set in hot asphalt
- Polyglass Elastoflex® SA V Base – Base sheet
Notes:
Polyglass recommends the use of Polyglass PG 500 mastic and Polyglass PG 100 Asphalt Primer.
Contact Polyglass Technical Services for suitability of other equal items at (866) 802-8017.
FASTLap means increased productivityFASTLap provides a patented granule-free roll end feature. The release film is clean and simple to remove. Minimizing the effort and time required to achieve a perfect end seam.
SEALLap quick waterproofing of side lapsThis is a unique patent-pending, factory-applied treatment on the side lap of rolls to enhance sealability.Advantages: Instant and Permanent bond between adjacent membranes, even under low temperature conditions. Cost Savings. No need for use of external caulk or mastics to ensure lap bond. Labor Savings. Factory applied adhesive on the selvage areas translates to less time to install roofing membrane. Environmentally friendly. No need for external mastics or heat, as required by competitors’ membranes.
FASTLap & SEALLap | Acceptable SubstratesSpecial Features
1. Selvage release film2. Surfacing (granules/ sand)3. Factory applied adhesive treatment
1
2
3
®

06 07
• EASYBOX is precut on one side of the box.• Easy removal of roll from side of the box – no more strain
from lifting the roll out of the box.
• Easy folding process – the box is already flat – no more work wasted breaking down boxes.
• Easy stacking of flat boxes creates simple disposal – an end to scattered boxes littering your jobsite.
FASTLap Enhanced End LapsThe sealing of the end lap between two rolls of granular modified bitumen membranes has long been an arduous and troublesome operation. If granules are not heated and embedded satisfactorily, a reliable and durable seam may not be achieved. If the granular areas are overheated, the reinforcement may warp, be damaged or loss of modified adhesive may occur.
ACCEPTABLE SUBSTRATESAcceptable substrates for ADESO self-adhered applications:
- Polyisocyanurate
- GP Densdeck Prime (pre-primed board must still be primed) DuraGuard® USG SecureRock®
- Asphalt impregnated, six-sided Woodfiber Board
- Primed Concrete
- New Plywood Decking or Primed Existing Plywood
- Joints must be taped (When in doubt, prime)
- Polyglass Elastobase® Poly/Sand – Base sheet, mechanically attached, heat welded or set in hot asphalt
- Polyglass Elastoflex® SA V Base – Base sheet
Notes:
Polyglass recommends the use of Polyglass PG 500 mastic and Polyglass PG 100 Asphalt Primer.
Contact Polyglass Technical Services for suitability of other equal items at (866) 802-8017.
FASTLap means increased productivityFASTLap provides a patented granule-free roll end feature. The release film is clean and simple to remove. Minimizing the effort and time required to achieve a perfect end seam.
SEALLap quick waterproofing of side lapsThis is a unique patent-pending, factory-applied treatment on the side lap of rolls to enhance sealability.Advantages: Instant and Permanent bond between adjacent membranes, even under low temperature conditions. Cost Savings. No need for use of external caulk or mastics to ensure lap bond. Labor Savings. Factory applied adhesive on the selvage areas translates to less time to install roofing membrane. Environmentally friendly. No need for external mastics or heat, as required by competitors’ membranes.
FASTLap & SEALLap | Acceptable SubstratesSpecial Features
1. Selvage release film2. Surfacing (granules/ sand)3. Factory applied adhesive treatment
1
2
3
Installation Guide®

08 09
1.
2.
3.
4.
5.
6.
7.
8.
9.
Trowel
Caulking Gun
Metal Head Hand Roller
Tape Measure
Utility Knives- Hook Blade, Straight Blade
Claw Hammer
Tin Snips
Hand Held Hot Air Welder
Silicone Hand Held Roller
1.
2.
3.
4.
Polyglass PG 500 TROWEL Grade Mod-Bit Adhesive – 10.3 oz cartridge
Polyglass PG 500 TROWEL Grade Mod-Bit Adhesive – 4.75 gal. Pail
Polyglass PG100 ASPHALT PRIMER – 14 oz spray Can
80 lb (minimum) linoleum roller
Tools
Accessories
1
1
2
1. ApplicationA. Remove existing materials and obsolete penetrations
down to an acceptable substrate, repair any voids or imperfections in the substrate.
B. For steep-slope underlayments, cut the 2-square rolls into a minimum of 3 equal sections.
C. Unroll and allow membrane to relax in the sun for a recom-mended 15 minutes prior to installation in final location.
2. ApplicationA. Measure leading edge for width of first sheet and snap straight
chalk line.B. Lay the material flat in place, starting at the lowest point.C. Align the membrane with chalk line at the lowest edge of
the roof.D. Install in shingle fashion from lowest point to highest point on roof.
APPLICATION INSTRUCTIONS
Tools & Accessories Applications
®
2 3 4

08 09
1.
2.
3.
4.
5.
6.
7.
8.
9.
Trowel
Caulking Gun
Metal Head Hand Roller
Tape Measure
Utility Knives- Hook Blade, Straight Blade
Claw Hammer
Tin Snips
Hand Held Hot Air Welder
Silicone Hand Held Roller
1.
2.
3.
4.
Polyglass PG 500 TROWEL Grade Mod-Bit Adhesive – 10.3 oz cartridge
Polyglass PG 500 TROWEL Grade Mod-Bit Adhesive – 4.75 gal. Pail
Polyglass PG100 ASPHALT PRIMER – 14 oz spray Can
80 lb (minimum) linoleum roller
Tools
Accessories
1
1
2
1. ApplicationA. Remove existing materials and obsolete penetrations
down to an acceptable substrate, repair any voids or imperfections in the substrate.
B. For steep-slope underlayments, cut the 2-square rolls into a minimum of 3 equal sections.
C. Unroll and allow membrane to relax in the sun for a recom-mended 15 minutes prior to installation in final location.
2. ApplicationA. Measure leading edge for width of first sheet and snap straight
chalk line.B. Lay the material flat in place, starting at the lowest point.C. Align the membrane with chalk line at the lowest edge of
the roof.D. Install in shingle fashion from lowest point to highest point on roof.
APPLICATION INSTRUCTIONS
Tools & Accessories Applications
Installation Guide®
2 3 4

10 11
3
4
6
5
3. ApplicationA. Fold the aligned membrane in half, exposing the dual
release film.
B. Peel release film at a 90 degree angle in a constant motion ensuring to keep weight on the outer edges, as you progress. Position the next sheet by overlapping seams and line up the overlap of the top sheet edge with the inside of the bottom sheet’s factory selvage SEALLap edges. Overlap and cut end laps minimum 6”.
C. This is only one example of an application technique; contractors may develop their own methods of application.
4. ApplicationA. Press the membrane into place with firm, even pressure.
5. ApplicationA. At seam overlaps, align next sheet of application, fold sheet
back and remove split release film. Remove, from the installed roll, the protective tape, SEALLap and apply even pressure to the self sealing SEALLap area, while overlapping the next sheet.
7. ApplicationA. Applications on a slope greater than 2-1/2” to 12” need to be
back nailed in the seams overlap with ring shanked metal capped roofing nails, 6” o.c.
6. ApplicationA. Roll seams and edges firmly with a steel or other suitable
roller to ensure full adhesion.
Applications Applications
®

10 11
3
4
6
5
3. ApplicationA. Fold the aligned membrane in half, exposing the dual
release film.
B. Peel release film at a 90 degree angle in a constant motion ensuring to keep weight on the outer edges, as you progress. Position the next sheet by overlapping seams and line up the overlap of the top sheet edge with the inside of the bottom sheet’s factory selvage SEALLap edges. Overlap and cut end laps minimum 6”.
C. This is only one example of an application technique; contractors may develop their own methods of application.
4. ApplicationA. Press the membrane into place with firm, even pressure.
5. ApplicationA. At seam overlaps, align next sheet of application, fold sheet
back and remove split release film. Remove, from the installed roll, the protective tape, SEALLap and apply even pressure to the self sealing SEALLap area, while overlapping the next sheet.
7. ApplicationA. Applications on a slope greater than 2-1/2” to 12” need to be
back nailed in the seams overlap with ring shanked metal capped roofing nails, 6” o.c.
6. ApplicationA. Roll seams and edges firmly with a steel or other suitable
roller to ensure full adhesion.
Applications Applications
Installation Guide®

12 13
7
8
9
9
8
8. Application A. After adhering rolls it is required that uniform pressure be
applied to the entire sheet area by using an 80 lb (minimum) linoleum roller, water filled lawn roller or similar weighted roller in a method suitable to the roof slope. Care must be taken to prevent injury when rolling membrane, especially on sloped surfaces.
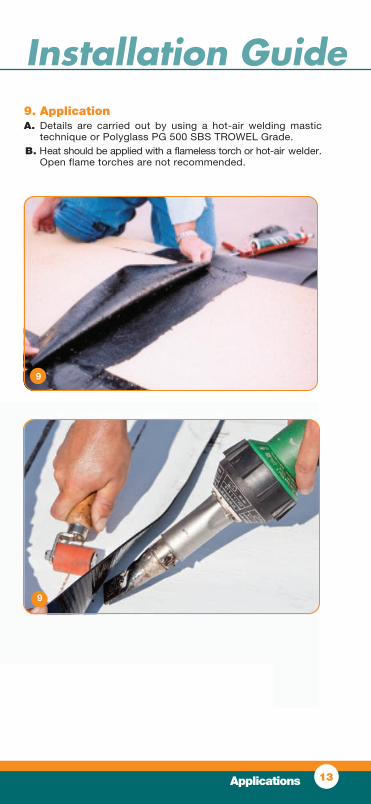
9. ApplicationA. Details are carried out by using a hot-air welding mastic
technique or Polyglass PG 500 SBS TROWEL Grade.B. Heat should be applied with a flameless torch or hot-air welder.
Open flame torches are not recommended.
Applications Applications
®
12 13
7
8
9
9
8
8. Application A. After adhering rolls it is required that uniform pressure be
applied to the entire sheet area by using an 80 lb (minimum) linoleum roller, water filled lawn roller or similar weighted roller in a method suitable to the roof slope. Care must be taken to prevent injury when rolling membrane, especially on sloped surfaces.
9. ApplicationA. Details are carried out by using a hot-air welding mastic
technique or Polyglass PG 500 SBS TROWEL Grade.B. Heat should be applied with a flameless torch or hot-air welder.
Open flame torches are not recommended.
Applications Applications
Installation Guide®

14 15
DO's
DON'Ts
ELASTOFLEX SA V starter strip cut to reqd. width, adhered to deck. Insure the polyolefin “top film” is clean and dust free in order to achieve the best adhesion of the following plies.Note: For 2 or more ply systems see Step 2.
Deck primed with asphalt primer (where required) - or accepted insulation attached to deck
Ref. Chalk line9-12" (may vary)
Roof nails (staggered 4”)
Decksubstrate
Drip edge (fastened in accordance with all local building codes)
ELASTOFLEX SA VStrip-in 9” wide minimum, stop 1/2” from outside edge of metal
ELASTOFLEX SA P or POLYFLEX SA Pmembrane installed over SA V Base strip and onto primed metal.
TYPICAL ROOF EDGE DETAIL
ELASTOFLEX SA V Base adhered to deck and over nailer, below edge metal. This is an alternative for 2 ply (or more) systems. The starter strip methodshown in Step 1 is for one-ply application only.
Notes:
1
2
3
1. DO prime all concrete, masonry, metal or metallic surfaces
2. DO apply to clean, dry, dust free surfaces
3. DO remove split release film at a 90 degree angle
4. DO roll all seams SEALLap and FASTLap to ensure 100% adhesion
5. DO reinforce all in/out side corners
6. DO back nail head laps whenever roof pitch is over 2-1/2:12
7. DO roll membrane when finished
8. DO keep material cool in summer
9. DO keep material warm in winter
10. DO sandwich all metal flashing components
1. DO NOT apply roofing membrane during inclement weather2. DO NOT take ADESO roll out of box until ready to apply3. DO NOT apply over shingles or similar roof coverings4. DO NOT store in direct sunlight5. DO NOT apply to a dirty, wet, dusty substrate6. DO NOT leave out of the box overnight. Stage only a few rolls in advance and use all rolls removed from packaging on the same day.7. DO NOT apply in cold or wet weather or when moisture is on deck (material substrate and ambient temperature should be at least 40 degrees F (5 degrees C) and rising)8. DO NOT forget to angle at 45 degrees on buried laps9. DO NOT forget to lap 6” on granular to granular overlaps
Do’s & Dont’s Details
A. Factory endlaps are provided with Polyglass proprietary FASTLap feature. These laps can be sealed in the usual way. At “BONDING AREAS” where a seam MUST be made to the granular surface, the following alternatives are acceptable:
Alternatives at Bonding area:1. Granular area heated to further embed granules into SBS or APP
compound before installing subsequent flashing piece
2. Heat weld subsequent flashing seams with hot-air gun or mini-torch
3. Granular endlaps must be a 6" Mininum & FULLY ADHERED. This can be achieved by carefully applying POLYPLUS 35 + SBS MODIFIED TROWEL ADHESIVE in the 6” overlap area before joining the seam surfaces
B. Ensure adhesion is achieved at all metal surfaces by priming with D41 Asphalt Roof Primer and providing a 3” min. overlap.
To prevent unsightly surplus adhesive on the visible area, mask the endlap temporarily with the tape and remove when the adhesive is dry.
STEP 2
STEP 1
STEP 3
®

14 15
DO's
DON'Ts
ELASTOFLEX SA V starter strip cut to reqd. width, adhered to deck. Insure the polyolefin “top film” is clean and dust free in order to achieve the best adhesion of the following plies.Note: For 2 or more ply systems see Step 2.
Deck primed with asphalt primer (where required) - or accepted insulation attached to deck
Ref. Chalk line9-12" (may vary)
Roof nails (staggered 4”)
Decksubstrate
Drip edge (fastened in accordance with all local building codes)
ELASTOFLEX SA VStrip-in 9” wide minimum, stop 1/2” from outside edge of metal
ELASTOFLEX SA P or POLYFLEX SA Pmembrane installed over SA V Base strip and onto primed metal.
TYPICAL ROOF EDGE DETAIL
ELASTOFLEX SA V Base adhered to deck and over nailer, below edge metal. This is an alternative for 2 ply (or more) systems. The starter strip methodshown in Step 1 is for one-ply application only.
Notes:
1
2
3
1. DO prime all concrete, masonry, metal or metallic surfaces
2. DO apply to clean, dry, dust free surfaces
3. DO remove split release film at a 90 degree angle
4. DO roll all seams SEALLap and FASTLap to ensure 100% adhesion
5. DO reinforce all in/out side corners
6. DO back nail head laps whenever roof pitch is over 2-1/2:12
7. DO roll membrane when finished
8. DO keep material cool in summer
9. DO keep material warm in winter
10. DO sandwich all metal flashing components
1. DO NOT apply roofing membrane during inclement weather2. DO NOT take ADESO roll out of box until ready to apply3. DO NOT apply over shingles or similar roof coverings4. DO NOT store in direct sunlight5. DO NOT apply to a dirty, wet, dusty substrate6. DO NOT leave out of the box overnight. Stage only a few rolls in advance and use all rolls removed from packaging on the same day.7. DO NOT apply in cold or wet weather or when moisture is on deck (material substrate and ambient temperature should be at least 40 degrees F (5 degrees C) and rising)8. DO NOT forget to angle at 45 degrees on buried laps9. DO NOT forget to lap 6” on granular to granular overlaps
Do’s & Dont’s Details
A. Factory endlaps are provided with Polyglass proprietary FASTLap feature. These laps can be sealed in the usual way. At “BONDING AREAS” where a seam MUST be made to the granular surface, the following alternatives are acceptable:
Alternatives at Bonding area:1. Granular area heated to further embed granules into SBS or APP
compound before installing subsequent flashing piece
2. Heat weld subsequent flashing seams with hot-air gun or mini-torch
3. Granular endlaps must be a 6" Mininum & FULLY ADHERED. This can be achieved by carefully applying POLYPLUS 35 + SBS MODIFIED TROWEL ADHESIVE in the 6” overlap area before joining the seam surfaces
B. Ensure adhesion is achieved at all metal surfaces by priming with D41 Asphalt Roof Primer and providing a 3” min. overlap.
To prevent unsightly surplus adhesive on the visible area, mask the endlap temporarily with the tape and remove when the adhesive is dry.
Installation Guide
STEP 2
STEP 1
STEP 3
®

16 17
45 DEG. ANGLE CUTAT SHEET CORNERS & POLYGLASS PG500 OR HEAT WELD Sealant protrudes
approx 1/4"
TOP ROLL
FASTLap ROLL-END SELVAGE
PRIMED SUBSTRATE* ELASTOFLEX SA V BASEor OTHER ACCEPTED BASE SHEET
POLYGLASS PG 500 SBS MASTIC APPLIED AT 45 DEG. ANGLE CUT[S]
,
PROTECTIVE SEAM TAPE SEALLap [TO BE REMOVED PRIOR TO SEAMING]
PREVIOUSLY INSTALLED SHEET or ROLL
SEAMING DETAIL FOR ELASTOFLEX SA P or POLYFLEX SA P
SEAM INTERSECTION TREATMENT – FIELD
45º ANGLE CUTAT SHEET CORNERS & POLYGLASS PG 500 OR HEAR WELD
PLAN VIEW OF Step 1.
Provide POLYGLASS approved detail ter-mination, as required by specification for wall treatment
Approved substrate
ELASTOFLEX SA Pfield membrane
ELASTOFLEX SA Vbase sheet
SEAM INTERSECTION TREATMENT – FLASHINGS
2
1
Sequence:A. Sheet 1 is applied to substrate.B. Triangle piece of approx. 45º are cut off at the bottom corner of
sheet 2 (usually at the FASTLap end of the sheet) and at the top corner of sheet 3 (the side lap selvage edge SEALLap).
C. Sheet 2 is aligned & applied to the substrate.D. A bead of Polyglass PG 500 SBS mastic is applied at the angle
cuts (see inset) or heat weld.E. Sheet 3 is applied.F. Top sheet is carefully rolled parallel to both sides of the sealant
not on the sealant.
Note:
Details Details
Refer To Notes On Page15
Bonding Area
Bondin
g Are
a
The angle cut & seam sealant is to be applied at all self-adhered sheet overlaps (base & cap)
STEP 1
STEP 2
OR HEAT WELD
®

16 17
45 DEG. ANGLE CUTAT SHEET CORNERS & POLYGLASS PG500 OR HEAT WELD Sealant protrudes
approx 1/4"
TOP ROLL
FASTLap ROLL-END SELVAGE
PRIMED SUBSTRATE* ELASTOFLEX SA V BASEor OTHER ACCEPTED BASE SHEET
POLYGLASS PG 500 SBS MASTIC APPLIED AT 45 DEG. ANGLE CUT[S]
,
PROTECTIVE SEAM TAPE SEALLap [TO BE REMOVED PRIOR TO SEAMING]
PREVIOUSLY INSTALLED SHEET or ROLL
SEAMING DETAIL FOR ELASTOFLEX SA P or POLYFLEX SA P
SEAM INTERSECTION TREATMENT – FIELD
45º ANGLE CUTAT SHEET CORNERS & POLYGLASS PG 500 OR HEAR WELD
PLAN VIEW OF Step 1.
Provide POLYGLASS approved detail ter-mination, as required by specification for wall treatment
Approved substrate
ELASTOFLEX SA Pfield membrane
ELASTOFLEX SA Vbase sheet
SEAM INTERSECTION TREATMENT – FLASHINGS
2
1
Sequence:A. Sheet 1 is applied to substrate.B. Triangle piece of approx. 45º are cut off at the bottom corner of
sheet 2 (usually at the FASTLap end of the sheet) and at the top corner of sheet 3 (the side lap selvage edge SEALLap).
C. Sheet 2 is aligned & applied to the substrate.D. A bead of Polyglass PG 500 SBS mastic is applied at the angle
cuts (see inset) or heat weld.E. Sheet 3 is applied.F. Top sheet is carefully rolled parallel to both sides of the sealant
not on the sealant.
Note:
Details Details
Refer To Notes On Page15
Bonding Area
Bondin
g Are
a
The angle cut & seam sealant is to be applied at all self-adhered sheet overlaps (base & cap)
Installation Guide
STEP 1
STEP 2
OR HEAT WELD
®

18 19
PGSA01_ADESO® SA RAISED EDGE METAL DETAIL PGSA02_ADESO® SA EDGE AND GUTTER DETAIL
032 min. edge metal, by others (primed with Polyglass PG 100, ASTM D-41 primer)
Continuous cleat max. 12” O.C.
Wood Nailers (see note 1)
Sheet metal edge flashing prime flange before stripping (required),with Polyglass PG 100 asphalt primer
Multiplte-ply Polyglass SA V & SA Proofing system plies
Fasteners at Approx. 6”O.C., staggered
Gutter spacer alternately spa-ced from brackets
Optional: flexible Polyglass SAmembrane closure; extend in to gutter
Gutter bracket support at 12” to 24”O.C. depending upon conditionsContinuous sheet metal closure
fastened approx. 18” 457mm O.C.
Extend one ply or a separate membrane, ELASTOFLEX SA V,sheet to overlay metal closure mechanically attached 8” O.C. to fascia
Continuous cleat *(fastened max. 12” O.C.)
Sheet metal gutter
Optional: turn-down
Roof deck
Wood nailers
Polyglass ELASTOFLEX SA V BASE ply sheet, set to roof edge
Wood cant fasten to blocking
Roof Deck
Thermal insulation
Polyglass ELSTOFLEX SA VBASE sheet
Fastener & stress plate, 6” O.C.
Polyglass SA P CAP, flashing ply
Polyglass ELASTOFLEX SA V BASE ply flashing to cover base sheet
Polyglass SAP CAP sheet
Polyglass PG 650 mastic adhesive
Coverboard insulation(by others), where required.
Fasten base flashing max. 8” (203 mm) O.C.
Fastener & sealing washer at min. 8” O.C. approved by metal manufacturer
Set flange in Polyglass PG 500
Details Details
Notes:1. Attach wood nailer and edge metal to wall/deck in
accordance with ANSI/SPRI ES-1.2. Refer to SMACNA recommendations & details regarding
metal thickness & cleat requirements.3. Membrane endlaps must be 6” minimum & fully adhered at
all membrane in all locations where FASTLap is not present.4. All acceptance substrates must be primed with Polyglass
PG 100 primer.5. Thermal insulation must be of suitable type & density to
accept ADESO self-adhered membranes.6. Mechanically attached thermal insulation is to be fastened
in accordance with insulation manufacturer’s approved fastening pattern for project conditions.
Notes:1. Attach wood nailer to wall/deck in accordance with ANSI/SPR1
ES-1.2. Wood blocking may be slotted for venting of wet-fill decks or
other applicable constructions.3. This detail should be used only where the deck is supported by
the outside wall.4. Refer to SMACNA recommendations & details regarding metal
thickness & cleat requirements.5. Membrane endlaps must be 6” minimum & fully adhered to all
membrane in all locations where FASTLap is not present.
*Continuous cleat is recommended to be at least one gauge heavier than edge flashing metal.
Installation Guide®

20 21
Continuous through- wall flashing (by others)
Wood nailer
Sheet metal parapet cap (by others)
Thermal insulationRoof deck
Termination fastened 6” O.C.
Continuous sheet membrane liner (by others)
Continuous sheet tapered wood shim(E.G. beveled cedar siding)
Coverboard insulation,where required
Wood cant fastened to nailers
Continuous cleat (see note 3)
Polyglass ELASTOFLEX SA V flashing sheet
Polyglass PG 500 mastic Polyglass SA P field sheetPolyglass ELASTOFLEX SA V
Seal top of flashing with a 3-course of verti-cal grade roof cement and reinforcement fa-bric (by others), or extension of Polyglass SA flashing plies over top of wall
Fastener & sealing washer fastened at(approx. 18” (457mm) O.C. depending upon wind zone and local conditions)
Polyglass SA P flashing sheet adhered toPolyglass ELASTOFLEX SA P in full bedding of Polyglass PG 500 mastic.
Extension of Polyglass field plies above head of cant. Required (not shown for clarity)
2” (51mm) wide clip approx. 30” (762mm) O.C. (not shown for clarity)
Extension of field plies above head of cant, required (not shown for clarity)
Polyglass SA P flashing sheet adhered to PolyglassELASTOFLEX SA P in full bedding of Polyglass PG 500
Fasteners approx. 18” O.C.
Sheet metal reglet (by others)
Tooled polyurethane sealant (by others)
Removable sheet metal counterflashing (by others)
Termination fastened 6” O.C. (required at ›18” vertical appl.)
Polyglass ELASTOFLEX SA V flashing sheet
PolyglassPG 500 mastic
Polyglass SA P field sheet
Polyglass ELASTOFLEX SA V
Coverboard insulation, where required
Thermal insulation
Roof deck
Wood cant fastened to nailers
Wood blocking mechanically fastened
PGSA03_ ADESO® SA BASE FLASHING DETAIL PGSA04_ADESO® SA PARAPET CAP DETAIL
Details Details
Notes:1. Acceptable masonry, metal & wood substrates must be primed
with Polyglass PG 100 asphalt primer prior to application of ADESO self-adhered membranes.
2. Flashing plies installed over granular field sheet must be set in full bedding of Polyglass PG 500 mastic to assure a watertight seal over the granules or heat welded.
3. All wood blocking is to be attached per ANSI/SPRI ES-1 recom-mendations.
4. Thermal insulation must be of suitable type & density to accept ADESO self-adhered membranes.
5. Metal flashing (by others) to be fabricated and installed following NRCA & SMACNA guidelines and recommendations.
Notes:1. Acceptable masonry, metal & wood substrates must be primed
with Polyglass PG 100 prior to application of ADESO self-adhered
membranes.2. Flashing plies installed over granular field sheet must be heat
seamed or set in full bedding of Polyglass PG 500 mastic to assure a watertight seal over the granules.
3. All wood blocking to be attached per ANSI/SPRI ES-1 recommendations.4. Thermal insulation must be of suitable type & density to accept
ADESO self-adhered membranes.5.Metal flashing (by others) to be fabricated and installed following
NRCA & SMACNA guidelines and recommendations.
®

20 21
Continuous through- wall flashing (by others)
Wood nailer
Sheet metal parapet cap (by others)
Thermal insulationRoof deck
Termination fastened 6” O.C.
Continuous sheet membrane liner (by others)
Continuous sheet tapered wood shim(E.G. beveled cedar siding)
Coverboard insulation,where required
Wood cant fastened to nailers
Continuous cleat (see note 3)
Polyglass ELASTOFLEX SA V flashing sheet
Polyglass PG 500 mastic Polyglass SA P field sheetPolyglass ELASTOFLEX SA V
Seal top of flashing with a 3-course of verti-cal grade roof cement and reinforcement fa-bric (by others), or extension of Polyglass SA flashing plies over top of wall
Fastener & sealing washer fastened at(approx. 18” (457mm) O.C. depending upon wind zone and local conditions)
Polyglass SA P flashing sheet adhered toPolyglass ELASTOFLEX SA P in full bedding of Polyglass PG 500 mastic.
Extension of Polyglass field plies above head of cant. Required (not shown for clarity)
2” (51mm) wide clip approx. 30” (762mm) O.C. (not shown for clarity)
Extension of field plies above head of cant, required (not shown for clarity)
Polyglass SA P flashing sheet adhered to PolyglassELASTOFLEX SA P in full bedding of Polyglass PG 500
Fasteners approx. 18” O.C.
Sheet metal reglet (by others)
Tooled polyurethane sealant (by others)
Removable sheet metal counterflashing (by others)
Termination fastened 6” O.C. (required at ›18” vertical appl.)
Polyglass ELASTOFLEX SA V flashing sheet
PolyglassPG 500 mastic
Polyglass SA P field sheet
Polyglass ELASTOFLEX SA V
Coverboard insulation, where required
Thermal insulation
Roof deck
Wood cant fastened to nailers
Wood blocking mechanically fastened
PGSA03_ ADESO® SA BASE FLASHING DETAIL PGSA04_ADESO® SA PARAPET CAP DETAIL
Details Details
Notes:1. Acceptable masonry, metal & wood substrates must be primed
with Polyglass PG 100 asphalt primer prior to application of ADESO self-adhered membranes.
2. Flashing plies installed over granular field sheet must be set in full bedding of Polyglass PG 500 mastic to assure a watertight seal over the granules or heat welded.
3. All wood blocking is to be attached per ANSI/SPRI ES-1 recom-mendations.
4. Thermal insulation must be of suitable type & density to accept ADESO self-adhered membranes.
5. Metal flashing (by others) to be fabricated and installed following NRCA & SMACNA guidelines and recommendations.
Notes:1. Acceptable masonry, metal & wood substrates must be primed
with Polyglass PG 100 prior to application of ADESO self-adhered
membranes.2. Flashing plies installed over granular field sheet must be heat
seamed or set in full bedding of Polyglass PG 500 mastic to assure a watertight seal over the granules.
3. All wood blocking to be attached per ANSI/SPRI ES-1 recommendations.4. Thermal insulation must be of suitable type & density to accept
ADESO self-adhered membranes.5.Metal flashing (by others) to be fabricated and installed following
NRCA & SMACNA guidelines and recommendations.
Installation Guide®

22 23
Fasteners & sealing washers at maximum 18” O.C. or as required by skylight/hatchmanufacturer
Extension of Polyglass field plies above head of cant, required (not shown for clarity)
Polyglass ELASTOFLEX SA V flashing sheet
Polyglass PG 500 adhesivePolyglass SA P field sheet
Polyglass ELASTOFLEX SA VCoverboard insulation, where required
Thermal insulationRoof deck
Wood cant
Wood nailers and curb
Polyglass SA P flashing sheet adhered toPolyglass ELASTOFLEX SA V in full bedding of Polyglass PG 500
Double dome skylight/hatch (by others)
Skylight frame with weep holes
Sheet metal counterflashing (by others)
Termination fastened 6” O.C.
Polyplus 35 premium SBS sealant
Stainless steel drawband
Polyglass membrane flashing to extend 8” min. beyond opening
Flare-cut Polyglass membrane flashing collar with “fingers”or lead jack
Polyglass PG 100, asphalt primer,Polyglass PG 500 adhesive(dependant on application method)
Polyglass ELASTOFLEX SA P
Polyglass ELASTOFLEX SA V BASE
Rigid insulation or approved substrate
Deck
Coverboard insulation, where required
8” min. (TYP)
4” min. (TYP.)
PGSA05_ADESO® SA SKYLIGHT, SCUTTLE & CURB, DETAIL PGSA06_ADESO® SA VENT PIPE FLASHING DETAIL
Details Details
Notes:1. Acceptable masonry, metal & wood substrates must be primed
with Polyglass PG 100 asphalt primer prior to application of ADESO self-adhered membranes.
2. Flashing plies installed over granular field sheet must be heat seamed or set in full bedding of Polyglass PG 500 adhesive to assure a watertight seal over the granules.
3. All wood blocking to be attached per ANSI/SPRI ES-1 recom-mendations.
4. Thermal insulation must be of suitable type & density to accept ADESO self-adhered membranes.
5. Metal flashing (by others) to be fabricated and installed following NRCA & SMACNA guidelines and recommendations.
Notes:1.Details are carried out by using a hot-air welding technique or
Polyglass PG 500 TROWEL Grade Adhesive, in combination with the ADESO self-adhered membranes.
®

22 23
Fasteners & sealing washers at maximum 18” O.C. or as required by skylight/hatchmanufacturer
Extension of Polyglass field plies above head of cant, required (not shown for clarity)
Polyglass ELASTOFLEX SA V flashing sheet
Polyglass PG 500 adhesivePolyglass SA P field sheet
Polyglass ELASTOFLEX SA VCoverboard insulation, where required
Thermal insulationRoof deck
Wood cant
Wood nailers and curb
Polyglass SA P flashing sheet adhered toPolyglass ELASTOFLEX SA V in full bedding of Polyglass PG 500
Double dome skylight/hatch (by others)
Skylight frame with weep holes
Sheet metal counterflashing (by others)
Termination fastened 6” O.C.
Polyplus 35 premium SBS sealant
Stainless steel drawband
Polyglass membrane flashing to extend 8” min. beyond opening
Flare-cut Polyglass membrane flashing collar with “fingers”or lead jack
Polyglass PG 100, asphalt primer,Polyglass PG 500 adhesive(dependant on application method)
Polyglass ELASTOFLEX SA P
Polyglass ELASTOFLEX SA V BASE
Rigid insulation or approved substrate
Deck
Coverboard insulation, where required
8” min. (TYP)
4” min. (TYP.)
PGSA05_ADESO® SA SKYLIGHT, SCUTTLE & CURB, DETAIL PGSA06_ADESO® SA VENT PIPE FLASHING DETAIL
Details Details
Notes:1. Acceptable masonry, metal & wood substrates must be primed
with Polyglass PG 100 asphalt primer prior to application of ADESO self-adhered membranes.
2. Flashing plies installed over granular field sheet must be heat seamed or set in full bedding of Polyglass PG 500 adhesive to assure a watertight seal over the granules.
3. All wood blocking to be attached per ANSI/SPRI ES-1 recom-mendations.
4. Thermal insulation must be of suitable type & density to accept ADESO self-adhered membranes.
5. Metal flashing (by others) to be fabricated and installed following NRCA & SMACNA guidelines and recommendations.
Notes:1.Details are carried out by using a hot-air welding technique or
Polyglass PG 500 TROWEL Grade Adhesive, in combination with the ADESO self-adhered membranes.
Installation Guide®

24 25
PGSA09_ADESO® ELASTOFLEX SA & POLYFLEX SA VERTICAL WALL DETAIL
PGSA07_ADESO® SA LIGHT/MEDIUM WEIGHT EQUIPMENT CURB DETAIL
Sheet metal cover with receiver for counterflashing (by others)
Fastener & sealing washer atmaximum 18” O.C. or the spacingrequired by metal manufacturer
Extension of field plies above head of cant, required (not shown for clarity)
Removable sheet metalcounterflashing (by others)
Wood cant fastened tonailers
Multiple-ply Polyglassmembrane base flashing(8” min. height) (ref. note #5)
Fasteners approx. 8” (203mm) O.C.
Multiple-ply PolyglassELASTOFLEX SA roof system
Coverboard insulation.Where requiredThermal insulationRoof deck
Wood nailers
Wood curb
Neoprene pad
Set bolts in sealant
Polyglass acceptable fastners 6” O.C.
Polyglass 2000MB+ caulk
Embed granules or usePOLYGLASS PG 500 adhesive
ELASTOFLEX SA (P)
ELASTOBASE (Poly/Sand)or ELASTOFLEX SA V BASE
Details Details
Notes:1. Attach wood nailer to wall/ deck in accordance with FMRC
guidelines, as per section 1-28, regarding windloads to roof systems & deck securement.
2. Wood blocking may be slotted for venting of wet-fill decks or other applicable constructions.
3. This detail should be used only where the deck is supported by outside wall.
4. Refer to SMACNA recommendations & details regarding metal thickness & cleat requirements.
5. Membrane endlaps must be 6” minimum & fully adhered to all membrane in all locations where FASTLap is not present.
Notes:1. Intermittent fastening is to be at 6” O.C.2. Maximum wall height without intermittent fastening is 24” unless
accepted in writing by Polyglass Technical Services, prior to application.
3. All areas where salvage edge is not present shall have granules embedded by utilizing heat, prior to overlapping.
An alternative application is to use Polyglass POLYPLUS 35 cold adhesive.
®

24 25
PGSA09_ADESO® ELASTOFLEX SA & POLYFLEX SA VERTICAL WALL DETAIL
PGSA07_ADESO® SA LIGHT/MEDIUM WEIGHT EQUIPMENT CURB DETAIL
Sheet metal cover with receiver for counterflashing (by others)
Fastener & sealing washer atmaximum 18” O.C. or the spacingrequired by metal manufacturer
Extension of field plies above head of cant, required (not shown for clarity)
Removable sheet metalcounterflashing (by others)
Wood cant fastened tonailers
Multiple-ply Polyglassmembrane base flashing(8” min. height) (ref. note #5)
Fasteners approx. 8” (203mm) O.C.
Multiple-ply PolyglassELASTOFLEX SA roof system
Coverboard insulation.Where requiredThermal insulationRoof deck
Wood nailers
Wood curb
Neoprene pad
Set bolts in sealant
Polyglass acceptable fastners 6” O.C.
Polyglass 2000MB+ caulk
Embed granules or usePOLYGLASS PG 500 adhesive
ELASTOFLEX SA (P)
ELASTOBASE (Poly/Sand)or ELASTOFLEX SA V BASE
Details Details
Notes:1. Attach wood nailer to wall/ deck in accordance with FMRC
guidelines, as per section 1-28, regarding windloads to roof systems & deck securement.
2. Wood blocking may be slotted for venting of wet-fill decks or other applicable constructions.
3. This detail should be used only where the deck is supported by outside wall.
4. Refer to SMACNA recommendations & details regarding metal thickness & cleat requirements.
5. Membrane endlaps must be 6” minimum & fully adhered to all membrane in all locations where FASTLap is not present.
Notes:1. Intermittent fastening is to be at 6” O.C.2. Maximum wall height without intermittent fastening is 24” unless
accepted in writing by Polyglass Technical Services, prior to application.
3. All areas where salvage edge is not present shall have granules embedded by utilizing heat, prior to overlapping.
An alternative application is to use Polyglass POLYPLUS 35 cold adhesive.
Installation Guide®

26 27
PGSA15_ADESO® SA BASE FLASHING PARAPETWALL - 2PLY DETAIL
PGSA16_ADESO® SA CLOSED VALLEY FLASHING DETAIL
“L” metal flashing, by others (set in mastic)
Wall siding, by others
PolyglassELASTOFLEX SA P flashing membrane
Polyglass ELASTOFLEX SA P
Polyglass ELASTOFLEX SA V BASE
Primed substrate (see note 3) mechanically fastened, per specification
Existing substrate
Polyglass ELASTOFLEX SA Vflashing membrane
Lap joint set in bed of Polyglass PG 500 + (trowel grade) mod. bit. Adhesive
Polyglass SA CAP membrane
Approved substrate
ELASTOFLEX SA V BASE
ELASTOFLEX SA V BASE
12” min.
(selvage edge end)
18” minimum
(half width of
ELASTOFLEX SA V)
Details
Details Details
Notes:
1. Refer to SMACNA recommendations & details regarding metal thickness & cleat requirements.
2. Membrane endlaps must be 6” minimum & fully adhered to all membrane in all locations where FASTLap is not present.
3. Polyglass USA requires all metal surfaces to be cleaned and primed with Polyglass PG 100 asphalt primer or an ASTM #D-41 equal.
Notes:Flashing membranes to be set in bed of Polyglass PG 500 or approved equal, modified asphalt adhesive (trowel grade)
Notes:
1. Closed valley to be lined with ELASTOFLEX SA V BASE and an ADESO self-adhered CAP sheets to run parallel through the valley.
2. Finish membranes to overlay flashing membrane creating the closed valley, overlap joints, which occur over granulated materials, are to be set in bed of Polyglass PG 500 or approved trowel grade, modified asphalt adhesive.
3. Valleys can be lined using the Polyglass header roll or metal flashing by others, consult Polyglass Technical Services at (866) 802-8017 for such applications.
®

26 27
PGSA15_ADESO® SA BASE FLASHING PARAPETWALL - 2PLY DETAIL
PGSA16_ADESO® SA CLOSED VALLEY FLASHING DETAIL
“L” metal flashing, by others (set in mastic)
Wall siding, by others
PolyglassELASTOFLEX SA P flashing membrane
Polyglass ELASTOFLEX SA P
Polyglass ELASTOFLEX SA V BASE
Primed substrate (see note 3) mechanically fastened, per specification
Existing substrate
Polyglass ELASTOFLEX SA Vflashing membrane
Lap joint set in bed of Polyglass PG 500 + (trowel grade) mod. bit. Adhesive
Polyglass SA CAP membrane
Approved substrate
ELASTOFLEX SA V BASE
ELASTOFLEX SA V BASE
12” min.
(selvage edge end)
18” minimum
(half width of
ELASTOFLEX SA V)
Details
Details Details
Notes:
1. Refer to SMACNA recommendations & details regarding metal thickness & cleat requirements.
2. Membrane endlaps must be 6” minimum & fully adhered to all membrane in all locations where FASTLap is not present.
3. Polyglass USA requires all metal surfaces to be cleaned and primed with Polyglass PG 100 asphalt primer or an ASTM #D-41 equal.
Notes:Flashing membranes to be set in bed of Polyglass PG 500 or approved equal, modified asphalt adhesive (trowel grade)
Notes:
1. Closed valley to be lined with ELASTOFLEX SA V BASE and an ADESO self-adhered CAP sheets to run parallel through the valley.
2. Finish membranes to overlay flashing membrane creating the closed valley, overlap joints, which occur over granulated materials, are to be set in bed of Polyglass PG 500 or approved trowel grade, modified asphalt adhesive.
3. Valleys can be lined using the Polyglass header roll or metal flashing by others, consult Polyglass Technical Services at (866) 802-8017 for such applications.
Installation Guide®
28 29
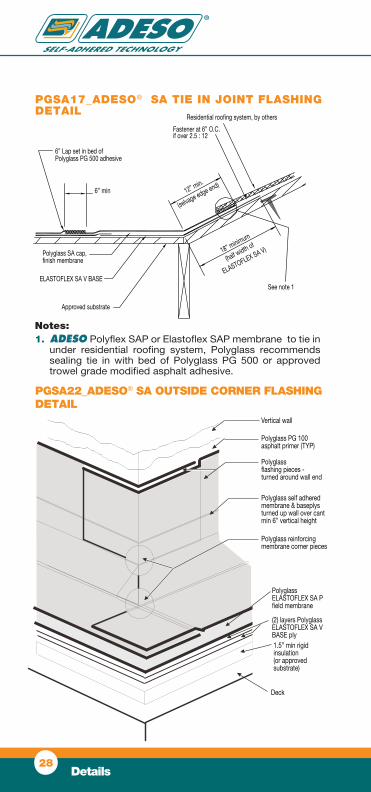
PGSA17_ADESO® SA TIE IN JOINT FLASHING DETAIL
Residential roofing system, by others
Approved substrate
ELASTOFLEX SA V BASE
Polyglass SA cap,finish membrane
6” Lap set in bed ofPolyglass PG 500 adhesive
6” min
See note 1
12” min.
(selvage edge end)
18” minimum
(half width of
ELASTOFLEX SA V)
Fastener at 6” O.C. if over 2.5 : 12
Vertical wall
Polyglass PG 100asphalt primer (TYP)
Polyglass self adheredmembrane & baseplysturned up wall over cantmin 6” vertical height
Polyglassflashing pieces -turned around wall end
Polyglass reinforcing membrane corner pieces
PolyglassELASTOFLEX SA Pfield membrane
(2) layers PolyglassELASTOFLEX SA VBASE ply1.5” min rigidinsulation(or approvedsubstrate)
Deck
PGSA22_ADESO® SA OUTSIDE CORNER FLASHINGDETAIL
Vertical wall
Polyglass PG 100asphalt primer 8or ASTM D-41 equal
Polyglassmembrane flashing
Polyglass reinforcing membranecorner piece
Polyglass SA CAP field membrane
(2) layers Polyglass ELASTOFLEX SA V BASE ply
Fire retardant cant strip req. (covered with base sheet)
1,5” min. rigidinsulation 8orapproved substrate)
Deck
PGSA23_ADESO® SA INSIDE CORNER FLASHING DETAIL
Details Details
Notes: 1. ADESO Polyflex SAP or Elastoflex SAP membrane to tie in
under residential roofing system, Polyglass recommends sealing tie in with bed of Polyglass PG 500 or approved trowel grade modified asphalt adhesive.
Notes:1. Membrane end laps must be a minimum 6” & fully adhered at all
membrane to membrane seams, and 3” minimum where overlapped and adhered to a primed metal surface.
Notes:1. Membrane end laps must be a minimum 6” and fully adhered at
all membrane to membrane seams and a minimum 3” where overlapped and adhered to primed metal surface.
®

28 29
PGSA17_ADESO® SA TIE IN JOINT FLASHING DETAIL
Residential roofing system, by others
Approved substrate
ELASTOFLEX SA V BASE
Polyglass SA cap,finish membrane
6” Lap set in bed ofPolyglass PG 500 adhesive
6” min
See note 1
12” min.
(selvage edge end)
18” minimum
(half width of
ELASTOFLEX SA V)
Fastener at 6” O.C. if over 2.5 : 12
Vertical wall
Polyglass PG 100asphalt primer (TYP)
Polyglass self adheredmembrane & baseplysturned up wall over cantmin 6” vertical height
Polyglassflashing pieces -turned around wall end
Polyglass reinforcing membrane corner pieces
PolyglassELASTOFLEX SA Pfield membrane
(2) layers PolyglassELASTOFLEX SA VBASE ply1.5” min rigidinsulation(or approvedsubstrate)
Deck
PGSA22_ADESO® SA OUTSIDE CORNER FLASHINGDETAIL
Vertical wall
Polyglass PG 100asphalt primer 8or ASTM D-41 equal
Polyglassmembrane flashing
Polyglass reinforcing membranecorner piece
Polyglass SA CAP field membrane
(2) layers Polyglass ELASTOFLEX SA V BASE ply
Fire retardant cant strip req. (covered with base sheet)
1,5” min. rigidinsulation 8orapproved substrate)
Deck
PGSA23_ADESO® SA INSIDE CORNER FLASHING DETAIL
Details Details
Notes: 1. ADESO Polyflex SAP or Elastoflex SAP membrane to tie in
under residential roofing system, Polyglass recommends sealing tie in with bed of Polyglass PG 500 or approved trowel grade modified asphalt adhesive.
Notes:1. Membrane end laps must be a minimum 6” & fully adhered at all
membrane to membrane seams, and 3” minimum where overlapped and adhered to a primed metal surface.
Notes:1. Membrane end laps must be a minimum 6” and fully adhered at
all membrane to membrane seams and a minimum 3” where overlapped and adhered to primed metal surface.
Installation Guide®

Notes:1. Attach wood nailer to wall/deck in accordance with
ANSI/SPRI ES-1.2. Wood blocking may be slotted for venting of wet-fill decks
or other applicable constructions.3. This detail should be used only where the deck is supported
by the outside wall.4. Refer to SMACNA recommendations & details regarding
metal thickness & cleat requirements.5. Membrane endlaps must be 6” minimum & fully adhered to
all membrane in all locations where FASTLap is not present.
30 31
Drain strainer
Cast iron clamping ring
30” square minimum, lead or 16 oz.copper flashing set in tooled Polyglass PG 500 + sealant prime top surfacebefore stripping
Polyglass ELASTOFLEX SAroofing membranes(2 plies, SA V + 1 ply SA P)
Polyglass SA multiple-plyroof membrane system
Tapered insulation
Roof deck
Thermal insulation
Coverboard insulation, where required
Drain bowl
Under deck clamp
ELASTOFLEX SA Pmembrane field plies, metal flashing and stripping pliesall extend under clamping ring
PGSA32_ADESO® SA ROOF DRAIN DETAIL – ALTERNATE
Details | General Recommendations
SURFACE PREPARATION & PRECAUTIONS
1. Apply only when the weather is dry and all material interface temperatures (air, roof deck, membrane) are 40 degrees F (5 degrees C) and rising. Roofing installation shall not be conducted when water is in any form i.e. rain, dew, ice, frost, snow. Use of hot air gun or SBS cold adhesive, may be required under low temperature conditions.
2. All roof deck application areas shall have positive drainage, continuous support and structurally sound to support the live and dead load requirements of the roofing system and sufficiently rigid to support construction traffic.
3. Apply only over clean, dry and dust-free surfaces. For best results, wood, concrete, masonry, metal or metallic surfaces and acceptable smooth surface BUR and other acceptable substrates are to be primed with Polyglass PG 100 Asphalt Roof Primer prior to the application of the membrane. The primed substrate should be fully dry prior to installation.
4. Masonry or concrete supported by steel frame or other steel structure shall be provided with suitable expansion joint designs and detailed for movement.
5. Ensure that installation of any ADESO self-adhered
product does not prevent or interfere with ventilation of existing construction.STORAGE
ADESO self-adhered membranes should be stored at room temperature whenever possible. Avoid storing out of the box for prolonged periods. Do not take the roll out of the box until it is ready for application. Do not store unpacked roll in direct sunlight and in bright sunshine or in hot weather. Removal of release film may cause static electricity discharge.
ADESO self-adhered membranes are to be applied directly to approved insulations, Polyglass base sheets, and roof decks. Do not apply to shingles, shakes or other residential finished roof coverings.
General Recommendations
®

Notes:1. Attach wood nailer to wall/deck in accordance with
ANSI/SPRI ES-1.2. Wood blocking may be slotted for venting of wet-fill decks
or other applicable constructions.3. This detail should be used only where the deck is supported
by the outside wall.4. Refer to SMACNA recommendations & details regarding
metal thickness & cleat requirements.5. Membrane endlaps must be 6” minimum & fully adhered to
all membrane in all locations where FASTLap is not present.
30 31
Drain strainer
Cast iron clamping ring
30” square minimum, lead or 16 oz.copper flashing set in tooled Polyglass PG 500 + sealant prime top surfacebefore stripping
Polyglass ELASTOFLEX SAroofing membranes(2 plies, SA V + 1 ply SA P)
Polyglass SA multiple-plyroof membrane system
Tapered insulation
Roof deck
Thermal insulation
Coverboard insulation, where required
Drain bowl
Under deck clamp
ELASTOFLEX SA Pmembrane field plies, metal flashing and stripping pliesall extend under clamping ring
PGSA32_ADESO® SA ROOF DRAIN DETAIL – ALTERNATE
Details | General Recommendations
SURFACE PREPARATION & PRECAUTIONS
1. Apply only when the weather is dry and all material interface temperatures (air, roof deck, membrane) are 40 degrees F (5 degrees C) and rising. Roofing installation shall not be conducted when water is in any form i.e. rain, dew, ice, frost, snow. Use of hot air gun or SBS cold adhesive, may be required under low temperature conditions.
2. All roof deck application areas shall have positive drainage, continuous support and structurally sound to support the live and dead load requirements of the roofing system and sufficiently rigid to support construction traffic.
3. Apply only over clean, dry and dust-free surfaces. For best results, wood, concrete, masonry, metal or metallic surfaces and acceptable smooth surface BUR and other acceptable substrates are to be primed with Polyglass PG 100 Asphalt Roof Primer prior to the application of the membrane. The primed substrate should be fully dry prior to installation.
4. Masonry or concrete supported by steel frame or other steel structure shall be provided with suitable expansion joint designs and detailed for movement.
5. Ensure that installation of any ADESO self-adhered
product does not prevent or interfere with ventilation of existing construction.STORAGE
ADESO self-adhered membranes should be stored at room temperature whenever possible. Avoid storing out of the box for prolonged periods. Do not take the roll out of the box until it is ready for application. Do not store unpacked roll in direct sunlight and in bright sunshine or in hot weather. Removal of release film may cause static electricity discharge.
ADESO self-adhered membranes are to be applied directly to approved insulations, Polyglass base sheets, and roof decks. Do not apply to shingles, shakes or other residential finished roof coverings.
General Recommendations
Installation Guide®

ww
w.p
olyg
lass
.com
POLYGLASS® USA, Inc.Corporate Office
1111 West Newport Center Drive Deerfield Beach, Florida 33442
Phone (954) 233-1330 - Fax (954) 418-4453 Toll Free (888) 410-1375
e-mail: [email protected]
Manufacturing FacilitiesFernley, Nevada 89408
Phone (775) 575-6007 - Fax (775) 575-2314 Toll Free (800) 222-9782
Hazleton, Pennsylvania 18202 Phone (570) 384-1230 - Fax (570) 384-3282
Toll Free (800) 894-4563
Winter Haven, Florida 33880 Phone (863) 297-5800 - Fax (863) 618-2193
Toll Free (866) 802-8017
for Self-Adhered Membranes Installation Guide
®
4AD
ESO
1 - 0
2/11
- 1
0,00
0- In
nerW
orki
ngs