installation checklist - summit racing equipment · pdf fileinstallation checklist 1) ... if...
TRANSCRIPT


INSTALLATION CHECKLIST1) Did you read the Installation Manual?
2) Did you connect EVERY wire shown on the “Main Schematic?”
3) Under NO circumstances may ANY other Temperature Sending Unit be used with this
kit.
DO NOT JUMPER THE TEMP SENSOR TO ANY OTHER EFI SENSOR WIRES.
4) THE ADJUSTABLE POTENTIOMETERS ARE VERY EASILY STRIPPED!
DO NOT FORCE THEM PAST THEIR INTERVAL STOPS!
5) If Fan(s) turn on full speed and do not respond to any adjustments of the POTS (plas-
tic adjusting screws on F5 controller), you will need to test the resistance of the Tempera-
ture Sending Unit.
TO DO THIS:
- Unplug the black 14-pin connector from the module.
- Using a Voltmeter, check the resistance between the Yellow Wire (Pin 5) and the Black
Wire (Pin 7), and compare to the Temperature Sensor Resistance graph on this checklist.
IF YOU HAVE ANY QUESTIONS, CALL OUR TECH LINE AT 1-800-423-9696
Temperature Sender Resistance DataTEMP (F)
9399
7263
5658
4441
3511
2795
2240
1806
1465
1195
980
809
671
559
469
395
334
283
241.8
207.1
178.0
153.6
133.1
115.7
32
41
50
59
68
77
86
95
104
113
122
131
140
149
158
167
176
185
194
203
212
221
230
239
RESISTANCE(Ohms)
DO NOT TWIST THESE PAST THE STOPS!
POTS DAMAGED BY CUSTOMER WILL VOID WARRANTY!
SIDE VIEW

1
2501 Ludelle Street
Fort Worth, Texas 76105 817-244-6212 Phone • 817-244-4024 Fax
888-350-6588 Sales • 800-423-9696 Tech E-mail: [email protected]
Web: www.painlessperformance.com
30140 &30142
F5 Dual Fan Controller
Introduction: The F5 Dual Fan Controller can be installed onto most any
vehicle with electric radiator cooling fans. These fan controllers, 30140 and
30142, are designed to control two brushed 12VDC electric motor cooling fans.
The following list of parts, necessary terminals, wire, connectors, mounting
hardware and components, are included in this kit.
(1) F5 Fan Controller Module with Fan Motor Ground Wires
(1) 14 pin header connector with wire harness
(1) MIDI fuse holder
(1) 70 Amp MIDI fuse
(2) #6 x ½” fuse mounting screws
(2) #6 nuts for fuse mounting screws
(4) 1/4” Heat Shrink
(3) 10 gauge #10 ring terminal
(1) 10 gauge 5/16” ring terminal
(1) 10 gauge 3/8” ring terminal
(1) 10 gauge 5/16” ring terminal
(1) 10 gauge 1/4” ring terminal
(4) 1/4” heat shrink
(1) 3/8” star washer
(1) 5/16” star washer
(1) 1/4” star washer
Parts list is continued on next page…

2
(1) 16 gauge blue1/4” spade terminal
(4) 18 gauge pink 1/4” spade terminal
(1) SPDT black toggle switch
(1) Red push button
(1) Rubber grommet
(10) 7” Zip Ties
(20) 4” Zip Ties
(3) #8 -1/2” Self Tap Screws
(3) Posi-Taps
(4) 12 gauge Butt Splices (4) 1/4” heat shrink
(3) 20 gauge Butt Splices
(3) 3/16” Heat Shrink
(2) #10x32 ¾” Black Screws
(2) #10x32 Black Nylon Locking Nuts
(1) Temperature Sensor
(1) Temperature Sensor Adaptor (30140 only)
(1) Temperature Sensor Pigtail
(4) 3/16” Heat Shrink
(1) Installation Schematic

3
The following information is HIGHLY CRITICAL to the success of
the installation and function of this product. These controllers are
have a temperature monitoring system embedded inside the
microprocessor on the circuit board that will allow for Painless
Performance Products to capture the highest temperature the
controller was exposed in the event of a failure. DO NOT MOUNT
THIS CONTROLLER IN ANY LOCATION UNDER THE HOOD
WITH EXCESSIVE HEAT. On most vehicles, the fender wells are
not a good location for this product. However, most vehicles
radiator core support will stay cool during operation of the vehicle
and serves as a good location to mount the F5 controller.
Specifications: The F5 Dual Fan Controller is manufactured to these
specifications. Do not operate this controller beyond these specifications.
Automotive Spec 125˚C / 257˚F temperature rating. Mounting location is
critical to controller life span. This cooling fan controller is designed to
handle temperatures up to 257˚F (125˚C). This is the standard automotive
specification for any product that is considered to be under hood rated. Most
areas within the engine compartment of most vehicles do not get this hot.
But, some do including areas around exhaust manifolds/headers and piping
or areas where air will run off of these components at temperatures upwards
of 1500˚F. Needless to say if this fan controller is mounted anywhere near
engine components that reach this temperature it will fail. We have written
into the controls of the fan controller a temperature recording program. It
records maximum PCB temperature and can be read back by our engineering
department should the module be returned as a failed unit. If you overheat
the PCB the warranty is voided.
Water must also be kept from flooding the unit within the plastic enclosure.
So, when mounting it make sure it’s where it won’t see water in excess from
rain or when washing the vehicle. It is encouraged to mount the controller in
an area under the hood such as behind the headlight buckets, on the radiator
Note: Mounting location is critical to controller life span.
There is a high probability of premature failure if
mounted in a location with excessive heat.
4
core support or to one of the front fenders. Any area that does not see an
excess of water or heat is fine.
Continuous Amperage handling of 35 Amp per fan channel.
Startup spike Amperage handling of 70 Amps per fan channel.
Pulse Width Modulation (PWM) control of low side (-) of brushed 12VDC
electric motors only. Some common Ford Taurus and Lincoln Mark VIII
fans will draw in excess of 105 amps at startup. Our controller will handle
these fans, but only with our single fan controller kits P/N’s 30141 and
30143. DO NOT run two of the larger mentioned fans with our 30140 and
30142 kits.
Tools Needed: Wire Crimping and Stripping Tools: This style of hand crimper can be purchased from just about any local auto parts store, home improvement store or can also be purchased online. You will need this style of crimper to crimp terminals included in the parts kit. A good set of wire strippers are required. This style of wire stripper is ideal for this Gauge Controller install because of its ability to properly strip wire gauges 10 to 20. These are available from just about any local auto part store, electrical supply shop, home improvement store or can be purchased online. Volt/Ohm Meter: A Volt/Ohm meter is always a good tool to have on hand when installing any type of electrical components into any vehicle. A standard inexpensive volt/ohm meter will work fine for this application. They can be purchased from any home improvement store, local hardware store, electrical supply shop or online. Electric Drill, Drill Bits, and Socket Head Nut drivers: A drill, drill bits and socket head nut drivers will be needed for the installation of the F5 controller, fuse holder, momentary button and toggle switch. A 9/16” drill bit or hole saw will be necessary. Heat Gun: A heat gun will be need to shrink the heat shrink over any butt splice that are made. Hand Tools: Standard hand tools such as a large Philips screwdriver, small Philips screwdriver and ¼” socket set will be required to complete the installation of the F5 fan controller.

5
Operation: Once installed into a vehicle this fan controller will pulse width
modulate (PWM) the GROUND SIDE of two 12VDC electric cooling fans. With
all components included in this kit properly installed you can expect the controller
to function as follows:
1. PWM control of cooling fan speed is primarily dictated by three things:
a. Signal from thermistor within the coolant sensor is read by the F5
controller. This signal is used to monitor engine coolant temperature.
b. The engine coolant temperature at which both cooling fans startup at
50% duty cycle is determined by the user adjustable “Start”
potentiometer located on the side of the controller. The potentiometer
is adjusted with a small Phillips screw driver. Adjustments are from
160˚F - 235˚F. WARNING: This potentiometer can easily be
damaged. Please see page 13 for more information. c. Temperature at which cooling fans are commanded to 100% duty
cycle is determined by the user adjustable “Full” potentiometer (pot
for short) located next to the “Start” pot. The potentiometer is
adjusted with a small Phillips screw driver. Adjustments are from
160˚F - 235˚F. WARNING: This potentiometer can easily be
damaged. Please see page 13 for more information.
2. Cooling fan speed can also be controlled through the connection and use of
secondary overrides. These overrides interrupt the primary fan control.
Each override is listed and described below:
a. Toggle switch- A three position toggle switch is included in this kit.
It is a simple On/Logic/Off toggle switch with three leads on it. Once
properly connected it allows the user to manually turn the cooling fans
to 100% duty cycle (on), 0% duty cycle (off) or to function normal
with the controller in control (logic). Although this toggle switch is
considered a secondary override it does in fact override all other
functions of the controller. For instance if the toggle switch is put into
Note: For instance, if the “Start” pot is set to 190˚F and “Full” pot is set to
210˚F the controller will turn the cooling fan on at 50% duty cycle when the
temperature sensor reads 190˚F. If the engine temperature continues to rise the
F5 controller begins to increase the duty cycle of the fan in direct relation to the
temperature increase. The amount of change in fan duty cycle per increase of
temperature degree is dependent upon how close the “Full” pot setting is to the
“Start” pot setting. The closer their settings are to the same degree the faster
the fan duty cycle will rise from 50% to 100%.

6
the “off” position the cooling fans will be commanded to off no matter
what. Same can be said for the “on” position.
b. VSS cutoff- This controller can receive a signal from a vehicle speed
sensor and use this sine or square wave signal to monitor vehicle
speed. Once the push button switch and VSS signal wire are
connected and the F5 controller is properly programmed it will shut
off the cooling fans at a user defined vehicle speed. The vehicle speed
at which fans turn off is set with the push button switch while driving
at that speed. When depressed the controller records the VSS signal
into its memory. From that point forward the F5 controller will
always shut off the cooling fans after the vehicle exceeds this set
speed for more than 5 seconds. If the vehicle drops down below the
set speed the F5 controller reengages the cooling fans.
c. A/C compressor- A/C compressors are engaged with a 12 volt signal
from a vehicle’s A/C switch. This fan controller can monitor this 12
volt signal. Once the A/C sense wire is properly connected this
controller will command the cooling fans to 100% on when the
compressor is commanded on by the A/C switch.
Note: If vehicle has the A/C compressor running but is also traveling above
the vehicle speed set point the F5 controller will not engage the cooling fan.
This is because when a vehicle is traveling at highway speeds the air moving
across the A/C condenser should be adequate for the heat transfer required by
the condenser and radiator.
Note: If the F5 controller should lose signal from the temp sensor it will
proceed to operate the cooling fan(s) at 100% duty cycle. It will do so
indefinitely until the temp sensor signal is once again readable. The sensor
included in this kit is manufactured by Delphi and has been used in the
automotive industry for decades. It’s very durable and reliable. A loss of signal
to the F5 controller is most likely a broken wire, incorrectly installed wire or
someone is trying to use a different sensor.
bnjkkl;included in this kit is manufactured by Delphi and has been in use in the
automotive industry for over 15 years. It is very durable and reliable. A loss of
signal by the F5 controller is most likely a broken wire
orincorrectlyconninstalled wire.

7
Please refer to the Installation Schematic that is
separately printed from this Installation Manual
during the process of installing your new F5
controller.
Component Installation:
1. Mount the F5 cooling fan module using either two black self-tap hex head
screws OR the two black 10-32 Phillips screws and black nylon lock nuts
from the parts kit. If you are using the 10-32 Phillips screws you will need to
mark and drill two 3/16” holes for the screws. Make sure the two 12 gauge
black/yellow and black/green PWM wires can reach the ground wires from
the cooling fans.
2. Find a good place to mount the 70 Amp fuse holder. It is suggested to
mount this as close to the battery as possible and between the battery and F5
module. Use the two #6 screws and nuts in the same bag with the fuse and
fuse holder to mount it. You will need to mark and drill two ¼” holes for the
#6 screws.
3. Find a suitable spot in the water jacket of the engine to install the
temperature sensor. DO NOT INSTALL THIS INTO THE THERMOSTAT
HOUSING. This sensor can also be installed into the lower radiator hose
with the proper pipe coupler and 3/8-18 pipe threaded bung (30140) or M12-
1.50 threaded bung (30142). (We do not provide the parts to install the
sensor into the lower radiator hose.) The threads on the sensor are 3/8-18
NPT for part number 30140 and M12-1.50 for part number 30142. You will
also find a 3/8-18NPT to 1/2-14NPT adapter in the bag with the sensor for
part number 30140. It is ideal to thread the sensor into the engine head. If
you cannot, then install it into the water pump, intake manifold or the lower
Note: Before mounting this fan controller visualize how air will flow
through your engine compartment. After the air passes through the
radiator it will usually run into the front of your engine first. Then, the air
splits to the left, right and down. We suggest you mount this controller
away from the areas that are within the direction of travel of this hot air.
Inner fenders catch the brunt of this hot air, so we feel this area is not
suitable for mounting. However, the core support is usually a suitable
place for mounting. NEVER ON THE FAN SHROUD!!!
8
radiator tank. Once installed plug in the adapter pigtail and route the wires
over towards the F5 module.
4. Inside the vehicle find a suitable place to mount the toggle switch and push
button switch. You will need to mark and drill two ½” holes to mount the
toggle switch and push button switch. Keep in mind, when finding a suitable
mounting location, that you will need to be able to press the push button
while driving to program the VSS cutoff speed. Use the rubber grommet
from the parts kit to run the wires through the firewall for the switches. The
grommet will require you to drill a 9/16” hole with a drill bit or hole saw.
a. The push button switch is only used to set the vehicle speed signal fan
cutoff.
b. The toggle switch can be used to manually switch the fans between
100% duty cycle (on), 0% duty cycle (off) and logic (controller selects
duty cycle based off of coolant temperature, VSS signal and A/C
signal)
BOTH SWITCHES ARE REQUIRED TO BE INSTALLED FOR ALL
VEHICLES REGARDLESS IF YOU PLAN TO USE THE A/C WIRE OR
VSS CUTOFF INPUT WIRE.

9
Wire Harness Installation: Connect each wire as described in this section.
ALL wires must be correctly installed for the F5 controller to function properly.
1. Plug the 14 pin connector into the F5 controller.
2. Wire #1- Black 10 gauge wire protruding from the center slot on the side of
the F5 controller. Connect this wire to a good ground source such as the
engine block, vehicle chassis or ground post on the battery. The parts kit has
3/8”, 5/16” & 1/4” ring terminals and heat shrink to pick from for use with
this connection. There is also three corresponding sized star washers to help
make a better ground connection depending on what size ring terminal is
chosen to be used. Cut the wire to length and strip off ¼” of insulation. Then
slide the heat shrink over the wire and crimp on the ring terminal you have
chosen to use. Shrink the heat shrink around the terminal using the heat gun.
Make sure to properly crimp all butt splices and terminals when installing
this harness. When crimping these terminals, take notice to the split in the
terminal. Make sure the smooth side of the jaw on the crimper goes towards
this split.
*Keep in mind that a bad ground connection is 99% of the time the issue
with dealing with electrical problems on automobiles. Take your time
and make this a good connection. Clean off any rust or paint from the
surface where you make this connection.
3. Wire #2- Black/Green 12 gauge wire protruding from one of the side slots
on the side of the F5 controller. Route this wire to the ground wire of
cooling fan #1. Cut the wire to length, then strip ¼” of insulation from both
the ground wire from the fan and the Black/Green wire. Slide one piece of
¼” heat shrink on to one of the wires, then connect them using one of the 12
gauge butt splices. Shrink the heat shrink over the butt splice using the heat
gun.
4. Wire #3- Black/Yellow 12 gauge wire protruding from the other slot on the
F5 controller. Route this wire to the ground wire of cooling fan #2. Cut the
wire to length, then strip ¼” of insulation from both the ground wire from
the fan and the Black/Yellow wire. Slide one piece of ¼” heat shrink on to

10
one of the wires, then connect them using one of the 12 gauge butt splices.
Shrink the heat shrink over the butt splice using the heat gun.
5. Wire #4- Red 10 gauge wire that is spliced to Wire #5 and #6. A piece of
the 10 gauge red wire will be cut and used to be connect one side of the 70
amp fuse to the positive battery post. Cut a piece of the red 10 gauge wire to
the appropriate length, then strip ¼” of insulation from both ends of the cut
piece of wire. Slide two pieces of ¼” heat shrink over the cut piece of wire
then crimp the 5/16” ring terminal on the battery side and a #10 ring
terminal on the fuse side. Shrink the heat shrink over the terminals using the
heat gun Connect the 5/16” ring terminal to the positive post on the battery
and connect the #10 ring terminal to one side of the fuse in the fuse holder.
Now take the remainder of the red 10 gauge wire that is still spliced to wire
#5 and #6 and strip ¼” of insulation from the end of the red 10 gauge wire.
Now terminate this wire and red 20 gauge wire # 15, after cutting wire # 15
to length and striping ¼” of insulation from it, using one #10 10 gauge ring
terminal. Be sure to slide one piece of ¼” heat shrink over both wires before
crimping the terminal on to both of them. Shrink the heat shrink over the
terminal using the heat gun. Connect the #10 ring terminal to the other side
of the fuse in the fuse holder.
6. Wire #5- Red 12 gauge wire that is spliced to Wire #4 and #6. Route this
wire to the power wire for fan #1. Cut the wire to length, then strip ¼” of
insulation from both the power wire from the fan and red 12 gauge wire #5.
Slide one piece of ¼” heat shrink on to one of the wires, then connect them
using one of the 12 gauge butt splices. Shrink the heat shrink over the butt
splice using the heat gun.
7. Wire #6– Red 12 gauge wire that is spliced to Wire #4 and #5. Route this
wire to the power wire for fan #2. Cut the wire to length, then strip ¼” of
insulation from both the power wire from the fan and red 12 gauge wire #6.
Slide one piece of ¼” heat shrink on to one of the wires, then connect them
using one of the 12 gauge butt splices. Shrink the heat shrink over the butt
splice using the heat gun.
8. Wire #20 Black 20 gauge wire must be spliced to the #18 coming from the
temp sensor pigtail. The butt splice is already crimped onto the temp sensor
pigtail, slip a piece of the 3/16” heat shrink onto the wire and crimp them
together with the butt splice. Shrink the heat shrink over the butt splice using
the heat gun.

11
9. Wire #8 Yellow 20 gauge wire in pin #5 of the 14 pin connector. This wire
is to be connected to yellow Wire #17 from the temp sensor pigtail. The butt
splice is already crimped onto the temp sensor pigtail, slip a piece of the
3/16” heat shrink onto the wire and crimp them together with the butt splice.
Shrink the heat shrink over the butt splice using the heat gun.
10. Wire #10 Purple 20 gauge wire in pin #12 of
the 14 pin connector. This wire is to be
connected to the high side or signal wire of the
vehicle’s speed sensor. Use one of the blue
Posi-taps or use one of the supplied 18-20 gauge
butt splices and 3/16” heat shrink from the parts
kit to make this connection. Connecting this
wire provides the F5 controller a signal from the
vehicle’s speed sensor. This signal is monitored
and used during the VSS fan cut off algorithm.
Sine Wave Generators: Vehicle speed sensors that generate an A/C or sine
waveform are two wire sensors. If your vehicle has an aftermarket two wire
speed sensor connect this wire to the same wire ran to either your fuel
injection computer or speedometer. If your vehicle has a factory VSS
generator you will need to identify which of the two wires is the high side
wire. OEM schematics usually show this as VSS High wires. If you are
having issues identifying which wire to connect here call our tech line for
assistance at (800) 423-9696.
Square Wave Generators: Vehicle speed sensors that generate square
waveforms have three wires. These sensor wires are power, ground and
signal. Connect the VSS signal wire from the F5 controller to the signal
wire from the sensor. If your vehicle has an aftermarket three wire speed
sensor connect this wire to the same wire ran to either your fuel injection
computer or speedometer. If you are having issues identifying which wire
to connect here call our tech line for assistance at (800) 423-9696.
Note: If you do not have a VSS and/or do not want to use this
optional feature this wire must then be connected to a ground
source. Also, to disable the VSS shut off or delete the stored
VSS shut off value simply put the toggle switch into manual off
mode and push the red button for 3 seconds. Then, put the
toggle switch back into the center position (normal mode).
12
11. Wire #9 Blue 20 gauge wire in pin #6 of the 14 pin connector. This wire is
to be connected to either outside terminal of the toggle switch. Cut this wire
to length, then strip off ¼” of insulation. Crimp on one of the pink female
spade terminals to make this connection
12. Wire #11 Grey 20 gauge wire in pin #13 of the 14 pin connector. This wire
is to be connected to the opposite outside terminal from Wire #9 on the
toggle switch. Cut this wire to length, then strip off ¼” of insulation. Crimp
on one of the pink female spade terminals to make this connection.
13. Wire #12 Tan 20 gauge wire in pin #11 of the 14 pin connector. This wire
is to be connected to the either terminal of the push button switch.
Connecting this wire provides a signal to the F5 controller from the push
button. When the controller sees the signal that the button is pushed it then
captures the signal from the VSS wire and records it to memory for use
during the VSS fan cut off algorithm. Cut this wire to length, then strip off
¼” of insulation. Crimp on one of the pink female spade terminals to make
this connection.
14. Wire #7 Black 20 gauge wire from pin #7 splice. This wire is going to be
terminated at the On/Logic/Off switch. Cut this wire to length and strip ¼”
of insulation off. Then strip ¼” of insulation from one side of the left over
wire and terminate both pieces of wire with the blue spade terminal. This
terminal will be connected to the center spade terminal on the back of the
On/Logic/Off. Now terminate the other end of the small piece of black wire
by cutting it to length and striping ¼” of insulation off, then crimp one of the
red spade terminals to this wire. This terminal will be connected to the other
side of the red push button.
15. Wire #13 Green 20 gauge wire in pin #4 of the 14 pin connector. This wire
is to be connected to the A/C compressor activation wire. Connecting this
wire provides a signal for the F5 controller to command 100% duty cycle to
the cooling fans when the A/C compressor is activated. Use one of the blue
Posi-taps or use one of the supplied 18-20 gauge butt splices and 3/16” heat
shrink from the parts kit to make this connection.
13
16. Wire #14 Orange 20 gauge wire in pin #14 of the 14 pin connector. This
wire is to be connected to a FUSED, ignition 12 Volt source. It turns the F5
module on. Use a voltmeter to find an ignition 12 Volt source either in the
engine compartment or under the dash. Use one of the blue Posi-taps or 18-
20 gauge butt splices and 3/16” heat shrink from the parts kit to make this
connection.
DO NOT TWIST THIS WIRE TOGETHER
WITH THE RED #15 WIRE AND PUT THEM
BOTH ON THE SAME POWER SOURCE. IT
WILL NOT WORK!!!
17. Wire #15 Red 20 gauge wire in pin #1 of the 14 pin connector. This wire is
to be connected to the same threaded post on the 70 Amp fuse holder along
with Wire #4. THIS SHOULD HAVE BEEN CONNECTED IN STEP #4
ON PAGE 9 OF THIS INSTRUCTION MANUAL.
14
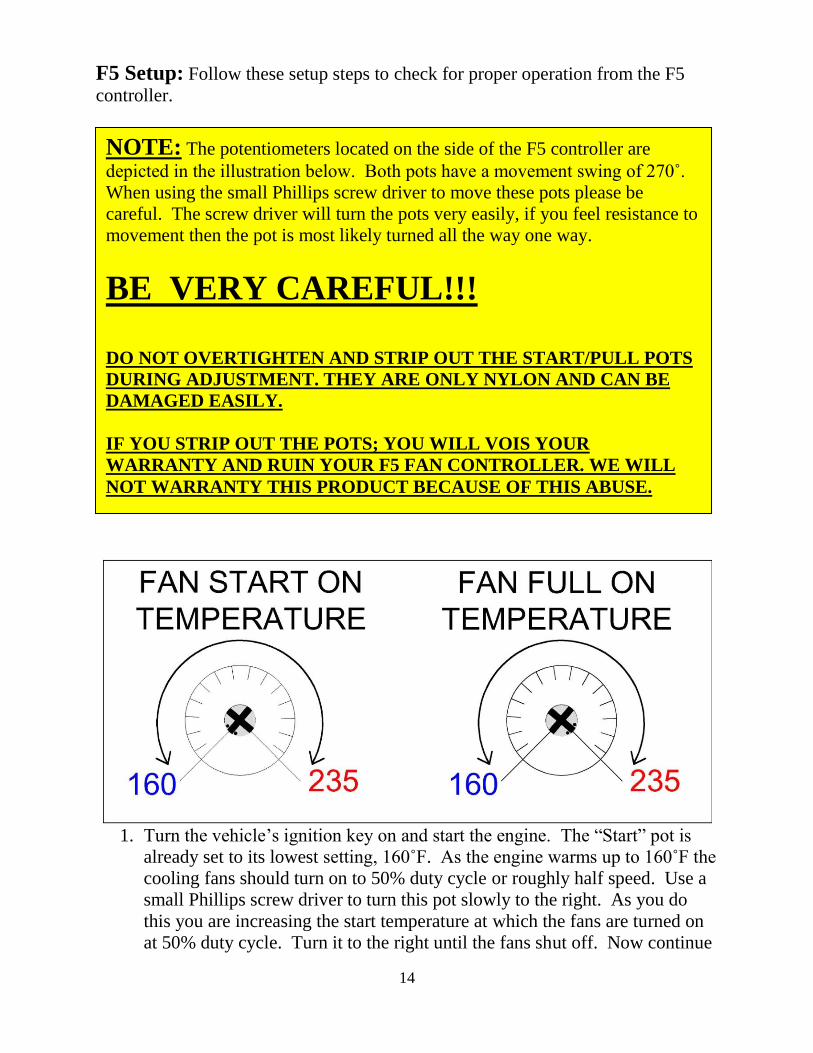
F5 Setup: Follow these setup steps to check for proper operation from the F5
controller.
1. Turn the vehicle’s ignition key on and start the engine. The “Start” pot is
already set to its lowest setting, 160˚F. As the engine warms up to 160˚F the
cooling fans should turn on to 50% duty cycle or roughly half speed. Use a
small Phillips screw driver to turn this pot slowly to the right. As you do
this you are increasing the start temperature at which the fans are turned on
at 50% duty cycle. Turn it to the right until the fans shut off. Now continue
NOTE: The potentiometers located on the side of the F5 controller are
depicted in the illustration below. Both pots have a movement swing of 270˚.
When using the small Phillips screw driver to move these pots please be
careful. The screw driver will turn the pots very easily, if you feel resistance to
movement then the pot is most likely turned all the way one way.
BE VERY CAREFUL!!!
DO NOT OVERTIGHTEN AND STRIP OUT THE START/PULL POTS
DURING ADJUSTMENT. THEY ARE ONLY NYLON AND CAN BE
DAMAGED EASILY.
IF YOU STRIP OUT THE POTS; YOU WILL VOIS YOUR
WARRANTY AND RUIN YOUR F5 FAN CONTROLLER. WE WILL
NOT WARRANTY THIS PRODUCT BECAUSE OF THIS ABUSE.

15
to turn the pot to the right, let the engine warm up and the fans turn on until
the engine is at the temperature you want the fans to run at 50% duty cycle.
Make sure you are watching the coolant temperature gauge in your
instrument cluster.
2. The “Full” pot is already set to its highest setting, 235˚F. Turning this pot to
the left will decrease the temperature at which the F5 controller commands
the cooling fans to 100% duty cycle. Your vehicle, its radiator size, engine
horsepower and cooling fan size will determine this pots setting. If you set
the “Full” pot setting lower than the “Start” pot setting the fan will always
run at 100% duty cycle once the temperature sensor reaches the “Start”
temperature.
3. With the engine still running turn the A/C compressor to on. If you have
elected to connect the A/C compressor sense wire the cooling fans should
now be running at 100% duty cycle. Turn the A/C to off.
4. With the engine still running move the toggle switch from the center
position (Normal Operation) to either other position. The switch should
command the fans to off in one of the positions and to 100% duty cycle in
the other. Put the switch back into the normal or center position. It should
be left here at all times unless you need to manually turn the fans on or off.
Keep in mind that this switch’s position overrides all other controls of the
cooling fans. If you put the switch into the off position the cooling fans will
Note: Once the F5 controller senses the engine temperature has reached its
“Start” pot setting it will operate both cooling fans at 50% duty cycle. A
3˚F drop in engine temperature from the “Start” pot setting will command
the F5 controller to shut the fans off. So, if you have the “Start” pot set
where the fans turn on at 200˚F, the F5 controller will continue to operate
the fans until the engine temperature decreases to 197˚F.
Note: A vehicle with cooling fans that are quite large, an efficient
radiator installed and good airflow dynamics through the engine
compartment may get away with leaving this pot at its highest setting. It
will all depend on whether the engine’s temperature is maintained properly
with the commanded cooling fan speed. If your engine temperature is
higher than you like then turn this “Full” pot to the left. Do so in small
increments.

16
never turn on. If you put the switch into the on position the cooling fans will
only turn off if the ignition switch sense wire loses its 12 volt signal by
turning the ignition switch to the off position.
5. Now with all the other F5 controller features functioning properly it is time
to calibrate the VSS shut off set speed. This is done by driving the vehicle at
a speed you would like the fans to not operate above and then pushing the
red push button once. At this point the F5 controller captures the VSS signal
into its memory. Each time the button is pushed the signal is captured into
memory. So, if you set it but don’t like the speed at which it was set just
drive the vehicle at the new speed and press the button again. We suggest
you set your VSS shut off at a speed greater than 35 miles per hour. If you
notice your VSS shut off point has changed without you pressing the red
button you may be experiencing interference from your A/C compressor
clutch.
Note: If you notice your VSS shutoff point has changed without you
pressing the red button you may be experiencing an interference issue
involving you’re A/C compressor clutch. If you experience this please
contact our tech line at 1-800-423-9696 for assistance.
Note: If the vehicle is traveling below your VSS shut off speed and then
accelerates to a speed greater than the stored VSS value it must continue to
travel above the VSS set point value for 5 seconds, before the F5
controller will shut the cooling fan(s) off.
Note: If the vehicle is traveling above your VSS shut off speed and then
decelerates to a speed less than the stored VSS value the F5 controller will
immediately turn the fan on if they are commanded, so by the A/C or
coolant temperature sensor.
Note: To disable the VSS shut off or delete the stored VSS shut off value
simply put the toggle switch into manual off mode and push the red
button. Then put the toggle switch back into the center position (normal
mode).

17
Painless Performance Limited Warranty and Return Policy: Chassis
harnesses and fuel injection harnesses are covered under a lifetime warranty. All other products
manufactured and/or sold by Painless Performance are warranted to the original purchaser to be
free from defects in material and workmanship under normal use. Painless Performance will
repair or replace defective products without charge during the first 12 months from the purchase
date. No products will be considered for warranty without a copy of the purchase receipt
showing the sellers name, address and date of purchase.