installation and user manual - amazon s3
TRANSCRIPT

BAR-FED TURN TRACK
WD-BF90 & WD-BF180
(translation of the original documentation)
Installation and user manual
Read the manual before using the machine!
S/N: (En) Valid from: 201409 Rev.: 2.0


WD-BF90 & WD-BF180 Rev. 2.0 (201409)
1. General information ......................................................................... 1
1.1 Symbols used in this manual ........................................................................... 1
1.2 Symbols on the connected dishwasher ........................................................... 1
2. Safety instructions ........................................................................... 2
2.1 General information ......................................................................................... 2
2.2 Transport .......................................................................................................... 2
2.3 Installation ........................................................................................................ 2
2.4 Operation ......................................................................................................... 3
2.4.1 Crushing risk ............................................................................................. 3
2.5 Cleaning ........................................................................................................... 3
2.6 Safety instructions if the equipment is not functioning ..................................... 3
2.7 Repairs and servicing ...................................................................................... 3
2.8 Recycling ......................................................................................................... 3
3. Installation ........................................................................................ 4
3.1 General information ......................................................................................... 4
3.2 Requirements for the installation site ............................................................... 4
3.3 Transport and storage ...................................................................................... 5
3.3.1 Unpacking ................................................................................................. 5
3.4 Installation ........................................................................................................ 6
3.4.1 Connection to dishwasher ........................................................................ 7
3.5 Connections ................................................................................................... 11
3.5.1 Drain connection ..................................................................................... 113.5.2 Cabling from limit switch ......................................................................... 11
3.6 Trial operation ................................................................................................ 12
3.6.1 Start-up schedule .................................................................................... 12
3.7 Technical documentation ............................................................................... 13
4. Instructions for use ........................................................................ 14
4.1 Preparations ................................................................................................... 14
4.2 Using the machine ......................................................................................... 15
4.3 After use ......................................................................................................... 16
4.3.1 Cleaning .................................................................................................. 164.3.2 Incorrect cleaning methods ..................................................................... 164.3.3 Operating problems ................................................................................ 16
5. Technical information .................................................................... 17


WD-BF90 & WD-BF180 Rev. 2.0 (201409)
General information
1. General information
Read the instructions in this manual carefully, as they contain important informa-
tion regarding the correct, effective and safe installation, use and servicing of bar-
fed turn tracks.
Keep this manual in a safe place so that it can be used by other operators.
1.1 Symbols used in this manual
This symbol warns of situations where a safety risk may arise. The instructions
given should be followed in order to avoid injury.
This symbol on a machine component warns of the presence of electrical equip-
ment. The connected dishwasher is sensitive to electrostatic discharge (ESD),
and a static electricity wristband must therefore be used when handling the ma-
chine's electronics.
This symbol explains the correct way to perform a task in order to prevent poor
results, damage to the turn track and dishwasher or hazardous situations.
This symbol identifies recommendations and hints to help you to get the best per-
formance from the equipment.
This symbol explains the importance of careful and regular cleaning of the equip-
ment to meet hygiene requirements.
1.2 Symbols on the connected dishwasher
This symbol on a machine component warns of the presence of electrical equip-
ment. The component may only be removed by a qualified electrician.
1

WD-BF90 & WD-BF180 Rev. 2.0 (201409)
Safety instructions
2. Safety instructions
2.1 General information
The dishwasher to which the turn track is connected is CE labelled, which means
that the whole installation (dishwasher and turn track) comply with the require-
ments in the EU Machinery Directive in relation to product safety. Product safety
means that the design of the equipment will prevent personal injury or damage to
property.
Modifying the equipment without the approval of the manufacturer invalidates the
manufacturer’s product liability.
To further improve safety during installation, operation and servicing, the operator
and the personnel responsible for installing and servicing the equipment should
read the safety instructions carefully.
Switch off the equipment immediately in the event of a fault or malfunction. The
equipment must only be serviced by trained engineers. The equipment must be
serviced by a person authorised to do so by the manufacturer. Use original spare
parts. Contact an authorised service company to draw up a programme of pre-
ventative maintenance. Hazardous situations may arise if the instructions above
are not followed.
Before using the equipment, ensure that personnel are given the necessary op-
eration and maintenance training.
2.2 Transport
Handle the equipment with care during unloading and transport to avoid the risk
of it tipping over.
2.3 Installation
The turn track is driven by the dishwasher feed device. If there is a need to inter-
fere with the machine's electrical equipment for feeding, the electrical cabinet may
only be opened by a qualified electrician. The connected dishwasher is sensitive
to electrostatic discharge (ESD), and a static electricity wristband must therefore
be used when handling the machine's electronics.
2

WD-BF90 & WD-BF180 Rev. 2.0 (201409)
Safety instructions
2.4 Operation
2.4.1 Crushing risk
Avoid contact with the turn track's drive system during use. The movement of the
drive system can cause crushing injuries.
2.5 Cleaning
Do not use pressure washers for cleaning. It is quite enough to use a standard
hose to rinse the turn track.
2.6 Safety instructions if the equipment is not functioning
Check the following:
• Has the equipment been used according to the instructions?
• Is the main switch in the ON position?
• Are the fuses in the electrical cabinet undamaged? Ask the service person-
nel to check the fuses.
If this does not solve the problem, ask authorised service personnel to check the
motor-powered turn track and dishwasher. For authorised service companies,
please see www.wexiodisk.com or contact Wexiödisk AB.
2.7 Repairs and servicing
Where repairs or servicing involve interfering with the dishwasher's electrical
equipment, the power must be switched off before work commences. If required,
the power switch must be locked to prevent unintentional operation.
2.8 Recycling
When the equipment has reached the end of its service life, it must be recycled in
accordance with current regulations. Contact professionals who specialise in re-
cycling.
3

WD-BF90 & WD-BF180 Rev. 2.0 (201409)
Installation
3. Installation
3.1 General information
The turn track must be installed by authorised personnel only.
Read these instructions carefully, as they contain important information regarding
the correct installation method.
The instructions should be used together with the dishwasher’s wiring diagram.
If the equipment is damaged as a result of the instructions not being followed, this
invalidates the supplier's guarantee and product liability.
3.2 Requirements for the installation site
The same requirements apply for installation of the turn track as for the dishwash-
er to which it is connected. (Refer to the dishwasher's installation and user man-
ual.)
4

WD-BF90 & WD-BF180 Rev. 2.0 (201409)
Installation
3.3 Transport and storage
Packaging must not be removed during transport.
Take care during transport, as there is a risk of the equipment tipping over.
NOTE: The turn track must not be transported without a pallet or other support,
otherwise it may become damaged.
The turn track is transported with a pallet as support (A)
If the turn track is not to be installed immediately, it must be stored in a frost-free
area where the air is dry.
3.3.1 Unpacking
Remove the packing material. Inspect the turn track for any transport damage.
Check that all parts have been delivered by comparing them with the delivery
note.
Packaging must be disposed of or recycled in accordance with local regulations.
WDBF_06
A
5

WD-BF90 & WD-BF180 Rev. 2.0 (201409)
Installation
3.4 Installation
A=Turn track 90°
B=Turn track 180°
1=Drain connection
2=Basket Support (1st, mounted on the supply side of the curve)
A B
WDBF_07_08_R1
6
WD-BF90 & WD-BF180 Rev. 2.0 (201409)
Installation
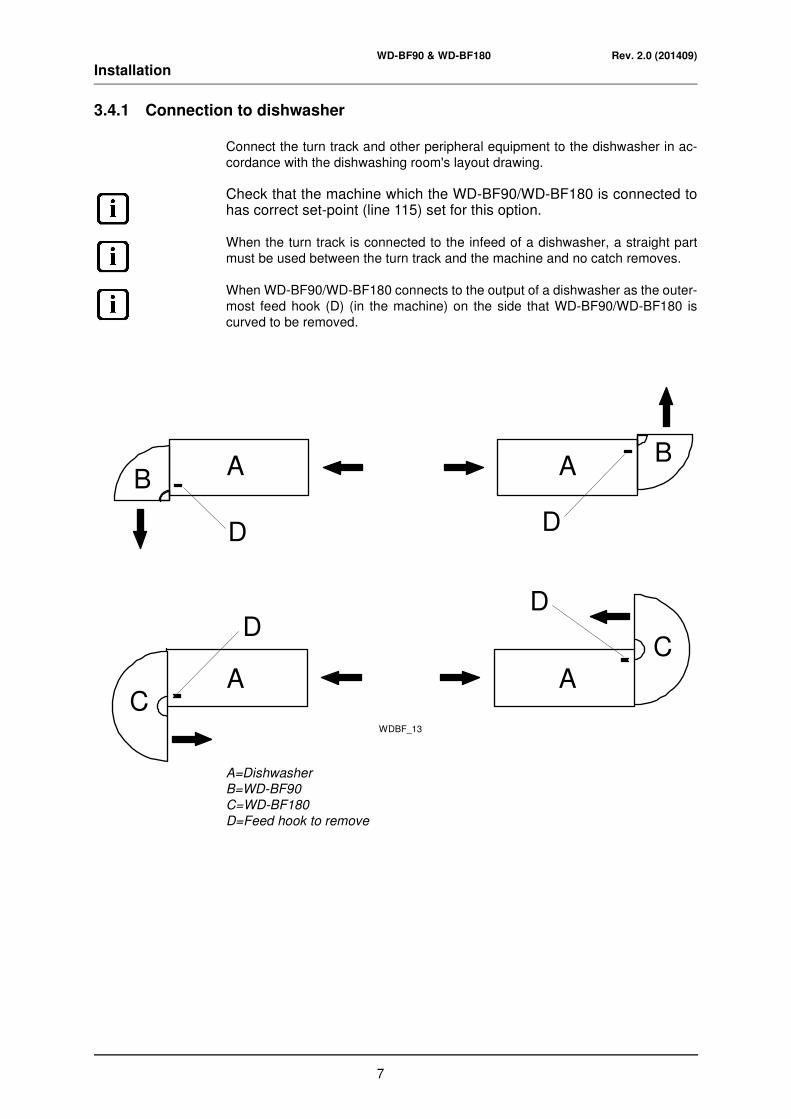
3.4.1 Connection to dishwasher
Connect the turn track and other peripheral equipment to the dishwasher in ac-
cordance with the dishwashing room's layout drawing.
Check that the machine which the WD-BF90/WD-BF180 is connected tohas correct set-point (line 115) set for this option.
When the turn track is connected to the infeed of a dishwasher, a straight part
must be used between the turn track and the machine and no catch removes.
When WD-BF90/WD-BF180 connects to the output of a dishwasher as the outer-
most feed hook (D) (in the machine) on the side that WD-BF90/WD-BF180 is
curved to be removed.
A=Dishwasher
B=WD-BF90
C=WD-BF180
D=Feed hook to remove
A AB
B
A AC
C
D
DD
D
WDBF_13
7

WD-BF90 & WD-BF180 Rev. 2.0 (201409)
Installation
Turn track adjustment options
180° turn track
1. Adjustable foot for correct fitting of turn track height for the dishwasher.
2. Lock nuts inside for adjusting the level of the stopper rail.
3. Stopper rail
4. Support for stopper rail (adjustable)
5. Basket support (adjustable)
WDBF_121
2
2
3
45
8

WD-BF90 & WD-BF180 Rev. 2.0 (201409)
Installation
Connection
The turn track is installed on delivery from the factory, but adjustment may be nec-
essary depending on the conditions at the installation location.
1. Dishwasher
2. Turn track
3. Lock nuts + washer
4. Drive bar
5. Sliding wedge
6. Cover strip
7. Screws + nuts + washers
8. The dishwasher's feeding cradle
Adjust the height of the turn track using the adjustable plastic feet. The hole in the
turn track's connection end must fit the hole in the bottom edge of the dishwash-
er's outfeed opening. The turn track must be evenly balanced.
Fit the cover strip (6) and screw the turn track and dishwasher together using
screws, washers and nuts (7).
Adjust the drive bar (4) so that the top edge is at the same level as the sliding sur-
face of the dishwasher's feeding cradle (8). The level of the drive bar is adjusted
by raising or lowering the stop rail which is fixed to the end of the turn track with
nuts at (3) and using the stopper rail's adjustable support which is fixed to the bot-
tom plate of the turn track (See the section on "Turn track adjustment options").
The basket support on the turn track's inner radius must always be at the same
level as the top edge of the drive bar (4).
WDBF_11
2
1
12
3
4 5 6 7 8
9

WD-BF90 & WD-BF180 Rev. 2.0 (201409)
Installation
Fitting the feeder arm
After fitting and adjustment of the turn track, connect the turn track's drive unit to
the dishwasher's feeder cradle.
1. Stainless steel washer
2. Turn track drive arm
3. Plastic washer
4. Cotter pin
5. Feeder arm
6. Plate
7. Screw
8. The dishwasher's feeding cradle
9. Lock nuts
The plate (6) is fitted using existing holes in the dishwasher's feeder cradle (8).
The plate must be facing the right direction, depending on the feeding direction of
the equipment.
The feeder arm (5) is connected to the feeder cradle (8) and to existing holes in
the drive arm of the turn track (2). Note the positioning of the plastic washers (3).
WDBF_10
1
2
3
4
5
6
1
3
7
4
8
9
10

WD-BF90 & WD-BF180 Rev. 2.0 (201409)
Installation
3.5 Connections
3.5.1 Drain connection
Connect the drain at (1). The drain pipe can be connected to the dishwasher drain
or run to a floor drain, where it must end above the water level. The drain should
be a 50 mm metal pipe if there is a risk of mechanical collision.
3.5.2 Cabling from limit switch
The cable from the limit switch for the connected roller table is pulled through ex-
isting holes in the end of the dishwasher and on to the terminal box positioned in
the lower part of the dishwasher behind the front plates (see electrical schematic
for connection).
Connection of 90° turn track and roller table on the machine's outfeed side
A=Limit switch
B=Roller table
C=Turn track
D=Dishwasher
E=Terminal box
WDBF_09A
B
C
D
E
11

WD-BF90 & WD-BF180 Rev. 2.0 (201409)
Installation
3.6 Trial operation
Test the turn track together with the dishwasher. Prepare the machine for a trial
run by following the INSTRUCTIONS FOR USE in the machine's user manual.
The instructions describe the measures that must be taken to prepare the ma-
chine for operation.
3.6.1 Start-up schedule
The following information should be completed and signed by the customer on
start-up:
Read the contents of the installation and user manuals carefully. Then check off
as follows:
Start the dishwasher and load baskets containing items. Carry out the fol-
lowing checks:
• Transport of baskets along the turn track.
• Check the function of the drive unit and stopper rail catches.
• Limit switch function. When a basket activates the limit switch on a con-
nected roller table, the turn track and dishwasher should stop. When the
basket is removed, the equipment should restart automatically.
• Drainage system integrity.
Customer:Adress for visitors:
Postcode + Town/City:
Telephone:
Contact:
Dealer:Telephone:
Contact:
Installation company:Telephone:
Contact:
Service company:Telephone:
End user’s signature:
Name in block capitals:
12

WD-BF90 & WD-BF180 Rev. 2.0 (201409)
Installation
3.7 Technical documentation
For correct use and servicing, it is essential that the documentation accompany-
ing the equipment be made available to personnel who will be using it. The instal-
lation and user manual, which describes handling and care, among other things,
should be stored near the equipment.
If a service manual and spare parts manual are supplied with the machine, these
should be given to the service engineer responsible for the machine.
13

WD-BF90 & WD-BF180 Rev. 2.0 (201409)
Instructions for use
4. Instructions for use
All personnel using the equipment should be trained in how it works by the person
responsible for staff safety.
The equipment should not be used by anyone suffering from a physical or mental
illness.
Children should be watched closely to ensure that they do not play with the equip-
ment.
4.1 Preparations
Before the equipment is used, check that it is clean, if not clean!
90° and 180° turn track
WDBF_04
14

WD-BF90 & WD-BF180 Rev. 2.0 (201409)
Instructions for use
4.2 Using the machine
The turn track is controlled from the dishwasher and operates when the dish-
washer is feeding baskets through the machine.
When a basket of clean items leaves the dishwasher, it is transported by the turn
track to the connected roller table.
Once the roller table is full of baskets, the first basket will activate the roller table's
limit switch (E). The dishwasher and turn track stop.
Remove the baskets from the roller table. The dishwasher and turn track start au-
tomatically.
A turn track can also be connected to the dishwasher's infeed opening and used
for transporting baskets of dirty items into the machine.
Example of installation: Dishwasher with 90° turn track and roller table
A=Dishwasher
B=Turn track
C=Roller table
D=Basket
E=Limit switch
The limit switch is activated by a basket and the equipment stops
AB
C
D
WDBF_05E
15

WD-BF90 & WD-BF180 Rev. 2.0 (201409)
Instructions for use
4.3 After use
HACCP is a preventive inspection system which ensures that hygiene require-
ments are met during the washing process and cleaning of the equipment. As a
result of its design, the turn track meets strict hygiene requirements. Regular,
thorough cleaning is also important from a hygiene perspective. Equipment that
is properly cleaned reduces the risk of dirt accumulating, increases the service life
of the equipment and reduces the risk of urgent interruptions to operation.
4.3.1 Cleaning
Before cleaning begins, the dishwasher must be switched off.
If detergent is used, it must not contain abrasives. Detergents containing abra-
sives will damage the stainless steel panels.
• Clean the inside of the turn track.
• Wipe the outside of the turn track with a soft, damp cloth.
4.3.2 Incorrect cleaning methods
NOTE: An incorrect cleaning method may damage the equipment. The following
points must be observed:
• Do NOT use steel wool, as this will cause corrosion.
• The curve may not be washed using a pressure washer. Only use a hose
for internal cleaning.
4.3.3 Operating problems
When you contact service personnel, you will need to provide the following infor-
mation:
• Type of equipment
• The dishwasher's serial number and installation date
• A brief description of the problem
• What happened to cause the problem
16

WD-BF90 & WD-BF180 Rev. 2.0 (201409)
Technical information
5. Technical information
The manufacturer reserves the right to make changes to the technical data.
Technical data
WD-BF90 WD-BF180Weight excl. packaging (kg) 20 30
Basket size (mm) 500x500 500x500
Drain connection (mm) 50 50
17