installation and service manual - waterboss
TRANSCRIPT

INSTALLATION ANDSERVICE MANUAL
waterBoss® 4343 S. Hamilton Road, Groveport, Ohio 43125
Water Softeners: waterBoss® - cityBoss® - BigBoss®
Filters: Iron Filter - Carbon Filter - Acid Netralizing Filter

Congratulationson your decision to place your confidence in a superior waterBoss® water treat-ment appliance.
Recognized worldwide for built-in quality, dependability, and ease of service,waterBoss® appliances represent state-of-the-art in home water treatment.Important information is contained in this manual which will help you get themaximum benefit and enjoyment from your particular model.
We urge you to read this information carefully now and any time a malfunctionmay occur. In most cases, these reviews will uncover minor problems that youcan correct yourself, thereby saving you time.
When calling the HelpLine, please have this guide and the serial number available. From 8 am to 5 pm EST, call 1-800-437-8993. Your serial number may be found on top of your valve assembly (See figures 2-3.)

QUESTIONS? ......................................................................................................... 1
GETTING MAXIMUM EFFICIENCY FROM YOUR APPLIANCE ............................ 2
INSTALLATION CHECKLIST ................................................................................. 3
DO'S AND DONT'S ................................................................................................. 4
REFERENCE ILLUSTRATIONS .............................................................................. 5
CYCLES .................................................................................................................. 10
ALL WATER CONDITIONERS ARE NOT CREATED EQUAL ............................. 12
INSTALLATION AND START-UP PROCEDURES ................................................ 13
SETTING THE 3 BUTTON CONTROLLER ............................................................ 15
CARE, MAINTENANCE AND PARTS .................................................................... 18
TROUBLESHOOTING ............................................................................................ 32
cityBoss® HARDNESS SETTING CHART ........................................................... 34
97WB-ANF ACID NETRALIZING FILTER START-UP PROCEDURES ............... 35
97WB-IF IRON FILTER START-UP PROCEDURES ............................................. 36
97WB-CF CARBON FILTER START-UP PROCEDURES .................................... 37
PARTS APPENDIX .................................................................................................. 38
SOFTENER SPECIFICATIONS .............................................................................. 40
FILTER SPECIFICATIONS ..................................................................................... 41
LIMITED WARRANTY ............................................................................................. 42
Table of Contents
When calling the HelpLine, please have this guide and the serial number available.From 8 am to 5 pm EST, call 1-800-437-8993. Your serial number may be found on top of your valve assembly (See figures 2-3.)

From 8 am to 5 pm EST, use the 800 HelpLine: 1-800-437-8993The HelpLine is available to help answer questions about specific water problems,appliance installation and operation. When calling the HelpLine, please have thisguide and the serial number of your appliance available. . Your serial number maybe found on top of your valve assembly (See figures 2-3.)
Date of Installation: ________________________________
Model Number: __________________________________
Serial Number: ___________________________________
Returned Limited warranty Card Date: ________________
1
Questions
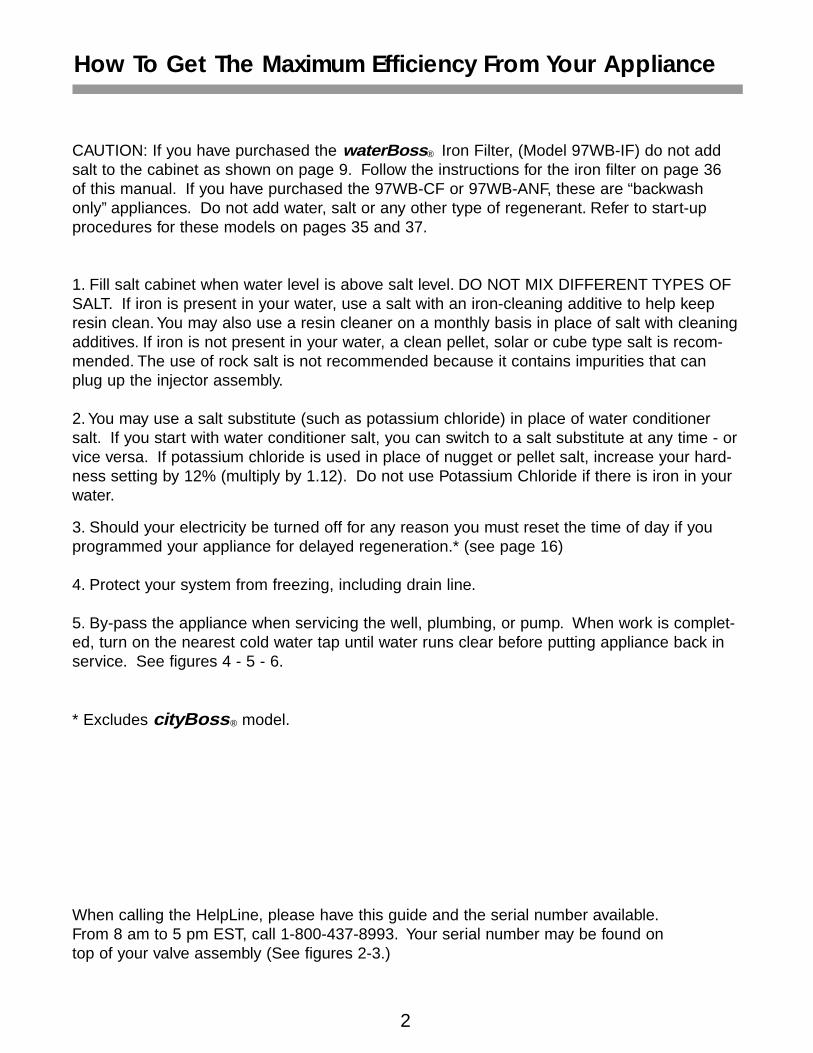
How To Get The Maximum Efficiency From Your Appliance
CAUTION: If you have purchased the waterBoss® Iron Filter, (Model 97WB-IF) do not addsalt to the cabinet as shown on page 9. Follow the instructions for the iron filter on page 36of this manual. If you have purchased the 97WB-CF or 97WB-ANF, these are “backwashonly” appliances. Do not add water, salt or any other type of regenerant. Refer to start-upprocedures for these models on pages 35 and 37.
1. Fill salt cabinet when water level is above salt level. DO NOT MIX DIFFERENT TYPES OFSALT. If iron is present in your water, use a salt with an iron-cleaning additive to help keepresin clean. You may also use a resin cleaner on a monthly basis in place of salt with cleaningadditives. If iron is not present in your water, a clean pellet, solar or cube type salt is recom-mended. The use of rock salt is not recommended because it contains impurities that canplug up the injector assembly.
2. You may use a salt substitute (such as potassium chloride) in place of water conditionersalt. If you start with water conditioner salt, you can switch to a salt substitute at any time - orvice versa. If potassium chloride is used in place of nugget or pellet salt, increase your hard-ness setting by 12% (multiply by 1.12). Do not use Potassium Chloride if there is iron in yourwater.
3. Should your electricity be turned off for any reason you must reset the time of day if youprogrammed your appliance for delayed regeneration.* (see page 16)
4. Protect your system from freezing, including drain line.
5. By-pass the appliance when servicing the well, plumbing, or pump. When work is complet-ed, turn on the nearest cold water tap until water runs clear before putting appliance back inservice. See figures 4 - 5 - 6.
* Excludes cityBoss® model.
When calling the HelpLine, please have this guide and the serial number available.From 8 am to 5 pm EST, call 1-800-437-8993. Your serial number may be found on top of your valve assembly (See figures 2-3.)
2

1. Water Pressure - Not less than 20 psi constant for waterBoss®, BigBoss®,cityBoss®.Not less than 30 psi for waterBoss® IRON, CARBON AND ACID NEUTRALIZING FILTERS.
2. Double check hardness - of water with test strips provided to verify that your waterBoss® is the right appliance for the job.cityBoss® FOR MUNICIPALLY-SUPPLIED WATER is for water without iron and up to 25grains of hardness per gallon.waterBoss® for up to 70 grains hardness per gallon.BigBoss® for up to 90 grains hardness per gallon. (See specifications, page 40.)
3. Water Supply Flow Rate - 5 gallons per minute is recommended as minimum.
4. Drain - Drain appliance to floor drain or washer drain. To prevent back-siphoning, the installer must provide an adequate air gap or a siphon break. See figure 1.
5. Electricity - The transformer supplied is a standard 120 volt, 60 cycle A.C. for USA or220 volt, 50 cycle A.C. for outside the USA. See figure 8.
6. Water Quality - If the water supply contains sulfur, bacteria, iron bacteria, tannins,algae, oil, acid or other unusual substances, then unless the system is represented asbeing capable of treating these contaminates in the specifications, other special treatment of the water supply must be used to remove these contaminates before theyenter this product.
If you have any questions call our HelpLine!
When calling the HelpLine, please have this guide and the serial number available.From 8 am to 5 pm EST, call 1-800-437-8993. Your serial number may be found on top of your valve assembly (See figures 2-3.)
3
Checklist Before Installation

SOME DO'S
1. Do comply with all local plumbing and electrical codes.
2. Do install pressure-reducing valve if inlet pressure exceeds 90 psi.
3. Do install gravity drain on salt storage cabinet. See figure 7.
4. Do secure drain line on appliance and at drain outlet. See figure 3.
5. Do allow a minimum of 8 to 10 feet of 3/4” pipe from the outlet of the water conditionerto the inlet of the water heater. See figure 1.
SOME DONT'S
1. Do not install if checklist items are not satisfactory.
2. Do not install if incoming or outlet piping water temperature exceeds 120 degrees Fahrenheit; 80 degress for Iron Filter.Please see specification on pages 40-41.
3. Do not allow soldering torch heat to be transferred to valve components or plastic parts.
4. Do not overtighten plastic fittings.
5. Do not place appliance right up against a wall which would deny access toplumbing. See figure 1.
6. Do not install the appliance backwards. Follow arrows on inlet/outlet.See figure 2.
7. Do not plug the transformer into an outlet that is activated by an on/off switch.See figure 8.
8. Do not connect the drain and the overflow (gravity drain) together.See figure 1.
When calling the HelpLine, please have this guide and the serial number available.From 8 am to 5 pm EST, call 1-800-437-8993. Your serial number may be found on top of your valve assembly (See figures 2-3.)
4
Do’s And Dont’s

Use this diagram as a location and installation guide for your waterBoss®, BigBoss®, andcityBoss®, water conditioners. For additional information on filter installations please refer topages 35, 36, and 37. This diagram applies to all types of installations (i.e. basement, slab,crawl space, outside).
Bypass Valves. To simplify installation and servicing, a one-piece or a three way bypass valvesystem is recommended when installing your appliance. A bypass system also provides accessto untreated water when required (i.e. for lawn and gardening purposes.) Also, see figures 4through 6.
Caution: If less than 10 feet of pipe connect the water treatment appliance(s), to the water heater, thena Check Valve must be installed between the water treatment appliance and the water heater. Installthe Check Valve as close to the water heater as possible.
When calling the HelpLine, please have this guide and the serial number available.From 8 am to 5 pm EST, call 1-800-437-8993. Your serial number may be found on top of your valve assembly (See figures 2-3.)
5
Reference Illustrations
Figure 1 - Installation Guide
1” Min.

6
Reference Illustrations
CONNECTING DRAIN LINE
CAUTION! The drain line must not bekinked, crimped or restricted in anyway. The drain line 1/2" inside diameter cannot be reduced in size.
Figure 2
Figure 3
PLUMBING CONNECTIONS
S/N 29350185
When calling the HelpLine, please have this guide and the serial number available.From 8 am to 5 pm EST, call 1-800-437-8993. Your serial number may be found on top of your valve assembly (See figures 2-3.)
S/N 29350185

7
Reference Illustrations
When calling the HelpLine, please have this guide and the serial number available.From 8 am to 5 pm EST, call 1-800-437-8993. Your serial number may be found on top of your valve assembly (See figures 2-3.)
Figure 4 Bypass Valves
Figure 5
Par t #93884
<push/pull> for service or bypass.
This part may be available through your local hardware store, plumber or callour HelpLine to order.
IN BYPASS POSITION
Figure 6
IN SERVICE POSITION

Figure 8
8
Reference Illustrations
When calling the HelpLine, please have this guide and the serial number available.From 8 am to 5 pm EST, call 1-800-437-8993. Your serial number may be found on top of your valve assembly (See figures 2-3.)
PLUGGING IN TRANSFORMERDo not plug transformer into an out-let that is controlled by on/off switch.
Figure 7
OVERFLOW CONNECTION

9
Reference Illustrations
When calling the HelpLine, please have this guide and the serial number available.From 8 am to 5 pm EST, call 1-800-437-8993. Your serial number may be found ontop of your valve assembly (See figures 2-3.)
Figure 9
Figure 10ADDING SALT TO THE BRINE CABINET(waterBoss, BigBoss, andcityBoss softeners only)
Refer to page 36 for IronFilter start-up procedures.
Set ImmediatepowerClean
waterMizeractive when
powerClean onwhen lit
Capacity remaininggallons X 100 metric=m3
40Status Indicator light
2 GALLONS

10
Cycles
When calling the HelpLine, please have this guide and the serial number available.From 8 am to 5 pm EST, call 1-800-437-8993. Your serial number may be found on top of your valve assembly (See figures 2-3.)
Figure 11
Water by-passes your appliance during regeneration to allow iron, sediment, hardness, etc. tobe washed down the drain. After regeneration, waterBoss® returns to service, providing your home with treated water.
Regeneration cycles:
1. First up-flow backwash. A rapid up-flow of water flushes out the resin bed andcleans the sediment filter.
2. Brine*. Brine is drawn out of the brine cabinet and up through the media tank,cleaning the resin bed and releasing accumulated hardness and iron.
3. Slow rinse*. A slow up-flow rinse process then flushes out the brine, hardness and iron.
4. Second up-flow backwash. This up-flow backwash flushes out any remaining brine solution and sediment from cycle 2.
5. Downflow soft water brine refill. Soft water is directed to the brine cabinet to preparethe brine for the next regeneration sequence.
6. Return to service. Regeneration is complete and the appliance is returned to normal operation.
* Does not include 97WB-CF and 97WB-ANF. These fiters backwash only and do notrequire any regenerant.

11
Cycles
When calling the HelpLine, please have this guide and the serial number available.From 8 am to 5 pm EST, call 1-800-437-8993. Your serial number may be found on top of your valve assembly (See figures 2-3.)
Figure 11
1 First up-flow backwash 2 Brine 3 Slow Rinse
4 Second up-flowbackwash
5 Downflow soft waterbrine refill
6 Return to service
12
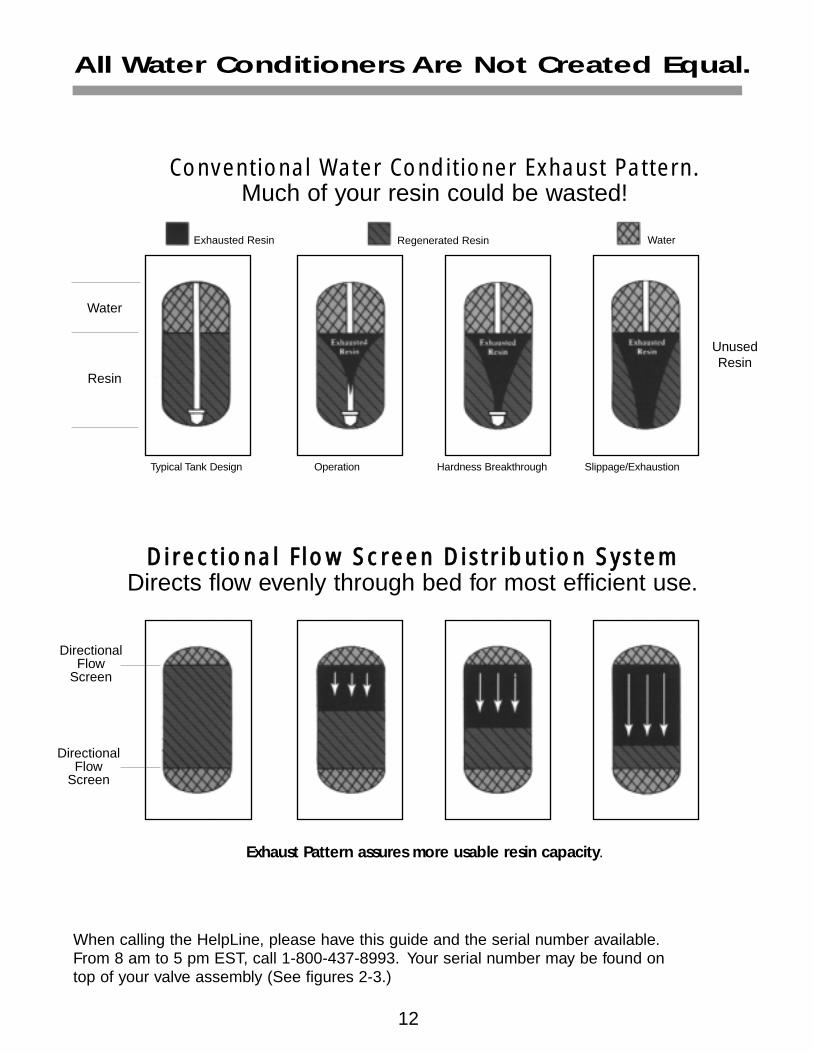
All Water Conditioners Are Not Created Equal.
When calling the HelpLine, please have this guide and the serial number available.From 8 am to 5 pm EST, call 1-800-437-8993. Your serial number may be found ontop of your valve assembly (See figures 2-3.)
Conventional Water Conditioner Exhaust Pattern.Much of your resin could be wasted!
Exhausted Resin Regenerated Resin Water
UnusedResin
DirectionalFlow
Screen
DirectionalFlow
Screen
Exhaust Pattern assures more usable resin capacity.
Water
Resin
Typical Tank Design Operation Hardness Breakthrough Slippage/Exhaustion
DDiirreeccttiioonnaall FFllooww SSccrreeeenn DDiissttrriibbuuttiioonn SSyysstteemmDirects flow evenly through bed for most efficient use.

13
Installation And Start-Up Procedures
When calling the HelpLine, please have this guide and the serial number available.From 8 am to 5 pm EST, call 1-800-437-8993. Your serial number may be found on top of your valve assembly (See figures 2-3.)
Each waterBoss® water conditioner and filter includes two connecting hoses and 8' of drain line.
1. Placement: Place your waterBoss® appliance in desired location. Turn off electricity and watersupply to water heater. Make sure inlet/outlet and drain connections meet the applicable localcodes. Check arrows on valve to be sure water flows in proper direction. See figures 1, 2, & 3.CAUTION: DO NOT PLUMB APPLIANCE IN BACKWARD.
2. Drain Line: must be a minimum of 1/2"-5/8” I.D. tubing and should make the shortest run to asuitable drain. The drain line may be elevated up to 8 feet from the discharge on the appliance aslong as the water pressure in your system is 40 psi or more. If drain line is 25' or longer, increasedrain line to 5/8" I.D. Also, the end of the drain line must be equal in height or lower than the controlvalve. See figure 1. All overhead drains for filter installations must be 3/4” I.D.
3. Flushing: Before placing your waterBoss® appliance in service, it is very important to flush thecold water lines of any debris. Turn on water supply, open the nearest cold water tap and let thewater run for 2 to 3 minutes until the water flows clear. Then put the by-pass in the Service position.See figures 4 through 6.
4. Check Leaks. Close faucet and check for leaks. If leaks are found, turn off main water supplyand open the nearest cold water faucet to depressurize lines. Close faucet to eliminate siphoningaction. Repair leaks. Turn on water supply and electricity to water heater. Place the bypass valvein the Service position. See figure 6.
5. Connect Overflow Line. The overflow line must end at a drain that is at least 3" lower than thebottom of the overflow fitting. It is a gravity line and cannot be run overhead.See figure 7.
6. Complete The Installation. Open a cold water tap and allow the appliance to flush for 20 minutesor until approximately 72 gallons has passed through the appliance per NSF requirements.
7. Plug In Transformer. See figure 8.

14
Installation And Start-Up Procedures
8. Setting Number. For waterBoss®, BigBoss®, and cityBoss® for municipally-suppliedwater, determine your controller setting number. Do not guess at the setting; continued waterquality problems or damage to the unit could result.
Municipal water - call your local water company to determine your water hardness in grainsper gallon. This will be your setting number. Or, follow the instructions on the hardnesstest strip provided with your cityBoss® to determine your hardness reading. This will be your setting number.
Well water - follow the instructions on the pH and hardness test strips provided with yourwaterBoss® to determine the pH and hardness of your water.Iron adjustment : if pH is 7 or above and you know your water has iron, add 15 to your hardness reading in grains per gallon and enter the result as your setting #.
Example: hardness in grains per gallon from test strip is 20 + 15 = 35 = setting #.This is a temporary setting until you have an accurate water test.
If the result of your hardness test strip reaches the test maximum of 25 grains per gallon, mix 1 cup tap water with 1 cup distilled water, then retest for hardness. Multiply yourreading x 2 and use this number as your setting number. If the test strip result is still25 grains per gallon, call your HelpLine. Or, contact the company below to test for hardness,iron and pH.
WATERSCREENNational Testing Laboratories, Inc.1-800-458-3330 - 9 am - 5 pm EST
If you feel you have an abnormal amount of iron, push the powerClean® button for mod-els waterBoss® and BigBoss® only. Also, be sure to use salt with an iron-cleaning additive.Be aware that cityBoss® for municipally-supplied water is not designed to treat water withiron. If pH is below 7, refer to acid neutralizing filters, page 41.
9. Adding Water & Salt. Be sure to remove any packaging or installation materials beforeadding salt. Next, add not more than 2 gallons of water to the brine cabinet. Then add salt tothe brine cabinet, wait 2 hours then push the immediate recharge button and hold for 5 sec-onds. A regeneration cycle will begin and continue as follows: BigBoss® , 37 minutes;cityBoss® for municipally-supplied water, 26 minutes; and waterBoss®, 26 minutes. After thefirst regeneration, your softener will automatically refill the correct amount of water in the brinecabinet. See figure 10.
10. Refill Salt when the salt level drops below the water level in the brine cabinet. Alwayskeep salt above water level. See figure 10
CAUTION! Failure to install, operate and maintain your water treatment appliance as instructed will VOID the product limited warranty.
NOTE! Make sure the Owner's Limited warranty Card is filled in and mailedwithin 30 days of installation. NO POSTAGE REQUIRED.

Setting The 3 Button Controller
DEMAND REGENERATION
You won't have to worry about vacation settings or extra guests because the controller measureswater usage and regenerates based on need. The appliance will regenerate using only the neces-sary amount of water and salt. If power has been turned off, your appliance will retain programmedsettings indefinitely. See figure 9.
1) ENTERING YOUR SETTING NUMBERSee page 14 for determining your setting number. The water hardness setting number shown in thedigital readout will increase 1 grain each time you push the "SET" button. After 70 grains (90 grainsfor BigBoss®) the read-out will return to 1, and continue to count up from 1 until the display numbermatches the hardness number. (See setting conversion chart on page 34 for cityBoss®) After 5seconds the display will change to show "gallons remaining (x 100). To recheck the hardness, touch"SET."
2) GALLONS REMAININGAfter setting water hardness, gallons remaining until the next automatic regeneration is shown bythe read-out lights. NOTE: Gallons remaining are in hundreds. 12=1,200 gallons
3) RECHARGE/REGENERATION STATUSRegeneration cycle numbers are shown during regeneration. The read-out will flash with the cyclenumber. The flashing regeneration numbers are:
(01) First Backwash(02) Brine/Slow Rinse (03) Second Backwash(04) Brine Refill(05) Service
See pages 11 and 12 for cycle descriptions and illustrationsTo quickly advance through the regeneration cycles, press and hold the Immediate Recharge buttonfor 5 seconds. Wait for the cycle to begin, after 20 seconds press and hold the Immediate Rechargebutton until the cycle number changes (about 5 seconds.) Each cycle can be advanced in this man-ner.
4) CONTROLLER STATUS LIGHTIt is normal for the light to blink in the digital readout window. This indicates the controller is operat-ing properly. See page 9.
5) waterMizerThe waterMizer® light will blink whenever water is being used. See figure 9. Does not apply to thewaterBoss® Filters. See separate start up procedures. Pages 35, 36, and 37.
6) IMMEDIATE RECHARGETo start an immediate regeneration, press The "IMMEDIATE RECHARGE" button and hold for 5seconds. The Immediate Recharge button is used when starting your water conditioner, to start animmediate regeneration, or to restore capacity if you have run out of salt. If your waterBoss® hasrun out of salt, you may not have soft water available. Remove the salt lid and add salt. Wait twohours, then press the "IMMEDIATE RECHARGE" button and hold for 5 seconds. See figure 9.
15

16
Setting The Controller - Continued
7) POWERCLEAN™ The powerClean™ feature is a service/maintenance step for water supplies that have an excessiveamount of iron. Activating this feature is a simple push of the powerClean™ button on the controller.A yellow light indicates that the powerClean™ feature is activated. The appliance will regenerateevery other day with five pounds of salt. Leave the powerClean™ feature on for a minimum of twoweeks. The frequent regeneration will elimate iron buildup in the resin bed. The use of salt with aniron cleaning agent or iron out cleaner is recommended for continuous use as a preventive measureagainst iron fouling of the resin bed. To deactivate this feature, simply press the powerClean™ but-ton. Use this feature every six months as a part of your routine maintenance procedure to insure along service life for your water treatment appliance. See figure 9.
DELAYED REGENERATION*. . . If you wish to regenerate at a specific time.NOTE: time is set in military time (EXAMPLE: 2 am = 0200.)
1) Enter Setting Number as described in "Demand Regeneration" procedure.
2) Set current time of day in military time to nearest hour.-Step A: Press "SET" button.-Step B: Press Immediate Recharge button (status indicator light on; not blinking.)-Step C: Press "SET" button until current time of day appears in the display.Wait until display returns to "Gallons Remaining" - approximately 10 seconds.Then proceed to set desired time of regeneration. (EXAMPLE: if current time ofday is 4:20 pm, set on 16 which represents 1600 military time.) NOTE: if more than 10 seconds lapse between any of the following steps, the display will return to the startpoint which is "Gallons Remaining."
3) Set desired time of regeneration in military time to nearest hour.- Step A: Press "SET" button.- Step B: Press Immediate Recharge button 2 times (status indicator light out.)- Step C: Press "SET" button until desired time of regeneration appears in the display.After Step C, the display will return to gallons remaining and it is ready for service.(EXAMPLE: if desired regeneration time is 2:00 am, set on 2 which represents 0200military time.)
NOTE: if display starts flashing, you have inadvertently held down the Immediate Recharge buttonfor more than 5 seconds and placed the unit into Immediate Regeneration. Let the appliance finishthe regeneration sequence, or advance through the cycles as previously described in paragraph 3,page 15.
NOTE: if you desire to return unit to Demand Regeneration when the controller is in DelayedRegeneration, simply set the time of regeneration to "88" (see Delayed Regeneration, Step 3.)
*cityBoss® for municipally-supplied water operates on Demand Regeneration only.

17
Advanced Settings For The 3 Button Controller
Adjustable Settings.Your electronic control has four manual adjustable settings. Theadjustments are:
1. Display water remaining in gallons or litres2. 72-96 hour forced regeneration (on/off) every 4
days minimum regeneration**3. Backwash #1 cycle length4. Salt refill cycle length
Making Adjustments.Remove the 4 housing backplate screws. The switches arelocated in the upper left of the circuit board. The switches caneasily be adjusted using a small, flat blade screwdriver.The switches are "ON" when in the up position and "OFF"when in the down position.
Switch Descriptions.
Switch #1 - LANGUAGEON = Display water remaining in litres
* OFF = Display water remaining in gallons
Switch #2 - 72-96 HOUR FORCED REGENERATION* ON = 72-96 hour forced regeneration activated
(every 3-4 days minimum regeneration)OFF = 72-96 hour forced regeneration deactivated
Switch #3 - BACKWASH #1ON = 3 minute backwash #1
OFF = 1 minute backwash #1
Switch #4 - BACKWASH #1ON = 7 minute backwash #1
* OFF = no valueSwitches 3 & 4 are used together to set the Backwash #1 cycle time.
Switch #5 - SALT SETTINGON = 5.0 minute Brine Refill (7.0# Salt). Brine
draw is increased by 10 minutes. Unit capacity - 27,000 at 1 cu. ft. (BigBoss)
OFF = 2.6 minutes Brine Refill (3.8# Salt) Unit capacity - 17,800 grains at .7 cu. ft. (waterBoss)
* Factory Settings** If the unit does not regenerate within 72 hours, it will automatically regenerate at the next time of regeneration (TOR), not to exceed 96 hours
1 2 3 4 5
ON
OFF
Switch #3 Switch #4 Backwash #1 Time
OFF OFF 1 0
ON OFF 3 1-2
OFF ON 7 2-3
ON ON 10 4-10
Backwash #1 Switch Setting Chart
powerClean™ overrides switches 2-5

18
Care, Maintenance and Parts
When calling the HelpLine, please have this guide and the serial number available.From 8 am to 5 pm EST, call 1-800-437-8993. Your serial number may be found on top of your valve assembly (See figures 2-3.)
Figure 12
ELECTRONICS AND CABINET
FIGURE# PART# DESCRIPTION QUANTITY
1 93832 Brine Hose Clamp 2
2 93848 3/8” Brine Tubing 1 - 16”
3 93208 Control Panel Cover 1
4 93205 Salt Port Lid 1
5 93582 Computer Control Assembly 1
93582 BB Computer Control (BigBoss™) 1
93582 CB Computer Control (cityBoss™) 1
93582 IF Computer Control (Iron Filter) 1
93582 CF Computer Control (Carbon Filter) 1
93582 NF Computer Control (Acid 1Neutralizing Filter)
6 C0700 2-pc. Overflow 1
7 93513-WB Valve Cover Assembly 1
8 93245 12 Volt Transformer/Power Cord 1
9 93813 Flexible Connectors 2
10 93879 Flexible Connector Gasket 4
11 90832 Cabinet Cover Clip 4
12 93202 Support Panel 1
93202-C Support Panel, CityBoss (not shown) 1
93247 Filters Support Panels (not shown) 1
13 93204 waterBoss®/CityBoss™ Cabinet 1
97201 BigBoss™/Filter Cabinet 1
14 93858 Turbine Assembly Sensor 1
15 90618-Top Top Fill Plug Assembly 1
NOTE - See Appendix on page 39 for Bottom Fill Plug Assembly

19
Care, Maintenance and Parts
When calling the HelpLine, please have this guide and the serial number available.From 8 am to 5 pm EST, call 1-800-437-8993. Your serial number may be found on top of your valve assembly (See figures 2-3.)
Figure 12
15

20
Care, Maintenance and Parts
When calling the HelpLine, please have this guide and the serial number available.From 8 am to 5 pm EST, call 1-800-437-8993. Your serial number may be found on top of your valve assembly (See figures 2-3.)
Figure 13
Cabinet and Assemblies
FIGURE# PART# DESCRIPTION QUANTITY
1 95301T Drive End Cap Assembly 1
2 93505 3/4" IO Adapter Assembly 1
3 93229 Flow Director 1
4 93838 IO Adapter “O” Ring 2
5 93808 End Cap “O” Ring 2
6 93501 Injector Assembly 1
7 93530 Resin Tank Assembly - 1
(waterBoss / cityBoss empty)
95505 Resin Tank Assembly - (BigBoss empty) 1
97505 Greensand Media Tank, complete 1
97506 Media Tank Assembly (Filters, empty) 1
97507 Carbon Media Tank, complete 1
97508 Acid Neutralizer Media Tank, complete 1
93846-5 Super Fine Mesh Resin .5 cu.ft.
93846 Super Fine Mesh Resin .7 cu.ft.
M020-1 Super Fine Mesh Resin (BigBoss) 1.0 cu.ft.
M1 Power Clean Filter Media- 1.25 lb.(waterBoss / BigBoss)
93703 Activated Carbon (cityBoss) .15 cu ft
93702 Redox Media (cityBoss) 4 lbs
8 93809 Screw 2
9 93870 Screw 4
10 93524 Drain End Cap 1
93524 F Drain End Cap For Filters 1
11 93842 Drain Hose 8’
12 93835 Spacer Tube 2
NOTE - See Appendix on page 38 for Drain End Cap Assembly

21
Care, Maintenance and Parts
When calling the HelpLine, please have this guide and the serial number available.From 8 am to 5 pm EST, call 1-800-437-8993. Your serial number may be found on top of your valve assembly (See figures 2-3.)
Figure 13
See Page 38
See Page 23
See Page 27
See Page 25
1
2
34
5
4
5
6
7
8
9
10
11
12
9

22
Care, Maintenance and Parts
Figure 14
Injector Assembly
FIGURE# PART# DESCRIPTION QUANTITY
1 93223 Injector Throat 1
2 93220 Bottom (Thick) Injector Seal 1
3 93221 Injector Nozzel 1
4 93232 Bottom (Thin) Injector Seal 1
5 93222 Injector Cap 1
6 90807 Injector Screw 4
7 93810 Injector Screen 1
93501 Injector Assembly 1(Includes all above items)
Note: When working on the injector assembly, make sure part #2 aligns properly with the outline marked on part #3.
When calling the HelpLine, please have this guide and the serial number available.From 8 am to 5 pm EST, call 1-800-437-8993. Your serial number may be found on top of your valve assembly (See figures 2-3.)

23
Care, Maintenance and Parts
When calling the HelpLine, please have this guide and the serial number available.From 8 am to 5 pm EST, call 1-800-437-8993. Your serial number may be found on top of your valve assembly (See figures 2-3.)
Figure 14
Part Number 93501Injector Assembly Contains All Of The Above Parts.

24
Care, Maintenance and Parts
When calling the HelpLine, please have this guide and the serial number available.From 8 am to 5 pm EST, call 1-800-437-8993. Your serial number may be found on top of your valve assembly (See figures 2-3.)
Figure 15
I/O Adapter Assembly
FIGURE# PART# DESCRIPTION QUANTITY
1 93227 3/4" IO Adapter 1
2 93858 Turbine Sensor Assembly 1
3 90232 Turbine Sensor Cap 1
4 90522 Turbine Assembly 1
5 93838 “O” Ring 2
6 93229 Flow Director 1
7 90809 Sensor Cap Screw 1
8 90828 Test Port / Sensor Housing O-ring 1
9 93271 Turbine Sensor Housing 1
10 90802 Turbine Sensor Housing Screw 2
11 90245 Turbine Axle 1
93505 I/O Adapter Assembly (contains items 1-11)

25
Care, Maintenance and Parts
When calling the HelpLine, please have this guide and the serial number available.From 8 am to 5 pm EST, call 1-800-437-8993. Your serial number may be found on top of your valve assembly (See figures 2-3.)
Figure 15
Part Number 93505I.O. Adapter Assembly Contains All Of The Above Parts.
11
4
2
37
10
9
8
1
5
6
Note: Parts 8, 9 and 11 are notfield serviceable.Do not remove screws (#10).
26
Care, Maintenance and Parts
When calling the HelpLine, please have this guide and the serial number available.From 8 am to 5 pm EST, call 1-800-437-8993. Your serial number may be found on top of your valve assembly (See figures 2-3.)
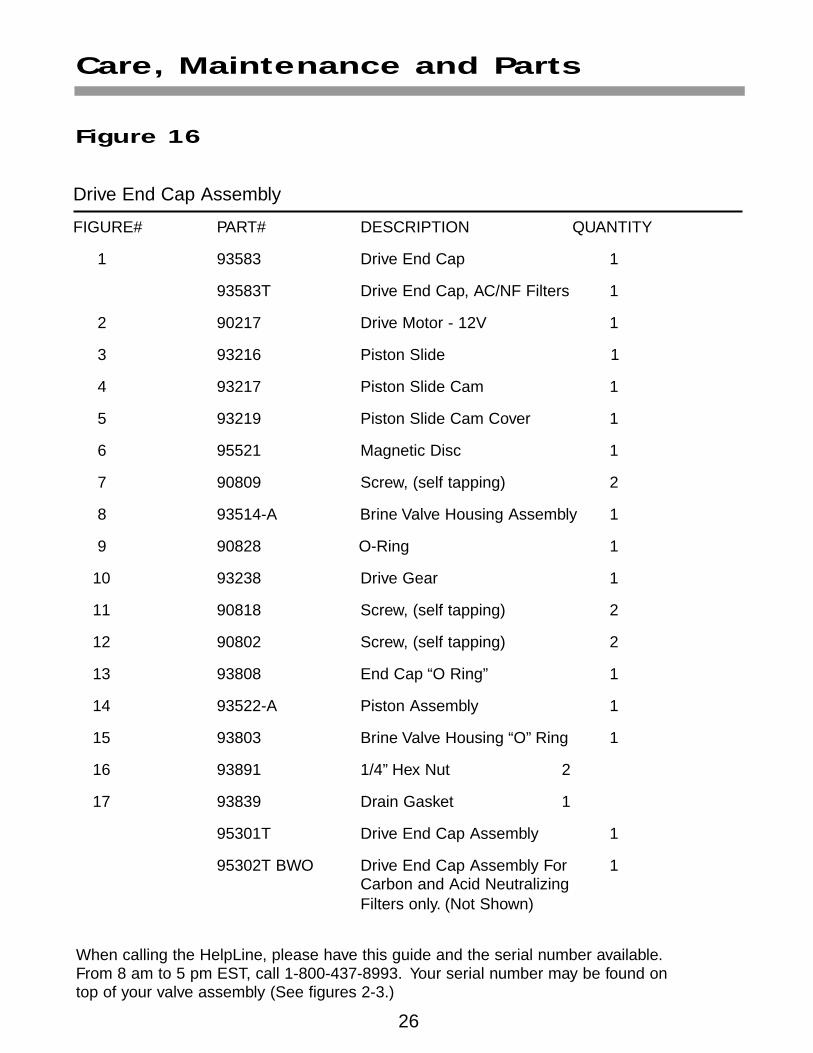
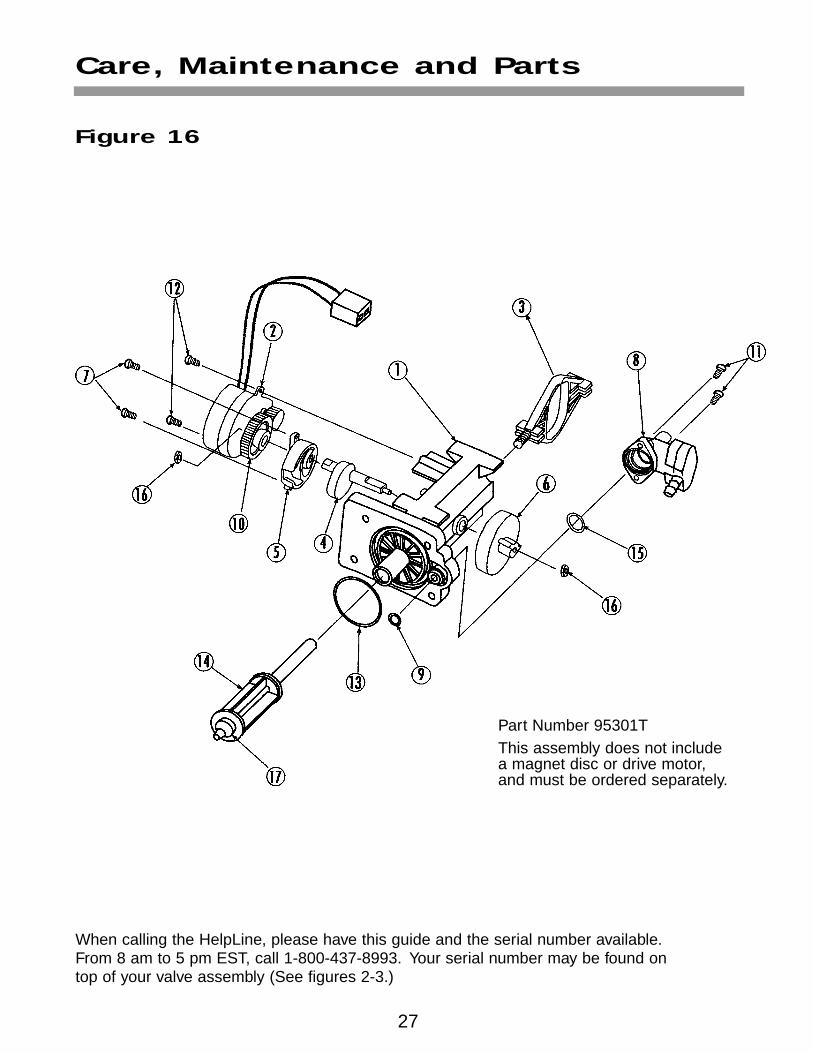
Figure 16
Drive End Cap Assembly
FIGURE# PART# DESCRIPTION QUANTITY
1 93583 Drive End Cap 1
93583T Drive End Cap, AC/NF Filters 1
2 90217 Drive Motor - 12V 1
3 93216 Piston Slide 1
4 93217 Piston Slide Cam 1
5 93219 Piston Slide Cam Cover 1
6 95521 Magnetic Disc 1
7 90809 Screw, (self tapping) 2
8 93514-A Brine Valve Housing Assembly 1
9 90828 O-Ring 1
10 93238 Drive Gear 1
11 90818 Screw, (self tapping) 2
12 90802 Screw, (self tapping) 2
13 93808 End Cap “O Ring” 1
14 93522-A Piston Assembly 1
15 93803 Brine Valve Housing “O” Ring 1
16 93891 1/4” Hex Nut 2
17 93839 Drain Gasket 1
95301T Drive End Cap Assembly 1
95302T BWO Drive End Cap Assembly For 1Carbon and Acid Neutralizing Filters only. (Not Shown)
27
Care, Maintenance and Parts
When calling the HelpLine, please have this guide and the serial number available.From 8 am to 5 pm EST, call 1-800-437-8993. Your serial number may be found on top of your valve assembly (See figures 2-3.)
Figure 16
Part Number 95301TThis assembly does not includea magnet disc or drive motor,and must be ordered separately.

Care, Maintenance and Parts
When calling the HelpLine, please have this guide and the serial number available.From 8 am to 5 pm EST, call 1-800-437-8993. Your serial number may be found on top of your valve assembly (See figures 2-3.)
Figure 17
Brine Valve Housing Assembly
FIGURE# PART# DESCRIPTION QUANTITY
1 93511-A Housing 1
2 93243 Housing Cap 1
3 90521 Piston Assembly 1
4 93805 “O” Ring 1
5 90843 .5 GPM Flow Control 1
6 93802 Piston Spring 1
7 90807 Screw 2
8 93803 “O” Ring 1
93514-A Brine Valve Housing Assembly 1
28

Care, Maintenance and Parts
When calling the HelpLine, please have this guide and the serial number available.From 8 am to 5 pm EST, call 1-800-437-8993. Your serial number may be found on top of your valve assembly (See figures 2-3.)
Figure 17
Part Number 93514-ABrine Valve Assembly ContainsAll Of The Above Parts.
Note: This part is not used on backwash only filters.
29

Care, Maintenance and Parts
Figure 18
Support Panel Assembly
FIGURE# PART# DESCRIPTION QUANTITY
1 93240 Refill Elbow 1
2 90846 Refill Nut 1
3 93882 Air Check Draw Tube-waterBoss/cityBoss 193882-25.75 Air Check Draw Tube-BigBoss 1
4 93202 Support Panel 1
93202-F Support Panel-Filters 1
NOTE - See Appendix on page 39 for Iron Filter Safty Shutoff Assembly
30
When calling the HelpLine, please have this guide and the serial number available.From 8 am to 5 pm EST, call 1-800-437-8993. Your serial number may be found on top of your valve assembly (See figures 2-3.)

31
Care, Maintenance and Parts
Figure 18
When calling the HelpLine, please have this guide and the serial number available.From 8 am to 5 pm EST, call 1-800-437-8993. Your serial number may be found on top of your valve assembly (See figures 2-3.)
32
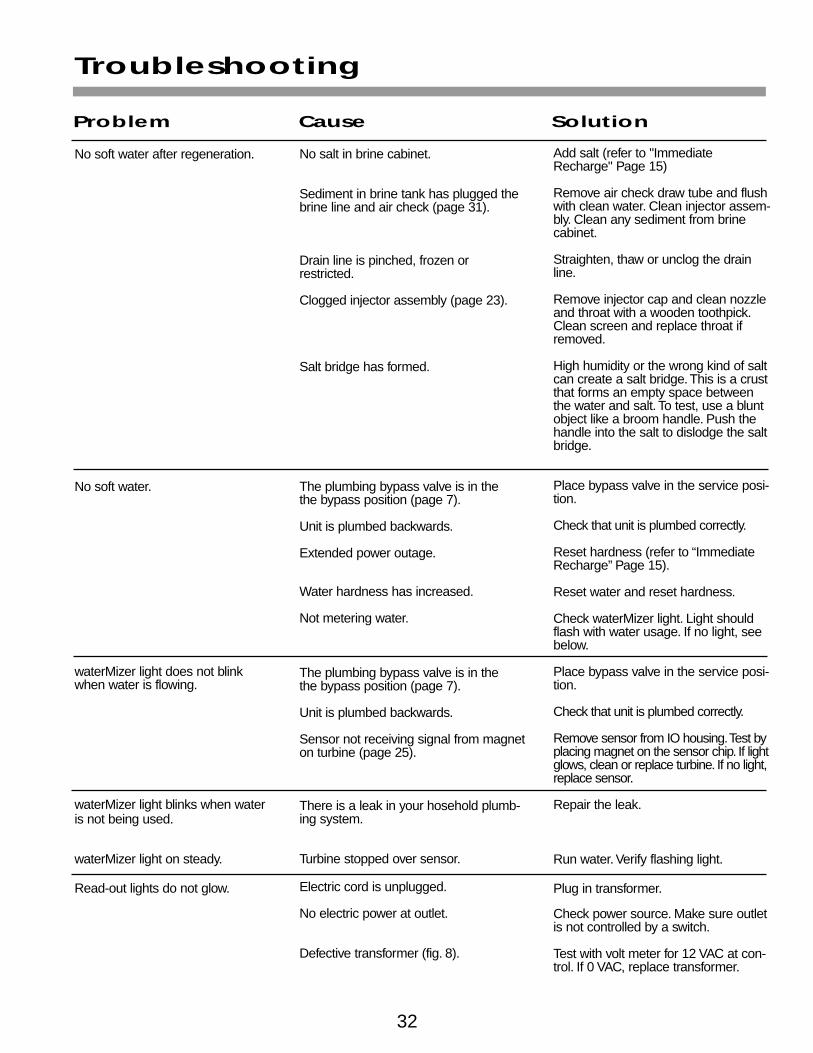
Troubleshooting
Problem Cause Solution
Add salt (refer to "ImmediateRecharge" Page 15)
Remove air check draw tube and flushwith clean water. Clean injector assem-bly. Clean any sediment from brinecabinet.
Straighten, thaw or unclog the drainline.
Remove injector cap and clean nozzleand throat with a wooden toothpick.Clean screen and replace throat ifremoved.
High humidity or the wrong kind of saltcan create a salt bridge. This is a crustthat forms an empty space betweenthe water and salt. To test, use a bluntobject like a broom handle. Push thehandle into the salt to dislodge the saltbridge.
Place bypass valve in the service posi-tion.
Check that unit is plumbed correctly.
Reset hardness (refer to “Immediate Recharge” Page 15).
Reset water and reset hardness.
Check waterMizer light. Light shouldflash with water usage. If no light, seebelow.
Place bypass valve in the service posi-tion.
Check that unit is plumbed correctly.
Remove sensor from IO housing.Test byplacing magnet on the sensor chip. If lightglows, clean or replace turbine. If no light,replace sensor.
Repair the leak.
Run water. Verify flashing light.
Plug in transformer.
Check power source. Make sure outletis not controlled by a switch.
Test with volt meter for 12 VAC at con-trol. If 0 VAC, replace transformer.
No salt in brine cabinet.
Sediment in brine tank has plugged thebrine line and air check (page 31).
Drain line is pinched, frozen or restricted.
Clogged injector assembly (page 23).
Salt bridge has formed.
The plumbing bypass valve is in the the bypass position (page 7).
Unit is plumbed backwards.
Extended power outage.
Water hardness has increased.
Not metering water.
The plumbing bypass valve is in the the bypass position (page 7).
Unit is plumbed backwards.
Sensor not receiving signal from magneton turbine (page 25).
There is a leak in your hosehold plumb-ing system.
Turbine stopped over sensor.
Electric cord is unplugged.
No electric power at outlet.
Defective transformer (fig. 8).
No soft water after regeneration.
No soft water.
waterMizer light does not blinkwhen water is flowing.
waterMizer light blinks when wateris not being used.
waterMizer light on steady.
Read-out lights do not glow.

33
Troubleshooting
Problem Cause Solution
With 12 VAC present at controller,replace circuit board.
Make sure computer control is pushed allthe way onto drive end cap.
Remove foreign objects from valve body.
Repair drive end cap.
Remove restriction, thaw or straightendrain line.
Clean flow control, air check and brineline. Clean any sediment from brinecabinet.
Clean or replace injector. Replace throatif removed.
Remove brine valve. Lubricate pistonwith silicone grease and reassemble.
Replace magnet disc.
Replace control.
Clean injector screen, nozzle and throat.See figure 14 page 23.
Maintain min. pressure of 30 psi.See specifications page 40-41.
Remove restrictions.
Remove restrictions, replace if crimped.
Verify correct water level relative to saltsetting. Check lines for loose connec-tions.
Verify adequate pressure and volume ofwater supply.See specifications page 40-41.
Defective circuit board (fig. 9).
Computer control not attached properly.
Foreign object in valve body.
Broken valve assembly.Motor running.Magnet disc not turning (pages 26 - 27).
Restricted, frozen or pinched drain line.
Plugged brine line, brine line flow controlor air check (pages 28-31).
Plugged injector assembly (pages 22-23).
Sticking brine refill valve.
Magnet disc defective.
Defective position sensor.
Plugged Injector.
Low water pressure.
Drain line or flow control restricted.
Brine line restricted or crimped.
Excessive amount of water inbrine cabinet.
Intermittent pressure dropfrom feed source.
Read-out lights do not glow.
Unit stays in regeneration. Cyclenumbers remain flashing.
Excess water in brine tank. Shouldbe approximately 6 - 8" with salt forwaterBoss, and cityBoss, and 8-10”for BigBoss.
Not regenerating in propersequence.
Salty water.
3 Button ControllerDisplay Indications Display Numbers Status Indicator Light
Service Lit solid showing gallons remaining x 100 Blinking
Calling for regeneration Displaying "00" Blinking or steady
Regeneration cycle Blinking numbers from "01" to "05" Blinking

34
Hardness Setting Conversion Chart
For cityBoss® Model Only
Setting is calculated by multiplying compensated hardness by 1.4
If Your Compensated Hardness Is Your Setting Is1 2
2 3
3 5
4 6
5 7
6 9
7 10
8 12
9 13
10 14
11 16
12 17
13 19
14 20
15 21
16 23
17 24
18 26
19 27
20 28
21 30
22 31
23 33
24 34
25 35
When calling the HelpLine, please have this guide and the serial number available.From 8 am to 5 pm EST, call 1-800-437-8993. Your serial number may be found on top of your valve assembly (See figures 2-3.)

Your waterBoss® Acid Neutralizing filter will backwash every two days. This has been prepro-grammed for you at the factory and is indicated by the yellow power clean light on the controller. Itis important that this light be on at all times. If you notice that the power clean light is out, simplypush the power clean button to activate the yellow light. All you will have to do is set the time of dayand the desired time of regeneration by following the procedure outlined on page 16 of your installa-tion and service manual. Caution: Set filter regeneration time 2 hours after the softener regenerationtime.
IMPORTANT: Because the 97WB-ANF is capable of elevating a low pH condition in the water, it isimportant that the filter be applied within the operating limits outlined on page 41 of your installationand service manual. Failure to comply with these specifications will cause poor backwash resultsand possibly a malfunction of the control valve. Additionally, it will be necessary to add two to fivepounds of the neutralizing media to the filter tank annually. The media slowly dissolves and therebycorrects the corrosive characteristic of the water. The hardness will increase by two to four grainsper gallon. Check the total hardness of the water after start-up of the neutralizer and set your watersoftener accordingly.
INSTALLATION TIP: Before placing this filter in service it will be necessary to backwash the filter toremove media fines in the filter bed. To backwash the filter, push and hold the immediate rechargebutton until the controller indicates cycle 01 (flashing). After 36 minutes, the controller will return tothe service mode and display 03 or 04 (solid). Retest the hardness before the water enters the sof-tener and reset the hardness setting of the softener. The pH value should be adjusted to at least 7.0after installation.
NOTE: This filter should be installed after the pressure tank or water meter and before thewaterBoss® water softener unless otherwise recommended. (See illustration). A minimum of ¾"pipe is required for proper function of the filter. It is important to examine the inlet piping to makesure the pipe is not plugged with iron. If the piping is plugged, it must be cleaned or replaced.
CAUTION: The calcite/corosex media in your unit gradually dissolves as it treats low pH water.Determine the amount of media in your unit by first depressurizing your unit. Next, remove the fillplug at the top of your unit. Move a dowel down the fill plug opening until it contacts the calcite/coro-sex media. Mark the dowel where it is level with the top of the fill plug opening. If the distancebetween the mark and the end of the dowel is less than 6", replace the fill plug and place your unitback in service. If it is more that 8", call your HelpLine for further instructions and to order new cal-cite/corosex media.
35
Start-Up Procedure
Model 97WB-ANF Acid Neutralizing Filter

Start-Up Procedure
Model 97WB-IF Iron Filter
Your waterBoss® Iron filter will regenerate every three to four days. This has been preprogrammed foryou at the factory. All you will have to do is set the time of day and the desired time of regeneration by fol-lowing the procedure outlined on page 16 of your installation and service manual. Caution: Set filterregeneration time 2 hours after the softener regeneration time.
IMPORTANT: Because the 97WB-IF is capable of treating a combination of undesirable constituents inthe water (iron and/or hydrogen sulfide), it is important that the filter be applied within the operating limitsoutlined on page 41 of your installation and service manual. Failure to comply with these specificationswill cause poor regeneration results and possibly a malfunction of the control valve.
INSTALLATION TIP: Before placing the filter in service, add three gallons of water to the cabinet. Makesure the Potassium Permanganate (KMnO4) has been thoroughly mixed as indicated below. To start aregeneration, push and hold the immediate recharge button until the controller indicates cycle 01(flash-ing). After 33 minutes, the filter will return to service mode and display 03 or 04 (solid).
NOTE: This filter should be installed after the pressure tank or water meter and before the waterBoss®
water softener unless otherwise recommended (See illustration). A minimum ¾" pipe is required for prop-er function of the filter. It is also important to examine the inlet piping to make sure the pipe is not pluggedwith lime or iron. If the piping is plugged, it must be cleaned or replaced.
CAUTION: When adding the Potassium Permanganate (KMnO4), use care when opening the containerand pouring it into the cabinet. Stir the Potassium Permanganate (KMnO4) until the color is a dark walnutand stir every two weeks. Follow the safety precautions on the container.A three pound bottle of Potassium Permanganate (KMnO4) will last approximately three months. Coarsegranular Potassium Permanganate (KMnO4) is recommended for this filter appliance (P/N 97804). Finegranular potassium permanganate can be drawn into the filter as a solid rather than a liquid. For furtheroperating and handling instructions, refer to the product label on the Potassium Permanganate bottle.
36

37
Start-Up Procedure
Model 97WB-CF Carbon Filter
Your waterBoss® Carbon filter will backwash every three to four days. This has been prepro-grammed for you at the factory. All you will have to do is set the time of day and the desiredtime of regeneration by following the procedure outlined on page 16 of your installation andservice manual. Caution: Set filter regeneration time 2 hours after the softener regeneration time.
IMPORTANT: Because the 97WB-CF is capable of treating a combination of undesirableconstituents in the water (chlorine, taste and odor), it is important that the filter be appliedwithin the operating limits outlined on page 41 of your installation and service manual. Failureto comply with these specifications will cause poor backwash results and possibly a malfunc-tion of the control valve.
NOTE: This filter should be installed after the pressure tank or water meter and after thewaterBoss® water softener unless otherwise recommended. (See illustration). A minimum ¾" pipe is required for proper function of the filter. It is also important to examinethe inlet piping to make sure the pipe is not plugged with lime. If the piping is plugged, it mustbe cleaned or replaced.
The carbon media in this filter may need to be changed periodically. If you notice disagreeable tastes and odors returning to your water, call the HelpLine for further instruc-tions and to order new carbon media.
Softener Filter

38
Parts Appendix
When calling the HelpLine, please have this guide and the serial number available. From 8am to 5 pm EST, call 1-800-437-8993. Your serial number may be found on top of your valveassembly (See figures 2-3.)
Drain End Cap Assembly
FIGURE# PART# DESCRIPTION QUANTITY
1 90268 Drain End Cap (Threaded) 1
2 H2086-5.0 Drain Line Flow Control Button 1
H2086-3.0 Drain Line Flow Control Button 1
3 90267 Retainer 1
4 93808 “O” Ring 1
90614 Drain End Cap Assembly (1-4) 1
5 V185 Drain Line Fitting (not shown) 1
1
2
3
4
Flow Control Button Sizes:5.0 For Models IF and NF Filters.3.0 For Models cityBoss and
waterBoss CF Filter.
Part # 90614

39
Parts Appendix
Iron Filter Safety Shutoff Assembly
FIGURE# PART# DESCRIPTION QUANTITY
1 93811-19.5WB Air Check / Brine Well Assembly 1For Iron Filter Only
2
1
Fill Plug Assemblies
FIGURE# PART# DESCRIPTION QUANTITY
1 90618 Bottom Fill Plug Assembly With ”O” Rings 1
2 90819 Bottom Fill Plug ”O” Rings 2
Retainer Sleeve
Steel Gripper
Nut
3/8" Rigid PVCPipe
Complete Assembly
RetainerSleeve 3/8" Polytube
Nut
PlasticInsert
SteelGripper
Elbow Body
The nut, gripper and retainer sleeve are a 3 piece assem-bly that can come apart if removed from the elbow body.Parts must be re-assembled exactly as shown to functionproperly.
Brine Valve Elbow Assembly
1

3.8 / 17,800 7.0 / 27,000 3.8 / 12,800
70 90 25
10 ppm 10 ppm 0
7 7 7
40
Softener Specifications
When calling the HelpLine, please have this guide and the serial number available. From 8am to 5 pm EST, call 1-800-437-8993. Your serial number may be found on top of your valveassembly (See figures 2-3.)
120ºF 120ºF 120ºF
10.5 X 14” I.D. 10.5 X 21” I.D. 10.5 X 14” I.D.
16 gpm/15 10 gpm/14.5 10 gpm/15
3.2 4.0 3.2
2.0 2.0 3.0
20 / 120 20 / 120 20 / 120
5 5 5
1 1 2
3 Button 3 Button 3 Button
26 37 min 26
15.0 21.0 17.0
Demand Demand Demand
120 lbs. 160 lbs. 120 lbs.
23.5” 30.5” 23.5”
14.5” X 19” 14.5” X 19” 14.5” X 19”
12VAC, 1 phase60 Hz 12VAC, 1 phase60 Hz 12VAC, 1
phase60 Hz
3/4 ” MPT 3/4” MPT 3/4” MPT
85 lbs 105 lbs 85 lbs
Maximum compensated hardness (grains)
Maximum ferrous iron reduction
Minimum pH
Media type and amounts
Salt usage (lbs.) / Capacity
Maximum water temperature
Mineral tank size
Peak flow rate / psi drop
Pressure drop @ service flow rate of 4 gpm
Maximum flow rate to drain during regeneration (backwash gpm)
Water Pressure (minimum-maximum psi)
Minimum water volume required (gpm)
Maximum Chlorine (ppm)
Controller type
Regeneration time (minutes)
Water used per regeneration (gallons)
Frequency of regeneration (days)
Salt Storage
Height (in.)
Footprint (in.)
Electrical Rating
Plumbing Connections
Shipping Weight - Approximate (lbs.)
MODEL # waterBoss BigBoss cityBoss
Redox Media - 4 lbs Activated carbon - .15 cu. ft.Super Fine Mesh Resin - .5
Power Clean Filter Media Super Fine Mesh Resin - 1
Power Clean Filter Media Super Fine Mesh Resin - .7

41
Filter Specifications
When calling the HelpLine, please have this guide and the serial number available.From 8 am to 5 pm EST, call 1-800-437-8993. Your serial number may be found on topof your valve assembly (See figures 2-3.)
80ºF 120ºF 120ºF
10.5 X 21” I.D. 10.5 X 21” I.D. 10.5 X 21” I.D.
7 gpm/15 7 gpm/15 6 gpm/15
9 9 9
5.0 3.0 5.0
30 / 120 30 / 120 30 / 120
5 5 5
3 Button 3 Button 3 Button
33 29 36
52.5 32.5 45
4 4 2
5 lb* N/A N/A
30.5” 30.5” 30.5”
14.5” X 19” 14.5” X 19” 14.5” X 19”
12VAC, 1 phase60 Hz 12VAC, 1 phase60 Hz 12VAC, 1
phase60 Hz
3/4” MPT 3/4” MPT 3/4” MPT
N/A N/A N/A
15 ppm N/A N/A
7 N/A 6.3
MODEL # 97WB-IF 97WB-CF 97WB-ANF
Backwash Only Backwash Only4 oz. PotassiumPermanganate
Greensand.7 cu. ft.
Carbon.7 cu. ft.
Calcite/Corosex.7 cu. ft.
Maximum compensated hardness (grains)
Maximum ferrous iron reduction
Minimum pH
Media type and amounts
Salt usage (lbs.) / Capacity
Maximum water temperature
Mineral tank size
Peak flow rate / psi drop
Pressure drop @ service flow rate of 4 gpm
Maximum flow rate to drain during regeneration (backwash gpm)
Water Pressure (minimum-maximum psi)
Minimum water volume required (gpm)
Controller type
Regeneration time (minutes)
Water used per regeneration (gallons)
Frequency of regeneration (days)
Salt Storage
Height (in.)
Footprint (in.)
Electrical Rating
Plumbing Connections
Shipping Weight - Approximate (lbs.)
Install before your water conditioner. waterBoss® Model 97WB-IF Iron Filter automatically reduces iron, Hydrogen Sulfide and iron bacteria.
Install after your water conditioner. waterBoss® Model 97WB-CF Carbon Filter with the activatedcarbon filtering bed, chlorine, taste and odor are automatically reduced - including most organic andman-made pollutants.Note: This filter can be installed before water conditioner in special situations.Call Helpline for specific applications.
Install before your water conditioner. waterBoss® Model 97WB-ANF Acid Neutralizing Filter auto-matically neutralizes low pH water. This will increase the water hardness by 2-4 grains.
* Potassium Permanganate
Note: The iron filter operates in the same manner as the waterBoss® Softeners, but with manganese green-sand in place of the super fine mesh resin. The filter uses a potassium permangante (KMnO4) solution forregeneration instead of salt brine. In service, the filter media aids in oxidizing the iron, manganese and/or hydro-gen sulfide to a solid particle, trapping it in the filter bed.

42
Limited Warranty
To Whom Warranty is ExtendedThis warranty is issued to the original owner at the original location site and is not transferable to other sites or to subsequentowners of the system.
TO PLACE THE EQUIPMENT UNDER WARRANTY, THE WARRANTY REGISTRATION CARD MUST BE COMPLETEDAND RETURNED BY THE ORIGINAL OWNER TO waterBoss®WITHIN 30 DAYS OF INSTALLATION.
CoverageThis limited warranty covers the waterBoss® systems deliveredto the original owner at the original location when the system is pur-chased for personal, family, or household use. It is intended to coverdefects occurring in workmanship or materials or both.
Warrantor's Performance and Length of Limited warranty -waterBoss® warrants that upon receipt from the original ownerof any mechanical or electronic part which is found to be defec-tive in materials or workmanship, waterBoss® will repair orreplace the defective item for 3 years from date of originalinstallation.
waterBoss® further warrants that upon receipt from the original owner of any waterBoss® media tank / valve body,brine cabinet, found to be defective in material or workmanship,waterBoss® will repair or replace the defective item for 10years from date of original installation.
All defective parts must be returned, along with the equipmentserial number and date of original installation, to waterBoss®
PREPAID, and replacement parts will be returned by waterBoss®
to the original owner FREIGHT COLLECT.
FURTHER EXCLUSIONS AND LIMITATIONS ON WARRANTY
THERE ARE NO WARRANTIES OTHER THAN THOSEDESCRIBED IN THIS WARRANTY INSTRUMENT.This warranty does not cover any service call or labor costsincurred with respect to the removal and replacement of anydefective part or parts. waterBoss® will not be liable for, nor willit pay service call or labor charges incurred or expended withrespect to this warranty.
In the event the water supply being processed through this prod-uct contains bacterial iron, algae, sulphur, tannins, organic matteror other unusual substances, then, unless the system is repre-sented as being capable of handling these substances in the sys-tem specifications, other special treatment of the water supplymust be used to remove these substances before they enter thisproduct. Otherwise, waterBoss® shall have no obligations underthis warranty.
This warranty does not cover damage to a part or parts of thesystem from causes such as fire, accidents, freezing, or unrea-sonable use, abuse or neglect by the owner.
This warranty does not cover damage to a part or parts of thesystem resulting from improper installation. All plumbing and elec-trical connections should be made in accordance with all localcodes and the installation instructions provided with the system.The warranty does not cover damage resulting from use with inad-equate or defective plumbing; inadequate or defective water supplyor pressure; inadequate or defective house wiring; improper voltage,electrical service, or electrical connections; or violation of applicablebuilding, plumbing, or electrical codes laws, ordinances or regula-tions.
THIS WARRANTY DOES NOT COVER INCIDENTAL,
CONSEQUENTIAL OR SECONDARY DAMAGES.
ANY IMPLIED WARRANTIES ON THE PRODUCTDESCRIBED IN THIS WARRANTY WILL NOT BEEFFECTIVE AFTER THE EXPIRATION OF THISWARRANTY.
Some states do not allow limitations on how long an implied war-ranty lasts or the exclusion or limitation of incidental or consequen-tial damages, so the above limitations and exclusion may notapply to you. This warranty gives you specific legal rights andyou may also have other rights which vary from state to state.
Claims ProceduresAny defects covered by this warranty should be promptly reported to: waterBoss®
4343 South Hamilton Road,Groveport, Ohio 43125
In writing about the defects, please provide the original owner’sname, telephone number and original address, serial numberand model number of the product, and date of purchase .waterBoss® reserves the right to replace defective parts withexact duplicates or their equivalent.
For Owner’s Reference
Model No. _________________________________
Equipment Serial No. _________________________________
Installation Date _____________________________________
Installer’s Signature __________________________________
waterBoss® will not accept any returns after 6months from date of purchase.
Call: 1-800-437-8993 For Return Information


When calling the HelpLine, please have this guide and the serial number available. From 8 am to 5 pm EST, call 1-800-437-8993.
©1998 waterBoss® P.O. Box 298, Groveport, OH 43125
LITHO USA Form #93966 RV1001HQW
U®
L
has the third party listings.
In Business Since 1956
®
Listed and tested under NSF Standard 44 for SofteningPerformance, Barium Reduction, and Radium 226/228Reduction. Water softeners using sodium chloride forregeneration add sodium to the water. Persons who areon sodium restricted diet should consider the addedsodium as part of their overall sodium intake.