installation and manual - sweetssweets.construction.com/swts_content_files/495/425875.pdfdoor and...
TRANSCRIPT

1" GLASS (NBV)V-30
S-67
1" GLAV-30S
3"
1" GLASS (NBV)V-30
S-67
3 3/4"
D38
1" GLASS (NBV)
V-30
S-67
D-2
4 3/
4"
V-30
S-67
D-2
4 3/
4"
1" GLASS (NBV)V-30
S-67D-16
3"
1" GLASS (NBV)
S
(NBV)V 30
S-67D-16
1" GLASS (NBV)
V-30
S-67
1" GLASS (NBV)
1" GLASS (NBV)
V-30
S-67
2 7/8"
2 7/8"
V-30
S-67
AS-6
D-63
D-12
1" GLASS (NBV)
V-30
S-67
1" GLASS (NBV)
V-30
S-67
2 7/8"
D-3
1" GLASS (NBV)
V-30
S-67
2 7/8"
D-3
DOOR AND FRAME
I N S T A L L A T I O N
A N D
G L A Z I N G
M A N U A L
May 2004

D1
D1
3 3/4
D38
V-30S-67
11/16
"13
/16"
D-2
VISTAWALL ARCHITECTURAL PRODUCTSCentral Operations & Headquarters
803 Airport RoadTerrell, TX 75160
Phone: 800-869-4567Fax: 972-551-6323
WWW.VISTAWALL.COM
D O O R A N D F R A M E
©VISTAWALL ARCHITECTURAL PRODUCTSEFFECTIVE 05/04

May 2004
DOOR AND FRAME
I N S T A L L A T I O N
A N D
G L A Z I N G
M A N U A L

CONTENTS
©VISTAWALL ARCHITECTURAL PRODUCTSEFFECTIVE 05/042
D O O R A N D F R A M E
CONTENTS
Inspect Materials . . . . . . . . . . . . . . . . . . . . . . . . . . . . . . . . . . . . . . . . . . . . . . . . . . .Page 3
Door Size Warranty Guidelines . . . . . . . . . . . . . . . . . . . . . . . . . . . . . . . . . . . . . . . .Page 4
Standard Hardware Locations . . . . . . . . . . . . . . . . . . . . . . . . . . . . . . . . . . . . . . . . .Page 5
Door Handing Designations . . . . . . . . . . . . . . . . . . . . . . . . . . . . . . . . . . . . . . . . . . .Page 6
Glass Sizing
For Doors . . . . . . . . . . . . . . . . . . . . . . . . . . . . . . . . . . . . . . . . . . . . . . . . . . .Page 7
For Sidelights . . . . . . . . . . . . . . . . . . . . . . . . . . . . . . . . . . . . . . . . . . . . . . . .Page 8
Preparation of Opening . . . . . . . . . . . . . . . . . . . . . . . . . . . . . . . . . . . . . . . . . . . . . .Page 9
Preparation of Frame . . . . . . . . . . . . . . . . . . . . . . . . . . . . . . . . . . . . . . . . . . . . . . .Page 10
Installation of Frame . . . . . . . . . . . . . . . . . . . . . . . . . . . . . . . . . . . . . . . . . . . . . . .Page 11
Installation of Air-Tight Threshold . . . . . . . . . . . . . . . . . . . . . . . . . . . . . . . . . . . . .Page 12
Threshold Modification . . . . . . . . . . . . . . . . . . . . . . . . . . . . . . . . . . . . . . . . . . . . . .Page 14
Glazing the Door . . . . . . . . . . . . . . . . . . . . . . . . . . . . . . . . . . . . . . . . . . . . . . . . . .Page 15
Installation of Offset Hung Door on Butt Hinges . . . . . . . . . . . . . . . . . . . . . . . . . .Page 16
Installation of Offset Hung Door on Pivots . . . . . . . . . . . . . . . . . . . . . . . . . . . . . .Page 18
Installation of Offset Hung Door with Standard Vistawall Concealed Closers . . . .Page 19
Installation of Center Hung Door with Standard Vistawall Concealed Closer . . . .Page 20
Installation of Offset Hung Door with LCN Concealed Closer . . . . . . . . . . . . . . . .Page 21
Installation of Center Hung Door with LCN Concealed Closer . . . . . . . . . . . . . . .Page 22
Installation of Offset Hung Door with Floor Closer . . . . . . . . . . . . . . . . . . . . . . . .Page 23
NIGHTWATCH® Installation Instructions . . . . . . . . . . . . . . . . . . . . . . . . . . . . . . . .Page 24
Final Adjustments to the Door . . . . . . . . . . . . . . . . . . . . . . . . . . . . . . . . . . . . . . . .Page 25
Attachments of and Adjustments to Hardware . . . . . . . . . . . . . . . . . . . . . . . . . . .Page 27
Maintenance Recommendations . . . . . . . . . . . . . . . . . . . . . . . . . . . . . . . . . . . . . .Page 30
D O O R A N D F R A M E
INSPECT MATERIALS UPON RECEIPT
Inspect all materials upon receipt to be sure that all items have been received and that no damage hasoccurred. If there is damage that is clearly due to improper handling in transit, it is up to Vistawall’scustomer to settle claims with the freight company. If there is damage (or missing / incorrect items)due to a Vistawall error, please notify Vistawall within 7 days.
The following items are shipped in the door box:Assembled door with glass stops taped in placeA box within the door box with the following items enclosed:
Push barPull handleExit device (if required)Pivots or butt hinges
The following items are shipped in the frame box:Left door jambRight door jambDoor headerThresholdScrews and clips; and gaskets (if required)Transom bar (if required)Transom head (if required)Transom sash (if required)
The following items are shipped in separate boxes:V-231 weatherstrip (if required)Closer
Doors and frames will be prepped for the following:Pivots or butt hinges or Pemko continuous hingePush bar (if Vistawall’s or in Vistawall possession prior to fabrication)Latch end of exit device (when required)Concealed overhead closer (when required)Cylinder (when required)
If hardware is not by Vistawall, physical hardware is required to be on hand at Vistawall prior to fabrication ofdoors. Hardware may be prepped for by template; as long as the hardware supplier provides templates priorto fabrication (Note: Vistawall does not guarantee fit with actual hardware; Only that the prep was made pertemplates provided). Vistawall does not prep for surface applied hardware items. Pemko hinges are the onlycontinuous hinges that Vistawall will prep for without physical hardware.
©VISTAWALL ARCHITECTURAL PRODUCTSEFFECTIVE 05/04 3

DOOR SIZE WARRANTY GUIDELINES
The following is our standard warranty guidelines and recommendations for door sizes.
Doors with no muntins or muntins at least as large as D-11 (1 7/8"): Size Up To & Including• Standard and Rugged Narrow Stile 4' 0" x 8' 6"• Standard and Rugged Medium Stile 4' 0" x 9' 0"• Standard and Rugged Wide Stile 4' 0" x 10' 0"
Doors with at least one D-135 (1/2") muntin:• Standard and Rugged Narrow Stile 3' 0" x 7' 6"• Standard and Rugged Medium Stile 3' 0" x 8' 0"• Standard and Rugged Wide Stile 3' 0" x 8' 0"
Auto Showroom Doors:• All types 5' 0" x 8' 0"
Any ASD leaf 5' 0" x 8' 0" or larger requires a casteron the leading edge.
NOTE:• All doors over 7' 0" tall require a minimum of 1 1/2 pair of hinges or a continuous gear hinge.
Ratio for intermediates is one (1) intermediate hinge for every 12" above 7' 0".• Doors utilizing special top and/or bottom rail assemblies, please contact Terrell.• Doors over these sizes and requiring a warranty, please contact Terrell.
D O O R A N D F R A M E
©VISTAWALL ARCHITECTURAL PRODUCTSEFFECTIVE 05/044

D O O R A N D F R A M E
©VISTAWALL ARCHITECTURAL PRODUCTSEFFECTIVE 05/04 5
STANDARD HARDWARE LOCATIONS
47 1/4"CYLINDER
41 1/4"PUSHBAR
PH-20
CTC
CTC
PB-21
8 1/2"
1/8"
3 31/32"
4 1/2"
1 1/16"
6 25/32"
4 1/2"
47 1/4"CYLINDER
41 1/4"PUSHBAR
PB-21
1/8"
1 1/16"
SINGLE ACTING DOORS DOUBLE ACTING DOORS
30 7/16"CYLINDER
41 1/4"PUSHBAR
PH-20PB-21
8 1/2"
1/8"
4 3/16"
4 1/2"
1 1/16"
9 1/2"
4 1/2"
SINGLE ACTING DOORS
30 7/16"CYLINDER
41 1/4"PUSHBAR
PB-21
1/8"
1 1/16"
DOUBLE ACTING DOORS
WESTERN REGION HARDWARE LOCATIONS
CENTRAL & EASTERN REGION HARDWARE LOCATIONS
D O O R A N D F R A M E
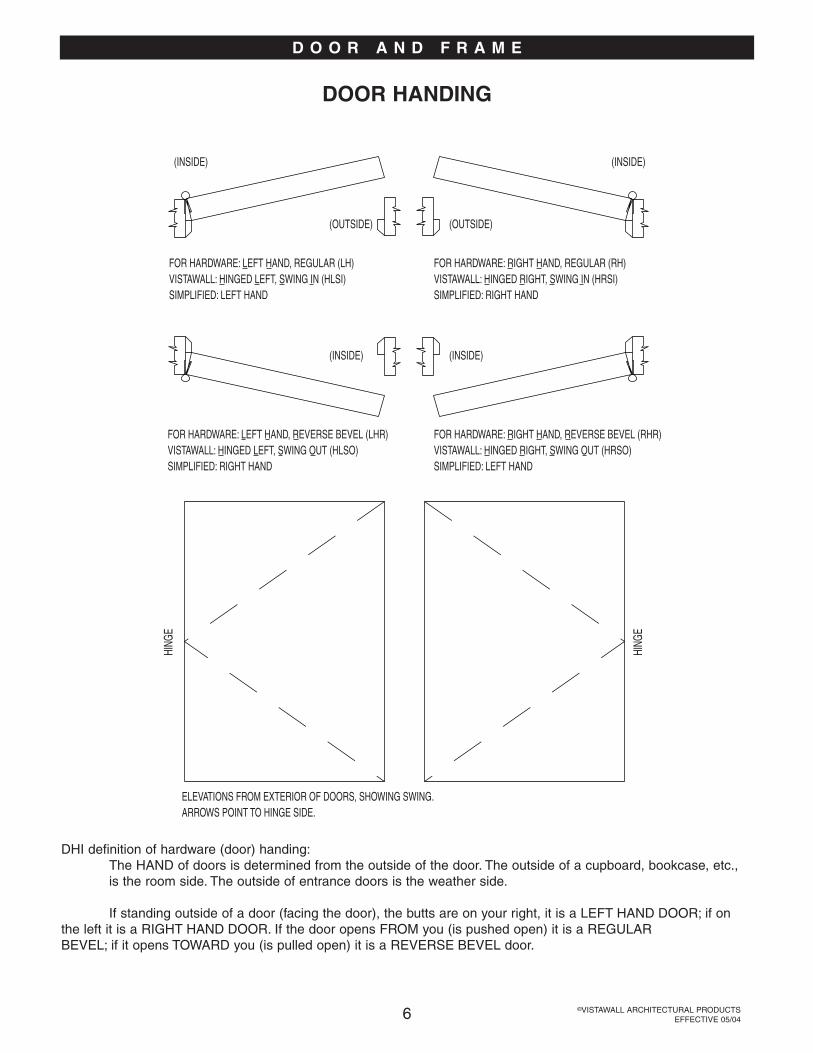
DOOR HANDING
©VISTAWALL ARCHITECTURAL PRODUCTSEFFECTIVE 05/046
(OUTSIDE) (OUTSIDE)
FOR HARDWARE: LEFT HAND, REGULAR (LH)VISTAWALL: HINGED LEFT, SWING IN (HLSI)SIMPLIFIED: LEFT HAND
FOR HARDWARE: RIGHT HAND, REGULAR (RH)VISTAWALL: HINGED RIGHT, SWING IN (HRSI)SIMPLIFIED: RIGHT HAND
(INSIDE) (INSIDE)
FOR HARDWARE: LEFT HAND, REVERSE BEVEL (LHR)VISTAWALL: HINGED LEFT, SWING OUT (HLSO)SIMPLIFIED: RIGHT HAND
FOR HARDWARE: RIGHT HAND, REVERSE BEVEL (RHR)VISTAWALL: HINGED RIGHT, SWING OUT (HRSO)SIMPLIFIED: LEFT HAND
HING
E
HING
E
ELEVATIONS FROM EXTERIOR OF DOORS, SHOWING SWING.ARROWS POINT TO HINGE SIDE.
(INSIDE) (INSIDE)
DHI definition of hardware (door) handing:The HAND of doors is determined from the outside of the door. The outside of a cupboard, bookcase, etc.,is the room side. The outside of entrance doors is the weather side.
If standing outside of a door (facing the door), the butts are on your right, it is a LEFT HAND DOOR; if on the left it is a RIGHT HAND DOOR. If the door opens FROM you (is pushed open) it is a REGULARBEVEL; if it opens TOWARD you (is pulled open) it is a REVERSE BEVEL door.

D O O R A N D F R A M E
GLASS SIZING
The following are general guidelines for sizing glass for doors and frames:
Doors:
Standard doors with no muntins should be calculated using the formulas and standard sizes shown on pagesA1-3 and B1-4 of the Vistawall Price Catalog.
Specialty doors should be calculated as shown on pages C-11 through C-15 of the Vistawall Price Catalog.
Non-standard doors are calculated as follows:
Metal-to-Metal - 7/16" both directions.Example:
Horizontally:Singles:
D.O. - 3/16" - (2 x stile width) - 7/16"Pairs:
(D.O. /2) - 3/16" - (2 x stile width) - 7/16"
Vertically:Non-standard doors without muntins:
D.O. -1/8" - top rail - 11/16" - bottom rail - 7/16"Non-standard doors with muntins:
Find Daylite Openings (DLO) based on location and muntin size.DLO + (2 x glass stop height) - 7/16"
Transom lites are calculated as follows:FG-1000 / FG2000 framing:
Horizontally:DLO + 5/8"
VerticallyWithout concealed closer:
DLO + 5/8"With concealed closer:
horiz.-to-horiz. DLO+5/16" - 3/4" (-7/16")
FG-3000 framing:Horizontally:
Transom FramesDLO (frame) - 1 1/2" (sash) + 5/8" (glass bite)
Vertically:Without concealed closer:
horiz.-to-horiz. DLO + 7/8"With concealed closer and standard header:
horiz.-to-horiz. DLO + 7/16" +7/8"(-5/16")
With concealed closer and optional header:horiz.-to-horiz. DLO + 7/16" - 3/8"
(+1/16")
©VISTAWALL ARCHITECTURAL PRODUCTSEFFECTIVE 05/04 7

D O O R A N D F R A M E
GLASS SIZING
©VISTAWALL ARCHITECTURAL PRODUCTSEFFECTIVE 05/048
Sidelight framing glass sizes should be determined by the following:
System Formula
FG-1000/2000 DLO +5/8"
FG3000 DLO +7/8"
S-52/S-53 or 54 Sash-to-sash DLO + 3/4"
TG Sash-to-sash DLO + 7/8"

D O O R A N D F R A M E
©VISTAWALL ARCHITECTURAL PRODUCTSEFFECTIVE 05/04 9
PREPARATION OF OPENING
Prior to installation of a door and frame, it is important to consider your surrounding construction.Is the opening large enough to handle the door and frame that was ordered?
Allow for at least 1/4" shim space all around.Are there any obstructions present within the opening?Is there sufficient structure to anchor the frame?Is the support located in the proper position?What is the sill condition?
Is there a ledge?Is there enough space to get anchorage into floor slab?If floor closer used, is the concrete blocked out at closer location?Is there a need for a different style of threshold?
Be sure that the slab is level at door area.
Thresholds will be standard 4" wide, 1/2" tall; sloped front and back, unless otherwise noted.
If there is a problem with location of opening or slab level, please contact your general contractor, in writing,requesting a correction. DO NOT begin installation until problems are resolved.
When all items above are addressed satisfactorily, the installation process can begin.

D O O R A N D F R A M E
©VISTAWALL ARCHITECTURAL PRODUCTSEFFECTIVE 05/0410
PREPARATION OF FRAME
All hardware back-up plates are installed in the frame at the factory. All sash materials will have been cut tolength and prepped in the factory.
If the doors and frames are from our stock, the transom frames are fabricated for a vertical frame size of 1251/2". If your opening is smaller, cut the verticals and sash down to the appropriate length; leaving a minimum 1/4"joint at head. The prep for the transom head horizontal should be made using; either: our jig, EZ-Punch,or a small cut-off of the head material.
Attach frame portion of pivots to the frame.Attach closer clips (if concealed overhead closer) and/or shear blocks to jambs.Cut and notch threshold as required for hardware.
Assemble frame, including threshold. For frames with transoms, sash members must slide into jambs andtransom bar during assembly on FG3000. Parts will not snap due to tolerance restrictions.
The frame is now ready for installation.
"A"
VIEW "A"

D O O R A N D F R A M E
©VISTAWALL ARCHITECTURAL PRODUCTSEFFECTIVE 05/04 11
INSTALLATION OF STANDARD DOOR FRAME
1. Door frame shall be completely assembled, including threshold; with all joints neatly aligned and tight. Besure all hardware is attached that must be installed prior to frame installation. If flat filler pieces used(recommended), snap them in place.
2. Door frame shall be installed square and plumb (See Figure 1 and 2, below).
3. Level the door frame at the threshold at the high point in the slab. It is preferable to not have a high pointin the slab. The door frame is designed to have the jambs run down to the slab.
4. Frame must be securely anchored in place. Solidly shim at all anchor points so as not to bow or distortframing.
5. Mark the concrete through the countersunk holes in threshold.
6. Use masonry bit to drill holes to receive inserts (included).
7. Anchor the threshold to the slab using flat head screws (included).
8. Install door stops (at transom frames).
Measure diagonals to check if square. Use 4' level to check if plumb at points A and B.
9. You are now ready to install the door. Proceed to pg. 15 if pre-glazing the door,or pg.17-24 to install door.
ARE THEYTHE SAME?
A
B
SHIM
FILLER
Figure 2Figure 1
19/32"
RIP REAR LEG OFFTHRESHOLD, FULL
4 1/2" FRAME
4" FRAME
SEAL JOINTAS REQUIRED
TILE FLOORING(NOTCH AROUND FRAMING AS

D O O R A N D F R A M E
©VISTAWALL ARCHITECTURAL PRODUCTSEFFECTIVE 05/0412
INSTALLATION INSTRUCTIONS FOR AIRTIGHT THRESHOLD
SINGLEBUTT HINGE OROFFSET PIVOT
DOORS
1. Cut the D-118 weather-strip to Door Widthminus 1 1/16" see (fig. 1).
2. Placing the D-118 1-1/16" up from the bottom of thedoor rail (fig. 2), center it by overlapping the stilesequal distances (fig. 1). Using the D-118 as a tem-plate, mark the door for the attachment holes. Drillthe door for #8 x 1/2" FHSMS, attach the D-118 tothe door and insert the D-120 silicone strip. Crimpends.
3. On both frame jambs drill two #29 (.136" dia.) holesin frame for #FS-256 screws and attach clips toframe (fig 2). Drill one #2 (.211" dia.) hole 1/2" infrom each end of the threshold as shown in (fig. 2)and countersink for #12 FHSMS #FS-42. Attachthreshold to clips.
4. Seal threshold to frame and surrounding conditions.
INSIDE
WIDE STILE DOOR
MEDIUM STILE DOOR
NARROW STILE DOOR
1 11/16"
3 5/32"4 9/16"
DOOR WIDTH MINUS 1 1/16"
1 3/8"
CLIP FOR 4" AND 4 1/2" FRAME
11/16" Ref.
1 1/16"
2 5/16"
2 3/4" 5/8"
FG-1118
D-120
5/32"TH-49
D-118 ATTACH WITH #8 SCREW
Figure 1
Figure 2

D O O R A N D F R A M E
©VISTAWALL ARCHITECTURAL PRODUCTSEFFECTIVE 05/04 13
INSTALLATION INSTRUCTIONS FOR AIRTIGHT THRESHOLD
PAIR OF DOORSBUTT HINGE OROFFSET PIVOT
1. Determine door type, mark placement as shownin (fig. 3). Place weather-strip on door and markfor 15 degrees cut as shown in (fig. 4). Cutweather strip.
2. Place weather strip on door 1-1/16" up andmark attachment holes using weather strip astemplate. Drill for #8 x 1/2" FHSMS and attachweather strip.
3. Install silicone strip allowing over lap as shownin (fig. 4) and crimp pivot end.
4. On both frame jambs drill two #29 (.136" dia.)holes in frame for #FS-256 screws and attachclips to frame (fig 5). Drill one #2 (.211" dia.)hole 1/2" in from each end of the threshold asshown in (fig. 2) and countersink for #12FHSMS #FS-42. Attach threshold to clips.
5. For doors with concealed rod panics drill holesin threshold as shown in (fig. 6). Be sure to drillinto condition below to allow rod to engage intothreshold as shown in (fig. 5). Attach #3315stop.
6. Seal threshold to frame and surroundingconditions.
INSIDE
WIDE STILE DOOR
MEDIUM STILE DOOR
NARROW STILE DOOR
1 11/16"
3 5/32"
4 9/16"
11/16" Ref.
1 1/16"
2 3/4" 5/8"
FG-1118
5/32"
BOTTOM RAIL ANDSTILE MEET
DRILL 17/32" Dia. x 11/16"LONG SLOT
29/32" 29/32"
CENTERLINE OF THRESHOLD
7/8"
TH-49
D-118 ATTACH WITH #8 SCREW
D-120 RAZOR TRIM AROUND THRESHOLD STOP
D134-2
DRILL INTO CONCRETE TO INSUREPANIC ROD PENETRATION
MRP# 3315
Figure 3
Figure 4
Figure 6Figure 5

D O O R A N D F R A M E
©VISTAWALL ARCHITECTURAL PRODUCTSEFFECTIVE 05/0414
THRESHOLD MODIFICATION
THRESHOLD MODIFICATIONFOR TILE FLOORING
1. Rip 15/32" off rear leg of threshold, full lengthof part.
2. Follow standard installation instructions forairtight threshold.
3. Butt flooring to rear of threshold, sealing jointas required. NOTE: Notching of flooringaround framing members may be required.
15/32"
TILE FLOORING(NOTCH AROUND FRAMING AS REQ'D)
SEAL JOINTAS REQUIRED
4" FRAME
4 1/2" FRAME
RIP REAR LEG OFFTHRESHOLD, FULL LENGTH

D O O R A N D F R A M E
GLAZING THE DOOR
©VISTAWALL ARCHITECTURAL PRODUCTSEFFECTIVE 05/04 15
Glass setting blocks are installed, in their proper locations, in the factory. Glazing prior to installation is possible(step 1). If the decision is made to glaze after the door is installed, skip step 1.
1. Lay door flat across two sawhorses (easiest); or, on protected floor (careful not to damage finish on door).
2. If glazing door after it is installed, lock door to prevent swinging.
3. Trim E.P.D.M. glazing gasket flush with ends of glass stops.
4. Remove glass stops on the side of door that is closest to you.
5. Turn glass jack in the top rail counter-clockwise until it is in retracted position flush with extrusion.
6. Be sure that the stops that remain are securely in place.
7. Place glass on the stops and against the setting blocks. If you are glazing the door in the installed position, it isimportant to push glass firmly against the glass stops.
8. Adjust for gaps at the stiles.
9. Once the glass is in the correct position, screw down the glass jack to top of glass.
10. Install the glass stops — horizontals first. Note: Top stops are notched to clear glass jack. Be sure to hook thestop into the dovetails on the rails and stiles; then snap in place. A mallet may be used to drive stops in place.

D O O R A N D F R A M E
©VISTAWALL ARCHITECTURAL PRODUCTSEFFECTIVE 05/0416
8"
9 1/2"
7"
A
A
B B
GLASSJACK
PIVOT ORHINGE STILE
SECTION A-A
SECTION B-B
NOTE: SETTING BLOCK LOCATIONS MAY VARY BY +/- 1"
ROLL IN
HEEL OF STOP

D O O R A N D F R A M E
INSTALLATION OF OFFSET HUNG DOOR ON BUTT HINGES
©VISTAWALL ARCHITECTURAL PRODUCTSEFFECTIVE 05/04 17
Back-up plates are installed in the door and the frame. Butt hinges should be installed on the door. The door mayor may not be glazed prior to installation of door.
1. Lift door upward until butt hinges align with hinge cutout in frame.
2. Block under door when hinge and cutout are aligned.
3. Attach hinges to frame back-up plates using proper screws (included). There is a slight adjustment available iflocation of door prep and frame cut-out is off slightly. Back off on the screws slightly and adjust door to properposition; then, tighten down screws.
4. Now that the door is hung, it is time for final adjustments and attachment of hardware.NOTE: If you have not pre-glazed the door, glaze the door before attachment of hardware.

D O O R A N D F R A M E
©VISTAWALL ARCHITECTURAL PRODUCTSEFFECTIVE 05/0418
1/8"
11/16" 6 25/32"
3 31/32"
FIGURE 2
FIGURE 1 TOP RAIL
LOCKSTILE
CUT AWAY FOR CLARITY
GLASSJACK
GLASS
6"
INSTALLATION OF OFFSET HUNG DOOR ON BUTT HINGES
Figure 1
Figure 2

D O O R A N D F R A M E
INSTALLATION OF OFFSET HUNG DOOR ON PIVOTS
©VISTAWALL ARCHITECTURAL PRODUCTSEFFECTIVE 05/04 19
Back-up plates are installed in the door and the frame where required. Frame portion of pivots should be on theframe and door portion of pivots should be installed on the door. The door may or may not be glazed prior to instal-lation of door.
1. Lift door upward and tilt in open position. Place door portion of bottom pivot on frame portion of bottom pivot.(See illustration)
2. Depress the pivot pin in the door portion of the top pivot.
3. Slide door portion of top pivot under the frame top pivot.
4. Jiggle door until the pivot pin slides into the frame top pivot.NOTE: To remove door, take the 3 screws out of the frame portion of top pivot and let drop. Then, tip doorout of frame.
5. Now that the door is hung, it is time for final adjustments and attachment of hardware.NOTE: If you have not pre-glazed the door, glaze the door before attachment of hardware.
DOOR TOPOFFSET PIVOT
BOTTOMOFFSET PIVOT
FRAME TOPOFFSETPIVOT

INSTALLATION OF OFFSET HUNG DOOR WITHSTANDARD VISTAWALL OVERHEAD CLOSERS
©VISTAWALL ARCHITECTURAL PRODUCTSEFFECTIVE 05/0420
D O O R A N D F R A M E
1. Set door in frame so that door portion of the bottompivot is over spindle of frame portion of the pivot.
2. Align door portion of OP-11 above frame portionand lower door until positive engagement is felt.NOTE: the bottom pivot is pre-adjusted to provide3/16" clearance between door top rail and frametransom bar. For further vertical adjustment seefigure 2 on page 27.
3. When door is properly positioned, secure closer todoor and transom bar per instructions provided withcloser. These closers require the use of offset arms.CAUTION: Smooth, permanent trouble-free opera-tion of the door depends on the proper installationof the closer. A print is furnished in each closerpackage to give correct installation procedure.
4. Close door, glaze and adjust as outlined on pages15 and 27.

INSTALLATION OF CENTER HUNG DOOR WITHSTANDARD VISTAWALL CONCEALED CLOSER
©VISTAWALL ARCHITECTURAL PRODUCTSEFFECTIVE 05/04 21
D O O R A N D F R A M E
1. With closer mounted in transom, (see Frameinstructions) make sure it is in hold-open position.When closer has no hold-open feature, the follow-ing “dogging” method applies:A. Rotate closer spindle to 90º (either R.H. or
L.H.) with a wrench for door installation, orrotate with door, when removing closer fromexisting installation.
B. Insert suitable 5/32" diameter hard pin or nailthrough 3/16" hole in base plate (located ondirect line between pivot and pivot jamb) (Seefig. 1)
C. The pin should go through base plate, lowerbushing plate at closer and hole in doggingcam (some back and forth movement of dooror wrench may be necessary to locate thishole. The pin should be inserted at least 11/2" into closer.
D. Holding the pin in place, release door orwrench gently. Closer will be held at 90º.
2. Lift door onto floor pivot making sure of pinengagement. Place door upright in the 90º openposition corresponding to the position of the indi-cator mark on the closer shaft.
3. Push top arm of door against closer shaft.4. Apply top clamping block per label at top of door,
with two socket head cap screws using 7/32" hexkey, but do not tighten (See fig. 2).
NOTE: If vertical adjustment of the door is required,use a wrench to turn bottom pivot adjusting screw upor down (See fig. 3).CAUTION: Make sure top clamping block screws areloose before making adjustment.5. Return to top clamping block and TIGHTEN sock-
et head cap screws SECURELY and EVENLY perthe torque label on the top corner of door.CAUTION: Be sure to remove pin before trying tooperate closer. To remove pin, open closer fromdogged position slightly to remove spring forcefrom pin. Remove pin and gently release closer.
6. Insert weathered end trim cap at top and secureto door with screw.
7. To operate, push door out of hold open position.(If model has no hold open, remove dogging pinand gently release closer.)
8. Glaze door. (See page 15)9. Check top arm centering screws for snug contact
with the sides of the top rail.CAUTION: Over-tightening will bulge the top rail.Check tightness of arm anchoring screws.If the door does not center in the frame afterbeing operated a few times, loosen the top armanchor screws, readjust the centering screws (donot bulge sides of top rail) and retighten theanchor screws.
10. Adjust closer closing speeds and latching speeds.(See Adjustment Instructions packed with Closer.)
Figure 1
Figure 2
Figure 3
Adjust door by turning adjustingscrew clockwise to lower dooror counterclockwise to raisedoor. When proper setting isachieved tighten top armattachment screws.
CLOSINGSPEED SLOW
LATCHINGSPEED
FAST
*PLATE SCREW
*DRESS PLATE
*LOCK WASHER
*ARM STUD
*ARM CLAMPING SCREW(1/4-20 X 7/8" CAP SCREW)
ADJUST POSITIONWITH FLAT BLADESCREW DRIVER
*ARM ADJUSTINGSCREW
ARM HOLDINGSCREW
CLOSER ARMFACTORY INSTALLED
CENTERINGSCREWS
*CLAMPING BLOCK
BOTTOMPIVOT BLOCK

D O O R A N D F R A M E
INSTALLATION OF OFFSET HUNG DOOR WITH LCN CONCEALEDOVERHEAD CLOSER
©VISTAWALL ARCHITECTURAL PRODUCTSEFFECTIVE 05/0422
Back-up plates are installed in the door and the frame. Track ships with closer.Frame portion of pivots should be on the frame and door portion of pivotsshould be installed on the door. The door may or may not be glazed prior to installation of door.
1. Lift door upward and tilt in open position. Place door portion of bottom pivoton frame portion of bottom pivot.
2. Align door and frame portions of top pivot3. Clip spindle of closer into track.4. Attach arm to spindle.5. Operate door a couple of times.6. Check clearances at both jambs. should be 3/32” between stiles and jamb.

INSTALLATION OF CENTER HUNG DOOR WITH LCN CONCEALED CLOSER
D O O R A N D F R A M E
Back-up plates are installed in the door and the frame. Track ships with closer.Frame portion of (CP150) pivots should be on the frame and door portion of pivots should be installed on the door. The door may or may not be glazed prior to installation of door.
1. Lift door upward and tilt in open position. Place door portion of bottom pivoton frame portion of bottom pivot.
2. Align door and frame portions of top pivot3. Clip spindle of closer into track.4. Operate door a couple of times.5. Check clearances at both jambs. should be 3/32” between stiles and jamb.
©VISTAWALL ARCHITECTURAL PRODUCTSEFFECTIVE 05/04 23
©VISTAWALL ARCHITECTURAL PRODUCTSEFFECTIVE 05/0424
SHIM
CAPSCREW
DOR-O-MATIC 25009/64"13/64" 1 13/16" RIXSON 27 SERIES CLOSERS
PIVOTSHOE
CAP
BOTTOMARM
1 49/64"
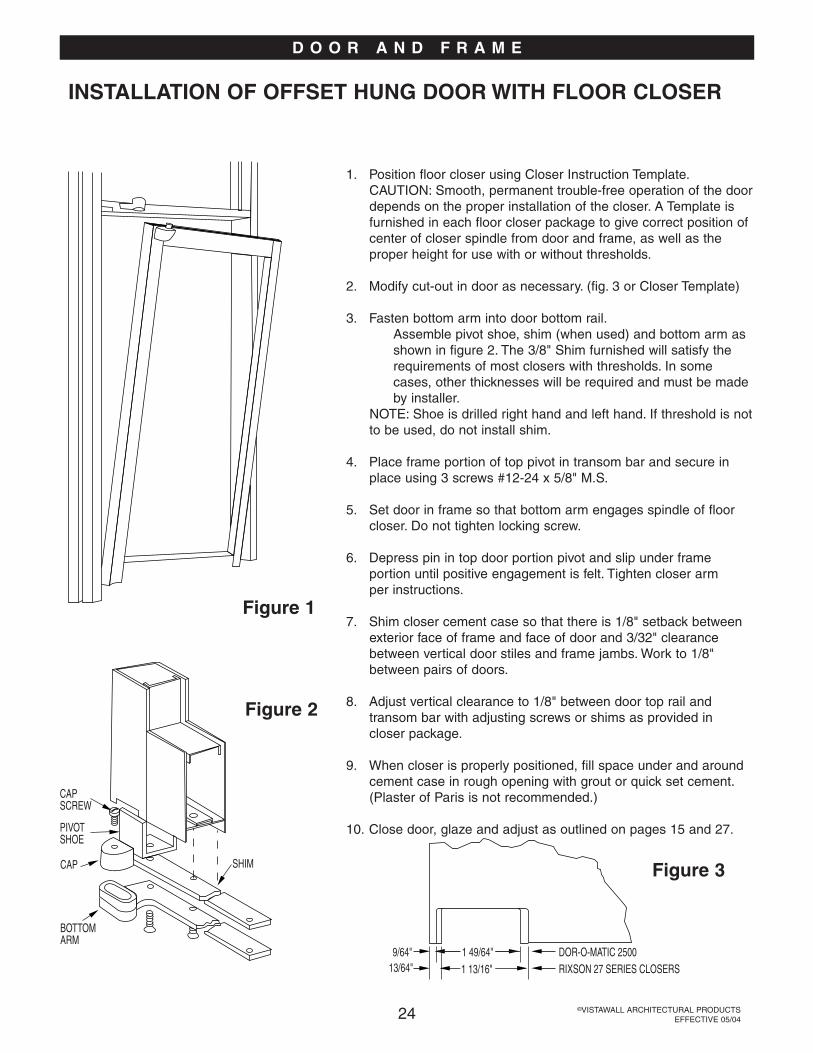
INSTALLATION OF OFFSET HUNG DOOR WITH FLOOR CLOSER
D O O R A N D F R A M E
1. Position floor closer using Closer Instruction Template.CAUTION: Smooth, permanent trouble-free operation of the doordepends on the proper installation of the closer. A Template isfurnished in each floor closer package to give correct position ofcenter of closer spindle from door and frame, as well as theproper height for use with or without thresholds.
2. Modify cut-out in door as necessary. (fig. 3 or Closer Template)
3. Fasten bottom arm into door bottom rail.Assemble pivot shoe, shim (when used) and bottom arm asshown in figure 2. The 3/8" Shim furnished will satisfy therequirements of most closers with thresholds. In somecases, other thicknesses will be required and must be madeby installer.
NOTE: Shoe is drilled right hand and left hand. If threshold is notto be used, do not install shim.
4. Place frame portion of top pivot in transom bar and secure inplace using 3 screws #12-24 x 5/8" M.S.
5. Set door in frame so that bottom arm engages spindle of floorcloser. Do not tighten locking screw.
6. Depress pin in top door portion pivot and slip under frameportion until positive engagement is felt. Tighten closer armper instructions.
7. Shim closer cement case so that there is 1/8" setback betweenexterior face of frame and face of door and 3/32" clearancebetween vertical door stiles and frame jambs. Work to 1/8"between pairs of doors.
8. Adjust vertical clearance to 1/8" between door top rail andtransom bar with adjusting screws or shims as provided incloser package.
9. When closer is properly positioned, fill space under and aroundcement case in rough opening with grout or quick set cement.(Plaster of Paris is not recommended.)
10. Close door, glaze and adjust as outlined on pages 15 and 27.
Figure 1
Figure 2
Figure 3

©VISTAWALL ARCHITECTURAL PRODUCTSEFFECTIVE 05/04 25
NIGHTWATCH® INSTALLATION INSTRUCTIONS
D O O R A N D F R A M E
1. After installing doors in opening, check to insure thatthe space between the doors is not less than 9/16".(fig. 1)
2. Remove closure (C) and open door with theadjustable fin to insure that the space between the fin(A) and outside corner of the rotor stile (B) is 3/32".Adjust fin (A) with FS-27 screws and lockwashers (fig.2) in slotted holes. Tighten down screws.
3. Apply a bead of polyurethane sealant approximately12" long at mid-lite on both sides of each door glassas shown in figure 3.
9/16"
EXTERIOR
INTERIOR
EXTERIOR
EXTERIOR
INTERIOR
ADJUSTABLEASTRAGAL (FIN)
A
C
B
SEALANT3/8"
FS-27 SCREW (Typ.)INTERIOR
8"
8"
31" TO BOTTOM OF DOOR
Figure 1
Figure 2
Figure 3

©VISTAWALL ARCHITECTURAL PRODUCTSEFFECTIVE 05/0426
FINAL ADJUSTMENTS TO DOOR
D O O R A N D F R A M E
After door is installed, check clearances. The top rail should be consistently 1/8" below the header. The bottom ofthe door should be consistently 3/16" above the threshold. The gap between door and jambs should be 3/32" fromtop to bottom.
If the gap between the top rail and header is showing too large at top of lock stile, loosen glass jack and lift up onthe door until gap is corrected. Tighten down glass jack to top of glass. (fig.1 next page)
If the gap is showing too tight at top of lock stile, turn glass jack counter-clockwise (dropping door) until proper gapis attained. (fig.1)
DO NOT raise door by only tightening the glass jack against the glass. Glass breakage could occur.
On pairs, adjust screws in adjustable astragal to keep a consistent 1/8" gap between door leafs.
On offset pivoted doors:Open door and turn bottom pivot support screws down until they contact the slab. Do not over-drive thescrews because that will place additional stress on the pivot. (fig.2)
If top of door on hinge side is not 1/8" below the frame, adjust door adjustment screw up or down and lockin position by turning the locking set screw. (fig. 2)
On butt hung doors, butts may be shimmed out to adjust clearance where there is too much of a gap at the lockstile.
ADJUST TO 1/8"
1/8"
HEADER
TOP RAIL
STILE
Figure 1

©VISTAWALL ARCHITECTURAL PRODUCTSEFFECTIVE 05/04 27
D O O R A N D F R A M E
1/8"
11/16"
FIGURE 2
FIGURE 1
TOP RAIL
LOCKSTILE
CUT AWAY FOR CLARITY
ADJUSTABLEBLOCK
GLASS
6"
LOCKING SET SCREW
DOOR ADJUSTMENT SCREW
PIVOT SUPPORT SCREWS
Figure 1
Figure 2

©VISTAWALL ARCHITECTURAL PRODUCTSEFFECTIVE 05/0428
ATTACHMENT OF AND ADJUSTMENTS TO HARDWARE
D O O R A N D F R A M E
CLOSER
Refer to instructions that are sent in the boxes for installation of the following items, unless noted otherwise:
SurfaceNorton 1600 SeriesLCN 4040 SeriesLCN Quest — Peel-off templates and instructions are sent in box.
ConcealedJackson 20-330LCN 2030Dorma RTS-88
FloorRixson 27 (Offset Hung)Rixson 28 (Center Hung)Dorma BTS-80
EXIT DEVICE (PANIC) — Rim
(RP-100)
EXIT DEVICES — Concealed Rod
(CP-100)(VIP-1) Installed in door at factory(VIP-2)
DOOR SWEEP
V-231Cut to length for door.Apply 2-sided tape to back of part.Peel protective sheet off.Place in position at bottom of door.Drill pilot holes through holes in V-231 into door.Fasten with screws supplied.

©VISTAWALL ARCHITECTURAL PRODUCTSEFFECTIVE 05/04 29
STANDARD PUSH BAR INSTALLATION
D O O R A N D F R A M E
PB-21 Push Bar will be shipped with screws for attachment. Holes are pre-drilled in the factory.
Where PB-21 is not used with PH-20:Step 1: Lay out the parts to be sure they are all there.Step 2: Place washer on 1/4" diameter through-bolts.Step 3: Align PB-21 with holes in door stiles.Step 4: Insert through-bolts into holes in stile from exterior of door.Step 5: Tighten through-bolts into push bar.
Where PB-21 is used with PH-20:Step 1: Lay out the parts to be sure they are all there.Step 2: Align Pull with top hole on exterior of door.Step 3: Insert through-bolt stud in top hole from interior into pull.Step 4: Loosen setscrews in PB-21.Step 5: Place PB-21 over stud on lock stile and align with hole in hinge stile.Step 6: Place washer on 1/4" diameter through-bolts.Step 7: Insert through-bolt from exterior into PB-21 at hinge stile.Step 8: Tighten setscrews into stud on lock stile.
Wire Push Bar Replacement for PB-11 shipped with studs for use in pre-existing riv-nuts.Step 1: Lay out the parts to be sure they are all there.Step 2: Remove PB-11 and bracket.Step 3: Install studs into existing riv-nuts.Step 4: Back out setscrews in replacement push.Step 5: Align replacement push over studs.Step 6: Tighten setscrews.

©VISTAWALL ARCHITECTURAL PRODUCTSEFFECTIVE 05/0430
STANDARD PULL HANDLE INSTALLATION
D O O R A N D F R A M E
PH-20 Pull Handle will be shipped with screws for attachment. Holes are pre-drilled in the stiles at the factory.
Where PH-20 is not used with PB-21 (PH-20TB):Step 1: Lay out the parts to be sure they are all there.Step 2: Place washers over through-bolts.Step 3: Align pull with holes in door stile.Step 4: Insert through-bolts into holes in stiles from exterior of door.Step 5: Tighten bolts into pull.
Where PH-20 is used with PB-21 (PH-20/PB-21):Step 1: Lay out the parts to be sure they are all there.Step 2: Align PH-20 with top hole on exterior of door.Step 3: Insert through-bolt stud from interior of door through top hole into PH-20.Step 4: Place washer on 1/4" diameter through-bolts.Step 5: Insert through-bolt from interior through bottom hole into PH-20.
PH-20BTB back-to-back pulls:Step 1: Lay out the parts to be sure they are all there.Step 2: Align pull with holes on exterior of door.Step 3: Insert through-bolt stud from interior of door through top hole into pull.Step 4: Insert through-bolt stud from interior of door through bottom hole into pull.Step 5: Loosen setscrews in push.Step 6: Place push over studs and tighten setscrews.
Wire Pull Replacement for PH-10 shipped with studs for use in pre-existing riv-nuts.Step 1: Lay out the parts to be sure they are all there.Step 2: Remove existing PH-10.Step 3: Install studs into existing riv-nuts.Step 4: Back out setscrews in replacement pull handle.Step 5: Align replacement pull handle over studs.Step 6: Tighten setscrews.

©VISTAWALL ARCHITECTURAL PRODUCTSEFFECTIVE 05/04 31
MAINTENANCE RECOMMENDATIONS
D O O R A N D F R A M E
• Every 3-4 weeks, the following items should be lubricated with STP Spray Silicone to insure the hardwarefunctions properly:
1. Door and Frame Pivots2. Lock Cylinders3. Exit Device (Panic) Hardware (fig. 3 pg. 32)4. Closer Arm
• The following items need to be checked regarding the door closer:1. Check/Adjust the Sweep Range, Latch Range, and the Back Check. This adjustment is made by
turning the Valves on the end of the closer. The “S” valve = Sweep, the “L” valve = Latch, and the“BC” valve = Back Check.
2. Check and tighten all loose screws on the closer arm and closer unit.
• Proper clearances are essential for proper operation of doors installed. Reference the installation of doorand exit device (panic) hardware installation instructions.
• Chemicals used to melt ice should not come in contact with aluminum threshold, bottom of door jambs orpivot hardware. These chemicals are very corrosive and may cause door failure and possible personal injury.

©VISTAWALL ARCHITECTURAL PRODUCTSEFFECTIVE 05/0432
D O O R A N D F R A M E
APPLY SILICONE SPRAY TO THE DESIGNATED AREASEVERY 3 TO 4 WEEKS. THIS WILL ALLOW MOVING PARTSTO FUNCTION PROPERLY
Figure 3