installation and maintenance of belts
DESCRIPTION
Installation and Maintenance of BeltsTRANSCRIPT

P O W E R T R A N S M I S S I O N P R O D U C T S
INSTALLATION, MAINTENANCE AND TROUBLESHOOTING GUIDE
POWER TRANSMISSION BELT DRIVE SYSTEM

DO NOT USE THE PRODUCTS IN THIS GUIDE IN AIRCRAFT APPLICATIONS. THE PRODUCTS IN THIS GUIDE ARE NOT INTENDED FOR USE IN AIRCRAFT APPLICATIONS.
DO NOT USE THE PRODUCTS IN THIS GUIDE IN LIFT OR BRAKE SYSTEMS WHICH DO NOT HAVE AN INDEPENDENT SAFETY BACKUP SYSTEM. THE PRODUCTS IN THIS GUIDE ARE NOT INTENDED FOR USE IN LIFT OR BRAKE SYSTEMS WHICH DO NOT HAVE AN INDEPENDENT SAFETY BACKUP SYSTEM.
FAILURE TO FOLLOW THESE WARNINGS AND THE PROPER PROCEDURES FOR SELECTION, INSTALLATION, CARE, MAINTENANCE AND STORAGE OF BELTS MAY RESULT IN THE BELT’S FAILURE TO PERFORM PROPERLY AND MAY RESULT IN DAMAGE TO PROPERTY AND/OR SERIOUS INJURY OR DEATH.
The products in this Guide have been tested under controlled laboratory conditions to meet specifi c test criteria. These tests are not intended to refl ect performance of the product or any other material in any specifi c application, but are intended to provide the user with application guidelines. The products are intended for use by knowledgeable persons having the technical skills necessary to evaluate their suitability for specifi c applications. Goodyear assumes no responsibility for the accuracy of this information under varied conditions found in fi eld use. The user has responsibility for exercising care in the use of these products.
WARNING

3
INSTALLATION GUIDETroubleshooting of Synchronous Belt Systems
Contents
INSTALLATIONV-BELTS V-Belts ..............................................................4
BANDED BELTS Torque Team V-Belts .........................................13 Poly-V Belts .....................................................20
SPECIALTY BELTS Variable Speed Belts .........................................26
SYNCHRONOUS BELTS Synchronous Belts ............................................28
MAINTENANCE What To Look For ..............................................35 What To Listen For ............................................36
TROUBLESHOOTING V-Belt Performance Analysis ...............................37 V-Belt Troubleshooting Chart ..............................39 Synchronous Troubleshooting Chart ....................40
Poly-V and Torque Team are registered ® trademarks of The Goodyear Tire and Rubber Company

4
V-BeltINSTALLATION GUIDE
a
GrooveAngle
File Break AllSharp Corners
Standard Groove Dimensions
S g S e
h g
R B
d B
b g
Ou
tsid
e
Dia
me
ter
Da
tum
D
iam
ete
r
Industry Standard Groove Dimensionsfor V-Belt Sheaves
Check sheaves for cleanliness, damage and wear each time belt maintenance is performed and whenever belts are changed. The inspection procedure is described on page 6 of this Guide. Use the tables (Tables 1 and 2) and tolerance data below as a reference to determine if excessive sheave wear has occurred. They can also aid in replacement belt cross-section selection, if necessary. The tables are based on industry standard dimensions for V-belt sheaves. Always check the original sheave specifications if possible. Variances from industry standards can occur to provide for special design or performance requirements.
(1) Diameters shown for combination grooves are outside diameters. A specifi c datum diameter does not exist for either A or B belts in combination grooves.
(2) The “a” values shown for the A/B combination sheaves are the geometrically derived values. These values may be different than those shown in manufacturer’s catalogs.
Summation of the deviations from “Sg” for all grooves in any one sheave shall not exceed ±0.050 inches.
The variation in datum diameter between the grooves in any onesheave must be within the following limits:
Up through 19.9 inches outside diameter and up through 6 grooves:0.010 inches (add 0.0005 inches for each additional groove.)
20.0 inches and over on outside diameter and up through 10grooves: 0.015 inches (add 0.0005 inches for each additional groove.)
This variation can be obtained easily by measuring the distance acrosstwo measuring balls or rods placed diametrically opposite each otherin a groove. Comparing this “diameter over balls or rods” measurementbetween grooves will give the variation in datum diameter.
Deep groove sheaves are intended for drives with belt offset such asquarter-turn or vertical shaft drives. (See RMA Power Transmission BeltTechnical Information Bulletin IP -3-10, V-belt drives with twist).
Joined belts will not operate in deep groove sheaves.
Also, A and AX joined belts will not operate in A/AX and B/BX combination grooves.
OTHER SHEAVE TOLERANCESOutside DiameterUp through 8.0 inchesoutside diameter.....±0.020 inchesFor each additional inch of outsidediameter add.....±0.005 inchesRadial Runout**Up through 10.0 inchesoutside diameter.....±0.010 inchesFor each additional inch of outsidediameter add.....±0.0005 inchesAxial Runout**Up through 5.0 inchesoutside diameter.....±0.005 inchesFor each additional inch of outsidediameter add.....±0.001 inches**Total Indicator Reading
TABLE 1 GROOVE DIMENSIONS — INCHES
Face Width of Standardand Deep Groove SheavesFace Width = Sg (Ng– 1) + 2 Se
Where:Ng=Number of Grooves

5
V-BeltINSTALLATION GUIDE
Cross Section
Standard GrooveOutside Diameter
Groove Angle 0.25
Degrees
b g0.005
b eRef.
h g min
R B min
d B 0.0005
S g
0.015 S e
Minimum Recommended
OutsideDiameter 2a
Cross Section
Standard GrooveOutside Diameter
Groove Angle 0.25
Degrees
b g0.005
b eRef.
h g min
R B min
d B 0.0005
S g
0.015 S e
Minimum Recommended
OutsideDiameter 2a 2he
Standard Groove Dimensions Design Factors
Deep Groove Dimensions Design Factors
3V
5V
8V
3V
5V
8V
Up Through 3.49 Over 3.49 To And Including 6.00 Over 6.00 To AndIncluding 12.00Over 12.00
Up Through 9.99Over 9.99 To And Including 16.00 Over 16.00
Up Through 15.99Over 15.99 To And Including 22.40 Over 22.40
Up Through 3.71 Over 3.71 To And Including 6.22Over 6.22 To AndIncluding 12.22Over 12.22
Up Through 10.31Over 10.31 To And Including 16.32 Over 16.32
Up Through 16.51Over 16.51 To And Including 22.92 Over 22.92
36
38
40
42
38
40
42
38
40
42
36
38
40
42
38
40
42
38
40
42
0.350
0.600
1.000
0.350
0.600
1.000
0.340
0.590
1.990
0.181
0.183
0.186
0.188
0.329
0.332
0.336
0.575
0.580
0.585
0.3438
0.5938
1.0000
0.406
0.688
1.125
0.344
+0.094
- 0.031
0.500
+0.125
- 0.047
0.750
+0.250
- 0.062
2.65
7.10
12.50
0
0
0
0.421
0.425
0.429
0.434
0.710
0.716
0.723
1.180
1.191
1.201
0.350
0.600
1.000
0.449
0.750
1.262
0.070
0.073
0.076
0.078
0.168
0.172
0.175
0.312
0.316
0.321
0.3438
0.5938
1.000
0.500
0.812
1.312
0.375
+0.094
- 0.031
0.562
+0.125
- 0.047
0.844
+0.250
- 0.062
2.87
7.42
13.02
0.050
0.100
0.200
0.218
0.320
0.524
GrooveAngle
Effe
ctiv
e a
nd
Ou
tsid
eD
iam
ete
rP
itch
D
iam
ete
r
a
File Break AllSharp
Corners
S g S e
h g
R B
d B
b e
b g h g R B
S e S g
d B
GrooveAngle
File Break AllSharp
Corners
b e b g
a
h e
Effe
ctiv
eD
iam
ete
r
Pitc
h
Dia
me
ter
Ou
tsid
e
Dia
me
ter
Deep Groove DimensionsStandard Groove Dimensions
Summation of the deviations from “Sg” for all grooves in any one sheaveshall not exceed ±0.031 inch. The variations in pitch diameter betweenthe grooves in any one sheave must be within the following limits:
Up through 19.9 inches outside diameter and up through 6 grooves –0.010 inches (Add 0.0005 inches for each additional groove.)
20.0 inches and over on outside diameter and up through 10 grooves –0.015 inches (add 0.0005 inches for each additional groove.)
This variation can easily be obtained by measuring the distance acrosstwo measuring balls or rods placed in the grooves diametrically oppositeeach other. Comparing this “diameter over balls or rods” measurementbetween grooves will give the variation in pitch diameter.
Deep groove sheaves are intended for drives with belt offset such as quarter-turn or vertical shaft drives. (See Power Transmission BeltTechnical Information Bulletin IP-3-10) They may also be necessary whereoscillations in the center distance may occur. Joined belts will not operatein deep groove sheaves.
OTHER SHEAVE TOLERANCESOutside DiameterUp through 8.0 inches outside diameter.....±0.020 inchesFor each additional inch of outside diameter add.....±0.005 inchesRadial Runout**Up through 10.0 inches outside diameter.....±0.010 inchesFor each additional inch of outside diameter add.....±0.0005 inchesAxial Runout**Up through 5.0 inches outside diameter.....±0.005 inchesFor each additional inch of outside diameter add.....±0.001 inches**Total Indicator Reading
Industry Standard Groove Dimensions for Hy-T Wedge® Belt Drives
Face Width of Standardand Deep Groove Sheaves
Face Width = Sg (Ng– 1) + 2 SeWhere: Ng=Number of Grooves
TABLE 2 GROOVE DIMENSIONS —INCHES
6
V-BeltINSTALLATION GUIDE
INSPECT SHEAVES
The following sections outline installation procedures that will ensure maximum life and performance for your Goodyear V-belts. Check sheaves for cleanliness, damage, and wear whether you are replacing an existing belt, performing routine maintenance, or installing a new drive.
Sheave Groove Gauge
PO
13.0
to 1
7.0
36°
POO
ver 17.038°
PO12.0 to 12.99
34°
StandardD
Section
LIKE THIS NOT THIS
An alternative method for checking for sheave groove wear is to place a new belt in the sheave groove. Note that the top of the belt should be fl ush with or slightly above the outer diameter of the sheave. Remember that if the belt top is below the sheave’s outer diameter, the groove is worn. Perform further inspection if possible. Use the Groove Dimension tables located on pages 4 and 5 of this manual to determine if excessive wear has occurred or to select replacement belts and sheave cross sections.
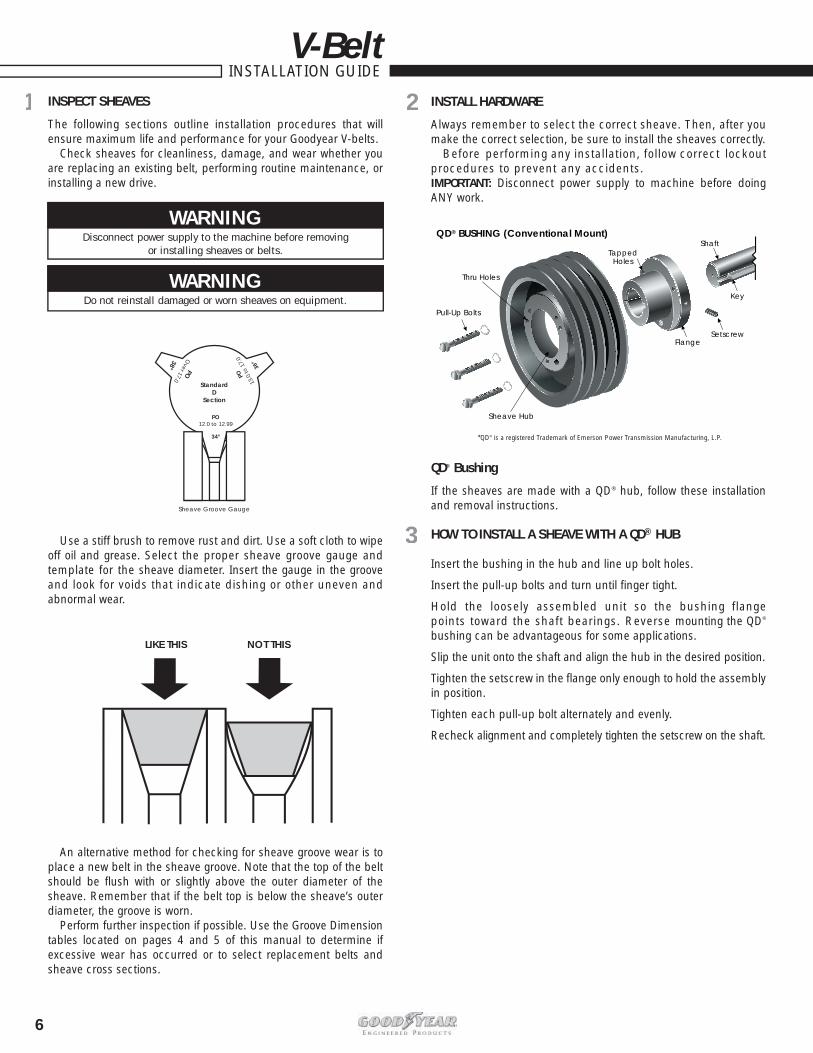
1 2 INSTALL HARDWARE
Always remember to select the correct sheave. Then, after you make the correct selection, be sure to install the sheaves correctly. Before performing any installation, follow correct lockout procedures to prevent any accidents. IMPORTANT: Disconnect power supply to machine before doing ANY work.
QD® Bushing
If the sheaves are made with a QD® hub, follow these installation and removal instructions.
HOW TO INSTALL A SHEAVE WITH A QD® HUB
Insert the bushing in the hub and line up bolt holes.
Insert the pull-up bolts and turn until fi nger tight.
Hold the loosely assembled unit so the bushing flange points toward the shaft bearings. Reverse mounting the QD® bushing can be advantageous for some applications.
Slip the unit onto the shaft and align the hub in the desired position.
Tighten the setscrew in the fl ange only enough to hold the assembly in position.
Tighten each pull-up bolt alternately and evenly.
Recheck alignment and completely tighten the setscrew on the shaft.
Use a stiff brush to remove rust and dirt. Use a soft cloth to wipe off oil and grease. Select the proper sheave groove gauge and template for the sheave diameter. Insert the gauge in the groove and look for voids that indicate dishing or other uneven and abnormal wear.
Thru Holes
Pull-Up Bolts
Flange
TappedHoles
Setscrew
Key
ShaftQD® BUSHING (Conventional Mount)
Sheave Hub
3
*QD® is a registered Trademark of Emerson Power Transmission Manufacturing, L.P.
WARNINGDisconnect power supply to the machine before removing
or installing sheaves or belts.
WARNINGDo not reinstall damaged or worn sheaves on equipment.

7
V-BeltINSTALLATION GUIDE
Split Taper Bushing
If the sheaves are made for split taper bushings, follow these installation and removal instructions.
HOW TO INSTALL SPLIT TAPER BUSHING SHEAVES
Put the bushing loosely in the sheave and start the capscrews.
Place the assembly on the shaft. Align both edges of the sheave with the edges of its mating sheave (i.e. the sheave on the driven shaft).
Tighten the capscrews according to the instructions furnished with the bushings.
HOW TO REMOVE SPLIT TAPER BUSHING SHEAVES
Remove all capscrews.
Put two of the capscrews in the tapped holes in the fl ange of the bushing.
Turn the bolts alternately and evenly until the sheave has loosened.
Remove the sheave/fl ange assembly from the shaft.
Taper-Lock Bushing
HOW TO INSTALL A SHEAVE MADE WITH A TAPER-LOCK HUB
Look at the bushing and the hub. Each has a set of half-holes. The threaded holes in the hub are the mates to the non-threaded holes in the bushing.
Insert the bushing in the hub and slide it onto the shaft. Align a threaded hub hole with non-threaded bushing hole.
Start the setscrews into the holes that are threaded in the hub only. Do not tighten the setscrews yet.
Align both edges of the sheave with the edges of its mating sheave.
Tighten the screws alternately and evenly. This procedure will wedge the bushing inward and cause it to contract evenly and grip the shaft.
HOW TO REMOVE A SHEAVE MADE WITH A TAPER-LOCK HUB
Remove all the setscrews.
Place two of the setscrews in the holes that are threaded in the bushing only.
Turn the setscrews alternately and evenly. This movement will unlock the grip and permit easy removal of the assembly with no shock to the bearings or machinery.
Non-Threaded Hub Hole
Threaded Bushing Hole(Used to remove sheave)
Bushing
Setscrews
*Taper-Lock: TM Reliance Electric Company
Sheave Hub
5
7
8
6
HOW TO REMOVE A SHEAVE WITH A QD® HUB
Place two of the pull-up bolts in the tapped holes in the sheave.
Turn the bolts alternately and evenly. They will push against the bushing fl ange and act as jackscrews to break the grip between the bushing and the hub.
4
Thru Holes
Capscrews
Bushing
Flange
Sheave
Tapped Holes

8
V-BeltINSTALLATION GUIDE
CHECK ALIGNMENT
Proper alignment is essential for long V-belt life. Check belt alignment whenever you maintain or replace belts or whenever you remove or install sheaves.
The illustration above shows the correct way to check alignment between two sheaves with a straight edge. Check both front and back alignment. Straight edge should touch sheaves at the four points indicated.
Non-parallel shafts or sheaves not aligned axially can cause angular misalignment.
Laser Alignment Tool
Goodyear’s Laser Alignment Tool provides an alternative to checking alignment with a straight edge. Each laser alignment tool comes with a rugged carrying case and detailed instructions to get you started with the quickest, easiest, and most versatile alignment tool on the market today.
IDENTIFY CORRECT BELT
Always select belts to match sheave grooves. Use a sheave groove gauge to determine the proper belt cross section. (Fig. A). Use a belt gauge to verify the old belt cross section when belt identifi cation is no longer legible. (Fig. B).
MATCHING BELTS
When using multiple grooved sheaves, be sure that all of the belts are the same brand. Always replace complete sets of V-Belts even if only one is worn or damaged.
HOW TO INSTALL BELTS
After you correctly install and align the sheaves, you can install the belts. Always move the drive unit so you can easily slip the belts into the grooves without force.
(Fig. A). (Fig. B).
9 10
11
12

9
V-BeltINSTALLATION GUIDE
Never force belts into a sheave with a tool such as a screwdriver or a wedge. Doing so may rupture the envelop fabric or break the cords.
Refer to Tables 3 and 4 to determine if enough clearance exists for belt installation and take-up. For example, if you are installing a B75 Hy-T plus belt, the minimum allowable center distance for installation is 1.25 inches. For belt take-up, the minimum allowance above center to maintain tension is 2 inches.
Minimum Allowance BelowStandard Center Distance for Installation of Belts
Up to and Incl. 35Over 35 to and Incl. 55Over 55 to and Incl. 85
Over 300 to and Incl. 390Over 390
Over 85 to and Incl. 112Over 112 to and Incl. 144Over 144 to and Incl. 180
Minumum AllowanceAbove Standard Center
Distance for Maintaining TensionAll Cross Sections
Standard Length Designation A B
BTorqueTeam C
CTorqueTeam D
DTorqueTeam E
Over 180 to and Incl. 210Over 210 to and Incl. 240Over 240 to and Incl. 300
0.750.750.75
1.001.001.25
1.501.501.60
1.501.50
2.002.00
1.001.00
1.251.251.25
1.601.801.80
1.501.502.00
2.002.102.20
2.002.00
2.903.00 2.50
1.501.501.50
1.902.002.20
2.002.002.00
2.302.502.50
2.002.502.50
3.203.203.50
2.502.503.00
2.002.50
2.702.90
2.603.00
3.604.10
3.003.50
1.001.502.00
2.503.003.50
4.004.505.00
6.001.5% of belt length
Table 3 Hy-T Plus V-Belts
Minimum Allowance Below Standard Center Distancefor Installation of Belts, Inches
Up to and Incl. 475Over 475 to and Incl. 710Over 710 to and Incl. 1060
Over 1060 to and Incl. 1250Over 1250 to and Incl. 1700Over 1700 to and Incl. 2000
Minumum AllowanceAbove Standard Center Distancefor Maintaining Tension, Inches
All Cross SectionsStandard
Length Designation 3V
3VTorqueTeam
Over 2000 to and Incl. 2360Over 2360 to and Incl. 2650Over 2650 to and Incl. 3000
0.50.80.8
1.21.41.4
1.01.0
2.12.1 1.5
0.80.8
1.41.4
1.01.01.0
2.12.12.1
1.51.51.8
1.21.21.2
2.42.42.4
1.81.81.8
1.01.21.5
1.82.22.5
3.03.23.5
Over 3000 to and Incl. 3550Over 3550 to and Incl. 3750Over 3750 to and Incl. 5000
1.2 2.4 2.02.02.0
4.04.55.5
5V
5VTorqueTeam 8V
8VTorqueTeam
3.4
3.43.43.6
3.63.63.6
4.04.04.0
Table 4 Hy-T Wedge V-Belts

10
V-BeltINSTALLATION GUIDE
Tensioning Methods
When you install belts at optimal tension, you save time and money. To illustrate this point, this table compares the cost and accuracy of various V-belt tensioning methods.
Choose one of three tensioning methods for V-Belts:
TensionRite™
Two TensionRite™ gauges are available: one for single belt drives and another for banded belt drives.
For more detailed instructions for using TensionRite,™ refer to the instructions attached to gauge.
100%
80%
60%
40%
20%
0%
$1,500
$1,200
$900
$600
$300
$0
64%
90%
99%93%
$1,200
$80
Average % Accuracy and Cost of Tensioning Devices
PERC
ENT
AC
CU
RAC
Y
CO
ST
Thumb test Plunger FrequencyTester
TensionRite
Percent Accuracy Cost ($)
$0 $0
TENSION
Proper tension is essential for maximum belt life and effi ciency. Improper belt tension is the primary cause of premature belt failure and increased costs. Under-tensioned belts lead to slippage, overheating, rollover and noise, all of which lead to higher maintenance costs and ineffi cient transmission of power. Also, over tensioning belts leads to premature wear, along with bearing, shaft, and sheave problems. The result is more frequent replacement of drive components and costly downtime.
Common Sense Rules of V–Belt Tensioning
The ideal tension is the lowest tension at which the belt will not slip under peak load conditions.
Check the belt tension frequently during the fi rst 24-48 hours of run-in operation.
Do not over tension belts. Doing so will shorten belt and bearing life.
Keep belts free from foreign materials that may cause slippage.
Inspect the V-drive periodically. Re-tension the belts if theyare slipping.
Maintain sheave alignment with a strong straight-edge tool while tensioning V-belts.
13

11
V-BeltINSTALLATION GUIDE
TensionRite Belt Frequency Meter
The TensionRite Belt Frequency Meter belt tensioning device measures actual belt tension or frequency and works with all industrial transmission belts including V-belts, synchronous belts, and Poly-V belts. Details about the TensionRite Belt Frequency Meter can be found on the web at www.goodyearindustrialproducts.com. Or contact your local Goodyear authorized distributor.
Defl ection Principle
Plunger-type gauges utilize the defl ection principle to check the tension of a belt drive.
Compare the actual defl ection force with the values in Tables 5 and 6. A force below the target value indicates under-tension. A force above the target indicates over-tension.
The gauge defl ects the center of the belt span and the force of this defl ection is compared to a target defl ection force for the particular span. Then, one can adjust the belt tension until the actual defl ection force equals the target.
Deflection1/64” per
inch of span
Table 5
Table 6
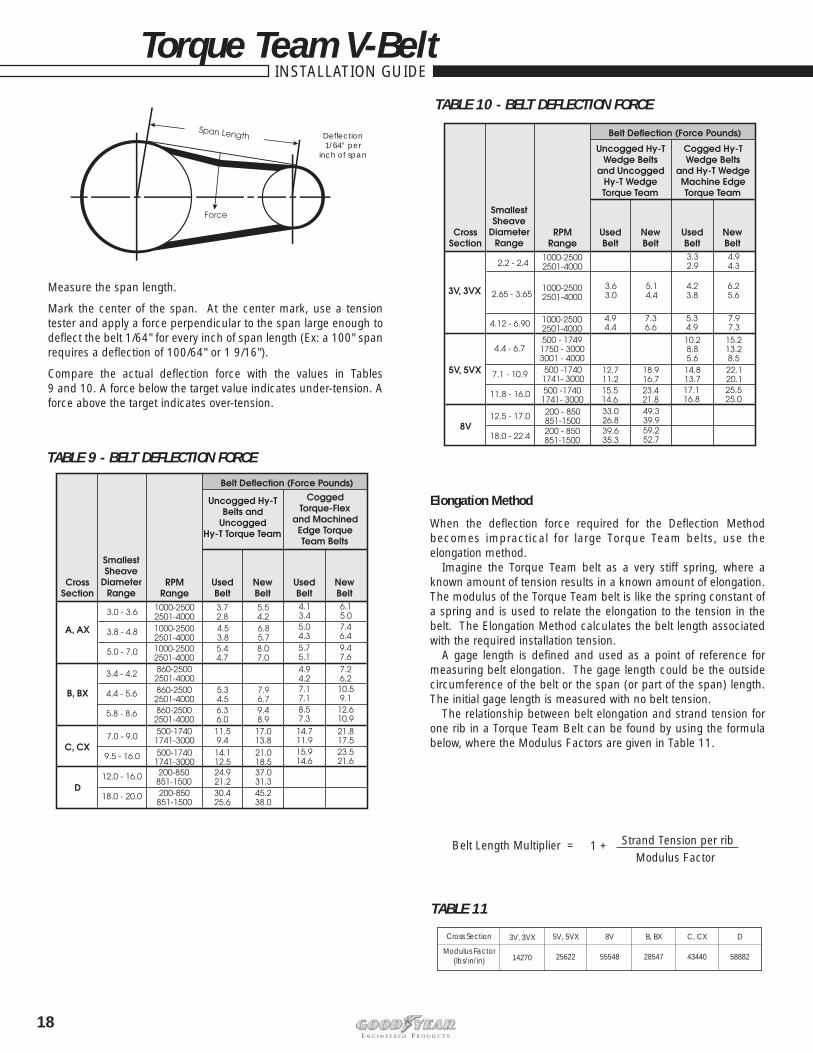
Measure the span length.
Mark the center of the span. At the center mark, use a tension tester and apply a force perpendicular to the span large enough to defl ect the belt 1/64" for every inch of span length (Ex: a 100" span requires a defl ection of 100/64" or 1 9/16").

V-BeltINSTALLATION GUIDE
12
The following few sections detail other issues that could arise during V-belt drive installation.
BELT GUARDS
V-belt drive guards ensure cleanliness and safety. Screened,meshed, or grilled guards are preferable because they allow for air circulation and heat escape.
IDLERS
Avoid the use of idlers if at all possible. A properly designed V-belt drive will not require an idler to deliver fully rated horsepower. Idlers put an additional bending stress point on belts, which reduces a belt’s horsepower rating and its life. Also, remember the smaller the idler, the greater the stress and the shorter a belt’s life. However, if the drive design requires an idler, observe the following design recommendations.
Inside Idler
A V-grooved idler located on the inside of the belts on the slack side of the drive is preferable to a back side idler. Locate the idler near the large sheave to avoid reduction of the arc of contact with the small sheave. Note that the size of the V-idler pulley should be equal to or larger (preferably) than the diameter of the small sheave.
14
15
Back Side Idler
A back side idler increases the arc of contact on both sheaves. However, such an idler also forces a backward bend in the V-belt, which contributes to unwanted wear such as bottom cracking and premature failure. If a back side idler is the only option, follow two guidelines: (1) make sure the diameter of the fl at idler pulley is at least 1.5 times the diameter of the small sheave and (2) locate the back side idler as close as possible to the small sheave on the slack side.
Kiss Idler
Unlike the back side idler, the kiss idler does not penetrate the belt span and create a back bend. Consequently, the kiss idler does not contribute to premature failure. The kiss idler can help control belt vibration and whip on drives subject to shock and pulsating loads. When using a kiss idler, make sure the diameter of the fl at pulley is at least 1.5 times the diameter of the small sheave on the slack side.

13
INSTALLATION GUIDETorque Team V-Belt
INSPECT SHEAVES
The following sections outline installation procedures that will en-sure maximum life and performance for your Goodyear Torque Team V-Belts. Check sheaves for cleanliness, damage, and wear whether you are replacing an existing belt, performing routine maintenance, or installing a new drive.
Sheave Groove Gauge
PO
13.0
to 1
7.0
36°
POO
ver 17.038°
PO12.0 to 12.99
34°
StandardD
Section
Use a stiff brush to remove rust and dirt. Use a soft cloth to wipe off oil and grease. Select the proper sheave groove gauge and template for the sheave diameter. Insert the gauge in the groove and look for voids that indicate dishing or other uneven and abnormal wear.
1 2 INSTALL HARDWARE
Always remember to select the correct sheave. Then, after you make the correct selection, be sure to install the sheaves correctly. Before performing any installation, follow correct lockout procedures to prevent any accidents. IMPORTANT: Disconnect power supply to machine before doing ANY work.
QD® Bushing
If the sheaves are made with a QD® hub, follow these installation and removal instructions.
HOW TO INSTALL A SHEAVE WITH A QD® HUB
Insert the bushing in the hub and line up bolt holes.
Insert the pull-up bolts and turn until fi nger tight.
Hold the loosely assembled unit so the bushing fl ange points toward the shaft bearings. Reverse mounting the QD® bushing can be advantageous for some applications.
Slip the unit onto the shaft and align the hub in the desired position.
Tighten the setscrew in the fl ange only enough to hold the assembly in position.
Tighten each pull-up bolt alternately and evenly.
Recheck alignment and completely tighten the setscrew on the shaft.
Thru Holes
Pull-Up Bolts
Flange
TappedHoles
Setscrew
Key
ShaftQD® BUSHING (Conventional Mount)
Sheave Hub
3
*QD® is a registered Trademark of Emerson Power Transmission Manufacturing, L.P.
WARNINGDisconnect power supply to the machine before removing
or installing sheaves or belts.
WARNINGDo not reinstall damaged or worn sheaves on equipment.

14
Torque Team V-BeltINSTALLATION GUIDE
Split Taper Bushing
If the sheaves are made for split taper bushings, follow these installation and removal instructions.
HOW TO INSTALL SPLIT TAPER BUSHING SHEAVES
Put the bushing loosely in the sheave and start the capscrews.
Place the assembly on the shaft. Align both edges of the sheave with the edges of its mating sheave (i.e. the sheave on the driven shaft).
Tighten the capscrews according to the instructions furnished with the bushings.
HOW TO REMOVE SPLIT TAPER BUSHING SHEAVES
Remove all capscrews.
Put two of the capscrews in the tapped holes in the flange of the bushing.
Turn the bolts alternately and evenly until the sheave has loosened.
Remove the sheave/fl ange assembly from the shaft.
Taper-Lock Bushing
HOW TO INSTALL A SHEAVE MADE WITH A TAPER-LOCK HUB
Look at the bushing and the hub. Each has a set of half-holes. The threaded holes in the hub are the mates to the non-threaded holes in the bushing.
Insert the bushing in the hub and slide it onto the shaft. Align a
threaded hub hole with non-threaded bushing hole.
Start the setscrews into the holes that are threaded in the hub only. Do not tighten the setscrews yet.
Align both edges of the sheave with the edges of its mating sheave.
Tighten the screws alternately and evenly. This procedure will wedge the bushing inward and cause it to contract evenly and grip the shaft.
HOW TO REMOVE A SHEAVE MADE WITH A TAPER-LOCK HUB
Remove all the setscrews.
Place two of the setscrews in the holes that are threaded in the bushing only.
Turn the setscrews alternately and evenly. This movement will unlock the grip and permit easy removal of the assembly with no shock to the bearings or machinery.
Non-Threaded Hub Hole
Threaded Bushing Hole(Used to remove sheave)
Bushing
Setscrews
*Taper-Lock: TM Reliance Electric Company
Sheave Hub
5
6
7
8
Thru Holes
Capscrews
Bushing
Flange
Sheave
Tapped Holes
HOW TO REMOVE A SHEAVE WITH A QD® HUB
Place two of the pull-up bolts in the tapped holes in the sheave.
Turn the bolts alternately and evenly. They will push against the bushing fl ange and act as jackscrews to break the grip between the bushing and the hub.

15
INSTALLATION GUIDETorque Team V-Belt
CHECK ALIGNMENT
Proper alignment is essential for long Torque Team V-Belt life. Check belt alignment whenever you maintain or replace belts or whenever you remove or install sheaves.
The illustration above shows the correct way to check alignment between two sheaves with a straight edge. Check both front and back alignment. Straight edge should touch sheaves at the four points indicated.
Non-parallel shafts or sheaves not aligned axially can cause angular misalignment.
Laser Alignment Tool
Goodyear’s Laser Alignment Tool provides an alternative to checking alignment with a straight edge. Each laser alignment tool comes with a rugged carrying case and detailed instructions to get you started with the quickest, easiest, and most versatile alignment tool on the market today.
9 IDENTIFY CORRECT BELT
Always select belts to match sheave grooves. Use a sheave groove gauge to determine the proper belt cross section (Fig. A). Make sure that the space between the grooves in the sheaves matches the spacing between belt ribs. Do not use Torque Team belts in deep groove sheaves; such sheaves could cut through the backing that holds the ribs together. Use a belt gauge to verify the old belt cross section when belt identifi cation is no longer legible (Fig. B).
(Fig. A). (Fig. B).
MATCHING BELTS
Banded Torque Team V-belts eliminate belt whip and turnover problems experienced with multiple V-belt sets under certain drive conditions. The individual ribs in the Torque Team Belts are produced at the same time and bonded together. Thus, ordering matched sets of individual V- belts is unnecessary. Using more than one set of Torque Team belts on the same drive is possible. For example, 2/5V1250 and 3/5V1250 Torque Team belts will transmit the same power as fi ve individual 5V1250 V-belts. The 2/5V1250 identifi cation describes a Torque Team belt with two 5V1250 individual V-belts joined together.
Don’t Mix Belt Brands.
DO NOT use sets from different manufacturers together as they may have different performance characteristics.
Don’t Mix New and Used Belts.
Like single V-belts, DO NOT use new and used Torque Team belts in combined sets.
Don’t use Torque Team Plus belts in combined sets unless they are matched by the factory.
11
10

16
Torque Team V-BeltINSTALLATION GUIDE
HOW TO INSTALL TORQUE TEAM BELTS
Never force Torque Team belts into a sheave. Instead, decrease the center distance between the sheaves, allowing the belt to slip easily into the sheave grooves. To tension a newly installed Torque Team belt, increase the center distance between the sheaves. Tables 7 and 8 detail center distance allowances for installation and tensioning of Classical and HY-T Wedge Torque Team belts. For example, a 5/5V1250 Torque Team belt requires decreasing the center distance 2.1 inches to install the belt and increasing the center distance 1.8 inches to maintain suffi cient tension.
12
Minimum Allowance BelowStandard Center Distance for Installation of Belts
Up to and Incl. 35Over 35 to and Incl. 55Over 55 to and Incl. 85
Over 300 to and Incl. 390Over 390
Over 85 to and Incl. 112Over 112 to and Incl. 144Over 144 to and Incl. 180
Minumum AllowanceAbove Standard Center
Distance for Maintaining TensionAll Cross Sections
Standard Length Designation A B
BTorqueTeam C
CTorqueTeam D
DTorqueTeam E
Over 180 to and Incl. 210Over 210 to and Incl. 240Over 240 to and Incl. 300
0.750.750.75
1.001.001.25
1.501.501.60
1.501.50
2.002.00
1.001.00
1.251.251.25
1.601.801.80
1.501.502.00
2.002.102.20
2.002.00
2.903.00 2.50
1.501.501.50
1.902.002.20
2.002.002.00
2.302.502.50
2.002.502.50
3.203.203.50
2.502.503.00
2.002.50
2.702.90
2.603.00
3.604.10
3.003.50
1.001.502.00
2.503.003.50
4.004.505.00
6.001.5% of belt length
Table 7 Hy-T Plus V-Belts
Minimum Allowance Below Standard Center Distancefor Installation of Belts, Inches
Up to and Incl. 475Over 475 to and Incl. 710Over 710 to and Incl. 1060
Over 1060 to and Incl. 1250Over 1250 to and Incl. 1700Over 1700 to and Incl. 2000
Minumum AllowanceAbove Standard Center Distance
for Maintaining Tension, InchesAll Cross Sections
Standard Length Designation 3V
3VTorqueTeam
Over 2000 to and Incl. 2360Over 2360 to and Incl. 2650Over 2650 to and Incl. 3000
0.50.80.8
1.21.41.4
1.01.0
2.12.1 1.5
0.80.8
1.41.4
1.01.01.0
2.12.12.1
1.51.51.8
1.21.21.2
2.42.42.4
1.81.81.8
1.01.21.5
1.82.22.5
3.03.23.5
Over 3000 to and Incl. 3550Over 3550 to and Incl. 3750Over 3750 to and Incl. 5000
1.2 2.4 2.02.02.0
4.04.55.5
5V
5VTorqueTeam 8V
8VTorqueTeam
3.4
3.43.43.6
3.63.63.6
4.04.04.0
Table 8 Hy-T Wedge V-Belts

17
INSTALLATION GUIDETorque Team V-Belt
TENSION
Proper tension is essential for maximum belt life and effi ciency. Improper belt tension is the primary cause of premature belt failure and increased costs. Under-tensioned belts lead to slippage, overheating, and noise, all of which lead to higher maintenance costs and ineffi cient transmission of power. Also, over tensioning belts leads to premature wear, along with bearing, shaft, and sheave problems. The result is more frequent replacement of drive components and costly downtime.
Common Sense Rules of Torque Team beltTensioning
The ideal tension is the lowest tension at which the belt will not slip under peak load conditions.
Check the belt tension frequently during the fi rst 24-48 hours of run-in operation.
Do not over tension belts. Doing so will shorten belt and bearing life.
Keep belts free from foreign materials that may cause slippage.
Inspect the Torque Team drive periodically. Re-tension the belts if they are slipping.
Maintain sheave alignment with a strong straight-edge tool while tensioning Torque Team belts.
Tensioning Methods
When you install belts at optimal tension, you save time and money. To illustrate this point, the fi gure below compares the cost and accuracy of various V-belt drive tensioning methods.
100%
80%
60%
40%
20%
0%
$1,500
$1,200
$900
$600
$300
$0
64%
90%
99%93%
$1,200
$80
Average % Accuracy and Cost of Tensioning Devices
PERC
ENT
AC
CU
RAC
Y
CO
ST
Thumb test Plunger FrequencyTester
TensionRite
Percent Accuracy Cost ($)
$0 $0
TensionRite Belt Frequency Meter
The TensionRite Belt Frequency Meter belt tensioning device measures actual belt tension or frequency and works with all industrial transmission belts including V-belts, synchronous belts, and Poly-V belts. Details about the TensionRite Belt Frequency Meter can be found on the web at www.goodyearindustrialproducts.com. Or contact your local Goodyear authorized distributor.
Defl ection Principle
Plunger-type gauges utilize the defl ection principle to check the tension of a belt drive.
Choose one of four tensioning methods for V-Belts:
TensionRite™
Two TensionRite™ gauges are available: one for single belt drives and another for banded belt drives.
For more detailed instructions for using TensionRite,™ refer to the instructions attached to gauge.
The gauge defl ects the center of the belt span and the force of this defl ection is compared to a target defl ection force for the particular span. Then, one can adjust the belt tension until the actual defl ection force equals the target.
13
18
Torque Team V-BeltINSTALLATION GUIDE
Elongation Method
When the defl ection force required for the Defl ection Method becomes impractical for large Torque Team belts, use the elongation method. Imagine the Torque Team belt as a very stiff spring, where a known amount of tension results in a known amount of elongation. The modulus of the Torque Team belt is like the spring constant of a spring and is used to relate the elongation to the tension in the belt. The Elongation Method calculates the belt length associated with the required installation tension. A gage length is defi ned and used as a point of reference for measuring belt elongation. The gage length could be the outside circumference of the belt or the span (or part of the span) length. The initial gage length is measured with no belt tension. The relationship between belt elongation and strand tension for one rib in a Torque Team Belt can be found by using the formula below, where the Modulus Factors are given in Table 11.
Cross Section
Modulus Factor(lbs/in/in)
3V, 3VX
14270
5V, 5VX
25622
8V
55548
B, BX
28547
C, CX
43440
D
58882
Deflection1/64” per
inch of span
Measure the span length.
Mark the center of the span. At the center mark, use a tension tester and apply a force perpendicular to the span large enough to defl ect the belt 1/64" for every inch of span length (Ex: a 100" span requires a defl ection of 100/64" or 1 9/16").
Compare the actual defl ection force with the values in Tables 9 and 10. A force below the target value indicates under-tension. A force above the target indicates over-tension.
TABLE 9 - BELT DEFLECTION FORCE
TABLE 10 - BELT DEFLECTION FORCE
TABLE 11
Strand Tension per rib Modulus Factor
1 +Belt Length Multiplier =

19
INSTALLATION GUIDETorque Team V-Belt
Enter the required strand installation tension per rib into the formula, along with the Modulus Factor that corresponds to the cross section of the Torque Team belt, to determine the Belt Length Multiplier.
Multiply the gage length by the Belt Length Multiplier to determine the fi nal gage length at the installation tension.
Example:A 5/5V1250 belt is to be installed at 1400 lbs. The Modulus Factor is 25622 lbs/in/in from table 11. The installation force is divided by the number of ribs in the Torque Team (1400/5 = 280 lbs). The Belt Length Multiplier is calculated next.
Belt Length Multiplier = 1 + 280/25622 = 1.0109
Outside Belt Circumference at installation tension = 1.0109 x 125 = 126.4 inches.
In other words, the belt is elongated 1.4 inches at installation tension.
These multipliers do not apply to Torque Team Plus belts.
Inside Idler
A V-grooved idler located on the inside of the belts on the slack side of the drive is preferable to a back side idler. Locate the idler near the large sheave to avoid reduction of the arc of contact with the small sheave. Note that the size of the V-idler pulley should be equal to or larger (preferably) than the diameter of the small sheave.
Back Side Idler
A back side idler increases the arc of contact on both sheaves. However, such an idler also forces a backward bend in the V-belt, which contributes to unwanted wear such as bottom cracking and premature failure. If a back side idler is the only option, follow two guidelines: (1) make sure the diameter of the fl at idler pulley is at least 1.5 times the diameter of the small sheave and (2) locate the back side idler as close as possible to the small sheave on the slack side.
The following few sections detail other issues that could arise during Torque Team V-Belt drive installation.
BELT GUARDS
IDLERS
Avoid the use of idlers if at all possible. A properly designed Torque Team V-belt drive will not require an idler to deliver fully rated horsepower. Idlers put an additional bending stress point on belts, which reduces a belt’s horsepower rating and its life. Also, remember the smaller the idler, the greater the stress and the shorter a belt’s life. However, if the drive design requires an idler, observe the following design recommendations.
Kiss Idler
Unlike the back side idler, the kiss idler does not penetrate the belt span and create a back bend. Consequently, the kiss idler does not contribute to premature failure. The kiss idler can help control belt vibration and whip on drives subject to shock and pulsating loads. When using a kiss idler, make sure the diameter of the fl at pulley is at least 1.5 times the diameter of the small sheave on the slack side.
V-belt drive guards ensure cleanliness and safety. Screened, meshed, or grilled guards are preferable because they allow for air circulation and heat escape.
14
15

20
Poly-V BeltINSTALLATION GUIDE
Inspect Sheaves
The following sections outline installation procedures that will ensure maximum life and performance for your Goodyear Poly-V belts. Check sheaves for cleanliness, damage, and wear whether you are replacing an existing belt, performing routine maintenance, or installing a new drive.
MotorNameplateHorsepower
MINIMUM RECOMMENDED SMALL SHEAVE DIAMETERSFOR ELECTRIC MOTORS (FOR POLY-V & V-BELT DRIVES)
1.251.251.502.002.252.25
STANDARD MOTOR R.P.M.
3450
.12 or less .25 .33 .50 .75 1
1.52357.5
1015202530
40506075
100
125150200250300
1750 1160 870 675 575
2.252.502.502.503.00
3.003.754.504.50
1.251.251.502.002.252.25
2.502.502.503.003.00
3.754.504.504.505.25
6.007.007.639.00
10.00
11.00
1.501.502.002.502.502.50
2.502.503.003.003.75
4.504.505.256.006.75
6.758.389.00
10.0013.00
13.0013.00
3.003.00
3.003.003.003.754.50
4.505.256.006.756.75
8.259.00
10.0010.0013.00
15.0018.0022.00
3.003.00
3.003.003.754.504.50
5.256.006.758.259.00
10.0010.0011.0013.0015.00
18.0020.0022.0022.0027.00
3.003.00
3.003.754.504.505.25
6.006.758.259.00
10.00
10.0011.0012.0014.0018.00
20.0022.0022.0022.0027.00
Small Sheave Diameters - Inches
Minimum Sheave Diameter
If the sheave driver is a standard electric motor, refer to Table 12 to be sure that the sheave diameter selected will meet the National Electrical Manufacturers Association Standard for minimum sheave diameters for electric motors. If the motor sheave is smaller than the minimum diameter shown in this table, increase the sheave diameter so that the motor sheave will conform with the chart unless either an oversize or outboard bearing is installed. Perform further inspection if possible. Use the Groove Dimension table below (Table 13) to determine if excessive wear has occurred or to select replacement belts and sprocket cross sections.
Table 12
d B
r b
r t
S g S e
a
h g
Ou
tsid
e
Dia
me
ter
Pitc
h
Dia
me
ter
Dia
me
ter
Ove
r Ba
lls
1
Cross Section
MinimumRecommended
OutsideDiameter
Inches
0.50
AngleGroove
0.50
Degrees
S gr t
+0.005-0.000Inches
a
Inches
r b
Inches Inches
h gMinimum
Inches
d B 0.0004
Inches
S e
Inches
H
J
K
L
M
0.80
1.50
3.00
7.00
40°
40°
40°
40°
40°
0.0630.001
0.0920.001
0.1400.002
0.1850.002
0.3700.002
0.005
0.008
0.010
0.015
0.030
0.020
0.030
0.038
0.058
0.116
0.013+0.000–0.005
0.015+0.000–0.005
0.020+0.000–0.005
0.015+0.000–0.005
0.030+0.000–0.010
0.041
0.071
0.122
0.183
0.377
0.0469
0.0625
0.1093
0.1406
0.2812
0.080+0.020–0.010
0.125+0.030–0.015
0.125+0.050 0.000
0.375+0.075–0.030
0.500+0.100–0.040
*Summation of the deviations from “Sg” for all gooves in any one sheave shall not exceed 0.010 inches.
Table 13 Groove Dimensions
WARNINGDisconnect power supply to the machine before removing
or installing sheaves or belts.
WARNINGDo not reinstall damaged or worn sheaves on equipment.

21
Poly-V BeltINSTALLATION GUIDE
INSTALLATION
Before performing any installation, follow correct lockout procedures to prevent any accidents. IMPORTANT: Disconnect power supply to machine before doing ANY work.
QD® Bushing
If the sheaves are made with a QD® hub, follow these installation and removal instructions.
HOW TO INSTALL A SHEAVE WITH A QD® HUB
Insert the bushing in the hub and line up bolt holes.
Insert the pull-up bolts and turn until fi nger tight.
Hold the loosely assembled unit so the bushing fl ange points toward the shaft bearings. Reverse mounting the QD® bushing can be advantageous for some applications.
Slip the unit onto the shaft and align the hub in the desired position.
Tighten the setscrew in the fl ange only enough to hold the assembly in position.
Tighten each pull-up bolt alternately and evenly.
Recheck alignment and completely tighten the setscrew on the shaft.
HOW TO REMOVE A SHEAVE WITH A QD® HUB
Place two of the pull-up bolts in the tapped holes in the sheave.
Turn the bolts alternately and evenly. They will push against the bushing fl ange and act as jackscrews to break the grip between the bushing and the hub.
2
Split Taper Bushing
If the sheaves are made for split taper bushings, follow these installation and removal instructions.
HOW TO INSTALL SPLIT TAPER BUSHING SHEAVES
Put the bushing loosely in the sheave and start the capscrews.
Place the assembly on the shaft. Align both edges of the sheave with the edges of its mating sheave (i.e. the sheave on the driven shaft).
Tighten the capscrews according to the instructions furnished with the bushings.
HOW TO REMOVE SPLIT TAPER BUSHING SHEAVES
Remove all capscrews.
Put two of the capscrews in the tapped holes in the fl ange of the bushing.
Turn the bolts alternately and evenly until the sheave has loosened.
Remove the sheave/fl ange assembly from the shaft.
5
6
3
4
Thru Holes
Capscrews
Bushing
Flange
Sheave
Tapped Holes
*QD® is a registered Trademark of Emerson Power Transmission Manufacturing, L.P.

22
Poly-V BeltINSTALLATION GUIDE
CHECK ALIGNMENT
Proper alignment is essential for long Poly-V belt life. Check belt alignment whenever you maintain or replace belts or whenever you remove or install sheaves.
The illustration above shows the correct way to check alignment between two sheaves with a straight edge. Check both front and back alignment. Straight edge should touch sheaves at the four points indicated.
Non-parallel shafts or sheaves not aligned axially can cause angular misalignment.
Laser Alignment Tool
Goodyear’s Laser Alignment Tool provides an alternative to checking alignment with a straight edge. Each laser alignment tool comes with a rugged carrying case and detailed instructions to get you started with the quickest, easiest, and most versatile alignment tool on the market today.
9
Taper-Lock Bushing
HOW TO INSTALL A SHEAVE MADE WITH A TAPER-LOCK HUB
Look at the bushing and the hub. Each has a set of half-holes. The threaded holes in the hub are the mates to the non-threaded holes in the bushing.
Insert the bushing in the hub and slide it onto the shaft. Align a threaded hub hole with non-threaded bushing hole.
Start the setscrews into the holes that are threaded in the hub only. Do not tighten the setscrews yet.
Align both edges of the sheave with the edges of its mating sheave.
Tighten the screws alternately and evenly. This procedure will wedge the bushing inward and cause it to contract evenly and grip the shaft.
HOW TO REMOVE A SHEAVE MADE WITH A TAPER-LOCK HUB
Remove all the setscrews.
Place two of the setscrews in the holes that are threaded in the bushing only.
Turn the setscrews alternately and evenly. This movement will unlock the grip and permit easy removal of the assembly with no shock to the bearings or machinery.
7
8

23
Poly-V BeltINSTALLATION GUIDE
IDENTIFY CORRECT BELT
Always select belts to match sheave grooves.
SIZE DESIGNATIONBELT
675 6L
6 48L
67.5 inchPitch Length
“L”Section
6Ribs
6Grooves
“L”Section
4.8Pulley Diameter
PULLEY
MATCHING BELTS
Matching multiple belts is not necessary for most Poly-V belt drives. If you encounter a special application calling for matching, specify “matched belts” on the order.
HOW TO INSTALL BELTS
After you correctly install and align the sheaves, you can install the belts. Always move the drive unit so you can easily slip the belts into the grooves without force.
Never force belts into a sheave with a tool such as a screwdriver or a wedge. Doing so may damage the ribs or break the cords.
10
11
12
Refer to table 14 to determine if enough clearance exists for belt installation and take-up.
For example, if you are installing a 220J8, the minimum allowance below center distance is ½ inch. If you are working to maintain tension, the minimum allowance above center distance for belt take-up is also ½ inch.
Minimum Allowance Below Standard Center Distance
for Installation of Belts, Inches
Up To and Incl. 20.0Over 20.0 To and Incl. 40.0Over 40.0 To and Incl. 60.0Over 60.0 To and Incl. 80.0Over 80.0 To and Incl. 100.0
Minumum AllowanceAbove Standard
Center Distance forMaintaining
Tension, inchesAll Cross Selections
Standard EffectiveLength, Inches J L M
0.40.50.60.60.7
Over 100.0 To and Incl. 120.0Over 120.0 To and Incl. 160.0Over 160.0 To and Incl. 200.0Over 200.0 To and Incl. 240.0Over 240.0 To and Incl. 300.0
Over 300.0 To and Incl. 360.0Over 360.0 To and Incl. 420.0Over 420.0 To and Incl. 480.0Over 480.0 To and Incl. 540.0Over 540.0 To and Incl. 600.0
0.8
0.90.91.0
1.11.21.31.4
1.5
1.61.71.81.92.2
2.32.62.93.23.6
0.30.50.70.91.1
1.31.72.22.63.3
3.94.65.25.86.5
TENSION
Proper tension is essential for maximum belt life and effi ciency. Improper belt tension is the primary cause of premature belt failure and increased costs. Under-tensioned belts lead to slippage, overheating, and noise, all of which lead to higher maintenance costs and ineffi cient transmission of power. Also, over tensioning belts leads to premature wear, along with bearing, shaft, and pulley problems. The result is more frequent replacement of drive components and costly downtime.
Table 14 POLY -V BELT RECOMMENDED INSTALLATION AND TAKE-UP ALLOWANCES
13
Shorter Center Distance for Poly-V belt installation
Longer Center Distance for Poly-V belt Take-Up

24
Poly-V BeltINSTALLATION GUIDE
Common Sense Rules of Poly-V Belt Tensioning
The ideal tension is the lowest tension at which the belt will not slip under peak load conditions.
Check the belt tension frequently during the fi rst 24-48 hours of run-in operation.
Do not over tension belts. Doing so will shorten belt and bearing life.
Keep belts free from foreign materials that may cause slippage.
Inspect the Poly-V drive periodically. Re-tension the belts if they are slipping.
Maintain sheave alignment with a strong straight-edge tool while tensioning Poly-V belts.
Tensioning Methods
Choose one of two tensioning methods for Poly-V belts:
TensionRite Belt Frequency Meter
The TensionRite Belt Frequency Meter belt tensioning device measures actual belt tension or frequency and works with all industrial transmission belts including V-belts, synchronous belts, and Poly-V belts. Details about the TensionRite Belt Frequency Meter can be found on the web at www.goodyearindustrialproducts.com, or contact your local Goodyear authorized distributor.
Defl ection Principle
Plunger-type gauges utilize the defl ection principle to check the tension of a belt drive.
The gauge defl ects the center of the belt span and the force of this defl ection is compared to a target defl ection force for the particular span. Then, one can adjust the belt tension until the actual defl ection force equals the target.
J
J
J
L
L
L
M
M
M
BeltCross Section
Small SheaveDiameter Range
Force “F”lbs. per rib
1.32 — 1.67
1.77 — 2.20
2.36 — 2.95
2.95 — 3.74
3.94 — 4.92
5.20 — 6.69
7.09 — 8.82
9.29 — 11.81
12.40 — 15.75
0.4
0.5
0.6
1.7
2.1
2.5
6.4
7.7
8.8
Run the drive briefl y to properly seat the belt. At least one sheave should rotate freely during the tensioning procedure.
Measure the span length. (See illustration)
Mark the center of span. At the center point, use a tension tester and apply a force perpendicular to the span large enough to defl ect the belt 1/64" for every inch of span length. (Ex: a 100" span requires a defl ection of 100/64" or 1 9/16") Compare the actual defl ection force with the values in Table 15. A force below the target value indicates under-tension. A force above the target indicates over-tension.
The following few sections detail other issues that could arise during a Poly-V belt drive installation.
BELT GUARDS
Poly-V belt drive guards ensure cleanliness and safety. Screened, meshed, or grilled guards are preferable because they allow for air circulation and heat escape.
Table 15 - BELT DEFLECTION FORCE

25
Poly-V BeltINSTALLATION GUIDE
IDLERS
Even though Poly-V belts are designed to handle idlers better than most other power transmission belts, idlers will reduce belt life and should be avoided. Idlers put an additional bending stress point on the belts, which reduces the belt’s horsepower rating and its life. The smaller the idler, the greater this stress and the shorter the belt’s life. If the drive design requires an idler, observe the following design recommendations.
Inside Idler
A V-grooved idler located on the inside of the belts on the slack side of the drive is preferable to a back side idler. Locate the idler near the large sheave to avoid reduction of the arc of contact with the small sheave. Note that the size of the V-idler pulley should be equal to or larger (preferably) than the diameter of the small sheave.
Back Side Idler
A back side idler increases the arc of contact on both sheaves. However, such an idler also forces a backward bend in the Poly-V belt, which contributes to unwanted wear such as rib cracking and premature failure. If a back side idler is the only option, follow two guidelines: (1) make sure the diameter of the fl at idler pulley is at least 1.5 times the diameter of the small sheave and (2) locate the back side idler as close as possible to the small sheave.
15
Kiss Idler
Unlike the back side idler, the kiss idler does not penetrate the belt span and create a back bend. Consequently, the kiss idler does not contribute to premature failure. The kiss idler can help control belt vibration and whip on drives subject to shock and pulsating loads. When using a kiss idler, make sure the diameter of the fl at pulley is at least 1.5 times the diameter of the small sheave.

26
Variable SpeedINSTALLATION GUIDE
INSPECT SHEAVES
The following sections outline installation procedures that will ensure maximum life and performance for your Goodyear Variable Speed belts. Check sheaves for cleanliness, damage, and wear whether you are replacing an existing belt, performing routine maintenance, or installing a new drive.
Worn sidewalls also interfere with the shifting action. Nicks or gouges can cut the belt. Dirt on the belt and in the grooves can abrade the belt and oil can attack the belt materials. Use a stiff brush to clean off rust and dirt. Wipe off any oil and grease. Worn moving parts cause vibration and reduce belt life.
.
1 CHECK ALIGNMENT
Proper alignment is more critical for Variable Speed Drive sheaves than for conventional V-belt drives. Check belt alignment whenever you maintain or replace belts or whenever you remove or install sheaves. This illustration (Fig A), shows the correct way to check alignment between two variable speed sheaves. Another il lustration (Fig B),shows a belt misaligned. To correct the alignment, move one sheave so that the straight edge is equidistant from both sides of the narrow sheave. The belt edges should also be equidistant from the straight edge.
RIGHT - The belt is parallel to the straight edge
Fig B
IDENTIFY CORRECT BELT
To select the correct belt, refer to the drive manufacturer’s recommendations. The belt length is most critical on fi xed center drives with both pulleys variable since accurate length is required to achieve precise drive speed variations. Belt length with one variable and one fi xed pulley is also critical as it affects the allowable increase and decrease in center distances.
2
3
Types of Variable Speed Drives
Both Sheaves Variable
Variable to Fixed Sheave
WARNINGDisconnect power supply to the machine before removing
or installing sheaves or belts.
WARNINGDo not reinstall damaged or worn sheaves on equipment.

27
Variable SpeedINSTALLATION GUIDE
HOW TO INSTALL BELTS
Take special care during the installation of variable speed belts to avoid damage to the belts and sheaves. You may have to open variator sheaves fully to facilitate installation. You may also have to shorten the drive center distance to allow for easy installation. You may have to remove sheaves, as well. After assembly, return the drive center distance to normal and recheck drive alignment.
TENSION
Spring loaded sheaves, which apply the tension required to handle the design load, govern variable speed belt tensioning.
BELT GUARDS
Belt guards ensure cleanliness and safety. Screened, meshed, or grilled guards are preferable because they allow for air circulation and heat escape. Note: Refer to www.osha.org.
IDLERS
Idlers are not recommended for variable speed drives.
4
5
6
7

Synchronous BeltsINSTALLATION GUIDE
28
INSPECT SPROCKETS
The following sections outline installation procedures that will ensure maximum life and performance for your Goodyear synchronous belts such as Hawk Pd,™ Falcon Pd,™ and Eagle Pd™ belts.
Worn teeth will cause belt wear and/or damage. Nicks or gouges can cut the belt. Dirt on the teeth and in the grooves can abrade the belt and oil can attack belt materials. Use a stiff brush to remove rust and dirt. Use a soft cloth to wipe off oil and grease. Make sure the components are ready for installation. Clean all shafts, removing any nicks or burrs. Clean all mating surfaces of the sprocket, bushing, and shaft. Do not use lubrication or anti-seize solution on any of these surfaces. Make sure the shafts are true and parallel by accurately measuring the distance between the shafts at three points along the shaft. The distance between the shafts should be the same at all three points as shown.
Also, make sure the shafts are rigidly mounted. Shafts should not defl ect when the belt is tensioned.
1 2
CHECK 1
CHECK 2
CHECK 3
SHAFT 1
SHAFT 2
INSTALL HARDWARE
Correct sprocket selection and installation is important. Before performing any installation, follow correct lockout procedures to prevent any accidents. IMPORTANT: Disconnect power supply to machine before doing ANY work.
QD® Bushing
If the sheaves are made with a QD® hub, follow these installation and removal instructions.
HOW TO INSTALL A SPROCKET WITH A QD® HUB
For conventional mounting, insert bushing into the sprocket, aligning the tapped holes in the bushing fl ange with the thru holes in the sprocket hub.
Insert capscrews through the thru holes and into the tapped holes.
Insert the key into the keyseat of the shaft.
With capscrews to the outside, place the sprocket and bushing assembly on the shaft, positioning the assembly with the bushing fl ange towards the shaft bearings. Reverse mounting the QD® bushing can be advantageous for some applications.
Mount the other sprocket in a similar manner.
Check that the teeth of both sprockets are pointing in the same direction when installing Eagle Pd™ sprockets.
Snug the capscrews so that the sprocket /bushing assembly can still move on the shaft.
Align the sprockets using a straight edge. Check for contact in four places as shown. Do not use bearings or drive shafts as reference points for sprocket alignment.
3
*QD® is a registered Trademark of Emerson Power Transmission Manufacturing, L.P.
WARNINGDisconnect power supply to the machine before removing
or installing sheaves or belts.
WARNINGDo not reinstall damaged or worn sheaves on equipment.

Synchronous BeltsINSTALLATION GUIDE
29
Using a torque wrench, tighten the capscrews to the torque values listed below. If there is not a gap of 1/8" to 1/4" between the bushing fl ange and the sprocket hub then disassemble the parts and determine the reason for the faulty assembly.
The sprocket will draw onto the bushing during tightening. Always recheck alignment after tightening the capscrews. If alignment has changed, loosen the capscrews and move sprocket/bushing assembly on shaft to re-align. Tighten the setscrews over the keyway to the torque values listed in the table.
If the sprockets are straight bore, use the above alignment procedure and then tighten the setscrews to the correct torque for the setscrew size as listed in the Torque Specifi cations table below (Table 16).
Bushing
CapscrewTorque
SetscrewTorque
SetscrewSize
(in-lb) (ft-lb) (in-lb) (in)
H
SH
SDS
SK
SF
E
F
J
M
N
108
108
108
180
360
720
900
1620
2700
3600
9
9
9
15
30
60
75
135
225
300
87
87
87
165
290
290
290
290
620
1/4
1/4
1/4
5/16
3/8
3/8
3/8
3/8
1/2
QD bushings can be installed with the capscrews on either side, excluding H, M, and N sizes. Drives with opposing shafts require one of the sprockets be mounted with the capscrews on the fl ange side and one with the capscrews on the hub side.
Split Taper Bushing
If the sprockets are made for split taper bushings, follow these installation and removal instructions.
HOW TO INSTALL SPLIT TAPER BUSHING SPROCKETS
Put the bushing loosely in the sprocket and start the capscrews.
Place the assembly on the shaft. Align both edges of the sprocket with the edges of its mating sprocket (i.e. the sprocket on the driven shaft).
Tighten the capscrews according to the instructions furnished with the bushings.
HOW TO REMOVE SPLIT TAPER BUSHING SPROCKETS
Remove all capscrews.
Put two of the capscrews in the tapped holes in the fl ange of the bushing.
Turn the bolts alternately and evenly until the sprocket has loosened.
Remove the sprocket/bushing assembly from the shaft.
4
5
HOW TO REMOVE A SPROCKET WITH A QD® HUB
Place two of the pull-up bolts in the tapped holes in the sprocket.
Turn the bolts alternately and evenly. They will push against the bushing fl ange and act as jackscrews to break the grip between the bushing and the hub.
6
Table 16 - TORQUE SPECIFICATIONS
Thru Holes
Capscrews
Bushing
Flange
Sheave
Tapped Holes

Synchronous BeltsINSTALLATION GUIDE
30
Taper-Lock Bushing
The following instructions illustrate how to install a sprocket made with a Taper-Lock hub.
HOW TO INSTALL A SPROCKET MADE WITH A TAPER-LOCK HUB
Look at the bushing and the hub. Each has a set of half-holes. The threaded holes in the hub are the mates to the non-threaded holes in the bushing.
Insert the bushing in the hub and slide it onto the shaft. Align a threaded hub hole with non-threaded bushing hole.
Start the setscrews into the holes that are threaded in the hub only. Do not tighten the setscrews yet.
Align both edges of the sprocket with the edges of its mating sprocket.
Tighten the screws alternately and evenly. This procedure will wedge the bushing inward and cause it to contract evenly and grip the shaft.
HOW TO REMOVE A SPROCKET MADE WITH A TAPER-LOCK HUB
Remove all the setscrews.
Place two of the setscrews in the holes that are threaded in the bushing only.
Turn the setscrews alternately and evenly. This movement will unlock the grip and permit easy removal of the assembly with no shock to the bearings or machinery.
CHECK ALIGNMENT
Drive Alignment
Synchronous belts are very sensitive to misalignment. The tension carrying member has a high tensile strength and resistance to elongation, resulting in a very stable belt product. Any misalignment will lead to inconsistent belt wear, uneven load distribution and premature tensile failure. In general, synchronous drives should not be used where misalignment is a problem. Limit misalignment to 1/3 degree or 1/16" per foot of center distance. With parallel shafts, misalignment occurs when there is an offset between the sprocket faces as in Fig A. Misalignment also occurs when the shafts are not pararllel as in Fig B.
IDENTIFY CORRECT BELT
Always select belts to match sprocket profi le. Eagle Pd™ belts and sprockets from Goodyear are identifi ed with a unique Color Spectrum System. The seven colors used for identifi cation are: Yellow, White, Purple, Blue, Green, Orange, and Red. Each color represents a different size so that Blue belts are made to operate with Blue sprockets. Make sure to obtain the same color belt and sprockets. When installing other Goodyear synchronous belts, use the correct sprocket width.
Laser Alignment Tool
Goodyear’s Laser Alignment Tool provides an alternative to checking alignment with a straight edge. Each laser alignment tool comes with a rugged carrying case and detailed instructions to get you started with the quickest, easiest, and most versatile alignment tool on the market today.
Figure A
Figure B7
9
10
8

Synchronous BeltsINSTALLATION GUIDE
31
MATCHING BELTS
Drives using synchronous belts are not recommended to run in matched sets. If a special application requires matching, specify “matched belts” on the order. Note: such requests require additional order lead time. Also, matching code numbers will not appear on the belts.
HOW TO INSTALL BELTS
Before installation, inspect the belt for damage. Belts should never appear crimped or bent to a diameter less than the minimum recommended sprocket diameter. Always move the drive unit so you can easily slip the belts into the grooves without force. Shorten the center distance or release the tensioning idler to install the belt. Do not pry the belt on the sprocket. Refer to the following Center Distance Allowance tables for the required center distance adjustment. Place the belt on each sprocket and ensure proper engagement between the sprocket and belt teeth. Lengthen the center distance or adjust the tensioning idler to remove any belt slack.
11
12
Shorter Center Distance for Synchronous belt installation
Longer Center Distance for Synchronous belt Take-Up
If you install a belt over one fl anged sprocket and one unfl anged sprocket with the sprockets already installed on the drive, allow the following decrease in center distance for installation and increase in center distance for tensioning.
Apply the following center distance allowances for Hawk Pd™ and Falcon Pd.™ A center distance adjustment, or decrease in center distance, is necessary to install a belt. In addition, an increase in center distance will be necessary for proper tensioning. If you install a belt together with sprockets, allow the following decrease in center distance for installation and an increase in center distance for tensioning.
PitchLengthRange(mm)
Allowance (Decrease)For Installation8M, 14M Belts
(mm/in)
Allowance (Increase)For Take-Up
8M, 14M Belts(mm/in)
Less than 1525
1525-3050
Greater than 3050
2.5/0.1
5.0/0.2
7.5/0.3
2.5/0.1
5.0/0.2
7.5/0.3
If you install the belt over two fl anged sprockets that are already installed on the drive, allow the following decrease in center distance for installation and increase in center distance for tensioning.
PitchLengthRange(mm)
Allowance (Decrease)For Installation
Allowance (Increase)For Take-Up
8M, 14M Belts(mm/in)
Less than 1525
1525-3050
Greater than 3050
22.5/0.9
25.0/1.0
27.5/1.1
2.5/0.1
5.0/0.2
7.5/0.3
8MBelts
14MBelts
(mm/in)
36.5/1.4
39.0/1.5
41.5/1.6
Consider the following center distance allowances when installing Eagle Pd™ sprockets. Since fl anges are not necessary on Eagle Pd™ drives, only one table of center distance allowances is provided.
PitchLengthRange(mm)
Allowance (Decrease)For Installation
Allowance (Increase)For Take-Up
8M, 14M Belts(mm/in)
Less than 1525
1525-3050
Greater than 3050
34.5/1.4
37.0/1.5
39.5/1.6
2.5/0.1
5.0/0.2
7.5/0.3
8MBelts
14MBelts
(mm/in)
59.2/2.3
62.0/2.4
64.5/2.5
PitchLengthRange(mm)
Allowance (Decrease)For Installation Allowance (Increase)
For Take-Up8M, 14M Belts
(mm/in)
Less than 1525
Greater than 1525
10.1/0.4
15.2/0.6
2.5/0.1
5.0/0.2
Yellow, White, Purple Belts
(mm/in)
15.2/0.6
17.8/0.7
Blue, Green, Orange, Red Belts

Synchronous BeltsINSTALLATION GUIDE
32
TENSION
Install and tension Goodyear synchronous belts properly to ensure optimum performance. Proper tension is essential for maximum belt life and effi ciency. Improper belt tension is the primary cause of premature belt failure and increased costs. Under-tensioned belts lead to ratcheting and excessive tooth loading, both of which lead to higher maintenance costs and ineffi cient transmission of power. Also, over tensioning belts leads to premature wear, along with bearing, shaft, and sprocket problems. The result is more frequent replacement of drive components and costly downtime.
Tensioning Methods
Choose one of two tensioning methods:
TensionRite Belt Frequency Meter
The TensionRite Belt Frequency Meter belt tensioning device mea-sures actual belt tension and works with all industrial transmission belts including V-belts, synchronous belts, and Poly-V belts. Details about the TensionRite Belt Frequency Meter can be found on the web at www.goodyearindustrialproducts.com. Or contact your local Goodyear authorized distributor.
Defl ection Principle
Plunger-type gauges utilize the defl ection principle to check the tension of a belt drive.
First, determine the proper defl ection force to tension the belt. Defl ection forces are listed in Table 17. Defl ection forces are also given on the output of the Maximizer computer drive analysis.
D, Diameter (in)D, Diameter (in)Q, Deflection (in)
F, Force (lbs)
P, Span Length
C, Center Distance (in)
BeltType
0-100 RPM
New Belt Used Belt
Yellow
White
Purple
Blue
Green
Orange
Red
8GTR 12
8GTR 21
8GTR 36
8GTR 62
14GTR 20
14GTR 37
14GTR 68
14GTR 90
14GTR 125
8M 20
8M 30
8M 50
8M 85
14 M 40
14 M 55
14 M 85
14 M 115
14 M 170
101-1000 RPM
New Belt Used Belt
1000-up RPM
New Belt Used Belt
15
30
60
54
80
107
161
24
42
72
124
38
70
129
171
238
15
23
39
69
47
70
116
162
249
11
21
43
38
57
76
115
17
30
51
88
29
54
99
131
181
11
17
29
50
34
51
84
118
181
12
24
47
44
66
88
131
14
25
42
72
31
57
105
140
194
13
20
35
61
38
56
93
130
201
8
17
34
31
47
63
94
10
18
30
52
23
43
78
104
144
10
15
26
45
28
41
68
95
146
9
19
38
38
57
76
115
7
12
21
36
28
52
95
126
175
12
19
32
56
32
48
79
110
171
7
13
27
27
41
55
82
5
9
15
26
21
39
71
95
131
9
14
24
41
24
35
58
80
125
EAG
LE P
d™
FALC
ON
Pd
™H
AW
K Pd
™
TABLE 17 - DEFLECTION FORCES FOR BELT TENSIONING (LBS)
13
where: P = span length, inches C= Center distance, inches D = Large pulley pitch diameter, inches d = Small pulley pitch diameter, inches
The gauge defl ects the center of the belt span and the force of this defl ection is compared to a target defl ection force for the particular span. Then, one can adjust the belt tension until the actual defl ection force equals the target.

Synchronous BeltsINSTALLATION GUIDE
33
If using a tension gauge, the defl ection scale is calibrated in inches of span length. Check the force required to defl ect the belt the proper amount. There is an O-ring to help record the force. If the measured force is less than the required defl ection force, lengthen the center distance. If the measured force is greater than the required defl ection force, shorten the center distance. If using other means to apply force to the belt, adjust the center distance so that the belt is defl ected 1/64" per inch of span length when the proper force is applied. After the belt is properly tensioned, lock down the center distance adjustments and recheck the sprocket alignment. If possible, run the drive for approximately 5 minutes with or without load. Stop the drive and lock out the power source and examine alignment, capscrew torque and belt tension of the drive. Adjust the center distance to increase the belt tension to the “New” Value in the Defl ection Force Tables. Lock down the drive adjustments and recheck tension. Recheck the belt tension, alignment, and capscrew torque after eight hours of operation to ensure the drive has not shifted.
The following few sections detail other issues that could arise during Synchronous belt installation.
USING A FIXED CENTER DISTANCE
A fi xed center distance drive has no adjustment for tensioning or installing the belt. Due to the tolerances of drive components, including sprocket, belt, and drive geometry, a drive with a Fixed Center Distance is not recommended as adequate belt tension cannot be assured. Proper belt installation requires a minimum center to center adjustment. Refer to belt installation for center to center adjustment. In some cases, fi xed center drives cannot be avoided and should be used only with the understanding that belt life will be reduced.
DESIGN FACTORS
To ensure proper belt selection, consult the appropriate design manual for Eagle Pd,™ Falcon Pd,™ or Hawk Pd.™ Due to the high load capacity of these belts, make sure that all of the drive components are adequately designed. Consult sprocket and other component manufacturers for design assistance or if verifi cation of application is needed.
BELT GUARDS
Belt guards ensure cleanliness and safety. Screened, meshed, or grilled guards are preferable because they allow for air circulation and heat escape.
14
15
16
17 IDLERS
Use idlers either inside or outside of the belt, preferably outside. Idlers often function as a tensioning mechanism when the drive has a fi xed center distance. When an idler is necessary, follow several general rules:
Locate the idler on the slack side of the belt.
Small, inside idlers should be grooved (up to 40 teeth).
Outside idlers should be fl at, not crowned.
Minimum idler diameter should be 4 inches on 8mm pitch drives and 8 inches on 14mm pitch drives.
Hold idler arc of contact to a minimum.
Do not use spring loaded tensioners.
Lock idlers fi rmly in place to minimize movement or defl ection during drive start-up and operation.
TEETH IN MESH
Sprockets with low belt angle of less than 60 degrees or less than six Teeth in Mesh will not transmit the full rated load. Should drives be designed using less than 6 Teeth in Mesh, the service life of the belt will be reduced.
18

Synchronous BeltsINSTALLATION GUIDE
34
FLANGED SPROCKETS
Use fl anges to keep the belt in the sprocket and prevent “rideoff.” As each belt has its own tracking characteristics, even belts with perfect drive alignment can have a tracking problem. Synchronous belts will have an inherent side thrust while in motion and can be controlled with fl anged sprockets. If side thrust is severe, check the drive for sprocket alignment, parallel shafts, and shaft defl ection.
For a Two-Sprocket Drive:
A minimum requirement should be two fl anges on one sprocket. For economical reasons, the smaller sprocket is usually fl anged.
When the center distance of the drive exceeds eight times the diameter of the smaller sprocket, it is suggested that fl anges be included on both sides of each sprocket.
On vertical shaft drives, one sprocket should be fl anged both sides and one sprocket fl anged bottom side only.
For a Multiple Sprocket Drive:
Two fl anges are required on every other sprocket or a single fl ange on every sprocket, altering sides.
MULTIPLE SPROCKET DRIVES
Multiple sprocket drives typically have one DriveR and two or more DriveN sprockets. In these cases, it is acceptable to size the drive based on the most severely loaded shaft. This is usually the DriveR shaft since the load of all the DriveN shafts must be transmitted through one DriveR shaft. Sprockets with a low belt wrap angle, less than 60 degrees, and/or a low number of teeth in mesh, less than six teeth, will not transmit full rated load and service life of the belt will be reduced. The number of Teeth in Mesh, TIM, is equal to (Belt Wrap in mm)/(Pitch in mm). Backside idlers can be used to increase belt wrap (see Using Idlers in this section). For detailed multiple sprocket drive design, contact a drive design specialist at Goodyear Engineered Products.
BEARING LOADS
On many drives, bearing life is a concern. Reducing the bearing load will increase bearing life. Bearing loads can be reduced in the following ways: Calculate the belt tension instead of using the belt tensioning tables. The tables are general and may specify higher belt tension than is necessary on some drives. Contact your local Goodyear authorized distributor to assist in calculating actual belt tension requirements for your drive. Larger diameter sprockets will require less belt tension on any given drive. Always position the sprockets close to the bearings. This positioning will reduce the effect of the “overhung” bearing load. Be sure not to install a belt at less than the recommended tension. A belt that is under tensioned will have a reduced service life.
20
21

35
INSTALLATION GUIDEMaintenance
Maintenance
Belt drives are a reliable and effi cient means of power transmission. Since they are essentially trouble-free, they are ignored often and do not receive the minimal attention they require for the full delivery of benefi ts over the course of a long life of use. Belt drive maintenance is neither complicated nor does it require a great deal of time or a large variety of special tools. Primarily, good maintenance requires that you look at and listen to the drive to discover and correct any problems
What to Look For:
Oil and Grease
Police a drive well. Immediately repair leaky bearings as excess oil on a bearing will splash on the belts. If you cannot correct these conditions without sacrifi cing adequate lubrication, use oil-resistant belts as too little lubrication will cause bearing failure, which may also cause belt failure when drag becomes excessive.
Dirt
No equipment operates best when it is dirty. Belts are no exception. Dirt accelerates belt wear and dirt build-up in a V-belt sheave groove impairs traction.
Added Loads
Check to see that no additional loads have been added since the original drive was selected.
Belt Guards
Belt guards ENSURE that large debris doesn’t enter the drive.
Cracking
Do not replace a V-belt simply because you observe bottom cracking. Reduce bottom cracking by using larger sheaves and larger reverse bend idler sheaves. However, tooth cracking on synchronous belts is an early indicator of tooth shear, and therefore, the belt should be replaced. See troubleshooting charts for corrective action.
Belt Dressing
Belt dressing is seldom benefi cial to belt drives. This TACKINESS actually accelerates the time to failure of V-belts. If V-belts slip or squeak, identify and correct the problem. Never use belt dressing on synchronous belts.
Vibration
Excessive vibration should be minimized. This is often due to low tension or damaged tensile member. In extreme cases, a back side kiss idler may need to be added in the vibrating span.
Tension
Tension is critical in belt drives. For V-belts the ideal tension is the lowest tension at which the belt will not slip under peak load conditions. For synchronous belts, under-tensioning leads to ratcheting and excessive tooth loading. Adjust tension to the values shown in the tables provided in this Guide. See section on “Installation” for the type of belt involved for additional information.
Heat
High temperatures cause heat-aging and shorten belt life. Check frequently belts operating in temperatures above 140 degrees F and consider special heat-resistant construction if belt life is not satisfactory.
Belt Turn Over
Turned over V-belts indicate drive misalignment, worn sheaves or excessive vibration.
Change in Ride Out
Ride out is the position of the top of the V-belt to the Outside Diameter of the sheave. A change in ride out over time indicates uneven belt wear or worn sheaves.
Lateral Vibration
Don’t allow belts to snake.
Belt Wear
Wear on V-belt sidewalls indicates consistent slippage, excessive dust, or rough sheaves. Tooth wear on synchronous belts is an indication of improper tooth meshing. See trouble guide for possible causes and corrections.
Debris
Broken belts or excessive vibration can result from the presence of foreign material on the belts or in the sheaves or sprockets.
Prevent belt whipping

36
MaintenanceINSTALLATION GUIDE
What to Listen For
Squeal
Squeal is usually a result of insuffi cient belt tension and requires prompt investigation. If squeal persists after you have checked all belts and adjusted tension, examine the drive itself for overloading.
Chirp
Chirp, a sound like that of a chirping bird, can occur on all types of belt drives. Never apply dressing or oil to a belt in an effort to eliminate chirps or squeaks. Realignment of an idler may help. Chirps or squeaks are often annoying, but will not harm belts.

Cause of Failure — Excessive exposure to oil or grease has causedthe belt to swell, become soft and the bottom envelope seam to“open up”.Correction — Provide splash guards, do not over lubricate, cleanbelts and sheaves with gasoline.
Cause of Failure — Cut bottom and sidewall indicate belt was pried over sheave and damaged during installation.Correction — Be sure to use proper length belt and move tensioning all the way “in” when installing belt.
Cause of Failure — Constant slippage caused by insufficienttension in belt.Correction — Tension drive in accordance with the recommendationsof the equipment manufacturer and this manual.
Cause of Failure — Belt has evenly spaced deep bottom cracks fromuse of a substandard backside idler.Correction — Replace backside idler with the minimum size recommendation.
Cause of Failure — Split on side at the belt pitch line indicates useof a sheave with a substandard diameter.Correction — Redesign drive to utilize proper size sheaves.
Cause of Failure — Weathering or “crazing” caused by the elements and aggravated by small sheaves.Correction — Provide protection for the drive and replace belt or belts.
Cause of Failure — Severe localized wear caused by a frozenor locked driven sheave.Correction — Determine that the drive components turn freely and tighten belt, if necessary.
Cause of Failure — Rough sheave sidewalls cause the cover to wear off in an uneven pattern.Correction — File or machine out the rough spot on the sheavegroove. If beyond repair, replace the sheave.
Cause of Failure — Ply separation caused by substandard sheavediameter.Correction — Redesign drive to use proper size sheaves.
Cause of Failure — The load carrying member has been broken by ashock load or damage during installation.Correction — Maintain proper tensioning and observe properinstallation procedures.
37
INSTALLATION GUIDETroubleshooting V-Belt Performance Analysis

Cause of Failure — Tensile breaks can be caused by high shockloads, foreign object between the bottom of the sheave and the bottom of the belt or damage during installation.Correction — Maintain proper drive tension and installationprocedures. Provide guard to keep foreign material from coming in contact with the drive.
Cause of Failure — Back of the belt has been rubbing on a belt guard or other appurtenance.Correction — Provide adequate clearance between belt and guardor any appurtenances.
Cause of Failure — Excessive dust and rough sheaves combine to cause severe envelope wear and early belt failure.Correction — Maintain sheave condition, alignment and attempt toprotect drive from excessive dust exposure.
Cause of Failure — Worn sheave grooves allow the joined beltto ride too low cutting through to the top band.Correction — Replace sheaves and maintain proper belt tension andsheave alignment.
Cause of Failure — Flange wear on PD synchronous belt.Correction — Adjust and maintain proper pulley alignment.
Cause of Failure — Web fabric wear caused by improper belt and pulley fit. Correction — Check belt/pulley fit and replace worn or out-of-spec pulleys.
Cause of Failure — Tooth shear caused by belt overload condition from improper application or shock loads.Correction — Consult engineering manual to proper application andmaintain proper belt tension.
Cause of Failure — Fabric wear caused by insufficient belt tension or pulleys which are not to the standard PD pulleydimensions and tolerances.Correction — Maintain proper tension and replace the out-of-spec pulleys.
38
Troubleshooting V-Belt Performance AnalysisINSTALLATION GUIDE

39
INSTALLATION GUIDETroubleshooting of V-Belt Systems

40
Troubleshooting of Synchronous Belt SystemsINSTALLATION GUIDE

41
INSTALLATION GUIDE Notes

42
NotesINSTALLATION GUIDE

43
INSTALLATION GUIDE Notes

P O W E R T R A N S M I S S I O N P R O D U C T S
U . S . A .
1 - 8 0 0 - 8 6 9 - 0 4 3 5F A X 1 - 8 0 0 - 2 2 8 - 3 1 4 8
C A N A D A
1 - 8 8 8 - 2 7 5 - 4 3 9 7F A X 1 - 8 8 8 - 4 6 4 - 4 3 9 7
G O O D Y E A R P T P . C O M
Conveyor Belt, Hydraulic Hose and Fittings, Industrial Hose, Lightweight Conveyor Belt, Power Transmission Products, Replacement Products, Rubber Track
700-821-947-50606GPTP013
059900-3/06
© 2006 The Goodyear Tire & Rubber Company and Goodyear Canada Inc. All Rights Reserved.