install guide for websphere 7.0 jahia ee v6.6.1 install guide for websphere 7.0 jahia ee v6.6.1.0...
TRANSCRIPT

DOCUMENTATION
Install guide for Websphere 7.0
Jahia EE v6.6.1.0
Jahia’s next-generation, open source CMS stems from a widely acknowledged
vision of enterprise application convergence – web, document, search, social and
portal – unified by the simplicity of web content management.
Jahia Solutions Group SA
9 route des Jeunes, CH-1227 Les acacias Geneva, Switzerland
http://www.jahia.com
Page 2 / 46
© 2002 – 2013 Jahia Solutions Group SA
Installing Jahia EE v6.6.1.0 on WebSphere 7.0.0.23
DOCUMENTATION .................................................................................................................................................. 1
1 Supported platforms .................................................................................................................................... 3
2 Requirements ............................................................................................................................................... 3
3 Installation instructions ............................................................................................................................... 3
3.1 Configuring Jahia ................................................................................................................................... 3
3.2 Shared libraries deployment ................................................................................................................. 4
3.3 Server configuration .............................................................................................................................. 5
3.4 Data source setup ................................................................................................................................. 8
3.5 Deploying in WebSphere ..................................................................................................................... 20
3.6 Jahia configuration externalization ..................................................................................................... 37
3.7 Portlet deployment ............................................................................................................................. 38
4 Debugging in WebSphere .......................................................................................................................... 43

Page 3 / 46
© 2002 – 2013 Jahia Solutions Group SA
Installing Jahia EE v6.6.1.0 on WebSphere 7.0.0.23
1 Supported platforms
The following procedure has only been tested with the 64-bit (because of memory requirements) version
7.0.0.23 of the IBM WebSphere Application Server platform. As this platform evolves over time, it is
possible that the installation may vary in points depending on the changes introduced in the platform.
Make sure to read the release notes of any update packs that are installed on the server to adjust your
deployment procedure accordingly.
2 Requirements
- WebSphere Application Server 7.0.0.23 or more recent fix pack
- Fully updated WebSphere Application Server JDK (non IBM JDKs are not supported)
- A supported 64-bit operating system such as RedHat Enterprise Linux 5 (see release notes for
support of more recent versions), Windows XP. (CentOS 5 is known to work but is not officially
supported). Ubutun/Debian or other Linux distributions are not recommended and not officially
supported.
- 4GB RAM (minimum), 8GB RAM (recommended)
- At least 20GB hard disk space (including WebSphere install)
In general it is highly recommended to stick as much as possible to the recommended platforms. For more
recent information, check the IBM WebSphere platform requirements for version 7.0.
3 Installation instructions
3.1 Configuring Jahia
1. Download the Jahia Enterprise package
2. Run the graphical installer on any platform, remove the option to use a bundled Tomcat package,
then select WebSphere as the target Application Server, and the database you will use with your

Page 4 / 46
© 2002 – 2013 Jahia Solutions Group SA
Installing Jahia EE v6.6.1.0 on WebSphere 7.0.0.23
WebSphere server. Once the installer is finished in your install directory you should find a file
named ROOT.ear and a file named shared-libraries.zip.
This completes Jahia’s preparation for deployment on Websphere. We can now move to the setup of the
server.
3.2 Shared libraries deployment
Extract the shared-libraries.zip ZIP file in the folder of your choice (we recommend something like
/opt/IBM/WebSphere/AppServer/shared-libraries), and declare a new shared library : in “Environment” /
“Shared Libraries”, select server scope and click on “new”, and then specify the folder where you have
copied the libs in the “Classpath” input and use the name “Jahia Shared Libraries” for the library name (this
will make automatic bindings work transparently). Make sure you click “OK” and then “Save” to persist the
changes to the master configuration. When deploying the application, it will have to reference this library
(the Jahia application itself, so that the library will be shared by all the modules from the EAR, including the
Jahia module). Also copy the:
portlet-api_2.0_spec-1.0.jar
to the directory :
AppServer/lib/ext/
The result should look something like this:

Page 5 / 46
© 2002 – 2013 Jahia Solutions Group SA
Installing Jahia EE v6.6.1.0 on WebSphere 7.0.0.23
3.3 Server configuration
3.3.1 JVM
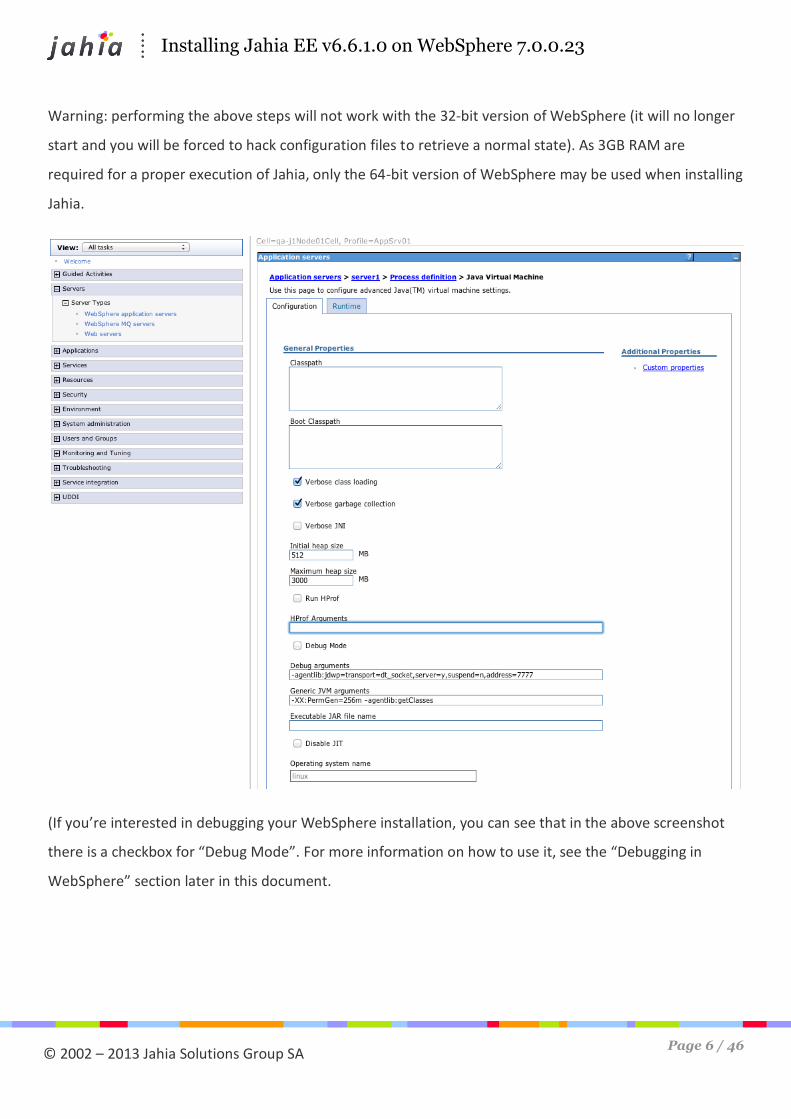
Open Servers -> Application Servers -> <server> -> Java and process management -> Process definition ->
Java Virtual Machine
Specify at least 3GB for the heap size, and 256MB for the permanent generation (Generic JVM arguments)
Page 6 / 46
© 2002 – 2013 Jahia Solutions Group SA
Installing Jahia EE v6.6.1.0 on WebSphere 7.0.0.23
Warning: performing the above steps will not work with the 32-bit version of WebSphere (it will no longer
start and you will be forced to hack configuration files to retrieve a normal state). As 3GB RAM are
required for a proper execution of Jahia, only the 64-bit version of WebSphere may be used when installing
Jahia.
(If you’re interested in debugging your WebSphere installation, you can see that in the above screenshot
there is a checkbox for “Debug Mode”. For more information on how to use it, see the “Debugging in
WebSphere” section later in this document.

Page 7 / 46
© 2002 – 2013 Jahia Solutions Group SA
Installing Jahia EE v6.6.1.0 on WebSphere 7.0.0.23
3.3.2 Web container
Open Servers -> Application Servers -> <server> -> Web Container Settings and click on the “Web
container” link
Then click on the “Custom Properties” link
Select New and then enter "com.ibm.ws.webcontainer.invokeFiltersCompatibility" as the property
name and "true" as the value as illustrated in the screenshot below:
Do the same for the following properties :
com.ibm.wsspi.jsp.enabledoublequotesdecoding = true
com.ibm.wsspi.jsp.evalquotedandescapedexpression = true
You should have the following result:

Page 8 / 46
© 2002 – 2013 Jahia Solutions Group SA
Installing Jahia EE v6.6.1.0 on WebSphere 7.0.0.23
Those server configurations require restarting the application server. You can delay this restart, but you
will have to do it at least once before starting Jahia.
Tip: to restart the server you will probably use a command line like the following:
/opt/IBM/WebSphere7/AppServer/profiles/AppSrv01/bin/stopServer.sh server1 ;
/opt/IBM/WebSphere7/AppServer/profiles/AppSrv01/bin/startServer.sh server1
3.4 Data source setup
You need to define a data source in your Application server for Jahia to be able to talk to the database
server. This data source will be further mapped on the resources declared in your Jahia application.
3.4.1 JDBC Provider creation
You need to create a JDBC provider before being able to create a datasource to your database server. If
you want to use a MS SQL Server database, you can use a JDBC Provider included with your WAS server,
and so skip directly the following points.
For other database providers, you will have to create manually your JDBC Provider:

Page 9 / 46
© 2002 – 2013 Jahia Solutions Group SA
Installing Jahia EE v6.6.1.0 on WebSphere 7.0.0.23
Copy the database driver jar file(s) into the AppServer/lib directory (if there isn’t already one that’s
suiteable). For Oracle, use the following driver: ojdbc5-11.2.0.2.0.jar and orai18n-11.2.0.2.0 in
WebSphere configuration and not the ojdbc14.jar or ojdbc6.jar ones. You can find the
recommended Oracle driver JARs in Jahia’s ROOT.ear/jahia.war/WEB-INF/lib directory
Open Resources / JDBC / JDBC Providers, specify Server scope (Node=node_name,
Server=server_name)
Click on “New” button
Fill in the screen as illustrated below, then click “Next”:
In the next screen, specify the path to the directory where the jdbc driver is located, enter
${WAS_LIBS_DIR}

Page 10 / 46
© 2002 – 2013 Jahia Solutions Group SA
Installing Jahia EE v6.6.1.0 on WebSphere 7.0.0.23
Please note that the driver is not yet the correct one, we will adjust this later.
Page 11 / 46
© 2002 – 2013 Jahia Solutions Group SA
Installing Jahia EE v6.6.1.0 on WebSphere 7.0.0.23
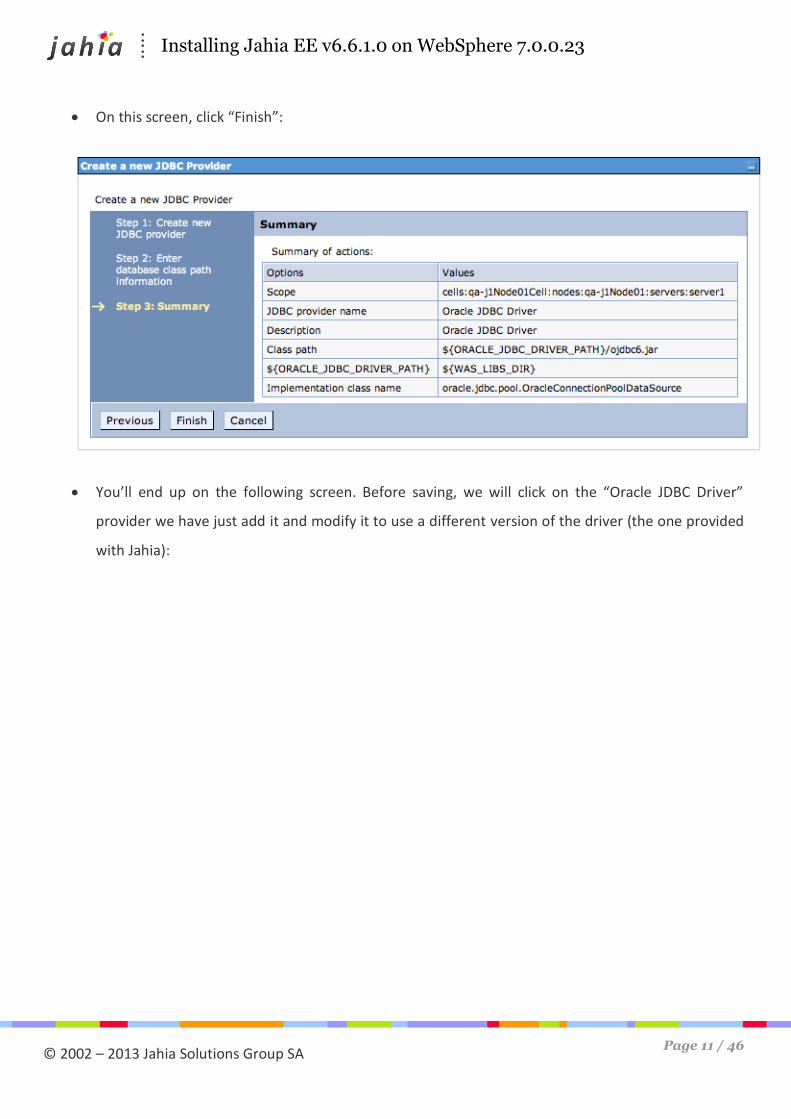
On this screen, click “Finish”:
You’ll end up on the following screen. Before saving, we will click on the “Oracle JDBC Driver”
provider we have just add it and modify it to use a different version of the driver (the one provided
with Jahia):

Page 12 / 46
© 2002 – 2013 Jahia Solutions Group SA
Installing Jahia EE v6.6.1.0 on WebSphere 7.0.0.23
You should now be on the following screen :

Page 13 / 46
© 2002 – 2013 Jahia Solutions Group SA
Installing Jahia EE v6.6.1.0 on WebSphere 7.0.0.23
We will now modify the “Class path” to use the latest version by inputting the following values:
${ORACLE_JDBC_DRIVER_PATH}/ojdbc5-11.2.0.2.0.jar
${ORACLE_JDBC_DRIVER_PATH}/orai18n-11.2.0.2.0.jar
Click “OK” and then click “Save” to the master configuration.
3.4.2 Data source creation
3.4.2.1 Authentication alias creation
You need to define the login and password that will be used to connect to your database instance.
Page 14 / 46
© 2002 – 2013 Jahia Solutions Group SA
Installing Jahia EE v6.6.1.0 on WebSphere 7.0.0.23
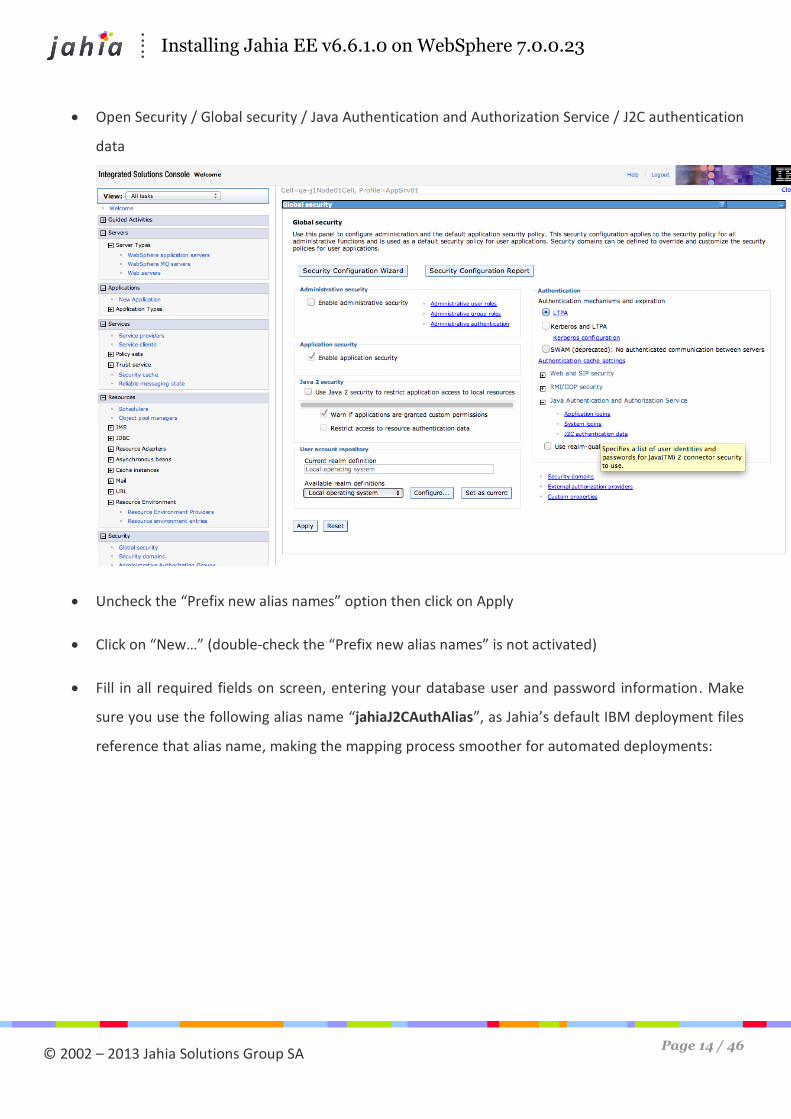
Open Security / Global security / Java Authentication and Authorization Service / J2C authentication
data
Uncheck the “Prefix new alias names” option then click on Apply
Click on “New…” (double-check the “Prefix new alias names” is not activated)
Fill in all required fields on screen, entering your database user and password information. Make
sure you use the following alias name “jahiaJ2CAuthAlias”, as Jahia’s default IBM deployment files
reference that alias name, making the mapping process smoother for automated deployments:

Page 15 / 46
© 2002 – 2013 Jahia Solutions Group SA
Installing Jahia EE v6.6.1.0 on WebSphere 7.0.0.23
Click on “Ok” and then “Save”:
3.4.2.2 Data source creation
You are now ready to create your data source. The Jahia application requires it to have JNDI name
jdbc/jahia.
Open Resources / JDBC / Data sources
Specify Server scope

Page 16 / 46
© 2002 – 2013 Jahia Solutions Group SA
Installing Jahia EE v6.6.1.0 on WebSphere 7.0.0.23
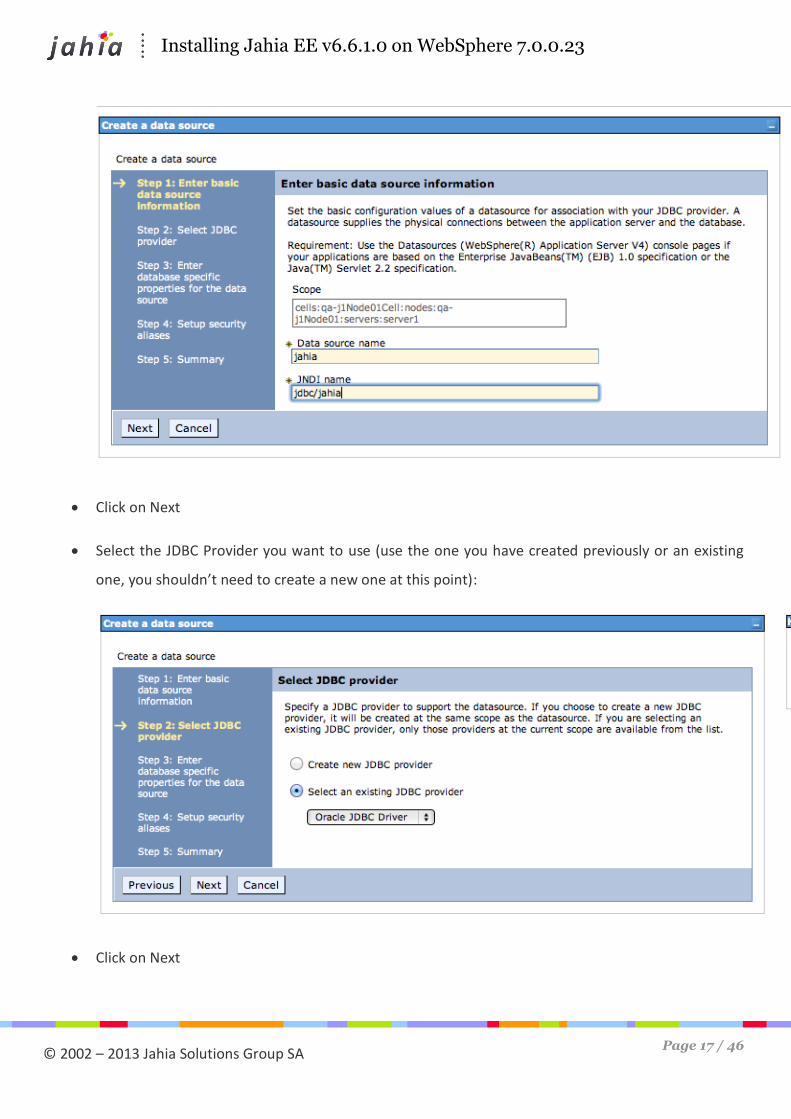
Click on “New…”
Specify an explicit name for your Data source, specify the required JNDI name “jdbc/Jahia”, and
select your previously defined authentication alias:
Page 17 / 46
© 2002 – 2013 Jahia Solutions Group SA
Installing Jahia EE v6.6.1.0 on WebSphere 7.0.0.23
Click on Next
Select the JDBC Provider you want to use (use the one you have created previously or an existing
one, you shouldn’t need to create a new one at this point):
Click on Next

Page 18 / 46
© 2002 – 2013 Jahia Solutions Group SA
Installing Jahia EE v6.6.1.0 on WebSphere 7.0.0.23
Fill in the next screen with your URL to your database, select the appropriate helper for your Oracle
version and make sure you uncheck the “Use this data source in container managed persistence
(CMP)” option.
Click on Next

Page 19 / 46
© 2002 – 2013 Jahia Solutions Group SA
Installing Jahia EE v6.6.1.0 on WebSphere 7.0.0.23
Select the Auth alias we created previously in the “Component-managed authentication alias”
drop-down, it should be named jahiaJ2CAuthAlias:
Click on “Next”
Your summary screen should look like this:
If everything looks ok, click on “Finish”, otherwise use the “Previous” button to perform the necessary
changes.
Page 20 / 46
© 2002 – 2013 Jahia Solutions Group SA
Installing Jahia EE v6.6.1.0 on WebSphere 7.0.0.23
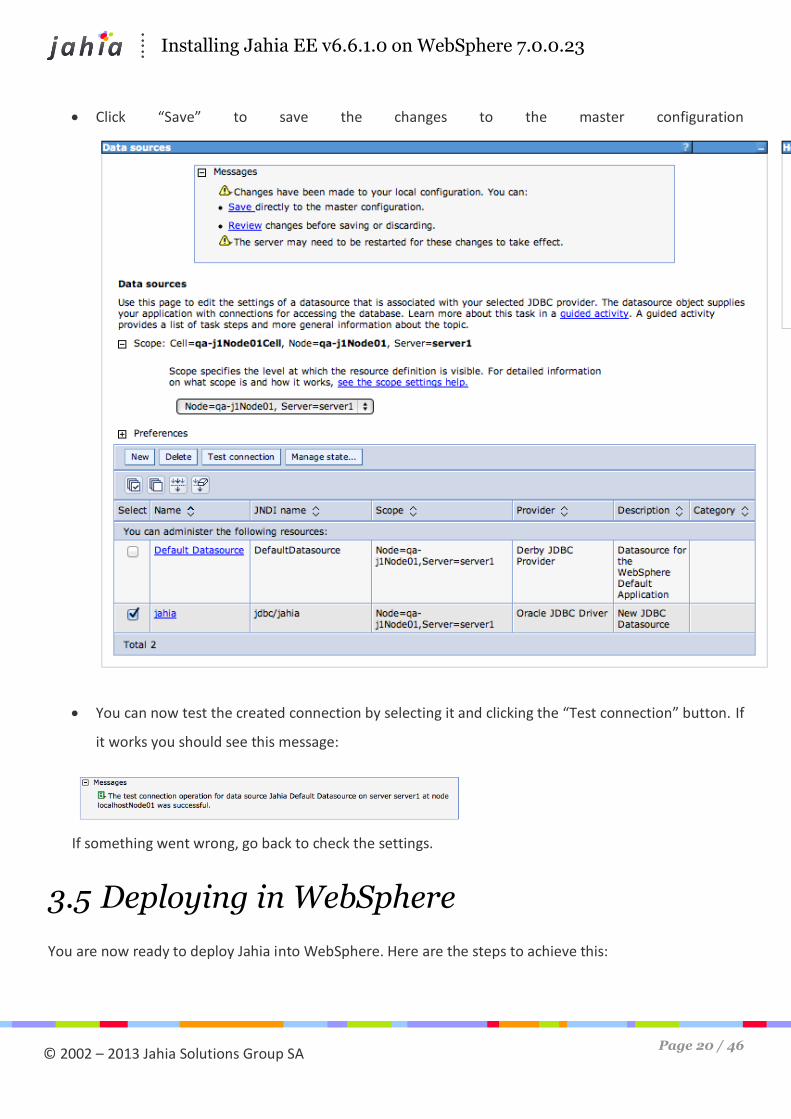
Click “Save” to save the changes to the master configuration
You can now test the created connection by selecting it and clicking the “Test connection” button. If
it works you should see this message:
If something went wrong, go back to check the settings.
3.5 Deploying in WebSphere
You are now ready to deploy Jahia into WebSphere. Here are the steps to achieve this:
Page 21 / 46
© 2002 – 2013 Jahia Solutions Group SA
Installing Jahia EE v6.6.1.0 on WebSphere 7.0.0.23
1. Important: if you deploy Jahia in the root context, and if you have kept the “Default application”
installed by WebSphere when creating your WebSphere profile, remove it from the server, as it
will interfere with the installation.
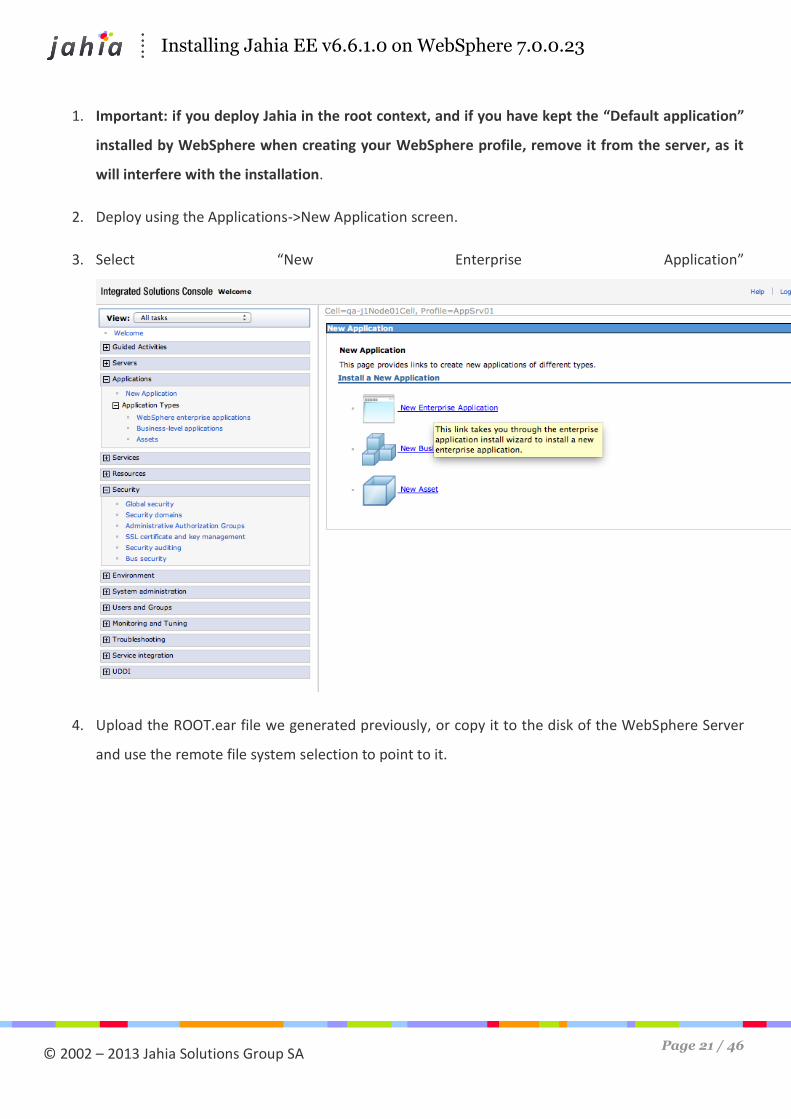
2. Deploy using the Applications->New Application screen.
3. Select “New Enterprise Application”
4. Upload the ROOT.ear file we generated previously, or copy it to the disk of the WebSphere Server
and use the remote file system selection to point to it.

Page 22 / 46
© 2002 – 2013 Jahia Solutions Group SA
Installing Jahia EE v6.6.1.0 on WebSphere 7.0.0.23
5. Click “Next”
6. Selected “Detailed” and then click “Next”:
Page 23 / 46
© 2002 – 2013 Jahia Solutions Group SA
Installing Jahia EE v6.6.1.0 on WebSphere 7.0.0.23
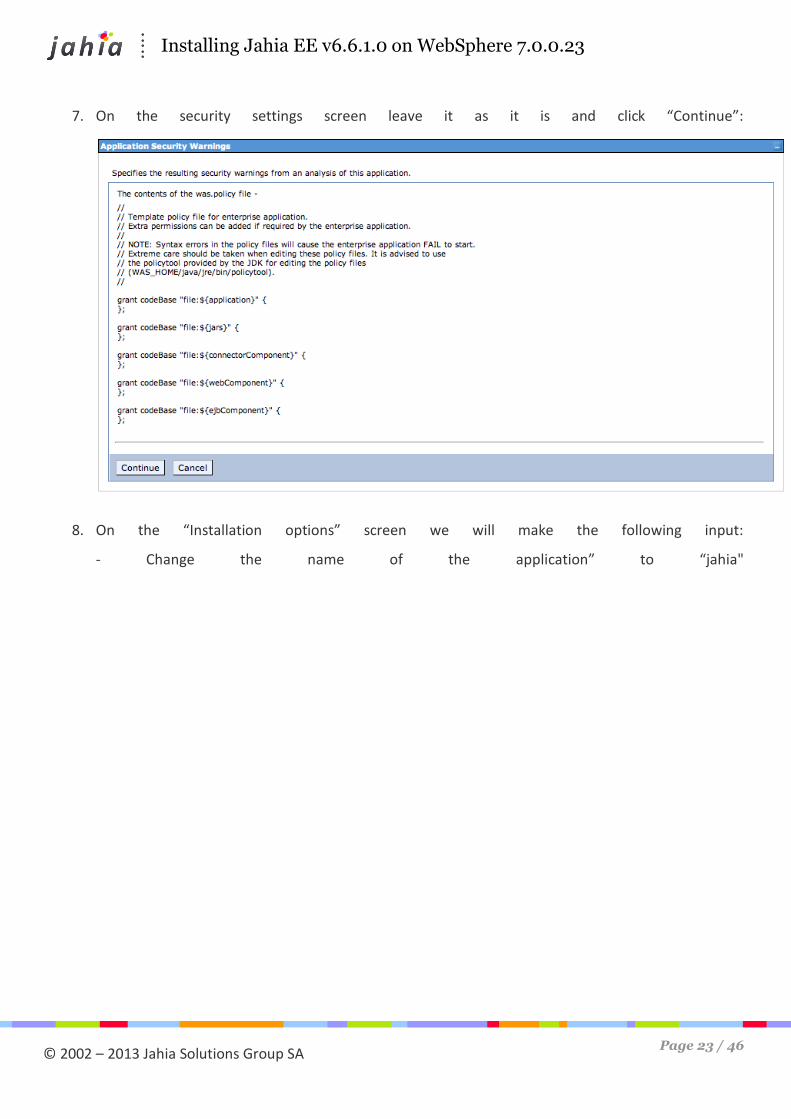
7. On the security settings screen leave it as it is and click “Continue”:
8. On the “Installation options” screen we will make the following input:
- Change the name of the application” to “jahia"

Page 24 / 46
© 2002 – 2013 Jahia Solutions Group SA
Installing Jahia EE v6.6.1.0 on WebSphere 7.0.0.23
Leave all the rest at the default values, you should have the following settings:
9. Click “Next”

Page 25 / 46
© 2002 – 2013 Jahia Solutions Group SA
Installing Jahia EE v6.6.1.0 on WebSphere 7.0.0.23
10. On the “Map modules to servers” screen don’t change anything simply click “Next”
11. On the “Provide JSP reloading options for Web modules” screen change the default value of 60
seconds to 120 seconds as Jahia has a lot of JSPs and scanning them too often is not a good idea (on

Page 26 / 46
© 2002 – 2013 Jahia Solutions Group SA
Installing Jahia EE v6.6.1.0 on WebSphere 7.0.0.23
production servers it is even recommended to set value higher):
12. Click “Next”
13. On the “Map shared libraries” screen, check the checkbox next to the “jahia” application :
and then click the “Reference shared libraries” button.
14. On the next screen move the “Jahia shared libraries” from “Available” to “Selected” by clicking on
the right arrow:

Page 27 / 46
© 2002 – 2013 Jahia Solutions Group SA
Installing Jahia EE v6.6.1.0 on WebSphere 7.0.0.23
and then click “Ok”
15. Your screen should now look like this:
You can then click “Next”.

Page 28 / 46
© 2002 – 2013 Jahia Solutions Group SA
Installing Jahia EE v6.6.1.0 on WebSphere 7.0.0.23
16. On the “Map shared library relationships” screen, leave everything as it is and click “Next”:
Page 29 / 46
© 2002 – 2013 Jahia Solutions Group SA
Installing Jahia EE v6.6.1.0 on WebSphere 7.0.0.23
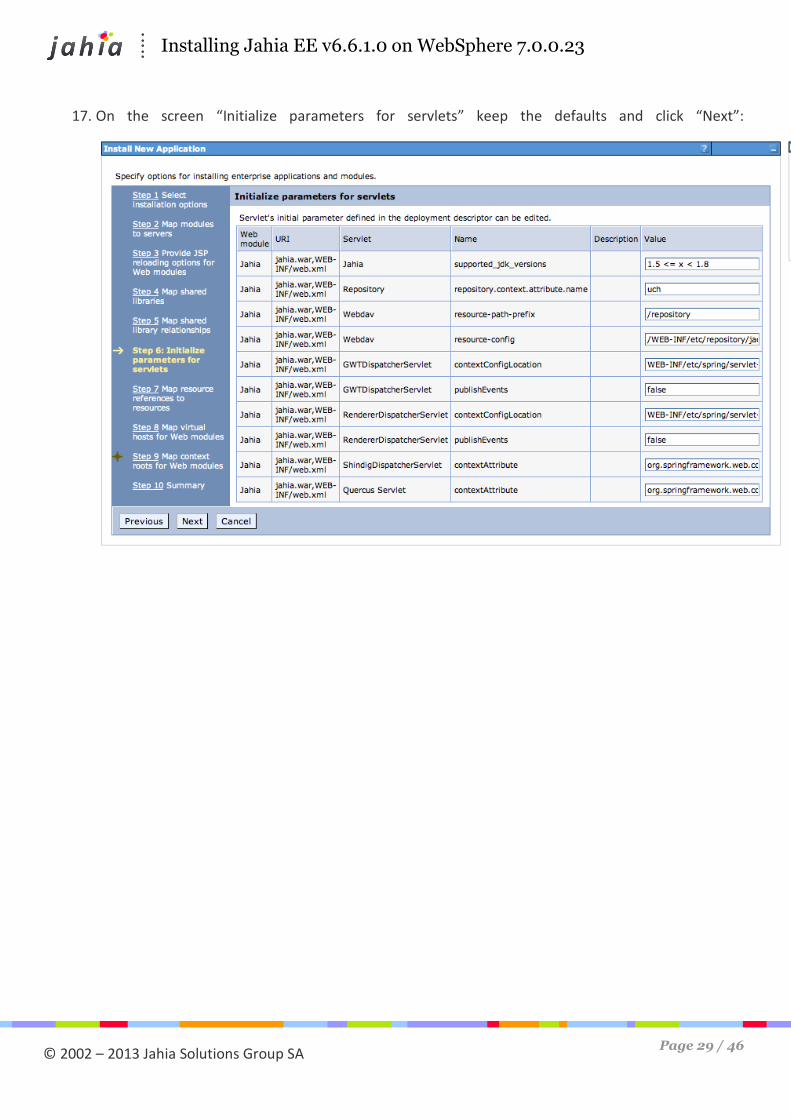
17. On the screen “Initialize parameters for servlets” keep the defaults and click “Next”:

Page 30 / 46
© 2002 – 2013 Jahia Solutions Group SA
Installing Jahia EE v6.6.1.0 on WebSphere 7.0.0.23
18. On the screen “Map resource references to resources” select the checkbox and click the “Modify
resource authentication method”:
19. A sub-screen to select the authentication method will appear. Select the “Use default method”
radio button and select the Authentication alias we have setup previously. Once that is done, click
the “Apply” button (make sure you had checked the checkbox next to the “Jahia” module in the
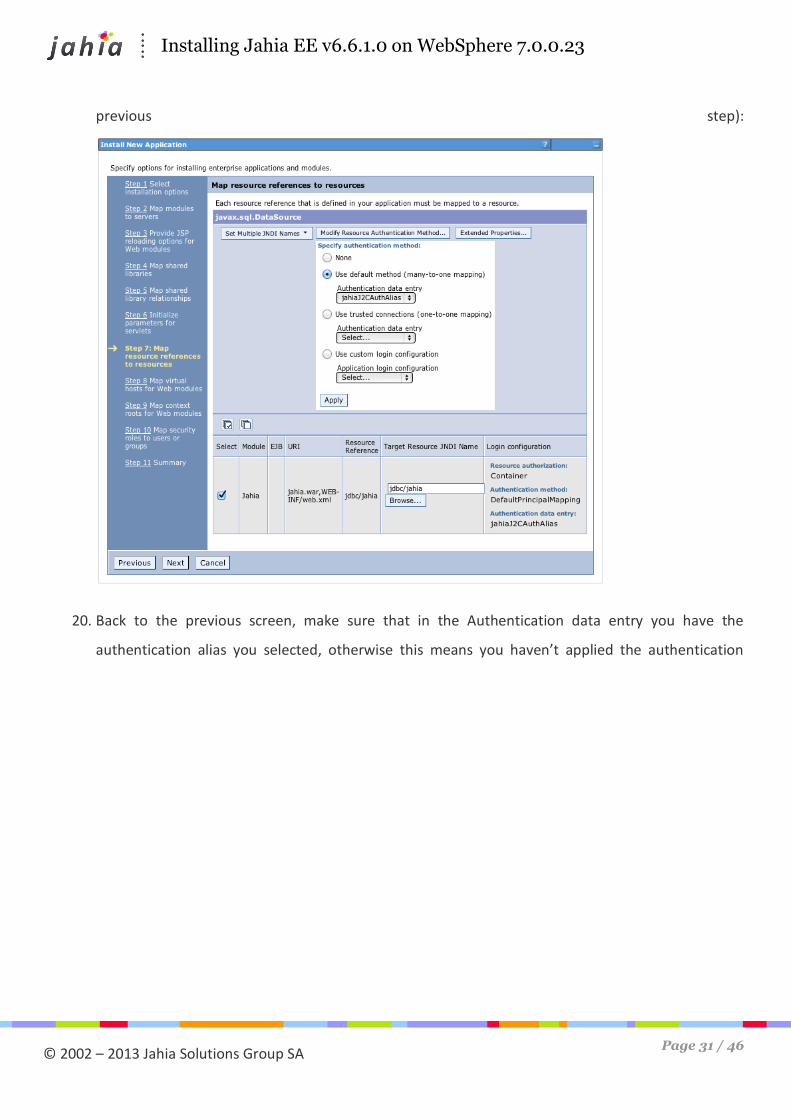
Page 31 / 46
© 2002 – 2013 Jahia Solutions Group SA
Installing Jahia EE v6.6.1.0 on WebSphere 7.0.0.23
previous step):
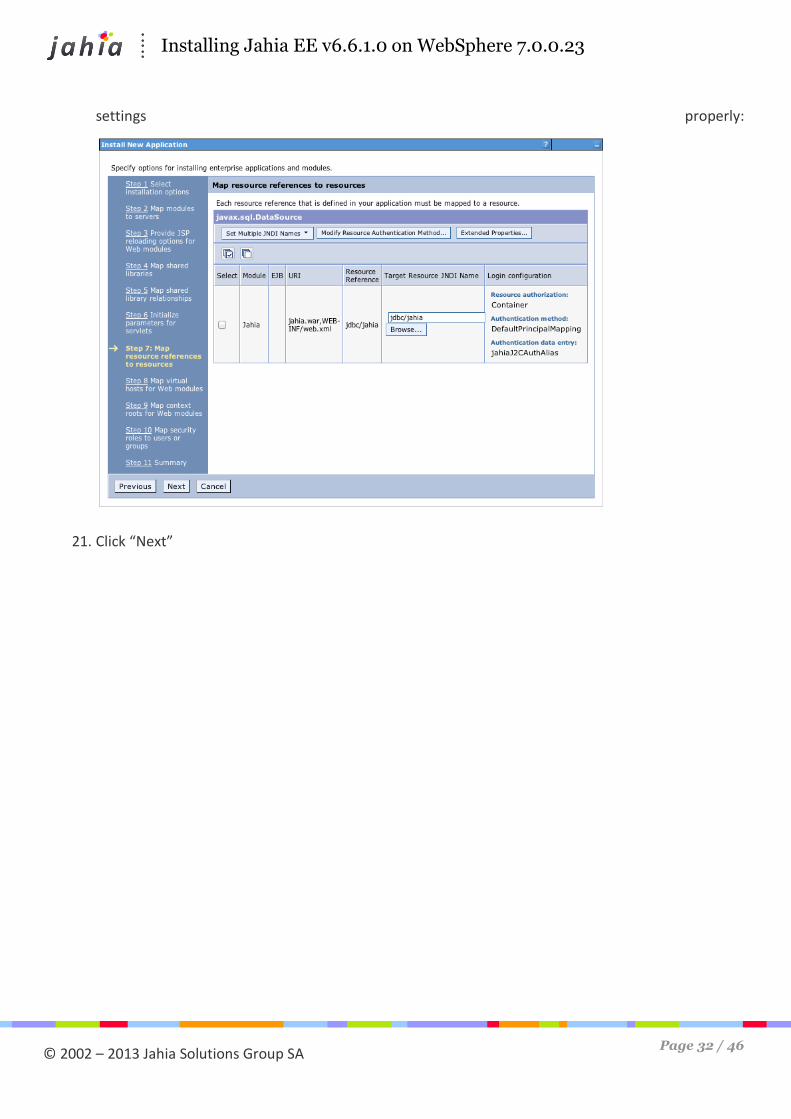
20. Back to the previous screen, make sure that in the Authentication data entry you have the
authentication alias you selected, otherwise this means you haven’t applied the authentication
Page 32 / 46
© 2002 – 2013 Jahia Solutions Group SA
Installing Jahia EE v6.6.1.0 on WebSphere 7.0.0.23
settings properly:
21. Click “Next”
Page 33 / 46
© 2002 – 2013 Jahia Solutions Group SA
Installing Jahia EE v6.6.1.0 on WebSphere 7.0.0.23
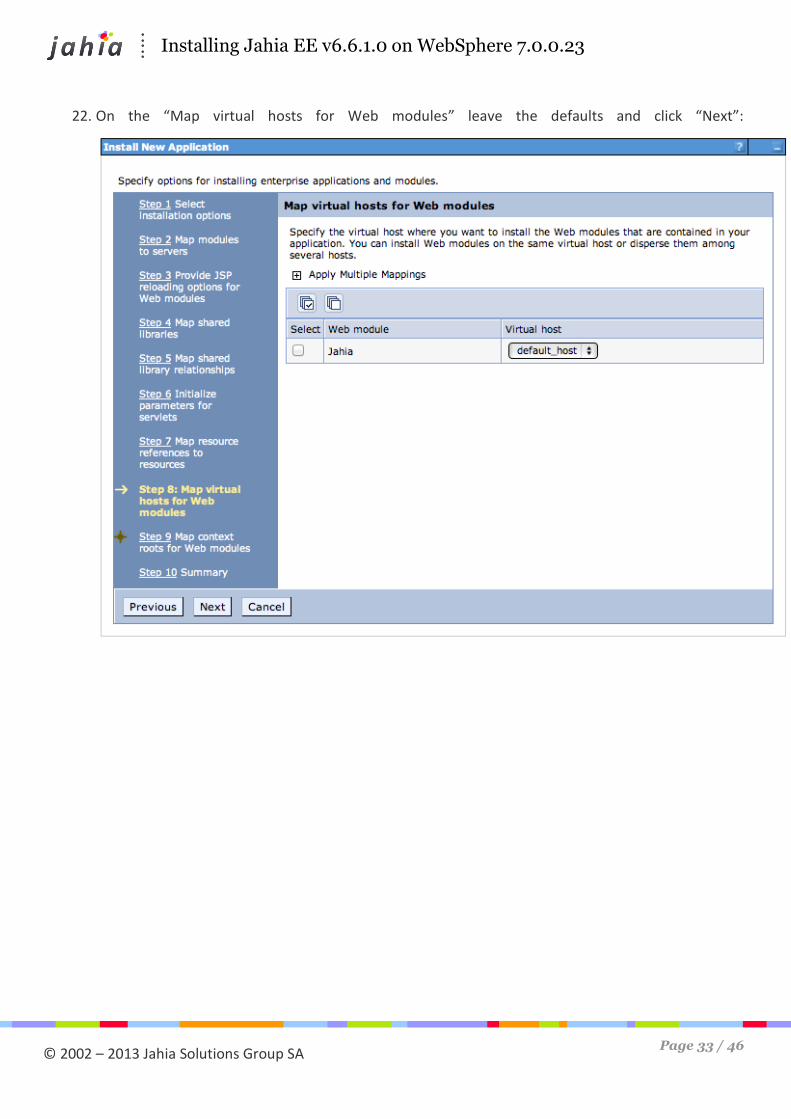
22. On the “Map virtual hosts for Web modules” leave the defaults and click “Next”:

Page 34 / 46
© 2002 – 2013 Jahia Solutions Group SA
Installing Jahia EE v6.6.1.0 on WebSphere 7.0.0.23
23. On the “Map context roots for Web modules” make sure the Context root that is selected
corresponds to the one you have used when setting up Jahia with the installer:
24. Click “Next”

Page 35 / 46
© 2002 – 2013 Jahia Solutions Group SA
Installing Jahia EE v6.6.1.0 on WebSphere 7.0.0.23
25. Your summary should look like this:
26. If all is ok, click “Finish”. This step might take some time to complete, that’s normal since it is
actually unpacking the application.
Page 36 / 46
© 2002 – 2013 Jahia Solutions Group SA
Installing Jahia EE v6.6.1.0 on WebSphere 7.0.0.23
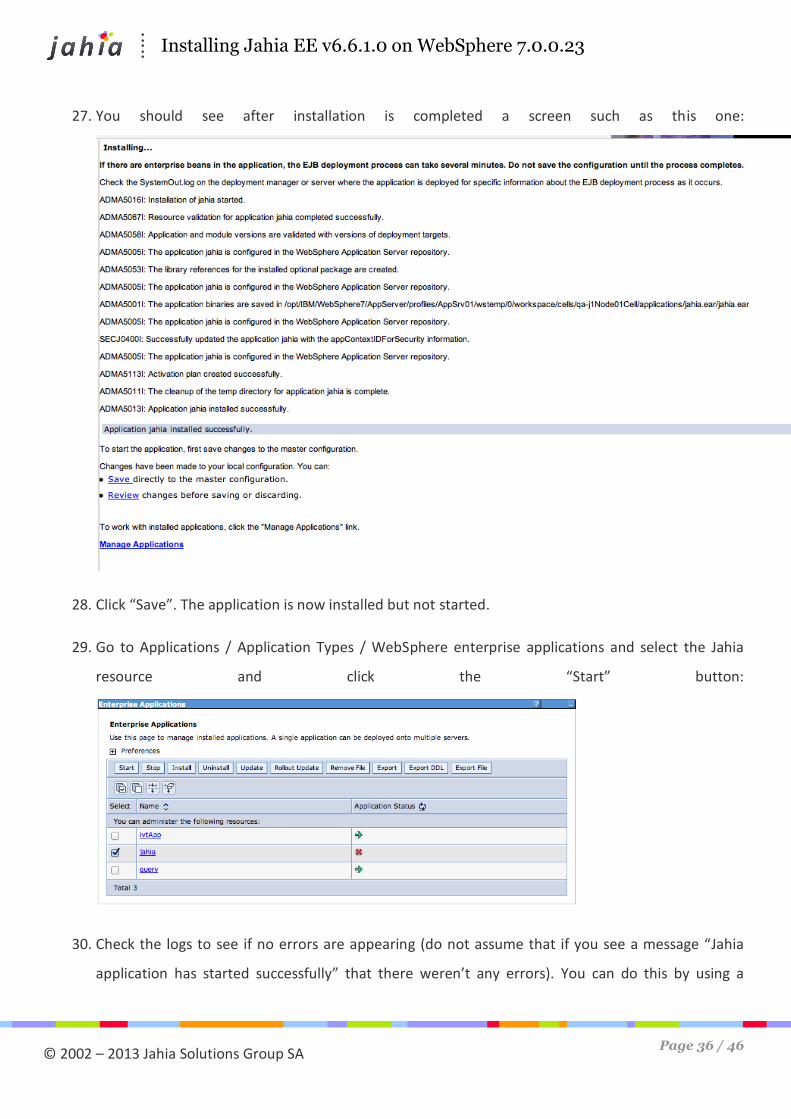
27. You should see after installation is completed a screen such as this one:
28. Click “Save”. The application is now installed but not started.
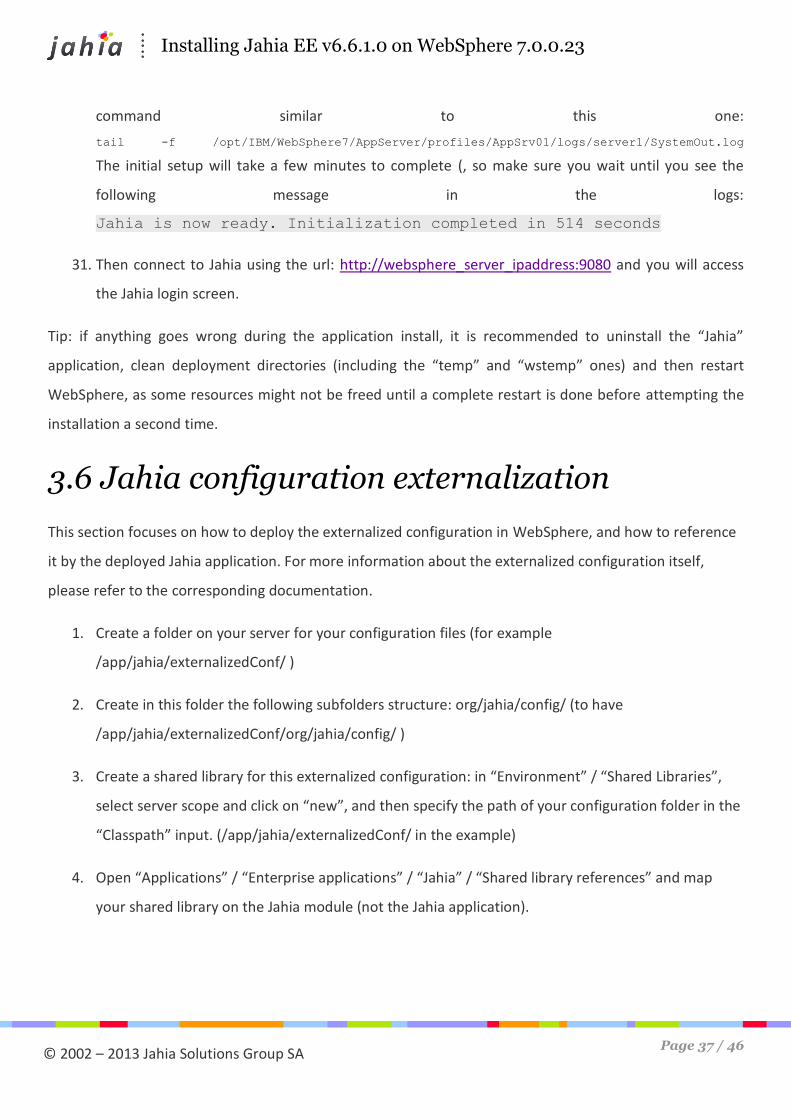
29. Go to Applications / Application Types / WebSphere enterprise applications and select the Jahia
resource and click the “Start” button:
30. Check the logs to see if no errors are appearing (do not assume that if you see a message “Jahia
application has started successfully” that there weren’t any errors). You can do this by using a
Page 37 / 46
© 2002 – 2013 Jahia Solutions Group SA
Installing Jahia EE v6.6.1.0 on WebSphere 7.0.0.23
command similar to this one:
tail -f /opt/IBM/WebSphere7/AppServer/profiles/AppSrv01/logs/server1/SystemOut.log
The initial setup will take a few minutes to complete (, so make sure you wait until you see the
following message in the logs:
Jahia is now ready. Initialization completed in 514 seconds
31. Then connect to Jahia using the url: http://websphere_server_ipaddress:9080 and you will access
the Jahia login screen.
Tip: if anything goes wrong during the application install, it is recommended to uninstall the “Jahia”
application, clean deployment directories (including the “temp” and “wstemp” ones) and then restart
WebSphere, as some resources might not be freed until a complete restart is done before attempting the
installation a second time.
3.6 Jahia configuration externalization
This section focuses on how to deploy the externalized configuration in WebSphere, and how to reference
it by the deployed Jahia application. For more information about the externalized configuration itself,
please refer to the corresponding documentation.
1. Create a folder on your server for your configuration files (for example
/app/jahia/externalizedConf/ )
2. Create in this folder the following subfolders structure: org/jahia/config/ (to have
/app/jahia/externalizedConf/org/jahia/config/ )
3. Create a shared library for this externalized configuration: in “Environment” / “Shared Libraries”,
select server scope and click on “new”, and then specify the path of your configuration folder in the
“Classpath” input. (/app/jahia/externalizedConf/ in the example)
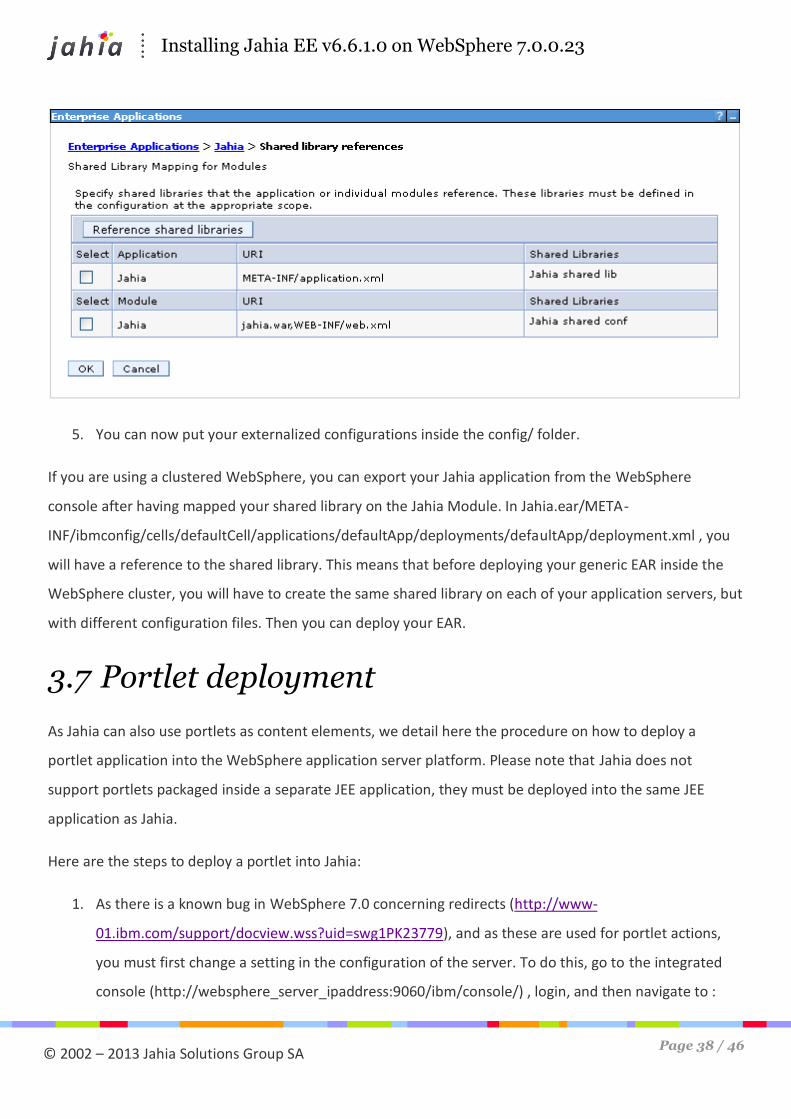
4. Open “Applications” / “Enterprise applications” / “Jahia” / “Shared library references” and map
your shared library on the Jahia module (not the Jahia application).
Page 38 / 46
© 2002 – 2013 Jahia Solutions Group SA
Installing Jahia EE v6.6.1.0 on WebSphere 7.0.0.23
5. You can now put your externalized configurations inside the config/ folder.
If you are using a clustered WebSphere, you can export your Jahia application from the WebSphere
console after having mapped your shared library on the Jahia Module. In Jahia.ear/META-
INF/ibmconfig/cells/defaultCell/applications/defaultApp/deployments/defaultApp/deployment.xml , you
will have a reference to the shared library. This means that before deploying your generic EAR inside the
WebSphere cluster, you will have to create the same shared library on each of your application servers, but
with different configuration files. Then you can deploy your EAR.
3.7 Portlet deployment
As Jahia can also use portlets as content elements, we detail here the procedure on how to deploy a
portlet application into the WebSphere application server platform. Please note that Jahia does not
support portlets packaged inside a separate JEE application, they must be deployed into the same JEE
application as Jahia.
Here are the steps to deploy a portlet into Jahia:
1. As there is a known bug in WebSphere 7.0 concerning redirects (http://www-
01.ibm.com/support/docview.wss?uid=swg1PK23779), and as these are used for portlet actions,
you must first change a setting in the configuration of the server. To do this, go to the integrated
console (http://websphere_server_ipaddress:9060/ibm/console/) , login, and then navigate to :
Page 39 / 46
© 2002 – 2013 Jahia Solutions Group SA
Installing Jahia EE v6.6.1.0 on WebSphere 7.0.0.23
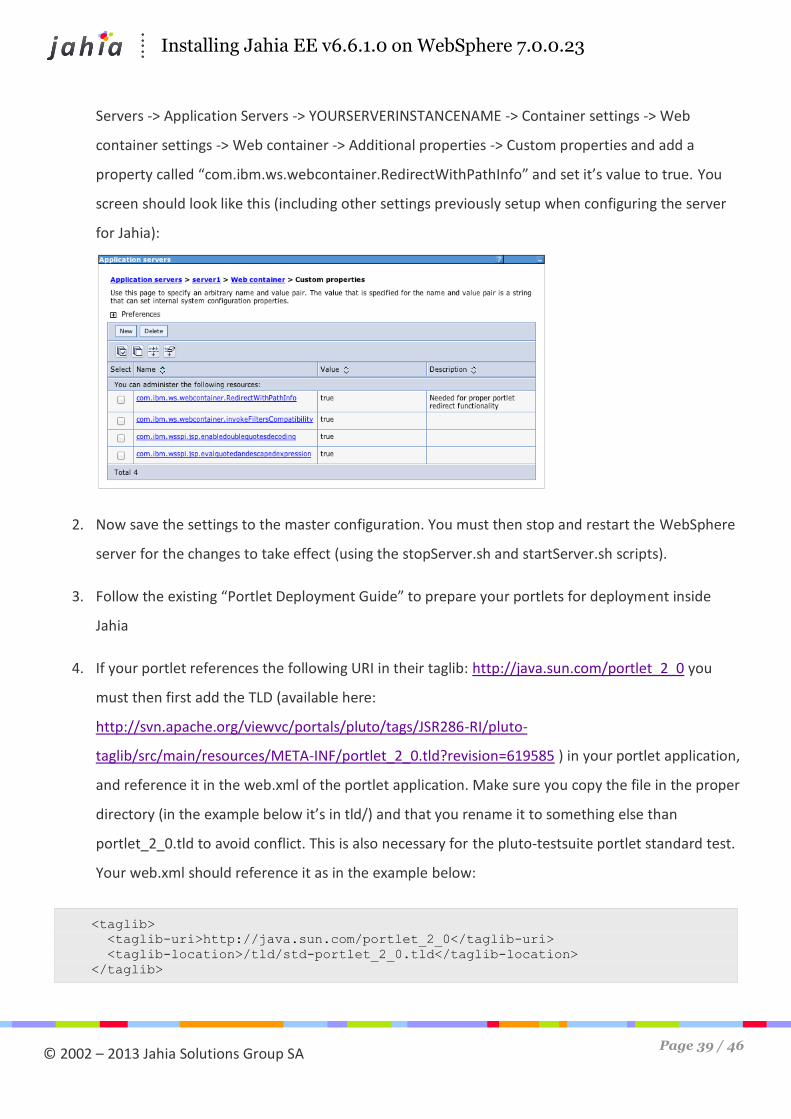
Servers -> Application Servers -> YOURSERVERINSTANCENAME -> Container settings -> Web
container settings -> Web container -> Additional properties -> Custom properties and add a
property called “com.ibm.ws.webcontainer.RedirectWithPathInfo” and set it’s value to true. You
screen should look like this (including other settings previously setup when configuring the server
for Jahia):
2. Now save the settings to the master configuration. You must then stop and restart the WebSphere
server for the changes to take effect (using the stopServer.sh and startServer.sh scripts).
3. Follow the existing “Portlet Deployment Guide” to prepare your portlets for deployment inside
Jahia
4. If your portlet references the following URI in their taglib: http://java.sun.com/portlet_2_0 you
must then first add the TLD (available here:
http://svn.apache.org/viewvc/portals/pluto/tags/JSR286-RI/pluto-
taglib/src/main/resources/META-INF/portlet_2_0.tld?revision=619585 ) in your portlet application,
and reference it in the web.xml of the portlet application. Make sure you copy the file in the proper
directory (in the example below it’s in tld/) and that you rename it to something else than
portlet_2_0.tld to avoid conflict. This is also necessary for the pluto-testsuite portlet standard test.
Your web.xml should reference it as in the example below:
<taglib>
<taglib-uri>http://java.sun.com/portlet_2_0</taglib-uri>
<taglib-location>/tld/std-portlet_2_0.tld</taglib-location>
</taglib>
Page 40 / 46
© 2002 – 2013 Jahia Solutions Group SA
Installing Jahia EE v6.6.1.0 on WebSphere 7.0.0.23
5. Add to the beginning of the web.xml (in the context-param section) file included in the portlet
application the following lines:
<context-param>
<param-name>com.ibm.websphere.portletcontainer.PortletDeploymentEnabled</param-
name>
<param-value>false</param-value>
</context-param>
6. We strongly recommended that you pass your web.xml and portlet.xml files in a XSD validator
before deploying on WebSphere, this will prevent any problems that may be due to a syntax error.
You can use any online XSD validator such as http://www.xmlforasp.net/schemavalidator.aspx
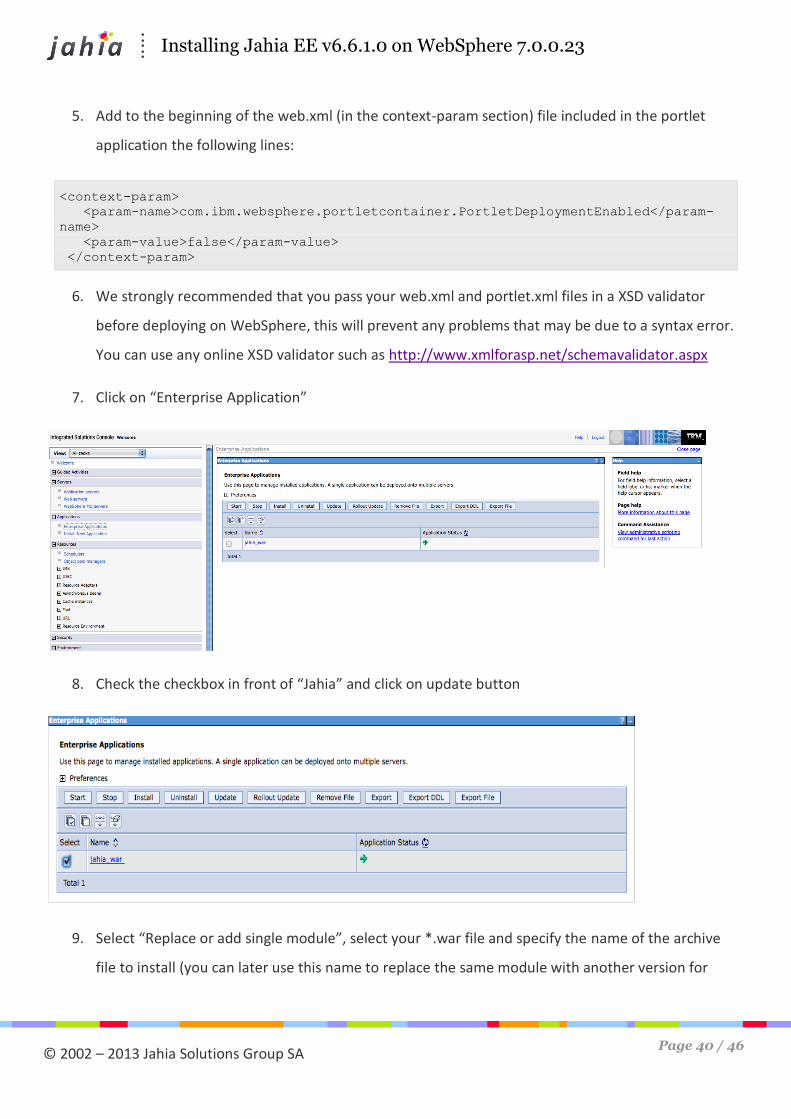
7. Click on “Enterprise Application”
8. Check the checkbox in front of “Jahia” and click on update button
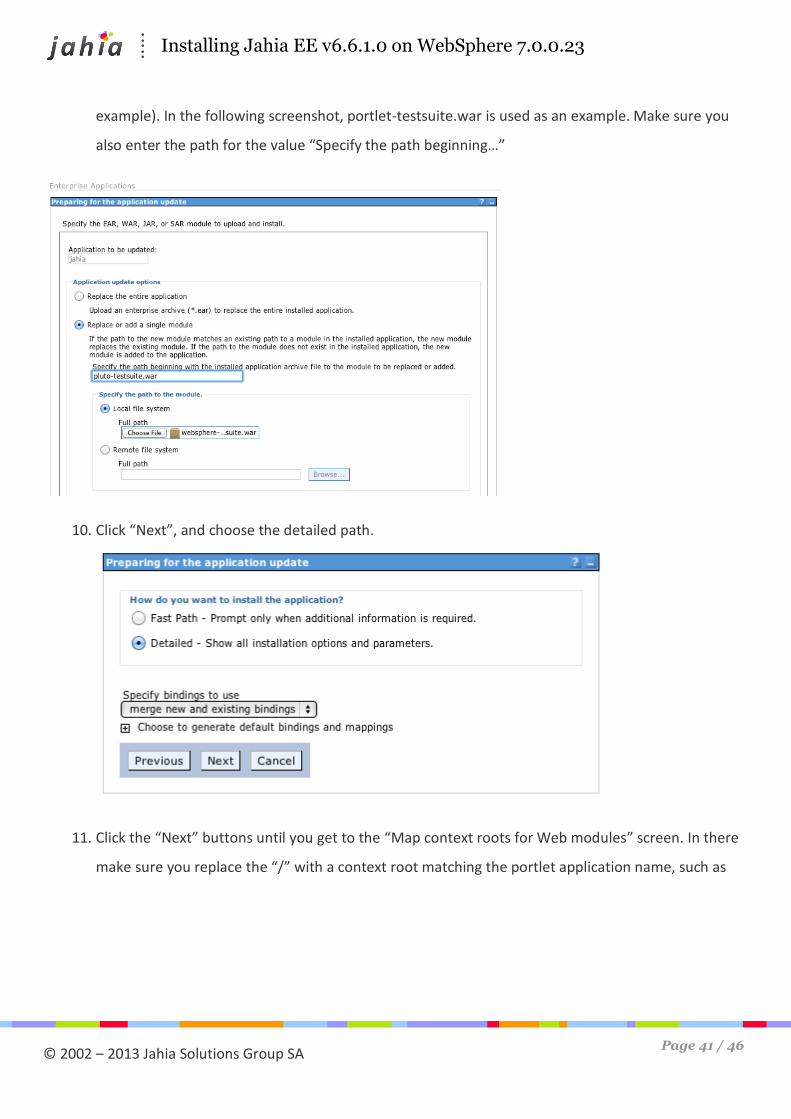
9. Select “Replace or add single module”, select your *.war file and specify the name of the archive
file to install (you can later use this name to replace the same module with another version for
Page 41 / 46
© 2002 – 2013 Jahia Solutions Group SA
Installing Jahia EE v6.6.1.0 on WebSphere 7.0.0.23
example). In the following screenshot, portlet-testsuite.war is used as an example. Make sure you
also enter the path for the value “Specify the path beginning…”
10. Click “Next”, and choose the detailed path.
11. Click the “Next” buttons until you get to the “Map context roots for Web modules” screen. In there
make sure you replace the “/” with a context root matching the portlet application name, such as

Page 42 / 46
© 2002 – 2013 Jahia Solutions Group SA
Installing Jahia EE v6.6.1.0 on WebSphere 7.0.0.23
“pluto-testsuite” in our example.
12. Your summary screen should look like this:
13. Click on “Finish” and “Save” link.
14. In Jahia, go into the “Manage Portlets” screen that will trigger an internal sync with the server. Your
portlet application should then appear and you can use it within the server.
Page 43 / 46
© 2002 – 2013 Jahia Solutions Group SA
Installing Jahia EE v6.6.1.0 on WebSphere 7.0.0.23
4 Debugging in WebSphere
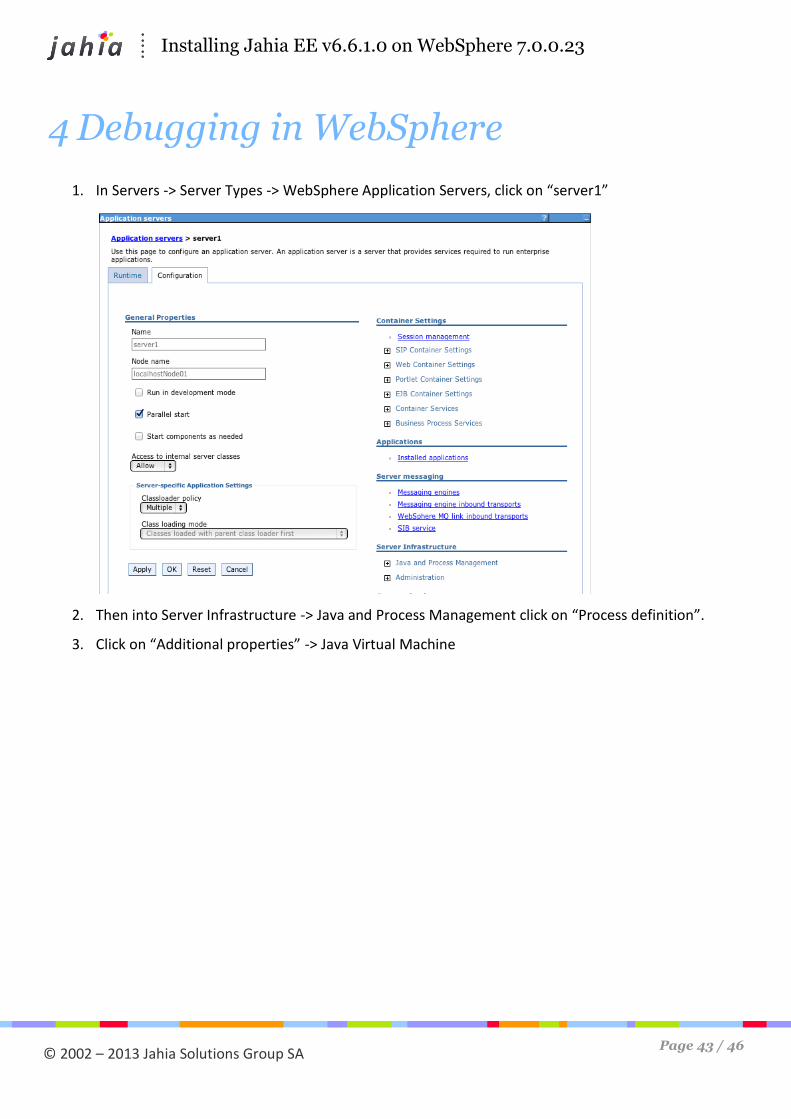
1. In Servers -> Server Types -> WebSphere Application Servers, click on “server1”
2. Then into Server Infrastructure -> Java and Process Management click on “Process definition”.
3. Click on “Additional properties” -> Java Virtual Machine

Page 44 / 46
© 2002 – 2013 Jahia Solutions Group SA
Installing Jahia EE v6.6.1.0 on WebSphere 7.0.0.23
4. Check the “Debug mode” checkbox and make sure that the port in the debug arguments is set to
7777
5. Click on “OK”
6. Save to the master configuration
7. Restart WebSphere. When running in debug mode JVM execution can be much slower!
8. In your IDE, do NOT use the WebSphere integration, simply setup a Java remote debugging session
on port 7777.

Page 45 / 46
© 2002 – 2013 Jahia Solutions Group SA
Installing Jahia EE v6.6.1.0 on WebSphere 7.0.0.23
9. Here is an example of a remote debugging configuration in Intellij IDEA:

Jahia Solutions Group SA
9 route des Jeunes, CH-1227 Les acacias Geneva, Switzerland
http://www.jahia.com