inquiry-based science education: applying it in the ... · guide for teachers final inquiry-based...
TRANSCRIPT

Guide for teachers final
Inquiry-Based Science Education: Applying it in the Classroom
Methodological Guide
Edith Saltiel 1
Preamble:
Out of the twelve European countries taking part in the Pollen project, some have been experimenting
with inquiry-based science education in primary school for several years now, while others have
chosen to develop research on the form of education itself. The experience gained on both sides,
obstacles encountered and research findings can only be helpful to all of the countries involved in the
project. This document, intended for primary education teachers in all twelve countries, aims to help
set up this form of education, clearly defining what inquiry-based science education entails and
offering tools derived from those created by certain countries.
I. Basic principles behind the inquiry-based approach
1 The need to take ownership of the initial question
In order for a child to actually aim to solve a problem, the problem needs to have a meaning for the
child, and he or she needs to have taken part, to whatever extent possible, in developing it; in short, the
problem needs to become the child’s own, so that he or she has the desire to solve it.
Imagine that a teacher wants children to work on hourglasses (observing, understanding, building, etc.)
and try to identify the parameters that determine how long the sand will take to fall. Several different
options exist:
a) The teacher shows the students an hourglass and states that the time required for the sand to
run out depends on […] and that the students are going to be able to see this for themselves. This
method is akin to the traditional, so-called lecture-type format, in which the teacher is content to
pronounce results, and it is worlds away from an inquiry-based approach.
b) The students observe, draw and describe an hourglass set on the teacher’s desk, then the
teacher asks them what factors determine how long it takes for the sand to run out. This question is
meaningful to most of the students, but not to all of them.
c) After having observed an hourglass, the teacher asks the students how to increase or
decrease the time required for the sand to run out. Here, the child starts to come up with questions as
he or she looks for a way to make something happen.
d) The teacher sets out at least three hourglasses, one of which takes much more time than the
others to run out of sand. The students, divided into groups, observe, draw and describe the hourglass
they have in front of them. Considering the distinctive features of the hourglasses set before them, one
will continue to have sand running, while the others will have stopped. The children will take notice of
this and instinctively wonder what makes that hourglass run longer. This is one way (though not the
only one) to have children take ownership of a problem.
1 The author is grateful to Jean-Pierre Sarmant for his comments and suggestions. His expertise contributed unique and
invaluable support for the preparation of this document.
2 The need for individual experimentation
Experimentation here does not mean complicated experiments involving sophisticated and costly
equipment. The reader will see that the experiments listed are in fact very simple and require nothing
more than ordinary, inexpensive equipment. The sample activities listed on the Pollen site are a good
example of what can be done by children.
Children have very good recollection of the experiments they conduct themselves. In addition, very
early on, they have ideas about a number of phenomena. Most often, it is not enough to tell them that a
given experiment will yield a given outcome (without doing the experiment or just showing it to
them), or to tell them that what they think is full of mistakes. They need to reach this realisation
themselves, hence the need to let them test the experiments they have come up with themselves
(provided that this can be done in a classroom setting) and let them substantiate their methods amongst
themselves. Here are two examples:
a) In the hourglass example, the children might consider the amount of sand, the width of
the glass, the size of the sand particles, the size of the hourglass, the presence of certain colour
additives, etc. There is nothing quite like leaving the children to carry out the experiments themselves
so that they realise they can achieve useable results only if they adjust one parameter at a time
(keeping the others constant) and that, taking that into consideration, the size of the hourglass does not
play an important part.
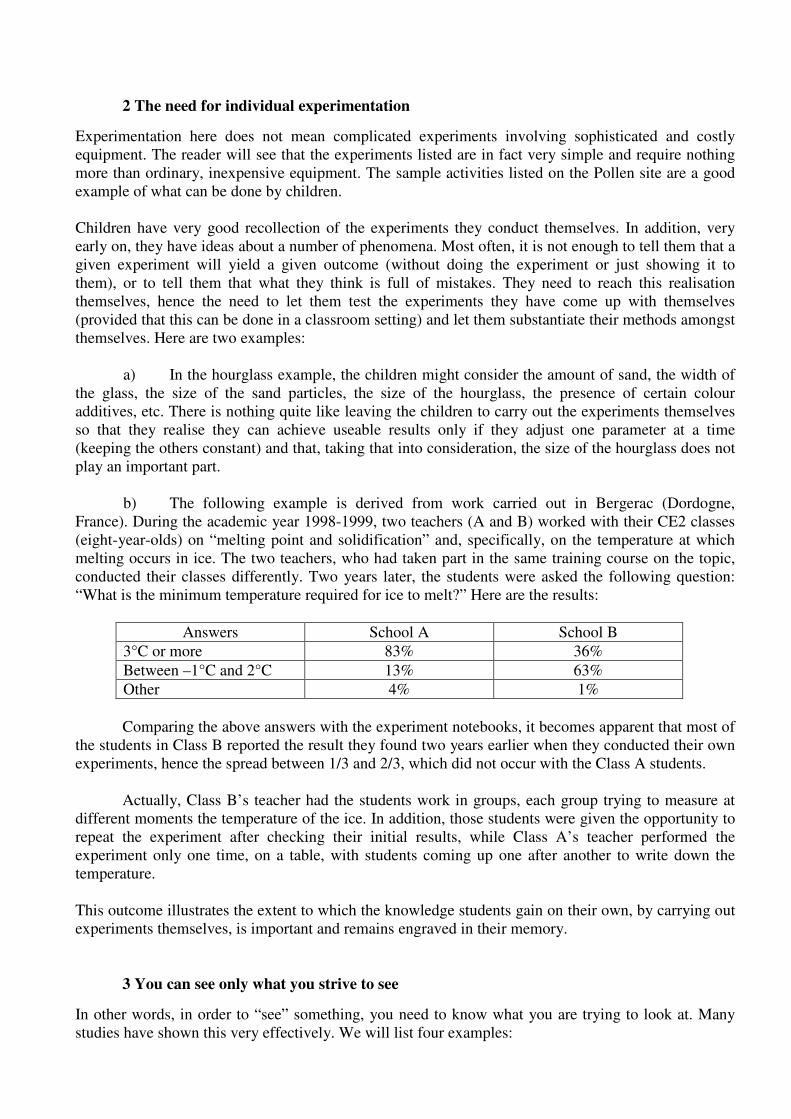
b) The following example is derived from work carried out in Bergerac (Dordogne,
France). During the academic year 1998-1999, two teachers (A and B) worked with their CE2 classes
(eight-year-olds) on “melting point and solidification” and, specifically, on the temperature at which
melting occurs in ice. The two teachers, who had taken part in the same training course on the topic,
conducted their classes differently. Two years later, the students were asked the following question:
“What is the minimum temperature required for ice to melt?” Here are the results:
Answers School A School B
3°C or more 83% 36%
Between –1°C and 2°C 13% 63%
Other 4% 1%
Comparing the above answers with the experiment notebooks, it becomes apparent that most of
the students in Class B reported the result they found two years earlier when they conducted their own
experiments, hence the spread between 1/3 and 2/3, which did not occur with the Class A students.
Actually, Class B’s teacher had the students work in groups, each group trying to measure at
different moments the temperature of the ice. In addition, those students were given the opportunity to
repeat the experiment after checking their initial results, while Class A’s teacher performed the
experiment only one time, on a table, with students coming up one after another to write down the
temperature.
This outcome illustrates the extent to which the knowledge students gain on their own, by carrying out
experiments themselves, is important and remains engraved in their memory.
3 You can see only what you strive to see
In other words, in order to “see” something, you need to know what you are trying to look at. Many
studies have shown this very effectively. We will list four examples:

- The first involves a future primary school teacher who, in her last year of training, was asked to
write a paper on the education-related topic of her choice. She chose the subject “observation”,
recalling her own experience as a student. During a school field trip, she had been instructed to
find fossils. She came back empty-handed because she did not know what she was supposed to
look for, having no idea what a fossil might be.
- The second involves a teacher2 who wanted to show the children that a candle placed under a
bowl would burn longer if the bowl was larger. The teacher took three bowls of different sizes
and explained to the children how to put them over the candles at the same time. Everything
went well. Yet, when the teacher asked them what difference they had noticed between the
bowls, he was disappointed to hear them say: “None. They were all the same. All of the candles
went out”. Clearly, not a single a child had noticed what the teacher had hoped they would see.
The students would have reacted differently had they first noted that the candle went out, then
observed the three bowls, each over a candle, and been instructed to note whether the three
candles went out at the same time.
- The third is not really specific to primary school children. Many adults have seen and
marvelled at rainbows. If you ask them what order the colours are in, only a very small
percentage will tell you that the colours are inverted. It is not enough to look; you also have to
know what you are trying to see.
- The fourth has to do with the history of science, which abounds in similar examples. For
instance, the notes left by Ampere and Arago3
state that current flowed through their measuring
device (measuring electrical intensity, an instrument now known as the amperometer) when
they put a coil carrying electrical current next to another coil, not connected to a generator.
They did not “see” the currents, as they were transitory (meaning they disappeared when the
coil was no longer being moved) and the phenomenon they were trying to show, or so they
thought, was supposed to occur as a permanent current. They let Faraday, nearly ten years later,
enjoy the glory of discovering the phenomenon of electromagnetic induction.
4 A great deal of information can be found in documentation, but it can be found even
more easily by those who know what they are looking for
To illustrate this point, let us look at what happened in one classroom: On that day, the subject was
bones. During the previous session, the teacher had handed each student a sheet of A4 paper with the
outline of a human body, and each student had to draw the bones as he or she imagined them.
During the session, the students were divided into groups of four. A sheet of paper (A3, with the
outline of a body) was given to each group so that the group could draw, in a certain colour (red, for
instance) the bones that all of the group’s members agreed existed, and in another colour (blue, for
instance), those on which disagreement remained.
Once this was done, each drawing was posted on the board and the teacher displayed a new body
outline (A0). The entire class began talking and drawing, in red, the bones on which everyone agreed.
2 Harlen W., Jos Elstgeest, Sheila Jelly, Primary Science: Taking the Plunge – Vol 2. Heinemann eds, UK., 2001, 160pp ou
W. Harlen, 2004. Enseigner les sciences : comment faire ? - Collection La main à la pâte, Le Pommier Eds, 220 pp. 3 André-Marie Ampère (1775-1836) French physician, chemist, biologist and mathematician. Having observed the so-
called Oersted Experiment in 1820, in which the needle of a compass is swayed in a different direction when a current runs
through an electrical wire sitting near it, he designed the theory of magnetic fields in a few days: a circuit through which a
current runs will affect a compass in the same way a magnet will, and thereby create a magnetic field. The unit of
measurement for electrical current now uses his name.
François Arago (1786-1853), French physician and astronomer. He made major contributions to developing optics and
electromagnetism.

The areas of disagreement gave rise to specific questions: are teeth bones? How many bones are there
in the spinal cord? (this question arose because some children thought that the spinal cord was made
up of a single bone, but others pointed out that, if that were the case, it would be impossible to bend
over to pick up a pencil on the ground). Once this entire process was completed, specific questions
emerged and the children went to find answers in their books, knowing full well what they were after.
5 Learning is not only acting on and with objects, it is also talking with other children and
writing both for oneself and for others
There is little use in dwelling on this final point as we will have an opportunity to come back to it.
Suffice it to say here that learning something by heart is not enough to solve problems and, in many
cases, it is by trying to convey one’s viewpoint that one finds answers to one’s questions. Who has not
come up against a problem and, in trying to explain it to a third party, found part of the solution?
II. Unity and variety in the inquiry-based approach4
- Unity: one essential feature of this type of education is not to instruct only the results of
science, but allow children to build up the knowledge desired by helping them express their ideas,
expose their reasoning, test their hypotheses and strive to be exacting. This type of approach is built
around the questions that students may raise about the real world. It causes them to gain knowledge
and know-how, as a result of inquiry carried out by the students themselves, under their teacher’s
guidance.
- Variety in method: the inquiry performed by the students can be based on a range of methods,
possibly during the same session, such as: direct experimentation, item production (building an object
or model, looking for a technical solution), direct or instrument-assisted observation (not a computer),
document-based research, investigation, production of a radio programme or short film and a tour. The
students do not only observe: they can identify, classify, question, make projections and explain the
reasons for their choices, perform simulations, experiment where appropriate, and record their
observations for later summary.
It goes without saying that the above means for broaching the subject are complementary and are to be
combined as appropriate to the topic of study. However, wherever possible, direct action and
experimentation on the students’ part are to be favoured.
III Inquiry: An iterative process – The step-by-step approach
It is important to ensure that the students understand what is being learned, and keep from a
superficial learning process in which motivation is based on the satisfaction of being rewarded or not,
rather than having the satisfaction of having learned and understood something and, thereby, having
gained knowledge.
The approach as a whole can be summarised in the following excerpt5, which sets out a framework.
However, it is important to note that the framework is not a user’s manual that needs to be followed
step-by-step, but rather a guide designed to help the teacher better position what he or she is doing.
A reasoned inquiry-based approach in science education
1- Based on a functional situation or fortuitous or arranged starting point:
Surprise, curiosity, questioning
⇓⇓⇓⇓
4 « Enseigner les sciences à l’école » 2002. Ministère de l’Education - Académie des sciences, CNDP- Paris, Collection
Ecole, 79 pp. 5 This framework is based on the one set out by Françoise Drouard
Document available online at http://ienpassy.edres74.net/article.php3?id_article=31

Statement of problem to be solved
⇓⇓⇓⇓
2- By reasoning and using available knowledge:
Possible explanations, possible answers, depiction of solutions
⇓⇓⇓⇓
Statement of hypotheses to be tested or, where appropriate, to be checked in documentation
⇓⇓⇓⇓
3- Depending on type of problem and hypotheses, one or more protocols designed, involving choice of following:
Experimentation
Plan design; vary
only one factor at a
time; gather results
through observation
or measurement
Trial and error
Plan a variety of
tests; compare
results
Modelling
Analogy-based
reasoning, check
using model
Observation
Or use of
documents
(images, data,
experiment
findings)
Document-based
research
By reading hard-
copy or on-line
documents or by
interviewing
qualified parties
Protocol design
⇓⇓⇓⇓
4- Note findings and compare with hypotheses tested
⇓
Confirm or reject assumption or some of the assumptions
⇓
5- Summarise all confirmed and rejected hypotheses
⇓
Structure knowledge developed into response to question raised
⇓⇓⇓⇓
6- Compare with established fact
⇓
7– Re-use in new classroom or everyday situation
It goes without saying that, depending on the subjects dealt with, and the constraints of the
experiments planned (for example, any germination will require time), the teacher will end up at some
point along this line. Likewise, one extremely important factor is not listed on this chart, meaning the
option of repeatedly coming back to Phase 2 after achieving results in Phase 4, in other words, re-
questioning the hypotheses and moving on to a new experiment. As a result, patterns can be repeated,
as shown in the flowchart below6.
6 W. Harlen: The interdependence of process and content in learning science. In Conference - IAP Workshop on the
Evaluation of inquiry-based Science Education programmes (Stockholm, September 21-23, 2005).
N e w e x p e r i e n c e
o r p r o b le m
E x i s t in g
i d e a
L i n k i n g
h y p o t h e s i s
P r e d i c t i o n
I n v e s t i g a t i o n t o
t e s t p r e d i c t i o n
a
c
N e w e v i d e n c e
b
D o e s t h e e v i d e n c e
s u p p o r t t h e
p r e d i c t i o n ?
d
N O Y E S
B i g g e r o r
m o d i f i e d i d e a

IV. Concrete implementation of an inquiry-based approach
There now exists a large number of documents, either on paper on websites, suggesting activities to be
carried out with students in the classroom (for instance, on the Pollen web site, www.pollen-
europa.net, Learning Units section). On each topic, relatively long modules are suggested,
encompassing several classroom sessions (10 to 15) and combining to form an instructional and
scientific sequence, rather than putting independent sessions side-by-side. A single theme (or subject)
is elaborated upon for several weeks, to avoid spreading efforts too thin, barely broaching subjects and
discarding them quickly. The idea is to give children enough time to step into the research situation
and build up their own knowledge. Two examples of how learning builds up through a module are
provided in Appendix 1.
Moreover, an activity is also designed as a follow-up or prelude to another one, if only for the child’s
viewpoint. The sequence in concepts is of importance, as it allows the children to gradually and
progressively approach the various aspects of a single theme and, in so doing, grasp the key notions in
a more in-depth manner.
Lastly, students’ activity and initiative are vital, and when they are divided into groups of three or four,
if the subject matter allows, they are motivated to organise themselves, assign responsibilities and
communicate with one another, and thus become increasingly independent. When those groups are
reunited in the full-class format, each group is able to report on what it did and achieved, and this also
provides a good opportunity to learn to listen to others, realise that there can be several different ways
to approach the same problem, etc.
The inquiry-based approach involves a number of key points:
a) How to choose the starting situation
The first step shall be to choose an area of study that falls within the students’ cultural environment
(germination, shadows, levers, food, electrical circuits, etc.), curricula and general objectives suited to
children of the age group under consideration. Once the focus area has been selected, it is important to
define the series of concepts that the students are to gain. After this is accomplished, it is time to begin
– but how? Which starting point should be used? The situation needs to encourage the students to raise
questions and culminate in a statement of the problem to be solved, with the problem possibly
requiring time before it is actually solved. It is important to manage to state the problem, as science is
built on problems to be solved, and not just observation alone.
Concretely speaking
When a teacher has never taught science or when he or she has never taught it in this manner, it is not
always easy to design a progressive sequence and find starting situations all along the sequence so that
the students are moved to question and take action. That is why it can be helpful to look at sample
activities7 and try them out in order to become familiar with the method recommended. Later on, the
teacher can design his or her own starting situations.
- Let us return to the hourglass example: initially, the students were asked to watch an
hourglass. However, the teacher chose to show hourglasses with very different time requirements for
the sand to run out, hence an initial series of questions: Why is it that one of the hourglasses needs
much more time than the others? What are the factors determining how much time is needed for the
sand to run out? This situation, chosen by the teacher, helped the students take ownership of the
problem, by raising the questions the teacher wished to cover.
In some cases, the study can also begin with a question (How is the melting temperature of ice
measured? How is saltwater made? How can saltwater be cleaned? etc.). Insofar as all starting
situations are intended to lead to the emergence of a problem and spark action, the wording of the
7 See Pollen website (www.pollen-europa.net), “Learning Units” section.

initial question is important. For example, if a teacher wants the children to design a Chinese shadow
puppet show, he or she can either ask the children to design it (possibly making it necessary for the
teacher to provide the material and suitable paper), or ask them, “How might we go about this?”
b) What questions should be asked of the children and how to ask them
This is an essential aspect. There are many questions that simply cannot facilitate activities and the
reasoning process, which W. Harlen8 calls sterile questions, as opposed to meaningful questions,
which, in contrast, lead to intellectual or manual activity in the children – to an inquiry. Sterile
questions often call for verbal responses (What is this called? What is a battery? Why does the current
move from the positive pole to the negative pole? etc.). This does not mean that the teacher should
never ask such questions, but they are not the kind of question that make it possible to implement an
inquiry-based approach that the child can carry out on his or her own.
So-called meaningful (or “productive”) questions are those that suggest a problem to the children and
spark action and reasoning. Such questions can emerge at the start of the session, but not only then, as
the aim is to help the children act and reason throughout the session.
It is possible to raise questions such as: “What differences and similarities do you see between these
objects (or situations)?”, “Is it more or less compared to the other experiment?”, “Can you find the
way to…?”, “In your opinion, what would happen if…?”. (The “In our opinion” is very important here
as it does not inhibit the student, who does not feel required to give the “right answer”, which he or she
does not necessarily know), “How could we go about…”, “How can you explain…?”, “How can we be
sure…?”9 or, if the subject is suited to quantitative questions, “How many… ? What is the
temperature?”
As Sheila Jelly states in W. Harlen’s work, “The key to expressing specific questions in special
situations is none other than practice”. To this effect, she advises a number of paths: examining the
questions suggested in children’s science books, asking whether they are empty or meaningful; looking
to determine what scientific experiment is encouraged; or using free time to practice looking for
meaningful questions.
c) Taking into account students’ questions and ideas
Whatever their culture and age, students generally have many ideas about the phenomena they
encounter in their personal experience, regardless of the work they may have done in school. It is
important to be familiar with those ideas, referred to as students’ “preconceptions” or “initial
conceptions”, as this helps the teacher, first of all, become familiar with the students’ reasoning, then
ask certain questions to guide classroom activities and, ultimately, check that they have effectively
understood the concepts introduced. By taking the students’ ideas seriously and taking into account
their questions, the teacher ensures that the students have the opportunity to see that there exist ideas
other than their own, and that the said ideas can be rooted in facts that they had not considered.
Let us take an example in the field of optics10
: Many children see the eye as a receptor, rather
than an active medium and, in order to see an object, they think that they need something to move
from the eye to the object. They, like our ancestors, have a lot of trouble accepting that, in order to see
an object, light (which is invisible) must move from the object and enter the eye. The children base
8 See reference in Note 1.
9 For example, “How do we know where the wind comes from ?”, title of one of the sequences described in “Teaching
sciences at primary school” on the Pollen website – Learning Units section. The titles of the sequences in the work are all
examples of so-called meaningful or productive questions. 10
L. Viennot, 2001 "Reasoning in physics, the part of common sense”. Kluwer Academic Publisher, 248pp. (translated
from the French).

their reasoning on the fact that, when light is shone directly in the eye, it is blinding. It takes some time
until they can distinguish between looking (to see an object, one obviously needs to look at it) and the
light from the object that enters the eye.
Likewise, in electricity, a number of children can be seen to believe that putting a light bulb on
a battery pole is enough to light it up. There is nothing quite like letting them experience the
phenomena on their own, so that they see the lamp will not shine. Later, many of them think that
electricity comes out of the poles, to enter the circuit (some specify that, when the two come together,
this is what makes the light shine). It is important to ensure that the children can clearly state that
viewpoint and ask them to later explain why, when there are three light bulbs in a row, all three shine.
Lastly, when the children are asked what becomes of the food11
that we eat, it is common
knowledge that many think there are two pipes, one for liquid and the other for solids. This idea is
strengthened by the fact that there are two exits, the anus and another one for urine.
For this reason, it is important to ensure that the children can express their ideas and,
subsequently, encourage them to think, by raising a number of questions, such as: “What happens
when you eat minestrone? Has something ever ‘gone down the wrong way’?, and what does this mean
to you?”, etc.
Quite often (but not always) such ideas are in contradiction with the scientific explanations of
the phenomena being studied. It is important to allow a new and more coherent explication to emerge,
through a process that will be all the more enthusiastically embarked upon as the students realise that
their ideas are inaccurate, incomplete or in contradiction with those of others, by helping students
express their ideas and encouraging them to express them orally or in writing; taking those ideas into
account, without judging them; not discarding them from the outset, even if they are considered
“incorrect” by the teacher; taking them all into consideration, without making value judgements. Then,
the inquiry process begins, during which most of the ideas will be able to change.
d) Holding group discussion
The students need time to think on their own and exchange ideas amongst themselves (and not
necessarily through the teacher). The teacher needs to take the students’ ideas seriously and then,
taking their questions into account, he or she can hold a group discussion to give the students an
opportunity to realise that ideas other than their own exist and that those ideas can be rooted in facts
that they had not considered (spinal cord bone example, mentioned above). In certain cases, they can
test them through experimentation. Such debate can come into play at different points in the session:
11
See Pollen website (www.pollen-europa.net) “Learning Units” section and Giordan A., De Vecchi G., 2002.
L’enseignement scientifique. Comment faire pour que ça marche ? Delagrave – collection Pédagogie et formation, 271pp.
Nanjing (China) Sao Carlos (Brazil) Paris (France)

- At the beginning, when the students sort through their questions to reach one or more
productive questions,
- When the students form hypotheses and suggest experimental protocols,
- When the experiments have been completed by all involved and the time comes to set out
valid conclusions, based on the results achieved, or
- When they compare and contrast them with scientific knowledge (the last point will be dealt
with in g and h).
Obtaining more productive questions
Holding such discussion is not always easy as children can put forward strange suggestions.
For example, when children are asked to find a way to recover the sugar that has dissolved in water, a
child might suggest “To recover the sugar that has dissolved in water, all you have to do is say
Abracadabra”. One way to make things work is by writing down all of the questions, suggestions,
proposals and hypotheses on the board, leaving none out. Depending on the question being considered,
the suggestions can be individual or developed as a group (for instance, developing an experimental
protocol). It is by taking into consideration each proposal and working on it (in any case, all those that
can be) that knowledge is built up.
Throughout this stage, it is vital that the teacher refrain from providing the right answers. Likewise, he
or she needs to keep from calling an answer wrong or right too quickly, or settling a disagreement
between two students. He or she needs to take the onlooker’s attitude: “let’s see”, “we are going to
try…”, so as to enable true discussion.
Let us go back to the dissolved sugar. It is important to take seriously the idea of letting the
child experiment and note the outcome; afterwards, what the child (and the other children) will observe
is that the suggested idea does not match up with the question initially raised.
Whenever possible, it is important to help the children realise that some questions (or answers)
can either not be tested, lead to dead ends, or yield nothing at all. It is also during these group
discussion periods that the children may raise difficult questions that the teacher cannot answer. The
appropriate response would be to say, “I don’t know, but we are going to try to find out together”.
While some questions can be investigated, others can not. In this case, the answer will have to found in
the available documentation or from a scientist (via a network of scientific consultants from the
website or a scientific guide, for instance, at the Pollen website (www.pollen-europa.net, “hotline”
section).
(Note: We can not guarantee to answer all questions. Even scientists do not always know. That
is why science is exciting).
e) Designing experimental protocols
The next section describes how the students can be assisted in designing an experimentation process,
in line with the equipment existing in the school, in order to later have the opportunity to interpret the
results. Each student needs to know exactly what is being sought (the question raised) and reflect upon
the problem.
One of the first problems lies in the equipment available to the students. Several options exist: either
the teacher gives each group of students the material required for the experiment(s) suggested, or the
material is put on a table and the students work together to reflect on the protocol and material
necessary to perform the protocol. At this point, yet more options exist, depending on the subject
chosen and the students’ age: either each student thinks individually about what he or she wants to do
and goes about achieving it, or there is group work during which the students have to design a protocol
that will be suggested to the entire class and discussed jointly.
- Taking into account the results achieved to reach valid conclusions
After each student (group) has performed the planned experiment and noted the results achieved, all of
the findings can be pooled for review: Are there doubts as to the findings achieved? Do certain

experiments need to be repeated? Which hypotheses were confirmed, and which were not? Is there a
need to come up with additional hypotheses and experiments and, if so, which? This can be the point at
which the process is repeated from the beginning, as described above.
The effectiveness of the discussions depends not only on the students’ skill at expressing
themselves orally, but also their ability to listen to one another. In certain classes, discussion may
always go through the teacher, while other students can debate by themselves. The time required to
learn these skills is well worth it, remaining patient and determined throughout the process. Thanks to
this process, the science class members develop into effective citizens of the future.
f) Class organisation
Before even embarking on the process, it is essential to ensure that the classroom is arranged in such a
way that the students and teacher are physically comfortable. Some schools may have a science room
(with enough tables so that the children and teacher can experiment as planned). Where this is not the
case, there should be no qualms about moving the classroom tables and chairs around, so that
teamwork is possible and so that the children have easy access to the equipment.
- The equipment
In primary school, the equipment used is generally not sophisticated, ranging from plastic bottles to
rubber bags, plastic and paper bags, plants, seeds, soil, cardboard, rubber, string, scissors, paper clips,
recipients of various sizes, fruits, vegetables, a variety of liquids, etc. In short, everyday equipment
that is common and inexpensive, except possibly batteries, light bulbs, thermometers, compasses, a
scale, and a binocular magnifying glass.
It should be noted that it is not always possible to experiment with the actual objects. This is often the
case with astronomy, but also when the course focuses on living organisms. In this case, the teacher
may opt for either modelling (for example, a physical model, or replica, of the Earth and the Sun, to
understand how the length of each day varies over the year, or a model of arm muscles, to understand
that the arm can be raised and lowered, etc.), or documentation (see bone example above).
Practical point
The equipment may be available in the school, or it might be borrowed from resource centres or
scientists, or the teacher can try to gather the equipment required by possibly calling upon the students
and parents (often a very effective option).
- Group work. It is important that all students are able to take part in this experimental work.
The times during which the students work in groups can be especially enriching if the students are
encouraged to discuss, compare their viewpoints and try to agree on a common conclusion. Each group
can have a speaker (appointed by the students in the group or the teacher) who tells the entire class the
conclusion, and how it is substantiated.
Practical point
Divide the children into groups of at least 3 or 4. The number of groups should not exceed eight.
Beyond that number, it is difficult for the teacher to manage all the groups alone and it is unlikely that
every member of the group will be fully involved. Within each group, assign each student a role. Each
role can be assigned by the teacher or, if the class allows, by the group itself. It is important, however,
that the roles be held alternately within the same group. This is to enable each student to realise what
each role entails and to limit the dominant personality effect or possible sexist attitudes, for example,
with all speaking roles assigned to boys or liquid-mixing roles assigned to a girl.
A teacher trying to put a class to work in groups for the first time can encounter serious difficulties at
the start: non-productive groups, very noisy classroom environment, commotion, arguments, etc. It is a
learning process in and of itself, for the student and for the teacher. To minimise such problems, it is

advisable that the teacher assign the roles him or herself, initially, and give clear instructions as to
what the children are to produce (a text, a protocol, a poster, an experience, a presentation, etc.), plan a
very detailed timeframe for each stage and, whatever happens, determine a signal when the classroom
becomes too noisy (turning off and on the light or clapping or ringing a bell or asking the children to
lay their heads on the table and close their eyes, etc.). Initially, it is advised that groups be small and
work divided up into small units, with the teacher determining their timetable. Later, once the children
have learned to work this way, they can organise themselves and the teacher is much less frequently
required to step in.
g) Guiding the students as they design protocols, identify suitable variables and become
aware of the need to control variables
Often, the aim will be to determine on what factors a certain phenomenon depends and test the
factors, one after another. In order for the experiment findings to be interpretable, certain requirements
need to be met, namely varying only one factor at a time (keeping all others constant): in other words,
carrying out a controlled experiment.
For example, if the aim is to learn what determines how long it takes for the sand to run out in an
hourglass, specifically whether or not it depends on the size of the hole, it is vital to make the children
realise that they need only change the factor they are testing i.e. the size of the hole (they can compare
two devices with different hole sizes). The amount of sand is the same, the size of the bottles is the
same, the size of the sand particles is the same, etc. This requirement should not be impressed upon
them automatically; on the contrary, the children can be left free to vary several parameters at the same
time in order to realise, on their own, that their results are not useable or comparable.
As it happens, the need to vary only one factor at a time (with the others remaining constant) does not
always seem obvious to adults. For instance, a number of teachers participating in a training course
were asked to put together an experiment to show that fertiliser spread over soil can end up in the
water table. To do this, they planned to take two plastic bottles with holes punched in the bottom, put
the same amount of soil in both, then put water in one and water plus fertiliser in the other, then, in a
saucer, recover the liquid that came out of the bottle after having passed through the soil. That liquid
was to then be evaporated in order to see whether one of the saucers contained solid residues that
would indicate the presence of fertiliser. In fact, while some teachers said they wanted to vary only one
factor at a time, they poured not only water and fertiliser in the bottles, but also food colouring. Given
the freedom to perform the experiment on their own, the teachers quickly saw that they could not learn
anything from it, as they had varied two different factors at the same time (fertiliser and food
colouring)!
The teacher therefore needs not only to be aware of the issue, but also extremely watchful in class. In
another example, a class is experimenting with evaporation. The aim was to show how an open or
closed container might affect the process. The teacher asked the students to draw experiment
flowcharts. Naturally, the students suggested comparing the liquid level in the containers, either with
or without tops. Unfortunately, many students suggested that the comparison be made with containers
with very little free surface area, hence part of the class embarked on experiments that could not yield
very helpful results.
First of all, it is important that the children realise that varying everything at the same time does not
help reach conclusions. For instance, if the children perform experiments that vary several factors at
the same time, they can achieve very different results depending on the group. The teacher, when
pooling the results, helps the children grasp this issue, by asking the right questions. Next, it is
important that they be given the tools needed to establish appropriate protocols. Here, there are several
options: teaching the children to draw charts showing the values of the various factors, noting that they

will be identical from one line to the next except for the one to be tested, or put labels on a small index
card12
indicating:
1) the question on which the experiment focuses;
2) the list of items that can vary;
3) the name of the variable that is to be varied and, lastly;
4) the list of variables that is not to vary.
h) Taking each student’s results into account, connecting them back to the initial
hypotheses and summarising the information
Following each study or experiment, it is important to review what has been achieved and tie this back
in with the hypotheses and initial assumptions. From this point, group discussion can begin,
coordinated by the teacher, who ensures that everyone has an opportunity to be heard and that every
viewpoint is respected. The experimental findings and rationale are what will distinguish between
possible divergences, not the number of proponents for a given opinion, or the “leaders’” beliefs.
In order to ensure that the experiment findings are reliable, it is important that the teacher makes sure
that each experiment is carried out several times, either by the same group or by two different groups.
This helps to ensure that no mistakes have been made, hence more dependable results and,
incidentally, confirmation of the right to make a mistake! In some cases, it may be necessary to repeat
an experiment.
During the previous stages, the child builds up knowledge, which, if the teacher does not go any
further, can be patchy, fragile or even fleeting. A review and summary of the experiment findings or
document research will make it possible for the children to structure what they have found out so they
are more likely to build up knowledge that is more reliable and meaningful. Once again, the summary
process is meaningful to the child when he or she has experienced all of the preceding stages. The
synthesis cannot, however, lead in any certain manner to unchallengeable knowledge, unless, under the
teacher’s guidance, the class compares its findings with what is known as “established fact”, meaning
that found in books.
i) Comparing and contrasting with “established fact”
The compare and contrast stage is essential, as shown in the real-life example below:
A class experimented on the theme of “mixing solids and liquids” (dissolving). At the end of the
session, several groups handed in papers concluding that “water and salt do not mix”.
The teacher did not react to what he considered were the “children’s findings” and planned a different
type of activity for the next session.
What happened? To save time, the teacher had given directions as to the amount of solid to use, but
not the liquid. The groups that used a small amount of water naturally observed that, even after
shaking it, some salt remained at the bottom of the recipient. The limitation of their conclusion is in
general nature. It would have been helpful if the teacher had suggested that they investigate what
happened if the amount of liquid was increased. This would have led to “correct” conclusions,
meaning those in line with established fact, (in this case, the amount of solid that can be made into a
solution cannot exceed a certain value – around 360 grams of ordinary salt per litre of water, at
ordinary temperatures). It is important that teachers check the background of topics in available
literature.
12
W. Harlen, 2004. Enseigner les sciences : comment faire ? - Collection La main à la pâte, Le Pommier Eds, 220 pp.

The recommended approach for teachers is similar to that of a researcher, yet also remains different.
The children should “discover” nature’s phenomena and properties and experiment and compare their
conclusions amongst themselves, like scientific community researchers might do. However, unlike
researchers, those children do not have to discover phenomena and laws that are yet unknown to the
scientific community, as everything a child learns in school is well-known fact to that community.
V.- LEAVING A RECORD
The expression “record” encompasses several different types of documents: texts, drawings,
flowcharts, graphs, charts, posters, etc.
The students can be invited, individually or in groups, to produce written documents (texts, drawings,
flowcharts, graphs) that are accepted as such and used in class as one of many learning aids. In many
schools, each student has an experiment notebook, which includes three types of distinctly different
written media: individual writing, intermediate writing and class writing, with the first two open and
minimally organised, at least at the beginning. Gradually, with the teacher’s help, but also through
self-criticism, the student organises his or her notes, improves spelling and comes to write more
effectively.
a) Individual writing: depending on the students’ age, this individual section includes
drawings (mainly for 5-6 year olds who do not yet know how to read or write), flowcharts, various
texts, an experimental protocol, the required material, a hypothesis and whatever the student thinks he
or she will see or do, a report on the completed experiment and the results.
The aim of such written accounts is to help the student not only remember, but also structure, his or
her thinking. In many cases, it is in writing that we have an opportunity to think and, as one teacher
said, “When the students did not write at length, they had failed to give the experiment enough thought
and the ensuing discussion to confirm hypotheses in verbal group exchange was unsubstantial without
the prior writing phase”. This shows how very important it is for each child to use that stage without
being afraid of being judged by the teacher (spelling mistakes, misinterpretation, incomplete or over-
embellished drawings, faulty conclusions, etc.) and understand that the writing is a stepping stone for
science activity. This is why we suggest not judging the individual written statements at this stage, and
even refraining from correcting them. There is one requirement, however: the child needs to have the
opportunity to read back over what he or she wrote.
Practical point
Set aside times (not too long) during which the students can write in their notebooks. This can involve
asking them to draw an experimental design, predict outcomes, substantiating them as well (for
example, predict whether a given object will sink or float and attempt to say why and come up with an
experiment protocol, etc.).
b) Intermediate Group Writing. These are usually (not always) statements produced as a
group and, very often, they are intended to convey to others what the group thinks and/or has done.
Accordingly, such statements are more elaborate in form than the individual ones, insofar as the other
students in the class have to be able to read and understand them. They come in a variety of formats:
posters, group reports, etc., and should normally not contain any spelling mistakes, though they may
contain incomplete drawings, misinterpretations or faulty conclusions.
Practical point
Every time the students work in a group, they shall be asked to produce a specific written record:
poster, experiment protocol, technical object, etc.

c) Class or Group Writing. These are records developed jointly as a class, with the teacher’s
assistance, to help the pupils to organise their thoughts and to use science language and ideas correctly.
Such writing is considered “knowledge” (it can be put on a par with the summary that might be
dictated by the teacher but which, here, can be drawn up by the class and the teacher). Expectations as
to proper spelling and syntax are very high here.
All of the above forms of writing help the child realise the progress he or she has made, remember
what has been accomplished and note the development of this thought process throughout the year, or
sometimes over a period of several years. Moreover, as the teacher reads the individual and
intermediate written statements, he or she can track the development specific to the student and group
and learn their preconceptions, trials and errors and progress. Often, reading the notebook shows the
teacher that a specific concept, which he or she thought was well integrated by the entire class, was
understood in an entirely different manner. Consequently, he or she is able to arrange and adjust the
content of the classroom sessions, rather than waiting until test time, which may be several weeks
later. However, it is important to be careful not to totally change a science class into a reading and
writing course, but rather to ensure that the science activities simply give the student an additional
opportunity to practice writing, speaking and building their language skills.
Practical point
Children can not only draw what they observe, such as flowers, animals, the sun, the teacher, etc., they
can also attempt to use their drawings to explain their ideas. For example, if young children are
working on shadows, they could be explicitly asked to show what it takes to make shadows in their
picture.
Likewise, later on, when they work on electricity, in the beginning, they might draw a battery, or a
light bulb with wires that come out any old place on the light bulb. By asking them to draw the set-ups
that work (making the light bulb shine) and those that do not (the light bulb does not shine), they
themselves will realise the importance of the bulb’s fuse and tip.
There are many ways of guiding or structuring the children’s writing, such as the ones shown below.
A practical tip to present the different types of writing may consist in using different coloured paper or
ink.
Some teachers also use a different picture code according to the children’s age, as shown in the
following illustration, which helps structure the notebook, both the individual component and the
group component.


Other teachers post a more comprehensive document in the classroom, to which the teacher and
students constantly refer (see Appendix 2).
Connection between Individual, Intermediate and Class Writing
Two examples are used to illustrate this:
- A teacher asked his students to take the temperature of an ice cube over a period of time
and individually record the related figures. The teacher saw that the results were presented somewhat
haphazardly. He combined a few presentations on the same sheet of paper and asked the students to
work in small groups to look at the presentations and identify what was missing, what needed to be
highlighted and how to highlight it. By combining the results, it became possible to jointly present the
results (as a chart), so that the presentation could later be easily used by any student in the class. The
process takes time, but there is real learning, as the students showed in their notebooks, where all of
the measurement findings were displayed appropriately.
- Likewise, older students (9-10 years old) can be asked to write an individual statement
on the experiment, without any further instructions from the teacher. The result can vary significantly:
some reports will be three lines long, while others are drawings with very little writing. There, too, the
teacher can choose a few different statements and ask groups of students to work on one of them,
identifying what is missing, what should be highlighted, etc. Once the results are pooled, the class can
work together to state what a report should include. There, too, while it can be deemed that the process
is too lengthy, the end result is sizeable!

Now, examples of individual and collective writings:
On the left is an extract from Sidonie’s experiment notebook. Sidonie is a pupil at Bergerac School
who, like the other pupils, observed hourglasses and wrote down what she noticed and the questions
she asked herself. Afterwards, the children pooled their observations and thoughts (on the right).
Individual writing Collective writing
Hourglasses
- Observe and compare and then note your ideas
(what I notice – what I think).
1. Grains of sand can be several sizes.
2. There are hourglasses that are longer than others.
3. Different colours can change the speed at which the sand
falls.
The hourglasses don’t always
have the same amount of
sand.
Sand falling Sand falling
less
quickly
5. Sand that falls
from slowest to quickest:
Hourglasses
After using we observe the differences.
Problem: How to explain that hourglasses last a
longer or shorter time?
Class hypothesis
This might depend on:
1. The quantity of sand.
2. The width of the cylinder neck.
3. The thickness of the grains of sand.
4. The size of the hourglass.
5. The presence of certain colouring.
6. The volume of the powder.
To check, we are going to do some experiments.
We need to make some hourglasses.
Intermediate writing
Light brown
skin
Tans a little
Brown skin
Tans easily
Black skin
Already tanned,
dark
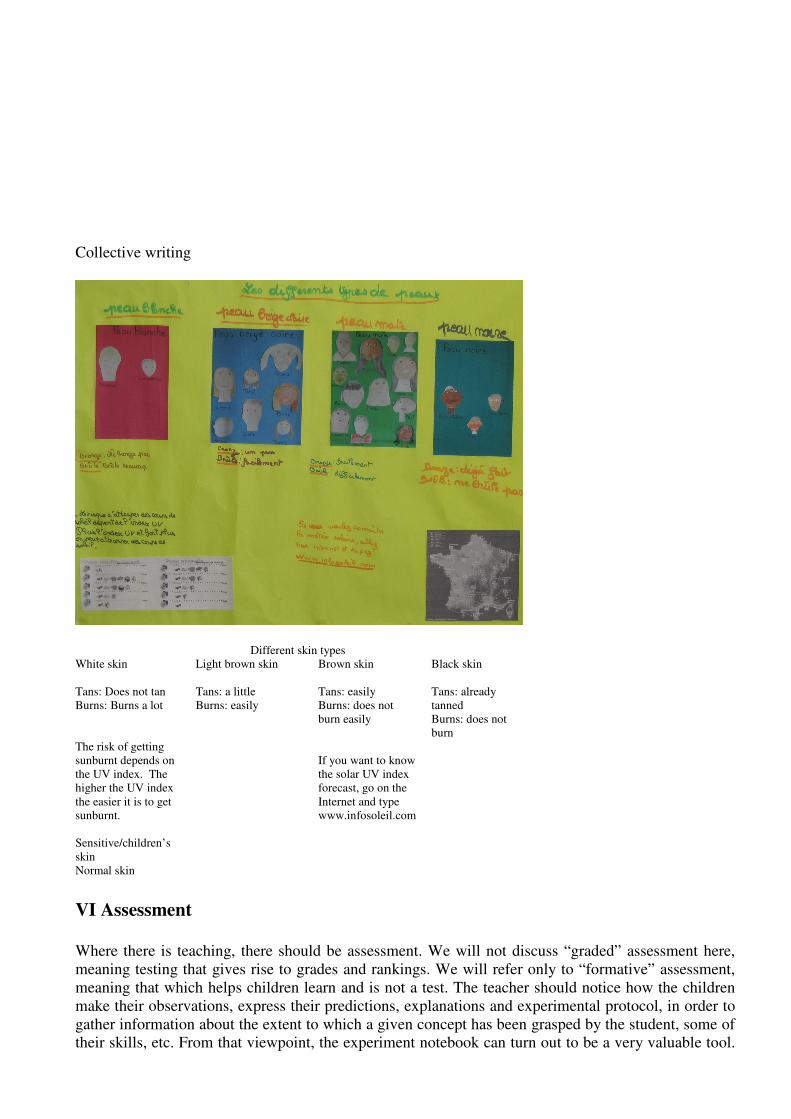
Collective writing
Different skin types
White skin
Tans: Does not tan
Burns: Burns a lot
The risk of getting
sunburnt depends on
the UV index. The
higher the UV index
the easier it is to get
sunburnt.
Sensitive/children’s
skin
Normal skin
Light brown skin
Tans: a little
Burns: easily
Brown skin
Tans: easily
Burns: does not
burn easily
If you want to know
the solar UV index
forecast, go on the
Internet and type
www.infosoleil.com
Black skin
Tans: already
tanned
Burns: does not
burn
VI Assessment
Where there is teaching, there should be assessment. We will not discuss “graded” assessment here,
meaning testing that gives rise to grades and rankings. We will refer only to “formative” assessment,
meaning that which helps children learn and is not a test. The teacher should notice how the children
make their observations, express their predictions, explanations and experimental protocol, in order to
gather information about the extent to which a given concept has been grasped by the student, some of
their skills, etc. From that viewpoint, the experiment notebook can turn out to be a very valuable tool.

However, assessment can take place at any time, and need not involve the notebook. Let us look at the
electricity example again.
For instance, the children can:
- Be provided with a sheet summarising the various ways in which a battery and light
bulb can be put together and asked which work and which do not. The question can be considered an
assessment. If, after having answered, the children are given a chance to test the set-ups suggested,
they will be able to identify their successes and failures and appraise what they have learned.
- Alternatively, they can be left in groups to design simple electrical set-ups, with the task
of drawing all of the results, including those that do not work. Later, the other groups can be asked to
check if they are correct by making the drawn set-ups, thus giving the children the opportunity to
clearly show what they have grasped and what is not yet very clear.
- This kind of assessment turns out to be very effective when used by the teacher to
improve his or her teaching, to give the student feedback that is not judgemental, to allow the children
to perform self-assessment and to involve them in the decision-making process with regard to how to
proceed from that point, etc.
VII. FAQ13
Some questions frequently asked by teachers.
1- What is the best way to start a new subject? It is very often said that the child’s interest needs to be central to any inquiry-based activity. This does
not mean that the child’s areas of interests necessarily have to be the starting point. Likewise, in an
arrangement where only one child is responsible for the subject, there is no guaranteeing that the entire
class will be mobilised regarding the subject. A subject can be broached in a relatively artificial
manner, provided that questions arouse the student’s enthusiasm.
2- Should misspelling be tolerated in the experiment notebooks? Whenever students are left to produce written accounts on their own, mistakes have to be expected,
especially in spelling and grammar. They are natural and reflect the fact that children cannot do what
they have not yet learned… If the teacher makes corrections, it is unlikely that this will lead to
progress in the student. It is far preferable that the student him or herself be asked to make the
corrections. However, in that case, the risk is that the science sessions become spelling classes and that
the students become weary (or inhibited). For these reasons, a certain degree of tolerance appears
necessary. However, going too far in that direction could distort the children’s view, making them
believe that they need only pay attention to their spelling in their reading and writing courses. This
would deprive them of an additional opportunity to pay attention to the spelling rules they are
supposed to know, recognise and obey. In order to ensure that spelling is gradually understood by the
end of primary school, constant attention needs to be paid to it, including during science activities.
The teacher’s skill consists of making reasonable demands on his or her students:
- High enough to not tolerate writing that fails to take into account any of what the student is
learning or has learned in the field of language, the aim being to develop language “reflexes”
and writer behaviours.
- But also to strike the right balance so that certain students do not turn away from their desire
to write which, often, can be seen in science activities.
Note: it is advisable to inform the parents of the “rules of the game” used for the experiment notebook,
so that they do not interpret the existence of errors as an excessively laid-back attitude, or even
incompetence on the part of the teacher.
13
Questions and answers extracted from « Guide des formations adaptées à la mise en œuvre des programmes rénovés de
l’enseignement des sciences et de la technologie à l’école primaire ». French Ministry of Education, and
http://gdes74.edres74.ac-grenoble.fr/rubrique.php3?id_rubrique=30, document available online.
3- How can I go about building upon previously gained knowledge when the students come from
different classes? One option lies in part in the tools set up to ensure that there is continuity between the classes,
and even between schools. The experiment notebook that the student keeps throughout his or her
schooling is one such tool.
The teacher’s log, the sequences and work plans also help ensure continuity and keep teachers
informed as to what has already been done.
Lastly, during the progression itself, there are often opportunities to raise many series of questions or
raise questions about a single theme, thus making it possible for children from different backgrounds
to work on a single topic.
4- How can I go about eliminating faulty rationales without excluding their originators? This question raises the issue of how an idea and the person who expresses it are often mixed up. Part
of the spirit of scientific activity is distinguishing between content (a hypothesis, for instance) and the
content producer (the person who comes up with the hypothesis). It can be said that showing the
scientific spirit is recognising trial and error as an almost fundamental right and a result of an always-
substantiated thought process, even if it turns out to be inaccurate or incomplete. It is thus up to the
teacher to not always take into account all of the faulty assumptions, but also to refrain from rejecting
them all. Some will help the course of study move forward. In addition, the relationships seen in the
classroom between all of the individuals present should make it possible to embrace all proposals and
deal with them in a way that is non-judgmental towards people, yet still questions the knowledge
involved. It is essential for the teacher to be seen as professional at this time.
5- What should I do if the students do not ask any questions? The questioning can come from the teacher but, in that case, it needs to be open enough not to inhibit
the students and complex enough so that they do not immediately find the answer (see above).
6- What should I do when one student immediately provides the answer to the entire class (for
example, during a discussion)? Take it as a hypothesis, just like any other. The fact that one student states the answer precludes
neither debate nor experimentation. Remain neutral and unflappable.
7- Asking the students for their hypotheses is an interesting idea. But then isn’t there a risk of ending
up with a large number of different hypotheses? Should they all be tested? Is this even possible? It is important to bring out all of the hypotheses, but it is rarely desirable that they all be checked. The
hypotheses need to be discussed. As you sort through and deal with them, each step needs to be
explained to the students: some hypotheses cannot be checked, while others can be temporarily
discarded through reasoning.
Some hypotheses can be set aside temporarily while others are tested. Sometimes, experimentation
makes it unnecessary to go back to a hypothesis that has been momentarily set aside.
8- How can I better manage the noise, over-excitement and disturbance often caused by an
experimental activity? Learning to behave properly is a process that is not specific to science. Regular practice is required.
The teacher needs to have set behavioural objectives and, thus, aim for sequential progress in his or
her students.
However, the objectives need to be suited to the students’ initial behaviour and age. For that reason, he
or she needs to choose the experimental activity in accordance with class behaviour.
Ensure a proper set-up, and provide enough equipment and time. The experimental stage needs to be
short in the beginning (it is important to be able to stop, even if some groups have not finished).
Constantly go back over the classroom rules. Show that you are present, walk around. Do not give up.
Your students need to be able to experiment. This is an important part of developing thought.
9- The children do not know how to work in groups. Doesn’t this make it very hard to do science? Start with paired work to develop cooperative skills.
Group work needs to be considered a full-fledged learning process.

To ensure this is the case, have no qualms about moving the tables around so that the students and
teacher are comfortably settled in. Give each group member a role (president, secretary, equipment
manager, etc.).
Have no reservations about continuing, even if the initial sessions are not perfect: this is the price to
pay for learning.
Set out a number of rules that need to be abided by, such as:
- The roles
- A specific schedule
- Instructions: what the children must do and produce
- A signal in case the noise level escalates too far
- Vary the demands you place on the groups (produce a text, plan, poster, report, hypothesis,
carry out document-based research, answer a possibility)

Appendix 1
Sample module sequence: electrical circuits (from age 8)
Step 1: how to light up a light bulb with a 4.5 V flat lantern battery (model 3R12) but no wires
(initial approach to concept of closed circuit, emphasising the importance of connections)
If there is now ay of obtaining this battery, go to step 2.
Step 2: how to light up a light bulb with a flat battery and wires
(second approach to closed circuit)
Step 3: how to light up a light bulb with a round battery and learning what is in a light bulb
(third approach to closed circuit: continuous chain of conductors arranged in loop)
Step 4: how to light up and turn off a light bulb without touching the wires. Switches – function and
design
(as soon as a circuit is opened, the light bulb stops burning. Consolidating the concept of
closed circuit)
Step 5 (optional) applications such as
- providing different batteries and light bulbs, some working and others out of order,
identifying those that work and those that do not or looking at a series circuit involving
several light bulbs and seeing what happens when one of the light bulbs is disconnected
Step 6: how to determine whether electricity is actually short circuiting (concept of conductors and
insulators, and applying it to security problems)
Step 7 (optional) how to ensure that, when one light bulb is removed from a circuit, the others do not
go out (concept of parallel and series circuits)
Step 8: various applications
- making a clown whose red nose lights up when his arms are touched (consolidating the
concept of closed circuit)
- designing a question and answer game (consolidating the concepts of closed and open
circuits)
- lighting up a dollhouse
- having each group of children design hidden electrical circuits and asking the other children
to identify the “hidden” circuit
Another possible sequence, within the “What happens to the food we eat” module (8-11 years of age)
Step 1: eat (an apple or some bread, for instance)
Observe and describe what happens and what you feel when you chew
(initial approach to the concept of digestion)
Step 2: drink (water, for instance)
Draw the pathway that food follows inside the body, as you imagine it
(initial approach to the concept of flow)
Step 2b (optional): dissect an animal (a rabbit or a chicken, for example)
Observe where the digested food is located
(Consolidating the concepts of digestion and flow)
4.5 V flat lantern battery (model 3R12)
- available in some countries
Note: In some countries, dissections are forbidden in schools by education authorities. If they are not
forbidden, this activity could be carried out.
Step 3 (optional): watch a movie showing the pathway food follows in the digestive tube
(consolidating the concept of flow)
Step 4 (optional): produce a model based on the side-view of a head, with moving cardboard
components and paper fasteners that make it possible to model swallowing
(consolidating the concept of flow)
Step 5: produce a model with ping-pong balls and nylon stockings to explain how food can move from
the mouth to the intestines
(consolidating the concept of flow)
Step 6: compare the mass of outgoing waste with the mass of incoming food, if possible from
livestock, and make hypotheses to explain the differences observed
(initial approach to the concept of intestinal absorption)
Step 7: model the passage of food through the intestinal wall into the blood, using a nylon stocking and
a mixture of foods (for example, an apple cut up in different sizes suspended in water and a tank to
recover what comes out at the end)
(consolidating the concept of intestinal absorption)
Conclusion:
In total, three biological concepts are explored during the module:
1) Digestion (meaning the transformation of food into very small pieces).
2) Intestinal flow (meaning the movement of food as it is transformed from the mouth to the anus).
3) Intestinal absorption (meaning the passage of food into the blood once it is small enough, through
the intestinal walls – the larger pieces that remain trapped in the intestine will be eliminated through
the faeces).

Appendix 2
The Experimental Approach to Science
What we remember
EXPERIMENT
What we think
What we are looking for
What I see
CONCLUSION
What I am looking for
What I am doing
What we suggest
What we observe
HYPOTHESIS
What I suggest
What I measure
EXPERIMENT RESULTS
What I can say
What I remember
What we are doing
PROBLEM What we are measuring
What we can say
What I plan to do
What I want to check
The experimental approach to science (taken from presentation page
of experiment book), School of Sciences, Appendix 1.
Bergerac School of Sciences